
1. 简介
在本教程中,您将构建 ClarityCam,这是一款免手动、语音驱动的 AI 智能体,可以看懂世界并向您解释。虽然 ClarityCam 的核心设计理念是无障碍功能,旨在为盲人和低视力用户提供强大的工具,但您将学到的原则对于创建任何现代通用语音应用都至关重要。

该项目基于一种强大的设计理念,即原生自适应界面 (NAI)。NAI 不会将无障碍功能视为事后考虑,而是将其作为基础。采用这种方法后,AI 智能体就成了界面,它可以适应不同的用户,处理语音和视觉等多模态输入,并根据用户的独特需求主动提供指导。
使用 NAI 构建您的第一个 AI 智能体:

学完本课程后,您将能够:
- 以无障碍功能为默认设置进行设计:应用原生自适应界面 (NAI) 原则,打造可为所有用户提供同等体验的 AI 系统。
- 对用户意图进行分类:构建强大的意图分类器,将自然语言命令转换为智能体的结构化操作。
- 保持对话式上下文:实现短期记忆功能,使智能体能够理解后续问题和指代性指令(例如“它是什么颜色?”)。
- 设计有效的提示:为 Gemini 等多模态模型设计重点突出、包含丰富上下文信息的提示,以确保图片分析准确可靠。
- 处理模糊不清的问题并引导用户:针对超出范围的请求设计优雅的错误处理机制,并主动引导用户,以建立信任和信心。
- 编排多智能体系统:使用一组专业智能体来构建应用,这些智能体可协同处理复杂的任务,例如语音处理、分析和语音合成。
2. 高级设计
ClarityCam 的核心设计理念是让用户轻松使用,但其背后是由一个复杂的协作式 AI 智能体系统提供支持。我们来详细了解一下该架构。

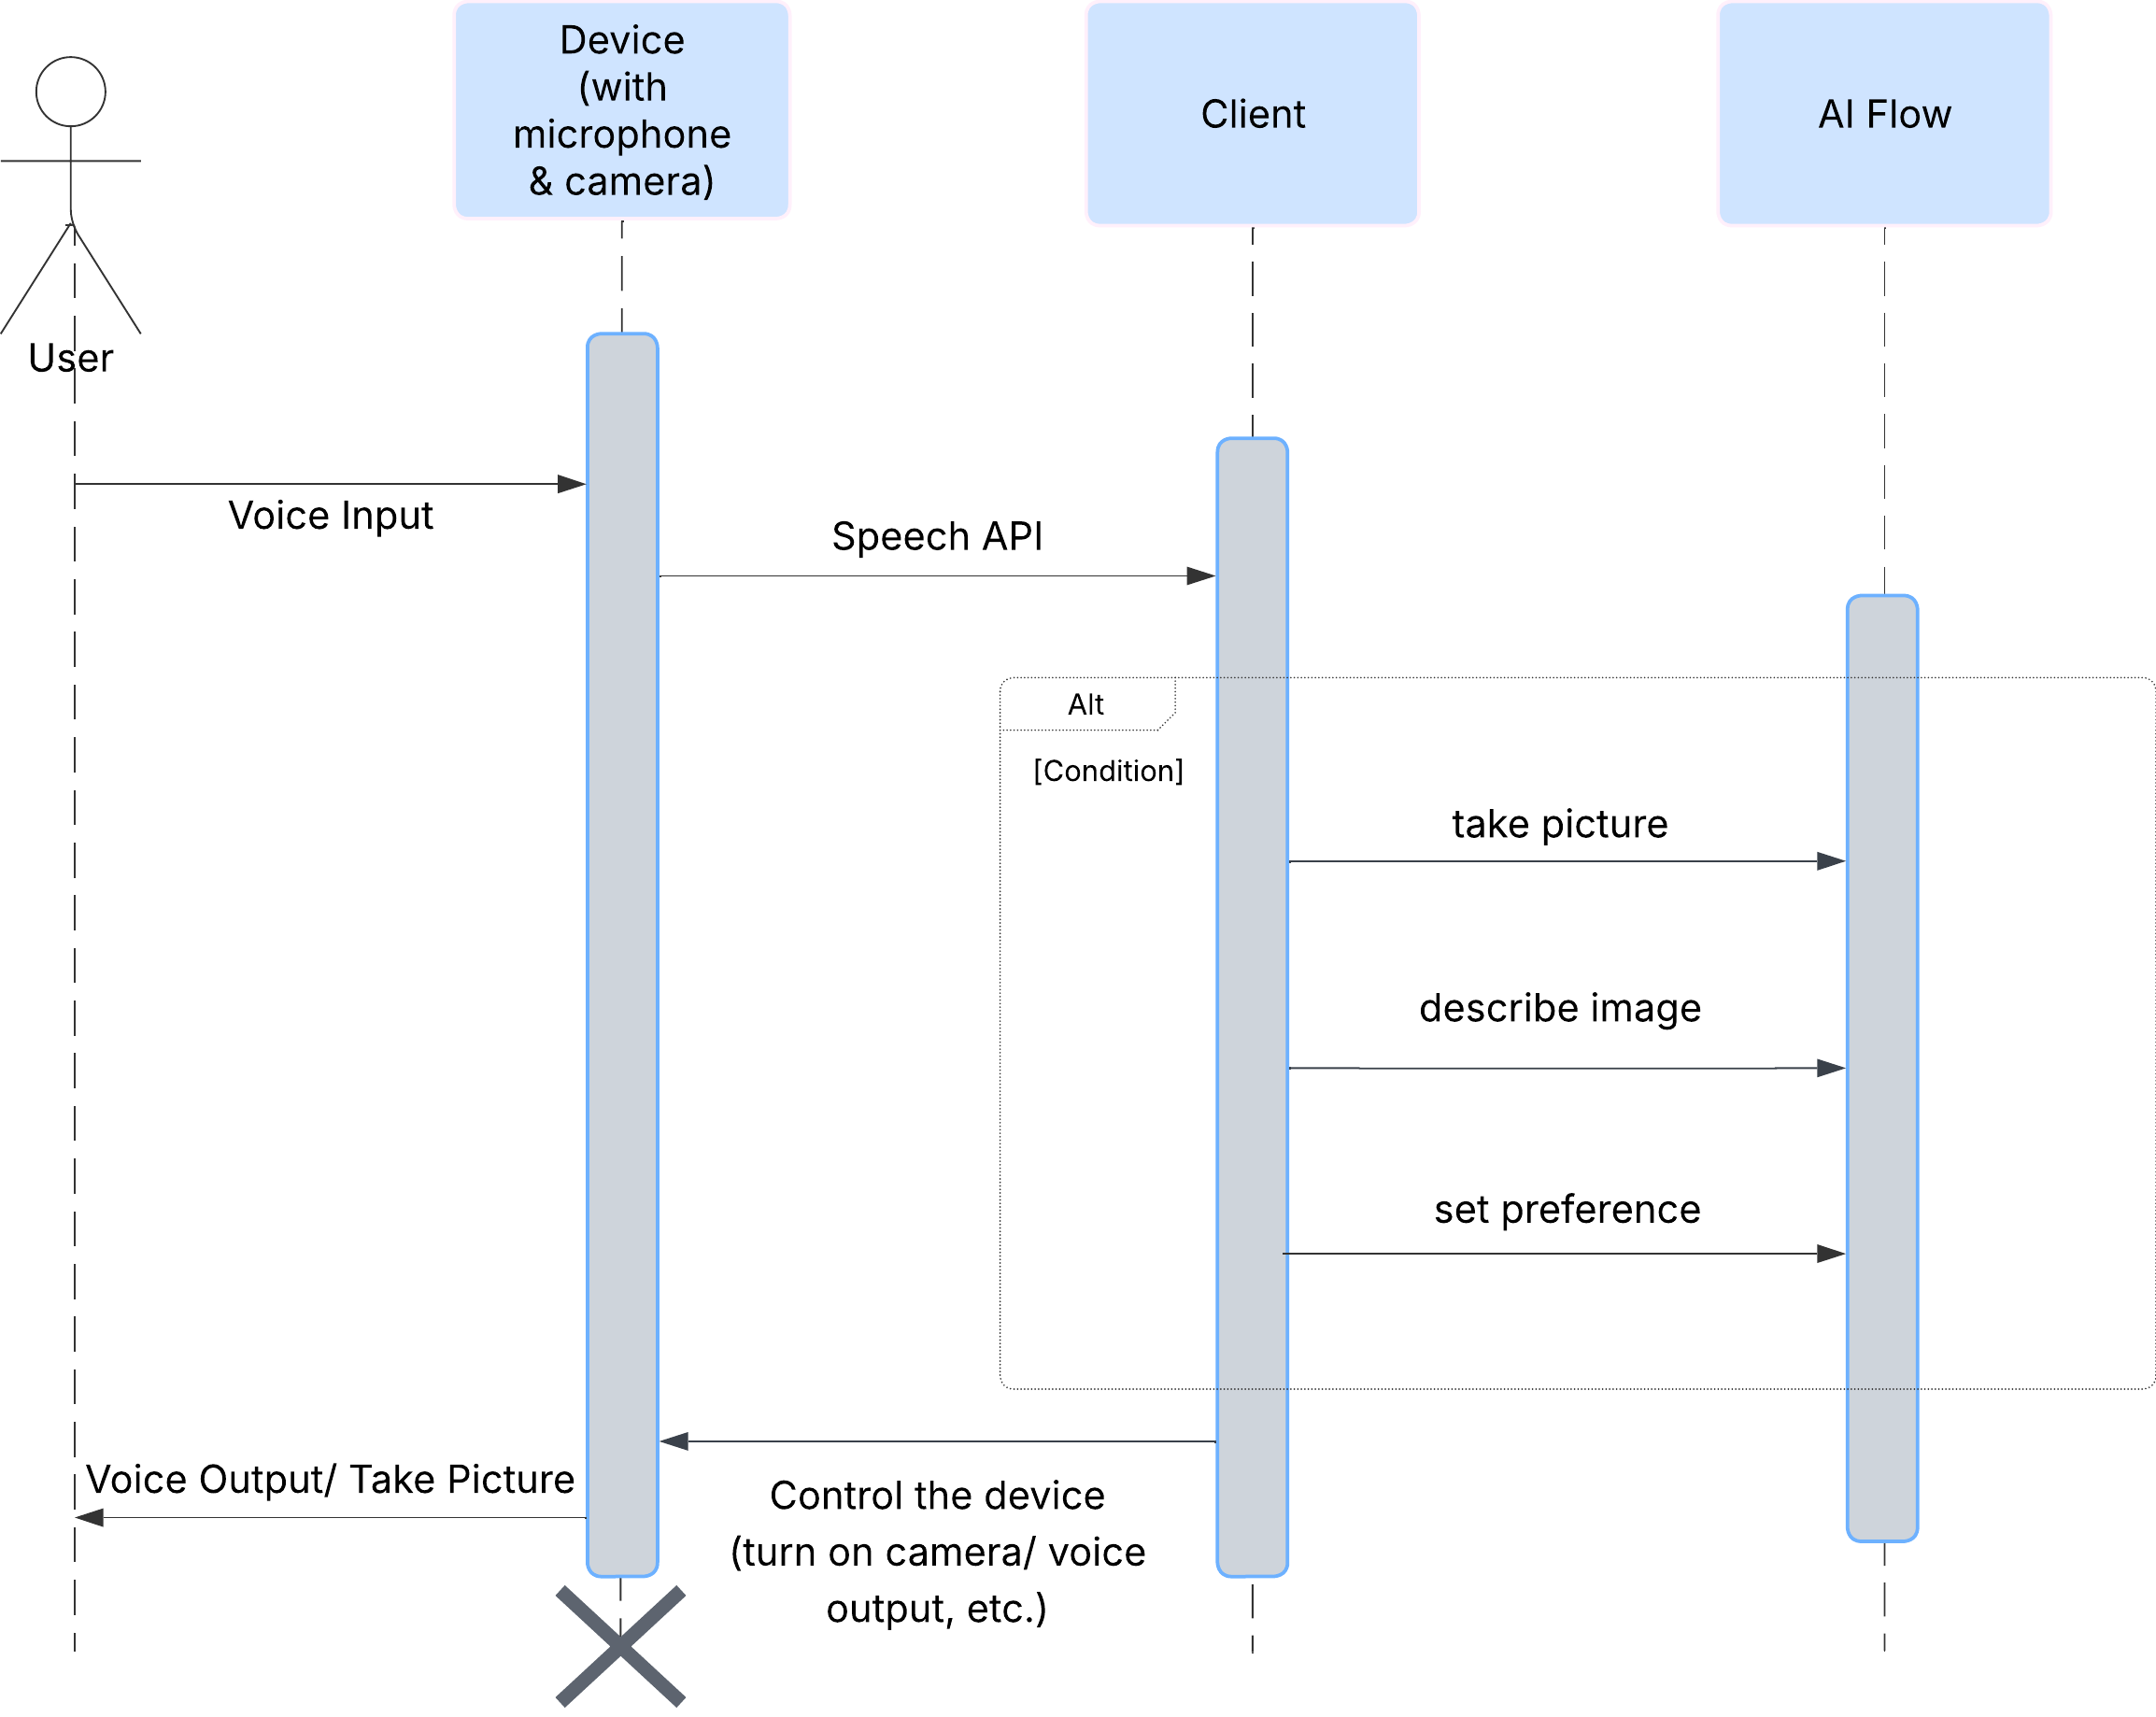
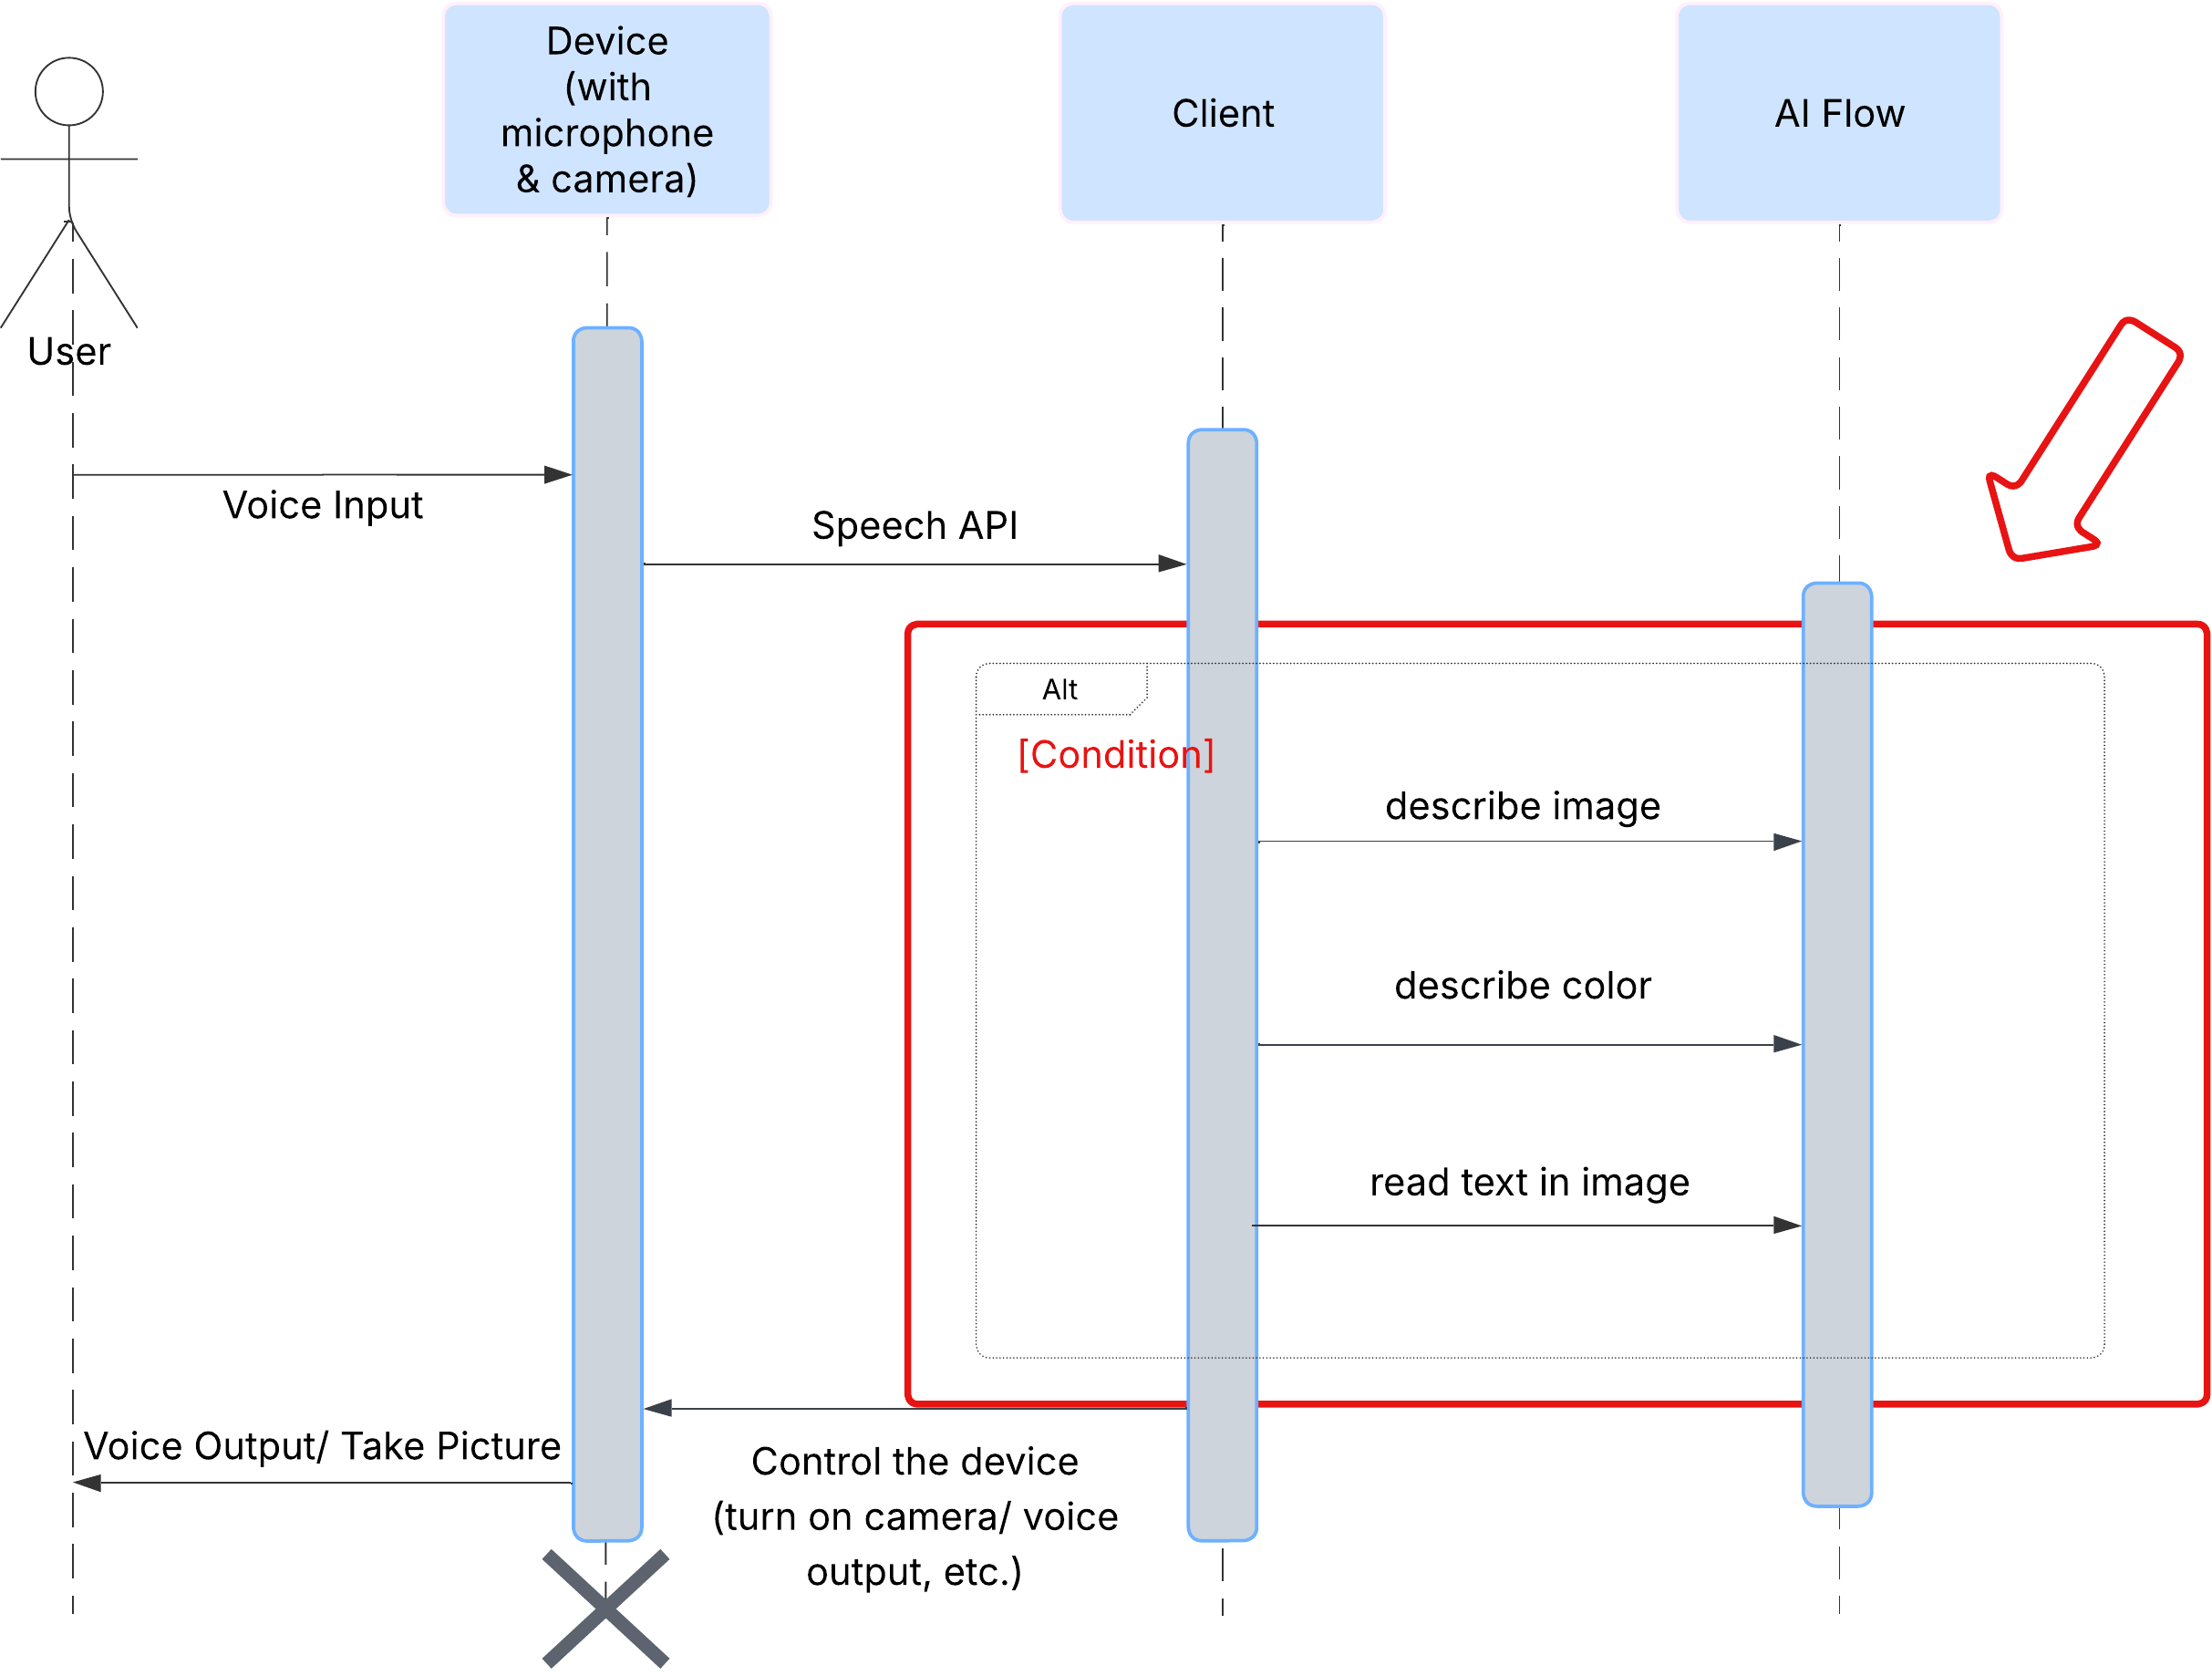
用户体验
首先,我们来看看用户如何与 ClarityCam 互动。整个体验过程无需动手,只需对话。用户说出命令,代理则以语音描述或操作做出回应。此序列图显示了典型的互动流程,从用户的初始语音指令到设备的最终音频响应。
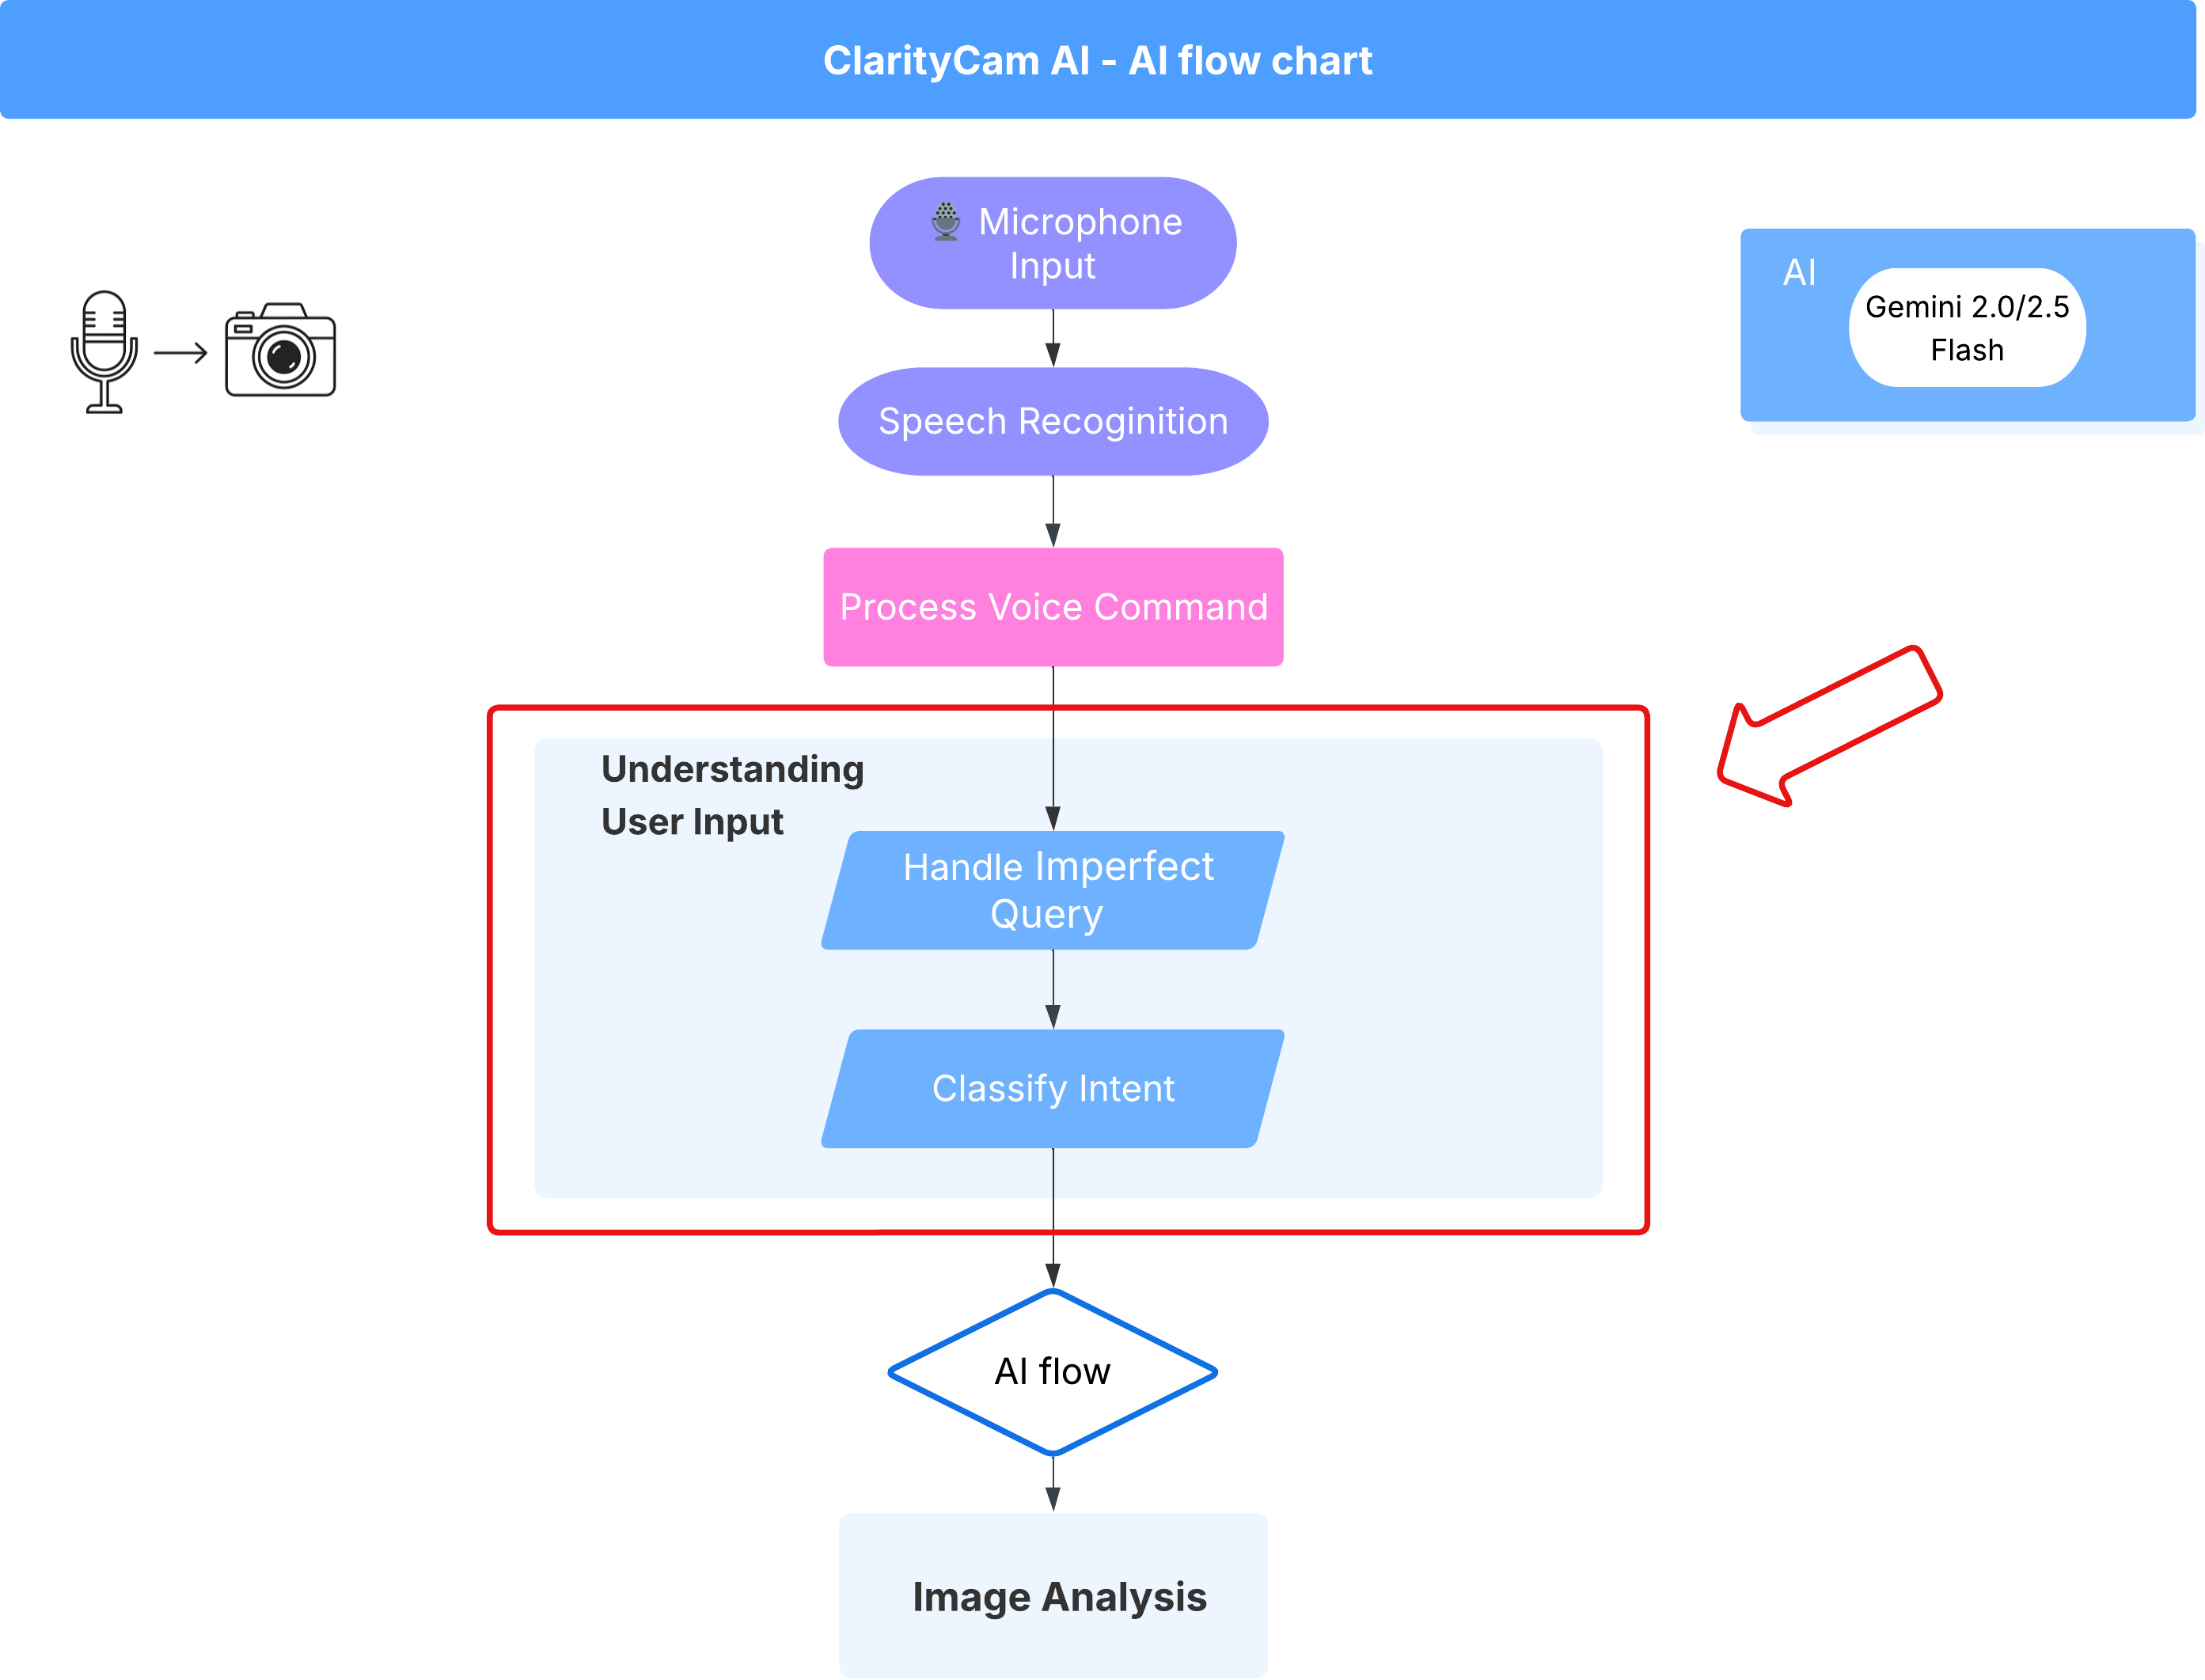
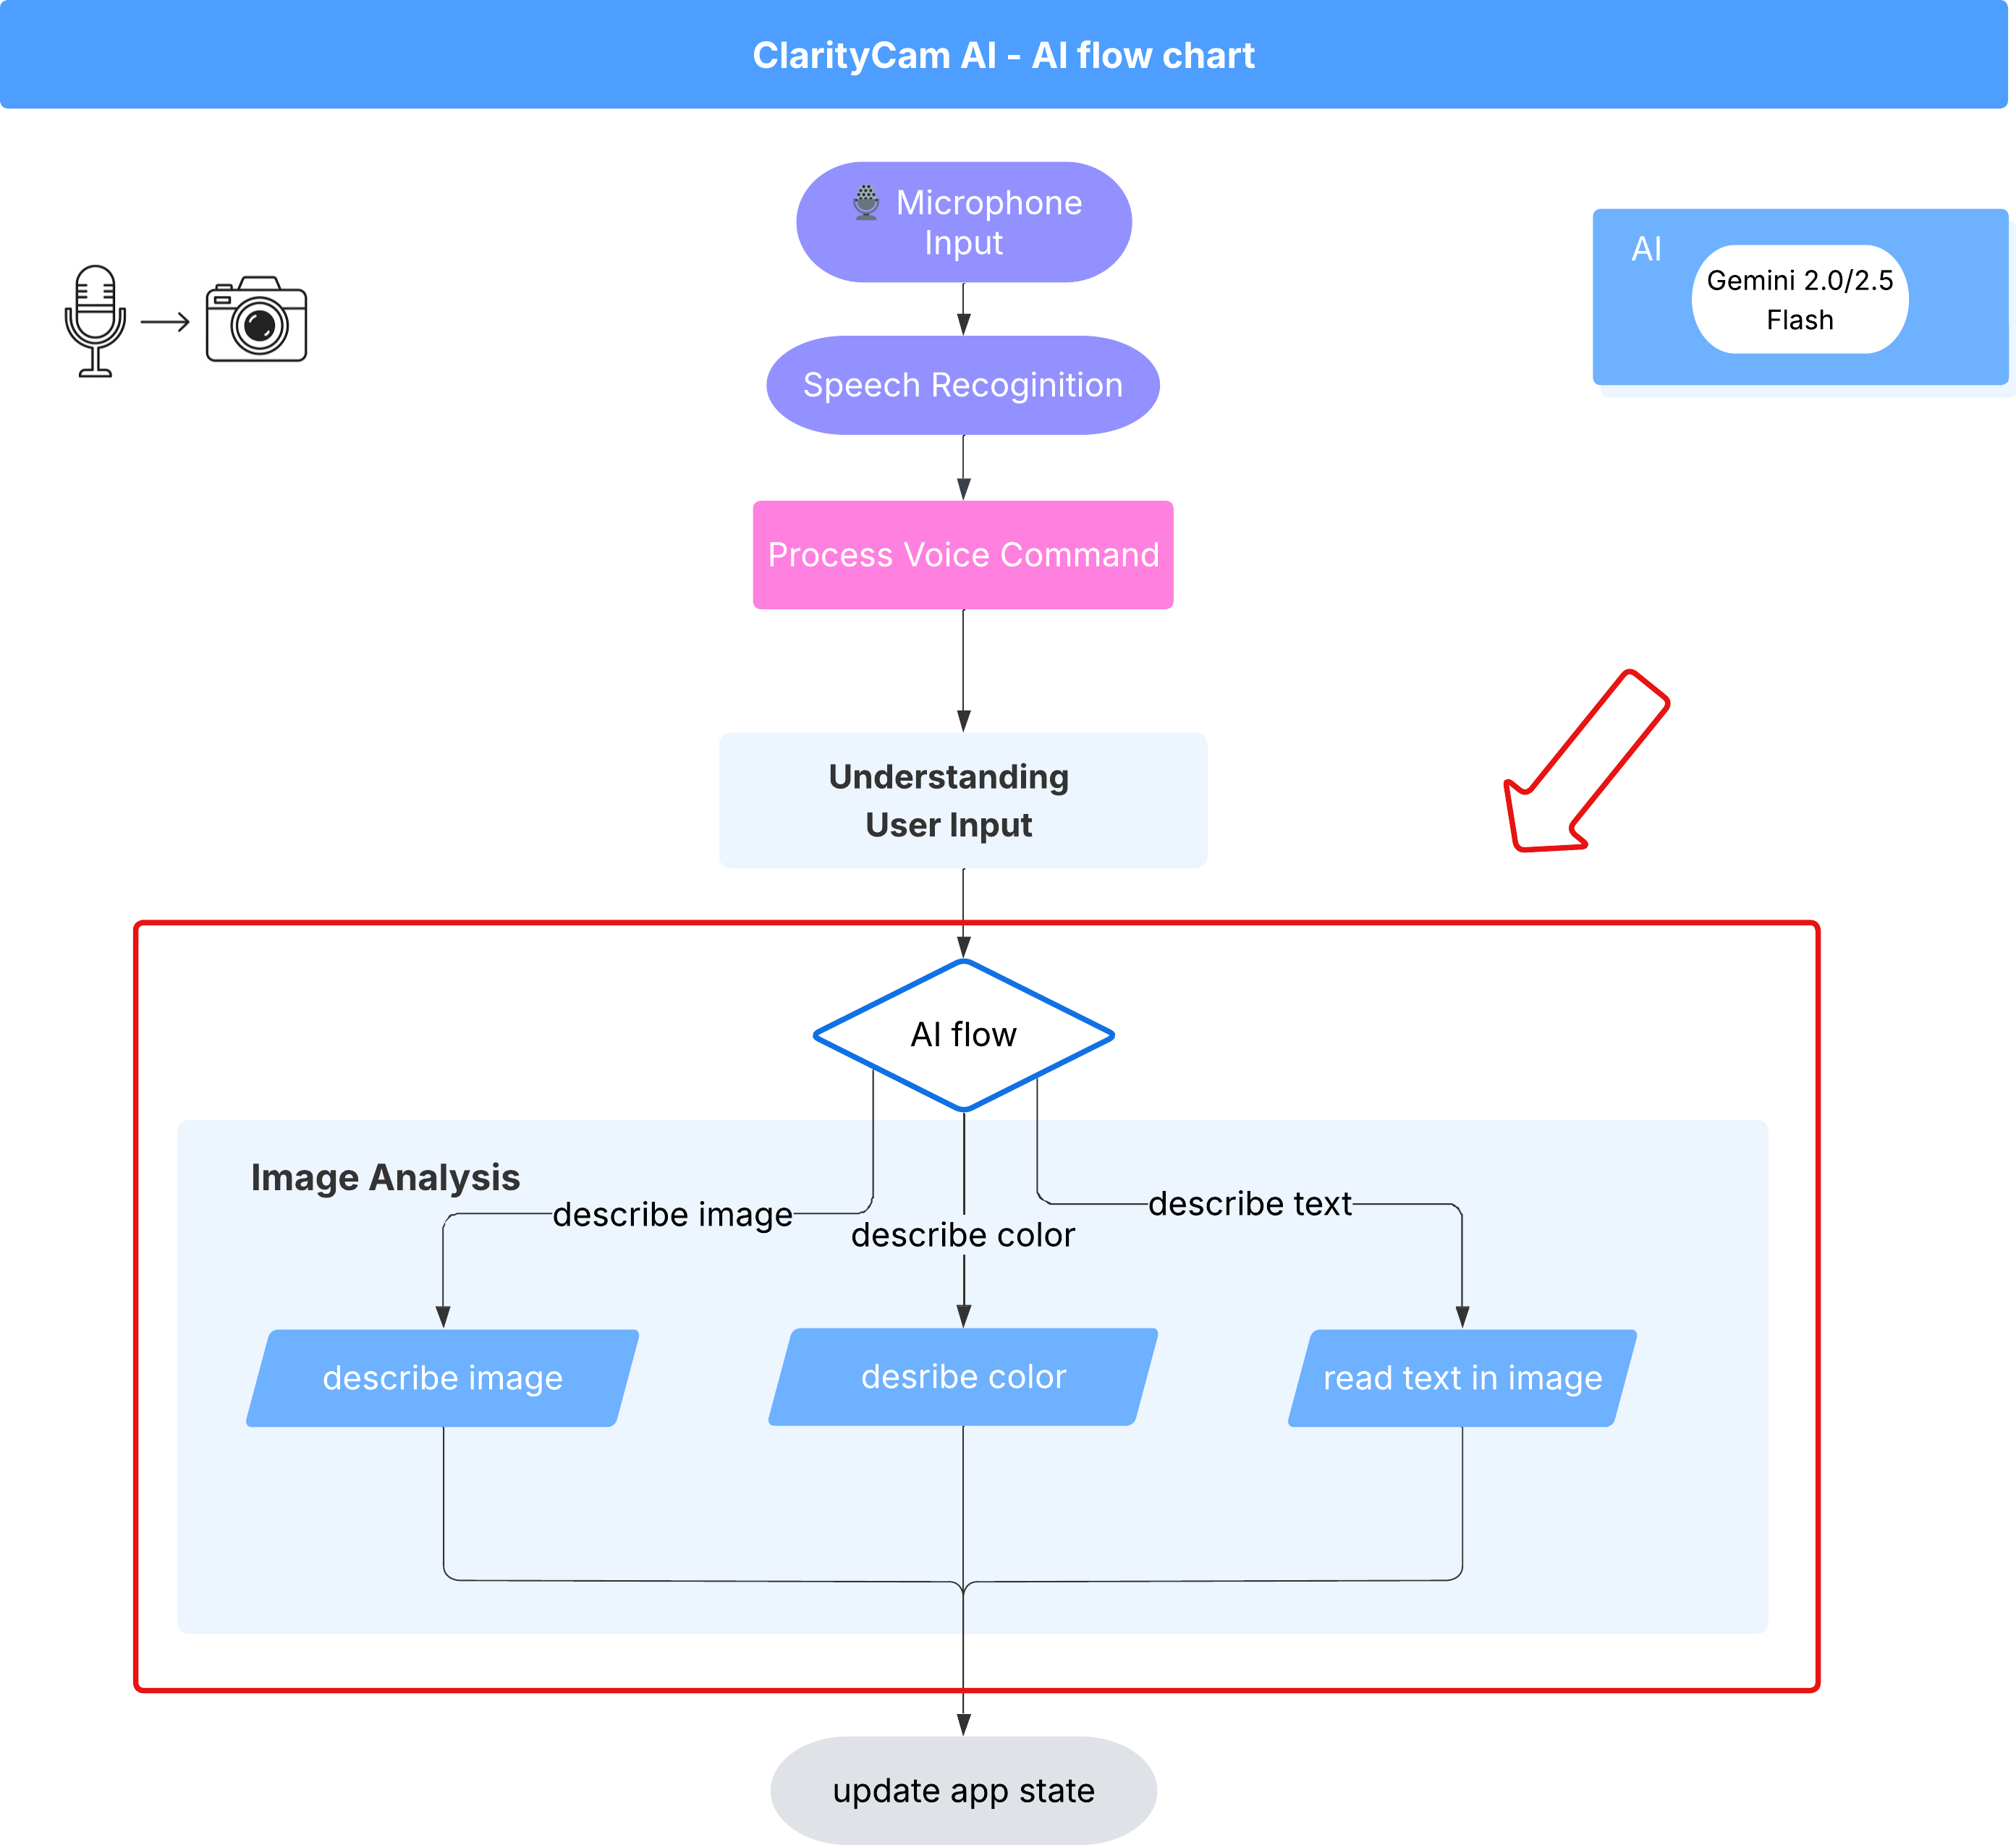
AI 智能体架构
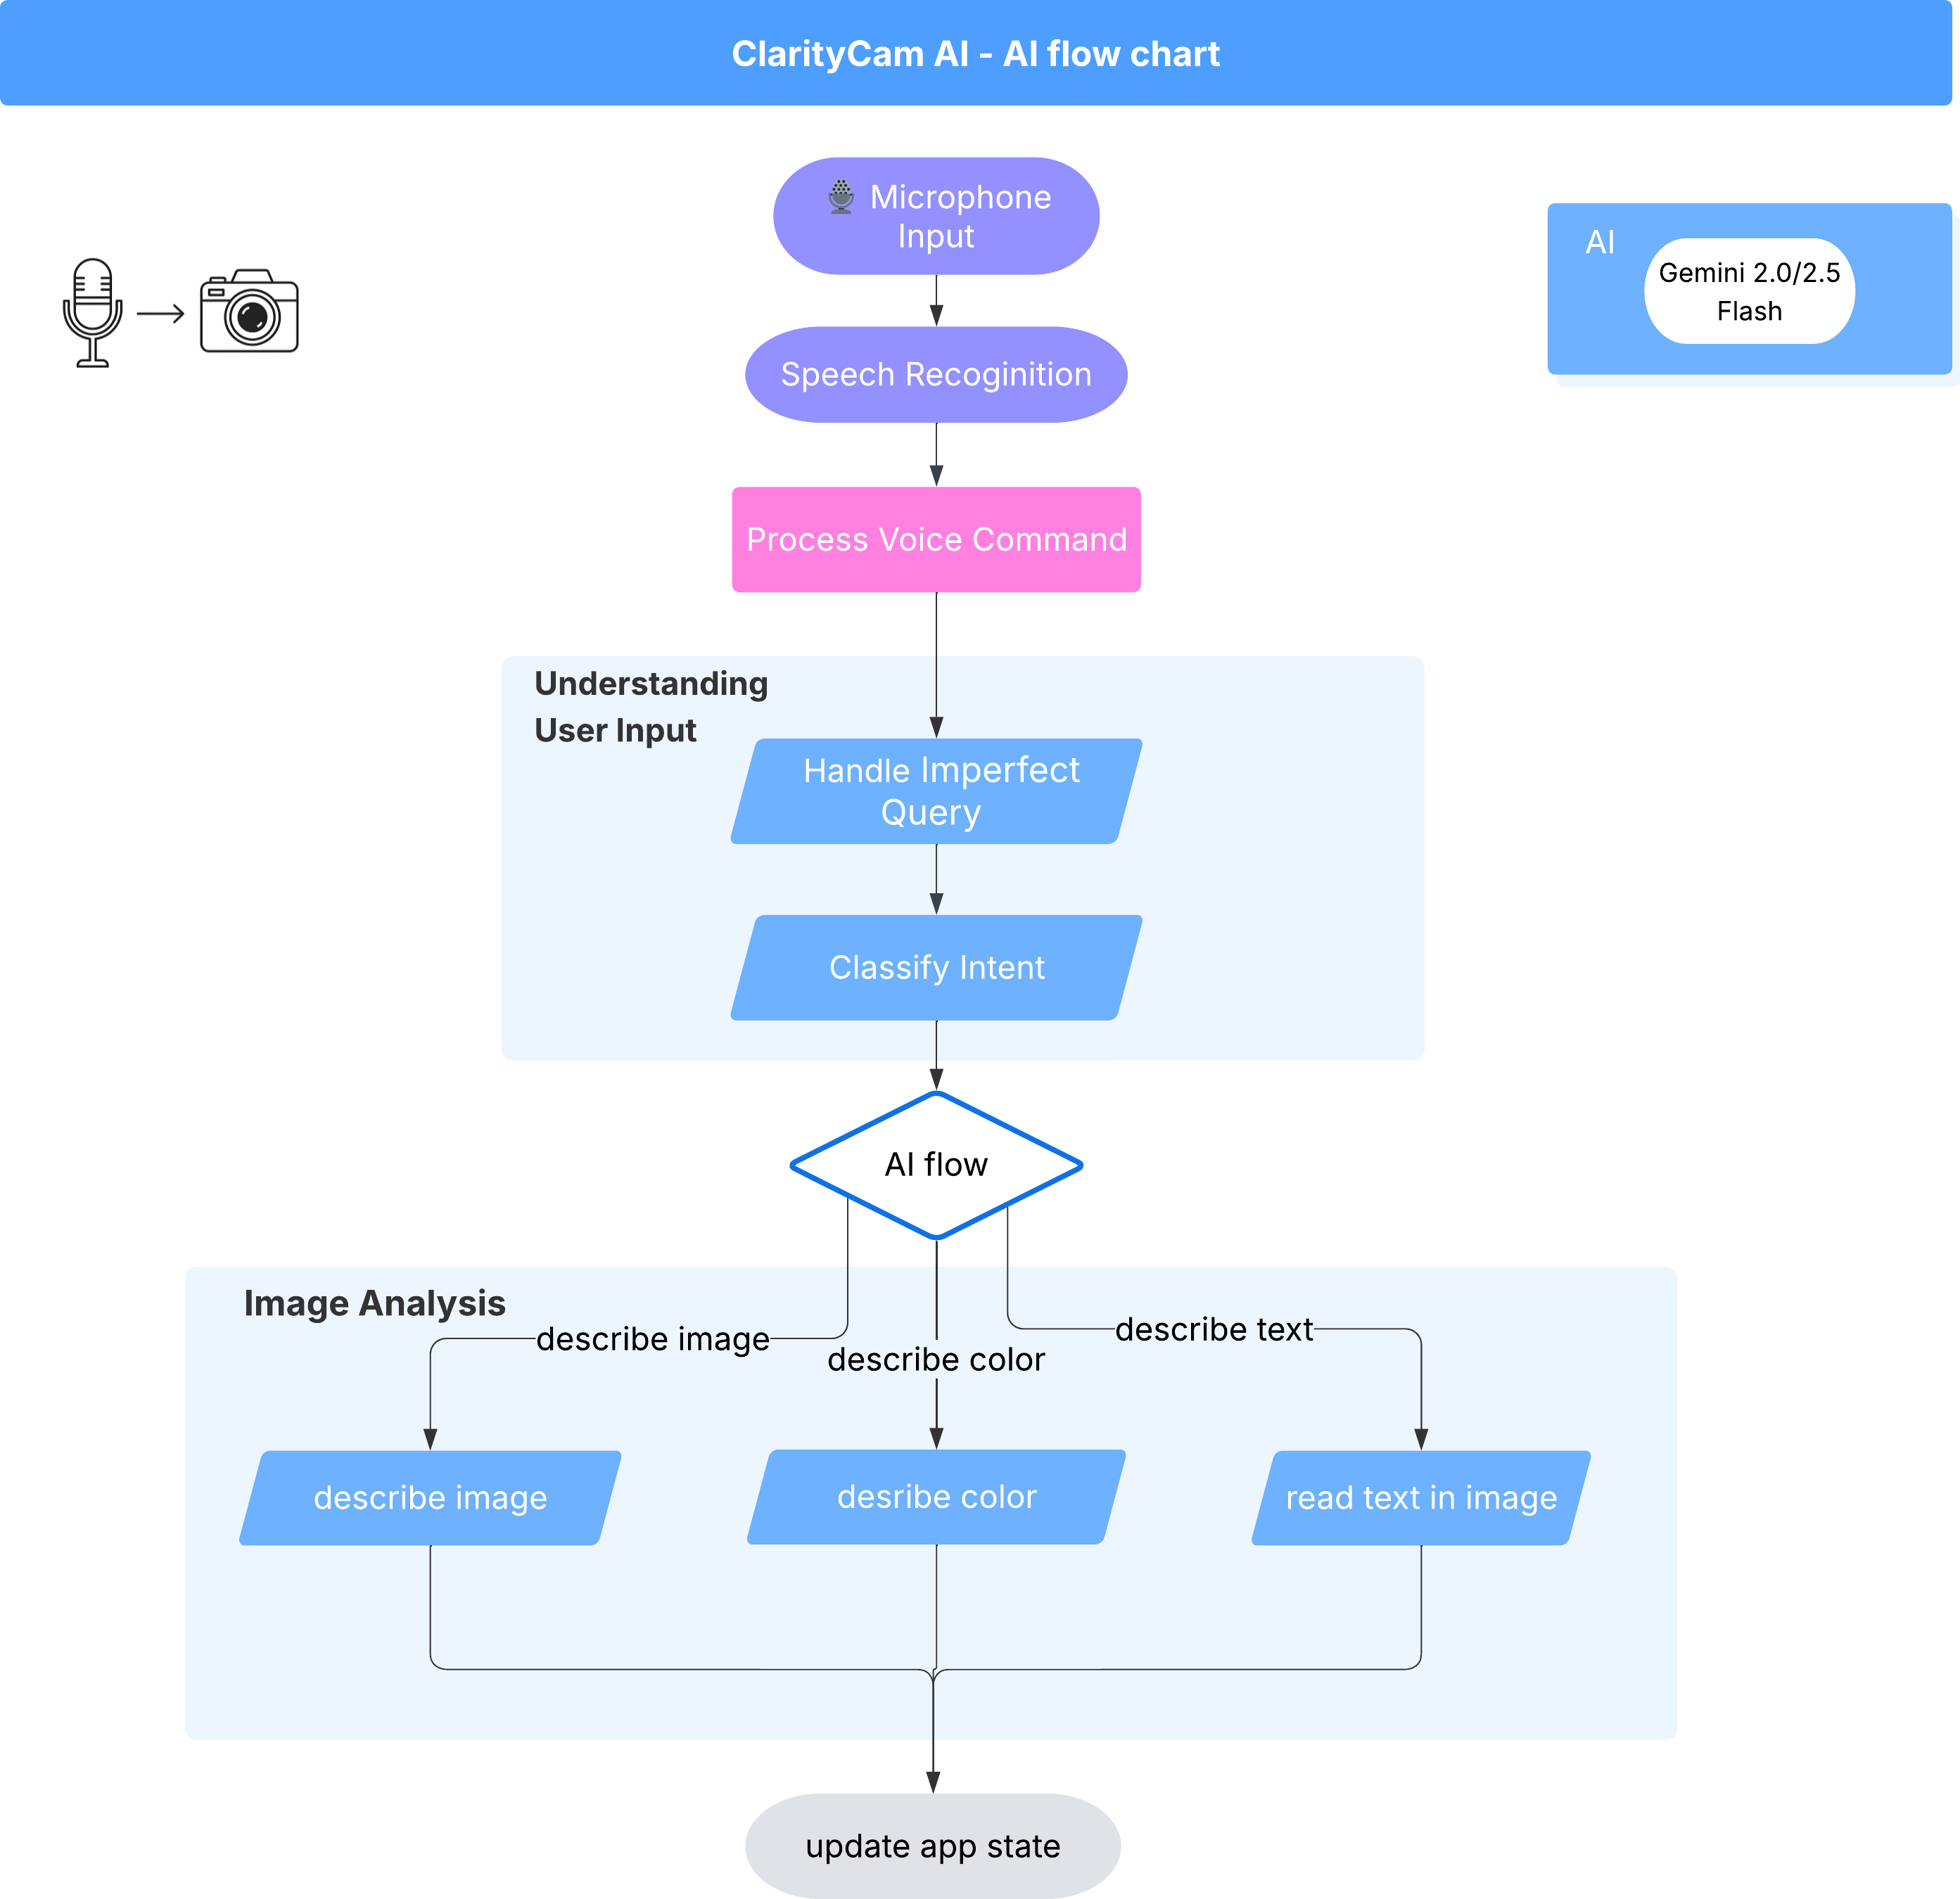
在表面之下,多智能体系统协同工作,共同打造出这种体验。当收到命令时,中央 Orchestrator 代理会将任务委托给负责理解意图、分析图片和生成回答的专业代理。此 AI 流程图深入介绍了这些代理如何协作。我们将在以下部分中实现此架构。
项目文件快速导览
在开始编写代码之前,我们先来熟悉一下项目的文件夹结构。虽然看起来有很多文件,但在整个教程中,您只需关注两个特定区域!
下面是我们的项目简化地图。
accessibilityAI/src/
├── 📁 app/
│   ├── layout.tsx      # An overall page shell (you can ignore this).
│   └── page.tsx        # ⬅️ MODIFY THIS: The main user interface for our app.
│
├── 📁 ai/
│   ├── 📁flows         # ⬅️ MODIFY THIS: The core AI logic and server functions.
│   └── intent-classifier.ts     # ⬅️ MODIFY THIS: Where we'll edit our AI prompts.
|   └── ai-instance.ts
|   └── dev.ts
│
├── 📁 components/       # Contains pre-built UI components (ignore this).
│
├── 📁 hooks/
│
├── 📁 lib/
│
└── 📁 types/
技术栈
我们的系统基于现代化的可扩缩技术栈构建,该技术栈结合了强大的云服务和先进的 AI 模型。以下是我们将要使用的关键组件:
- Google Cloud Platform (GCP):为我们的代理提供无服务器基础架构。
- Cloud Run:将各个代理部署为容器化的可扩缩微服务。
- Artifact Registry:安全地存储和管理代理的 Docker 映像。
- Secret Manager:安全地处理敏感凭据和 API 密钥。
- 大语言模型 (LLM):充当系统的“大脑”。
- Google 的 Gemini 模型:我们利用 Gemini 系列强大的多模态功能来处理各种任务,从对用户意图进行分类到分析图片内容和提供智能描述。
3. 设置和前提条件
启用结算账号:如需运行此 Codelab,您需要一个有一定信用额度的结算账号。使用本 Codelab 顶部横幅中的积分开始学习。如果您已关联结算账号,则可以跳过此步骤。
创建新的 GCP 项目
- 前往 Google Cloud 控制台并创建一个新项目。

- 前往 Google Cloud 控制台并创建一个新项目。
- 打开左侧面板,点击
Billing,检查结算账号是否与此 GCP 账号相关联。
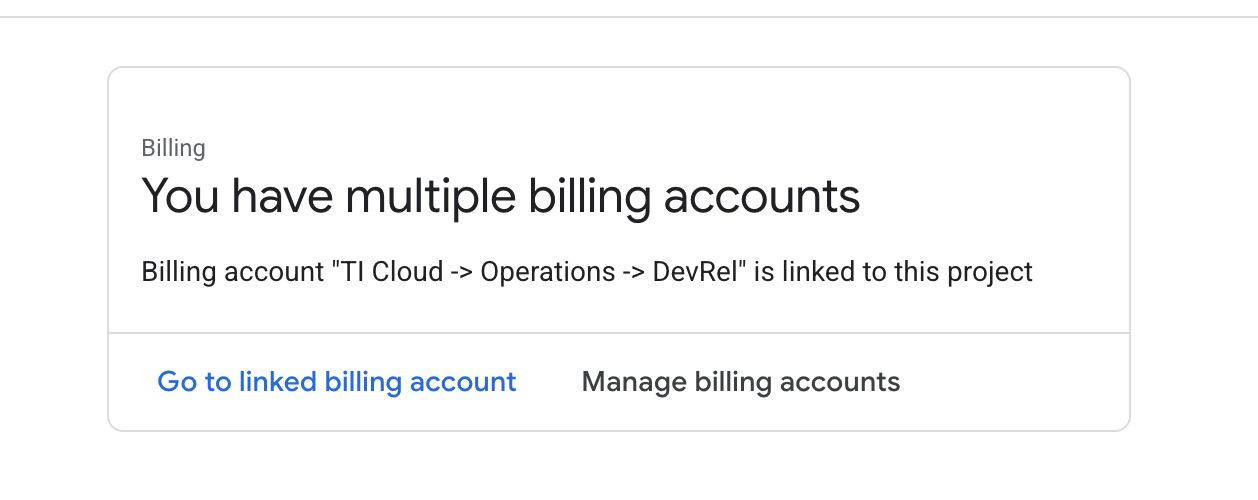
如果您看到此页面,请选中 manage billing account,选择 Google Cloud 试用版并将其关联到您的账号。
创建 Gemini API 密钥
您需要先拥有密钥,然后才能保护该密钥。
- 前往 Google AI Studio:https://aistudio.google.com/
- 使用您的 Google 账号登录。
- 点击“获取 API 密钥”按钮,该按钮通常位于左侧导航窗格中或右上角。
- 在 “API 密钥”对话框中,点击“在新项目中创建 API 密钥”。
- 系统会为您生成新的 API 密钥。立即复制此密钥,并将其暂时存储在安全的地方(例如密码管理工具或安全记事本)。您将在后续步骤中使用此值。
本地开发工作流(在您的机器上进行测试)
您需要能够运行 npm run dev 并让应用正常运行。这时,.env 就派上用场了。
- 将 API 密钥添加到文件中:创建一个名为
.env的新文件,并将以下代码行添加到此文件中。
请务必将 YOUR_API_KEY_HERE 替换为您从 AI Studio 获取并保存到 .env 的密钥:
GOOGLE_GENAI_API_KEY="YOUR_API_KEY_HERE"
[可选] 设置 IDE 和环境
在本教程中,您可以在熟悉的开发环境(例如 VS Code 或 IntelliJ)中使用本地终端。不过,我们强烈建议您使用 Google Cloud Shell,以确保获得标准化的预配置环境。
以下步骤是针对 Cloud Shell 环境编写的。如果您选择改用本地环境,请确保已安装并正确配置 git、nvm、npm 和 gcloud。
在 Cloud Shell 编辑器中工作
👉点击 Google Cloud 控制台顶部的激活 Cloud Shell(这是 Cloud Shell 窗格顶部的终端形状图标),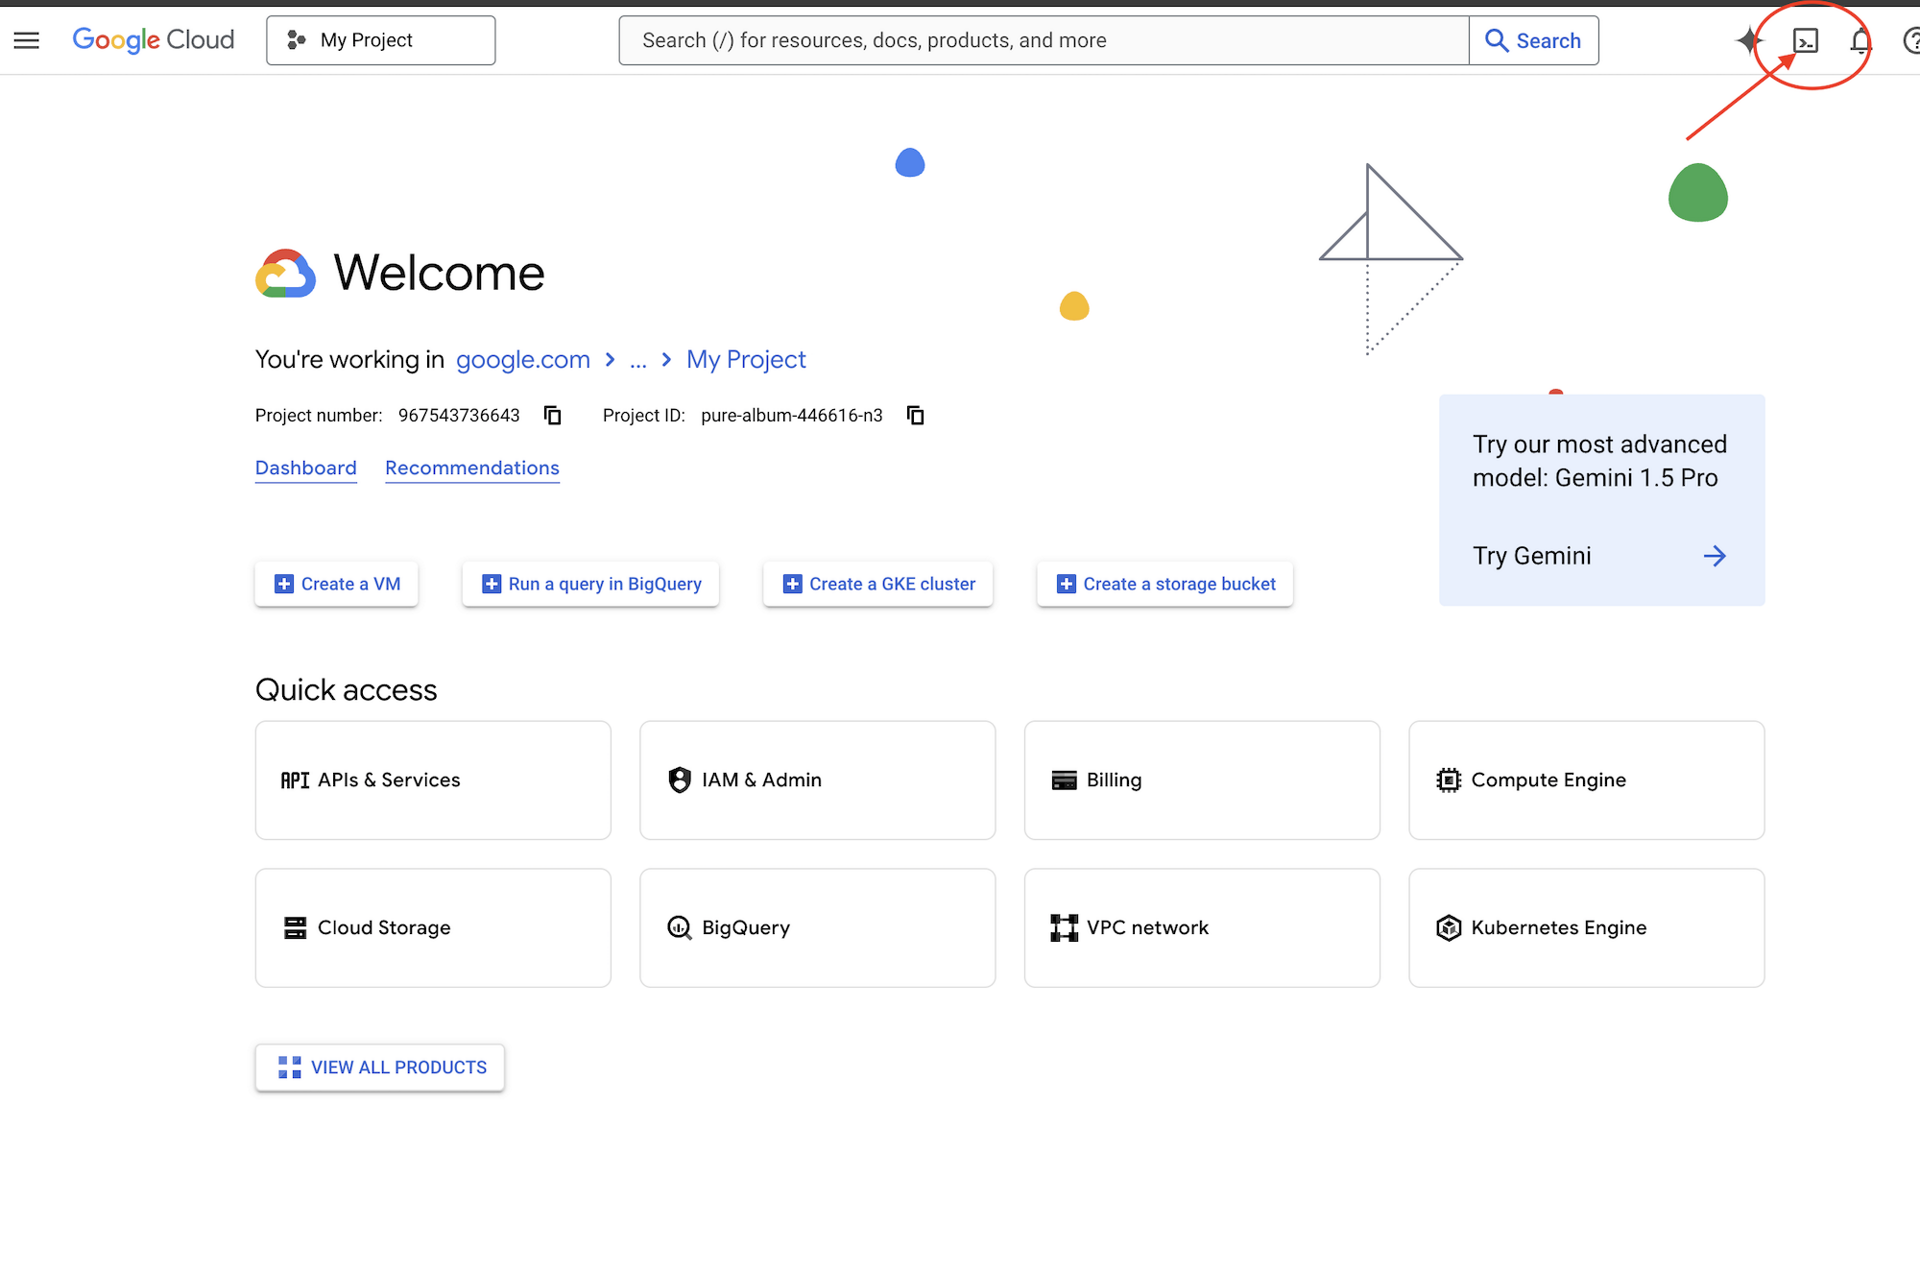
👉点击“打开编辑器”按钮(看起来像一个带有铅笔的打开的文件夹)。此操作会在窗口中打开 Cloud Shell 代码编辑器。您会在左侧看到文件资源管理器。
👉如图所示,点击底部状态栏中的 Cloud Code 登录按钮。按照说明对插件进行授权。如果您在状态栏中看到 Cloud Code - no project,请选择该选项,然后在下拉菜单中选择“Select a Google Cloud Project”(选择 Google Cloud 项目),然后从您创建的项目列表中选择特定的 Google Cloud 项目。
👉在云 IDE 中打开终端,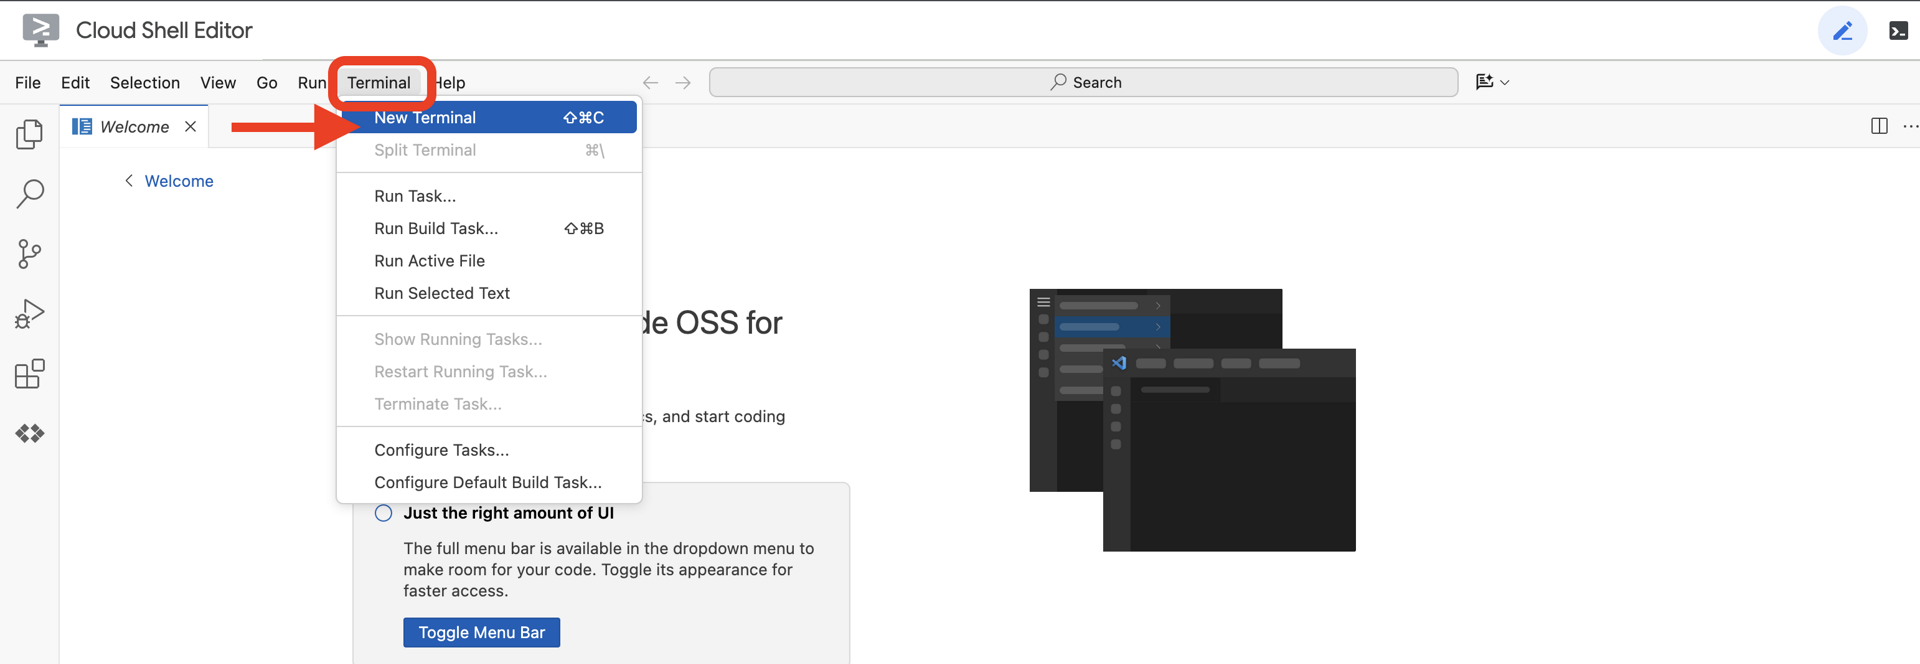
👉在终端中,使用以下命令验证您是否已通过身份验证,以及项目是否已设置为您的项目 ID:
gcloud auth list
👉 从 GitHub 克隆 natively-accessible-interface 项目:
git clone https://github.com/cuppibla/AccessibilityAgent.git
👉运行命令时,请务必将 <YOUR_PROJECT_ID> 替换为您的项目 ID(您可以在 Google Cloud 控制台的项目部分找到您的项目 ID,❗️❗️请务必不要混淆 project id 和 project number❗️❗️):
echo <YOUR_PROJECT_ID> > ~/project_id.txt
gcloud config set project $(cat ~/project_id.txt)
👉运行以下命令以启用必要的 Google Cloud API:(此命令可能需要大约 2 分钟才能运行完毕)
gcloud services enable compute.googleapis.com  \
                        storage.googleapis.com  \
                        run.googleapis.com  \
                        artifactregistry.googleapis.com  \
                        aiplatform.googleapis.com \
                        eventarc.googleapis.com \
                        sqladmin.googleapis.com \
                        secretmanager.googleapis.com \
                        cloudbuild.googleapis.com \
                        cloudresourcemanager.googleapis.com \
                        cloudfunctions.googleapis.com \
                        cloudaicompanion.googleapis.com
这可能需要几分钟的时间。
设置权限
👉设置服务账号权限。在终端中,运行以下命令:
gcloud config set project $(cat ~/project_id.txt)
export PROJECT_ID=$(gcloud config get project)
export SERVICE_ACCOUNT_NAME=$(gcloud compute project-info describe --format="value(defaultServiceAccount)")

echo "Here's your SERVICE_ACCOUNT_NAME $SERVICE_ACCOUNT_NAME"
授予权限。在终端中,运行以下命令:
#Cloud Storage (Read/Write):
gcloud projects add-iam-policy-binding $PROJECT_ID \
  --member="serviceAccount:$SERVICE_ACCOUNT_NAME" \
  --role="roles/storage.objectAdmin"

#Pub/Sub (Publish/Receive):
gcloud projects add-iam-policy-binding $PROJECT_ID \
  --member="serviceAccount:$SERVICE_ACCOUNT_NAME" \
  --role="roles/pubsub.publisher"

gcloud projects add-iam-policy-binding $PROJECT_ID \
  --member="serviceAccount:$SERVICE_ACCOUNT_NAME" \
  --role="roles/pubsub.subscriber"


#Cloud SQL (Read/Write):
gcloud projects add-iam-policy-binding $PROJECT_ID \
  --member="serviceAccount:$SERVICE_ACCOUNT_NAME" \
  --role="roles/cloudsql.editor"


#Eventarc (Receive Events):
gcloud projects add-iam-policy-binding $PROJECT_ID \
  --member="serviceAccount:$SERVICE_ACCOUNT_NAME" \
  --role="roles/iam.serviceAccountTokenCreator"

gcloud projects add-iam-policy-binding $PROJECT_ID \
  --member="serviceAccount:$SERVICE_ACCOUNT_NAME" \
  --role="roles/eventarc.eventReceiver"

#Vertex AI (User):
gcloud projects add-iam-policy-binding $PROJECT_ID \
  --member="serviceAccount:$SERVICE_ACCOUNT_NAME" \
  --role="roles/aiplatform.user"

#Secret Manager (Read):
gcloud projects add-iam-policy-binding $PROJECT_ID \
  --member="serviceAccount:$SERVICE_ACCOUNT_NAME" \
  --role="roles/secretmanager.secretAccessor"
4. 了解用户输入内容 - 意图分类器
在采取行动之前,AI 智能体必须先准确了解用户的需求。现实世界中的输入通常比较杂乱,可能含糊不清、包含错别字或使用对话式语言。
在本部分中,我们将构建关键的“监听”组件,该组件可将原始用户输入转换为清晰可执行的命令。
添加 intent 分类器
现在,我们将定义为分类器提供支持的 AI 逻辑。
👉 操作:在 Cloud Shell IDE 中,前往 ~/src/ai/intent-classifier/ 目录
第 1 步:定义智能体的词汇 (IntentCategory)
首先,我们需要创建一个明确的列表,列出智能体可以执行的所有可能的操作。
👉 操作:将占位符 // REPLACE ME PART 1: add IntentCategory here 替换为以下代码:
👉 替换为以下代码:
export type IntentCategory =
  // Image Analysis Intents
  | "DescribeImage"
  | "AskAboutImage"
  | "ReadTextInImage"
  | "IdentifyColorsInImage"
  // Control Intents
  | "TakePicture"
  | "StartCamera"
  | "SelectImage"
  | "StopSpeaking"
  // Preference Intents
  | "SetDescriptionDetailed"
  | "SetDescriptionConcise"
  // Fallback Intents
  | "GeneralInquiry"       // User has a general question about the agent's functions or polite interaction
  | "OutOfScopeRequest"    // User's request is clearly outside the agent's defined capabilities
  | "Unknown";             // Intent could not be determined with confidence
解释
此 TypeScript 代码会创建一个名为 IntentCategory 的自定义类型。这是一个严格的列表,其中定义了智能体可以理解的每项可能的操作或“意图”。这是至关重要的第一步,因为它可以将可能无限多的用户短语(例如“告诉我你看到了什么”“图片里有什么?”)转换为清晰、可预测的命令集。分类器的目标是将任何用户查询映射到这些特定类别之一。
第 2 步
为了做出准确的决策,我们的 AI 需要了解自身的能力和局限性。我们将以详细的文本块形式提供此信息。
👉 操作:将占位符“REPLACE ME PART 2: add AGENT_CAPABILITIES_AND_LIMITATIONS here”替换为以下代码:
替换以下代码:// REPLACE ME PART 2: add AGENT_CAPABILITIES_AND_LIMITATIONS here:
👉 使用以下代码
const AGENT_CAPABILITIES_AND_LIMITATIONS = `
**Core Capabilities (What the Agent CAN DO):**
* **Image Analysis:**
    * DescribeImage: Provide a general description of the current image.
    * AskAboutImage: Answer a specific question about the visual content of the current image (e.g., "Is there a dog?", "What color is the car?").
    * ReadTextInImage: Read any text found in the current image.
    * IdentifyColorsInImage: Identify the dominant colors of the current image.
* **Image Input Control:**
    * TakePicture: Capture an image using the currently active camera stream.
    * StartCamera: Activate the camera (e.g., "use camera", "take another picture").
    * SelectImage: Allow the user to choose an image file from their device.
* **Voice & Audio Control:**
    * StopSpeaking: Stop the current text-to-speech output.
* **Preference Management:**
    * SetDescriptionDetailed: Make future image descriptions more detailed.
    * SetDescriptionConcise: Make future image descriptions less detailed or concise.
* **General Interaction:**
    * GeneralInquiry: Handle conversational phrases (e.g., "hello", "thank you") or questions about its own capabilities (e.g., "what can you do?", "help").

**Limitations (What the Agent CANNOT DO and should be classified as OutOfScopeRequest):**
* Cannot generate or create new images.
* Cannot edit or modify existing images (e.g., "remove background," "make the car blue").
* Cannot analyze video files or live video beyond capturing a single frame.
* Cannot provide general knowledge or answer questions unrelated to the provided image's visual content (e.g., "What's the weather?", "Who is the president?", "Tell me a joke", "What time is it?").
* Cannot perform mathematical calculations or complex data analysis.
* Cannot translate languages as a primary function.
* Cannot remember information from past images or vastly different previous queries in the same session.
* Cannot control other device settings or applications.
* Cannot perform web searches.
`;
重要意义:
此文本不是供用户阅读的,而是供我们的 AI 模型使用的。我们将直接将此“职位描述”输入到提示中(在下一步中),以便为大语言模型 (LLM) 提供做出准确决策所需的背景信息。如果没有此上下文,LLM 可能会错误地将“天气怎么样?”归类为 AskAboutImage。有了此上下文,模型便知道天气不是图片中的视觉元素,并正确地将其归类为超出范围。
第 3 步
现在,我们将编写 Gemini 模型将遵循的完整指令集,以执行分类。
👉 操作:将 // REPLACE ME PART 3 - classifyIntentPrompt 替换为以下代码:
替换为以下代码
const classifyIntentPrompt = ai.definePrompt({
  name: 'classifyIntentPrompt',
  input: { schema: ClassifyIntentInputSchema },
  output: { schema: ClassifyIntentOutputSchema },
  prompt: `You are classifying the user's intent for ClarityCam, a voice-controlled AI application focused on image analysis.
Analyze the user query: '{userQuery}'.

First, understand ClarityCam's capabilities and limitations:
${AGENT_CAPABILITIES_AND_LIMITATIONS}

Now, classify the user's PRIMARY intent into ONE of the following categories:
* **DescribeImage**: User wants a general description of the current image.
* **AskAboutImage**: User is asking a specific question directly related to the visual content of the current image.
* **ReadTextInImage**: User wants any text read from the current image.
* **IdentifyColorsInImage**: User wants the dominant colors of the current image.
* **TakePicture**: User wants to capture an image using an active camera.
* **StartCamera**: User wants to activate the camera.
* **SelectImage**: User wants to choose an image file.
* **StopSpeaking**: User wants the current text-to-speech output to stop.
* **SetDescriptionDetailed**: User wants future image descriptions to be more detailed.
* **SetDescriptionConcise**: User wants future image descriptions to be less detailed.
* **GeneralInquiry**: The query is a simple conversational filler (e.g., "hello", "thanks"), a polite closing, or a direct question about the agent's functions (e.g., "what can you do?", "how does this work?", "help").
* **OutOfScopeRequest**: The query asks the agent to perform an action clearly listed under its "Limitations" or otherwise demonstrably outside its defined image analysis and control functions. Examples: "Tell me a joke," "What's the weather in London?", "Generate an image of a cat," "Can you edit my photo to make it brighter?", "Send this image to my friends","Translate 'hello' to Spanish."

Output ONLY the category name.
If the query is ambiguous but seems generally related to polite interaction or asking about the agent itself, prefer 'GeneralInquiry'.
If the query is clearly asking for something the agent CANNOT do, use 'OutOfScopeRequest'.
If truly unclassifiable even with these guidelines, use 'Unknown'.`,
  config: {
    temperature: 0.05, // Very low temperature for highly deterministic classification
  }
});
此提示是实现神奇效果的关键。它是分类器的“大脑”,用于告知 AI 其角色、提供必要的上下文,并定义所需的输出。请注意以下关键的提示工程方法:
- 角色扮演:以“您正在对...进行分类”开头,明确任务。
- 上下文注入:它会将
AGENT_CAPABILITIES_AND_LIMITATIONS变量动态插入到提示中。 - 严格的输出格式:指令“仅输出类别名称”对于获得干净、可预测的响应至关重要,这样我们才能在代码中轻松使用该响应。
- 低温度:对于分类任务,我们需要确定性、逻辑性的答案,而不是创意性的答案。将温度设为非常低的值 (0.05) 可确保模型高度专注且保持一致。
第 4 步:将应用连接到 AI Flow
最后,让我们从主应用文件中调用新的 AI 分类器。
👉 操作:找到 ~/src/app/page.tsx 文件。在 processVoiceCommand 函数内,将 // REPLACE ME PART 1: add classificationResult 替换为以下内容:
const classificationResult = await classifyIntentFlow({ userQuery: commandToProcess });
        intent = classificationResult.intent as IntentCategory;
此代码是前端应用与后端 AI 逻辑之间的关键桥梁。它会接收用户的语音指令 (commandToProcess),将其发送到您刚刚构建的 classifyIntentFlow,并等待 AI 返回分类后的意图。
意图变量现在包含一个干净的结构化命令(例如 DescribeImage)。此结果将用于后续的 switch 语句,以驱动应用的逻辑并决定接下来要采取的操作。它将 AI 的“思考”转化为应用的“行动”。
启动界面
现在,让我们看看应用的实际运行效果!我们来启动开发服务器。
👉 在终端中,运行以下命令:npm run dev 注意:您可能需要在运行 npm run dev 之前运行 npm install
片刻之后,您会看到类似于以下内容的输出,这意味着服务器已成功运行:
   ▲ Next.js 15.2.3 (Turbopack)
   - Local:        http://localhost:9003
   - Network:      http://10.88.0.4:9003
   - Environments: .env

 ✓ Starting...
 ✓ Ready in 1512ms
 ○ Compiling / ...
 ✓ Compiled / in 26.6s
现在,点击本地网址 (http://localhost:9003) 以在浏览器中打开应用。
您应该会看到 SightGuide 界面!目前,这些按钮尚未与任何逻辑相关联,因此点击它们不会执行任何操作。这正是我们在此阶段的预期。我们将在下一部分中让它们发挥作用!
现在,您已了解了界面,请返回到终端并按 Ctrl + C 停止开发服务器,然后再继续
5. 了解用户输入 - 不完美的查询检查
添加了不完美查询检查
第 1 部分:定义提示(“是什么”)
首先,我们来定义 AI 的指令。提示是 AI 调用指令的“配方”,它会准确告知模型我们希望它做什么。
👉 操作:在 IDE 中,前往 ~/src/ai/flows/check_typo/。
替换以下代码:// REPLACE ME PART 1: add prompt here:
👉 使用以下代码
const prompt = ai.definePrompt({
  name: 'checkTypoPrompt',
  input: {
    schema: CheckTypoInputSchema,
  },
  output: {
    schema: CheckTypoOutputSchema,
  },
  prompt: `You are a helpful AI assistant that checks user text for typos and suggests corrections.
- If you find typos, respond with the corrected text.
- If there are no typos, or if you are unsure about a correction, respond with the original text unchanged.

User text: {text}

Corrected text:
`,
});
此代码块定义了一个名为 checkTypoPrompt 的可重复使用的 AI 模板。输入和输出架构定义了此任务的数据合同。这样可以防止出错,并使我们的系统具有可预测性。
第 2 部分:创建流程(“如何”)
现在,我们有了“食谱”(提示),接下来需要创建一个可以实际执行该提示的函数。在 Genkit 中,这称为 flow。flow 将提示封装在一个可执行的函数中,应用的其余部分可以轻松调用该函数。
👉 操作:在同一 ~/src/ai/flows/check_typo/ 文件中,将以下代码替换为 // REPLACE ME PART 2: add flow here:
👉 使用以下代码
const checkTypoFlow = ai.defineFlow<
  typeof CheckTypoInputSchema,
  typeof CheckTypoOutputSchema
>(
  {
    name: 'checkTypoFlow',
    inputSchema: CheckTypoInputSchema,
    outputSchema: CheckTypoOutputSchema,
  },
  async input => {
    const {output} = await prompt(input);
    return output!;
  }
);
第 3 部分:使用错字检查器
现在,我们已经完成了 AI 流,接下来可以将其集成到应用的主逻辑中。我们会在收到用户命令后立即调用它,以确保文本在进行任何进一步处理之前是干净的。
👉操作:前往 ~/src/app/ai/flows/check-typo.ts 并找到 export async function checkTypo 函数。取消注释 return 语句:
将 return; 改为 return checkTypoFlow(input);
👉操作:前往 ~/src/app/page.tsx 并找到 processVoiceCommand 函数。替换以下代码:REPLACE ME PART 2: add typoResult here:
👉 使用以下代码
const typoResult = await checkTypo({ text: rawCommand });
        if (typoResult && typoResult.correctedText && typoResult.correctedText.trim().length > 0) {
            const originalTrimmedLower = rawCommand.trim().toLowerCase();
            const correctedTrimmedLower = typoResult.correctedText.trim().toLowerCase();
            if (correctedTrimmedLower !== originalTrimmedLower) {
                commandToProcess = typoResult.correctedText;
                typoCorrectionAnnouncement = `I think you said: ${commandToProcess}. `;
            }
        }
通过此变更,我们为每个用户命令创建了更强大的数据处理流水线。
语音指令流程(只读,无需采取任何行动)

现在,我们已经有了核心“理解”组件(拼写检查器和意图分类器),接下来,我们来看看它们如何融入应用的主要语音处理逻辑。
一切都从用户说话开始。浏览器的 Web Speech API 会监听语音,并在用户说完话后提供所听到内容的转写文本。以下代码处理此流程。
👉只读:前往 ~/src/app/page.tsx 并进入 handleResult 函数。找到以下代码:
for (let i = event.resultIndex; i < event.results.length; ++i) {
        if (event.results[i].isFinal) {
          finalTranscript += event.results[i][0].transcript;
        }
      }
      if (finalTranscript) {
        console.log("Final Transcript:", finalTranscript);
        processVoiceCommand(finalTranscript);
      }
测试我们的错字更正功能
现在,我们进入有趣的环节!我们来看看新的错别字更正功能如何处理完美和不完美的语音指令。
启动应用
首先,我们让开发服务器再次运行起来。在终端中,运行以下命令:npm run dev
打开应用
服务器准备就绪后,打开浏览器并前往本地地址(例如 http://localhost:9003)。
启用语音指令
点击 Start Listening 按钮。浏览器可能会请求使用麦克风的权限。请点击“允许”。
测试不完美的命令
现在,我们故意给它一个略有瑕疵的指令,看看 AI 是否能理解。对着麦克风清晰地说话:
“Picture take of me”
观察结果
“奇迹”就发生在这里!即使您说的是“帮我拍照”,应用也应该会正确启动相机。checkTypo 流程会在后台将您的短语更正为“拍照”,然后 classifyIntentFlow 会理解更正后的指令。
这证实了我们的拼写更正功能运行正常,让应用更加稳健且易于使用!完成后,您可以拍照来停止相机,也可以直接在终端中停止服务器 (Ctrl + C)。
6. 依托 AI 技术的图片分析 - 描述图片
现在,我们的代理可以理解请求了,接下来,我们来为它添加视觉功能。在本部分中,我们将构建 Vision Agent 的功能,它是负责所有图片分析的核心组件。我们先介绍最重要的功能(描述图片),然后添加读取文本的功能。
功能 1:描述图片
这是智能体的主要功能。我们不会只生成静态说明,而是会构建一个动态流程,该流程可以根据用户偏好调整详细程度。这是原生自适应界面 (NAI) 理念的重要组成部分。
👉 操作:在 Cloud Shell IDE 中,前往 ~/src/ai/flows/describe_image/ 文件并取消注释以下代码。
第 1 步:构建动态提示模板
首先,我们将创建一个复杂的提示模板,该模板可以根据收到的输入更改其指令。
取消注释以下代码
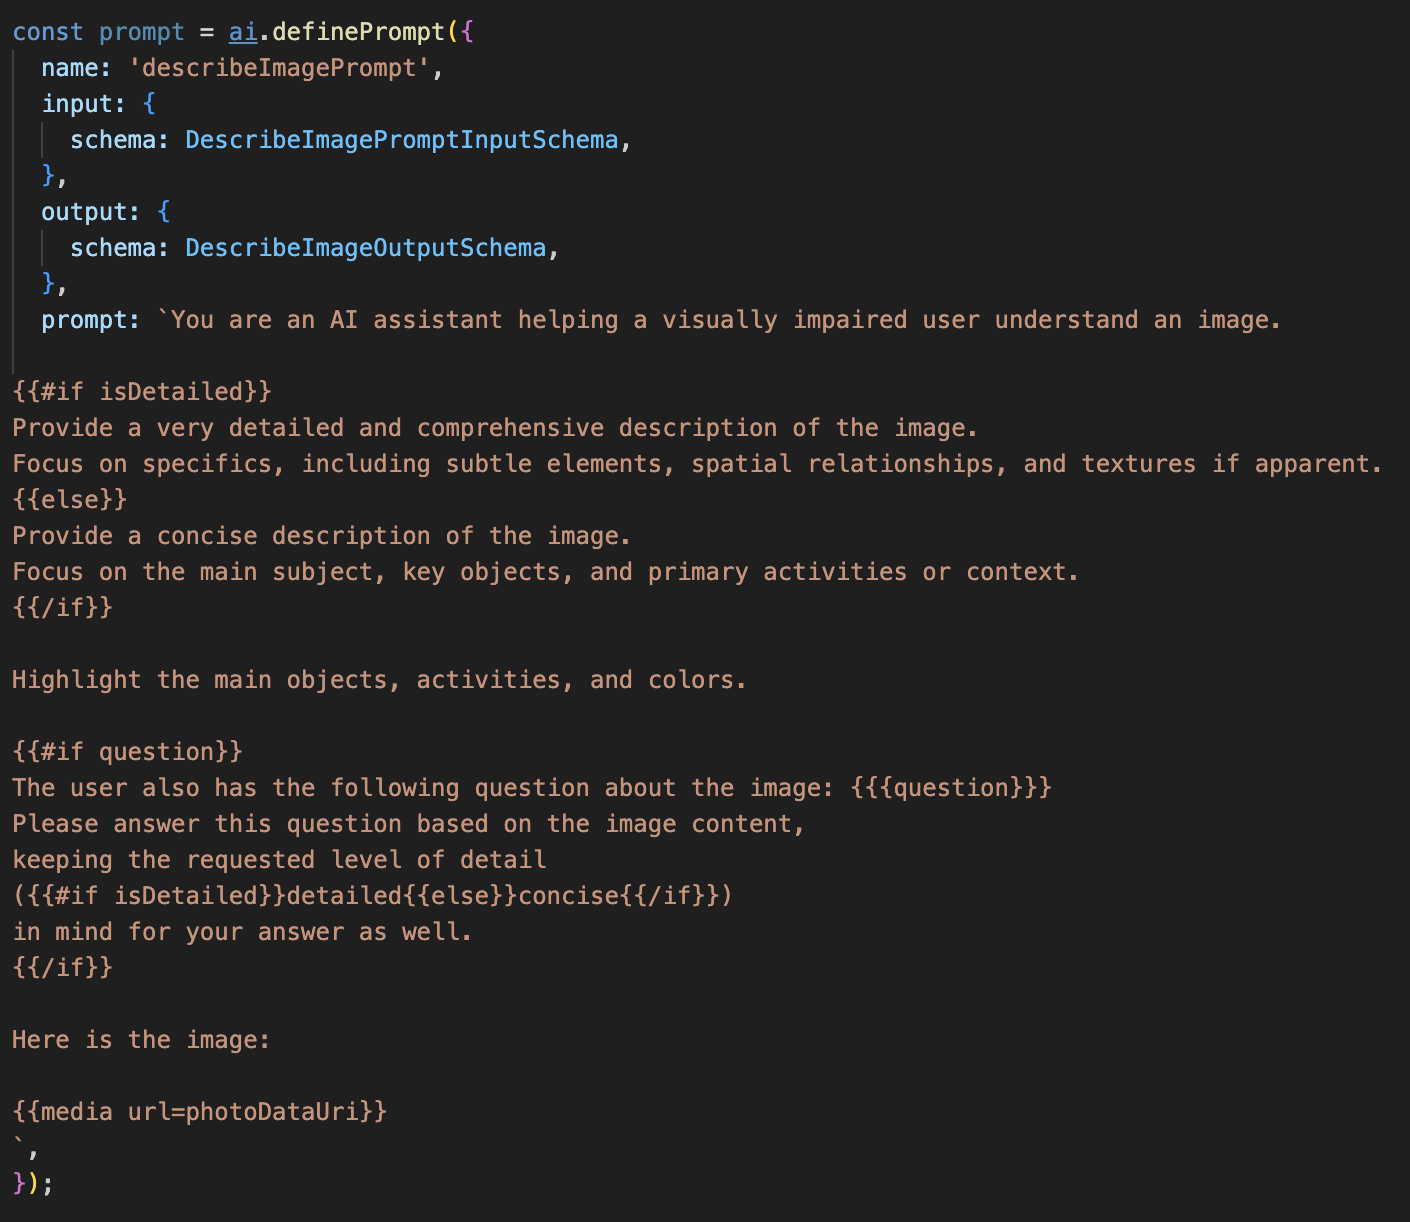
此代码定义了一个字符串变量 prompt,该变量使用一种名为 Dot-Mustache 的模板语言。这样一来,我们就可以直接在提示中嵌入条件逻辑。
{#if isDetailed}...{else}...{/if}:这是一个条件块。如果我们发送给此提示的输入数据包含属性 isDetailed: true,AI 将收到“非常详细”的一组指令。否则,它将收到“简洁”指令。这就是我们的代理如何适应用户偏好的。
{#if question}...{/if}:仅当输入数据包含问题属性时,才会包含此代码块。这样,我们就可以使用同一条功能强大的提示来生成一般说明和回答具体问题。
{media url=photoDataUri}:这是用于将图片数据直接嵌入提示中以供多模态模型分析的特殊 Genkit 语法。
第 2 步:创建智能流程
接下来,我们将定义提示以及使用新模板的流程。此流程包含一些逻辑,用于将用户偏好转换为模板可以理解的布尔值。
👉 操作:在 Cloud Shell IDE 中,在同一 ~/src/ai/flows/describe_image/ 文件中,替换以下代码。// REPLACE ME PART 1: add flow here
👉 使用以下代码:
// Define the prompt using the template from Step 1
const prompt = ai.definePrompt({
  name: 'describeImagePrompt',
  input: { schema: DescribeImagePromptInputSchema },
  output: { schema: DescribeImageOutputSchema },
  prompt: promptTemplate,
});

// Define the flow
const describeImageFlow = ai.defineFlow<
  typeof DescribeImageInputSchema,
  typeof DescribeImageOutputSchema
>(
  {
    name: 'describeImageFlow',
    inputSchema: DescribeImageInputSchema,
    outputSchema: DescribeImageOutputSchema,
  },
  async (pageInput) => {
    const preference = pageInput.detailPreference || "concise";

    // Prepare the input for the prompt, including the new boolean flag
    const promptInputData = {
      ...pageInput,
      isDetailed: preference === "detailed",
    };

    const { output } = await prompt(promptInputData);
    return output!;
  }
);
这相当于在前端与 AI 提示之间建立了一个智能中介。
- 它会从我们的应用接收
pageInput,其中包含用户的偏好设置(以字符串形式,例如"detailed")。 - 然后,它会创建一个新对象
promptInputData。 - 最重要的行是
isDetailed: preference === "detailed"。此行代码的关键作用是根据偏好设置字符串创建true或false布尔值。 - 最后,它会使用这些增强型数据调用
prompt。现在,第 1 步中的提示模板可以使用isDetailed布尔值来动态更改发送给 AI 的指令。
第 3 步:连接前端
现在,我们来从 page.tsx 中的界面触发此流程。
👉操作:前往 ~/src/app/ai/flows/describe-image.ts 并找到 export async function describeImage 函数。取消注释 return 语句:
将 return; 改为 return describeImageFlow(input);
👉操作:在 ~/src/app/page.tsx 中,找到 handleAnalyze 函数,将代码 // REPLACE ME PART 2: DESCRIBE IMAGE
👉 替换为以下代码:
case "description":
    result = await describeImage({
        photoDataUri,
        question,
        detailPreference: descriptionPreference
    });
    outputText = question ? `Answer: ${result.description}` : `Description: ${result.description}`;
    break;
当用户的意图是获取说明时,系统会执行此代码。它会调用我们的 describeImage 流,并传递图片数据以及 React 组件中的 descriptionPreference 状态变量(这一点至关重要)。这是最后一块拼图,可将界面中存储的用户偏好设置直接连接到 AI 流,以便 AI 流相应地调整其行为。
测试图片描述功能
让我们看看图片描述功能的实际效果,从拍摄照片到聆听 AI 的所见内容。
启动应用
首先,我们让开发服务器再次运行起来。👉 在终端中,运行以下命令:npm run dev 注意:您可能需要在运行 npm run dev 之前运行 npm install
打开应用
服务器准备就绪后,打开浏览器并前往本地地址(例如 http://localhost:9003)。
启用摄像头
点击“开始聆听”按钮,并在系统提示时授予麦克风使用权限。然后,说出您的第一个指令:
“拍照”
应用将激活设备的摄像头。您现在应该会在屏幕上看到实时视频画面。
拍摄照片
在摄像头处于活动状态时,将其对准您要描述的任何内容。现在,再次说出该命令以拍摄照片:
“拍照”
实时视频将被您刚刚拍摄的静态照片替换。
询问说明
当屏幕上显示新照片时,发出最终指令:
“描述图片”
收听结果
应用会显示处理状态,然后您会听到 AI 生成的图片描述!该文本也会显示在“状态和结果”卡片中。
完成后,您可以拍摄一张照片来停止摄像头,也可以直接在终端中停止服务器 (Ctrl + C)。
7. AI 赋能的图片分析 - 描述文本 (OCR)
接下来,我们会为 Vision Agent 添加光学字符识别 (OCR) 功能。这样一来,它就可以读取任何图片中的文字。
👉 操作:在 IDE 中,前往 ~/src/ai/flows/read-text-in-image/,取消注释 以下代码:
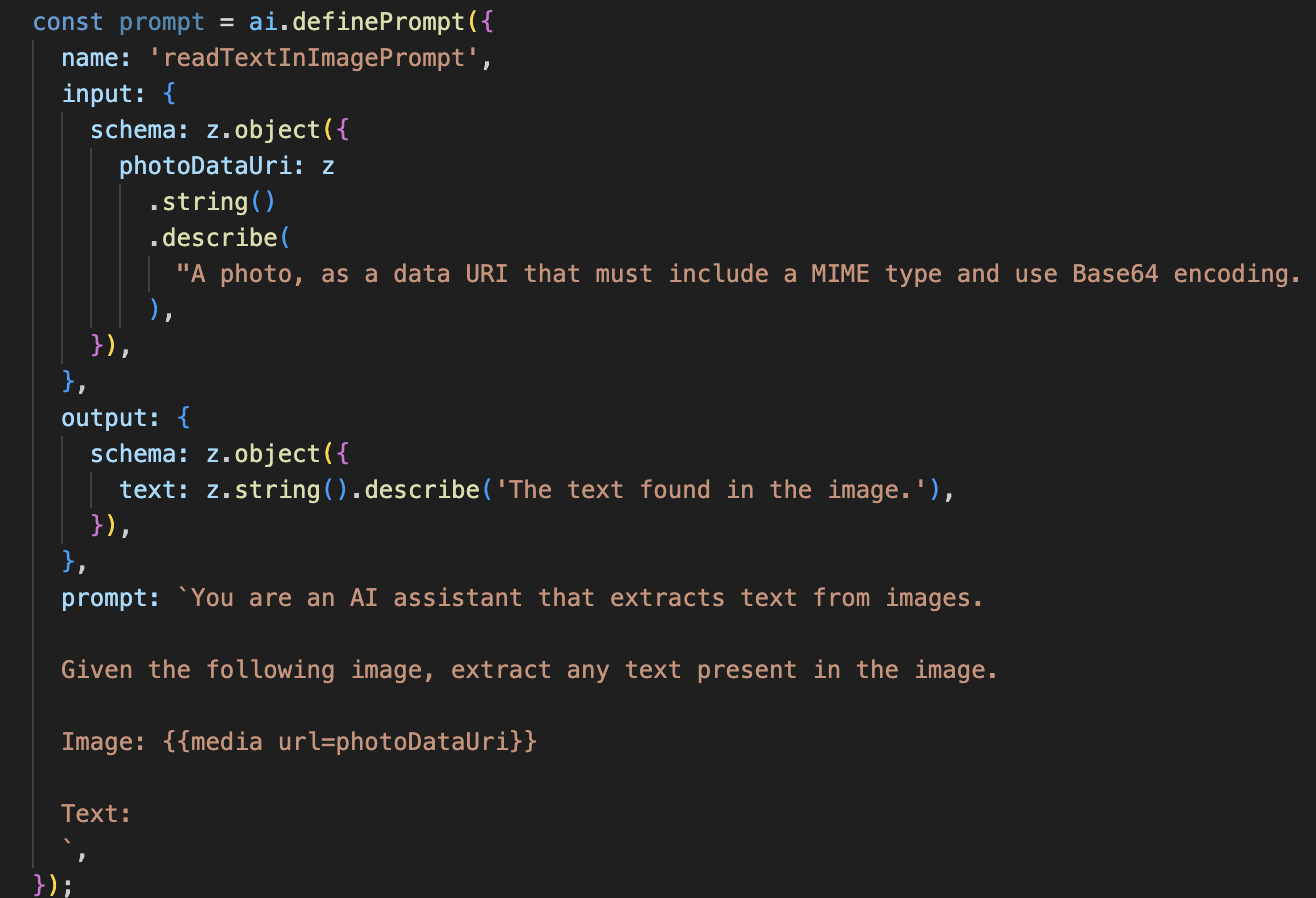
👉 操作:在 IDE 中,在同一 ~/src/ai/flows/read-text-in-image/ 文件中,将 // REPLACE ME: Creating Prmopt 替换为
👉 替换为以下代码:
const readTextInImageFlow = ai.defineFlow<
  typeof ReadTextInImageInputSchema,
  typeof ReadTextInImageOutputSchema
>(
  {
    name: 'readTextInImageFlow',
    inputSchema: ReadTextInImageInputSchema,
    outputSchema: ReadTextInImageOutputSchema,
  },
  async input => {
    const {output} = await prompt(input);
    return output!;
  }
);
这种 AI 流程要简单得多,突出了使用专注的工具来完成特定作业的原则。
- 提示:与我们的说明提示不同,此提示是静态的,并且非常具体。它的唯一作用是指示 AI 充当 OCR 引擎:“提取图片中显示的所有文字。”
- 架构:输入和输出架构也很简单,需要输入图片并返回单个文本字符串。
连接前端以进行 OCR
最后,让我们在 page.tsx 中关联此新功能。
👉操作:前往 ~/src/app/ai/flows/read-text-in-image.ts 并找到 export async function readTextInImage 函数。取消注释 return 语句:
将 return; 改为 return readTextInImageFlow(input);
👉 操作:在 ~/src/app/page.tsx 中,找到 handleAnalyze 函数和 switch 语句。
替换REPLACE ME PART 3: READ TEXT
使用以下代码:
 case "text":
            result = await readTextInImage({ photoDataUri });
            outputText = result.text ? `Text Found: ${result.text}` : "No text found.";
            break;
当用户的 intent 为 ReadTextInImage 时,系统会触发此代码。它会调用简单的 readTextInImage 流。第 result.text ? ... : ... 行是一种简洁的处理输出的方式,如果 AI 无法在图片中找到任何文本,则会向用户提供一条有用的消息。
测试“朗读文本 (OCR)”功能
请按照以下步骤测试文字朗读功能。请务必将摄像头对准包含清晰文字的对象。
- 使用
npm run dev运行应用,然后在浏览器中打开该应用。 - 点击“开始聆听”,并在系统提示时授予麦克风使用权限。
- 激活摄像头。说出指令:“拍照”。您应该会在屏幕上看到实时视频画面。
- 拍摄照片。将相机镜头对准要朗读的文字,然后再次说出指令:“拍照”。视频将被静态照片取代。
- 要求提供文本。现在,照片已拍摄完毕,请发出最终指令:“What is the text in the image?”
- 查看结果过一会儿,应用会分析照片并大声读出检测到的文字。如果找不到任何文字,系统会通知您。
这表明强大的 OCR 功能正在运行!完成后,使用 Ctrl + C 停止服务器。
8. 高级 AI 增强功能 - 只读 ✨
优秀的 AI 智能体可以遵循指令。出色的 AI 智能体应直观易用、值得信赖且实用。在本部分中,我们将重点介绍三项可提升智能体能力的高级增强功能。
我们将探讨如何:
Add Context & Memory来处理自然、对话式的后续问题。Reduce Hallucination,以构建更可靠、更值得信赖的代理。Make the Agent Proactive,以提供更易于访问且更人性化的体验。Add preference setting自定义图片说明
增强功能 1:上下文和记忆
自然的对话不是一系列孤立的命令,而是流畅的交流。如果用户问“What's in the picture?”,而代理回答“A red car”,用户很自然地会接着问“What color is it?”,而不会再次提及“car”。我们的代理需要短期记忆才能理解此上下文。
我们如何实现它(总结)
我们已将此功能内置到 describeImage 流程中。本部分简要介绍了该模式的运作方式。当我们从 page.tsx 调用 describeImage 函数时,会将对话历史记录传递给该函数。
👉 代码展示(来自 page.tsx):
const result = await describeImage({
    photoDataUri,
    question: commandToProcess,
    detailPreference: descriptionPreference,
    previousUserQueryOnImage: lastUserQuery ?? undefined,
    previousAIResponseOnImage: lastAIResponse ?? undefined,
});
previousUserQueryOnImage和previousAIResponseOnImage:这两个属性是代理的短期记忆。通过将上次互动传递给 AI,我们为 AI 提供所需的上下文,以便其理解模糊或参考性的后续问题。- 自适应提示:此上下文由 describe_image 流程中的提示使用。提示旨在让智能体在生成新回答时考虑之前的对话,从而使智能体能够做出智能回答。
增强功能 2:减少幻觉
当 AI 编造事实或声称自己拥有实际上并不具备的能力时,就会出现“幻觉”。为了赢得用户信任,我们的代理必须了解自身的局限性,并能妥善拒绝超出范围的请求。
我们如何实现它(总结)
防止出现幻觉的最有效方法是为模型设定明确的界限。我们在构建意图分类器时实现了这一点。
👉 代码展示(来自 intent-classifier 流程):
// Define Agent Capabilities and Limitations for the prompt
const AGENT_CAPABILITIES_AND_LIMITATIONS = `
**Core Capabilities (What the Agent CAN DO):**
* **Image Analysis:**
    * DescribeImage: Provide a general description of the current image...

**Limitations (What the Agent CANNOT DO...):**
* Cannot generate or create new images.
* Cannot provide general knowledge or answer questions unrelated to the image...
* Cannot perform web searches.
`;
此常量充当“职位描述”,我们在分类提示中将其提供给 AI。
- 为模型提供依据:通过明确告知 AI 不能做什么,我们让它“立足于现实”。当看到“天气怎么样?”之类的查询时,它可以自信地将其与限制列表进行匹配,并将意图归类为 OutOfScopeRequest。
- 建立信任:如果智能体能够诚实地说“我无法提供帮助”,那么它会比尝试猜测但猜错的智能体更值得信赖。这是安全可靠的 AI 设计的基本原则。`
增强功能 3:创建主动式客服
对于以无障碍功能为先的应用,我们不能依赖视觉提示。当用户激活聆听模式时,需要立即获得非视觉确认,以了解代理是否已准备就绪并等待命令。现在,我们将添加主动式介绍,以便提供这项重要反馈。
第 1 步:添加用于跟踪首次收听的状态
首先,我们需要一种方法来确定用户是否是首次在会话期间按 "Start Listening" 按钮。
👉 在 ~/src/app/page.tsx 中,您会在 ClarityCam 组件顶部附近看到以下新的状态变量。
export default function ClarityCam() {
  // ... other state variables
  const [descriptionPreference, setDescriptionPreference] = useState<DescriptionPreference>("concise");

  // Add this new line
  const [isFirstListen, setIsFirstListen] = useState(true);

  // ... rest of the component
}
我们引入了一个新的状态变量 isFirstListen,并将其初始化为 true。我们将使用此标志来触发一次性欢迎辞。
第 2 步:更新 toggleListening 函数
现在,我们来修改处理麦克风的函数,以便播放问候语。
👉 在 ~/src/app/page.tsx 中,找到 toggleListening 函数并查看以下 if 块。
const toggleListening = useCallback(() => {
    // ... existing logic to setup speech recognition

    if (isListening || isAttemptingStart) {
        // ... existing logic to stop listening
    } else {
        stopSpeaking(); // Stop any ongoing TTS

        // Add this new block
        if (isFirstListen) {
            setIsFirstListen(false);
            const introMessage = "Hello! I am ClarityCam, your AI assistant. I'm now listening. You can ask me to 'describe the image', 'read text', 'take a picture', or ask questions about what's in an image.";
            speakText(introMessage);
        } else {
            speakText("Listening..."); // Optional: provide feedback on subsequent clicks
        }

        // ... rest of the logic to start listening
    }
}, [/*...existing dependencies...*/, isFirstListen]); // Don't forget to add isFirstListen to the dependency array!
- 检查标志:if (isFirstListen) 块用于检查是否是首次激活。
- 防止重复:它在块内做的第一件事是调用 setIsFirstListen(false)。这样可确保每个会话仅播放一次介绍性消息。
- 提供指导:introMessage 经过精心设计,可尽可能提供帮助。它会向用户问好,通过名称识别代理,确认代理现在处于活跃状态(“我正在聆听”),并提供用户可以使用的语音指令的清晰示例。
- 听觉反馈:最后,speakText(introMessage) 会传递此关键信息,提供即时保证和指导,而无需用户查看屏幕。
增强功能 4:适应用户偏好(总结)
真正的智能代理不仅能响应,还能学习并适应用户的需求。我们构建的最强大的功能之一是,用户可以通过“更详细”等命令随时更改图片说明的详细程度。
我们如何实现此功能(总结):此功能由我们为 describeImage 流程创建的动态提示提供支持。它使用条件逻辑来根据用户偏好设置更改发送给 AI 的指令。
👉 代码展示(来自 describe_image 的 promptTemplate):
const settingPreferenceTemplate = `
{#if isDetailed}
Provide a very detailed and comprehensive description of the image. Focus on specifics, including subtle elements, spatial relationships, and textures if apparent.
{else}
Provide a concise description of the image. Focus on the main subject, key objects, and primary activities or context.
{/if}

Highlight the main objects, activities, and colors.
...
`;
- 条件逻辑:
{#if isDetailed}...{else}...{/if}块是关键。当 describeImageFlow 从前端接收到 detailPreference 时,它会创建一个 isDetailed 布尔值(true 或 false)。 - 自适应指令:此布尔值标志用于确定 AI 模型接收哪组指令。如果 isDetailed 为 true,则指示模型生成高度描述性的回答。如果为 false,则指示要简洁。
- 用户控制:此模式直接将用户的语音指令(例如“使说明简洁”,归类为 SetDescriptionConcise intent)与 AI 行为的根本性变化相关联,使代理感觉真正具有响应性和个性化。
9. 部署到云端
使用 Google Cloud Build 构建 Docker 映像
gcloud builds submit . --tag gcr.io/$PROJECT_ID/accessibilityai-nextjs-app:latest
accessibilityai-nextjs-app是建议的图片名称。- 该 . 使用当前目录 (
accessibilityAI/) 作为 build 源。
将映像部署到 Google Cloud Run
- 确保您的 API 密钥和其他密文已在 Secret Manager 中准备就绪。例如
GOOGLE_GENAI_API_KEY。
将此 YOUR_ACTUAL_GOOGLE_AI_KEY_VALUE 替换为您的实际 Gemini API 密钥值。
echo "YOUR_ACTUAL_GOOGLE_AI_KEY_VALUE" | gcloud secrets create GOOGLE_GENAI_API_KEY --data-file=- --project=YOUR_PROJECT_ID
向 Cloud Run 服务的运行时服务账号(例如 PROJECT_NUMBER-compute@developer.gserviceaccount.com 或专用账号)授予此 Secret 的“Secret Manager Secret Accessor”角色。
- 部署命令:
gcloud run deploy accessibilityai-app-service \
  --image gcr.io/$PROJECT_ID/accessibilityai-nextjs-app:latest \
  --platform managed \
  --region us-central1 \
  --allow-unauthenticated \
  --port 3000 \
  --set-secrets=GOOGLE_GENAI_API_KEY=GOOGLE_GENAI_API_KEY:latest \
  --set-env-vars NODE_ENV="production"