
1. 簡介
在本教學課程中,您將建構 ClarityCam,這是一種免持的語音驅動 AI 代理程式,可觀察世界並向您說明。ClarityCam 的設計以無障礙功能為核心,為視障和低視能使用者提供強大的工具,但您學到的原則對於建立任何現代一般用途語音應用程式都至關重要。

這項專案是以強大的設計理念為基礎,稱為「原生適應性介面」(Natively Adaptive Interface,NAI)。NAI 不會將無障礙功能視為事後補救措施,而是將其視為基礎。採用這種做法時,AI 代理程式就是介面,可配合不同使用者調整、處理語音和視覺等多模態輸入內容,並根據使用者的獨特需求主動提供指引。
使用 NAI 建構第一個 AI 代理:

完成本課程後,您將能夠:
- 以無障礙功能為預設設計:套用原生適應性介面 (NAI) 原則,建立可為所有使用者提供同等體驗的 AI 系統。
- 分類使用者意圖:建立強大的意圖分類器,將自然語言指令轉換為代理程式可執行的結構化動作。
- 維持對話脈絡:實作短期記憶功能,讓代理程式瞭解後續問題和參照指令 (例如「這是什麼顏色?」)。
- 設計有效的提示:為 Gemini 等多模態模型設計重點明確、背景資訊豐富的提示,確保圖片分析結果準確可靠。
- 處理模糊不清的請求並引導使用者:針對超出範圍的請求設計優雅的錯誤處理機制,並主動協助使用者上手,建立信任感和信心。
- 協調多代理系統:使用一系列專用代理建構應用程式,共同處理語音處理、分析和語音合成等複雜工作。
2. 高階設計
ClarityCam 的核心設計理念是讓使用者輕鬆操作,但背後是由複雜的協作式 AI 代理系統驅動。我們來分析一下這個架構。

使用者體驗
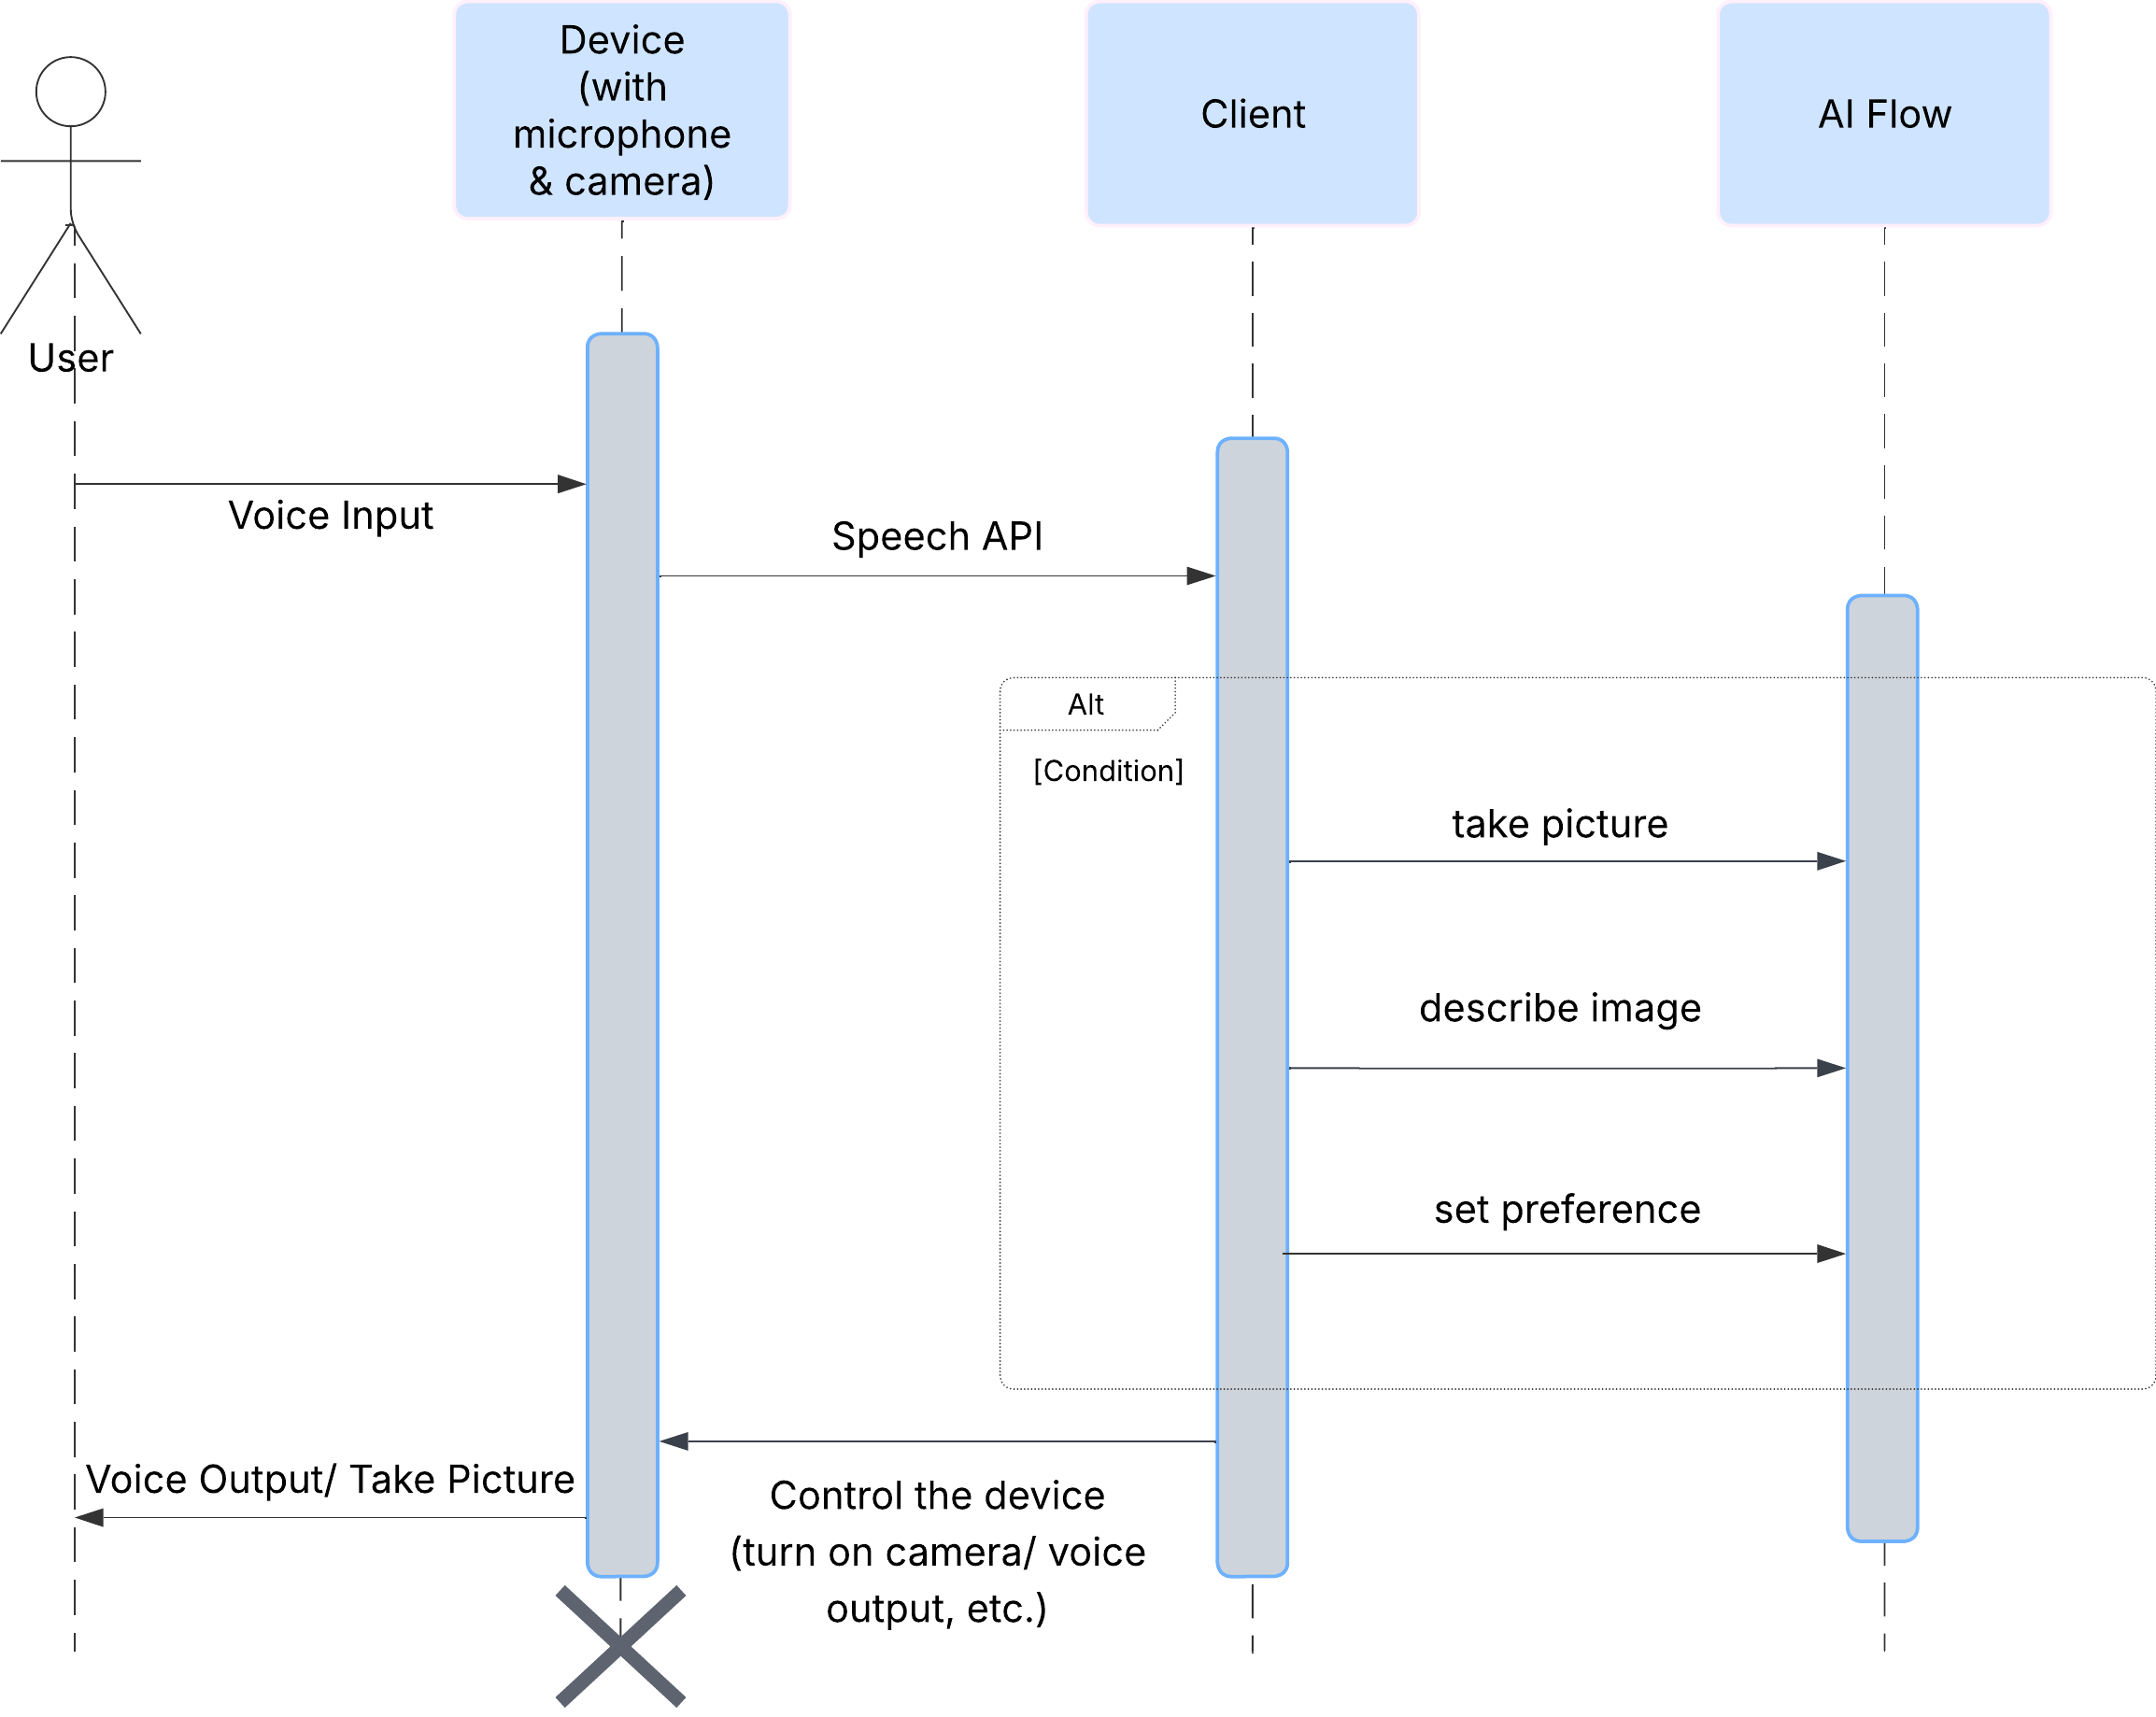
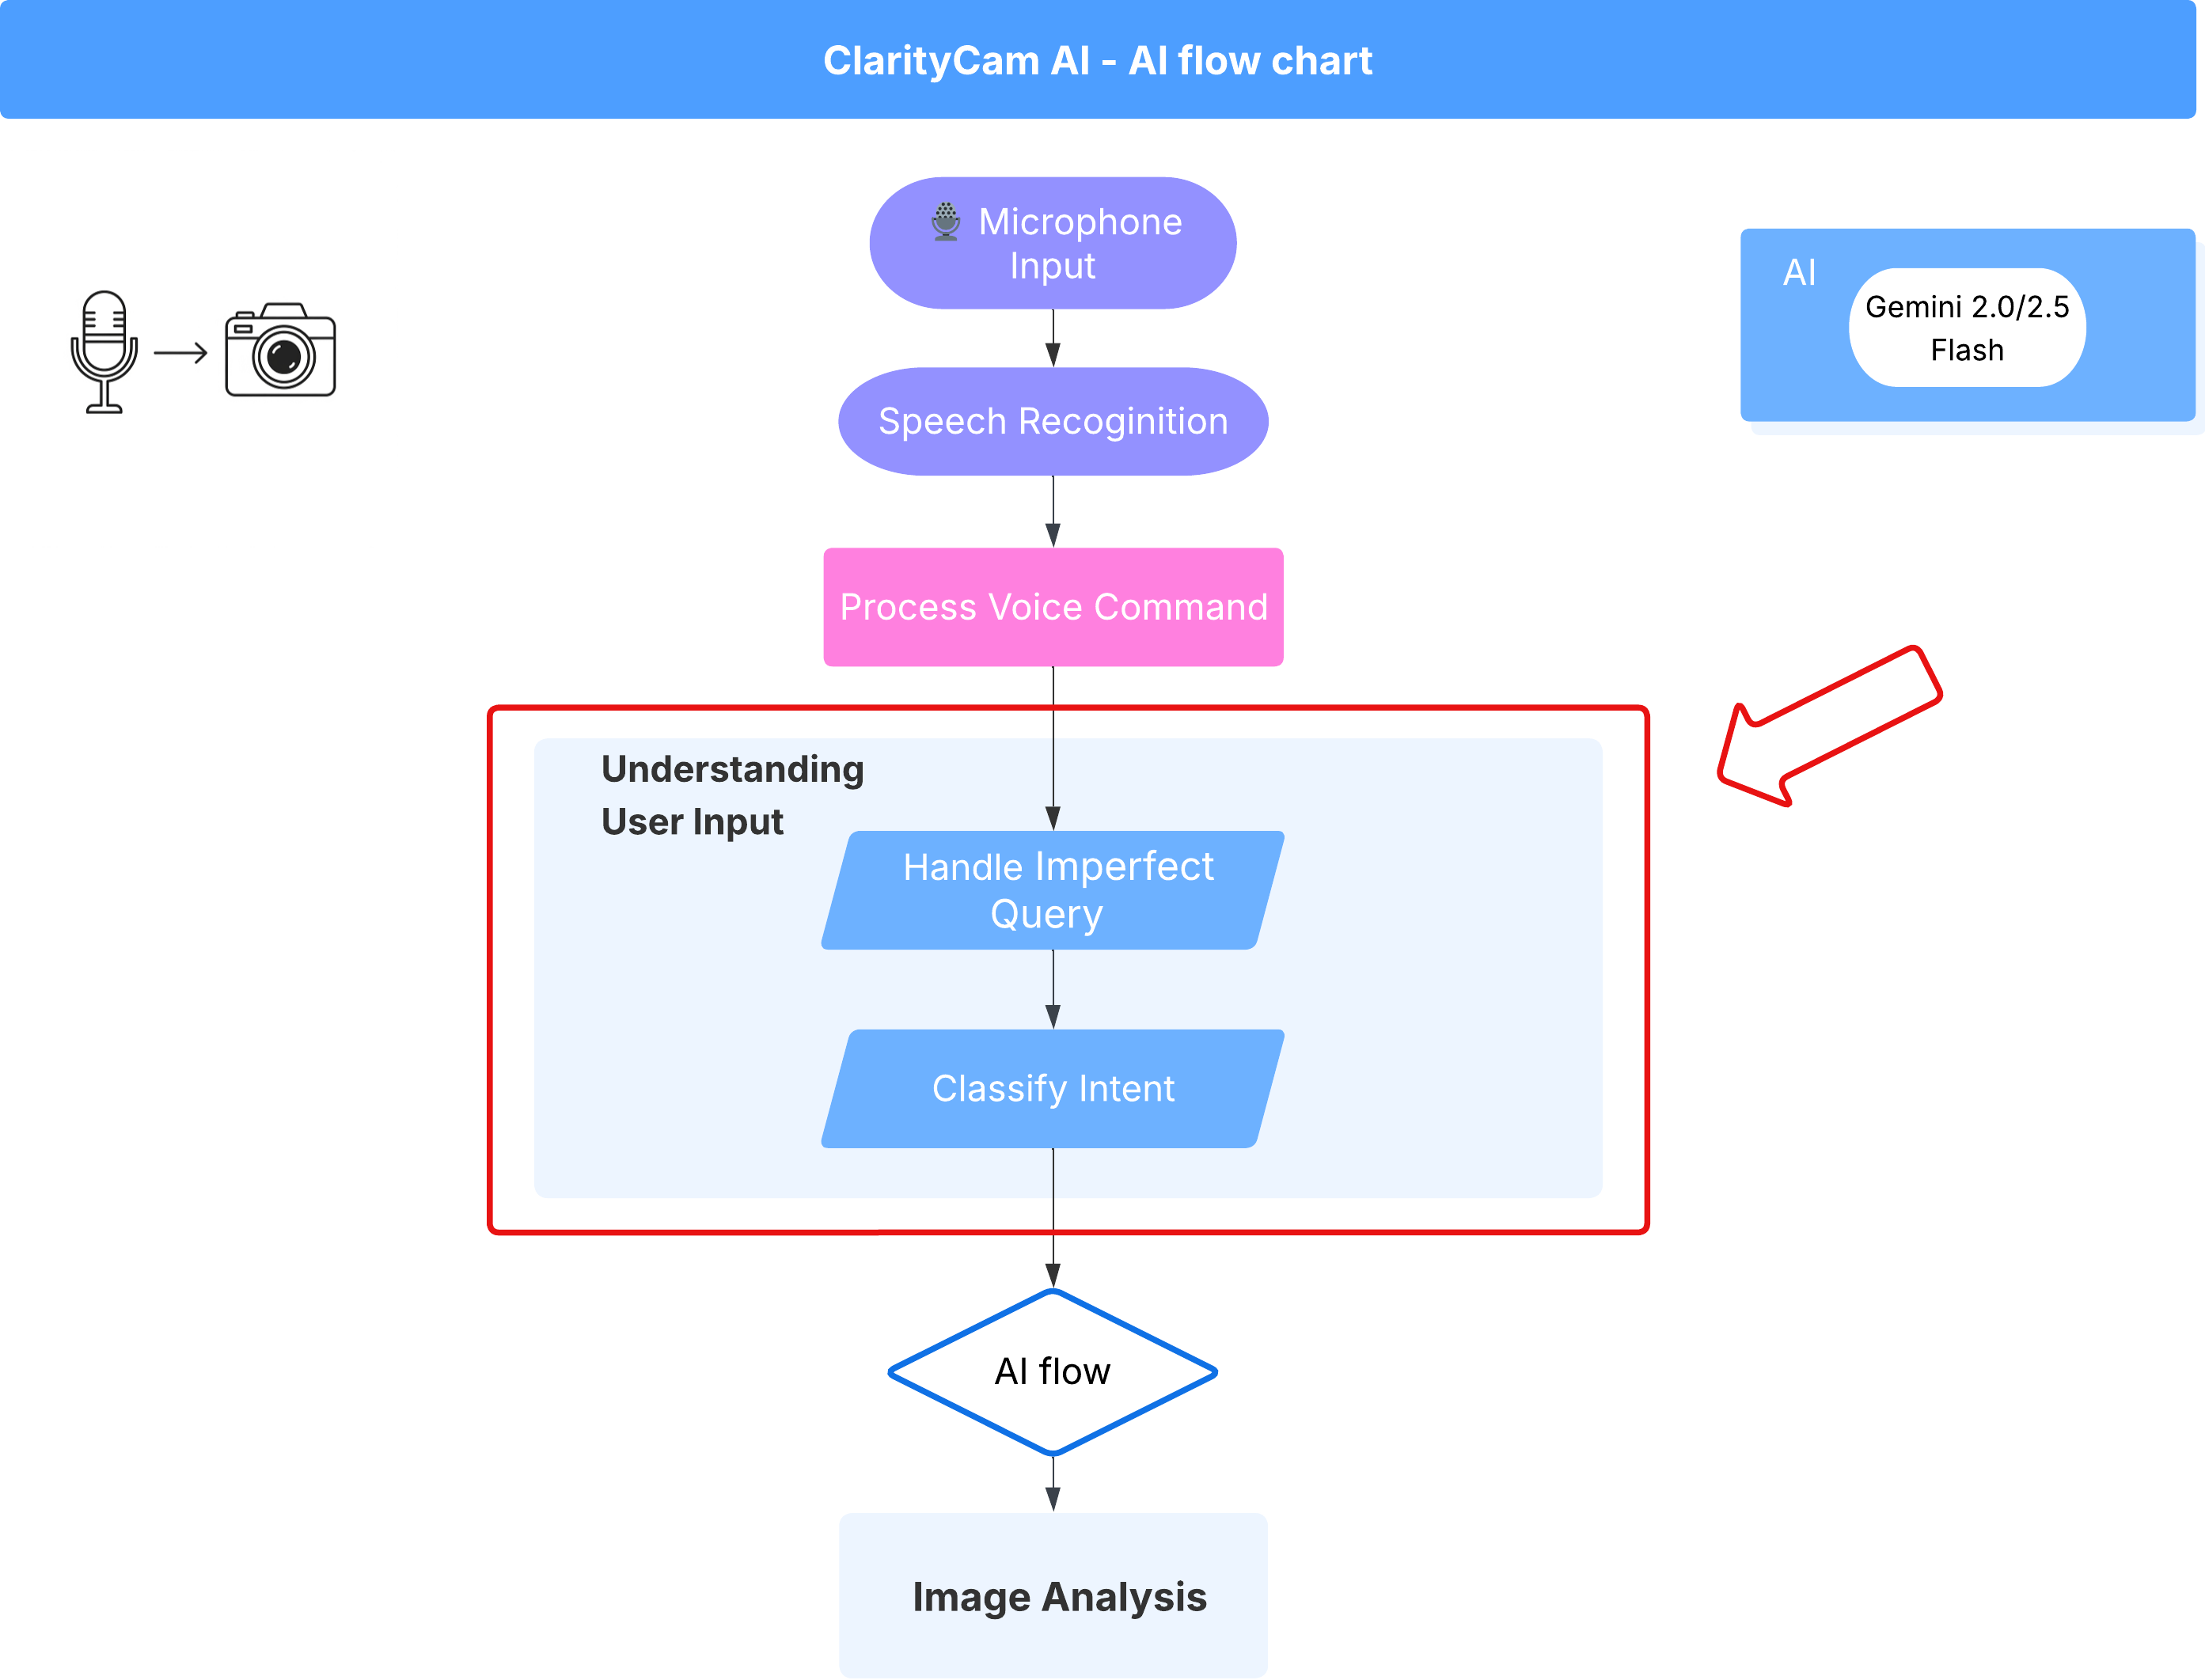
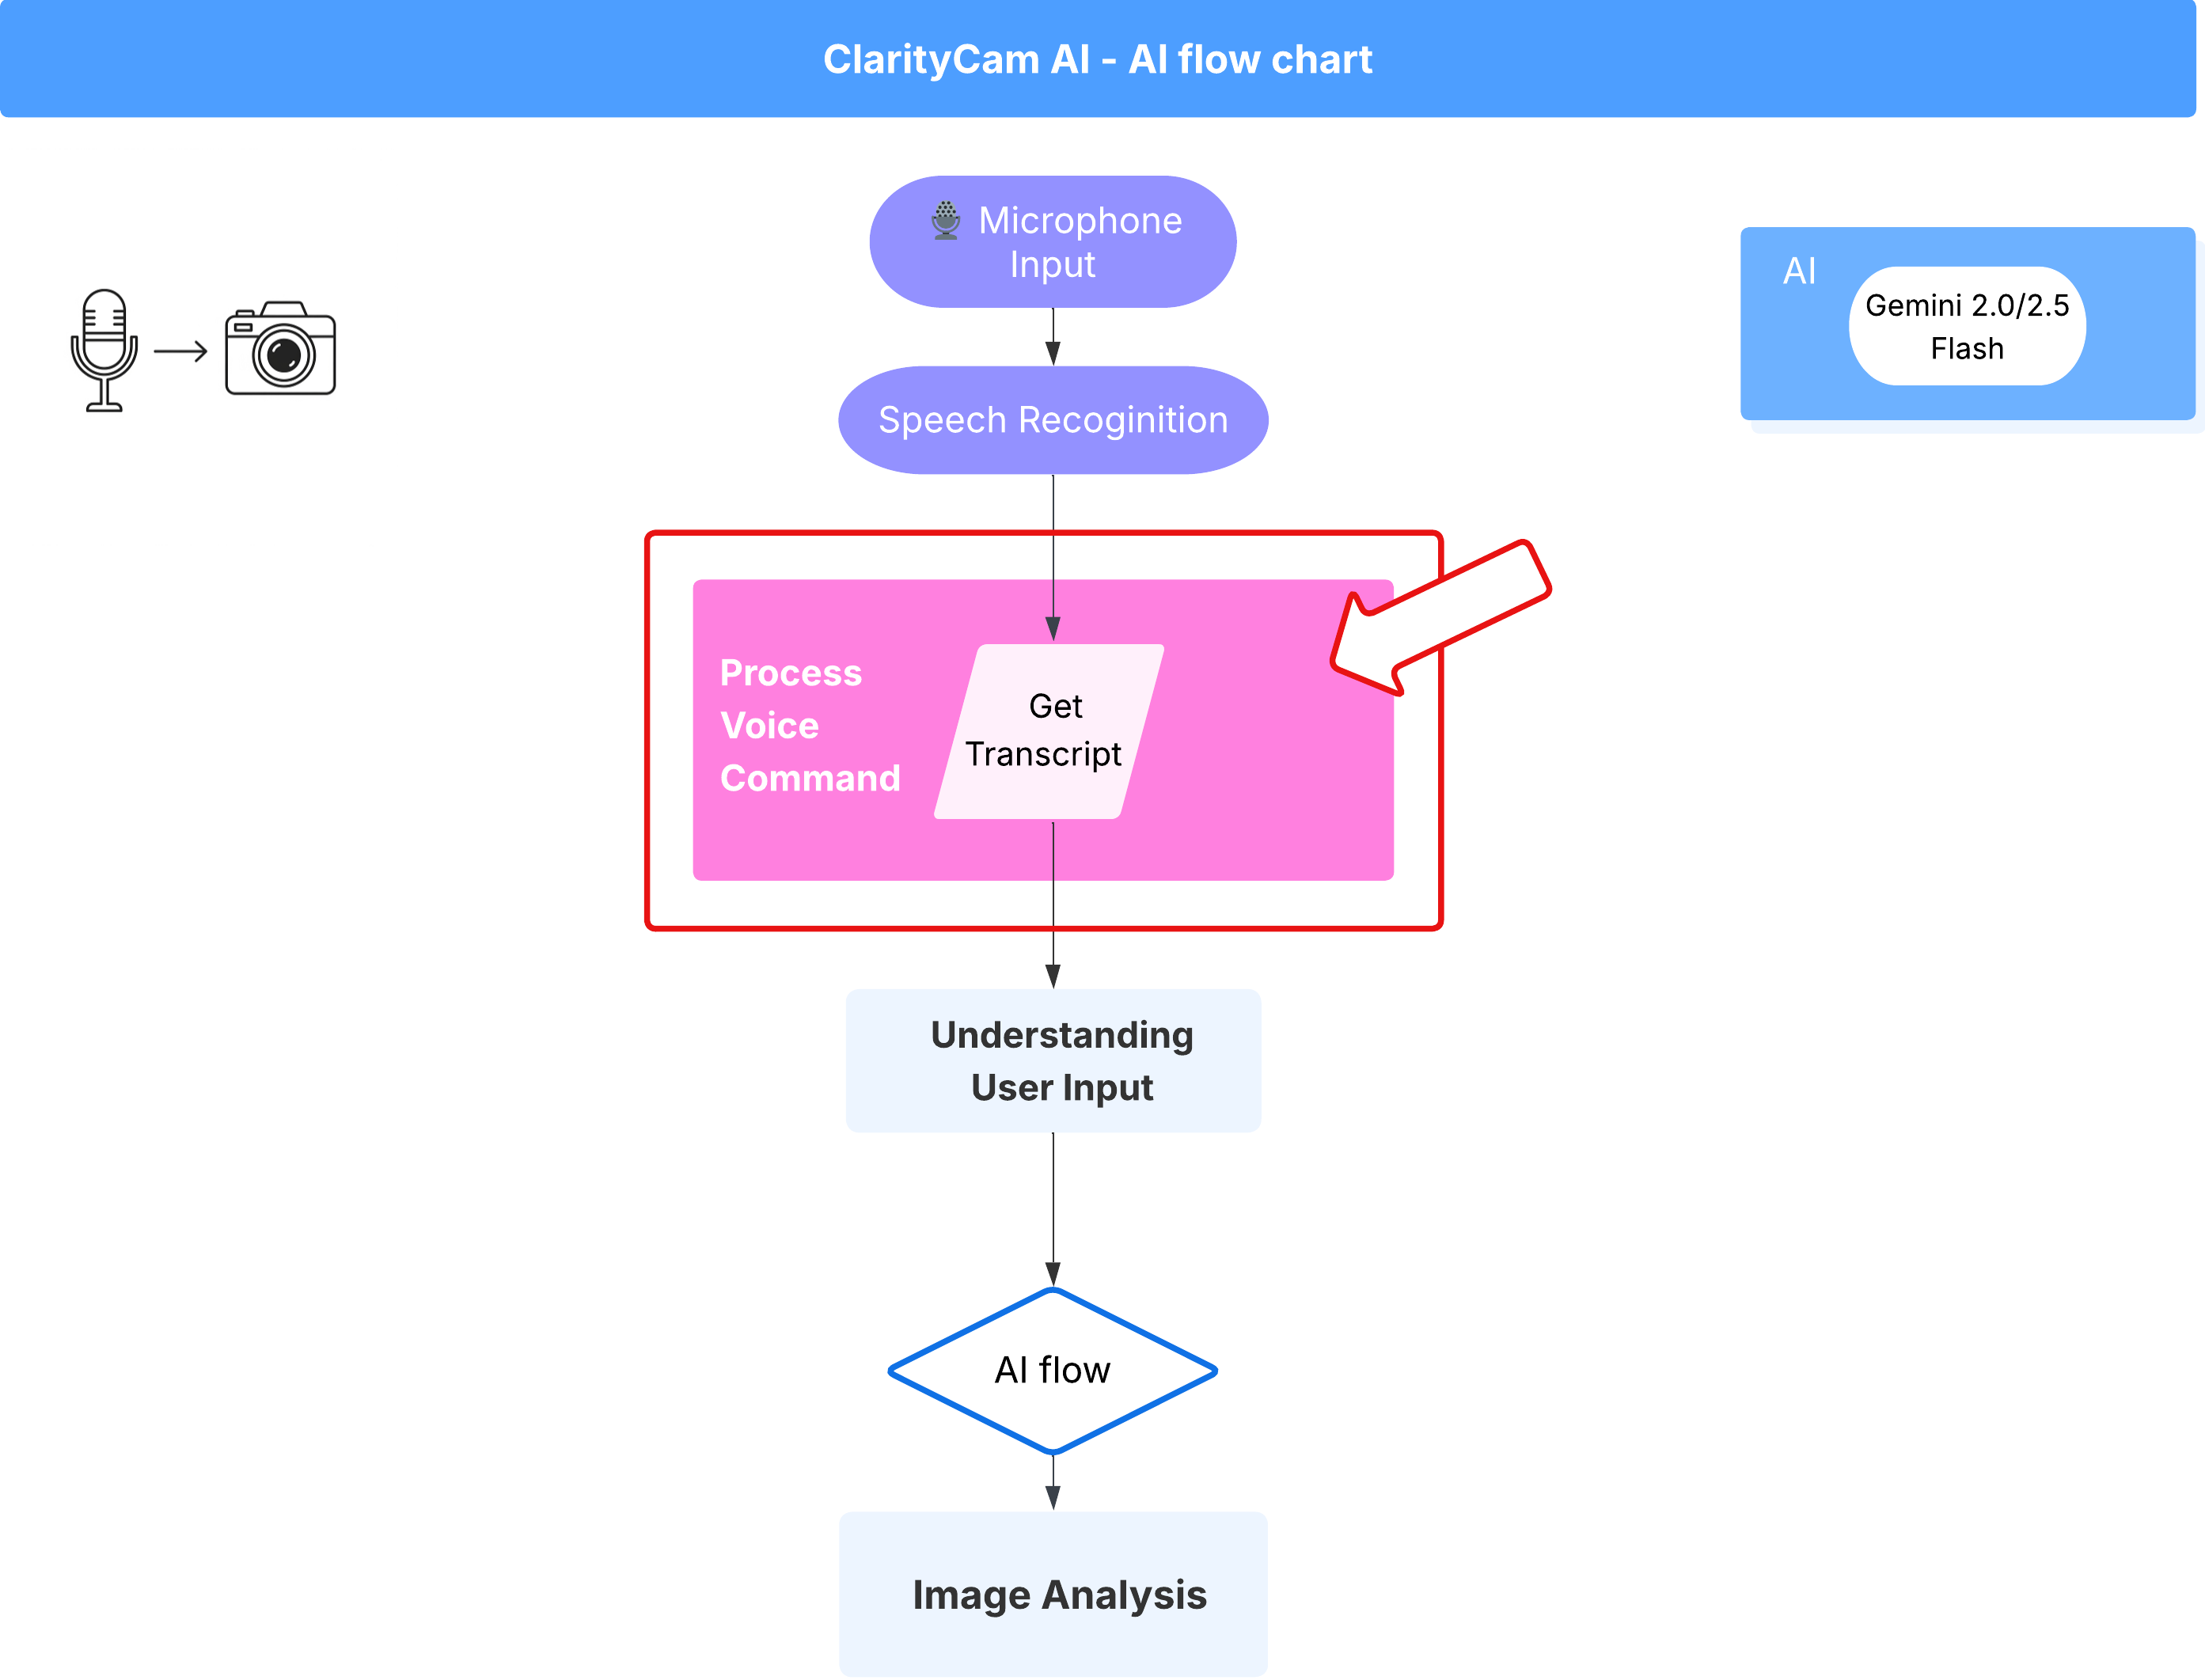
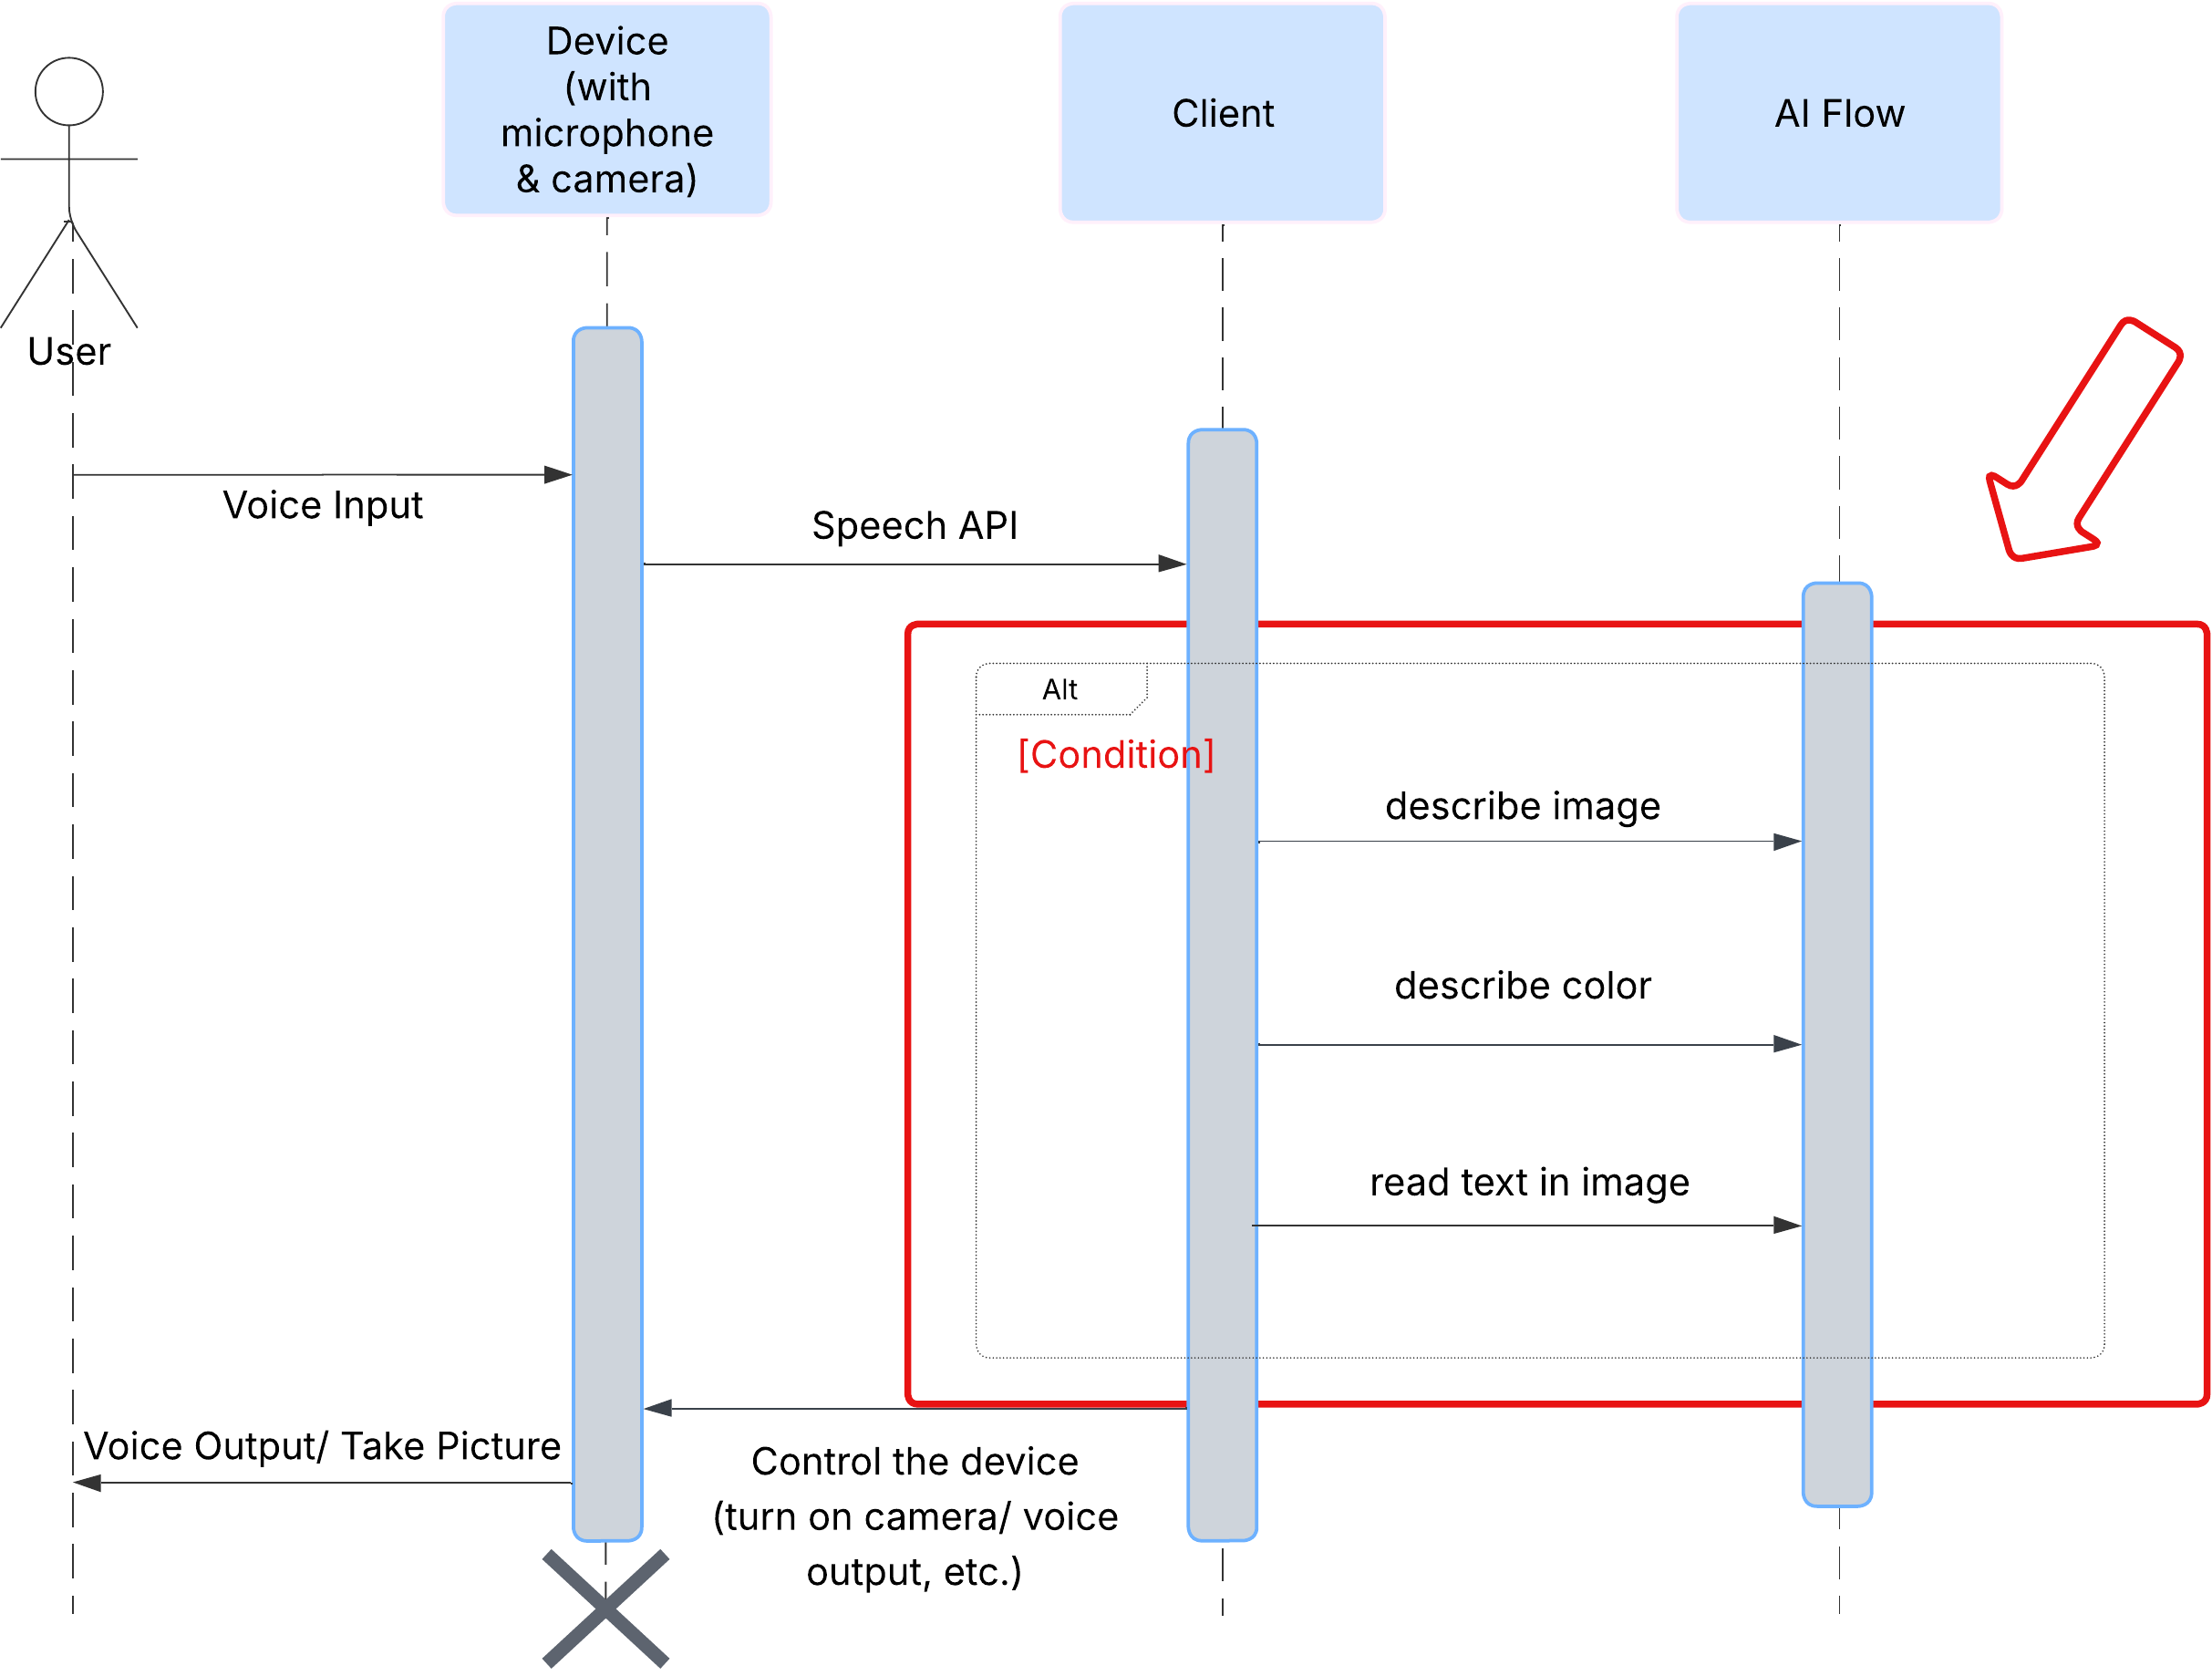
首先,我們來看看使用者如何與 ClarityCam 互動。整個過程完全免持,而且可以透過語音對話操作。使用者說出指令,代理程式會以語音描述或動作回應。這張序列圖顯示典型的互動流程,從使用者發出初始語音指令,到裝置傳回最終音訊回應。
AI 代理架構
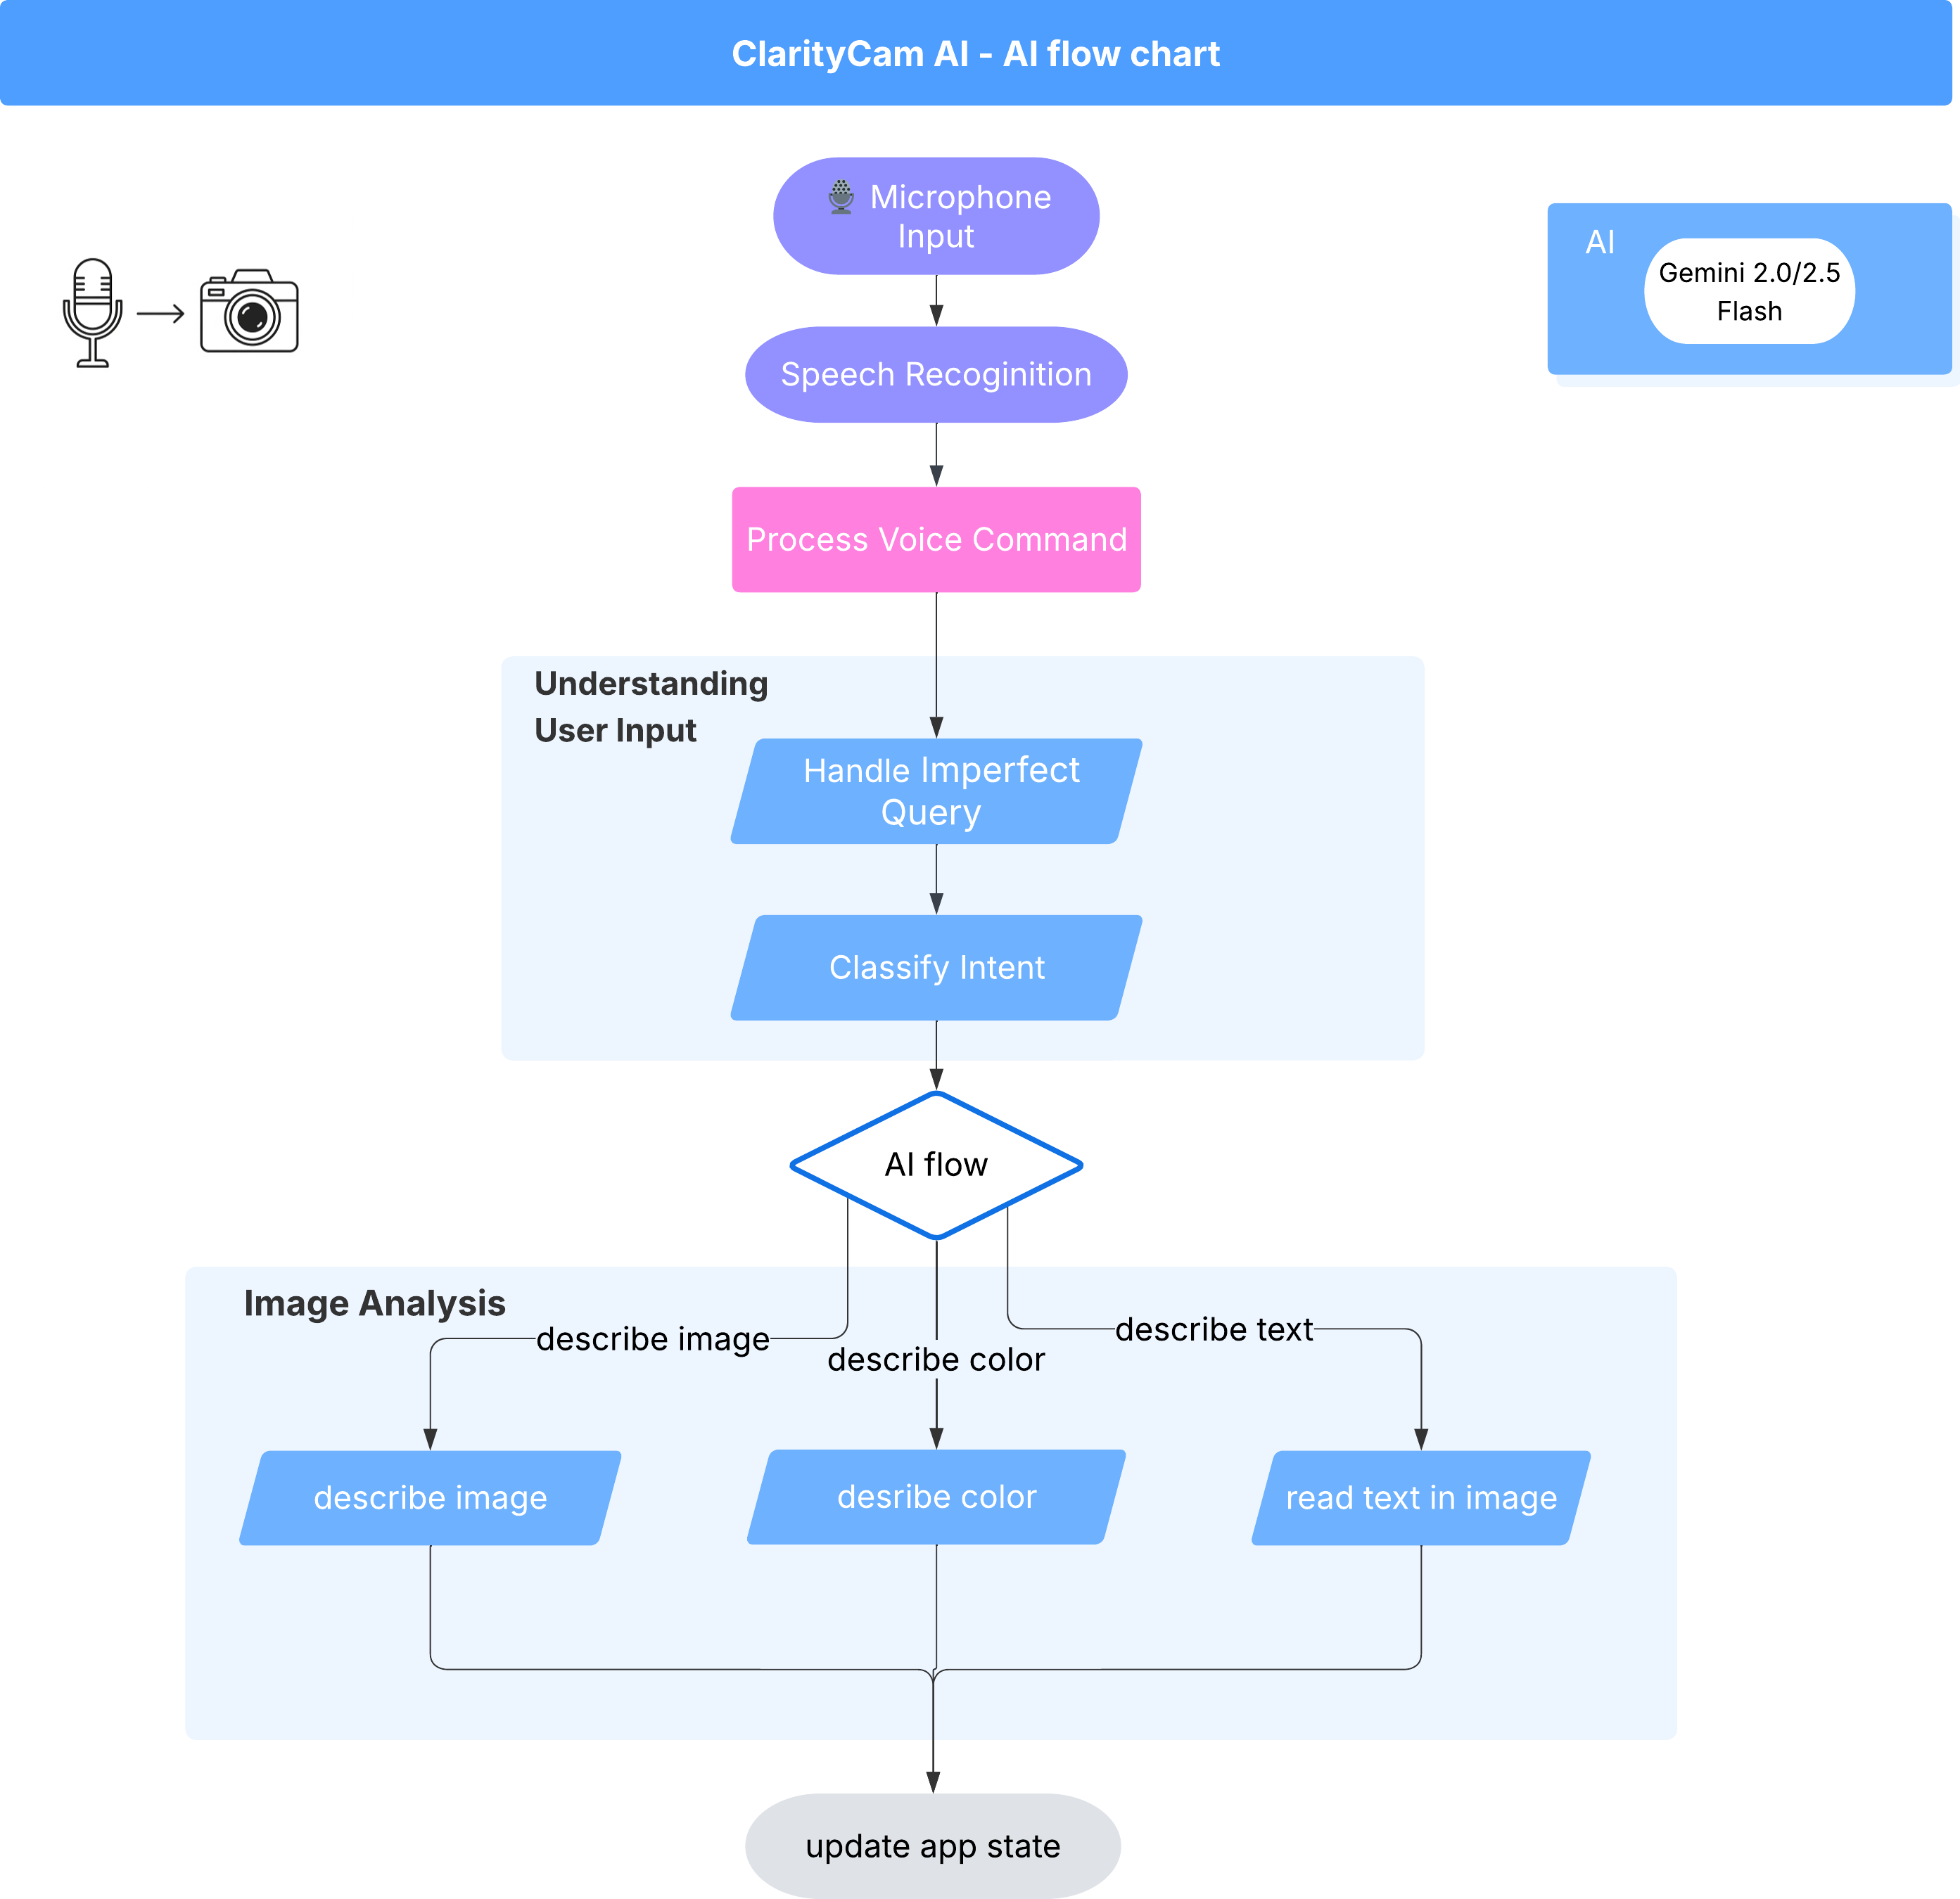
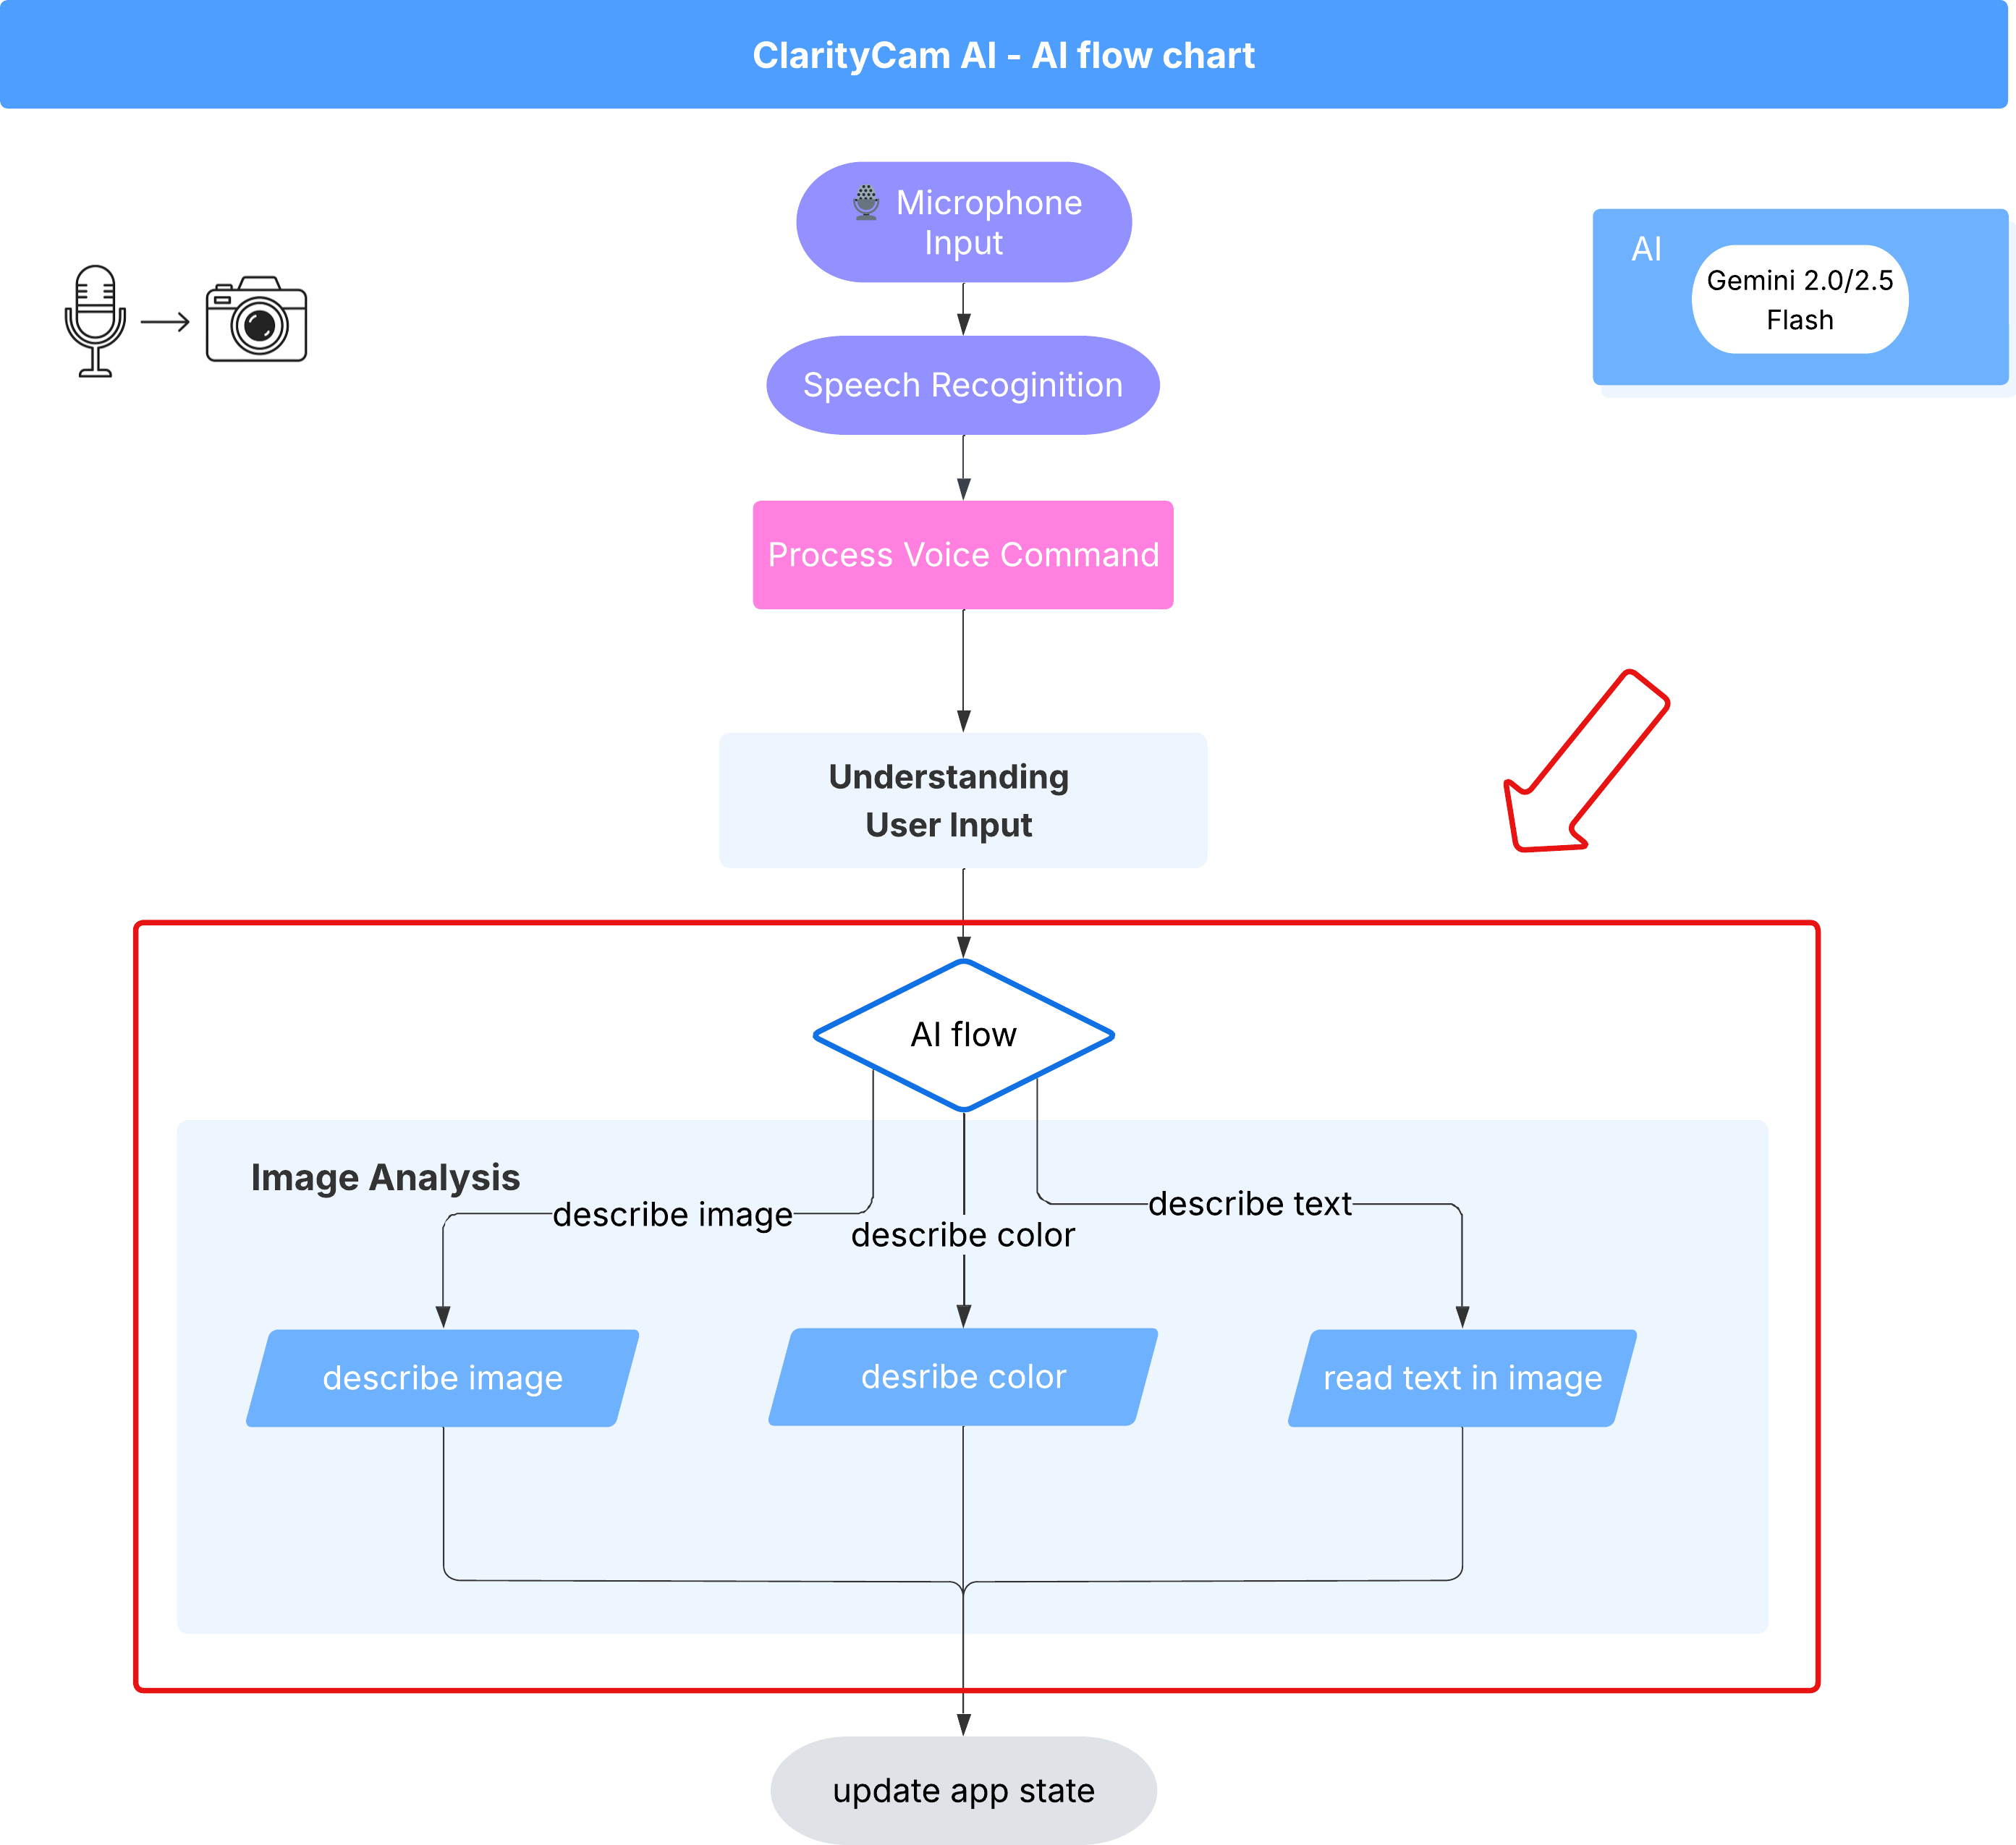
在幕後,多代理程式系統會協同運作,提供生動的體驗。收到指令後,中央 Orchestrator 代理程式會將任務委派給專責瞭解意圖、分析圖片及產生回應的專門代理程式。這份 AI 流程圖深入探索這些代理程式如何協作。我們將在後續章節中實作這個架構。
專案檔案快速導覽
開始編寫程式碼前,請先熟悉專案的檔案結構。檔案數量可能很多,但您只需要在本教學課程中專注於兩個特定區域!
以下是我們專案的簡化地圖。
accessibilityAI/src/
├── 📁 app/
│   ├── layout.tsx      # An overall page shell (you can ignore this).
│   └── page.tsx        # ⬅️ MODIFY THIS: The main user interface for our app.
│
├── 📁 ai/
│   ├── 📁flows         # ⬅️ MODIFY THIS: The core AI logic and server functions.
│   └── intent-classifier.ts     # ⬅️ MODIFY THIS: Where we'll edit our AI prompts.
|   └── ai-instance.ts
|   └── dev.ts
│
├── 📁 components/       # Contains pre-built UI components (ignore this).
│
├── 📁 hooks/
│
├── 📁 lib/
│
└── 📁 types/
技術堆疊
我們的系統採用現代化且可擴充的技術堆疊,結合了強大的雲端服務和先進的 AI 模型。我們將使用的主要元件如下:
- Google Cloud Platform (GCP):為我們的代理程式提供無伺服器基礎架構。
- Cloud Run:將個別代理程式部署為容器化、可擴充的微服務。
- Artifact Registry:安全地儲存及管理代理程式的 Docker 映像檔。
- Secret Manager:安全地處理機密憑證和 API 金鑰。
- 大型語言模型 (LLM):做為系統的「大腦」,
- Google 的 Gemini 模型:我們運用 Gemini 系列強大的多模態功能,進行各種作業,包括分類使用者意圖、分析圖片內容,以及提供智慧描述。
3. 設定和必要條件
啟用帳單帳戶:如要執行本程式碼研究室,您需要有帳單帳戶,且帳戶內有部分抵免額。請使用本程式碼研究室頂端橫幅中的抵免額開始操作。如果已連結帳單帳戶,可以略過這個步驟。
建立新的 GCP 專案
- 前往 Google Cloud 控制台,建立新專案。
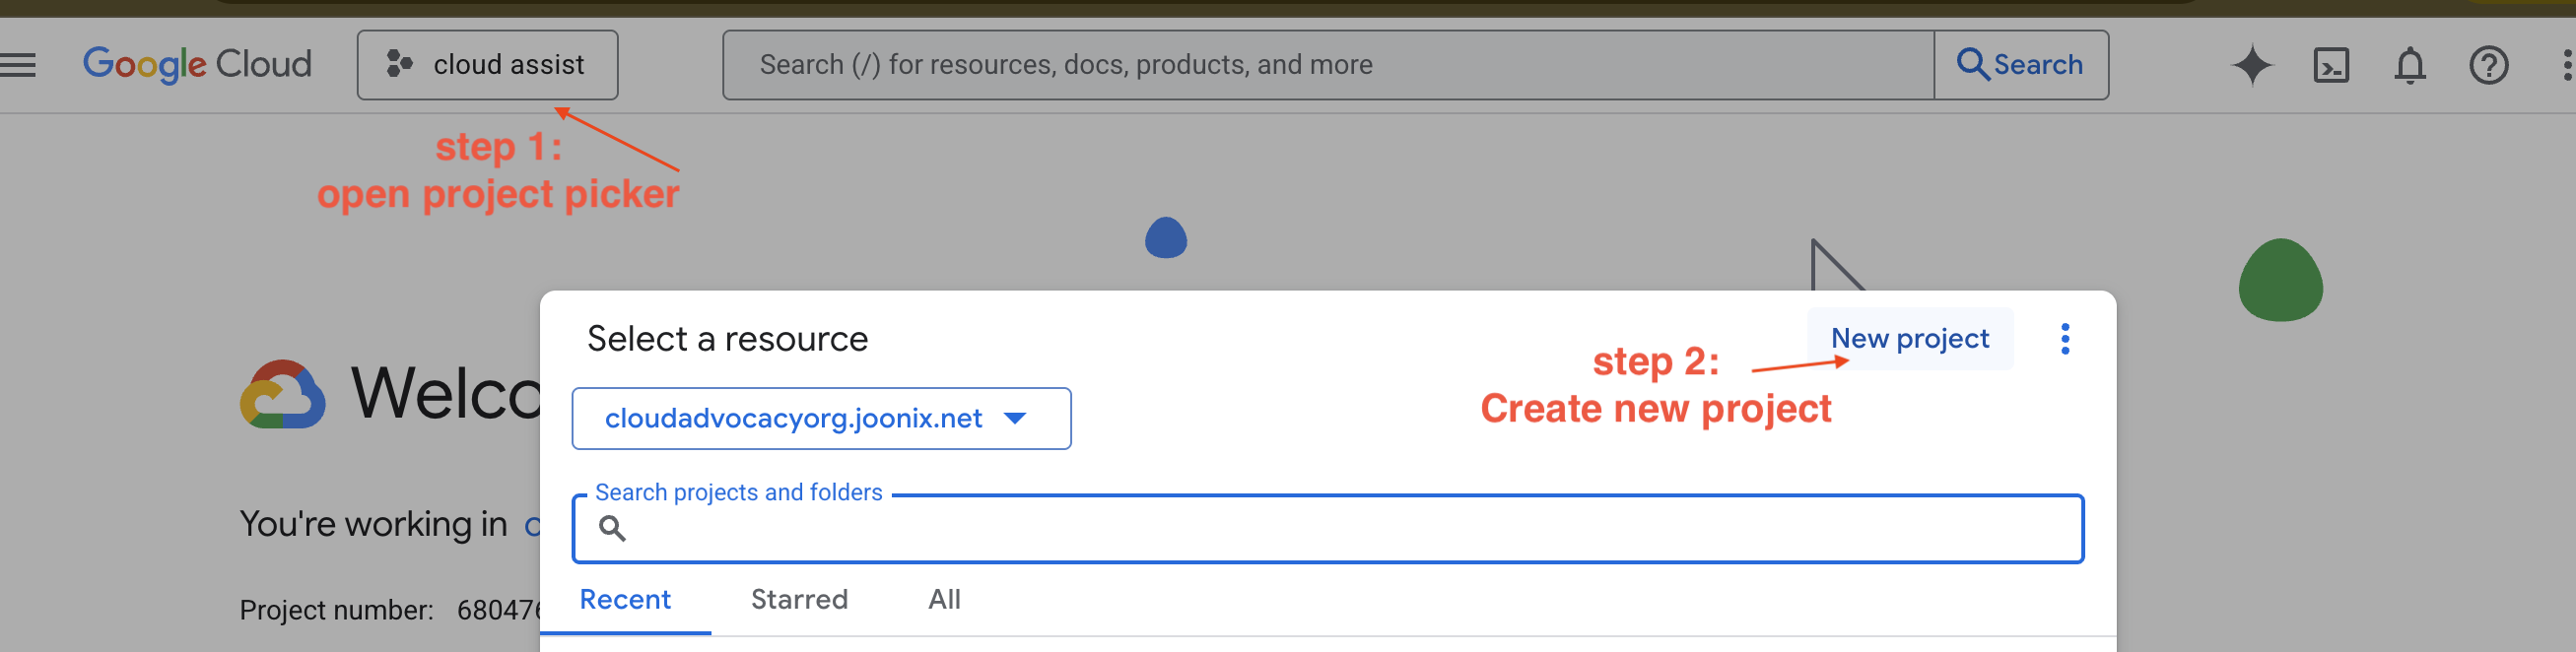
- 前往 Google Cloud 控制台,建立新專案。
- 開啟左側面板,按一下
Billing,確認帳單帳戶是否已連結至這個 GCP 帳戶。

如果看到這個頁面,請檢查 manage billing account,選擇 Google Cloud 試用方案,然後連結至該方案。
建立 Gemini API 金鑰
您必須先擁有金鑰,才能保護金鑰。
- 前往 Google AI Studio:https://aistudio.google.com/
- 使用 Google 帳戶登入。
- 按一下「Get API key」(取得 API 金鑰) 按鈕,通常位於左側導覽窗格或右上角。
- 在「API 金鑰」對話方塊中,按一下「在新的專案中建立 API 金鑰」。
- 系統會為您產生新的 API 金鑰。立即複製這組金鑰,並暫時存放在安全的地方 (例如密碼管理工具或安全記事)。您會在後續步驟中使用這個值。
本機開發工作流程 (在本機上測試)
您必須能夠執行 npm run dev,並讓應用程式正常運作。這時 .env 就能派上用場。
- 將 API 金鑰加進檔案:建立名為
.env的新檔案,並在檔案中加入下列指令行。
請務必將 YOUR_API_KEY_HERE 替換成從 AI Studio 取得的金鑰,並儲存至 .env:
GOOGLE_GENAI_API_KEY="YOUR_API_KEY_HERE"
[選用] 設定 IDE 和環境
在本教學課程中,您可以使用熟悉的開發環境 (例如 VS Code 或 IntelliJ) 和本機終端機。不過,我們強烈建議使用 Google Cloud Shell,確保環境標準化且預先設定完成。
下列步驟適用於 Cloud Shell 環境。如果您選擇改用本機環境,請務必安裝並正確設定 git、nvm、npm 和 gcloud。
使用 Cloud Shell 編輯器
👉點選 Google Cloud 控制台頂端的「啟用 Cloud Shell」 (這是 Cloud Shell 窗格頂端的終端機形狀圖示),
👉按一下「Open Editor」(開啟編輯器) 按鈕 (類似於開啟的資料夾,內有鉛筆)。視窗中會開啟 Cloud Shell 程式碼編輯器。左側會顯示檔案總管。
👉點選底部狀態列中的「Cloud Code Sign-in」按鈕,如下圖所示。依指示授權外掛程式。如果狀態列顯示「Cloud Code - no project」,請選取該項目,然後在「Select a Google Cloud Project」(選取 Google Cloud 專案) 下拉式選單中,從您建立的專案清單中選取特定 Google Cloud 專案。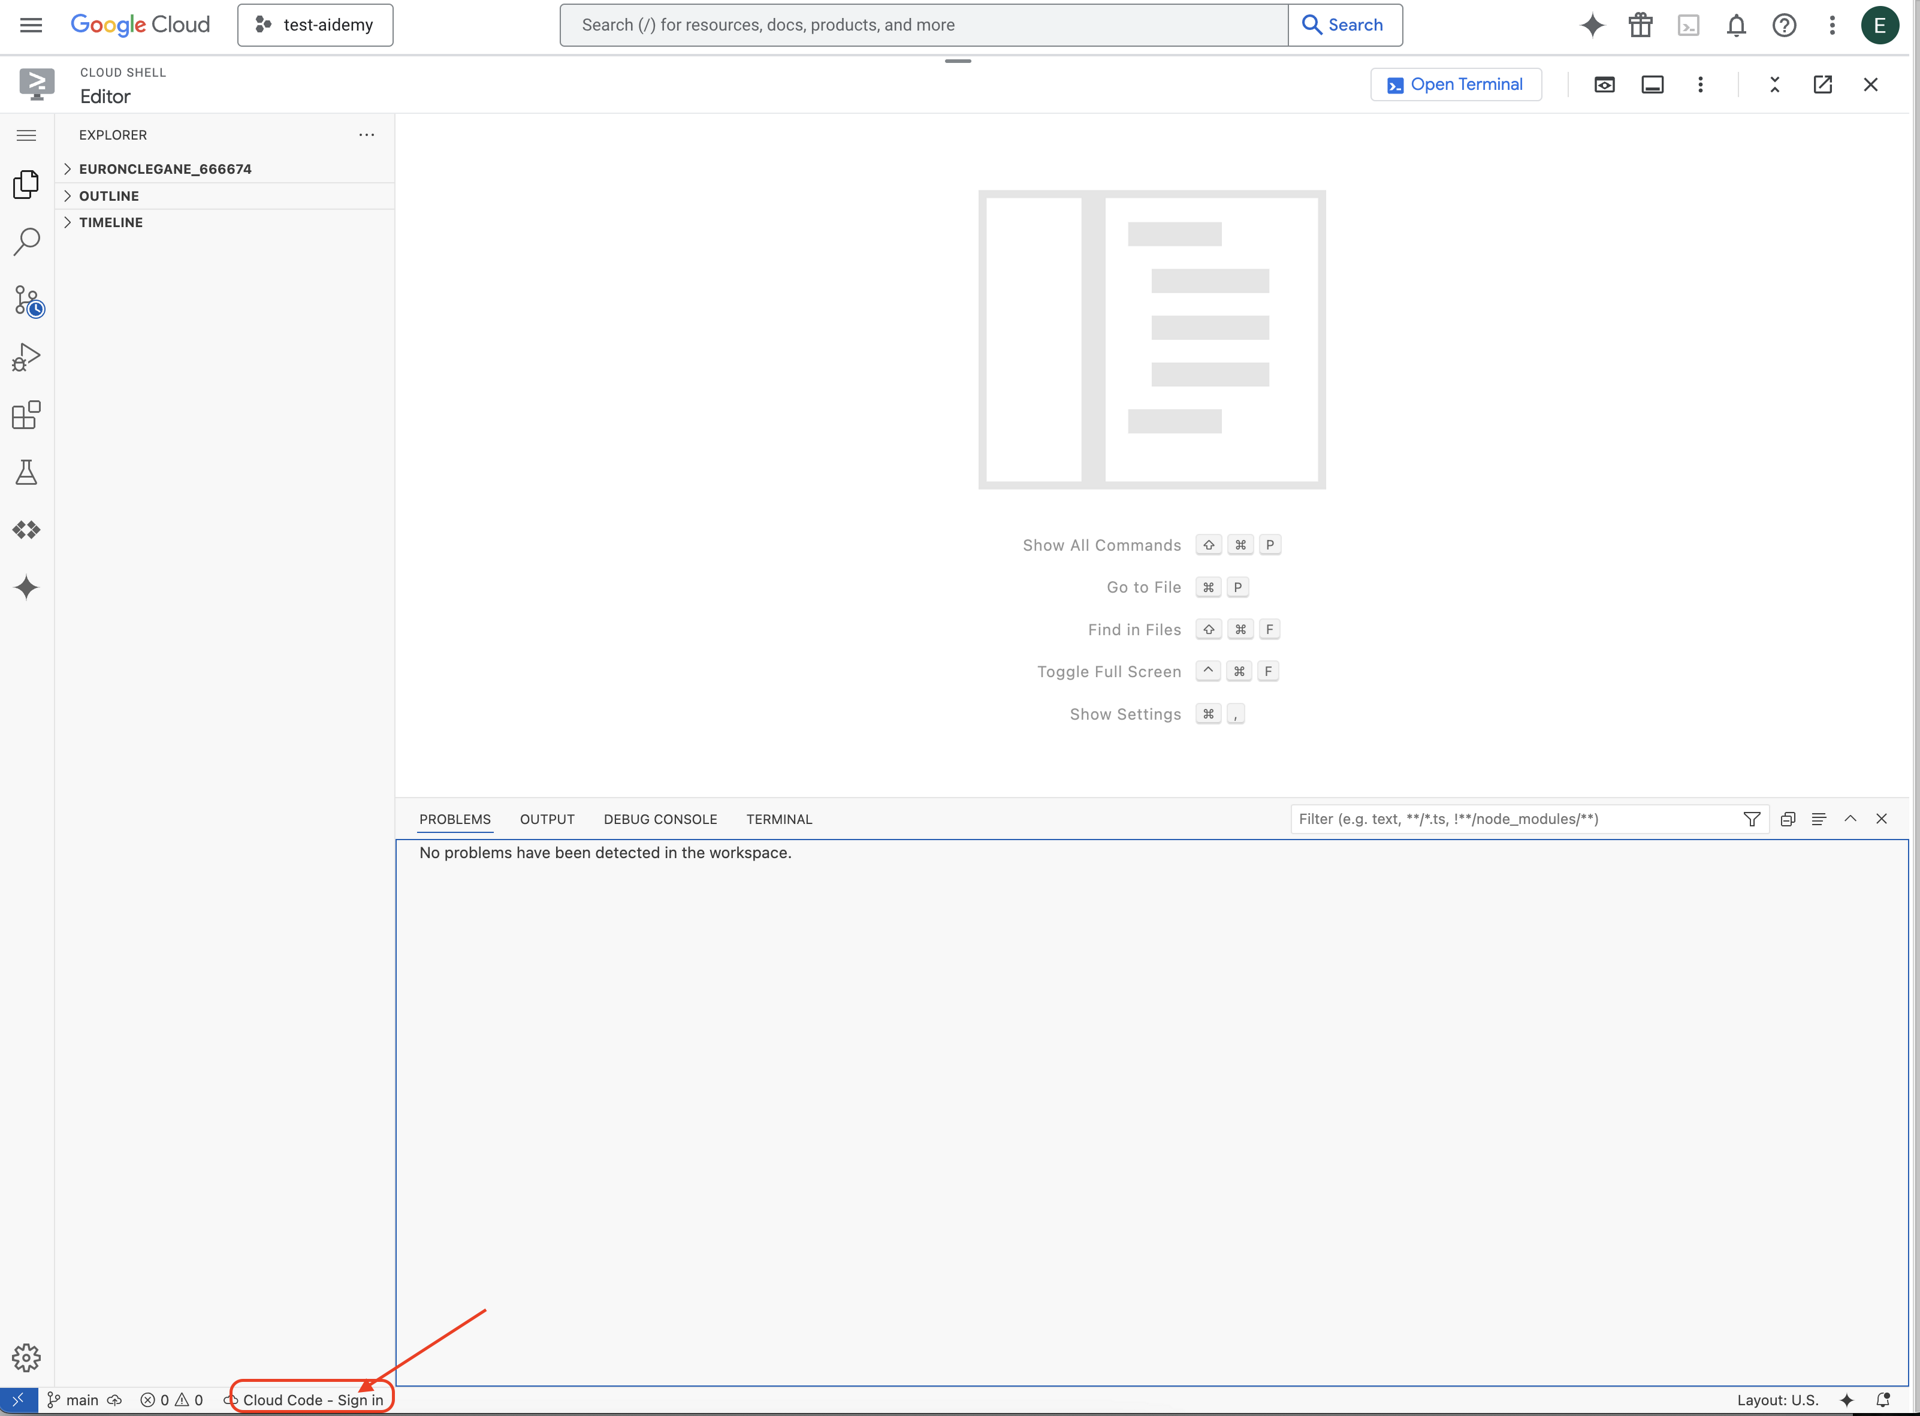
👉在雲端 IDE 中開啟終端機 
👉在終端機中,使用下列指令確認您已通過驗證,且專案已設為您的專案 ID:
gcloud auth list
👉 從 GitHub 複製 natively-accessible-interface 專案:
git clone https://github.com/cuppibla/AccessibilityAgent.git
👉並執行,請務必將 <YOUR_PROJECT_ID> 替換為您的專案 ID (您可以在 Google Cloud 控制台的專案部分找到專案 ID,❗️❗️請務必不要混用 project id 和 project number❗️❗️):
echo <YOUR_PROJECT_ID> > ~/project_id.txt
gcloud config set project $(cat ~/project_id.txt)
👉執行下列指令,啟用必要的 Google Cloud API:(這項指令可能需要約 2 分鐘才能執行完畢)
gcloud services enable compute.googleapis.com  \
                        storage.googleapis.com  \
                        run.googleapis.com  \
                        artifactregistry.googleapis.com  \
                        aiplatform.googleapis.com \
                        eventarc.googleapis.com \
                        sqladmin.googleapis.com \
                        secretmanager.googleapis.com \
                        cloudbuild.googleapis.com \
                        cloudresourcemanager.googleapis.com \
                        cloudfunctions.googleapis.com \
                        cloudaicompanion.googleapis.com
這項作業可能需要幾分鐘才能完成。
設定權限
👉設定服務帳戶權限。在終端機中執行:
gcloud config set project $(cat ~/project_id.txt)
export PROJECT_ID=$(gcloud config get project)
export SERVICE_ACCOUNT_NAME=$(gcloud compute project-info describe --format="value(defaultServiceAccount)")

echo "Here's your SERVICE_ACCOUNT_NAME $SERVICE_ACCOUNT_NAME"
授予權限。在終端機中執行:
#Cloud Storage (Read/Write):
gcloud projects add-iam-policy-binding $PROJECT_ID \
  --member="serviceAccount:$SERVICE_ACCOUNT_NAME" \
  --role="roles/storage.objectAdmin"

#Pub/Sub (Publish/Receive):
gcloud projects add-iam-policy-binding $PROJECT_ID \
  --member="serviceAccount:$SERVICE_ACCOUNT_NAME" \
  --role="roles/pubsub.publisher"

gcloud projects add-iam-policy-binding $PROJECT_ID \
  --member="serviceAccount:$SERVICE_ACCOUNT_NAME" \
  --role="roles/pubsub.subscriber"


#Cloud SQL (Read/Write):
gcloud projects add-iam-policy-binding $PROJECT_ID \
  --member="serviceAccount:$SERVICE_ACCOUNT_NAME" \
  --role="roles/cloudsql.editor"


#Eventarc (Receive Events):
gcloud projects add-iam-policy-binding $PROJECT_ID \
  --member="serviceAccount:$SERVICE_ACCOUNT_NAME" \
  --role="roles/iam.serviceAccountTokenCreator"

gcloud projects add-iam-policy-binding $PROJECT_ID \
  --member="serviceAccount:$SERVICE_ACCOUNT_NAME" \
  --role="roles/eventarc.eventReceiver"

#Vertex AI (User):
gcloud projects add-iam-policy-binding $PROJECT_ID \
  --member="serviceAccount:$SERVICE_ACCOUNT_NAME" \
  --role="roles/aiplatform.user"

#Secret Manager (Read):
gcloud projects add-iam-policy-binding $PROJECT_ID \
  --member="serviceAccount:$SERVICE_ACCOUNT_NAME" \
  --role="roles/secretmanager.secretAccessor"
4. 瞭解使用者輸入內容 - 意圖分類器
AI 代理必須先準確瞭解使用者的需求,才能採取行動。現實世界的輸入內容通常很雜亂,可能含糊不清、有錯字或使用口語。
在本節中,我們將建構重要的「聆聽」元件,將原始使用者輸入內容轉換為明確且可執行的指令。
新增意圖分類器
現在我們要定義分類器採用的 AI 邏輯。
👉 動作:在 Cloud Shell IDE 中,前往 ~/src/ai/intent-classifier/ 目錄
步驟 1:定義代理的詞彙 (IntentCategory)
首先,我們需要建立代理程式可執行的所有可能動作的明確清單。
👉 動作:將預留位置 // REPLACE ME PART 1: add IntentCategory here 替換為下列程式碼:
👉 使用下列程式碼:
export type IntentCategory =
  // Image Analysis Intents
  | "DescribeImage"
  | "AskAboutImage"
  | "ReadTextInImage"
  | "IdentifyColorsInImage"
  // Control Intents
  | "TakePicture"
  | "StartCamera"
  | "SelectImage"
  | "StopSpeaking"
  // Preference Intents
  | "SetDescriptionDetailed"
  | "SetDescriptionConcise"
  // Fallback Intents
  | "GeneralInquiry"       // User has a general question about the agent's functions or polite interaction
  | "OutOfScopeRequest"    // User's request is clearly outside the agent's defined capabilities
  | "Unknown";             // Intent could not be determined with confidence
說明
這段 TypeScript 程式碼會建立名為 IntentCategory 的自訂型別。這份清單會嚴格定義代理程式可理解的每個可能動作或「意圖」。這是至關重要的第一步,因為這會將無數可能的使用者用語 (例如「告訴我你看到什麼」、「圖片內容是什麼?」) 轉換為一組明確且可預測的指令。分類器的目標是將任何使用者查詢對應至其中一個特定類別。
步驟 2
為了做出準確的決策,AI 必須瞭解自身的能力和限制。我們會以詳細文字區塊的形式提供這項資訊。
👉 動作:將預留位置「REPLACE ME PART 2: add AGENT_CAPABILITIES_AND_LIMITATIONS here」替換為下列程式碼:
請將下方程式碼替換為 // REPLACE ME PART 2: add AGENT_CAPABILITIES_AND_LIMITATIONS here:
👉 使用下列程式碼
const AGENT_CAPABILITIES_AND_LIMITATIONS = `
**Core Capabilities (What the Agent CAN DO):**
* **Image Analysis:**
    * DescribeImage: Provide a general description of the current image.
    * AskAboutImage: Answer a specific question about the visual content of the current image (e.g., "Is there a dog?", "What color is the car?").
    * ReadTextInImage: Read any text found in the current image.
    * IdentifyColorsInImage: Identify the dominant colors of the current image.
* **Image Input Control:**
    * TakePicture: Capture an image using the currently active camera stream.
    * StartCamera: Activate the camera (e.g., "use camera", "take another picture").
    * SelectImage: Allow the user to choose an image file from their device.
* **Voice & Audio Control:**
    * StopSpeaking: Stop the current text-to-speech output.
* **Preference Management:**
    * SetDescriptionDetailed: Make future image descriptions more detailed.
    * SetDescriptionConcise: Make future image descriptions less detailed or concise.
* **General Interaction:**
    * GeneralInquiry: Handle conversational phrases (e.g., "hello", "thank you") or questions about its own capabilities (e.g., "what can you do?", "help").

**Limitations (What the Agent CANNOT DO and should be classified as OutOfScopeRequest):**
* Cannot generate or create new images.
* Cannot edit or modify existing images (e.g., "remove background," "make the car blue").
* Cannot analyze video files or live video beyond capturing a single frame.
* Cannot provide general knowledge or answer questions unrelated to the provided image's visual content (e.g., "What's the weather?", "Who is the president?", "Tell me a joke", "What time is it?").
* Cannot perform mathematical calculations or complex data analysis.
* Cannot translate languages as a primary function.
* Cannot remember information from past images or vastly different previous queries in the same session.
* Cannot control other device settings or applications.
* Cannot perform web searches.
`;
重要性:
這段文字不是給使用者閱讀,而是提供給 AI 模型。我們會在下一個步驟中,將這份「職務說明」直接輸入提示,為語言模型 (LLM) 提供做出準確決策所需的背景資訊。如果沒有這個脈絡,LLM 可能會將「現在天氣如何?」誤判為 AskAboutImage。有了這個脈絡,模型就會知道天氣不是圖片中的視覺元素,並正確分類為超出範圍。
步驟 3
現在我們要編寫完整的指令集,供 Gemini 模型依循執行分類作業。
👉 做法:將 // REPLACE ME PART 3 - classifyIntentPrompt 替換為下列程式碼:
使用下列程式碼
const classifyIntentPrompt = ai.definePrompt({
  name: 'classifyIntentPrompt',
  input: { schema: ClassifyIntentInputSchema },
  output: { schema: ClassifyIntentOutputSchema },
  prompt: `You are classifying the user's intent for ClarityCam, a voice-controlled AI application focused on image analysis.
Analyze the user query: '{userQuery}'.

First, understand ClarityCam's capabilities and limitations:
${AGENT_CAPABILITIES_AND_LIMITATIONS}

Now, classify the user's PRIMARY intent into ONE of the following categories:
* **DescribeImage**: User wants a general description of the current image.
* **AskAboutImage**: User is asking a specific question directly related to the visual content of the current image.
* **ReadTextInImage**: User wants any text read from the current image.
* **IdentifyColorsInImage**: User wants the dominant colors of the current image.
* **TakePicture**: User wants to capture an image using an active camera.
* **StartCamera**: User wants to activate the camera.
* **SelectImage**: User wants to choose an image file.
* **StopSpeaking**: User wants the current text-to-speech output to stop.
* **SetDescriptionDetailed**: User wants future image descriptions to be more detailed.
* **SetDescriptionConcise**: User wants future image descriptions to be less detailed.
* **GeneralInquiry**: The query is a simple conversational filler (e.g., "hello", "thanks"), a polite closing, or a direct question about the agent's functions (e.g., "what can you do?", "how does this work?", "help").
* **OutOfScopeRequest**: The query asks the agent to perform an action clearly listed under its "Limitations" or otherwise demonstrably outside its defined image analysis and control functions. Examples: "Tell me a joke," "What's the weather in London?", "Generate an image of a cat," "Can you edit my photo to make it brighter?", "Send this image to my friends","Translate 'hello' to Spanish."

Output ONLY the category name.
If the query is ambiguous but seems generally related to polite interaction or asking about the agent itself, prefer 'GeneralInquiry'.
If the query is clearly asking for something the agent CANNOT do, use 'OutOfScopeRequest'.
If truly unclassifiable even with these guidelines, use 'Unknown'.`,
  config: {
    temperature: 0.05, // Very low temperature for highly deterministic classification
  }
});
這個提示是魔法的關鍵。這是分類器的「大腦」,可告知 AI 角色、提供必要脈絡,並定義所需輸出內容。請注意以下幾項重要的提示工程技巧:
- 角色扮演:開頭為「你要分類...」,明確設定任務。
- 內容注入:系統會將
AGENT_CAPABILITIES_AND_LIMITATIONS變數動態插入提示中。 - 嚴格的輸出格式:「只輸出類別名稱」這項指令非常重要,因為這樣才能取得乾淨且可預測的回覆,方便我們在程式碼中使用。
- 低溫參數:分類時,我們需要確定性且符合邏輯的答案,而非有創意的答案。將溫度參數設為極低的值 (0.05),可確保模型高度專注且一致。
步驟 4:將應用程式連結至 AI Flow
最後,請從主要應用程式檔案呼叫新的 AI 分類器。
👉 動作:前往 ~/src/app/page.tsx 檔案。在 processVoiceCommand 函式中,將 // REPLACE ME PART 1: add classificationResult 替換為下列內容:
const classificationResult = await classifyIntentFlow({ userQuery: commandToProcess });
        intent = classificationResult.intent as IntentCategory;
這段程式碼是前端應用程式與後端 AI 邏輯之間的重要橋樑。這個函式會接收使用者的語音指令 (commandToProcess),傳送至您剛建構的 classifyIntentFlow,並等待 AI 回傳分類意圖。
意圖變數現在會保留乾淨的結構化指令 (例如 DescribeImage)。後續的 switch 陳述式會使用這項結果,驅動應用程式的邏輯,並決定接下來要採取的動作。這項功能可將 AI 的「思考」轉化為應用程式的「動作」。
啟動使用者介面
現在來看看應用程式的實際運作情形!啟動開發伺服器。
👉 在終端機中執行下列指令:npm run dev 注意:您可能需要先執行 npm install,再執行 npm run dev
稍待片刻,您會看到類似以下的輸出內容,表示伺服器已成功執行:
   ▲ Next.js 15.2.3 (Turbopack)
   - Local:        http://localhost:9003
   - Network:      http://10.88.0.4:9003
   - Environments: .env

 ✓ Starting...
 ✓ Ready in 1512ms
 ○ Compiling / ...
 ✓ Compiled / in 26.6s
現在,按一下本機網址 (http://localhost:9003),即可在瀏覽器中開啟應用程式。
您應該會看到 SightGuide 使用者介面!目前按鈕尚未連結任何邏輯,因此點選按鈕不會執行任何動作。這正是我們現階段的預期結果。我們會在下一節中讓這些項目栩栩如生!
您已瞭解 UI,請返回終端機並按下 Ctrl + C 停止開發伺服器,再繼續後續步驟。
5. 瞭解使用者輸入內容 - 不完美的查詢檢查
新增不完美查詢檢查
第 1 部分:定義提示 (「內容」)
首先,請定義 AI 的指令。提示是 AI 呼叫的「食譜」,可明確告知模型我們希望它執行的動作。
👉 動作:在 IDE 中,前往 ~/src/ai/flows/check_typo/。
請將下方程式碼替換為 // REPLACE ME PART 1: add prompt here:
👉 使用下列程式碼
const prompt = ai.definePrompt({
  name: 'checkTypoPrompt',
  input: {
    schema: CheckTypoInputSchema,
  },
  output: {
    schema: CheckTypoOutputSchema,
  },
  prompt: `You are a helpful AI assistant that checks user text for typos and suggests corrections.
- If you find typos, respond with the corrected text.
- If there are no typos, or if you are unsure about a correction, respond with the original text unchanged.

User text: {text}

Corrected text:
`,
});
這個程式碼區塊會定義 AI 的可重複使用範本,名為 checkTypoPrompt。輸入和輸出架構會定義這項工作的資料合約。這樣可避免錯誤,並讓系統可預測。
第 2 部分:建立流程 (「如何」)
現在我們有了「食譜」(提示),需要建立實際執行提示的函式。在 Genkit 中,這稱為「流程」。流程會將提示包裝在可執行的函式中,方便應用程式的其餘部分呼叫。
👉 動作:在同一個 ~/src/ai/flows/check_typo/ 檔案中,將下列程式碼取代為 // REPLACE ME PART 2: add flow here:
👉 使用下列程式碼
const checkTypoFlow = ai.defineFlow<
  typeof CheckTypoInputSchema,
  typeof CheckTypoOutputSchema
>(
  {
    name: 'checkTypoFlow',
    inputSchema: CheckTypoInputSchema,
    outputSchema: CheckTypoOutputSchema,
  },
  async input => {
    const {output} = await prompt(input);
    return output!;
  }
);
第 3 部分:使用錯字檢查工具
AI 流程完成後,我們現在可以將其整合至應用程式的主要邏輯。我們會在收到使用者指令後立即呼叫這項函式,確保文字乾淨無誤,再進行後續處理。
👉動作:前往 ~/src/app/ai/flows/check-typo.ts,然後找出 export async function checkTypo 函式。取消註解回傳敘述:
原價 return; 降價為 return checkTypoFlow(input);
👉動作:前往 ~/src/app/page.tsx,然後找出 processVoiceCommand 函式。請將下方程式碼替換為 REPLACE ME PART 2: add typoResult here:
👉 使用下列程式碼
const typoResult = await checkTypo({ text: rawCommand });
        if (typoResult && typoResult.correctedText && typoResult.correctedText.trim().length > 0) {
            const originalTrimmedLower = rawCommand.trim().toLowerCase();
            const correctedTrimmedLower = typoResult.correctedText.trim().toLowerCase();
            if (correctedTrimmedLower !== originalTrimmedLower) {
                commandToProcess = typoResult.correctedText;
                typoCorrectionAnnouncement = `I think you said: ${commandToProcess}. `;
            }
        }
這項異動可為每個使用者指令建立更穩固的資料處理管道。
語音指令流程 (唯讀,不須採取任何行動)
我們已備妥核心「理解」元件 (錯別字檢查工具和意圖分類器),接著來看看這些元件如何融入應用程式的主要語音處理邏輯。
一切都從使用者說話開始。瀏覽器的 Web Speech API 會監聽語音,並在使用者說完話後,提供所聽到內容的文字轉錄稿。下列程式碼會處理這項程序。
👉唯讀:前往 ~/src/app/page.tsx,然後進入 handleResult 函式。找出下列程式碼:
for (let i = event.resultIndex; i < event.results.length; ++i) {
        if (event.results[i].isFinal) {
          finalTranscript += event.results[i][0].transcript;
        }
      }
      if (finalTranscript) {
        console.log("Final Transcript:", finalTranscript);
        processVoiceCommand(finalTranscript);
      }
測試錯別字修正功能
現在來到有趣的部分!現在就來看看新版錯字修正功能如何處理完美和不完美的語音指令。
啟動應用程式
首先,請再次啟動開發伺服器。在終端機中執行:npm run dev
開啟應用程式
伺服器準備就緒後,請開啟瀏覽器並前往本機位址 (例如 http://localhost:9003)。
啟用語音指令
按一下 Start Listening 按鈕。瀏覽器可能會要求你授權使用麥克風。請按一下「允許」。
測試不完美的指令
現在,我們故意給它一個稍微有瑕疵的指令,看看 AI 是否能解讀。對著麥克風清楚說話:
「幫我拍照」
觀察結果
這就是魔法發生的地方!即使你說「幫我拍照」,應用程式也應該會正確啟動相機。checkTypo 流程會在幕後將你的片語修正為「拍照」,classifyIntentFlow 接著會解讀修正後的指令。
這表示我們的錯字修正功能運作正常,讓應用程式更加完善且容易使用!完成後,你可以拍照停止攝影機,或直接在終端機中停止伺服器 (Ctrl + C)。
6. AI 輔助圖片分析 - 描述圖片
現在代理程式可以瞭解要求,接下來要讓它「看」到畫面。在本節中,我們將建構 Vision Agent 的功能,這是負責所有圖片分析的核心元件。我們會先推出最重要的功能 (描述圖片),然後新增讀取文字的功能。
功能 1:描述圖片
這是代理的主要功能。我們不會只生成靜態說明,而是會建立動態流程,根據使用者偏好調整詳細程度。這是原生自動調整式介面 (NAI) 哲學的重要部分。
👉 動作:在 Cloud Shell IDE 中,前往 ~/src/ai/flows/describe_image/ 檔案並取消註解下列程式碼。
步驟 1:建立動態提示範本
首先,我們會建立進階提示範本,根據收到的輸入內容變更指令。
取消註解下列程式碼

這段程式碼會定義字串變數 (提示),並使用名為 Dot-Mustache 的範本語言。這樣我們就能直接在提示中嵌入條件式邏輯。
{#if isDetailed}...{else}...{/if}:這是條件式區塊。如果我們傳送至這個提示的輸入資料包含 isDetailed: true 屬性,AI 就會收到「非常詳細」的一組指令。否則會收到「簡潔」的指示。這就是我們的代理程式如何配合使用者偏好。
{#if question}...{/if}:只有在輸入資料包含問題屬性時,才會加入這個區塊。這樣一來,我們就能針對一般說明和特定問題使用相同的強大提示。
{media url=photoDataUri}:這是特殊的 Genkit 語法,可將圖片資料直接嵌入提示,供多模態模型分析。
步驟 2:建立智慧流程
接著,我們定義提示和流程,這些提示和流程會使用新範本。這個流程包含一些邏輯,可將使用者的偏好設定轉換為範本可理解的布林值。
👉 做法:在 Cloud Shell IDE 中,於同一個 ~/src/ai/flows/describe_image/ 檔案中,取代下列程式碼。// REPLACE ME PART 1: add flow here
👉 使用下列程式碼:
// Define the prompt using the template from Step 1
const prompt = ai.definePrompt({
  name: 'describeImagePrompt',
  input: { schema: DescribeImagePromptInputSchema },
  output: { schema: DescribeImageOutputSchema },
  prompt: promptTemplate,
});

// Define the flow
const describeImageFlow = ai.defineFlow<
  typeof DescribeImageInputSchema,
  typeof DescribeImageOutputSchema
>(
  {
    name: 'describeImageFlow',
    inputSchema: DescribeImageInputSchema,
    outputSchema: DescribeImageOutputSchema,
  },
  async (pageInput) => {
    const preference = pageInput.detailPreference || "concise";

    // Prepare the input for the prompt, including the new boolean flag
    const promptInputData = {
      ...pageInput,
      isDetailed: preference === "detailed",
    };

    const { output } = await prompt(promptInputData);
    return output!;
  }
);
這會做為前端與 AI 提示之間的智慧型中介服務。
- 這個函式會從應用程式接收
pageInput,其中包含使用者偏好設定 (以字串形式表示,例如"detailed")。 - 然後建立新物件
promptInputData。 - 最重要的行是
isDetailed: preference === "detailed"。這行程式碼會根據偏好字串建立true或false布林值,這項工作至關重要。 - 最後,它會使用這項強化資料呼叫
prompt。現在,步驟 1 中的提示範本可以使用isDetailed布林值,動態變更傳送給 AI 的指令。
步驟 3:連結前端
現在,讓我們從 page.tsx 中的使用者介面觸發這個流程。
👉動作:前往 ~/src/app/ai/flows/describe-image.ts,然後找出 export async function describeImage 函式。取消註解回傳敘述:
原價 return; 降價為 return describeImageFlow(input);
👉動作:在 ~/src/app/page.tsx 中找出 handleAnalyze 函式,然後將程式碼 // REPLACE ME PART 2: DESCRIBE IMAGE
👉 使用下列程式碼:
case "description":
    result = await describeImage({
        photoDataUri,
        question,
        detailPreference: descriptionPreference
    });
    outputText = question ? `Answer: ${result.description}` : `Description: ${result.description}`;
    break;
當使用者想取得說明時,系統就會執行這段程式碼。這個函式會呼叫 describeImage 流程,並傳遞圖片資料和 React 元件中的 descriptionPreference 狀態變數 (這點非常重要)。這是最後一塊拼圖,可將儲存在 UI 中的使用者偏好設定直接連結至 AI 流程,以便相應調整行為。
測試圖像描述功能
讓我們看看圖片描述功能如何運作,從拍攝相片到聆聽 AI 看到的內容。
啟動應用程式
首先,請再次啟動開發伺服器。👉 在終端機中執行下列指令:npm run dev 注意:您可能需要先執行 npm install,再執行 npm run dev
開啟應用程式
伺服器準備就緒後,請開啟瀏覽器並前往本機位址 (例如 http://localhost:9003)。
啟動相機
按一下「開始聆聽」按鈕,並在系統提示時授予麥克風存取權。接著說出第一個指令:
「拍照」
應用程式會啟動裝置的相機,現在畫面上應該會顯示即時影像。
拍攝相片
啟動攝影機後,將鏡頭對準要描述的物體。現在請再次說出指令,擷取圖片:
「拍照」
系統會以你剛拍攝的靜態相片取代即時影像。
要求提供說明
螢幕上顯示新相片後,請下達最終指令:
「描述圖片」
聆聽結果
應用程式會顯示處理狀態,接著你就會聽到 AI 生成的圖片描述!文字也會顯示在「狀態和結果」資訊卡中。
完成後,您可以拍照或直接在終端機中停止伺服器 (Ctrl + C),即可停止攝影機。
7. AI 輔助圖片分析 - 描述文字 (OCR)
接著,我們會在 Vision Agent 中加入光學字元辨識 (OCR) 功能。這樣一來,Gemini 就能讀取任何圖片中的文字。
👉 動作:在 IDE 中前往 ~/src/ai/flows/read-text-in-image/,取消註解下列程式碼:

👉 做法:在 IDE 中,於同一個 ~/src/ai/flows/read-text-in-image/ 檔案中,將 // REPLACE ME: Creating Prmopt
👉 使用下列程式碼:
const readTextInImageFlow = ai.defineFlow<
  typeof ReadTextInImageInputSchema,
  typeof ReadTextInImageOutputSchema
>(
  {
    name: 'readTextInImageFlow',
    inputSchema: ReadTextInImageInputSchema,
    outputSchema: ReadTextInImageOutputSchema,
  },
  async input => {
    const {output} = await prompt(input);
    return output!;
  }
);
這個 AI 流程簡單許多,強調使用專用工具處理特定工作的原則。
- 提示:與說明提示不同,這個提示是靜態且非常具體。這項提示的唯一用途,是指示 AI 充當 OCR 引擎:「擷取圖片中的所有文字」。
- 結構定義:輸入和輸出結構定義也很簡單,預期會收到圖片,並傳回單一字串的文字。
連結前端以進行 OCR
最後,我們要在 page.tsx 中連結這項新功能。
👉動作:前往 ~/src/app/ai/flows/read-text-in-image.ts,然後找出 export async function readTextInImage 函式。取消註解回傳敘述:
原價 return; 降價為 return readTextInImageFlow(input);
👉 動作:在 ~/src/app/page.tsx 中,找出 handleAnalyze 函式和 switch 陳述式。
取代REPLACE ME PART 3: READ TEXT
使用下列程式碼:
 case "text":
            result = await readTextInImage({ photoDataUri });
            outputText = result.text ? `Text Found: ${result.text}` : "No text found.";
            break;
當使用者意圖為 ReadTextInImage 時,系統會觸發這段程式碼。這個函式會呼叫簡單的 readTextInImage 流程。result.text ? ... : ... 這行程式碼可清楚處理輸出內容,如果 AI 無法在圖片中找到任何文字,就會向使用者提供實用的訊息。
測試「朗讀文字 (OCR)」功能
請按照下列步驟測試文字朗讀功能。請記得將鏡頭對準文字清楚的物件。
- 使用
npm run dev執行應用程式,並在瀏覽器中開啟。 - 按一下「開始聆聽」,並在出現提示時授予麥克風存取權。
- 啟動攝影機。說出「拍照」指令,畫面上應該會顯示即時影像。
- 拍攝相片。將相機對準要朗讀的文字,然後再次說出指令:「拍照」。系統會將影片換成靜態相片。
- 要求對方傳送訊息。現在已拍攝相片,請下達最終指令:「圖片中的文字是什麼?」
- 查看結果 應用程式會在分析相片後,朗讀偵測到的文字。如果找不到任何文字,系統會通知你。
這表示強大的 OCR 功能運作正常,完成後,請按下 Ctrl + C 停止伺服器。
8. 進階 AI 強化功能 - 唯讀 ✨
優質的 AI 代理程式可以遵循指令,優質的 AI 代理程式應直覺易用、值得信賴且實用。在本節中,我們將著重於三項進階強化功能,提升代理程式的能力。
我們將探討如何:
Add Context & Memory,處理自然流暢的後續對話。Reduce Hallucination,打造更可靠且值得信賴的代理程式。Make the Agent Proactive,提供更易於存取且方便使用的體驗。Add preference setting自訂圖片說明
強化功能 1:脈絡和記憶
自然對話不是一連串獨立的指令,而是流暢的對話。如果使用者問「圖片內容是什麼?」,代理程式回答「一輛紅色汽車」,使用者可能會自然地追問「是什麼顏色?」,而不會再次提到「汽車」。代理需要短期記憶才能瞭解這個情境。
實作方式 (回顧)
我們已在 describeImage 流程中內建這項功能。本節將回顧該模式的運作方式。從 page.tsx 呼叫 describeImage 函式時,我們會將對話記錄傳遞給該函式。
👉 程式碼展示 (來自 page.tsx):
const result = await describeImage({
    photoDataUri,
    question: commandToProcess,
    detailPreference: descriptionPreference,
    previousUserQueryOnImage: lastUserQuery ?? undefined,
    previousAIResponseOnImage: lastAIResponse ?? undefined,
});
previousUserQueryOnImage和previousAIResponseOnImage:這兩項屬性是代理程式的短期記憶。將最後一次互動傳送給 AI,可提供必要的背景資訊,讓 AI 瞭解模糊不清或參照式的後續問題。- 自動調整的提示:這個脈絡會用於 describe_image 流程中的提示。提示會考量先前的對話內容,再生成新的回覆,讓服務專員能做出智慧回應。
強化功能 2:減少幻覺
如果 AI 捏造事實或聲稱自己具備實際上沒有的能力,就是產生「幻覺」。為建立使用者信任感,代理程式必須瞭解自身限制,並能優雅地拒絕超出範圍的要求。
實作方式 (回顧)
如要避免模型產生幻覺,最有效的方法是為模型設定明確的界線。我們在建構意圖分類器時,就達成了這項成就。
👉 程式碼展示 (來自 intent-classifier 流程):
// Define Agent Capabilities and Limitations for the prompt
const AGENT_CAPABILITIES_AND_LIMITATIONS = `
**Core Capabilities (What the Agent CAN DO):**
* **Image Analysis:**
    * DescribeImage: Provide a general description of the current image...

**Limitations (What the Agent CANNOT DO...):**
* Cannot generate or create new images.
* Cannot provide general knowledge or answer questions unrelated to the image...
* Cannot perform web searches.
`;
這個常數會做為「職務說明」,在分類提示中提供給 AI。
- 建立模型基準:明確告知 AI 哪些事不能做,讓 AI 依據現實情況運作。當系統看到「天氣如何?」這類查詢時,可以放心地將其與限制清單比對,並將意圖分類為 OutOfScopeRequest。
- 建立信任感:如果代理程式誠實地說「我無法協助處理這件事」,會比嘗試猜測但猜錯的代理程式更值得信賴。這是安全可靠 AI 設計的基本原則。`
強化功能 3:建立主動式代理程式
對於以無障礙功能為優先的應用程式,我們無法依賴視覺提示。使用者啟動聆聽模式時,需要立即獲得非視覺確認,瞭解代理程式已準備就緒,等待指令。我們現在會主動提供簡介,說明這項重要意見回饋。
步驟 1:新增追蹤首次收聽的狀態
首先,我們需要知道使用者是否在工作階段中第一次按下 "Start Listening" 按鈕。
👉 在 ~/src/app/page.tsx 中,查看 ClarityCam 元件頂端附近的新狀態變數。
export default function ClarityCam() {
  // ... other state variables
  const [descriptionPreference, setDescriptionPreference] = useState<DescriptionPreference>("concise");

  // Add this new line
  const [isFirstListen, setIsFirstListen] = useState(true);

  // ... rest of the component
}
我們導入了新的狀態變數 isFirstListen,並將其初始化為 true。我們會使用這個標記觸發一次性歡迎訊息。
步驟 2:更新 toggleListening 函式
現在,請修改處理麥克風的函式,播放問候語。
👉 在 ~/src/app/page.tsx 中,找出 toggleListening 函式並查看下列 if 區塊。
const toggleListening = useCallback(() => {
    // ... existing logic to setup speech recognition

    if (isListening || isAttemptingStart) {
        // ... existing logic to stop listening
    } else {
        stopSpeaking(); // Stop any ongoing TTS

        // Add this new block
        if (isFirstListen) {
            setIsFirstListen(false);
            const introMessage = "Hello! I am ClarityCam, your AI assistant. I'm now listening. You can ask me to 'describe the image', 'read text', 'take a picture', or ask questions about what's in an image.";
            speakText(introMessage);
        } else {
            speakText("Listening..."); // Optional: provide feedback on subsequent clicks
        }

        // ... rest of the logic to start listening
    }
}, [/*...existing dependencies...*/, isFirstListen]); // Don't forget to add isFirstListen to the dependency array!
- 檢查旗標:if (isFirstListen) 區塊會檢查這是否為首次啟用。
- 防止重複:區塊內的第一件事是呼叫 setIsFirstListen(false)。這可確保每個工作階段只會播放一次簡介訊息。
- 提供指引:introMessage 經過精心設計,盡可能提供實用資訊。向使用者問好、以名稱識別代理程式、確認代理程式已啟動 (「我現在會聆聽」),並提供可使用的語音指令範例。
- 語音回饋:最後,speakText(introMessage) 會傳送這項重要資訊,立即提供保證和指引,使用者不必看著螢幕也能瞭解。
強化功能 4:配合使用者偏好設定 (回顧)
真正智慧的服務專員不只會回覆,還會學習並配合使用者的需求調整。我們建構的功能中,最強大的一項是讓使用者能透過「詳細一點」等指令,即時變更圖片說明的詳細程度。
實作方式 (回顧):這項功能採用我們為 describeImage 流程建立的動態提示詞。這項功能會根據使用者偏好,運用條件式邏輯變更傳送給 AI 的指令。
👉 程式碼展示 (來自 describe_image 的 promptTemplate):
const settingPreferenceTemplate = `
{#if isDetailed}
Provide a very detailed and comprehensive description of the image. Focus on specifics, including subtle elements, spatial relationships, and textures if apparent.
{else}
Provide a concise description of the image. Focus on the main subject, key objects, and primary activities or context.
{/if}

Highlight the main objects, activities, and colors.
...
`;
- 條件式邏輯:
{#if isDetailed}...{else}...{/if}區塊是關鍵。當 describeImageFlow 從前端收到 detailPreference 時,會建立 isDetailed 布林值 (true 或 false)。 - 自動調整指令:這個布林值旗標會決定 AI 模型接收的指令集。如果 isDetailed 為 true,模型會收到詳細描述的指令。如果為 false,則指示要簡潔。
- 使用者控制:這個模式會將使用者的語音指令 (例如「簡潔地撰寫說明」,這會歸類為 SetDescriptionConcise 意圖) 直接連結至 AI 行為的重大變化,讓代理程式感覺真正回應使用者需求並提供個人化服務。
9. 部署至雲端
使用 Google Cloud Build 建構 Docker 映像檔
gcloud builds submit . --tag gcr.io/$PROJECT_ID/accessibilityai-nextjs-app:latest
accessibilityai-nextjs-app是建議的圖片名稱。- 請參閱這份 使用目前目錄 (
accessibilityAI/) 做為建構來源。
將映像檔部署至 Google Cloud Run
- 請確保 API 金鑰和其他密鑰已儲存在 Secret Manager 中。例如
GOOGLE_GENAI_API_KEY。
將 YOUR_ACTUAL_GOOGLE_AI_KEY_VALUE 替換成實際的 Gemini API 金鑰值。
echo "YOUR_ACTUAL_GOOGLE_AI_KEY_VALUE" | gcloud secrets create GOOGLE_GENAI_API_KEY --data-file=- --project=YOUR_PROJECT_ID
將這個密鑰的「Secret Manager 密鑰存取者」角色授予 Cloud Run 服務的執行階段服務帳戶 (例如 PROJECT_NUMBER-compute@developer.gserviceaccount.com 或專屬帳戶)。
- 部署指令:
gcloud run deploy accessibilityai-app-service \
  --image gcr.io/$PROJECT_ID/accessibilityai-nextjs-app:latest \
  --platform managed \
  --region us-central1 \
  --allow-unauthenticated \
  --port 3000 \
  --set-secrets=GOOGLE_GENAI_API_KEY=GOOGLE_GENAI_API_KEY:latest \
  --set-env-vars NODE_ENV="production"