
1. खास जानकारी
ज़्यादातर एजेंट ऐप्लिकेशन, सामान्य टेक्स्ट के तौर पर जवाब देते हैं. A2UI में यह बदलाव किया गया है. यह एक प्रोटोकॉल है, जिसमें 18 डिक्लेरेटिव यूज़र इंटरफ़ेस (यूआई) प्रिमिटिव होते हैं. इनकी मदद से, आपका एजेंट बेहतर और इंटरैक्टिव इंटरफ़ेस बना सकता है. क्लाइंट उन्हें नेटिव तौर पर रेंडर करता है. हर लेआउट के लिए, नए फ़्रंटएंड कोड की ज़रूरत नहीं होती.
इस कोडलैब में, एजेंट बनाने के लिए Agent Development Kit (ADK) और यूज़र इंटरफ़ेस (यूआई) जनरेट करने के लिए A2UI का इस्तेमाल किया गया है.
आपको क्या बनाना है
क्लाउड इन्फ़्रास्ट्रक्चर के डैशबोर्ड का मॉकअप, तीन चरणों में दिखाया गया है:
- एक स्टैंडर्ड एजेंट, जो संसाधन के डेटा को सादे टेक्स्ट के तौर पर दिखाता है
- एक A2UI एजेंट, जो स्ट्रक्चर्ड A2UI JSON के तौर पर वही डेटा दिखाता है
- रेंडर किया गया एजेंट, जो ADK के डेवलपर यूज़र इंटरफ़ेस (यूआई) में, A2UI JSON को इंटरैक्टिव यूज़र इंटरफ़ेस (यूआई) कॉम्पोनेंट के तौर पर दिखाता है
आपको क्या सीखने को मिलेगा
- A2UI कैसे काम करता है: 18 प्रिमिटिव, तीन तरह के मैसेज, फ़्लैट कॉम्पोनेंट मॉडल
- एडीके एजेंट को A2UI JSON जनरेट करने के लिए प्रॉम्प्ट करने के लिए, A2UI SDK का इस्तेमाल कैसे करें
adk webमें A2UI कॉम्पोनेंट रेंडर करने का तरीका
आपको किन चीज़ों की ज़रूरत होगी
- बिलिंग की सुविधा वाला Google Cloud प्रोजेक्ट
- कोई वेब ब्राउज़र, जैसे कि Chrome
- Python 3.12+
यह कोडलैब, उन डेवलपर के लिए है जिन्हें Python और Google Cloud के बारे में कुछ जानकारी है.
इस कोडलैब को पूरा करने में करीब 15 से 20 मिनट लगेंगे.
इस कोडलैब में बनाए गए संसाधनों की लागत 5 डॉलर से कम होनी चाहिए.
2. अपना एनवायरमेंट सेट अप करने का तरीका
Google Cloud प्रोजेक्ट बनाना
- Google Cloud Console में, प्रोजेक्ट चुनने वाले पेज पर, Google Cloud प्रोजेक्ट चुनें या बनाएं.
- पक्का करें कि आपके Cloud प्रोजेक्ट के लिए बिलिंग की सुविधा चालू हो. किसी प्रोजेक्ट के लिए बिलिंग चालू है या नहीं, यह देखने का तरीका जानें.
Cloud Shell Editor शुरू करना
Google Cloud Console से Cloud Shell सेशन लॉन्च करने के लिए, Google Cloud Console में Cloud Shell चालू करें पर क्लिक करें.
इससे आपकी Google Cloud Console के सबसे नीचे वाले पैनल में एक सेशन लॉन्च होता है.
एडिटर लॉन्च करने के लिए, Cloud Shell विंडो के टूलबार पर मौजूद एडिटर खोलें पर क्लिक करें.
एनवायरमेंट वैरिएबल सेट करना
Cloud Shell Editor टूलबार में, टर्मिनल और नया टर्मिनल पर क्लिक करें. इसके बाद, अपने प्रोजेक्ट और लोकेशन को सेट करने के लिए यहां दिए गए कमांड चलाएं. साथ ही, Vertex AI में Gemini का इस्तेमाल करने के लिए, ADK को कॉन्फ़िगर करें.
export GOOGLE_CLOUD_PROJECT=<INSERT_YOUR_GCP_PROJECT_HERE>
export GOOGLE_CLOUD_LOCATION=global
export GOOGLE_GENAI_USE_VERTEXAI=True
एपीआई चालू करें
टर्मिनल में, ज़रूरी एपीआई चालू करने के लिए यह कमांड चलाएं:
gcloud services enable aiplatform.googleapis.com
डिपेंडेंसी इंस्टॉल करना
टर्मिनल में, Agent Development Kit (ADK) का नया वर्शन इंस्टॉल करने के लिए, यह कमांड चलाएं:
pip install -U google-adk a2ui-agent-sdk
export PATH="$HOME/.local/bin:$PATH"
3. एजेंट बनाना
ADK के ऐसे स्टैंडर्ड एजेंट से शुरुआत करें जो सादा टेक्स्ट दिखाता है. फ़िलहाल, ज़्यादातर एजेंट ऐप्लिकेशन ऐसे दिखते हैं.
एजेंट फ़ोल्डर बनाना
a2ui_agent नाम का एक फ़ोल्डर बनाएं. इसमें आपके एजेंट और टूल का सोर्स कोड होगा.
टूल और मॉक डेटा तय करना
नीचे दिए गए कॉन्टेंट का इस्तेमाल करके a2ui_agent/resources.py बनाएं. यह टूल, क्लाउड संसाधनों की सूची दिखाता है. साथ ही, उनके स्टेटस की जानकारी देता है.
RESOURCES = [
    {
        "name": "auth-service",
        "type": "Cloud Run",
        "region": "us-west1",
        "status": "healthy",
        "cpu": "2 vCPU",
        "memory": "1 GiB",
        "instances": 3,
        "url": "https://auth-service-abc123.run.app",
        "last_deployed": "2026-04-18T14:22:00Z",
    },
    {
        "name": "events-db",
        "type": "Cloud SQL",
        "region": "us-east1",
        "status": "warning",
        "tier": "db-custom-8-32768",
        "storage": "500 GB SSD",
        "connections": 195,
        "version": "PostgreSQL 16",
        "issue": "Storage usage at 92%",
    },
    {
        "name": "analytics-pipeline",
        "type": "Cloud Run",
        "region": "us-west1",
        "status": "error",
        "cpu": "2 vCPU",
        "memory": "4 GiB",
        "instances": 0,
        "url": "https://analytics-pipeline-ghi789.run.app",
        "last_deployed": "2026-04-10T16:45:00Z",
        "issue": "CrashLoopBackOff: OOM killed",
    },
]

def get_resources() -> list[dict]:
    """Get all cloud resources in the current project.
    Returns a list of cloud infrastructure resources including their
    name, type, region, status, and type-specific details.
    Status is one of: healthy, warning, error. Resources with
    warning or error status include an 'issue' field describing
    the problem.
    """
    return RESOURCES
एजेंट को तय करना
नीचे दिए गए कॉन्टेंट का इस्तेमाल करके a2ui_agent/agent.py बनाएं:
from google.adk.agents import Agent
from .resources import get_resources

root_agent = Agent(
    model="gemini-3-flash-preview",
    name="cloud_dashboard",
    description="A cloud infrastructure assistant that reports on project resources.",
    instruction=(
        "You are a cloud infrastructure assistant. When users ask about their "
        "cloud resources, use the get_resources tool to fetch the current state. "
        "Summarize the results clearly in plain text."
    ),
    tools=[get_resources],
)
4. एजेंट को टेस्ट करना
ADK में डेवलपर यूज़र इंटरफ़ेस (यूआई) शामिल होता है. इसका इस्तेमाल करके, ब्राउज़र में अपने एजेंट से इंटरैक्ट किया जा सकता है और उसे प्रॉम्प्ट भेजे जा सकते हैं.
ADK डेवलपमेंट यूज़र इंटरफ़ेस (यूआई) चालू करें
ADK dev UI शुरू करने के लिए, Cloud Shell Editor टर्मिनल में यह कमांड चलाएं:
adk web --port 8080 --allow_origins "*" --reload_agents
आपको कुछ ऐसा मैसेज दिखेगा:
+-----------------------------------------------------------------------------+
| ADK Web Server started                                                      |
|                                                                             |
| For local testing, access at http://127.0.0.1:8080.                         |
+-----------------------------------------------------------------------------+
ADK का डेवलपर यूज़र इंटरफ़ेस (यूआई) खोलें
अपने ब्राउज़र में ADK dev UI खोलने के लिए, लोकल टेस्टिंग यूआरएल पर Ctrl या Cmd क्लिक करें. इसके अलावा, वेब प्रीव्यू बटन पर क्लिक करके, पोर्ट 8080 पर प्रीव्यू करें को चुनें.
ADK dev UI देखने के बाद, ड्रॉप-डाउन मेन्यू से a2ui_agent चुनें.
सैंपल प्रॉम्प्ट भेजना
एजेंट को सैंपल प्रॉम्प्ट भेजें:
What's running in my project?
अब कोई दूसरा सैंपल प्रॉम्प्ट आज़माएं. आपको ज़्यादा टेक्स्ट आउटपुट मिलेगा:
Does anything need my attention?
आपकी बातचीत कुछ ऐसी दिखनी चाहिए:
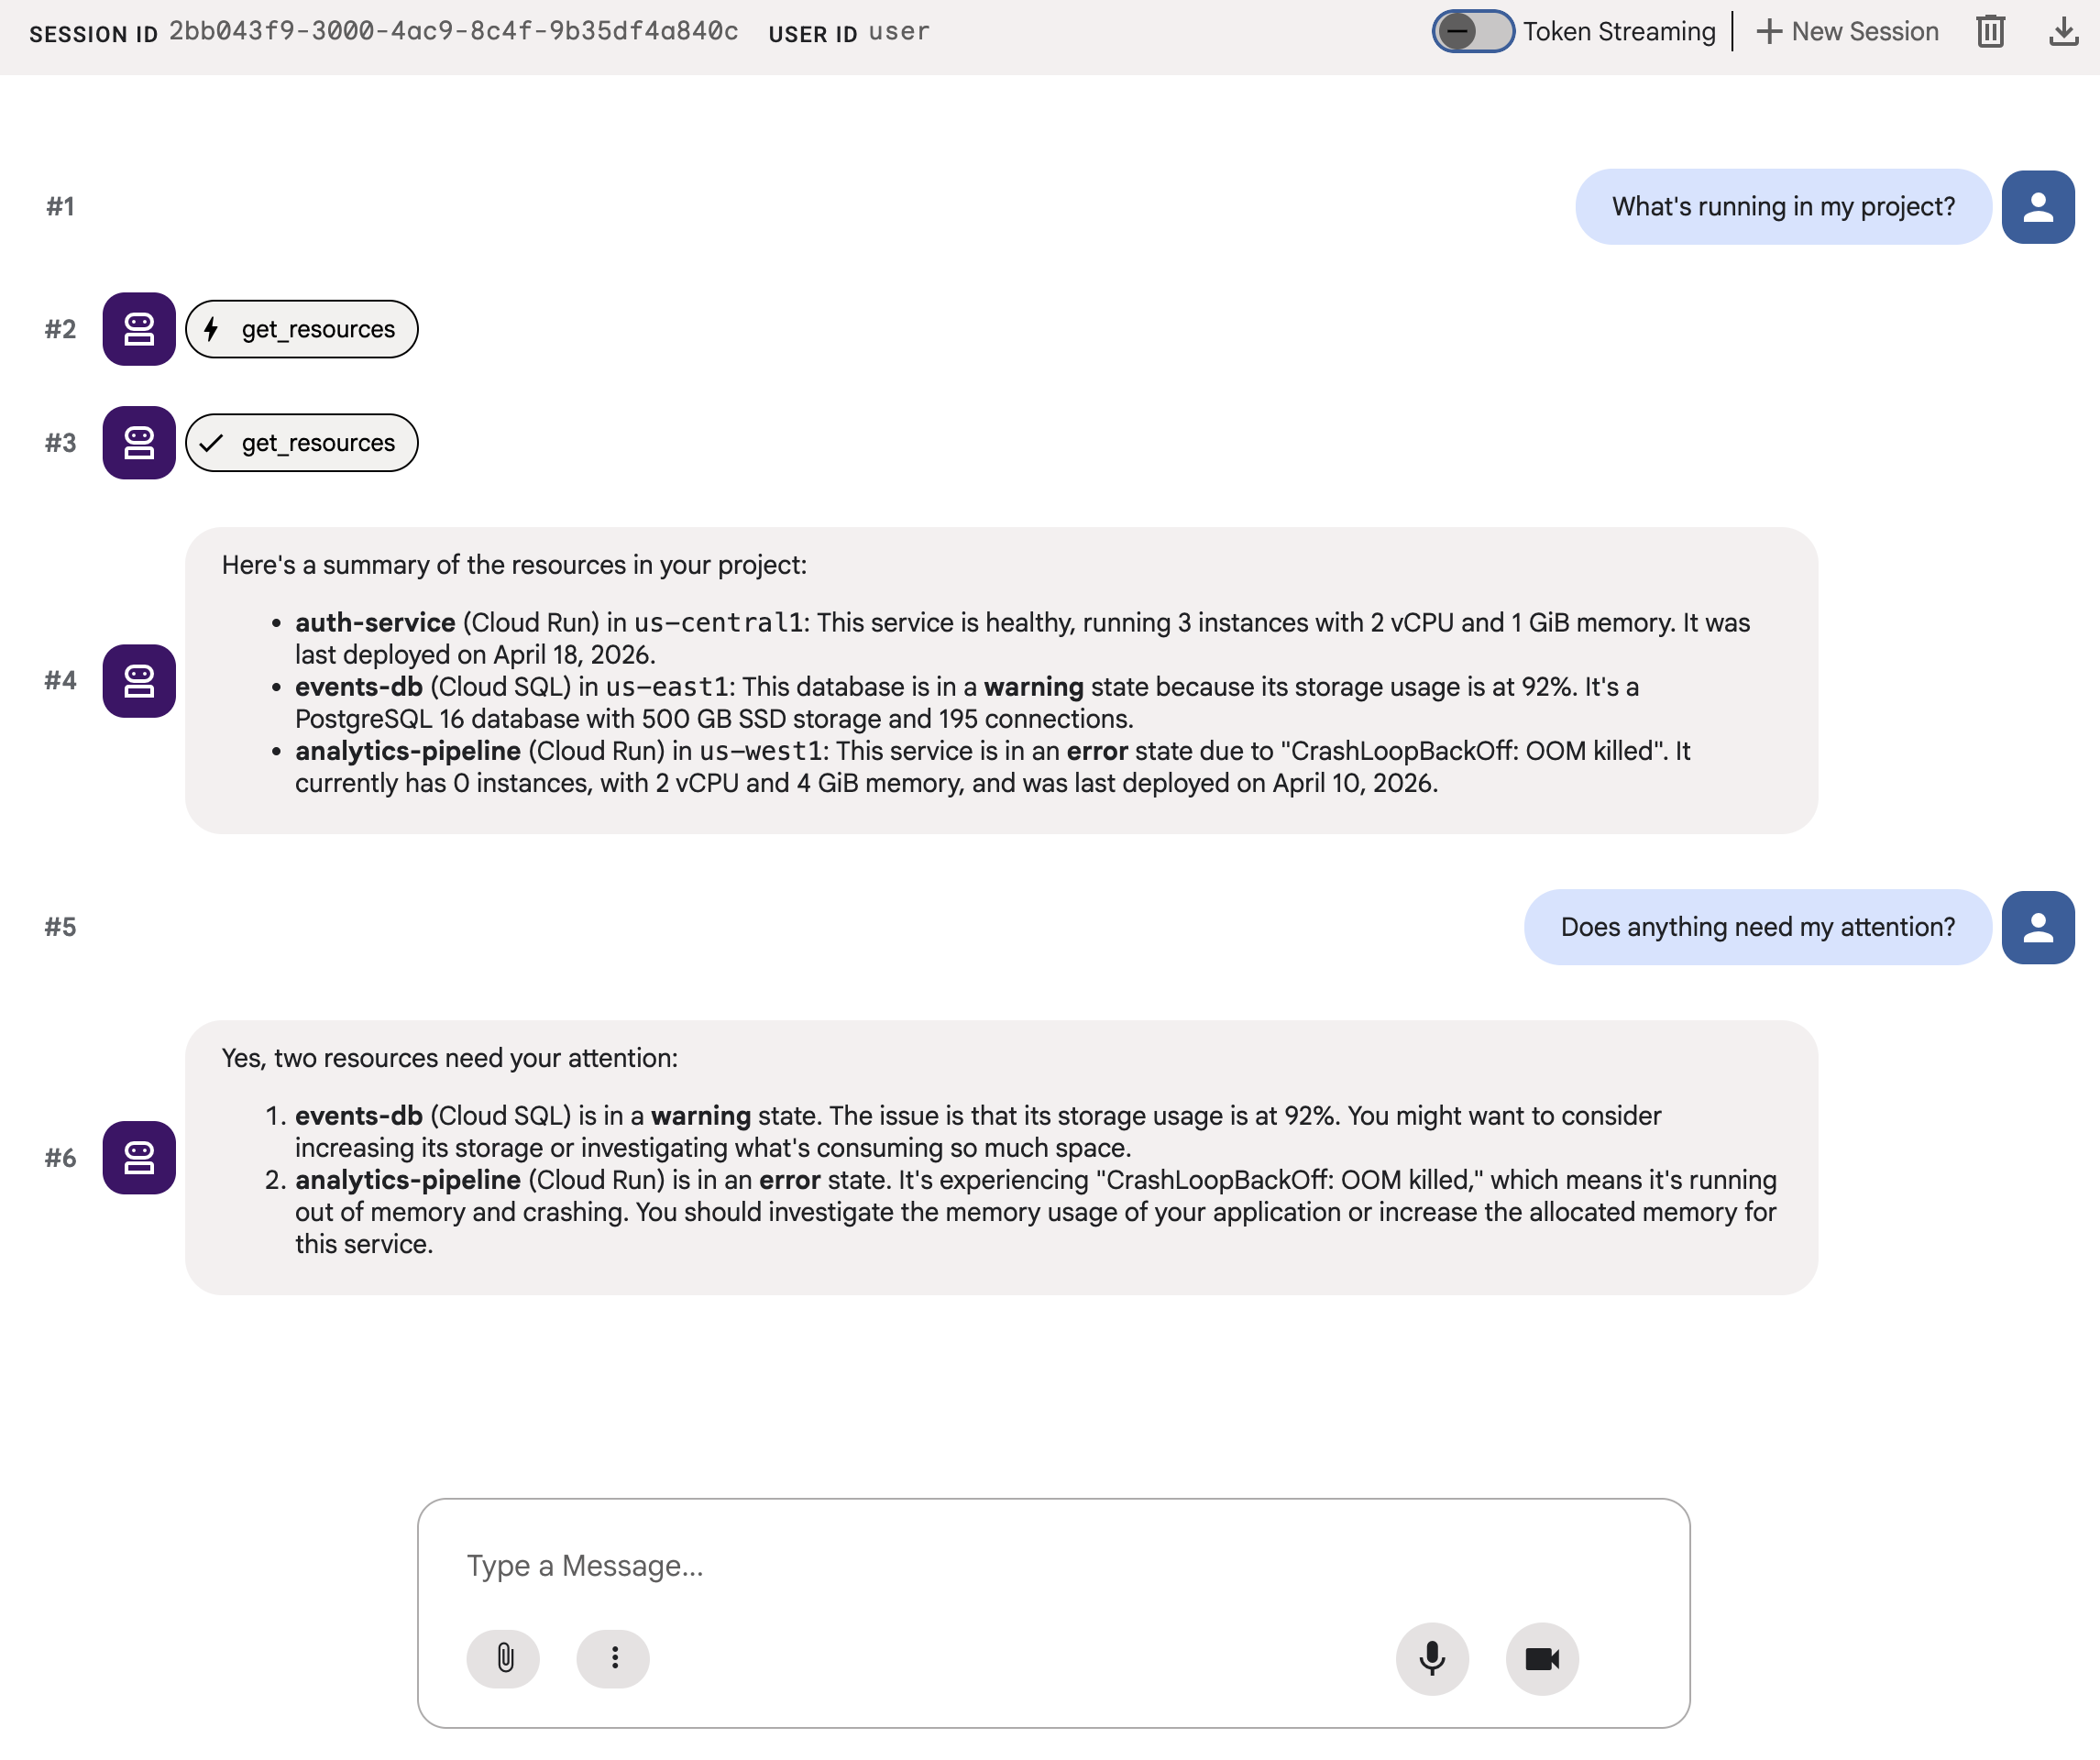
आपको टेक्स्ट का एक बड़ा हिस्सा दिखेगा. जवाब सटीक है, लेकिन उपयोगकर्ता अनुभव अच्छा नहीं है.
5. A2UI JSON जनरेट करें
अगर एजेंट, टेक्स्ट के बजाय यूज़र इंटरफ़ेस (यूआई) के बारे में जानकारी दे, तो क्या होगा? A2UI एक प्रोटोकॉल है. इसकी मदद से एजेंट, 18 प्रिमिटिव के कैटलॉग से इंटरैक्टिव इंटरफ़ेस बना सकते हैं. क्लाइंट उन्हें नेटिव तौर पर रेंडर करता है.
A2UI Python SDK में एक स्कीमा मैनेजर शामिल होता है. यह आपके लिए सिस्टम प्रॉम्प्ट जनरेट करता है. इससे एलएलएम को A2UI कॉम्पोनेंट कैटलॉग, प्रॉपर्टी के सही नाम और टाइप, और JSON स्ट्रक्चर के बारे में पूरी जानकारी मिलती है.
एजेंट को अपडेट करना
a2ui_agent/agent.py के कॉन्टेंट को इससे बदलें:
from google.adk.agents import Agent
from a2ui.schema.manager import A2uiSchemaManager
from a2ui.basic_catalog.provider import BasicCatalog
from .resources import get_resources

schema_manager = A2uiSchemaManager(
    version="0.8",
    catalogs=[BasicCatalog.get_config("0.8")],
)

instruction = schema_manager.generate_system_prompt(
    role_description=(
        "You are a cloud infrastructure assistant. When users ask about "
        "their cloud resources, use the get_resources tool to fetch the "
        "current state."
    ),
    workflow_description=(
        "Analyze the user's request and return structured UI when appropriate."
    ),
    ui_description=(
        "Use cards for resource summaries, rows and columns for comparisons, "
        "icons for status indicators, and buttons for drill-down actions. "
        "Do NOT use markdown formatting in text values. Use the usageHint "
        "property for heading levels instead. "
        "Respond ONLY with the A2UI JSON array. Do NOT include any text "
        "outside the JSON. Put all explanations into Text components."
    ),
    include_schema=True,
    include_examples=True,
)

root_agent = Agent(
    model="gemini-3-flash-preview",
    name="cloud_dashboard",
    description="A cloud infrastructure assistant that renders rich A2UI interfaces.",
    instruction=instruction,
    tools=[get_resources],
)
generate_system_prompt() तरीके में, आपकी भूमिका की जानकारी को A2UI JSON स्कीमा और कुछ इनपुट-आउटपुट उदाहरणों के साथ दिया गया प्रॉम्प्ट के साथ जोड़ा जाता है. इससे एलएलएम को यह पता चलता है कि उसे अपने आउटपुट को किस तरह से फ़ॉर्मैट करना है. आपको कॉम्पोनेंट कैटलॉग को मैन्युअल तरीके से लिखने की ज़रूरत नहीं है.
6. JSON फ़ॉर्मैट में मिले आउटपुट की जांच करना
अगर आपने ADK का डेवलपर यूज़र इंटरफ़ेस (यूआई) पहले से चालू रखा है, तो यह आपके एजेंट में किए गए बदलावों को अपने-आप फिर से लोड कर देगा.
a2ui_agent चुनें. इसके बाद, ADK के डेवलपर यूज़र इंटरफ़ेस (यूआई) में सबसे ऊपर दाईं ओर मौजूद, +नया सेशन पर क्लिक करके नया सेशन शुरू करें. इसके बाद, वही प्रॉम्प्ट भेजें जो आपने पहले भेजा था:
What's running in my project?
इस बार, एजेंट सादे टेक्स्ट के बजाय A2UI JSON के साथ जवाब देता है. आपको चैट आउटपुट में, beginRendering, surfaceUpdate, और dataModelUpdate वाले स्ट्रक्चर्ड मैसेज दिखेंगे.
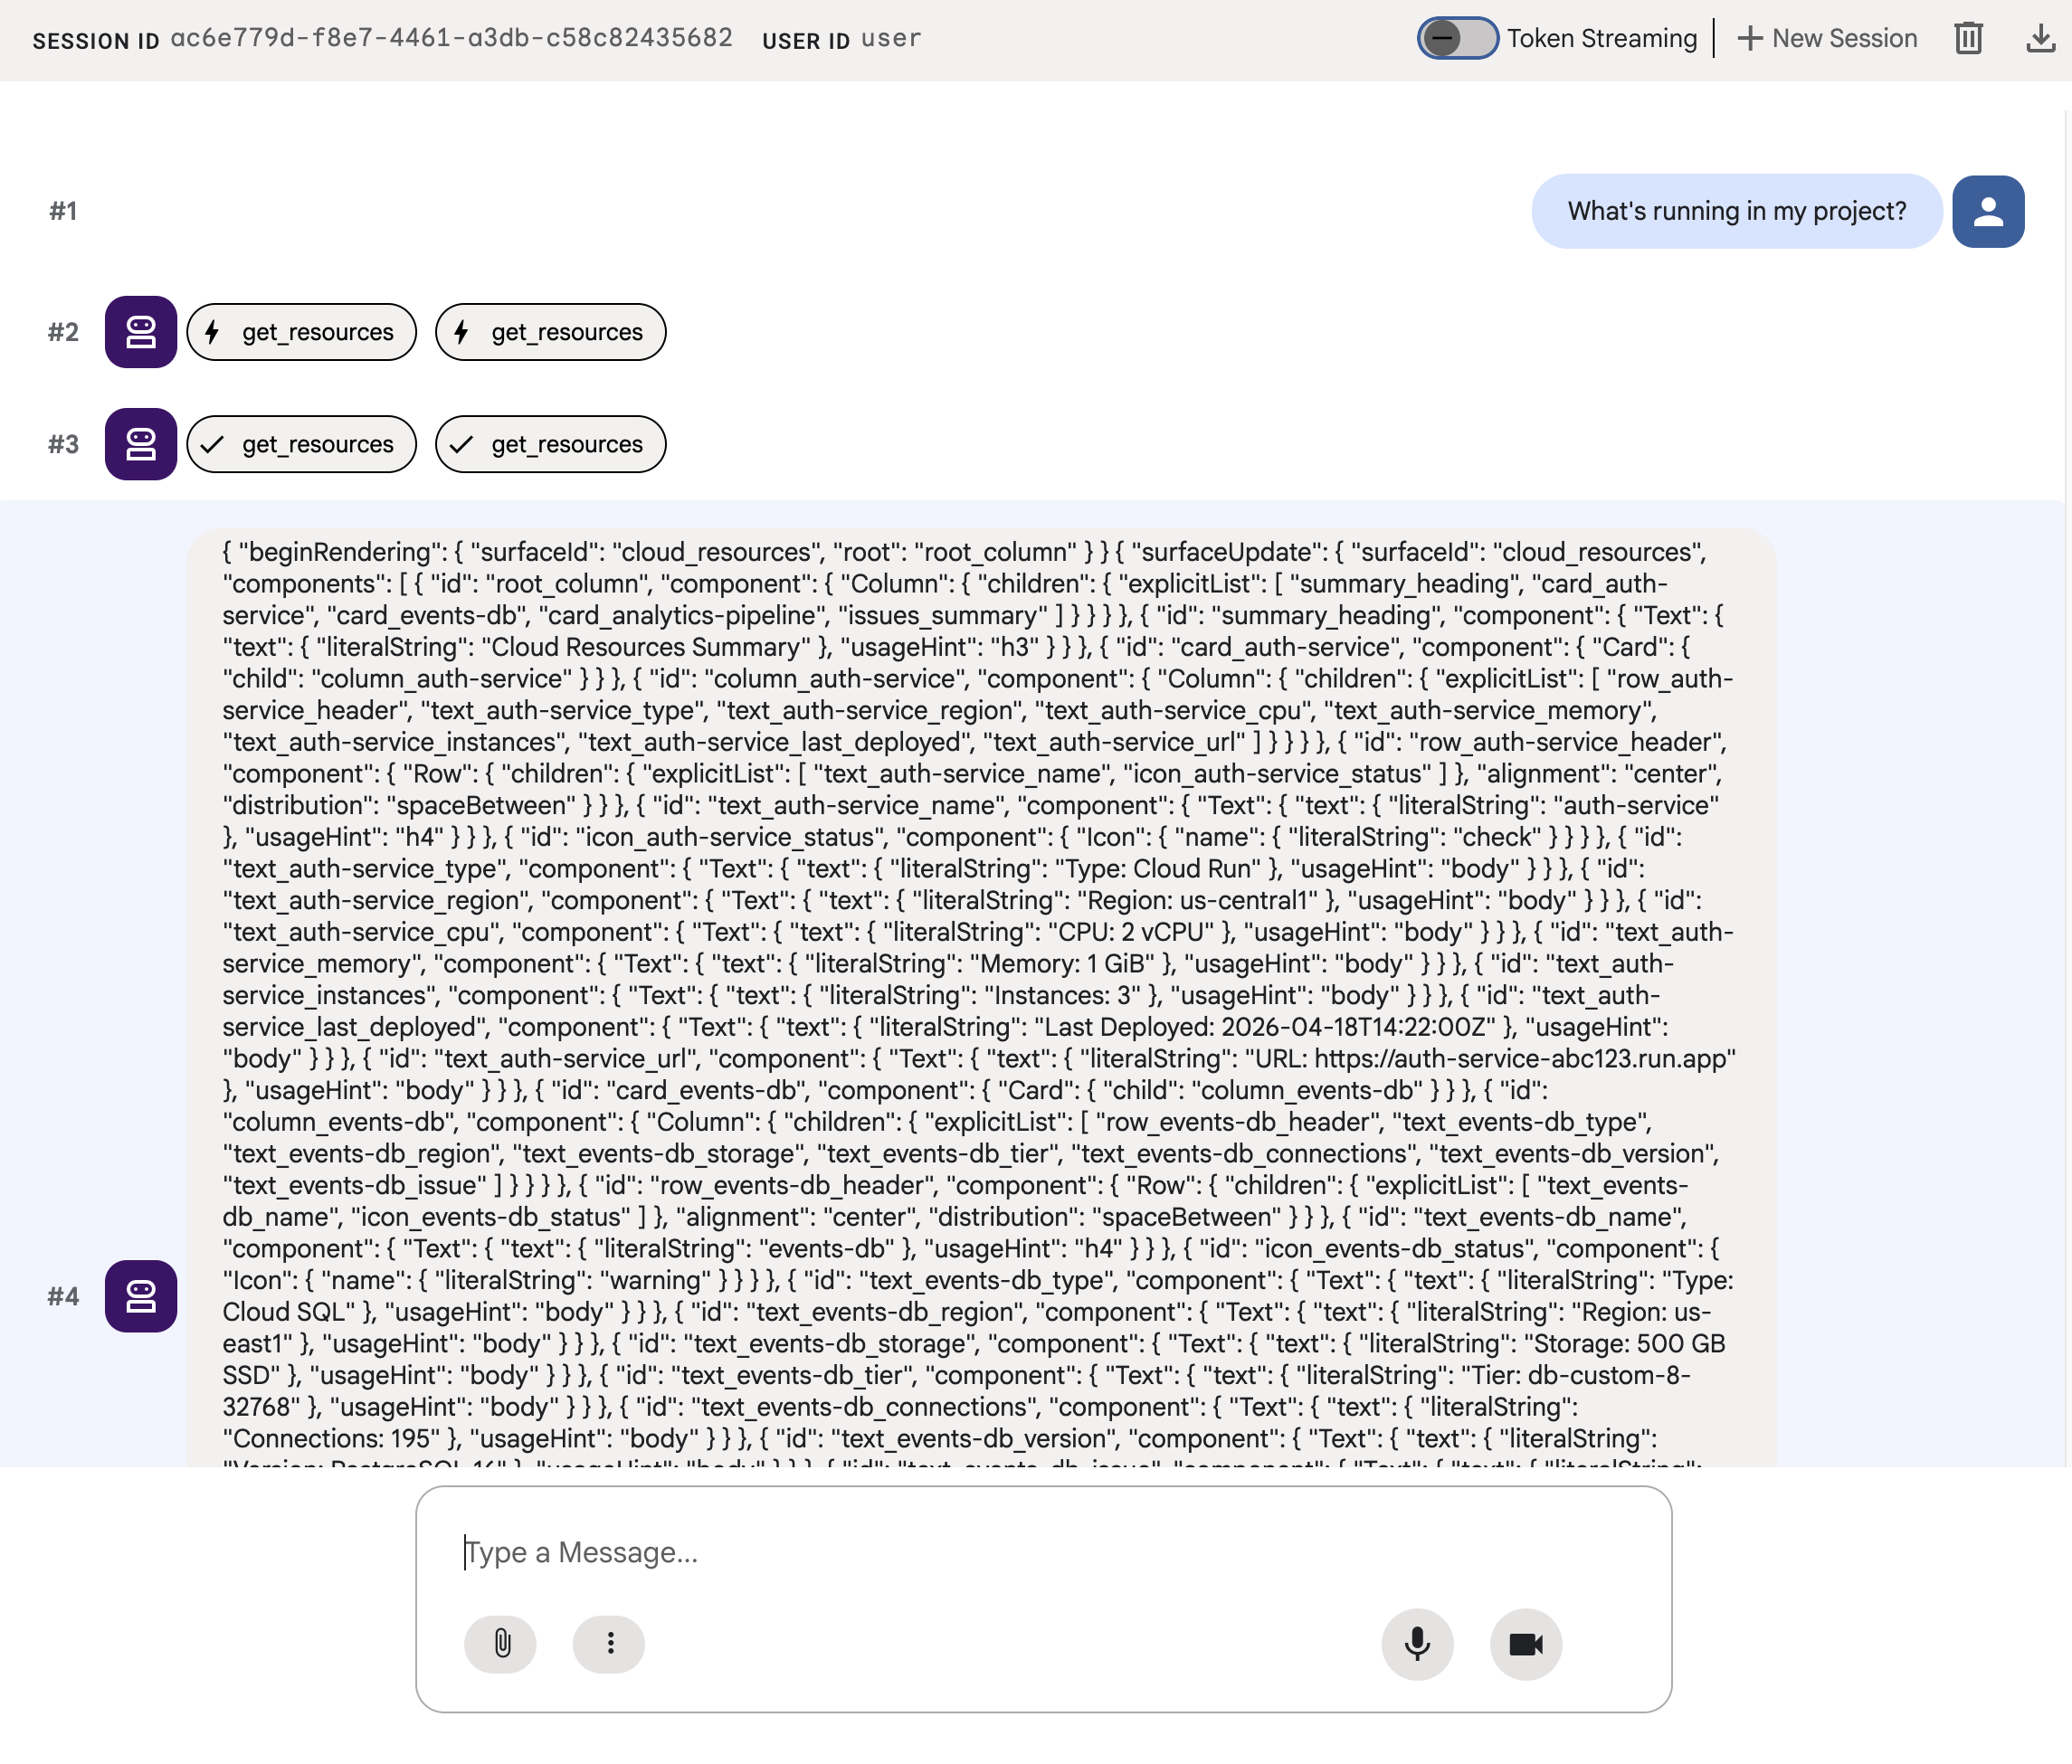
JSON में कार्ड, आइकॉन, और बटन के साथ रिच यूज़र इंटरफ़ेस (यूआई) के बारे में बताया गया है. हालांकि, adk web इसे रॉ टेक्स्ट के तौर पर दिखाता है. अगले चरण में, इसे असल यूज़र इंटरफ़ेस (यूआई) कॉम्पोनेंट के तौर पर रेंडर किया जाएगा.
7. A2UI के बारे में जानकारी
आपके एजेंट ने अभी-अभी जो JSON जनरेट किया है उसे देखें. आपको दिखेगा कि इसमें तीन तरह के मैसेज शामिल हैं. A2UI के हर जवाब का स्ट्रक्चर एक जैसा होता है:
1. beginRendering
यह रेंडरिंग सर्फ़ेस बनाता है और रूट कॉम्पोनेंट का नाम देता है:
{"beginRendering": {"surfaceId": "default", "root": "main-column"}}
2. surfaceUpdate
यह आईडी रेफ़रंस के साथ कॉम्पोनेंट ट्री को फ़्लैट लिस्ट के तौर पर भेजता है (नेस्ट नहीं किया गया):
{"surfaceUpdate": {"surfaceId": "default", "components": [
  {"id": "main-column", "component": {"Column": {"children": {"explicitList": ["title", "card1"]}}}},
  {"id": "title", "component": {"Text": {"text": {"literalString": "My Resources"}, "usageHint": "h1"}}},
  {"id": "card1", "component": {"Card": {"child": "card1-content"}}},
  {"id": "card1-content", "component": {"Text": {"text": {"path": "service_name"}}}}
]}}
3. dataModelUpdate
स्ट्रक्चर से अलग डेटा भेजता है:
{"dataModelUpdate": {"surfaceId": "default", "contents": [
  {"key": "service_name", "valueString": "auth-service"},
  {"key": "status", "valueString": "healthy"}
]}}
कॉम्पोनेंट, {"path": "key"} का इस्तेमाल करके डेटा से बाइंड होते हैं. कॉम्पोनेंट ट्री को फिर से भेजे बिना, डेटा को अपडेट किया जा सकता है.
18 प्रिमिटिव
कैटगरी | घटक |
लेआउट | कार्ड, कॉलम, लाइन, सूची, टैब, डिवाइडर, मोडल |
डिसप्ले | टेक्स्ट, इमेज, आइकॉन, वीडियो, ऑडियो प्लेयर |
इनपुट | TextField, DateTimeInput, MultipleChoice, CheckBox, Slider |
कार्रवाई | बटन |
एजेंट, एक ही कैटलॉग से अलग-अलग लेआउट बनाता है. हर प्रिमिटिव के बारे में पूरी जानकारी पाने के लिए, कॉम्पोनेंट रेफ़रंस देखें. ब्राउज़ व्यू, प्राथमिकता वाला डैशबोर्ड, और कॉन्फ़िगरेशन फ़ॉर्म, ये सभी 18 प्रिमिटिव का इस्तेमाल करते हैं. इसके लिए, किसी नए फ़्रंटएंड कॉम्पोनेंट की ज़रूरत नहीं होती.
8. A2UI कॉम्पोनेंट रेंडर करना
एजेंट, मान्य A2UI JSON जनरेट करता है, लेकिन adk web इसे रॉ टेक्स्ट के तौर पर दिखाता है. इसे यूज़र इंटरफ़ेस (यूआई) के कॉम्पोनेंट के तौर पर रेंडर करने के लिए, आपको एक छोटे से यूटिलिटी टूल की ज़रूरत होगी. यह टूल, एजेंट के A2UI JSON आउटपुट को उस फ़ॉर्मैट में बदलता है जिसकी उम्मीद adk web के बिल्ट-इन रेंडरर को होती है.
A2UI रेंडरिंग यूटिलिटी बनाना
नीचे दिए गए कॉन्टेंट का इस्तेमाल करके a2ui_agent/a2ui_utils.py बनाएं:
import json
import re
from google.genai import types
from google.adk.agents.callback_context import CallbackContext
from google.adk.models.llm_response import LlmResponse

def _wrap_a2ui_part(a2ui_message: dict) -> types.Part:
    """Wrap a single A2UI message for rendering in adk web."""
    datapart_json = json.dumps({
        "kind": "data",
        "metadata": {"mimeType": "application/json+a2ui"},
        "data": a2ui_message,
    })
    blob_data = (
        b"<a2a_datapart_json>"
        + datapart_json.encode("utf-8")
        + b"</a2a_datapart_json>"
    )
    return types.Part(
        inline_data=types.Blob(
            data=blob_data,
            mime_type="text/plain",
        )
    )

def a2ui_callback(
    callback_context: CallbackContext,
    llm_response: LlmResponse,
) -> LlmResponse | None:
    """Convert A2UI JSON in text output to rendered components."""
    if not llm_response.content or not llm_response.content.parts:
        return None
    for part in llm_response.content.parts:
        if not part.text:
            continue
        text = part.text.strip()
        if not text:
            continue
        if not any(k in text for k in ("beginRendering", "surfaceUpdate", "dataModelUpdate")):
            continue
        # Strip markdown fences
        if text.startswith("```"):
            text = text.split("\n", 1)[-1]
            if text.endswith("```"):
                text = text[:-3].strip()
        # Find where JSON starts (skip conversational prefix)
        json_start = None
        for i, ch in enumerate(text):
            if ch in ("[", "{"):
                json_start = i
                break
        if json_start is None:
            continue
        json_text = text[json_start:]
        # raw_decode parses JSON and ignores trailing text
        try:
            parsed, _ = json.JSONDecoder().raw_decode(json_text)
        except json.JSONDecodeError:
            # Handle concatenated JSON objects: {"a":1} {"b":2}
            try:
                fixed = "[" + re.sub(r'\}\s*\{', '},{', json_text) + "]"
                parsed, _ = json.JSONDecoder().raw_decode(fixed)
            except json.JSONDecodeError:
                continue
        if not isinstance(parsed, list):
            parsed = [parsed]
        a2ui_keys = {"beginRendering", "surfaceUpdate", "dataModelUpdate", "deleteSurface"}
        a2ui_messages = [msg for msg in parsed if isinstance(msg, dict) and any(k in msg for k in a2ui_keys)]
        if not a2ui_messages:
            continue
        new_parts = [_wrap_a2ui_part(msg) for msg in a2ui_messages]
        return LlmResponse(
            content=types.Content(role="model", parts=new_parts),
            custom_metadata={"a2a:response": "true"},
        )
    return None
इस यूटिलिटी से दो काम किए जा सकते हैं:
- यह एजेंट के टेक्स्ट आउटपुट से A2UI JSON निकालता है
- यह फ़ंक्शन, हर A2UI मैसेज को उस फ़ॉर्मैट में रैप करता है जिसकी उम्मीद
adk webके बिल्ट-इन A2UI रेंडरर को होती है
एजेंट को अपडेट करना
a2ui_agent/agent.py के कॉन्टेंट को इससे बदलें. पिछले चरण की तुलना में, इस चरण में सिर्फ़ a2ui_callback को इंपोर्ट किया गया है. साथ ही, एजेंट पर after_model_callback पैरामीटर जोड़ा गया है:
from google.adk.agents import Agent
from a2ui.schema.manager import A2uiSchemaManager
from a2ui.basic_catalog.provider import BasicCatalog
from .resources import get_resources
from .a2ui_utils import a2ui_callback

schema_manager = A2uiSchemaManager(
    version="0.8",
    catalogs=[BasicCatalog.get_config("0.8")],
)

instruction = schema_manager.generate_system_prompt(
    role_description=(
        "You are a cloud infrastructure assistant. When users ask about "
        "their cloud resources, use the get_resources tool to fetch the "
        "current state."
    ),
    workflow_description=(
        "Analyze the user's request and return structured UI when appropriate."
    ),
    ui_description=(
        "Use cards for resource summaries, rows and columns for comparisons, "
        "icons for status indicators, and buttons for drill-down actions. "
        "Do NOT use markdown formatting in text values. Use the usageHint "
        "property for heading levels instead. "
        "Respond ONLY with the A2UI JSON array. Do NOT include any text "
        "outside the JSON. Put all explanations into Text components."
    ),
    include_schema=True,
    include_examples=True,
)

root_agent = Agent(
    model="gemini-3-flash-preview",
    name="cloud_dashboard",
    description="A cloud infrastructure assistant that renders rich A2UI interfaces.",
    instruction=instruction,
    tools=[get_resources],
    after_model_callback=a2ui_callback,
)
9. रेंडर किए गए यूज़र इंटरफ़ेस (यूआई) की जांच करना
अगर आपने ADK का डेवलपर यूज़र इंटरफ़ेस (यूआई) पहले से चालू रखा है, तो यह आपके एजेंट में किए गए बदलावों को अपने-आप फिर से लोड कर देगा.
ब्राउज़र टैब को रीफ़्रेश करें, a2ui_agent चुनें. इसके बाद, ADK के डेवलपर यूज़र इंटरफ़ेस (यूआई) में सबसे ऊपर दाईं ओर मौजूद, +नया सेशन पर क्लिक करके नया सेशन शुरू करें. साथ ही, पहले वाला प्रॉम्प्ट फिर से भेजें:
What's running in my project?
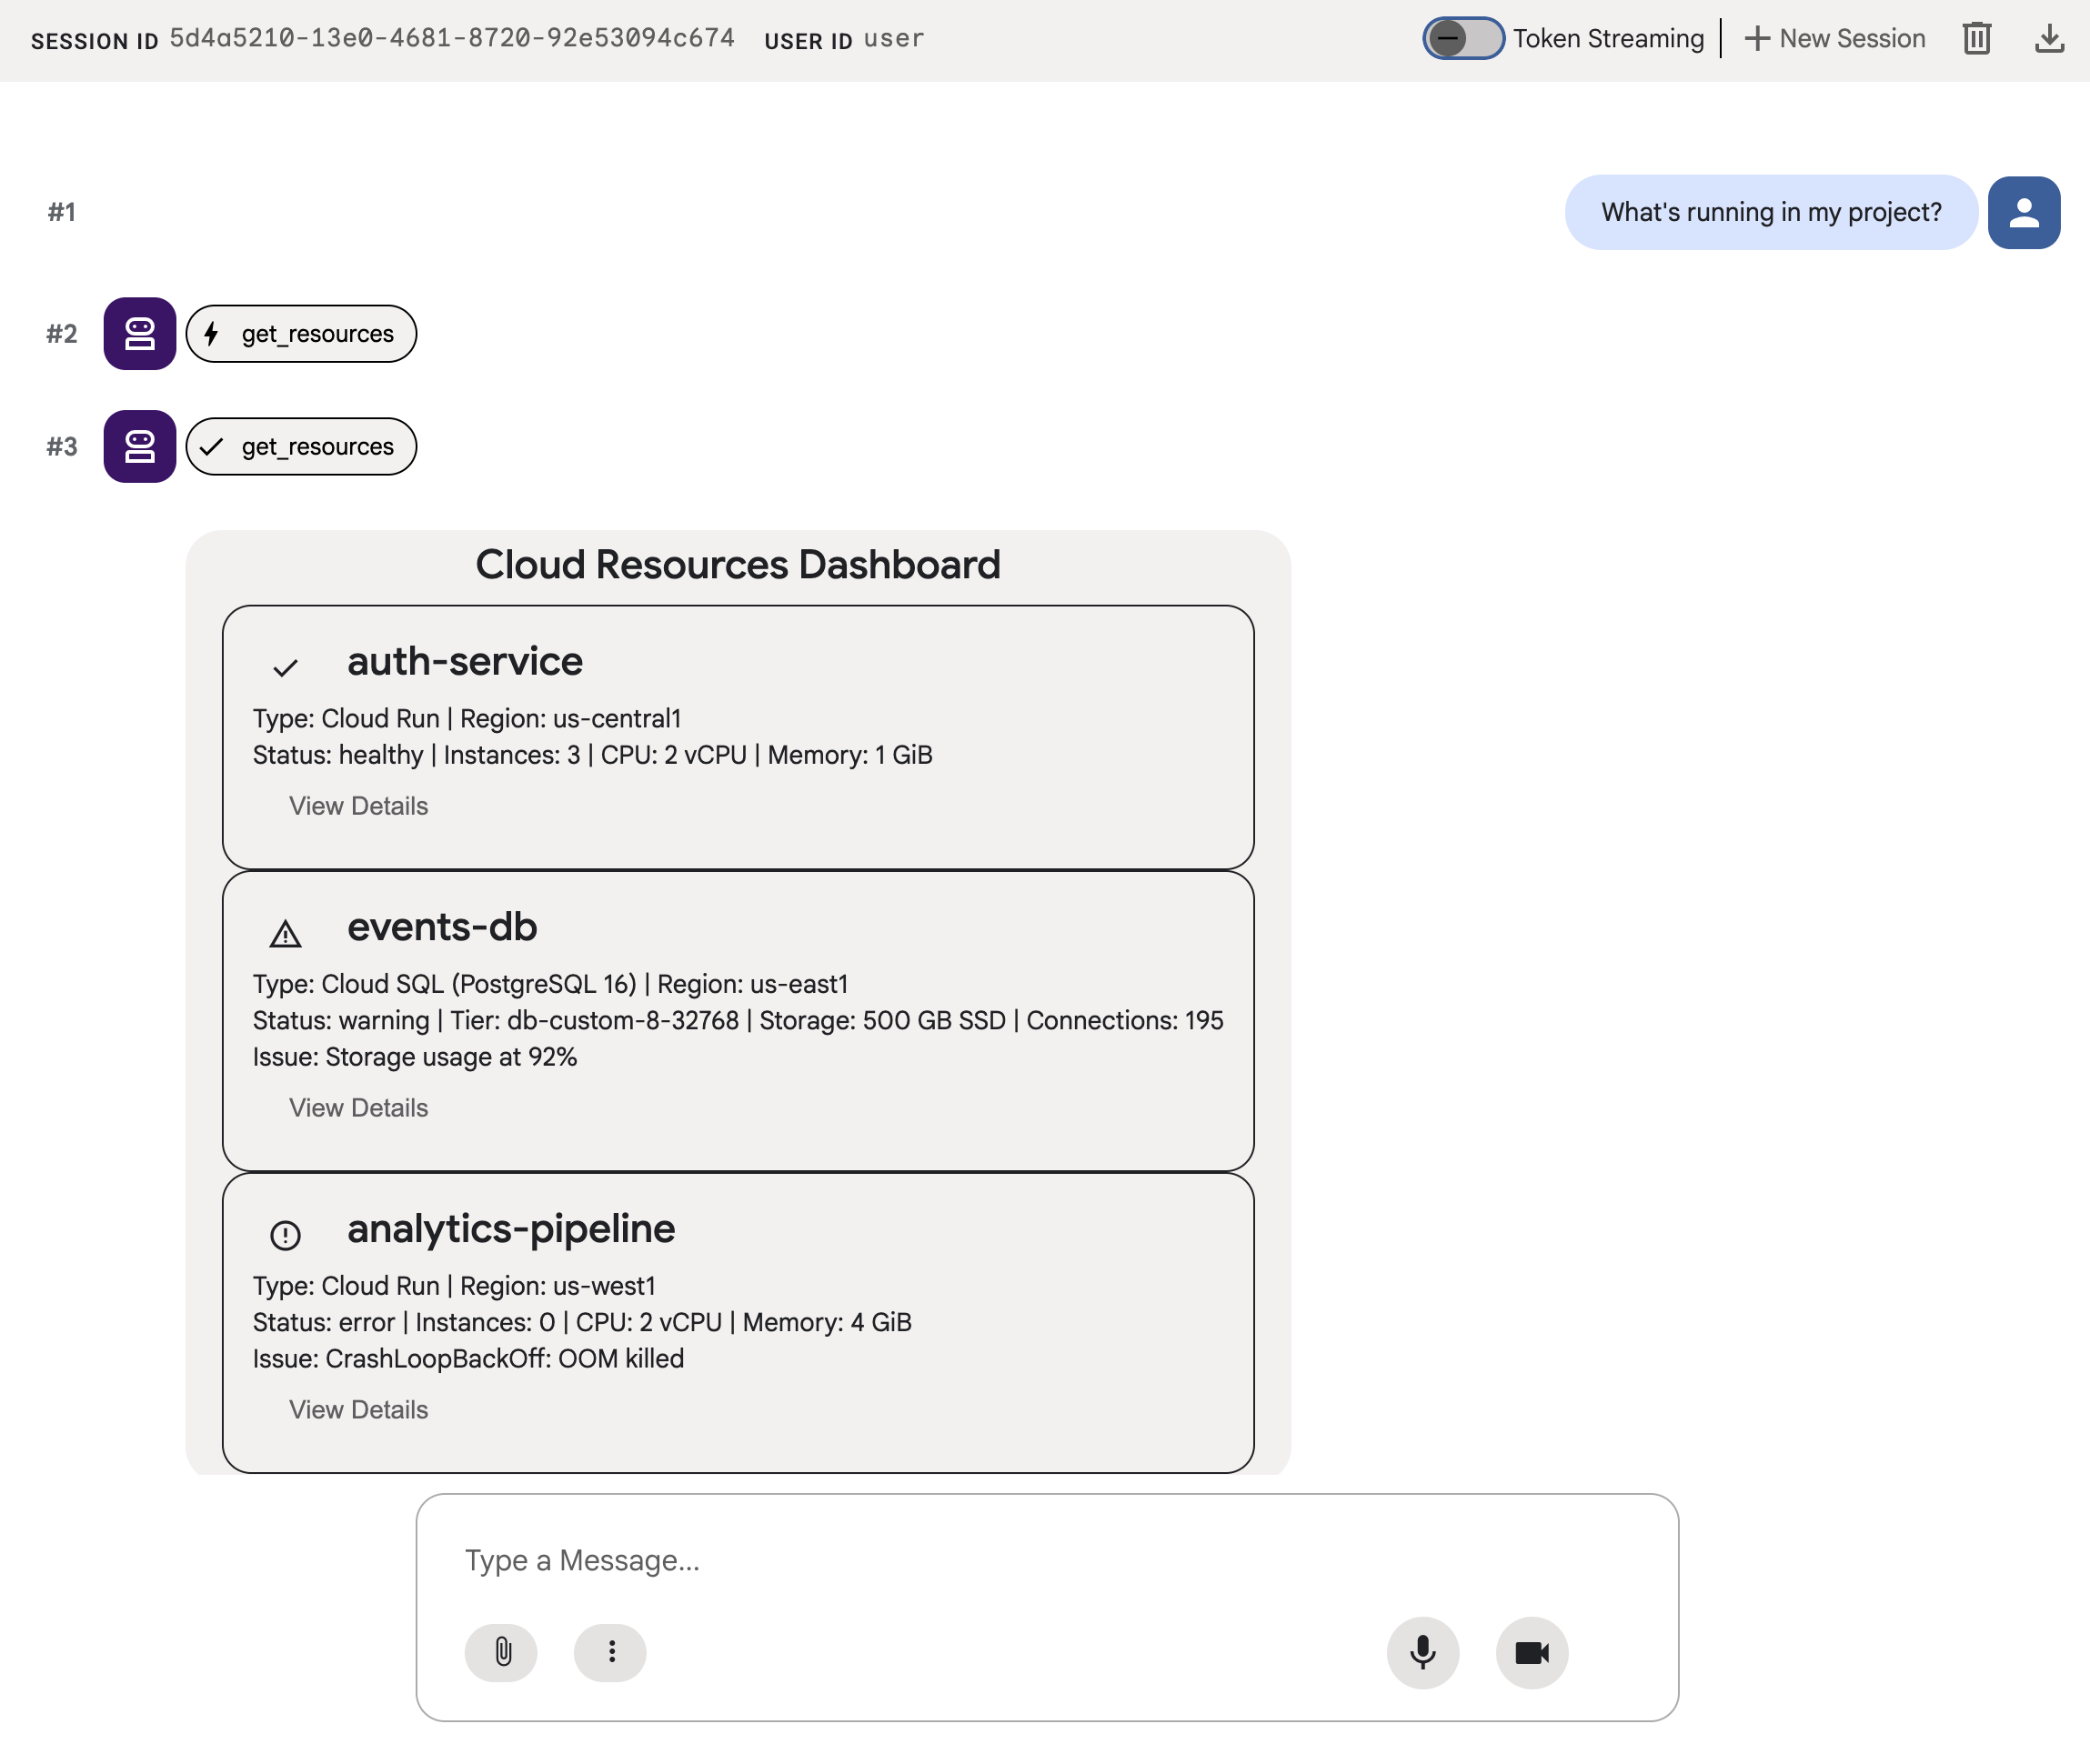
इस बार, adk web, A2UI कॉम्पोनेंट को असल यूज़र इंटरफ़ेस (यूआई) के तौर पर रेंडर करता है: स्टेटस इंडिकेटर, संसाधन की जानकारी, और कार्रवाई वाले बटन वाले कार्ड.
किसी दूसरे प्रॉम्प्ट का इस्तेमाल करके देखें कि एजेंट, प्रिमिटिव के एक ही सेट से अलग-अलग यूज़र इंटरफ़ेस (यूआई) कैसे बनाता है:
Does anything need my attention?
आखिर में, नई सेवा को डिप्लॉय करने के लिए, कोई दूसरा यूज़र इंटरफ़ेस (यूआई) जनरेट करने के लिए, कोई दूसरा प्रॉम्प्ट आज़माएं:
I need to deploy a new service
हर प्रॉम्प्ट को एक ही एजेंट, एक ही टूल, और एक ही 18 प्रिमिटिव पर भेजा जाता है. हालांकि, हर प्रॉम्प्ट से अलग-अलग मकसद के लिए अलग-अलग यूज़र इंटरफ़ेस (यूआई) मिलता है.
10. स्टोरेज में जगह बनाएं
लोकल सर्वर को चालू रखने से बचने के लिए, संसाधनों को बंद करें:
adk webचलाने वाले टर्मिनल में, एजेंट सर्वर को रोकने के लिए Ctrl+C दबाएं.
अगर आपने इस कोडलैब के लिए कोई प्रोजेक्ट बनाया है, तो पूरे प्रोजेक्ट को मिटाया जा सकता है:
gcloud projects delete ${GOOGLE_CLOUD_PROJECT}
11. बधाई हो
आपने A2UI का इस्तेमाल करके, एक ऐसा ADK एजेंट बनाया है जो रिच और इंटरैक्टिव यूज़र इंटरफ़ेस (यूआई) जनरेट करता है.
आपने क्या सीखा
- A2UI एक प्रोटोकॉल है, जिसमें 18 डिक्लेरेटिव प्रिमिटिव और तीन तरह के मैसेज होते हैं
- A2UI SDK, सिस्टम प्रॉम्प्ट जनरेट करता है. इससे एलएलएम को कॉम्पोनेंट कैटलॉग के बारे में जानकारी मिलती है
- एक ही एजेंट, टूल, और प्रिमिटिव का इस्तेमाल करके, अलग-अलग इंटेंट के लिए अलग-अलग यूज़र इंटरफ़ेस (यूआई) बनाए जाते हैं
- A2UI कॉम्पोनेंट को डेवलपमेंट के दौरान सीधे तौर पर
adk webमें रेंडर किया जा सकता है
प्रोडक्शन फ़्रंटएंड बनाना
इस कोडलैब में, आपने डेवलपमेंट और टेस्टिंग के लिए adk web में A2UI को रेंडर किया.
प्रोडक्शन के लिए, आपको आधिकारिक A2UI रेंडरर में से किसी एक का इस्तेमाल करके फ़्रंटएंड बनाना होगा:
प्लैटफ़ॉर्म | प्रतिपादक | इंस्टॉल करें |
वेब (React) |
|
|
वेब (Lit) |
|
|
वेब (Angular) |
|
|
मोबाइल/डेस्कटॉप | Flutter GenUI SDK |