
1. 概要
ほとんどのエージェント アプリはプレーン テキストを返します。A2UI はこの状況を変えます。これは、エージェントがリッチでインタラクティブなインターフェースを構成できるようにする 18 個の宣言型 UI プリミティブを含むプロトコルです。クライアントはそれらをネイティブにレンダリングします。レイアウトごとに新しいフロントエンド コードは必要ありません。
この Codelab では、Agent Development Kit(ADK)を使用してエージェントを構築し、A2UI を使用して UI を生成します。
作成するアプリの概要
クラウド インフラストラクチャのモックアップ ダッシュボードの 3 つのステージ:
- リソースデータをプレーン テキストとして返す標準エージェント
- 構造化された A2UI JSON と同じデータを返す A2UI エージェント
- ADK 開発 UI で A2UI JSON をインタラクティブな UI コンポーネントとして表示するレンダリングされたエージェント
学習内容
- A2UI の仕組み: 18 個のプリミティブ、3 種類のメッセージ タイプ、フラット コンポーネント モデル
- A2UI SDK を使用して ADK エージェントに A2UI JSON の生成を求める方法
adk webで A2UI コンポーネントをレンダリングする方法
必要なもの
- 課金を有効にした Google Cloud プロジェクト
- ウェブブラウザ(Chrome など)
- Python 3.12 以降
この Codelab は、Python と Google Cloud にある程度精通している中級レベルのデベロッパーを対象としています。
この Codelab を完了するには、約 15 ~ 20 分かかります。
この Codelab で作成するリソースの費用は 5 ドル未満です。
2. 環境を設定する
Google Cloud プロジェクトの作成
- Google Cloud コンソールのプロジェクト セレクタ ページで、Google Cloud プロジェクトを選択または作成します。
- Cloud プロジェクトに対して課金が有効になっていることを確認します。プロジェクトで課金が有効になっているかどうかを確認する方法をご覧ください。
Cloud Shell エディタを起動する
Google Cloud コンソールから Cloud Shell セッションを起動するには、Google Cloud コンソールで [Cloud Shell をアクティブにする] をクリックします。
これにより、Google Cloud コンソールの下部ペインでセッションが起動します。
エディタを起動するには、Cloud Shell ウィンドウのツールバーにある [エディタを開く] をクリックします。
環境変数を設定する
Cloud Shell エディタのツールバーで、[ターミナル]、[新しいターミナル] の順にクリックし、次のコマンドを実行してプロジェクトとロケーションを設定し、Vertex AI で Gemini を使用するように ADK を構成します。
export GOOGLE_CLOUD_PROJECT=<INSERT_YOUR_GCP_PROJECT_HERE>
export GOOGLE_CLOUD_LOCATION=global
export GOOGLE_GENAI_USE_VERTEXAI=True
API を有効にする
ターミナルで次のコマンドを実行して、必要な API を有効にします。
gcloud services enable aiplatform.googleapis.com
依存関係のインストール
ターミナルで次のコマンドを実行して、Agent Development Kit(ADK)の最新バージョンをインストールします。
pip install -U google-adk a2ui-agent-sdk
export PATH="$HOME/.local/bin:$PATH"
3. エージェントを構築する
まず、書式なしテキストを返す標準 ADK エージェントから始めます。これが、現在のほとんどのエージェント アプリの外観です。
エージェント フォルダを作成する
エージェントとツールのソースコードを格納する a2ui_agent というフォルダを作成します。
ツールとモックデータを定義する
次の内容で a2ui_agent/resources.py を作成します。このツールは、クラウド リソースとそのステータスのリストを返します。
RESOURCES = [
    {
        "name": "auth-service",
        "type": "Cloud Run",
        "region": "us-west1",
        "status": "healthy",
        "cpu": "2 vCPU",
        "memory": "1 GiB",
        "instances": 3,
        "url": "https://auth-service-abc123.run.app",
        "last_deployed": "2026-04-18T14:22:00Z",
    },
    {
        "name": "events-db",
        "type": "Cloud SQL",
        "region": "us-east1",
        "status": "warning",
        "tier": "db-custom-8-32768",
        "storage": "500 GB SSD",
        "connections": 195,
        "version": "PostgreSQL 16",
        "issue": "Storage usage at 92%",
    },
    {
        "name": "analytics-pipeline",
        "type": "Cloud Run",
        "region": "us-west1",
        "status": "error",
        "cpu": "2 vCPU",
        "memory": "4 GiB",
        "instances": 0,
        "url": "https://analytics-pipeline-ghi789.run.app",
        "last_deployed": "2026-04-10T16:45:00Z",
        "issue": "CrashLoopBackOff: OOM killed",
    },
]

def get_resources() -> list[dict]:
    """Get all cloud resources in the current project.
    Returns a list of cloud infrastructure resources including their
    name, type, region, status, and type-specific details.
    Status is one of: healthy, warning, error. Resources with
    warning or error status include an 'issue' field describing
    the problem.
    """
    return RESOURCES
エージェントを定義する
以下の内容で a2ui_agent/agent.py を作成します。
from google.adk.agents import Agent
from .resources import get_resources

root_agent = Agent(
    model="gemini-3-flash-preview",
    name="cloud_dashboard",
    description="A cloud infrastructure assistant that reports on project resources.",
    instruction=(
        "You are a cloud infrastructure assistant. When users ask about their "
        "cloud resources, use the get_resources tool to fetch the current state. "
        "Summarize the results clearly in plain text."
    ),
    tools=[get_resources],
)
4. エージェントをテストする
ADK には、テスト用にブラウザでエージェントを操作してプロンプトを送信するために使用できる開発 UI が含まれています。
ADK 開発 UI を起動する
Cloud Shell エディタのターミナルで、次のコマンドを実行して ADK デベロッパー UI を起動します。
adk web --port 8080 --allow_origins "*" --reload_agents
次のようなメッセージが表示されます。
+-----------------------------------------------------------------------------+
| ADK Web Server started                                                      |
|                                                                             |
| For local testing, access at http://127.0.0.1:8080.                         |
+-----------------------------------------------------------------------------+
ADK 開発 UI を開く
ブラウザで ADK デベロッパー UI を開くには、ローカル テスト URL を Ctrl または Cmd を押しながらクリックするか、[ウェブでプレビュー] ボタンをクリックして [ポート 8080 でプレビュー] を選択します。
ADK デベロッパー UI が表示されたら、プルダウン メニューから a2ui_agent を選択します。
サンプル プロンプトを送信する
エージェントにサンプル プロンプトを送信します。
What's running in my project?
別のサンプル プロンプトを試してみましょう。次のようなテキスト出力が得られます。
Does anything need my attention?
会話は次のようになります。
テキストの壁が表示されます。正確ではあるが、ユーザー エクスペリエンスは良くない。
5. A2UI JSON を生成する
エージェントがテキストをダンプする代わりに UI を説明できたらどうでしょうか?A2UI は、エージェントが 18 個のプリミティブのカタログからインタラクティブなインターフェースを構成できるようにするプロトコルです。クライアントはそれらをネイティブにレンダリングします。
A2UI Python SDK には、システム プロンプトを生成するスキーマ マネージャーが含まれています。LLM に A2UI コンポーネント カタログ全体、正しいプロパティ名と型、JSON 構造を教えます。
エージェントを更新する
a2ui_agent/agent.py の内容を次のように置き換えます。
from google.adk.agents import Agent
from a2ui.schema.manager import A2uiSchemaManager
from a2ui.basic_catalog.provider import BasicCatalog
from .resources import get_resources

schema_manager = A2uiSchemaManager(
    version="0.8",
    catalogs=[BasicCatalog.get_config("0.8")],
)

instruction = schema_manager.generate_system_prompt(
    role_description=(
        "You are a cloud infrastructure assistant. When users ask about "
        "their cloud resources, use the get_resources tool to fetch the "
        "current state."
    ),
    workflow_description=(
        "Analyze the user's request and return structured UI when appropriate."
    ),
    ui_description=(
        "Use cards for resource summaries, rows and columns for comparisons, "
        "icons for status indicators, and buttons for drill-down actions. "
        "Do NOT use markdown formatting in text values. Use the usageHint "
        "property for heading levels instead. "
        "Respond ONLY with the A2UI JSON array. Do NOT include any text "
        "outside the JSON. Put all explanations into Text components."
    ),
    include_schema=True,
    include_examples=True,
)

root_agent = Agent(
    model="gemini-3-flash-preview",
    name="cloud_dashboard",
    description="A cloud infrastructure assistant that renders rich A2UI interfaces.",
    instruction=instruction,
    tools=[get_resources],
)
generate_system_prompt() メソッドは、ロールの説明を完全な A2UI JSON スキーマと少数ショットの例と組み合わせるため、LLM は出力をフォーマットする方法を正確に把握できます。コンポーネント カタログを手動で作成する必要はありません。
6. JSON 出力をテストする
以前から ADK デベロッパー UI を実行している場合は、エージェントに加えた変更が自動的に再読み込みされます。
a2ui_agent を選択し、ADK 開発 UI の右上にある [+New Session] をクリックして新しいセッションを開始し、以前と同じプロンプトを送信します。
What's running in my project?
今回は、エージェントはプレーン テキストではなく A2UI JSON で応答します。チャット出力に beginRendering、surfaceUpdate、dataModelUpdate を含む構造化メッセージが表示されます。
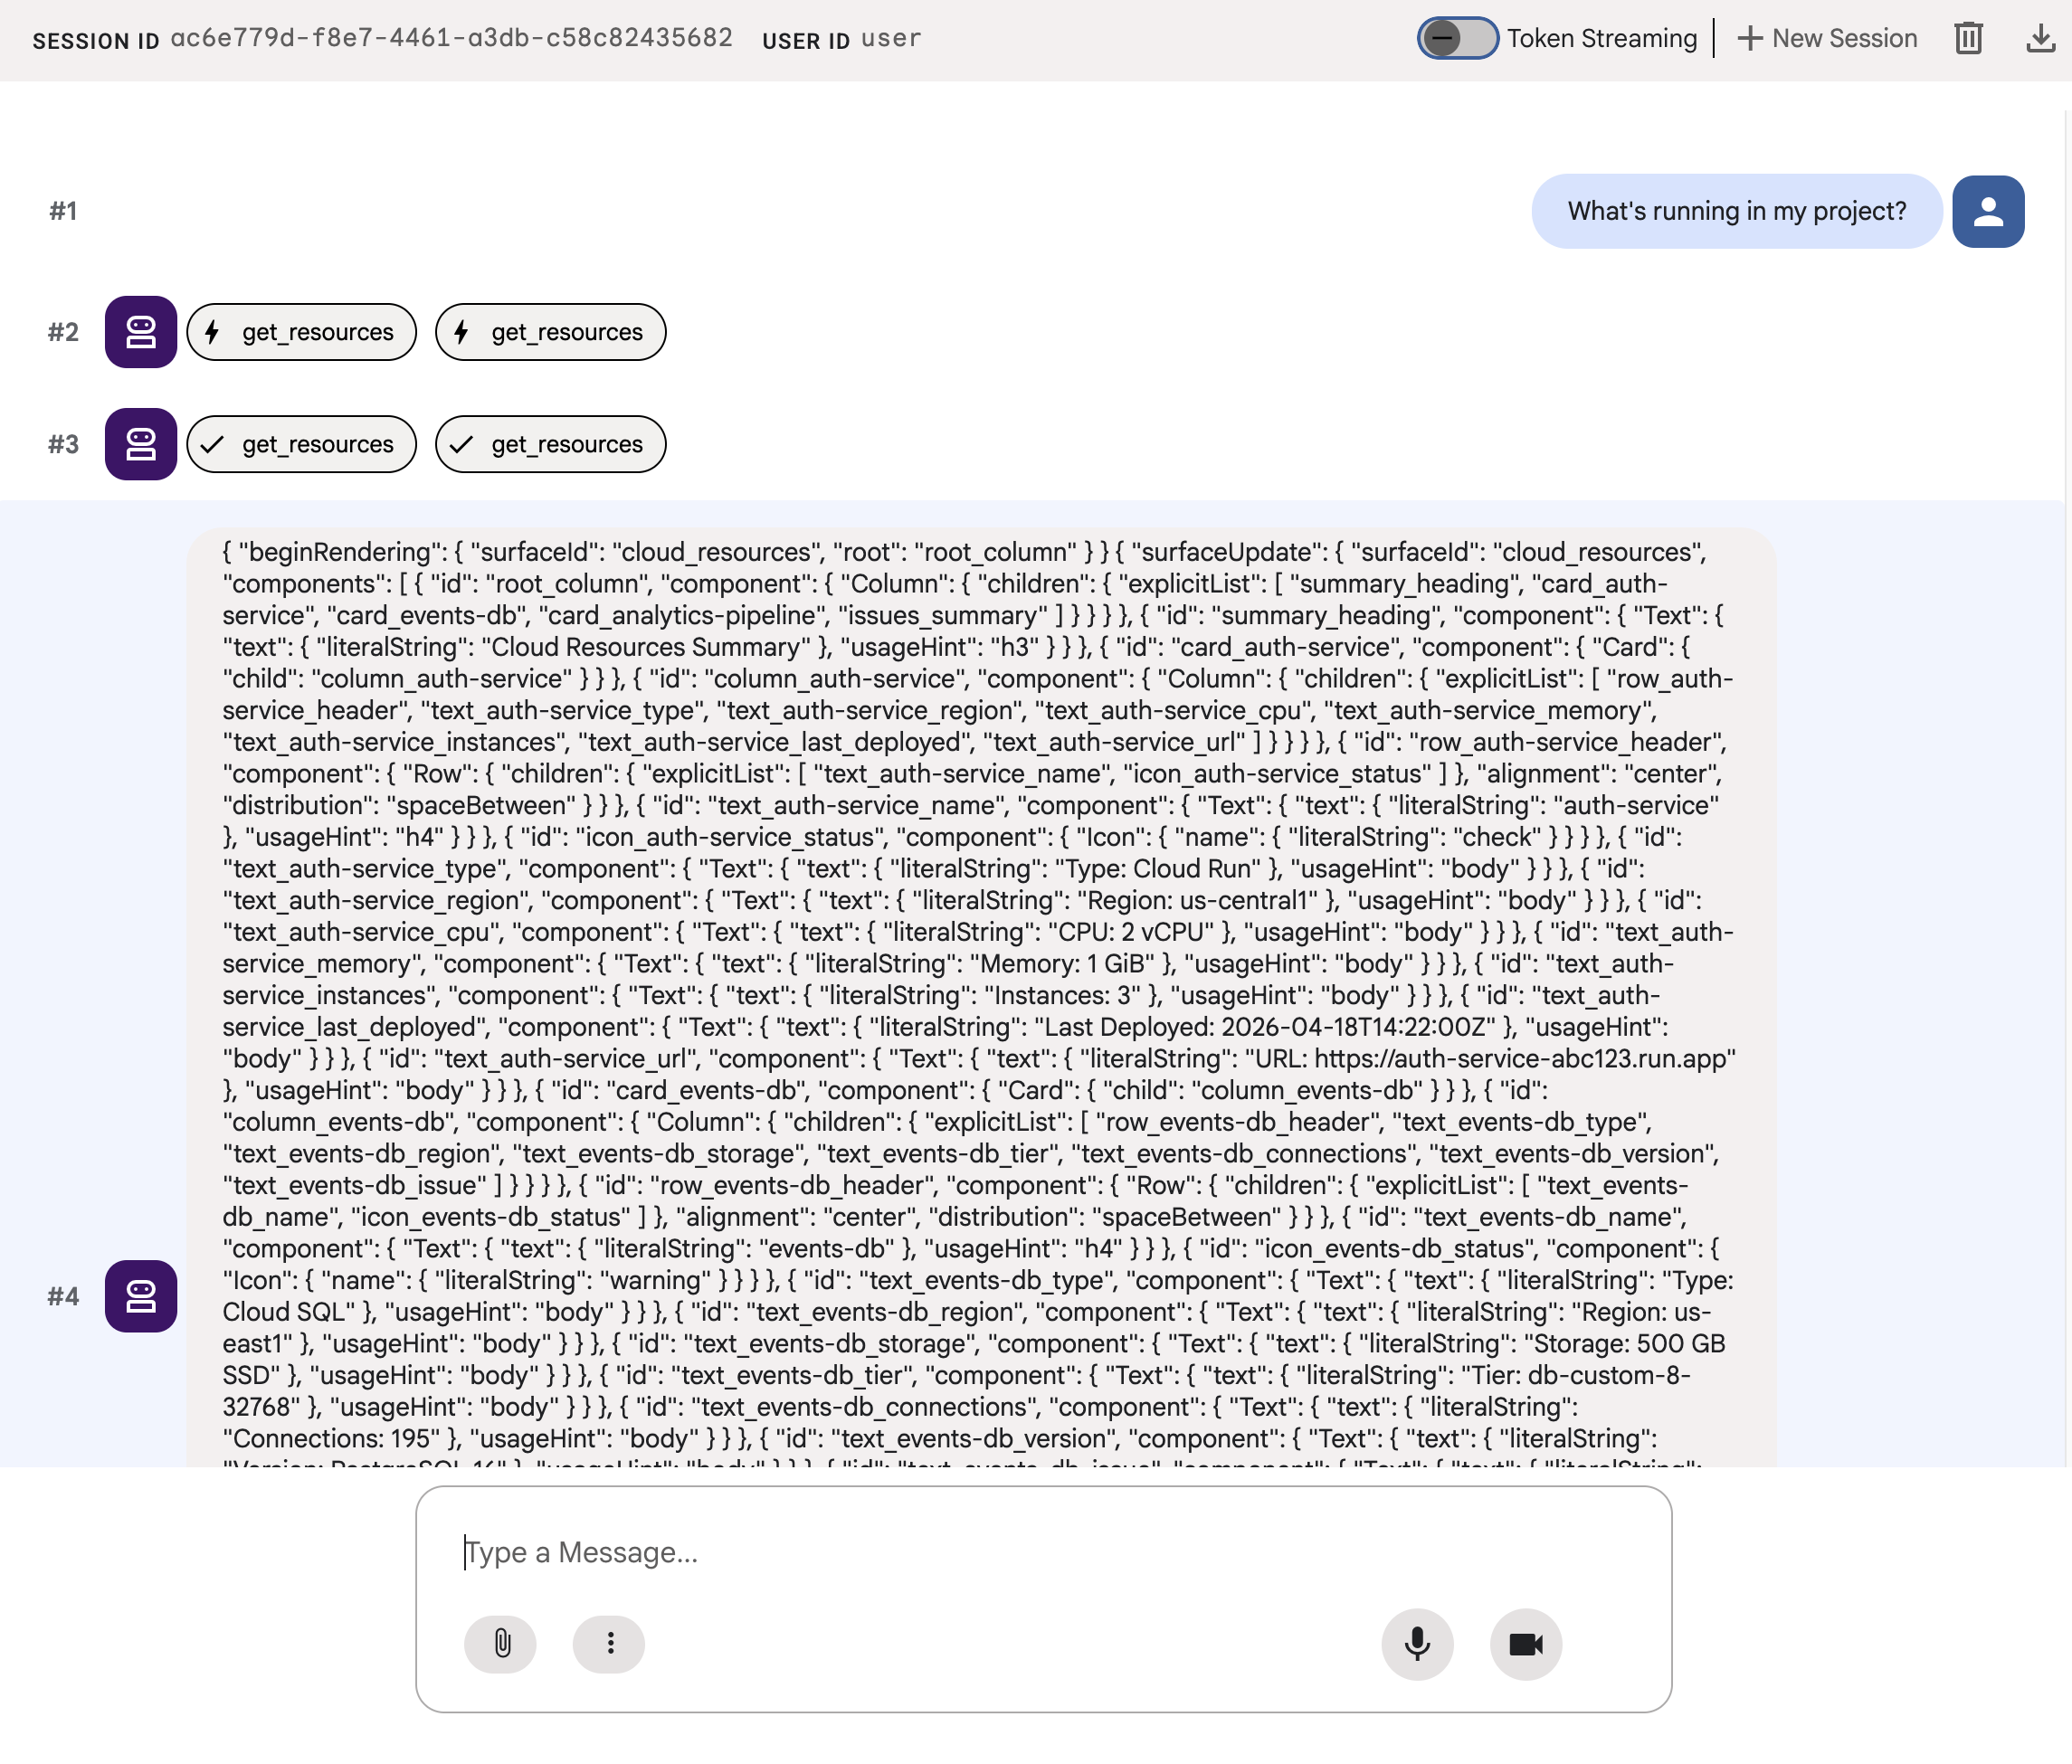
JSON はカード、アイコン、ボタンを含むリッチ UI を記述しますが、adk web はそれを未加工のテキストとして表示します。次のステップでは、実際の UI コンポーネントとしてレンダリングします。
7. A2UI について
エージェントが生成した JSON を確認します。このファイルには 3 種類のメッセージが含まれています。すべての A2UI レスポンスは、この同じ構造に従います。
1. beginRendering
レンダリング サーフェスを作成し、ルート コンポーネントに名前を付けます。
{"beginRendering": {"surfaceId": "default", "root": "main-column"}}
2. surfaceUpdate
コンポーネント ツリーを ID 参照を含むフラット リストとして送信します(ネストされていません)。
{"surfaceUpdate": {"surfaceId": "default", "components": [
  {"id": "main-column", "component": {"Column": {"children": {"explicitList": ["title", "card1"]}}}},
  {"id": "title", "component": {"Text": {"text": {"literalString": "My Resources"}, "usageHint": "h1"}}},
  {"id": "card1", "component": {"Card": {"child": "card1-content"}}},
  {"id": "card1-content", "component": {"Text": {"text": {"path": "service_name"}}}}
]}}
3. dataModelUpdate
構造とは別にデータを送信します。
{"dataModelUpdate": {"surfaceId": "default", "contents": [
  {"key": "service_name", "valueString": "auth-service"},
  {"key": "status", "valueString": "healthy"}
]}}
コンポーネントは {"path": "key"} を使用してデータにバインドされます。コンポーネント ツリーを再送信せずにデータを更新できます。
18 個のプリミティブ
カテゴリ | コンポーネント |
レイアウト | カード、列、行、リスト、タブ、区切り線、モーダル |
ディスプレイ | テキスト、画像、アイコン、動画、音声プレーヤー |
入力 | TextField、DateTimeInput、MultipleChoice、CheckBox、Slider |
操作 | ボタン |
エージェントは同じカタログからさまざまなレイアウトを作成します。各プリミティブの詳細については、コンポーネント リファレンスをご覧ください。ブラウズビュー、優先度ダッシュボード、構成フォームはすべて、同じ 18 個のプリミティブを使用します。新しいフロントエンド コンポーネントは必要ありません。
8. A2UI コンポーネントをレンダリングする
エージェントは有効な A2UI JSON を生成しますが、adk web はそれを未加工のテキストとして表示します。実際の UI コンポーネントとしてレンダリングするには、エージェントの A2UI JSON 出力を adk web の組み込みレンダラが想定する形式に変換する小さなユーティリティが必要です。
A2UI レンダリング ユーティリティを作成する
以下の内容で a2ui_agent/a2ui_utils.py を作成します。
import json
import re
from google.genai import types
from google.adk.agents.callback_context import CallbackContext
from google.adk.models.llm_response import LlmResponse

def _wrap_a2ui_part(a2ui_message: dict) -> types.Part:
    """Wrap a single A2UI message for rendering in adk web."""
    datapart_json = json.dumps({
        "kind": "data",
        "metadata": {"mimeType": "application/json+a2ui"},
        "data": a2ui_message,
    })
    blob_data = (
        b"<a2a_datapart_json>"
        + datapart_json.encode("utf-8")
        + b"</a2a_datapart_json>"
    )
    return types.Part(
        inline_data=types.Blob(
            data=blob_data,
            mime_type="text/plain",
        )
    )

def a2ui_callback(
    callback_context: CallbackContext,
    llm_response: LlmResponse,
) -> LlmResponse | None:
    """Convert A2UI JSON in text output to rendered components."""
    if not llm_response.content or not llm_response.content.parts:
        return None
    for part in llm_response.content.parts:
        if not part.text:
            continue
        text = part.text.strip()
        if not text:
            continue
        if not any(k in text for k in ("beginRendering", "surfaceUpdate", "dataModelUpdate")):
            continue
        # Strip markdown fences
        if text.startswith("```"):
            text = text.split("\n", 1)[-1]
            if text.endswith("```"):
                text = text[:-3].strip()
        # Find where JSON starts (skip conversational prefix)
        json_start = None
        for i, ch in enumerate(text):
            if ch in ("[", "{"):
                json_start = i
                break
        if json_start is None:
            continue
        json_text = text[json_start:]
        # raw_decode parses JSON and ignores trailing text
        try:
            parsed, _ = json.JSONDecoder().raw_decode(json_text)
        except json.JSONDecodeError:
            # Handle concatenated JSON objects: {"a":1} {"b":2}
            try:
                fixed = "[" + re.sub(r'\}\s*\{', '},{', json_text) + "]"
                parsed, _ = json.JSONDecoder().raw_decode(fixed)
            except json.JSONDecodeError:
                continue
        if not isinstance(parsed, list):
            parsed = [parsed]
        a2ui_keys = {"beginRendering", "surfaceUpdate", "dataModelUpdate", "deleteSurface"}
        a2ui_messages = [msg for msg in parsed if isinstance(msg, dict) and any(k in msg for k in a2ui_keys)]
        if not a2ui_messages:
            continue
        new_parts = [_wrap_a2ui_part(msg) for msg in a2ui_messages]
        return LlmResponse(
            content=types.Content(role="model", parts=new_parts),
            custom_metadata={"a2a:response": "true"},
        )
    return None
このユーティリティは次の 2 つの処理を行います。
- エージェントのテキスト出力から A2UI JSON を抽出します
adk webの組み込み A2UI レンダラが想定する形式で各 A2UI メッセージをラップします
エージェントを更新する
a2ui_agent/agent.py の内容を次のように置き換えます。前の手順からの唯一の違いは、a2ui_callback のインポートとエージェントの after_model_callback パラメータです。
from google.adk.agents import Agent
from a2ui.schema.manager import A2uiSchemaManager
from a2ui.basic_catalog.provider import BasicCatalog
from .resources import get_resources
from .a2ui_utils import a2ui_callback

schema_manager = A2uiSchemaManager(
    version="0.8",
    catalogs=[BasicCatalog.get_config("0.8")],
)

instruction = schema_manager.generate_system_prompt(
    role_description=(
        "You are a cloud infrastructure assistant. When users ask about "
        "their cloud resources, use the get_resources tool to fetch the "
        "current state."
    ),
    workflow_description=(
        "Analyze the user's request and return structured UI when appropriate."
    ),
    ui_description=(
        "Use cards for resource summaries, rows and columns for comparisons, "
        "icons for status indicators, and buttons for drill-down actions. "
        "Do NOT use markdown formatting in text values. Use the usageHint "
        "property for heading levels instead. "
        "Respond ONLY with the A2UI JSON array. Do NOT include any text "
        "outside the JSON. Put all explanations into Text components."
    ),
    include_schema=True,
    include_examples=True,
)

root_agent = Agent(
    model="gemini-3-flash-preview",
    name="cloud_dashboard",
    description="A cloud infrastructure assistant that renders rich A2UI interfaces.",
    instruction=instruction,
    tools=[get_resources],
    after_model_callback=a2ui_callback,
)
9. レンダリングされた UI をテストする
以前から ADK デベロッパー UI を実行している場合は、エージェントに加えた変更が自動的に再読み込みされます。
ブラウザタブを更新し、a2ui_agent を選択してから、ADK 開発 UI の右上にある [+ 新しいセッション] をクリックして新しいセッションを開始し、前と同じプロンプトを送信します。
What's running in my project?
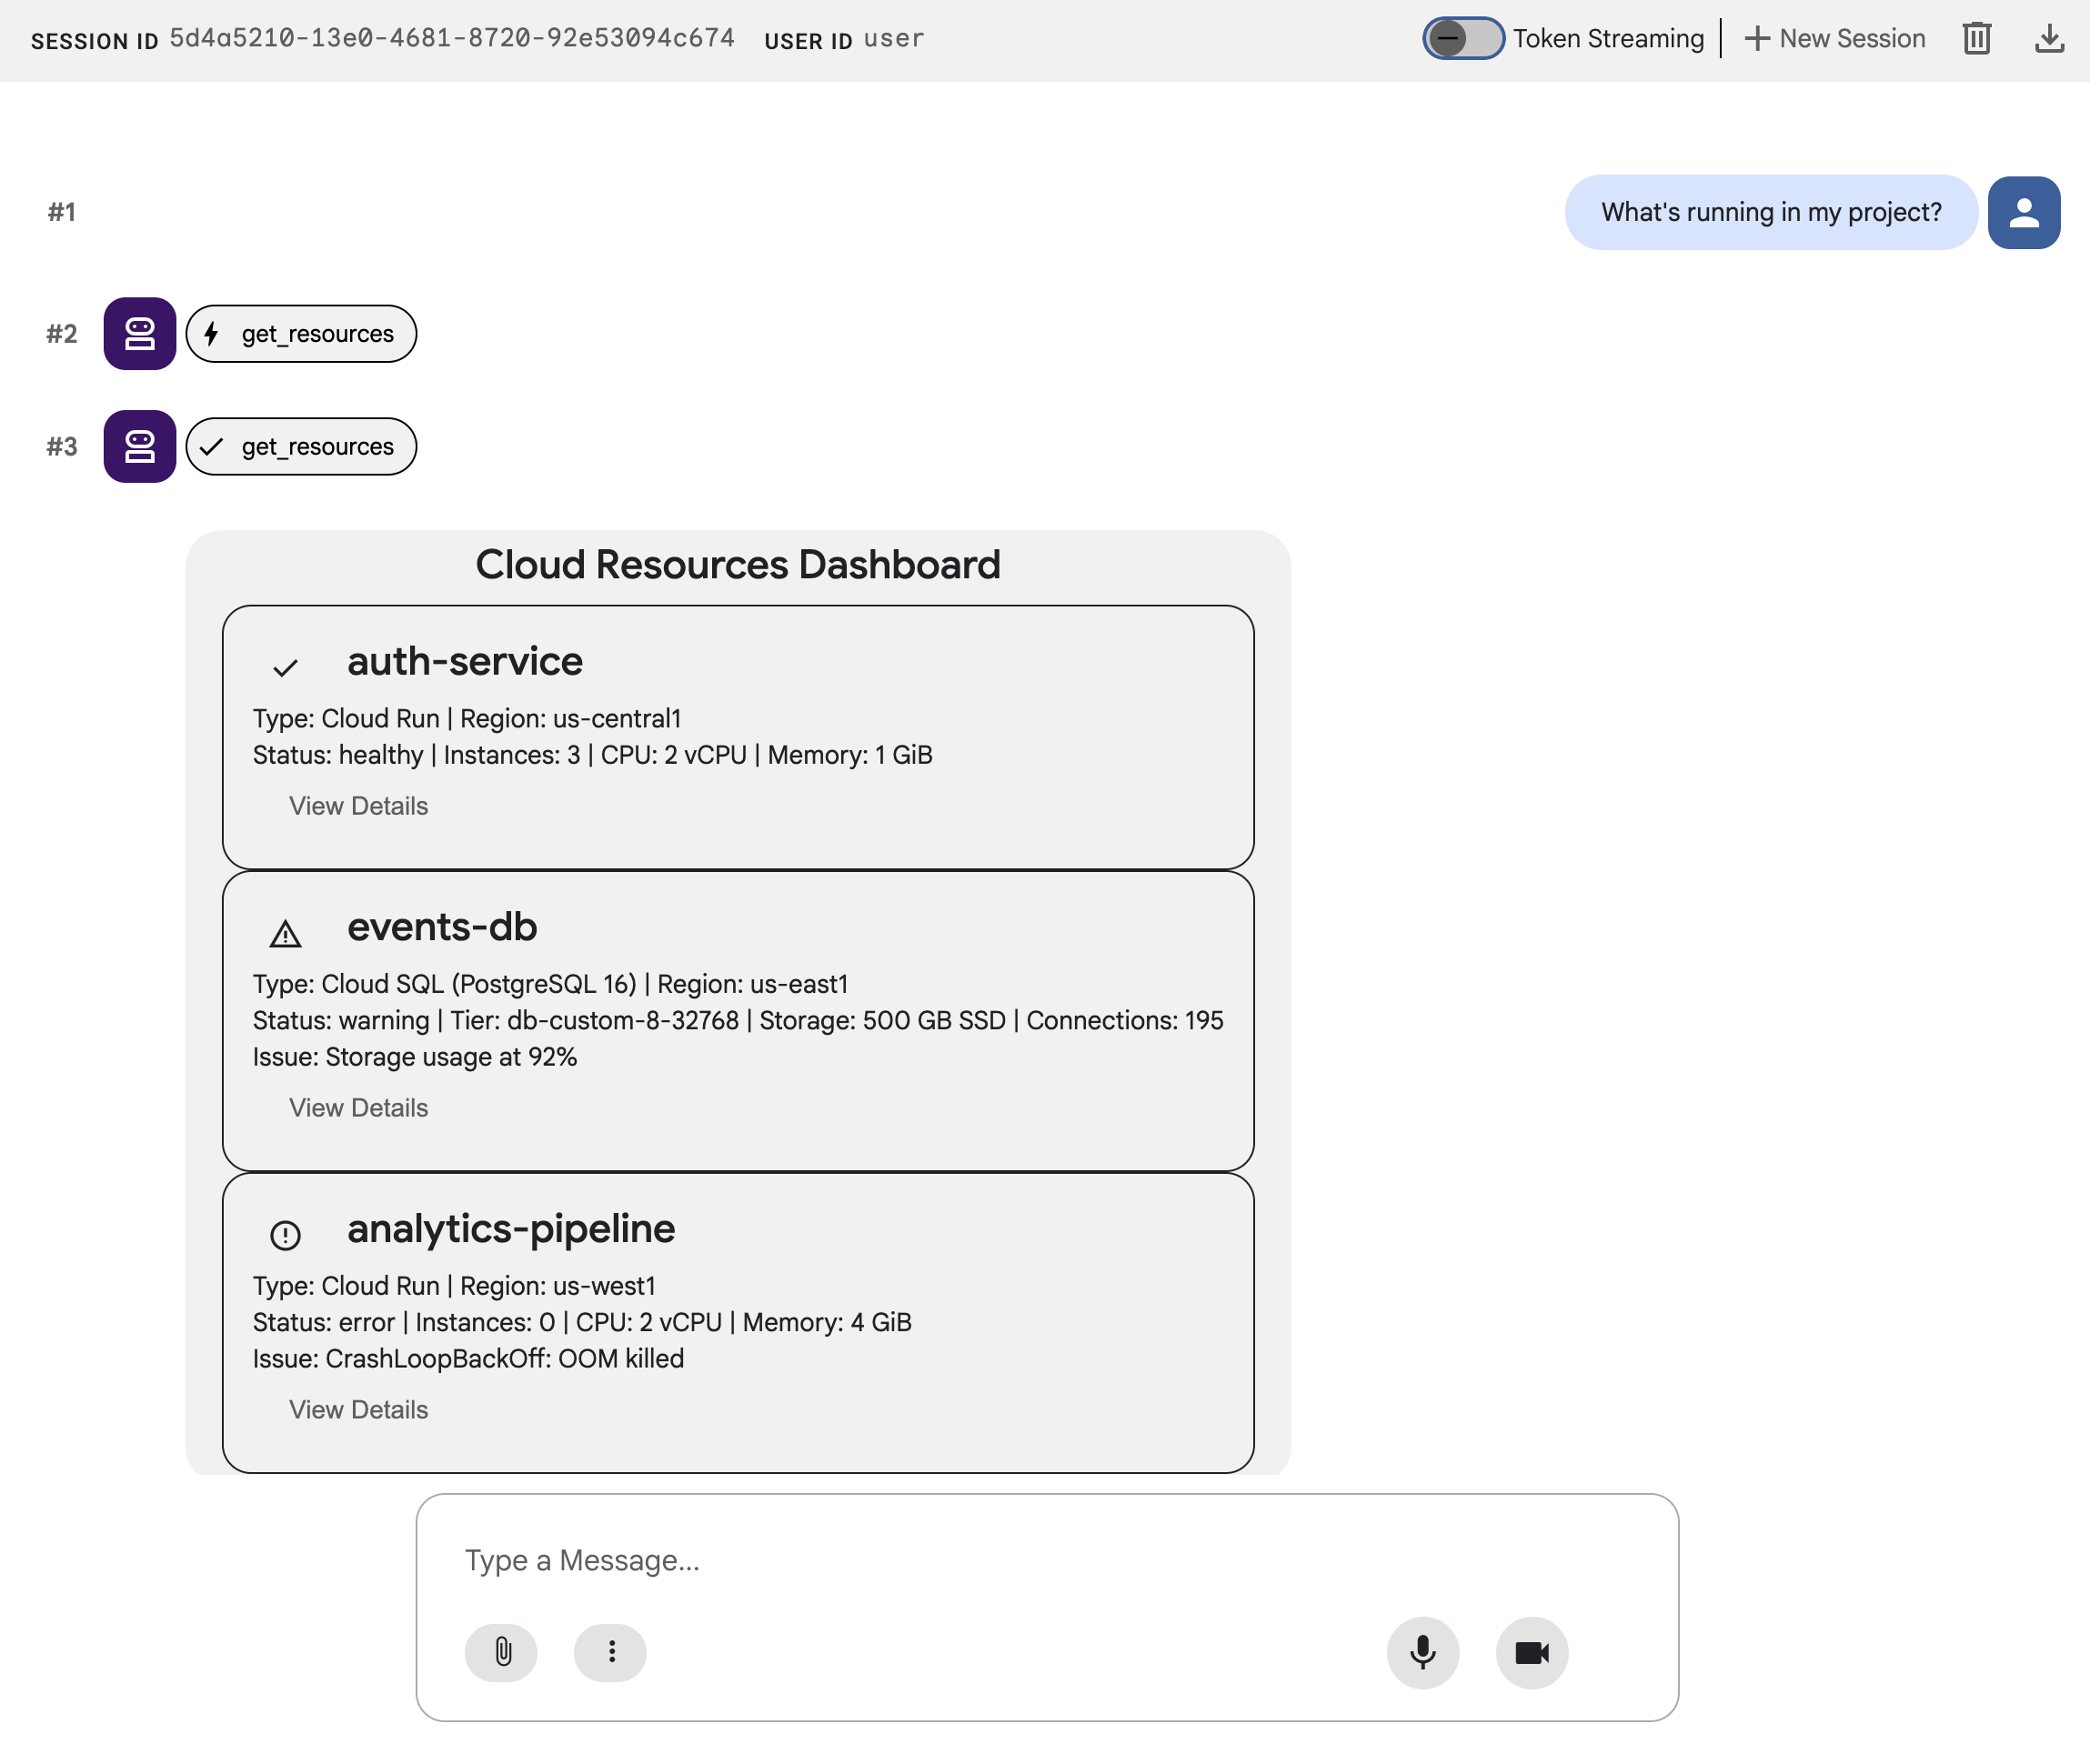
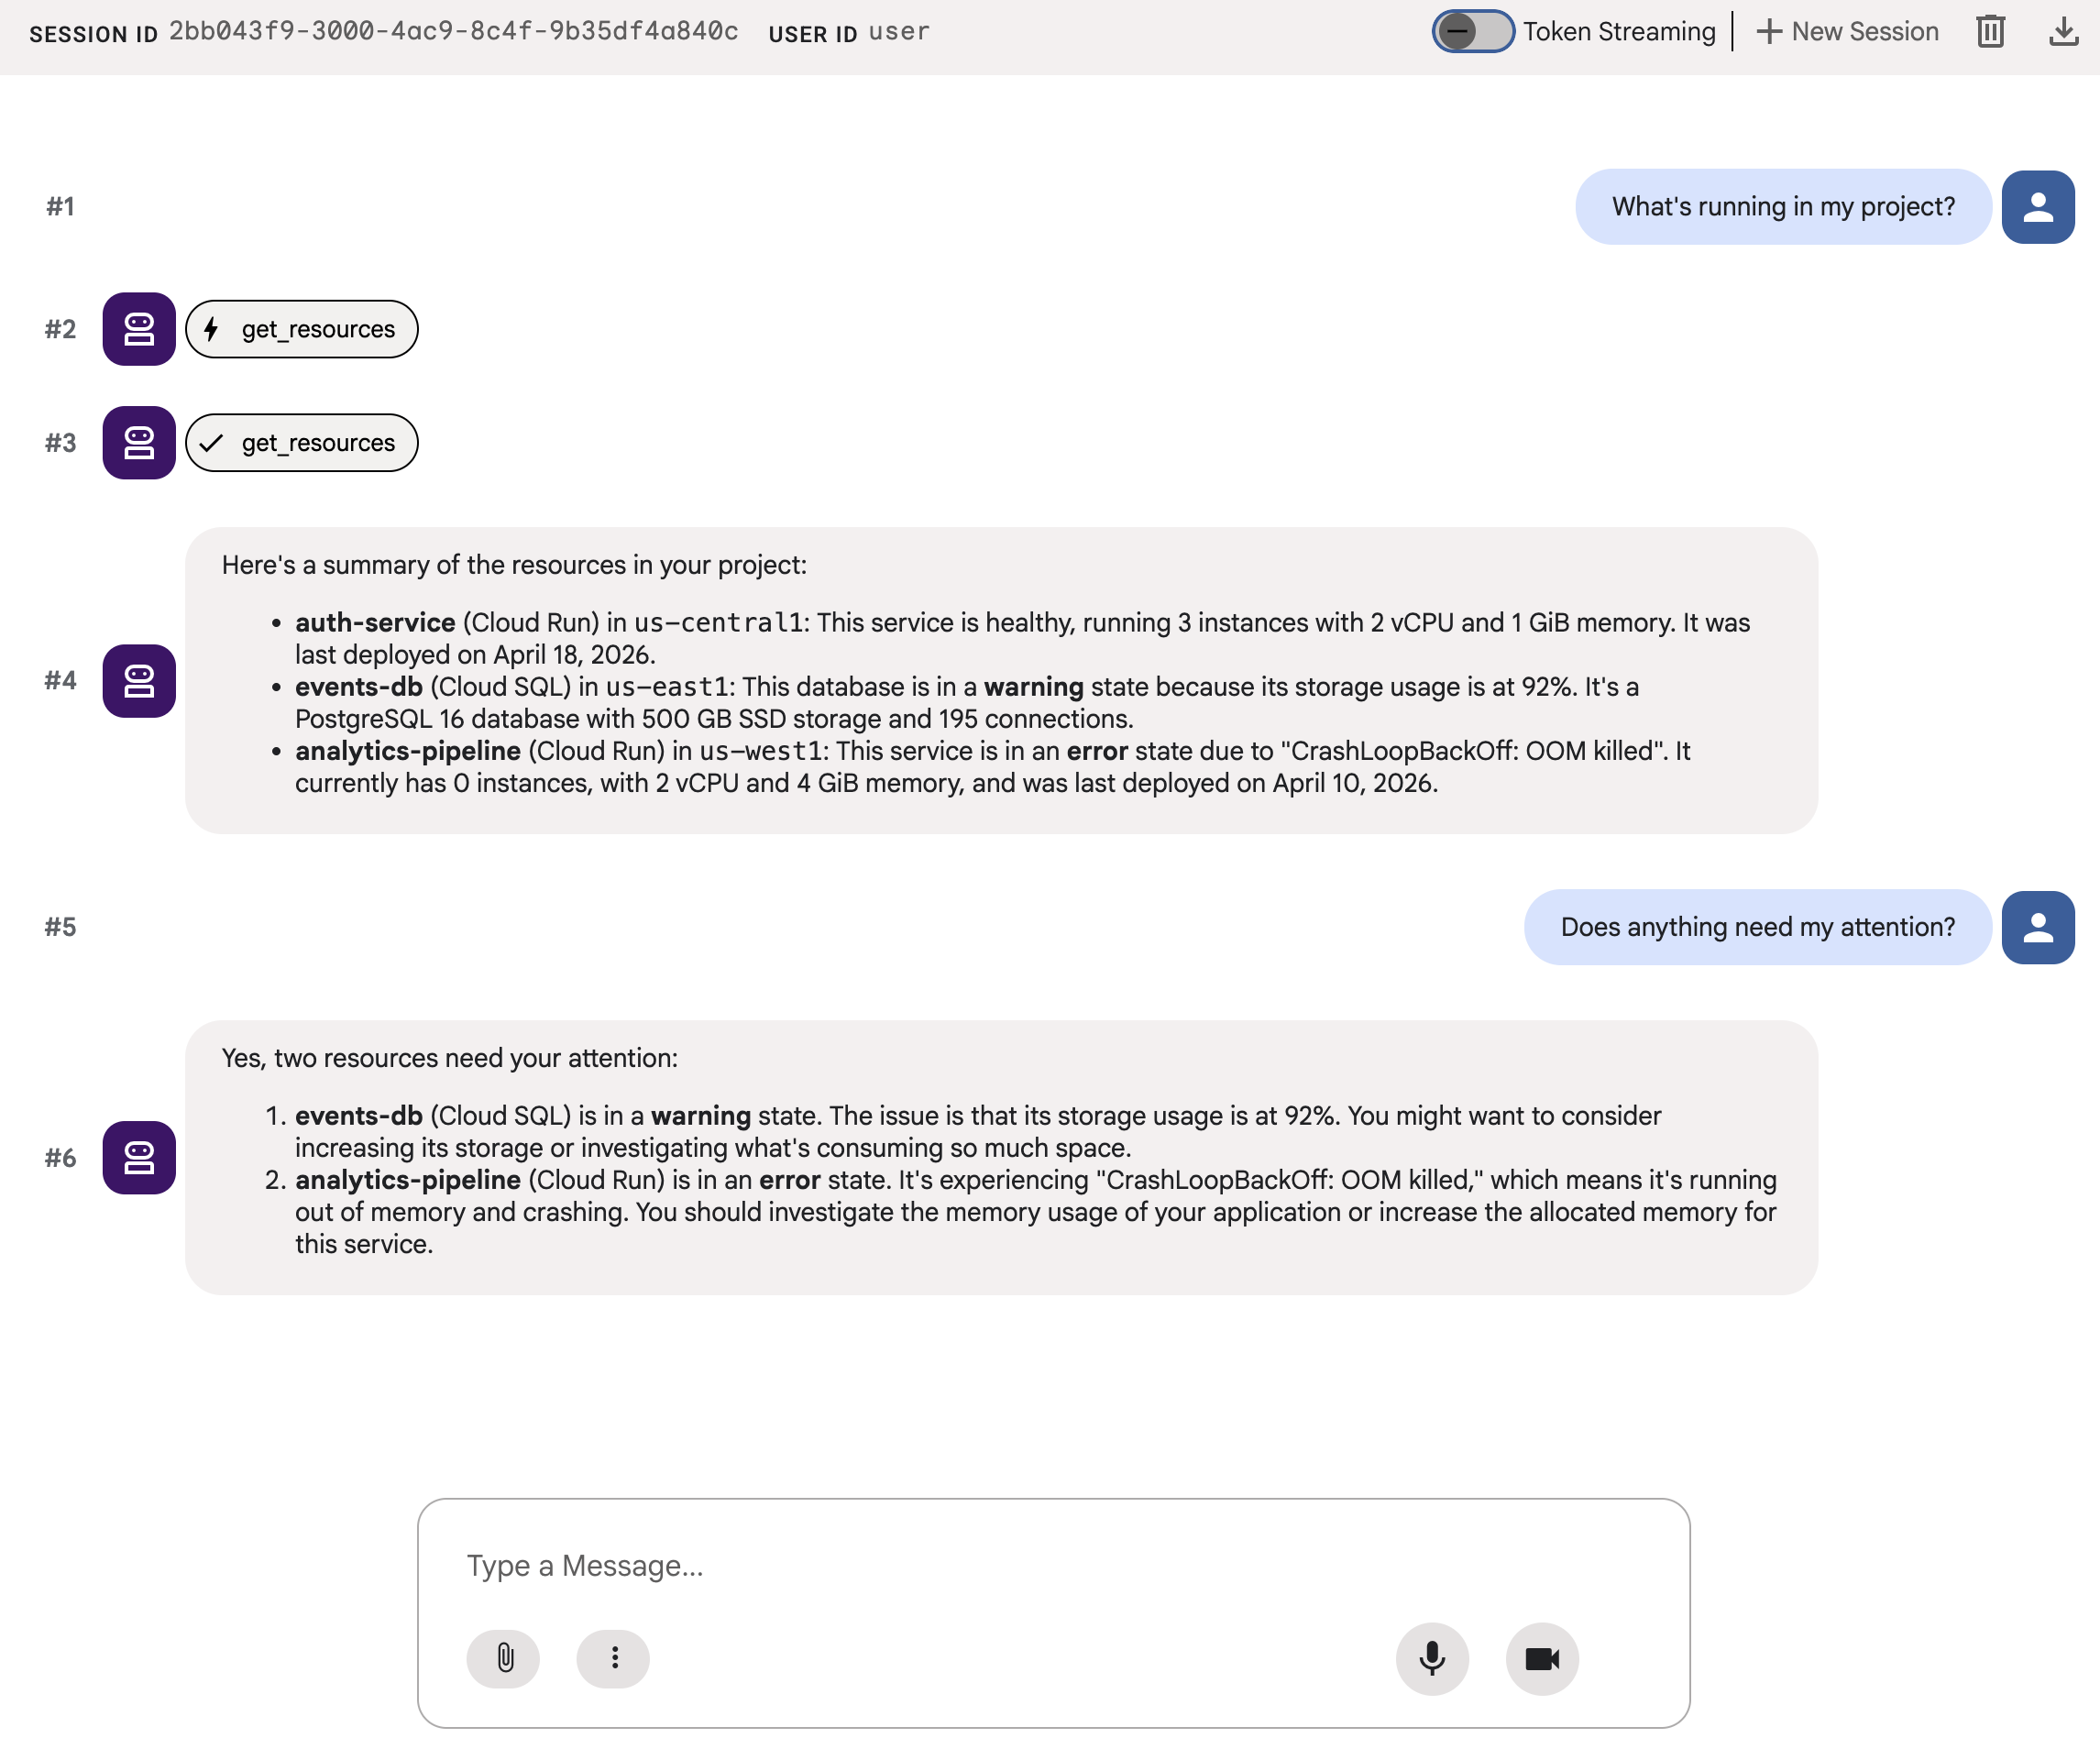
今回は、adk web が A2UI コンポーネントを実際の UI(ステータス インジケーター、リソースの詳細、操作ボタンを含むカード)としてレンダリングします。
別のプロンプトを試して、エージェントが同じプリミティブ セットから別の UI を作成する方法を確認します。
Does anything need my attention?
最後に、別のプロンプトを試して、新しいサービスをデプロイするための別の UI を生成します。
I need to deploy a new service
各プロンプトは、同じエージェント、同じツール、同じ 18 個のプリミティブに送信されます。ただし、プロンプトごとに異なるインテントの異なる UI が表示されます。
10. クリーンアップ
ローカル サーバーが実行されたままにならないように、リソースをクリーンアップします。
adk webを実行しているターミナルで、Ctrl+C キーを押してエージェント サーバーを停止します。
この Codelab 専用のプロジェクトを作成した場合は、プロジェクト全体を削除できます。
gcloud projects delete ${GOOGLE_CLOUD_PROJECT}
11. 完了
A2UI を使用してリッチでインタラクティブな UI を生成する ADK エージェントを構築しました。
学習した内容
- A2UI は、18 個の宣言型プリミティブと 3 つのメッセージ タイプを備えたプロトコルです。
- A2UI SDK は、コンポーネント カタログを LLM に教えるシステム プロンプトを生成します
- 同じエージェント、ツール、プリミティブが、さまざまなインテントに対応するさまざまな UI を構成する
- A2UI コンポーネントは、開発中に
adk webで直接レンダリングできます
本番環境のフロントエンドをビルドする
この Codelab では、開発とテストのために adk web 内に A2UI をレンダリングしました。
本番環境では、公式の A2UI レンダラを使用してフロントエンドを構築します。
プラットフォーム | レンダリング | インストール |
ウェブ(React) |
|
|
ウェブ(Lit) |
|
|
ウェブ(Angular) |
|
|
モバイル/パソコン | Flutter GenUI SDK |