
1. 개요
대부분의 에이전트 앱은 일반 텍스트를 반환합니다. A2UI는 이러한 상황을 바꿉니다. 이 프로토콜은 에이전트가 풍부한 대화형 인터페이스를 구성할 수 있는 18개의 선언적 UI 기본 요소를 갖추고 있습니다. 클라이언트가 이를 네이티브로 렌더링합니다. 레이아웃별로 새로운 프런트엔드 코드가 필요하지 않습니다.
이 Codelab에서는 에이전트 개발 키트 (ADK)를 사용하여 에이전트를 빌드하고 A2UI를 사용하여 UI를 생성합니다.
빌드할 항목
3단계로 구성된 모의 클라우드 인프라 대시보드:
- 리소스 데이터를 일반 텍스트로 반환하는 표준 에이전트
- 구조화된 A2UI JSON과 동일한 데이터를 반환하는 A2UI 에이전트
- A2UI JSON을 ADK 개발 UI에 대화형 UI 구성요소로 표시하는 렌더링된 에이전트
학습할 내용
- A2UI 작동 방식: 18개의 기본 요소, 3개의 메시지 유형, 플랫 구성요소 모델
- A2UI SDK를 사용하여 ADK 에이전트가 A2UI JSON을 생성하도록 프롬프트하는 방법
adk web에서 A2UI 구성요소를 렌더링하는 방법
필요한 항목
- 결제가 사용 설정된 Google Cloud 프로젝트
- 웹브라우저(예: Chrome)
- Python 3.12 이상
이 Codelab은 Python 및 Google Cloud에 익숙한 중급 개발자를 대상으로 합니다.
이 Codelab을 완료하는 데 약 15~20분이 소요됩니다.
이 Codelab에서 만든 리소스의 비용은 5달러 미만이어야 합니다.
2. 환경 설정
Google Cloud 프로젝트 만들기
- Google Cloud 콘솔의 프로젝트 선택기 페이지에서 Google Cloud 프로젝트를 선택하거나 만듭니다.
- Cloud 프로젝트에 결제가 사용 설정되어 있는지 확인합니다. 프로젝트에 결제가 사용 설정되어 있는지 확인하는 방법을 알아보세요.
Cloud Shell 편집기 시작
Google Cloud 콘솔에서 Cloud Shell 세션을 시작하려면 Google Cloud 콘솔에서 Cloud Shell 활성화를 클릭합니다.
그러면 Google Cloud 콘솔 하단 창에서 세션이 시작됩니다.
편집기를 실행하려면 Cloud Shell 창의 툴바에서 편집기 열기를 클릭합니다.
환경 변수 설정하기
Cloud Shell 편집기 툴바에서 터미널 및 새 터미널을 클릭한 다음 다음 명령어를 실행하여 프로젝트와 위치를 설정하고 Vertex AI에서 Gemini를 사용하도록 ADK를 구성합니다.
export GOOGLE_CLOUD_PROJECT=<INSERT_YOUR_GCP_PROJECT_HERE>
export GOOGLE_CLOUD_LOCATION=global
export GOOGLE_GENAI_USE_VERTEXAI=True
API 사용 설정
터미널에서 다음 명령어를 실행하여 필요한 API를 사용 설정합니다.
gcloud services enable aiplatform.googleapis.com
종속 항목 설치
터미널에서 다음 명령어를 실행하여 최신 버전의 에이전트 개발 키트 (ADK)를 설치합니다.
pip install -U google-adk a2ui-agent-sdk
export PATH="$HOME/.local/bin:$PATH"
3. 에이전트 빌드
일반 텍스트를 반환하는 표준 ADK 에이전트로 시작합니다. 오늘날 대부분의 에이전트 앱은 다음과 같습니다.
에이전트 폴더 만들기
에이전트 및 도구의 소스 코드가 포함될 a2ui_agent 폴더를 만듭니다.
도구 및 모의 데이터 정의
다음 콘텐츠로 a2ui_agent/resources.py을 만듭니다. 이 도구는 클라우드 리소스 목록과 상태를 반환합니다.
RESOURCES = [
    {
        "name": "auth-service",
        "type": "Cloud Run",
        "region": "us-west1",
        "status": "healthy",
        "cpu": "2 vCPU",
        "memory": "1 GiB",
        "instances": 3,
        "url": "https://auth-service-abc123.run.app",
        "last_deployed": "2026-04-18T14:22:00Z",
    },
    {
        "name": "events-db",
        "type": "Cloud SQL",
        "region": "us-east1",
        "status": "warning",
        "tier": "db-custom-8-32768",
        "storage": "500 GB SSD",
        "connections": 195,
        "version": "PostgreSQL 16",
        "issue": "Storage usage at 92%",
    },
    {
        "name": "analytics-pipeline",
        "type": "Cloud Run",
        "region": "us-west1",
        "status": "error",
        "cpu": "2 vCPU",
        "memory": "4 GiB",
        "instances": 0,
        "url": "https://analytics-pipeline-ghi789.run.app",
        "last_deployed": "2026-04-10T16:45:00Z",
        "issue": "CrashLoopBackOff: OOM killed",
    },
]

def get_resources() -> list[dict]:
    """Get all cloud resources in the current project.
    Returns a list of cloud infrastructure resources including their
    name, type, region, status, and type-specific details.
    Status is one of: healthy, warning, error. Resources with
    warning or error status include an 'issue' field describing
    the problem.
    """
    return RESOURCES
에이전트 정의
다음 콘텐츠로 a2ui_agent/agent.py를 만듭니다.
from google.adk.agents import Agent
from .resources import get_resources

root_agent = Agent(
    model="gemini-3-flash-preview",
    name="cloud_dashboard",
    description="A cloud infrastructure assistant that reports on project resources.",
    instruction=(
        "You are a cloud infrastructure assistant. When users ask about their "
        "cloud resources, use the get_resources tool to fetch the current state. "
        "Summarize the results clearly in plain text."
    ),
    tools=[get_resources],
)
4. 에이전트 테스트
ADK에는 브라우저에서 에이전트와 상호작용하고 프롬프트를 전송하여 테스트할 수 있는 개발 UI가 포함되어 있습니다.
ADK 개발 UI 시작
Cloud Shell 편집기 터미널에서 다음 명령어를 실행하여 ADK 개발 UI를 시작합니다.
adk web --port 8080 --allow_origins "*" --reload_agents
다음과 유사한 메시지가 표시됩니다.
+-----------------------------------------------------------------------------+
| ADK Web Server started                                                      |
|                                                                             |
| For local testing, access at http://127.0.0.1:8080.                         |
+-----------------------------------------------------------------------------+
ADK 개발 UI 열기
Ctrl 또는 Cmd 키를 누른 상태에서 로컬 테스트 URL을 클릭하거나 웹 미리보기 버튼을 클릭하고 포트 8080에서 미리보기를 선택하여 브라우저에서 ADK 개발 UI를 열 수 있습니다.
ADK 개발 UI를 보고 있다면 드롭다운 메뉴에서 a2ui_agent를 선택합니다.
샘플 프롬프트 보내기
에이전트에게 샘플 프롬프트를 보냅니다.
What's running in my project?
이제 다른 샘플 프롬프트를 사용해 보세요. 더 많은 텍스트 출력이 표시됩니다.
Does anything need my attention?
대화는 다음과 유사해야 합니다.
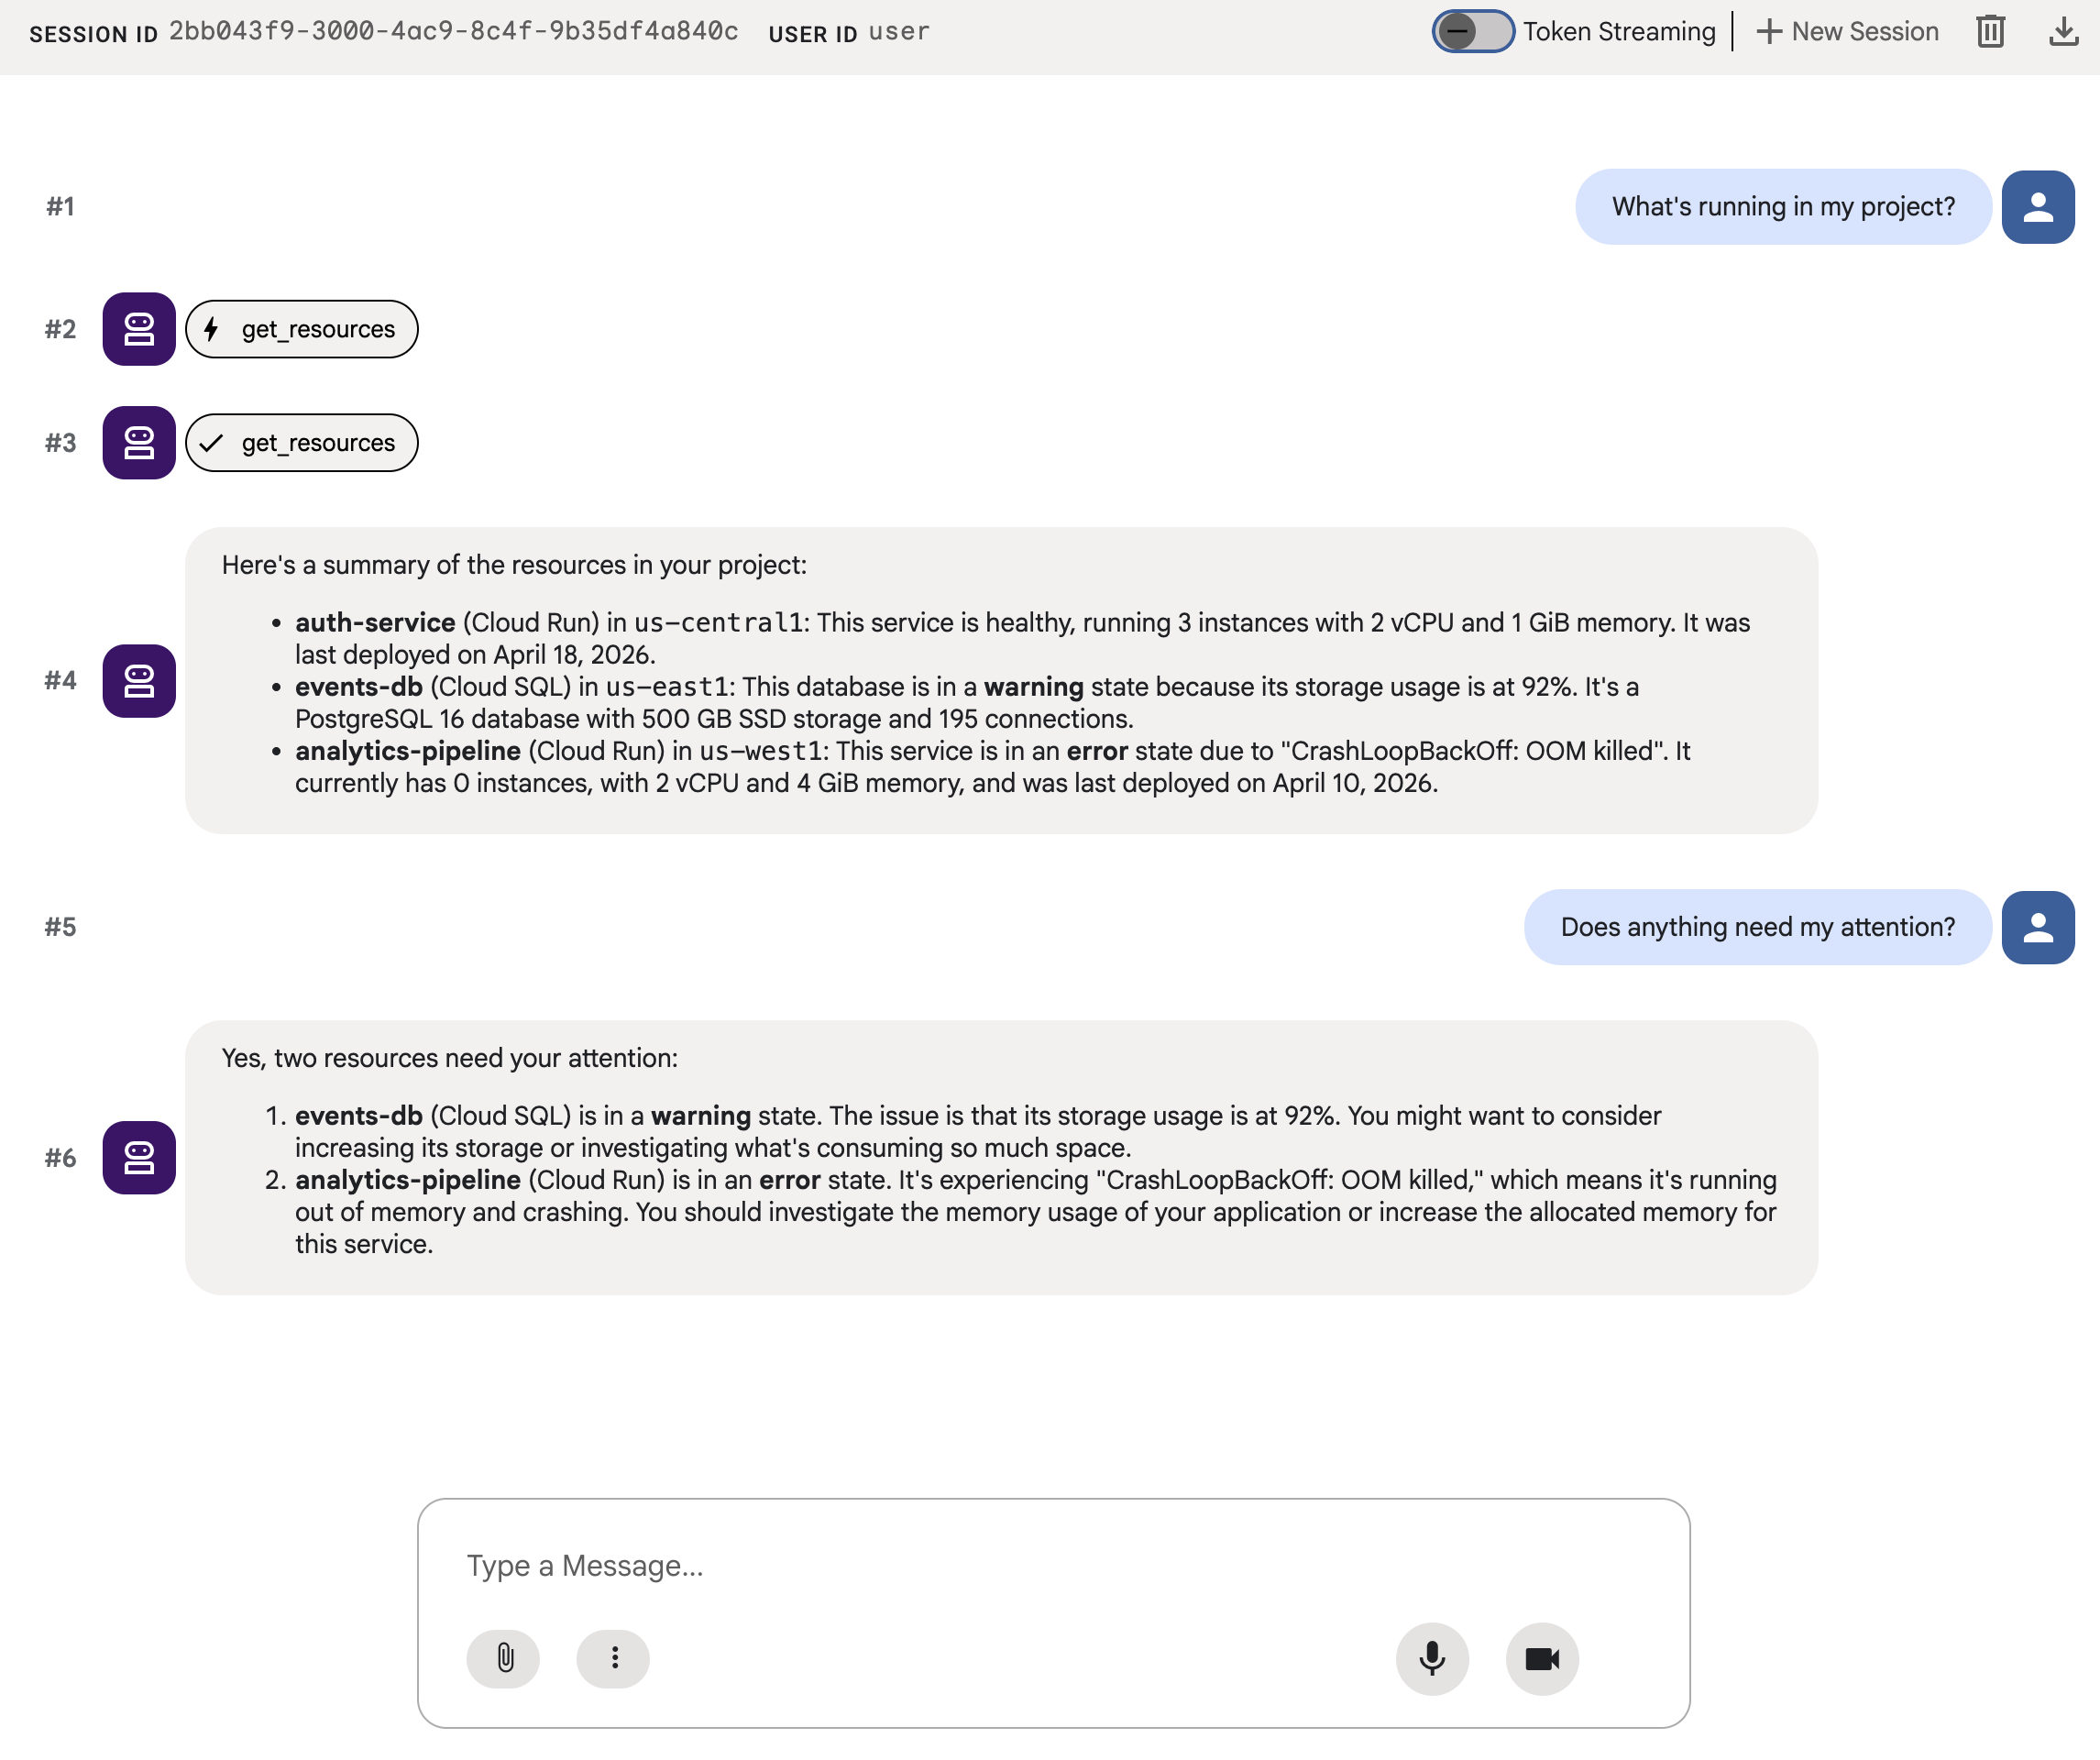
그러면 텍스트가 많이 표시됩니다. 정확하지만 사용자 환경이 좋지 않습니다.
5. A2UI JSON 생성
상담사가 텍스트를 덤프하는 대신 UI를 설명할 수 있다면 어떨까요? A2UI는 에이전트가 18개의 기본 요소 카탈로그에서 대화형 인터페이스를 구성할 수 있도록 지원하는 프로토콜입니다. 클라이언트가 이를 네이티브로 렌더링합니다.
A2UI Python SDK에는 시스템 프롬프트를 생성하는 스키마 관리자가 포함되어 있습니다. LLM에 전체 A2UI 구성요소 카탈로그, 올바른 속성 이름과 유형, JSON 구조를 학습시킵니다.
에이전트 업데이트
a2ui_agent/agent.py의 내용을 다음으로 바꿉니다.
from google.adk.agents import Agent
from a2ui.schema.manager import A2uiSchemaManager
from a2ui.basic_catalog.provider import BasicCatalog
from .resources import get_resources

schema_manager = A2uiSchemaManager(
    version="0.8",
    catalogs=[BasicCatalog.get_config("0.8")],
)

instruction = schema_manager.generate_system_prompt(
    role_description=(
        "You are a cloud infrastructure assistant. When users ask about "
        "their cloud resources, use the get_resources tool to fetch the "
        "current state."
    ),
    workflow_description=(
        "Analyze the user's request and return structured UI when appropriate."
    ),
    ui_description=(
        "Use cards for resource summaries, rows and columns for comparisons, "
        "icons for status indicators, and buttons for drill-down actions. "
        "Do NOT use markdown formatting in text values. Use the usageHint "
        "property for heading levels instead. "
        "Respond ONLY with the A2UI JSON array. Do NOT include any text "
        "outside the JSON. Put all explanations into Text components."
    ),
    include_schema=True,
    include_examples=True,
)

root_agent = Agent(
    model="gemini-3-flash-preview",
    name="cloud_dashboard",
    description="A cloud infrastructure assistant that renders rich A2UI interfaces.",
    instruction=instruction,
    tools=[get_resources],
)
generate_system_prompt() 메서드는 역할 설명과 전체 A2UI JSON 스키마, 퓨샷 예시를 결합하므로 LLM이 출력 형식을 정확히 알 수 있습니다. 구성요소 카탈로그를 직접 작성할 필요가 없습니다.
6. JSON 출력 테스트
이전에 실행한 ADK 개발 UI가 아직 실행 중인 경우 에이전트에 적용한 변경사항이 자동으로 다시 로드됩니다.
a2ui_agent를 선택하고 ADK 개발 UI의 오른쪽 상단에 있는 +새 세션을 클릭하여 새 세션을 시작한 후 이전과 동일한 프롬프트를 보냅니다.
What's running in my project?
이번에는 에이전트가 일반 텍스트 대신 A2UI JSON으로 응답합니다. 채팅 출력에 beginRendering, surfaceUpdate, dataModelUpdate가 포함된 구조화된 메시지가 표시됩니다.
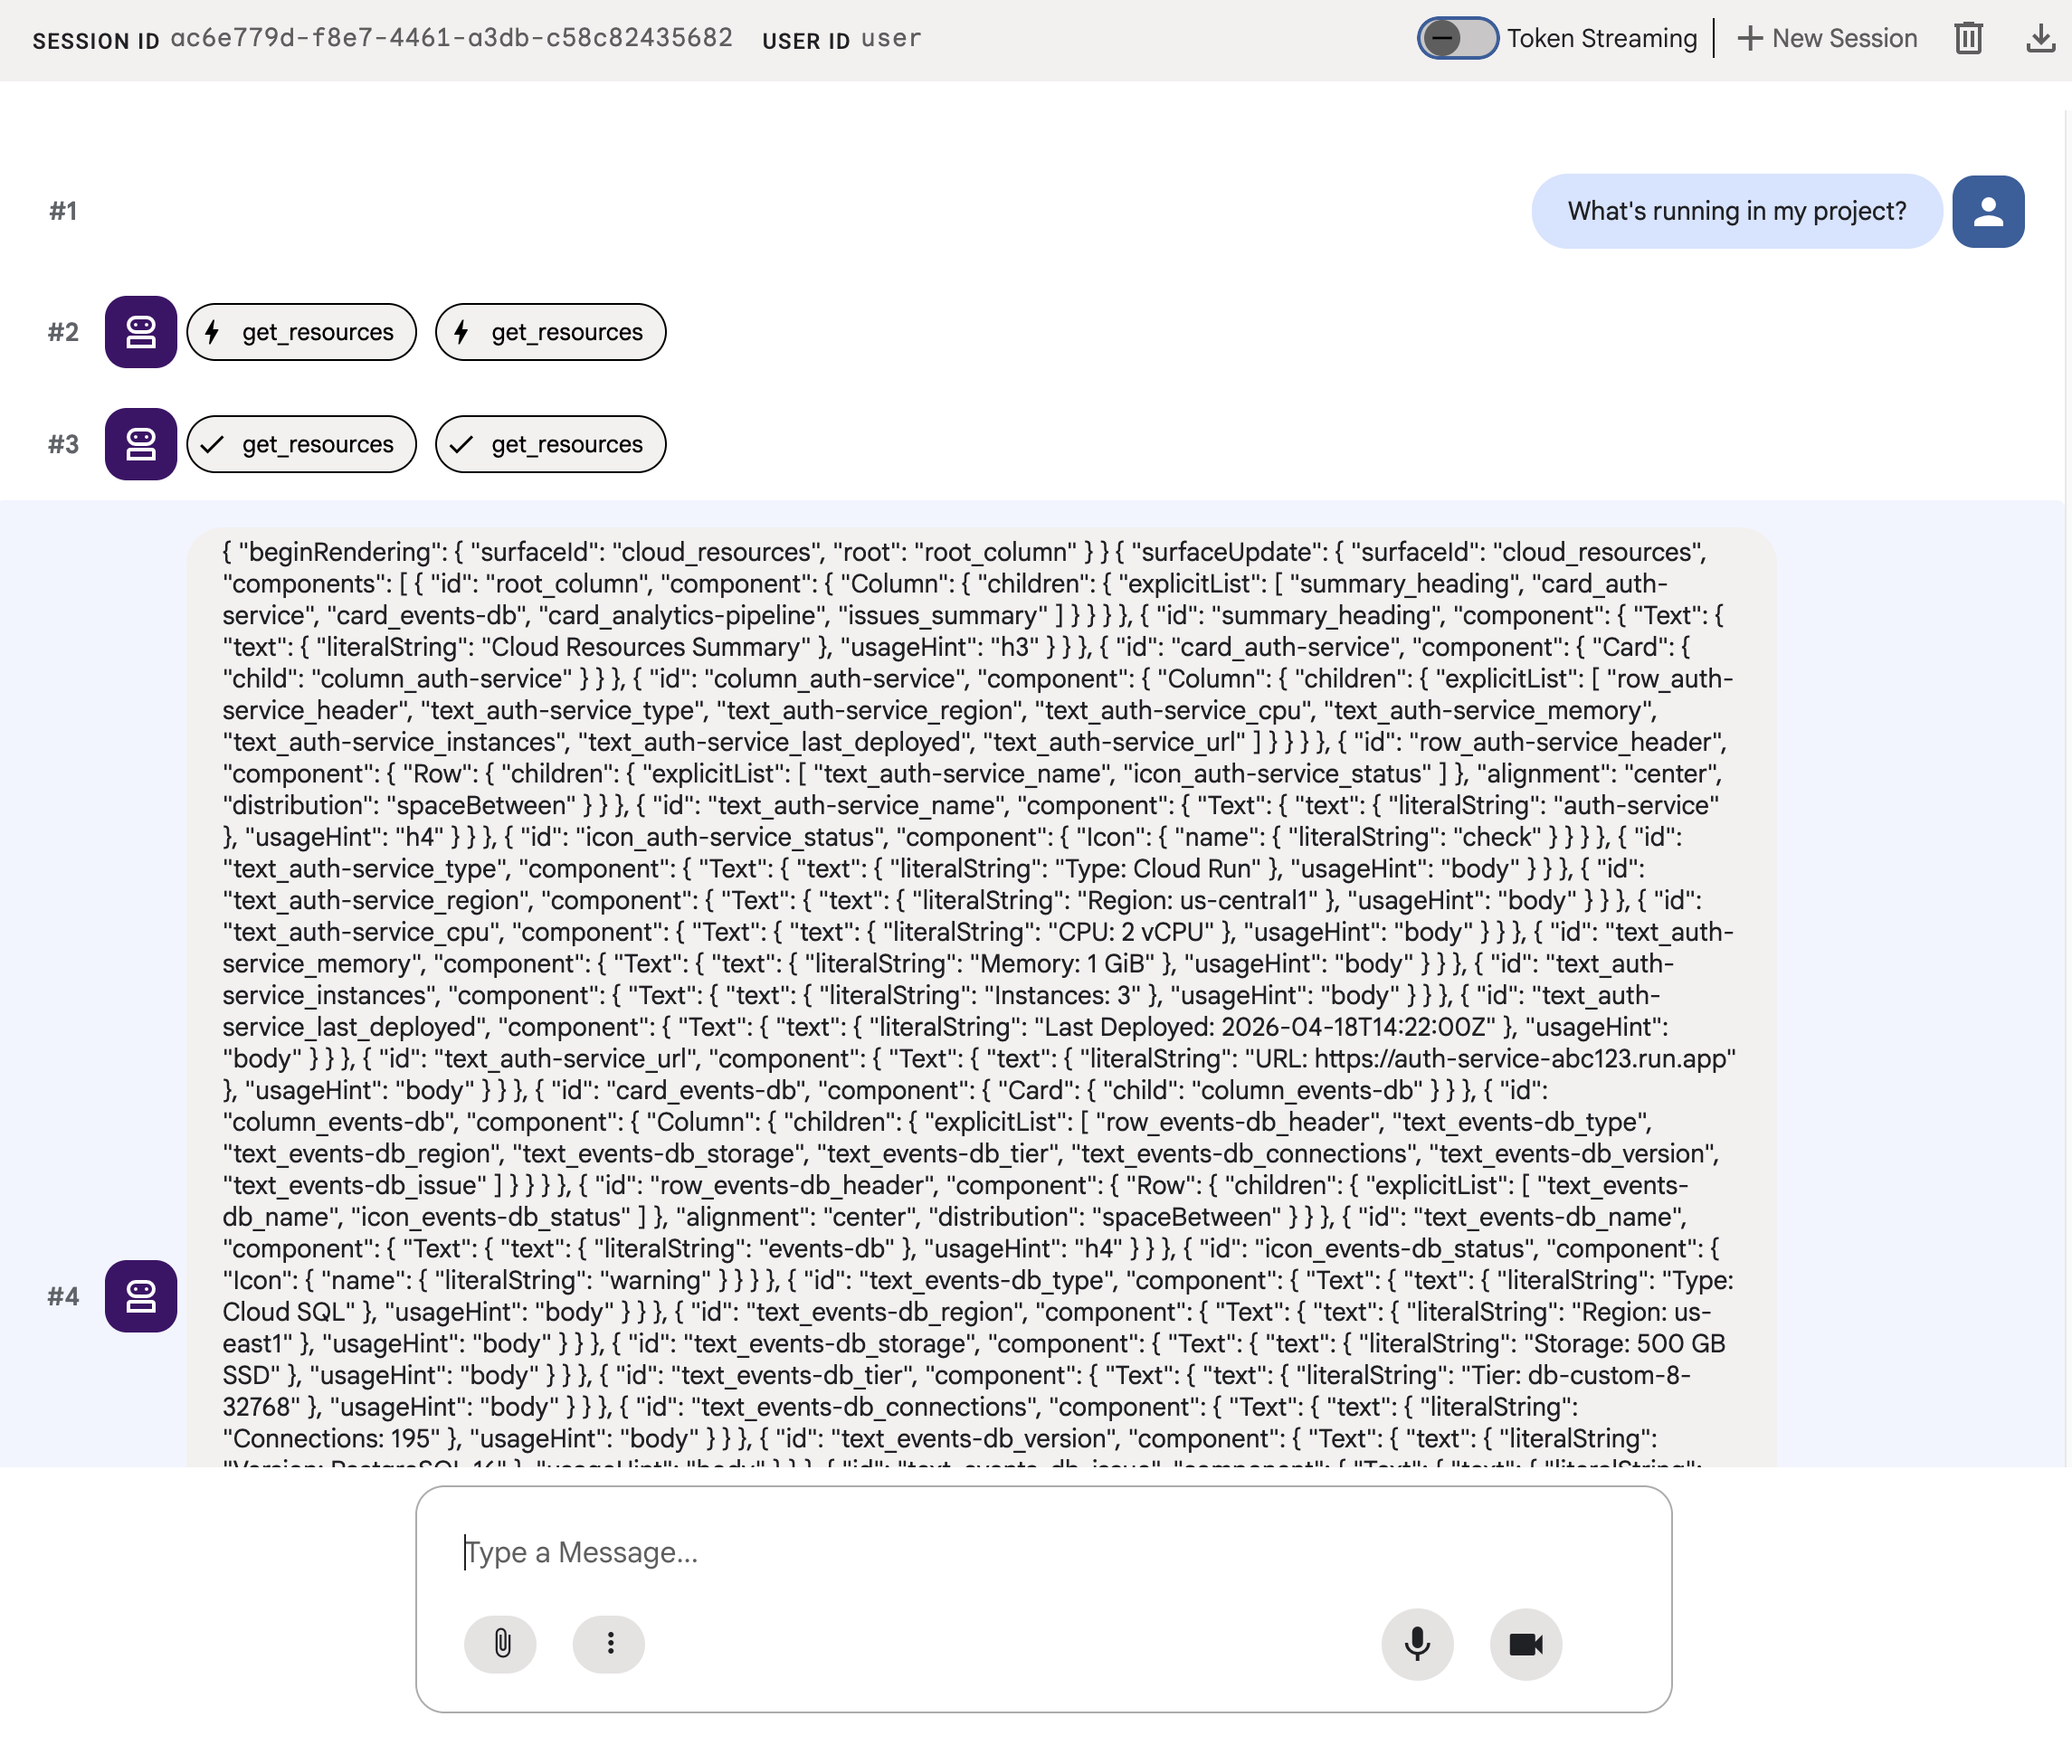
JSON은 카드, 아이콘, 버튼이 있는 리치 UI를 설명하지만 adk web는 이를 원시 텍스트로 표시합니다. 다음 단계에서는 실제 UI 구성요소로 렌더링되도록 합니다.
7. A2UI 이해
에이전트가 방금 생성한 JSON을 확인합니다. 세 가지 유형의 메시지가 포함되어 있습니다. 모든 A2UI 응답은 다음과 같은 동일한 구조를 따릅니다.
1. beginRendering
렌더링 노출 영역을 만들고 루트 구성요소의 이름을 지정합니다.
{"beginRendering": {"surfaceId": "default", "root": "main-column"}}
2. surfaceUpdate
구성요소 트리를 ID 참조가 있는 플랫 목록으로 전송합니다 (중첩되지 않음).
{"surfaceUpdate": {"surfaceId": "default", "components": [
  {"id": "main-column", "component": {"Column": {"children": {"explicitList": ["title", "card1"]}}}},
  {"id": "title", "component": {"Text": {"text": {"literalString": "My Resources"}, "usageHint": "h1"}}},
  {"id": "card1", "component": {"Card": {"child": "card1-content"}}},
  {"id": "card1-content", "component": {"Text": {"text": {"path": "service_name"}}}}
]}}
3. dataModelUpdate
구조와 별도로 데이터를 전송합니다.
{"dataModelUpdate": {"surfaceId": "default", "contents": [
  {"key": "service_name", "valueString": "auth-service"},
  {"key": "status", "valueString": "healthy"}
]}}
구성요소는 {"path": "key"}를 사용하여 데이터에 바인딩됩니다. 구성요소 트리를 다시 전송하지 않고 데이터를 업데이트할 수 있습니다.
18개의 기본 요소
카테고리 | 구성요소 |
레이아웃 | 카드, 열, 행, 목록, 탭, 구분선, 모달 |
디스플레이 | 텍스트, 이미지, 아이콘, 동영상, 오디오 플레이어 |
입력 | TextField, DateTimeInput, MultipleChoice, CheckBox, Slider |
작업 | 버튼 |
상담사는 동일한 카탈로그에서 다양한 레이아웃을 구성합니다. 각 기본 요소에 관한 자세한 내용은 구성요소 참조를 참고하세요. 탐색 뷰, 우선순위 대시보드, 구성 양식은 모두 동일한 18개의 기본 요소를 사용합니다. 새 프런트엔드 구성요소가 필요하지 않습니다.
8. A2UI 구성요소 렌더링
에이전트가 유효한 A2UI JSON을 생성하지만 adk web가 원시 텍스트로 표시합니다. 실제 UI 구성요소로 렌더링하려면 에이전트의 A2UI JSON 출력을 adk web의 기본 렌더러가 예상하는 형식으로 변환하는 작은 유틸리티가 필요합니다.
A2UI 렌더링 유틸리티 만들기
다음 콘텐츠로 a2ui_agent/a2ui_utils.py를 만듭니다.
import json
import re
from google.genai import types
from google.adk.agents.callback_context import CallbackContext
from google.adk.models.llm_response import LlmResponse

def _wrap_a2ui_part(a2ui_message: dict) -> types.Part:
    """Wrap a single A2UI message for rendering in adk web."""
    datapart_json = json.dumps({
        "kind": "data",
        "metadata": {"mimeType": "application/json+a2ui"},
        "data": a2ui_message,
    })
    blob_data = (
        b"<a2a_datapart_json>"
        + datapart_json.encode("utf-8")
        + b"</a2a_datapart_json>"
    )
    return types.Part(
        inline_data=types.Blob(
            data=blob_data,
            mime_type="text/plain",
        )
    )

def a2ui_callback(
    callback_context: CallbackContext,
    llm_response: LlmResponse,
) -> LlmResponse | None:
    """Convert A2UI JSON in text output to rendered components."""
    if not llm_response.content or not llm_response.content.parts:
        return None
    for part in llm_response.content.parts:
        if not part.text:
            continue
        text = part.text.strip()
        if not text:
            continue
        if not any(k in text for k in ("beginRendering", "surfaceUpdate", "dataModelUpdate")):
            continue
        # Strip markdown fences
        if text.startswith("```"):
            text = text.split("\n", 1)[-1]
            if text.endswith("```"):
                text = text[:-3].strip()
        # Find where JSON starts (skip conversational prefix)
        json_start = None
        for i, ch in enumerate(text):
            if ch in ("[", "{"):
                json_start = i
                break
        if json_start is None:
            continue
        json_text = text[json_start:]
        # raw_decode parses JSON and ignores trailing text
        try:
            parsed, _ = json.JSONDecoder().raw_decode(json_text)
        except json.JSONDecodeError:
            # Handle concatenated JSON objects: {"a":1} {"b":2}
            try:
                fixed = "[" + re.sub(r'\}\s*\{', '},{', json_text) + "]"
                parsed, _ = json.JSONDecoder().raw_decode(fixed)
            except json.JSONDecodeError:
                continue
        if not isinstance(parsed, list):
            parsed = [parsed]
        a2ui_keys = {"beginRendering", "surfaceUpdate", "dataModelUpdate", "deleteSurface"}
        a2ui_messages = [msg for msg in parsed if isinstance(msg, dict) and any(k in msg for k in a2ui_keys)]
        if not a2ui_messages:
            continue
        new_parts = [_wrap_a2ui_part(msg) for msg in a2ui_messages]
        return LlmResponse(
            content=types.Content(role="model", parts=new_parts),
            custom_metadata={"a2a:response": "true"},
        )
    return None
이 유틸리티는 다음 두 가지 작업을 실행합니다.
- 에이전트의 텍스트 출력에서 A2UI JSON을 추출합니다.
adk web의 내장 A2UI 렌더러가 예상하는 형식으로 각 A2UI 메시지를 래핑합니다.
에이전트 업데이트
a2ui_agent/agent.py의 콘텐츠를 다음으로 바꿉니다. 이전 단계에서 변경된 부분은 a2ui_callback 가져오기와 에이전트의 after_model_callback 파라미터뿐입니다.
from google.adk.agents import Agent
from a2ui.schema.manager import A2uiSchemaManager
from a2ui.basic_catalog.provider import BasicCatalog
from .resources import get_resources
from .a2ui_utils import a2ui_callback

schema_manager = A2uiSchemaManager(
    version="0.8",
    catalogs=[BasicCatalog.get_config("0.8")],
)

instruction = schema_manager.generate_system_prompt(
    role_description=(
        "You are a cloud infrastructure assistant. When users ask about "
        "their cloud resources, use the get_resources tool to fetch the "
        "current state."
    ),
    workflow_description=(
        "Analyze the user's request and return structured UI when appropriate."
    ),
    ui_description=(
        "Use cards for resource summaries, rows and columns for comparisons, "
        "icons for status indicators, and buttons for drill-down actions. "
        "Do NOT use markdown formatting in text values. Use the usageHint "
        "property for heading levels instead. "
        "Respond ONLY with the A2UI JSON array. Do NOT include any text "
        "outside the JSON. Put all explanations into Text components."
    ),
    include_schema=True,
    include_examples=True,
)

root_agent = Agent(
    model="gemini-3-flash-preview",
    name="cloud_dashboard",
    description="A cloud infrastructure assistant that renders rich A2UI interfaces.",
    instruction=instruction,
    tools=[get_resources],
    after_model_callback=a2ui_callback,
)
9. 렌더링된 UI 테스트
이전에 실행한 ADK 개발 UI가 아직 실행 중인 경우 에이전트에 적용한 변경사항이 자동으로 다시 로드됩니다.
브라우저 탭을 새로고침하고 a2ui_agent를 선택한 다음 ADK 개발 UI의 오른쪽 상단에 있는 +새 세션을 클릭하여 새 세션을 시작하고 이전과 동일한 프롬프트를 전송합니다.
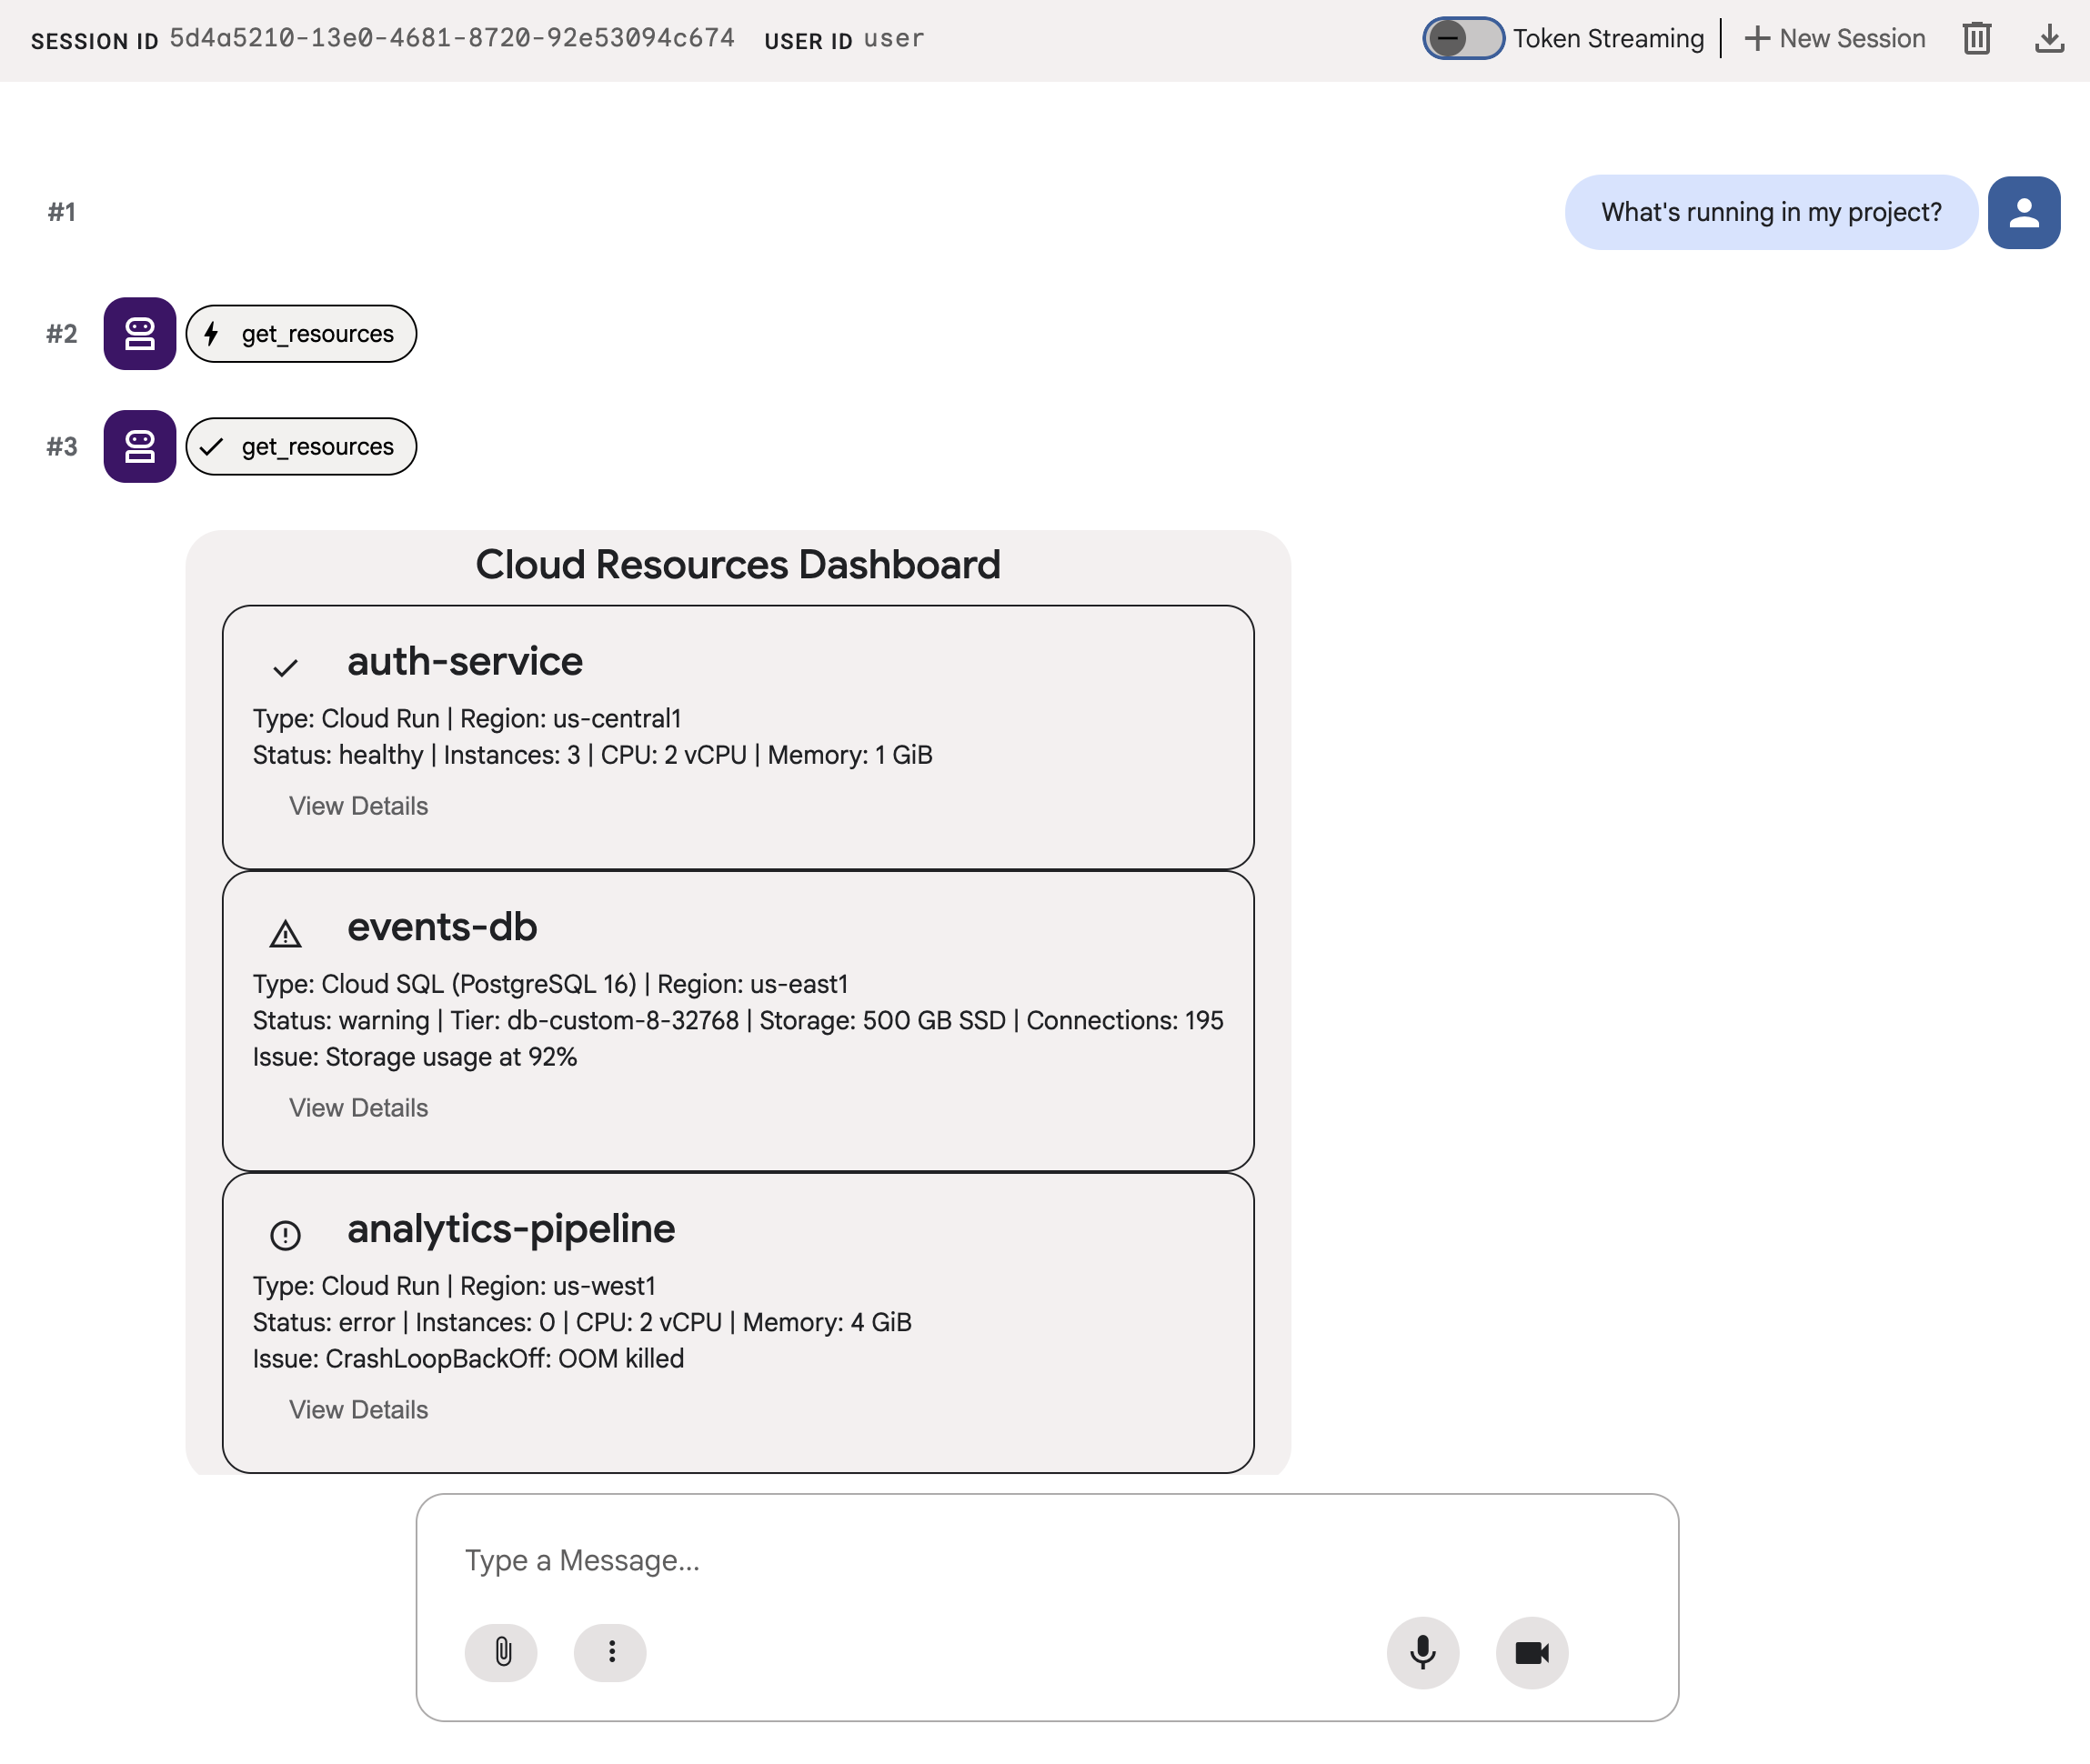
What's running in my project?
이번에는 adk web가 상태 표시기, 리소스 세부정보, 작업 버튼이 있는 카드를 실제 UI로 렌더링합니다.
다른 프롬프트를 사용하여 에이전트가 동일한 기본 요소 집합에서 다른 UI를 구성하는 방법을 확인하세요.
Does anything need my attention?
마지막으로 다른 프롬프트를 사용하여 새 서비스를 배포할 다른 UI를 생성해 보세요.
I need to deploy a new service
각 프롬프트는 동일한 에이전트, 동일한 도구, 동일한 18개의 기본 요소로 이동합니다. 하지만 각 프롬프트는 의도에 따라 다른 UI를 생성합니다.
10. 삭제
로컬 서버가 실행된 상태로 두지 않으려면 리소스를 정리하세요.
adk web를 실행하는 터미널에서 Ctrl+C를 눌러 에이전트 서버를 중지합니다.
이 Codelab을 위해 특별히 프로젝트를 만든 경우 전체 프로젝트를 삭제할 수 있습니다.
gcloud projects delete ${GOOGLE_CLOUD_PROJECT}
11. 축하합니다
A2UI를 사용하여 풍부한 대화형 UI를 생성하는 ADK 에이전트를 빌드했습니다.
학습한 내용
- A2UI는 18개의 선언적 기본 요소와 3개의 메시지 유형이 있는 프로토콜입니다.
- A2UI SDK는 LLM에 구성요소 카탈로그를 알려주는 시스템 프롬프트를 생성합니다.
- 동일한 에이전트, 도구, 기본 요소가 다양한 의도에 대해 서로 다른 UI를 구성합니다.
- 개발 중에 A2UI 구성요소를
adk web에서 직접 렌더링할 수 있습니다.
프로덕션 프런트엔드 빌드
이 Codelab에서는 개발 및 테스트를 위해 adk web 내부에 A2UI를 렌더링했습니다.
프로덕션의 경우 공식 A2UI 렌더러 중 하나를 사용하여 프런트엔드를 빌드합니다.
플랫폼 | 렌더기 | 설치 |
웹 (React) |
|
|
웹 (Lit) |
|
|
웹 (Angular) |
|
|
모바일/데스크톱 | Flutter GenUI SDK |