
1. ภาพรวม
แอป Agent ส่วนใหญ่จะแสดงข้อความธรรมดา แต่ A2UI จะเปลี่ยนแปลงสิ่งนั้น โดยเป็นโปรโตคอลที่มีองค์ประกอบ UI เชิงประกาศ 18 รายการ ซึ่งช่วยให้ Agent สร้างอินเทอร์เฟซแบบอินเทอร์แอกทีฟที่สมบูรณ์ได้ และไคลเอ็นต์จะแสดงผลองค์ประกอบเหล่านั้นแบบเนทีฟ โดยไม่จำเป็นต้องใช้โค้ดฟรอนท์เอนด์ใหม่ต่อเลย์เอาต์
Codelab นี้ใช้ Agent Development Kit (ADK) เพื่อสร้าง Agent และใช้ A2UI เพื่อสร้าง UI
สิ่งที่คุณจะได้สร้าง
แดชบอร์ดโครงสร้างพื้นฐานของระบบคลาวด์จำลองใน 3 ขั้นตอน
- Agent มาตรฐาน ที่แสดงข้อมูลทรัพยากรเป็นข้อความธรรมดา
- Agent A2UI ที่แสดงข้อมูลเดียวกันเป็น JSON ของ A2UI ที่มีโครงสร้าง
- Agent ที่แสดงผล ซึ่งแสดง JSON ของ A2UI เป็นคอมโพเนนต์ UI แบบอินเทอร์แอกทีฟใน ADK dev UI
สิ่งที่คุณจะได้เรียนรู้
- วิธีการทำงานของ A2UI: องค์ประกอบพื้นฐาน 18 รายการ, ข้อความ 3 ประเภท, โมเดลคอมโพเนนต์แบบแบน
- วิธีใช้ A2UI SDK เพื่อแจ้งให้ Agent ADK สร้าง JSON ของ A2UI
- วิธีแสดงผลคอมโพเนนต์ A2UI ใน
adk web
สิ่งที่คุณต้องมี
- โปรเจ็กต์ Google Cloud ที่เปิดใช้การเรียกเก็บเงินแล้ว
- เว็บเบราว์เซอร์ เช่น Chrome
- Python 3.12 ขึ้นไป
Codelab นี้เหมาะสำหรับนักพัฒนาแอประดับกลางที่มีความคุ้นเคยกับ Python และ Google Cloud
Codelab นี้ใช้เวลาประมาณ 15-20 นาทีจึงจะเสร็จสมบูรณ์
ทรัพยากรที่สร้างขึ้นใน Codelab นี้ควรมีค่าใช้จ่ายไม่เกิน $5
2. ตั้งค่าสภาพแวดล้อม
สร้างโปรเจ็กต์ Google Cloud
- ใน Google Cloud Console บนหน้าตัวเลือกโปรเจ็กต์ ให้เลือกหรือสร้างโปรเจ็กต์ Google Cloud
- ตรวจสอบว่าได้เปิดใช้การเรียกเก็บเงินสำหรับโปรเจ็กต์ที่อยู่ในระบบคลาวด์แล้ว ดูวิธีตรวจสอบว่าได้เปิดใช้การเรียกเก็บเงินในโปรเจ็กต์แล้วหรือไม่
เริ่ม Cloud Shell Editor
หากต้องการเปิดเซสชัน Cloud Shell จากคอนโซล Google Cloud ให้คลิกเปิดใช้งาน Cloud Shell ในคอนโซล Google Cloud
การดำเนินการนี้จะเปิดเซสชันในบานหน้าต่างด้านล่างของคอนโซล Google Cloud
หากต้องการเปิดตัวแก้ไข ให้คลิกเปิดตัวแก้ไข บนแถบเครื่องมือของหน้าต่าง Cloud Shell
ตั้งค่าตัวแปรสภาพแวดล้อม
ในแถบเครื่องมือ Cloud Shell Editor ให้คลิก Terminal แล้วคลิก New Terminal จากนั้นเรียกใช้คำสั่งต่อไปนี้เพื่อตั้งค่าโปรเจ็กต์ สถานที่ และกำหนดค่า ADK ให้ใช้ Gemini ใน Vertex AI
export GOOGLE_CLOUD_PROJECT=<INSERT_YOUR_GCP_PROJECT_HERE>
export GOOGLE_CLOUD_LOCATION=global
export GOOGLE_GENAI_USE_VERTEXAI=True
เปิดใช้ API
ในเทอร์มินัล ให้เรียกใช้คำสั่งต่อไปนี้เพื่อเปิดใช้ API ที่จำเป็น
gcloud services enable aiplatform.googleapis.com
ติดตั้งการอ้างอิง
ในเทอร์มินัล ให้เรียกใช้คำสั่งต่อไปนี้เพื่อติดตั้ง Agent Development Kit (ADK) เวอร์ชันล่าสุด
pip install -U google-adk a2ui-agent-sdk
export PATH="$HOME/.local/bin:$PATH"
3. สร้าง Agent
เริ่มต้นด้วย Agent ADK มาตรฐานที่แสดงข้อความธรรมดา ซึ่งเป็นลักษณะของแอป Agent ส่วนใหญ่ในปัจจุบัน
สร้างโฟลเดอร์ Agent
สร้างโฟลเดอร์ชื่อ a2ui_agent ซึ่งจะมีซอร์สโค้ดสำหรับ Agent และเครื่องมือ
กำหนดเครื่องมือและข้อมูลจำลอง
สร้าง a2ui_agent/resources.py ที่มีเนื้อหาต่อไปนี้ เครื่องมือนี้จะแสดงรายการทรัพยากรระบบคลาวด์พร้อมสถานะ
RESOURCES = [
    {
        "name": "auth-service",
        "type": "Cloud Run",
        "region": "us-west1",
        "status": "healthy",
        "cpu": "2 vCPU",
        "memory": "1 GiB",
        "instances": 3,
        "url": "https://auth-service-abc123.run.app",
        "last_deployed": "2026-04-18T14:22:00Z",
    },
    {
        "name": "events-db",
        "type": "Cloud SQL",
        "region": "us-east1",
        "status": "warning",
        "tier": "db-custom-8-32768",
        "storage": "500 GB SSD",
        "connections": 195,
        "version": "PostgreSQL 16",
        "issue": "Storage usage at 92%",
    },
    {
        "name": "analytics-pipeline",
        "type": "Cloud Run",
        "region": "us-west1",
        "status": "error",
        "cpu": "2 vCPU",
        "memory": "4 GiB",
        "instances": 0,
        "url": "https://analytics-pipeline-ghi789.run.app",
        "last_deployed": "2026-04-10T16:45:00Z",
        "issue": "CrashLoopBackOff: OOM killed",
    },
]

def get_resources() -> list[dict]:
    """Get all cloud resources in the current project.
    Returns a list of cloud infrastructure resources including their
    name, type, region, status, and type-specific details.
    Status is one of: healthy, warning, error. Resources with
    warning or error status include an 'issue' field describing
    the problem.
    """
    return RESOURCES
กำหนด Agent
สร้าง a2ui_agent/agent.py ที่มีเนื้อหาต่อไปนี้
from google.adk.agents import Agent
from .resources import get_resources

root_agent = Agent(
    model="gemini-3-flash-preview",
    name="cloud_dashboard",
    description="A cloud infrastructure assistant that reports on project resources.",
    instruction=(
        "You are a cloud infrastructure assistant. When users ask about their "
        "cloud resources, use the get_resources tool to fetch the current state. "
        "Summarize the results clearly in plain text."
    ),
    tools=[get_resources],
)
4. ทดสอบ Agent
ADK มี dev UI ที่คุณใช้โต้ตอบและส่งพรอมต์ไปยัง Agent ในเบราว์เซอร์เพื่อทำการทดสอบได้
เริ่ม ADK dev UI
ในเทอร์มินัล Cloud Shell Editor ให้เรียกใช้คำสั่งต่อไปนี้เพื่อเริ่ม ADK dev UI
adk web --port 8080 --allow_origins "*" --reload_agents
คุณควรเห็นข้อความที่คล้ายกับข้อความต่อไปนี้
+-----------------------------------------------------------------------------+
| ADK Web Server started                                                      |
|                                                                             |
| For local testing, access at http://127.0.0.1:8080.                         |
+-----------------------------------------------------------------------------+
เปิด ADK dev UI
คุณสามารถเปิด ADK dev UI ในเบราว์เซอร์ได้โดยคลิก Ctrl หรือ Cmd ที่ URL การทดสอบในเครื่อง หรือโดยคลิกปุ่มแสดงตัวอย่างเว็บ แล้วเลือกแสดงตัวอย่างบนพอร์ต 8080
เมื่อดู ADK dev UI แล้ว ให้เลือก a2ui_agent จากเมนูแบบเลื่อนลง
ส่งพรอมต์ตัวอย่าง
ส่งพรอมต์ตัวอย่างไปยัง Agent ดังนี้
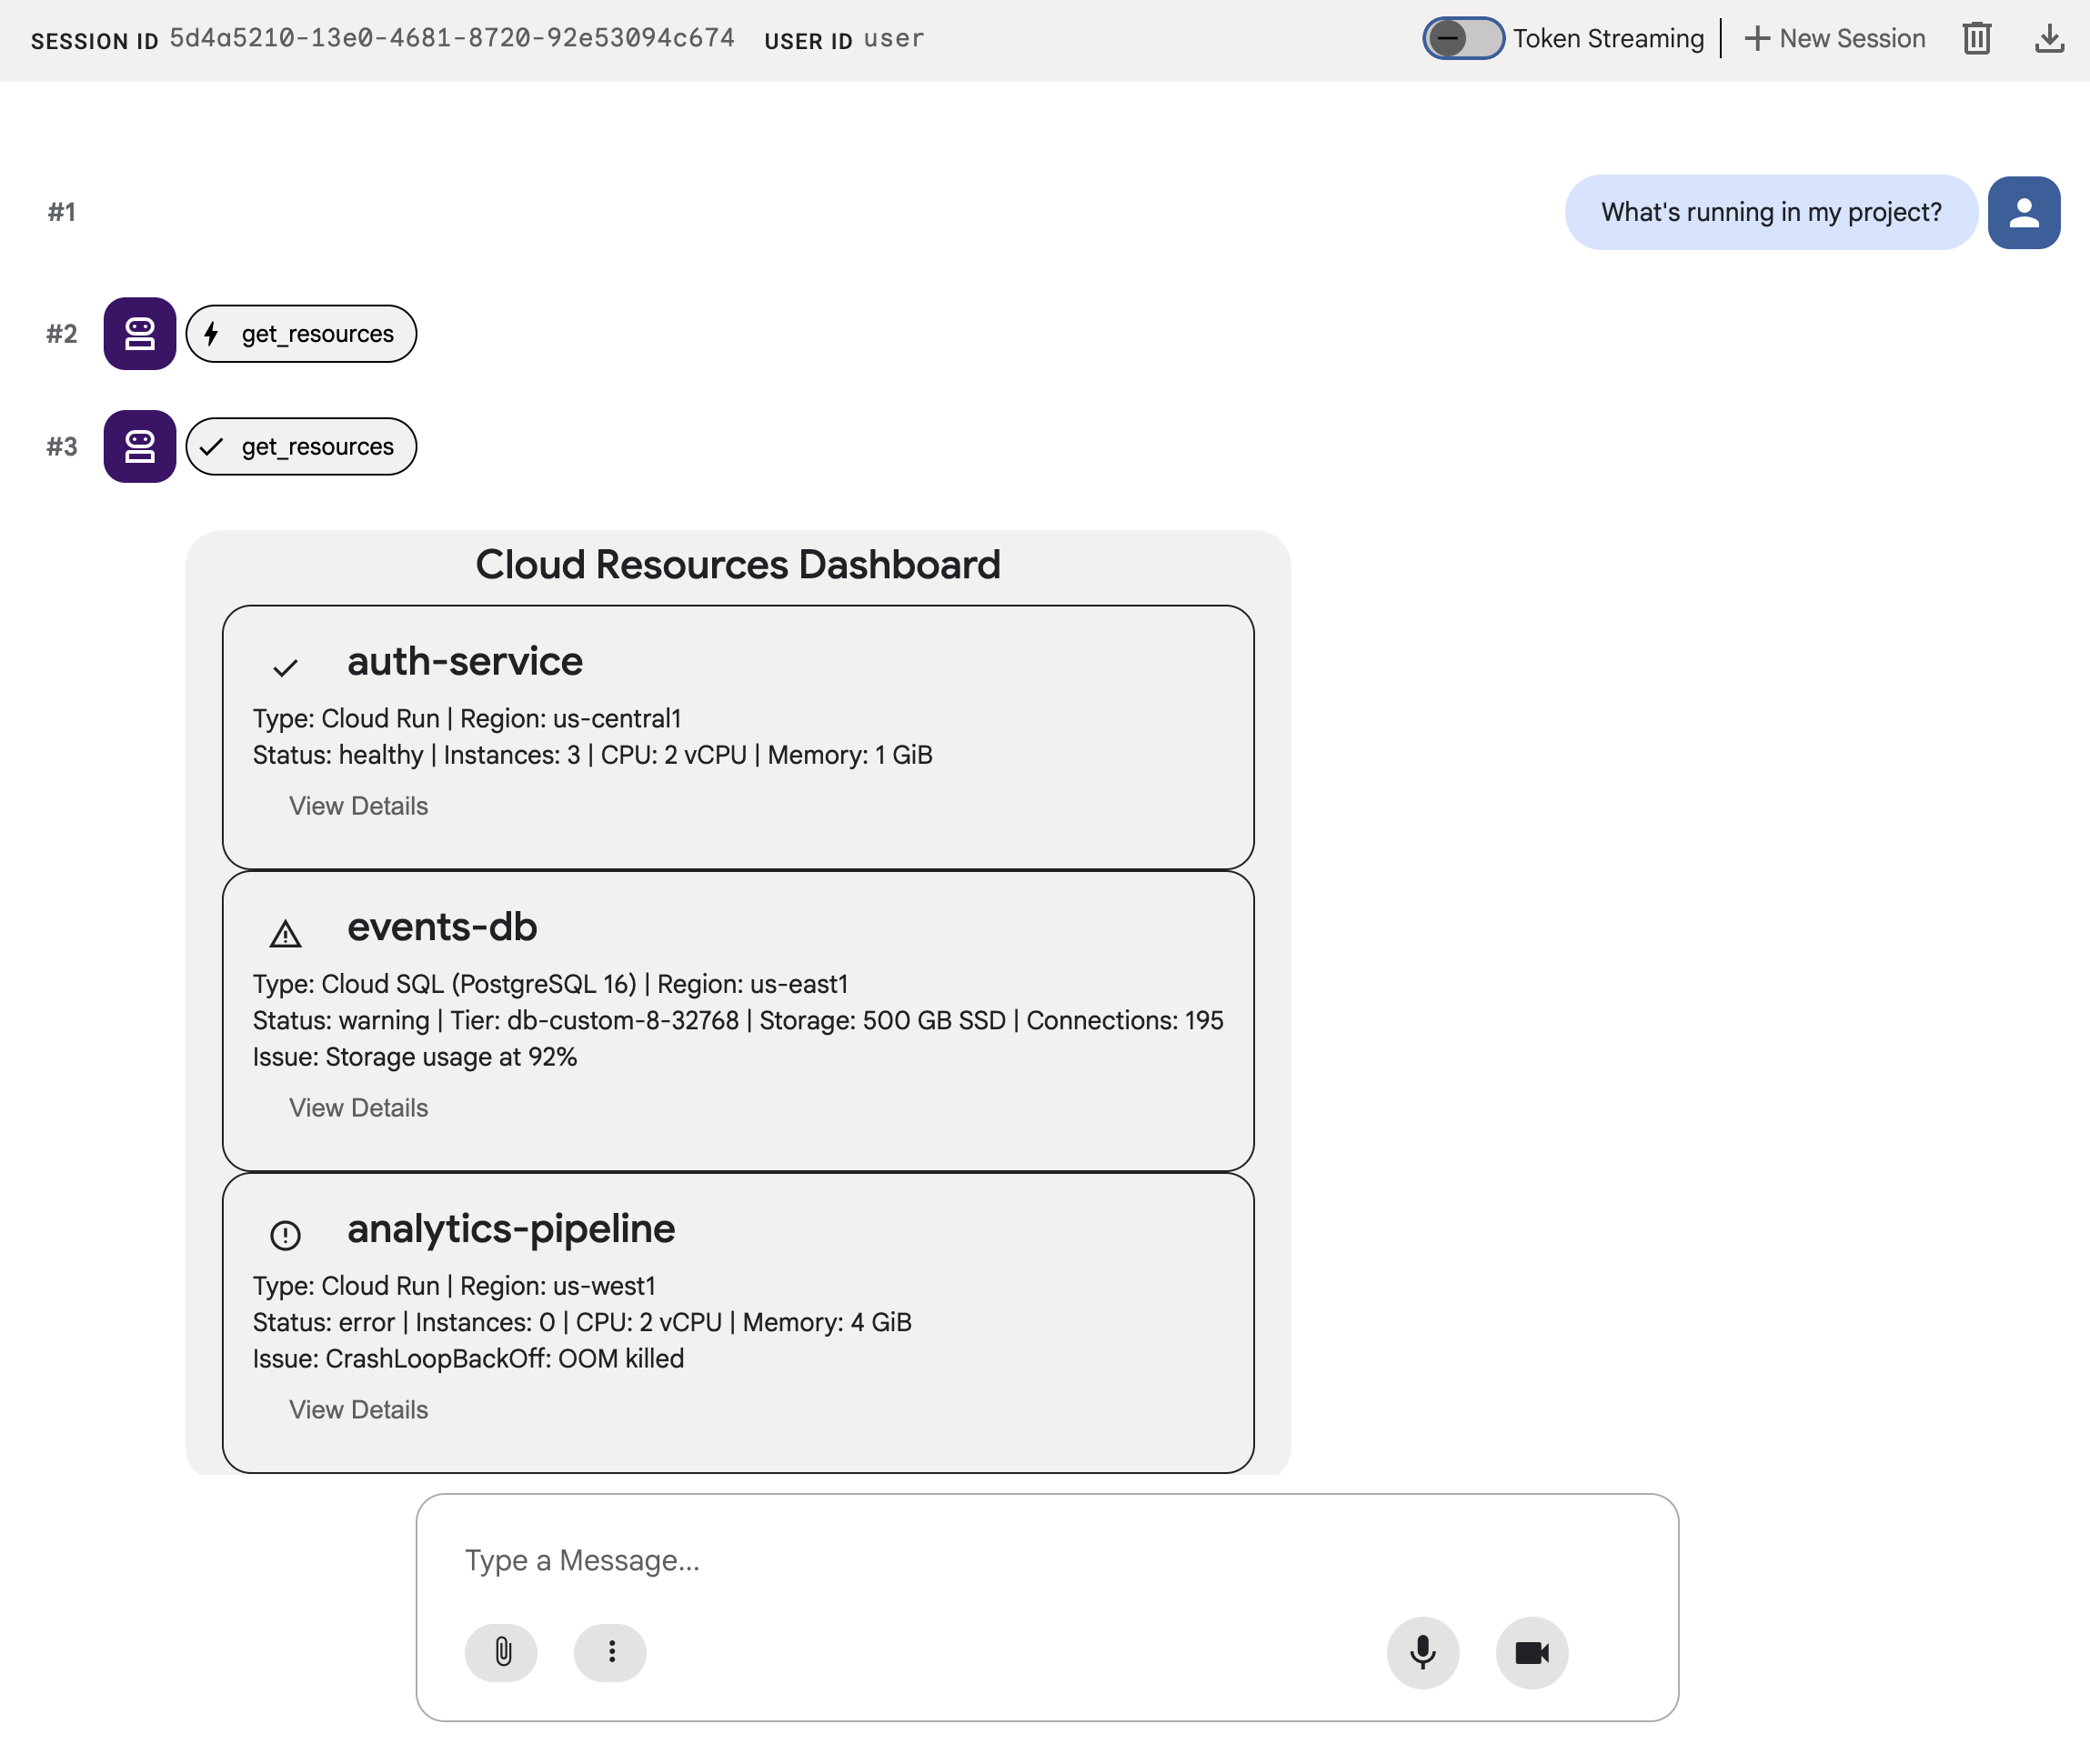
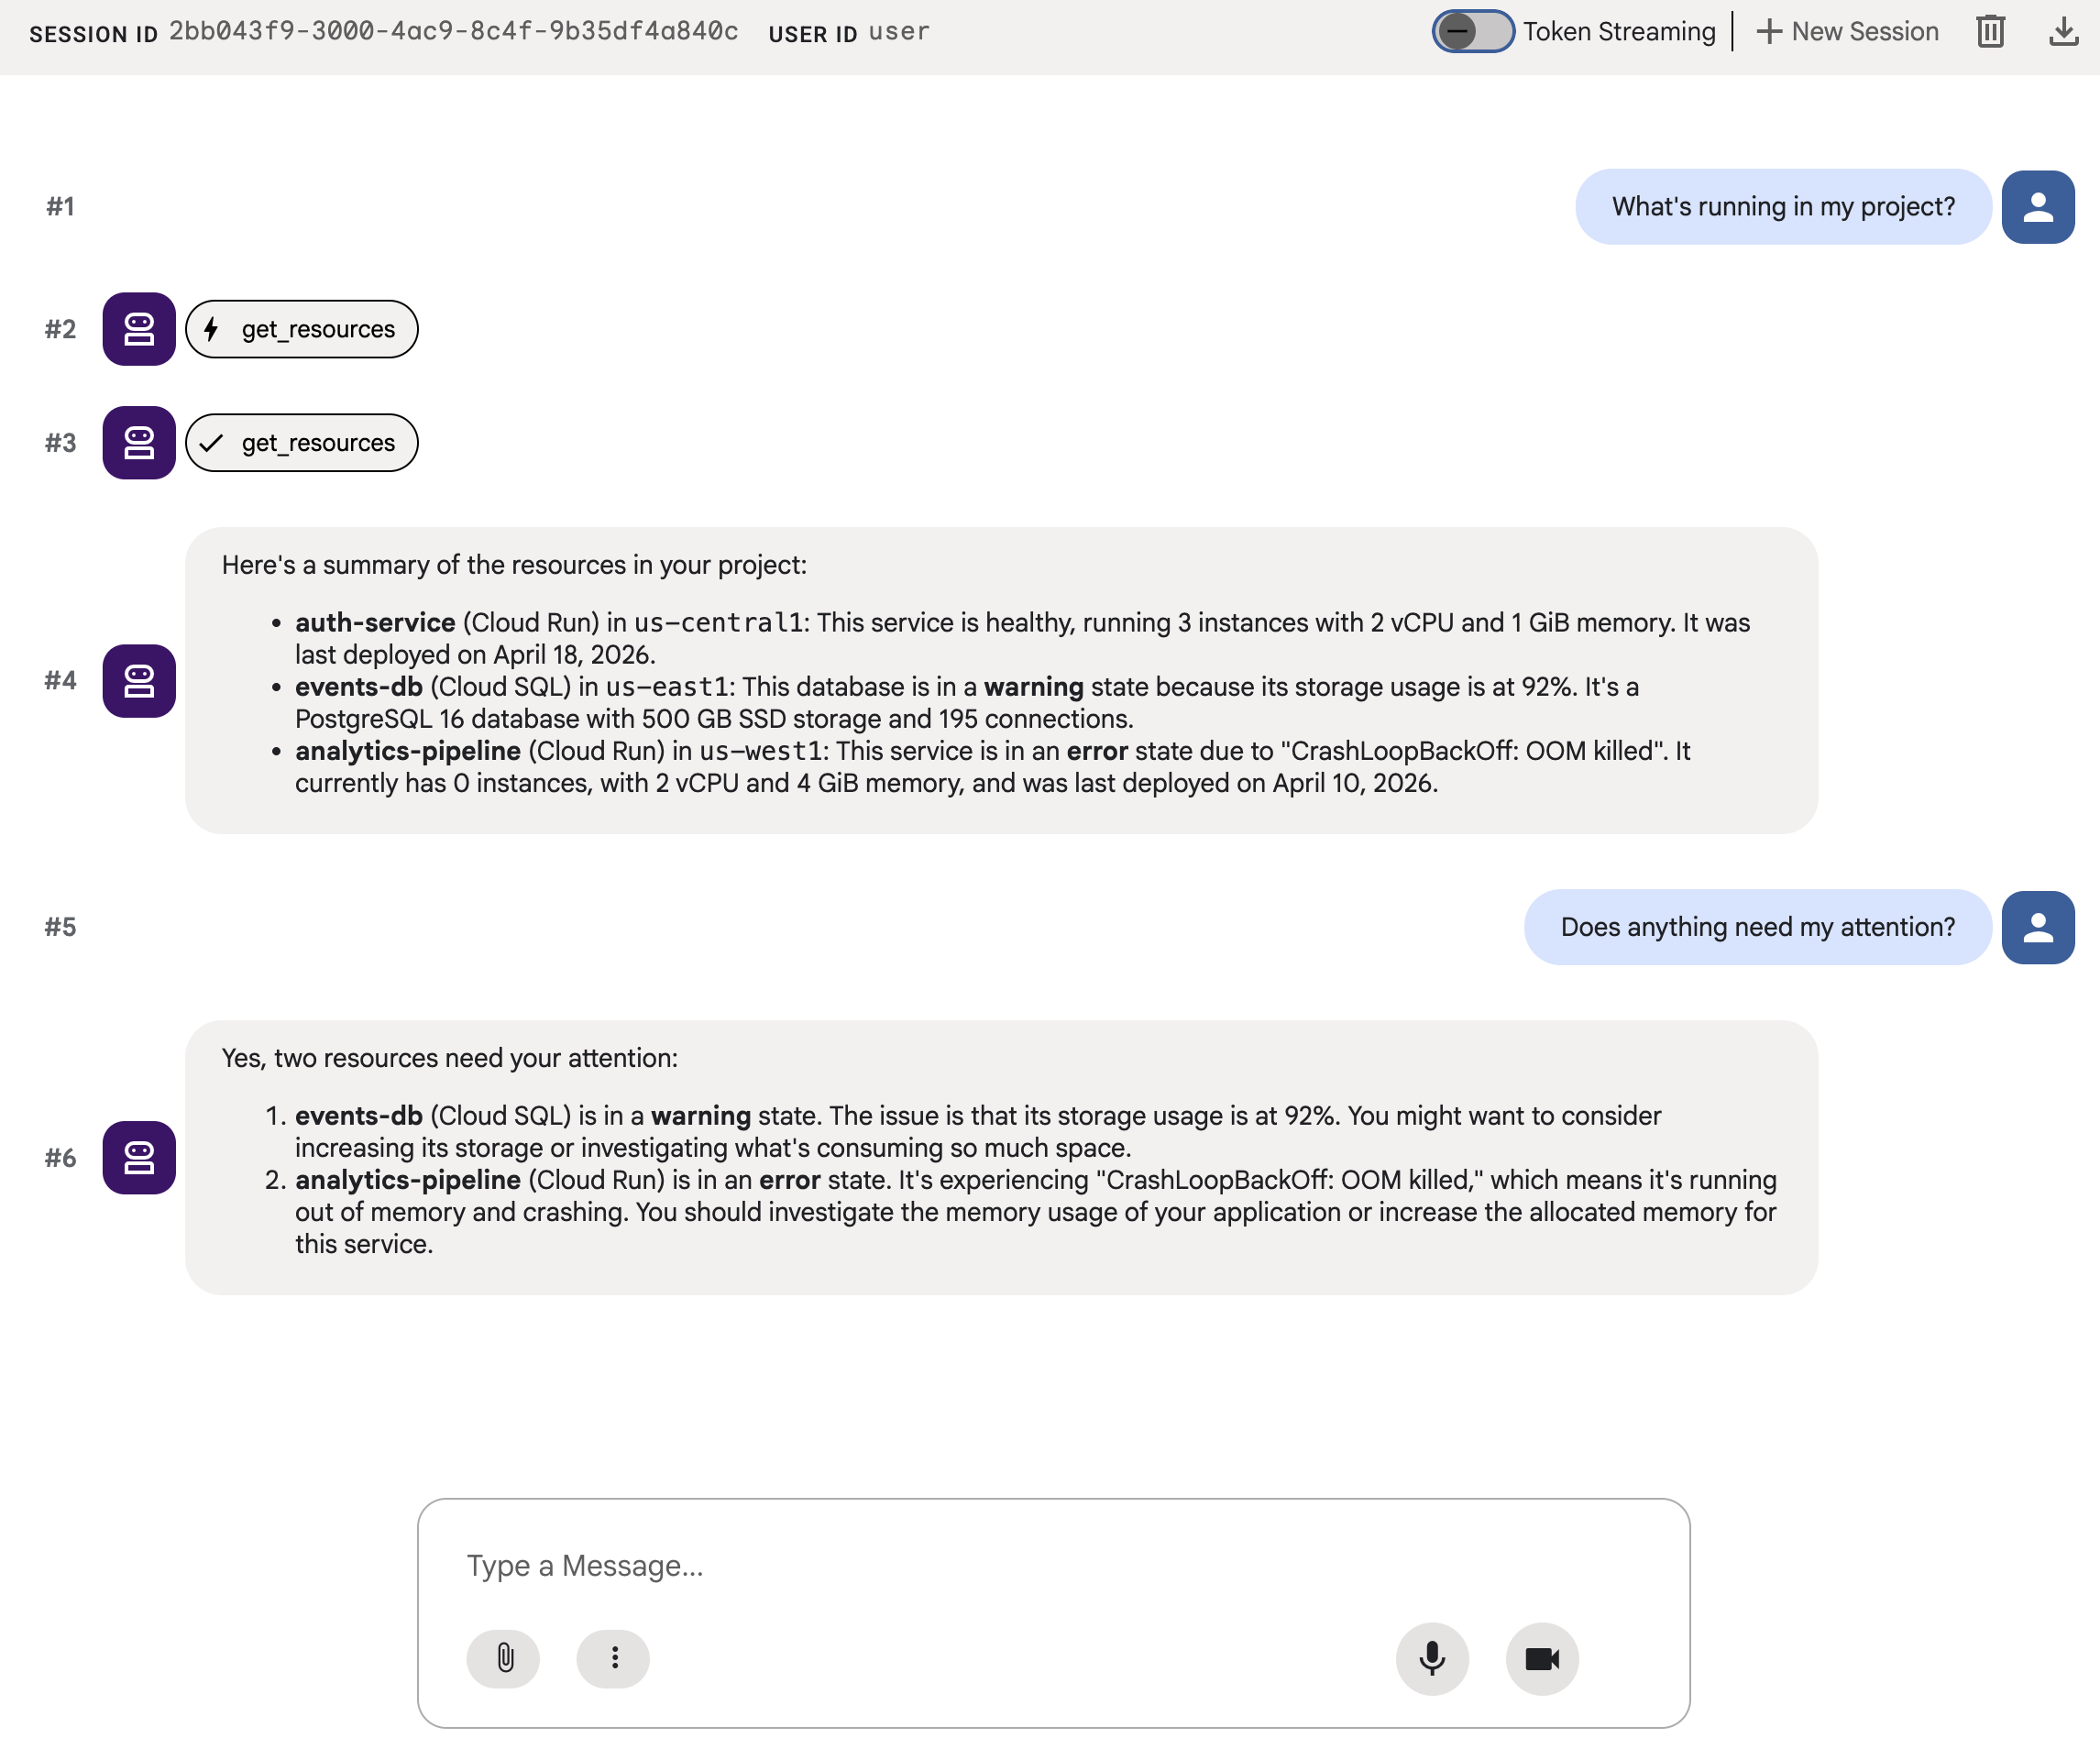
What's running in my project?
ตอนนี้ลองส่งพรอมต์ตัวอย่างอีกรายการ แล้วคุณจะได้รับเอาต์พุตข้อความเพิ่มเติม
Does anything need my attention?
การสนทนาของคุณควรมีลักษณะคล้ายกับตัวอย่างต่อไปนี้
คุณจะเห็นข้อความเป็นพรืด ซึ่งถูกต้อง แต่ประสบการณ์ของผู้ใช้ไม่ดีนัก
5. สร้าง JSON ของ A2UI
จะเป็นอย่างไรหาก Agent สามารถอธิบาย UI แทนที่จะแสดงข้อความ A2UI เป็นโปรโตคอลที่ช่วยให้ Agent สร้างอินเทอร์เฟซแบบอินเทอร์แอกทีฟจากแคตตาล็อกองค์ประกอบพื้นฐาน 18 รายการได้ และไคลเอ็นต์จะแสดงผลองค์ประกอบเหล่านั้นแบบเนทีฟ
A2UI Python SDK มีตัวจัดการสคีมาที่สร้างพรอมต์ระบบให้คุณ โดยจะสอน LLM เกี่ยวกับแคตตาล็อกคอมโพเนนต์ A2UI ทั้งหมด ชื่อและประเภทพร็อพเพอร์ตี้ที่ถูกต้อง รวมถึงโครงสร้าง JSON
อัปเดต Agent
แทนที่เนื้อหาของ a2ui_agent/agent.py ด้วยเนื้อหาต่อไปนี้
from google.adk.agents import Agent
from a2ui.schema.manager import A2uiSchemaManager
from a2ui.basic_catalog.provider import BasicCatalog
from .resources import get_resources

schema_manager = A2uiSchemaManager(
    version="0.8",
    catalogs=[BasicCatalog.get_config("0.8")],
)

instruction = schema_manager.generate_system_prompt(
    role_description=(
        "You are a cloud infrastructure assistant. When users ask about "
        "their cloud resources, use the get_resources tool to fetch the "
        "current state."
    ),
    workflow_description=(
        "Analyze the user's request and return structured UI when appropriate."
    ),
    ui_description=(
        "Use cards for resource summaries, rows and columns for comparisons, "
        "icons for status indicators, and buttons for drill-down actions. "
        "Do NOT use markdown formatting in text values. Use the usageHint "
        "property for heading levels instead. "
        "Respond ONLY with the A2UI JSON array. Do NOT include any text "
        "outside the JSON. Put all explanations into Text components."
    ),
    include_schema=True,
    include_examples=True,
)

root_agent = Agent(
    model="gemini-3-flash-preview",
    name="cloud_dashboard",
    description="A cloud infrastructure assistant that renders rich A2UI interfaces.",
    instruction=instruction,
    tools=[get_resources],
)
เมธอด generate_system_prompt() จะรวมคำอธิบายบทบาทของคุณเข้ากับสคีมา JSON ของ A2UI ทั้งหมดและตัวอย่างแบบ Few-Shot เพื่อให้ LLM ทราบวิธีจัดรูปแบบเอาต์พุตอย่างถูกต้อง คุณจึงไม่จำเป็นต้องเขียนแคตตาล็อกคอมโพเนนต์ด้วยตนเอง
6. ทดสอบเอาต์พุต JSON
หากคุณยังคงเรียกใช้ ADK dev UI จากก่อนหน้านี้ ระบบควรโหลดการเปลี่ยนแปลงที่คุณทำกับ Agent อีกครั้งโดยอัตโนมัติ
เลือก a2ui_agent แล้วเริ่มเซสชันใหม่โดยคลิก +New Session ที่ด้านขวาบนของ ADK dev UI จากนั้นส่งพรอมต์เดิมอีกครั้ง
What's running in my project?
คราวนี้ Agent จะตอบกลับด้วย JSON ของ A2UI แทนข้อความธรรมดา คุณจะเห็นข้อความที่มีโครงสร้างซึ่งมี beginRendering, surfaceUpdate และ dataModelUpdate ในเอาต์พุตแชท
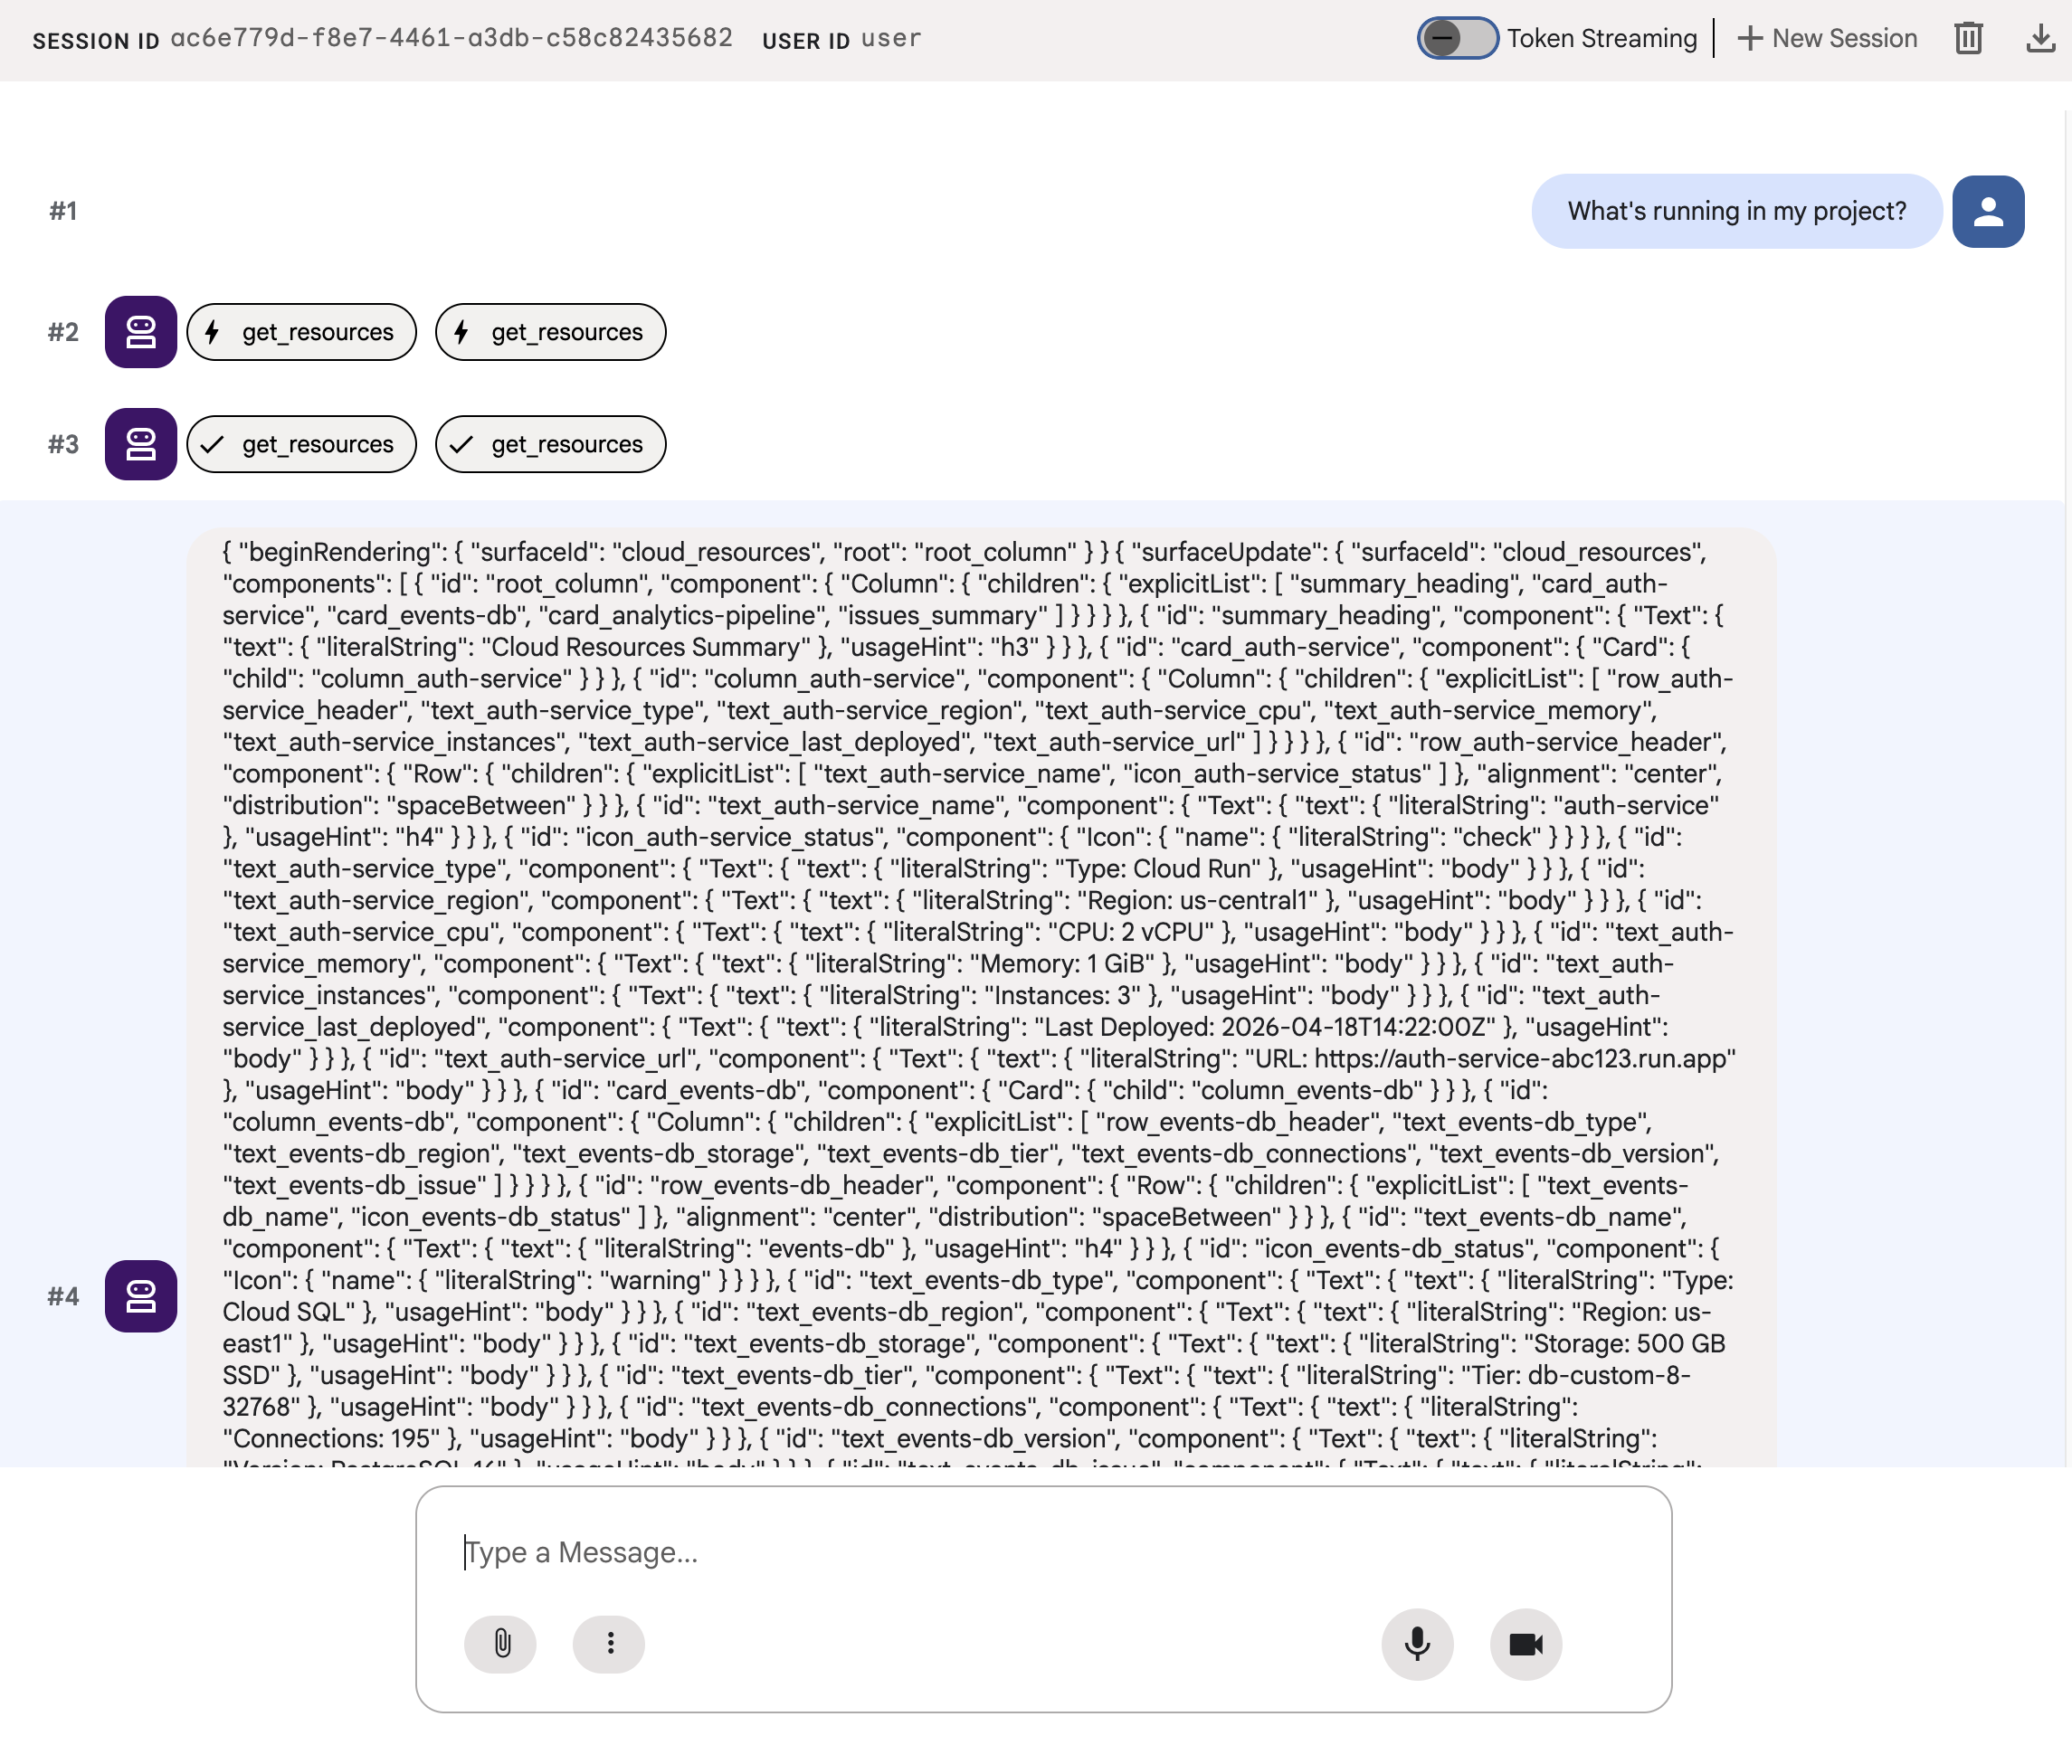
JSON อธิบาย UI ที่สมบูรณ์ซึ่งมีการ์ด ไอคอน และปุ่ม แต่ adk web จะแสดงเป็นข้อความดิบ ในขั้นตอนถัดไป คุณจะทำให้ระบบแสดงผลเป็นคอมโพเนนต์ UI จริง
7. ทำความเข้าใจ A2UI
ดู JSON ที่ Agent เพิ่งสร้าง คุณจะเห็นว่า JSON มีข้อความ 3 ประเภท การตอบกลับของ A2UI ทุกรายการมีโครงสร้างเดียวกันดังนี้
1. beginRendering
สร้างพื้นผิวการแสดงผลและตั้งชื่อคอมโพเนนต์ราก
{"beginRendering": {"surfaceId": "default", "root": "main-column"}}
2. surfaceUpdate
ส่งแผนผังคอมโพเนนต์เป็นรายการแบบแบน พร้อมข้อมูลอ้างอิงรหัส (ไม่ซ้อนกัน)
{"surfaceUpdate": {"surfaceId": "default", "components": [
  {"id": "main-column", "component": {"Column": {"children": {"explicitList": ["title", "card1"]}}}},
  {"id": "title", "component": {"Text": {"text": {"literalString": "My Resources"}, "usageHint": "h1"}}},
  {"id": "card1", "component": {"Card": {"child": "card1-content"}}},
  {"id": "card1-content", "component": {"Text": {"text": {"path": "service_name"}}}}
]}}
3. dataModelUpdate
ส่งข้อมูลแยกจากโครงสร้าง
{"dataModelUpdate": {"surfaceId": "default", "contents": [
  {"key": "service_name", "valueString": "auth-service"},
  {"key": "status", "valueString": "healthy"}
]}}
คอมโพเนนต์จะผูกกับข้อมูลโดยใช้ {"path": "key"} คุณสามารถอัปเดตข้อมูลได้โดยไม่ต้องส่งแผนผังคอมโพเนนต์อีกครั้ง
องค์ประกอบพื้นฐาน 18 รายการ
หมวดหมู่ | คอมโพเนนต์ |
เลย์เอาต์ | การ์ด, คอลัมน์, แถว, รายการ, แท็บ, ตัวคั่น, โมดัล |
Display | ข้อความ, รูปภาพ, ไอคอน, วิดีโอ, เครื่องเล่นเสียง |
Input | ช่องข้อความ, ช่องป้อนวันที่และเวลา, ตัวเลือกหลายรายการ, ช่องทำเครื่องหมาย, แถบเลื่อน |
การดำเนินการ | ปุ่ม |
Agent จะสร้างเลย์เอาต์ต่างๆ จากแคตตาล็อกเดียวกัน ดูรายละเอียดทั้งหมดเกี่ยวกับองค์ประกอบพื้นฐานแต่ละรายการได้ในข้อมูลอ้างอิงคอมโพเนนต์ มุมมองการเรียกดู แดชบอร์ดลำดับความสำคัญ และแบบฟอร์มการกำหนดค่าทั้งหมดใช้องค์ประกอบพื้นฐาน 18 รายการเดียวกันนี้ จึงไม่จำเป็นต้องใช้คอมโพเนนต์ฟรอนท์เอนด์ใหม่
8. แสดงผลคอมโพเนนต์ A2UI
Agent จะสร้าง JSON ของ A2UI ที่ถูกต้อง แต่ adk web จะแสดงเป็นข้อความดิบ หากต้องการแสดงผลเป็นคอมโพเนนต์ UI จริง คุณต้องใช้ยูทิลิตีขนาดเล็กที่แปลงเอาต์พุต JSON ของ A2UI ของ Agent เป็นรูปแบบที่ตัวแสดงผลในตัวของ adk web คาดหวัง
สร้างยูทิลิตีการแสดงผล A2UI
สร้าง a2ui_agent/a2ui_utils.py ที่มีเนื้อหาต่อไปนี้
import json
import re
from google.genai import types
from google.adk.agents.callback_context import CallbackContext
from google.adk.models.llm_response import LlmResponse

def _wrap_a2ui_part(a2ui_message: dict) -> types.Part:
    """Wrap a single A2UI message for rendering in adk web."""
    datapart_json = json.dumps({
        "kind": "data",
        "metadata": {"mimeType": "application/json+a2ui"},
        "data": a2ui_message,
    })
    blob_data = (
        b"<a2a_datapart_json>"
        + datapart_json.encode("utf-8")
        + b"</a2a_datapart_json>"
    )
    return types.Part(
        inline_data=types.Blob(
            data=blob_data,
            mime_type="text/plain",
        )
    )

def a2ui_callback(
    callback_context: CallbackContext,
    llm_response: LlmResponse,
) -> LlmResponse | None:
    """Convert A2UI JSON in text output to rendered components."""
    if not llm_response.content or not llm_response.content.parts:
        return None
    for part in llm_response.content.parts:
        if not part.text:
            continue
        text = part.text.strip()
        if not text:
            continue
        if not any(k in text for k in ("beginRendering", "surfaceUpdate", "dataModelUpdate")):
            continue
        # Strip markdown fences
        if text.startswith("```"):
            text = text.split("\n", 1)[-1]
            if text.endswith("```"):
                text = text[:-3].strip()
        # Find where JSON starts (skip conversational prefix)
        json_start = None
        for i, ch in enumerate(text):
            if ch in ("[", "{"):
                json_start = i
                break
        if json_start is None:
            continue
        json_text = text[json_start:]
        # raw_decode parses JSON and ignores trailing text
        try:
            parsed, _ = json.JSONDecoder().raw_decode(json_text)
        except json.JSONDecodeError:
            # Handle concatenated JSON objects: {"a":1} {"b":2}
            try:
                fixed = "[" + re.sub(r'\}\s*\{', '},{', json_text) + "]"
                parsed, _ = json.JSONDecoder().raw_decode(fixed)
            except json.JSONDecodeError:
                continue
        if not isinstance(parsed, list):
            parsed = [parsed]
        a2ui_keys = {"beginRendering", "surfaceUpdate", "dataModelUpdate", "deleteSurface"}
        a2ui_messages = [msg for msg in parsed if isinstance(msg, dict) and any(k in msg for k in a2ui_keys)]
        if not a2ui_messages:
            continue
        new_parts = [_wrap_a2ui_part(msg) for msg in a2ui_messages]
        return LlmResponse(
            content=types.Content(role="model", parts=new_parts),
            custom_metadata={"a2a:response": "true"},
        )
    return None
ยูทิลิตีนี้ทำ 2 สิ่งต่อไปนี้
- แยก JSON ของ A2UI ออกจากเอาต์พุตข้อความของ Agent
- ห่อข้อความ A2UI แต่ละรายการในรูปแบบที่ตัวแสดงผล A2UI ในตัวของ
adk webคาดหวัง
อัปเดต Agent
แทนที่เนื้อหาของ a2ui_agent/agent.py ด้วยเนื้อหาต่อไปนี้ การเปลี่ยนแปลงจากขั้นตอนก่อนหน้ามีเพียงการนำเข้า a2ui_callback และพารามิเตอร์ after_model_callback ใน Agent
from google.adk.agents import Agent
from a2ui.schema.manager import A2uiSchemaManager
from a2ui.basic_catalog.provider import BasicCatalog
from .resources import get_resources
from .a2ui_utils import a2ui_callback

schema_manager = A2uiSchemaManager(
    version="0.8",
    catalogs=[BasicCatalog.get_config("0.8")],
)

instruction = schema_manager.generate_system_prompt(
    role_description=(
        "You are a cloud infrastructure assistant. When users ask about "
        "their cloud resources, use the get_resources tool to fetch the "
        "current state."
    ),
    workflow_description=(
        "Analyze the user's request and return structured UI when appropriate."
    ),
    ui_description=(
        "Use cards for resource summaries, rows and columns for comparisons, "
        "icons for status indicators, and buttons for drill-down actions. "
        "Do NOT use markdown formatting in text values. Use the usageHint "
        "property for heading levels instead. "
        "Respond ONLY with the A2UI JSON array. Do NOT include any text "
        "outside the JSON. Put all explanations into Text components."
    ),
    include_schema=True,
    include_examples=True,
)

root_agent = Agent(
    model="gemini-3-flash-preview",
    name="cloud_dashboard",
    description="A cloud infrastructure assistant that renders rich A2UI interfaces.",
    instruction=instruction,
    tools=[get_resources],
    after_model_callback=a2ui_callback,
)
9. ทดสอบ UI ที่แสดงผล
หากคุณยังคงเรียกใช้ ADK dev UI จากก่อนหน้านี้ ระบบควรโหลดการเปลี่ยนแปลงที่คุณทำกับ Agent อีกครั้งโดยอัตโนมัติ
รีเฟรชแท็บเบราว์เซอร์ เลือก a2ui_agent จากนั้นเริ่มเซสชันใหม่โดยคลิก +New Session ที่ด้านขวาบนของ ADK dev UI แล้วส่งพรอมต์เดิมอีกครั้ง
What's running in my project?
คราวนี้ adk web จะแสดงผลคอมโพเนนต์ A2UI เป็น UI จริง ได้แก่ การ์ดที่มีตัวบ่งชี้สถานะ รายละเอียดทรัพยากร และปุ่มการดำเนินการ
ลองใช้พรอมต์อื่นเพื่อดูว่า Agent สร้าง UI อื่นจากชุดองค์ประกอบพื้นฐานชุดเดียวกันได้อย่างไร
Does anything need my attention?
สุดท้าย ให้ลองใช้พรอมต์อื่นเพื่อสร้าง UI อื่นสำหรับการติดตั้งใช้งานบริการใหม่
I need to deploy a new service
พรอมต์แต่ละรายการจะส่งไปยัง Agent เครื่องมือ และองค์ประกอบพื้นฐาน 18 รายการเดียวกัน แต่พรอมต์แต่ละรายการจะแสดง UI ที่แตกต่างกันสำหรับความตั้งใจที่แตกต่างกัน
10. ล้าง
ล้างทรัพยากรเพื่อหลีกเลี่ยงไม่ให้เซิร์ฟเวอร์ในเครื่องทำงานอยู่
- ในเทอร์มินัลที่เรียกใช้
adk webให้กด Ctrl+C เพื่อหยุดเซิร์ฟเวอร์ Agent
หากคุณสร้างโปรเจ็กต์ขึ้นมาเพื่อ Codelab นี้โดยเฉพาะ คุณสามารถลบโปรเจ็กต์ทั้งหมดได้
gcloud projects delete ${GOOGLE_CLOUD_PROJECT}
11. ขอแสดงความยินดี
คุณได้สร้าง Agent ADK ที่สร้าง UI แบบอินเทอร์แอกทีฟที่สมบูรณ์โดยใช้ A2UI
สิ่งที่คุณได้เรียนรู้
- A2UI เป็นโปรโตคอลที่มีองค์ประกอบพื้นฐานเชิงประกาศ 18 รายการ และข้อความ 3 ประเภท
- A2UI SDK จะสร้างพรอมต์ระบบที่สอน LLM เกี่ยวกับแคตตาล็อกคอมโพเนนต์
- Agent เครื่องมือ และองค์ประกอบพื้นฐานเดียวกันจะสร้าง UI ที่แตกต่างกันสำหรับความตั้งใจที่แตกต่างกัน
- คอมโพเนนต์ A2UI สามารถแสดงผลได้โดยตรงใน
adk webระหว่างการพัฒนา
สร้างฟรอนท์เอนด์สำหรับเวอร์ชันที่ใช้งานจริง
ใน Codelab นี้ คุณได้แสดงผล A2UI ภายใน adk web เพื่อการพัฒนาและการทดสอบ
สำหรับเวอร์ชันที่ใช้งานจริง คุณจะต้องสร้างฟรอนท์เอนด์โดยใช้ตัวแสดงผล A2UI อย่างเป็นทางการตัวใดตัวหนึ่งต่อไปนี้
แพลตฟอร์ม | ตัวแสดงผล | ติดตั้ง |
เว็บ (React) |
|
|
เว็บ (Lit) |
|
|
เว็บ (Angular) |
|
|
มือถือ/เดสก์ท็อป | Flutter GenUI SDK |