
1. 總覽
大多數代理程式應用程式都會傳回純文字。A2UI 改變了這一點。這項通訊協定包含 18 個宣告式 UI 基本元素,可讓代理程式組合豐富的互動式介面。用戶端會以原生方式算繪這些項目。每個版面配置都不需要新的前端程式碼。
本程式碼實驗室會使用 Agent Development Kit (ADK) 建構代理,並使用 A2UI 生成 UI。
建構項目
模擬雲端基礎架構資訊主頁,分為三個階段:
- 傳回純文字格式資源資料的標準代理程式
- A2UI 代理程式,傳回的資料與結構化 A2UI JSON 相同
- 已算繪的代理程式,會在 ADK 開發 UI 中以互動式 UI 元件顯示 A2UI JSON
課程內容
- A2UI 的運作方式:18 個基本元素、3 種訊息類型、平面元件模型
- 如何使用 A2UI SDK 提示 ADK 代理產生 A2UI JSON
- 如何在
adk web中轉譯 A2UI 元件
軟硬體需求
- 已啟用計費功能的 Google Cloud 雲端專案
- 網路瀏覽器,例如 Chrome
- Python 3.12 以上版本
本程式碼實驗室適合熟悉 Python 和 Google Cloud 的中階開發人員。
完成本程式碼研究室大約需要 15 到 20 分鐘。
本程式碼研究室建立的資源費用應低於 $5 美元。
2. 設定環境
建立 Google Cloud 專案
- 在 Google Cloud 控制台的專案選取器頁面中,選取或建立 Google Cloud 專案。
- 確認 Cloud 專案已啟用計費功能。瞭解如何檢查專案是否已啟用計費功能。
啟動 Cloud Shell 編輯器
如要從 Google Cloud 控制台啟動 Cloud Shell 工作階段,請點按 Google Cloud 控制台中的「啟用 Cloud Shell」。
系統便會在 Google Cloud 控制台的底部窗格啟動工作階段。
如要啟動編輯器,請點選 Cloud Shell 視窗工具列中的「開啟編輯器」。
設定環境變數
在 Cloud Shell 編輯器工具列中,依序點選「終端機」和「新增終端機」,然後執行下列指令來設定專案、位置,並將 ADK 設定為使用 Vertex AI 中的 Gemini。
export GOOGLE_CLOUD_PROJECT=<INSERT_YOUR_GCP_PROJECT_HERE>
export GOOGLE_CLOUD_LOCATION=global
export GOOGLE_GENAI_USE_VERTEXAI=True
啟用 API
在終端機執行下列指令,啟用必要的 API:
gcloud services enable aiplatform.googleapis.com
安裝依附元件
在終端機中執行下列指令,安裝最新版 Agent Development Kit (ADK):
pip install -U google-adk a2ui-agent-sdk
export PATH="$HOME/.local/bin:$PATH"
3. 建構代理
首先,請使用會傳回純文字的標準 ADK 代理。這就是現今大多數代理商應用程式的樣貌。
建立代理程式資料夾
建立名為 a2ui_agent 的資料夾,用來存放代理程式和工具的原始碼。
定義工具和模擬資料
建立含有以下內容的 a2ui_agent/resources.py。這項工具會傳回雲端資源清單及其狀態。
RESOURCES = [
    {
        "name": "auth-service",
        "type": "Cloud Run",
        "region": "us-west1",
        "status": "healthy",
        "cpu": "2 vCPU",
        "memory": "1 GiB",
        "instances": 3,
        "url": "https://auth-service-abc123.run.app",
        "last_deployed": "2026-04-18T14:22:00Z",
    },
    {
        "name": "events-db",
        "type": "Cloud SQL",
        "region": "us-east1",
        "status": "warning",
        "tier": "db-custom-8-32768",
        "storage": "500 GB SSD",
        "connections": 195,
        "version": "PostgreSQL 16",
        "issue": "Storage usage at 92%",
    },
    {
        "name": "analytics-pipeline",
        "type": "Cloud Run",
        "region": "us-west1",
        "status": "error",
        "cpu": "2 vCPU",
        "memory": "4 GiB",
        "instances": 0,
        "url": "https://analytics-pipeline-ghi789.run.app",
        "last_deployed": "2026-04-10T16:45:00Z",
        "issue": "CrashLoopBackOff: OOM killed",
    },
]

def get_resources() -> list[dict]:
    """Get all cloud resources in the current project.
    Returns a list of cloud infrastructure resources including their
    name, type, region, status, and type-specific details.
    Status is one of: healthy, warning, error. Resources with
    warning or error status include an 'issue' field describing
    the problem.
    """
    return RESOURCES
定義代理
建立 a2ui_agent/agent.py,並加入以下內容:
from google.adk.agents import Agent
from .resources import get_resources

root_agent = Agent(
    model="gemini-3-flash-preview",
    name="cloud_dashboard",
    description="A cloud infrastructure assistant that reports on project resources.",
    instruction=(
        "You are a cloud infrastructure assistant. When users ask about their "
        "cloud resources, use the get_resources tool to fetch the current state. "
        "Summarize the results clearly in plain text."
    ),
    tools=[get_resources],
)
4. 測試代理
ADK 包含開發 UI,您可以在瀏覽器中與代理互動並傳送提示,以進行測試。
啟動 ADK 開發 UI
在 Cloud Shell 編輯器終端機中執行下列指令,啟動 ADK 開發人員 UI:
adk web --port 8080 --allow_origins "*" --reload_agents
畫面會顯示類似以下的訊息:
+-----------------------------------------------------------------------------+
| ADK Web Server started                                                      |
|                                                                             |
| For local testing, access at http://127.0.0.1:8080.                         |
+-----------------------------------------------------------------------------+
開啟 ADK 開發 UI
如要在瀏覽器中開啟 ADK 開發人員 UI,請按 Ctrl 或 Cmd 鍵,然後點選本機測試網址,或是點選「Web Preview」(網頁預覽) 按鈕,然後選取「Preview on Port 8080」(透過以下通訊埠預覽:8080)。
查看 ADK 開發 UI 時,請從下拉式選單中選取 a2ui_agent。
傳送範例提示
向代理傳送範例提示:
What's running in my project?
現在請試試其他提示,你會發現輸出文字變多了:
Does anything need my attention?
對話內容應如下所示:
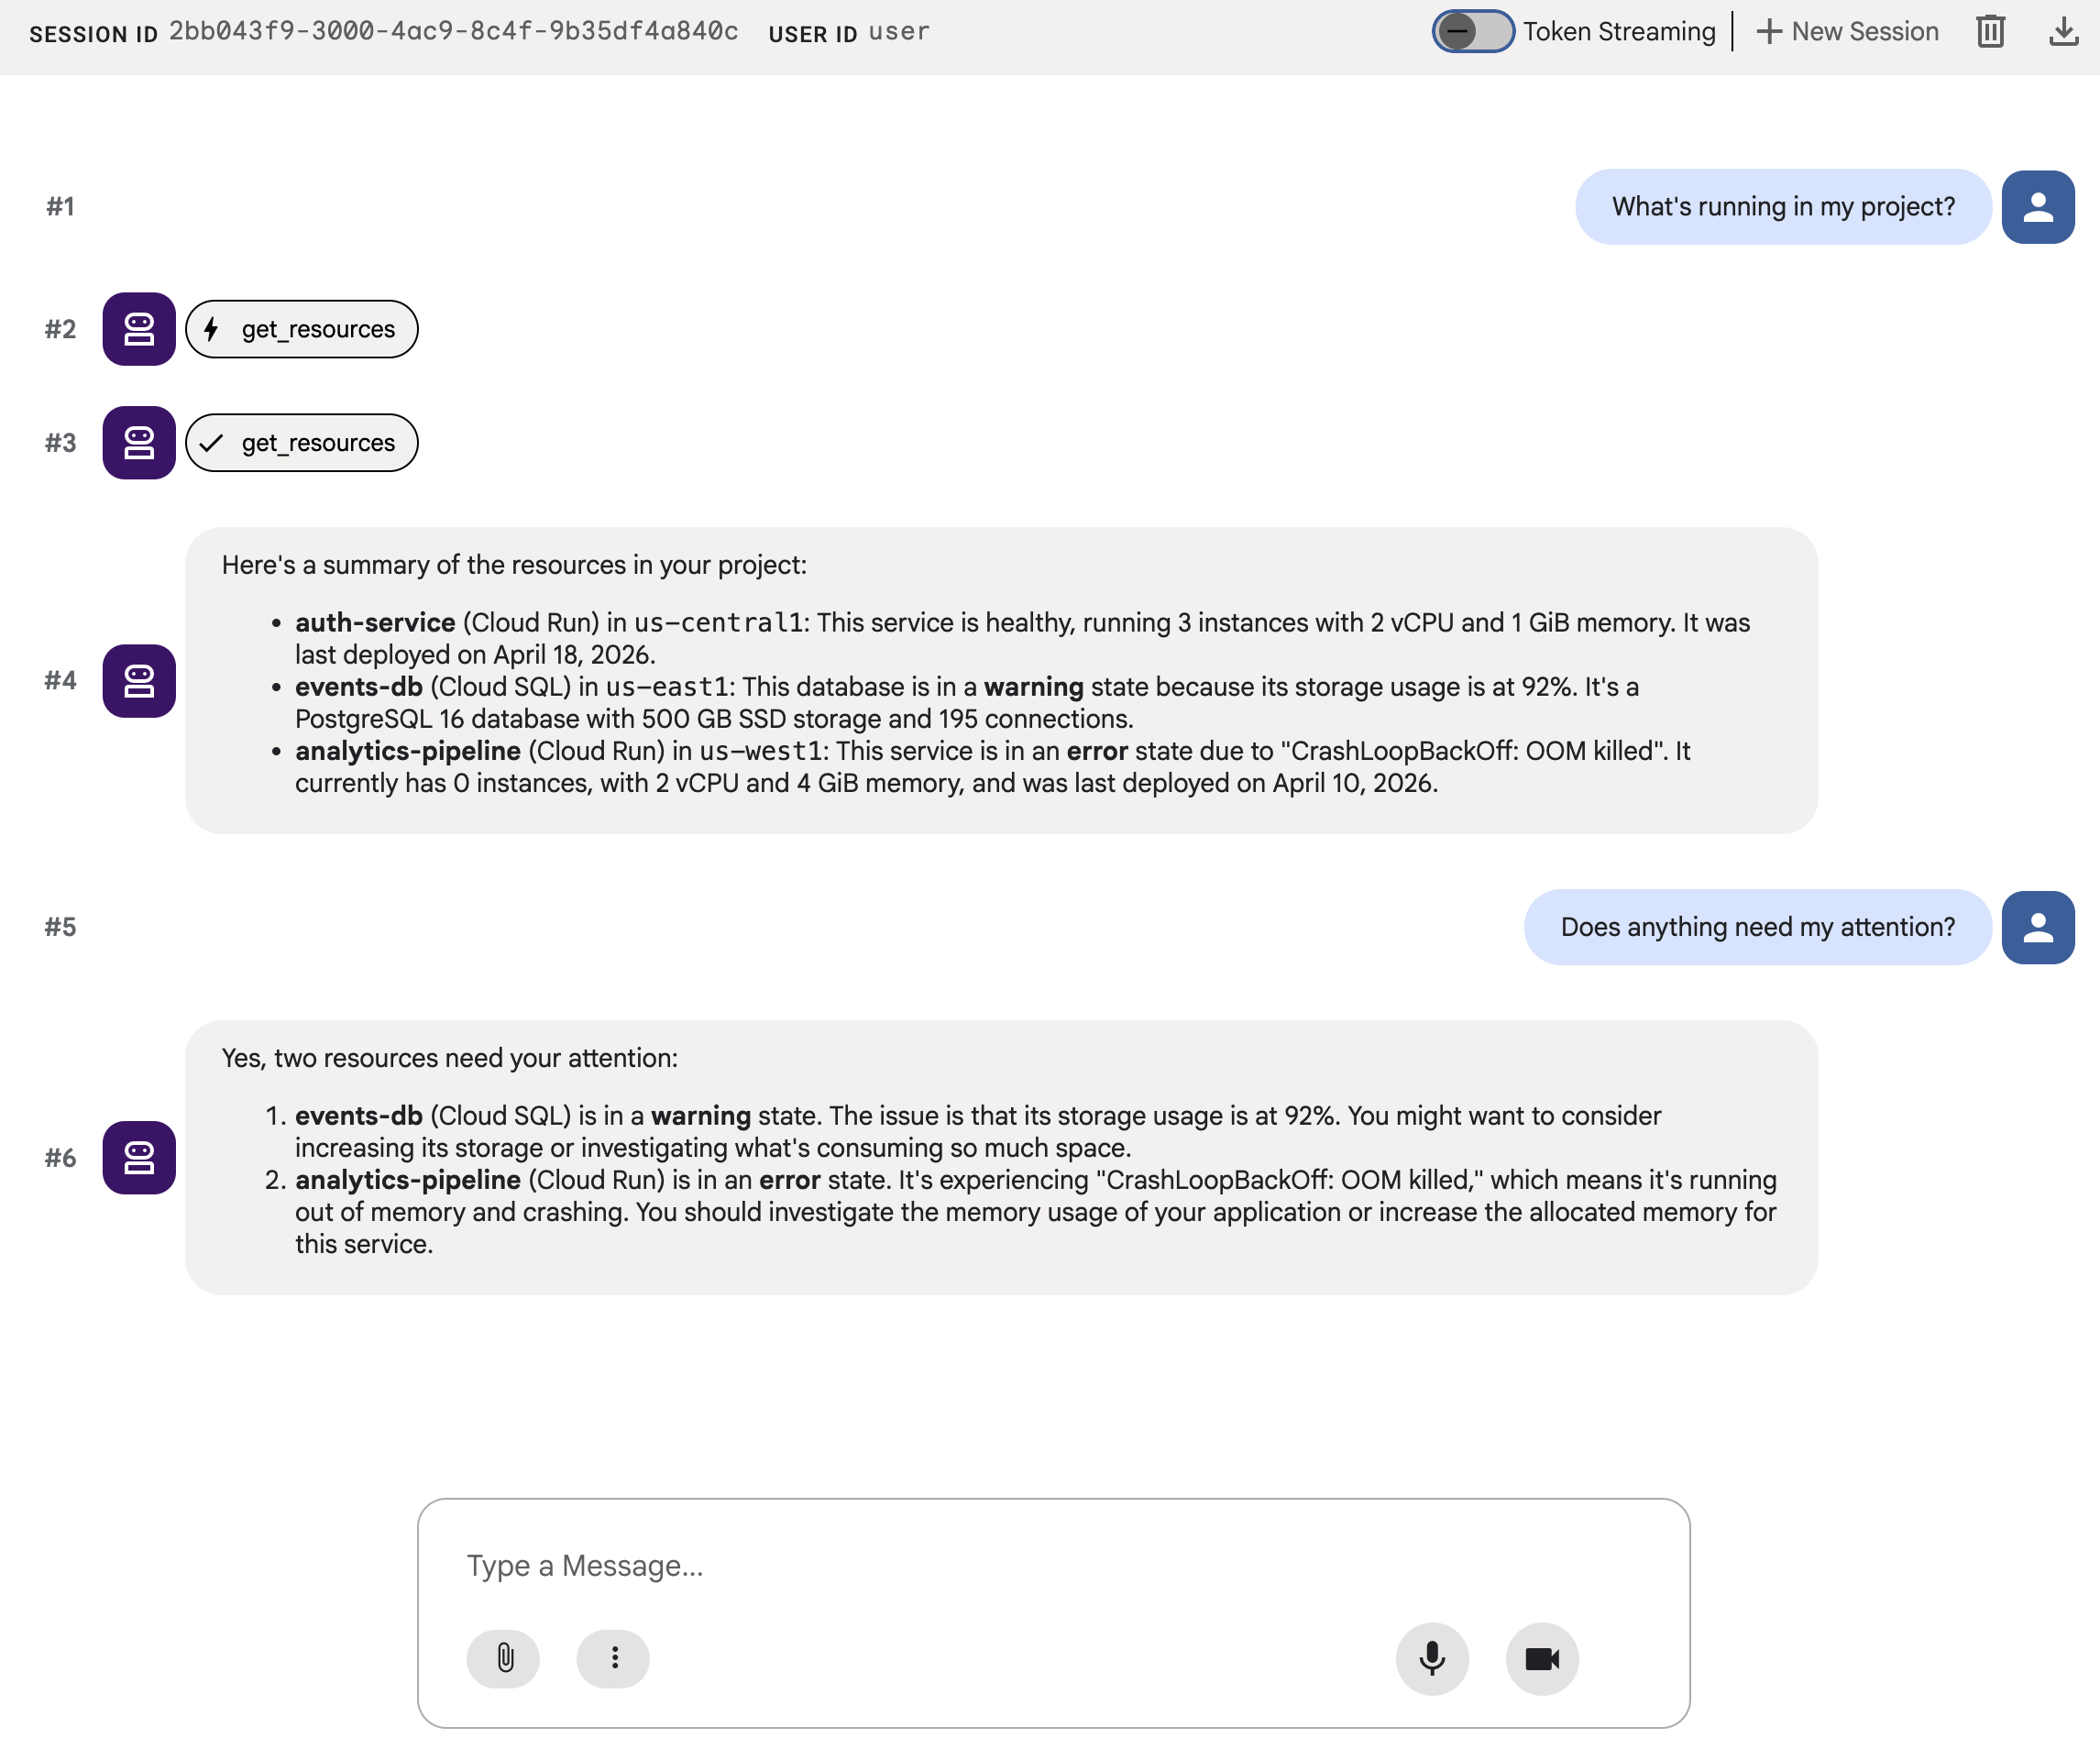
你會看到一連串文字。準確,但使用者體驗不佳。
5. 產生 A2UI JSON
如果代理程式可以描述 UI,而不是傾印文字,會怎麼樣?A2UI 是一種通訊協定,可讓代理從 18 個基本元素的目錄中組合互動式介面。用戶端會以原生方式算繪這些項目。
A2UI Python SDK 內含可為您產生系統提示的結構定義管理工具。這會教導 LLM 完整的 A2UI 元件目錄、正確的屬性名稱和類型,以及 JSON 結構。
更新代理程式
將 a2ui_agent/agent.py 改成以下內容:
from google.adk.agents import Agent
from a2ui.schema.manager import A2uiSchemaManager
from a2ui.basic_catalog.provider import BasicCatalog
from .resources import get_resources

schema_manager = A2uiSchemaManager(
    version="0.8",
    catalogs=[BasicCatalog.get_config("0.8")],
)

instruction = schema_manager.generate_system_prompt(
    role_description=(
        "You are a cloud infrastructure assistant. When users ask about "
        "their cloud resources, use the get_resources tool to fetch the "
        "current state."
    ),
    workflow_description=(
        "Analyze the user's request and return structured UI when appropriate."
    ),
    ui_description=(
        "Use cards for resource summaries, rows and columns for comparisons, "
        "icons for status indicators, and buttons for drill-down actions. "
        "Do NOT use markdown formatting in text values. Use the usageHint "
        "property for heading levels instead. "
        "Respond ONLY with the A2UI JSON array. Do NOT include any text "
        "outside the JSON. Put all explanations into Text components."
    ),
    include_schema=True,
    include_examples=True,
)

root_agent = Agent(
    model="gemini-3-flash-preview",
    name="cloud_dashboard",
    description="A cloud infrastructure assistant that renders rich A2UI interfaces.",
    instruction=instruction,
    tools=[get_resources],
)
generate_system_prompt() 方法會將角色說明與完整的 A2UI JSON 結構定義和少量樣本結合,讓 LLM 確切瞭解輸出內容的格式。您不需要手動撰寫元件目錄。
6. 測試 JSON 輸出內容
如果您先前已執行 ADK 開發人員 UI,系統應會自動重新載入您對代理程式所做的變更。
選取 a2ui_agent,點選 ADK 開發 UI 右上方的「+ New Session」,開始新的工作階段,然後傳送與先前相同的提示:
What's running in my project?
這次,代理程式會傳回 A2UI JSON,而非純文字。您會在即時通訊輸出內容中看到包含 beginRendering、surfaceUpdate 和 dataModelUpdate 的結構化訊息。
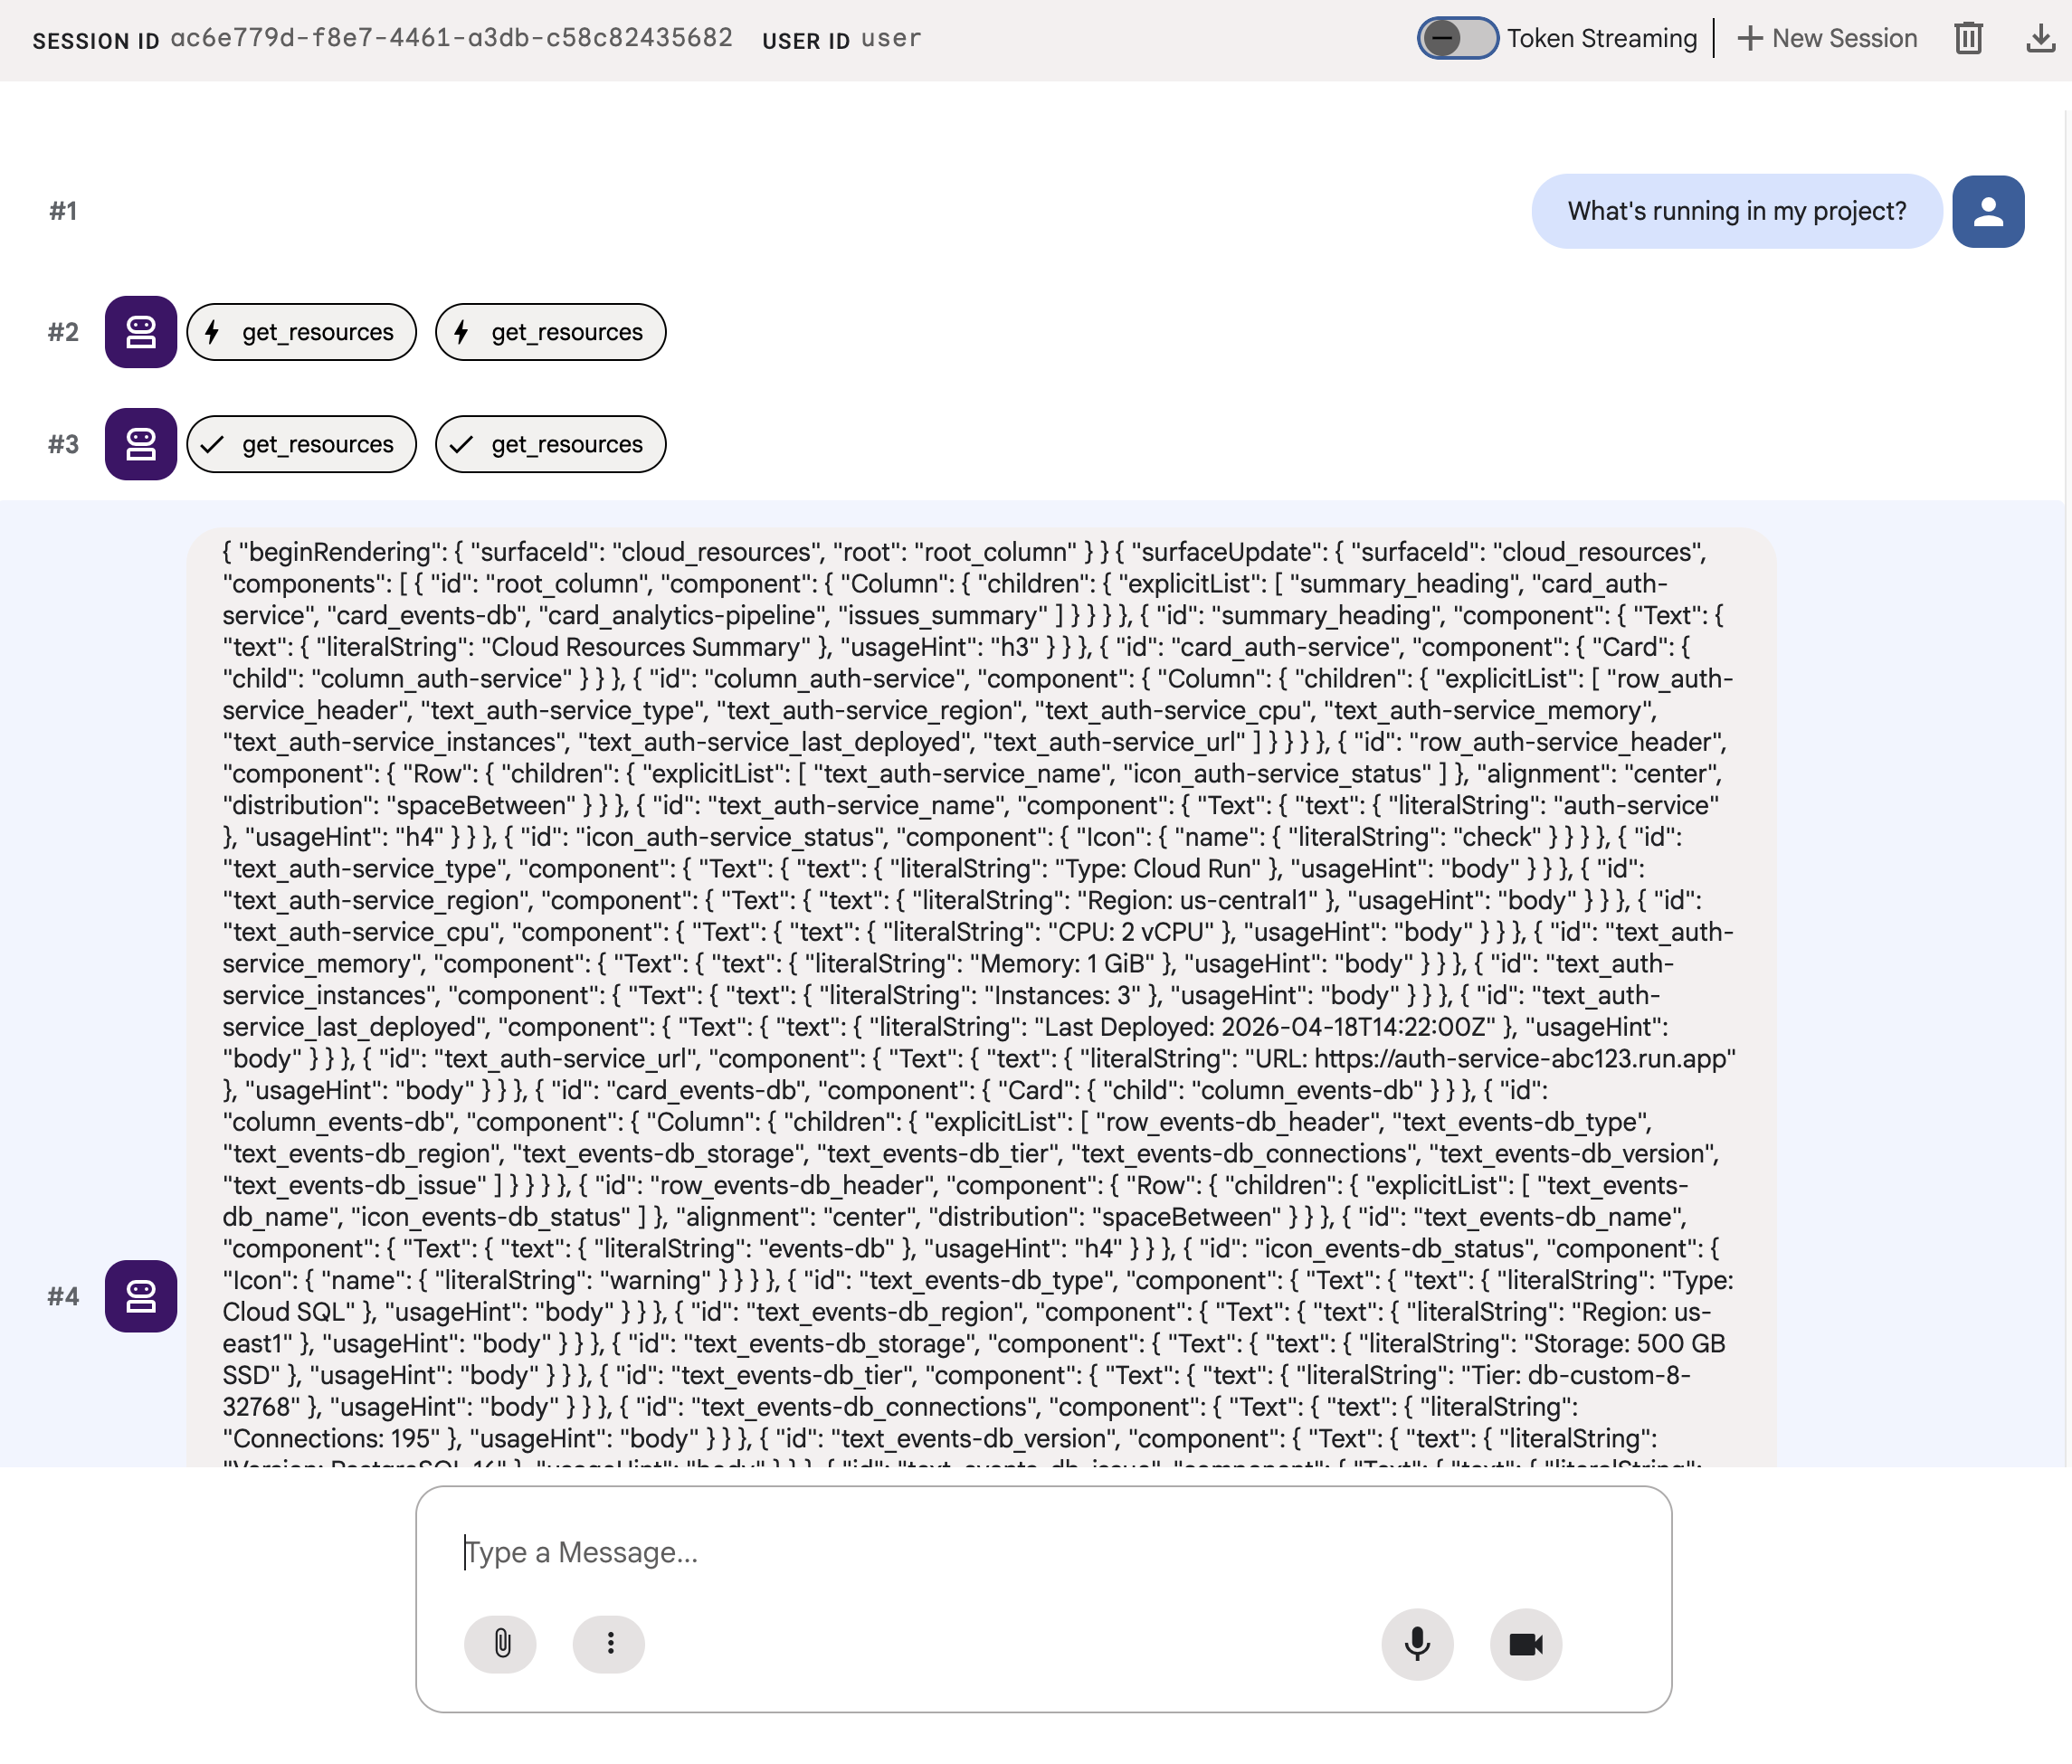
JSON 描述的是含有資訊卡、圖示和按鈕的豐富 UI,但 adk web 會以原始文字顯示。在下一個步驟中,您會將其算繪為實際的 UI 元件。
7. 瞭解 A2UI
查看代理程式剛生成的 JSON。您會發現其中包含三種訊息。每個 A2UI 回應都遵循相同的結構:
1. beginRendering
建立算繪介面並命名根元件:
{"beginRendering": {"surfaceId": "default", "root": "main-column"}}
2. surfaceUpdate
以 ID 參照 (非巢狀結構) 形式,將元件樹狀結構做為扁平清單傳送:
{"surfaceUpdate": {"surfaceId": "default", "components": [
  {"id": "main-column", "component": {"Column": {"children": {"explicitList": ["title", "card1"]}}}},
  {"id": "title", "component": {"Text": {"text": {"literalString": "My Resources"}, "usageHint": "h1"}}},
  {"id": "card1", "component": {"Card": {"child": "card1-content"}}},
  {"id": "card1-content", "component": {"Text": {"text": {"path": "service_name"}}}}
]}}
3. dataModelUpdate
分開傳送資料和結構:
{"dataModelUpdate": {"surfaceId": "default", "contents": [
  {"key": "service_name", "valueString": "auth-service"},
  {"key": "status", "valueString": "healthy"}
]}}
元件會使用 {"path": "key"} 繫結至資料。您可以更新資料,不必重新傳送元件樹狀結構。
18 個原始物件
類別 | 元件 |
版面配置 | 資訊卡、欄、列、清單、分頁標籤、分隔線、模式 |
螢幕 | 文字、圖片、圖示、影片、AudioPlayer |
輸入功率 | TextField、DateTimeInput、MultipleChoice、CheckBox、Slider |
動作 | 按鈕 |
代理程式會從相同目錄組合不同的版面配置。如要瞭解各個基本體的完整詳細資料,請參閱元件參考資料。瀏覽檢視畫面、優先順序資訊主頁和設定表單都使用這 18 個基本元素。不需要新的前端元件。
8. 轉譯 A2UI 元件
代理會產生有效的 A2UI JSON,但 adk web 會以原始文字形式顯示。如要將其算繪為實際的 UI 元件,您需要一個小型公用程式,將代理程式的 A2UI JSON 輸出內容轉換為 adk web 內建算繪器預期的格式。
建立 A2UI 算繪公用程式
建立 a2ui_agent/a2ui_utils.py,並加入以下內容:
import json
import re
from google.genai import types
from google.adk.agents.callback_context import CallbackContext
from google.adk.models.llm_response import LlmResponse

def _wrap_a2ui_part(a2ui_message: dict) -> types.Part:
    """Wrap a single A2UI message for rendering in adk web."""
    datapart_json = json.dumps({
        "kind": "data",
        "metadata": {"mimeType": "application/json+a2ui"},
        "data": a2ui_message,
    })
    blob_data = (
        b"<a2a_datapart_json>"
        + datapart_json.encode("utf-8")
        + b"</a2a_datapart_json>"
    )
    return types.Part(
        inline_data=types.Blob(
            data=blob_data,
            mime_type="text/plain",
        )
    )

def a2ui_callback(
    callback_context: CallbackContext,
    llm_response: LlmResponse,
) -> LlmResponse | None:
    """Convert A2UI JSON in text output to rendered components."""
    if not llm_response.content or not llm_response.content.parts:
        return None
    for part in llm_response.content.parts:
        if not part.text:
            continue
        text = part.text.strip()
        if not text:
            continue
        if not any(k in text for k in ("beginRendering", "surfaceUpdate", "dataModelUpdate")):
            continue
        # Strip markdown fences
        if text.startswith("```"):
            text = text.split("\n", 1)[-1]
            if text.endswith("```"):
                text = text[:-3].strip()
        # Find where JSON starts (skip conversational prefix)
        json_start = None
        for i, ch in enumerate(text):
            if ch in ("[", "{"):
                json_start = i
                break
        if json_start is None:
            continue
        json_text = text[json_start:]
        # raw_decode parses JSON and ignores trailing text
        try:
            parsed, _ = json.JSONDecoder().raw_decode(json_text)
        except json.JSONDecodeError:
            # Handle concatenated JSON objects: {"a":1} {"b":2}
            try:
                fixed = "[" + re.sub(r'\}\s*\{', '},{', json_text) + "]"
                parsed, _ = json.JSONDecoder().raw_decode(fixed)
            except json.JSONDecodeError:
                continue
        if not isinstance(parsed, list):
            parsed = [parsed]
        a2ui_keys = {"beginRendering", "surfaceUpdate", "dataModelUpdate", "deleteSurface"}
        a2ui_messages = [msg for msg in parsed if isinstance(msg, dict) and any(k in msg for k in a2ui_keys)]
        if not a2ui_messages:
            continue
        new_parts = [_wrap_a2ui_part(msg) for msg in a2ui_messages]
        return LlmResponse(
            content=types.Content(role="model", parts=new_parts),
            custom_metadata={"a2a:response": "true"},
        )
    return None
這項公用程式會執行下列兩項作業:
- 從代理的文字輸出內容擷取 A2UI JSON
- 以
adk web內建 A2UI 算繪器預期的格式,包裝每個 A2UI 訊息
更新代理程式
將 a2ui_agent/agent.py 改成以下內容。與上一個步驟相比,唯一的變更是匯入 a2ui_callback,以及代理程式的 after_model_callback 參數:
from google.adk.agents import Agent
from a2ui.schema.manager import A2uiSchemaManager
from a2ui.basic_catalog.provider import BasicCatalog
from .resources import get_resources
from .a2ui_utils import a2ui_callback

schema_manager = A2uiSchemaManager(
    version="0.8",
    catalogs=[BasicCatalog.get_config("0.8")],
)

instruction = schema_manager.generate_system_prompt(
    role_description=(
        "You are a cloud infrastructure assistant. When users ask about "
        "their cloud resources, use the get_resources tool to fetch the "
        "current state."
    ),
    workflow_description=(
        "Analyze the user's request and return structured UI when appropriate."
    ),
    ui_description=(
        "Use cards for resource summaries, rows and columns for comparisons, "
        "icons for status indicators, and buttons for drill-down actions. "
        "Do NOT use markdown formatting in text values. Use the usageHint "
        "property for heading levels instead. "
        "Respond ONLY with the A2UI JSON array. Do NOT include any text "
        "outside the JSON. Put all explanations into Text components."
    ),
    include_schema=True,
    include_examples=True,
)

root_agent = Agent(
    model="gemini-3-flash-preview",
    name="cloud_dashboard",
    description="A cloud infrastructure assistant that renders rich A2UI interfaces.",
    instruction=instruction,
    tools=[get_resources],
    after_model_callback=a2ui_callback,
)
9. 測試算繪的 UI
如果您先前已執行 ADK 開發人員 UI,系統應會自動重新載入您對代理程式所做的變更。
重新整理瀏覽器分頁,選取 a2ui_agent,然後點選 ADK 開發 UI 右上方的「+ New Session」,開始新的工作階段,並傳送與先前相同的提示:
What's running in my project?
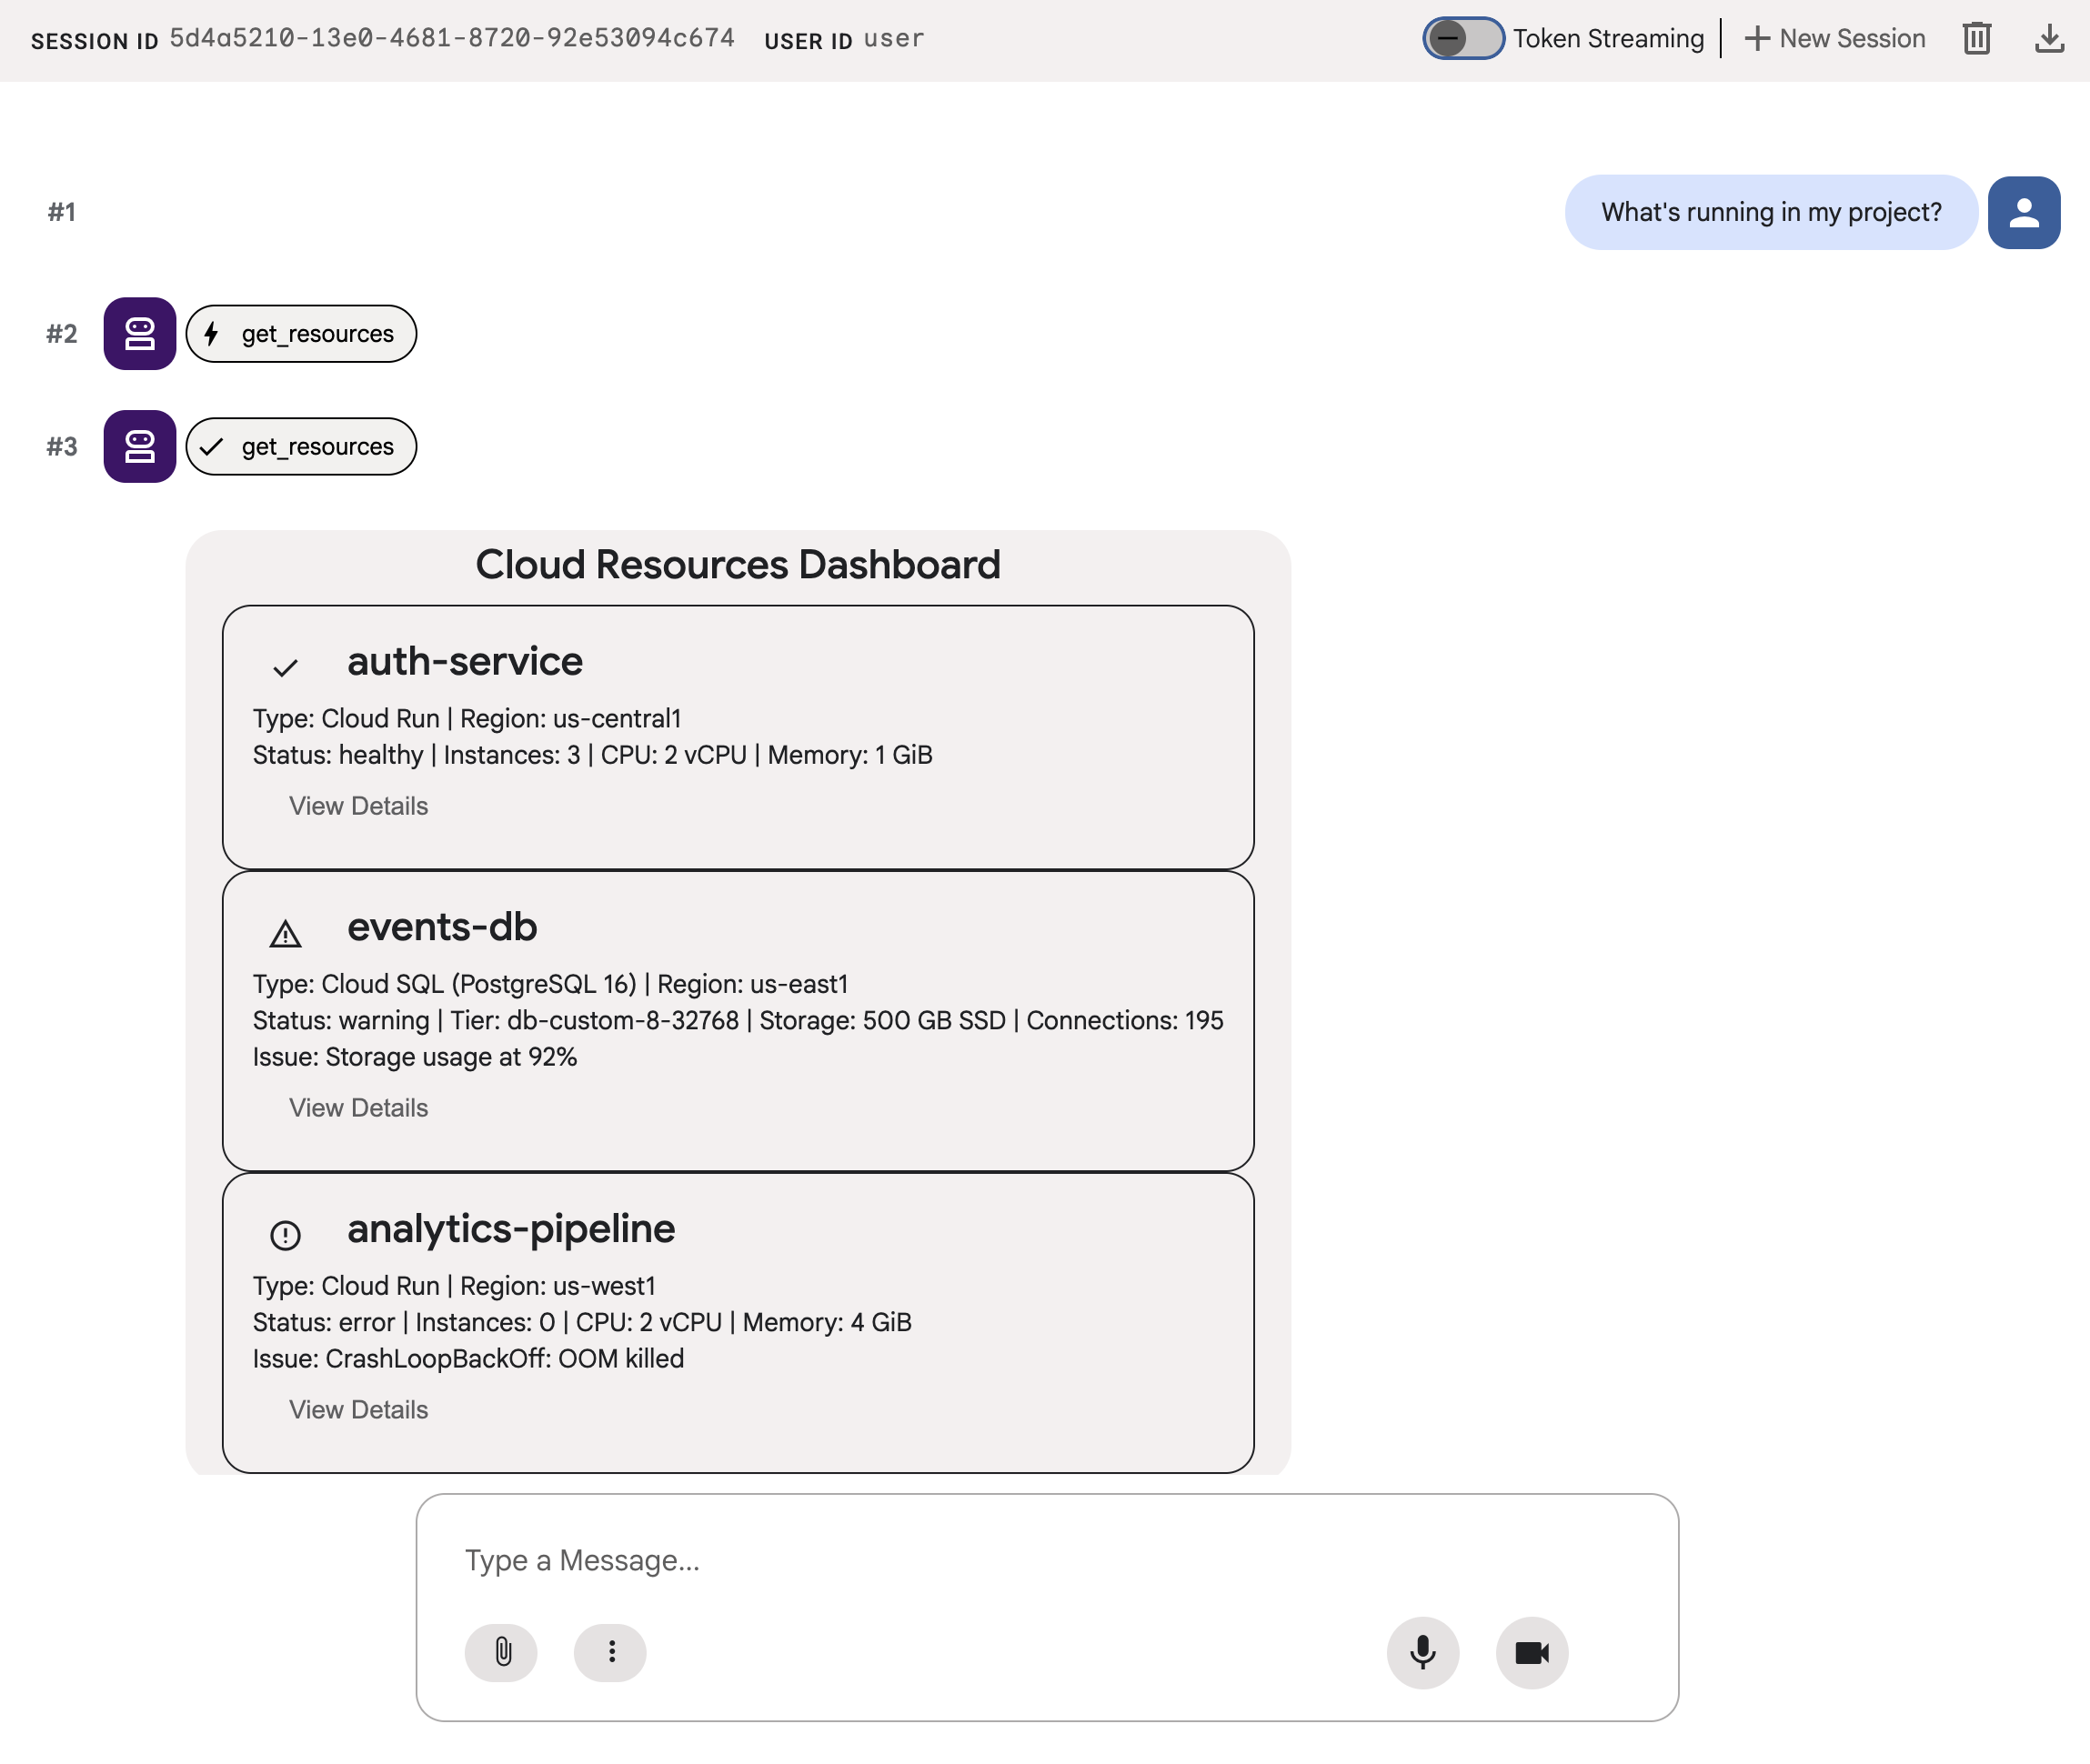
這次 adk web 會將 A2UI 元件轉譯為實際 UI:含有狀態指標、資源詳細資料和動作按鈕的資訊卡。
請嘗試其他提示詞,看看代理如何從同一組基本元素組成不同的 UI:
Does anything need my attention?
最後,請嘗試使用其他提示生成不同 UI,以部署新服務:
I need to deploy a new service
每個提示都會傳送至相同的代理、工具和 18 個基本元素。但每項提示都會產生不同的 UI,以滿足不同的意圖。
10. 清除
為避免本機伺服器持續運作,請清理資源:
- 在執行
adk web的終端機中,按下 Ctrl+C 鍵停止代理程式伺服器。
如果您是特地為了這個程式碼研究室建立專案,可以刪除整個專案:
gcloud projects delete ${GOOGLE_CLOUD_PROJECT}
11. 恭喜
您已建構 ADK 代理,可使用 A2UI 生成豐富的互動式 UI。
您學到的內容
- A2UI 是一種通訊協定,具有 18 個宣告式基本類型和 3 種訊息類型
- A2UI SDK 會產生系統提示,向 LLM 說明元件目錄
- 相同代理程式、工具和基本元素會針對不同意圖組成不同的 UI
- 開發期間,A2UI 元件可直接在
adk web中算繪
建構正式版前端
在本程式碼研究室中,您在 adk web 內算繪 A2UI,以進行開發和測試。
如要用於正式環境,請使用其中一個官方 A2UI 算繪器建構前端:
平台 | 轉譯器 | 安裝 |
網頁 (React) |
|
|
網頁 (Lit) |
|
|
網頁 (Angular) |
|
|
行動裝置/電腦 | Flutter GenUI SDK |