
1. Introduction
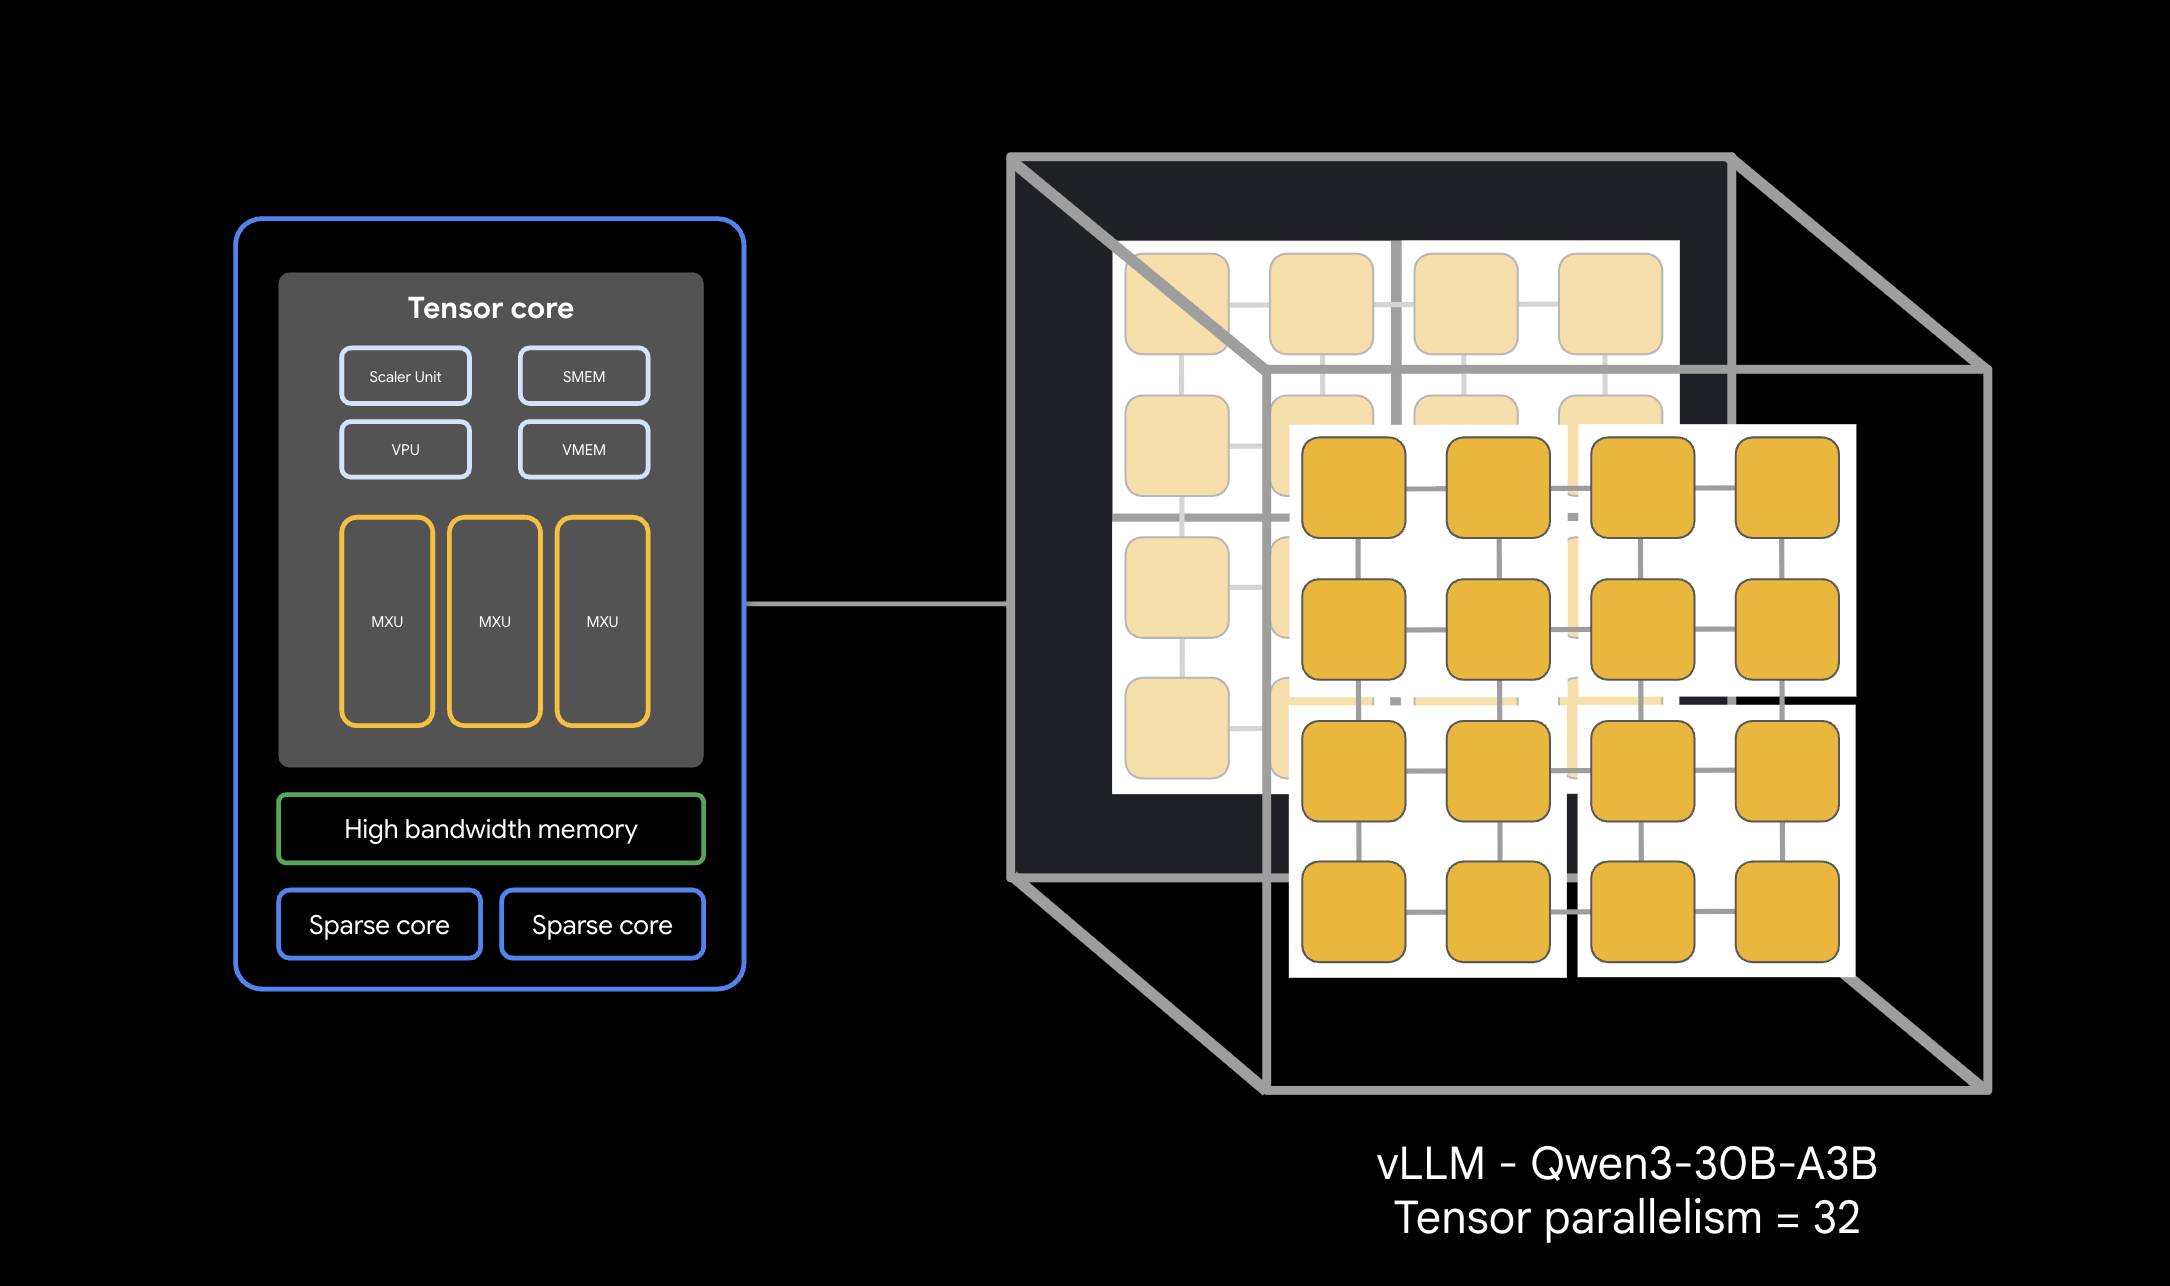
In this codelab, you will learn how to deploy high-performance, multi-host vLLM (Virtual Large Language Model) inferencing services on Google Kubernetes Engine (GKE) using Google Cloud TPUs. You will configure distributed inference using Ray and manage the workload natively on GKE using LeaderWorkerSets.
This walkthrough simulates a production setup for serving large models like Qwen 30B.
What you'll do
- Create a custom VPC network for accelerator traffic.
- Provision a GKE cluster with Ray Operator and GCS Fuse CSI driver.
- Initialize a GCS Rapid Cache for accelerated model loading.
- Provision a multi-host TPU v6e node pool with reserved capacity.
- Configure Workload Identity for secure access to model weights.
- Deploy and test the vLLM engine serving a 30B parameter model.
What you'll need
- A Google Cloud project with billing enabled.
- A Google Cloud Reservation for TPU v6e resources (32 chips,
ct6e-standard-4t). - Access to copy model weights from a source bucket.
- Cloud Shell or a local terminal with
gcloud,kubectl, andhelminstalled.
- Estimated Duration: 60 minutes
- Estimated Cost: Under $60 (assuming teardown follows promptly).
2. Before you begin
Create or Select a Google Cloud Project
- In the Google Cloud Console, select or create a Google Cloud project.
- Ensure that billing is enabled for your Cloud project.
Start Cloud Shell
- Click Activate Cloud Shell at the top of the Google Cloud console.
- Verify authentication:
gcloud auth list
- Confirm your project:
gcloud config get project
- Set it if needed:
export PROJECT_ID=<YOUR_PROJECT_ID>
gcloud config set project $PROJECT_ID
Set Environment Variables
To make executing commands easier, define the following variables in your shell. Replace <YOUR_ZONE> with your allocated TPU zone and <YOUR_RESERVATION_NAME> with your reservation ID. You will need to create a Hugging Face User Access Token to download gated model weights. Once you have created it, replace <YOUR_HUGGING_FACE_TOKEN> with your newly created token.
export PROJECT_ID=$(gcloud config get-value project)
export PROJECT_NUMBER=$(gcloud projects describe ${PROJECT_ID} --format="value(projectNumber)")
export ZONE="<YOUR_ZONE>" # e.g., us-east5-a
export REGION=${ZONE%-*}
export CLUSTER_NAME="qwen-serving-cluster"
export GVNIC_NETWORK_PREFIX="qwen-serving"
export BUCKET_NAME="inf-demo-model-storage-${PROJECT_NUMBER}"
export RESERVATION_NAME="<YOUR_RESERVATION_NAME>"
export NODE_POOL_NAME="tpu-v6e-32-resvd-pool"
export MULTIHOST_COLLECTION_NAME="tpu-6-collection"
export HF_TOKEN="<YOUR_HUGGING_FACE_TOKEN>" # Token with access to Qwen model if restricted
Enable APIs
Enable the required Google Cloud services:
gcloud services enable \
    container.googleapis.com \
    compute.googleapis.com \
    iam.googleapis.com \
    cloudresourcemanager.googleapis.com
3. Create Custom Networking
Multi-host TPU workloads require specific network configurations, including higher MTU sizes for efficient accelerator communication. Create a custom VPC network for your cluster.
- Create the VPC network with a large MTU (8896):
gcloud compute --project=${PROJECT_ID} \ networks create ${GVNIC_NETWORK_PREFIX}-main \ --subnet-mode=custom \ --mtu=8896 - Create the subnet for the cluster:
gcloud compute --project=${PROJECT_ID} \ networks subnets create ${GVNIC_NETWORK_PREFIX}-tpu \ --network=${GVNIC_NETWORK_PREFIX}-main \ --region=${REGION} \ --range=192.168.100.0/24 - Create firewall rules allowing internal traffic to enable workers to communicate:
gcloud compute --project=${PROJECT_ID} firewall-rules create ${GVNIC_NETWORK_PREFIX}-allow-internal \
    --network=${GVNIC_NETWORK_PREFIX}-main \
    --allow=all \
    --source-ranges=172.16.0.0/12,192.168.0.0/16,10.0.0.0/8 \
    --description="Allow all internal traffic within the network."
4. Provision GKE Cluster
Create a Standard GKE cluster setup configured to support GCS Fuse mounts and Ray Operator workloads.
- Create the cluster:
gcloud container clusters create ${CLUSTER_NAME} \ --project=${PROJECT_ID} \ --location=${REGION} \ --release-channel=rapid \ --machine-type=e2-standard-4 \ --network=${GVNIC_NETWORK_PREFIX}-main \ --subnetwork=${GVNIC_NETWORK_PREFIX}-tpu \ --num-nodes=1 \ --gateway-api=standard \ --enable-managed-prometheus \ --enable-dataplane-v2 \ --enable-dataplane-v2-metrics \ --workload-pool=${PROJECT_ID}.svc.id.goog \ --addons=GcsFuseCsiDriver,RayOperator \ --enable-ip-alias - Retrieve Cluster Credentials:
gcloud container clusters get-credentials ${CLUSTER_NAME} --region=${REGION} - Create Hugging Face Secret: Save your token securely for container access downloads:
kubectl create secret generic hf-secret \ --from-literal=hf_api_token=${HF_TOKEN} \ --dry-run=client -o yaml | kubectl apply -f - - Install LeaderWorkerSet (LWS) via Helm. LWS manages groups of pods that must be scheduled together:
helm install lws oci://registry.k8s.io/lws/charts/lws \
    --version=0.7.0 \
    --namespace lws-system \
    --create-namespace \
    --wait
5. Enable GCS Rapid Cache
To speed up reading dozens of GBs of weights from Cloud Storage during serving, create a GCS bucket and enable GCS Rapid Cache in your zone.
- Create the bucket:
gcloud storage buckets create gs://$BUCKET_NAME \ --location=$REGION \ --uniform-bucket-level-access - Initialize Rapid Cache in your TPU zone:
gcloud storage buckets anywhere-caches create gs://$BUCKET_NAME $ZONE \
    --ttl=1d \
    --admission-policy=ADMIT_ON_FIRST_MISS
6. Setup Workload Identity & Storage Permissions
Configure identity links to securely mount the weight bucket into your GKE pods without embedding long-lived keys.
- Create a dedicated IAM Service Account:
gcloud iam service-accounts create tpu-reader-sa - Grant Bucket Read permissions:
gcloud storage buckets add-iam-policy-binding gs://${BUCKET_NAME} \ --member="serviceAccount:tpu-reader-sa@${PROJECT_ID}.iam.gserviceaccount.com" \ --role="roles/storage.objectAdmin" - Create Workload Identity Binding for the
defaultnamespace Kubernetes Service Account:gcloud iam service-accounts add-iam-policy-binding tpu-reader-sa@${PROJECT_ID}.iam.gserviceaccount.com \ --role="roles/iam.workloadIdentityUser" \ --member="serviceAccount:${PROJECT_ID}.svc.id.goog[default/default]" - Annotate the Kubernetes SA:
kubectl annotate serviceaccount default iam.gke.io/gcp-service-account=tpu-reader-sa@${PROJECT_ID}.iam.gserviceaccount.com
7. Model Weights Setup
To serve a 30B parameter model, you need to download weights from Hugging Face into your GCS bucket. To bypass the Cloud Shell disk quota limit (5GB), use a Standard Kubernetes Job to download directly inside the cluster and write into the mounted GCS Fuse volume securely.
- Deploy the Model Downloader Job: Create and apply the following manifest to initiate the download:
cat <<EOF | kubectl apply -f - apiVersion: batch/v1 kind: Job metadata: name: model-downloader spec: ttlSecondsAfterFinished: 60 template: metadata: annotations: gke-gcsfuse/volumes: "true" gke-gcsfuse/memory-limit: "0" spec: serviceAccountName: default restartPolicy: OnFailure containers: - name: downloader image: python:3.10-slim command: ["/bin/sh", "-c"] args: - | pip install -U "huggingface_hub[hf_transfer]" filelock export HF_HUB_ENABLE_HF_TRANSFER=1 python -c ' import filelock class DummyLock: def __init__(self, *args, **kwargs): pass def __enter__(self): return self def __exit__(self, *args): pass def acquire(self, *args, **kwargs): pass def release(self, *args, **kwargs): pass filelock.FileLock = DummyLock from huggingface_hub import snapshot_download snapshot_download( repo_id="Qwen/Qwen3-30B-A3B", local_dir="/models/qwen3-30b-weights", local_dir_use_symlinks=False ) ' env: - name: HF_TOKEN valueFrom: secretKeyRef: name: hf-secret key: hf_api_token volumeMounts: - name: model-weights mountPath: /models volumes: - name: model-weights csi: driver: gcsfuse.csi.storage.gke.io volumeAttributes: bucketName: ${BUCKET_NAME} mountOptions: "implicit-dirs" EOF - Monitor the Download: Check the logs of the downloader pod to follow progress:
kubectl logs -f job/model-downloader
8. Create reserved TPU Node Pool
Provision the actual multi-host TPU slice using your existing capacity reservation.
- Run the creation command:
gcloud beta container node-pools create ${NODE_POOL_NAME} \ --project=${PROJECT_ID} \ --cluster=${CLUSTER_NAME} \ --region=${REGION} \ --node-locations=${ZONE} \ --machine-type=ct6e-standard-4t \ --tpu-topology=4x8 \ --num-nodes=8 \ --scopes=https://www.googleapis.com/auth/cloud-platform \ --reservation-affinity=specific \ --reservation=${RESERVATION_NAME} \ --accelerator-network-profile=auto \ --node-labels=cloud.google.com/gke-nodepool-group-name=${MULTIHOST_COLLECTION_NAME} \ --node-labels=cloud.google.com/gke-workload-type=HIGH_AVAILABILITY \ --node-labels=cloud.google.com/gke-networking-dra-driver=true - Wait for nodes to join: You can observe node aggregation scaling directly. Wait until 8 nodes containing
ct6ejoinkubectl get nodes.
9. Deploy vLLM Service
- Create Network Claims: You need to request the network environment:
cat <<EOF | kubectl apply -f - apiVersion: resource.k8s.io/v1 kind: ResourceClaimTemplate metadata: name: all-netdev spec: spec: devices: requests: - name: req-netdev exactly: deviceClassName: netdev.google.com allocationMode: All EOF - Deploy Load Balancer API Endpoint:
cat <<EOF | kubectl apply -f - apiVersion: v1 kind: Service metadata: name: vllm-tpu-service spec: type: LoadBalancer selector: leaderworkerset.sigs.k8s.io/name: vllm-tpu-qwen leaderworkerset.sigs.k8s.io/worker-index: "0" ports: - protocol: TCP port: 8000 targetPort: 8000 EOF - Deploy LeaderWorkerSet workload: This manifest starts Ray head/worker aggregation dynamically across the 8 slice hosts.
cat <<EOF | kubectl apply -f -
apiVersion: leaderworkerset.x-k8s.io/v1
kind: LeaderWorkerSet
metadata:
  name: vllm-tpu-qwen
spec:
  replicas: 1
  leaderWorkerTemplate:
    size: 8
    restartPolicy: RecreateGroupOnPodRestart
    workerTemplate:
      metadata:
        annotations:
          gke-gcsfuse/volumes: "true"
          gke-gcsfuse/memory-limit: "0"
        labels:
          leaderworkerset.sigs.k8s.io/name: vllm-tpu-qwen
          gke-gcsfuse/volumes: "true"
      spec:
        hostname: vllm-tpu-qwen
        serviceAccountName: default
        containers:
        - name: vllm-tpu
          image: vllm/vllm-tpu:nightly
          command: ["sh", "-c"]
          args:
          - |
            MY_TPU_IP=\$(hostname -I | awk '{print \$1}')
            echo "My TPU Network IP is: \$MY_TPU_IP"

            LEADER_DNS="vllm-tpu-qwen-0.vllm-tpu-qwen"
            until getent hosts \$LEADER_DNS; do
              echo "DNS not ready. Sleeping 5s..."
              sleep 5
              done
            LEADER_IP=\$(getent hosts \$LEADER_DNS | awk '{print \$1}')

            export JAX_PLATFORMS=''
            export SCAN_TPU_CHIPS=True
            export TPU_MULTIHOST_BACKEND=ray
            export JAX_DISTRIBUTED_INITIALIZATION_TIMEOUT=300
            export LD_LIBRARY_PATH=\$LD_LIBRARY_PATH:/usr/local/lib
            export VLLM_HOST_IP=\$MY_TPU_IP

            if [ "\$LWS_WORKER_INDEX" = "0" ]; then
              echo "Starting Ray Head..."
              ray start --head --port=6379 --node-ip-address=\$MY_TPU_IP --resources='{"TPU": 4}' --block &
              sleep 20
              until ray status; do sleep 5; done

              echo "Starting vLLM API Server..."
              python3 -m vllm.entrypoints.openai.api_server \
                --model=/models/qwen3-30b-weights \
                --tensor-parallel-size=32 \
                --pipeline-parallel-size=1 \
                --distributed-executor-backend=ray \
                --host=0.0.0.0 --port=8000 \
                --enforce-eager \
                --gpu-memory-utilization=0.90
            else
              ray start --address=\${LEADER_IP}:6379 --node-ip-address=\$MY_TPU_IP --resources='{"TPU": 4}' --block
            fi
          ports:
          - containerPort: 8000
          - containerPort: 6379
          volumeMounts:
          - name: model-weights
            mountPath: /models
            readOnly: true
          - name: dshm
            mountPath: /dev/shm
          resources:
            claims:
            - name: net-resources
            limits:
              google.com/tpu: 4
              memory: "100Gi"
            requests:
              google.com/tpu: 4
              memory: "100Gi"
        nodeSelector:
          cloud.google.com/gke-tpu-accelerator: tpu-v6e-slice
          cloud.google.com/gke-tpu-topology: 4x8
          gke.networks.io/accelerator-network-profile: auto
        resourceClaims:
        - name: net-resources
          resourceClaimTemplateName: all-netdev
        volumes:
        - name: model-weights
          csi:
            driver: gcsfuse.csi.storage.gke.io
            volumeAttributes:
              bucketName: ${BUCKET_NAME}
              mountOptions: "implicit-dirs"
        - name: dshm
          emptyDir:
            medium: Memory
EOF
10. Test Deployment Response
It can take 5-10 minutes for all pods in the LeaderWorkerSet to pull container images, initialize Ray, and become fully Ready. You can track status by watching pod initialization:
kubectl get pods -l leaderworkerset.sigs.k8s.io/name=vllm-tpu-qwen -w
Wait until all 8 vllm-tpu-qwen- pods show STATUS as Running and READY as 2/2, and ensure the load balancer has received an External IP before proceeding. This can take 7-10 minutes.
- Retrieve External IP:
export EXTERNAL_IP=$(kubectl get svc vllm-tpu-service -o jsonpath='{.status.loadBalancer.ingress[0].ip}')
echo $EXTERNAL_IP
Caution: In a production service, this endpoint should be secured with something like Identity Aware Proxy (IAP)
- Submit inference request using
curl:curl -N -s http://$EXTERNAL_IP:8000/v1/chat/completions \ -H "Content-Type: application/json" \ -d '{ "model": "/models/qwen3-30b-weights", "messages": [{"role": "user", "content": "Write a haiku about high-performance computing on TPUs."}], "temperature": 0.7, "max_tokens": 100, "stream": true }' | sed 's/^data: //' | grep -v '\[DONE\]' | grep -v '^$' | jq -rj '.choices[0].delta.content // empty' ; echo ""
11. Clean up
To avoid ongoing charges to your Google Cloud account, delete the resources created during this codelab.
- Delete Node Pool:
gcloud container node-pools delete "${NODE_POOL_NAME}" \ --cluster="${CLUSTER_NAME}" \ --region="${REGION}" \ --project="${PROJECT_ID}" --quiet - Delete Cluster:
gcloud container clusters delete "${CLUSTER_NAME}" \ --region="${REGION}" \ --project="${PROJECT_ID}" --quiet - Delete Network and firewall setups:
gcloud compute firewall-rules delete \ "${GVNIC_NETWORK_PREFIX}-allow-internal" \ --project="${PROJECT_ID}" --quiet gcloud compute networks subnets delete "${GVNIC_NETWORK_PREFIX}-tpu" \ --region="${REGION}" --quiet gcloud compute networks delete "${GVNIC_NETWORK_PREFIX}-main" --quiet - Unbind and Delete Service Account:
# 1. Create the cleanup script cat << 'EOF' > clean_up_sa.sh #!/bin/bash # Validate that PROJECT_ID is available if [ -z "$PROJECT_ID" ]; then echo "Error: PROJECT_ID environment variable is not set." exit 1 fi SA_EMAIL="tpu-reader-sa@${PROJECT_ID}.iam.gserviceaccount.com" SA_MEMBER="serviceAccount:${SA_EMAIL}" echo "Gathering IAM policy for ${SA_EMAIL}..." # Fetch roles assigned to this specific SA ROLES=$(gcloud projects get-iam-policy ${PROJECT_ID} \ --flatten="bindings[].members" \ --filter="bindings.members:${SA_MEMBER}" \ --format="value(bindings.role)") if [ -z "$ROLES" ]; then echo "No IAM bindings found for this service account." else for ROLE in $ROLES; do echo "Removing binding for: ${ROLE}..." gcloud projects remove-iam-policy-binding ${PROJECT_ID} \ --member="${SA_MEMBER}" \ --role="${ROLE}" --quiet > /dev/null done echo "Successfully unbound all roles." fi # 2. Delete the service account itself echo "Deleting service account..." gcloud iam service-accounts delete ${SA_EMAIL} --project=${PROJECT_ID} --quiet echo "Cleanup complete." EOF # 2. Make the script executable and run it chmod +x clean_up_sa.sh ./clean_up_sa.sh - Delete GCS Bucket Navigate to your cloud console, select Cloud Storage -> Buckets, select inf-demo-model-storage and then choose ‘Delete'.
12. Congratulations
Congratulations! You've successfully deployed a multi-host TPU high-inference rate vLLM stack utilizing Ray natively over Google Kubernetes Engine.
What you've learned
- Provisioning custom pathways tailored for high-speed TPU traffic.
- Mounting weights utilizing GCS Fuse and regional rapid caches.
- Orchestrating multi-host workload slices natively syncronised via LeaderWorkerSets.
- To learn more look at the vLLM User Guide and llm-d Deployment Guides