
1. はじめに
この Codelab では、Google Cloud TPU を使用して、Google Kubernetes Engine(GKE)に高パフォーマンスの分離型推論サービスをデプロイする方法について説明します。分散 LLM サービング用のオープンソース フレームワークである llm-d を使用して、複数の TPU ホスト間でプレフィル フェーズとデコード フェーズを分離し、共有 KV キャッシュと GKE 推論ゲートウェイを設定します。
この設定は、Qwen3-32B などの大規模モデルを高スループットと低レイテンシで提供するための本番環境をシミュレートします。
演習内容
- アクセラレータ トラフィック用に最適化された MTU を使用して、カスタム VPC ネットワークを作成します。
- GCS Fuse CSI ドライバと Ray Operator アドオンを使用して GKE クラスタをプロビジョニングします。
- TPU v6e スライス(合計 32 個のチップ)用に 8 つの専用ノードプールを作成します。
- GCS アクセス用の Workload Identity と権限を構成します。
llm-dをデプロイして、Qwen3-32B モデルの分離型サービングを管理します。- ベンチマーク テストでデプロイを確認します。
アーキテクチャ
![llm-d 分離型サービング アーキテクチャ。モデルがプレフィルの 4 つの 2x2 レプリカに分割され、デコードも同様に分割されていることを示しています。]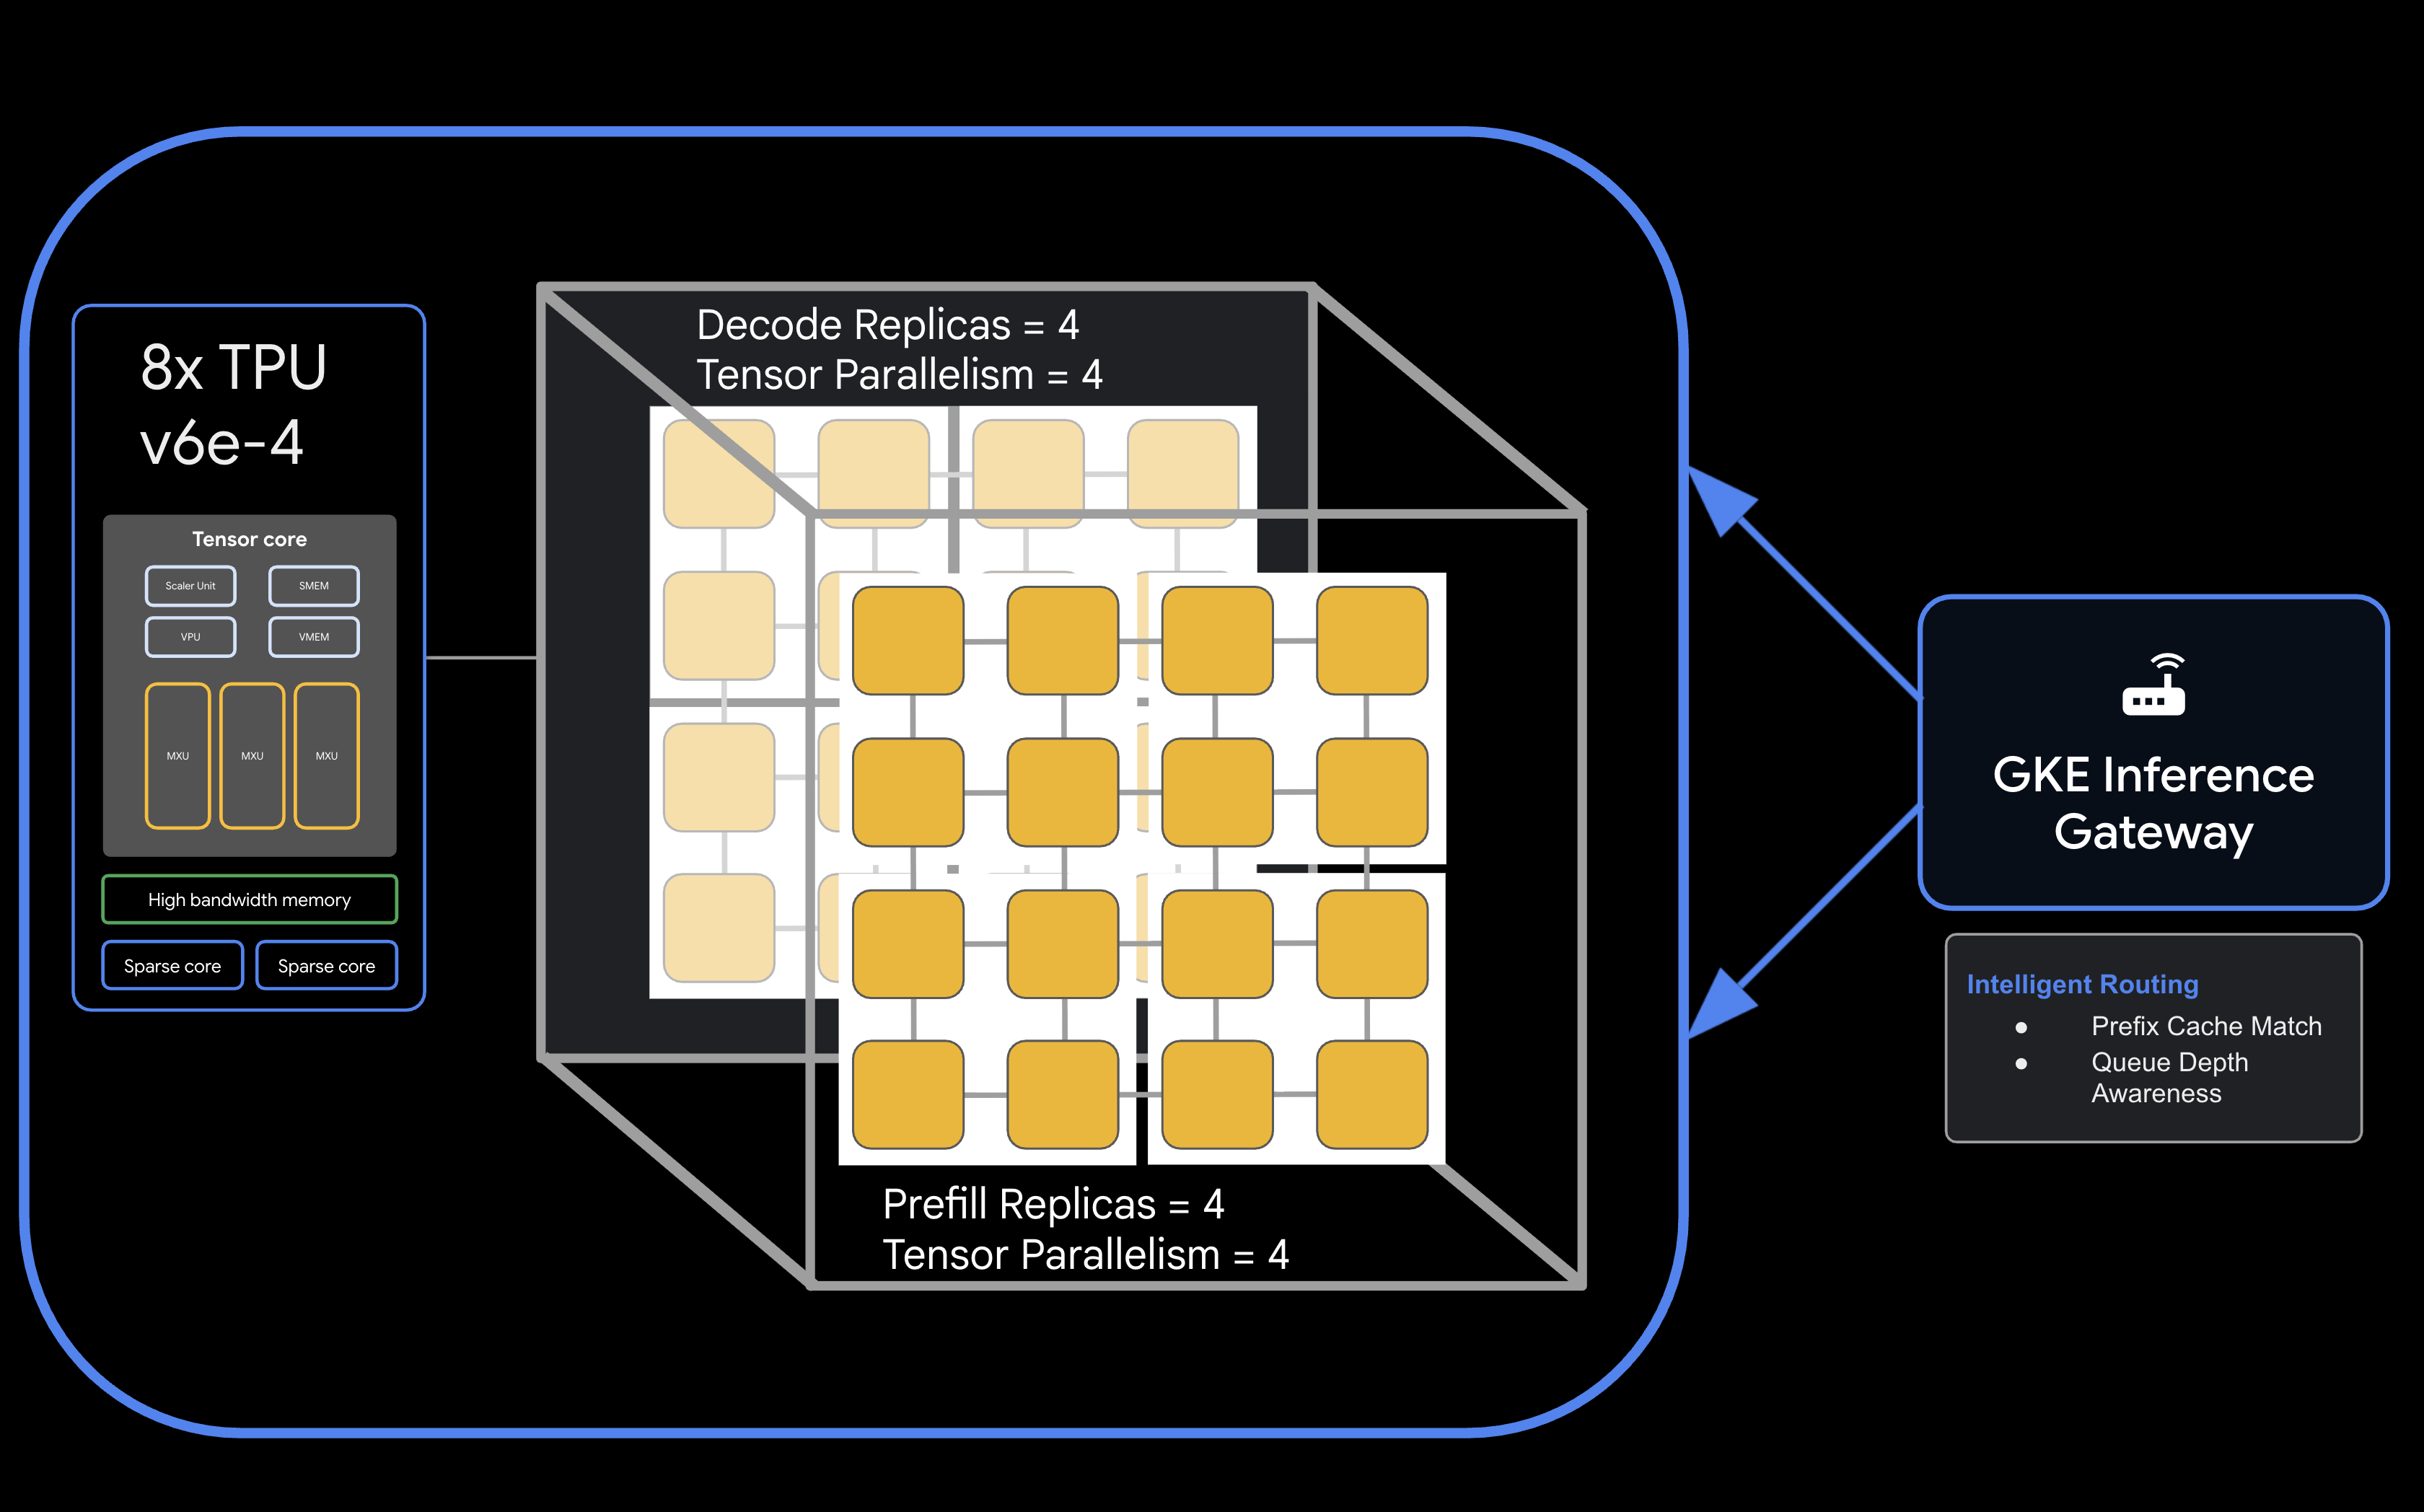
必要なもの
- 課金を有効にした Google Cloud プロジェクト
- TPU v6e リソース(32 チップ、
ct6e-standard-4t)の Google Cloud 予約 - モデルの重みをダウンロードするための Hugging Face ユーザー アクセス トークン
gcloud、kubectl、helmがインストールされた Cloud Shell またはローカル ターミナル
- 推定所要時間: 60 分
- 推定費用: このラボでは大量の TPU リソースを使用するため、プロジェクトを完了するには最低でも $60 の費用がかかります。演習が完了したらすぐにクリーンアップの手順を行ってください。
2. 始める前に
Google Cloud プロジェクトを作成または選択する
- Google Cloud コンソールで、Google Cloud プロジェクトを作成または選択します。
- Cloud プロジェクトで課金が有効になっていることを確認します。
Cloud Shell の起動
- Google Cloud コンソールの上部にある「Cloud Shell をアクティブにする 」アイコンをクリックします。
- 認証を検証します。
gcloud auth list
- プロジェクトを確認します。
gcloud config get project
- 必要に応じて設定します。
export PROJECT_ID=<YOUR_PROJECT_ID>
gcloud config set project $PROJECT_ID
API を有効にする
必要な Google Cloud サービスを有効にします。
gcloud services enable \
    container.googleapis.com \
    compute.googleapis.com \
    iam.googleapis.com \
    cloudresourcemanager.googleapis.com
環境変数の設定
シェルで次の変数を定義します。<YOUR_ZONE> は割り当てられた TPU ゾーンに、<YOUR_RESERVATION_NAME> は予約 ID に、<YOUR_HUGGING_FACE_TOKEN> はトークンに置き換えます。
export PROJECT_ID=$(gcloud config get-value project)
export ZONE="<YOUR_ZONE>" # e.g., us-east5-a
export REGION=${ZONE%-*}
export NAMESPACE=default
export CLUSTER_NAME="qwen-serving-cluster"
export GVNIC_NETWORK_PREFIX="qwen-serving"
export RESERVATION_NAME="<YOUR_RESERVATION_NAME>"
export HF_TOKEN="<YOUR_HUGGING_FACE_TOKEN>"
3. カスタム ネットワークを作成する
分離型サービングでは、プレフィル ノードとデコード ノード間の高帯域幅トラフィックを処理するために、特定のネットワーク構成が必要です。
- 効率的なアクセラレータ通信のために、大きな MTU(8896)を使用して VPC ネットワークを作成 します。
gcloud compute --project=${PROJECT_ID} \ networks create ${GVNIC_NETWORK_PREFIX}-main \ --subnet-mode=auto \ --bgp-routing-mode=regional \ --mtu=8896 - クラスタの サブネットを作成 します。
gcloud compute --project=${PROJECT_ID} \ networks subnets create ${GVNIC_NETWORK_PREFIX}-tpu \ --network=${GVNIC_NETWORK_PREFIX}-main \ --region=${REGION} \ --range=10.10.0.0/18 - GKE Gateway API に必要な プロキシ専用サブネットを作成 します。
gcloud compute networks subnets create ${GVNIC_NETWORK_PREFIX}-proxy \ --purpose=REGIONAL_MANAGED_PROXY \ --role=ACTIVE \ --region=${REGION} \ --network=${GVNIC_NETWORK_PREFIX}-main \ --range=172.16.0.0/26 - 内部通信を許可する ファイアウォール ルールを作成 します。
gcloud compute --project=${PROJECT_ID} firewall-rules create ${GVNIC_NETWORK_PREFIX}-allow-internal \
    --network=${GVNIC_NETWORK_PREFIX}-main \
    --allow=all \
    --source-ranges=172.16.0.0/12,10.0.0.0/8 \
    --description="Allow all internal traffic within the network."
4. GKE クラスタをプロビジョニングする
GCS Fuse マウントと Ray Operator ワークロードをサポートするように構成された Standard GKE クラスタを作成します。
- クラスタを作成 します。
gcloud container clusters create ${CLUSTER_NAME} \ --project=${PROJECT_ID} \ --location=${REGION} \ --release-channel=rapid \ --machine-type=e2-standard-4 \ --network=${GVNIC_NETWORK_PREFIX}-main \ --subnetwork=${GVNIC_NETWORK_PREFIX}-tpu \ --num-nodes=1 \ --gateway-api=standard \ --enable-managed-prometheus \ --enable-dataplane-v2 \ --enable-dataplane-v2-metrics \ --workload-pool=${PROJECT_ID}.svc.id.goog \ --addons=HttpLoadBalancing,GcsFuseCsiDriver,RayOperator,HorizontalPodAutoscaling,NodeLocalDNS \ --enable-ip-alias - クラスタの認証情報を取得 します。
gcloud container clusters get-credentials ${CLUSTER_NAME} --region=${REGION} - Hugging Face Secret を作成 します。
kubectl create secret generic llm-d-hf-token \
    --from-literal=hf_api_token=${HF_TOKEN} \
    --dry-run=client -o yaml | kubectl apply -f -
5. 予約済み TPU ノードプールを作成する
予約を使用して、TPU v6e スライス用に 8 つの専用ノードプールをプロビジョニングします。
次のループを実行して、8 つのノードプールを作成します。
for i in {1..8}
do
  gcloud beta container node-pools create "tpu-v6e-single-$i" \
    --project=${PROJECT_ID} \
    --cluster=${CLUSTER_NAME} \
    --region=${REGION} \
    --node-locations=${ZONE} \
    --machine-type=ct6e-standard-4t \
    --tpu-topology=2x2 \
    --num-nodes=1 \
    --reservation-affinity=specific \
    --reservation=${RESERVATION_NAME} \
    --workload-metadata=GKE_METADATA &
done
すべてのノードが作成され、クラスタに参加するまで待ちます。kubectl get nodes でステータスを確認できます。
6. llm-d サービスをデプロイする
次に、llm-d フレームワークをデプロイして、分離型サービングを管理します。
- Helm をインストール して、llm-d チャートをデプロイします。
curl -fsSL -o get_helm.sh https://raw.githubusercontent.com/helm/helm/main/scripts/get-helm-4 chmod 700 get_helm.sh ./get_helm.sh - llm-d のクローンを作成 し、必要な依存関係をインストールします。
git clone https://github.com/llm-d/llm-d.git # When using yq alongside Helm, you almost always want the version by Mike Farah (mikefarah/yq). We remove the most common yq installation before reinstalling sudo rm -rf /usr/local/bin/yq cd llm-d ./helpers/client-setup/install-deps.sh - カスタム values_tpu.yaml を準備 して、クラスタの分離型サービングを構成します。
cat <<EOF > llm-d/guides/pd-disaggregation/ms-pd/values_tpu.yaml multinode: false # Configure accelerator type for Google TPU accelerator: type: google modelArtifacts: uri: "hf://Qwen/Qwen3-32B" size: 200Gi authSecretName: "llm-d-hf-token" name: "Qwen/Qwen3-32B" labels: llm-d.ai/inference-serving: "true" llm-d.ai/guide: "pd-disaggregation" llm-d.ai/hardware-variant: "tpu" llm-d.ai/hardware-vendor: "google" llm-d.ai/model: "Qwen3-32B" tracing: enabled: true otlpEndpoint: "localhost:4317" serviceNames: routingProxy: "routing-proxy" sampling: sampler: "always_off" samplerArg: "0" routing: servicePort: 8000 proxy: image: ghcr.io/llm-d/llm-d-routing-sidecar:v0.5.0 connector: nixlv2 secure: false decode: parallelism: tensor: 4 create: true replicas: 4 modelCommand: custom extraConfig: nodeSelector: cloud.google.com/gke-tpu-accelerator: "tpu-v6e-slice" cloud.google.com/gke-tpu-topology: "2x2" monitoring: podmonitor: enabled: true portName: "vllm" path: "/metrics" interval: "30s" containers: - name: "vllm" image: "vllm/vllm-tpu:nightly" command: - "/bin/bash" - "-c" - | # ROLE: kv_consumer (Receives KV cache from prefill) KV_CONFIG="{\"kv_connector\":\"TPUConnector\", \"kv_connector_module_path\" : \"tpu_inference.distributed.tpu_connector\", \"kv_role\":\"kv_consumer\", \"kv_ip\" : \"$POD_IP\"}" echo "KV_CONFIG=$KV_CONFIG" python3 -m vllm.entrypoints.openai.api_server \ --model "Qwen/Qwen3-32B" \ --port 8200 \ --tensor-parallel-size 4 \ --kv-transfer-config "${KV_CONFIG}" \ --disable-uvicorn-access-log \ --max-num-seqs 256 \ --block-size 128 \ --gpu-memory-utilization 0.90 \ --max-model-len 8192 env: - name: POD_IP valueFrom: fieldRef: fieldPath: status.podIP - name: TPU_SIDE_CHANNEL_PORT value: "9600" - name: TPU_KV_TRANSFER_PORT value: "9100" ports: - containerPort: 8200 name: vllm protocol: TCP - containerPort: 9100 name: tpu-kv-transfer protocol: TCP - containerPort: 9600 name: tpu-coord protocol: TCP resources: limits: memory: 64Gi cpu: "16" google.com/tpu: 4 requests: memory: 64Gi cpu: "16" google.com/tpu: 4 mountModelVolume: true volumeMounts: - name: metrics-volume mountPath: /.config - name: shm mountPath: /dev/shm - name: torch-compile-cache mountPath: /.cache startupProbe: httpGet: path: /health port: vllm initialDelaySeconds: 15 periodSeconds: 30 timeoutSeconds: 5 failureThreshold: 120 livenessProbe: httpGet: path: /health port: vllm periodSeconds: 10 timeoutSeconds: 5 failureThreshold: 3 readinessProbe: httpGet: path: /v1/models port: vllm periodSeconds: 5 timeoutSeconds: 2 failureThreshold: 3 volumes: - name: metrics-volume emptyDir: {} - name: shm emptyDir: medium: Memory sizeLimit: "16Gi" - name: torch-compile-cache emptyDir: {} prefill: parallelism: tensor: 4 create: true replicas: 4 modelCommand: custom extraConfig: nodeSelector: cloud.google.com/gke-tpu-accelerator: "tpu-v6e-slice" cloud.google.com/gke-tpu-topology: "2x2" monitoring: podmonitor: enabled: true portName: "vllm" path: "/metrics" interval: "30s" containers: - name: "vllm" image: "vllm/vllm-tpu:nightly" command: - "/bin/bash" - "-c" - | # ROLE: kv_producer (Sends KV cache to decode) KV_CONFIG="{\"kv_connector\":\"TPUConnector\", \"kv_connector_module_path\" : \"tpu_inference.distributed.tpu_connector\", \"kv_role\":\"kv_producer\", \"kv_ip\" : \"$POD_IP\"}" echo "KV_CONFIG=$KV_CONFIG" python3 -m vllm.entrypoints.openai.api_server \ --model "Qwen/Qwen3-32B" \ --port 8200 \ --tensor-parallel-size 4 \ --kv-transfer-config "${KV_CONFIG}" \ --disable-uvicorn-access-log \ --enable-chunked-prefill \ --block-size 128 \ --gpu-memory-utilization 0.90 \ --max-model-len 8192 env: - name: POD_IP valueFrom: fieldRef: fieldPath: status.podIP - name: TPU_SIDE_CHANNEL_PORT value: "9600" - name: TPU_KV_TRANSFER_PORT value: "9100" ports: - containerPort: 8200 name: vllm protocol: TCP - containerPort: 9100 name: tpu-kv-transfer protocol: TCP - containerPort: 9600 name: tpu-coord protocol: TCP resources: limits: memory: 64Gi cpu: "16" google.com/tpu: 4 requests: memory: 64Gi cpu: "16" google.com/tpu: 4 mountModelVolume: true volumeMounts: - name: metrics-volume mountPath: /.config - name: shm mountPath: /dev/shm - name: torch-compile-cache mountPath: /.cache startupProbe: httpGet: path: /health port: vllm initialDelaySeconds: 15 periodSeconds: 30 timeoutSeconds: 5 failureThreshold: 120 livenessProbe: httpGet: path: /health port: vllm periodSeconds: 10 timeoutSeconds: 5 failureThreshold: 3 readinessProbe: httpGet: path: /v1/models port: vllm periodSeconds: 5 timeoutSeconds: 2 failureThreshold: 3 volumes: - name: metrics-volume emptyDir: {} - name: shm emptyDir: medium: Memory sizeLimit: "16Gi" - name: torch-compile-cache emptyDir: {} EOF - llm-d の Helm チャートを使用して Service と Gateway をデプロイ します。
cd llm-d/guides/pd-disaggregation/ helmfile apply -e gke_tpu -n $NAMESPACE kubectl apply -f ./httproute.gke.yaml - vLLM サービスが起動するまで待ちます。「INFO: Application startup complete.」 が表示されるまで、デコードとプリフィル POD のログを監視します。
DECODE_POD=$(kubectl get pods -l llm-d.ai/modelservice-role=decode -o jsonpath='{.items[0].metadata.name}')

# Get the first Prefill pod name
PREFILL_POD=$(kubectl get pods -l llm-d.ai/modelservice-role=prefill -o jsonpath='{.items[0].metadata.name}')

echo "Run each of these until vLLM starts successfully and then ctrl-C out"
echo "kubectl logs -f $DECODE_POD -c vllm"
echo "kubectl logs -f $PREFILL_POD -c vllm"
7. デプロイ レスポンスをテストする
次のスクリプトは、GKE 推論ゲートウェイを介してサービング クラスタへの接続をテストし、ベンチマーク テストを実行します。
- 接続をテストしてベンチマークを実行 します。
cat <<EOBF > ./run_benchmark.sh
#!/bin/bash

# Configuration
NAMESPACE="default"
JOB_NAME="qwen3-pd-benchmark"
MODEL_NAME="Qwen/Qwen3-32B"

echo "🔍 Discovering Gateway IP..."
GATEWAY_IP=$(kubectl get gateway -n ${NAMESPACE} -o jsonpath='{.items[0].status.addresses[0].value}')

if [ -z "$GATEWAY_IP" ]; then
    echo "❌ Error: Could not find Gateway IP. Check 'kubectl get gateway'."
    exit 1
fi

TARGET_URL="http://${GATEWAY_IP}"
echo "✅ Found Gateway at: $TARGET_URL"

echo "🗑️  Cleaning up old benchmark jobs..."
kubectl delete job $JOB_NAME --ignore-not-found=true

echo "🚀 Generating and applying Benchmark Job..."
cat <<EOF | kubectl apply -f -
apiVersion: batch/v1
kind: Job
metadata:
name: $JOB_NAME
namespace: $NAMESPACE
spec:
template:
    spec:
    containers:
    - name: llm-benchmark
        image: vllm/vllm-openai:latest
        command: ["/bin/bash", "-c"]
        args:
        - |
            # 1. Download dataset
            if [ ! -f /data/sharegpt.json ]; then
            echo "Downloading ShareGPT dataset..."
            curl -L "https://huggingface.co/datasets/anon8231489123/ShareGPT_Vicuna_unfiltered/resolve/main/ShareGPT_V3_unfiltered_cleaned_split.json" -o /data/sharegpt.json
            fi

            # 2. Wait for Gateway readiness
            echo "Checking connectivity to $MODEL_NAME..."
            until curl -s "$TARGET_URL/v1/models" | grep -q "$MODEL_NAME"; do
            echo "Waiting for Gateway backends to sync..."
            sleep 10
            done

            # 3. Run Benchmark
            vllm bench serve \\
            --base-url "$TARGET_URL" \\
            --model "$MODEL_NAME" \\
            --dataset-name "sharegpt" \\
            --dataset-path "/data/sharegpt.json" \\
            --request-rate 80.0 \\
            --num-prompts 2000 \\
            --tokenizer "$MODEL_NAME"
        volumeMounts:
        - name: dataset-volume
        mountPath: /data
    restartPolicy: Never
    volumes:
    - name: dataset-volume
        emptyDir: {}
EOF

echo "⏳ Job submitted. Follow logs with:"
echo "kubectl logs -f job/$JOB_NAME"
EOBF

chmod a+x ./run_benchmark.sh

./run_benchmark.sh
8. クリーンアップ
Google Cloud アカウントに継続的に課金されないようにするには、この Codelab で作成したリソースを削除します。
アセットをクリーンアップするには、次の手順を行います。
# 1. Delete LeaderWorkerSet and Helm release
kubectl delete leaderworkerset qwen-simple-anywhere-cache --ignore-not-found
helm uninstall lws --namespace lws-system 2>/dev/null
kubectl delete namespace lws-system --ignore-not-found

# 2. Delete GKE Node Pools
# Note: Usually deleting the cluster deletes the node pools,
# but explicit deletion ensures it's gone before the cluster teardown begins.
for i in {1..8}
do
	gcloud container node-pools delete "tpu-v6e-single-$i" \
	    --cluster="${CLUSTER_NAME}" \
	    --region="${REGION}" \
	    --project="${PROJECT_ID}" --quiet

done

# 3. Delete GKE Cluster
gcloud container clusters delete "${CLUSTER_NAME}" \
    --region="${REGION}" \
    --project="${PROJECT_ID}" --quiet

echo "--- Starting IAM and Service Account Cleanup ---"

# 1. Define the full Service Account email for clarity
SA_EMAIL="tpu-reader-sa@${PROJECT_ID}.iam.gserviceaccount.com"

# 2. Remove Storage Bucket IAM Binding
# This removes the 'objectViewer' role from the specific bucket
gcloud storage buckets remove-iam-policy-binding gs://inf-demo-model-storage \
    --member="serviceAccount:${SA_EMAIL}" \
    --role="roles/storage.objectViewer" --quiet

# 3. Remove Workload Identity Binding
# This severs the link between the GKE KSA and the GCP SA
gcloud iam service-accounts remove-iam-policy-binding "${SA_EMAIL}" \
    --role="roles/iam.workloadIdentityUser" \
    --member="serviceAccount:${PROJECT_ID}.svc.id.goog[default/default]" --quiet

# 4. Delete the Service Account
gcloud iam service-accounts delete "${SA_EMAIL}" --project="${PROJECT_ID}" --quiet

echo "IAM cleanup complete!"

echo "--- Starting Network and Firewall Cleanup ---"

# 4. Delete Firewall Rules (Must go before the Network)
gcloud compute firewall-rules delete \
    "${GVNIC_NETWORK_PREFIX}-allow-ssh" \
    "${GVNIC_NETWORK_PREFIX}-allow-icmp" \
    "${GVNIC_NETWORK_PREFIX}-allow-internal" \
    "ray-allow-internal" \
    --project="${PROJECT_ID}" --quiet

# 5. Delete Subnets (Must go before the Network)
gcloud compute networks subnets delete "${GVNIC_NETWORK_PREFIX}-tpu" \
    --region="${REGION}" \
    --project="${PROJECT_ID}" --quiet

gcloud compute networks subnets delete "${GVNIC_NETWORK_PREFIX}-proxy-sub" \
    --region="${REGION}" \
    --project="${PROJECT_ID}" --quiet

gcloud compute networks subnets delete "proxy-only-subnet" \
    --region="${REGION}" \
    --project="${PROJECT_ID}" --quiet

# 6. Finally, delete the VPC Network
gcloud compute networks delete "${GVNIC_NETWORK_PREFIX}-main" \
    --project="${PROJECT_ID}" --quiet

echo "Cleanup complete!"
9. 完了
おめでとうございます!llm-d と GKE を使用して、分離型 v6e TPU に Qwen3-32B を正常にデプロイできました。
学習した内容
- 高速 TPU トラフィック用にカスタム ネットワークを構成する方法。
- GKE で予約済み TPU ノードプールをプロビジョニングする方法。
- プレフィル ワークロードとデコード ワークロードを分離するために
llm-dをデプロイする方法。