
1. บทนำ
ใน Codelab นี้ คุณจะได้เรียนรู้วิธีทำให้บริการอนุมานที่มีประสิทธิภาพสูงและแยกส่วนใช้งานได้ใน Google Kubernetes Engine (GKE) โดยใช้ Google Cloud TPU คุณจะใช้ llm-d ซึ่งเป็นเฟรมเวิร์กโอเพนซอร์สสำหรับการแสดงผล LLM แบบกระจาย เพื่อแยกเฟสการป้อนข้อความล่วงหน้าและการถอดรหัสในโฮสต์ TPU หลายรายการ ตั้งค่าการแคช KV ที่แชร์ และ GKE Inference Gateway
การตั้งค่านี้จำลองสภาพแวดล้อมการใช้งานจริงสำหรับการแสดงโมเดลขนาดใหญ่ เช่น Qwen3-32B ที่มีปริมาณงานสูงและความหน่วงต่ำ
สิ่งที่คุณต้องดำเนินการ
- สร้างเครือข่าย VPC ที่กำหนดเองด้วย MTU ที่เพิ่มประสิทธิภาพสำหรับการรับส่งข้อมูลของตัวเร่ง
- จัดสรรคลัสเตอร์ GKE ด้วยไดรเวอร์ CSI ของ GCS Fuse และส่วนเสริม Ray Operator
- สร้าง Node Pool เฉพาะ 8 รายการสำหรับ TPU v6e Slice (ชิปทั้งหมด 32 ตัว)
- กำหนดค่า Workload Identity และสิทธิ์สำหรับการเข้าถึง GCS
- ติดตั้งใช้งาน
llm-dเพื่อจัดการการแสดงผลแบบแยกส่วนของโมเดล Qwen3-32B - ยืนยันการติดตั้งใช้งานด้วยการทดสอบเปรียบเทียบ
สถาปัตยกรรม
[llm-d disaggregated serving architecture showing model split into 4 2x2 replicas of prefill and the same for decode]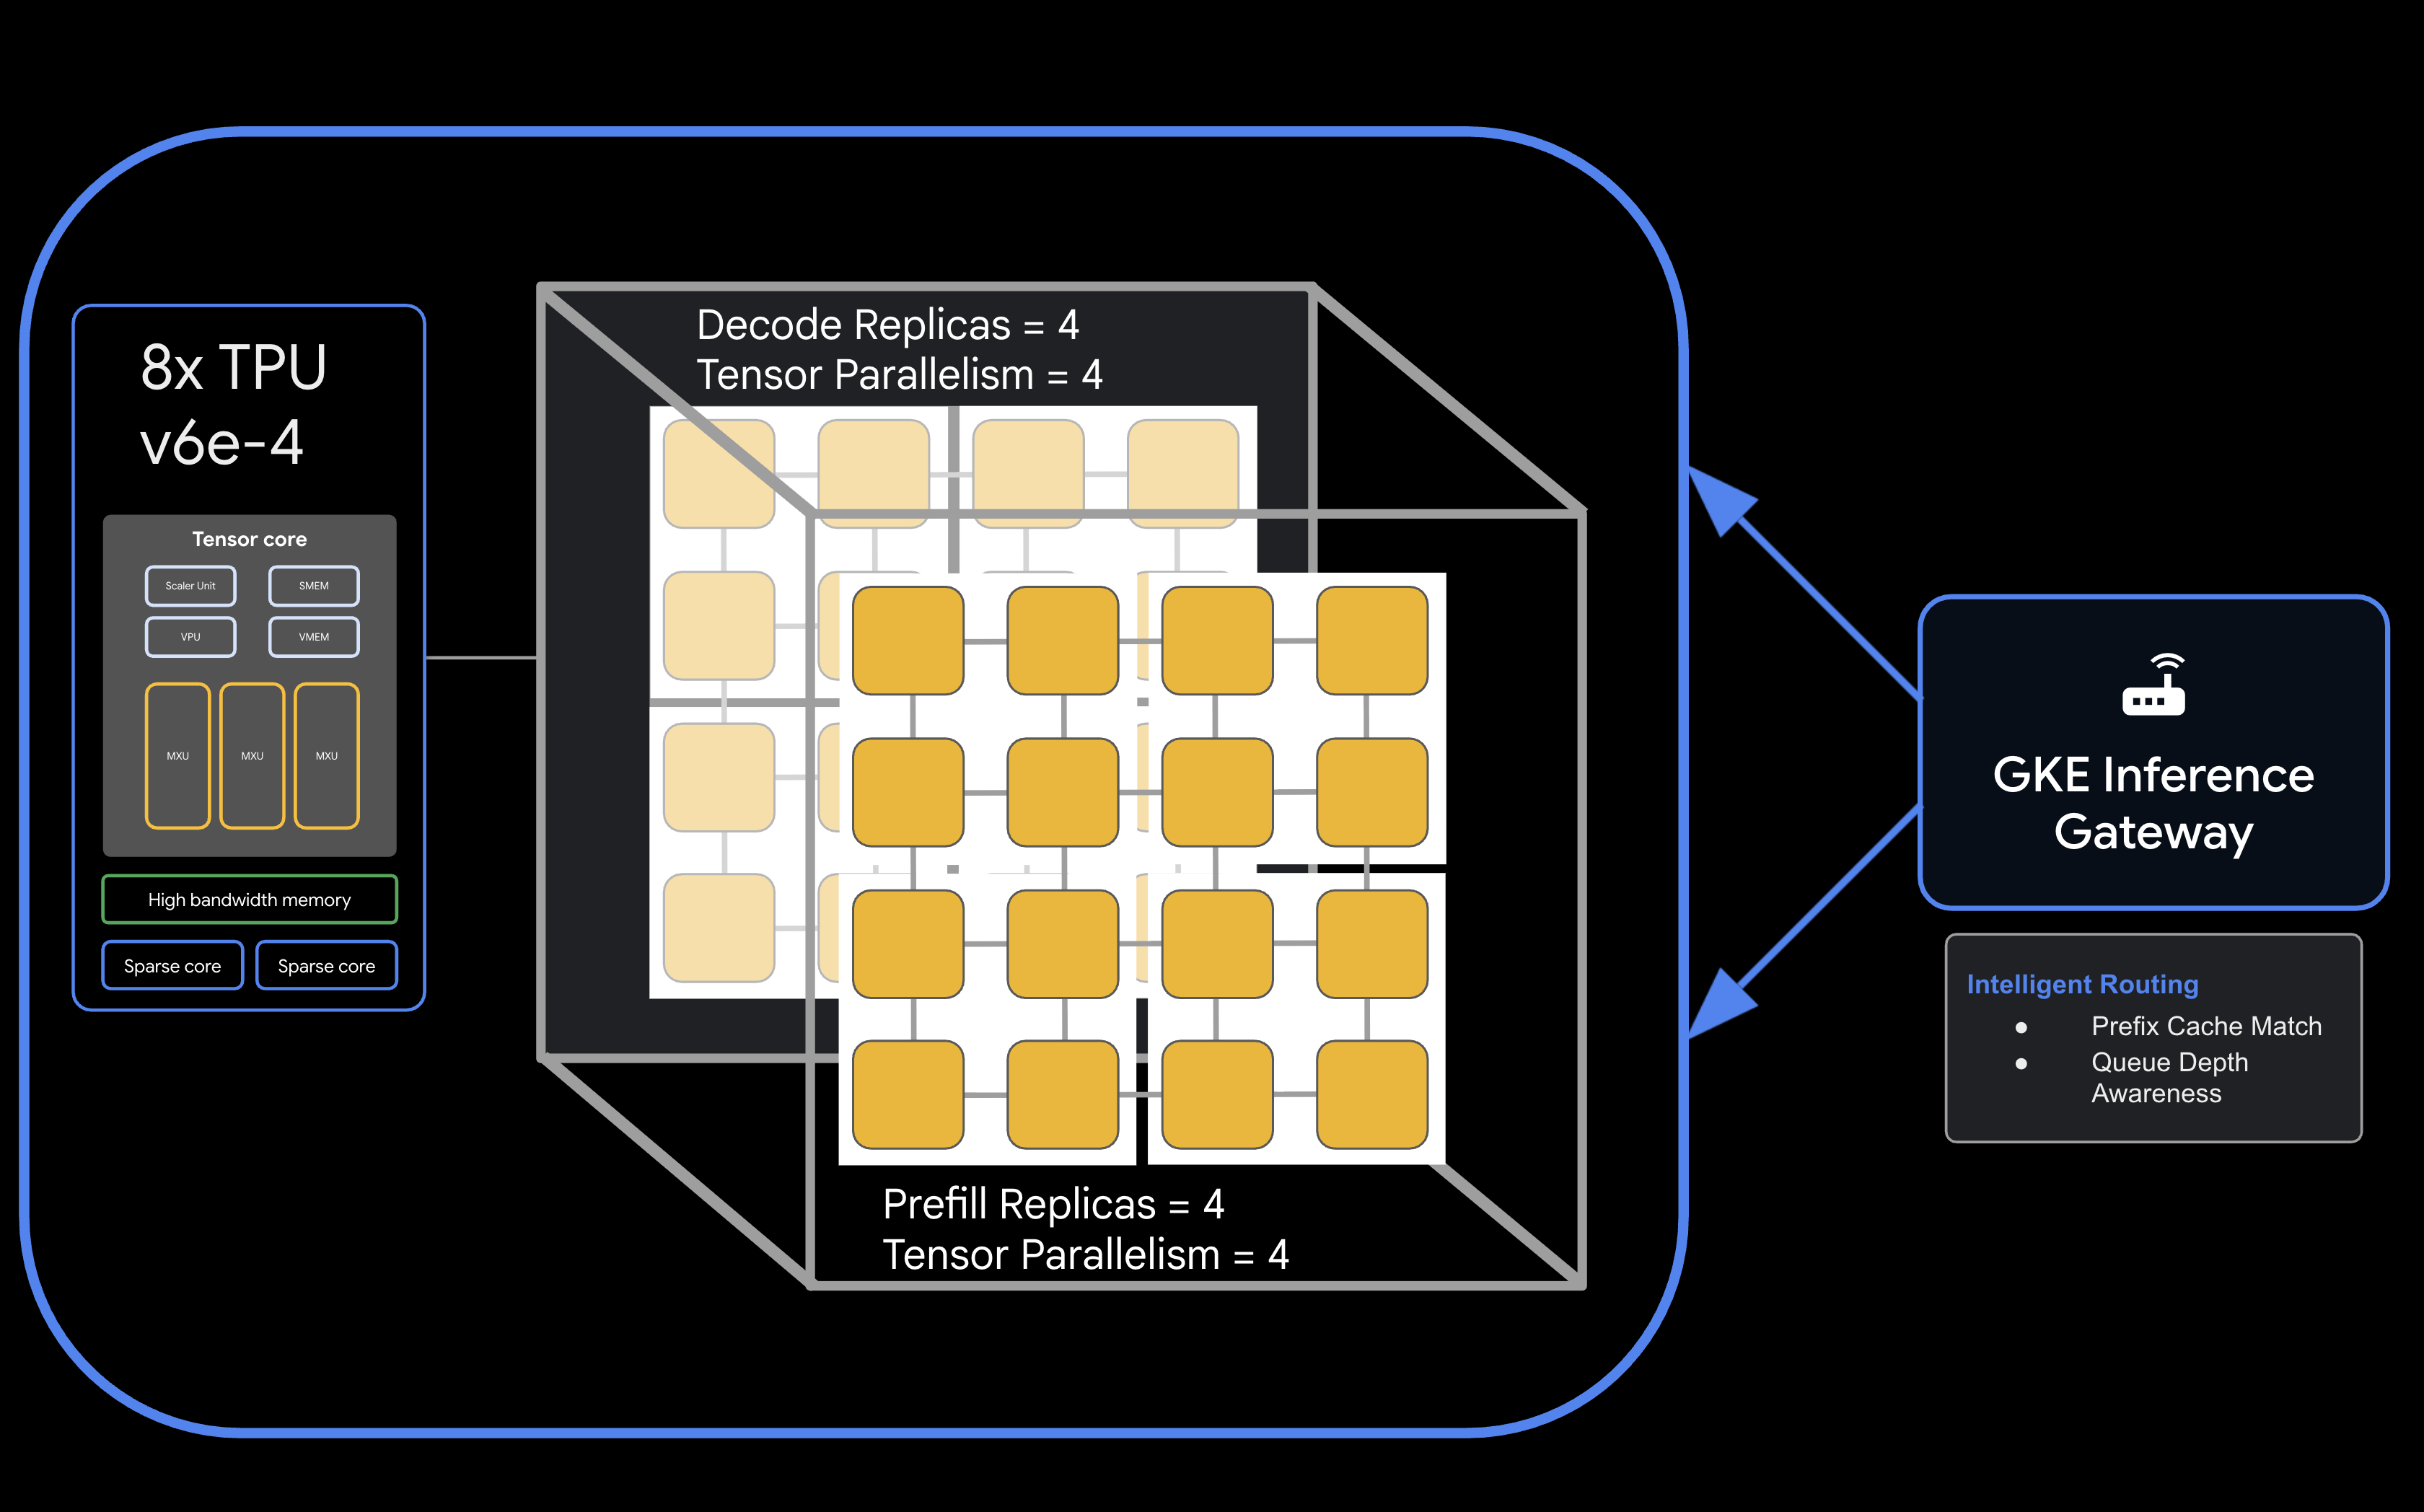
สิ่งที่คุณต้องมี
- โปรเจ็กต์ Google Cloud ที่เปิดใช้การเรียกเก็บเงิน
- การจอง Google Cloud สำหรับทรัพยากร TPU v6e (ชิป 32 ตัว
ct6e-standard-4t) - โทเค็นเพื่อการเข้าถึงของผู้ใช้ Hugging Face สำหรับดาวน์โหลดน้ำหนักของโมเดล
- Cloud Shell หรือเทอร์มินัลในเครื่องที่ติดตั้ง
gcloud,kubectlและhelm
- ระยะเวลาโดยประมาณ: 60 นาที
- ค่าใช้จ่ายโดยประมาณ: Lab นี้ต้องใช้ทรัพยากร TPU จำนวนมากและจะมีค่าใช้จ่ายอย่างน้อย $60 ในการทำโปรเจ็กต์ให้เสร็จ โปรดทำตามขั้นตอนการล้างข้อมูลทันทีหลังจากทำแบบฝึกหัดเสร็จ
2. ก่อนเริ่มต้น
สร้างหรือเลือกโปรเจ็กต์ Google Cloud
- ในคอนโซล Google Cloud ให้เลือกหรือสร้างโปรเจ็กต์ Google Cloud
- ตรวจสอบว่าโปรเจ็กต์ที่อยู่ในระบบคลาวด์เปิดใช้การเรียกเก็บเงินแล้ว
เริ่มต้น Cloud Shell
- คลิกเปิดใช้งาน Cloud Shell ที่ด้านบนของคอนโซล Google Cloud
- ยืนยันการตรวจสอบสิทธิ์
gcloud auth list
- ยืนยันโปรเจ็กต์
gcloud config get project
- ตั้งค่าหากจำเป็น
export PROJECT_ID=<YOUR_PROJECT_ID>
gcloud config set project $PROJECT_ID
เปิดใช้ API
เปิดใช้บริการ Google Cloud ที่จำเป็น
gcloud services enable \
    container.googleapis.com \
    compute.googleapis.com \
    iam.googleapis.com \
    cloudresourcemanager.googleapis.com
ตั้งค่าตัวแปรสภาพแวดล้อม
กำหนดตัวแปรต่อไปนี้ในเชลล์ แทนที่ <YOUR_ZONE> ด้วยโซน TPU ที่จัดสรร <YOUR_RESERVATION_NAME> ด้วยรหัสการจอง และ <YOUR_HUGGING_FACE_TOKEN> ด้วยโทเค็นของคุณ
export PROJECT_ID=$(gcloud config get-value project)
export ZONE="<YOUR_ZONE>" # e.g., us-east5-a
export REGION=${ZONE%-*}
export NAMESPACE=default
export CLUSTER_NAME="qwen-serving-cluster"
export GVNIC_NETWORK_PREFIX="qwen-serving"
export RESERVATION_NAME="<YOUR_RESERVATION_NAME>"
export HF_TOKEN="<YOUR_HUGGING_FACE_TOKEN>"
3. สร้างเครือข่ายที่กำหนดเอง
การแสดงผลแบบแยกส่วนต้องมีการกำหนดค่าเครือข่ายที่เฉพาะเจาะจงเพื่อจัดการการรับส่งข้อมูลที่มีแบนด์วิดท์สูงระหว่างโหนดการเติมข้อความล่วงหน้าและโหนดการถอดรหัส
- สร้างเครือข่าย VPC ที่มี MTU ขนาดใหญ่ (8896) เพื่อให้การสื่อสารของตัวเร่งความเร็วมีประสิทธิภาพ
gcloud compute --project=${PROJECT_ID} \ networks create ${GVNIC_NETWORK_PREFIX}-main \ --subnet-mode=auto \ --bgp-routing-mode=regional \ --mtu=8896 - สร้างซับเน็ตสำหรับคลัสเตอร์
gcloud compute --project=${PROJECT_ID} \ networks subnets create ${GVNIC_NETWORK_PREFIX}-tpu \ --network=${GVNIC_NETWORK_PREFIX}-main \ --region=${REGION} \ --range=10.10.0.0/18 - สร้างซับเน็ตเฉพาะพร็อกซีที่จำเป็นสำหรับ GKE Gateway API
gcloud compute networks subnets create ${GVNIC_NETWORK_PREFIX}-proxy \ --purpose=REGIONAL_MANAGED_PROXY \ --role=ACTIVE \ --region=${REGION} \ --network=${GVNIC_NETWORK_PREFIX}-main \ --range=172.16.0.0/26 - สร้างกฎไฟร์วอลล์เพื่ออนุญาตการสื่อสารภายใน
gcloud compute --project=${PROJECT_ID} firewall-rules create ${GVNIC_NETWORK_PREFIX}-allow-internal \
    --network=${GVNIC_NETWORK_PREFIX}-main \
    --allow=all \
    --source-ranges=172.16.0.0/12,10.0.0.0/8 \
    --description="Allow all internal traffic within the network."
4. จัดสรรคลัสเตอร์ GKE
สร้างคลัสเตอร์ GKE มาตรฐานที่กำหนดค่าให้รองรับการติดตั้ง GCS Fuse และเวิร์กโหลด Ray Operator
- สร้างคลัสเตอร์
gcloud container clusters create ${CLUSTER_NAME} \ --project=${PROJECT_ID} \ --location=${REGION} \ --release-channel=rapid \ --machine-type=e2-standard-4 \ --network=${GVNIC_NETWORK_PREFIX}-main \ --subnetwork=${GVNIC_NETWORK_PREFIX}-tpu \ --num-nodes=1 \ --gateway-api=standard \ --enable-managed-prometheus \ --enable-dataplane-v2 \ --enable-dataplane-v2-metrics \ --workload-pool=${PROJECT_ID}.svc.id.goog \ --addons=HttpLoadBalancing,GcsFuseCsiDriver,RayOperator,HorizontalPodAutoscaling,NodeLocalDNS \ --enable-ip-alias - เรียกข้อมูลเข้าสู่ระบบของคลัสเตอร์:
gcloud container clusters get-credentials ${CLUSTER_NAME} --region=${REGION} - สร้างข้อมูลลับของ Hugging Face:
kubectl create secret generic llm-d-hf-token \
    --from-literal=hf_api_token=${HF_TOKEN} \
    --dry-run=client -o yaml | kubectl apply -f -
5. สร้าง Node Pool TPU ที่สงวนไว้
จัดสรร Node Pool เฉพาะ 8 รายการสำหรับ Slice ของ TPU v6e โดยใช้การจอง
เรียกใช้ลูปต่อไปนี้เพื่อสร้าง Node Pool ทั้ง 8 รายการ
for i in {1..8}
do
  gcloud beta container node-pools create "tpu-v6e-single-$i" \
    --project=${PROJECT_ID} \
    --cluster=${CLUSTER_NAME} \
    --region=${REGION} \
    --node-locations=${ZONE} \
    --machine-type=ct6e-standard-4t \
    --tpu-topology=2x2 \
    --num-nodes=1 \
    --reservation-affinity=specific \
    --reservation=${RESERVATION_NAME} \
    --workload-metadata=GKE_METADATA &
done
รอจนกว่าจะสร้างโหนดทั้งหมดและเข้าร่วมคลัสเตอร์ คุณตรวจสอบสถานะได้ที่ kubectl get nodes
6. ติดตั้งใช้งานบริการ llm-d
ตอนนี้คุณจะติดตั้งใช้งานเฟรมเวิร์ก llm-d เพื่อจัดการการแสดงโฆษณาแบบแยกส่วน
- ติดตั้ง Helm เพื่อติดตั้งใช้งานแผนภูมิ llm-d
curl -fsSL -o get_helm.sh https://raw.githubusercontent.com/helm/helm/main/scripts/get-helm-4 chmod 700 get_helm.sh ./get_helm.sh - โคลน llm-d และติดตั้งการอ้างอิงที่จำเป็น
git clone https://github.com/llm-d/llm-d.git # When using yq alongside Helm, you almost always want the version by Mike Farah (mikefarah/yq). We remove the most common yq installation before reinstalling sudo rm -rf /usr/local/bin/yq cd llm-d ./helpers/client-setup/install-deps.sh - เตรียม custom_values_tpu.yaml เพื่อกำหนดค่าการแสดงผลแบบแยกส่วนสำหรับคลัสเตอร์
cat <<EOF > llm-d/guides/pd-disaggregation/ms-pd/values_tpu.yaml multinode: false # Configure accelerator type for Google TPU accelerator: type: google modelArtifacts: uri: "hf://Qwen/Qwen3-32B" size: 200Gi authSecretName: "llm-d-hf-token" name: "Qwen/Qwen3-32B" labels: llm-d.ai/inference-serving: "true" llm-d.ai/guide: "pd-disaggregation" llm-d.ai/hardware-variant: "tpu" llm-d.ai/hardware-vendor: "google" llm-d.ai/model: "Qwen3-32B" tracing: enabled: true otlpEndpoint: "localhost:4317" serviceNames: routingProxy: "routing-proxy" sampling: sampler: "always_off" samplerArg: "0" routing: servicePort: 8000 proxy: image: ghcr.io/llm-d/llm-d-routing-sidecar:v0.5.0 connector: nixlv2 secure: false decode: parallelism: tensor: 4 create: true replicas: 4 modelCommand: custom extraConfig: nodeSelector: cloud.google.com/gke-tpu-accelerator: "tpu-v6e-slice" cloud.google.com/gke-tpu-topology: "2x2" monitoring: podmonitor: enabled: true portName: "vllm" path: "/metrics" interval: "30s" containers: - name: "vllm" image: "vllm/vllm-tpu:nightly" command: - "/bin/bash" - "-c" - | # ROLE: kv_consumer (Receives KV cache from prefill) KV_CONFIG="{\"kv_connector\":\"TPUConnector\", \"kv_connector_module_path\" : \"tpu_inference.distributed.tpu_connector\", \"kv_role\":\"kv_consumer\", \"kv_ip\" : \"$POD_IP\"}" echo "KV_CONFIG=$KV_CONFIG" python3 -m vllm.entrypoints.openai.api_server \ --model "Qwen/Qwen3-32B" \ --port 8200 \ --tensor-parallel-size 4 \ --kv-transfer-config "${KV_CONFIG}" \ --disable-uvicorn-access-log \ --max-num-seqs 256 \ --block-size 128 \ --gpu-memory-utilization 0.90 \ --max-model-len 8192 env: - name: POD_IP valueFrom: fieldRef: fieldPath: status.podIP - name: TPU_SIDE_CHANNEL_PORT value: "9600" - name: TPU_KV_TRANSFER_PORT value: "9100" ports: - containerPort: 8200 name: vllm protocol: TCP - containerPort: 9100 name: tpu-kv-transfer protocol: TCP - containerPort: 9600 name: tpu-coord protocol: TCP resources: limits: memory: 64Gi cpu: "16" google.com/tpu: 4 requests: memory: 64Gi cpu: "16" google.com/tpu: 4 mountModelVolume: true volumeMounts: - name: metrics-volume mountPath: /.config - name: shm mountPath: /dev/shm - name: torch-compile-cache mountPath: /.cache startupProbe: httpGet: path: /health port: vllm initialDelaySeconds: 15 periodSeconds: 30 timeoutSeconds: 5 failureThreshold: 120 livenessProbe: httpGet: path: /health port: vllm periodSeconds: 10 timeoutSeconds: 5 failureThreshold: 3 readinessProbe: httpGet: path: /v1/models port: vllm periodSeconds: 5 timeoutSeconds: 2 failureThreshold: 3 volumes: - name: metrics-volume emptyDir: {} - name: shm emptyDir: medium: Memory sizeLimit: "16Gi" - name: torch-compile-cache emptyDir: {} prefill: parallelism: tensor: 4 create: true replicas: 4 modelCommand: custom extraConfig: nodeSelector: cloud.google.com/gke-tpu-accelerator: "tpu-v6e-slice" cloud.google.com/gke-tpu-topology: "2x2" monitoring: podmonitor: enabled: true portName: "vllm" path: "/metrics" interval: "30s" containers: - name: "vllm" image: "vllm/vllm-tpu:nightly" command: - "/bin/bash" - "-c" - | # ROLE: kv_producer (Sends KV cache to decode) KV_CONFIG="{\"kv_connector\":\"TPUConnector\", \"kv_connector_module_path\" : \"tpu_inference.distributed.tpu_connector\", \"kv_role\":\"kv_producer\", \"kv_ip\" : \"$POD_IP\"}" echo "KV_CONFIG=$KV_CONFIG" python3 -m vllm.entrypoints.openai.api_server \ --model "Qwen/Qwen3-32B" \ --port 8200 \ --tensor-parallel-size 4 \ --kv-transfer-config "${KV_CONFIG}" \ --disable-uvicorn-access-log \ --enable-chunked-prefill \ --block-size 128 \ --gpu-memory-utilization 0.90 \ --max-model-len 8192 env: - name: POD_IP valueFrom: fieldRef: fieldPath: status.podIP - name: TPU_SIDE_CHANNEL_PORT value: "9600" - name: TPU_KV_TRANSFER_PORT value: "9100" ports: - containerPort: 8200 name: vllm protocol: TCP - containerPort: 9100 name: tpu-kv-transfer protocol: TCP - containerPort: 9600 name: tpu-coord protocol: TCP resources: limits: memory: 64Gi cpu: "16" google.com/tpu: 4 requests: memory: 64Gi cpu: "16" google.com/tpu: 4 mountModelVolume: true volumeMounts: - name: metrics-volume mountPath: /.config - name: shm mountPath: /dev/shm - name: torch-compile-cache mountPath: /.cache startupProbe: httpGet: path: /health port: vllm initialDelaySeconds: 15 periodSeconds: 30 timeoutSeconds: 5 failureThreshold: 120 livenessProbe: httpGet: path: /health port: vllm periodSeconds: 10 timeoutSeconds: 5 failureThreshold: 3 readinessProbe: httpGet: path: /v1/models port: vllm periodSeconds: 5 timeoutSeconds: 2 failureThreshold: 3 volumes: - name: metrics-volume emptyDir: {} - name: shm emptyDir: medium: Memory sizeLimit: "16Gi" - name: torch-compile-cache emptyDir: {} EOF - ติดตั้งใช้งานบริการและเกตเวย์โดยใช้แผนภูมิ Helm ของ llm-d
cd llm-d/guides/pd-disaggregation/ helmfile apply -e gke_tpu -n $NAMESPACE kubectl apply -f ./httproute.gke.yaml - รอให้บริการ vLLM เริ่มทำงานดูบันทึก POD ของการถอดรหัสและการเติมข้อความล่วงหน้าจนกว่าคุณจะเห็น "INFO: Application startup complete."
DECODE_POD=$(kubectl get pods -l llm-d.ai/modelservice-role=decode -o jsonpath='{.items[0].metadata.name}')

# Get the first Prefill pod name
PREFILL_POD=$(kubectl get pods -l llm-d.ai/modelservice-role=prefill -o jsonpath='{.items[0].metadata.name}')

echo "Run each of these until vLLM starts successfully and then ctrl-C out"
echo "kubectl logs -f $DECODE_POD -c vllm"
echo "kubectl logs -f $PREFILL_POD -c vllm"
7. การตอบกลับการทดสอบการทำให้ใช้งานได้
สคริปต์ด้านล่างจะทดสอบการเชื่อมต่อกับคลัสเตอร์ที่ให้บริการผ่าน GKE Inference Gateway แล้วจึงเรียกใช้การทดสอบเปรียบเทียบ
- ทดสอบการเชื่อมต่อและเรียกใช้การเปรียบเทียบ:
cat <<EOBF > ./run_benchmark.sh
#!/bin/bash

# Configuration
NAMESPACE="default"
JOB_NAME="qwen3-pd-benchmark"
MODEL_NAME="Qwen/Qwen3-32B"

echo "🔍 Discovering Gateway IP..."
GATEWAY_IP=$(kubectl get gateway -n ${NAMESPACE} -o jsonpath='{.items[0].status.addresses[0].value}')

if [ -z "$GATEWAY_IP" ]; then
    echo "❌ Error: Could not find Gateway IP. Check 'kubectl get gateway'."
    exit 1
fi

TARGET_URL="http://${GATEWAY_IP}"
echo "✅ Found Gateway at: $TARGET_URL"

echo "🗑️  Cleaning up old benchmark jobs..."
kubectl delete job $JOB_NAME --ignore-not-found=true

echo "🚀 Generating and applying Benchmark Job..."
cat <<EOF | kubectl apply -f -
apiVersion: batch/v1
kind: Job
metadata:
name: $JOB_NAME
namespace: $NAMESPACE
spec:
template:
    spec:
    containers:
    - name: llm-benchmark
        image: vllm/vllm-openai:latest
        command: ["/bin/bash", "-c"]
        args:
        - |
            # 1. Download dataset
            if [ ! -f /data/sharegpt.json ]; then
            echo "Downloading ShareGPT dataset..."
            curl -L "https://huggingface.co/datasets/anon8231489123/ShareGPT_Vicuna_unfiltered/resolve/main/ShareGPT_V3_unfiltered_cleaned_split.json" -o /data/sharegpt.json
            fi

            # 2. Wait for Gateway readiness
            echo "Checking connectivity to $MODEL_NAME..."
            until curl -s "$TARGET_URL/v1/models" | grep -q "$MODEL_NAME"; do
            echo "Waiting for Gateway backends to sync..."
            sleep 10
            done

            # 3. Run Benchmark
            vllm bench serve \\
            --base-url "$TARGET_URL" \\
            --model "$MODEL_NAME" \\
            --dataset-name "sharegpt" \\
            --dataset-path "/data/sharegpt.json" \\
            --request-rate 80.0 \\
            --num-prompts 2000 \\
            --tokenizer "$MODEL_NAME"
        volumeMounts:
        - name: dataset-volume
        mountPath: /data
    restartPolicy: Never
    volumes:
    - name: dataset-volume
        emptyDir: {}
EOF

echo "⏳ Job submitted. Follow logs with:"
echo "kubectl logs -f job/$JOB_NAME"
EOBF

chmod a+x ./run_benchmark.sh

./run_benchmark.sh
8. ล้างข้อมูล
โปรดลบทรัพยากรที่สร้างขึ้นระหว่างการทำ Codelab นี้เพื่อหลีกเลี่ยงการเรียกเก็บเงินอย่างต่อเนื่องในบัญชี Google Cloud
ทำตามขั้นตอนต่อไปนี้เพื่อล้างข้อมูลชิ้นงาน
# 1. Delete LeaderWorkerSet and Helm release
kubectl delete leaderworkerset qwen-simple-anywhere-cache --ignore-not-found
helm uninstall lws --namespace lws-system 2>/dev/null
kubectl delete namespace lws-system --ignore-not-found

# 2. Delete GKE Node Pools
# Note: Usually deleting the cluster deletes the node pools,
# but explicit deletion ensures it's gone before the cluster teardown begins.
for i in {1..8}
do
	gcloud container node-pools delete "tpu-v6e-single-$i" \
	    --cluster="${CLUSTER_NAME}" \
	    --region="${REGION}" \
	    --project="${PROJECT_ID}" --quiet

done

# 3. Delete GKE Cluster
gcloud container clusters delete "${CLUSTER_NAME}" \
    --region="${REGION}" \
    --project="${PROJECT_ID}" --quiet

echo "--- Starting IAM and Service Account Cleanup ---"

# 1. Define the full Service Account email for clarity
SA_EMAIL="tpu-reader-sa@${PROJECT_ID}.iam.gserviceaccount.com"

# 2. Remove Storage Bucket IAM Binding
# This removes the 'objectViewer' role from the specific bucket
gcloud storage buckets remove-iam-policy-binding gs://inf-demo-model-storage \
    --member="serviceAccount:${SA_EMAIL}" \
    --role="roles/storage.objectViewer" --quiet

# 3. Remove Workload Identity Binding
# This severs the link between the GKE KSA and the GCP SA
gcloud iam service-accounts remove-iam-policy-binding "${SA_EMAIL}" \
    --role="roles/iam.workloadIdentityUser" \
    --member="serviceAccount:${PROJECT_ID}.svc.id.goog[default/default]" --quiet

# 4. Delete the Service Account
gcloud iam service-accounts delete "${SA_EMAIL}" --project="${PROJECT_ID}" --quiet

echo "IAM cleanup complete!"

echo "--- Starting Network and Firewall Cleanup ---"

# 4. Delete Firewall Rules (Must go before the Network)
gcloud compute firewall-rules delete \
    "${GVNIC_NETWORK_PREFIX}-allow-ssh" \
    "${GVNIC_NETWORK_PREFIX}-allow-icmp" \
    "${GVNIC_NETWORK_PREFIX}-allow-internal" \
    "ray-allow-internal" \
    --project="${PROJECT_ID}" --quiet

# 5. Delete Subnets (Must go before the Network)
gcloud compute networks subnets delete "${GVNIC_NETWORK_PREFIX}-tpu" \
    --region="${REGION}" \
    --project="${PROJECT_ID}" --quiet

gcloud compute networks subnets delete "${GVNIC_NETWORK_PREFIX}-proxy-sub" \
    --region="${REGION}" \
    --project="${PROJECT_ID}" --quiet

gcloud compute networks subnets delete "proxy-only-subnet" \
    --region="${REGION}" \
    --project="${PROJECT_ID}" --quiet

# 6. Finally, delete the VPC Network
gcloud compute networks delete "${GVNIC_NETWORK_PREFIX}-main" \
    --project="${PROJECT_ID}" --quiet

echo "Cleanup complete!"
9. ขอแสดงความยินดี
ยินดีด้วย คุณได้ติดตั้งใช้งาน Qwen3-32B บน TPU v6e ที่แยกส่วนโดยใช้ llm-d และ GKE เรียบร้อยแล้ว
สิ่งที่คุณได้เรียนรู้
- วิธีกำหนดค่าเครือข่ายที่กำหนดเองสำหรับการรับส่งข้อมูล TPU ความเร็วสูง
- วิธีจัดสรรพูลโหนด TPU ที่สงวนไว้ใน GKE
- วิธีติดตั้งใช้งาน
llm-dเพื่อแยกภาระงานการเติมข้อความล่วงหน้าและการถอดรหัส