
1. Giới thiệu
Trong lớp học lập trình này, bạn sẽ tìm hiểu cách triển khai các dịch vụ suy luận phân tách hiệu suất cao trên Google Kubernetes Engine (GKE) bằng TPU của Google Cloud. Bạn sẽ sử dụng llm-d, một khung nguồn mở để phân phát LLM phân tán, nhằm tách các giai đoạn điền trước và giải mã trên nhiều máy chủ TPU, thiết lập bộ nhớ đệm KV dùng chung và Cổng suy luận GKE.
Thiết lập này mô phỏng một môi trường sản xuất để phân phát các mô hình lớn như Qwen3-32B với thông lượng cao và độ trễ thấp.
Bạn sẽ thực hiện
- Tạo mạng VPC tuỳ chỉnh có MTU được tối ưu hoá cho lưu lượng truy cập của bộ tăng tốc.
- Cung cấp một cụm GKE có trình điều khiển CSI GCS Fuse và các tiện ích bổ sung Ray Operator.
- Tạo 8 nhóm nút chuyên dụng cho các lát TPU v6e (tổng cộng 32 chip).
- Định cấu hình Workload Identity và quyền truy cập GCS.
- Triển khai
llm-dđể quản lý việc phân phát mô hình Qwen3-32B phân tách. - Xác minh quá trình triển khai bằng một bài kiểm thử điểm chuẩn.
Kiến trúc
![llm-d disaggregated serving architecture showing model split into 4 2x2 replicas of prefill and the same for decode]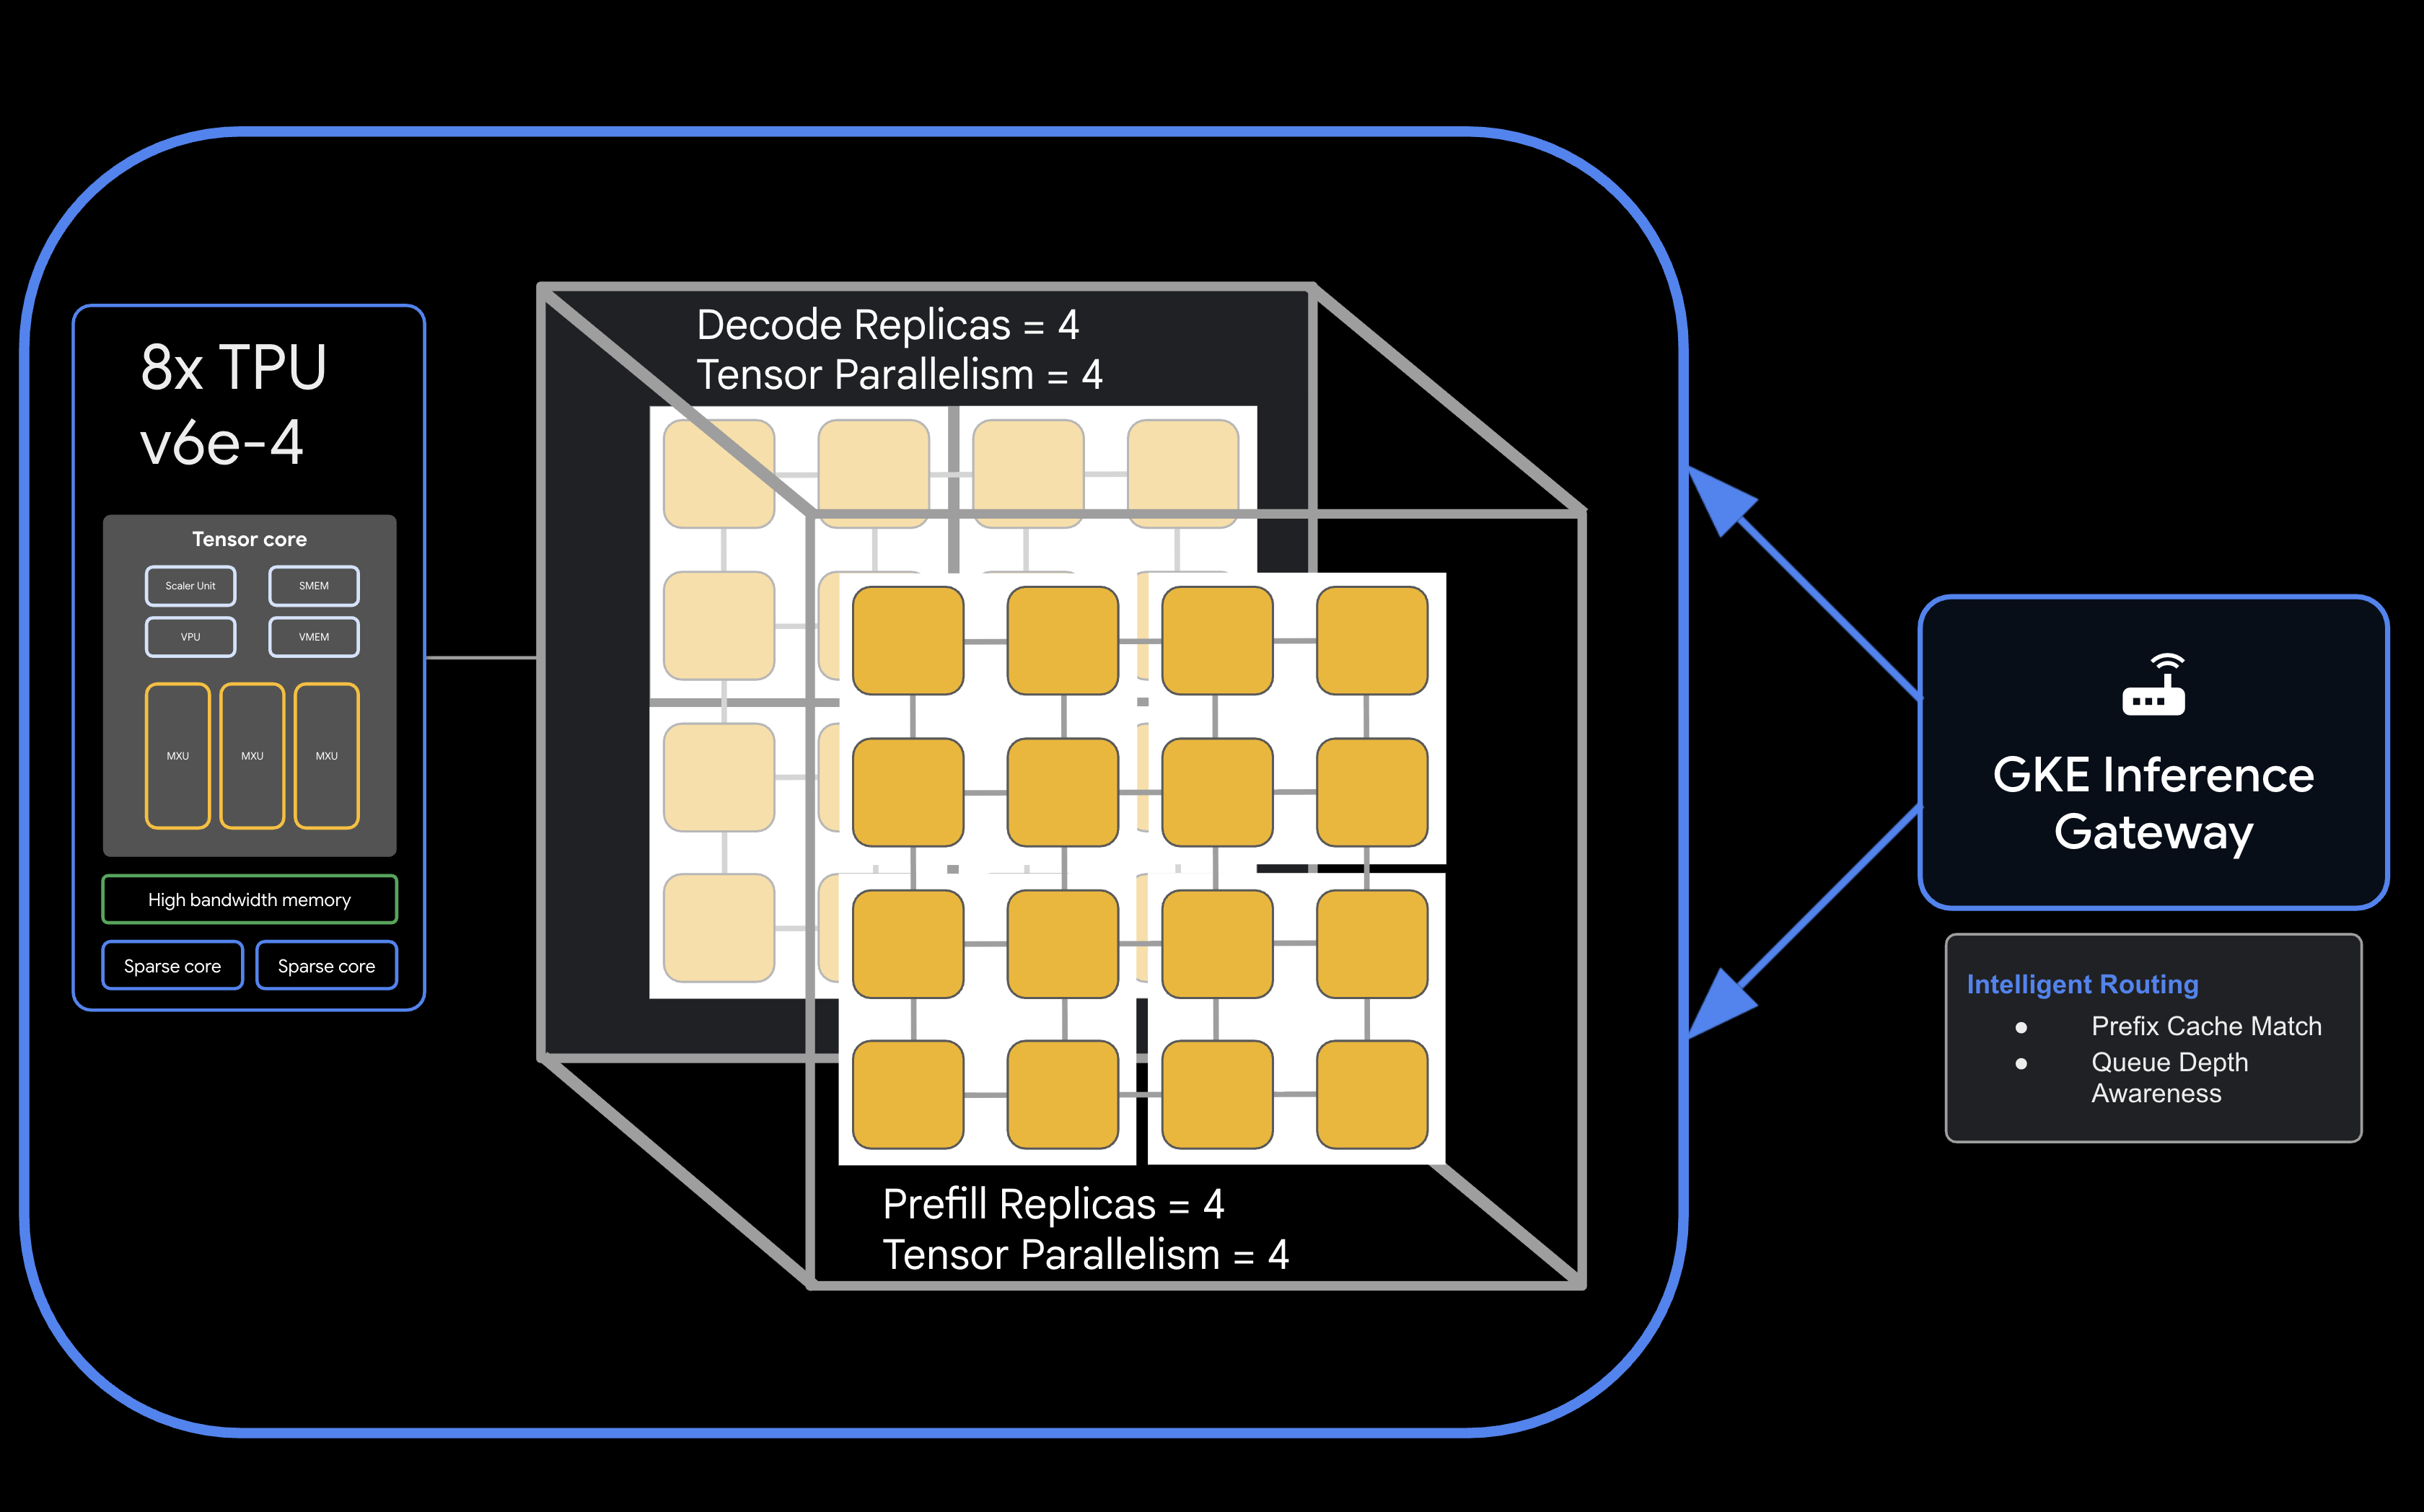
Bạn cần có
- Một dự án trên Google Cloud đã bật tính năng thanh toán.
- Google Cloud Reservation cho tài nguyên TPU v6e (32 chip,
ct6e-standard-4t). - Mã truy cập người dùng Hugging Face để tải trọng số mô hình xuống.
- Cloud Shell hoặc một thiết bị đầu cuối cục bộ đã cài đặt
gcloud,kubectlvàhelm.
- Thời lượng ước tính: 60 phút
- Chi phí ước tính: Phòng thí nghiệm này liên quan đến các tài nguyên TPU đáng kể và sẽ tốn tối thiểu 60 USD để hoàn thành dự án. Đảm bảo bạn làm theo các bước dọn dẹp ngay sau khi hoàn tất bài tập.
2. Trước khi bắt đầu
Tạo hoặc chọn một dự án trên Google Cloud
- Trong Google Cloud Console, hãy chọn hoặc tạo một dự án trên Google Cloud.
- Đảm bảo bạn đã bật tính năng thanh toán cho dự án trên đám mây.
Bắt đầu Cloud Shell
- Nhấp vào Kích hoạt Cloud Shell ở đầu bảng điều khiển Cloud.
- Xác minh quy trình xác thực:
gcloud auth list
- Xác nhận dự án của bạn:
gcloud config get project
- Đặt dự án nếu cần:
export PROJECT_ID=<YOUR_PROJECT_ID>
gcloud config set project $PROJECT_ID
Bật API
Bật các dịch vụ cần thiết của Google Cloud:
gcloud services enable \
    container.googleapis.com \
    compute.googleapis.com \
    iam.googleapis.com \
    cloudresourcemanager.googleapis.com
Đặt các biến môi trường
Xác định các biến sau trong shell. Thay thế <YOUR_ZONE> bằng vùng TPU được phân bổ, <YOUR_RESERVATION_NAME> bằng mã đặt chỗ và <YOUR_HUGGING_FACE_TOKEN> bằng mã thông báo của bạn.
export PROJECT_ID=$(gcloud config get-value project)
export ZONE="<YOUR_ZONE>" # e.g., us-east5-a
export REGION=${ZONE%-*}
export NAMESPACE=default
export CLUSTER_NAME="qwen-serving-cluster"
export GVNIC_NETWORK_PREFIX="qwen-serving"
export RESERVATION_NAME="<YOUR_RESERVATION_NAME>"
export HF_TOKEN="<YOUR_HUGGING_FACE_TOKEN>"
3. Tạo mạng tuỳ chỉnh
Việc phân phát phân tách yêu cầu các cấu hình mạng cụ thể để xử lý lưu lượng truy cập băng thông cao giữa các nút điền trước và giải mã.
- Tạo mạng VPC có MTU lớn (8896) để giao tiếp hiệu quả với bộ tăng tốc:
gcloud compute --project=${PROJECT_ID} \ networks create ${GVNIC_NETWORK_PREFIX}-main \ --subnet-mode=auto \ --bgp-routing-mode=regional \ --mtu=8896 - Tạo mạng con cho cụm:
gcloud compute --project=${PROJECT_ID} \ networks subnets create ${GVNIC_NETWORK_PREFIX}-tpu \ --network=${GVNIC_NETWORK_PREFIX}-main \ --region=${REGION} \ --range=10.10.0.0/18 - Tạo mạng con chỉ dành cho proxy cần thiết cho GKE Gateway API:
gcloud compute networks subnets create ${GVNIC_NETWORK_PREFIX}-proxy \ --purpose=REGIONAL_MANAGED_PROXY \ --role=ACTIVE \ --region=${REGION} \ --network=${GVNIC_NETWORK_PREFIX}-main \ --range=172.16.0.0/26 - Tạo quy tắc tường lửa để cho phép giao tiếp nội bộ:
gcloud compute --project=${PROJECT_ID} firewall-rules create ${GVNIC_NETWORK_PREFIX}-allow-internal \
    --network=${GVNIC_NETWORK_PREFIX}-main \
    --allow=all \
    --source-ranges=172.16.0.0/12,10.0.0.0/8 \
    --description="Allow all internal traffic within the network."
4. Cung cấp cụm GKE
Tạo một cụm GKE tiêu chuẩn được định cấu hình để hỗ trợ các điểm gắn kết GCS Fuse và khối lượng công việc Ray Operator.
- Tạo cụm:
gcloud container clusters create ${CLUSTER_NAME} \ --project=${PROJECT_ID} \ --location=${REGION} \ --release-channel=rapid \ --machine-type=e2-standard-4 \ --network=${GVNIC_NETWORK_PREFIX}-main \ --subnetwork=${GVNIC_NETWORK_PREFIX}-tpu \ --num-nodes=1 \ --gateway-api=standard \ --enable-managed-prometheus \ --enable-dataplane-v2 \ --enable-dataplane-v2-metrics \ --workload-pool=${PROJECT_ID}.svc.id.goog \ --addons=HttpLoadBalancing,GcsFuseCsiDriver,RayOperator,HorizontalPodAutoscaling,NodeLocalDNS \ --enable-ip-alias - Lấy thông tin xác thực của cụm:
gcloud container clusters get-credentials ${CLUSTER_NAME} --region=${REGION} - Tạo khoá bí mật Hugging Face:
kubectl create secret generic llm-d-hf-token \
    --from-literal=hf_api_token=${HF_TOKEN} \
    --dry-run=client -o yaml | kubectl apply -f -
5. Tạo nhóm nút TPU dành riêng
Cung cấp 8 bộ nút chuyên dụng cho các lát cắt TPU v6e bằng yêu cầu đặt trước của bạn.
Chạy vòng lặp sau để tạo 8 nhóm nút:
for i in {1..8}
do
  gcloud beta container node-pools create "tpu-v6e-single-$i" \
    --project=${PROJECT_ID} \
    --cluster=${CLUSTER_NAME} \
    --region=${REGION} \
    --node-locations=${ZONE} \
    --machine-type=ct6e-standard-4t \
    --tpu-topology=2x2 \
    --num-nodes=1 \
    --reservation-affinity=specific \
    --reservation=${RESERVATION_NAME} \
    --workload-metadata=GKE_METADATA &
done
Chờ cho đến khi tất cả các nút được tạo và tham gia vào cụm. Bạn có thể kiểm tra trạng thái bằng kubectl get nodes.
6. Triển khai dịch vụ llm-d
Bây giờ, bạn sẽ triển khai khung llm-d để quản lý việc phân phát phân tách.
- Cài đặt Helm để triển khai biểu đồ llm-d:
curl -fsSL -o get_helm.sh https://raw.githubusercontent.com/helm/helm/main/scripts/get-helm-4 chmod 700 get_helm.sh ./get_helm.sh - Sao chép llm-d và cài đặt các phần phụ thuộc cần thiết:
git clone https://github.com/llm-d/llm-d.git # When using yq alongside Helm, you almost always want the version by Mike Farah (mikefarah/yq). We remove the most common yq installation before reinstalling sudo rm -rf /usr/local/bin/yq cd llm-d ./helpers/client-setup/install-deps.sh - Chuẩn bị values_tpu.yaml tuỳ chỉnh để định cấu hình việc phân phát phân tách cho cụm của bạn:
cat <<EOF > llm-d/guides/pd-disaggregation/ms-pd/values_tpu.yaml multinode: false # Configure accelerator type for Google TPU accelerator: type: google modelArtifacts: uri: "hf://Qwen/Qwen3-32B" size: 200Gi authSecretName: "llm-d-hf-token" name: "Qwen/Qwen3-32B" labels: llm-d.ai/inference-serving: "true" llm-d.ai/guide: "pd-disaggregation" llm-d.ai/hardware-variant: "tpu" llm-d.ai/hardware-vendor: "google" llm-d.ai/model: "Qwen3-32B" tracing: enabled: true otlpEndpoint: "localhost:4317" serviceNames: routingProxy: "routing-proxy" sampling: sampler: "always_off" samplerArg: "0" routing: servicePort: 8000 proxy: image: ghcr.io/llm-d/llm-d-routing-sidecar:v0.5.0 connector: nixlv2 secure: false decode: parallelism: tensor: 4 create: true replicas: 4 modelCommand: custom extraConfig: nodeSelector: cloud.google.com/gke-tpu-accelerator: "tpu-v6e-slice" cloud.google.com/gke-tpu-topology: "2x2" monitoring: podmonitor: enabled: true portName: "vllm" path: "/metrics" interval: "30s" containers: - name: "vllm" image: "vllm/vllm-tpu:nightly" command: - "/bin/bash" - "-c" - | # ROLE: kv_consumer (Receives KV cache from prefill) KV_CONFIG="{\"kv_connector\":\"TPUConnector\", \"kv_connector_module_path\" : \"tpu_inference.distributed.tpu_connector\", \"kv_role\":\"kv_consumer\", \"kv_ip\" : \"$POD_IP\"}" echo "KV_CONFIG=$KV_CONFIG" python3 -m vllm.entrypoints.openai.api_server \ --model "Qwen/Qwen3-32B" \ --port 8200 \ --tensor-parallel-size 4 \ --kv-transfer-config "${KV_CONFIG}" \ --disable-uvicorn-access-log \ --max-num-seqs 256 \ --block-size 128 \ --gpu-memory-utilization 0.90 \ --max-model-len 8192 env: - name: POD_IP valueFrom: fieldRef: fieldPath: status.podIP - name: TPU_SIDE_CHANNEL_PORT value: "9600" - name: TPU_KV_TRANSFER_PORT value: "9100" ports: - containerPort: 8200 name: vllm protocol: TCP - containerPort: 9100 name: tpu-kv-transfer protocol: TCP - containerPort: 9600 name: tpu-coord protocol: TCP resources: limits: memory: 64Gi cpu: "16" google.com/tpu: 4 requests: memory: 64Gi cpu: "16" google.com/tpu: 4 mountModelVolume: true volumeMounts: - name: metrics-volume mountPath: /.config - name: shm mountPath: /dev/shm - name: torch-compile-cache mountPath: /.cache startupProbe: httpGet: path: /health port: vllm initialDelaySeconds: 15 periodSeconds: 30 timeoutSeconds: 5 failureThreshold: 120 livenessProbe: httpGet: path: /health port: vllm periodSeconds: 10 timeoutSeconds: 5 failureThreshold: 3 readinessProbe: httpGet: path: /v1/models port: vllm periodSeconds: 5 timeoutSeconds: 2 failureThreshold: 3 volumes: - name: metrics-volume emptyDir: {} - name: shm emptyDir: medium: Memory sizeLimit: "16Gi" - name: torch-compile-cache emptyDir: {} prefill: parallelism: tensor: 4 create: true replicas: 4 modelCommand: custom extraConfig: nodeSelector: cloud.google.com/gke-tpu-accelerator: "tpu-v6e-slice" cloud.google.com/gke-tpu-topology: "2x2" monitoring: podmonitor: enabled: true portName: "vllm" path: "/metrics" interval: "30s" containers: - name: "vllm" image: "vllm/vllm-tpu:nightly" command: - "/bin/bash" - "-c" - | # ROLE: kv_producer (Sends KV cache to decode) KV_CONFIG="{\"kv_connector\":\"TPUConnector\", \"kv_connector_module_path\" : \"tpu_inference.distributed.tpu_connector\", \"kv_role\":\"kv_producer\", \"kv_ip\" : \"$POD_IP\"}" echo "KV_CONFIG=$KV_CONFIG" python3 -m vllm.entrypoints.openai.api_server \ --model "Qwen/Qwen3-32B" \ --port 8200 \ --tensor-parallel-size 4 \ --kv-transfer-config "${KV_CONFIG}" \ --disable-uvicorn-access-log \ --enable-chunked-prefill \ --block-size 128 \ --gpu-memory-utilization 0.90 \ --max-model-len 8192 env: - name: POD_IP valueFrom: fieldRef: fieldPath: status.podIP - name: TPU_SIDE_CHANNEL_PORT value: "9600" - name: TPU_KV_TRANSFER_PORT value: "9100" ports: - containerPort: 8200 name: vllm protocol: TCP - containerPort: 9100 name: tpu-kv-transfer protocol: TCP - containerPort: 9600 name: tpu-coord protocol: TCP resources: limits: memory: 64Gi cpu: "16" google.com/tpu: 4 requests: memory: 64Gi cpu: "16" google.com/tpu: 4 mountModelVolume: true volumeMounts: - name: metrics-volume mountPath: /.config - name: shm mountPath: /dev/shm - name: torch-compile-cache mountPath: /.cache startupProbe: httpGet: path: /health port: vllm initialDelaySeconds: 15 periodSeconds: 30 timeoutSeconds: 5 failureThreshold: 120 livenessProbe: httpGet: path: /health port: vllm periodSeconds: 10 timeoutSeconds: 5 failureThreshold: 3 readinessProbe: httpGet: path: /v1/models port: vllm periodSeconds: 5 timeoutSeconds: 2 failureThreshold: 3 volumes: - name: metrics-volume emptyDir: {} - name: shm emptyDir: medium: Memory sizeLimit: "16Gi" - name: torch-compile-cache emptyDir: {} EOF - Triển khai Dịch vụ và Cổng bằng biểu đồ Helm của llm-d:
cd llm-d/guides/pd-disaggregation/ helmfile apply -e gke_tpu -n $NAMESPACE kubectl apply -f ./httproute.gke.yaml - Chờ các dịch vụ vLLM bắt đầuTheo dõi nhật ký POD giải mã và điền trước cho đến khi bạn thấy "INFO: Application startup complete."
DECODE_POD=$(kubectl get pods -l llm-d.ai/modelservice-role=decode -o jsonpath='{.items[0].metadata.name}')

# Get the first Prefill pod name
PREFILL_POD=$(kubectl get pods -l llm-d.ai/modelservice-role=prefill -o jsonpath='{.items[0].metadata.name}')

echo "Run each of these until vLLM starts successfully and then ctrl-C out"
echo "kubectl logs -f $DECODE_POD -c vllm"
echo "kubectl logs -f $PREFILL_POD -c vllm"
7. Kiểm thử phản hồi triển khai
Tập lệnh bên dưới sẽ kiểm thử khả năng kết nối với cụm phân phát thông qua Cổng suy luận GKE, sau đó chạy một bài kiểm thử điểm chuẩn.
- Kiểm thử khả năng kết nối và chạy điểm chuẩn:
cat <<EOBF > ./run_benchmark.sh
#!/bin/bash

# Configuration
NAMESPACE="default"
JOB_NAME="qwen3-pd-benchmark"
MODEL_NAME="Qwen/Qwen3-32B"

echo "🔍 Discovering Gateway IP..."
GATEWAY_IP=$(kubectl get gateway -n ${NAMESPACE} -o jsonpath='{.items[0].status.addresses[0].value}')

if [ -z "$GATEWAY_IP" ]; then
    echo "❌ Error: Could not find Gateway IP. Check 'kubectl get gateway'."
    exit 1
fi

TARGET_URL="http://${GATEWAY_IP}"
echo "✅ Found Gateway at: $TARGET_URL"

echo "🗑️  Cleaning up old benchmark jobs..."
kubectl delete job $JOB_NAME --ignore-not-found=true

echo "🚀 Generating and applying Benchmark Job..."
cat <<EOF | kubectl apply -f -
apiVersion: batch/v1
kind: Job
metadata:
name: $JOB_NAME
namespace: $NAMESPACE
spec:
template:
    spec:
    containers:
    - name: llm-benchmark
        image: vllm/vllm-openai:latest
        command: ["/bin/bash", "-c"]
        args:
        - |
            # 1. Download dataset
            if [ ! -f /data/sharegpt.json ]; then
            echo "Downloading ShareGPT dataset..."
            curl -L "https://huggingface.co/datasets/anon8231489123/ShareGPT_Vicuna_unfiltered/resolve/main/ShareGPT_V3_unfiltered_cleaned_split.json" -o /data/sharegpt.json
            fi

            # 2. Wait for Gateway readiness
            echo "Checking connectivity to $MODEL_NAME..."
            until curl -s "$TARGET_URL/v1/models" | grep -q "$MODEL_NAME"; do
            echo "Waiting for Gateway backends to sync..."
            sleep 10
            done

            # 3. Run Benchmark
            vllm bench serve \\
            --base-url "$TARGET_URL" \\
            --model "$MODEL_NAME" \\
            --dataset-name "sharegpt" \\
            --dataset-path "/data/sharegpt.json" \\
            --request-rate 80.0 \\
            --num-prompts 2000 \\
            --tokenizer "$MODEL_NAME"
        volumeMounts:
        - name: dataset-volume
        mountPath: /data
    restartPolicy: Never
    volumes:
    - name: dataset-volume
        emptyDir: {}
EOF

echo "⏳ Job submitted. Follow logs with:"
echo "kubectl logs -f job/$JOB_NAME"
EOBF

chmod a+x ./run_benchmark.sh

./run_benchmark.sh
8. Dọn dẹp
Để tránh các khoản phí liên tục cho tài khoản Google Cloud, hãy xoá các tài nguyên được tạo trong lớp học lập trình này.
Chạy các bước sau để dọn dẹp tài sản:
# 1. Delete LeaderWorkerSet and Helm release
kubectl delete leaderworkerset qwen-simple-anywhere-cache --ignore-not-found
helm uninstall lws --namespace lws-system 2>/dev/null
kubectl delete namespace lws-system --ignore-not-found

# 2. Delete GKE Node Pools
# Note: Usually deleting the cluster deletes the node pools,
# but explicit deletion ensures it's gone before the cluster teardown begins.
for i in {1..8}
do
	gcloud container node-pools delete "tpu-v6e-single-$i" \
	    --cluster="${CLUSTER_NAME}" \
	    --region="${REGION}" \
	    --project="${PROJECT_ID}" --quiet

done

# 3. Delete GKE Cluster
gcloud container clusters delete "${CLUSTER_NAME}" \
    --region="${REGION}" \
    --project="${PROJECT_ID}" --quiet

echo "--- Starting IAM and Service Account Cleanup ---"

# 1. Define the full Service Account email for clarity
SA_EMAIL="tpu-reader-sa@${PROJECT_ID}.iam.gserviceaccount.com"

# 2. Remove Storage Bucket IAM Binding
# This removes the 'objectViewer' role from the specific bucket
gcloud storage buckets remove-iam-policy-binding gs://inf-demo-model-storage \
    --member="serviceAccount:${SA_EMAIL}" \
    --role="roles/storage.objectViewer" --quiet

# 3. Remove Workload Identity Binding
# This severs the link between the GKE KSA and the GCP SA
gcloud iam service-accounts remove-iam-policy-binding "${SA_EMAIL}" \
    --role="roles/iam.workloadIdentityUser" \
    --member="serviceAccount:${PROJECT_ID}.svc.id.goog[default/default]" --quiet

# 4. Delete the Service Account
gcloud iam service-accounts delete "${SA_EMAIL}" --project="${PROJECT_ID}" --quiet

echo "IAM cleanup complete!"

echo "--- Starting Network and Firewall Cleanup ---"

# 4. Delete Firewall Rules (Must go before the Network)
gcloud compute firewall-rules delete \
    "${GVNIC_NETWORK_PREFIX}-allow-ssh" \
    "${GVNIC_NETWORK_PREFIX}-allow-icmp" \
    "${GVNIC_NETWORK_PREFIX}-allow-internal" \
    "ray-allow-internal" \
    --project="${PROJECT_ID}" --quiet

# 5. Delete Subnets (Must go before the Network)
gcloud compute networks subnets delete "${GVNIC_NETWORK_PREFIX}-tpu" \
    --region="${REGION}" \
    --project="${PROJECT_ID}" --quiet

gcloud compute networks subnets delete "${GVNIC_NETWORK_PREFIX}-proxy-sub" \
    --region="${REGION}" \
    --project="${PROJECT_ID}" --quiet

gcloud compute networks subnets delete "proxy-only-subnet" \
    --region="${REGION}" \
    --project="${PROJECT_ID}" --quiet

# 6. Finally, delete the VPC Network
gcloud compute networks delete "${GVNIC_NETWORK_PREFIX}-main" \
    --project="${PROJECT_ID}" --quiet

echo "Cleanup complete!"
9. Xin chúc mừng
Xin chúc mừng! Bạn đã triển khai thành công Qwen3-32B trên các TPU v6e phân tách bằng llm-d và GKE.
Kiến thức bạn học được
- Cách định cấu hình mạng tuỳ chỉnh cho lưu lượng truy cập TPU tốc độ cao.
- Cách cung cấp các nhóm nút TPU dành riêng trên GKE.
- Cách triển khai
llm-dđể tách khối lượng công việc điền trước và giải mã.