
1. Introduction
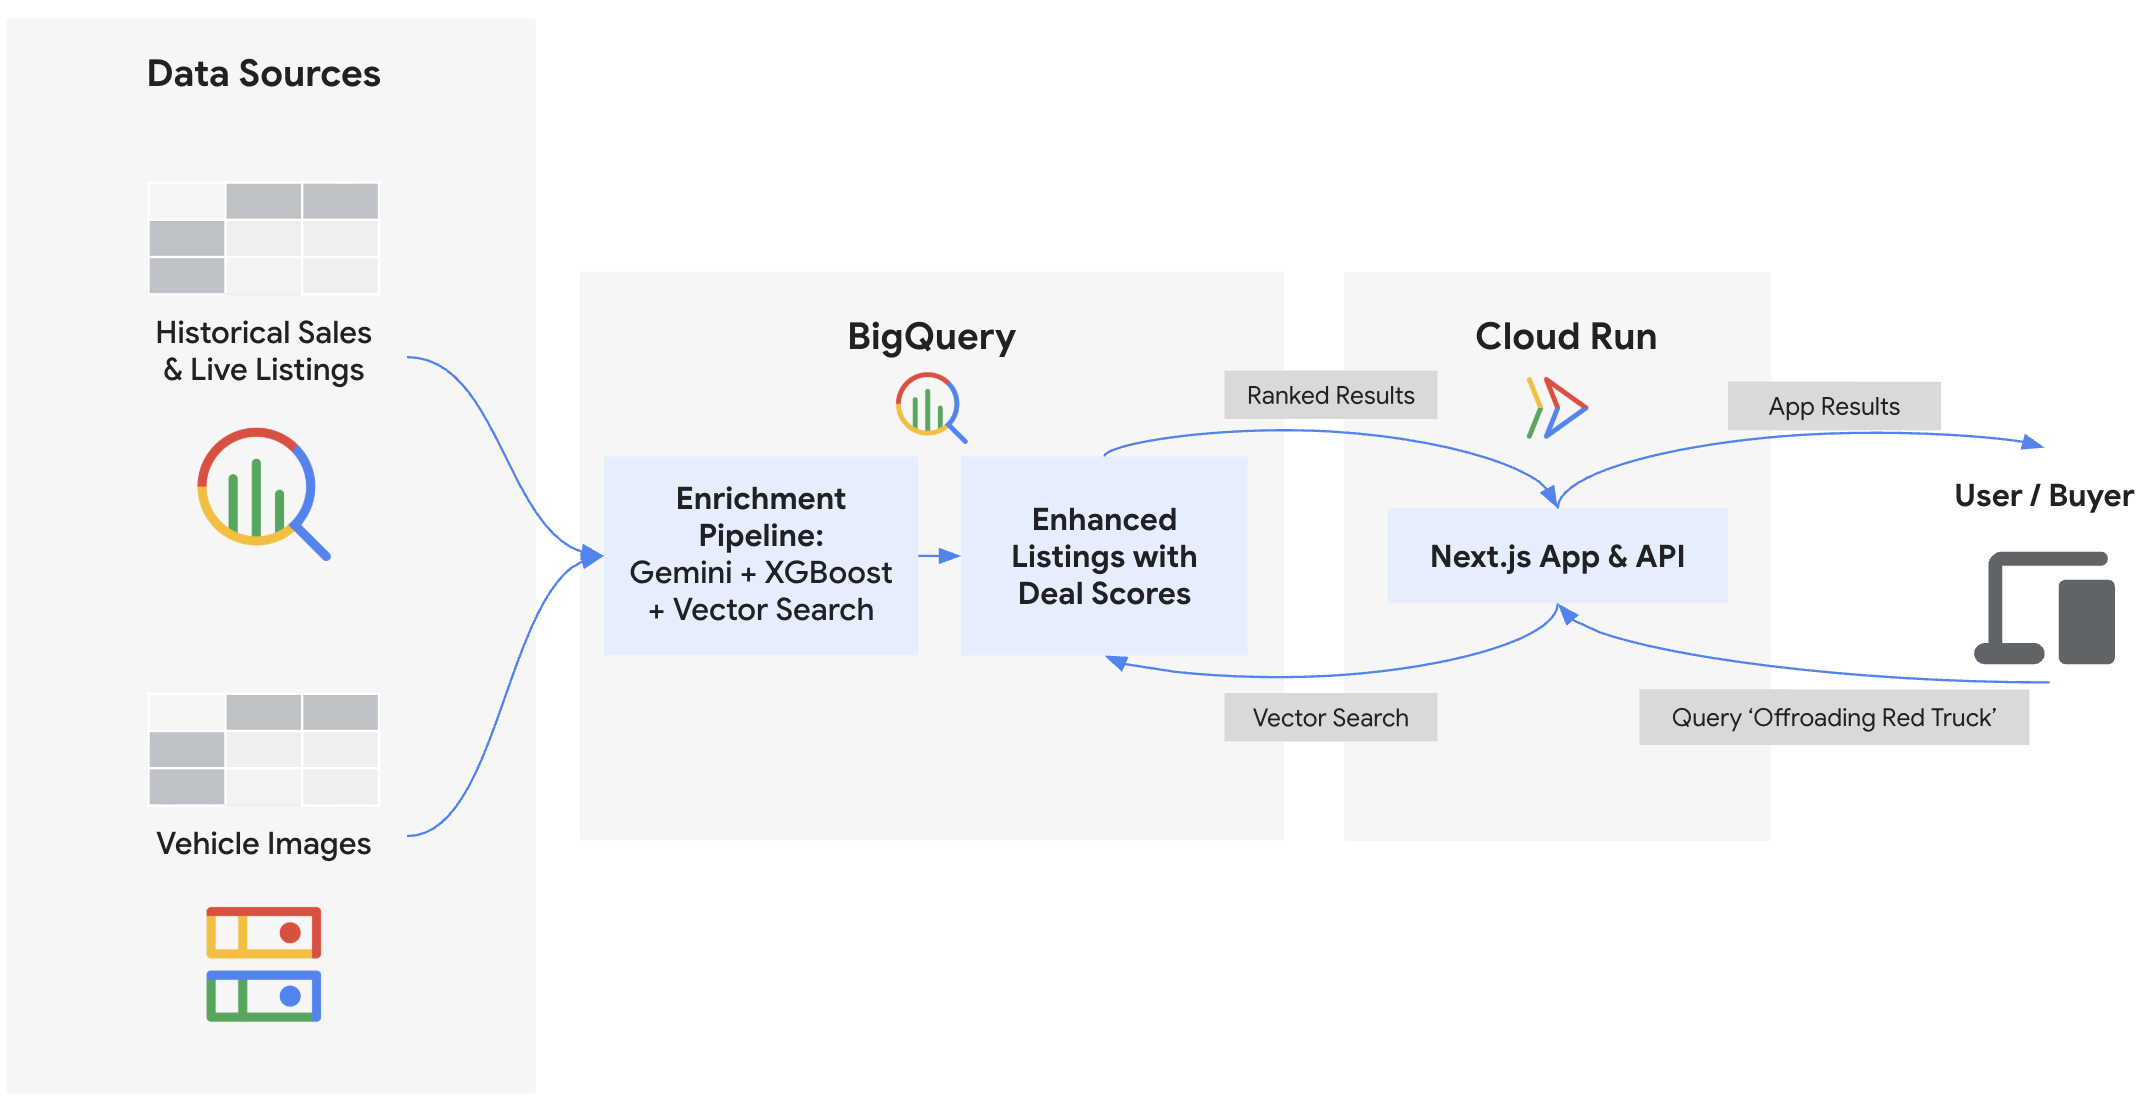
In this codelab, you will build the backend and deploy the frontend for "Cymbal Autos," an online vehicle marketplace. You will use BigQuery and Gemini models on Gemini Enterprise Agent Platform to inspect vehicle photos, predict prices using BigQuery ML, detect scam listings using vector embeddings, and calculate composite deal scores. Finally, you will surface these insights on a Next.js frontend deployed to Cloud Run.
What you'll do
- Connect BigQuery to unstructured Cloud Storage images using ObjectRef
- Extract vehicle attributes from photos using BigQuery with Gemini models
- Predict fair market prices by training an XGBoost regression model with BigQuery ML
- Identify potential scam and trustworthy listings by embedding vehicle descriptions and performing
VECTOR_SEARCH - Calculate a comprehensive Deal Score for each listing, while incorporating condition signals from the seller's description using
AI.SCORE - Export data and deploy the Next.js marketplace application to Google Cloud Run
What you'll need
- A web browser such as Chrome
- A Google Cloud project with billing enabled
- Basic familiarity with SQL, Python, and Google Cloud
- Sufficient IAM permissions to enable APIs, create resources, and assign permissions (e.g., Project Owner)
This codelab is for intermediate developers.
The resources created in this codelab should cost less than $5.
2. Before you begin
Create a Google Cloud Project
- In the Google Cloud Console, on the project selector page, select or create a Google Cloud project.
- Make sure that billing is enabled for your Cloud project. Learn how to check if billing is enabled on a project.
Start Cloud Shell
You will use Google Cloud Shell to download the code, run setup scripts, and deploy the application.
- Click Activate Cloud Shell at the top of the Google Cloud Console.

- Once connected to Cloud Shell, authenticate your session to ensure your application can access Google Cloud APIs. Follow the prompts to authorize Cloud Shell:
gcloud auth application-default login
- Set your Google Cloud Project ID and a unique name for your Google Cloud Storage bucket (where you will store raw data):
export PROJECT_ID=$(gcloud config get-value project)
export USER_BUCKET="cymbal-autos-${PROJECT_ID}"

gcloud config set project $PROJECT_ID
You should see a message similar to the one below:
Your active configuration is: [cloudshell-####]
Updated property [core/project]
Enable APIs
Run this command in Cloud Shell to enable all the required APIs for this codelab:
gcloud services enable \
  aiplatform.googleapis.com \
  artifactregistry.googleapis.com \
  bigquery.googleapis.com \
  bigqueryconnection.googleapis.com \
  cloudbuild.googleapis.com \
  run.googleapis.com
On successful execution, you should see a message similar to the one shown below:
Operation "operations/..." finished successfully.
3. Get the Code and Setup Data
First, download the demo assets and configure your environment variables.
- From Cloud Shell, clone the
devrel-demosrepository and navigate to the project directory:
git clone https://github.com/GoogleCloudPlatform/devrel-demos.git
cd devrel-demos/data-analytics/cymbal-autos-multimodal
- Run the script to copy data into your environment. This script syncs the local repository datasets to your personal Cloud Storage bucket and fetches the vehicle images from a public bucket:
chmod +x scripts/setup/*.sh
./scripts/setup/00_copy_data.sh
Afterward, you should see a message similar to:
Average throughput: 87.8MiB/s
Data copy complete!
- Next, set up the BigQuery Cloud Resource Connection. To analyze unstructured images in Cloud Storage and call Agent Platform models directly from your SQL queries, BigQuery must delegate IAM permissions to an underlying Service Account. This script creates that secure connection and grants it the necessary Vertex AI User and Service Usage Consumer roles (which takes about a minute to propagate):
./scripts/setup/01_setup_api_connection.sh
You should see a message similar to:
Environment setup complete! Your BigQuery connection is ready.
- Finally, create the initial BigQuery dataset and load the raw tabular data. This creates your
model_devdataset and populates the starting tables, setting the foundation before you write any machine learning queries:
./scripts/setup/02_load_to_bq.sh
You should see a message similar to:
=================================================================
BigQuery load complete!
=================================================================
4. Multimodal Vision Extraction
Before scoring the vehicle listings, you'll extract structured data (like color, body style, or visual damage) from hundreds of raw photos. By tapping into ObjectRef functions and Gemini models hosted in Agent Platform, you can generate these features without moving any files or writing complex data pipelines. This extraction directly powers the ✨ Visual Condition badge on the frontend application.
- Open BigQuery Studio in a new browser tab.
- Click the + Compose new query button. You will use the SQL Editor to interact with SQL code throughout this codelab.
- Before building the machine learning extractors, you can take a quick look at the raw images. Run the following query to view the array of image URIs stored in Google Cloud Storage for each listing:
SELECT auction_id, item_name, description, images
FROM `model_dev.vehicle_metadata` LIMIT 5;
- Now, in your BigQuery Studio SQL Editor, paste the following SQL to create a new table with an
image_refcolumn. Click Run.
CREATE OR REPLACE TABLE `model_dev.vehicle_multimodal` AS
SELECT
  *,
  ARRAY(
    SELECT OBJ.FETCH_METADATA(OBJ.MAKE_REF(uri, 'us.conn'))
    FROM UNNEST(images) AS uri
  ) AS image_ref
FROM `model_dev.vehicle_metadata`;
- Take a look at the new
image_refObjectRef column you just created. The new table now has an ObjectRef column that has permissions to execute on the images themselves. Run the following query to view it:
SELECT auction_id, item_name, description, image_ref
FROM `model_dev.vehicle_multimodal` LIMIT 5;
- Now you'll use
AI.GENERATEandAI.CLASSIFYto analyze the images.AI.GENERATEextracts the condition score and a one-sentence damage summary by prompting Gemini, whileAI.CLASSIFYstrictly categorizes the vehicle's body style and color.
Execute the following query to extract these insights into a dedicated feature table. You should expect this to take about 3 minutes to finish.
CREATE OR REPLACE TABLE `model_dev.vehicle_vision_features` AS
WITH generated_data AS (
   SELECT
   auction_id,
   AI.GENERATE(
     prompt => ('Rate the condition of this car on a scale from 0-100. Output a 1 sentence description of any glaring red flags', image_ref),
     output_schema => 'condition INT64, description_summary STRING'
   ).* EXCEPT(full_response,status)
 FROM
   `model_dev.vehicle_multimodal`
),

-- Object-centric Classifications
classified_data AS (
 SELECT
   auction_id,
   AI.CLASSIFY(
     ('What type of automobile is this?', image_ref[0]),
     categories => ['Truck', 'Sedan', 'SUV']) AS body_style,
   AI.CLASSIFY(
     ('Color of the exterior of the automobile', image_ref[0]),
     categories => ['Black', 'White', 'Silver', 'Gray', 'Red', 'Blue', 'Brown', 'Green', 'Beige', 'Gold']) AS color,
   AI.CLASSIFY(
     ('Color of the interior of the automobile', image_ref[0]),
     categories => ['Black', 'Gray', 'Beige', 'Tan', 'Brown', 'White', 'Red']) AS interior
 FROM `model_dev.vehicle_multimodal`
)

-- Join the AI insights back together into the final feature table
SELECT
 g.auction_id,
 g.condition,
 g.description_summary,
 c.body_style,
 c.color,
 c.interior
FROM generated_data g
JOIN classified_data c ON g.auction_id = c.auction_id;
- To view the generated features yourself, run the following query, or just look at the screenshot below:
SELECT auction_id, condition, description_summary, body_style, color, interior FROM `model_dev.vehicle_vision_features` LIMIT 5;
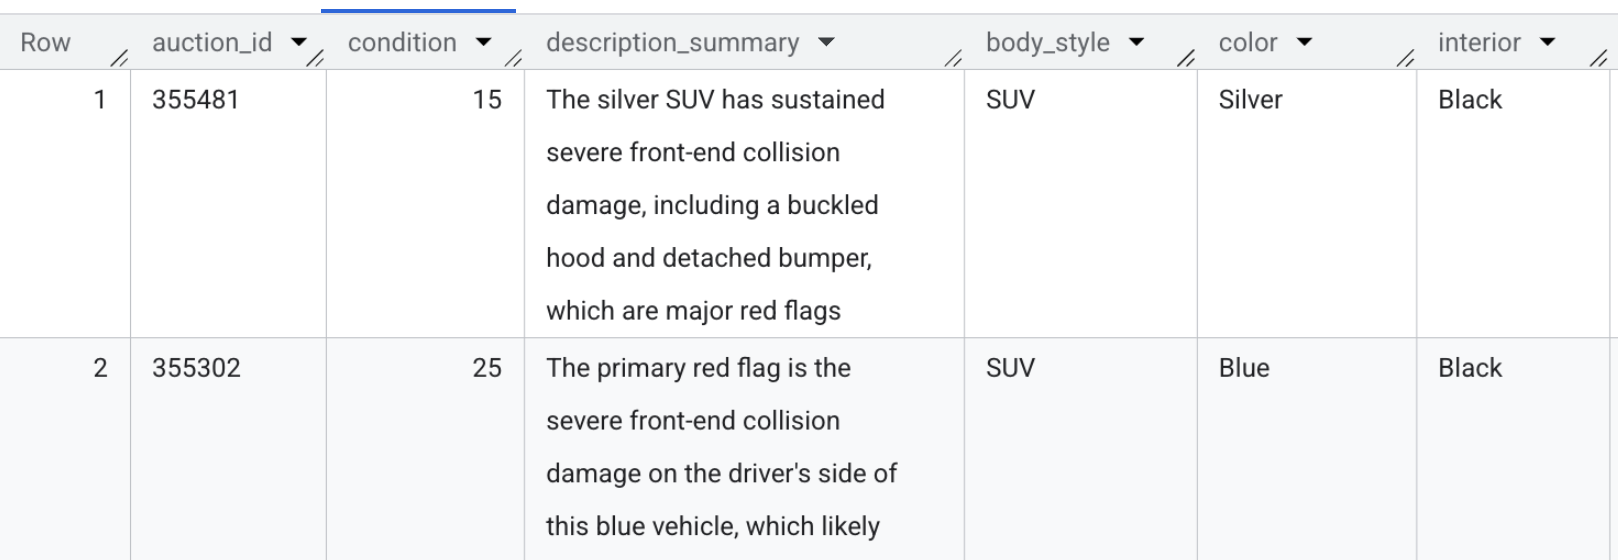
Section Recap: You accessed the raw images directly from BigQuery and used Gemini models to extract structured visual features without moving any files.
5. Predictive Pricing with XGBoost
To calculate whether a vehicle is a genuinely good deal, a reliable baseline is needed for its fair market value. Rather than pulling data out into local scripts or notebooks to train a model, you can train an XGBoost model directly inside BigQuery using standard SQL. This price prediction drives the 📈 Fair Market Value logic on the frontend application.
- Navigate back to your BigQuery Studio tab.
- First, take a look at the training dataset. Unlike the active vehicle listings, this
synthetic_carstable contains 100,000 historical sales that will be used to train the model. Run this quick query to take a peek:
SELECT
  *
FROM
  `model_dev.synthetic_cars`
LIMIT 10;
- Now, execute the following SQL to train an XGBoost regression model. This model learns how attributes like mileage, year, make, and visual condition affect price from those 100,000 historical records:
CREATE OR REPLACE MODEL `model_dev.car_price_model`
OPTIONS(
  MODEL_TYPE = 'BOOSTED_TREE_REGRESSOR',
  INPUT_LABEL_COLS = ['selling_price'],
  MAX_ITERATIONS = 15,
  TREE_METHOD = 'HIST'
) AS
SELECT
  * EXCEPT(vin, sale_date, market_value, seller)
FROM
  `model_dev.synthetic_cars`;
- Before predicting prices for the live, ongoing vehicle listings, you must gather all the relevant input features into one place. Run this SQL to merge the structured vehicle metadata with the vision-extracted features you just generated:
CREATE OR REPLACE TABLE `model_dev.vehicle_prediction_features` AS
SELECT
  meta.auction_id,
  meta.model_year,
  meta.make,
  meta.model,
  meta.mileage,
  meta.transmission_type,
  meta.state,
  COALESCE(vision.body_style, 'Unknown') AS body_style,
  COALESCE(vision.condition, 50) AS condition,
  COALESCE(meta.color, vision.color, 'Unknown') AS color,
  COALESCE(vision.interior, 'Unknown') AS interior
FROM `model_dev.vehicle_metadata` meta
LEFT JOIN `model_dev.vehicle_vision_features` vision
  ON meta.auction_id = vision.auction_id;
- Finally, predict the fair market value of every ongoing vehicle listing. Execute the following query to feed the aggregated features into your newly trained model and save the numerical outputs to a secure predictions table:
CREATE OR REPLACE TABLE `model_dev.vehicle_price_predictions` AS
SELECT
  auction_id,
  ROUND(predicted_selling_price, 2) AS predicted_market_value
FROM ML.PREDICT(
  MODEL `model_dev.car_price_model`,
  (SELECT * FROM `model_dev.vehicle_prediction_features`)
);
- Now, verify the model's output. Run this quick query to preview the predicted market values for the live vehicle listings:
SELECT * FROM `model_dev.vehicle_price_predictions` LIMIT 5;
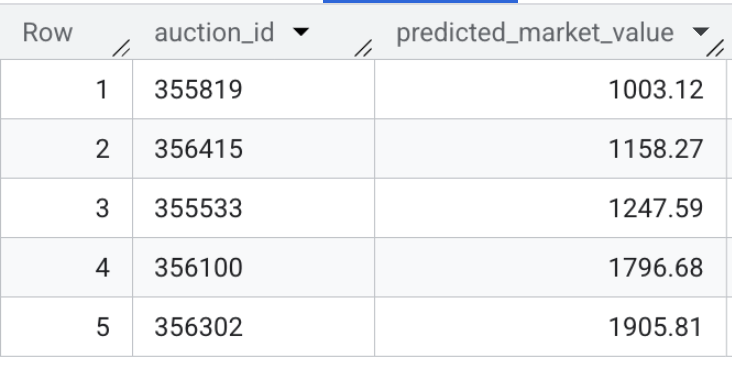
Section Recap: You trained an XGBoost regression model using 100,000 sample transactions and ran batch inference to predict the fair market value for every active vehicle listing in the dataset.
6. Semantic Embeddings & Authenticity Detection
In this section, you will execute two distinct embedding pipelines to enable smart features for the vehicle marketplace:
- Multimodal Image Search: Translate raw vehicle photos into vector space to allow users to search using natural language (e.g. "a reliable work truck").
- Text Embeddings & Similarity Search: Translate written vehicle descriptions into vector embeddings to compare active listings against known potential scam or enthusiast profiles using
VECTOR_SEARCH. This calculates the 🔍 Authenticity Score that buyers see on the app.
- First, you need to generate multimodal embeddings for the vehicle listings. With the
gemini-embedding-2-previewmodel, you can input both images and text into the exact same embedding. While this model is fully capable of processing multiple modalities simultaneously, in this specific case we are only embedding the vehicle images. This powers the "semantic search" bar for the frontend application, allowing buyers to use natural language (like "a reliable pickup truck") and quickly retrieve matching listings. Run this query to generate the multimodal vectors usingAI.EMBED:
CREATE OR REPLACE TABLE `model_dev.vehicle_images_embedded` AS
SELECT
  auction_id,
  AI.EMBED(
    STRUCT(image_ref),
    endpoint => 'gemini-embedding-2-preview').result AS multimodal_embedding
FROM `model_dev.vehicle_multimodal`
WHERE ARRAY_LENGTH(image_ref) > 0;
- Next, you'll examine the risk profile data loaded earlier. Note that it contains both known scam typologies and legitimate enthusiast sample listings. Run this query to view the baseline profiles:
SELECT profile_id, profile_type, description
FROM `model_dev.seller_risk_profiles`;
- Now you'll translate those raw risk descriptions into vector embeddings. You can use a specialized text-embedding model (
text-embedding-005) to strictly evaluate the written language you just previewed. Paste the following SQL and click Run to embed the baseline profiles:
CREATE OR REPLACE TABLE `model_dev.seller_risk_profiles_embedded` AS
SELECT
  profile_id,
  description AS content,
  profile_type,
  AI.EMBED(description, endpoint => 'text-embedding-005').result AS text_embedding
FROM `model_dev.seller_risk_profiles`;
- Next, generate comparable embeddings for the actual live vehicle inventory. Run this query to translate the raw HTML description for each vehicle into vector space so they can be compared against the baseline profiles:
CREATE OR REPLACE TABLE `model_dev.vehicle_descriptions_embedded` AS
SELECT
  auction_id,
  description AS content,
  AI.EMBED(description, endpoint => 'text-embedding-005').result AS text_embedding
FROM `model_dev.vehicle_metadata`
WHERE description IS NOT NULL;
- Finally, execute the vector search to calculate the semantic distance between the live listings and the baseline profiles. Run the following SQL to perform the mapping. A lower mathematical distance means a listing is highly similar to a known scam cluster, while a higher distance suggests a legitimate description.
CREATE OR REPLACE TABLE `model_dev.vehicle_authenticity_scores` AS
SELECT
  scam_search.query.auction_id,
  CAST(
    GREATEST(0.0, LEAST(100.0, ROUND((MIN(scam_search.distance) - 0.33) / 0.12 * 100.0)))
    AS INT64
  ) AS authenticity_score
FROM VECTOR_SEARCH(
  TABLE `model_dev.seller_risk_profiles_embedded`,
  'text_embedding',
  (
      SELECT text_embedding, auction_id
      FROM `model_dev.vehicle_descriptions_embedded`
  ),
  top_k => 15,
  distance_type => 'COSINE'
) AS scam_search
WHERE scam_search.base.profile_type = 'scam'
GROUP BY 1;
The contents of this table may look like the following:
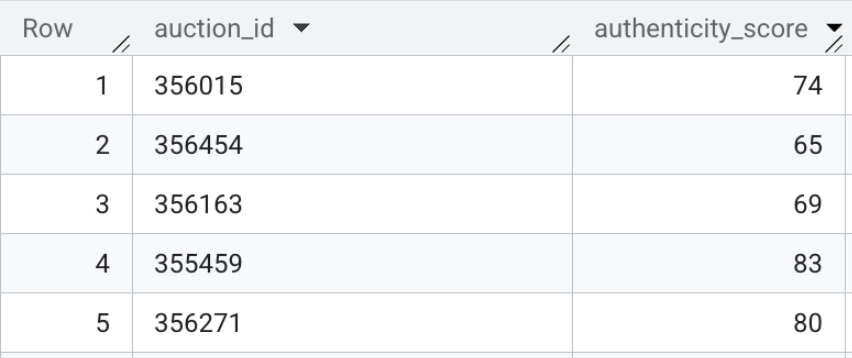
Section Recap: You generated multimodal embeddings for the frontend search bar, and used vector search directly inside BigQuery to evaluate raw HTML text listings against known scam profiles.
7. Generative Deal Scoring
You now have structured datasets generated via multiple distinct machine learning techniques, all orchestrated entirely within BigQuery: vision extraction, XGBoost model to predict fair market value, and vector search embeddings.
The final step is to merge these AI signals into a consolidated view as the definitive Deal Score for the frontend application.
- First, join the raw metadata with the AI-extracted vision features, predictive pricing outputs, and semantic authenticity scores. Execute the following SQL:
CREATE OR REPLACE TABLE `model_dev.vehicle_features_enhanced` AS
SELECT
  meta.auction_id,
  meta.item_name,
  meta.model_year,
  meta.make,
  meta.model,
  meta.mileage,
  meta.current_bid,
  meta.listing_url,
  meta.transmission_type,
  meta.description,
  meta.state,
  COALESCE(vision.body_style, 'Unknown') AS body_style,
  COALESCE(vision.condition, 50) AS condition,
  COALESCE(meta.color, vision.color, 'Unknown') AS color,
  COALESCE(vision.interior, 'Unknown') AS interior,
  COALESCE(scam.authenticity_score, 100) AS authenticity_score,
  vision.description_summary,
  prices.predicted_market_value
FROM `model_dev.vehicle_metadata` meta
LEFT JOIN `model_dev.vehicle_vision_features` vision
  ON meta.auction_id = vision.auction_id
LEFT JOIN `model_dev.vehicle_price_predictions` prices
  ON meta.auction_id = prices.auction_id
LEFT JOIN `model_dev.vehicle_authenticity_scores` scam
  ON meta.auction_id = scam.auction_id;
- Next, calculate a 0-100 Deal Score by combining four distinct AI signals. This formula balances value, quality, and risk to surface the best listings:
- Price Score (40%): Measures savings against fair market value.
- Vision Score (30%): Insights from previous photo analysis.
- Authenticity Score (15%): Scam risk assessment.
- Condition Score (15%): Inferred on-the-fly from the seller's description via
AI.SCORE.
CREATE OR REPLACE TABLE `model_dev.marketplace_listings` AS
WITH score_elements AS (
  SELECT
    *,
    -- 1. SELLER DESCRIPTION SCORE (use AI.SCORE on seller description)
      AI.SCORE(
        FORMAT("Rate the vehicle condition (0-100) based ONLY on this text: '%s'", description)
    ) AS description_score,

    -- 2. PRICE SCORE
    -- Higher impact for underpricing, lower impact for overpricing.
    CAST(LEAST(100.0, GREATEST(0.0,
      75.0 + (
        IF((predicted_market_value - current_bid) > 0,
           ((predicted_market_value - current_bid) / NULLIF(predicted_market_value, 0)) * 250.0,
           ((predicted_market_value - current_bid) / NULLIF(predicted_market_value, 0)) * 40.0
        )
      )
    )) AS INT64) AS price_score
  FROM `model_dev.vehicle_features_enhanced`
),
final_calcs AS (
  SELECT
    *,

    -- 3. Combine scores: Price (40%), Condition (30%), Description (15%), Authenticity (15%)
    ROUND(
      (
        (price_score * 0.40) +
        (CAST(condition AS INT64) * 0.30) +
        (COALESCE(description_score, 50) * 0.15) +
        (CAST(authenticity_score AS INT64) * 0.15)
      )
      -- Authenticity penalty for scores below 50.
      * (IF(CAST(authenticity_score AS INT64) < 50, 0.20, 1.05))
    ) AS raw_score
  FROM score_elements
)
SELECT
  * EXCEPT(raw_score),

  -- 4. Set floor values: low authenticity scores drop to 10; others floor at 35.
  CAST(GREATEST(
    (IF(CAST(authenticity_score AS INT64) < 50, 10, 35)),
    LEAST(100, raw_score)
  ) AS INT64) AS deal_score
FROM final_calcs;
To ensure high-quality recommendations, the query applies two specific logic layers:
- Authenticity Gating: If a listing is flagged as "High Risk" (score < 50), the total Deal Score is automatically slashed by 80% to prevent suspicious listings from being promoted.
- "Hidden Gem" Optimization: The formula uses piecewise logic to reward savings aggressively while being more forgiving toward markups, ensuring that an overpriced car in pristine condition can still achieve a "Fair" ranking.
The resulting table, model_dev.marketplace_listings, contains fields like deal_score, alongside price_score and authenticity_score.
- To view the deal scores yourself, run the following query, or just look at the screenshot below:
SELECT item_name, model_year, authenticity_score, predicted_market_value, price_score, deal_score FROM `model_dev.marketplace_listings`
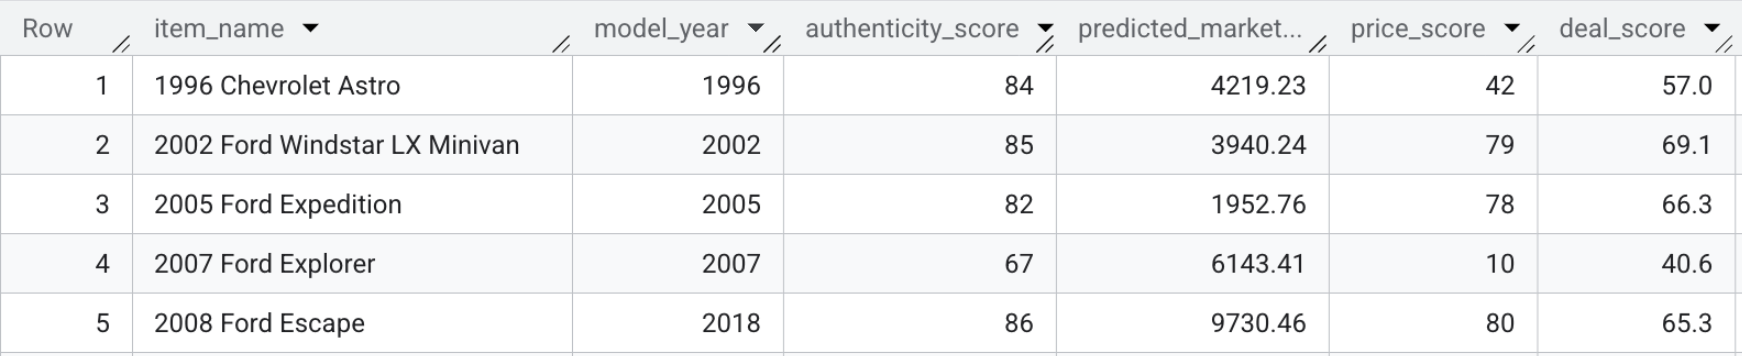
Section Recap: You combined the predictive pricing, visual features, and authenticity scores alongside the seller's description to calculate a single Deal Score for each listing.
8. Deploy the Frontend Application
Now it's time to stand up the frontend application. This lets you finally search the inventory of vehicle listings and interact with the AI-generated insights you just built, like the Deal Score.
Export AI Scores to the Frontend
The React frontend relies on a local JSON payload for fast initial page loads. To power the marketplace, extract the final Generative Deal Scores from BigQuery and inject them back into the Next.js project.
- Ensure your environment is ready. If your Cloud Shell session timed out or you navigated to a different folder, run the following command to return to the project root and restore your environment variables:
cd ~/devrel-demos/data-analytics/cymbal-autos-multimodal && \
export PROJECT_ID=$(gcloud config get-value project) && \
export USER_BUCKET="cymbal-autos-${PROJECT_ID}"
- Run the provided Python script to query the final BigQuery view and merge the new Deal Scores into the application's underlying data store:
python3 scripts/setup/08_export_frontend_data.py
You will receive a confirmation message like:
💾 Updated local file: app/src/data/cars.json
Deploy the Application to Cloud Run
With the data successfully enriched, you can deploy the Next.js frontend application to the public internet using Cloud Run. It features a modern interface with deal ratings, interactive image carousels, and a dynamic hybrid semantic search bar that queries BigQuery in real-time.
- In Cloud Shell, navigate to the
app/directory of your cloned repository. This is critical—staying in the root directory will cause the build to fail.
cd app
- Deploy the application as a serverless container using Cloud Run. The command passes the
PROJECT_IDas an environment variable so the Next.js API knows which BigQuery project to query:
gcloud run deploy cymbal-autos-frontend \
  --source . \
  --region us-west1 \
  --allow-unauthenticated \
  --min-instances 1 \
  --set-env-vars PROJECT_ID=$PROJECT_ID \
  --project $PROJECT_ID
- When the deployment completes, the terminal will output a secure Service URL. It will look similar to this:
Service URL: https://cymbal-autos-frontend-[YOUR-PROJECT-NUMBER].us-west1.run.app/
9. Explore the Cymbal Autos Application
With your frontend container pushed to Cloud Run, it's time to test out the app.
- Visit the site: Open the secure Service URL returned by Cloud Run.

- Perform a Semantic Search: Try searching for an abstract concept, like "A reliable work truck that hauls and can offroad". The Next.js app translates your raw text into a multimodal vector embedding and fires off a real-time
VECTOR_SEARCHagainst BigQuery, mapping your idea against the vehicle ecosystem.
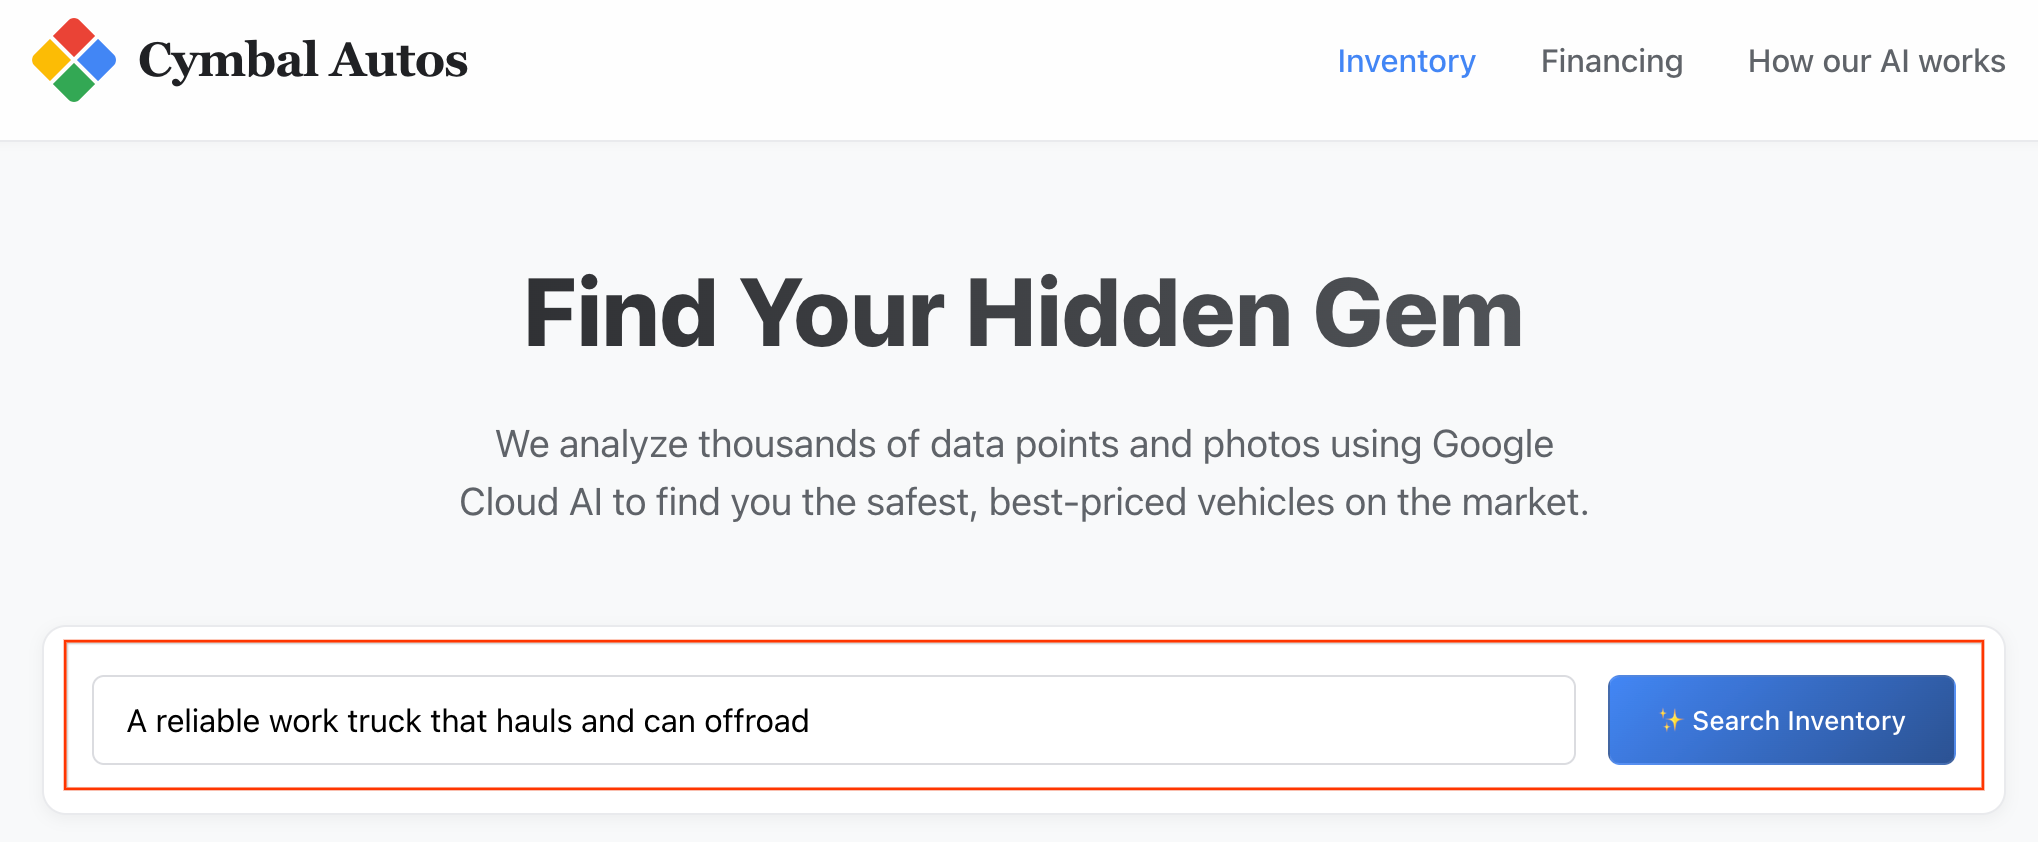
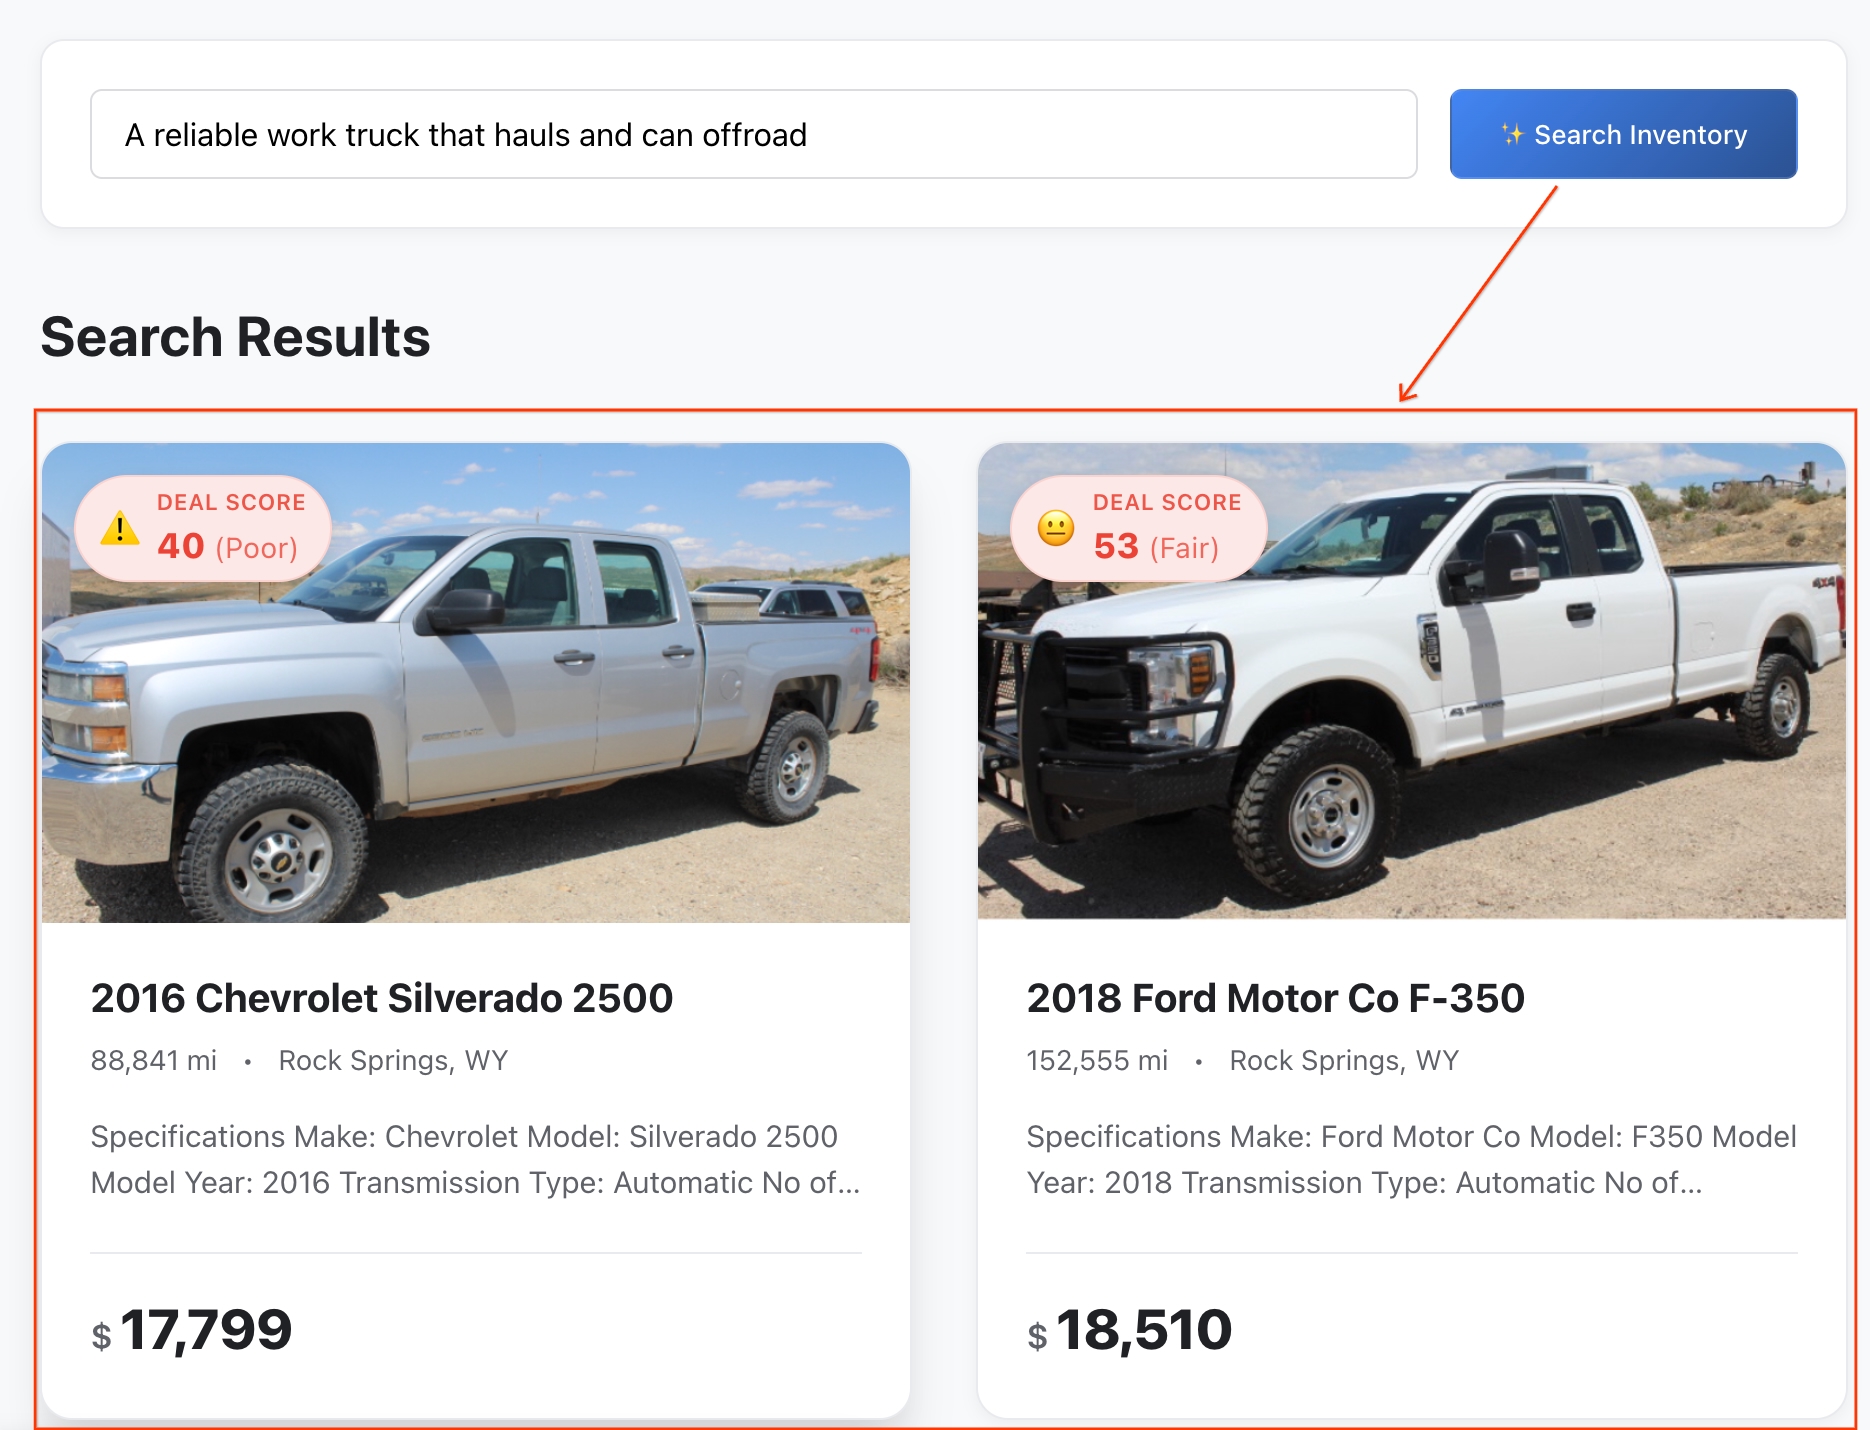
Note: listings are sorted by semantic similarity.
- Review the Results: BigQuery calculated the exact mathematical distance between your abstract idea and the vehicle's features to return the closest semantic matches.
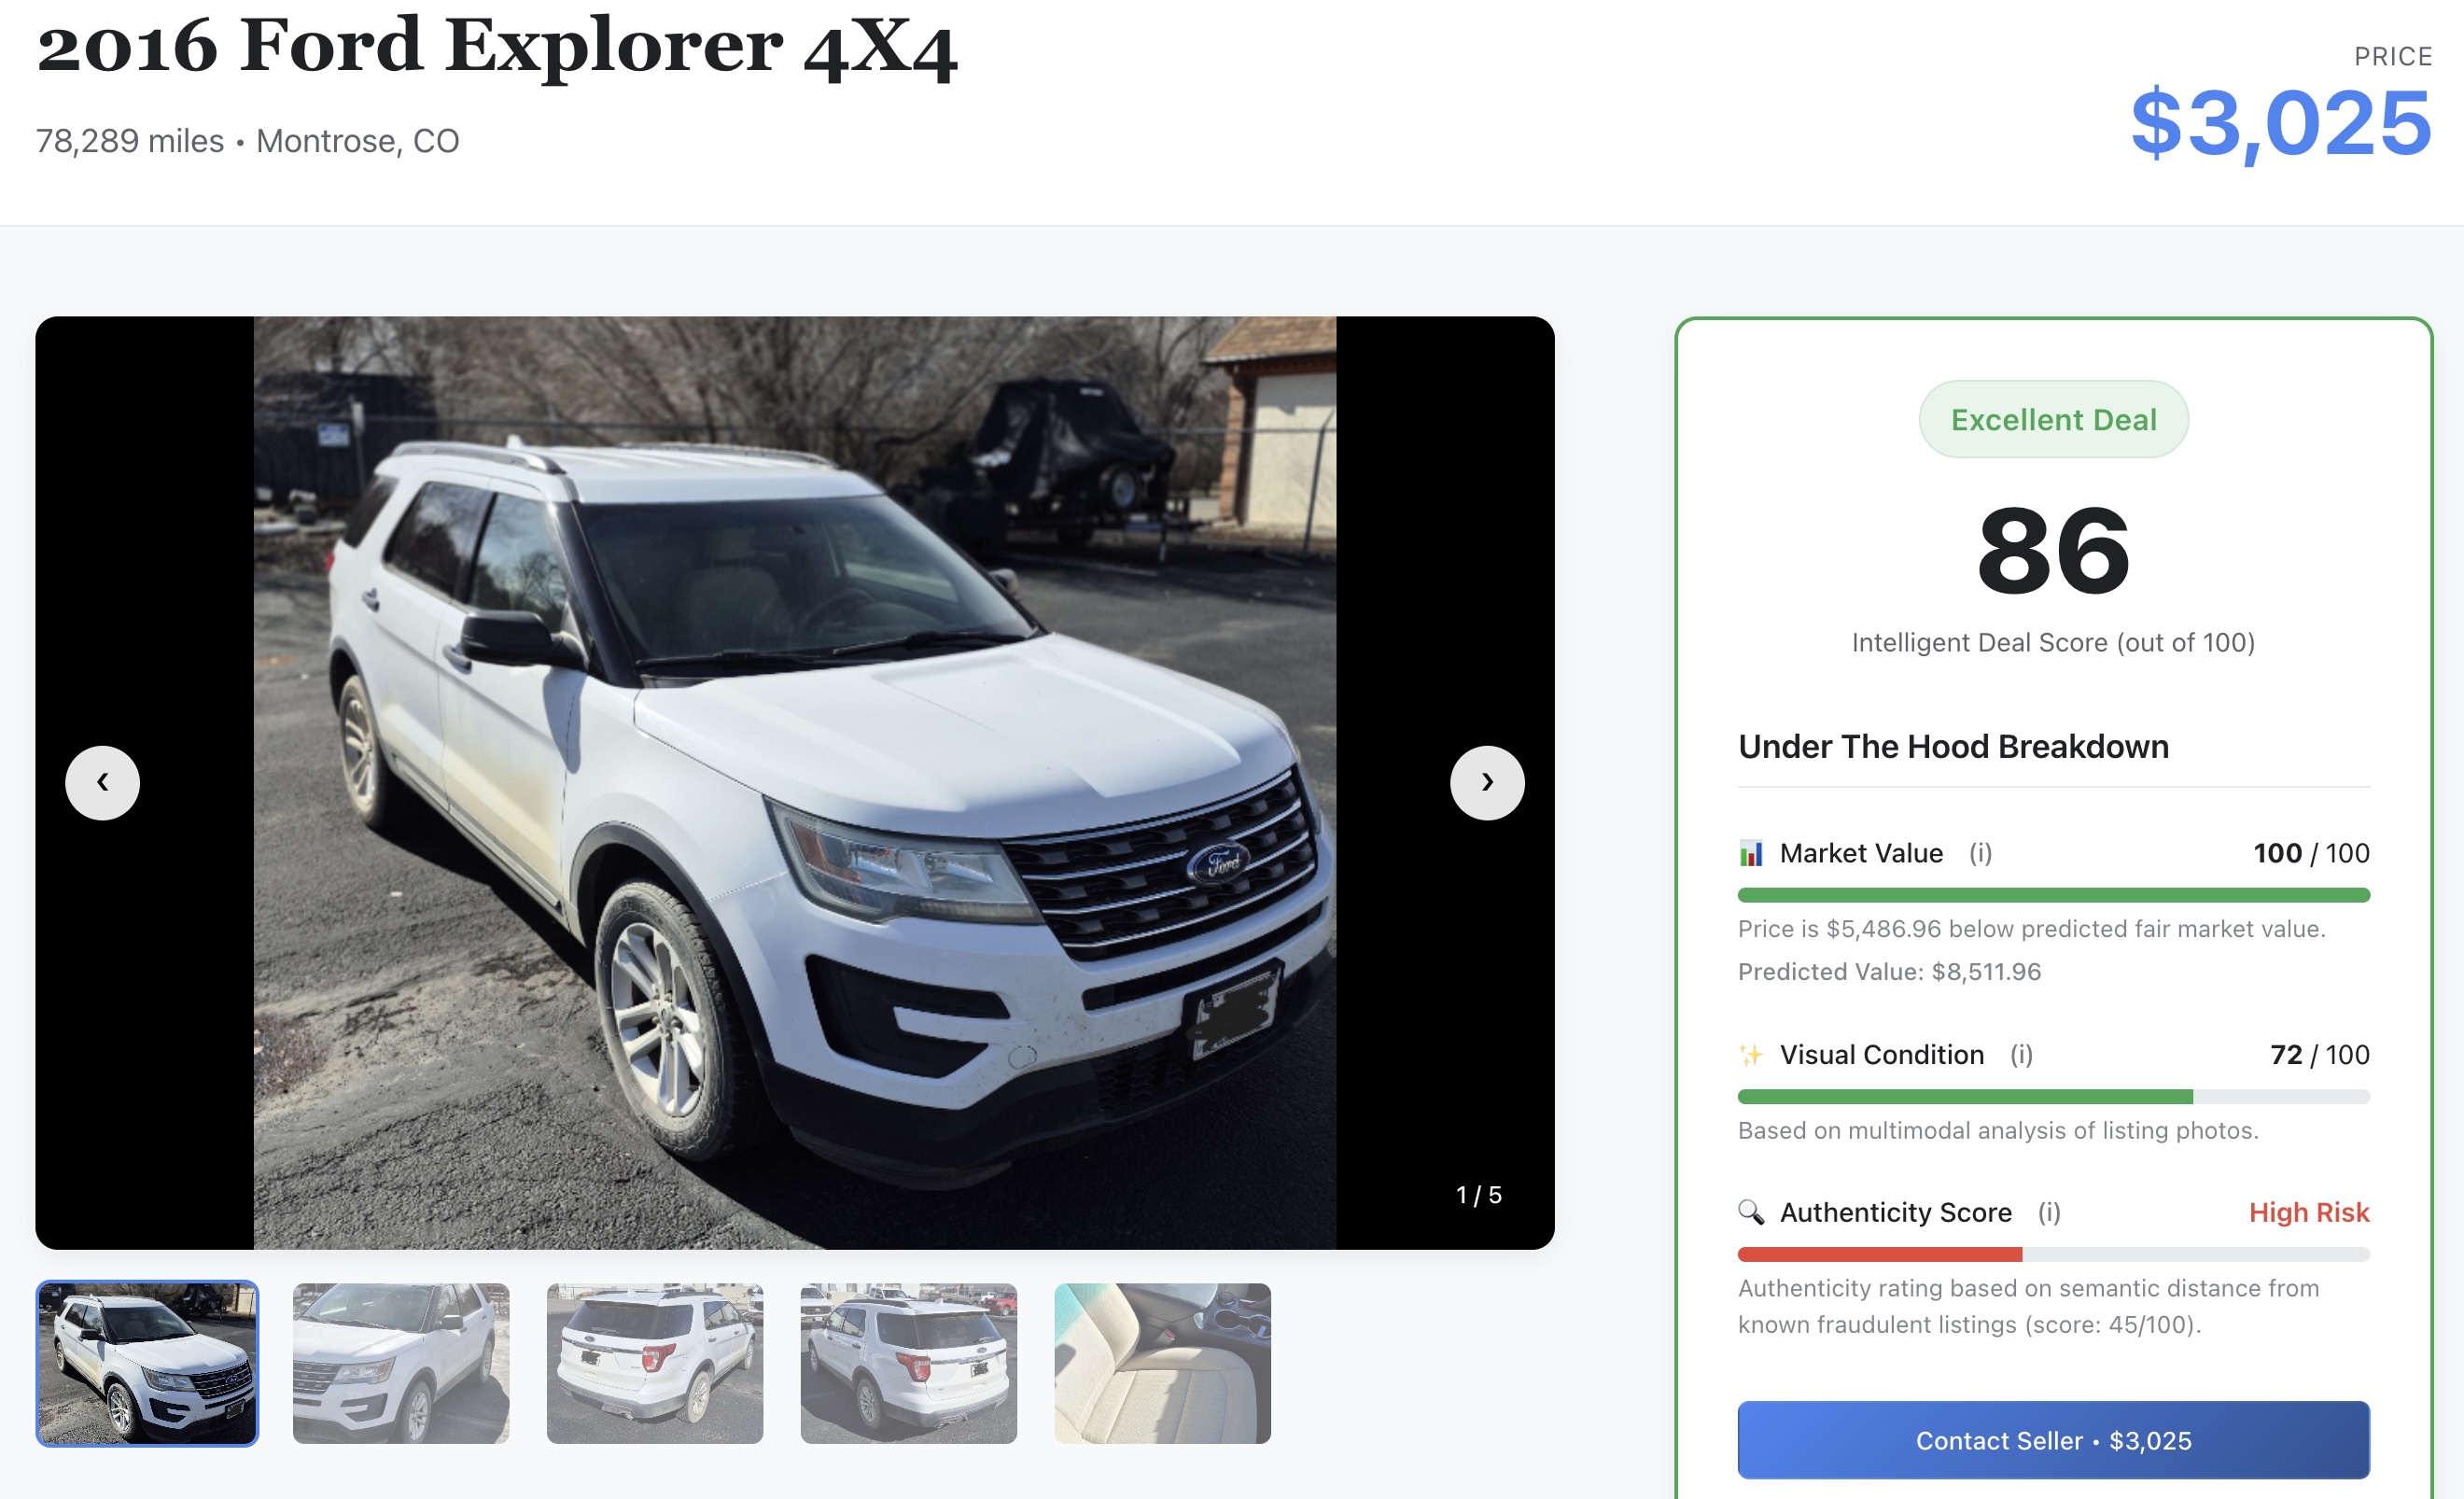
- Dig into the Details: Click on any vehicle to open its full listing profile.
- Check the AI Signal: Scroll through the details to see the raw machine learning scores you generated earlier in the lab:
- 📈 Fair Market Value: The baseline price predicted by your XGBoost model.
- ✨ Visual Condition: The physical damage rating extracted by Gemini models.
- 🔍 Authenticity Score: The authenticity vector metric separates legitimate sellers from potential scammers.
10. Clean up
To avoid incurring ongoing charges to your Google Cloud account for the resources used in this codelab, you can delete the entire Google Cloud project you created for this codelab, or you can execute the following automated teardown script.
- From your Cloud Shell terminal, navigate back to the root containing directory:
cd ..
- Run the cleanup script below. This will empty your Google Cloud Storage bucket, drop the
model_devBigQuery dataset, delete the BigQuery connection, and delete the Cloud Run service.
chmod +x scripts/cleanup/teardown.sh
./scripts/cleanup/teardown.sh
11. Congratulations
Congratulations! You successfully built an intelligent vehicle marketplace. You used BigQuery to unify unstructured data analysis, predictive modeling, and AI integrations into a single workspace.
What you've learned
- How to connect BigQuery to unstructured Cloud Storage images using ObjectRef
- How to extract vehicle attributes from photos using BigQuery with Gemini models like the
AI.GENERATEandAI.CLASSIFYfunctions - How to predict vehicle prices using BigQuery ML
- How to identify potential scam listings by embedding vehicle descriptions and performing
VECTOR_SEARCH - How to use
AI.SCOREto evaluate unstructured data on-the-fly and incorporate results into a comprehensive Deal Score - How to export data and deploy the Next.js marketplace application to Cloud Run
Next steps
- Discover the full range of generative AI functions available in BigQuery
- Learn more about creating predictive models with GoogleSQL