
1. Introduction
In this codelab, you will build a sophisticated Marathon Planner Agent using the Agent Development Kit (ADK). You will progressively examine capabilities of the agent, from a well-structured system prompt to dynamic skill loading and mapping MCP tools. Finally, you will test the agent locally and deploy it to the Agent Runtime (Agent Engine).
What you'll do
- Initialize a new ADK agent project
- Compose a robust system prompt using a structured builder
- Add Google Maps MCP tools for real-world location context
- Dynamically load skills into the agent's toolset
- Test the agent execution locally
- Deploy the agent to Agent Engine (Cloud Run)
What you'll need
- A web browser such as Chrome
- A Google Cloud project with billing enabled
- Basic familiarity with Python
This codelab is for intermediate developers looking to build specialized generative AI agents.
Estimated duration: 45 minutes
The resources created in this codelab should cost less than $2.
2. Before you begin
Create a Google Cloud Project
- In the Google Cloud Console, on the project selector page, select or create a Google Cloud project.
- Make sure that billing is enabled for your Cloud project. Learn how to check if billing is enabled on a project.
Start Cloud Shell
Cloud Shell is a command-line environment running in Google Cloud that comes preloaded with necessary tools.
- Click Activate Cloud Shell at the top of the Google Cloud console.
- Once connected to Cloud Shell, verify your authentication:
gcloud auth list - Confirm your project is configured:
gcloud config get project - If your project is not set as expected, set it:
export PROJECT_ID=<YOUR_PROJECT_ID>
gcloud config set project $PROJECT_ID
Verify authentication:
gcloud auth list
Confirm your project:
gcloud config get project
Set it if needed:
export PROJECT_ID=<YOUR_PROJECT_ID>
gcloud config set project $PROJECT_ID
Enable APIs
Run this command to enable all the required APIs:
gcloud services enable \
  aiplatform.googleapis.com \
  run.googleapis.com \
  secretmanager.googleapis.com \
  mapstools.googleapis.com \
  storage.googleapis.com \
  cloudresourcemanager.googleapis.com \
  serviceusage.googleapis.com
Create a Google Maps API Key
To use the Google Maps MCP tools, you need to generate a Maps API key.
- In the Google Cloud Console, use the search bar to navigate to Google Maps Platform > Credentials.
- If prompted, confirm your Google Cloud project.
- Click Create Credentials and select API key.
- Copy the generated API key. You will need it in the next step.
3. Set up your environment
For this codelab, the code is hosted on GitHub. You will clone the repository, which contains the directory structure and required sub-components (such as the skills/ directory).
- Clone the repository and navigate to the project folder:
git clone https://github.com/GoogleCloudPlatform/next-26-keynotes
cd next-26-keynotes/devkey/demo-1
- Set up a Python virtual environment and install ADK:
uv venv
source .venv/bin/activate
uv sync
- Set your Maps API key. The application reads it from an environment variable:
export GOOGLE_MAPS_API_KEY="<YOUR_MAPS_API_KEY>"
Configure Environment Variables
The Simulator Agent uses a .env file for configuration. Copy the sample file and update it with your Project ID.
- Copy the sample environment file:
cp planner_agent/sample.env planner_agent/.env
- Open
planner_agent/.envand update theGOOGLE_CLOUD_PROJECTfield with your actual Google Cloud Project ID and update theGOOGLE_MAPS_API_KEYfield with your Google Maps API key that you created.
The file should look similar to this:
GOOGLE_GENAI_USE_VERTEXAI=1
GOOGLE_CLOUD_PROJECT=<YOUR_PROJECT_ID>
GOOGLE_CLOUD_LOCATION=global
GOOGLE_MAPS_API_KEY=<YOUR_MAPS_API_KEY>
GOOGLE_CLOUD_AGENT_ENGINE_ENABLE_TELEMETRY=true
OTEL_PYTHON_LOGGING_AUTO_INSTRUMENTATION_ENABLED=true
OTEL_INSTRUMENTATION_GENAI_CAPTURE_MESSAGE_CONTENT=true
ADK_CAPTURE_MESSAGE_CONTENT_IN_SPANS=true
4. Create a new ADK agent
Explore the core file that defines the agent: planner_agent/agent.py.
In the build-agents-with-skills repository, the agent is initialized using ADK's Agent class. It specifies the underlying model, an identity name, and pulls in the instructions and tools defined in other modules.
Open planner_agent/agent.py to examine the initialization code:
instruction="Answer user questions to the best of your knowledge"
description="A helpful assistant for user questions."
tools=[]

# ...

root_agent = Agent(
    model='gemini-3-flash-preview',
    name='planner_agent',
    description=description,
    instruction=instruction,
    tools=tools
)
The Agent class abstracts away message history, tool orchestration, and LLM communication, leaving you to focus on the agent's behavior.
Right now, the agent is very generic. You can interact with it like any other LLM.
uv run adk run planner_agent
This command will start a chat with the agent. It uses gemini-3-flash-preview as its model and can answer basic questions.
Running agent planner_agent, type exit to exit.
[user]: What is the length of a Marathon
[planner_agent]: The official length of a marathon is **26.2 miles**, which is
equivalent to **42.195 kilometers**.
The agent already knows some facts about marathons. However, this is not enough to plan a proper marathon with rules and route planning.
5. Create a system prompt
System prompts (instructions) dictate the agent's behavior. Instead of a single giant string, this project uses a PromptBuilder (planner_agent/utils.py) to compose instructions dynamically.
Open planner_agent/prompts.py to see how the prompt is structured into logical sections:
from collections import OrderedDict
from .utils import PromptBuilder

ROLE = """\
...
"""

RULES = """\
...
"""

WORKFLOW = """\
...
"""

###

# Planner instructions with no tools mentioned
PLANNER_INSTRUCTION_NO_TOOLS = PromptBuilder(
    OrderedDict(
        role=ROLE,
        rules=RULES,
        tools=TOOLS_PROMPT_ONLY,
        workflow=WORKFLOW_PROMPT_ONLY,
    )
).build()

# Planner instruction with skills and tools defined
PLANNER_INSTRUCTION = PromptBuilder(
    OrderedDict(
        role=ROLE,
        rules=RULES,
        skills=SKILLS,
        tools=TOOLS,
        workflow=WORKFLOW,
    )
).build()
Back in planner_agent/agent.py, this is already imported.
Find the section with TODO: Replace Instruction and Description and uncomment the instruction and description variable reassignment.
That section of code should look like this:
instruction=PLANNER_INSTRUCTION_NO_TOOLS
description="Expert GIS analyst for marathon route and event planning."
You are importing a version of the prompt for the agent that does not reference any tools. You will add tools in a later step.
You can test out this version of the agent:
uv run adk run planner_agent
In the chat window, send the following prompt:
Plan a marathon for 10000 participants in Las Vegas on April 24, 2027 in the
evening timeframe
After a few moments, you should receive a response similar to this:
Running agent planner_agent, type exit to exit.
[user]: Plan a marathon for 10000 participants in Las Vegas on April 24, 2027 in the evening timeframe
[planner_agent]: Here is the comprehensive marathon plan for Las Vegas.

As requested, I have designed this event for an evening start on April 24, 2027. Because certain parameters (theme and budget) were not specified, I have applied pragmatic defaults: this will be a "Neon Nights" scenic theme to capitalize on the evening Strip, operating on a moderate-to-high budget given the infrastructure needed to secure major Las Vegas corridors.

### 1. Intent Alignment
*   **City & Theme:** Las Vegas, Nevada. Theme: "Neon Nights" an evening race maximizing the visual impact of the illuminated city.
*   **Date & Time:** Saturday, April 24, 2027. Late April evenings in Las Vegas offer optimal running weather (temperatures dropping from ~70°F at sunset to ~60°F). Race start is 6:30 PM (sunset is approx. 7:20 PM).
...
...
With a well-defined prompt, the output is already much closer to the expected result. In the next step, you will add tools to take the agent to the next level.
6. Add skills and tools
To enable skills and tools in planner_agent/agent.py, find the section with TODO: Replaces Tools and uncomment the next two lines. Your code should look like the following:
instruction=PLANNER_INSTRUCTION
tools=get_tools()
That's the only code change required in this step. The rest of this section explains the concepts behind skills and tools.
Skills
An agent Skill is a self-contained unit of functionality that an ADK agent can use to perform a specific task. An agent Skill encapsulates the necessary instructions, resources, and tools required for a task, based on the Agent Skill specification. The structure of a Skill allows it to be loaded incrementally to minimize the impact on the operating context window of the agent.
For the marathon planning agent, there are 3 skills defined:
- gis-spatial-engineering - Responsible for processing GeoJSON data to create the marathon route.
- mapping - Use Google Maps tools for searching places and weather info.
- race-director - Validate marathon route follows planning guidelines.
Skills can have scripts, additional assets and references.
The application loads all the skills and provides them as tools in planner_agent/tools.py. Notice how this is done in the get_tools() function:
def get_tools() -> list:
    """Build the planner's tool list with lazy-loaded skills."""
    from google.adk.code_executors.unsafe_local_code_executor import UnsafeLocalCodeExecutor

    skills_dir = pathlib.Path(__file__).parent / "skills"

    skills = []
    if skills_dir.exists():
        skills = [
            load_skill_from_dir(d)
            for d in sorted(skills_dir.iterdir())
            if d.is_dir() and not d.name.startswith("_") and (d / "SKILL.md").exists()
        ]

    additional_tools = _load_additional_tools(skills_dir)

    skill_toolset = SkillToolset(
        skills=skills,
        code_executor=UnsafeLocalCodeExecutor(),
        additional_tools=additional_tools,
    )

    tools = [
        skill_toolset,
        PreloadMemoryTool(),
    ]

    tools.extend(get_maps_tools())

    return tools
The part that is most interesting is the load_skill_from_dir method from ADK. There is another way to create skills in ADK, and that is inline. While not used in this codelab, it looks something like this:
from google.adk.skills import models

greeting_skill = models.Skill(
    frontmatter=models.Frontmatter(
        name="greeting-skill",
        description=(
            "A friendly greeting skill that can say hello to a specific person."
        ),
    ),
    instructions=(
        "Step 1: Read the 'references/hello_world.txt' file to understand how"
        " to greet the user. Step 2: Return a greeting based on the reference."
    ),
    resources=models.Resources(
        references={
            "hello_world.txt": "Hello! So glad to have you here!",
            "example.md": "This is an example reference.",
        },
    ),
)
Add mapping tools
The marathon planner needs spatial context to generate routes. You provide this by integrating the Google Maps MCP (Model Context Protocol) server.
In planner_agent/tools.py, notice how the MCP server is registered with the ApiRegistry tool:
from google.adk.integrations.api_registry import ApiRegistry

class MapsApiRegistry(ApiRegistry):
    """ApiRegistry subclass that strips ADC headers to force API key auth."""

    def get_toolset(self, *args, **kwargs):  # noqa: ANN002, ANN003
        toolset = super().get_toolset(*args, **kwargs)
        conn = getattr(toolset, "_connection_params", None)
        headers = getattr(conn, "headers", None) if conn else None
        if headers:
            headers.pop("Authorization", None)  # type: ignore[union-attr]
            headers.pop("x-goog-user-project", None)  # type: ignore[union-attr]
        return toolset

def get_maps_tools() -> list:
    """Return Maps MCP toolset if configured."""
    project_id = os.getenv("GOOGLE_CLOUD_PROJECT", "").strip()
    maps_key = _resolve_maps_key()

    if not project_id or not maps_key:
        return []

    # Map the MCP server location on Google Cloud
    mcp_server_name = f"projects/{project_id}/locations/global/mcpServers/google-mapstools.googleapis.com-mcp"

    # Initialize the custom API registry that supports header injection
    api_registry = MapsApiRegistry(
        api_registry_project_id=project_id,
        header_provider=header_provider,
    )
    return [api_registry.get_toolset(mcp_server_name=mcp_server_name)]
By adding the MCP toolset, the agent automatically gains the ability to query Google Maps for routing, elevation, and location details!
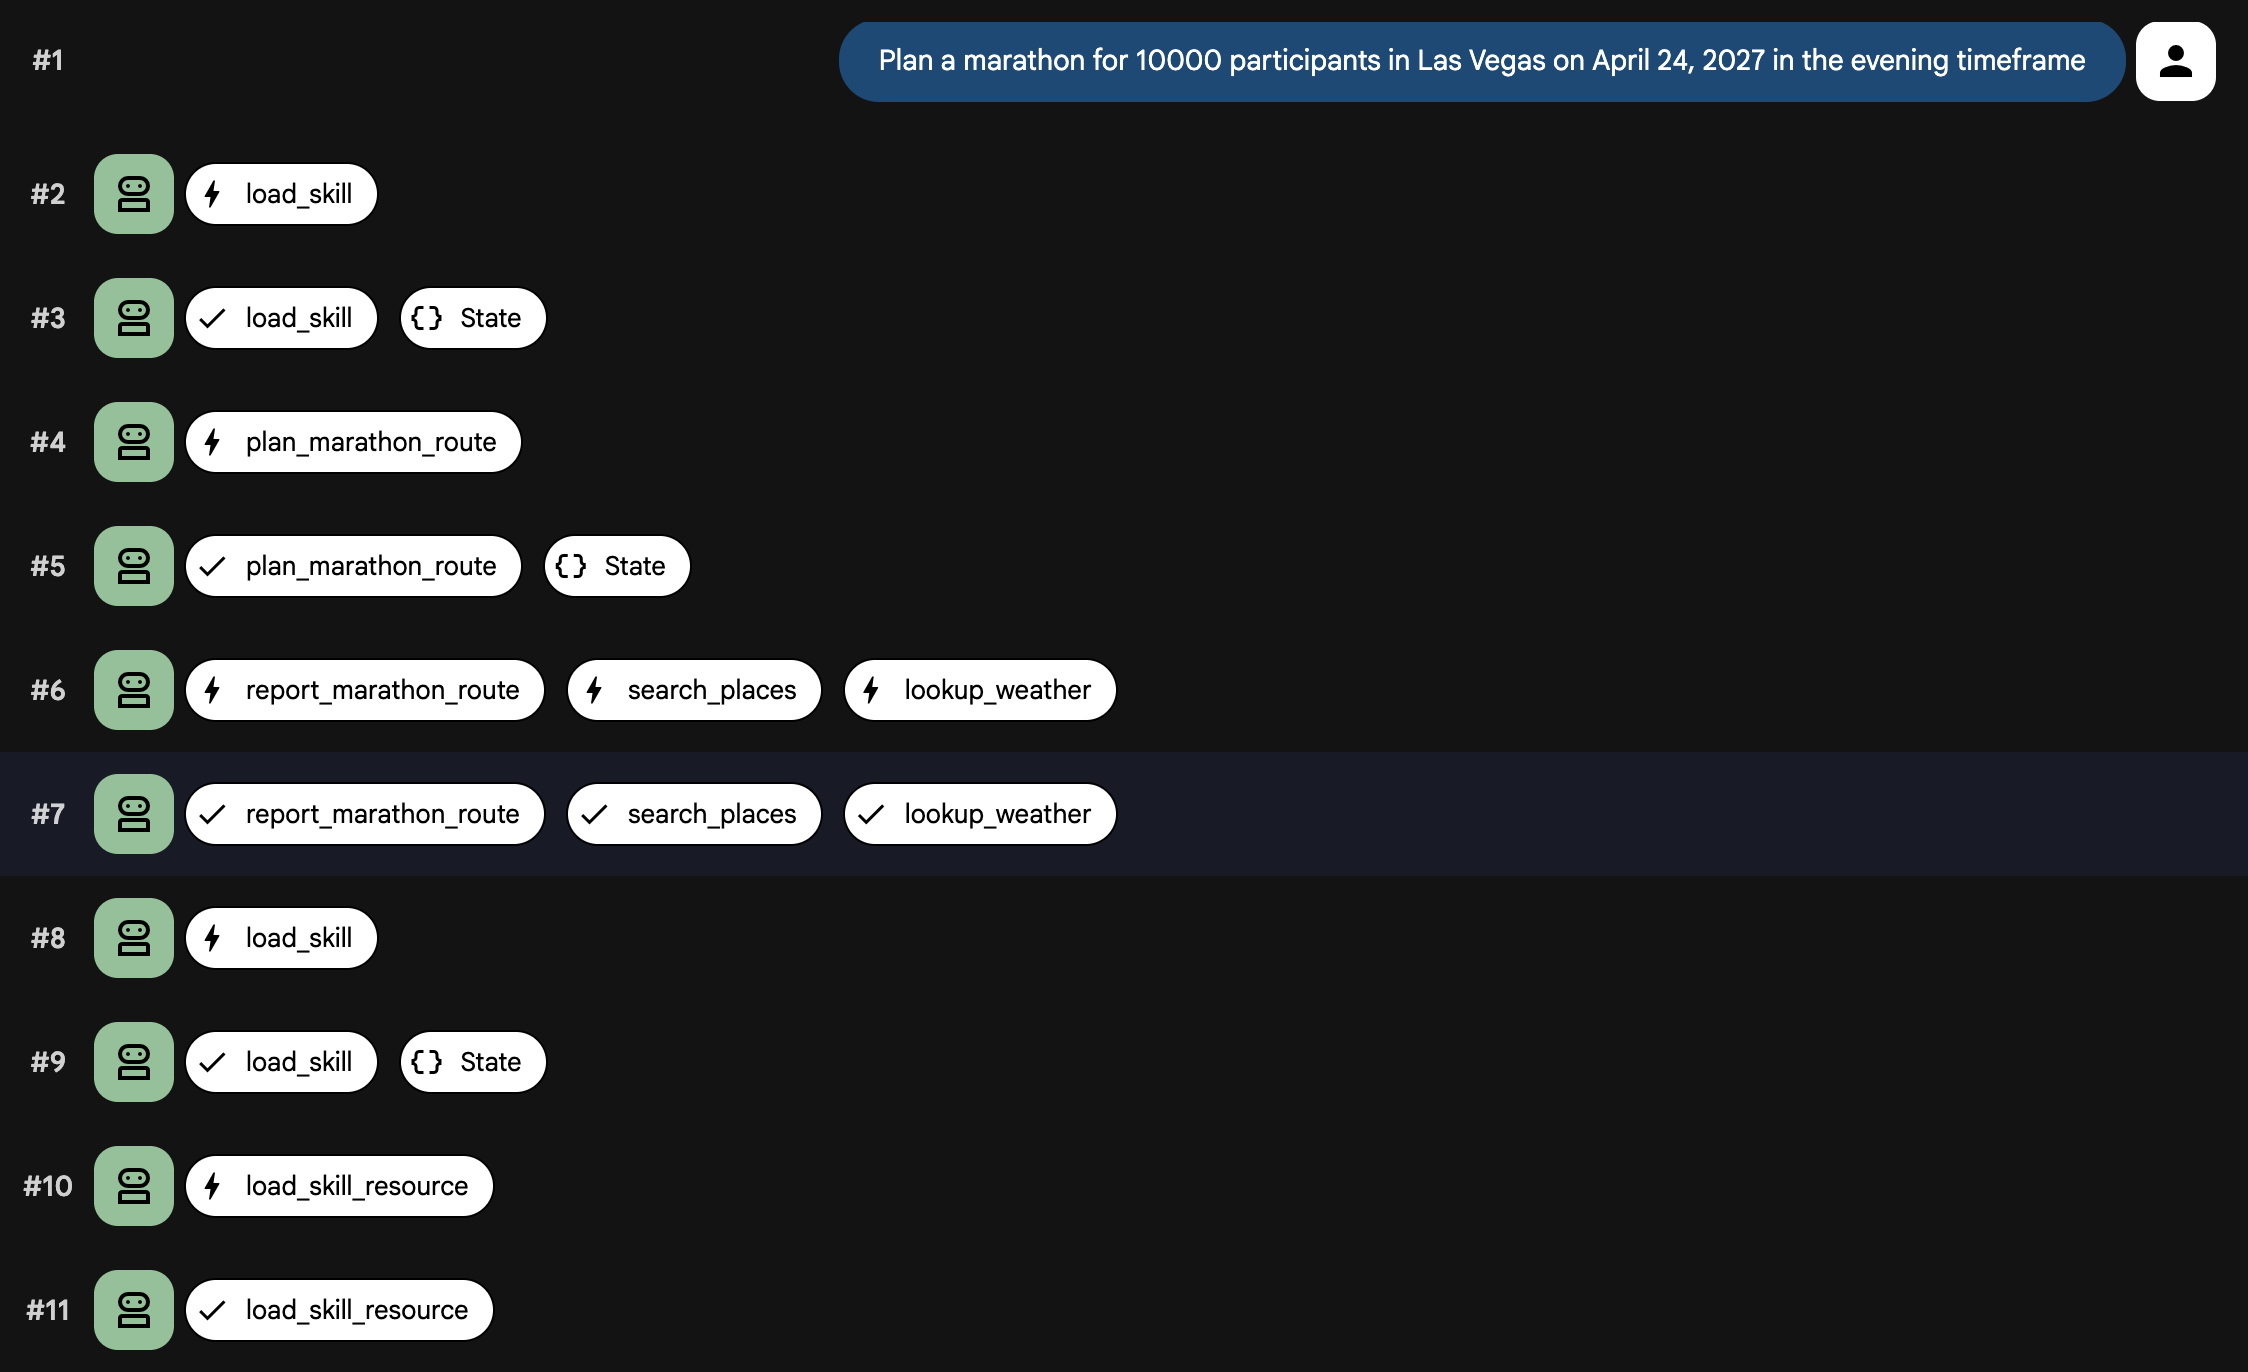
7. Run the agent locally
Now that the agent, prompt, and tools are wired together, run the agent locally. This time, you will use adk web so you can see the Skill Load and Tool Call events.
uv run adk web
You should see something similar
INFO:     Started server process [99665]
INFO:     Waiting for application startup.

+-----------------------------------------------------------------------------+
| ADK Web Server started                                                      |
|                                                                             |
| For local testing, access at http://127.0.0.1:8000.                         |
+-----------------------------------------------------------------------------+

INFO:     Application startup complete.
INFO:     Uvicorn running on http://127.0.0.1:8000 (Press CTRL+C to quit)
- Open your browser and go to the URL shown in the terminal (usually
http://localhost:8000). - In the top-left drop-down, select
planner_agent. - In the chat window, send the following prompt:
Plan a marathon for 10000 participants in Las Vegas on April 24, 2027 in the
evening timeframe
You should see skills being loaded and tools being called. After a few moments, the agent will generate a marathon plan.
Your UI should look similar to this:
8. Deploy the agent
Once you are happy with how the agent performs locally, you can deploy it to Agent Engine, which hosts the agent on Cloud Run securely.
To deploy the agent, use the ADK CLI deployment command:
uv run adk deploy agent_engine \
  --env_file planner_agent/.env --region=us-central1 \
  planner_agent
When the deployment finishes, the CLI outputs a securely hosted endpoint for your agent. You can now integrate this endpoint into frontend applications, chatbots, or other backend systems. You can also use the Agent Runtime Playground to test the agent out.
The output looks like the following:
Files and dependencies resolved
Deploying to agent engine...
✅ Created agent engine: projects/<PROJECT_ID>/locations/us-west1/reasoningEngines/<AGENT_ID>
You can use the provided Python script to communicate with the agent.
- Copy the sample environment file:
cp sample.env .env
- Open
.envand update theGOOGLE_CLOUD_PROJECTfield with your actual Google Cloud Project ID.
The file should look like the following:
GOOGLE_CLOUD_PROJECT=<YOUR_PROJECT_ID>
GOOGLE_CLOUD_LOCATION=us-central1
- You can list agents in your project.
python main.py list
You should see something similar
Listing deployed agents...

ID: <AGENT_ID> | Display Name: planner_agent
Once you have the deployed Agent ID, you can send a prompt:
export AGENT_ID=<AGENT_ID>
python main.py prompt --agent-id ${AGENT_ID} --message "Plan a marathon for
10000 participants in Las Vegas on April 24, 2027 in the evening timeframe"
You will get an output that looks like the following:
Streaming response from agent <AGENT_ID>:

{'model_version': 'gemini-3-flash-preview', 'content': {'parts': [{'text': 'Here is a comprehensive
...
...
...
9. Clean up
To avoid ongoing charges to your Google Cloud account, delete the resources created during this codelab.
Delete the Cloud Run service created by the deployment:
python main.py delete --agent-id ${AGENT_ID}
If you stored the Maps API key in Secret Manager, delete the secret:
gcloud secrets delete maps-api-key --project=$PROJECT_ID
If you created a new Google Cloud project for this codelab, you can delete the entire project to remove all resources and APIs associated with it:
gcloud projects delete $PROJECT_ID
10. Congratulations
Congratulations! You've built a sophisticated Marathon Planner Agent using ADK.
What you've learned
- Initializing an Agent Development Kit (ADK) project
- Utilizing
PromptBuilderfor modular system prompts - Integrating mapping capabilities using MCP tools and
ApiRegistry - Conditionally loading skills using
SkillToolset - Testing locally and deploying to Agent Engine