
1. 簡介
在本程式碼實驗室中,您將使用 Agent Development Kit (ADK) 建構精密的馬拉松規劃代理。您將逐步檢查代理的功能,從結構良好的系統提示到動態技能載入,以及對應 MCP 工具。最後,您將在本機測試代理,並部署至 Agent Runtime (Agent Engine)。
學習內容
- 初始化新的 ADK 代理程式專案
- 使用結構化建構工具撰寫完善的系統提示
- 新增 Google 地圖 MCP 工具,取得真實世界的位置資訊
- 將技能動態載入代理程式的工具集
- 在本機測試代理程式執行作業
- 部署代理至 Agent Engine (Cloud Run)
軟硬體需求
- 網路瀏覽器,例如 Chrome
- 已啟用計費功能的 Google Cloud 雲端專案
- 對 Python 有基本的瞭解
本程式碼研究室適合想建構專屬生成式 AI 代理的中級開發人員。
預估時間:45 分鐘
本程式碼研究室建立的資源費用應低於 $2 美元。
2. 事前準備
建立 Google Cloud 專案
- 在 Google Cloud 控制台的專案選取器頁面中,選取或建立 Google Cloud 專案。
- 確認 Cloud 專案已啟用計費功能。瞭解如何檢查專案是否已啟用計費功能。
啟動 Cloud Shell
Cloud Shell 是在 Google Cloud 中運作的指令列環境,已預先載入必要工具。
- 按一下 Google Cloud 控制台頂端的「啟用 Cloud Shell」。
- 連至 Cloud Shell 後,請驗證您的驗證:
gcloud auth list - 確認專案已設定完成:
gcloud config get project - 如果專案未如預期設定,請設定專案:
export PROJECT_ID=<YOUR_PROJECT_ID>
gcloud config set project $PROJECT_ID
驗證:
gcloud auth list
確認專案:
gcloud config get project
視需要設定:
export PROJECT_ID=<YOUR_PROJECT_ID>
gcloud config set project $PROJECT_ID
啟用 API
執行下列指令,啟用所有必要的 API:
gcloud services enable \
  aiplatform.googleapis.com \
  run.googleapis.com \
  secretmanager.googleapis.com \
  mapstools.googleapis.com \
  storage.googleapis.com \
  cloudresourcemanager.googleapis.com \
  serviceusage.googleapis.com
建立 Google Maps API 金鑰
如要使用 Google 地圖 MCP 工具,必須產生 Maps API 金鑰。
- 在 Google Cloud 控制台中,使用搜尋列前往「Google Maps Platform」>「憑證」。
- 如果系統顯示提示,請確認 Google Cloud 專案。
- 接著點按「建立憑證」並選取「API 金鑰」。
- 複製產生的 API 金鑰。下一個步驟將會用到這項資訊。
3. 設定環境
本程式碼研究室的程式碼位於 GitHub。您將複製存放區,其中包含目錄結構和必要子元件 (例如 skills/ 目錄)。
- 複製存放區並前往專案資料夾:
git clone https://github.com/GoogleCloudPlatform/next-26-keynotes
cd next-26-keynotes/devkey/demo-1
- 設定 Python 虛擬環境並安裝 ADK:
uv venv
source .venv/bin/activate
uv sync
- 設定 Maps API 金鑰。應用程式會從環境變數讀取這項資訊:
export GOOGLE_MAPS_API_KEY="<YOUR_MAPS_API_KEY>"
設定環境變數
模擬器代理程式會使用 .env 檔案進行設定。複製範例檔案,並更新為您的專案 ID。
- 複製範例環境檔案:
cp planner_agent/sample.env planner_agent/.env
- 開啟
planner_agent/.env,然後使用實際的 Google Cloud 專案 ID 更新GOOGLE_CLOUD_PROJECT欄位,並使用您建立的 Google 地圖 API 金鑰更新GOOGLE_MAPS_API_KEY欄位。
檔案應如下所示:
GOOGLE_GENAI_USE_VERTEXAI=1
GOOGLE_CLOUD_PROJECT=<YOUR_PROJECT_ID>
GOOGLE_CLOUD_LOCATION=global
GOOGLE_MAPS_API_KEY=<YOUR_MAPS_API_KEY>
GOOGLE_CLOUD_AGENT_ENGINE_ENABLE_TELEMETRY=true
OTEL_PYTHON_LOGGING_AUTO_INSTRUMENTATION_ENABLED=true
OTEL_INSTRUMENTATION_GENAI_CAPTURE_MESSAGE_CONTENT=true
ADK_CAPTURE_MESSAGE_CONTENT_IN_SPANS=true
4. 建立新的 ADK 代理程式
查看定義代理的檔案:planner_agent/agent.py。
在 build-agents-with-skills 存放區中,代理程式會使用 ADK 的 Agent 類別初始化。這個檔案會指定基礎模型、身分識別名稱,並提取其他模組中定義的指令和工具。
開啟 planner_agent/agent.py 檢查初始化程式碼:
instruction="Answer user questions to the best of your knowledge"
description="A helpful assistant for user questions."
tools=[]

# ...

root_agent = Agent(
    model='gemini-3-flash-preview',
    name='planner_agent',
    description=description,
    instruction=instruction,
    tools=tools
)
Agent 類別會抽象化訊息記錄、工具自動化調度管理和 LLM 通訊,讓您專注於代理的行為。
目前代理程式非常籠統。您可以像使用其他 LLM 一樣與其互動。
uv run adk run planner_agent
這個指令會啟動與代理程式的對話。這項功能採用 gemini-3-flash-preview 模型,可回答基本問題。
Running agent planner_agent, type exit to exit.
[user]: What is the length of a Marathon
[planner_agent]: The official length of a marathon is **26.2 miles**, which is
equivalent to **42.195 kilometers**.
助理已經知道一些馬拉松的相關資訊,不過,這不足以規劃適當的馬拉松,包括規則和路線規劃。
5. 建立系統提示
系統提示 (指令) 會決定代理程式的行為。這個專案使用 PromptBuilder (planner_agent/utils.py) 動態編寫指令,而不是單一巨型字串。
開啟 planner_agent/prompts.py,瞭解提示詞如何劃分為邏輯區段:
from collections import OrderedDict
from .utils import PromptBuilder

ROLE = """\
...
"""

RULES = """\
...
"""

WORKFLOW = """\
...
"""

###

# Planner instructions with no tools mentioned
PLANNER_INSTRUCTION_NO_TOOLS = PromptBuilder(
    OrderedDict(
        role=ROLE,
        rules=RULES,
        tools=TOOLS_PROMPT_ONLY,
        workflow=WORKFLOW_PROMPT_ONLY,
    )
).build()

# Planner instruction with skills and tools defined
PLANNER_INSTRUCTION = PromptBuilder(
    OrderedDict(
        role=ROLE,
        rules=RULES,
        skills=SKILLS,
        tools=TOOLS,
        workflow=WORKFLOW,
    )
).build()
回到 planner_agent/agent.py,這項資料已匯入。
找到含有 TODO: Replace Instruction and Description 的部分,並取消註解 instruction 和 description 變數重新指派。
該程式碼區段應如下所示:
instruction=PLANNER_INSTRUCTION_NO_TOOLS
description="Expert GIS analyst for marathon route and event planning."
您要匯入的代理程式提示版本未參照任何工具。您會在後續步驟中新增工具。
您可以測試這個版本的代理程式:
uv run adk run planner_agent
在對話視窗中傳送下列提示:
Plan a marathon for 10000 participants in Las Vegas on April 24, 2027 in the
evening timeframe
稍待片刻,您應該會收到類似以下的回覆:
Running agent planner_agent, type exit to exit.
[user]: Plan a marathon for 10000 participants in Las Vegas on April 24, 2027 in the evening timeframe
[planner_agent]: Here is the comprehensive marathon plan for Las Vegas.

As requested, I have designed this event for an evening start on April 24, 2027. Because certain parameters (theme and budget) were not specified, I have applied pragmatic defaults: this will be a "Neon Nights" scenic theme to capitalize on the evening Strip, operating on a moderate-to-high budget given the infrastructure needed to secure major Las Vegas corridors.

### 1. Intent Alignment
*   **City & Theme:** Las Vegas, Nevada. Theme: "Neon Nights" an evening race maximizing the visual impact of the illuminated city.
*   **Date & Time:** Saturday, April 24, 2027. Late April evenings in Las Vegas offer optimal running weather (temperatures dropping from ~70°F at sunset to ~60°F). Race start is 6:30 PM (sunset is approx. 7:20 PM).
...
...
只要提示定義明確,輸出內容就更接近預期結果。在下一個步驟中,您將新增工具,讓代理程式更上一層樓。
6. 新增技能和工具
如要在 planner_agent/agent.py 中啟用技能和工具,請找出含有 TODO: Replaces Tools 的區段,並將下兩行取消註解。您的編碼應該會如下:
instruction=PLANNER_INSTRUCTION
tools=get_tools()
這是這個步驟中唯一需要變更的程式碼。本節的其餘部分會說明技能和工具背後的概念。
技能
代理程式技能是獨立的功能單元,ADK 代理程式可用於執行特定工作。代理程式技能會根據代理程式技能規格,封裝工作所需的必要指令、資源和工具。技能的結構可讓系統逐步載入,盡量減少對代理程式作業環境視窗的影響。
馬拉松規劃代理程式定義了 3 項技能:
- gis-spatial-engineering - 負責處理 GeoJSON 資料,建立馬拉松路線。
- 地圖:使用 Google 地圖工具搜尋地點和天氣資訊。
- race-director - Validate marathon route follows planning guidelines.
技能可以包含指令碼、其他資產和參考資料。
應用程式會載入所有技能,並在 planner_agent/tools.py 中提供這些技能做為工具。請注意 get_tools() 函式中的做法:
def get_tools() -> list:
    """Build the planner's tool list with lazy-loaded skills."""
    from google.adk.code_executors.unsafe_local_code_executor import UnsafeLocalCodeExecutor

    skills_dir = pathlib.Path(__file__).parent / "skills"

    skills = []
    if skills_dir.exists():
        skills = [
            load_skill_from_dir(d)
            for d in sorted(skills_dir.iterdir())
            if d.is_dir() and not d.name.startswith("_") and (d / "SKILL.md").exists()
        ]

    additional_tools = _load_additional_tools(skills_dir)

    skill_toolset = SkillToolset(
        skills=skills,
        code_executor=UnsafeLocalCodeExecutor(),
        additional_tools=additional_tools,
    )

    tools = [
        skill_toolset,
        PreloadMemoryTool(),
    ]

    tools.extend(get_maps_tools())

    return tools
最有趣的部分是 ADK 的 load_skill_from_dir 方法。您也可以在 ADK 中以內嵌方式建立技能。雖然本程式碼研究室不會使用這項功能,但其外觀大致如下:
from google.adk.skills import models

greeting_skill = models.Skill(
    frontmatter=models.Frontmatter(
        name="greeting-skill",
        description=(
            "A friendly greeting skill that can say hello to a specific person."
        ),
    ),
    instructions=(
        "Step 1: Read the 'references/hello_world.txt' file to understand how"
        " to greet the user. Step 2: Return a greeting based on the reference."
    ),
    resources=models.Resources(
        references={
            "hello_world.txt": "Hello! So glad to have you here!",
            "example.md": "This is an example reference.",
        },
    ),
)
新增對應工具
馬拉松路線規劃工具需要空間背景資訊才能生成路線。方法是整合 Google 地圖 MCP (Model Context Protocol) 伺服器。
在 planner_agent/tools.py 中,請注意 MCP 伺服器如何向 ApiRegistry 工具註冊:
from google.adk.integrations.api_registry import ApiRegistry

class MapsApiRegistry(ApiRegistry):
    """ApiRegistry subclass that strips ADC headers to force API key auth."""

    def get_toolset(self, *args, **kwargs):  # noqa: ANN002, ANN003
        toolset = super().get_toolset(*args, **kwargs)
        conn = getattr(toolset, "_connection_params", None)
        headers = getattr(conn, "headers", None) if conn else None
        if headers:
            headers.pop("Authorization", None)  # type: ignore[union-attr]
            headers.pop("x-goog-user-project", None)  # type: ignore[union-attr]
        return toolset

def get_maps_tools() -> list:
    """Return Maps MCP toolset if configured."""
    project_id = os.getenv("GOOGLE_CLOUD_PROJECT", "").strip()
    maps_key = _resolve_maps_key()

    if not project_id or not maps_key:
        return []

    # Map the MCP server location on Google Cloud
    mcp_server_name = f"projects/{project_id}/locations/global/mcpServers/google-mapstools.googleapis.com-mcp"

    # Initialize the custom API registry that supports header injection
    api_registry = MapsApiRegistry(
        api_registry_project_id=project_id,
        header_provider=header_provider,
    )
    return [api_registry.get_toolset(mcp_server_name=mcp_server_name)]
加入 MCP 工具組後,代理就會自動取得查詢 Google 地圖路線、海拔和位置詳細資料的能力!
7. 在本機執行代理程式
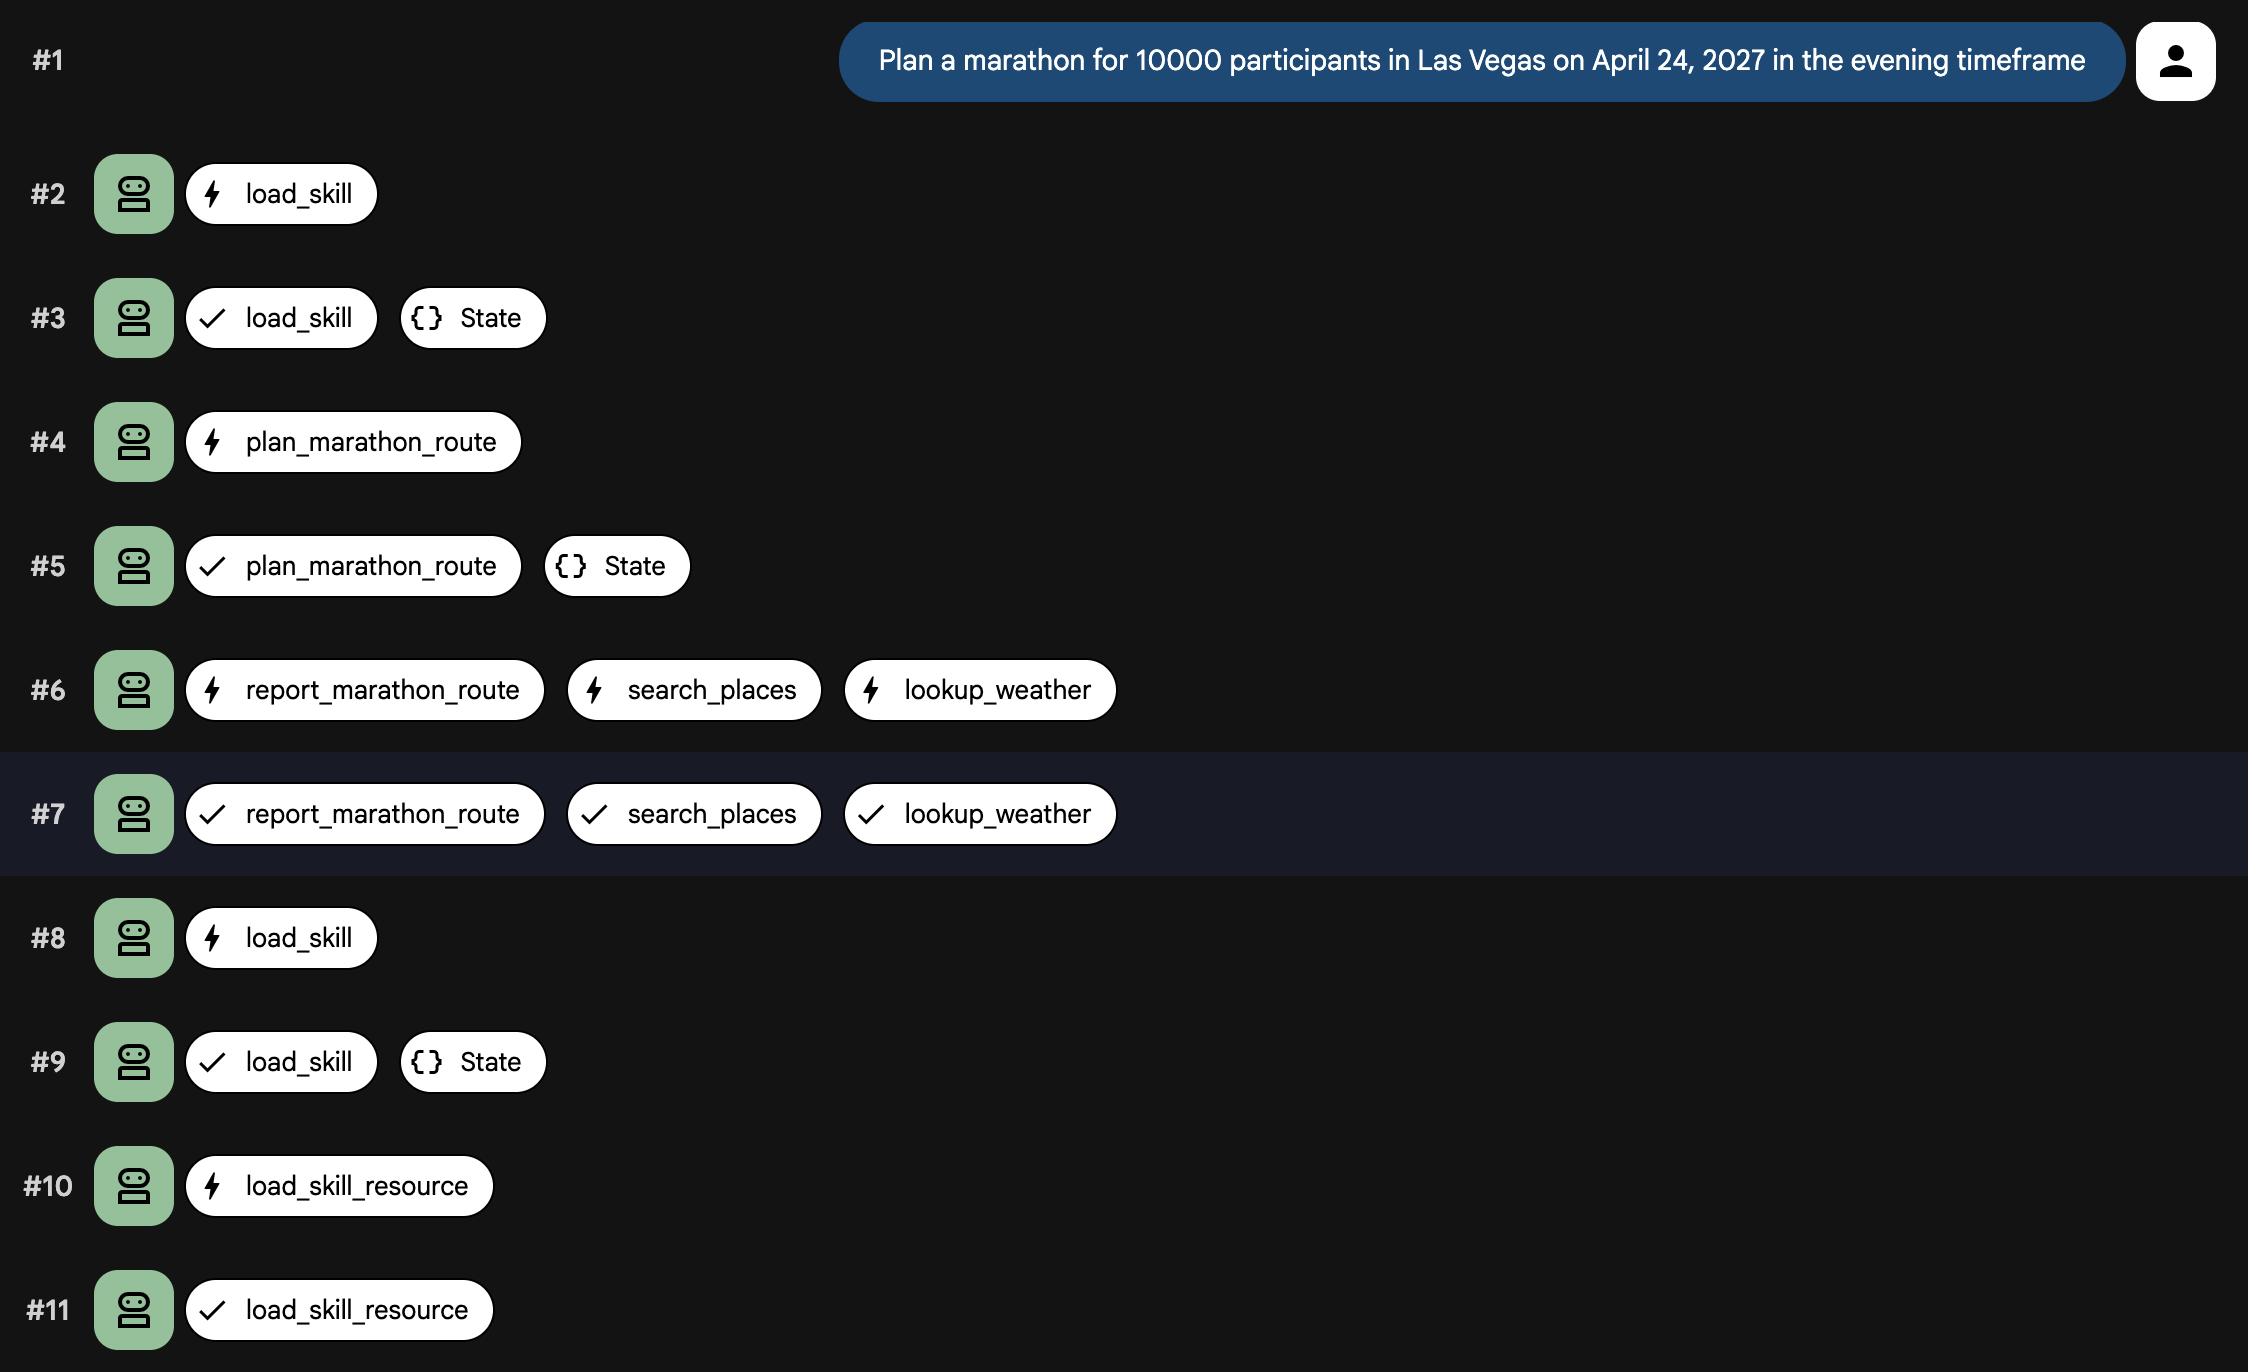
現在代理程式、提示詞和工具已連結在一起,請在本機執行代理程式。這次您將使用 adk web,以便查看技能載入和工具呼叫事件。
uv run adk web
您應該會看到類似
INFO:     Started server process [99665]
INFO:     Waiting for application startup.

+-----------------------------------------------------------------------------+
| ADK Web Server started                                                      |
|                                                                             |
| For local testing, access at http://127.0.0.1:8000.                         |
+-----------------------------------------------------------------------------+

INFO:     Application startup complete.
INFO:     Uvicorn running on http://127.0.0.1:8000 (Press CTRL+C to quit)
- 開啟瀏覽器並前往終端機中顯示的網址 (通常是
http://localhost:8000)。 - 在左上方的下拉式選單中,選取
planner_agent。 - 在對話視窗中傳送下列提示:
Plan a marathon for 10000 participants in Las Vegas on April 24, 2027 in the
evening timeframe
您應該會看到系統載入技能並呼叫工具。不久後,這項代理程式就會生成馬拉松計畫。
使用者介面應如下所示:
8. 部署代理程式
如果對代理程式在本機的運作情況感到滿意,可以將其部署至 Agent Engine,在 Cloud Run 上安全地代管代理程式。
如要部署代理程式,請使用 ADK CLI 部署指令:
uv run adk deploy agent_engine \
  --env_file planner_agent/.env --region=us-central1 \
  planner_agent
部署完成後,CLI 會輸出代理程式的安全代管端點。現在您可以將這個端點整合到前端應用程式、聊天機器人或其他後端系統。您也可以使用 Agent Runtime Playground 測試代理程式。
輸出內容如下:
Files and dependencies resolved
Deploying to agent engine...
✅ Created agent engine: projects/<PROJECT_ID>/locations/us-west1/reasoningEngines/<AGENT_ID>
您可以使用提供的 Python 指令碼與代理程式通訊。
- 複製範例環境檔案:
cp sample.env .env
- 開啟
.env,並將GOOGLE_CLOUD_PROJECT欄位更新為實際的 Google Cloud 專案 ID。
檔案內容應如下所示:
GOOGLE_CLOUD_PROJECT=<YOUR_PROJECT_ID>
GOOGLE_CLOUD_LOCATION=us-central1
- 您可以列出專案中的代理程式。
python main.py list
您應該會看到類似
Listing deployed agents...

ID: <AGENT_ID> | Display Name: planner_agent
取得已部署的 Agent ID 後,即可傳送提示:
export AGENT_ID=<AGENT_ID>
python main.py prompt --agent-id ${AGENT_ID} --message "Plan a marathon for
10000 participants in Las Vegas on April 24, 2027 in the evening timeframe"
輸出內容應如下所示:
Streaming response from agent <AGENT_ID>:

{'model_version': 'gemini-3-flash-preview', 'content': {'parts': [{'text': 'Here is a comprehensive
...
...
...
9. 清理
如要避免系統持續向您的 Google Cloud 帳戶收取費用,請刪除在本程式碼研究室中建立的資源。
刪除部署作業建立的 Cloud Run 服務:
python main.py delete --agent-id ${AGENT_ID}
如果將 Maps API 金鑰儲存在 Secret Manager 中,請刪除密鑰:
gcloud secrets delete maps-api-key --project=$PROJECT_ID
如果您為這個程式碼研究室建立了新的 Google Cloud 雲端專案,可以刪除整個專案,移除所有相關聯的資源和 API:
gcloud projects delete $PROJECT_ID
10. 恭喜
恭喜!您已使用 ADK 建構精密的馬拉松規劃工具代理。
目前所學內容
- 初始化 Agent Development Kit (ADK) 專案
- 使用
PromptBuilder建立模組化系統提示 - 使用 MCP 工具和
ApiRegistry整合對應功能 - 使用
SkillToolset條件式載入技能 - 在本機測試及部署至 Agent Engine