
1. Introduction
In this codelab, you will learn how to use an AI agent to perform a complex infrastructure migration automatically. Instead of manually writing Kubernetes manifests or running automation scripts, you will express your intent in natural language, and the agent will use the Model Context Protocol (MCP) and the Gemini Cloud Assist server to generate and apply the configuration for you.
GCA MCP Server Capabilities
The GCA MCP server provides several specialized tools to the agent:
ask_cloud_assist: This is the primary interface for Google Cloud Platform assistance and for the Gemini Cloud Assist agent. All functionality of Gemini Cloud Assist is accessible through this tool and it encompasses the functionality of the other MCP tools.design_infra: This supports workflows for designing and architecting infrastructure on Google Cloud Platform.investigate_issue: This supports workflows for troubleshooting in Google Cloud. It can do quick troubleshooting or deeper troubleshooting through an Investigation resource.invoke_operation: This supports workflows for creating, updating, and deleting resources in Google Cloud. This tool is only functional when Agent Actions are enabled. Write operations in Gemini Cloud Assist can only be executed through the invocation of this tool.optimize_costs: This supports workflows for analyzing, tracking, and optimizing Google Cloud costs. It provides detailed breakdowns of spend and identifies opportunities for cost efficiency by finding idle or underutilized resources.
You will start with a pre-staged environment with a GKE cluster and a downloaded model. You will then use gemini-cli to prompt the agent to migrate a workload from Cloud Run to GKE and start up a Gemma inference instance with vLLM using the staged model in your storage bucket.
What you'll do
- Stage a GKE cluster and download a Gemma model using Terraform.
- Configure
gemini-cliwith agent rules and an MCP server. - Use a specific natural language prompt to instruct the agent to perform the full migration and deployment.
- Verify the deployment performed by the agent.
What you'll need
- A web browser such as Chrome.
- A Google Cloud project with billing enabled.
- A Hugging Face token (required for downloading the Gemma model during the staging phase).
This codelab is for developers of all levels, including beginners.
Estimated duration: 45-60 minutes.
2. Before you begin
Create or select a Google Cloud project
- In the Google Cloud Console, select or create a Google Cloud project.
- Make sure that billing is enabled for your Cloud project.
Start Cloud Shell
- Click Activate Cloud Shell at the top of the Google Cloud console.
- Verify authentication:
gcloud auth list
- Confirm your project:
gcloud config get project
- Set it if needed:
export PROJECT_ID=<YOUR_PROJECT_ID>
gcloud config set project $PROJECT_ID
Enable APIs
Run this command to enable all the required APIs:
gcloud services enable \
  run.googleapis.com \
  container.googleapis.com \
  aiplatform.googleapis.com \
  compute.googleapis.com \
  cloudbuild.googleapis.com \
  cloudresourcemanager.googleapis.com
Also, enable the Gemini Cloud Assist MCP service:
gcloud beta services mcp enable geminicloudassist.googleapis.com
3. Stage the Environment
In this step, you will prepare the environment by building a custom chatbot image, creating the GKE cluster, and downloading the Gemma model to a Cloud Storage bucket.
Often, organizations start with the Gemini API but later decide to migrate to a self-hosted model for greater control, customization, or to use a fine-tuned version specific to their business. In this codelab, we use Gemma as an example of a powerful open model that you can host yourself on GKE. Staging it in a Cloud Storage bucket makes it available for our cluster to use.
Download Demo Assets
Clone the specific folder from the GitHub repository.
git clone --filter=blob:none --sparse https://github.com/GoogleCloudPlatform/next-26-keynotes.git
cd next-26-keynotes
git sparse-checkout set devkey/intent-to-infrastructure
cd devkey/intent-to-infrastructure
Build Chatbot Image
Before provisioning the infrastructure, you need to build the custom chatbot image and push it to Artifact Registry. This image will be used by Cloud Run in the next step.
- Create an Artifact Registry repository named
chatbot-repoinasia-southeast1:gcloud artifacts repositories create chatbot-repo \ --repository-format=docker \ --location=asia-southeast1 \ --description="Chatbot Docker repository" - Navigate to the
srcdirectory:cd src - Build and push the image using Cloud Build:
gcloud builds submit --config cloudbuild.yaml \ --substitutions=_LOCATION="asia-southeast1",_REPOSITORY_ID="chatbot-repo",_IMAGE_NAME="chatbot",_IMAGE_TAG="latest" - Navigate back to the project root:
cd ..
Provision Base Infrastructure
Navigate to the terraform directory and run Step 1 to create the GKE cluster.
cd terraform
./deploy.sh demo step1 apply
This script uses Terraform to provision the base infrastructure. It creates the VPC, GKE cluster, service accounts, and deploys the initial Cloud Run service using the chatbot image you just built.
During the process, Terraform will display the plan and prompt for confirmation. You will need to type yes to approve and proceed:
Do you want to perform these actions?
  Terraform will perform the actions described above.
  Only 'yes' will be accepted to approve.
The entire process may take 15-20 minutes to complete.
Once the deployment is complete, look for the cloud_run_url in the Terraform outputs printed in the terminal. Click on the URL to open the chatbot in your browser. You can now interact with the chatbot, which is currently running against Gemini 2.5 Flash.
Download the Model
In this step, we will stage the Gemma model in a Cloud Storage bucket. While we are starting with the managed Gemini API, you might choose to run a custom fine-tuned model or another custom open model. Alternatively, you might simply want to keep the model execution managed within your own cluster for security or compliance reasons. Staging the model here sets us up for the migration from the managed Gemini API to a self-hosted model on GKE.
Run Step 2 to download the Gemma model to your GCS bucket. You will need your Hugging Face token. This process runs on your GKE cluster, and will take around 15 minutes (or longer depending on traffic) to download the model from Hugging Face and upload it to your bucket for later use.
./deploy.sh demo step2 apply -var="hf_token=<YOUR_HF_TOKEN>"
This Terraform command creates a Kubernetes Job on your GKE cluster to handle the download. The Terraform script will stay active as long as the job is running.
If you want to monitor the progress from a different shell session, or verify that it completed after the run, you can run:
kubectl get jobs
4. Setup Agent and MCP
Now we will configure the agent that will perform the migration. We will use gemini-cli and equip it with rules to interact with the environment.
The Gemini Cloud Assist (GCA) MCP server is a critical component of this flow. It acts as a bridge between your client-side agent and Google Cloud, enabling it to perform investigations, generate plans (like gcloud and kubectl commands), and apply changes directly to resources in your cloud project.
Ensure you have been granted a role that allows calling MCP tools, such as roles/geminicloudassist.user. If you encounter permission issues later, consult the documentation on configuring IAM roles for Cloud Assist.
For more detailed instructions on integrating Gemini Cloud Assist with third-party tools, see the Integrate Gemini Cloud Assist with third-party tools using MCP documentation.
Install Gemini Cloud Assist Extension
- Authenticate via Application Default Credentials (ADC) by running:
gcloud auth application-default login
- Install the MCP server as a Gemini CLI extension:
gemini extensions install https://github.com/GoogleCloudPlatform/gemini-cloud-assist-mcp
- Verify that the skill was successfully installed: Start
geminiand run the following command to list active skills:
/skills list
Verify that you see the skill related to Gemini Cloud Assist in the list. Type exit to return to your Cloud Shell prompt.
Enable Mutations in Gemini Cloud Assist
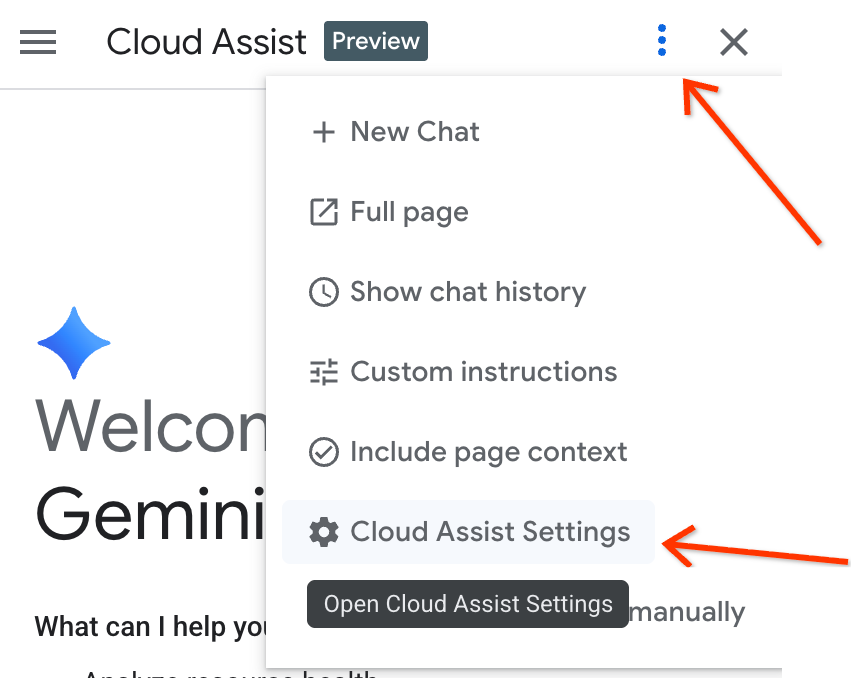
To allow the agent to apply changes to your infrastructure, you must enable mutation features in the Gemini Cloud Assist UI.
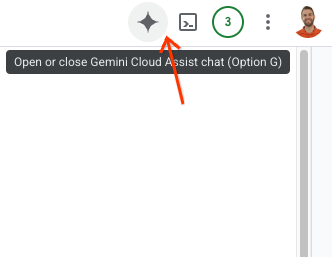
- Open the Gemini Assist Sidebar by clicking the Gemini logo in the top right of the Google Cloud Console window.
- Enable any necessary APIs listed in the sidebar.
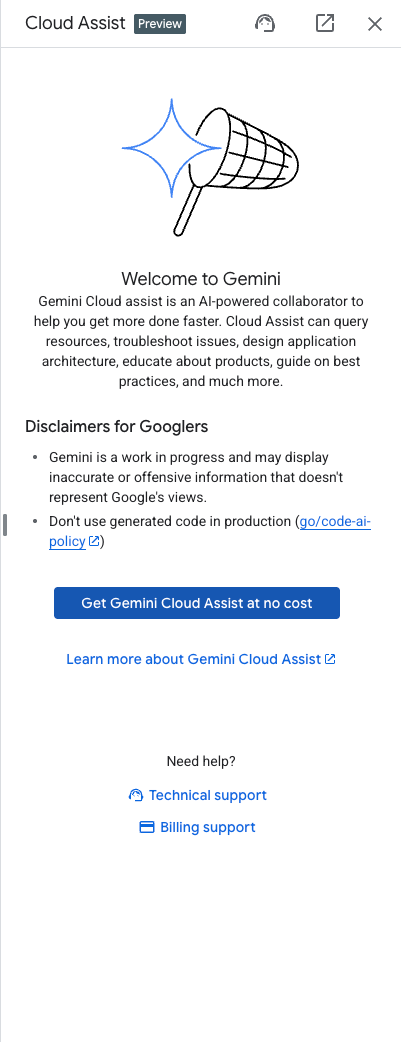
- Navigate to settings in the sidebar and check "Enable Cloud Assist to execute actions".

Configure Agent Rules
The project directory includes a custom gemini.md file in the root of the folder (intent-to-infrastructure). This file contains rules that guide the agent to use the correct tools.
Verify that this file exists in your directory. You should run gemini from this directory so that it has access to the Terraform files, application code, and the gemini.md rules file.
5. Step 1: Migrate Chatbot to GKE
Now we will use the agent to perform the first part of the migration: moving the chatbot application from Cloud Run to GKE.
- Start
geminifrom the root of theintent-to-infrastructuredirectory (ensuring it has access togemini.md). - First, let's ask the agent to explore the project to understand the application and infrastructure. Enter the following prompt:
Tell me about the app and infrastructure in this project
The agent should read the files in the directory and give you an overview of the chatbot application and the Terraform configuration.
- Now, use the following prompt to instruct the agent to perform the migration.
Convert my Cloud Run service to the equivalent on GKE.
- The agent should:
- Use the
ask_cloud_assisttool to understand the context. - Use the
design_infratool to generate the Kubernetes YAML for the chatbot application. - Ask: "Would you like to proceed with applying this configuration?"
- Use the
- Respond with
yesto apply the changes. The agent will useinvoke_operationto deploy the resources to your GKE cluster.
Verify Step 1
- Get the list of services:
kubectl get services
You should see a service for the chatbot application running.
- Port-forward the service to access the chatbot:
kubectl port-forward svc/chatbot-service 8080:80
(Note: Replace
chatbot-service
with the actual name of the service generated by the agent if it differs).
Test the chatbot. It should still be responding using the Gemini API (as it was configured in Cloud Run).
6. Step 2: Deploy Gemma via vLLM and Reconnect
In this step, we will use the agent to deploy a self-hosted Gemma model on GKE and reconnect our application to it.
- In the same
geminisession, enter the following prompt:
Now that the chatbot is on GKE, add a vLLM service running the Gemma model from my storage bucket in the same cluster. Make sure to give the vLLM service at least 10 minutes to start up to account for loading the large model. Then, update the chatbot service to reference this vLLM service instead of the Gemini API.
- The agent should:
- Use
design_infrato generate YAML for the vLLM deployment and service. - Update the chatbot deployment YAML to change the environment variables (or config) to point to the new vLLM service instead of the Gemini API.
- Ask for confirmation to apply the changes.
- Use
- Respond with
yesto apply the changes.
Verify Step 2
- Get the list of pods again:
kubectl get pods
You should now see pods for both the chatbot and vLLM.
- Once vLLM is ready, port-forward the chatbot service again if needed and test it. It should now be powered by your self-hosted Gemma model!
7. Clean Up
To avoid ongoing charges to your Google Cloud account, delete the resources created during this codelab.
Run the destroy command for the base infrastructure:
cd terraform
./deploy.sh demo step1 destroy
Additionally, you can uninstall or disable the Gemini Cloud Assist extension if you wish to clean up your local environment. Use gemini extensions uninstall or gemini extensions disable followed by the extension name.
8. What's next
To learn more about Gemini Cloud Assist and advanced features, check out these resources:
9. Congratulations
Congratulations! You have successfully performed an agent-driven migration of a workload to GKE using natural language and MCP.