
1. Introduction
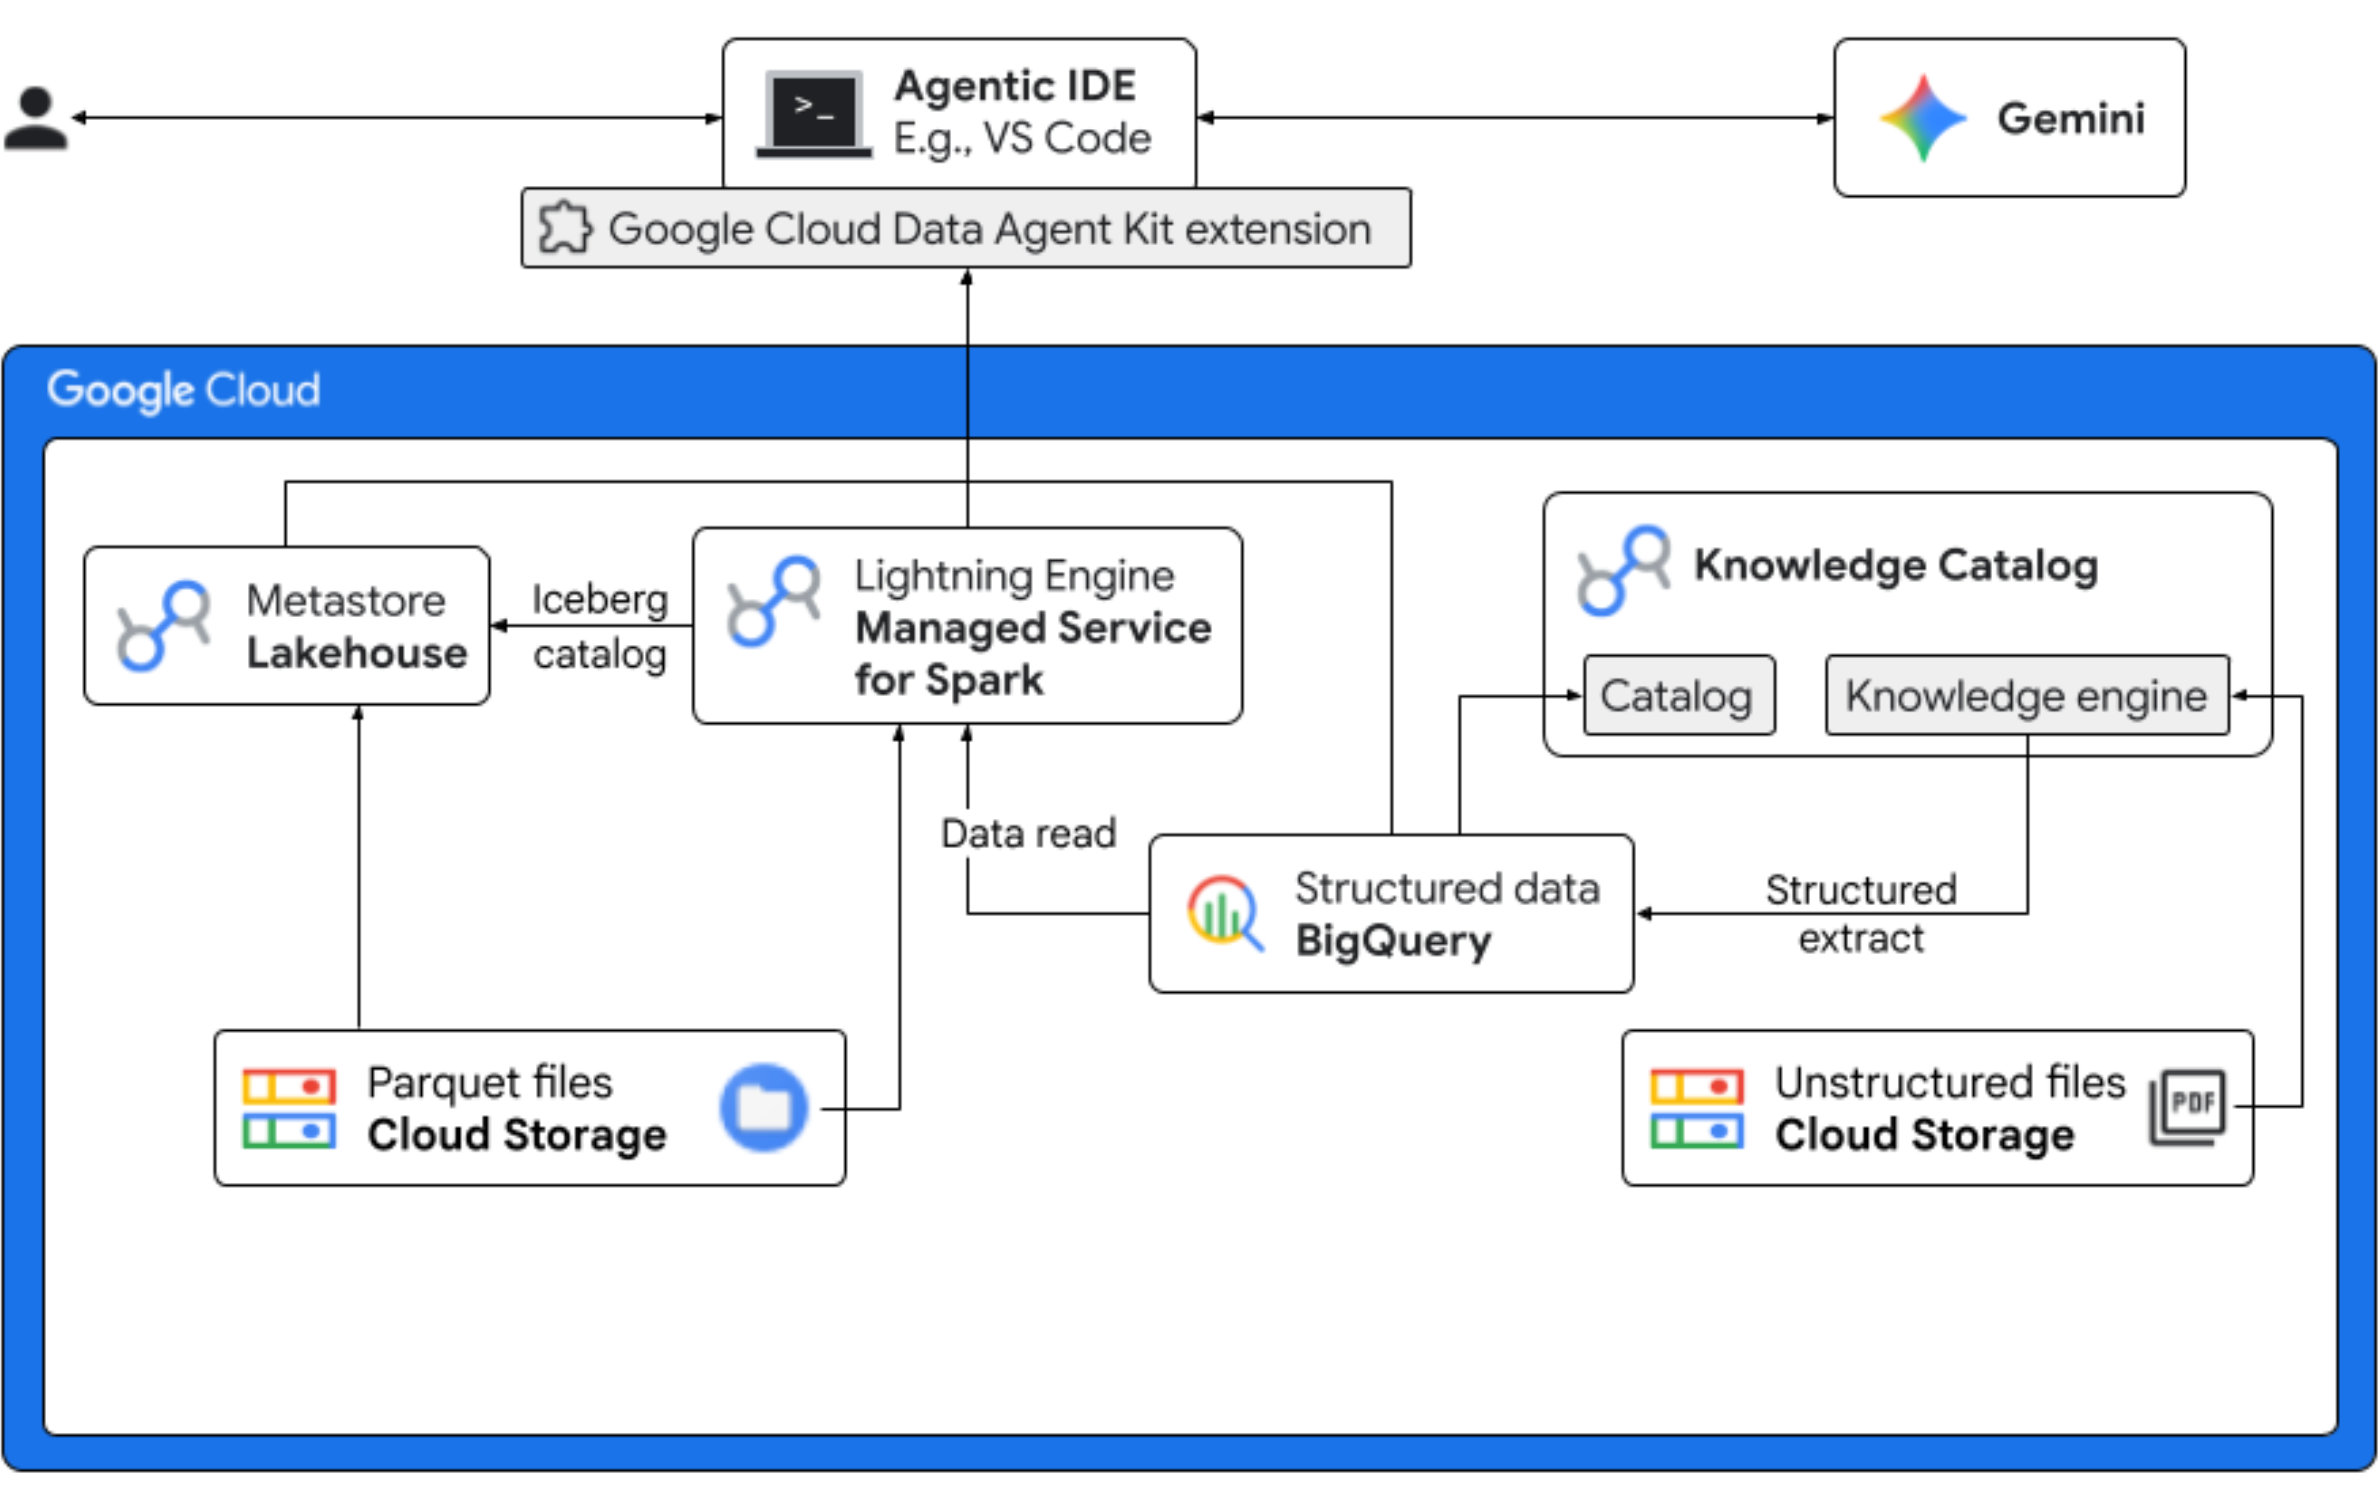
In this codelab, you will step into the role of a data scientist for a fictitious Froyo company launching a new product flavor, "Midnight Swirl". To ensure a successful global launch, the business must answer critical questions regarding ingredients, market demand, and return on investment (ROI). This end-to-end workflow demonstrates how Google Cloud's Knowledge Catalog (formerly known as Dataplex) and Lakehouse for Apache Iceberg (formerly known as BigLake) bridge the gap between "dark" unstructured data and delivers actionable business intelligence using Gemini in your IDE (VS Code) through a unified governance layer.
What you'll do
- Unstructured discovery: PDF recipes stored in Cloud Storage are crawled by Knowledge Catalog DataScan. Create Object tables in BigQuery for the PDFs scanned. Using Vertex AI Semantic Inference, the system "reads" the PDFs to extract structured information for products, allergens, ingredients, and related attributes. It then intelligently generates a schema for the data stored in the PDFs.
- Unified metadata: The extracted data from PDF files is stored directly into BigQuery as a native wide table, and views are created to aid common queries. An independent input dataset containing historical sales data is stored in Apache Iceberg Tables on Google Cloud Storage. This Iceberg table will be joined with the extracted data in BigQuery in a subsequent step.
- Cross-engine analytics: Using Managed Service for Apache Spark (formerly known as Dataproc) with an Iceberg REST Catalog, you'll join this fresh PDF metadata and inferenced structured semantic data (from BigQuery tables and views) with structured sales data stored in Apache Iceberg Tables on Google Cloud Storage. This is governed by a Managed Apache Spark interactive session template used as Jupyter Notebook kernel that ensures consistent security and compute settings for the Spark job.
- Semantic insights: By joining the inferred product data with customer and sales data (in BigQuery), the demo is able to extract insights such as identifying allergen data and revenue forecast.
- Autonomous governance: The entire lifecycle—from discovery scans to Spark execution—is orchestrated through Gemini-ready templates, instructions, rules, and agent driven automation, proving that AI can manage the infrastructure that powers the analytics.
What you'll need
Completing this codelab may incur costs, estimated at less than $5 for typical usage. To get detailed cost estimates based on your projected usage or current pricing, use the Google Cloud Pricing Calculator.
Make sure you have the following prerequisites to complete the codelab.
- Chrome web browser.
- A personal Gmail account if you are using the trial credits provided in the Before you begin section.
- Download and install Visual Studio (VS) Code.
2. Before you begin
Create a Google Cloud Project
- In the Google Cloud Console, on the project selector page, select or create a Google Cloud project.
- Make sure that billing is enabled for your Cloud project. Learn how to check if billing is enabled on a project.
Start Cloud Shell
Cloud Shell is a command-line environment running in Google Cloud that comes preloaded with necessary tools.
- Click Activate Cloud Shell at the top of the Google Cloud console.
- Once connected to Cloud Shell, verify your authentication:
gcloud auth list - Confirm your project is configured:
gcloud config get project - If your project is not set as expected, set it:
export PROJECT_ID=<YOUR_PROJECT_ID>
gcloud config set project $PROJECT_ID
Enable required APIs
Run this command to enable all the required APIs:
  gcloud services enable \
    dataplex.googleapis.com \
    datacatalog.googleapis.com \
    discoveryengine.googleapis.com \
    bigqueryconnection.googleapis.com \
    bigquery.googleapis.com \
    biglake.googleapis.com \
    dataproc.googleapis.com \
    metastore.googleapis.com \
    dataform.googleapis.com \
    notebooks.googleapis.com \
    aiplatform.googleapis.com \
    cloudresourcemanager.googleapis.com \
    serviceusage.googleapis.com \
    secretmanager.googleapis.com \
    storage.googleapis.com
Download codelab assets
This repository contains Parquet, recipes, suppliers, copilot-instructions.md, template.yaml, and quickstart.py files for use with this codelab. Make sure you download these files.
To download the files, do the following:
- In the Cloud Shell, run the following command:
git clone --depth 1 --filter=blob:none --sparse https://github.com/GoogleCloudPlatform/next-26-keynotes.git - Navigate into the newly created folder:
cd next-26-keynotes - Pull the
data-cloud-demofoldergit sparse-checkout set genkey/data-cloud-demo - After the checkout is complete, navigate to the
data-cloud-demofolder and extract the ZIP files to access the codelab assets.
3. Setup Lakehouse for Froyo customer data
In this section, you create a catalog in Lakehouse to use the Lakehouse metastore for your workflows. It creates interoperability between your query engines by offering a single source of truth for all of your Iceberg data. It lets query engines, such as Apache Spark, discover, read metadata, and manage Iceberg tables in a consistent way.
Required roles
Make sure that you have the following Identity and Access Management (IAM) roles:
roles/biglake.viewerroles/bigquery.userroles/bigquery.dataEditorroles/biglake.editorroles/biglake.metadataViewerroles/bigquery.connectionUserroles/storage.objectUserroles/storage.objectViewerroles/storage.objectCreatorroles/storage.admin
For more information about granting IAM roles, see Grant an IAM role.
Create a Lakehouse catalog with a bucket
Create a Lakehouse catalog to manage metadata for your Iceberg tables. You connect to this catalog in your Spark job to create and query Iceberg tables.
- In the Google Cloud console, go to Lakehouse.
- Click Create catalog. The Create catalog page opens.
- For Catalog type, select Iceberg Rest catalog.
- For Select your Lakehouse catalog bucket options, select Single bucket catalog.
- For Default catalog Cloud Storage bucket, click Browse, and then click Create new bucket.
- On the Create a bucket page, do the following:
- In the Get started section, enter a globally unique name that meets the bucket name requirements.
- In the Choose where to store your data section, select Region for Location type and enter your region. For example,
us-west1. - In the Choose how to control access to objects section, clear the Enforce public access prevention on this bucket checkbox.
This let's you simulate real-world scenarios like hosting public web content or shared data repositories. Without this change, the bucket would enforce a strict "private-only" policy; any attempt to access your assets would result in a403forbidden error, even if you successfully granted public permissions to the files. - Click Continue > Create > Select > Continue.
- For Authentication method, select Credential vending mode.
- Click Create.Your catalog is created and the Catalog details page opens.
- Under Authentication method, click Set bucket permissions.
- In the dialog, click Confirm.This verifies that your catalog's service account has the
Storage Object Userrole on your storage bucket. - From the Catalog details page, copy the REST catalog URI path. Use this path during the Run Spark job task.
Upload the Parquet files to the bucket
To upload your Parquet files to the root of your bucket, do the following:
- In the Google Cloud console, go to the Cloud Storage Buckets page.
- In the list of buckets, click the bucket name. For example,
acai_demo. - In the Objects tab for the bucket, click Upload > Upload files.
- Select the files from the Parquet folder that you cloned in the Before you begin section of this codelab.
- Click Open.
4. Set up the VPC network
Create a Virtual Private Cloud (VPC) network and a subnet that allows resources to talk to Google APIs without going out to the public internet, and a firewall that allows internal traffic to flow freely between your data processing nodes.
- In the Google Cloud console, go to the VPC networks page.
- Click Create VPC network.
- Enter a Name for the network. For example,
acai-network. - To configure the maximum transmission unit (MTU) of the network, select Set MTU automatically checkbox.
- Choose Automatic for the Subnet creation mode.
- In the Firewall rules section, select all the checkbox for IPv4 firewall rules
- Click Create.
Enable Private Google Access
Dataproc Serverless nodes don't have public IP addresses. To talk to the Lakehouse Catalog and Cloud Storage, the subnet must have Private Google Access enabled.
- In the Google Cloud console, go to the VPC networks page.
- Click the name of the network that contains the subnet for which you need to enable Private Google Access. For example,
us-west1. - Click the name of the subnet. The Subnet details page is displayed.
- Click Edit.
- In the Private Google Access section, select On.
- Click Save.
5. Create and run a Spark job
To create and query an Iceberg table, upload the PySpark job with the necessary Spark SQL statements. Then run the job with Managed Service for Spark.
Upload quickstart.py to your Cloud Storage bucket
After you cloned the codelab assets, update the quickstart.py script with your project details and upload it to the Cloud Storage bucket.
- Open the
quickstart.pyscript in a text editor. - Replace the placeholder
BUCKET_NAMEin the script with your Cloud Storage bucket name and save it. - In the Google Cloud console, go to Cloud Storage buckets.
- Click the name of your bucket. For example,
acai_demo. - On the Objects tab, click Upload > Upload files.
- In the file browser, select the updated
quickstart.pyfile, and then click Open.
Run the Spark job
After you upload the quickstart.py script, run it as a Managed Service for Spark batch job.
- To configure the variables, run the following command in Cloud Shell.
# Configuration Variables export PROJECT_ID="<PROJECT_ID>" export REGION="<REGION>" export BUCKET_NAME="<BUCKET_NAME>" export SUBNET="<SUBNET>" export LAKEHOUSE_CATALOG_ID="<LAKEHOUSE_CATALOG_ID>" export CATALOG_URI_ID="<CATALOG_URI_ID>"- LAKEHOUSE_CATALOG_ID: the name of the Lakehouse catalog resource that contains your PySpark application file. For example,
acai_demo - PROJECT_ID: your Google Cloud project ID.
- REGION: the region to run the Managed Service for Spark batch workload in. For example,
us-west1. - BUCKET_NAME: your Cloud Storage bucket name. For example,
acai_demo. - SUBNET: your VPC subnet name. For example,
acai-network. - CATALOG_URI_ID: the URI ID of the Lakehouse catalog that you copied when creating a Lakehouse catalog with a bucket. For example,
https://biglake.googleapis.com/iceberg/v1/restcatalog.
- LAKEHOUSE_CATALOG_ID: the name of the Lakehouse catalog resource that contains your PySpark application file. For example,
- In Cloud Shell, run the following Managed Service for Spark batch job using the
quickstart.pyscript.gcloud dataproc batches submit pyspark gs://${BUCKET_NAME}/quickstart.py \ --project=${PROJECT_ID} \ --region=${REGION} \ --subnet=${SUBNET} \ --version=2.2 \ --properties="\ spark.sql.defaultCatalog=${LAKEHOUSE_CATALOG_ID},\ spark.sql.catalog.${LAKEHOUSE_CATALOG_ID}=org.apache.iceberg.spark.SparkCatalog,\ spark.sql.catalog.${LAKEHOUSE_CATALOG_ID}.type=rest,\ spark.sql.catalog.${LAKEHOUSE_CATALOG_ID}.uri=${CATALOG_URI_ID},\ spark.sql.catalog.${LAKEHOUSE_CATALOG_ID}.warehouse=gs://${BUCKET_NAME},\ spark.sql.catalog.${LAKEHOUSE_CATALOG_ID}.io-impl=org.apache.iceberg.gcp.gcs.GCSFileIO,\ spark.sql.catalog.${LAKEHOUSE_CATALOG_ID}.header.x-goog-user-project=${PROJECT_ID},\ spark.sql.catalog.${LAKEHOUSE_CATALOG_ID}.rest.auth.type=org.apache.iceberg.gcp.auth.GoogleAuthManager,\ spark.sql.extensions=org.apache.iceberg.spark.extensions.IcebergSparkSessionExtensions,\ spark.sql.catalog.${LAKEHOUSE_CATALOG_ID}.rest-metrics-reporting-enabled=false,\ spark.sql.catalog.${LAKEHOUSE_CATALOG_ID}.header.X-Iceberg-Access-Delegation=vended-credentials,\ spark.sql.catalog.${LAKEHOUSE_CATALOG_ID}.gcs.oauth2.refresh-credentials-endpoint=https://oauth2.googleapis.com/token"All tables registered successfully! Batch [126fa2226a904d2e944c8eecbe0b1840] finished. metadata: '@type': type.googleapis.com/google.cloud.dataproc.v1.BatchOperationMetadata batch: projects/PROJECT_ID/locations/REGION/batches/126fa2226a904d2e944c8eecbe0b1840 batchUuid: 3bff88ca-64d6-4c16-b9ad-2a47ae93ebff createTime: '2026-04-09T13:17:26.222727Z' description: Batch labels: goog-dataproc-batch-id: 126fa2226a904d2e944c8eecbe0b1840 goog-dataproc-batch-uuid: 3bff88ca-64d6-4c16-b9ad-2a47ae93ebff goog-dataproc-drz-resource-uuid: batch-3bff88ca-64d6-4c16-b9ad-2a47ae93ebff goog-dataproc-location: REGION operationType: BATCH name: projects/PROJECT_ID/regions/REGION/operations/47bc59e8-5082-3af9-89a0-22289aa5f4b9
6. Query the table from BigQuery
By successfully running the Spark batch job, you have used Managed Service for Spark Serverless as a distributed compute engine to register multiple tables, one per Parquet file within the Lakehouse Metastore. This registration allows Google Cloud to treat your raw files in Cloud Storage as structured, high-performance tables.
The following steps guide you through confirming that the metadata has been correctly synchronized, ensuring that your data is not only stored safely but is also fully discoverable and queryable through the BigQuery interface.
- In the Google Cloud console, go to BigQuery.
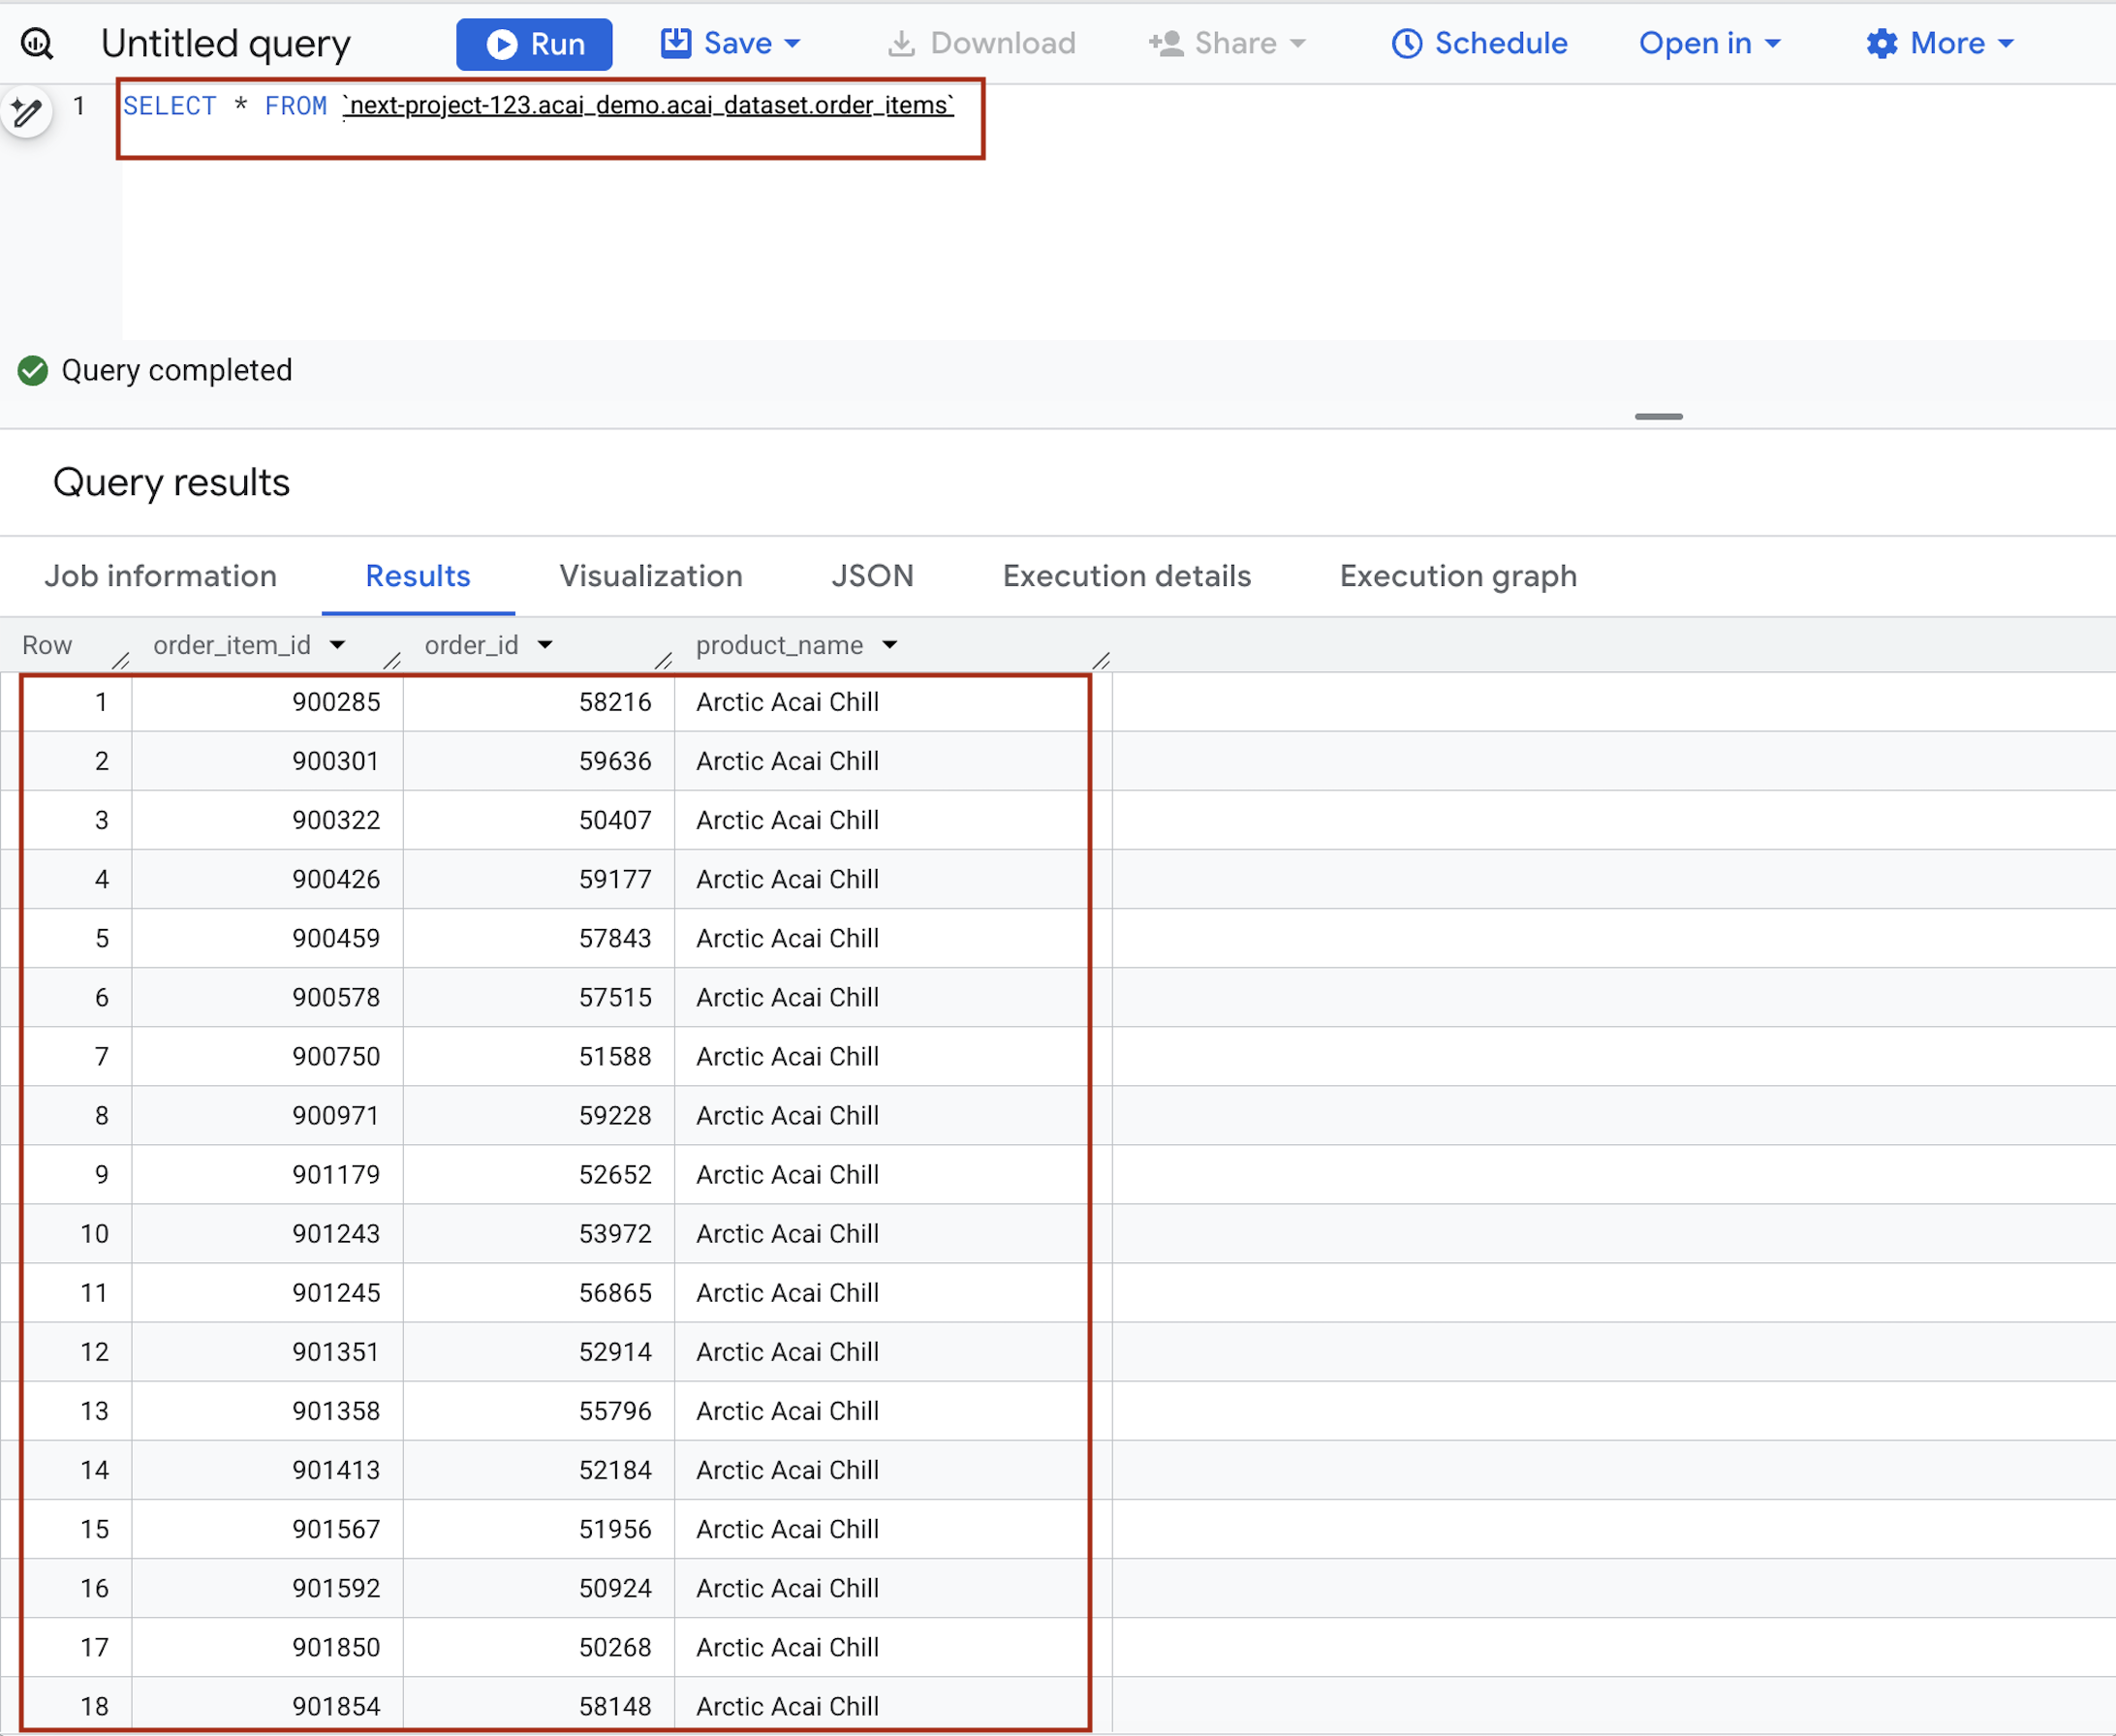
- In the query editor, enter the following statement. The query uses the
project.namespace.dataset.tablesyntax.SELECT * FROM `<PROJECT_ID>.<NAMESPACE>.<ICEBERG_DATASET>.<ICEBERG_TABLE>`PROJECT_ID.acai_demo.acai_dataset.order_items.
Replace the following:- PROJECT_ID: your Google Cloud project ID.
- NAMESPACE: the namespace that is created in the previous step as a result of the Spark job, which you can find it in your BigQuery object explorer page. For example,
acai_demo. - ICEBERG_DATASET: the dataset name within the Iceberg catalog, for example,
acai_dataset. - ICEBERG_TABLE: the table name within the Iceberg dataset, for example,
order_items.
- Click Run. The query results show the data that you inserted with the Spark job.
7. Set up unstructured product data files
In this section, you create an organizational structure within BigQuery to store Froyo recipe and supplier data, specifically for Froyo product details. It also establishes a Cloud Resource Connection, which acts as a secure "bridge" allowing BigQuery to read files from external sources like Cloud Storage.
Create bucket and upload the Froyo detail files
Create and upload the supplier and recipe files to the Cloud Storage bucket.
- In the Google Cloud console, go to the Cloud Storage Buckets page.
- Click Create.
- On the Create a bucket page, enter your bucket information. After each of the following steps, click Continue to proceed to the next step:
- In the Get started section, enter the bucket name. For example,
acai_pdfs. - In the Choose where to store your data section, select Region and then enter your region. For example,
us-west1. - In the Choose how to control access to objects section, clear the Enforce public access prevention on this bucket checkbox.
- Click Create.
- In the list of buckets, click the bucket you created. For example,
acai_pdfs. - In the Objects tab for the bucket, click Upload > Upload folders.
- Select the
recipesfolder that you extracted in the Before you begin section of this codelab. - Click Upload.
- Repeat the upload process for the
suppliersfolder.
Create a connection
Create a Cloud Resource Connection. This generates a unique Service Account that acts as BigQuery's "ID card" to access external files.
- Go to the BigQuery page.
- In the left pane, click Explorer. If you don't see the left pane, click Expand left pane to open the pane.
- In the Explorer pane, expand your project name, and then click Connections.
- On the Connections page, click Create connection.
- For Connection type, choose Vertex AI remote models, remote functions, BigLake and Spanner (Cloud Resource).
- In the Connection ID field, enter the connection ID name. For example,
acai_pdf_connection. Make sure to note this ID as you'll need it when you set up the data scan later in this codelab. - Set Location type to Region and then select a region. For example,
us-west1. The connection should be colocated with your other resources such as datasets. - Click Create connection.
- Click Go to connection.
- In the Connection info pane, copy the service account ID for use in a later step. The service account looks similar to
bqcx-175930350285-qn3a@gcp-sa-bigquery-condel.iam.gserviceaccount.com.
Manage access to service accounts
Provide access to the service account so that the Lakehouse can read your PDFs.
- Go to the IAM & Admin page.
- Click Grant access. The Add principals dialog opens.
- In the New principals field, enter the service account ID that you copied earlier.
- In the Select a role field, and add the following roles:
roles/storage.objectUserroles/storage.objectViewerroles/bigquery.userroles/bigquery.dataEditorroles/aiplatform.userroles/storage.adminroles/dataproc.serviceAgent
- Click Save.
For more information about IAM roles in BigQuery, see Predefined roles and permissions.
8. Manage permissions for DataScan job
Create specific service accounts (identities) for Spark and Dataform, and then grant them—along with Google's automated service agents—the precise permissions needed to read storage, run BigQuery jobs, and use Vertex AI for discovery.
IAM access for Spark and Dataform
- In the Google Cloud console, go to the Create service account page.
- If not selected, select your Google Cloud project.
- Click Create service account.
- Enter a service account name. For example,
sa-spark-stg1. The Google Cloud console generates a service account ID based on this name. Edit the ID if necessary. You cannot change the ID later. - To set access controls, click Create and continue and continue to the next step.
- Choose the following IAM roles to grant to the service account on the project.
roles/dataproc.workerroles/storage.objectUserroles/bigquery.dataEditorroles/bigquery.jobUserroles/aiplatform.userroles/dataplex.discoveryPublishingServiceAgent
- When you are done adding roles, click Continue.
- Click Done to finish creating the service account.
BigQuery connection permissions for accessing Knowledge Catalog
- In the Google Cloud console, go to the Cloud Storage Buckets page.
- In the list of buckets, click the bucket name you created for Froyo. For example,
acai_pdfs. - In the Permissions tab, click Grant access. The Add principals dialog appears.
- In the New principals field, enter your BigQuery Service account ID. The service account looks similar to
bqcx-175930350285-qn3a@gcp-sa-bigquery-condel.iam.gserviceaccount.com. - Select the following role (or roles) from the Select a role drop-down menu.
roles/storage.objectUserroles/dataplex.serviceAgentroles/dataplex.securityAdminroles/aiplatform.serviceAgentroles/dataplex.discoveryPublishingServiceAgent
- Click Save.
9. Set up Knowledge Catalog
Build a Knowledge Catalog to unify your Froyo-related data and automate the discovery of unstructured files (such as PDF recipes and PDF suppliers).
Create the DataScan through curl
In this section, you create scans for your Cloud Storage bucket (for example, acai_pdfs) by adding the datascan_ID and pointing it to your BigQuery datasets. After that Knowledge Catalog will automatically create entries for your PDFs in BigQuery.
- To scan the PDFs (suppliers and recipes), run the following command:
# 1. Set your variables PROJECT_ID="<PROJECT_ID>" REGION="<REGION>" ENV_SUFFIX="stg1" DATASCAN_ID="froyo-profile-${ENV_SUFFIX}" BUCKET_NAME="<BUCKET_NAME>" # 2. Set this to the Name of the connection you created in Step 7 CONNECTION_ID="<CONNECTION_ID_NAME>" # 3. Define the API Endpoint DATAPLEX_API="dataplex.googleapis.com/v1/projects/${PROJECT_ID}/locations/${REGION}" # 4. Create the DataScan via CURL echo "Creating Dataplex DataScan: ${DATASCAN_ID}..." curl -X POST "https://$DATAPLEX_API/dataScans?dataScanId=${DATASCAN_ID}" \ -H "Authorization: Bearer $(gcloud auth print-access-token)" \ -H "Content-Type: application/json" \ -d '{ "data": { "resource": "//storage.googleapis.com/projects/'"${PROJECT_ID}"'/buckets/'"${BUCKET_NAME}"'" }, "executionSpec": { "trigger": { "on_demand": {} } }, "dataDiscoverySpec": { "bigqueryPublishingConfig": { "tableType": "BIGLAKE", "connection": "projects/'"${PROJECT_ID}"'/locations/'"${REGION}"'/connections/'"${CONNECTION_ID}"'" }, "storageConfig": { "unstructuredDataOptions": { "entity_inference_enabled": true } } } }' - The
curlcommand displays the Knowledge Catalog DataScan results, similar to the following image.
Run the job
Run the following command:
gcloud dataplex datascans run $DATASCAN_ID --location=$REGION
Describe a job
To describe the job, run the following command:
gcloud dataplex datascans describe $DATASCAN_ID --location=$REGION
Delete a datascan job
If the scan runs for longer than 10 minutes, or if the job status remains Pending for an extended time without transitioning to Running, it might be due to temporary resource unavailability in the region. If this happens, you can run the following command to delete the job, and then try creating and running it again. Sometimes, an initial run might fail quickly with an error like unable to acquire necessary resources.
gcloud dataplex datascans delete $DATASCAN_ID --location=$REGION
View the status of the job
To check the job status, do the following:
- In the Google Cloud console, go to the Metadata curation page.
- In the Cloud Storage discovery tab, click the name of the discovery scans.
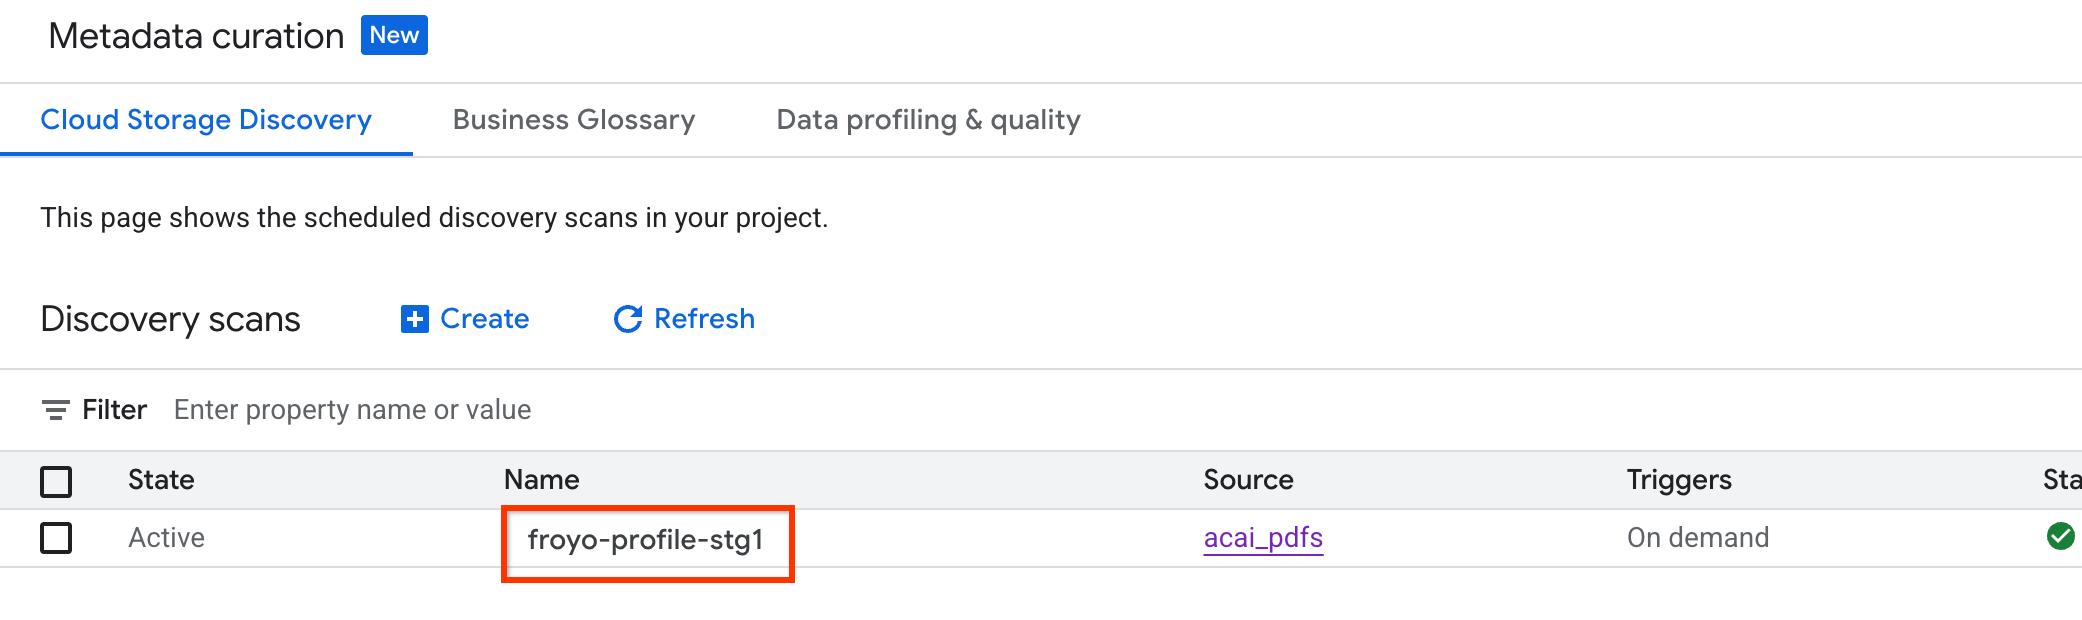
- On the Scan details page, you can see the job status.
- Once the job finishes, check if the Published dataset (for example,
acai_pdfs_discovered_003) that you created using thecurlcommand is present.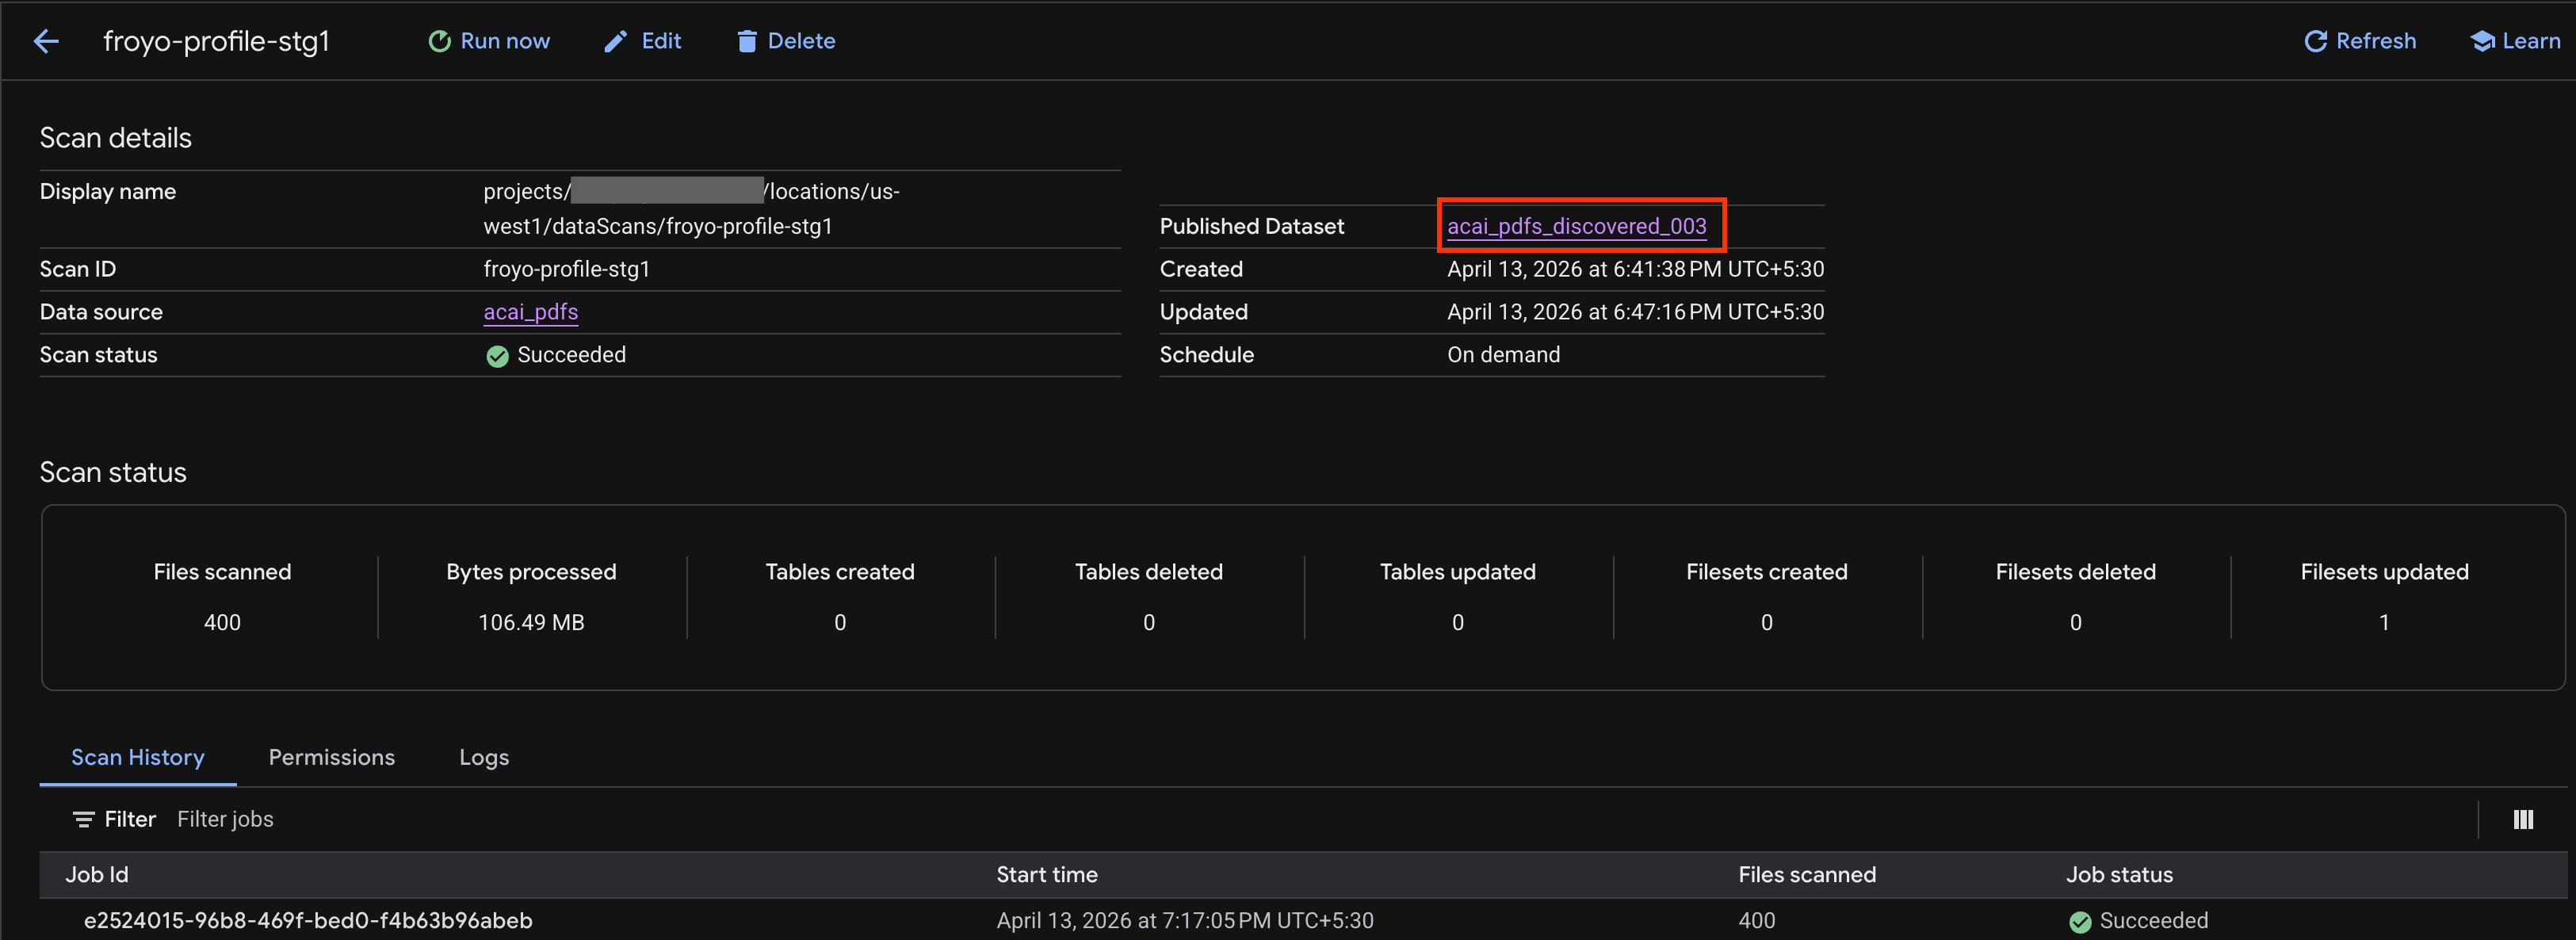
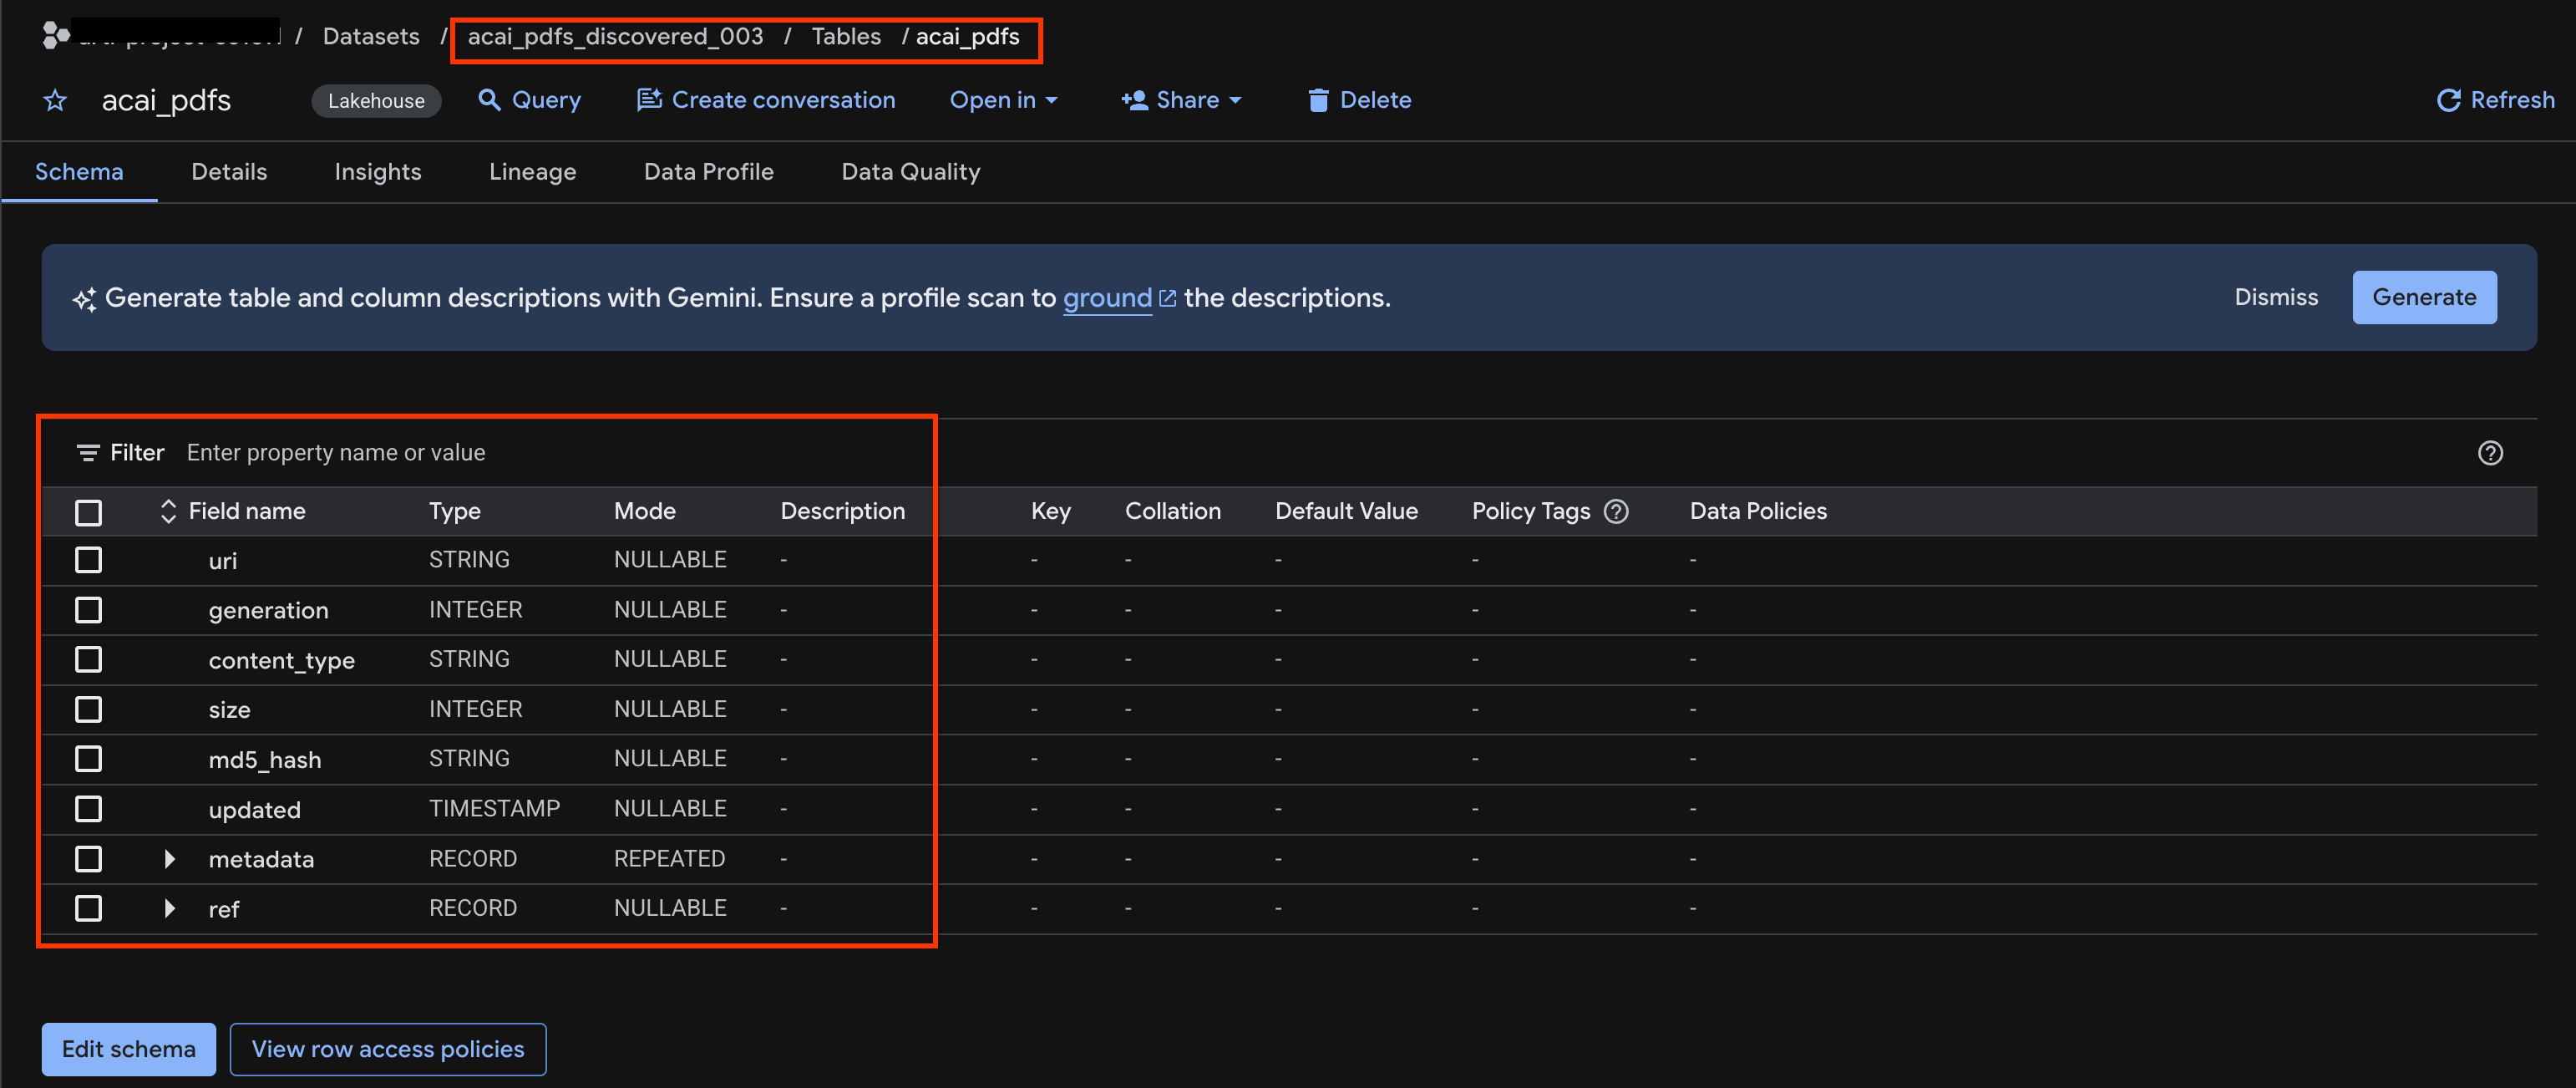
View the object table
To view the object table created after the discovery job, do the following:
- In the Google Cloud console, go to BigQuery.
- Click Datasets and select the published dataset that's created in the previous step. For example,
acai_pdfs_discovered_003. - To view the object table, click the table ID. For example,
acai_pdfs. - The resulting object table looks like the following image:
10. Semantic extraction
You are going to infer and extract structured tables, other database objects, and relationships for this unstructured object table you created in the previous step. For that you'll use the Knowledge Catalog Insights feature to generate SQL statements to extract structured data from the unstructured table
- In the Google Cloud console, go to the Knowledge Catalog Search page.
- Search for the dataset table that you want to view insights for. For example,
acai_pdfs_discovered_003.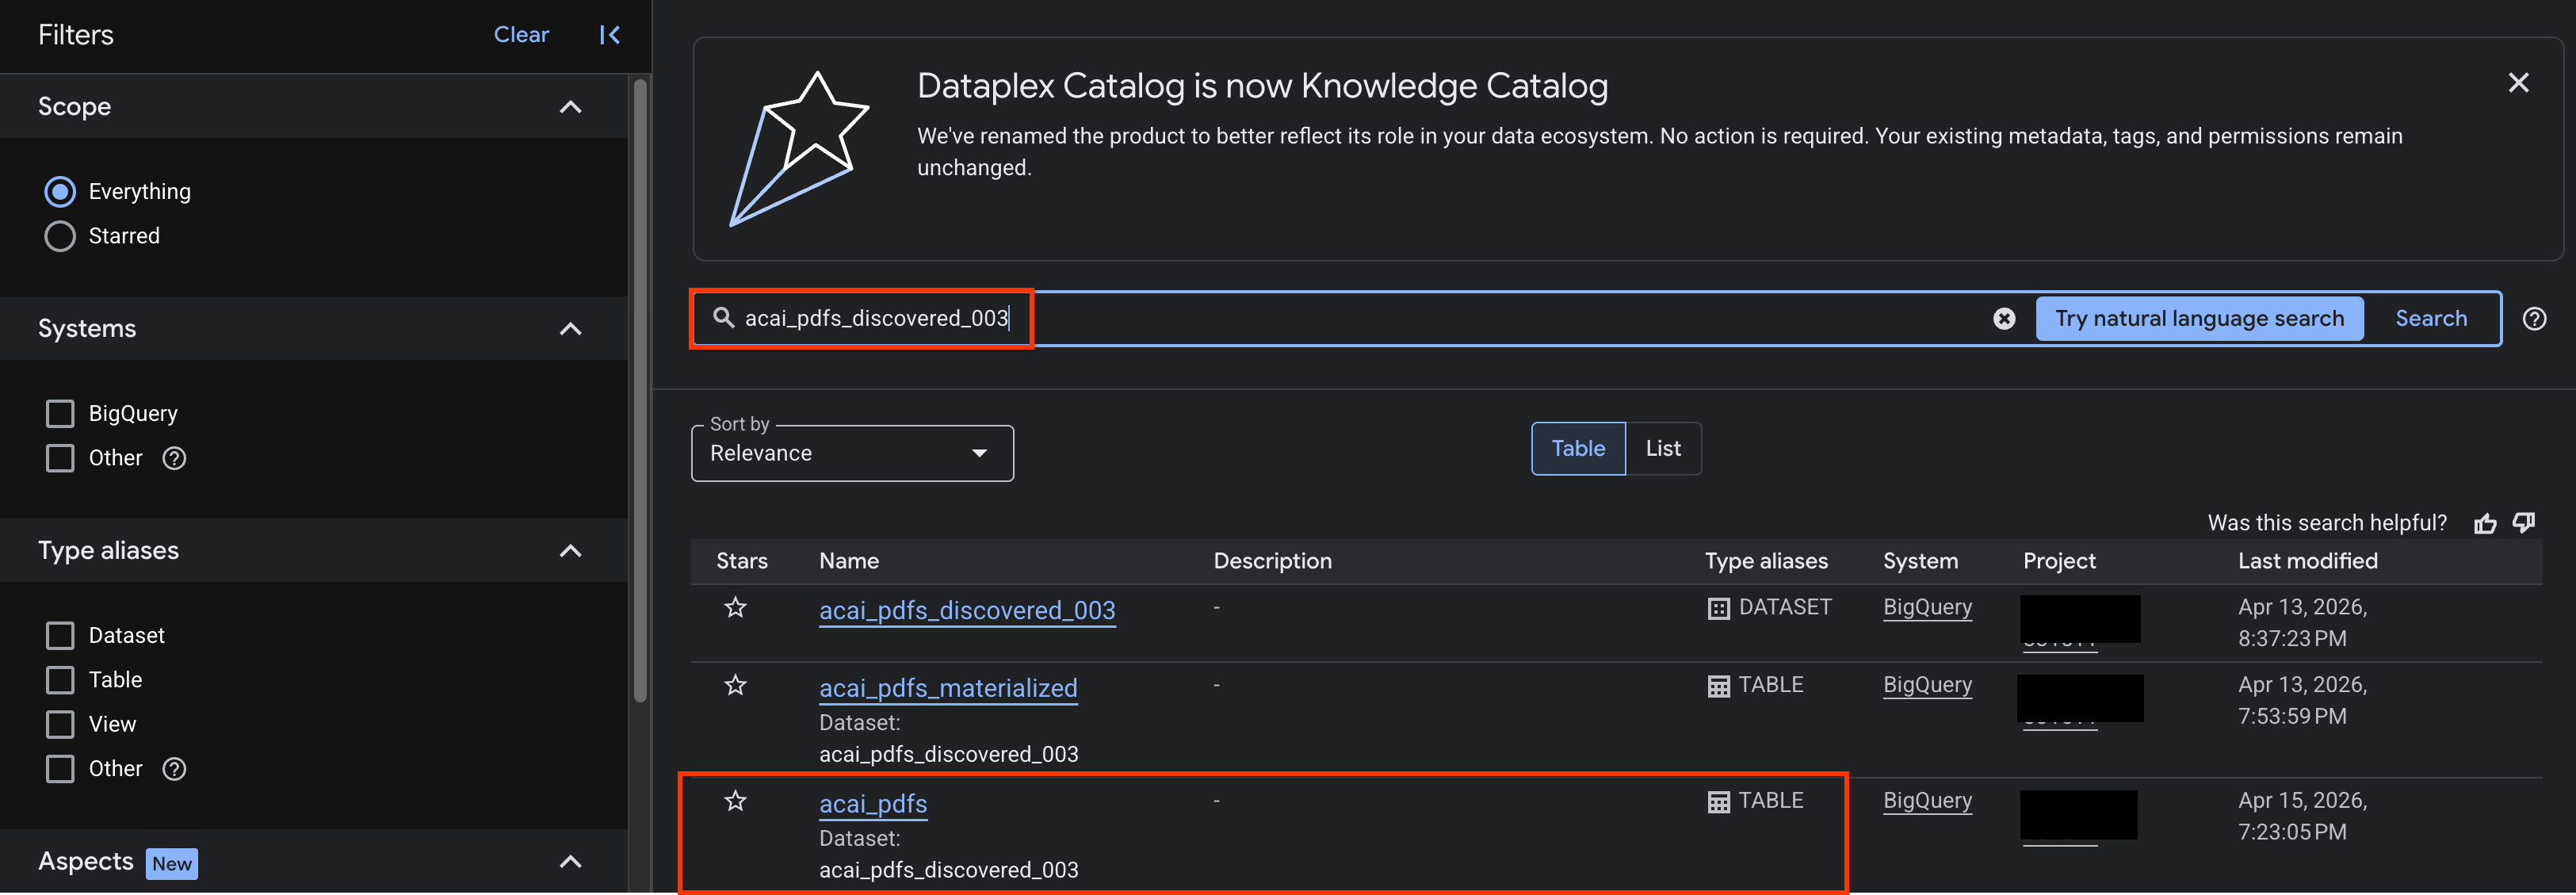
- In the search results, click the table to open its entry page.
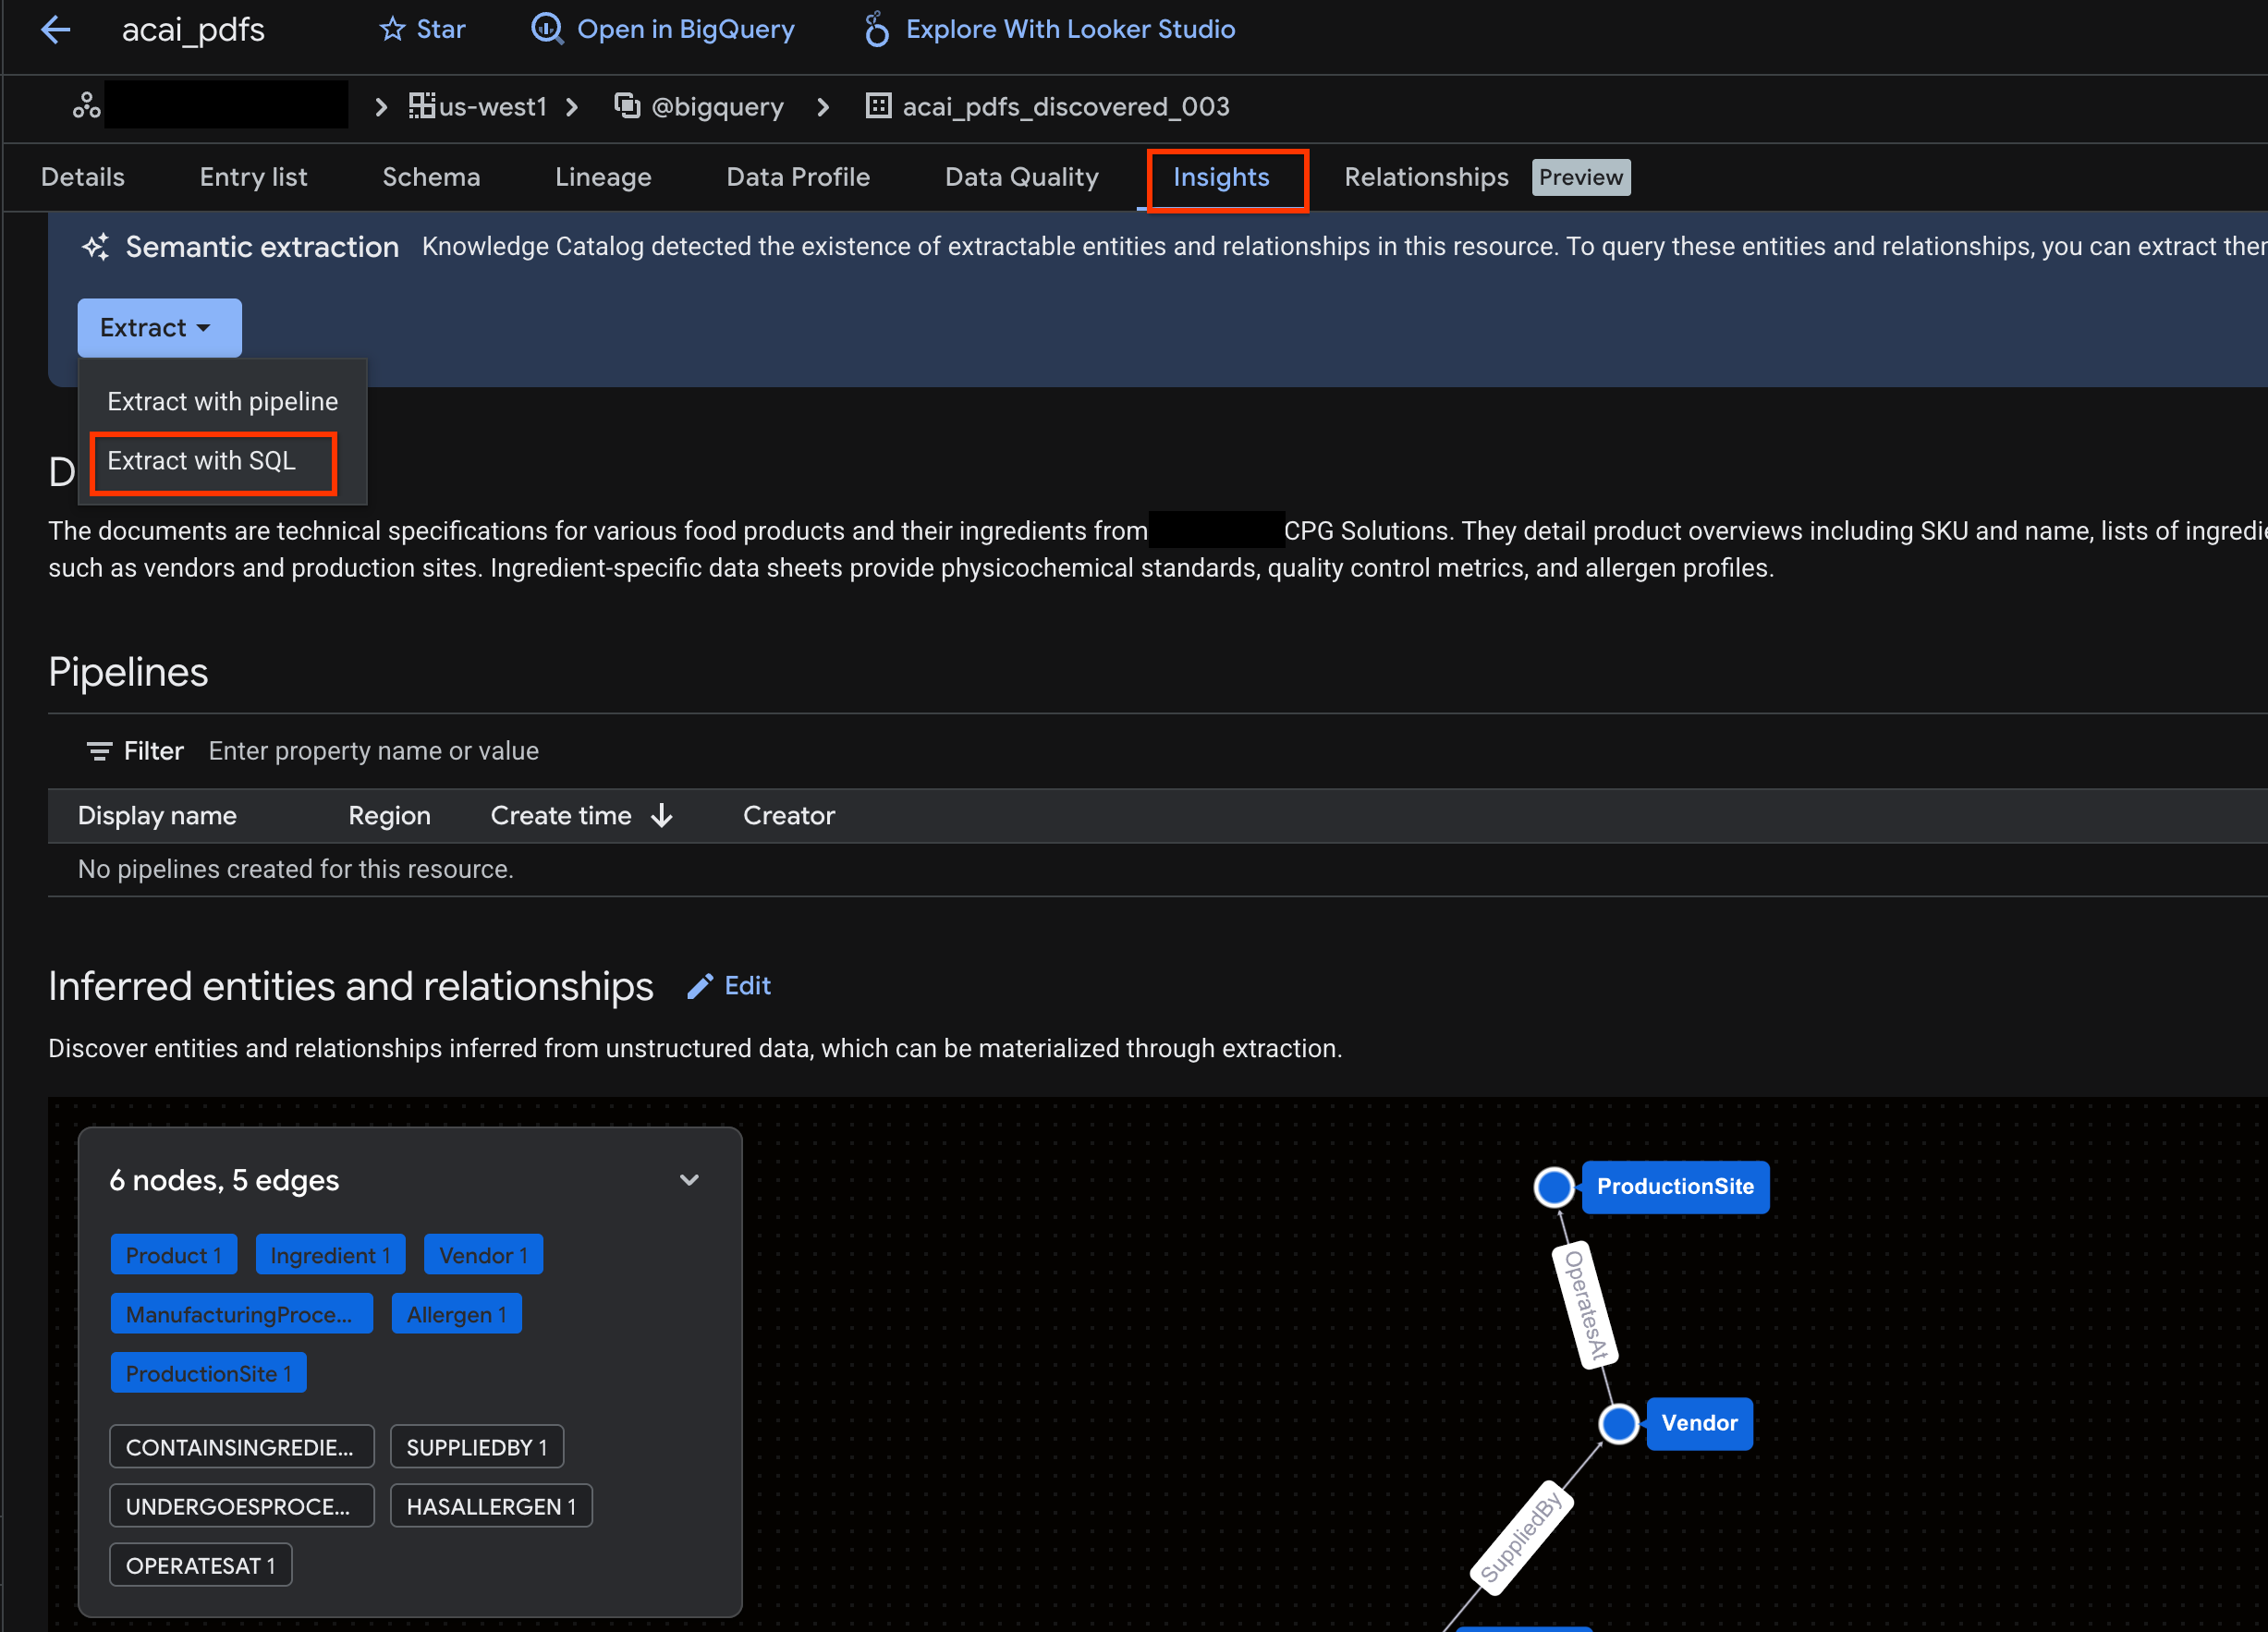
- Click the Insights tab. If the tab is empty, it means that the insights for this table have not yet been generated. Insight generation might take a 15 to 25 minutes.
- Once you see the insights, click Extract > Extract with SQL.
- In the Extract with SQL page, for Destination, enter your dataset. For example,
acai_pdfs_discovered_003. - Click Extract. This opens the BigQuery Editor with the Query loaded.
- Click Run. This step generates a set of statements and might take a few minutes to complete the run.
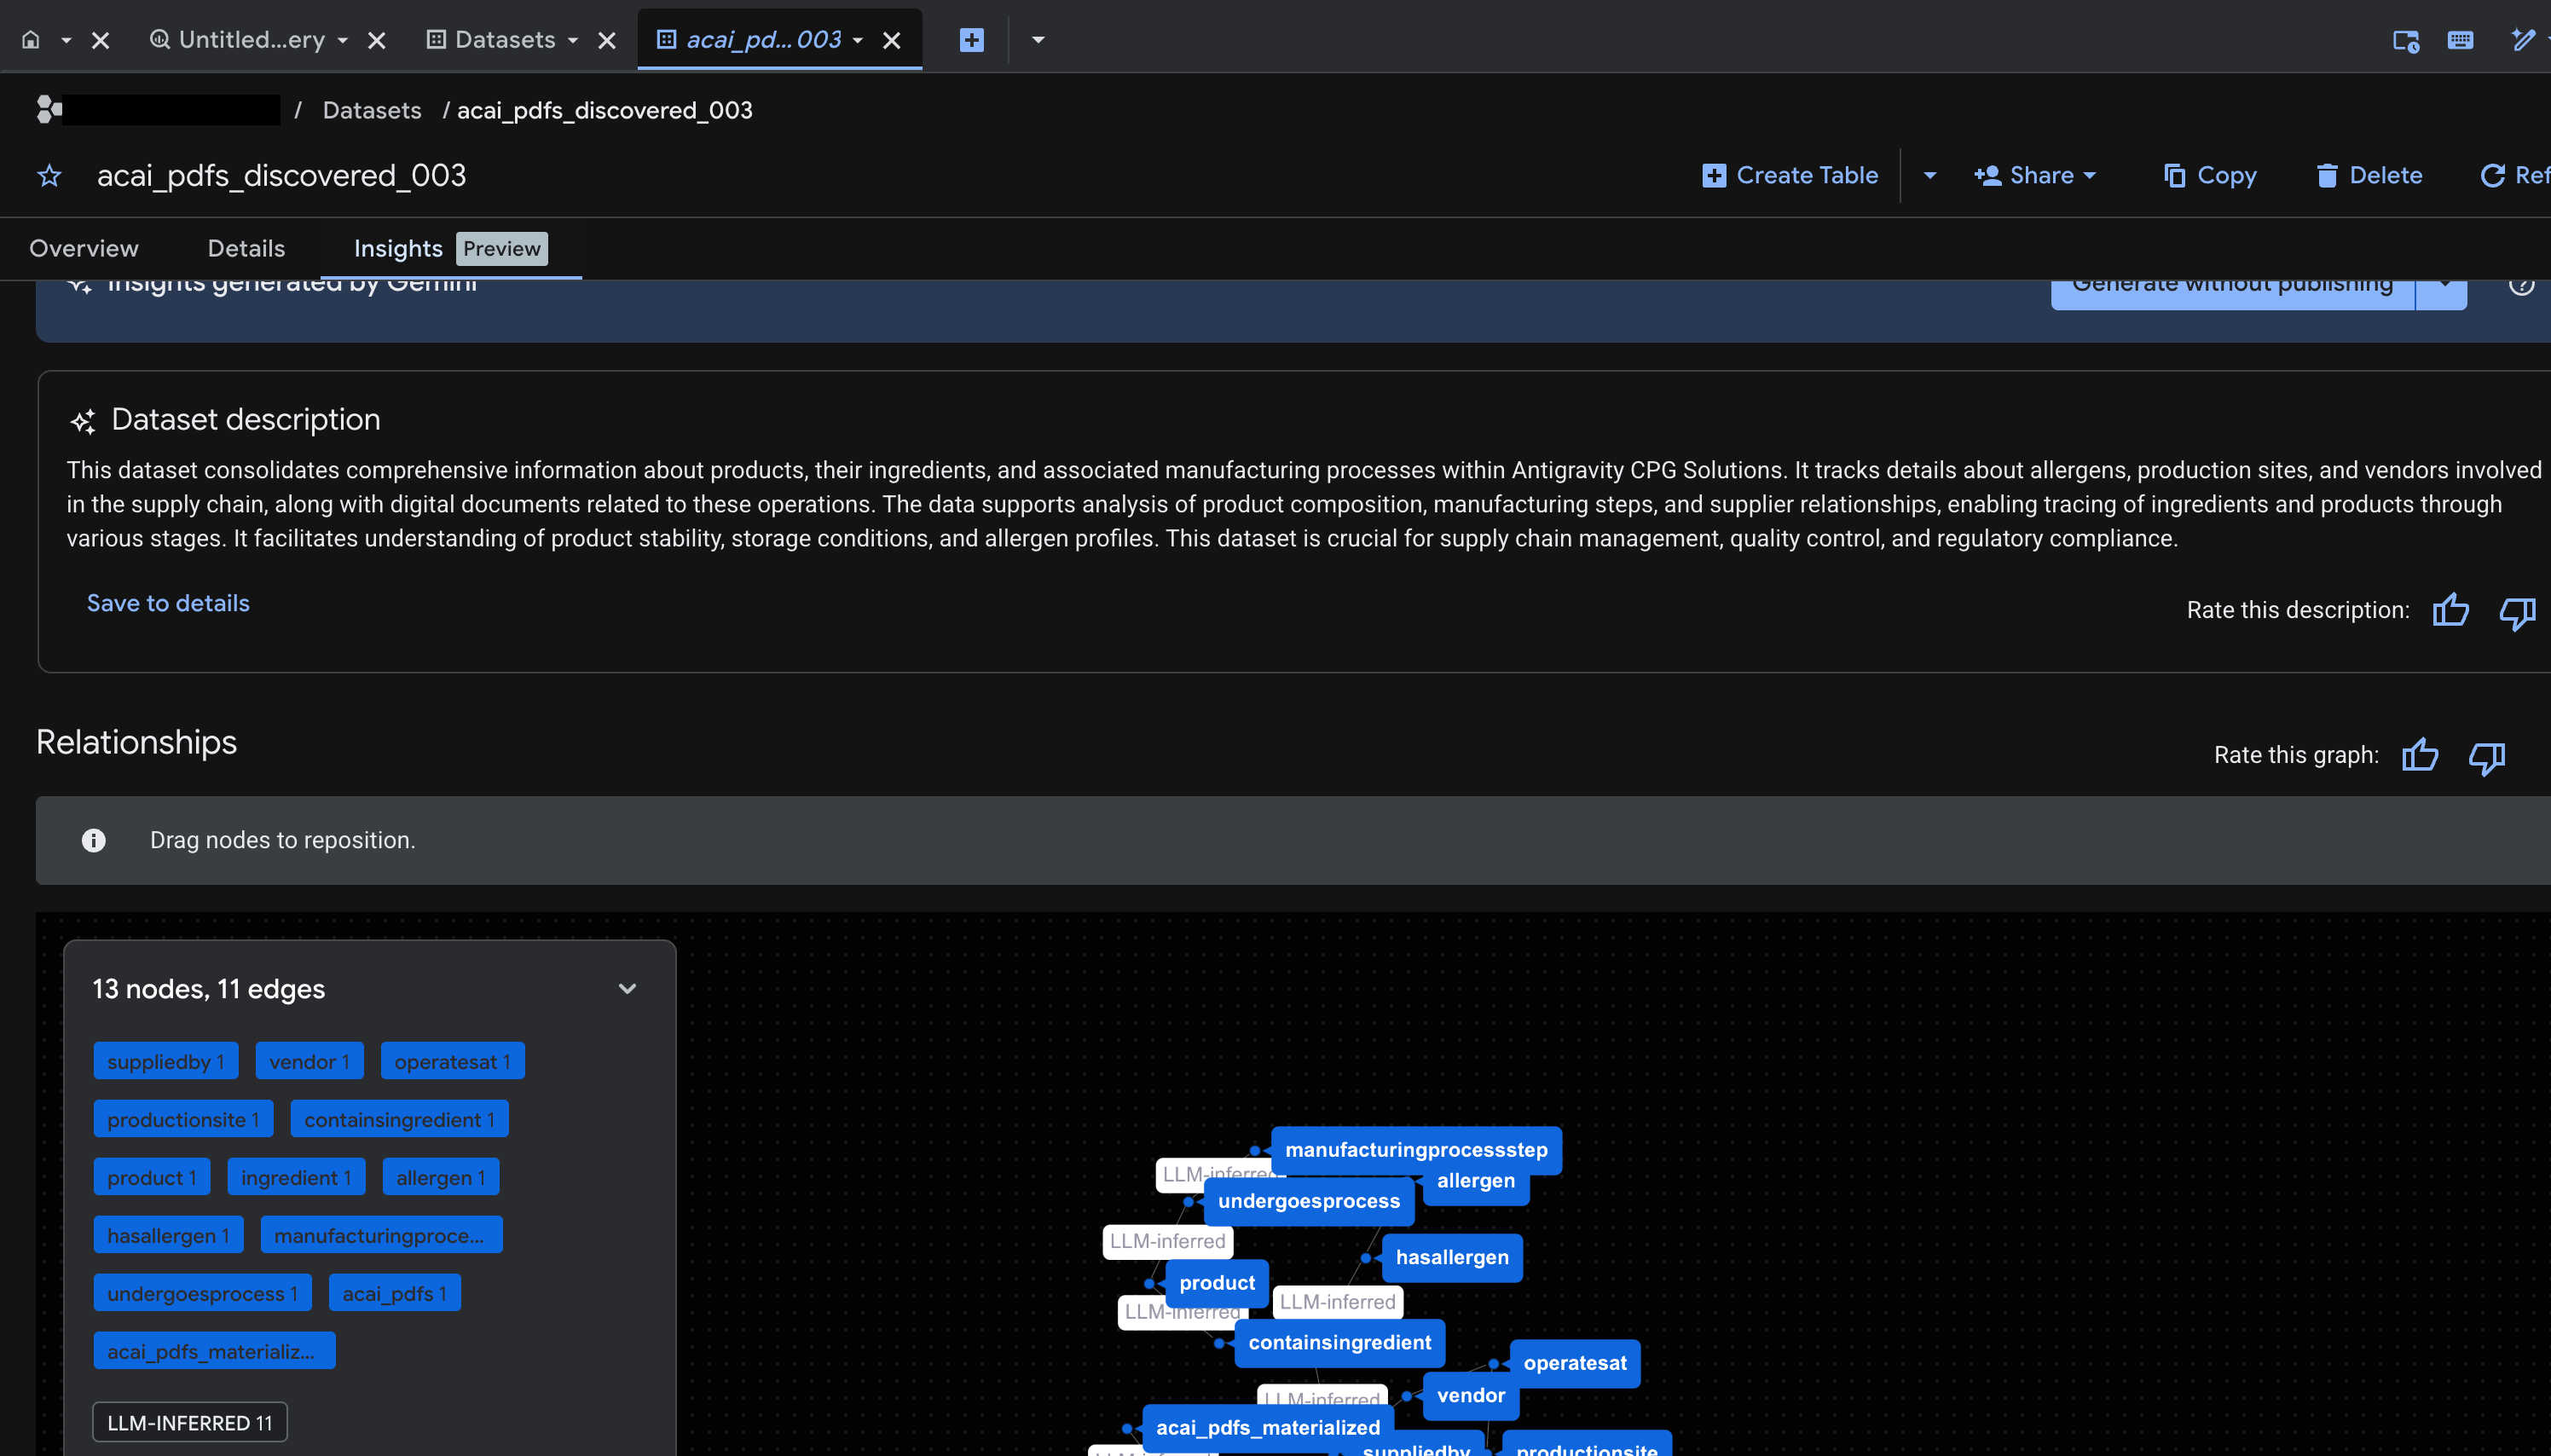
- When the query completes, you see the following results:
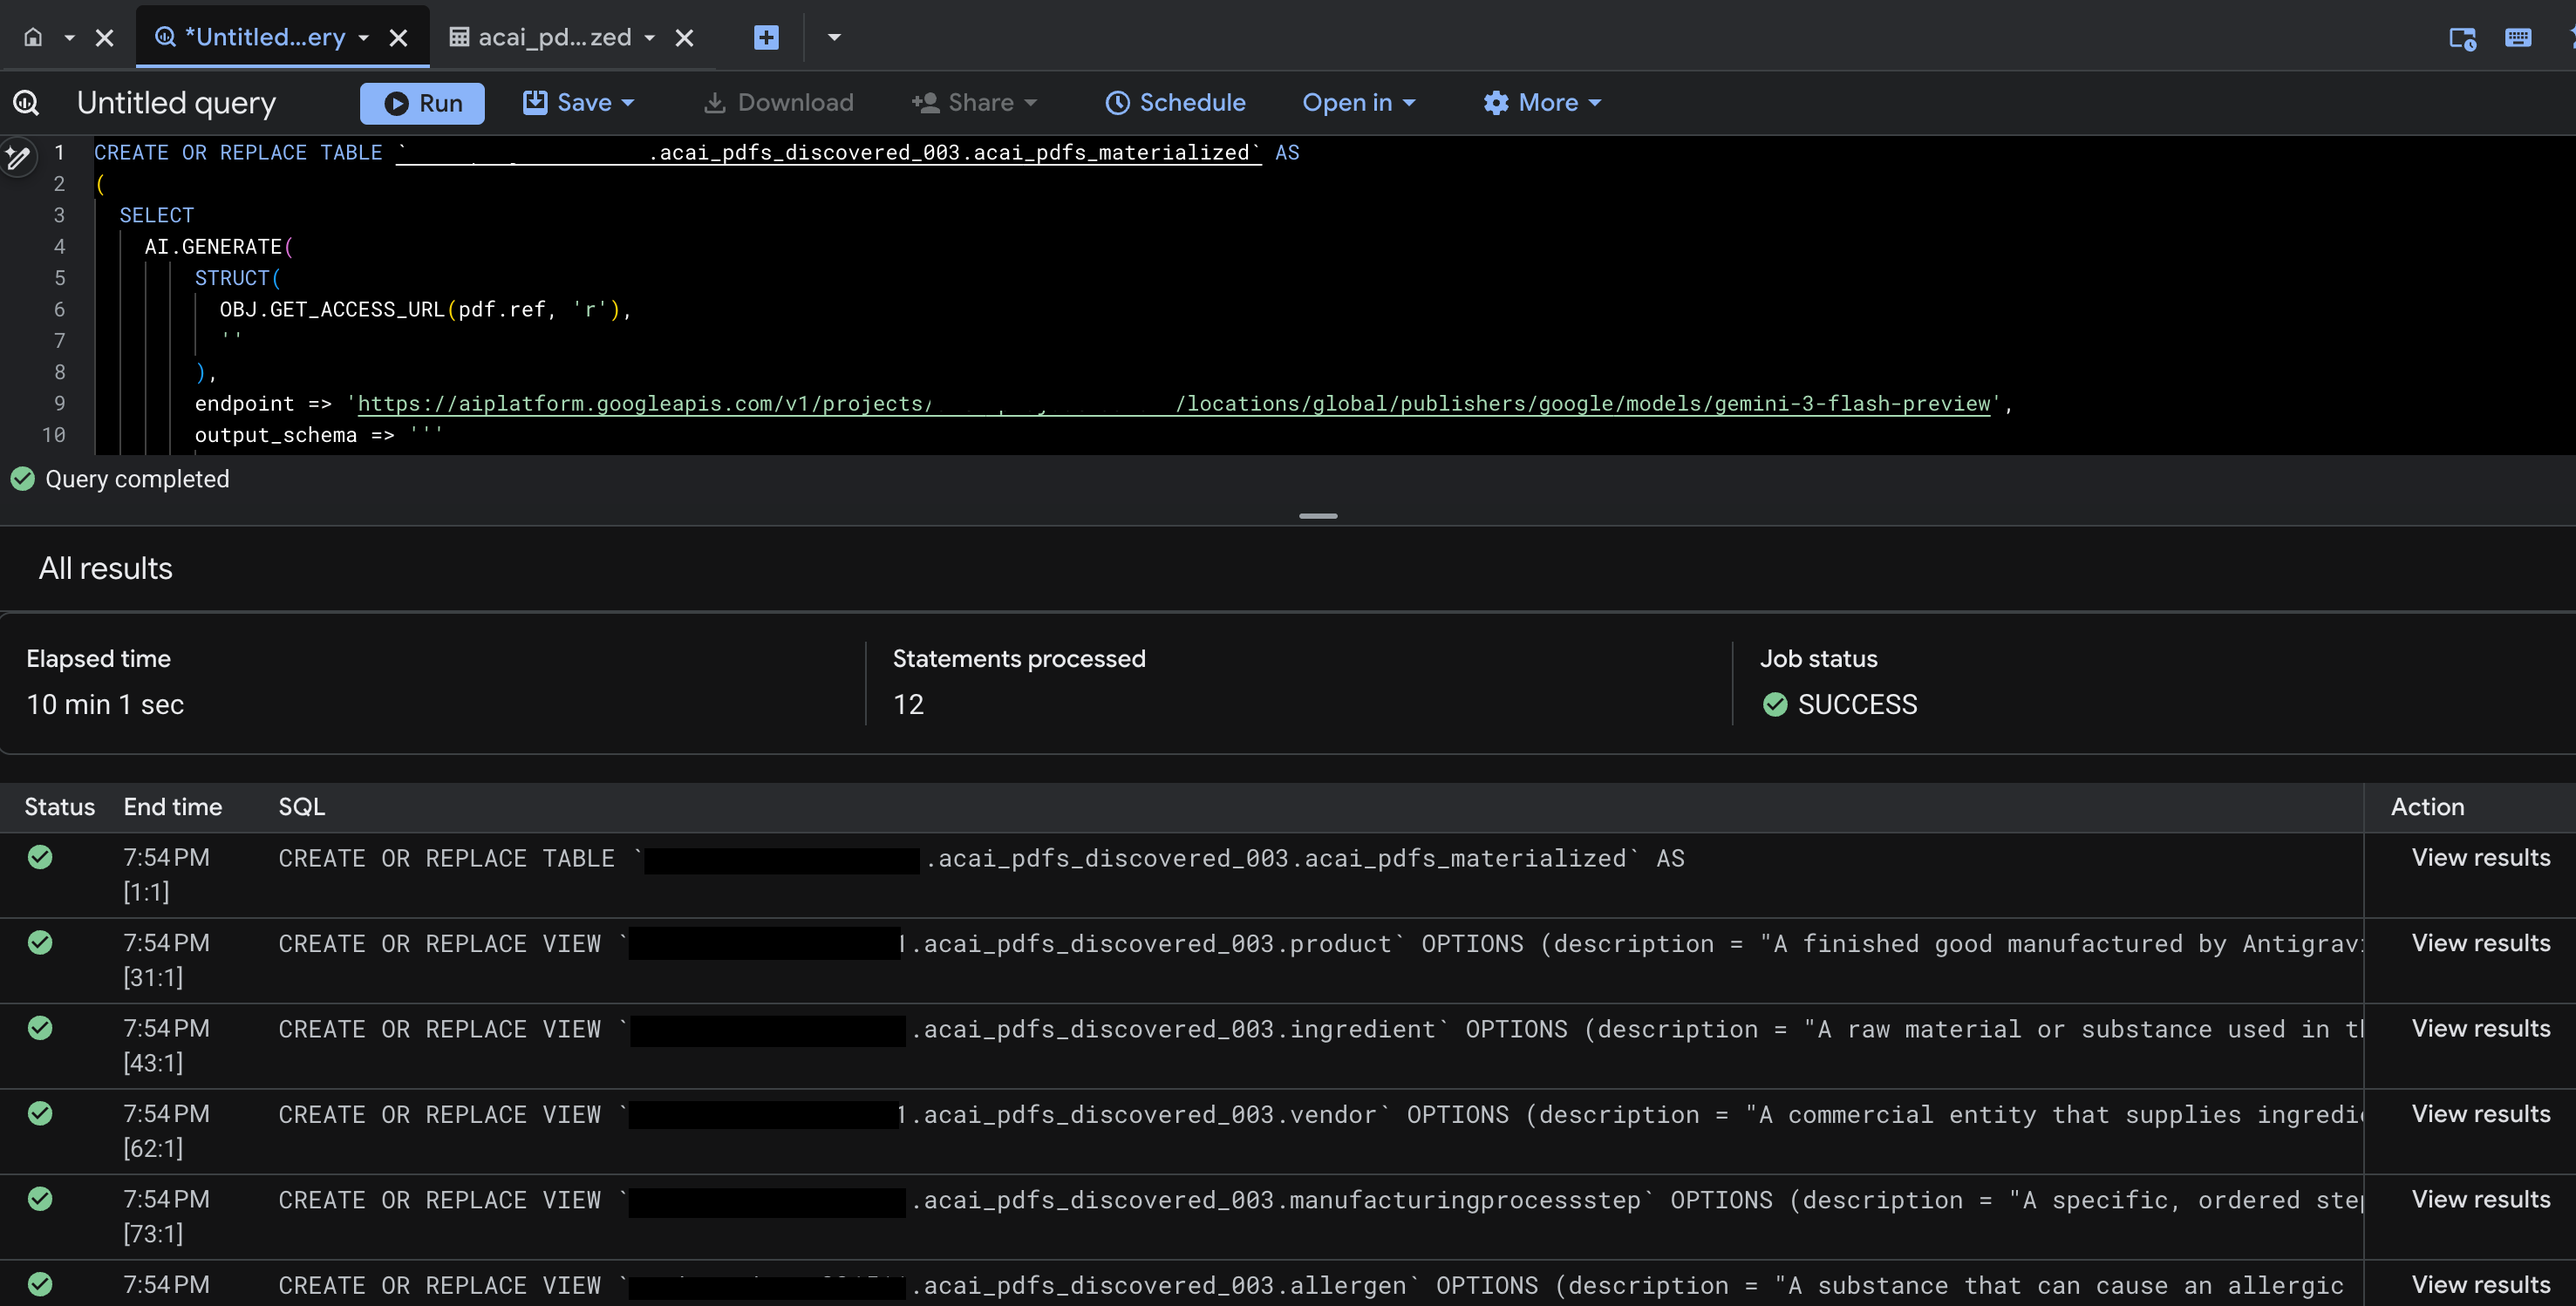
- Go to BigQuery and click Datasets (for example,
acai_pdfs_discovered_003). A new set of structured database objects are created in the dataset that you selected in step number 6.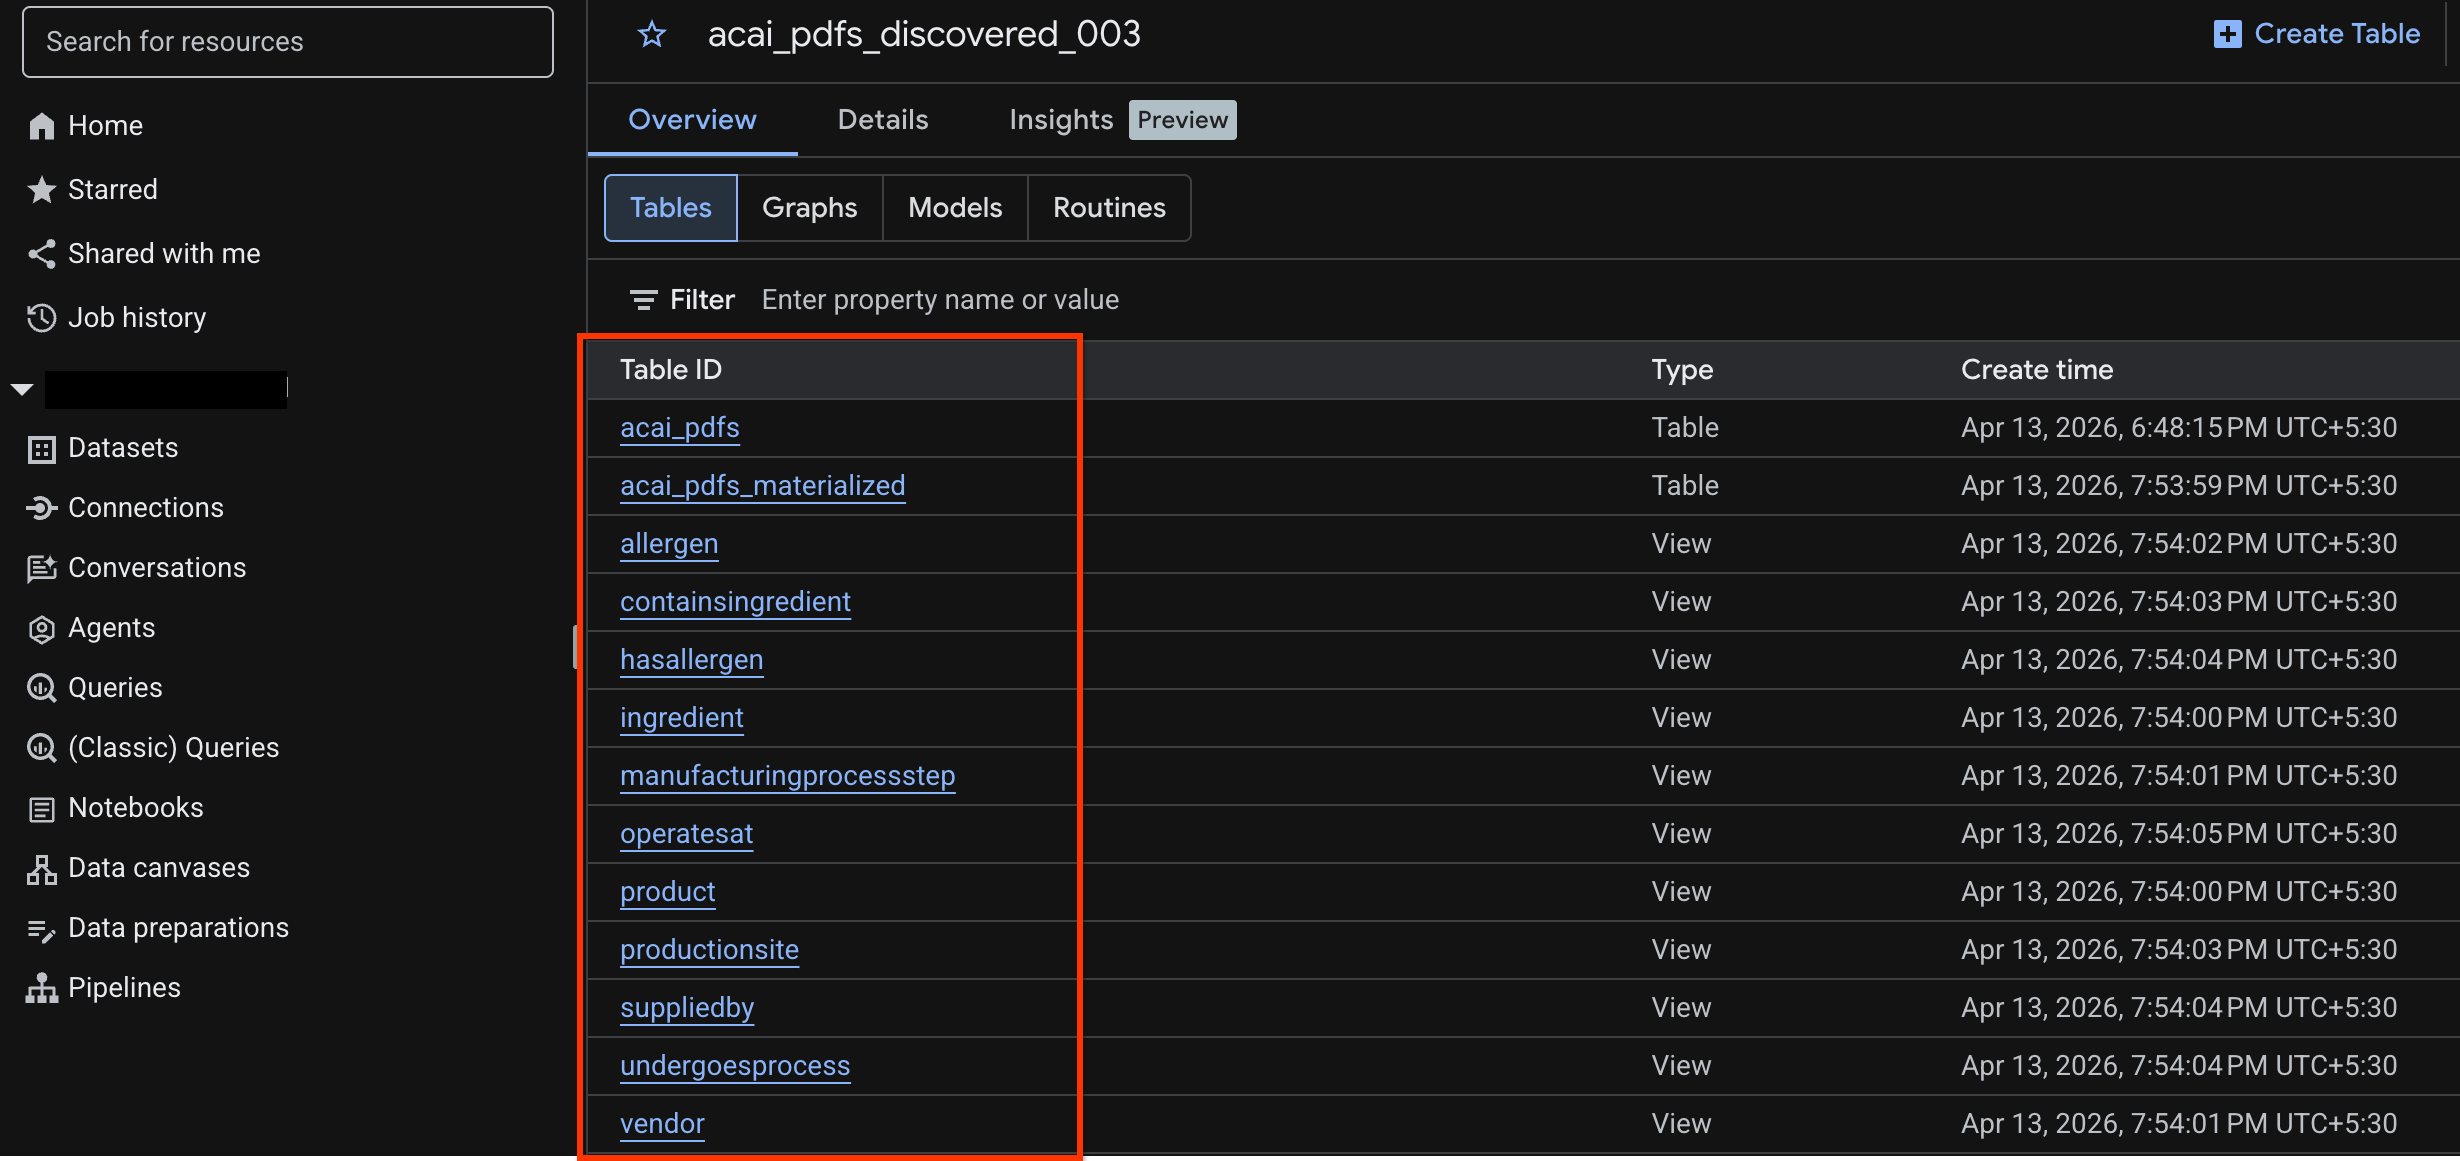
Generate insights for object in BigQuery
To generate insights for a BigQuery dataset, you must access the dataset in BigQuery using BigQuery Studio.
- In the Google Cloud console, go to BigQuery Studio.
- In the Explorer pane, select the project, go to the dataset you want to generate insights for.
- Click the Insights tab.
- If you see an Enable API button, click it to enable Gemini for Google Cloud. This opens the Enable core features window.
- In the Core feature APIs section, click Enable for Gemini for Google Cloud API and BigQuery Unified API, and then click Next.
- In the Permissions (optional) section, grant IAM roles to principals if needed, and then click Next.
- To generate insights and publish them to Knowledge Catalog, click Generate and publish.
- Once published you will be able to view insights on the tab.
11. Set up your IDE for agentic data analytics
The Google Cloud Data Agent Kit extension for Visual Studio Code is an IDE extension for data scientists and data engineers. It lets you connect to and work with your Google Data Cloud resources and data directly from the IDE. For more information, see Data Agent Kit extension for VS Code overview
The Data Agent Kit extension for VS Code is useful when you want to do the following:
- Build, test, review, and deploy a production-ready data pipeline, such as Spark ETL or BigQuery ETL, directly from VS Code.
- Explore data, build a training pipeline, identify optimal ML models, and deploy them to a production endpoint using AI assistance.
- Connect to trusted data sources, build a high-performance data model, and publish an interactive dashboard for business stakeholders.
Install the Data Agent Kit extension for VS Code
- Open VS Code.
- Install the Google Cloud CLI. For more information, see Install the Google Cloud CLI.
- Install the Data Agent Kit extension for VS Code.
- Finish the extension onboarding process, which requires you to:
- Sign in to the extension
- Install skills, MCP servers
- Reload or restart the window once you are done with onboarding. For more information, see Setup and configure the Data Agent Kit extension for VS Code.
- After the IDE reloads, click Google Data Cloud icon in the navigation pane, go to settings, and ensure you correctly set your project ID and region (
us-west1) in the common settings.
Set up the workspace in VS Code
- Open VS Code and select File > Open folder > New folder.
- Create a new folder named
acai_testand then click Open VS Code now considers the folder you've opened a workspace. - On the Workspace trust dialog, select Yes, I trust the authors to enable all features in the workspace.
- Create a folder
.githubin theacai_testworkspace. - Create a new file
copilot-instructions.mdin the.githubfolder and enter the following rules in it.## 1. Project Context - **Project ID**: <PROJECT_ID> - **Domain**: This project is centralized around "Froyo", a brand of frozen yogurt offering multiple flavors. - **Documentation**: Raw PDF documents detailing flavors and ingredients are stored in Google Cloud Storage at `gs://<BUCKET_NAME>`. ## 2. Execution & Data Processing Rules - **CRITICAL RULE - Structured Specs**: The semantic and structured information extracted from the PDFs is available in a BigQuery dataset named `<BQ_DATASET_NAME>` (referred to as the Knowledge Catalog). - **CRITICAL RULE - Customer Data**: Existing Froyo customer data resides in BigQuery in the dataset `<DATASET_ID>`. When you are referencing a dataset, ensure you are using it with the project ID (`<PROJECT_ID>`) and namespace prefix `<NAMESPACE_NAME>`. For example, to query order table in this dataset you should use `<PROJECT_ID>.<NAMESPACE>.<DATASET_ID>.orders`. - **CRITICAL RULE - Data Joins between BigQuery dataset and Iceberg dataset**: ANY task requiring a join or integration between the BigQuery datasets `<DATASET_ID>` of the PDF data and the `<DATASET_ID>` of the customer data MUST be executed using **Spark Notebooks**. - **CRITICAL RULE - Notebook Kernel**: Every Spark notebook utilized MUST exclusively be configured to run on the Serverless Session template `iceberg-federation-template` as its kernel. - **CRITICAL RULE - Data Science**: ANY data science, machine learning, or advanced analytical task MUST be performed strictly within **Spark Notebooks** using the aforementioned setup. - Create another new file
template.yamlin theacai_testworkspace and enter the following information in the file.labels: client: "vscode" jupyterSession: displayName: "iceberg-federation-template" kernel: "PYTHON" environmentConfig: executionConfig: serviceAccount: "sa-spark-dev1@<PROJECT_ID>.iam.gserviceaccount.com" subnetworkUri: "projects/<PROJECT_ID>/regions/<REGION>/subnetworks/<SUBNET_NAME>" runtimeConfig: version: "2.3" properties: # This enables the secure proxy URL you were looking for dataproc.tier: "premium" spark.dataproc.engine: "lightningEngine" spark.dataproc.lightningEngine.runtime: "native" spark.memory.offHeap.enabled: "true" spark.memory.offHeap.size: "1g" spark.executor.memory: "4g" "dataproc.component.gateway.enabled": "true" "dataproc.jupyter.listen.all.interfaces": "true" "spark.sql.extensions": "org.apache.iceberg.spark.extensions.IcebergSparkSessionExtensions" "spark.sql.defaultCatalog": "<CATALOG_NAME>" "spark.sql.catalog.<CATALOG_NAME>": "org.apache.iceberg.spark.SparkCatalog" "spark.sql.catalog.<CATALOG_NAME>.type": "rest" "spark.sql.catalog.<CATALOG_NAME>.uri": "<CATALOG_URI_ID>" "spark.sql.catalog.<CATALOG_NAME>.warehouse": "bl://projects/<PROJECT_ID>/catalogs/<CATALOG_NAME>" "spark.sql.catalog.<CATALOG_NAME>.rest.auth.type": "org.apache.iceberg.gcp.auth.GoogleAuthManager" - On VS Code, click Terminal and run the following command to import the
template.yamlfile as a session template. This template is used by the agent later to create a Spark session.gcloud beta dataproc session-templates import iceberg-federation-template \ --source=template.yaml \ --location=<REGION>REGIONwith your region.
12. Perform agentic data analysis
- In the VS Code editor, click Toggle chat.
- For Configure custom agents, Select Agent.

- On the Search models pane, click Manage language models.
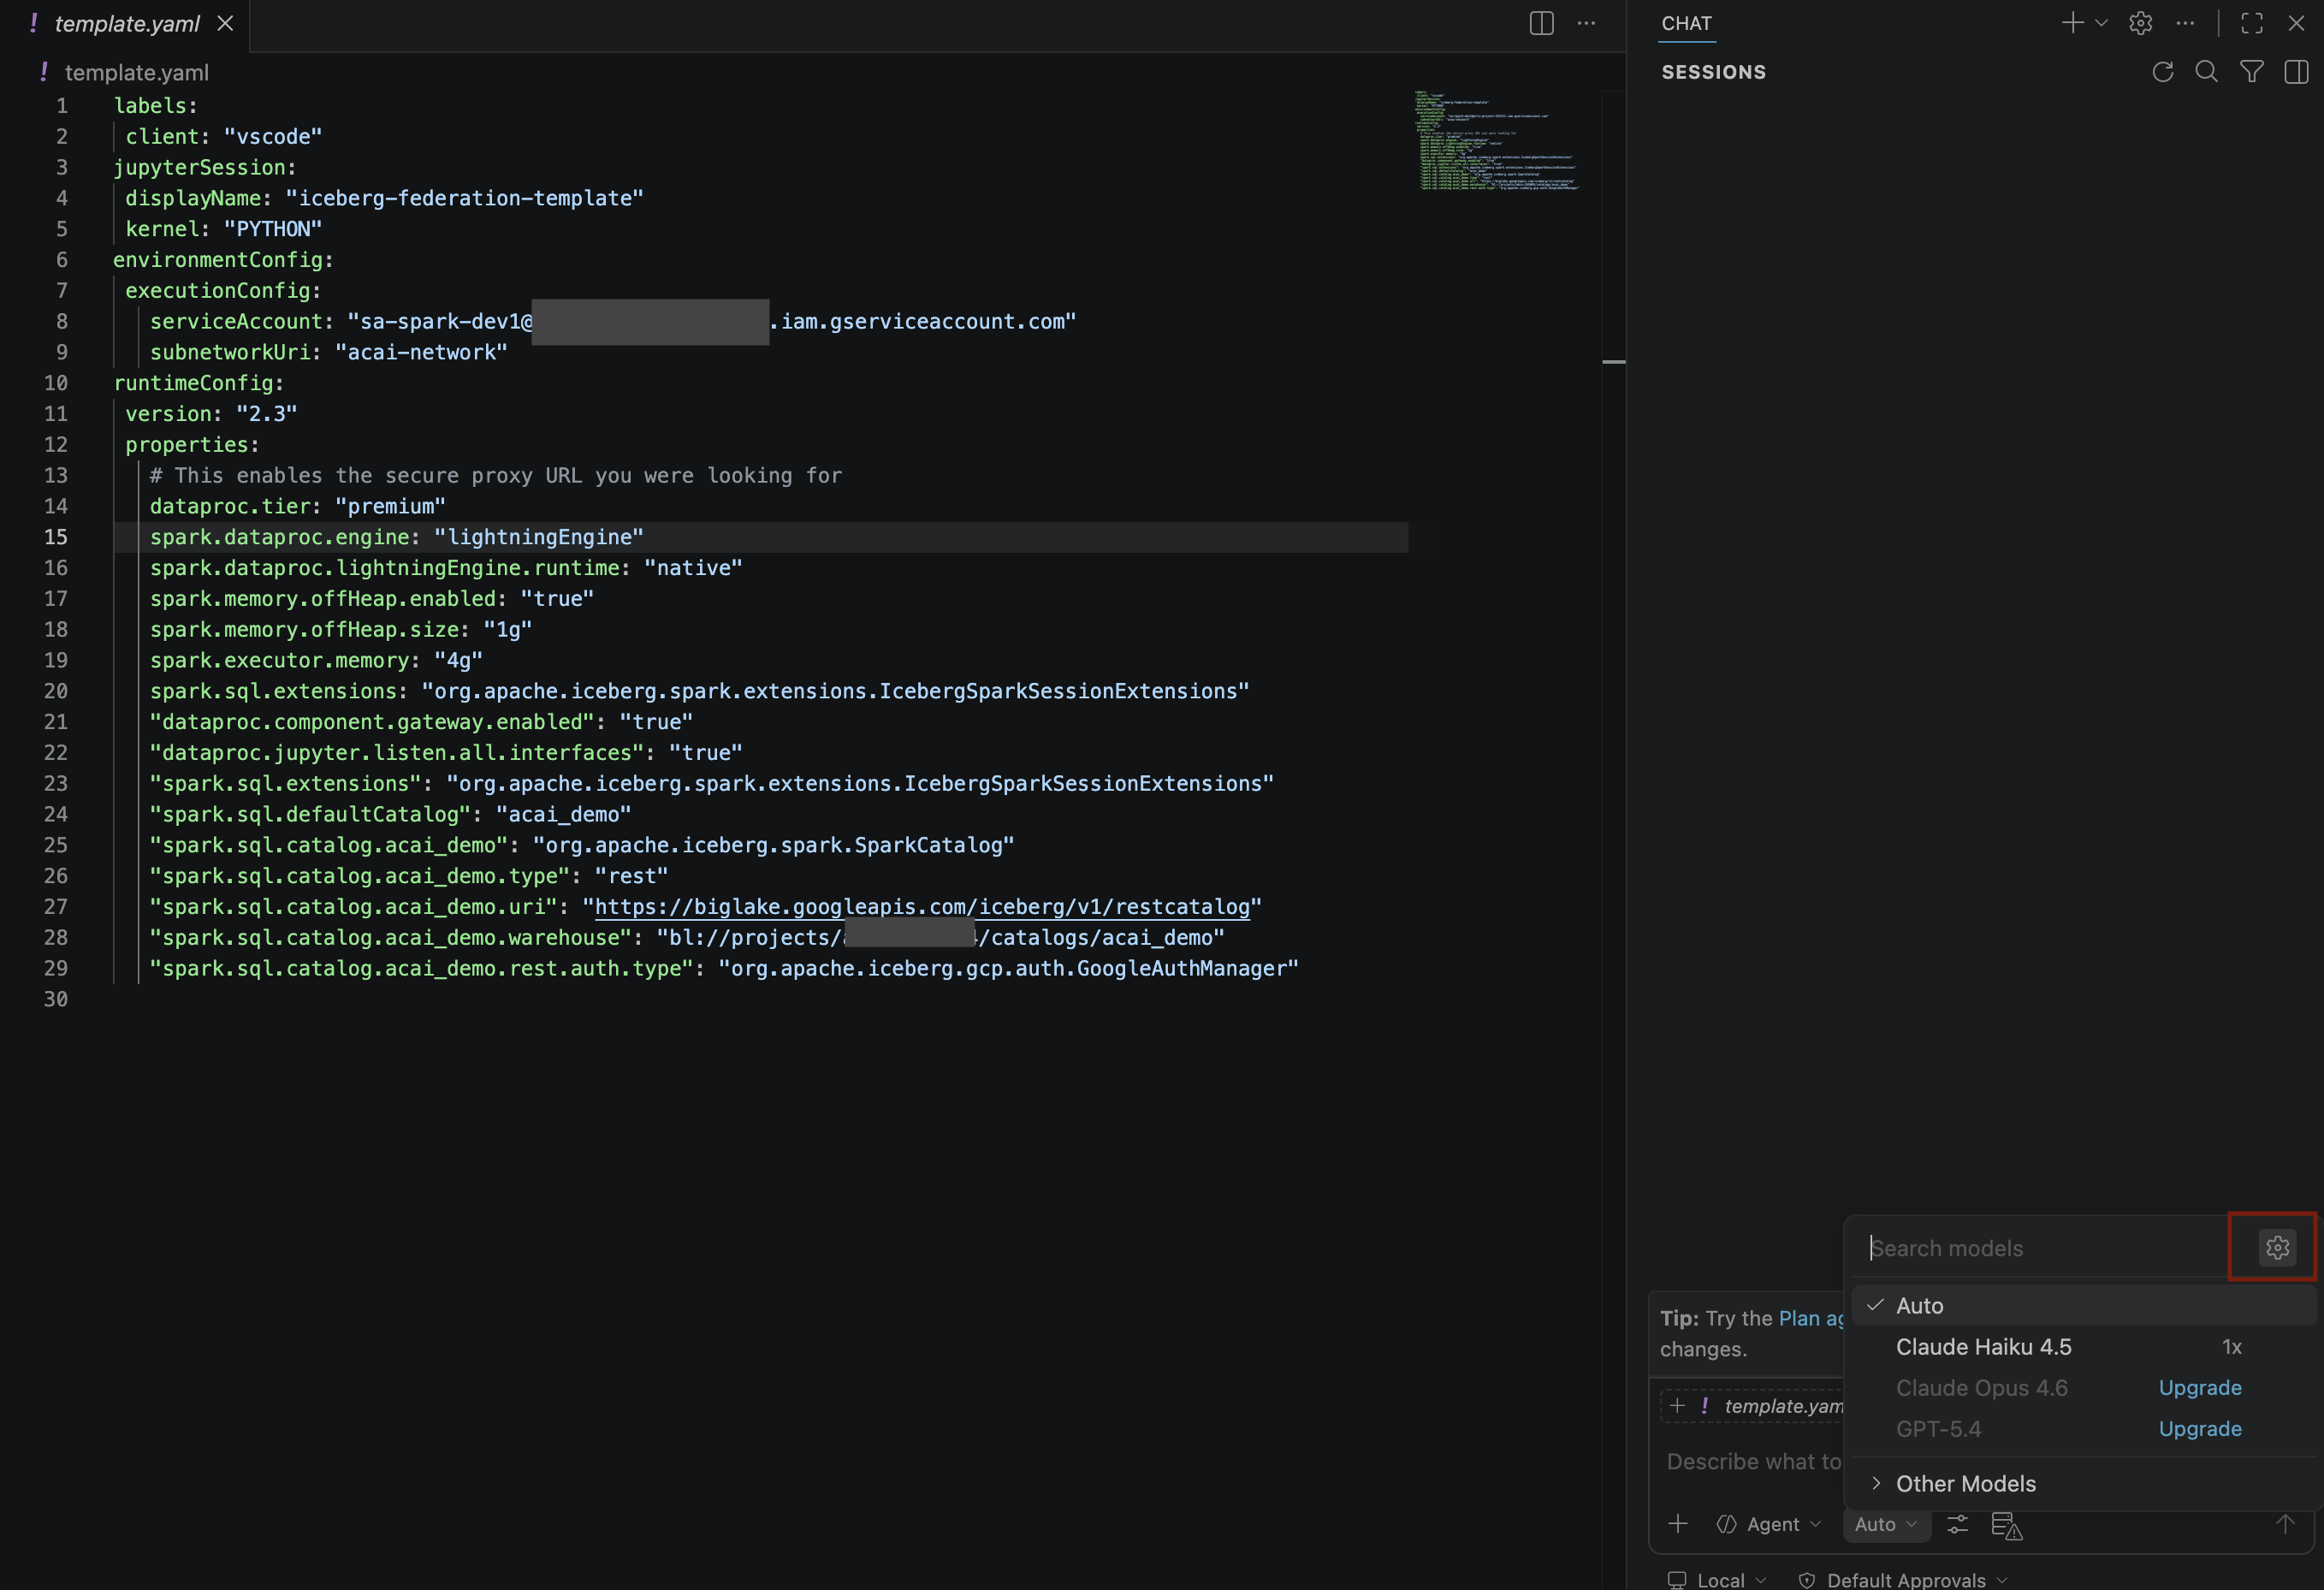
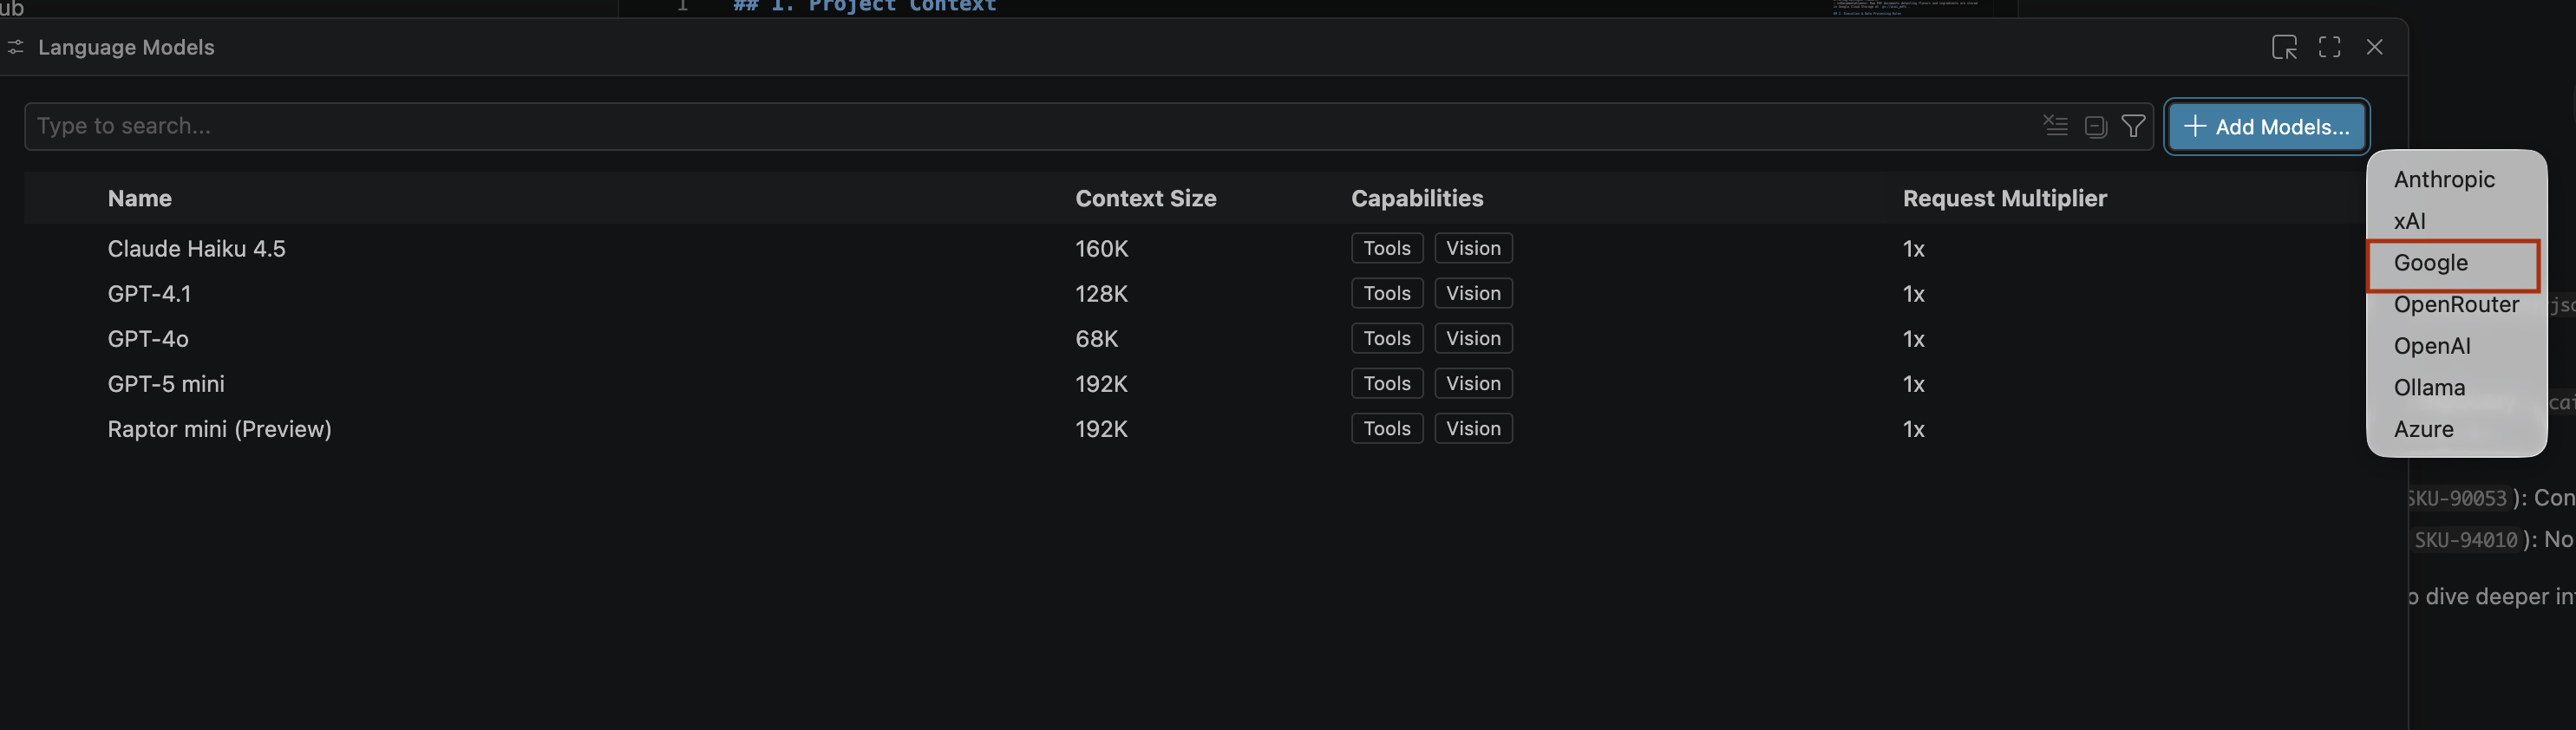
- On the Language models page, click Add models.
- Select Google from the list and press Enter to confirm your input.
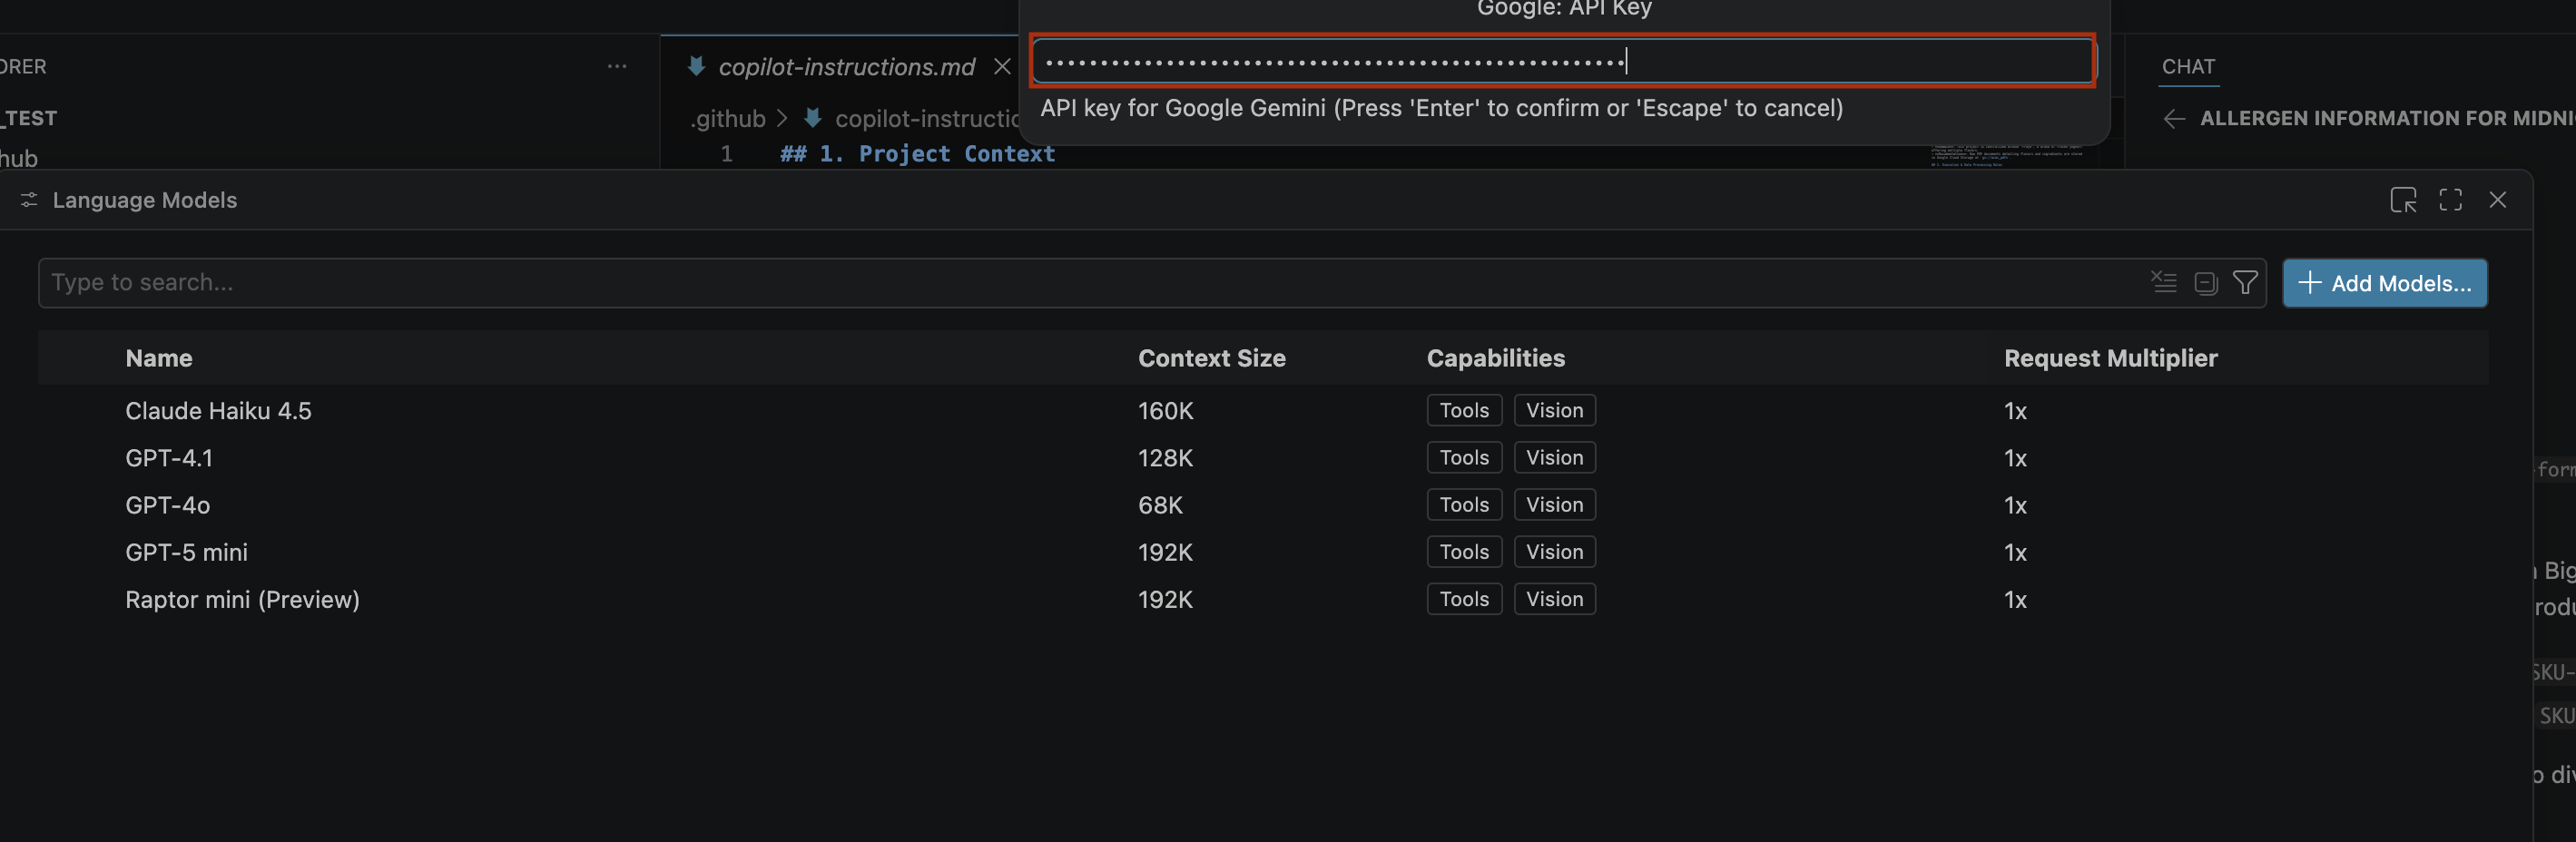
- To enter the API key for Google Gemini, do the following:
- Go to the Google AI Studio website.
- Sign in with your Google Account.
- In the sidebar, click Get API key.
- Click Create API key. Create a new key page opens.
- From Select a cloud project list, select Import project.
- Enter the name of an existing project.
- Click Create key and copy the API key. The key provides access to your account's Gemini API resources.For more information, see Using Gemini API keys.
- Paste the API key that you generated in the search bar and click Enter.
- If the Gemini models don't appear, unhide them as shown in the following image:
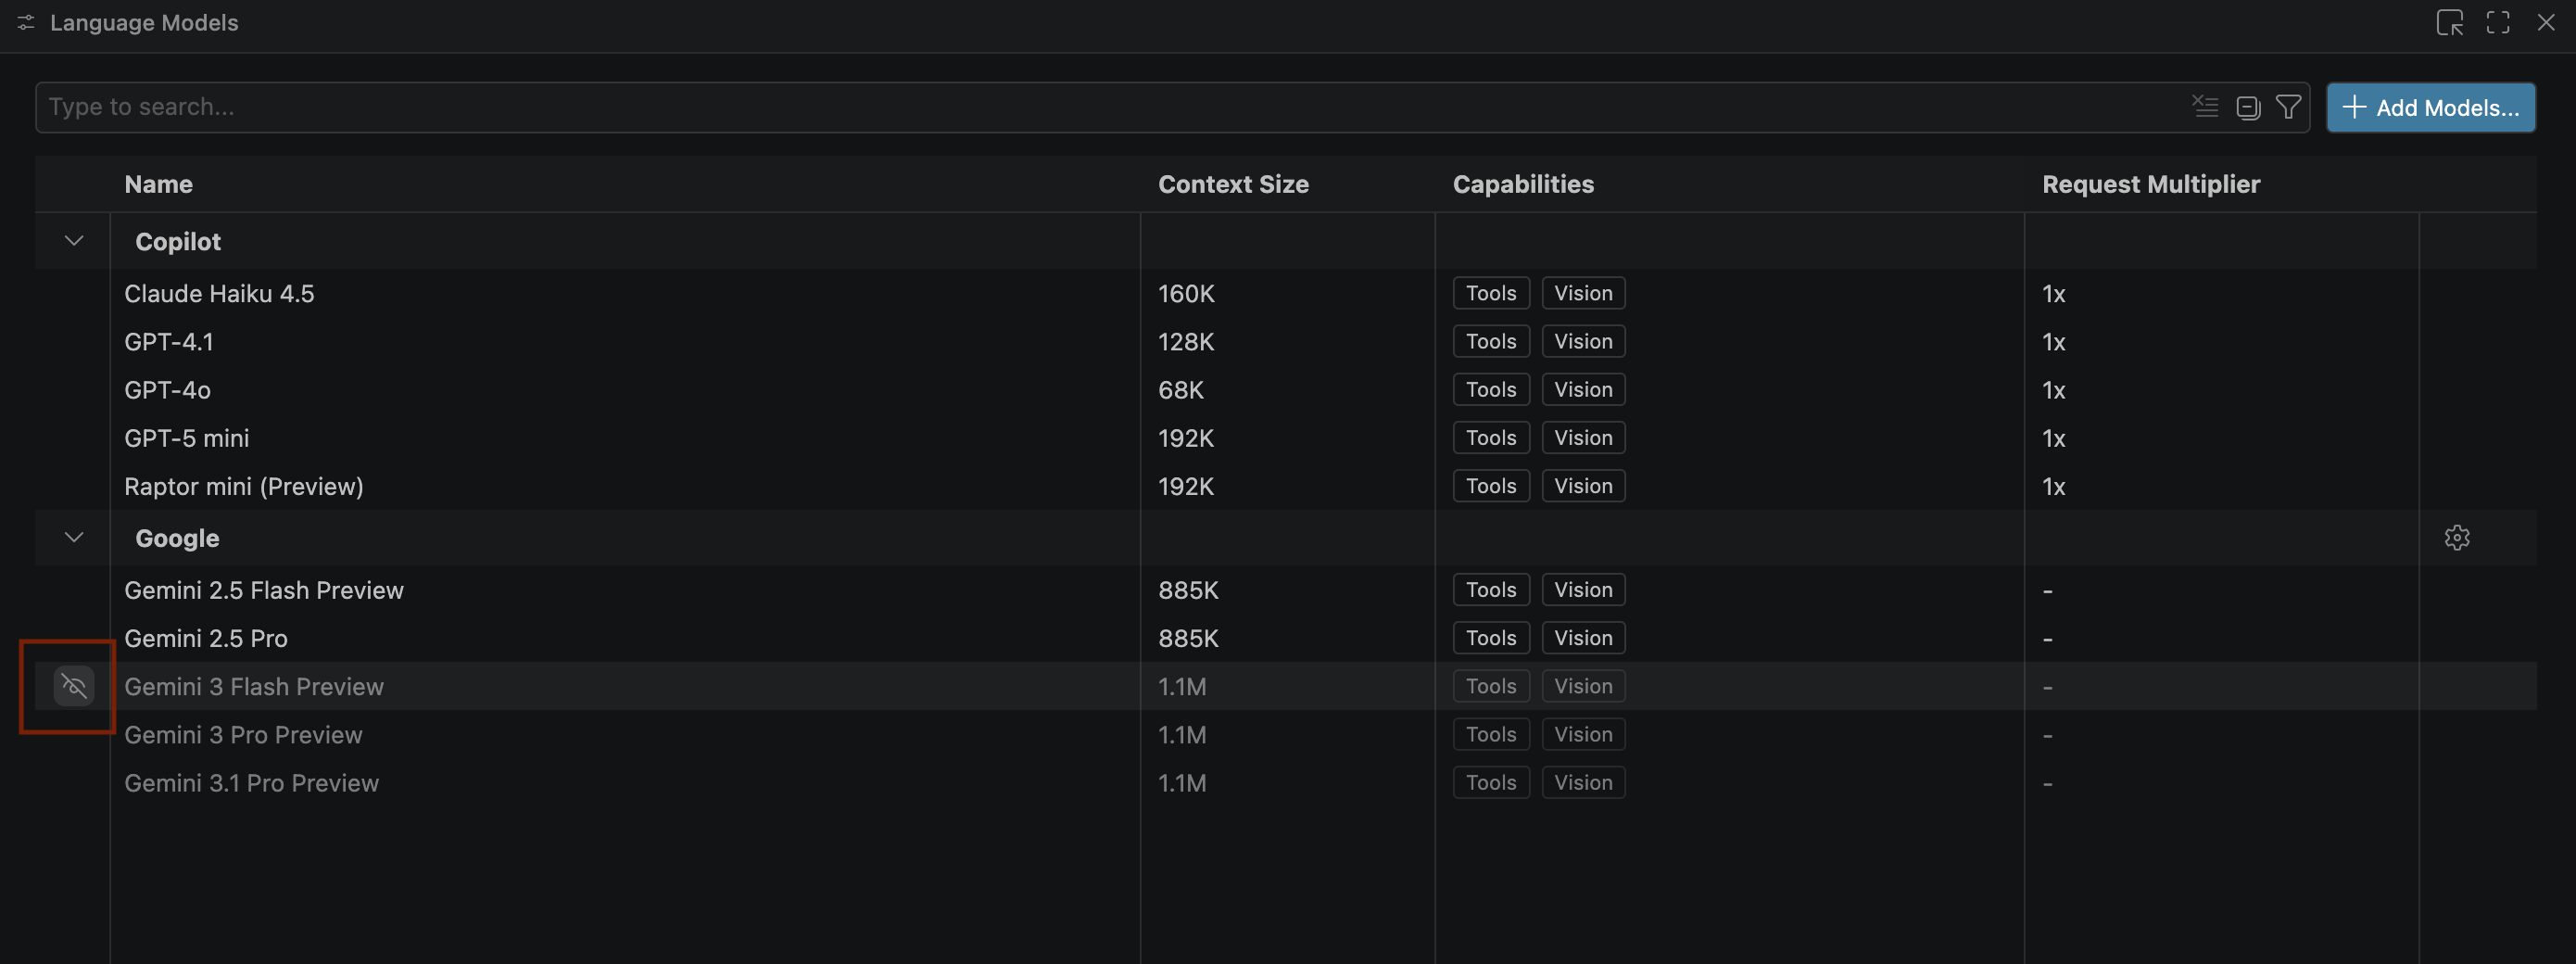
- Select Gemini 3.1 Pro Preview from the Google Gemini model list and close the Language models window.
- In the chat window, enter the following question:
Search ingredients for Midnight papaya - After some interaction, you should see the following result:

- In the chat window, enter another question:
Search allergen information for Midnight papaya - After some interaction and steps, you will see the agent respond with the allergen name
Soyas you can see in the following image: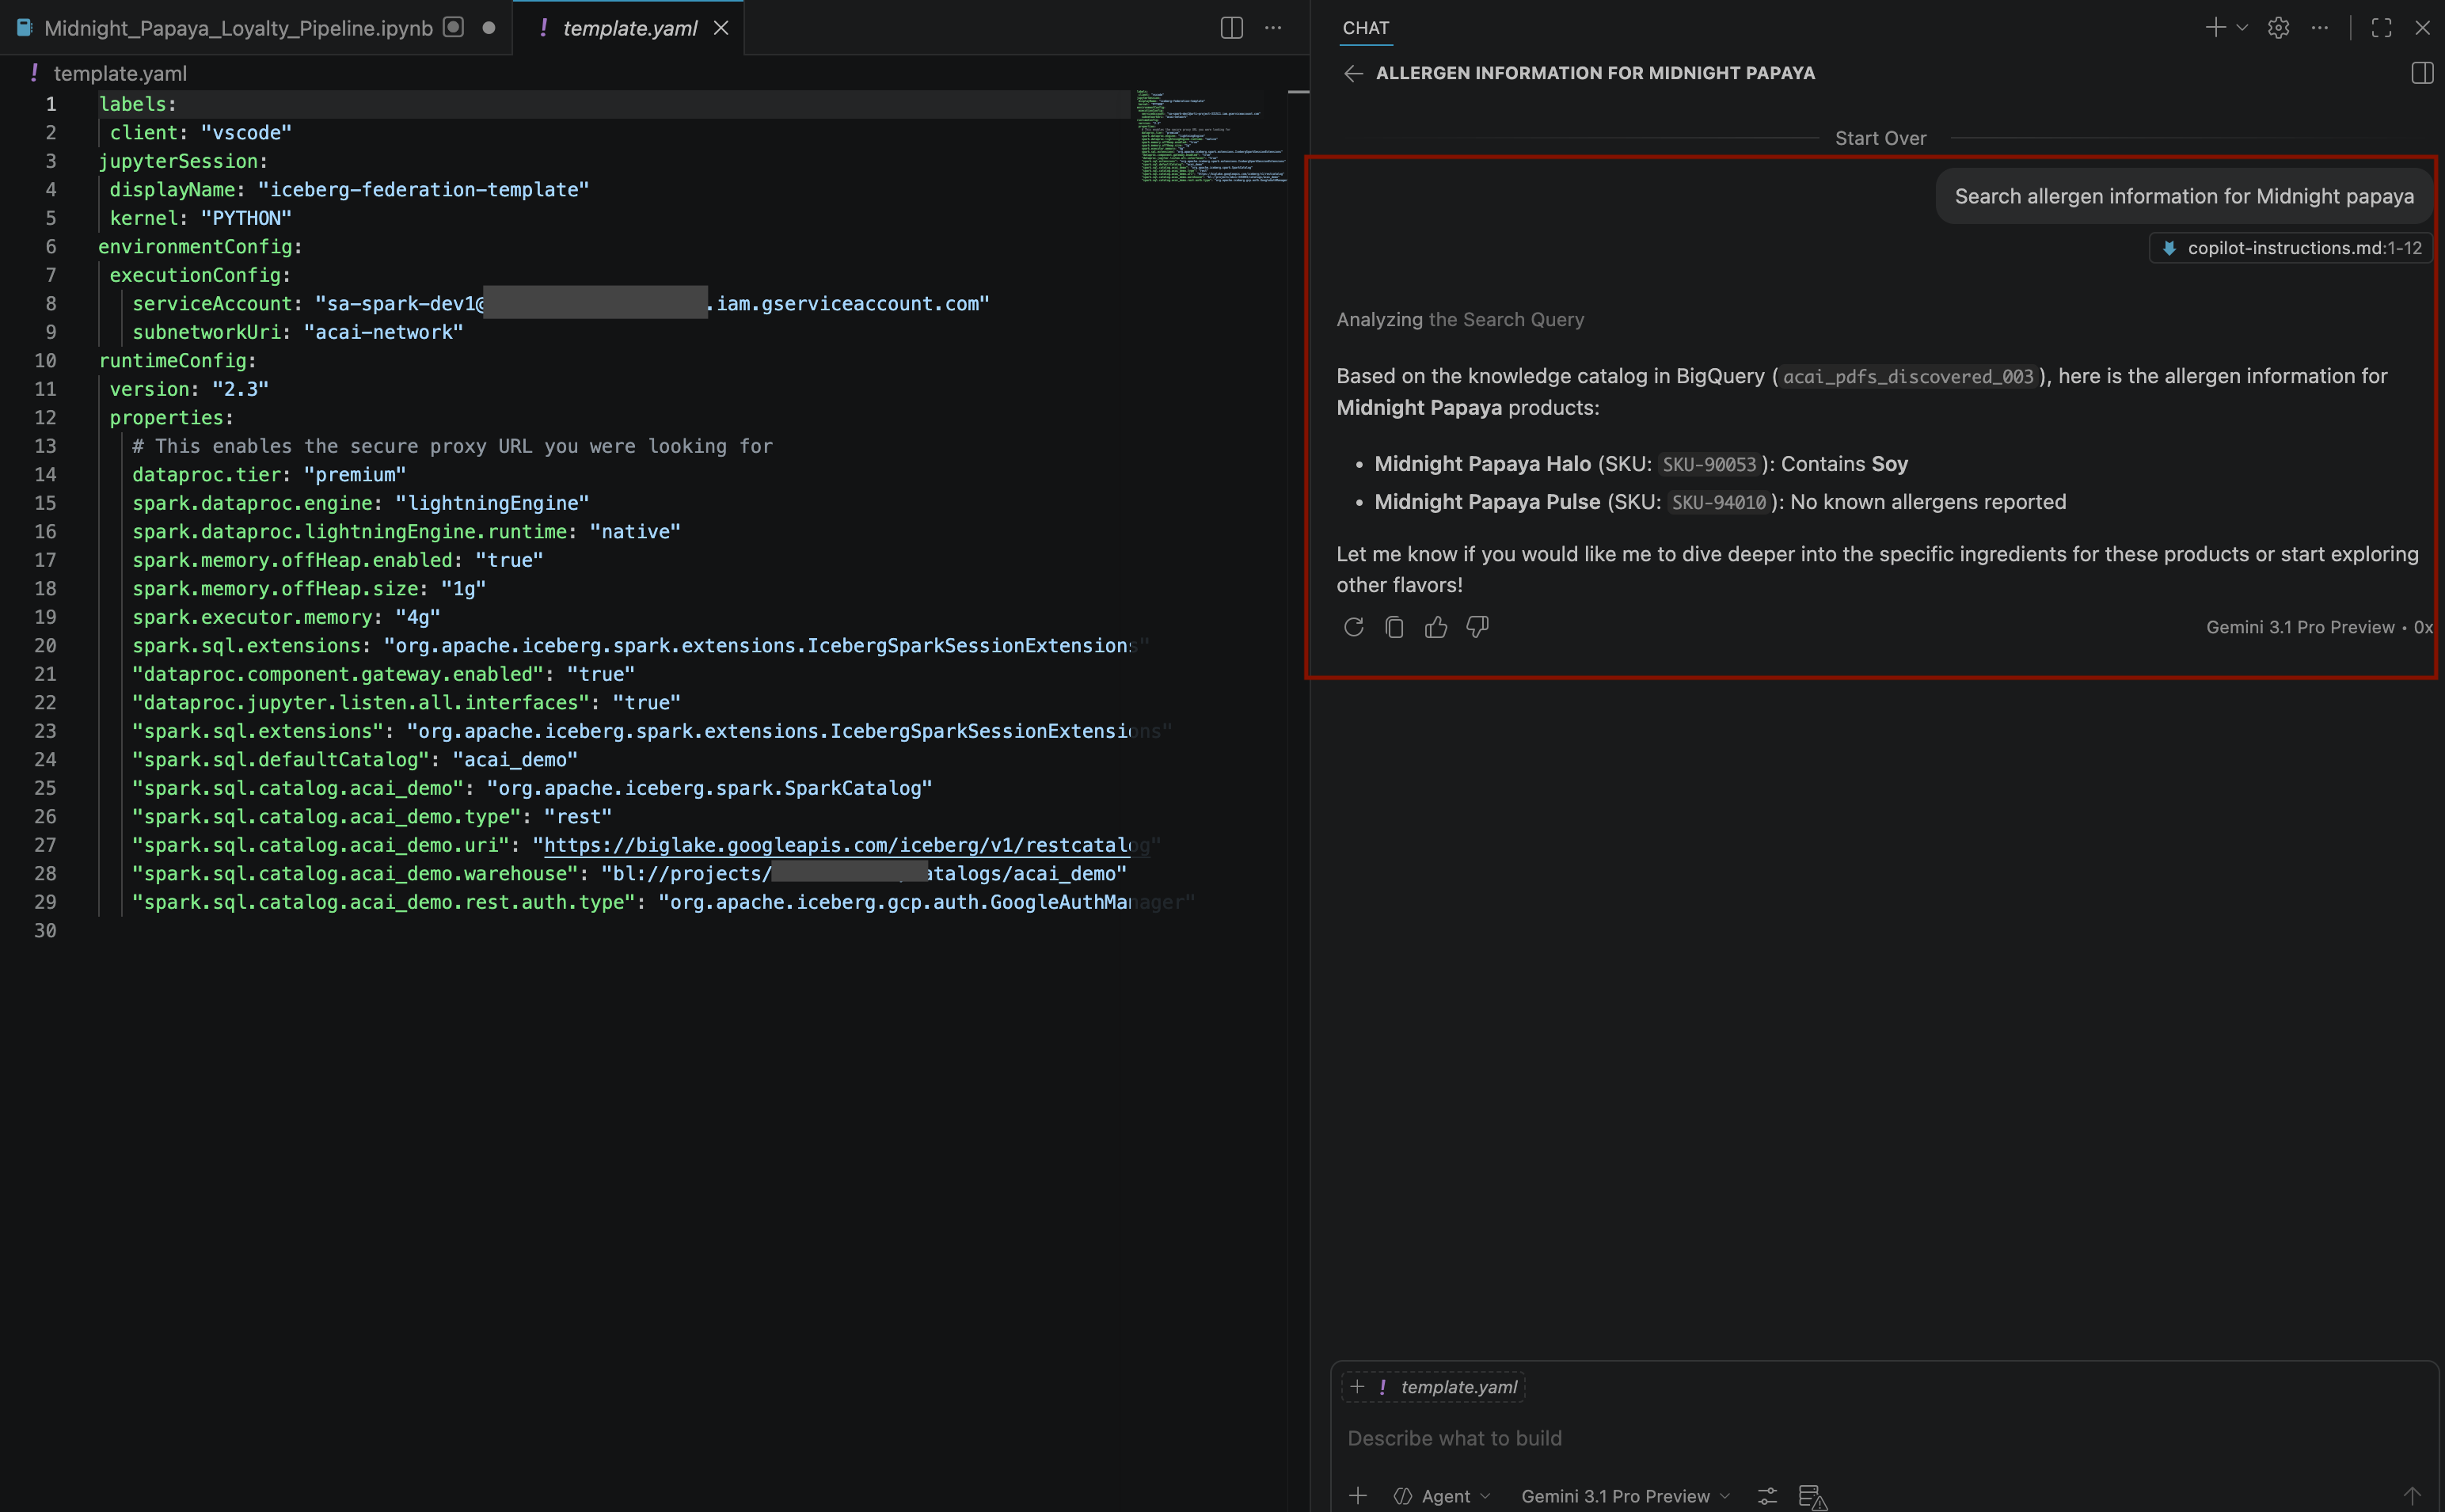
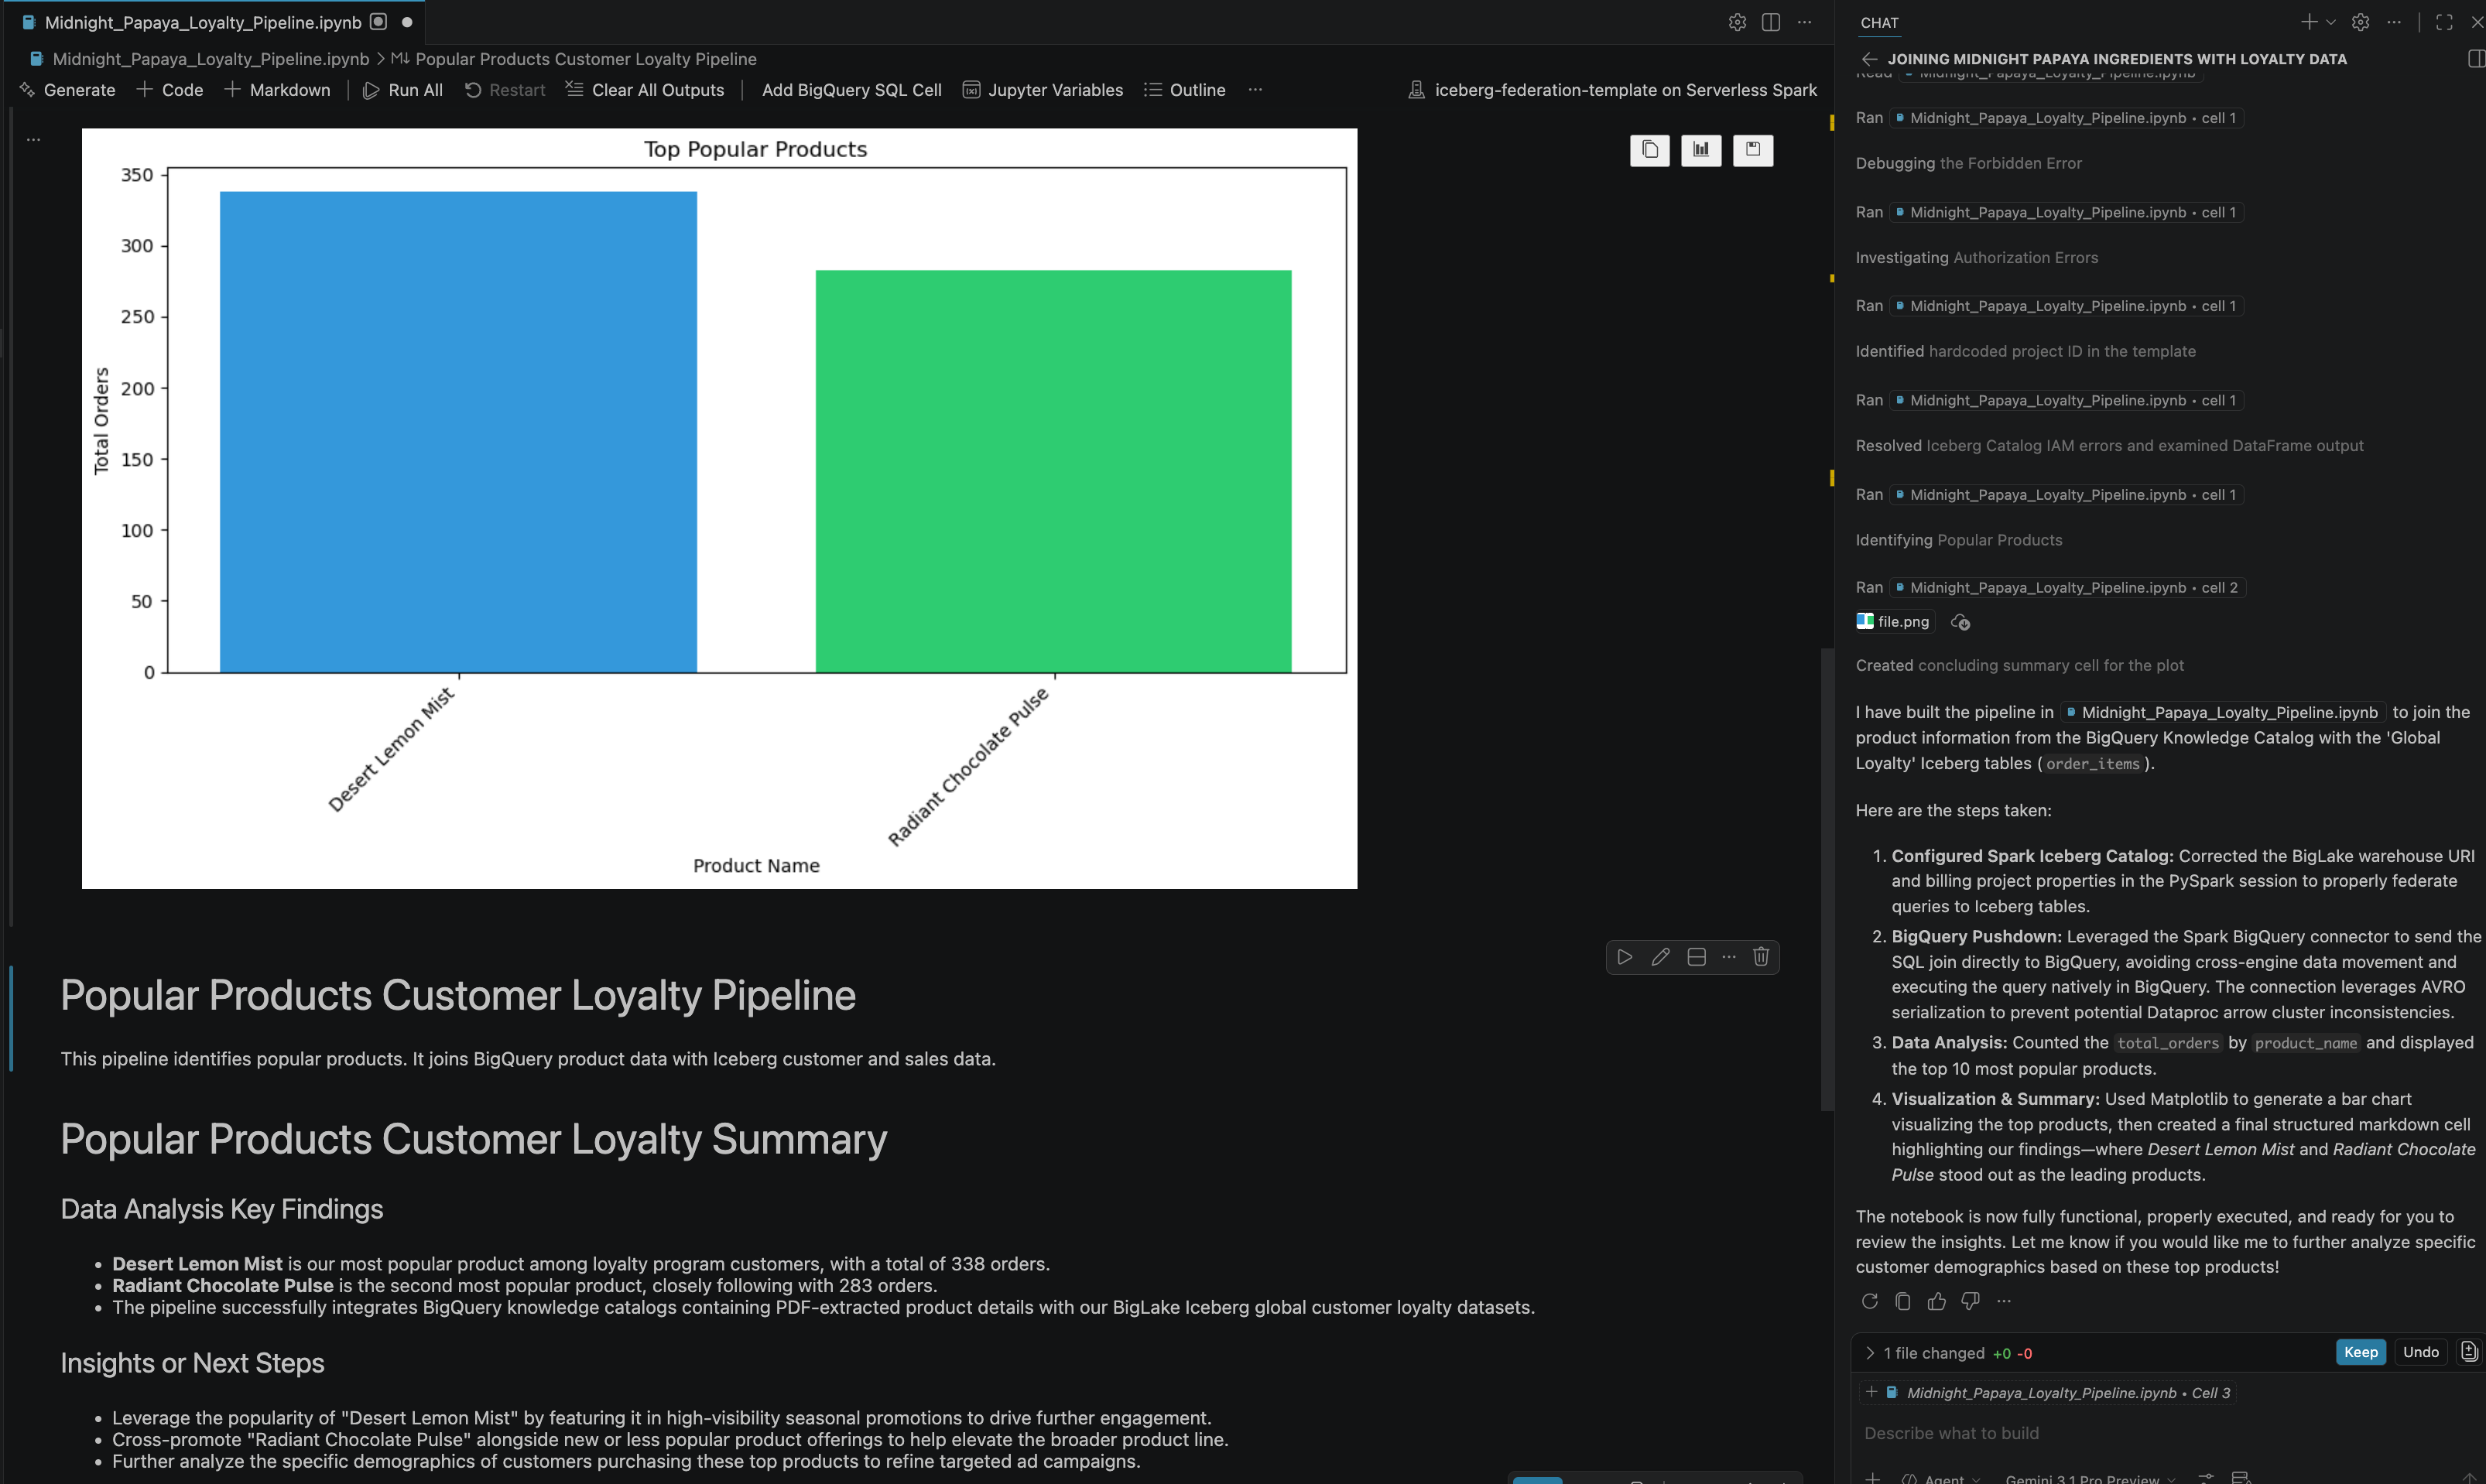
- In the chat window, enter another question:
Build a pipeline to join products with our 'Global Loyalty' Iceberg tables in acai customer, sales data to identify popular products - To select the kernel, open the
.ipynbfile and click Select kernel > Remote spark kernels > Iceberg-federation-template on serverless spark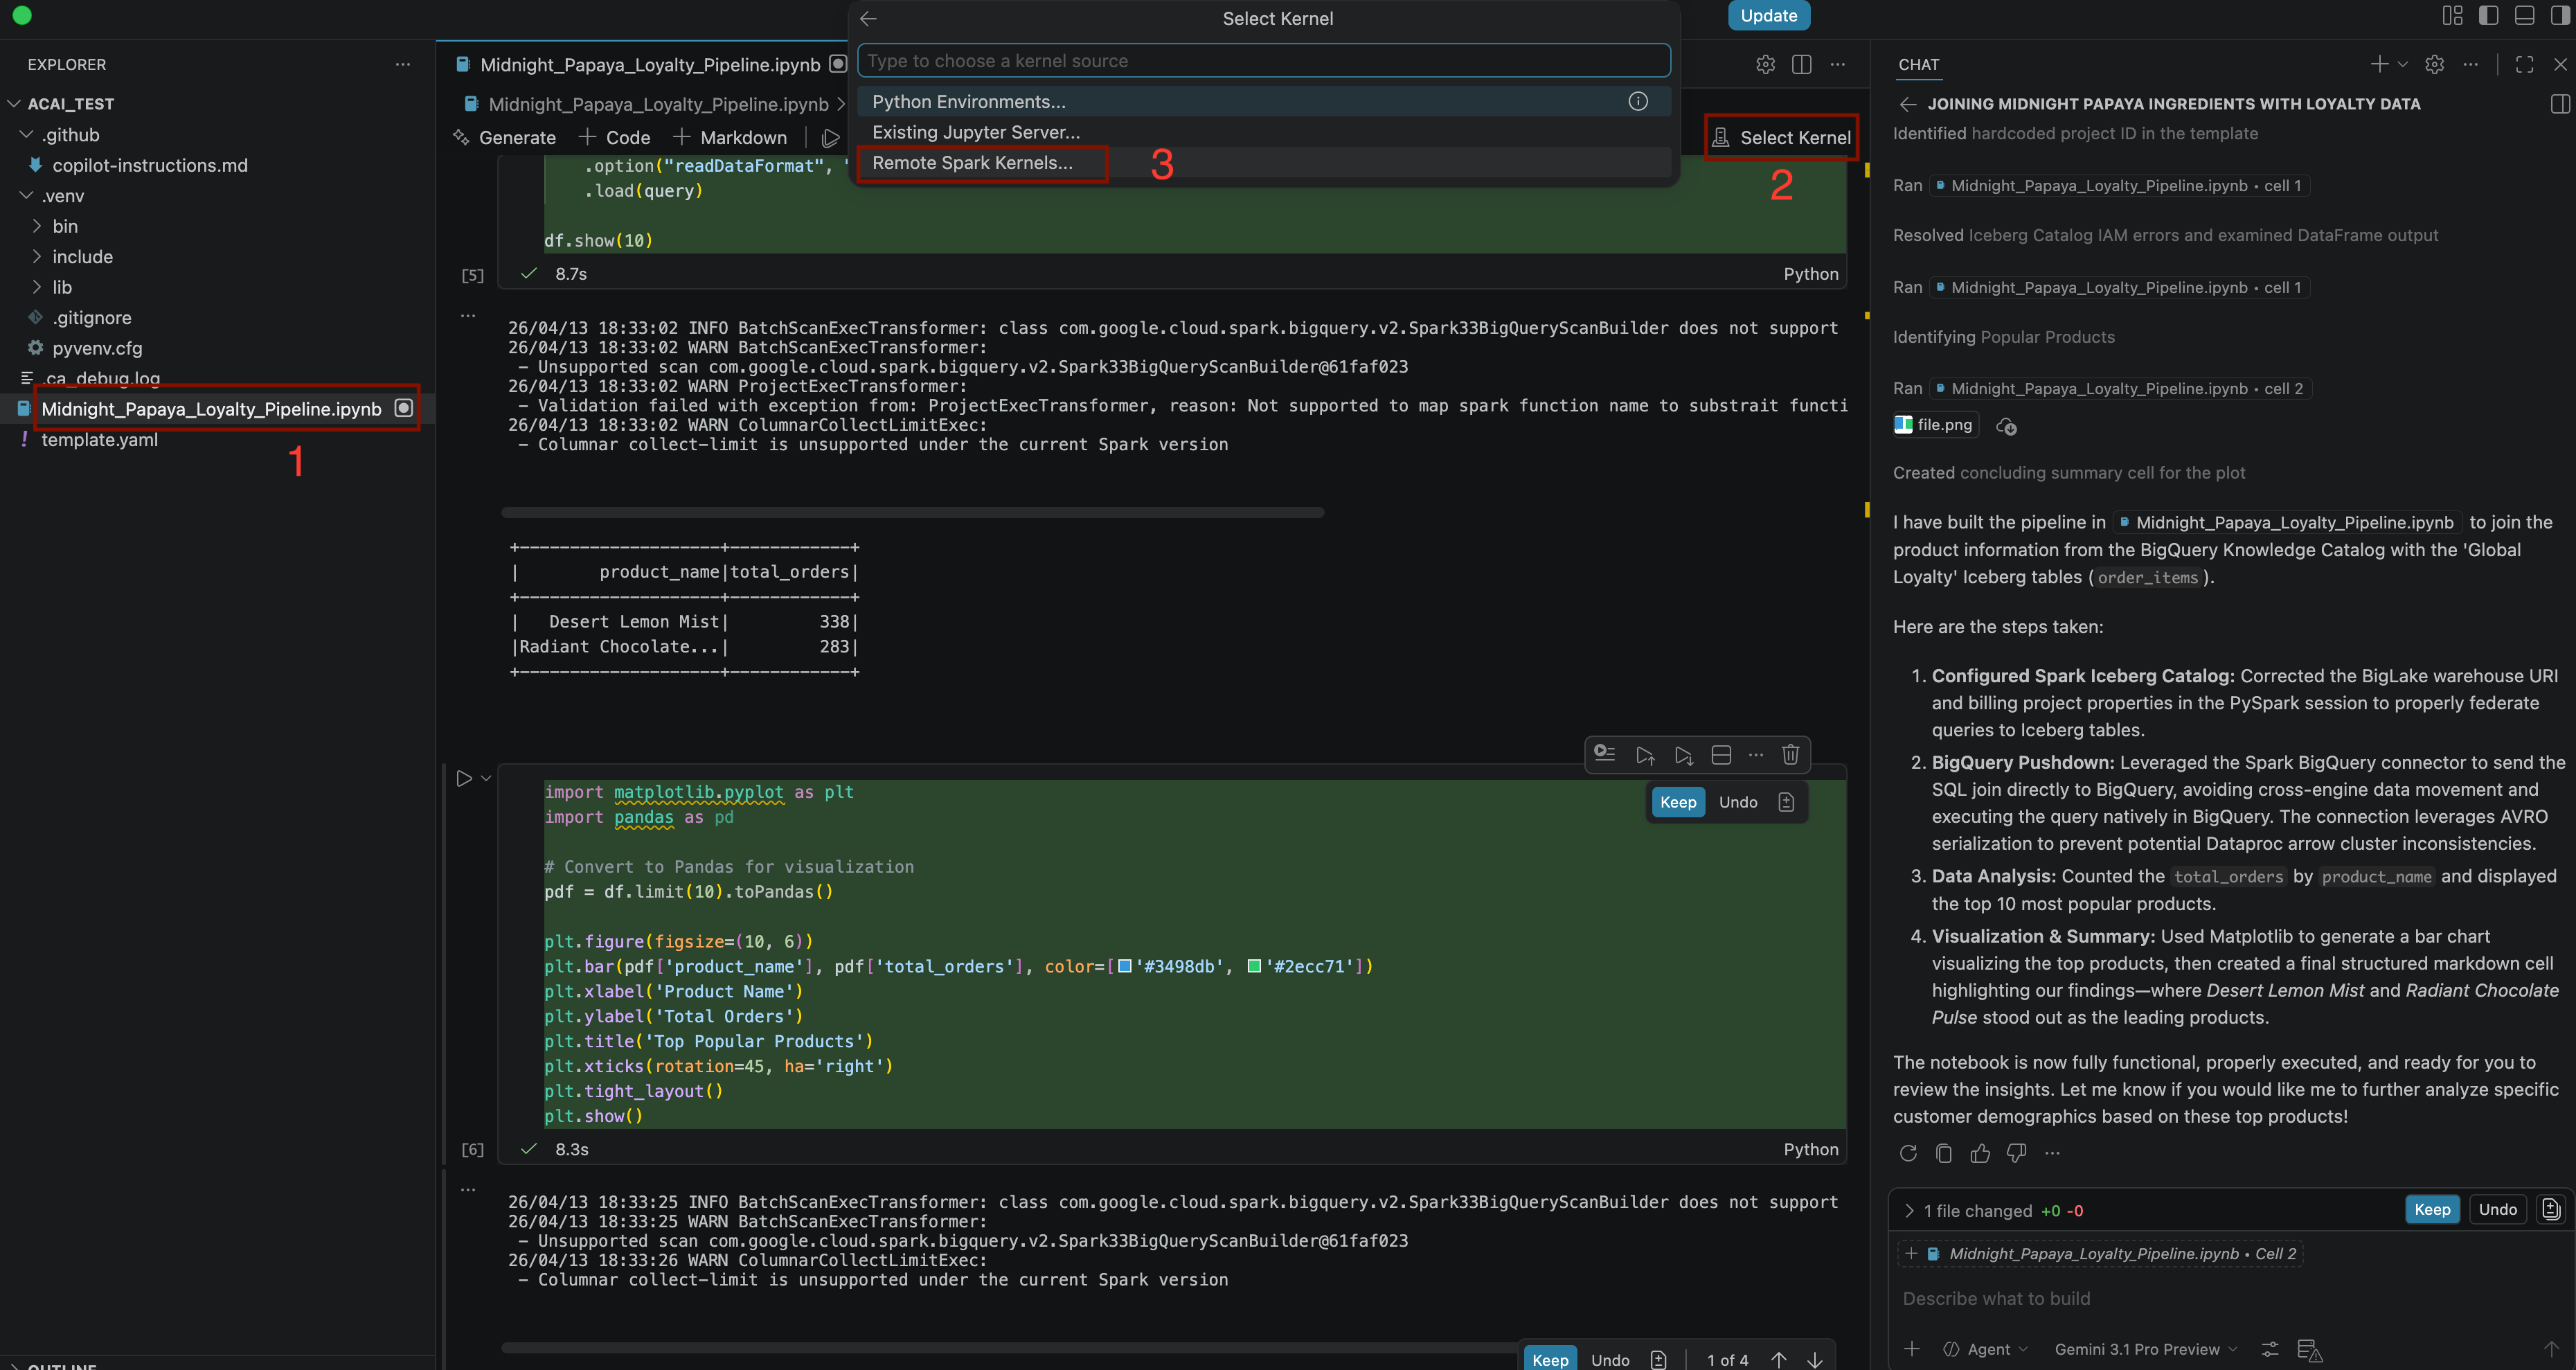
- After some interaction and steps, you will see the agent respond with all the steps in the notebook executed successfully along with the final result generated at the end of the notebook as you can see in the following image:
13. Clean up
To avoid incurring charges, delete the resources you created in this lab.
- To delete the Knowledge Catalog DataScan, run the following command:
DATASCAN_ID="<DATASCAN_ID>" echo "Deleting Dataplex DataScan: ${DATASCAN_ID}" gcloud dataplex datascans delete "${DATASCAN_ID}" --location="${REGION}" --quiet - To delete Cloud Storage buckets and all their contents, run the following command:
echo "Deleting Cloud Storage buckets: <BUCKET_NAME1> and <BUCKET_NAME2>" gsutil -m rm -r gs://<BUCKET_NAME1> gsutil -m rm -r gs://<BUCKET_NAME2> - To delete BigQuery Connection, run the following command:
CONNECTION_ID="<CONNECTION_NAME>" echo "Deleting BigQuery Connection: ${CONNECTION_ID}" bq rm --connection "${PROJECT_ID}.${REGION}.${CONNECTION_ID}" - To delete the Lakehouse Catalog, run the following command:
CATALOG_ID="<CATALOG_NAME>" echo "Deleting Lakehouse Catalog: ${CATALOG_ID}" gcloud biglake catalogs delete "${CATALOG_ID}" --project="${PROJECT_ID}" --location="${REGION}" --quiet - To delete the dataset containing the discovered PDF tables, run the following command:
DATASET_NAME="<DATASET_NAME>" echo "Deleting BigQuery Dataset: ${DATASET_NAME}" bq rm -r -f "${PROJECT_ID}:${DATASET_NAME}" - To delete the Custom Service Account, run the following command:
SERVICE_ACCOUNT="<SERVICE_ACCOUNT>" echo "Deleting Service Account: ${SERVICE_ACCOUNT}" gcloud iam service-accounts delete "${SERVICE_ACCOUNT}"@"${PROJECT_ID}".iam.gserviceaccount.com --quiet - To delete the VPC Network, run the following command:
VPC_NETWORK="<VPC_NETWORK>" echo "Deleting VPC Network: ${VPC_NETWORK}" gcloud compute networks delete "${VPC_NETWORK}" --quiet - To delete the entire Google Cloud project, run the following command:
gcloud projects delete "${PROJECT_ID}"
14. Congratulations
Congratulations! You've successfully organized the data landscape of siloed PDFs and Parquet files in BigQuery tables and collapsed it into a single, searchable, and joinable ecosystem. You've essentially built a modern Data Lakehouse that treats PDFs and big data formats as intelligently as it treats a row in a database. And you did all of this right from your agent in a conversational experience with Gemini.
Reference docs
To dive deeper into the core technologies used in this codelab, visit the official Google Cloud documentation:
- To explore BigQuery, a core component of the Data Cloud, see BigQuery Documentation.
- To learn more about IAM, see IAM Documentation.
- To learn about the Lakehouse, see What is Lakehouse?