

1. 简介
在此 Codelab 中,您将使用智能体开发套件 (ADK) 构建一个行程规划智能体,并使用 Google 地图为其提供依据。您将提示智能体生成风景优美的路线和餐厅推荐,从而利用 Google 地图中的真实世界数据。
您将执行的操作
- 使用 Agent Starter Pack 初始化代理项目
- 配置智能体以使用 Google 地图接地工具
- 使用 Web 界面在本地测试生成的智能体
所需条件
- 网络浏览器,例如 Chrome
- 启用了结算功能的 Google Cloud 项目
此 Codelab 适合中级开发者,他们对 Python 和 Google Cloud 有一定的了解,但不一定是专家。
2. 准备工作
创建 Google Cloud 项目
- 在 Google Cloud 控制台的项目选择器页面上,选择或创建一个 Google Cloud 项目。
- 确保您的 Cloud 项目已启用结算功能。了解如何检查项目是否已启用结算功能。
启动 Cloud Shell
- 验证身份验证:
gcloud auth list
- 确认您的项目:
gcloud config get project
- 根据需要进行设置:
export PROJECT_ID=<YOUR_PROJECT_ID>
gcloud config set project $PROJECT_ID
启用 API
运行以下命令可启用所有必需的 API:
gcloud services enable \
  aiplatform.googleapis.com
3. 安装 Agent Starter Pack
开始 ADK 项目的最简单方法是使用 Agent Starter Pack。Google Cloud Agent Starter Pack 是一款开源命令行界面 (CLI) 工具,旨在加速在 Google Cloud 上开发和部署可用于生产用途的生成式 AI 智能体。
- 确保已安装
uv,然后运行创建命令以初始化新的代理项目:
uvx agent-starter-pack create
- 出现提示时,请提供以下选项,以配置项目以进行本地开发(使用 React 前端):
- 代理模板:
adk(简单 React 代理) - 部署:
none(目前已停用云部署) - 区域:
us-central1
这会生成一个项目目录结构,其中包含您的主要代理逻辑、测试和 GEMINI.md 指南。进入新目录:
cd my-agent
4. 配置依据功能
Agent Starter Pack 会生成一个 GEMINI.md 文件,用于指示 AI 辅助编码工具如何管理您的项目。我们会更新此页面,以包含 Google 地图 Grounding 文档。
- 在编辑器中打开
GEMINI.md。 - 在
## Reference Documentation部分下添加以下参考链接:
- **Google Maps Grounding**: https://docs.cloud.google.com/vertex-ai/generative-ai/docs/grounding/grounding-with-google-maps
此上下文将有助于任何 AI 编码助理了解基础功能。
5. 更新代理
现在,我们将配置智能体,使其充当行程规划器,并配备 Google 地图 Grounding 工具。
- 打开
app/agent.py文件。 - 将
app/agent.py的全部内容替换为以下代码:
"""Agent application for the itinerary planner codelab."""

import os
import google.auth
from google.adk.agents import Agent
from google.adk.apps import App
from google.adk.models import Gemini
from google.adk.tools import google_maps_grounding
from google.genai import types

# Authenticate and set environment variables
_, project_id = google.auth.default()
os.environ["GOOGLE_CLOUD_PROJECT"] = project_id
os.environ["GOOGLE_CLOUD_LOCATION"] = "global"
os.environ["GOOGLE_GENAI_USE_VERTEXAI"] = "True"

# Define the root agent
root_agent = Agent(
    name="itinerary_planner_agent",
    model=Gemini(
        model="gemini-2.5-flash",
        retry_options=types.HttpRetryOptions(attempts=3),
    ),
    instruction=(
        "You are an itinerary planner agent. Help users plan their trips by"
        " recommending restaurants and scenic routes. Use the"
        " google_maps_grounding tool to get both restaurant recommendations and"
        " route recommendations based on user preferences. When calling for"
        " restaurant recommendation, prompt the tool to tell you about the vibe"
        " of the place. When calling for routes with multiple legs, describe"
        " each of those legs with a brief sentence. Always describe the key"
        " landmarks along the route in one brief sentence."
    ),
    # Add the Google Maps Grounding tool to the agent
    tools=[google_maps_grounding],
)

app = App(
    root_agent=root_agent,
    name="app",
)
此代码配置了一个基于 gemini-2.5-flash 的智能体,该智能体使用 google_maps_grounding 工具检索有关地点和路线的最新信息。
如需查看所有可用模型,请参阅 Vertex AI 文档。
6. 运行代理
在设置好代理逻辑后,尝试在本地 Web 界面中对其进行测试。
- 从
my-agent目录的根目录中,运行以下命令以启动 Web 应用:
uv run adk web
或者,如果使用虚拟环境,请运行以下命令:
adk web
- 在浏览器中打开终端输出中提供的网址。
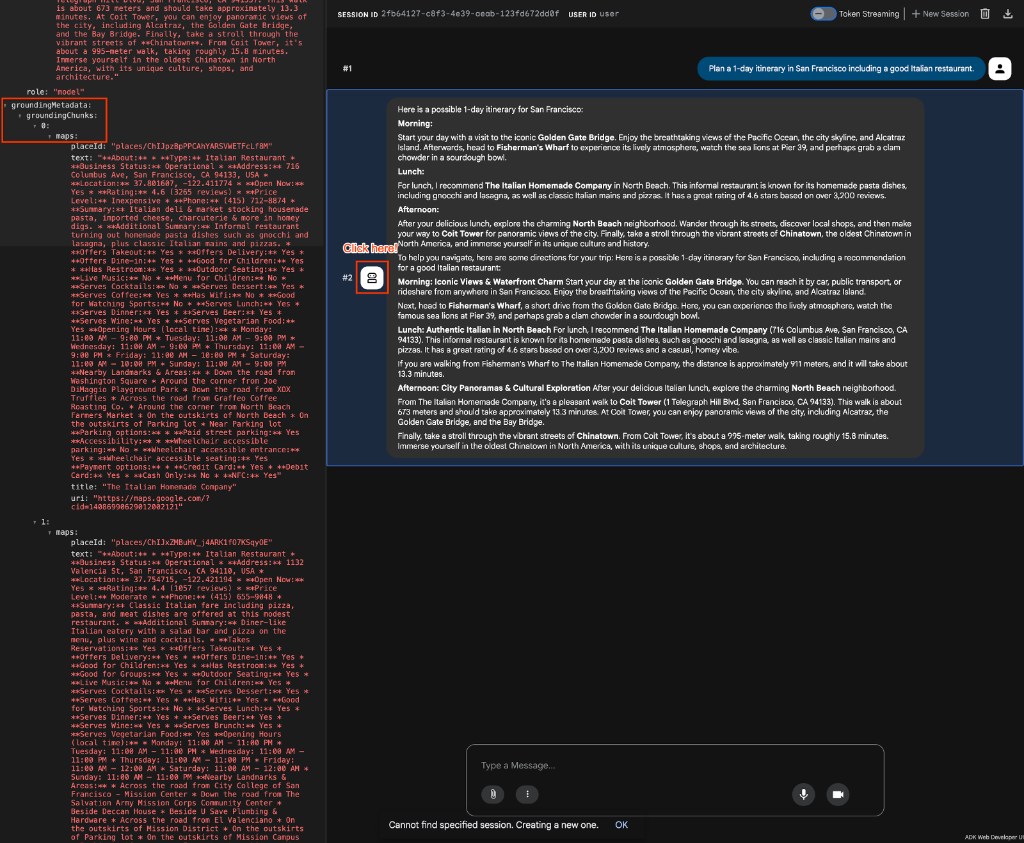
- 向智能体提问,测试其功能。例如:
- “在旧金山规划 1 天的行程,包括一家不错的意大利餐厅。”
- “我要去东京旅游,你能为我提供一份行程安排吗?其中包含有趣的历史地标和一家氛围舒适且评价很高的拉面店。”
您应该会看到类似以下输出:详细的行程安排,其中包含直接从 Google 地图提取的真实评价和路线说明。
7. 在代码中验证 Grounding
如需以编程方式确认代理是否成功使用 Google 地图接地,您可以检查响应事件中是否包含 Google 地图专属的元数据。
当您运行代理(例如在测试脚本中)时,代理会生成包含 grounding_metadata 的事件。您可以遍历此元数据中的 grounding_chunks,并检查 maps 属性。
以下示例展示了如何检查 maps 属性,类似于您在自动化测试中可能使用的代码:
async for event in runner.run_async(
    user_id="test_user",
    session_id=session.id,
    new_message=content,
):
    if event.grounding_metadata:
        if event.grounding_metadata.grounding_chunks:
            for chunk in event.grounding_metadata.grounding_chunks:
                # Check for the maps attribute to confirm maps grounding
                if hasattr(chunk, "maps") and chunk.maps:
                    print("SUCCESS: Maps grounding chunks detected in the response!")
8. 提取编码多段线
除了验证是否进行了事实依据,您可能还想提取特定数据,例如路线路径。当 Google 地图接地工具返回路线信息时,通常会包含“编码的多段线”,可用于在地图前端上渲染路线。
您可以通过检查 grounding_chunks 的 maps 属性中的文本来找到此折线。以下示例展示了如何检测到这种情况:
async for event in runner.run_async(
    user_id="test_user",
    session_id=session.id,
    new_message=content,
):
    if event.grounding_metadata:
        if event.grounding_metadata.grounding_chunks:
            for chunk in event.grounding_metadata.grounding_chunks:
                # Extract the encoded polyline from the maps chunk text
                if (
                    hasattr(chunk, "maps")
                    and chunk.maps
                    and hasattr(chunk.maps, "text")
                    and chunk.maps.text
                    and "Encoded Polyline" in chunk.maps.text
                ):
                    print("SUCCESS: Encoded Polyline detected in the response!")
9. 清理
为避免系统向您的 Google Cloud 账号持续收取费用,请删除在此 Codelab 中创建的资源。
- 如果您为此 Codelab 创建了一个专用项目,请将其完全删除:
gcloud projects delete $PROJECT_ID
如果您使用的是现有项目,并且想要保留该项目,则无需删除任何特定资源,因为代理在本地运行,并且所使用的 API 是无服务器的。
10. 恭喜
恭喜!您已成功构建行程规划代理,并使用 Google 地图数据洞见为其提供依据。
您学到的内容
- 如何使用 Agent Starter Pack 搭建新代理
- 如何向 ADK 智能体定义添加接地工具
- 如何使用内置的 Web 运行程序测试 ADK 智能体
后续步骤
- 探索其他 ADK 工具和集成模式