
1. Introduction
In this lab, you will go beyond simple chatbots and build a distributed multi-agent system.
While a single LLM can answer questions, real-world complexity often requires specialized roles. You don't ask your backend engineer to design the UI, and you don't ask your designer to optimize database queries. Similarly, we can create specialized AI agents that focus on one task and coordinate with each other to solve complex problems.
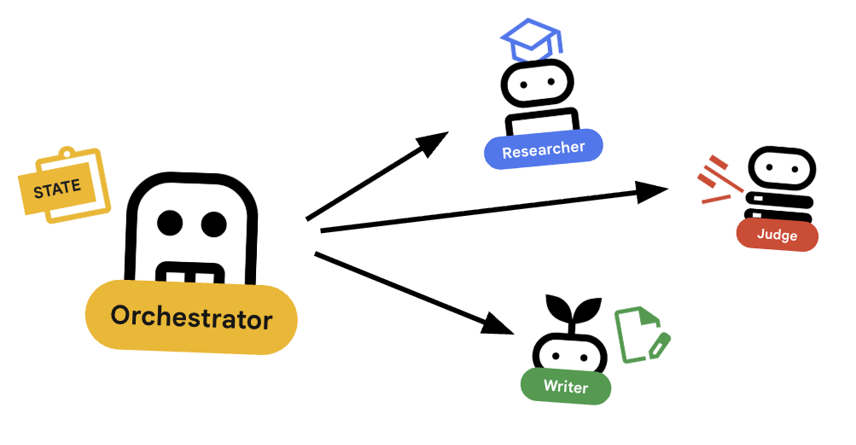
You will build a Course Creation System consisting of:
- Researcher Agent: Using google_search to find up-to-date information.
- Judge Agent: Critiquing the research for quality and completeness.
- Content Builder Agent: Turning the research into a structured course.
- Orchestrator Agent: Managing the workflow and communication between these specialists.
What you'll learn
- Define a tool-using agent (researcher) that can search the web.
- Implement structured output with Pydantic for the judge.
- Connect to remote agents using the Agent-to-Agent (A2A) protocol.
- Construct a LoopAgent to create a feedback loop between the researcher and judge.
- Run the distributed system locally using the ADK.
- Deploy the multi-agent system to Google Cloud Run.
- Use a Gemma model on a Cloud Run GPU for the content builder agent.
What you'll need
- A web browser such as Chrome
- A Google Cloud project with billing enabled
2. Architecture and Orchestration Principles
First, let's understand how these agents work together. We are building a Course Creation Pipeline.
The System Design
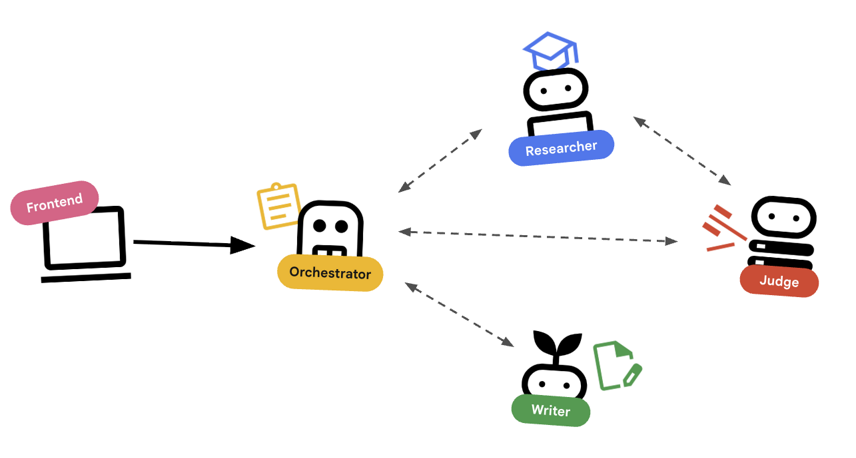
Orchestrating with Agents
Standard agents (like the Researcher) do work. Orchestrator Agents (like LoopAgent or SequentialAgent) manage other agents. They don't have their own tools; their "tool" is delegation.
LoopAgent: This acts like awhileloop in code. It runs a sequence of agents repeatedly until a condition is met (or max iterations reached). We use this for the Research Loop:- Researcher finds info.
- Judge critiques it.
- If Judge says "Fail", the EscalationChecker lets the loop continue.
- If Judge says "Pass", the EscalationChecker breaks the loop.
SequentialAgent: This acts like a standard script execution. It runs agents one after another. We use this for the High-Level Pipeline:- First, run the Research Loop (until it finishes with good data).
- Then, run the Content Builder (to write the course).
By combining these, we create a robust system that can self-correct before generating the final output.
3. Setup
Project setup
Create a Google Cloud Project
- In the Google Cloud Console, on the project selector page, select or create a Google Cloud project.
- Make sure that billing is enabled for your Cloud project. Learn how to check if billing is enabled on a project.
Start Cloud Shell
Cloud Shell is a command-line environment running in Google Cloud that comes preloaded with necessary tools.
- Click Activate Cloud Shell at the top of the Google Cloud console.
- Once connected to Cloud Shell, verify your authentication:
gcloud auth list - Confirm your project is configured:
gcloud config get project - If your project is not set as expected, set it:
export PROJECT_ID=<YOUR_PROJECT_ID>
gcloud config set project $PROJECT_ID
Environment Setup
- Open Cloud Shell: Click the Activate Cloud Shell icon in the top-right of the Google Cloud Console.
Get the Starter Code
- Clone the starter repository into your home directory:Move into your home directory
cd ~git clone --depth 1 --filter=blob:none --sparse https://github.com/GoogleCloudPlatform/devrel-demos.git temp-repo && cd temp-repo && git sparse-checkout set agents/multi-agent-system && cd .. && mv temp-repo/agents/multi-agent-system . && rm -rf temp-repocd multi-agent-system - Enable APIs: Run the following command to enable the necessary Google Cloud services:
gcloud services enable \ run.googleapis.com \ artifactregistry.googleapis.com \ cloudbuild.googleapis.com \ aiplatform.googleapis.com \ compute.googleapis.com - Open this folder in your editor.
cloudshell edit .
Setup Environment
- Set up environment variables.We'll create a
.envfile to store these variables so you can easily reload them if your session disconnects.cat <<EOF > .env export GOOGLE_CLOUD_PROJECT=$(gcloud config get-value project) export GOOGLE_CLOUD_LOCATION=europe-west4 export GOOGLE_GENAI_USE_VERTEXAI=true EOF - Source the environment variables:
source .env
4. 🕵️ The Researcher Agent
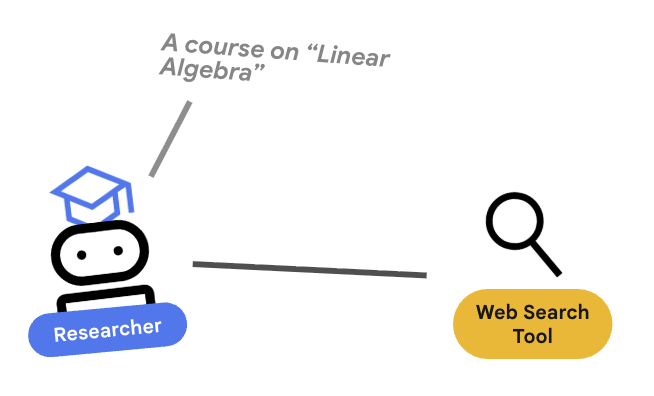
The Researcher is a specialist. Its only job is to find information. To do this, it needs access to a tool: Google Search.
Why separate the Researcher?
Deep Dive: Why not just have one agent do everything?
Small, focused agents are easier to evaluate and debug. If the research is bad, you iterate on the Researcher's prompt. If the course formatting is bad, you iterate on the Content Builder. In a monolithic "do-it-all" prompt, fixing one thing often breaks another.
- If you are working in Cloud Shell, run the following command to open Cloud Shell editor:
cloudshell workspace . - Open
agents/researcher/agent.py. - Review the following code that defines the
researcheragent:# ... existing imports ... # Define the Researcher Agent researcher = Agent( name="researcher", model=MODEL, description="Gathers information on a topic using Google Search.", instruction=""" You are an expert researcher. Your goal is to find comprehensive and accurate information on the user's topic. Use the `google_search` tool to find relevant information. Summarize your findings clearly. If you receive feedback that your research is insufficient, use the feedback to refine your next search. """, tools=[google_search], ) root_agent = researcher
Key Concept: Tool Use
Notice we pass tools=[google_search]. The ADK handles the complexity of describing this tool to the LLM. When the model decides it needs information, it generates a structured tool call, the ADK executes the Python function google_search, and feeds the result back to the model.
5. ⚖️ The Judge Agent
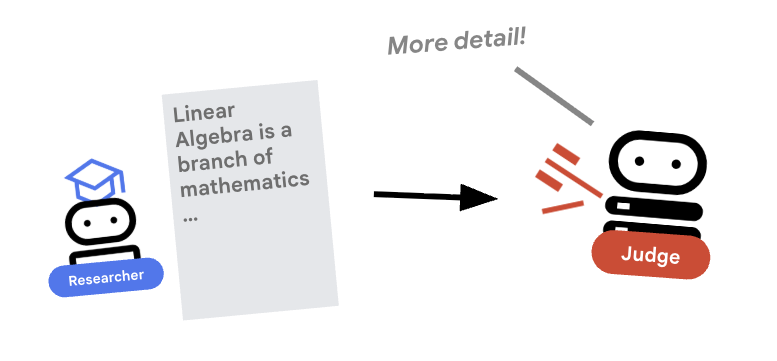
The Researcher works hard, but LLMs can be lazy. We need a Judge to review the work. The Judge accepts the research and returns a structured Pass/Fail assessment.
Structured Output
Deep Dive: To automate workflows, we need predictable outputs. A rambling text review is hard to parse programmatically. By enforcing a JSON schema (using Pydantic), we ensure the Judge returns a boolean pass or fail that our code can reliably act upon.
- Open
agents/judge/agent.py. - Review the following code that defines the
JudgeFeedbackschema and thejudgeagent.# 1. Define the Schema class JudgeFeedback(BaseModel): """Structured feedback from the Judge agent.""" status: Literal["pass", "fail"] = Field( description="Whether the research is sufficient ('pass') or needs more work ('fail')." ) feedback: str = Field( description="Detailed feedback on what is missing. If 'pass', a brief confirmation." ) # 2. Define the Agent judge = Agent( name="judge", model=MODEL, description="Evaluates research findings for completeness and accuracy.", instruction=""" You are a strict editor. Evaluate the 'research_findings' against the user's original request. If the findings are missing key info, return status='fail'. If they are comprehensive, return status='pass'. """, output_schema=JudgeFeedback, # Disallow delegation because it should only output the schema disallow_transfer_to_parent=True, disallow_transfer_to_peers=True, ) root_agent = judge
Key Concept: Restricting Agent Behavior
We set disallow_transfer_to_parent=True and disallow_transfer_to_peers=True. This forces the Judge to only return the structured JudgeFeedback. It cannot decide to "chat" with the user or delegate to another agent. This makes it a deterministic component in our logic flow.
6. ✍️ The Content Builder Agent
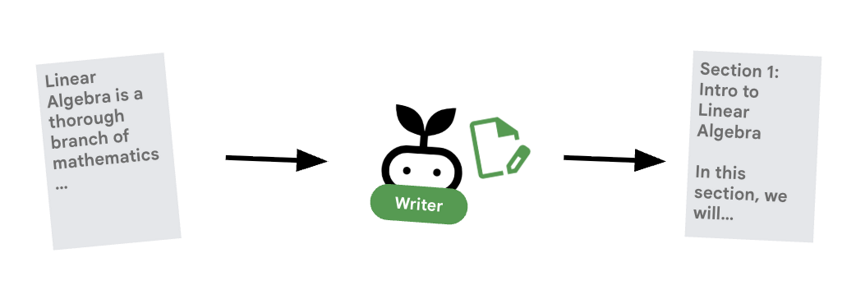
The Content Builder is the creative writer. It takes the approved research and turns it into a course. It uses a Gemma model served by Cloud Run.
Let's first look at the Cloud Run service that hosts the model
- Open
ollama_backend/Dockerfile - Here you can see how the Dockerfile uses an Ollama image, listens for requests on port 8080, and stores the requested model in a /model folder.
FROM ollama/ollama:latest

# Listen on all interfaces, port 8080 (Cloud Run default)
ENV OLLAMA_HOST 0.0.0.0:8080

# Store model weight files in /models
ENV OLLAMA_MODELS /models
⚙️ When you deploy, you will set the following configurations:
- GPU: NVIDIA L4 chosen for its excellent price-performance ratio for inference workloads. The L4 provides 24GB GPU memory and optimized tensor operations, making it ideal for 270M parameter models like Gemma
- Memory: 16GB system memory to handle model loading, CUDA operations, and Ollama's memory management
- CPU: 8 cores for optimal I/O handling and preprocessing tasks
- Concurrency: 4 requests per instance balances throughput with GPU memory usage
- Timeout: 600 seconds accommodates initial model loading and container startup
Now let's look at the Content Builder agent that uses the Gemma model.
- Open
agents/content_builder/agent.py. - Review the following code that defines the
content_builderagent.
# the `ollama-gemma-gpu` Cloud Run service URL which hosts the Gemma model
target_url = os.environ.get("OLLAMA_API_BASE")

# ... existing code ...

# (Note: We use 'ollama/gemma3:270m' to align with ADK's expected prefix)
gemma_model_name = os.environ.get("GEMMA_MODEL_NAME", "gemma3:270m")
model = LiteLlm(
    model=f"ollama_chat/{gemma_model_name}",
    api_base=target_url
)

# 5. Define the Agent
content_builder = Agent(
    name="content_builder",
    model=model,
    description="Transforms research findings into a structured course.",
    instruction="""
    You are an expert course creator.
    Take the approved 'research_findings' and transform them into a well-structured, engaging course module.

    **Formatting Rules:**
    1. Start with a main title using a single `#` (H1).
    2. Use `##` (H2) for main section headings. These will be used for the Table of Contents.
    3. Use `###` (H3) for sub-sections within main sections.
    4. Use bullet points and clear paragraphs.
    5. Maintain a professional but engaging tone.

    **Structure Requirements:**
    - Begin with a brief Introduction section explaining what the learner will gain.
    - Organize content into 3-5 main sections with clear headings.
    - Include Key Takeaways at the end as a bulleted summary.
    - Keep each section focused and concise.

    Ensure the content directly addresses the user's original request.
    Do not include any preamble or explanation outside the course content itself.
    """,
)

root_agent = content_builder
Key Concept: Context Propagation
You might wonder: "How does the Content Builder know what the Researcher found?" In the ADK, agents in a pipeline share a session.state. Later, in the Orchestrator, we will configure the Researcher and Judge to save their outputs to this shared state. The Content Builder's prompt effectively has access to this history.
7. 🎻 The Orchestrator
The Orchestrator is the manager of our multi-agent team. Unlike the specialist agents (Researcher, Judge, Content Builder) who perform specific tasks, the Orchestrator's job is to coordinate the workflow and ensure information flows correctly between them.
🌐 The Architecture: Agent-to-Agent (A2A)
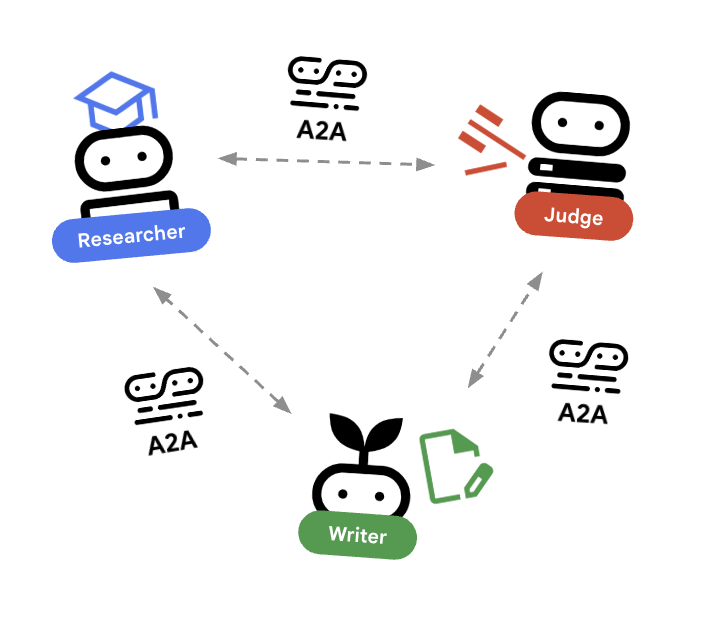
In this lab, we are building a distributed system. Instead of running all agents in a single Python process, we deploy them as independent microservices. This allows each agent to scale independently and fail without crashing the entire system.
To make this possible, we use the Agent-to-Agent (A2A) protocol.
The A2A Protocol
Deep Dive: In a production system, agents run on different servers (or even different clouds). The A2A protocol creates a standard way for them to discover and talk to each other over HTTP. RemoteA2aAgent is the ADK client for this protocol.
- Open
agents/orchestrator/agent.py. - Review how the following code that defines the connections.
# ... existing code ...

# Connect to the Researcher (Localhost port 8001)
researcher_url = os.environ.get("RESEARCHER_AGENT_CARD_URL", "http://localhost:8001/a2a/agent/.well-known/agent-card.json")
researcher = RemoteA2aAgent(
    name="researcher",
    agent_card=researcher_url,
    description="Gathers information using Google Search.",
    # IMPORTANT: Save the output to state for the Judge to see
    after_agent_callback=create_save_output_callback("research_findings"),
    # IMPORTANT: Use authenticated client for communication
    httpx_client=create_authenticated_client(researcher_url)
)

# Connect to the Judge (Localhost port 8002)
judge_url = os.environ.get("JUDGE_AGENT_CARD_URL", "http://localhost:8002/a2a/agent/.well-known/agent-card.json")
judge = RemoteA2aAgent(
    name="judge",
    agent_card=judge_url,
    description="Evaluates research.",
    after_agent_callback=create_save_output_callback("judge_feedback"),
    httpx_client=create_authenticated_client(judge_url)
)

# Content Builder (Localhost port 8003)
content_builder_url = os.environ.get("CONTENT_BUILDER_AGENT_CARD_URL", "http://localhost:8003/a2a/agent/.well-known/agent-card.json")
content_builder = RemoteA2aAgent(
    name="content_builder",
    agent_card=content_builder_url,
    description="Builds the course.",
    httpx_client=create_authenticated_client(content_builder_url)
)
8. 🛑 The Escalation Checker
A loop needs a way to stop. If the Judge says "Pass", we want to exit the loop immediately and move to the Content Builder.
Custom Logic with BaseAgent
Deep Dive: Not all agents use LLMs. Sometimes you need simple Python logic. BaseAgent lets you define an agent that just runs code. In this case, we check the session state and use EventActions(escalate=True) to signal the LoopAgent to stop.
- Still in
agents/orchestrator/agent.py. - Review the following code reviews the judge's feedback and proceeds to the next step when ready
class EscalationChecker(BaseAgent):
    """Checks the judge's feedback and escalates (breaks the loop) if it passed."""

    async def _run_async_impl(
        self, ctx: InvocationContext
    ) -> AsyncGenerator[Event, None]:
        # Retrieve the feedback saved by the Judge
        feedback = ctx.session.state.get("judge_feedback")
        print(f"[EscalationChecker] Feedback: {feedback}")

        # Check for 'pass' status
        is_pass = False
        if isinstance(feedback, dict) and feedback.get("status") == "pass":
            is_pass = True
        # Handle string fallback if JSON parsing failed
        elif isinstance(feedback, str) and '"status": "pass"' in feedback:
            is_pass = True

        if is_pass:
            # 'escalate=True' tells the parent LoopAgent to stop looping
            yield Event(author=self.name, actions=EventActions(escalate=True))
        else:
            # Continue the loop
            yield Event(author=self.name)

escalation_checker = EscalationChecker(name="escalation_checker")
Key Concept: Control Flow via Events
Agents communicate not just with text, but with Events. By yielding an event with escalate=True, this agent sends a signal up to its parent (the LoopAgent). The LoopAgent is programmed to catch this signal and terminate the loop.
9. 🔁 The Research Loop
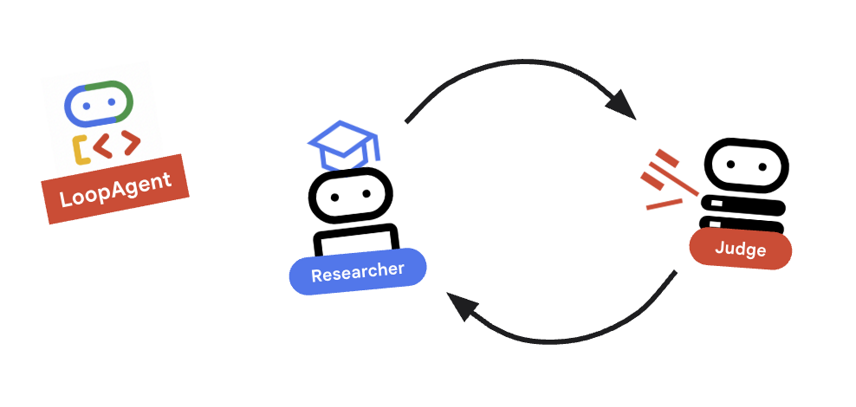
We need a feedback loop: Research -> Judge -> (Fail) -> Research -> ...
- In
agents/orchestrator/agent.py. - Review how the following code defines the
research_loopdefinition.research_loop = LoopAgent( name="research_loop", description="Iteratively researches and judges until quality standards are met.", sub_agents=[researcher, judge, escalation_checker], max_iterations=3, )
Key Concept: LoopAgent
The LoopAgent cycles through its sub_agents in order.
researcher: Finds data.judge: Evaluates data.escalation_checker: Decides whether toyield Event(escalate=True). Ifescalate=Truehappens, the loop breaks early. Otherwise, it restarts at the researcher (up tomax_iterations).
10. 🔗 The Final Pipeline
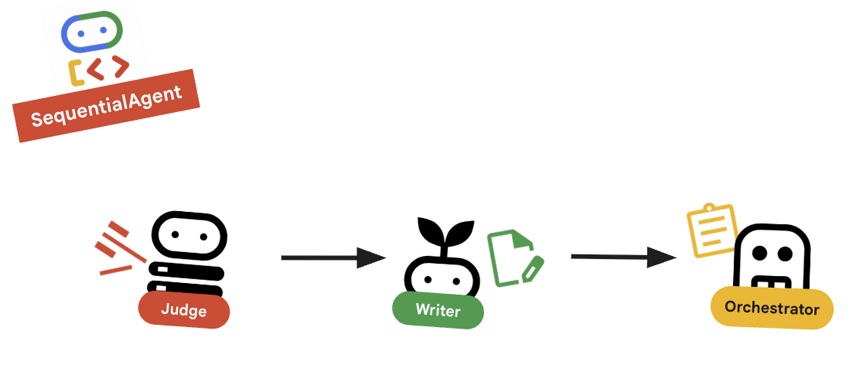
Bringing it all together....
- In
agents/orchestrator/agent.py. - Review how the
root_agentis defined at the bottom of the file.root_agent = SequentialAgent( name="course_creation_pipeline", description="A pipeline that researches a topic and then builds a course from it.", sub_agents=[research_loop, content_builder], )
Key Concept: Hierarchical Composition
Notice that research_loop is itself an agent (a LoopAgent). We treat it just like any other sub-agent in the SequentialAgent. This composability allows you to build complex logic by nesting simple patterns (loops inside sequences, sequences inside routers, etc.).
11. 🚀 Deploy to Cloud Run
We will deploy each agent as a separate service on Cloud Run, including a Cloud Run service for the course creator UI and a Cloud Run service using GPUs for the Gemma model.
Understanding Deployment Configuration
When deploying agents to Cloud Run, we pass several environment variables to configure their behavior and connectivity:
GOOGLE_CLOUD_PROJECT: Ensures the agent uses the correct Google Cloud project for logging and Vertex AI calls.GOOGLE_GENAI_USE_VERTEXAI: Tells the agent framework (ADK) to use Vertex AI for model inference instead of calling Gemini APIs directly.[AGENT]_AGENT_CARD_URL: This is crucial for the Orchestrator. It tells the Orchestrator where to find the remote agents. By setting this to the deployed Cloud Run URL (specifically the agent card path), we enable the Orchestrator to discover and communicate with the Researcher, Judge, and Content Builder over the internet.
To deploy all the agents to Cloud Run services, run the following script.
First, make sure that the script is executable.
chmod u+x ~/multi-agent-system/deploy.sh
Note This will take several minutes to run as each service is deployed sequentially.
~/multi-agent-system/deploy.sh
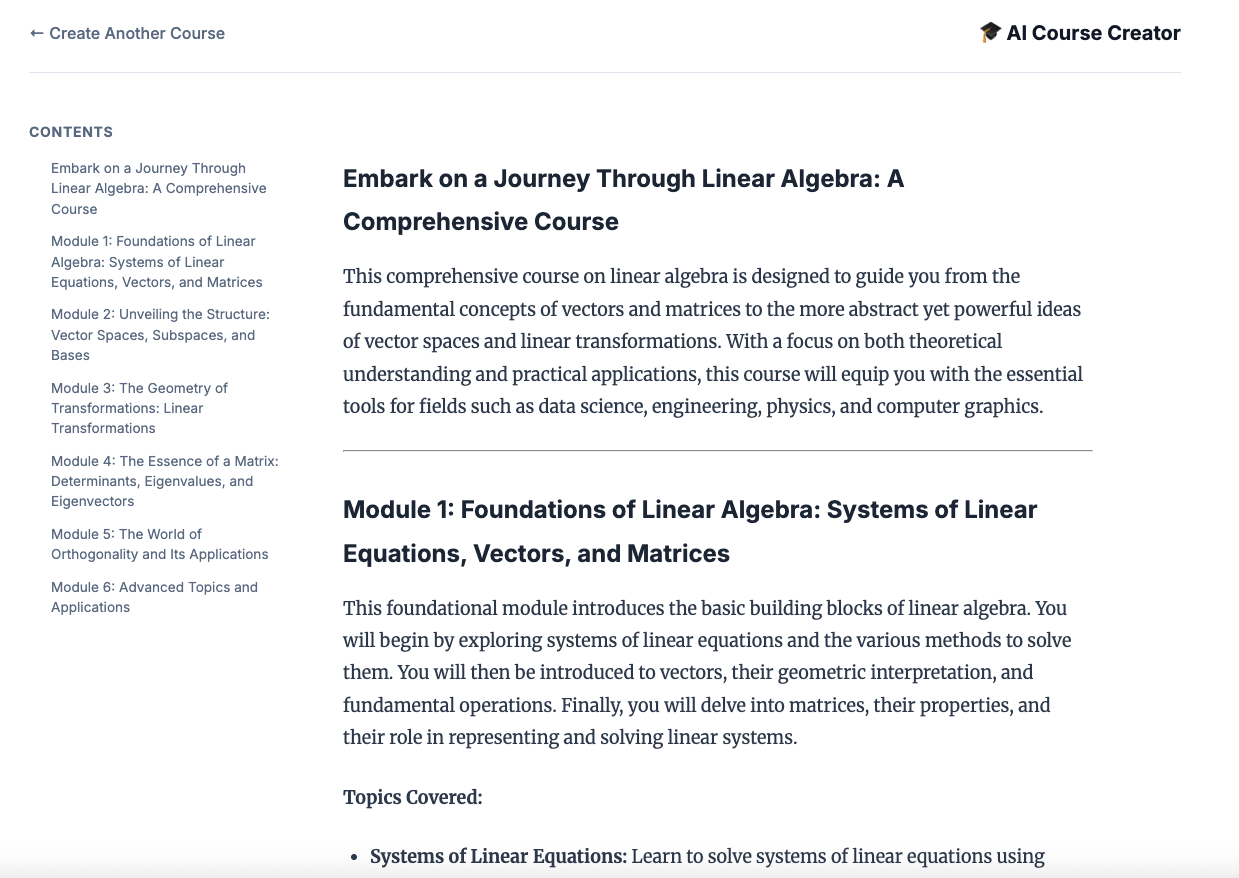
12. Create a course!
Open the Course Creator website. The Course Creator Cloud Run service is the last service deployed from the script. You can identify the URL to the course creator as https://course-creator-, which should be the final output line from the deployment script.
And type in a course idea, e.g. "linear algebra".
Your agents will begin working on your course.
13. Clean Up
To avoid incurring charges to your Google Cloud account for the resources used in this codelab, follow these steps to delete your services and container images.
1. Delete Cloud Run Services
The most efficient way to clean up is to delete the services you deployed to Cloud Run.
# Delete the main agent and app services
gcloud run services delete researcher content-builder judge orchestrator course-creator \
    --region $REGION --quiet

# Delete the GPU backend (Ollama)
gcloud run services delete ollama-gemma-gpu \
    --region $OLLAMA_REGION --quiet
2. Delete Artifact Registry Images
When you used the --source flag to deploy, Google Cloud created a repository in the Artifact Registry to store your container images. To remove these and save on storage costs, delete the repository:
gcloud artifacts repositories delete cloud-run-source-deploy --location us-east4 --quiet
3. Remove Local Files and Environment
To keep your Cloud Shell environment clean, remove the project folder and any local configuration:
cd ~
rm -rf multi-agent-system
4. (Optional) Delete the Project
If you created a project just for this codelab, you can ensure no further billing occurs by shutting down the project itself via the Manage Resources Page.
14. Congratulations!
You have successfully built and deployed a production-ready, distributed multi-agent system.
What you've accomplished
- Decomposed a Complex Task: Instead of one giant prompt, we split the work into specialized roles (Researcher, Judge, Content Builder).
- Implemented Quality Control: We used a
LoopAgentand a structuredJudgeto ensure only high-quality information reaches the final step. - Built for Production: By using the Agent-to-Agent (A2A) protocol and Cloud Run, we created a system where each agent is an independent, scalable microservice. This is far more robust than running everything in a single Python script.
- Orchestration: We used
SequentialAgentandLoopAgentto define clear control flow patterns. *. Cloud Run GPUs: Deployed a Gemma model to a Cloud Run GPU