
1. 简介
在本实验中,您将超越简单的聊天机器人,构建一个分布式多智能体系统。
虽然单个 LLM 可以回答问题,但现实世界的复杂性往往需要专门的角色。您不会让后端工程师设计界面,也不会让设计师优化数据库查询。同样,我们可以创建专注于一项任务的专业 AI 智能体,并让它们相互协调来解决复杂问题。
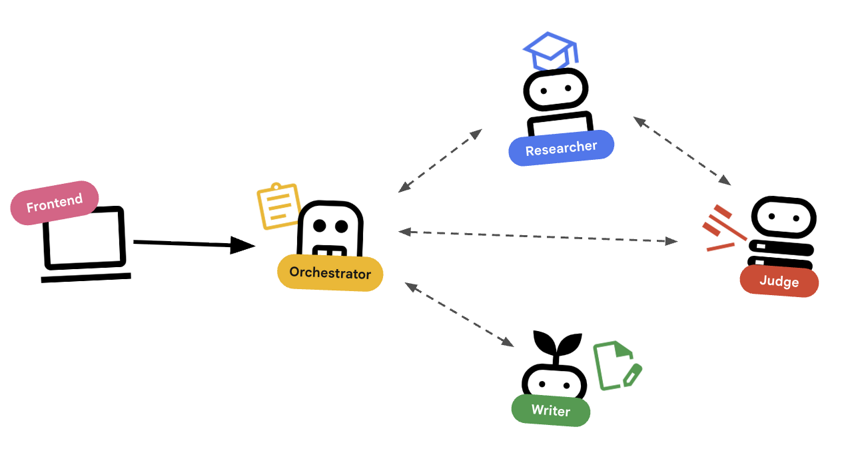
您将构建一个课程创建系统,其中包含:
- 研究员智能体:使用 google_search 查找最新信息。
- Judge Agent:批判性地评估研究的质量和完整性。
- Content Builder Agent:将研究转化为结构化课程。
- 编排器代理:管理这些专家之间的工作流和通信。
学习内容
- 定义一个可以使用工具(研究员)的智能体,该智能体可以搜索网络。
- 使用 Pydantic 为法官实现结构化输出。
- 使用 Agent-to-Agent (A2A) 协议连接远程智能体。
- 构建一个 LoopAgent,以在研究人员和法官之间创建反馈环。
- 使用 ADK 在本地运行分布式系统。
- 将多智能体系统部署到 Google Cloud Run。
- 在 Cloud Run GPU 上使用 Gemma 模型作为内容构建器代理。
所需条件
- 网络浏览器,例如 Chrome
- 启用了结算功能的 Google Cloud 项目
2. 架构和编排原则
首先,我们来了解一下这些代理如何协同工作。我们将构建一个课程创建流水线。
系统设计
使用智能体进行编排
标准智能体(例如研究员)确实可以正常工作。编排器代理(例如 LoopAgent 或 SequentialAgent)管理其他代理。它们没有自己的工具;它们的“工具”是委托。
LoopAgent:此函数的作用类似于代码中的while循环。它会重复运行一系列代理,直到满足某个条件(或达到最大迭代次数)。我们会将此数据用于研究循环:- 研究人员查找信息。
- 裁判会对其进行评判。
- 如果 Judge 显示“失败”,EscalationChecker 会让循环继续。
- 如果 Judge 说“通过”,EscalationChecker 会中断循环。
SequentialAgent:此操作类似于标准脚本执行。它会依次运行各个代理。我们将其用于高级流水线:- 首先,运行研究循环(直到它以良好的数据完成)。
- 然后,运行内容构建器(用于撰写课程)。
通过将这些方法相结合,我们创建了一个强大的系统,该系统可以在生成最终输出之前进行自我修正。
3. 设置
项目设置
创建 Google Cloud 项目
- 在 Google Cloud 控制台的项目选择器页面上,选择或创建一个 Google Cloud 项目。
- 确保您的 Cloud 项目已启用结算功能。了解如何检查项目是否已启用结算功能。
启动 Cloud Shell
Cloud Shell 是在 Google Cloud 中运行的命令行环境,预加载了必要的工具。
- 点击 Google Cloud 控制台顶部的激活 Cloud Shell。
- 连接到 Cloud Shell 后,验证您的身份验证:
gcloud auth list - 确认您的项目已配置:
gcloud config get project - 如果项目未按预期设置,请进行设置:
export PROJECT_ID=<YOUR_PROJECT_ID>
gcloud config set project $PROJECT_ID
环境设置
- 打开 Cloud Shell:点击 Google Cloud 控制台右上角的激活 Cloud Shell 图标。
获取起始代码
- 将起始代码库克隆到您的主目录:移至您的主目录
cd ~git clone --depth 1 --filter=blob:none --sparse https://github.com/GoogleCloudPlatform/devrel-demos.git temp-repo && cd temp-repo && git sparse-checkout set agents/multi-agent-system && cd .. && mv temp-repo/agents/multi-agent-system . && rm -rf temp-repocd multi-agent-system - 启用 API:运行以下命令以启用必要的 Google Cloud 服务:
gcloud services enable \ run.googleapis.com \ artifactregistry.googleapis.com \ cloudbuild.googleapis.com \ aiplatform.googleapis.com \ compute.googleapis.com - 在编辑器中打开此文件夹。
cloudshell edit .
设置环境
- 设置环境变量。我们将创建一个
.env文件来存储这些变量,以便您在会话断开连接时轻松重新加载它们。cat <<EOF > .env export GOOGLE_CLOUD_PROJECT=$(gcloud config get-value project) export GOOGLE_CLOUD_LOCATION=europe-west4 export GOOGLE_GENAI_USE_VERTEXAI=true EOF - 加载环境变量:
source .env
4. 🕵️ Researcher 智能体

研究员是专家。它的唯一任务是查找信息。为此,它需要访问一个工具:Google 搜索。
为何要将研究者分开?
深入探究:为什么不让一个代理完成所有任务?
小巧且专注的代理更易于评估和调试。如果研究结果不理想,您可以迭代研究人员的提示。如果课程格式不佳,您可以在内容构建器中进行迭代。在“包罗万象”的单体提示中,修复一个问题往往会导致另一个问题。
- 如果您在 Cloud Shell 中工作,请运行以下命令以打开 Cloud Shell 编辑器:
cloudshell workspace . - 打开
agents/researcher/agent.py。 - 查看以下定义
researcher代理的代码:# ... existing imports ... # Define the Researcher Agent researcher = Agent( name="researcher", model=MODEL, description="Gathers information on a topic using Google Search.", instruction=""" You are an expert researcher. Your goal is to find comprehensive and accurate information on the user's topic. Use the `google_search` tool to find relevant information. Summarize your findings clearly. If you receive feedback that your research is insufficient, use the feedback to refine your next search. """, tools=[google_search], ) root_agent = researcher
关键概念:工具使用
请注意,我们传递了 tools=[google_search]。ADK 会处理向 LLM 描述此工具的复杂性。当模型确定需要信息时,它会生成结构化的工具调用,ADK 会执行 Python 函数 google_search,并将结果反馈给模型。
5. ⚖️ 法官智能体
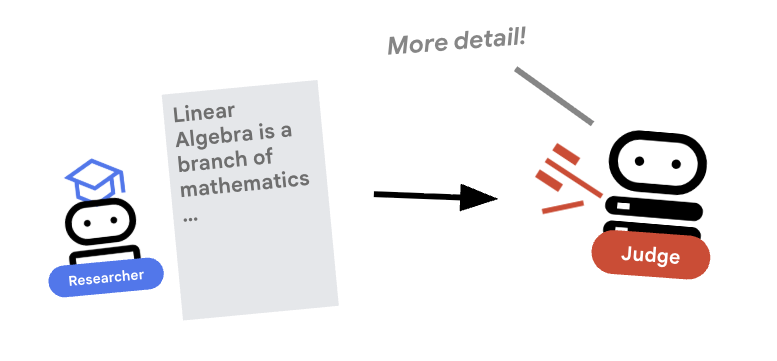
研究者很勤奋,但 LLM 可能很懒惰。我们需要评审员来审核作品。Judge 接受研究并返回结构化的通过/未通过评估结果。
结构化输出
深入探讨:为了实现工作流自动化,我们需要可预测的输出。杂乱无章的文字评价难以通过编程方式进行解析。通过强制执行 JSON 架构(使用 Pydantic),我们可确保 Judge 返回布尔值 pass 或 fail,以便我们的代码能够可靠地根据该值采取行动。
- 打开
agents/judge/agent.py。 - 查看以下代码,其中定义了
JudgeFeedback架构和judge代理。# 1. Define the Schema class JudgeFeedback(BaseModel): """Structured feedback from the Judge agent.""" status: Literal["pass", "fail"] = Field( description="Whether the research is sufficient ('pass') or needs more work ('fail')." ) feedback: str = Field( description="Detailed feedback on what is missing. If 'pass', a brief confirmation." ) # 2. Define the Agent judge = Agent( name="judge", model=MODEL, description="Evaluates research findings for completeness and accuracy.", instruction=""" You are a strict editor. Evaluate the 'research_findings' against the user's original request. If the findings are missing key info, return status='fail'. If they are comprehensive, return status='pass'. """, output_schema=JudgeFeedback, # Disallow delegation because it should only output the schema disallow_transfer_to_parent=True, disallow_transfer_to_peers=True, ) root_agent = judge
关键概念:限制智能体行为
我们设置了 disallow_transfer_to_parent=True 和 disallow_transfer_to_peers=True。这会强制 Judge 仅返回结构化 JudgeFeedback。它无法决定是否与用户“聊天”,也无法委托给其他代理。这使其成为逻辑流程中的确定性组件。
6. ✍️ 内容构建智能体
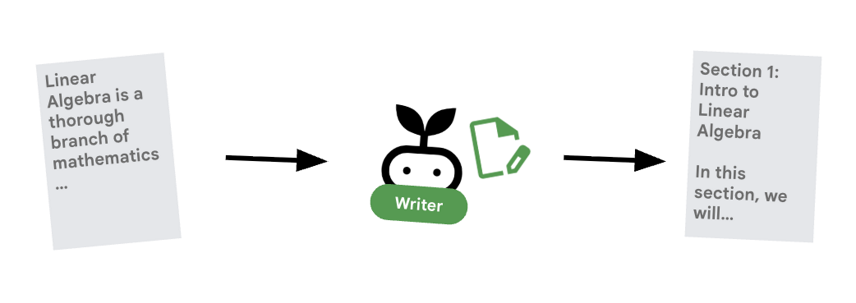
内容构建器是创意撰稿人。它将已获批准的研究转化为课程。它使用由 Cloud Run 部署的 Gemma 模型。
我们先来看看托管模型的 Cloud Run 服务
- 打开“
ollama_backend/Dockerfile” - 在此处,您可以了解 Dockerfile 如何使用 Ollama 映像、监听端口 8080 上的请求,以及将请求的模型存储在 /model 文件夹中。
FROM ollama/ollama:latest

# Listen on all interfaces, port 8080 (Cloud Run default)
ENV OLLAMA_HOST 0.0.0.0:8080

# Store model weight files in /models
ENV OLLAMA_MODELS /models
⚙️ 部署时,您将设置以下配置:
- GPU:NVIDIA L4,因其在推理工作负载方面具有出色的性价比而入选。L4 提供 24 GB GPU 内存和优化的张量运算,非常适合 2.7 亿参数模型,例如 Gemma
- 内存:16 GB 系统内存,用于处理模型加载、CUDA 操作和 Ollama 的内存管理
- CPU:8 个核心,可实现最佳 I/O 处理和预处理任务
- 并发:每个实例 4 个请求,可在吞吐量和 GPU 内存用量之间实现平衡
- 超时时间:600 秒,可满足初始模型加载和容器启动的需求
现在,我们来看看使用 Gemma 模型的 Content Builder 应用构建智能体。
- 打开
agents/content_builder/agent.py。 - 查看以下定义
content_builder代理的代码。
# the `ollama-gemma-gpu` Cloud Run service URL which hosts the Gemma model
target_url = os.environ.get("OLLAMA_API_BASE")

# ... existing code ...

# (Note: We use 'ollama/gemma3:270m' to align with ADK's expected prefix)
gemma_model_name = os.environ.get("GEMMA_MODEL_NAME", "gemma3:270m")
model = LiteLlm(
    model=f"ollama_chat/{gemma_model_name}",
    api_base=target_url
)

# 5. Define the Agent
content_builder = Agent(
    name="content_builder",
    model=model,
    description="Transforms research findings into a structured course.",
    instruction="""
    You are an expert course creator.
    Take the approved 'research_findings' and transform them into a well-structured, engaging course module.

    **Formatting Rules:**
    1. Start with a main title using a single `#` (H1).
    2. Use `##` (H2) for main section headings. These will be used for the Table of Contents.
    3. Use `###` (H3) for sub-sections within main sections.
    4. Use bullet points and clear paragraphs.
    5. Maintain a professional but engaging tone.

    **Structure Requirements:**
    - Begin with a brief Introduction section explaining what the learner will gain.
    - Organize content into 3-5 main sections with clear headings.
    - Include Key Takeaways at the end as a bulleted summary.
    - Keep each section focused and concise.

    Ensure the content directly addresses the user's original request.
    Do not include any preamble or explanation outside the course content itself.
    """,
)

root_agent = content_builder
关键概念:上下文传播
您可能会问:“内容构建器怎么知道研究者找到了什么?”在 ADK 中,流水线中的代理共享一个 session.state。稍后,在 Orchestrator 中,我们将配置 Researcher 和 Judge,以将其输出保存到此共享状态。内容构建器的提示实际上可以访问此历史记录。
7. 🎻 编排器
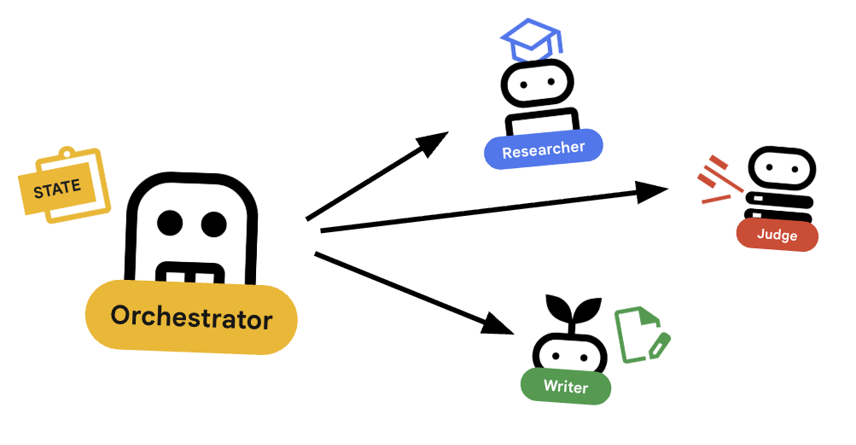
编排器是我们多智能体团队的管理器。与执行特定任务的专家智能体(研究员、评判员、内容构建器)不同,编排器的任务是协调工作流并确保信息在它们之间正确流动。
🌐 架构:代理对代理 (A2A)
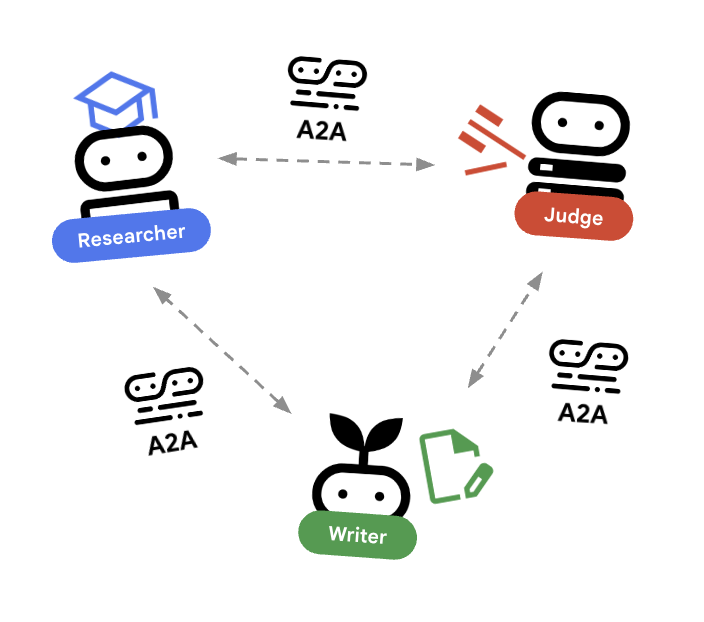
在本实验中,我们将构建一个分布式系统。我们不会在单个 Python 进程中运行所有代理,而是将它们部署为独立的微服务。这样一来,每个代理都可以独立扩缩,并且即使发生故障也不会导致整个系统崩溃。
为了实现这一点,我们使用了 Agent-to-Agent (A2A) 协议。
A2A 协议
深入探讨:在生产系统中,代理在不同的服务器(甚至不同的云)上运行。A2A protocol为它们提供了一种标准方式,以便通过 HTTP 相互发现和通信。RemoteA2aAgent 是相应协议的 ADK 客户端。
- 打开
agents/orchestrator/agent.py。 - 查看以下定义连接的代码。
# ... existing code ...

# Connect to the Researcher (Localhost port 8001)
researcher_url = os.environ.get("RESEARCHER_AGENT_CARD_URL", "http://localhost:8001/a2a/agent/.well-known/agent-card.json")
researcher = RemoteA2aAgent(
    name="researcher",
    agent_card=researcher_url,
    description="Gathers information using Google Search.",
    # IMPORTANT: Save the output to state for the Judge to see
    after_agent_callback=create_save_output_callback("research_findings"),
    # IMPORTANT: Use authenticated client for communication
    httpx_client=create_authenticated_client(researcher_url)
)

# Connect to the Judge (Localhost port 8002)
judge_url = os.environ.get("JUDGE_AGENT_CARD_URL", "http://localhost:8002/a2a/agent/.well-known/agent-card.json")
judge = RemoteA2aAgent(
    name="judge",
    agent_card=judge_url,
    description="Evaluates research.",
    after_agent_callback=create_save_output_callback("judge_feedback"),
    httpx_client=create_authenticated_client(judge_url)
)

# Content Builder (Localhost port 8003)
content_builder_url = os.environ.get("CONTENT_BUILDER_AGENT_CARD_URL", "http://localhost:8003/a2a/agent/.well-known/agent-card.json")
content_builder = RemoteA2aAgent(
    name="content_builder",
    agent_card=content_builder_url,
    description="Builds the course.",
    httpx_client=create_authenticated_client(content_builder_url)
)
8. 🛑 升级检查工具
循环需要一种停止方式。如果 Judge 说“通过”,我们希望立即退出循环并移至 Content Builder。
使用 BaseAgent 实现自定义逻辑
深入探究:并非所有智能体都使用 LLM。有时,您需要简单的 Python 逻辑。BaseAgent 可让您定义仅运行代码的代理。在这种情况下,我们会检查会话状态,并使用 EventActions(escalate=True) 向 LoopAgent 发出停止信号。
- 仍处于
agents/orchestrator/agent.py状态。 - 查看以下代码,了解法官的反馈,并在准备就绪后继续执行下一步
class EscalationChecker(BaseAgent):
    """Checks the judge's feedback and escalates (breaks the loop) if it passed."""

    async def _run_async_impl(
        self, ctx: InvocationContext
    ) -> AsyncGenerator[Event, None]:
        # Retrieve the feedback saved by the Judge
        feedback = ctx.session.state.get("judge_feedback")
        print(f"[EscalationChecker] Feedback: {feedback}")

        # Check for 'pass' status
        is_pass = False
        if isinstance(feedback, dict) and feedback.get("status") == "pass":
            is_pass = True
        # Handle string fallback if JSON parsing failed
        elif isinstance(feedback, str) and '"status": "pass"' in feedback:
            is_pass = True

        if is_pass:
            # 'escalate=True' tells the parent LoopAgent to stop looping
            yield Event(author=self.name, actions=EventActions(escalate=True))
        else:
            # Continue the loop
            yield Event(author=self.name)

escalation_checker = EscalationChecker(name="escalation_checker")
关键概念:通过事件控制流程
代理不仅通过文本进行通信,还通过事件进行通信。通过使用 escalate=True 生成事件,此代理会向上级(即 LoopAgent)发送信号。LoopAgent 已编程为捕获此信号并终止循环。
9. 🔁 研究循环
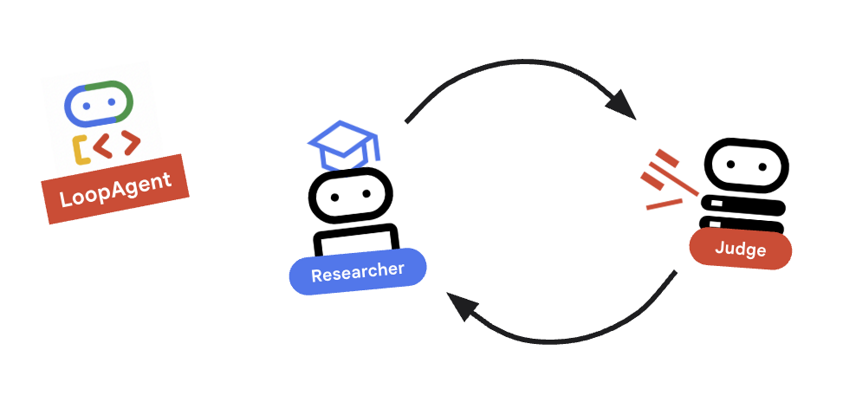
我们需要一个反馈环:研究 -> 判断 ->(失败)-> 研究 -> …
- 在
agents/orchestrator/agent.py中。 - 查看以下代码如何定义
research_loop定义。research_loop = LoopAgent( name="research_loop", description="Iteratively researches and judges until quality standards are met.", sub_agents=[researcher, judge, escalation_checker], max_iterations=3, )
关键概念:LoopAgent
LoopAgent 会按顺序循环遍历其 sub_agents。
researcher:查找数据。judge:评估数据。escalation_checker:决定是否要yield Event(escalate=True)。如果发生escalate=True,则循环会提前中断。否则,它会从研究员开始重新启动(最多max_iterations次)。
10. 🔗 最终流水线
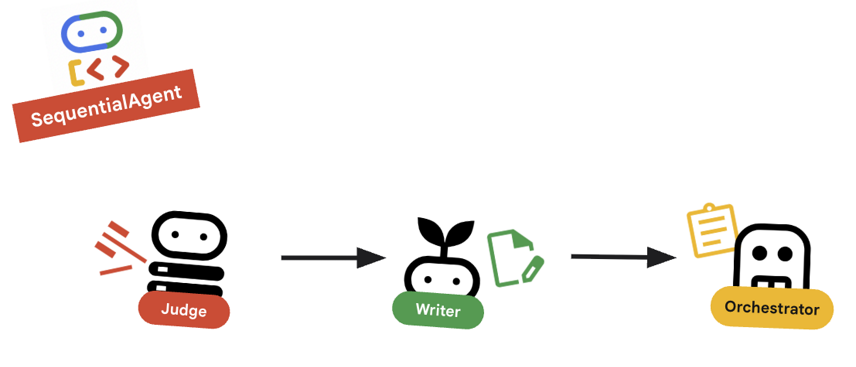
总结一下…
- 在
agents/orchestrator/agent.py中。 - 查看文件底部
root_agent的定义方式。root_agent = SequentialAgent( name="course_creation_pipeline", description="A pipeline that researches a topic and then builds a course from it.", sub_agents=[research_loop, content_builder], )
关键概念:分层组合
请注意,research_loop 本身也是一个代理(一个 LoopAgent)。我们将其视为 SequentialAgent 中的任何其他分代理。这种可组合性让您可以通过嵌套简单模式(序列中的循环、路由器中的序列等)来构建复杂的逻辑。
11. 🚀 部署到 Cloud Run
我们将每个代理部署为 Cloud Run 上的单独服务,包括课程创建者界面对应的 Cloud Run 服务,以及使用 GPU 的 Gemma 模型对应的 Cloud Run 服务。
了解部署配置
将代理部署到 Cloud Run 时,我们会传递多个环境变量来配置其行为和连接:
GOOGLE_CLOUD_PROJECT:确保代理使用正确的 Google Cloud 项目进行日志记录和 Vertex AI 调用。GOOGLE_GENAI_USE_VERTEXAI:告知代理框架 (ADK) 使用 Vertex AI 进行模型推理,而不是直接调用 Gemini API。[AGENT]_AGENT_CARD_URL:这对编排程序至关重要。它会告知编排器在何处查找远程代理。通过将此变量设置为已部署的 Cloud Run 网址(具体来说是智能体卡路径),我们可以让 Orchestrator 通过互联网发现 Researcher、Judge 和 Content Builder 并与之通信。
如需将所有代理部署到 Cloud Run 服务,请运行以下脚本。
首先,确保脚本可执行。
chmod u+x ~/multi-agent-system/deploy.sh
注意:由于每个服务都是按顺序部署的,因此此操作需要几分钟才能运行完毕。
~/multi-agent-system/deploy.sh
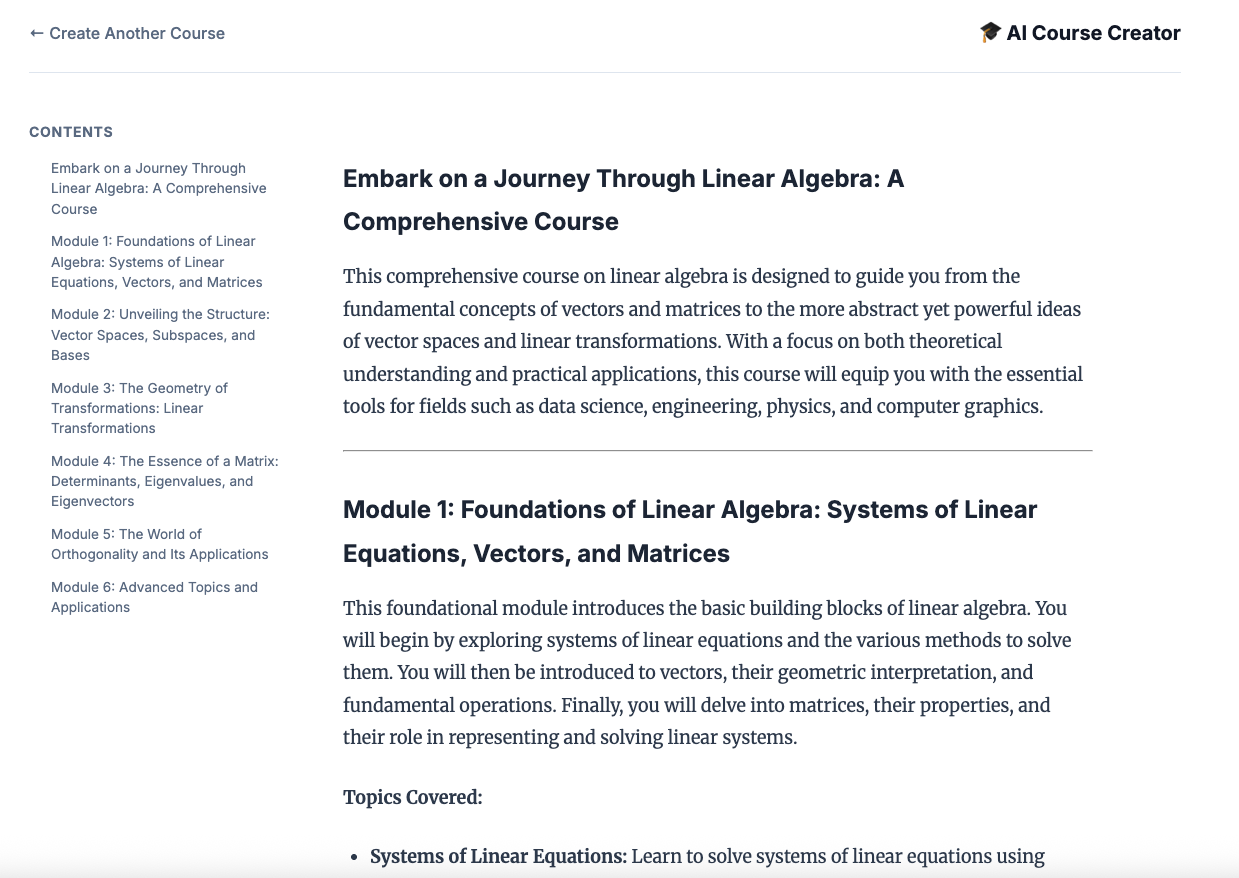
12. 创建课程!
打开课程创建者网站。Course Creator Cloud Run 服务是脚本部署的最后一个服务。您可以将课程创建者的网址标识为 https://course-creator-,这应该是部署脚本的最终输出行。
然后输入课程创意,例如“线性代数”。
智能体将开始处理您的课程。
13. 清理
为避免系统因本 Codelab 中使用的资源向您的 Google Cloud 账号收取费用,请按照以下步骤操作,删除您的服务和容器映像。
1. 删除 Cloud Run 服务
最有效的清理方法是删除您部署到 Cloud Run 的服务。
# Delete the main agent and app services
gcloud run services delete researcher content-builder judge orchestrator course-creator \
    --region $REGION --quiet

# Delete the GPU backend (Ollama)
gcloud run services delete ollama-gemma-gpu \
    --region $OLLAMA_REGION --quiet
2. 删除 Artifact Registry 映像
当您使用 --source 标志进行部署时,Google Cloud 会在 Artifact Registry 中创建一个代码库来存储您的容器映像。如需移除这些内容并节省存储费用,请删除代码库:
gcloud artifacts repositories delete cloud-run-source-deploy --location us-east4 --quiet
3. 移除本地文件和环境
为保持 Cloud Shell 环境的整洁,请移除项目文件夹和所有本地配置:
cd ~
rm -rf multi-agent-system
4. (可选)删除项目
如果您专门为本 Codelab 创建了一个项目,则可以通过“管理资源”页面关闭该项目,确保不会再产生结算费用。
14. 恭喜!
您已成功构建并部署了一个可用于生产用途的分布式多智能体系统。
学习成果
- 分解复杂任务:我们没有使用一个庞大的提示,而是将工作拆分为专门的角色(研究员、评判员、内容构建者)。
- 实施质量控制:我们使用
LoopAgent和结构化Judge来确保只有高质量的信息才能进入最后一步。 - 专为生产环境打造:通过使用智能体到智能体 (A2A) 协议和 Cloud Run,我们创建了一个系统,其中每个智能体都是一个独立的可扩缩微服务。这比在单个 Python 脚本中运行所有内容要稳健得多。
- 编排:我们使用
SequentialAgent和LoopAgent定义清晰的控制流模式。*. Cloud Run GPU:已将 Gemma 模型部署到 Cloud Run GPU