
1. 簡介
在本實驗室中,您將超越簡單的聊天機器人,建構分散式多代理系統。
雖然單一 LLM 就能回答問題,但現實世界往往複雜得多,需要專業角色。您不會要求後端工程師設計 UI,也不會要求設計師最佳化資料庫查詢。同樣地,我們可以建立專門處理單一工作的 AI 代理,並協調這些代理來解決複雜問題。
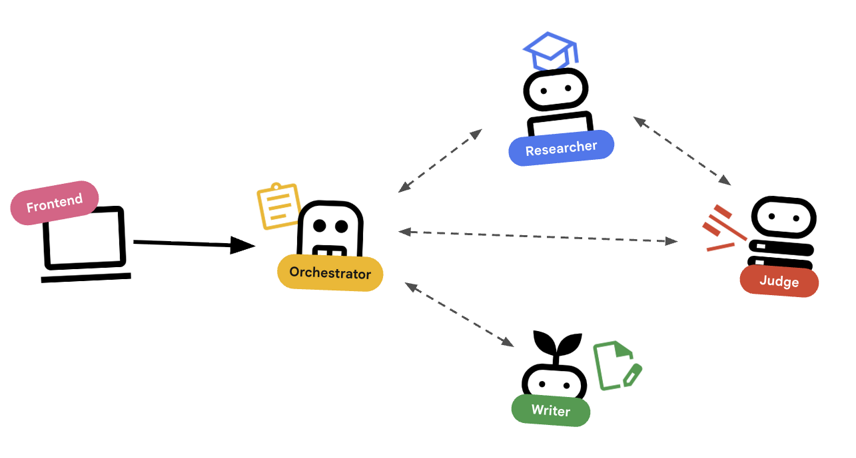
您將建立課程建立系統,其中包含:
- 研究人員代理:使用 google_search 尋找最新資訊。
- Judge 代理:評估研究的品質和完整性。
- 內容建立工具代理:將研究結果轉換為結構化課程。
- 自動化調度管理工具代理:管理工作流程,以及這些專家之間的通訊。
課程內容
- 定義可搜尋網路的工具使用代理程式 (研究人員)。
- 使用 Pydantic 為評估人員實作結構化輸出內容。
- 使用代理對代理 (A2A) 通訊協定連線至遠端代理。
- 建構 LoopAgent,在研究人員和法官之間建立意見回饋循環。
- 使用 ADK 在本機執行分散式系統。
- 將多代理系統部署至 Google Cloud Run。
- 在 Cloud Run GPU 上使用 Gemma 模型,做為內容產生器代理程式。
軟硬體需求
- 網路瀏覽器,例如 Chrome
- 已啟用計費功能的 Google Cloud 雲端專案
2. 架構和自動化調度管理原則
首先,請瞭解這些代理程式如何協同運作。我們要建立課程建立管道。
系統設計
使用 Agent 自動調度管理
標準代理程式 (例如研究人員) 確實會執行工作。自動調度管理工具代理 (例如 LoopAgent 或 SequentialAgent) 會管理其他代理。他們沒有自己的工具,他們的「工具」是委派。
LoopAgent:這項作業在程式碼中就像while迴圈。它會反覆執行一系列代理,直到符合條件 (或達到最高疊代次數) 為止。我們將此資訊用於研究迴圈:- 研究人員找到資訊。
- 評審會提出批評。
- 如果「Judge」顯示「Fail」,「EscalationChecker」 會讓迴圈繼續。
- 如果「Judge」說「Pass」,「EscalationChecker」就會中斷迴圈。
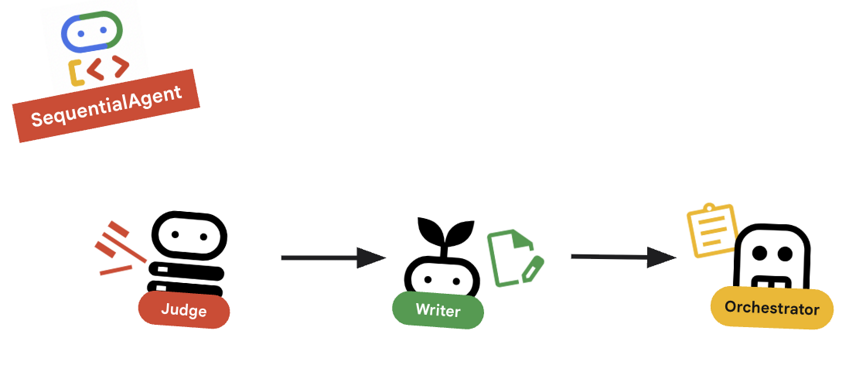
SequentialAgent:這項操作與標準指令碼執行作業類似。依序執行代理。我們將此用於高階管道:- 首先,請執行研究迴圈 (直到完成並取得良好資料為止)。
- 然後執行「內容建立工具」 (撰寫課程)。
結合這些技術,我們打造出強大的系統,可在生成最終輸出內容前自我修正。
3. 設定
專案設定
建立 Google Cloud 專案
- 在 Google Cloud 控制台的專案選取器頁面中,選取或建立 Google Cloud 專案。
- 確認 Cloud 專案已啟用計費功能。瞭解如何檢查專案是否已啟用計費功能。
啟動 Cloud Shell
Cloud Shell 是在 Google Cloud 中運作的指令列環境,已預先載入必要工具。
- 按一下 Google Cloud 控制台頂端的「啟用 Cloud Shell」。
- 連至 Cloud Shell 後,請驗證您的驗證:
gcloud auth list - 確認專案已設定完成:
gcloud config get project - 如果專案未如預期設定,請設定專案:
export PROJECT_ID=<YOUR_PROJECT_ID>
gcloud config set project $PROJECT_ID
環境設定
- 開啟 Cloud Shell:點選 Google Cloud 控制台右上方的「啟用 Cloud Shell」圖示。
取得範例程式碼
- 將入門存放區複製到主目錄:移至主目錄
cd ~git clone --depth 1 --filter=blob:none --sparse https://github.com/GoogleCloudPlatform/devrel-demos.git temp-repo && cd temp-repo && git sparse-checkout set agents/multi-agent-system && cd .. && mv temp-repo/agents/multi-agent-system . && rm -rf temp-repocd multi-agent-system - 啟用 API:執行下列指令,啟用必要的 Google Cloud 服務:
gcloud services enable \ run.googleapis.com \ artifactregistry.googleapis.com \ cloudbuild.googleapis.com \ aiplatform.googleapis.com \ compute.googleapis.com - 在編輯器中開啟這個資料夾。
cloudshell edit .
設定環境
- 設定環境變數。我們會建立
.env檔案來儲存這些變數,方便您在工作階段中斷時重新載入。cat <<EOF > .env export GOOGLE_CLOUD_PROJECT=$(gcloud config get-value project) export GOOGLE_CLOUD_LOCATION=europe-west4 export GOOGLE_GENAI_USE_VERTEXAI=true EOF - 取得環境變數:
source .env
4. 🕵️ 研究人員代理
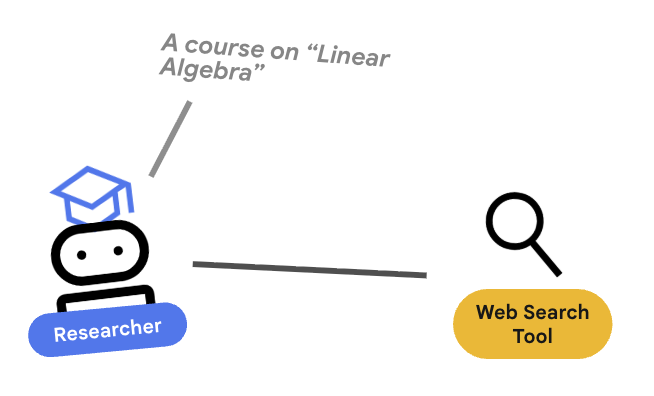
研究人員是專家,這項工具的唯一用途是尋找資訊。這需要存取 Google 搜尋工具。
為何要將研究人員分開?
深入探討:為什麼不讓一個代理程式處理所有工作?
專注的小型代理程式較容易評估和偵錯。如果研究結果不佳,請根據研究人員的提示詞進行疊代。如果課程格式不佳,請在內容建構工具中進行疊代。在單體式「全能」提示中,修正一件事通常會導致另一件事出錯。
- 如果您在 Cloud Shell 中工作,請執行下列指令開啟 Cloud Shell 編輯器:
cloudshell workspace . - 開啟
agents/researcher/agent.py。 - 請查看下列程式碼,瞭解如何定義
researcher代理程式:# ... existing imports ... # Define the Researcher Agent researcher = Agent( name="researcher", model=MODEL, description="Gathers information on a topic using Google Search.", instruction=""" You are an expert researcher. Your goal is to find comprehensive and accurate information on the user's topic. Use the `google_search` tool to find relevant information. Summarize your findings clearly. If you receive feedback that your research is insufficient, use the feedback to refine your next search. """, tools=[google_search], ) root_agent = researcher
重要概念:工具使用
請注意,我們傳遞了 tools=[google_search]。ADK 會處理向 LLM 說明這項工具的複雜性。模型判斷需要資訊時,會產生結構化工具呼叫,ADK 則會執行 Python 函式 google_search,並將結果回饋給模型。
5. ⚖️ 法官代理
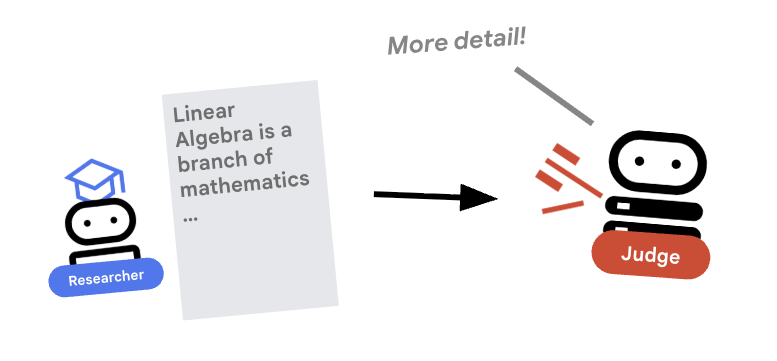
研究人員會努力工作,但 LLM 可能會偷懶。我們需要法官審查這項作業。法官接受研究結果,並傳回結構化的「通過」/「未通過」評估。
結構化輸出內容
深入瞭解:如要自動執行工作流程,我們需要可預測的輸出內容。如果評論內容冗長,程式就難以剖析。強制執行 JSON 結構定義 (使用 Pydantic) 後,我們就能確保 Judge 會傳回布林值 pass 或 fail,供程式碼可靠地採取行動。
- 開啟
agents/judge/agent.py。 - 請查看下列程式碼,瞭解如何定義
JudgeFeedback結構定義和judge代理程式。# 1. Define the Schema class JudgeFeedback(BaseModel): """Structured feedback from the Judge agent.""" status: Literal["pass", "fail"] = Field( description="Whether the research is sufficient ('pass') or needs more work ('fail')." ) feedback: str = Field( description="Detailed feedback on what is missing. If 'pass', a brief confirmation." ) # 2. Define the Agent judge = Agent( name="judge", model=MODEL, description="Evaluates research findings for completeness and accuracy.", instruction=""" You are a strict editor. Evaluate the 'research_findings' against the user's original request. If the findings are missing key info, return status='fail'. If they are comprehensive, return status='pass'. """, output_schema=JudgeFeedback, # Disallow delegation because it should only output the schema disallow_transfer_to_parent=True, disallow_transfer_to_peers=True, ) root_agent = judge
重要概念:限制代理程式行為
我們設定了 disallow_transfer_to_parent=True 和 disallow_transfer_to_peers=True。這會強制 Judge 只傳回結構化 JudgeFeedback。無法決定是否要與使用者「即時通訊」,或委派給其他服務專員。因此成為邏輯流程中的確定性元件。
6. ✍️ 內容建構代理程式
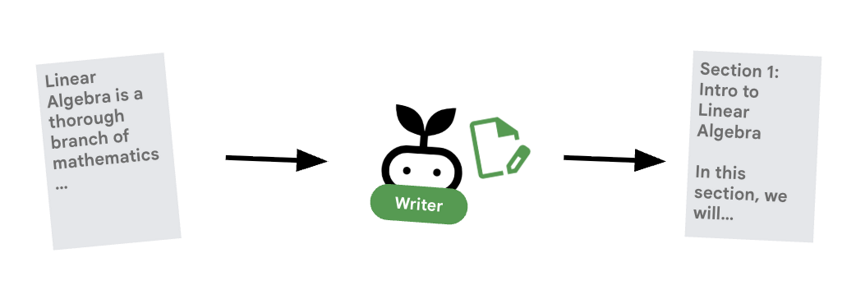
內容產生器是廣告素材撰寫者,將核准的研究內容製作成課程。並使用 Cloud Run 提供的 Gemma 模型。
首先,請查看代管模型的 Cloud Run 服務
- 開啟「
ollama_backend/Dockerfile」 - 您可以在這裡看到 Dockerfile 如何使用 Ollama 映像檔、監聽通訊埠 8080 上的要求,以及將要求的模型儲存在 /model 資料夾中。
FROM ollama/ollama:latest

# Listen on all interfaces, port 8080 (Cloud Run default)
ENV OLLAMA_HOST 0.0.0.0:8080

# Store model weight files in /models
ENV OLLAMA_MODELS /models
⚙️ 部署時,您將設定下列設定:
- GPU:選擇 NVIDIA L4,因為其推論工作負載的性價比極高。L4 提供 24 GB 的 GPU 記憶體,並最佳化張量運算,因此非常適合 Gemma 等 2.7 億參數模型
- 記憶體:16 GB 系統記憶體,用於處理模型載入、CUDA 作業和 Ollama 的記憶體管理
- CPU:8 核心,可妥善處理 I/O 和前置處理工作
- 並行:每個執行個體 4 個要求可平衡處理量與 GPU 記憶體用量
- 逾時:600 秒可容納初始模型載入和容器啟動
現在來看看使用 Gemma 模型的 Content Builder 代理程式。
- 開啟
agents/content_builder/agent.py。 - 請查看下列程式碼,瞭解如何定義
content_builder代理程式。
# the `ollama-gemma-gpu` Cloud Run service URL which hosts the Gemma model
target_url = os.environ.get("OLLAMA_API_BASE")

# ... existing code ...

# (Note: We use 'ollama/gemma3:270m' to align with ADK's expected prefix)
gemma_model_name = os.environ.get("GEMMA_MODEL_NAME", "gemma3:270m")
model = LiteLlm(
    model=f"ollama_chat/{gemma_model_name}",
    api_base=target_url
)

# 5. Define the Agent
content_builder = Agent(
    name="content_builder",
    model=model,
    description="Transforms research findings into a structured course.",
    instruction="""
    You are an expert course creator.
    Take the approved 'research_findings' and transform them into a well-structured, engaging course module.

    **Formatting Rules:**
    1. Start with a main title using a single `#` (H1).
    2. Use `##` (H2) for main section headings. These will be used for the Table of Contents.
    3. Use `###` (H3) for sub-sections within main sections.
    4. Use bullet points and clear paragraphs.
    5. Maintain a professional but engaging tone.

    **Structure Requirements:**
    - Begin with a brief Introduction section explaining what the learner will gain.
    - Organize content into 3-5 main sections with clear headings.
    - Include Key Takeaways at the end as a bulleted summary.
    - Keep each section focused and concise.

    Ensure the content directly addresses the user's original request.
    Do not include any preamble or explanation outside the course content itself.
    """,
)

root_agent = content_builder
重要概念:脈絡傳播
你可能會想:「內容產生器怎麼知道研究人員找到的內容?」在 ADK 中,管道中的代理會共用 session.state。稍後,我們會在 Orchestrator 中設定 Researcher 和 Judge,將輸出內容儲存至這個共用狀態。內容產生器提示可有效存取這項記錄。
7. 🎻 Orchestrator
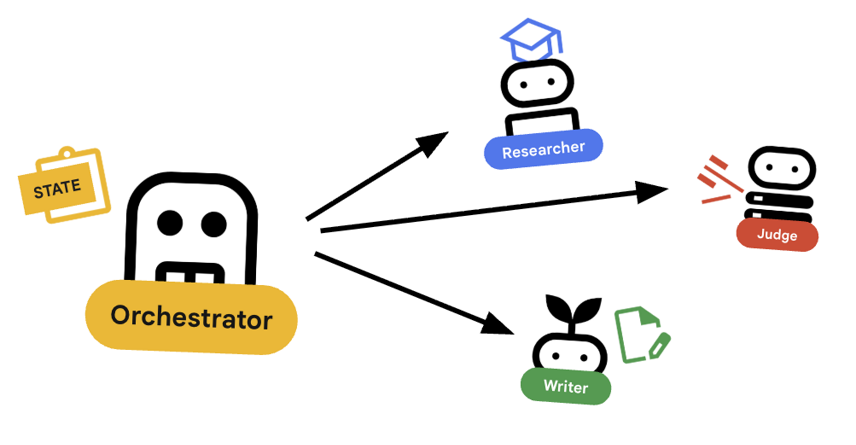
Orchestrator 是多代理團隊的管理員,與執行特定工作的專家代理 (研究人員、評估人員、內容建立者) 不同,自動調度管理工具的工作是協調工作流程,確保資訊在這些代理之間正確流動。
🌐 架構:Agent2Agent (A2A)

在本實驗室中,我們將建構分散式系統。我們不會在單一 Python 程序中執行所有代理程式,而是將其部署為獨立的微服務。這樣一來,每個代理程式就能獨立擴充及失敗,不會導致整個系統當機。
為此,我們採用 Agent2Agent (A2A) 通訊協定。
A2A 通訊協定
深入瞭解:在正式版系統中,代理程式會在不同伺服器 (甚至是不同雲端) 上執行。A2A 通訊協定會建立標準方式,讓代理程式透過 HTTP 互相探索及通訊。RemoteA2aAgent 是這個通訊協定的 ADK 用戶端。
- 開啟
agents/orchestrator/agent.py。 - 請查看下列定義連線的程式碼。
# ... existing code ...

# Connect to the Researcher (Localhost port 8001)
researcher_url = os.environ.get("RESEARCHER_AGENT_CARD_URL", "http://localhost:8001/a2a/agent/.well-known/agent-card.json")
researcher = RemoteA2aAgent(
    name="researcher",
    agent_card=researcher_url,
    description="Gathers information using Google Search.",
    # IMPORTANT: Save the output to state for the Judge to see
    after_agent_callback=create_save_output_callback("research_findings"),
    # IMPORTANT: Use authenticated client for communication
    httpx_client=create_authenticated_client(researcher_url)
)

# Connect to the Judge (Localhost port 8002)
judge_url = os.environ.get("JUDGE_AGENT_CARD_URL", "http://localhost:8002/a2a/agent/.well-known/agent-card.json")
judge = RemoteA2aAgent(
    name="judge",
    agent_card=judge_url,
    description="Evaluates research.",
    after_agent_callback=create_save_output_callback("judge_feedback"),
    httpx_client=create_authenticated_client(judge_url)
)

# Content Builder (Localhost port 8003)
content_builder_url = os.environ.get("CONTENT_BUILDER_AGENT_CARD_URL", "http://localhost:8003/a2a/agent/.well-known/agent-card.json")
content_builder = RemoteA2aAgent(
    name="content_builder",
    agent_card=content_builder_url,
    description="Builds the course.",
    httpx_client=create_authenticated_client(content_builder_url)
)
8. 🛑 提報檢查工具
迴圈需要停止的方式。如果法官說「通過」,我們希望立即結束迴圈,並移至內容產生器。
使用 BaseAgent 的自訂邏輯
深入瞭解:並非所有代理都會使用大型語言模型。有時您需要簡單的 Python 邏輯。BaseAgent 可讓您定義只執行程式碼的代理。在本例中,我們會檢查工作階段狀態,並使用 EventActions(escalate=True) 發出信號,要求 LoopAgent 停止。
- 還是在
agents/orchestrator/agent.py中。 - 查看以下程式碼,瞭解評審的意見回饋,並在準備就緒時繼續下一個步驟
class EscalationChecker(BaseAgent):
    """Checks the judge's feedback and escalates (breaks the loop) if it passed."""

    async def _run_async_impl(
        self, ctx: InvocationContext
    ) -> AsyncGenerator[Event, None]:
        # Retrieve the feedback saved by the Judge
        feedback = ctx.session.state.get("judge_feedback")
        print(f"[EscalationChecker] Feedback: {feedback}")

        # Check for 'pass' status
        is_pass = False
        if isinstance(feedback, dict) and feedback.get("status") == "pass":
            is_pass = True
        # Handle string fallback if JSON parsing failed
        elif isinstance(feedback, str) and '"status": "pass"' in feedback:
            is_pass = True

        if is_pass:
            # 'escalate=True' tells the parent LoopAgent to stop looping
            yield Event(author=self.name, actions=EventActions(escalate=True))
        else:
            # Continue the loop
            yield Event(author=self.name)

escalation_checker = EscalationChecker(name="escalation_checker")
重要概念:透過事件控制流程
代理程式不僅能透過文字通訊,還能透過事件通訊。這個代理程式會透過 escalate=True 產生事件,將訊號傳送至父項 (即 LoopAgent)。LoopAgent 經過程式設計,可擷取這個訊號並終止迴圈。
9. 🔁 研究循環
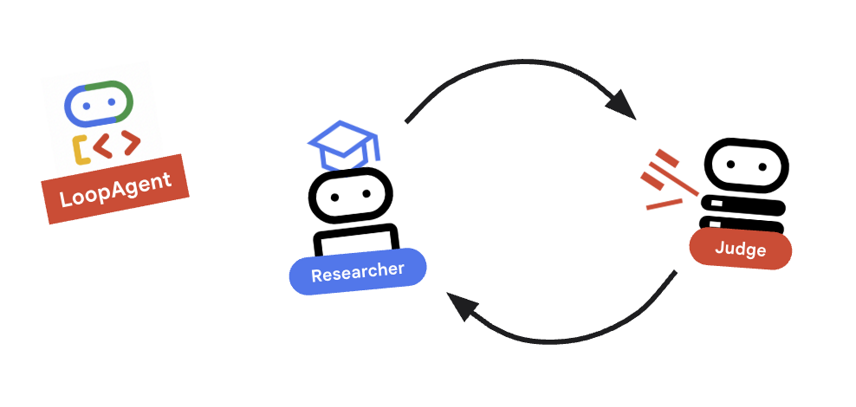
我們需要回饋循環:研究 -> 判斷 -> (失敗) -> 研究 -> ...
- 支援
agents/orchestrator/agent.py。 - 請查看下列程式碼如何定義
research_loop定義。research_loop = LoopAgent( name="research_loop", description="Iteratively researches and judges until quality standards are met.", sub_agents=[researcher, judge, escalation_checker], max_iterations=3, )
重要概念:LoopAgent
LoopAgent 會依序循環處理 sub_agents。
researcher:尋找資料。judge:評估資料。escalation_checker:決定是否要yield Event(escalate=True)。如果發生escalate=True,迴圈會提早中斷。否則,系統會從研究人員重新開始 (最多max_iterations)。
10. 🔗 最終管道
正在整合所有資訊...
- 支援
agents/orchestrator/agent.py。 - 查看檔案底部的
root_agent定義。root_agent = SequentialAgent( name="course_creation_pipeline", description="A pipeline that researches a topic and then builds a course from it.", sub_agents=[research_loop, content_builder], )
重要概念:階層式組合
請注意,research_loop 本身就是代理 (LoopAgent),我們會將其視為 SequentialAgent 中的任何其他子代理。這種可組合性可讓您透過巢狀簡單模式 (序列中的迴圈、路由器中的序列等),建構複雜的邏輯。
11. 🚀 部署至 Cloud Run
我們會在 Cloud Run 上將每個代理程式部署為個別服務,包括課程建立者 UI 的 Cloud Run 服務,以及使用 GPU 的 Gemma 模型 Cloud Run 服務。
瞭解部署設定
將代理程式部署至 Cloud Run 時,我們會傳遞多個環境變數,以設定代理程式的行為和連線:
GOOGLE_CLOUD_PROJECT:確保代理程式使用正確的 Google Cloud 雲端專案進行記錄和 Vertex AI 呼叫。GOOGLE_GENAI_USE_VERTEXAI:告知代理程式架構 (ADK) 使用 Vertex AI 進行模型推論,而非直接呼叫 Gemini API。[AGENT]_AGENT_CARD_URL:這對 Orchestrator 至關重要。當中定義 Orchestrator 應從何處尋找遠端代理程式。將此值設為已部署的 Cloud Run 網址 (具體來說是代理程式資訊卡路徑),即可讓 Orchestrator 透過網際網路探索 Researcher、Judge 和 Content Builder,並與這些服務通訊。
如要將所有代理程式部署至 Cloud Run 服務,請執行下列指令碼。
首先,請確認指令碼可執行。
chmod u+x ~/multi-agent-system/deploy.sh
注意:由於系統會依序部署各項服務,因此這項作業需要幾分鐘才能完成。
~/multi-agent-system/deploy.sh
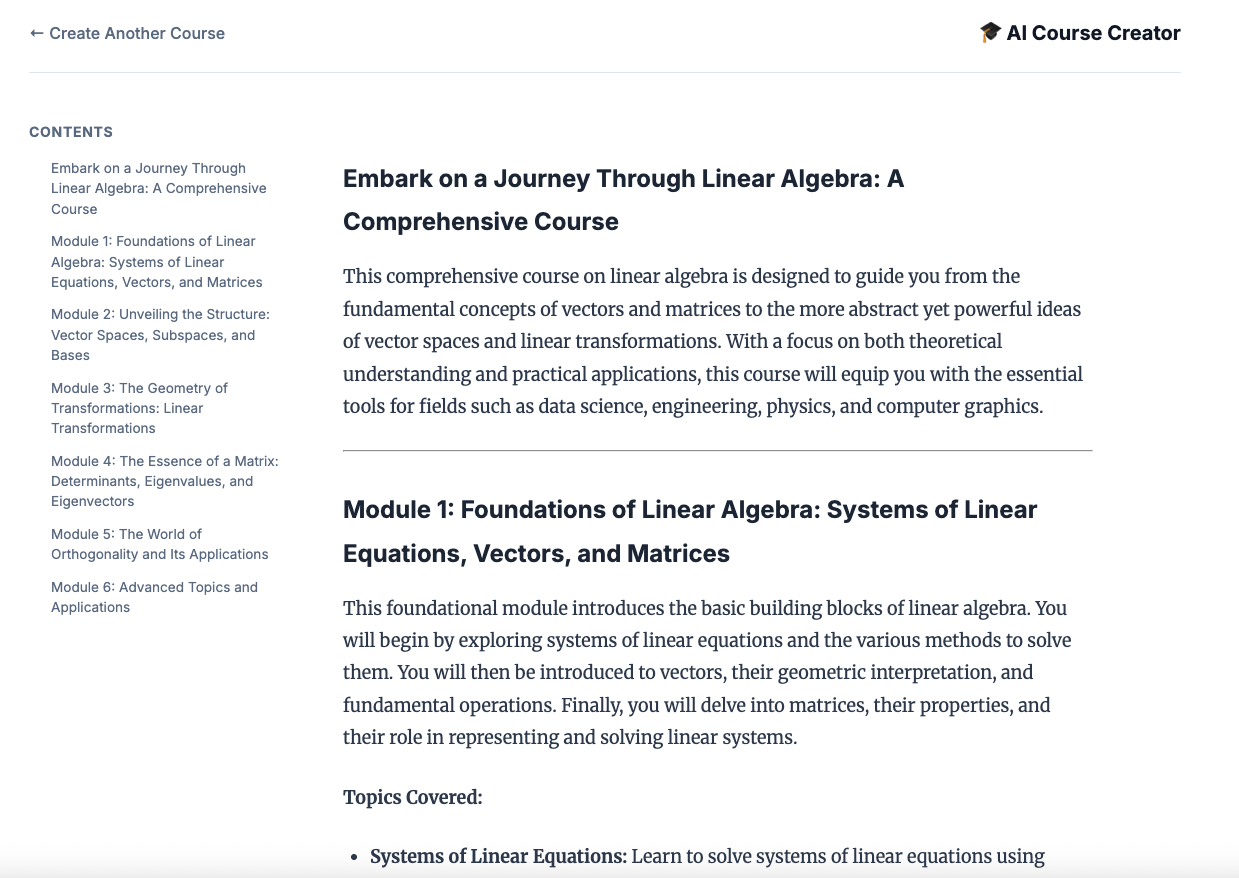
12. 建立課程!
開啟 Course Creator 網站。Course Creator Cloud Run 服務是從指令碼部署的最後一項服務。您可以將課程建立者的網址識別為 https://course-creator-,這應該是部署指令碼的最終輸出行。
然後輸入課程主題,例如「線性代數」。
專員會開始處理你的課程。
13. 清除
如要避免系統向您的 Google Cloud 帳戶收取本程式碼研究室所用資源的費用,請按照下列步驟刪除服務和容器映像檔。
1. 刪除 Cloud Run 服務
最有效率的清理方式是刪除部署至 Cloud Run 的服務。
# Delete the main agent and app services
gcloud run services delete researcher content-builder judge orchestrator course-creator \
    --region $REGION --quiet

# Delete the GPU backend (Ollama)
gcloud run services delete ollama-gemma-gpu \
    --region $OLLAMA_REGION --quiet
2. 刪除 Artifact Registry 映像檔
使用 --source 旗標部署時,Google Cloud 會在 Artifact Registry 中建立存放區,用於儲存容器映像檔。如要移除這些檔案並節省儲存費用,請刪除存放區:
gcloud artifacts repositories delete cloud-run-source-deploy --location us-east4 --quiet
3. 移除本機檔案和環境
為保持 Cloud Shell 殼層環境乾淨,請移除專案資料夾和所有本機設定:
cd ~
rm -rf multi-agent-system
4. (選用) 刪除專案
如果您是特地為了這個程式碼研究室建立專案,可以透過「管理資源」頁面關閉專案,確保系統不會繼續計費。
14. 恭喜!
您已成功建構及部署可用於正式環境的分散式多代理系統。
學習成果
- 將複雜工作拆解成多個步驟:我們沒有使用一個大型提示,而是將工作拆分成多個專業角色 (研究人員、評估人員、內容建立者)。
- 實施品質控管:我們使用
LoopAgent和結構化Judge,確保只有高品質資訊能進入最後階段。 - 專為正式環境打造:我們使用 Agent-to-Agent (A2A) 通訊協定和 Cloud Run,建立的系統中每個代理程式都是獨立的微服務,可隨需求擴充。相較於在單一 Python 指令碼中執行所有項目,這種做法更為穩健。
- 自動化調度管理:我們使用
SequentialAgent和LoopAgent定義明確的控制流程模式。*. Cloud Run GPU:將 Gemma 模型部署至 Cloud Run GPU