
1. Introduction
In modern retail, your data is a diverse, sprawling ecosystem. You have rock-solid transactional data (pricing and inventory), "messy" polymorphic catalogs (electronics specs vs. apparel sizes), and petabytes of behavioral logs. Forcing these into a single monolith doesn't just create technical debt—it kills the user experience.
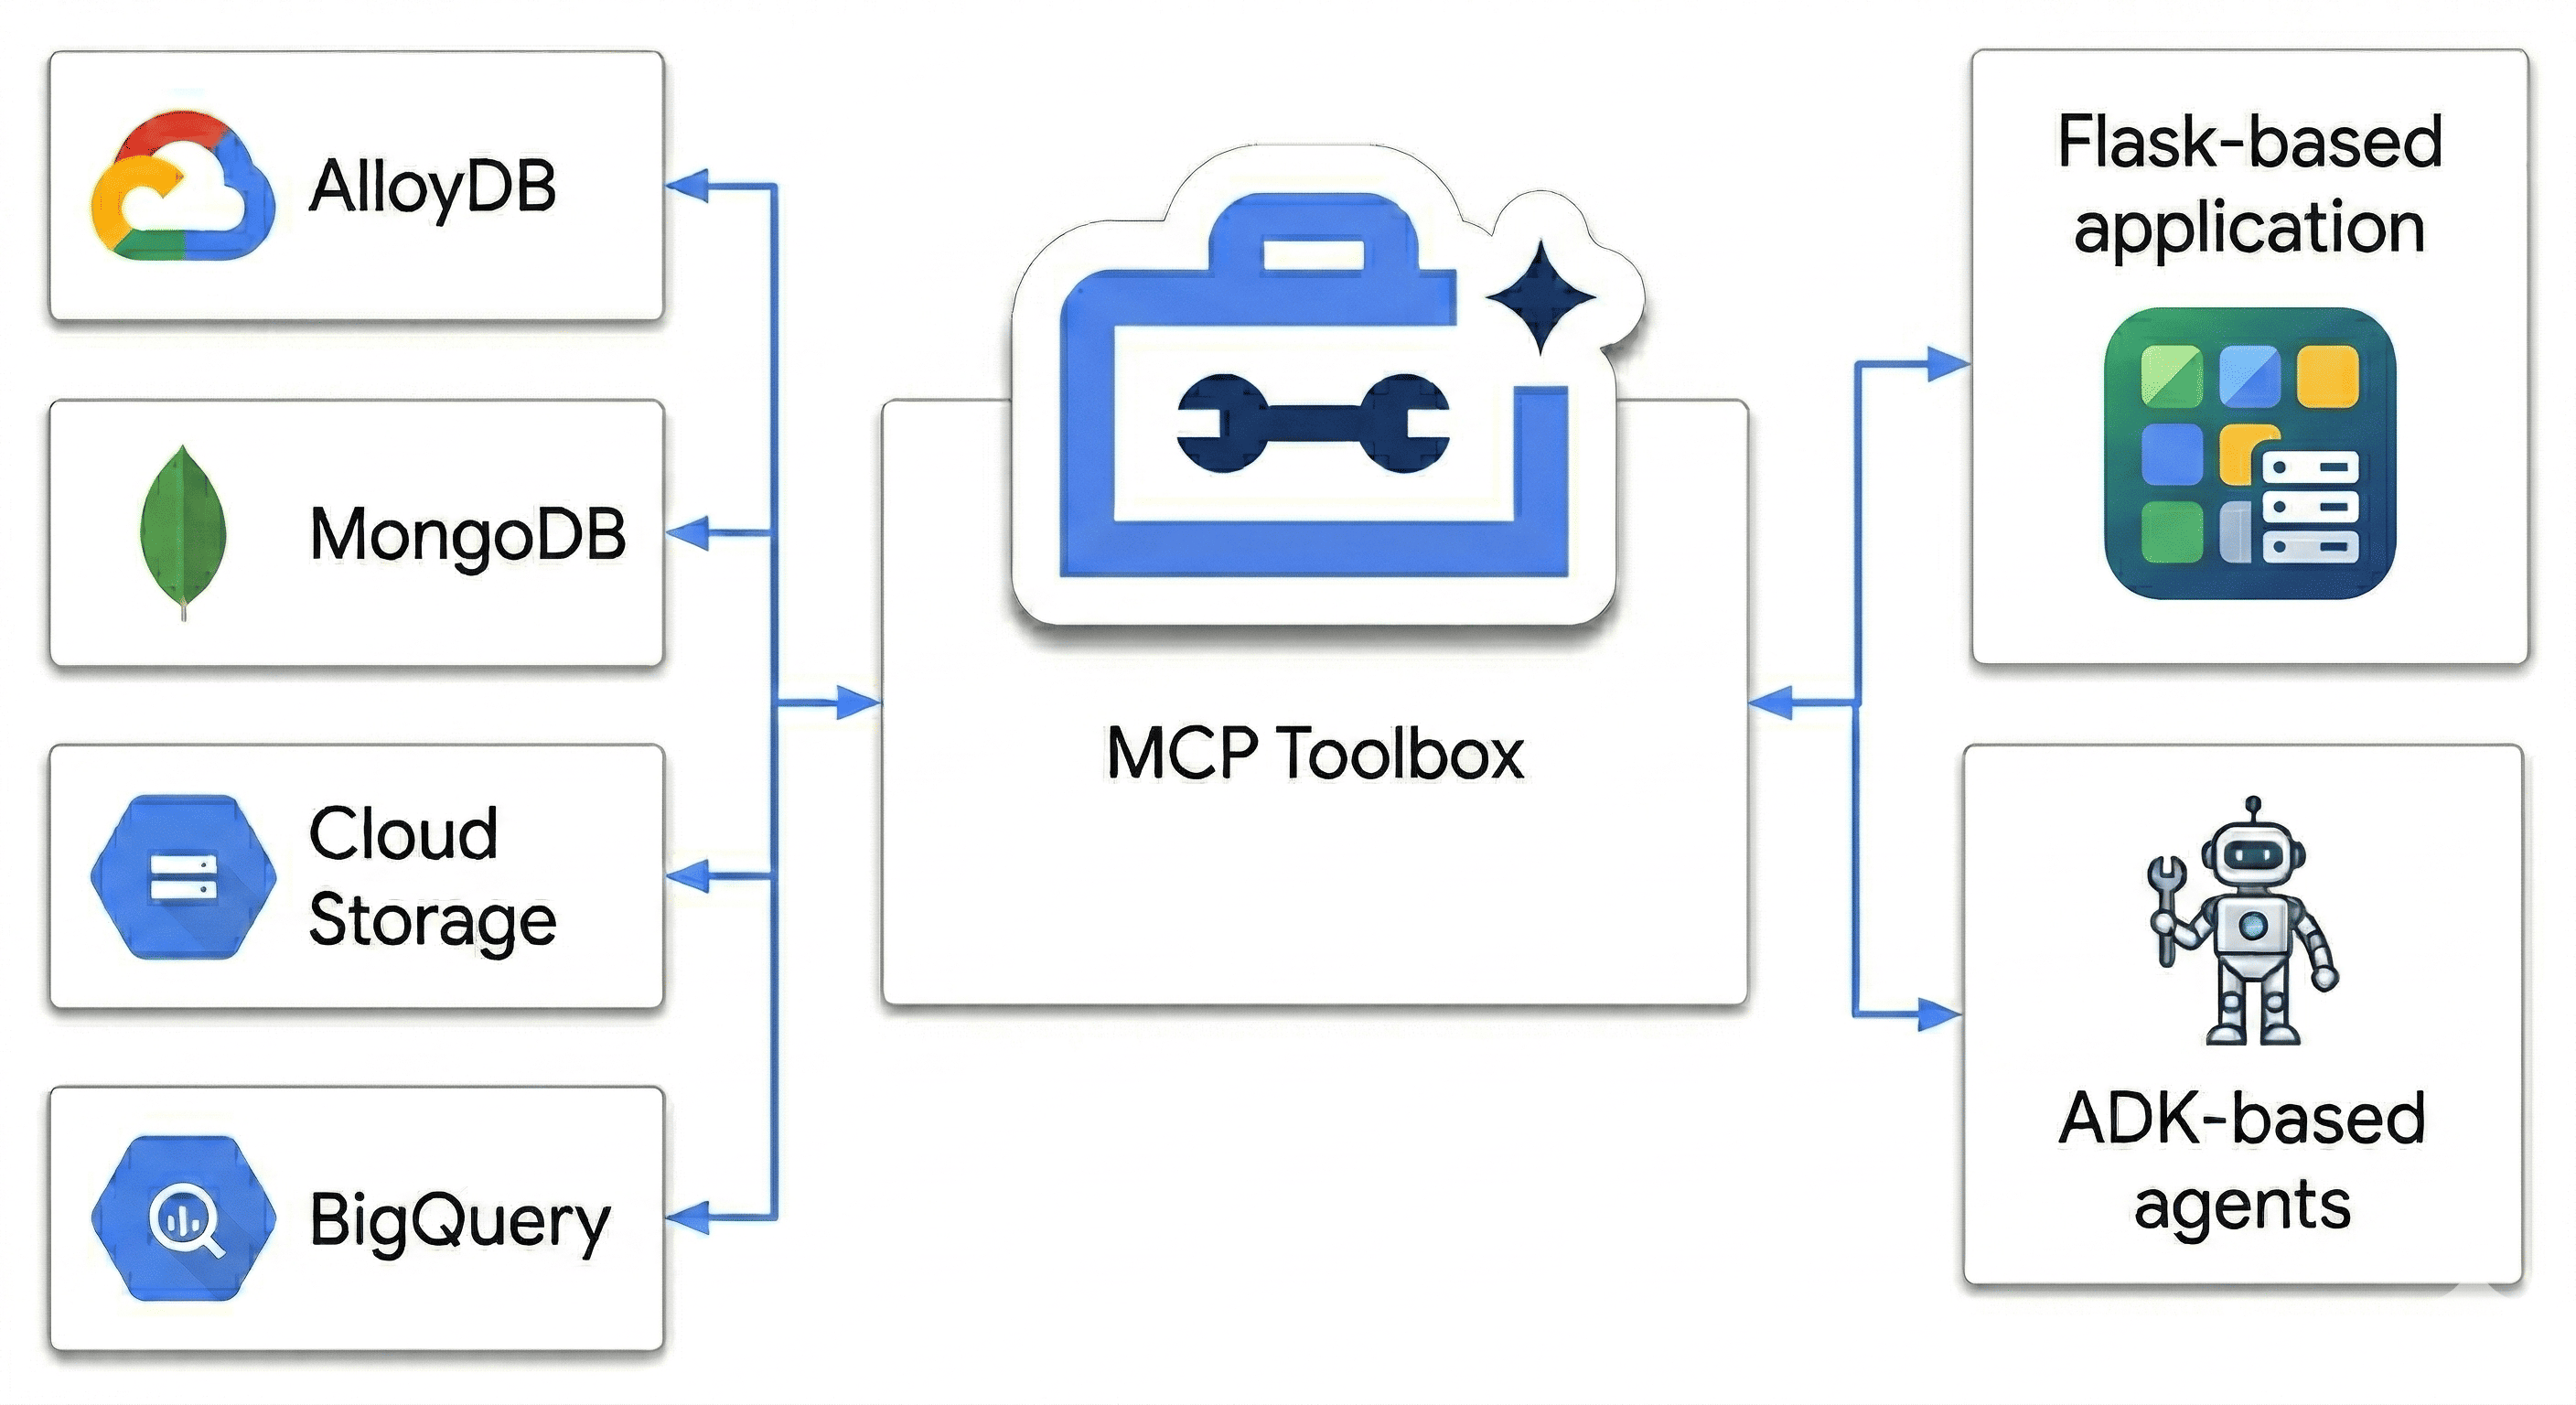
In this codelab, you will architect a Polyglot Powerhouse that harmonizes:
- AlloyDB: Your transactional backbone for high-speed consistency and image embeddings.
- MongoDB Atlas on Google Cloud: Your flexible, schema-agnostic catalog layer.
- Cloud Storage: Your analytical brain for real-time trend forecasting.
- BigQuery: Your high-res digital warehouse.
The "secret sauce"? You'll use the MCP Toolbox for Databases to intelligently orchestrate and unify the data sources running on Cloud Run as a semantic bridge, then deploy a multi-agent chat app using Agent Development Kit (ADK). You're not just building a search bar; you're building an intelligent retail brain that understands context, respects constraints, and bridges the gap between raw data and human intent.
The Impossible User Query
Standard e-commerce agents fail at multi-dimensional reasoning (combining negative constraints, visual similarity, and real-time inventory). For example, I typically want to talk to a retail site like this:
"Hey, I'm planning a high-altitude photography trip. Show me some weather-resistant backpacks similar in style to the ‘AeroGlow Pro' but without any leather components. Also, let me know if they are actually in stock and if other photographers have complained about the strap durability in the reviews."
Why this query is "The Agent Killer":
- Visual Similarity (AlloyDB + Vector Search): "Similar in style to the AeroGlow Pro" requires image embedding comparison.
- Negative Constraint (MongoDB): "Without any leather" requires filtering through flexible, nested attributes that aren't usually in a standard SQL schema.
- Real-Time Inventory (AlloyDB): "Actually in stock" requires a live transactional check (not a stale search index).
- Semantic Synthesis (BigQuery + Multi-Agent): Analyzing reviews for "strap durability" requires the agent to summarize unstructured feedback from BigQuery on the fly.
Most retail bots would just see ‘Backpack' and ‘Leather' and show 10 leather backpacks. How are we stopping that?
Because we aren't just matching keywords. We're using the MCP Toolbox to let our agents ‘reason' across all these sources the transactional truth in AlloyDB and the flexible attributes in MongoDB simultaneously. Let's build it.
What you'll do
- Provision an AlloyDB cluster for core product data
- Configure MongoDB Atlas on Google Cloud to store semi-structured product details
- Create a Cloud Storage bucket to serve product images
- Deploy the MCP Toolbox for Databases to Cloud Run for uniform data access
- Run ETL processes to push data into BigQuery for analytics
- Converse with an AI agent in natural language.
Prerequisites
- A web browser such as Chrome
- A Google Cloud project with billing enabled
- A free MongoDB Atlas on Google Cloud account
2. Before you begin
Create a Google Cloud Project
- In the Google Cloud Console, on the project selector page, select or create a Google Cloud project.
- Make sure that billing is enabled for your Cloud project. Learn how to check if billing is enabled on a project.
Start Cloud Shell
Cloud Shell is a command-line environment running in Google Cloud that comes preloaded with necessary tools.
- Click Activate Cloud Shell at the top of the Google Cloud console.
- Once connected to Cloud Shell, verify your authentication:
gcloud auth list - Confirm your project is configured:
gcloud config get project - If your project is not set as expected, set it:
export PROJECT_ID=<YOUR_PROJECT_ID>
gcloud config set project $PROJECT_ID
Enable required APIs
Run this command to enable all the required APIs:
gcloud services enable \
  alloydb.googleapis.com \
  bigquery.googleapis.com \
  storage.googleapis.com \
  run.googleapis.com \
  cloudbuild.googleapis.com \
  artifactregistry.googleapis.com \
  iam.googleapis.com \
  secretmanager.googleapis.com \
  compute.googleapis.com \
  servicenetworking.googleapis.com \
  aiplatform.googleapis.com
3. Set up Cloud Storage
Cloud Storage serves as a massive store for unstructured media assets, such as product images.
- In the Google Cloud Console, navigate to Cloud Storage, and click Create bucket.
- Give your bucket a globally unique name (e.g.,
ecommerce-app-images). - Click Create.
- To allow the demo application to access the images without authentication, clear the Enforce public access prevention on this bucket option, and click Confirm.
- Go to the Permissions tab.
- In Permissions, click Grant access.
- In New principals, enter
allUsers. - In Select a role, select Cloud Storage > Storage Object User.
- Click Save, and then click Allow Public Access to confirm that you are making the resource public.
Upload placeholder images
The BRK2-149-multidb-ecommerce uses placeholder images for the best visual experience.
- In your Cloud Shell, clone the
next-26-sessionsrepository:git clone https://github.com/GoogleCloudPlatform/next-26-sessions.git - Navigate to the
UploadImagesfolder:cd next-26-sessions/BRK2-149-multidb-ecommerce/UploadImages - In the Google Cloud Console, navigate to Cloud Storage, and click Buckets.
- Click the name of your newly created bucket.
- Click Upload > Upload files, select the downloaded sample images, and click Open.
4. Set up AlloyDB
AlloyDB serves as the single source of truth for structured, transactional, and critical data like product IDs, names, SKUs, prices, and inventory. AlloyDB also powers the AI agent with similarity search capabilities for recommendations and natural language queries.
Provision an AlloyDB Cluster
- In the Google Cloud Console, navigate to AlloyDB for PostgreSQL.
- Click Create Cluster.
- For Cluster ID, enter
ecommerce-cluster. - Set a strong password for the
postgresuser. For learning purposes, you can usealloydb. - For Database Version, keep the default.
- For Region, select
us-central1(or your preferred region).
Configure Primary Instance
- For Instance ID, enter
ecommerce-cluster-primary. - In Zonal Availability, select Single zone.
- For Machine Type, choose a small machine type (e.g., N2, 4 vCPUs, 32 GB RAM).
- In Private IP Connectivity, select Private Services Access (PSA), and select the
defaultnetwork.If default network isn't already set, click Confirm network setup to create one. - In Public IP Connectivity, select the Enable Public IP checkbox for the MCP toolbox to connect properly in this codelab.
- In Authorised external networks, enter
0.0.0.0/0. Select the I acknowledge the risks checkbox and click Save. - Click Create Cluster.
Note: Ensure you note down your public IP addres (it looks similar to 34.124.240.26).
Initialize the Database
- Click AlloyDB Studio from the left navigation menu.
- In Database drop-down, select
postgres. - Select Built-in authentication to sign in to the database.
- For Username, use the
postgresuser. - For Password, enter the password you set earlier.
- Click Authenticate.
- In the editor view, open a new untitled query tab.
- Copy the following DDL and click Run:
CREATE TABLE products_core_table ( product_id UUID PRIMARY KEY, name VARCHAR(255) NOT NULL, sku VARCHAR(50) UNIQUE NOT NULL, price NUMERIC(10, 2) NOT NULL, stock INT NOT NULL ); - In your Cloud Shell, navigate to the
BRK2-149-multidb-ecommercefolder:cd next-26-sessions/BRK2-149-multidb-ecommerce - Open the
alloydb_insert_queries.sqlfile in your Cloud Shell and copy the insert queries.cat alloydb_insert_queries.sql - In a new untitled query tab, paste only the
INSERTstatements and click Run. - In a new untitled query tab, copy the following DDL and click Run to create an index on the
products_core_tabletable:CREATE INDEX idx_products_core_sku ON products_core_table(sku);
Create image embeddings for AI agent to fetch similar products
The AI agent integration uses image embeddings to fetch similar products. The embeddings are generated using the multimodalembedding@001 model and stored in the AlloyDB database. The embeddings are 1408 dimensional vectors and are stored in the img_embeddings column.
Before we can generate embeddings, we must grant required roles to the AlloyDB service account to access Cloud Storage.
Grant roles to AlloyDB service account to access Cloud Storage
We grant the Storage Object User and Storage Object Viewer role to the AlloyDB service account to enable it to read objects from the Cloud Storage bucket.
- Navigate to IAM and admin.
- Click Grant access.
- In the New principals field, enter the search for AlloyDB service account. The service account looks similar to
service-991742412753@gcp-sa-alloydb.iam.gserviceaccount.com. - Click Select a role.
- Find and select the Storage Object User role.
- Click Add another role and select the Storage Object Viewer role.
- Click Add another role and select the Vertex AI User role.
- Click Save.
Enable extensions
For building this app, we will use the extensions pgvector and google_ml_integration. The pgvector extension allows you to store and search vector embeddings. The google_ml_integration extension provides functions you use to access Vertex AI prediction endpoints to get predictions in SQL. Enable these extensions by running the following DDLs:
- In the Google Cloud Console, navigate to AlloyDB for PostgreSQL.
- Click AlloyDB Studio from the left navigation menu.
- In the editor view, open a new untitled query tab.
- Copy the following DDL and click Run:
CREATE EXTENSION IF NOT EXISTS vector;
CREATE EXTENSION IF NOT EXISTS google_ml_integration;
Initialize database with embeddings
- Add the img_embeddings column to the
products_core_table.ALTER TABLE products_core_table ADD COLUMN img_embeddings vector(1408); - Generate embeddings for the images and store them in the
img_embeddingscolumn.UPDATE products_core_table SET img_embeddings = google_ml.image_embedding( model_id => 'multimodalembedding@001', image => 'gs://<STORAGE_BUCKET_NAME>/' || sku || '.jpg', mimetype => 'image/jpeg') WHERE sku IN ( SELECT sku FROM products_core_table WHERE img_embeddings IS NULL AND sku IS NOT NULL LIMIT 10 ); - Repeat the earlier query at least 5 times to generate image embeddings for the entire set, as the Studio has a 5-minute limitation. If this query times out, change the
LIMITto5and rerun the query ten times. This step might take a couple of minutes to complete.
5. Set up MongoDB Atlas on Google Cloud
MongoDB stores rich, semi-structured product details and flexible user behavior data (like clicks and views).\
Create MongoDB cluster
- Go to MongoDB Atlas on Google Cloud, select a free tier account.
- Select the Free cluster tier, and enter a name for the cluster, for example
ecommerce-cluster. - Select Google Cloud as the provider and ensure the region aligns with your Google Cloud region (e.g.,
us-central1). - Click Create Deployment.
- Click Close.
Configure Network Access
- In the Atlas console, go to Database & Network Access.
- Click IP Access List.
- Click Add IP Address.
- Add
0.0.0.0/0, which allows access from anywhere. - Click Confirm.
Create a Database User
- In the Atlas console, go to Database & Network Access.
- Click Database Users.
- Click Add New Database User.
- Select Password as the authentication method.
- Enter username as
store-userand password asstoreuser. - Click Add Built In Role, select Read and write to any database.
- Click Add User.
Get the Connection String
- Go to Database > Clusters > Connect.
- In the Connect your application, click Drivers.
- Copy the connection string that is shown in Add your connection string into your application code. The string looks something like this:
mongodb+srv://store-user:<db_password>@ecommerce-cluster.g8vaekh.mongodb.net/?appName=ecommerce-clusterdb_passwordwith your MongoDB password. In this codelab, it isstoreuser.
Save this connection string. You will use it later for the MONGODB_CONNECTION_STRING environment variable.
Create Database and Collection
- In the Atlas console, go to Database > Clusters > Browse Collections.
- Click Create Database and enter the details:
- Database Name:
ecommerce_db - Collection Name:
product_details_collection
- Database Name:
- Click Create Database.
- In the Data Explorer, select the Collection Name.
- Click the Add Data (+) icon, and then click Insert document.
- Copy the JSON content from product_details_export.json and paste it into the Insert Document editor dialog.
- Click Insert to insert the array of documents and verify that 192 documents are added.
- In the Data Explorer, click Create collection (+) next to the
ecommerce_dbdatabase. - Enter
user_interactions_collectionfor the collection name, and click Create Collection. - In the Data Explorer, select the
user_interactions_collectioncollection. - Click the Add Data (+) icon, and then click Insert document.
- Copy the JSON content from user_interactions_export.json and paste it into the Insert Document editor dialog.
- Click Insert Document.
6. Set up BigQuery
BigQuery aggregates and analyzes historical user behavior to generate intelligent reporting and recommendations.
Create the Dataset
- In the Google Cloud Console, navigate to BigQuery.
- Next to your project ID in the Explorer pane, click the three-dot menu and select Create dataset.
- Enter
ecommerce_analyticsfor the Dataset ID. - Click Create dataset.
Create the Analytics Table
- Open a new query in the BigQuery workspace.
- Run the following SQL statement to create the summary table linking users to product interactions:
CREATE TABLE ecommerce_analytics.user_product_interactions (
    user_id STRING DEFAULT 'any user',
    product_id STRING,
    interaction_score INT
);
Grant roles to Compute service account for MCP Toolbox
We grant roles to the Compute service account used for our Toolbox. This is done to enable the MCP Toolbox to access BigQuery, Secret Manager, and other cloud services.
To grant roles, complete the following steps:
- Navigate to IAM and admin.
- Click Grant access.
- In the New principals field, enter the default Compute service account named
YOUR_PROJECT_NUMBER-compute@developer.gserviceaccount.com. ReplaceYOUR_PROJECT_NUMBERwith your Google Cloud Project Number. - Click Select a role.
- Find and select the BigQuery Data Editor role.
- Click Add another role and select the BigQuery Job User role.
- Click Add another role and select the Secret Manager Secret Accessor role.
- Click Add another role and select the Editor role.
- Click Save.
7. Understand the Application End to End
To learn about how each component works with each other, we will create a simple ecommerce application that uses multiple databases and services. The application is built with a Python (Flask) backend and integrates multiple Google Cloud services and databases.
Understand the directory structure
In the next section, you will clone the BRK2-149-multidb-ecommerce repository and use it to run the application locally. Once we test the application locally, we will deploy both MCP Toolbox and the application to Cloud Run.
Explore the downloaded files in this directory. The following high level directories are present:
UploadImages: stores image assets, primarily used for documentation or visual content for the ecommerce product catalog.static: stores the application's static web assets, such as CSS and JavaScript files, used to style and add interactivity to the user interface ( source).templates: stores the HTML templates (likely Jinja2 for Flask) used by the Python application to dynamically render web pages for the ecommerce catalog ( source).toolbox-implementation: stores configuration and implementation details for the Model Context Protocol (MCP) Toolbox, facilitating multidb database interactions using predefined tools.
The files in this repository work together to build, configure, and deploy a multidb ecommerce application. Central files like app.py orchestrate the backend by integrating diverse data sources defined in SQL and JSON files, while configuration files ensure seamless deployment to cloud environments:
app.py: orchestrates Flask backend and multi-database integrations.agentengine.py: Core logic for initializing and configuring Vertex AI agents..env: stores secrets for database and storage connections.tools.yaml: configures MCP Toolbox for multidb database operations.Dockerfile: defines container image and environment setup.requirements.txt: lists Python libraries needed for application runtime.tools.yaml: configurations for MCP Toolbox.Procfile: specifies production execution commands for deployment.alloydb_insert_queries.sql: contains SQL queries for relational data.product_details_export.jsonanduser_interactions_export.json: provides sample JSON data for NoSQL database.README.md: guides setup, deployment, and project understanding.
End-to-End Flow of the Application
- AlloyDB Setup: Provision a high-performance cluster and use the provided SQL scripts to create the products_core_table with vector columns for image embeddings.
- MongoDB Atlas Setup: Deploy a cluster on Google Cloud to store fluid product attributes in product_details and log real-time clickstreams in user_interactions.
- BigQuery Analytics: Create a dataset to aggregate interaction logs, enabling complex analytical queries that identify "Top 5" trending items across millions of events.
- Cloud Storage Repository: Create a public bucket to house high-resolution product imagery, ensuring each asset is accessible via a signed or public URL for the frontend.
- MCP Toolbox Deployment: Deploy the Toolbox to Cloud Run, establishing it as the central RESTful bridge that translates natural language intent into multi-database queries.
- Tools.yaml Configuration: Define your "Tools"—such as get_product_core_data or get_top_5_views—mapping specific SQL and NoSQL operations to simple, agent-readable names.
- Flask Backend Logic: Implement app.py routes that interface with the MCP Toolbox, handling the coordination of data retrieval and serving as the API for the UI.
- Multi-Agent Orchestration: Configure the ADK agents within the code to reason through user intent, selecting the right "Tool" to solve complex, multi-source retail queries.
- Frontend Integration: Build an index.html interface featuring the product catalog with interactions recording feature, Analytics tab to understand product performance analytics, and a dedicated "Agent Tab" that uses the ADK multi-agent chat to provide a seamless conversational shopping experience.
Now let's implement the orchestration and deployments.
8. Setup MCP Toolbox and Deploy to Cloud Run
The MCP Toolbox abstracts our multiple data sources, letting our application fetch and write data uniformly.
Install MCP Toolbox Locally
- In your Cloud Shell, navigate to the
toolbox-implementationfolder:cd next-26-sessions/BRK2-149-multidb-ecommerce/toolbox-implementation - Download the MCP Toolbox binary and make it executable:
export VERSION=0.29.0
curl -L -o toolbox https://storage.googleapis.com/genai-toolbox/v$VERSION/linux/amd64/toolbox
chmod +x toolbox
Configure tools.yaml
You need to define the abstractions for AlloyDB, MongoDB, and BigQuery. The tools.yaml file tells the MCP toolbox how to interact with each other.
- Create and edit the file
tools.yamlusing the embedded editor:cloudshell edit tools.yamltools.yamlfile can be found in the GitHub Repository. Copy its contents into your newtools.yamlfile. - Update the host, user, passwords, project IDs, and connection strings to match the infrastructure you provisioned in earlier steps:
Database
Field
Example Value
AlloyDB/BigQuery
project_idYOUR_PROJECT_IDAlloyDB
regionus-central1AlloyDB
clusterecommerce-clusterAlloyDB
instanceecommerce-cluster-primaryAlloyDB
databasepostgresAlloyDB
passwordalloydbMongoDB
connection_stringmongodb+srv://store-user:storeuser@ecommerce-cluster.urcxr6q.mongodb.net
Grant roles to Compute service account for MCP Toolbox
We grant roles to the Compute service account used for our Toolbox. This is done to enable the MCP Toolbox to access AlloyDB.
- Navigate to IAM and admin.
- Click Grant access.
- In the New principals field, enter the default Compute service account named
YOUR_PROJECT_NUMBER-compute@developer.gserviceaccount.com. ReplaceYOUR_PROJECT_NUMBERwith your Google Cloud Project Number. - Click Select a role.
- Find and select the BigQuery Data Editor role.
- Click Add another role and select the AlloyDB Client role.
- Click Add another role and select the Service Usage Consumer role.
- Click Add another role and select Storage Object Viewer role.
- Click Save.
Test your tool UI
- In your cloudshell terminal, run the toolbox locally to serve the UI:
./toolbox --ui - Open the Web Preview in Cloud Shell on port 5000 and navigate to the tools page. For example, depending on your session URL, you can view it at:
https://5000-cs-71152278760-default.cs-asia-southeast1-cash.cloudshell.dev/ui
The following MCP toolbox UI is seen:
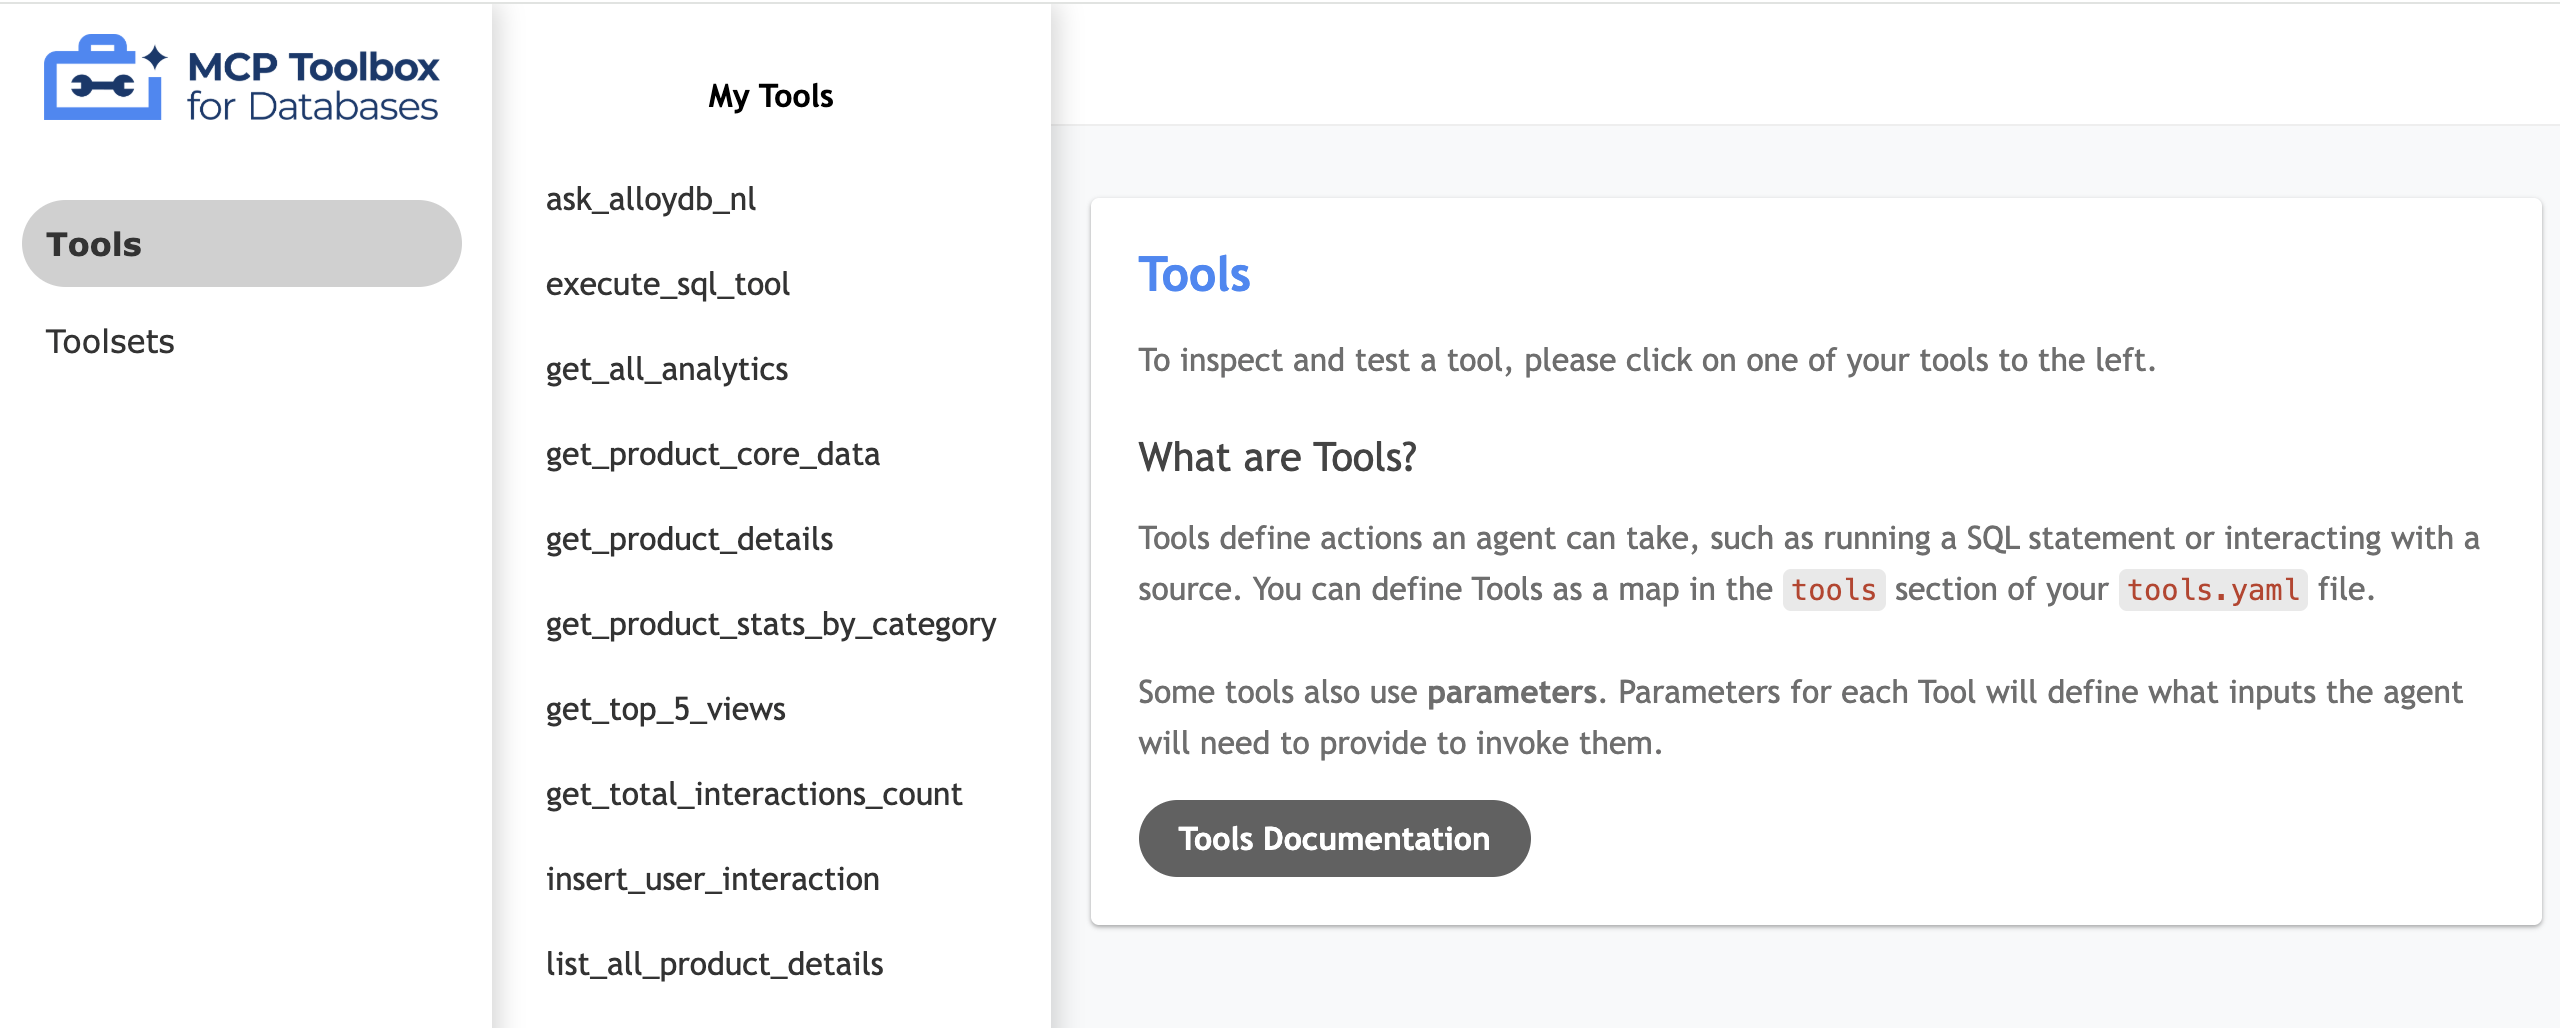
Deploy to Cloud Run
Deploy the MCP Toolbox to Cloud Run to make it available as a secure, managed service that our application can use to query the databases. We will store the configuration in Secret Manager to protect sensitive connection details.
- Open a new Cloud Shell session.
- Navigate to the
toolbox-implementationfolder:cd next-26-sessions/BRK2-149-multidb-ecommerce/toolbox-implementation - Upload the
tools.yamlconfig to Google Secret Manager:gcloud secrets create tools --data-file=tools.yamlgcloud secrets versions add tools --data-file=tools.yaml - Deploy using the public MCP Toolbox container image:
export IMAGE=us-central1-docker.pkg.dev/database-toolbox/toolbox/toolbox:0.29.0 export PROJECT_ID=$(gcloud config get-value project) gcloud run deploy toolbox \ --image $IMAGE \ --region us-central1 \ --service-account $(gcloud projects describe $PROJECT_ID --format="value(projectNumber)")-compute@developer.gserviceaccount.com \ --set-secrets "/app/tools.yaml=tools:latest" \ --args="--tools-file=/app/tools.yaml","--address=0.0.0.0","--port=8080","--ui" \ --allow-unauthenticated - Once deployed, note down the provided Cloud Run Service URL. It should look like
https://toolbox-*********-uc.a.run.app/ui.
9. Set up the ecommerce application and deploy to Cloud Run
With our databases running and the MCP Toolbox abstraction deployed, we can run the Flask web application!
To serve the product catalog, the Flask application processes data by performing the following steps:
- Fetch core data: Retrieves the full list of products from AlloyDB (
list_products_core). - Fetch extended details: Retrieves all product details from MongoDB (
list_all_product_details). - Combine lists: Concatenates the two lists.
- Enrich with media: Adds the Cloud Storage image URL to every item.
Generate reasoning engine application path
To initialize and register an AI agent using Google Cloud's Vertex AI Reasoning Engine, run the following command:
- In your cloudshell terminal, navigate to the
BRK2-149-multidb-ecommercefolder.cd next-26-sessions/BRK2-149-multidb-ecommerce - Run the requirements.txt to install the dependencies
pip install -r requirements.txt - Run the
agentengine.pyscript to generate the reasoning engine application path:python agentengine.py
The output will be similar to the following:
projects/991742412753/locations/us-central1/reasoningEngines/4933254136889081856
Configure the Environment Variables
- Create a
.envfile and edit it:cloudshell edit .env - Replace the values with your specific database connections and your new Cloud Run Toolbox URL:
# 1. MongoDB Connection String
MONGODB_CONNECTION_STRING="mongodb+srv://<db_user>:<db_password>@cluster0.mongodb.net"

# 2. MCP Toolbox Server Location
# Must match the address where you run the toolbox server
MCP_TOOLBOX_SERVER_URL="https://toolbox-*********-uc.a.run.app"

# 3. Google Cloud Storage Bucket Name
GCS_PRODUCT_BUCKET="ecommerce-app-images"

# 4. Fallback image URL
FALLBACK_IMAGE_URL="https://storage.googleapis.com/ecommerce-media-bold-circuit-492711-n9/fallback.jpg"

# 5. Google Gen AI Vertex AI flag
GOOGLE_GENAI_USE_VERTEXAI=TRUE

# 6. Project ID
PROJECT_ID=codelab-project-491117

# 7. Google Cloud Location of AlloyDB, BigQuery databases
GOOGLE_CLOUD_LOCATION=us-central1

# 8. Reasoning engine application path
APP_NAME=projects/991742412753/locations/us-central1/reasoningEngines/4933254136889081856

# 9. Model ID
MODEL=gemini-1.5-flash-lite
Deploy the Frontend to Cloud Run
- Deploy the web application to Cloud Run to complete the architecture:
gcloud run deploy polyglot --source . --platform managed \ --region us-central1 \ --allow-unauthenticated \ --set-env-vars \ MONGODB_CONNECTION_STRING="<MONGODB_CONNECTION_STRING>", \ MCP_TOOLBOX_SERVER_URL="<MCP_TOOLBOX_SERVER_URL>", \ GCS_PRODUCT_BUCKET="<GCS_PRODUCT_BUCKET>", \ FALLBACK_IMAGE_URL="<FALLBACK_IMAGE_URL>", \ GOOGLE_GENAI_USE_VERTEXAI=TRUE, \ PROJECT_ID="YOUR_PROJECT_ID", \ GOOGLE_CLOUD_LOCATION=us-central1, \ APP_NAME="<YOUR_REASONING_ENGINE_APP_PATH>", \ MODEL="gemini-1.5-flash-lite"YOUR_PROJECT_ID: Your Google Cloud Project ID.YOUR_REASONING_ENGINE_APP_PATH: The output from runningpython agentengine.py, for example,projects/991742412753/locations/us-central1/reasoningEngines/4933254136889081856.MCP_TOOLBOX_SERVER_URL: The URL of your MCP Toolbox server, for examplehttps://toolbox-*********-uc.a.run.app.GCS_PRODUCT_BUCKET: The name of your Google Cloud Storage bucket, for exampleecommerce-app-images.MONGODB_CONNECTION_STRING: The connection string for your MongoDB database, for examplemongodb+srv://store-user:storeuser@ecommerce-cluster.g8vaekh.mongodb.netFALLBACK_IMAGE_URL: The URL of the fallback image, for examplehttps://storage.googleapis.com/ecommerce-app-images/fallback.jpg
Your application is now live! Open the service URL provided by Cloud Run to see the Multidb Ecommerce catalog. The URL will be similar to https://polyglot-*********-uc.a.run.app/.
10. Explore the application
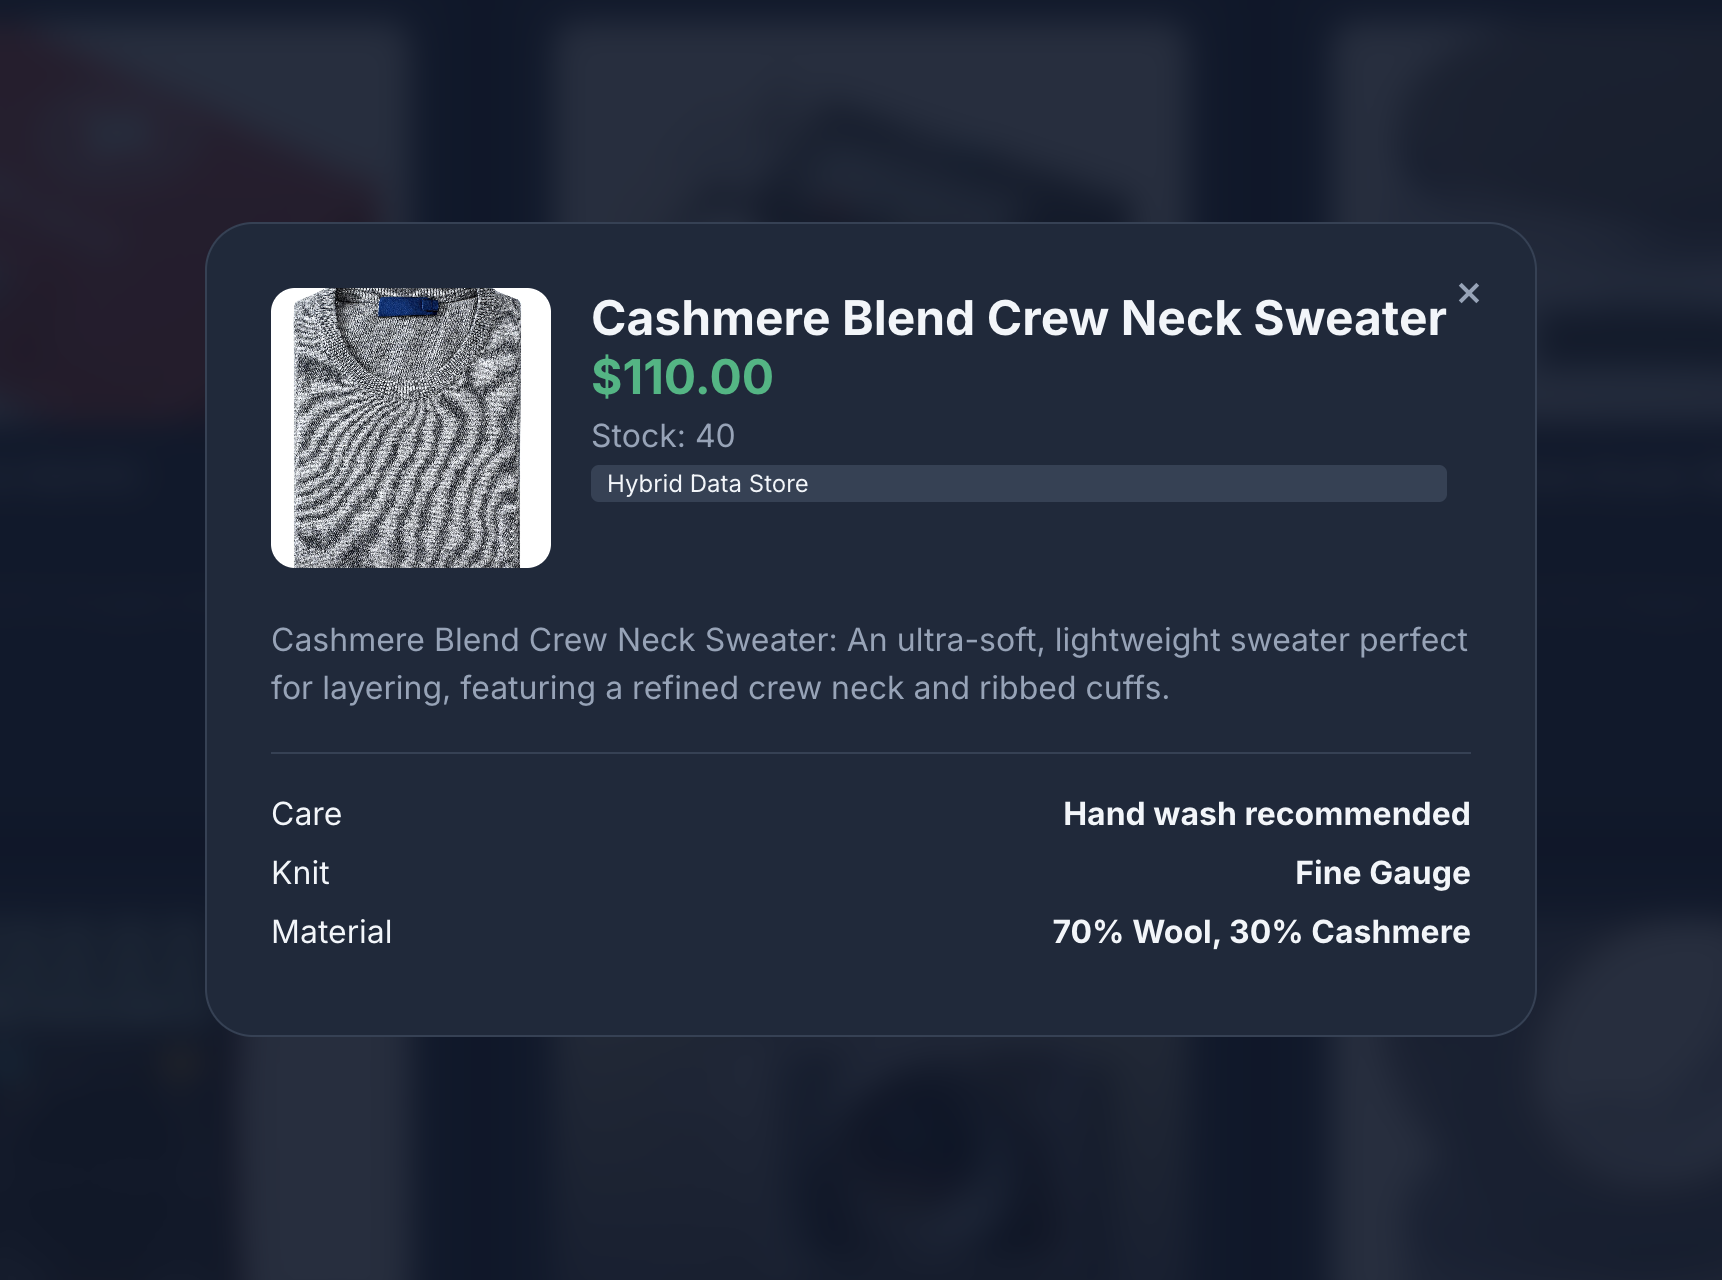
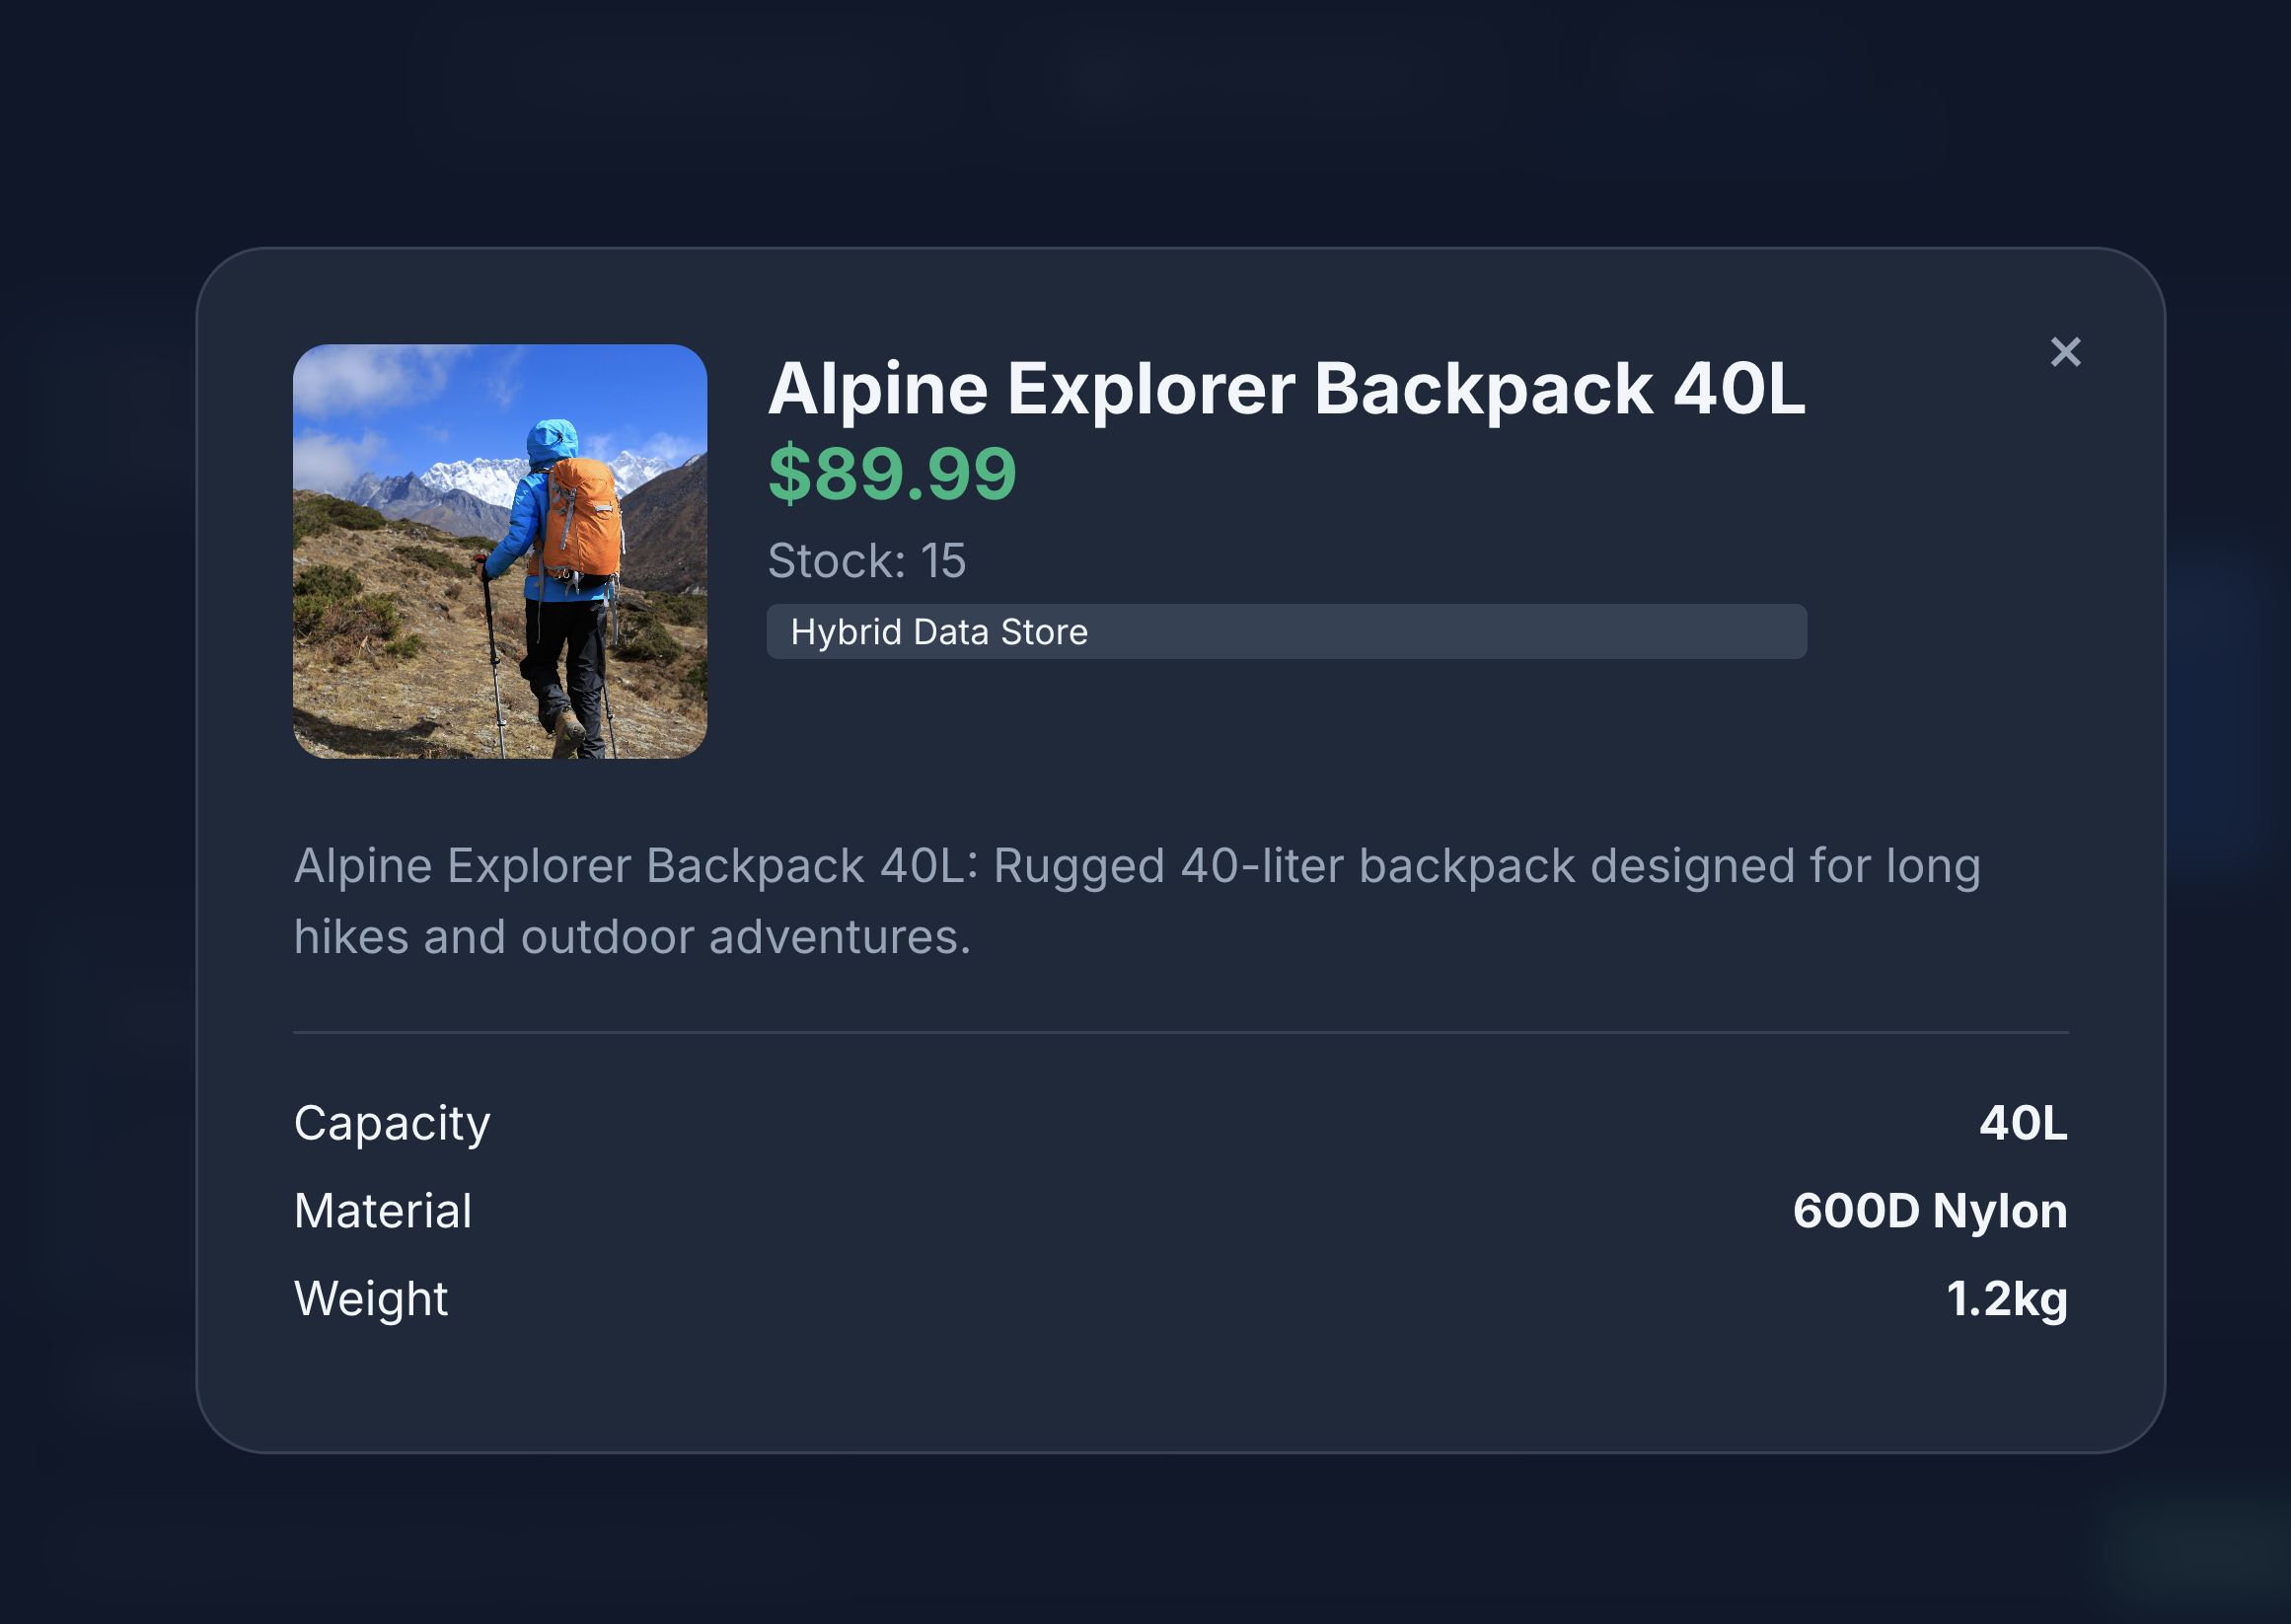
- Click Product Catalog to view all products.
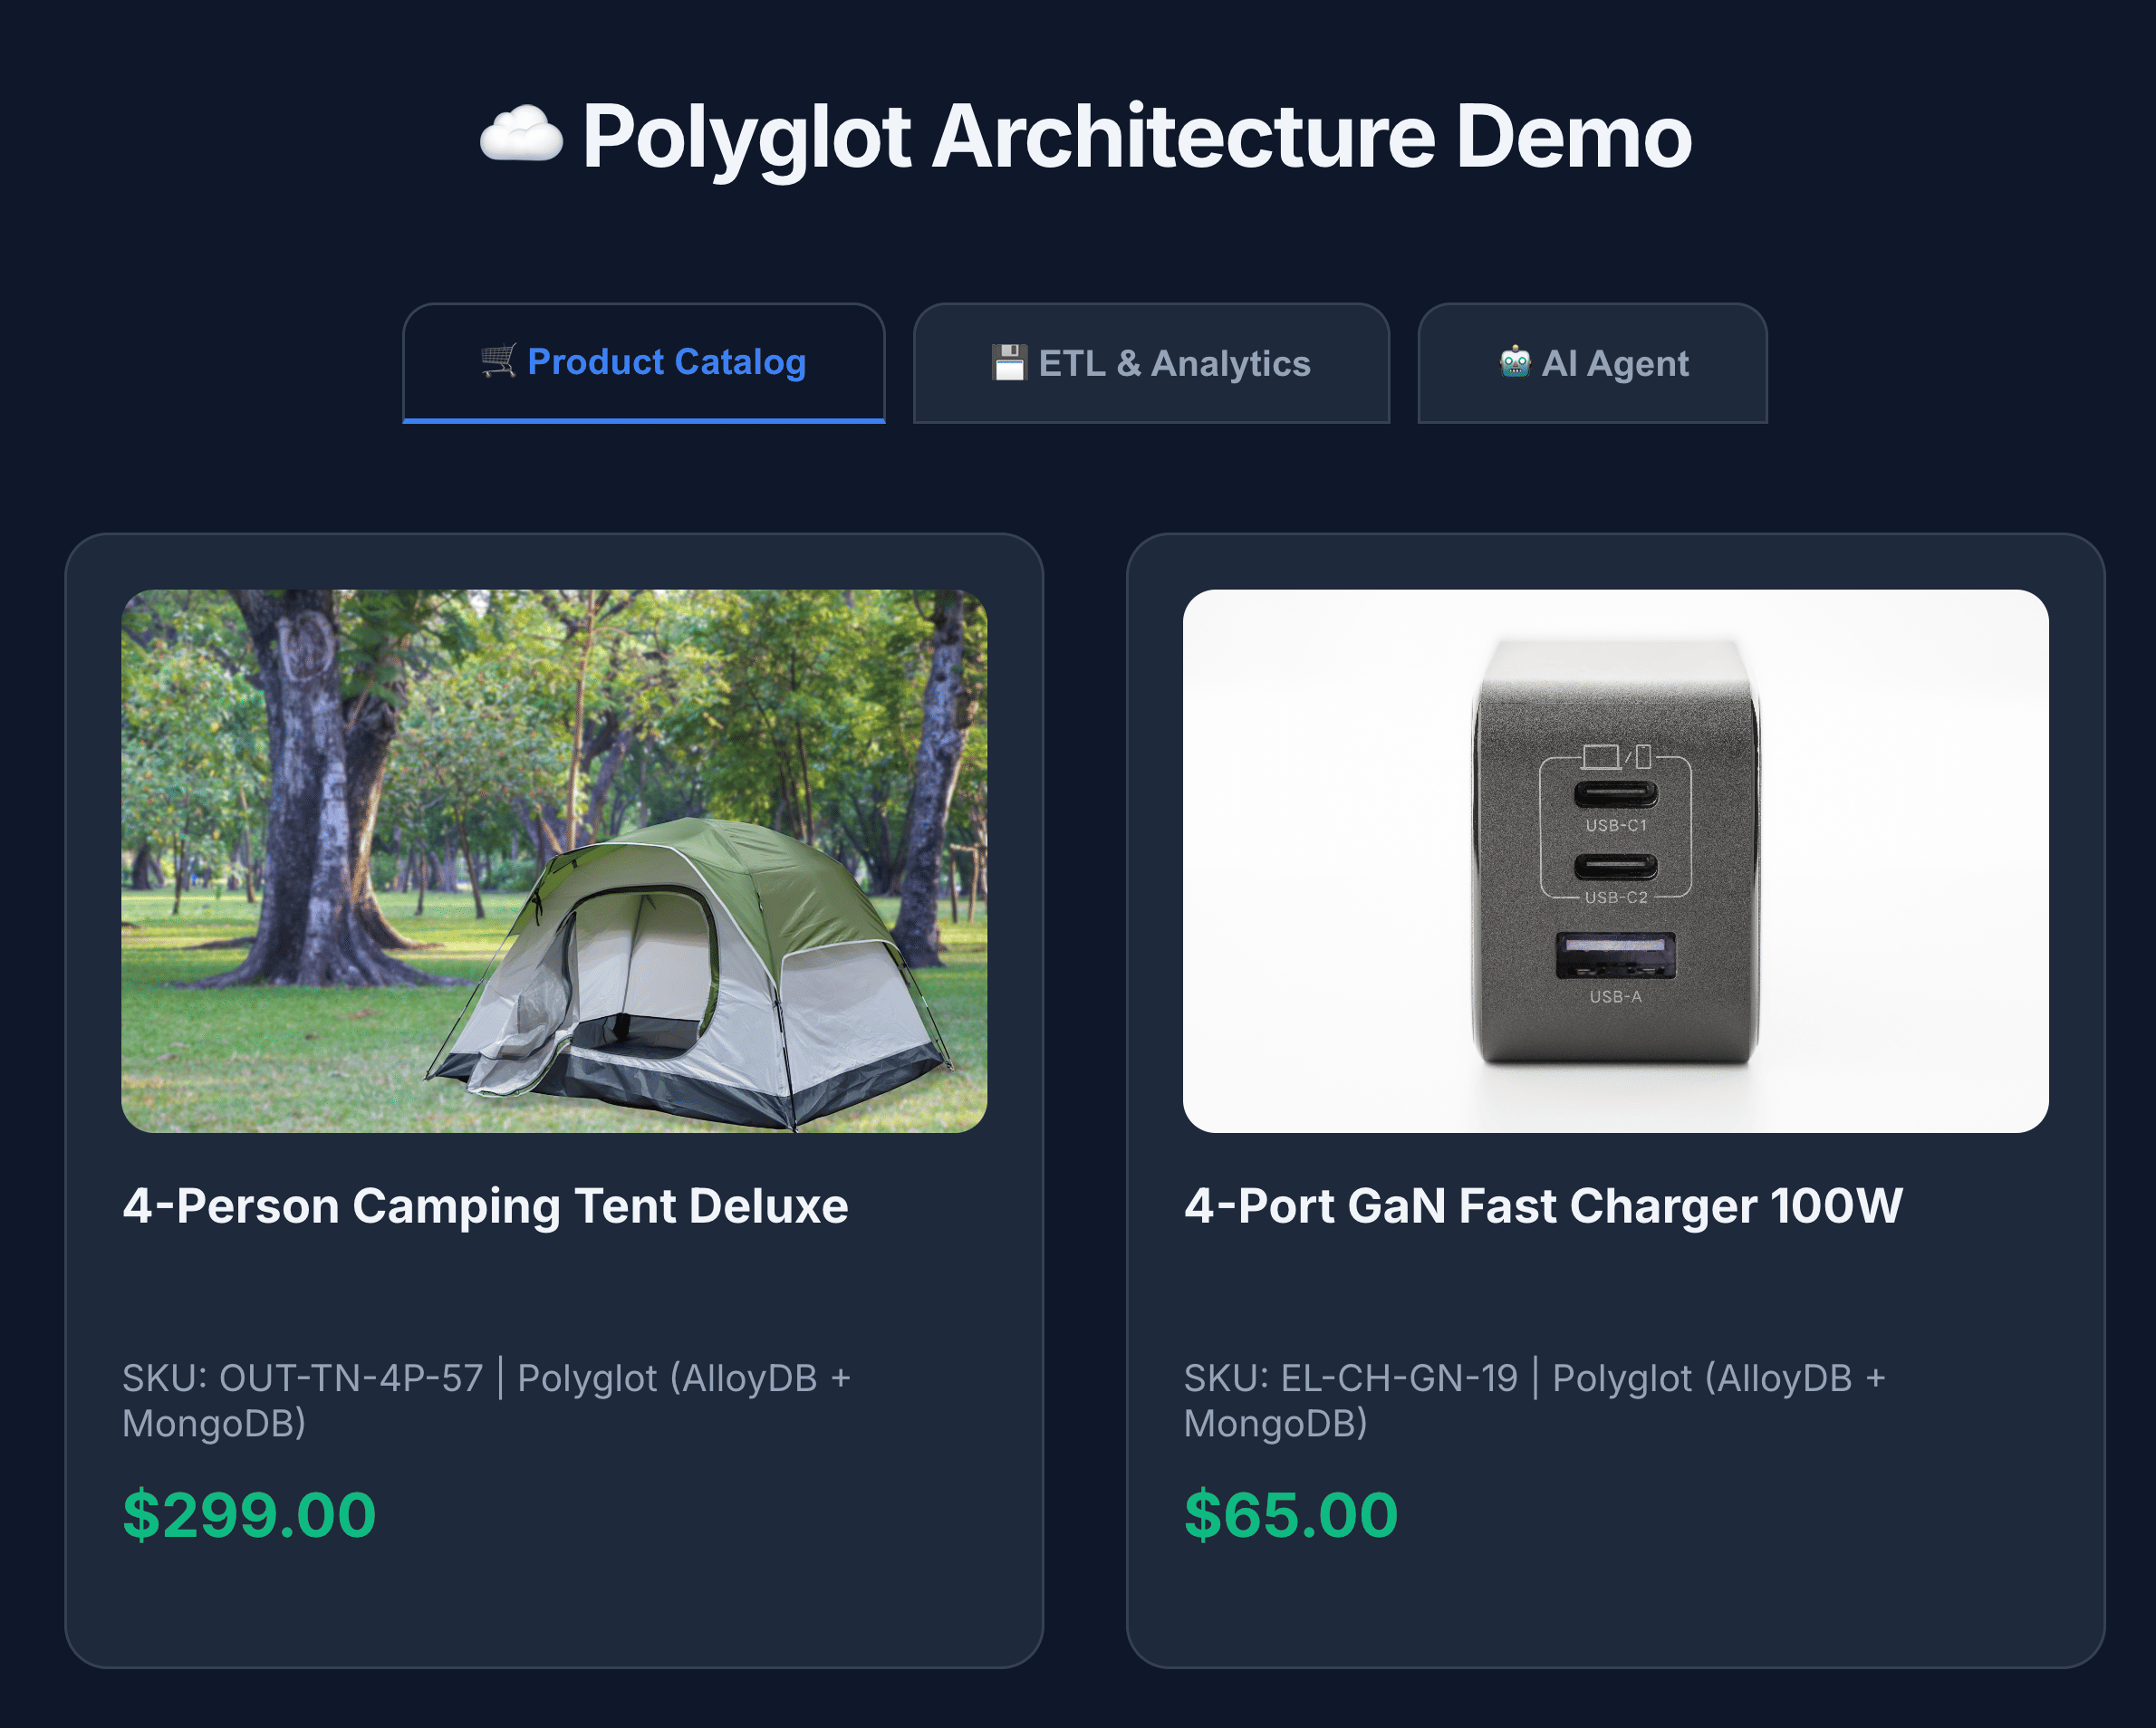
- Click a product icon to view product details. You will notice that the images are sourced from Cloud Storage, the product details are fetched from MongoDB and the product inventory is fetched from AlloyDB.
- Interact with the product catalog to generate mock views and writes sent to MongoDB.
- Click the ETL & Analytics to view the product analytics. You will notice that the product analytics are fetched from BigQuery.
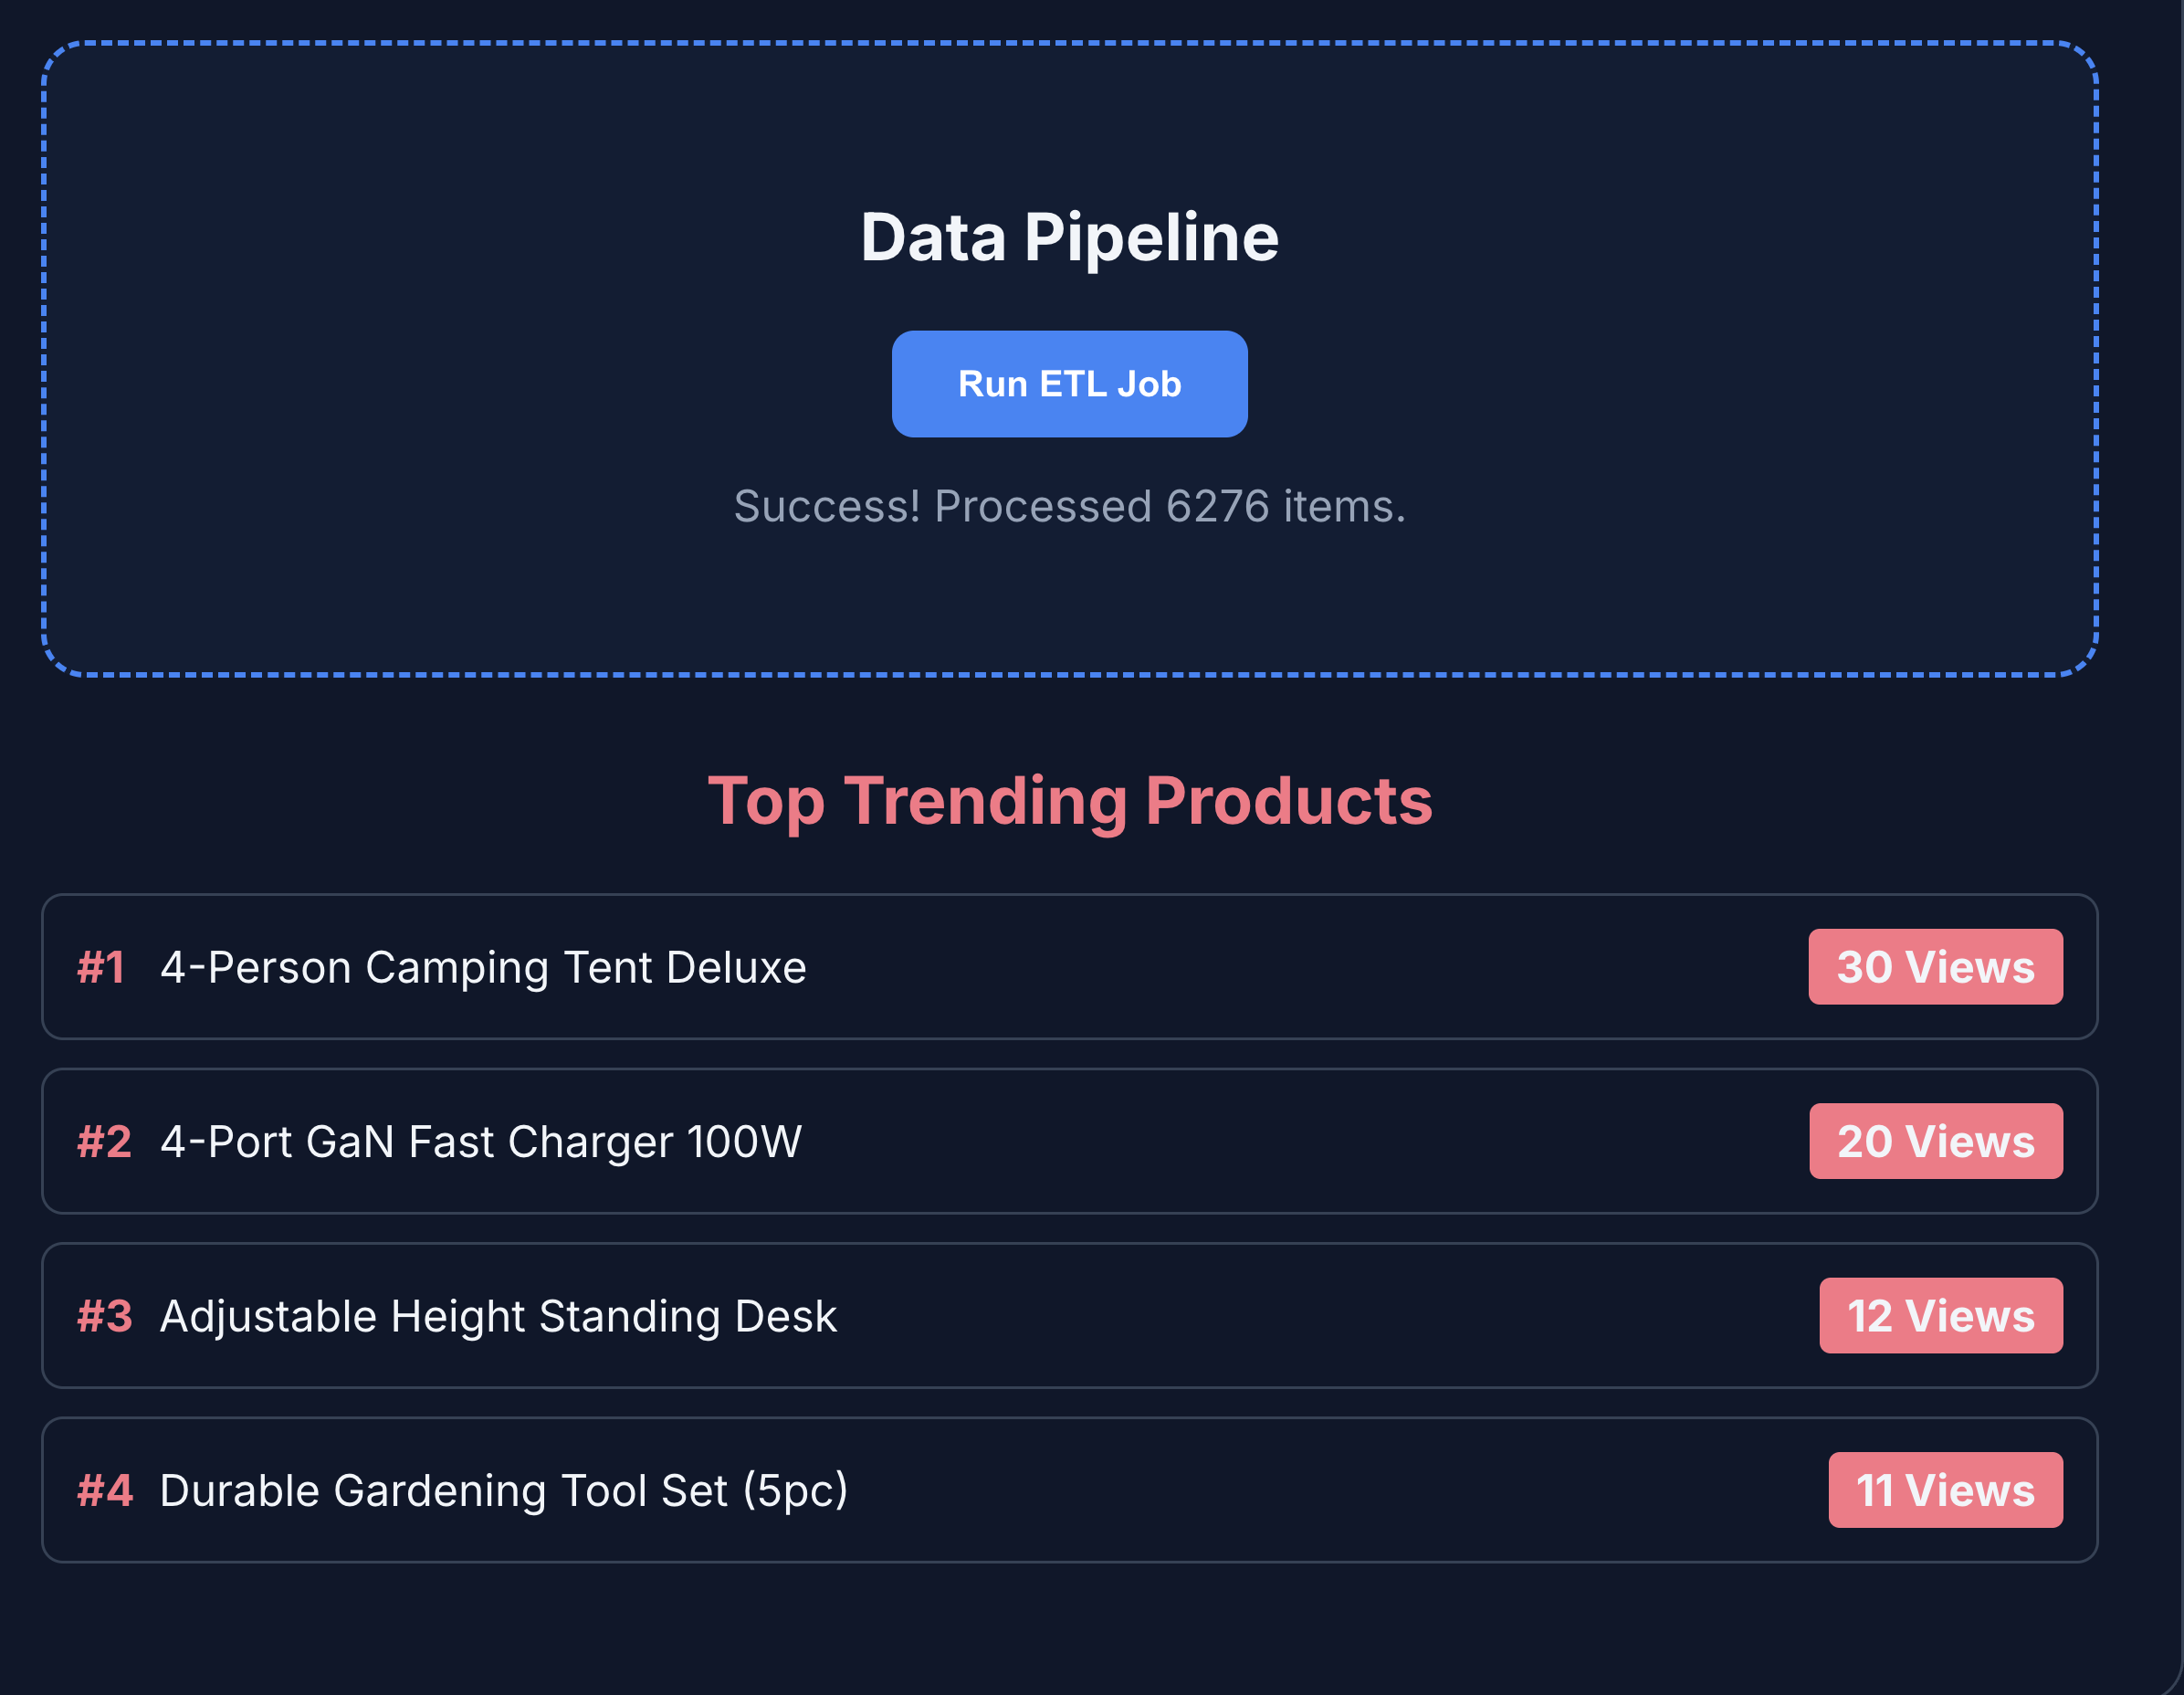
- Click the AI agent tab to interact with the AI agent. Ask natural language questions such as the following:
I'm planning a high-altitude photography trip.
Show me some weather-resistant backpacks similar in style to aero glow pro
but without any leather components. Also, let me know if they are actually in
stock and if other photographers have complained about the strap durability
in the reviews.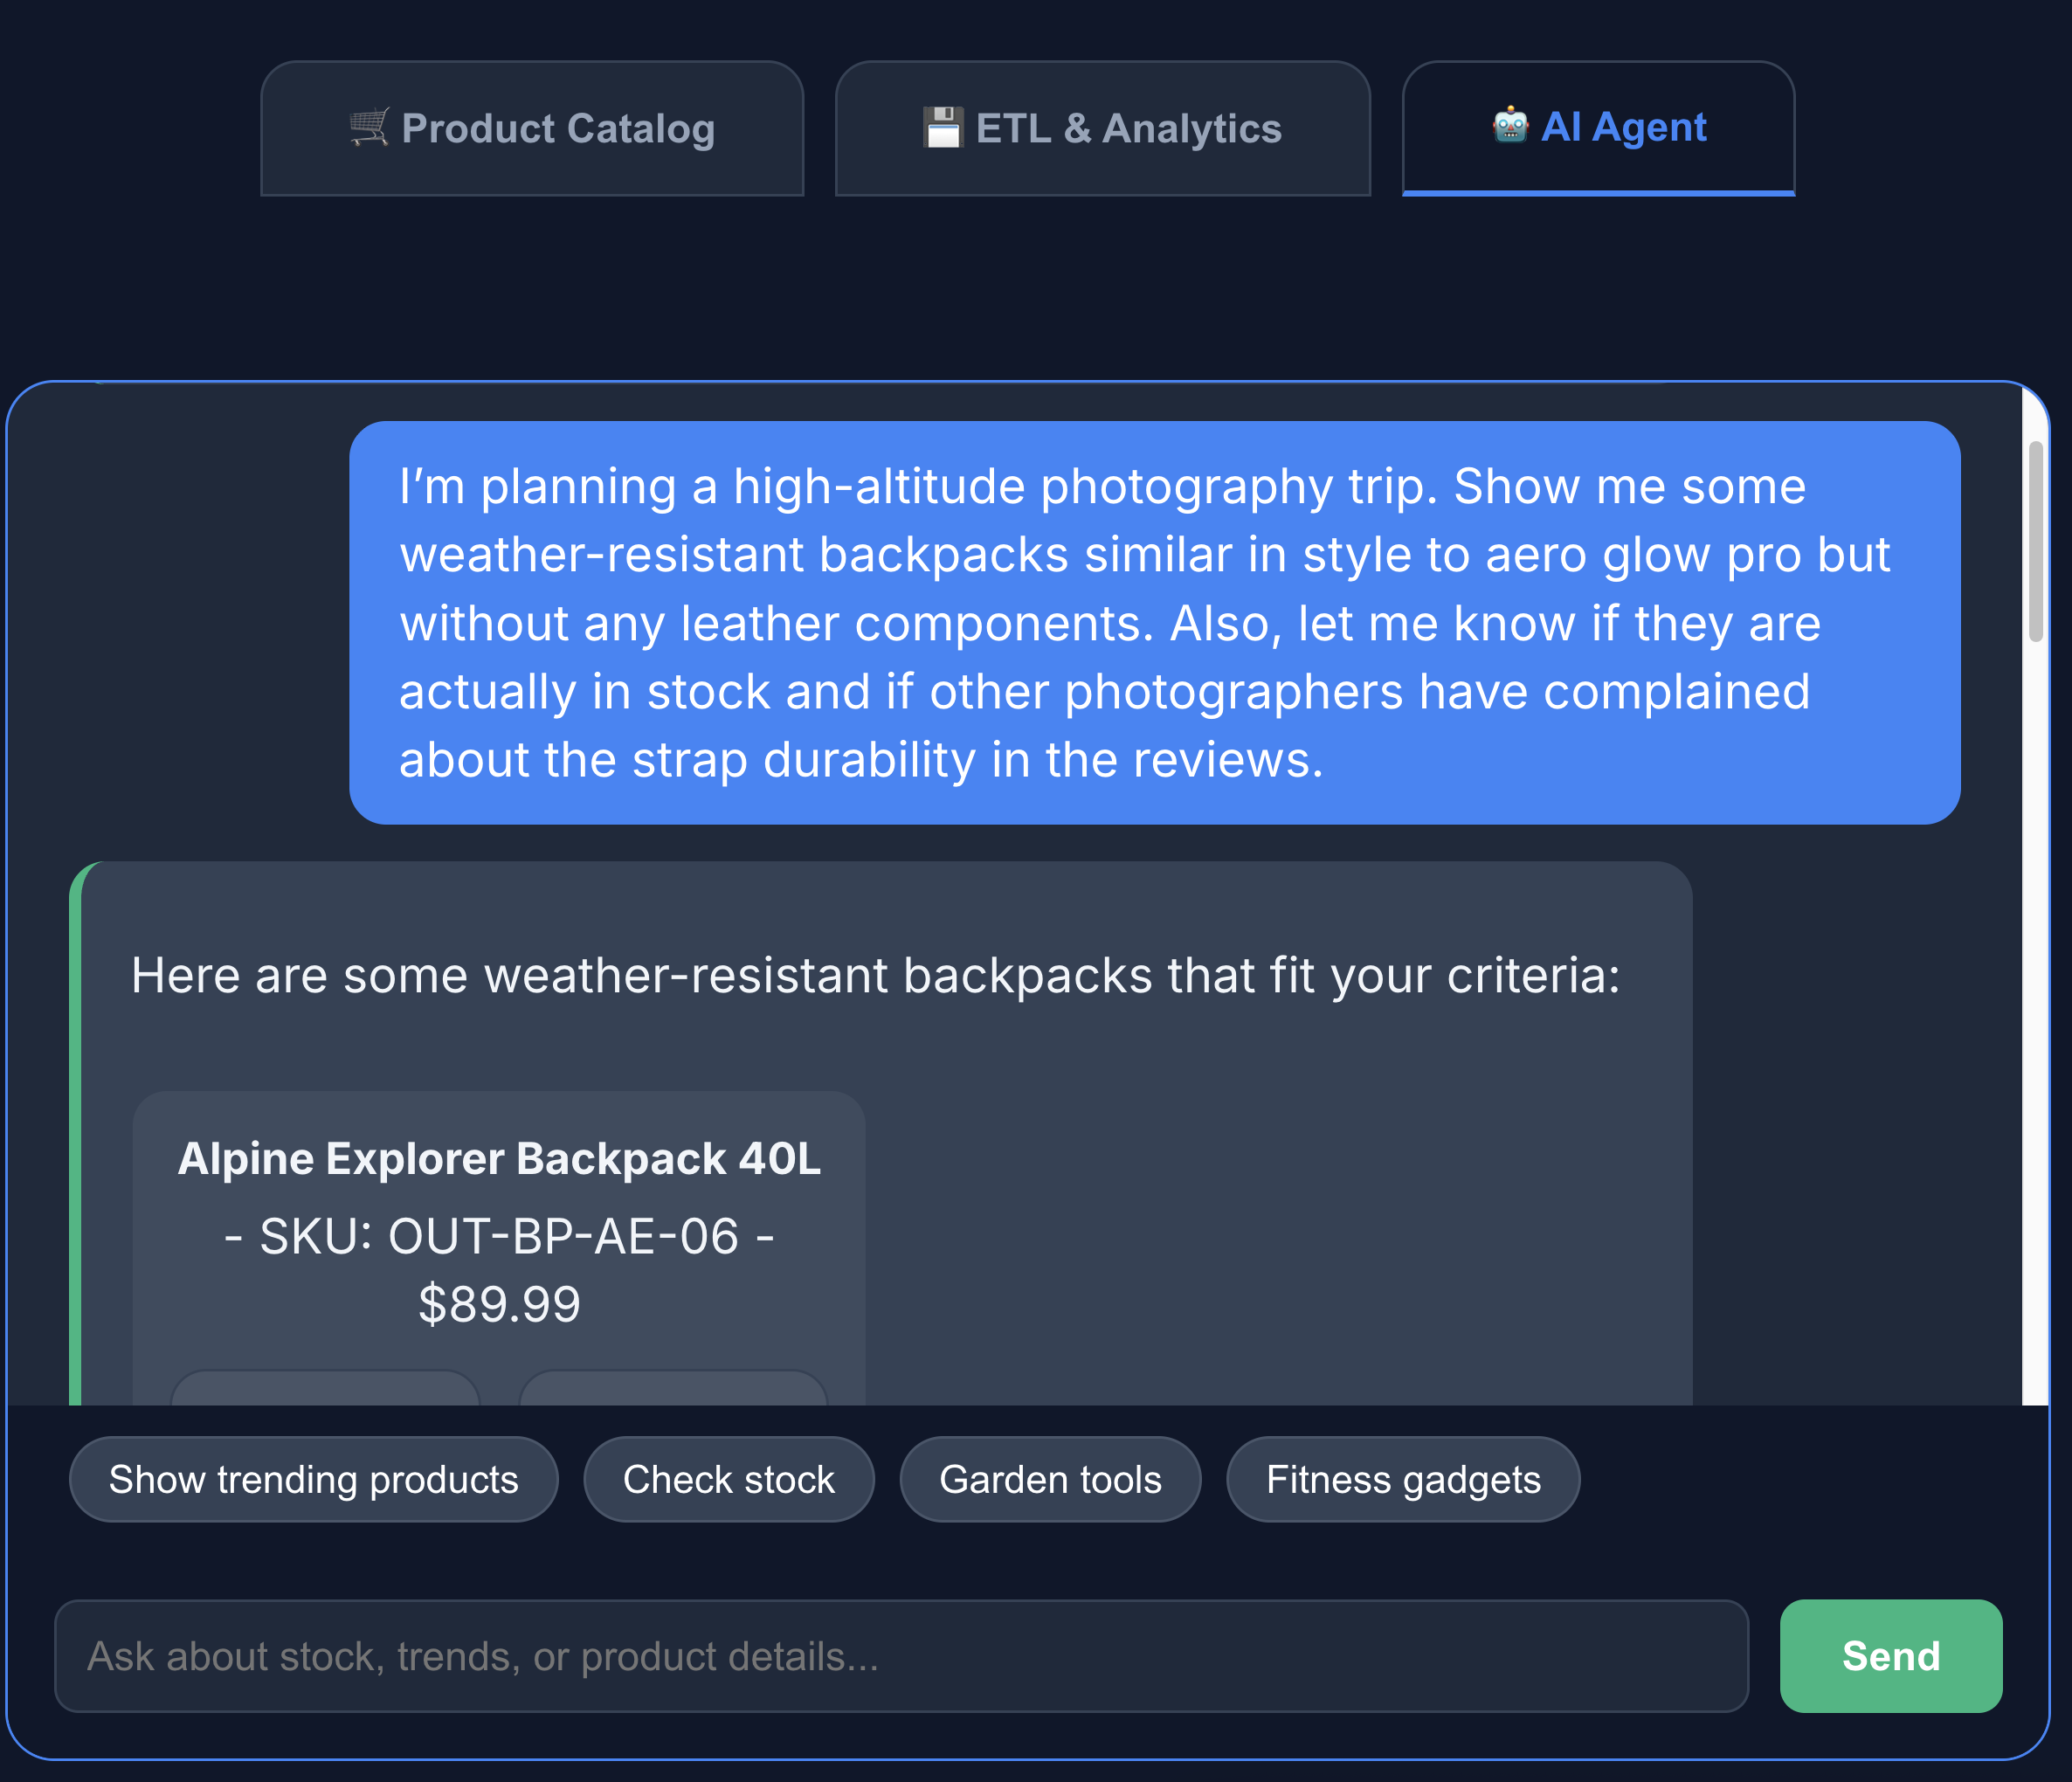
You can see that the search returns exactly what we asked for - a backpack without leather components, in stock and with no complaints about strap durability in the reviews.
11. Clean up
To avoid ongoing charges to your Google Cloud account, delete the resources created during this codelab.
Run these cloud shell commands:
gcloud run services delete toolbox --region us-central1 --quiet
gcloud run services delete multi-db-app --region us-central1 --quiet
bq rm -r -f -d $PROJECT_ID:ecommerce_analytics
gcloud storage rm --recursive gs://ecommerce-app-images
gcloud alloydb clusters delete ecommerce-cluster --region us-central1 --force --quiet
Optionally, to delete the entire Google Cloud project and all its resources, run the following command:
gcloud projects delete $PROJECT_ID
12. Congratulations
Congratulations! You've successfully built a cross-cloud Multidb architecture.
You demonstrated how the MCP Toolbox serves as the architectural glue for a modern, specialized application. By matching the right database to the right job, you achieved:
- Flexible Data Writes: MongoDB for event logs.
- Transactional Consistency: AlloyDB for core integrity.
- High-Performance Analytics: BigQuery for business intelligence.
- Unified Development: A single Python backend abstracting all complexity using the MCP Toolbox.
Reference docs
Learn more about related Google Cloud products and explore these codelabs:
- AlloyDB AI: Getting started with Vector Embeddings with AlloyDB AI
- AlloyDB AI: Multimodal Embeddings in AlloyDB
- MCP Toolbox: Installing and Setting-up MCP Toolbox for Databases on AlloyDB
For more information on the products used in this codelab, see: