
1. Introduction
If you prefer to run the packaged scripts directly without the step-by-step tutorial, you can find them in the GoogleCloudPlatform/devrel-demos repository.
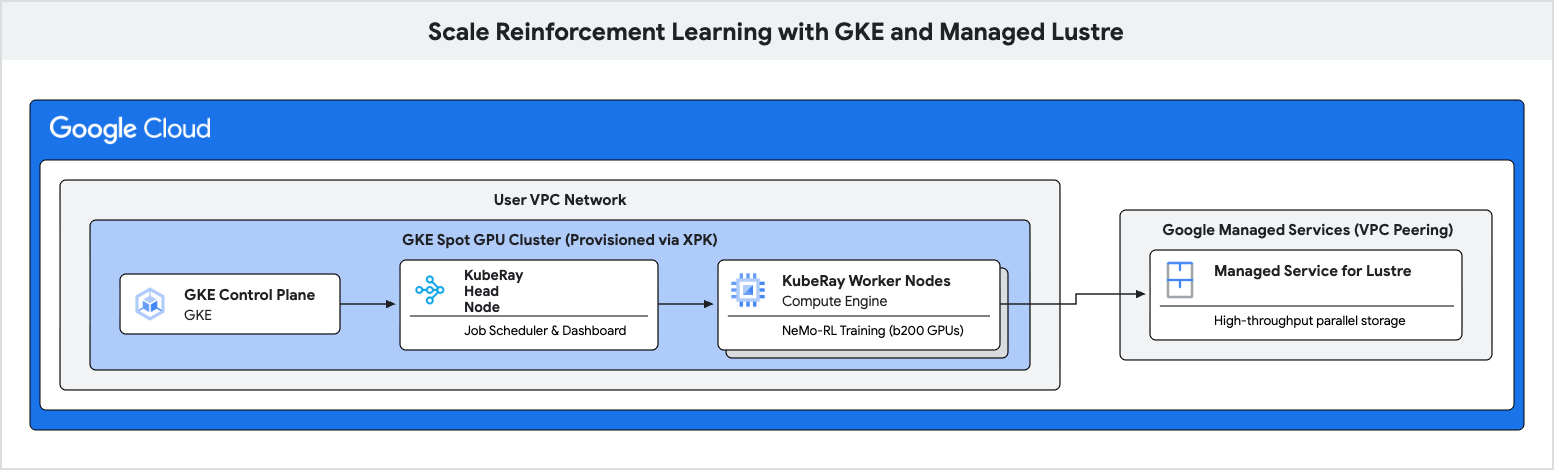
In this codelab, you will learn how to deploy a high-performance training pipeline for Reinforcement Learning (RL) using Google Kubernetes Engine (GKE) and Managed Lustre.
Reinforcement Learning workloads, particularly those using algorithms like Group Relative Policy Optimization (GRPO), generate massive amounts of data during "Experience Generation" and require frequent checkpointing. Standard object storage can cause bottlenecks during these I/O bursts, leaving expensive accelerators idle.
You will use Managed Lustre, a parallel file system, to eliminate these bottlenecks and achieve higher training throughput.
What you'll do
- Configure environment variables for a GPU-based Ray cluster.
- Provision a Spot GPU cluster on GKE and a Managed Lustre instance using Cluster Toolkit.
- Deploy a KubeRay cluster and mount the Lustre filesystem.
- Submit a NeMo-RL training workload.
- Observe high throughput and low checkpoint latency using Cloud Monitoring.
What you'll need
- A web browser such as Chrome.
- A Google Cloud project with billing enabled.
This codelab is for advanced technical users, platform engineers, and AI researchers who are familiar with GKE and storage concepts.
Estimated Total Duration: 45 to 60 minutes plus 2 hours of training time
2. Before you begin
Create a Google Cloud Project
- In the Google Cloud Console, select or create a Google Cloud project.
- Make sure that billing is enabled for your Cloud project.
Start Cloud Shell
Cloud Shell is a command-line environment running in Google Cloud that comes preloaded with necessary tools.
- Click Activate Cloud Shell at the top of the Google Cloud console.
- Once connected to Cloud Shell, verify your authentication:
gcloud auth list - Confirm your project is configured:
gcloud config get project - If your project is not set as expected, set it:
export PROJECT_ID=<YOUR_PROJECT_ID>
gcloud config set project $PROJECT_ID
Install Cluster Toolkit
This codelab uses Cluster Toolkit (gcluster) to deploy the GKE cluster. For instructions on how to set up Cluster Toolkit, see the Cluster Toolkit setup guide.
Enable APIs
Run this command in Cloud Shell to enable all required APIs:
gcloud services enable \
  container.googleapis.com \
  lustre.googleapis.com \
  compute.googleapis.com \
  servicenetworking.googleapis.com
3. Configure Environment Variables
To keep the commands in this codelab consistent, set up a few environment variables.
Create a file named env.sh and populate it with your configuration. You can use the following template:
# Environment Variables for the RL Demo execution
export PROJECT_ID="{{'<var>'}}PROJECT_ID{{'</var>'}}"
export ZONE="us-east1-b"
export REGION="us-east1"
export CLUSTER_NAME="ray-a4-gpu-spot"
export HF_TOKEN="{{'<var>'}}YOUR_HF_TOKEN{{'</var>'}}" # Required for downloading models
export WANDB_API_KEY="{{'<var>'}}YOUR_WANDB_API_KEY{{'</var>'}}" # Optional

# Topology defaults
export NUM_NODES="8"
export GPUS_PER_NODE="8" # Fixed for A4/B200 architecture
Replace <YOUR_PROJECT_ID> and <YOUR_HF_TOKEN> with your actual values.
Source the file to load the variables into your current session:
source env.sh
4. Deploy GKE Cluster and Managed Lustre using Cluster Toolkit
In this step, you use Cluster Toolkit (gcluster) to deploy a GKE cluster with Spot GPUs and automatically provision Managed Lustre storage with the Lustre CSI driver and pre-configured PersistentVolumeClaim (lustre-pvc).
Prepare the Blueprint
Before deploying, review the examples/gke-a4/gke-a4.yaml blueprint (for details, see Create an A4 cluster):
- Enable Managed Lustre: Uncomment the
managed-lustreandlustre-pvcmodule sections ingke-a4.yaml. - Enable RayOperator Add-on: Set
enable_ray_operator: trueunder thegke_clustermodule settings ingke-a4.yaml.
Deploy Infrastructure
Set your authorized CIDR for Cloud Shell access and deploy using gcluster deploy:
export AUTHORIZED_CIDR="$(curl -s ifconfig.me)/32"

gcluster deploy examples/gke-a4/gke-a4.yaml \
  --vars project_id=${PROJECT_ID},deployment_name=${CLUSTER_NAME},region=${REGION},zone=${ZONE},static_node_count=${NUM_NODES},authorized_cidr=${AUTHORIZED_CIDR},spot=true
Wait for the deployment to complete. Cluster Toolkit provisions the VPC network, Private Service Access (PSA) peering, Managed Lustre filesystem, Lustre CSI driver, RayOperator add-on, and the Kubernetes storage claim (lustre-pvc) automatically in one coordinated deployment.
5. Deploy Ray Cluster on GKE
In this step, you will deploy a KubeRay cluster on your GKE nodes and mount the Lustre filesystem using the PersistentVolumeClaim (lustre-pvc) automatically provisioned by Cluster Toolkit.
Create RayCluster Configuration
Create a file named ray-cluster.yaml. This specifies the KubeRay head and worker nodes, using the nvidia-b200 accelerator type and mounting the Lustre volume at /lustre.
cat << EOF > ray-cluster.yaml
apiVersion: ray.io/v1
kind: RayCluster
metadata:
  name: ${CLUSTER_NAME}
  namespace: default
spec:
  rayVersion: '2.54.0'
  headGroupSpec:
    rayStartParams:
      dashboard-host: '0.0.0.0'
    template:
      spec:
        nodeSelector:
          cloud.google.com/gke-accelerator: nvidia-b200
        tolerations:
        - key: "nvidia.com/gpu"
          operator: "Exists"
          effect: "NoSchedule"
        containers:
        - name: ray-head
          image: nvcr.io/nvidia/nemo-rl:v0.4.0
          ports:
          - containerPort: 6379
            name: gcs-server
          - containerPort: 8265
            name: dashboard
          - containerPort: 10001
            name: client
          resources:
            limits:
              cpu: "32"
              memory: "1000Gi"
            requests:
              cpu: "8"
              memory: "64Gi"
          volumeMounts:
          - mountPath: /lustre
            name: lustre-storage
        volumes:
        - name: lustre-storage
          persistentVolumeClaim:
            claimName: lustre-pvc
  workerGroupSpecs:
  - groupName: gpu-worker-group
    replicas: ${NUM_NODES}
    minReplicas: ${NUM_NODES}
    maxReplicas: ${NUM_NODES}
    rayStartParams: {}
    template:
      spec:
        nodeSelector:
          cloud.google.com/gke-accelerator: nvidia-b200
        tolerations:
        - key: "nvidia.com/gpu"
          operator: "Exists"
          effect: "NoSchedule"
        containers:
        - name: ray-worker
          image: nvcr.io/nvidia/nemo-rl:v0.4.0
          resources:
            limits:
              nvidia.com/gpu: "8"
              cpu: "100"
              memory: "1000Gi"
            requests:
              nvidia.com/gpu: "8"
              cpu: "100"
              memory: "1000Gi"
          volumeMounts:
          - mountPath: /lustre
            name: lustre-storage
          - mountPath: /dev/shm
            name: dshm
        volumes:
        - name: lustre-storage
          persistentVolumeClaim:
            claimName: lustre-pvc
        - name: dshm
          emptyDir:
            medium: Memory
EOF
Connect to the Cluster
Ensure your Cloud Shell session is authenticated to your GKE cluster:
gcloud container clusters get-credentials ${CLUSTER_NAME} \
  --region ${REGION} \
  --project ${PROJECT_ID}
Apply RayCluster Configuration
Apply the Ray cluster configuration:
kubectl apply -f ray-cluster.yaml
Verify Cluster Status
Monitor the creation of the pods:
kubectl get pods -w
Wait until the head and worker pods are Running.
6. Submit Reinforcement Learning Workload
In this step, you will submit the NeMo-RL GRPO training job to your Ray cluster.
Connect to the Ray Dashboard
To submit jobs and view metrics, you need to connect to the Ray Dashboard. As the dashboard is in GKE, use port-forwarding to access it from Cloud Shell:
# Run this in a separate Cloud Shell tab or in the background
kubectl port-forward service/${CLUSTER_NAME}-head-svc 8265:8265 &
Create the Execution Script
Create a file named run_nemo_rl.sh. This script will be executed on the Ray cluster workers. We use cat << EOF to fill in the environment variables you set earlier.
cat << EOF > run_nemo_rl.sh
#!/bin/bash
set -ex

# Override job runtime conflicts (NeMo-RL passes os.environ to ray.init)
export RAY_OVERRIDE_JOB_RUNTIME_ENV=1

echo "--- Running on Ray Cluster ---"
cd /opt/nemo-rl

# Ensure directories exist on the high-speed Lustre drive
mkdir -p /lustre/huggingface_cache
mkdir -p /lustre/nemo_rl_qwen_72b_ds_cp

echo "Launching NeMo-RL GRPO training..."
uv run python examples/run_grpo_math.py \
  --config examples/configs/grpo_math_70B_megatron.yaml \
  policy.model_name='Qwen/Qwen2.5-72B-Instruct' \
  policy.megatron_cfg.converter_type='Qwen2ForCausalLM' \
  logger.wandb_enabled=False \
  cluster.num_nodes=${NUM_NODES} \
  cluster.gpus_per_node=${GPUS_PER_NODE} \
  logger.wandb.name='nemo-rl-grpo-test1' \
  grpo.max_num_steps=20 \
  grpo.num_generations_per_prompt=8 \
  grpo.num_prompts_per_step=32 \
  policy.train_global_batch_size=256 \
  checkpointing.enabled=True \
  checkpointing.save_period=2 \
  checkpointing.keep_top_k=2 \
  checkpointing.metric_name=null \
  checkpointing.checkpoint_dir=/lustre/nemo_rl_qwen_72b_ds_cp/nemo-rl-grpo-test1 \
  data.dataset_name='DeepScaler'
EOF
chmod +x run_nemo_rl.sh
Create Ray Ignore File
Create a .rayignore file to prevent Ray from uploading large or unnecessary directories:
cat << EOF > .rayignore
cluster-toolkit/
.git/
*.sh.log
EOF
Create Runtime Environment Configuration
Create a JSON file to pass environment variables to the Ray job:
cat << EOF > ray_runtime_env_nemo.json
{
  "env_vars": {
    "HF_TOKEN": "${HF_TOKEN}",
    "WANDB_API_KEY": "${WANDB_API_KEY}",
    "HF_HOME": "/lustre/huggingface_cache",
    "GLOO_SOCKET_IFNAME": "eth0",
    "NCCL_SOCKET_IFNAME": "eth0"
  }
}
EOF
Submit the Job
Use the Ray CLI to submit the job to the dashboard endpoint. If the ray command is not found in Cloud Shell, you can install it with pip install ray:
ray job submit \
    --address="http://localhost:8265" \
    --working-dir . \
    --runtime-env ray_runtime_env_nemo.json \
    -- bash run_nemo_rl.sh
You will see logs streaming in your Cloud Shell terminal. The job will load the model, initialize the Ray workers, and begin the GRPO training loop.
7. Monitor Training Performance
In this step, you will observe the performance of the Lustre filesystem during training and checkpointing.
Check Training Logs
As the training progresses, you will see logs indicating that checkpoints are being saved to /lustre/nemo_rl_qwen_72b_ds_cp/nemo-rl-grpo-test1. Notice that checkpointing happens asynchronously and does not block the Ray workers for very long.
To view the speed of checkpointing, look for log lines indicating saved checkpoints.
View Lustre Metrics in the Cloud Console
To see metrics for your Lustre instance:
- In the Google Cloud Console, search for Managed Service for Lustre.
- Click on your instance name (for example,
${CLUSTER_NAME}-lustreorrl-demo-gpu-lustre). - Click on the Monitoring tab.
Here you can observe:
- Throughput (Bytes/sec): See the spikes during checkpointing.
- Capacity: Monitor how much space is being consumed by checkpoints.
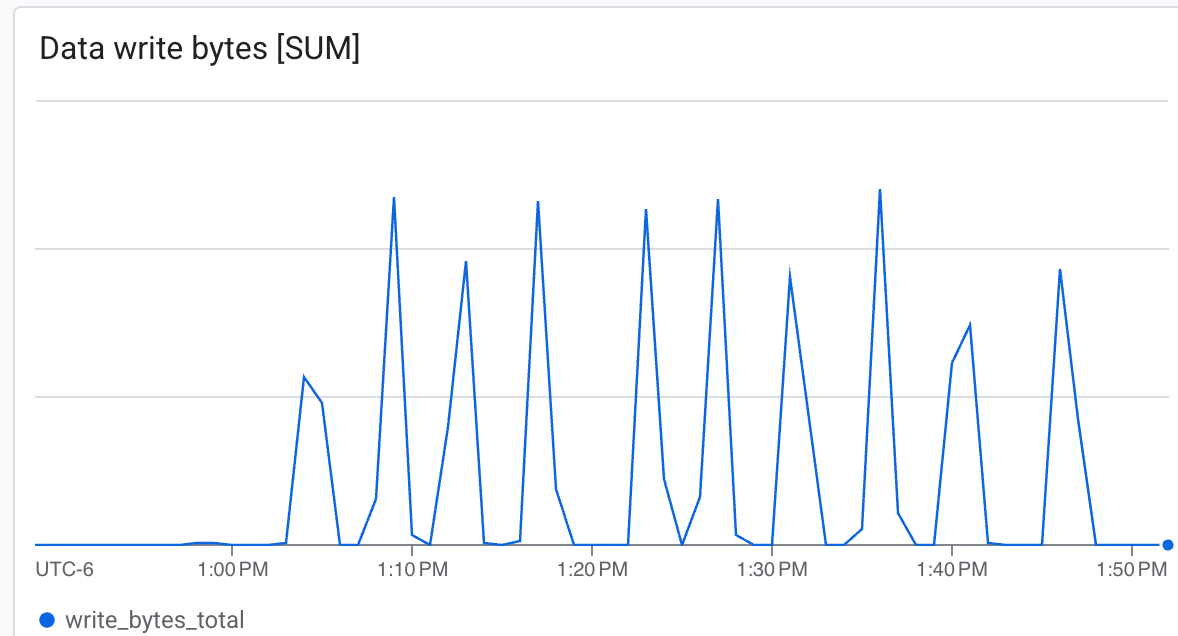 Lustre is capable of writing at very high speed, writing checkpoints in minimal time
8. Clean Up Resources
Run the following command in Cloud Shell to destroy all provisioned infrastructure (GKE cluster, GPU node pools, Managed Lustre instance, and VPC network) in a single step:
gcluster destroy "${CLUSTER_NAME}"
This command runs synchronously in the foreground, tearing down all infrastructure managed by the deployment and outputting progress logs to your terminal. Wait for the command to finish completely before closing your Cloud Shell session.
9. Congratulations
You have successfully completed the Scale Reinforcement Learning with GKE and Managed Lustre codelab!
What you've learned
- How to use Cluster Toolkit to provision a GKE GPU cluster with Spot instances and Managed Lustre storage.
- How to deploy a KubeRay cluster and mount Lustre storage.
- How to submit a NeMo-RL GRPO training workload.
- How to observe storage performance during training.
Next steps
- Explore more NVIDIA NeMo-RL features.
- Learn more about Google Cloud AI Hypercomputer.
- Review the Managed Service for Lustre documentation.