
1. 簡介
如果您想直接執行封裝的指令碼,而不使用逐步教學課程,可以在 GoogleCloudPlatform/devrel-demos 存放區中找到這些指令碼。
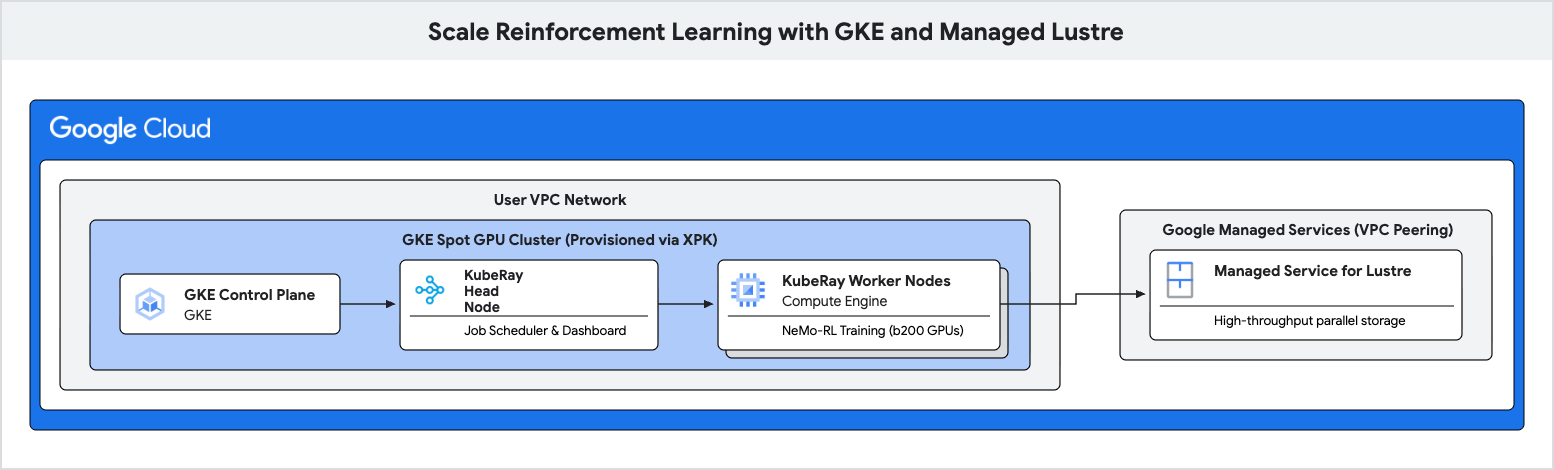
在本程式碼研究室中,您將瞭解如何使用 Google Kubernetes Engine (GKE) 和 Managed Lustre,部署高效能的強化學習 (RL) 訓練管道。
增強學習工作負載 (尤其是使用群組相對政策最佳化 (GRPO) 等演算法的工作負載) 會在「體驗生成」期間產生大量資料,且需要頻繁檢查點。在這些 I/O 爆量期間,標準物件儲存空間可能會造成瓶頸,導致昂貴的加速器閒置。
您將使用平行檔案系統 Managed Lustre,消除這些瓶頸並提高訓練處理量。
學習內容
- 為以 GPU 為基礎的 Ray 叢集設定環境變數。
- 使用 XPK 工具在 GKE 上佈建 Spot GPU 叢集。
- 建立 Managed Lustre 執行個體。
- 部署 KubeRay 叢集,並掛接 Lustre 檔案系統。
- 提交 NeMo-RL 訓練工作負載。
- 使用 Cloud Monitoring 觀察高處理量和低檢查點延遲時間。
軟硬體需求
- 網路瀏覽器,例如 Chrome。
- 已啟用計費功能的 Google Cloud 專案。
本程式碼實驗室適合熟悉 GKE 和儲存空間概念的進階技術使用者、平台工程師和 AI 研究人員。
預計總時長:45 到 60 分鐘,外加 2 小時的訓練時間
2. 事前準備
建立 Google Cloud 專案
- 在 Google Cloud 控制台中,選取或建立 Google Cloud 專案。
- 確認 Cloud 專案已啟用計費功能。
啟動 Cloud Shell
Cloud Shell 是在 Google Cloud 中運作的指令列環境,已預先載入必要工具。
- 點選 Google Cloud 控制台頂端的「啟用 Cloud Shell」。
- 連至 Cloud Shell 後,請驗證您的驗證:
gcloud auth list - 確認專案已設定完成:
gcloud config get project - 如果專案未如預期設定,請設定專案:
export PROJECT_ID=<YOUR_PROJECT_ID>
gcloud config set project $PROJECT_ID
安裝 XPK
本程式碼研究室會使用 xpk 佈建 GKE 叢集。如需安裝 xpk 的操作說明,請參閱 xpk 安裝指南。
在 Cloud Shell 中,您可以使用下列指令安裝:
pip install xpk
啟用 API
在 Cloud Shell 執行下列指令,啟用所有必要 API:
gcloud services enable \
  container.googleapis.com \
  lustre.googleapis.com \
  compute.googleapis.com \
  servicenetworking.googleapis.com
3. 設定環境變數
為確保本程式碼研究室中的指令一致,請設定幾個環境變數。
建立名為 env.sh 的檔案,並填入設定。你可以使用下列範本:
# Environment Variables for the RL Demo execution
export PROJECT_ID="<YOUR_PROJECT_ID>"
export ZONE="us-east1-b"
export REGION="us-east1"
export CLUSTER_NAME="ray-a4-gpu-spot"
export NETWORK_NAME="${CLUSTER_NAME}-net-0" # Implicitly targets the VPC created by XPK
export LUSTRE_INSTANCE_ID="rl-demo-gpu-lustre"
export LUSTRE_CAPACITY="9000" # Capacity in GiB
export HF_TOKEN="<YOUR_HF_TOKEN>" # Required for downloading models
export WANDB_API_KEY="<YOUR_WANDB_API_KEY>" # Optional

# Topology defaults
export NUM_NODES="8"
export GPUS_PER_NODE="8" # Fixed for A4/B200 architecture
export DEVICE_TYPE="b200-8"
請將 <YOUR_PROJECT_ID> 和 <YOUR_HF_TOKEN> 替換為實際值。
載入檔案,將變數載入目前的工作階段:
source env.sh
4. 使用 XPK 建立 GKE 叢集
在本步驟中,您會使用 xpk 佈建含有 Spot GPU 的 GKE 叢集。
xpk 是 AI Hypercomputer 佈建工具,可簡化 GKE 叢集建立作業,以用於自動化工作負載。只要指定裝置類型和節點數量,系統就會建立所需的 VPC、子網路和節點集區。
執行叢集建立指令:
xpk cluster create \
  --num-nodes=${NUM_NODES} \
  --device-type=${DEVICE_TYPE} \
  --default-pool-cpu-machine-type="e2-standard-4" \
  --spot \
  --enable-lustre-csi-driver \
  --project=${PROJECT_ID} \
  --zone=${ZONE} \
  --cluster=${CLUSTER_NAME}
等待叢集建立完成。這項作業可能需要幾分鐘才能完成。
啟用 RayOperator 外掛程式
建立叢集後,請啟用 RayOperator 外掛程式來管理 KubeRay 叢集:
gcloud container clusters update ${CLUSTER_NAME} \
  --region ${REGION} \
  --project ${PROJECT_ID} \
  --update-addons=RayOperator=ENABLED
驗證 Lustre CSI 驅動程式
XPK 應透過 --enable-lustre-csi-driver 標記自動啟用 Lustre CSI 驅動程式。確認已啟用:
gcloud container clusters describe ${CLUSTER_NAME} \
  --region ${REGION} \
  --project ${PROJECT_ID} \
  --format="value(addonsConfig.lustreCsiDriverConfig.enabled)"
如果傳回 false,請執行備援啟用指令:
gcloud container clusters update ${CLUSTER_NAME} \
  --region ${REGION} \
  --project ${PROJECT_ID} \
  --update-addons=LustreCsiDriver=ENABLED
5. 佈建 Managed Lustre 執行個體
在這個步驟中,您會建立 Managed Service for Lustre 執行個體。Lustre 是平行檔案系統,可提供高處理量,適合用於檢查點。
為受管理服務分配 IP 範圍
Lustre 需要與 Google 代管服務建立虛擬私有雲對等互連連線。首先,請分配全域 IP 範圍:
gcloud compute addresses create "google-managed-services-${NETWORK_NAME}" \
    --global \
    --purpose=VPC_PEERING \
    --prefix-length=24 \
    --network="${NETWORK_NAME}" \
    --project="${PROJECT_ID}"
建立虛擬私有雲對等互連
將虛擬私有雲連線至服務網路:
gcloud services vpc-peerings connect \
    --service=servicenetworking.googleapis.com \
    --ranges="google-managed-services-${NETWORK_NAME}" \
    --network="${NETWORK_NAME}" \
    --project="${PROJECT_ID}" || \
gcloud services vpc-peerings update \
    --service=servicenetworking.googleapis.com \
    --ranges="google-managed-services-${NETWORK_NAME}" \
    --network="${NETWORK_NAME}" \
    --project="${PROJECT_ID}" \
    --force
建立 Lustre 執行個體
接著建立 Lustre 執行個體。這個指令會以非同步方式執行。
gcloud lustre instances create "${LUSTRE_INSTANCE_ID}" \
    --project="${PROJECT_ID}" \
    --location="${ZONE}" \
    --capacity-gib="${LUSTRE_CAPACITY}" \
    --per-unit-storage-throughput="1000" \
    --filesystem="lustre" \
    --network="projects/${PROJECT_ID}/global/networks/${NETWORK_NAME}" \
    --gke-support-enabled \
    --async
確認 Lustre 狀態
Lustre 執行個體大約需要 10 到 15 分鐘才能準備就緒。您可以透過下列指令檢查狀態:
gcloud lustre instances describe ${LUSTRE_INSTANCE_ID} \
    --project ${PROJECT_ID} \
    --location ${ZONE} \
    --format="value(state)"
請等到狀態為 ACTIVE 再繼續操作。
6. 在 GKE 上部署 Ray 叢集
在這個步驟中,您會在 GKE 節點上部署 KubeRay 叢集,並使用 PersistentVolume (PV) 和 PersistentVolumeClaim (PVC) 掛接 Lustre 檔案系統。
擷取 Lustre IP
建立磁碟區前,請先取得 Lustre 執行個體的掛接點 IP:
export LUSTRE_IP=$(gcloud lustre instances describe "${LUSTRE_INSTANCE_ID}" --project="${PROJECT_ID}" --location="${ZONE}" --format="value(mountPoint)" | cut -d'@' -f1)
echo "Lustre IP is: ${LUSTRE_IP}"
建立 Lustre PV 和 PVC
使用下列設定建立名為 rl-lustre-volume.yaml 的檔案。這項設定會定義 GKE 如何連線至 Lustre 執行個體。
cat << EOF > rl-lustre-volume.yaml
apiVersion: v1
kind: PersistentVolume
metadata:
  name: rl-demo-gpu-lustre-pv
spec:
  capacity:
    storage: ${LUSTRE_CAPACITY}Gi
  accessModes:
    - ReadWriteMany
  persistentVolumeReclaimPolicy: Retain
  volumeMode: Filesystem
  claimRef:
    namespace: default
    name: rl-demo-gpu-lustre-pvc
  csi:
    driver: lustre.csi.storage.gke.io
    volumeHandle: ${PROJECT_ID}/${ZONE}/${LUSTRE_INSTANCE_ID}
    volumeAttributes:
      ip: ${LUSTRE_IP}
      filesystem: lustre
---
apiVersion: v1
kind: PersistentVolumeClaim
metadata:
  name: rl-demo-gpu-lustre-pvc
spec:
  accessModes:
    - ReadWriteMany
  storageClassName: ""
  volumeName: rl-demo-gpu-lustre-pv
  resources:
    requests:
      storage: ${LUSTRE_CAPACITY}Gi
EOF
套用磁碟區設定:
kubectl apply -f rl-lustre-volume.yaml
建立 RayCluster 設定
建立名為 ray-cluster.yaml 的檔案。這會指定 KubeRay 的頭部和工作站節點,使用 nvidia-b200 加速器類型,並在 /lustre 掛接 Lustre 磁碟區。
cat << EOF > ray-cluster.yaml
apiVersion: ray.io/v1
kind: RayCluster
metadata:
  name: ${CLUSTER_NAME}
  namespace: default
spec:
  rayVersion: '2.54.0'
  headGroupSpec:
    rayStartParams:
      dashboard-host: '0.0.0.0'
    template:
      spec:
        nodeSelector:
          cloud.google.com/gke-accelerator: nvidia-b200
        tolerations:
        - key: "nvidia.com/gpu"
          operator: "Exists"
          effect: "NoSchedule"
        containers:
        - name: ray-head
          image: nvcr.io/nvidia/nemo-rl:v0.4.0
          ports:
          - containerPort: 6379
            name: gcs-server
          - containerPort: 8265
            name: dashboard
          - containerPort: 10001
            name: client
          resources:
            limits:
              cpu: "32"
              memory: "1000Gi"
            requests:
              cpu: "8"
              memory: "64Gi"
          volumeMounts:
          - mountPath: /lustre
            name: lustre-storage
        volumes:
        - name: lustre-storage
          persistentVolumeClaim:
            claimName: rl-demo-gpu-lustre-pvc
  workerGroupSpecs:
  - groupName: gpu-worker-group
    replicas: ${NUM_NODES}
    minReplicas: ${NUM_NODES}
    maxReplicas: ${NUM_NODES}
    rayStartParams: {}
    template:
      spec:
        nodeSelector:
          cloud.google.com/gke-accelerator: nvidia-b200
        tolerations:
        - key: "nvidia.com/gpu"
          operator: "Exists"
          effect: "NoSchedule"
        containers:
        - name: ray-worker
          image: nvcr.io/nvidia/nemo-rl:v0.4.0
          resources:
            limits:
              nvidia.com/gpu: "8"
              cpu: "100"
              memory: "1000Gi"
            requests:
              nvidia.com/gpu: "8"
              cpu: "100"
              memory: "1000Gi"
          volumeMounts:
          - mountPath: /lustre
            name: lustre-storage
          - mountPath: /dev/shm
            name: dshm
        volumes:
        - name: lustre-storage
          persistentVolumeClaim:
            claimName: rl-demo-gpu-lustre-pvc
        - name: dshm
          emptyDir:
            medium: Memory
EOF
套用 Ray 叢集設定:
kubectl apply -f ray-cluster.yaml
驗證叢集狀態
監控 Pod 的建立作業:
kubectl get pods -w
等待頭部和工作站 Pod Running。
7. 提交強化學習工作負載
在這個步驟中,您會將 NeMo-RL GRPO 訓練工作提交至 Ray 叢集。
連線至 Ray 資訊主頁
如要提交工作及查看指標,您必須連線至 Ray 資訊主頁。由於資訊主頁位於 GKE 中,請使用通訊埠轉送功能從 Cloud Shell 存取:
# Run this in a separate Cloud Shell tab or in the background
kubectl port-forward service/${CLUSTER_NAME}-head-svc 8265:8265 &
建立執行指令碼
建立名為 run_nemo_rl.sh 的檔案。這段指令碼會在 Ray 叢集工作站上執行。我們會使用 cat << EOF 填入您先前設定的環境變數。
cat << EOF > run_nemo_rl.sh
#!/bin/bash
set -ex

# Override job runtime conflicts (NeMo-RL passes os.environ to ray.init)
export RAY_OVERRIDE_JOB_RUNTIME_ENV=1

echo "--- Running on Ray Cluster ---"
cd /opt/nemo-rl

# Ensure directories exist on the high-speed Lustre drive
mkdir -p /lustre/huggingface_cache
mkdir -p /lustre/nemo_rl_qwen_72b_ds_cp

echo "Launching NeMo-RL GRPO training..."
uv run python examples/run_grpo_math.py \\
  --config examples/configs/grpo_math_70B_megatron.yaml \\
  policy.model_name='Qwen/Qwen2.5-72B-Instruct' \\
  policy.megatron_cfg.converter_type='Qwen2ForCausalLM' \\
  logger.wandb_enabled=False \\
  cluster.num_nodes=${NUM_NODES} \\
  cluster.gpus_per_node=${GPUS_PER_NODE} \\
  logger.wandb.name='nemo-rl-grpo-test1' \\
  grpo.max_num_steps=20 \\
  grpo.num_generations_per_prompt=8 \\
  grpo.num_prompts_per_step=32 \\
  policy.train_global_batch_size=256 \\
  checkpointing.enabled=True \\
  checkpointing.save_period=2 \\
  checkpointing.keep_top_k=2 \\
  checkpointing.metric_name=null \\
  checkpointing.checkpoint_dir=/lustre/nemo_rl_qwen_72b_ds_cp/nemo-rl-grpo-test1 \\
  data.dataset_name='DeepScaler'
EOF
chmod +x run_nemo_rl.sh
建立 Ray 忽略檔案
建立 .rayignore 檔案,避免 Ray 上傳大型或不必要的目錄:
cat << EOF > .rayignore
xpkclusters/
.git/
*.sh.log
EOF
建立執行階段環境設定
建立 JSON 檔案,將環境變數傳遞至 Ray 工作:
cat << EOF > ray_runtime_env_nemo.json
{
  "env_vars": {
    "HF_TOKEN": "${HF_TOKEN}",
    "WANDB_API_KEY": "${WANDB_API_KEY}",
    "HF_HOME": "/lustre/huggingface_cache",
    "GLOO_SOCKET_IFNAME": "eth0",
    "NCCL_SOCKET_IFNAME": "eth0"
  }
}
EOF
提交工作
使用 Ray CLI 將工作提交至資訊主頁端點。如果 Cloud Shell 找不到 ray 指令,可以使用 pip install ray 安裝:
ray job submit \
    --address="http://localhost:8265" \
    --working-dir . \
    --runtime-env ray_runtime_env_nemo.json \
    -- bash run_nemo_rl.sh
Cloud Shell 終端機中會顯示串流記錄。這項工作會載入模型、初始化 Ray 工作站,並開始 GRPO 訓練迴圈。
8. 監控訓練效能
在這個步驟中,您將觀察訓練和檢查點期間 Lustre 檔案系統的效能。
查看訓練記錄
訓練期間,您會看到記錄檔,指出檢查點正在儲存至 /lustre/nemo_rl_qwen_72b_ds_cp/nemo-rl-grpo-test1。請注意,檢查點作業是非同步進行,不會長時間封鎖 Ray 工作人員。
如要查看檢查點的儲存速度,請尋找指出已儲存檢查點的記錄行。
在 Cloud Console 中查看 Lustre 指標
如要查看 Lustre 執行個體的指標,請按照下列步驟操作:
- 在 Google Cloud 控制台中,搜尋 Managed Service for Lustre。
- 按一下執行個體名稱 (
rl-demo-gpu-lustre)。 - 點選「監控」分頁標籤。
您可以在這裡觀察:
- 處理量 (位元組/秒):查看檢查點期間的尖峰。
- 容量:監控檢查點耗用的空間。
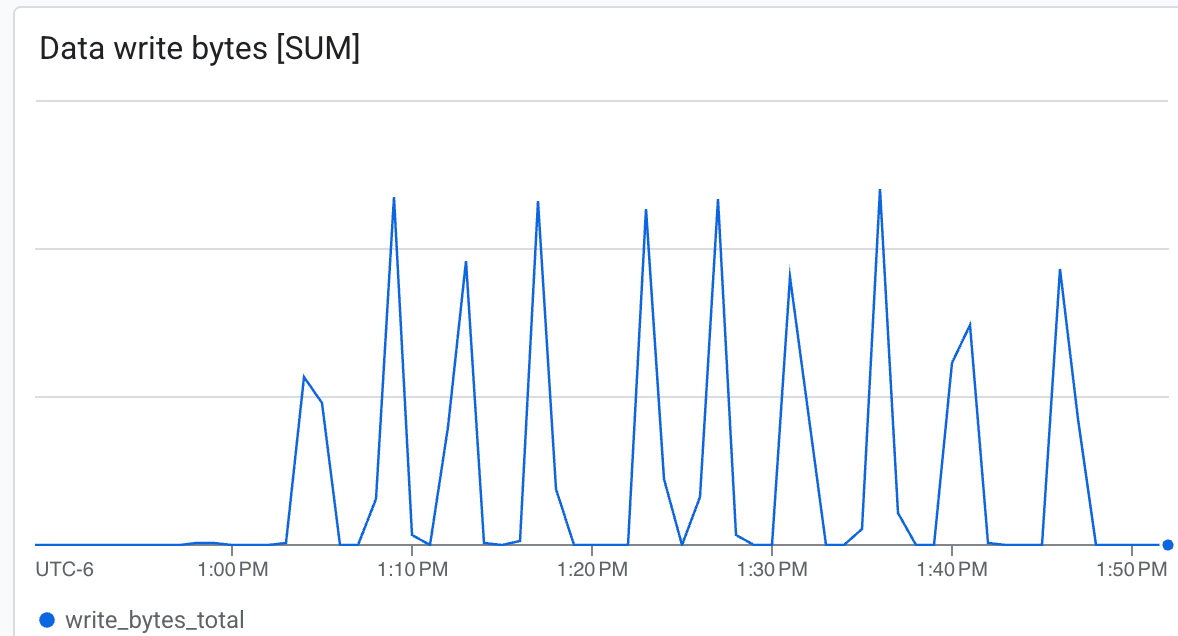 Lustre 能夠以極高速度寫入資料,並在最短時間內寫入檢查點 ab。
9. 清除資源
在 Cloud Shell 中執行下列指令,刪除本程式碼研究室中建立的資源。
刪除 Managed Lustre 執行個體
gcloud lustre instances delete "${LUSTRE_INSTANCE_ID}" \
    --project="${PROJECT_ID}" \
    --location="${ZONE}" \
    --quiet --async
使用 XPK 刪除 GKE 叢集
xpk cluster delete \
    --project="${PROJECT_ID}" \
    --zone="${ZONE}" \
    --cluster="${CLUSTER_NAME}" \
    --force
清理 IP 別名 (選用)
如要徹底清除為虛擬私有雲對等互連建立的 IP 範圍,請按照下列步驟操作:
gcloud compute addresses delete "google-managed-services-${NETWORK_NAME}" \
    --global \
    --project="${PROJECT_ID}" \
    --quiet
系統會以非同步方式刪除資源。您可以在 Cloud 控制台中確認狀態。
10. 恭喜
您已成功完成「使用 GKE 和 Managed Lustre 擴充強化學習」程式碼研究室!
目前所學內容
- 如何使用
xpk佈建含 Spot 執行個體的 GKE GPU 叢集。 - 如何啟用 Lustre CSI 驅動程式和 RayOperator 外掛程式。
- 如何佈建 Google Cloud Managed Service for Lustre 執行個體。
- 如何部署 KubeRay 叢集並掛接 Lustre 儲存空間。
- 如何提交 NeMo-RL GRPO 訓練工作負載。
- 如何觀察訓練期間的儲存空間效能。
後續步驟
- 探索更多 NVIDIA NeMo-RL 功能。
- 進一步瞭解 Google Cloud AI Hypercomputer。
- 參閱 Managed Service for Lustre 說明文件。