
1. Introduction
In this codelab, you will build a no-code universal employee helpdesk app using Vertex AI Search.
Imagine you work at Cymbal, a global retail company. Employees often have questions like "What is the policy for booking business travel?" or "How many units of sneakers do we have in stock?".
Typically, you must sign in to completely different systems to find these answers. In addition to dealing with different systems, you must also read through a large number of unstructured HR data or run complex SQL prompts on structured financial data to get answers to your questions.
In this codelab, you will build a single, unified app that connects to these datasets, allowing employees to get conversational, grounded answers to their questions using Vertex AI's Retrieval Augmented Generation (RAG) capabilities.
What you'll do
In this codelab, you will complete the following steps:
- Set up data sources. Create a Cloud Storage bucket for unstructured HR documents and a BigQuery dataset for structured financial data.
- Configure data stores. Create Vertex AI Search data stores connected to your Cloud Storage and BigQuery data sources.
- Connect the app. Create a Vertex AI Search app and link both data stores to it.
- Test the app. Interact with the unified search interface to verify grounded answers that synthesize information from across both data stores.
- Explore next steps. Review options for tuning the generative AI model and deploying your search app.

What you'll need
- A web browser such as Chrome.
- A Google Cloud project with billing enabled.
- Git installed on your local machine.
This codelab is for developers of all levels.
2. Before you begin
Create a Google Cloud project and enable the required APIs.
- In the Google Cloud Console, on the project selector page, select or create a Google Cloud project .
- Make sure that billing is enabled for your Cloud project. Learn how to check if billing is enabled on a project.
Required IAM roles
This codelab assumes that you have the Project Owner role for your Google Cloud project.
Enable APIs
- In the Google Cloud console, click Activate Cloud Shell: If you've never used Cloud Shell before, a pane appears giving you the choice to start Cloud Shell in a trusted environment with or without a boost. If you are asked to authorize Cloud Shell, click Authorize.
- In Cloud Shell, enable all required APIs:
gcloud services enable \
  discoveryengine.googleapis.com \
  aiplatform.googleapis.com \
  bigquery.googleapis.com \
  storage.googleapis.com
3. Clone a GitHub repository
To show how search works in the Cymbal employee helpdesk app, you require some mock files. In this section, you clone a GitHub repository to your local machine to get these files. You will upload these files to Google Cloud in later steps using the Cloud Console interface.
- In a terminal on your local machine, clone the
next-26-sessionsrepository:git clone https://github.com/GoogleCloudPlatform/next-26-sessions.git - Navigate to the downloaded repository directory:
cd next-26-sessions/BRK1-063-the-knowledge-source/cymbal-employee-helpdesk - Explore the downloaded files in this directory. You will notice that there are two folders:
HRandFinance.- HR. This folder contains a number of unstructured files, such as
.doc,.txt, and.htmlfiles. You will upload the HR files to a Cloud Storage bucket. - Finance. This folder contains two
.jsonlfiles. You will upload these files to a BigQuery dataset.
- HR. This folder contains a number of unstructured files, such as
4. Create a Cloud Storage bucket for unstructured files
In this section, you create a Cloud Storage bucket and upload the documents in the HR folder that you downloaded in the Clone a GitHub repository section. Unstructured data, like the HR documents in this example, doesn't follow a predefined format and can include text files, documents, or multimedia content.
- In the Cloud console, go to the Buckets page.
- Click Create.
- On the Create a bucket page, enter the name of a bucket. The name must be globally unique. For example:
cymbal-app-hr-12. - Retain the default options.
- Click Create.The bucket is created and the Bucket details page is displayed. If you don't see the Bucket details page, click the bucket that you just created.
- On the Bucket details page, click Upload > Upload folder, and then select the
HRfolder that you downloaded in the Clone a GitHub repository section. - Confirm the upload.
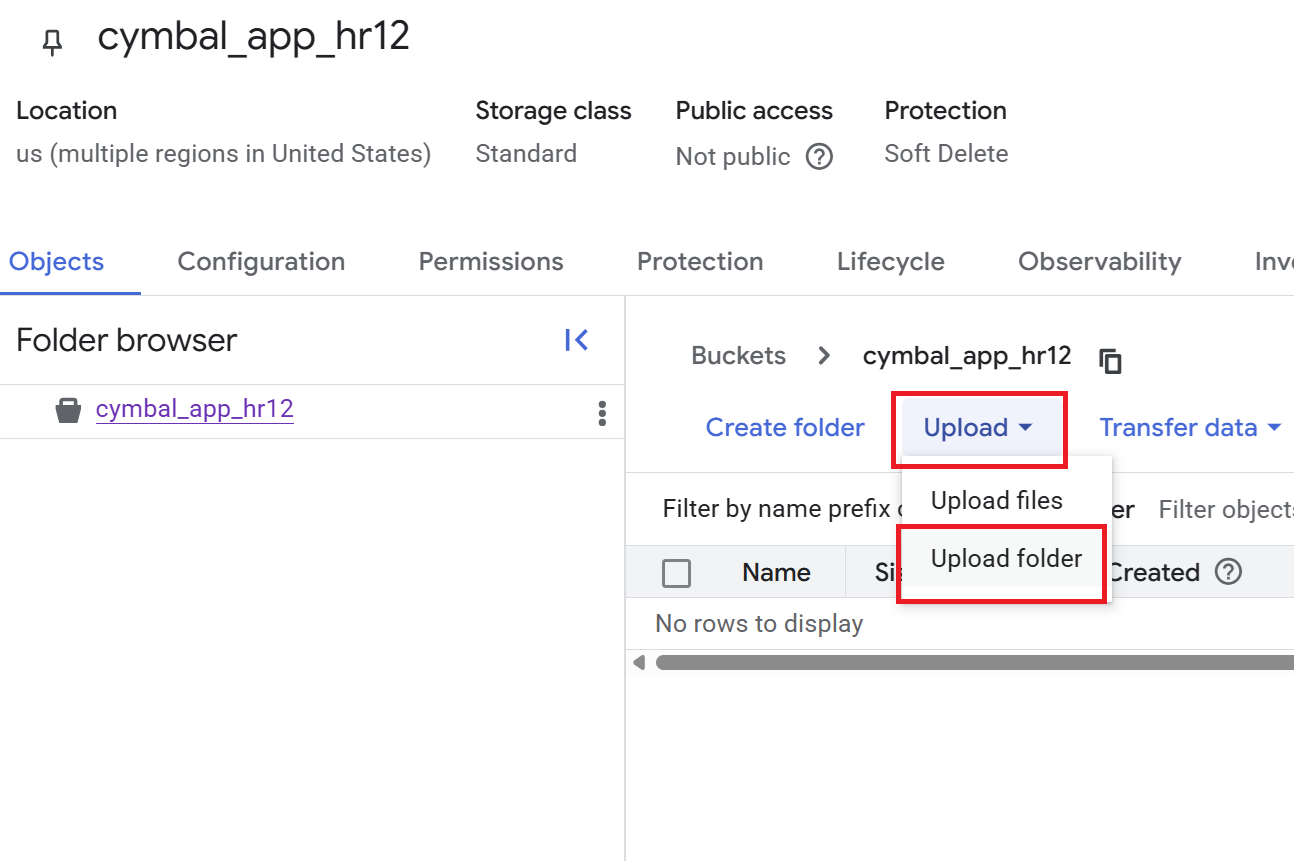
- On the Bucket details page, click the
HRfolder to view the list of files.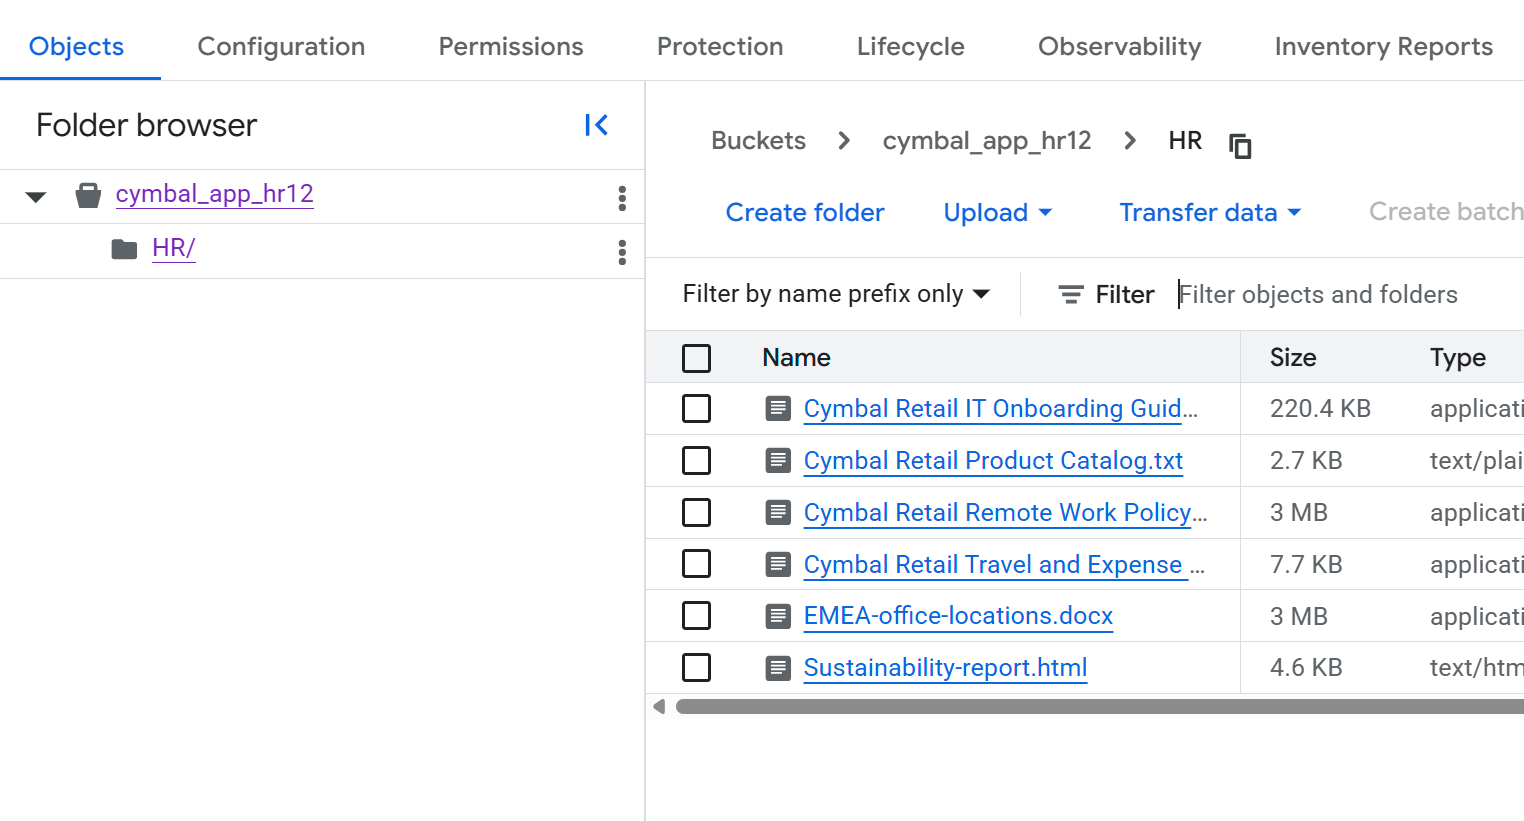
5. Create a BigQuery dataset for structured files
In this section, you create a BigQuery dataset and load the documents in the Finance folder that you downloaded in the Clone a GitHub repository section into a new table. Structured data, like the financial documents in this example, follows a predefined format, such as records in a database.
- In the Cloud console, go to the BigQuery page.
- In the Explorer pane, click your project name, and then click View actions (the three vertical dots) > Create dataset.
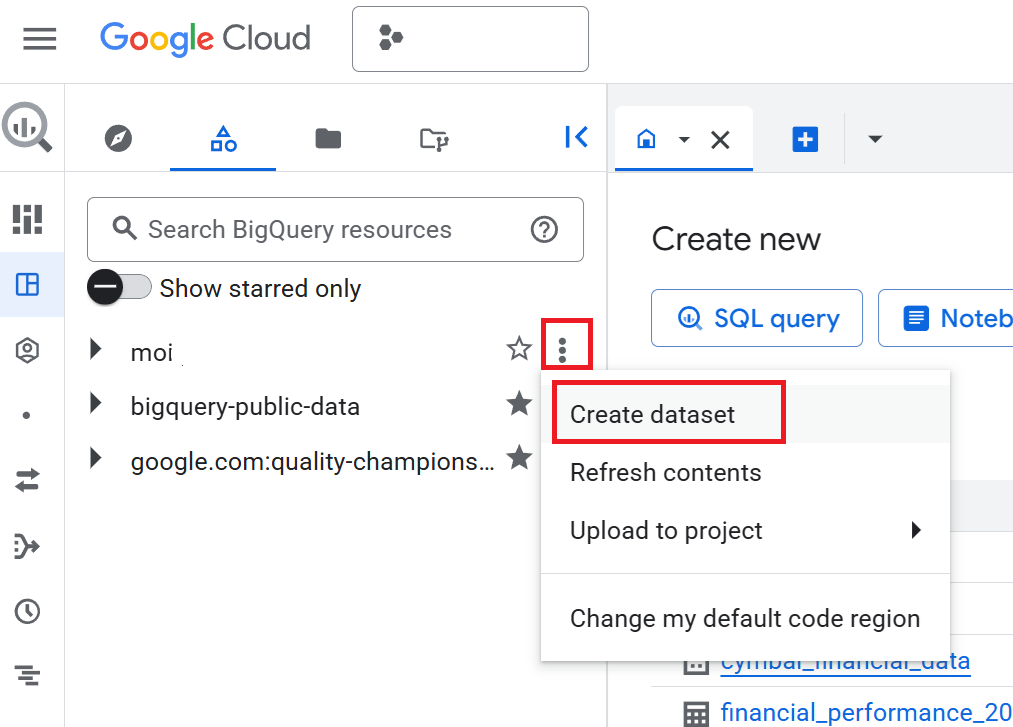
- On the Create dataset pane, enter the Dataset ID as
cymbal_finance. - For Data location, select
US (multiple regions in United States). - Retain the default options and click Create dataset.
- In the Explorer pane, expand your project, and click the
cymbal_financedataset. - In the dataset details pane, click Create table.
- On the Create table page, in the Source section, do the following:
- For Create table from, select Upload.
- For Select file, click Browse, navigate to the
Financefolder you downloaded, and selectcymbal_employee_finance.jsonl. - For File format, select JSONL (Newline delimited JSON).
- In the Destination section, enter the Table name as
employee_finance. - In the Schema section, select the Auto-detect checkbox.
- Retain the other default settings and click Create table.
- Repeat steps 7 through 11 to load data into a new table. In step 8b, select
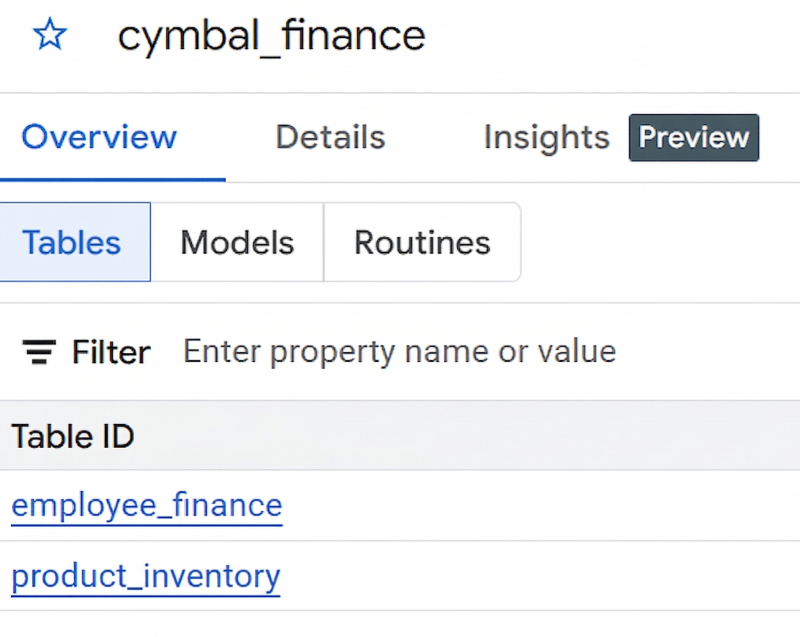
product_inventory.jsonl, and in step 9, enterproduct_inventoryas the Table name.If you don't see the tables in the dataset details pane, click Refresh. - If you successfully created the dataset and the two tables, it should look like the following image:
6. Create a Vertex AI Search app
- In the Cloud Console, go to the Vertex AI Search page.
- In the Custom search (general) tile, click Create.
- On the Search app configuration page, ensure that the options Enterprise edition features and Generative responses are selected.
- Name your app
cymbal-employee-portal. - Enter the Company name as
Cymbal Corp. - Retain the Location of your app as
global. - Click Continue.
7. Create and connect data stores
On the Data stores page, you create data stores that you will connect to your app. You must create three data stores: one for unstructured HR data, and two for structured financial data.
Create a data store for unstructured data
- On the Data stores page, click Create data store.
- For Select a data source, select Cloud storage.
- On the Import data from Cloud Storage pane, go to Unstructured data import (Document search and RAG), and select Documents.
- Retain the Synchronization frequency option as One-time.
- For Select a folder or a file that you want to import, click Folder.
- In the
gs://...field, enter the name of the bucket you created in the section Create a Cloud Storage bucket for unstructured files. For example, if the name of the bucket iscymbal-app-hr-12, enter the name ascymbal-app-hr-12/HR.Ingesting from theHRfolder ensures that only the HR documents are included in this data store. - Click Continue.
- Enter the name of the data store as
cymbal-hr. - Click Continue.
- Retain the option for General pricing.
- Click Create.
After you click Create, you are returned to the Data stores page.
Create data stores for structured data
You will create two data stores for structured data from BigQuery: one for employee finance information and another for product inventory.
Create a data store for employee finance data
- On the Data stores page, click Create data store again.
- For Select a data source, select BigQuery.
- For Structured data import, select BigQuery table with your own schema.
- Retain the Synchronization frequency option as One-time.
- For Select a table that you want to import, click Browse. In the Select path dialog that opens, select the
employee_financetable from thecymbal_financedataset in your project. You might see tables with similar names from other projects, so ensure that you select the table from your project. - Click Continue.
- Review the Review schema and assign key properties page.
- Click Continue.
- Enter the name of the data store as
cymbal-finance. - Click Continue.
- Retain the option for General pricing.
- Click Create.
After you click Create, you are returned to the Data stores page.
Create a data store for product inventory data
- On the Data stores page, click Create data store again.
- For Select a data source, select BigQuery.
- For Structured data import, select BigQuery table with your own schema.
- Retain the Synchronization frequency option as One-time.
- For Select a table that you want to import, click Browse. In the Select path dialog that opens, select the
product_inventorytable from thecymbal_financedataset in your project. - Click Continue.
- Review the Review schema and assign key properties page.
- Click Continue.
- Enter the name of the data store as
cymbal-inventory. - Click Continue.
- Retain the option for General pricing.
- Click Create.
After you click Create, you are returned to the Data stores page.
8. Connect data stores to your app
You should now see three data stores in the list on the Data stores page: cymbal-hr (unstructured), cymbal-finance (structured), and cymbal-inventory (structured). To connect these data stores to your app, follow these steps:
- On the Data stores page, select all three data stores that you just created:
cymbal-hr,cymbal-finance, andcymbal-inventory. Ensure that you select all three data stores before proceeding. - Click Continue.
- Retain the option for General pricing.
- Click Create.
9. Test the Cymbal employee portal app
- In the
cymbal-employee-portalapp, click Preview. - In the Search here box, enter the following question:
What are the stipends that I get as an employee of Cymbal located in London? - Enter a question related to product inventory:
How many units of sneakers do we have in stock? - Enter another question:
What is the stipend for an executive in Cymbal?
Notice how the search app retrieved information from multiple sources to formulate its response. To answer these questions, the app searched across both the structured financial data stored in BigQuery and the unstructured HR documents in Cloud Storage.
This demonstrates the power of Vertex AI Search to synthesize answers across various data formats and disparate data stores into a single, cohesive experience.
You can also tune the AI model to provide even more accurate and domain-specific answers. For more information on customizing the generative experience, refer to the Get answers and follow-ups documentation.
10. Options for deploying your app
While deploying the application to end-users is outside the scope of this codelab, it is helpful to know how this translates to a real-world scenario. You have several options for integrating your Vertex AI Search app into your organization's workflows:
- Pre-built web widget. You can embed a ready-to-use search or chat interface directly into your company's existing intranet or web pages using an HTML
scripttag. This is the fastest way to get your app in front of users. - Custom API integration. For complete control over the user experience, you can use the Vertex AI Search REST APIs or client libraries (such as Python, Node.js, or Java) to build a custom frontend from scratch.
11. Clean up
To avoid ongoing charges to your Google Cloud account, delete the resources created during this codelab:
- In the Cloud console, go to the Vertex AI Search page.
- Click See existing apps.
- For the
cymbal-employee-portalapp, click the three vertical dots for More, and then click Delete. - Follow the on-screen prompts to confirm deletion.
- To delete the data stores, click Data stores on the left navigation panel of the console.
- Delete the
cymbal-hr,cymbal-finance, andcymbal-inventorydata stores:- For the
cymbal-hrdata store, click the three vertical dots for More, and then click Delete. - Follow the on-screen prompts to confirm deletion.
- For the
cymbal-financedata store, click the three vertical dots for More, and then click Delete. - Follow the on-screen prompts to confirm deletion.
- For the
cymbal-inventorydata store, click the three vertical dots for More, and then click Delete. - Follow the on-screen prompts to confirm deletion.
- For the
- Go to the Buckets page and delete the bucket you created (for example,
cymbal-app-hr-12). - Go to the BigQuery page and delete the
cymbal_financedataset.
12. Congratulations
Mission complete! You've successfully built a unified enterprise search experience using Vertex AI Search.
By bridging the gap between your unstructured enterprise data in Cloud Storage and structured records from BigQuery, you've created a powerful tool capable of complex business reasoning—all without writing a single line of machine learning code.
What you've learned
- Ingestion: How to ingest unstructured documents from Cloud Storage and structured data from BigQuery into Vertex AI Search.
- Multi-data store querying. How to query a multi-data store search app to synthesize unified answers from both structured and unstructured data.
- Tuning and customization. How to tune the generative AI models to provide more accurate, domain-specific answers.
- Deployment options. The various ways to integrate this reasoning capability into real-world applications using prebuilt widgets or custom APIs.