
1. What you will learn
Welcome to the ADK Master Class - Your Journey into Multi-Agent Systems
You're about to step into the exciting world of AI agents. Forget simple chatbots that just answer questions. We're diving deep into the Agent Development Kit (ADK) to build sophisticated, autonomous systems that can reason, plan, and use tools to accomplish complex tasks.

By the end of this tutorial, you will be able to:
- Build Your First AI Agent: Go from zero to a fully functional agent that can understand a user's needs, use tools like Google Search, and generate detailed, helpful responses.
- Master Custom Tools: Unlock the true power of agents by connecting them to your own custom functions and APIs. You'll teach your agent to fetch real-time data, like live weather forecasts.
- Construct Multi-Agent Systems: Learn the "Agent-as-a-Tool" pattern, a revolutionary concept where agents delegate tasks to other specialized agents, creating a team of AI experts that work together.
- Orchestrate Complex Workflows: Go beyond simple delegation and master advanced patterns like Routers, Sequential Chains, Loops, and Parallel Execution to build robust, efficient, and intelligent applications that can handle almost any requests.
- Give Your Agents Memory: Understand the critical role of conversational memory, enabling your agents to handle follow-up questions, learn from feedback, and manage multi-step tasks seamlessly.
Let's get started! 🚀
2. Setup: Get Your API Key
Google AI Studio API Key Setup
To power our AI agents, we need a Gemini API key from Google AI Studio. This is the fastest way to get started.
Step 1 — Get Your Gemini API Key from AI Studio (1 min)
- Open https://aistudio.google.com/app/apikey in a new browser tab.
- Sign in with your Google account.
- Click "Create API key" (top-right).
- A dialog opens with a project dropdown:
- If you already have a Google project created before: Select it and click "Create API key in existing project"
- If NOT in the list: Click "Create Project".
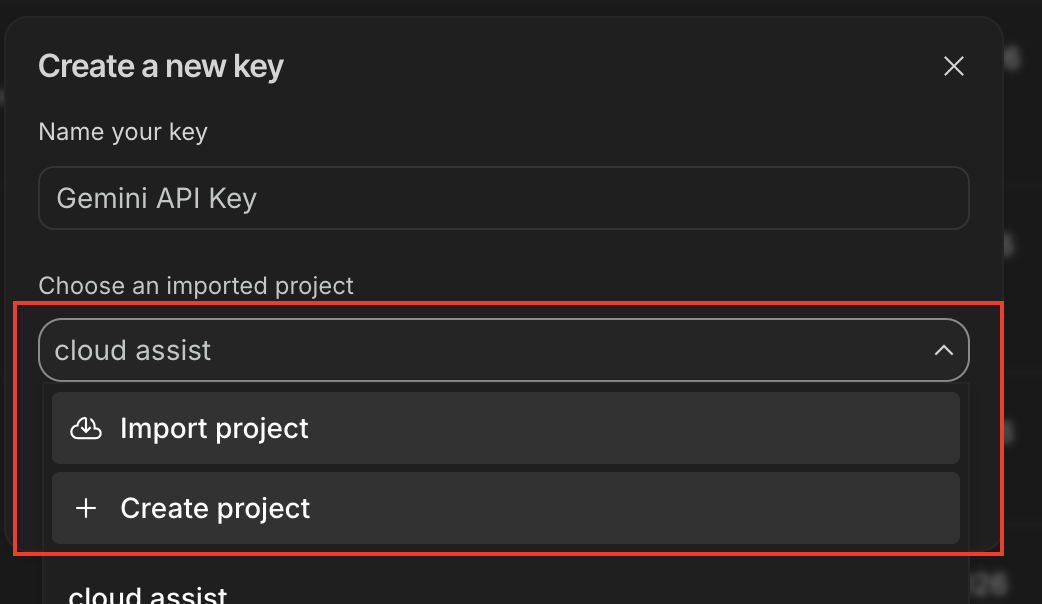
- Copy the API key that appears. It starts with
AIza...and is ~40 characters.
✏️ Paste it somewhere safe — you'll need it for the Colab notebooks and the ADK Web setup (in the Appendix).
Step 2 — Add Your API Key to Colab (1 min)
Each notebook has a setup cell that loads your API key. You have two options — pick whichever you prefer:
Option A: Colab Secrets (Recommended — key stays hidden)
- In the Colab notebook, click the 🔑 key icon in the left sidebar.
- Click "Add new secret".
- Set the Name to
GOOGLE_API_KEY. - Paste your API key (from Step 1) into the Value field.
- Toggle the "Notebook access" switch to ON.
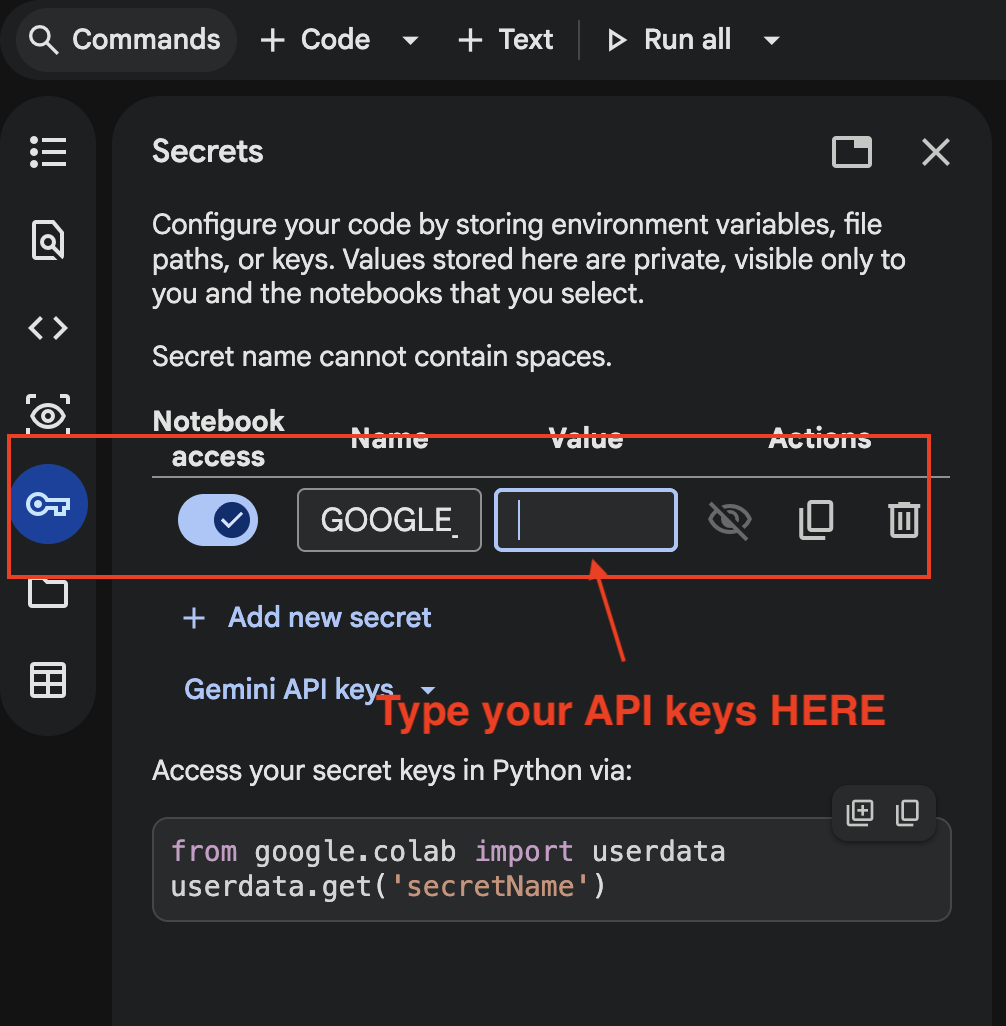
When you run the setup cell, it will automatically pick up the key:
✅ API key loaded from Colab Secrets.
Option B: Paste when prompted (quick & easy)
If you skip Colab Secrets, and directly run codelab1 and codelab2, the notebook will prompt you with a password field:
🔑 Enter your Google AI Studio API key: ••••••••
Paste your API key and press Enter. The key won't be visible on screen.
✅ API key entered manually.
After the API key cell runs, the next cell configures the environment:
✅ API key configured (starts with 'AIzaSy...')
✅ Using Google AI Studio (not Vertex AI).
✅ Checkpoint: You see both ✅ messages above in the notebook. Your API key is configured and you're ready to build agents!
3. Session 1: Your First Agent with Runner

Let's start with the fundamentals. Here, we create our first simple agent, the day_trip_agent. This agent's purpose is to generate a full-day trip itinerary based on a user's request, including budget considerations. This example introduces the three core components of any agent interaction in the ADK:
- Agent: The core brain of the operation. It's defined by its instructions (its personality and mission), the AI model it uses (like Gemini), and the tools it can access.
- Session: The conversation's memory. It stores the history of interactions (user messages and agent responses), allowing for a continuous dialogue.
- Runner: The engine that executes the task. It takes the Agent and the Session, processes the new user query, and orchestrates the steps to generate a response.
➡️ Where to Find It in the Notebook
👉 This corresponds to the cells under Part 1: Your First Agent - The Day Trip Genie 🧞.🌟

- Agent Definition: Look for the
create_day_trip_agent()function. This is where the agent is defined. Notice the detailed instruction string—this is the prompt that tells the agent how to behave. We also give it its first tool: Google Search. - Helper Function: The
run_agent_query()helper function is defined here. We'll use this utility throughout the notebook to simplify running queries. - Test Run: The
run_day_trip_genie()function simulates a user asking for an "affordable" and "relaxing" day trip. The agent uses its instructions and the Google Search tool to find suitable locations and create a markdown-formatted itinerary.
➡️ Action: Examine the instruction prompt for the day_trip_agent. See how the request for an "affordable" trip in the test query directly relates to the agent's guideline to be "Budget-Aware."
4. Session 2: Custom Tools 🛠️

While Google Search is powerful, the true potential of AI agents is unlocked when you connect them to your own unique data sources, APIs, or custom logic. In this section, we'll create a custom tool from a simple Python function.
The most critical part of a function tool is its docstring. The ADK automatically parses the docstring to understand what the tool does, what parameters it accepts (Args), and what it returns (Returns). The large language model (LLM) reads this description to decide when and how to use the tool.
➡️ Where to Find It in the Notebook
👉 This corresponds to the cells under 2.1 The Simple FunctionTool: Calling a Real-Time Weather API. 🌟

- Tool Definition: The
get_live_weather_forecast(location: str)function is the core of our custom tool. It takes a city name, calls the public National Weather Service API, and returns a dictionary with the temperature and forecast. - Agent Definition: The weather_agent is created and equipped with our new tool by passing
tools=[get_live_weather_forecast]during its initialization. The agent's instructions explicitly tell it to use this tool before suggesting outdoor activities. - Test Run: The query, "I want to go hiking near Lake Tahoe, what's the weather like?", directly triggers the agent to use the
get_live_weather_forecasttool because its instructions require it.
➡️ Action: Read the docstring for the get_live_weather_forecast function and the instruction for the weather_agent. Note the direct relationship between them.
5. Session 3: Agent-as-a-Tool 🧑🍳

Why build a single, monolithic agent when you can create a team of specialists? The Agent-as-a-Tool pattern is a powerful way to build complex systems where a primary agent, often called an Orchestrator or Router, delegates tasks to other, more focused agents.
This pattern allows you to create modular, reusable agents. For example, you can have one agent that is an expert at database queries, another that is an expert at creative writing, and a third that acts as a friendly concierge. The orchestrator's job is to understand the user's request and route it to the correct specialist.
➡️ Where to Find It in the Notebook
👉 This corresponds to the cells under 2.2 The Agent-as-a-Tool: Consulting a Specialist 🧑🍳.🌟

This example builds a sophisticated, multi-layered agent system:
- The Specialists:
- food_critic_agent: A highly specialized agent that only provides restaurant suggestions.
- db_agent: A mock agent that pretends to query a database for hotel information.
- concierge_agent: A mid-level agent that acts as a polite concierge. Crucially, it has the
food_critic_agentas its own tool.
- The Orchestrator (
trip_data_concierge_agent): This is the top-level agent that the user interacts with. Its instructions make it a "master travel planner" and it is given two tools that call the other agents:- call_db_agent: A function that calls the
db_agent. - call_concierge_agent: A function that calls the
concierge_agent.
- call_db_agent: A function that calls the
- The Flow: The test run in
run_trip_data_concierge()demonstrates the full delegation chain.- A user asks the orchestrator for a hotel and a nearby restaurant.
- The orchestrator's instructions tell it to first use the
call_db_agenttool to get hotel data. - The orchestrator then uses the
call_concierge_agenttool to get a recommendation. - The
concierge_agent, upon receiving the request, uses its own tool, thefood_critic_agent, to get a restaurant idea.
The food critic's response is passed back to the concierge, who politely formats it and sends it back to the orchestrator, who finally presents it to the user.
➡️ Action: Trace the execution flow in the test run under run_trip_data_concierge(). Observe how the TOOL CALLED printouts show the chain of delegation from the orchestrator down to the specialists. This is a sequential chain of command.
6. Session 4: Agent Memory 🧠

A truly intelligent agent needs to do more than just respond to one-off queries. It needs to remember the conversation, understand context, and adapt to feedback. This is achieved through proper session management. Think of a "loop agent" as an agent engaged in a continuous conversational loop, powered by its memory.
When you use the same session object for multiple, sequential queries, the agent can "see" the entire history of the conversation. This allows it to handle follow-up questions, correct itself based on feedback, and plan multi-step tasks.
➡️ Where to Find It in the Notebook
👉 This corresponds to the cells under Part 3: Agent with a Memory - The Adaptive Planner 🗺️. 🌟

- Agent Definition: The
create_multi_day_trip_agent()function defines an agent designed to plan a trip progressively. Its instructions emphasize remembering the context, handling feedback, and planning one day at a time.
Scenario 3a: Agent WITH Memory (✅)
This test is run in the run_adaptive_memory_demonstration() function.
- A single
trip_sessionis created and reused for three consecutive turns. - Turn 1: The user initiates a 2-day trip plan.
- Turn 2: The user gives feedback ("I'm not a huge fan of castles"). Because the agent has the memory of Turn 1, it understands which part of the plan to change and provides an alternative.
- Turn 3: The user confirms the change and asks for the next step. The agent remembers everything and proceeds to plan Day 2.
Scenario 3b: Agent WITHOUT Memory (❌)
This test is run in the run_memory_failure_demonstration() function.
This demonstrates the critical importance of session management by making a mistake on purpose. A new session is created for each turn.
- Turn 1: The user initiates the trip in session_one. The agent responds correctly.
- Turn 2: The user asks to plan Day 2, but the query is sent in a brand new session_two. Because this new session has no history, the agent is confused. It has amnesia! It doesn't know what trip is being planned.
Action: Compare the agent's responses in run_adaptive_memory_demonstration() and run_memory_failure_demonstration(). This is the most important concept in the notebook: one continuous conversation requires one continuous session.
7. Session 5: The Router Agent 🚏

A single agent can only do so much. To tackle truly complex user requests, we need a team of specialized agents. But how do we know which agent to use for a given query? That's where the Router Agent comes in.
The Router Agent acts as a "master" agent or a dispatcher. Its sole purpose is to analyze an incoming user query and decide which specialist agent (or workflow of agents) is the best fit for the job. It doesn't answer the query itself; it simply routes it to the correct downstream agent.
For example, a query about "the best sushi" should go to a foodie_agent, while a question about "concerts this weekend" should be handled by a weekend_guide_agent.
➡️ Where to find this in the notebook:
👉 This concept is central to the entire notebook, but it's first introduced in Part 1: Multi-Agent Mayhem - Sequential Workflows 🧠→🤖→🤖 🌟

- Agent Definitions: The code cell defines multiple specialist agents (day_trip_agent, foodie_agent, transportation_agent) and, most importantly, the router_agent. Pay close attention to the instruction prompt for the router_agent, it's explicitly told to only return the name of the best agent for the job.
- Execution Logic: The run_sequential_app function demonstrates how to first call the router_agent to get a decision (chosen_route) and then use that decision in an
if/elifblock to execute the appropriate specialist agent.
8. Session 6: SequentialAgent ⛓️

Some tasks require multiple steps in a specific order. For instance, "Find me the best sushi in Palo Alto and then tell me how to get there." This is a two-step process: first, find the restaurant, and second, get directions.
The ADK provides a clean and powerful way to manage this with the SequentialAgent. This is a special workflow agent that executes a list of sub-agents in a predefined order.
The magic lies in the shared state. The output of one agent in the sequence can be automatically saved to a shared state dictionary and then used as an input for the next agent, eliminating the need for complex manual code to pass information between steps.
➡️ Where to find this in the notebook:
👉 This is covered in Part 2 (The ADK Way): Multi-Agent Mayhem with SequentialAgent 🧠→⛓️→🤖. 🌟

- Agent Refactoring: In the first code cell of this section, notice the key changes to the
foodie_agentandtransportation_agent:foodie_agentnow has anoutput_key="destination". This tells the ADK to save its final answer into a variable nameddestinationin the shared state.transportation_agentnow has the placeholder{destination}in its instruction prompt. The ADK automatically injects the value from the shared state into this placeholder.
- Defining the Workflow: The
find_and_navigate_agentis defined as a SequentialAgent, with its sub_agents set to [foodie_agent,transportation_agent], ensuring they run in that exact order. - Simplified Execution: Look at the
run_sequential_appfunction in this section. The complexif/eliflogic is gone! Thefind_and_navigate_agentis now treated as a single, callable unit, and the ADK handles the internal sequential steps automatically.
9. Session 7: LoopAgent 🔁

Not all problems have a straightforward, one-shot solution. Sometimes, we need to propose a solution, critique it, and refine it until it meets a specific constraint.
For this, the ADK offers the LoopAgent. This workflow agent repeatedly executes a sequence of sub-agents until a specific condition is met. This is perfect for building "perfectionist" agents that can plan, critique, and improve their own work.
The diagram shows the Planner Agent creating a plan first. Then, we enter the LoopAgent. The Critic Agent checks the plan. If it's flawed, the Refiner Agent creates a new version, and the loop repeats. If the plan is good, the Refiner Agent calls the exit_loop tool, and the final, validated plan is returned.

➡️ Where to find this in the notebook:
👉 This is explained in Iterative Ideas with LoopAgent 🧠→🔁→🤖. 🌟
- The Core Agents: The workflow uses a
planner_agent,critic_agent, andrefiner_agent. - The Loop Definition: The
refinement_loopis defined as a LoopAgent that orchestrates thecritic_agentandrefiner_agentandsets max_iterations=3. - The Exit Condition: The loop terminates when the
critic_agentapproves the plan, leading therefiner_agentto call the customexit_looptool.
10. Session 8: ParallelAgent ⚡️

Efficiency is key. If a user asks for multiple, unrelated pieces of information at once, running these searches one by one would be slow.
The ParallelAgent is the solution. This workflow agent executes a list of sub-agents concurrently. Once all the parallel tasks are complete, their results can be gathered and synthesized into a single, comprehensive response.
This diagram shows the ParallelAgent taking a single query and forking the work into three concurrent tracks. The museum_finder, concert_finder, and restaurant_finder all run at the same time. Once all three are finished, their individual results (saved to the shared state) are joined and passed to the final Synthesis Agent, which combines them into one answer.
➡️ Where to find this in the notebook:
👉 This workflow is detailed in the section Parallel Power with ParallelAgent 🧠→⚡️→🤖🤖🤖. 🌟

- Specialist Agents: Three specialist agents are defined, each with a unique output_key (e.g., museum_result).
- The Parallel Workflow: The parallel_research_agent is defined as a ParallelAgent, with the three finder agents listed as its sub_agents.
- The Synthesis Step: After the parallel step, a final synthesis_agent gathers all the findings from the shared state using placeholders (
{museum_result},{concert_result}, etc.) to format a neat summary.
11. Appendix: ADK Web - 🍎 For Mac/Linux

This guide will walk you through setting up and running the ADK Day Trip Planning Agent on your local machine.
Prerequisites
- Python 3.8 or higher
- Python 3.9+: Installs google-adk==1.5.0 (latest version with full features)
- Python 3.8: Installs google-adk==0.3.0 (compatible version)
- Google AI Studio API key (from the Setup step above)
- Internet connection
Step 1: Clone the Repository
Open Terminal and run:
git clone https://github.com/cuppibla/ADK_Basic.git
cd ADK_Basic
Step 2: Set Up Virtual Environment and Install Dependencies
Option A: Automated Setup (Recommended)
# Run the setup script
chmod +x setup_venv.sh
./setup_venv.sh
Option B: Manual Setup
# Create virtual environment
python3 -m venv .adk_env

# Activate virtual environment
source .adk_env/bin/activate

# Install dependencies
pip install --upgrade pip
pip install -r requirements.txt
Step 3: 🔥 IMPORTANT - Create Environment Variables
⚠️ Don't skip this step! Create a .env file in the agent/ directory:
# Create the .env file
touch agent/.env

# Open it in your default text editor
open agent/.env
Add these lines to the file:
GOOGLE_GENAI_USE_VERTEXAI=FALSE
GOOGLE_API_KEY=your_actual_api_key_here
🚨 CRITICAL: Replace your_actual_api_key_here with your actual API key from the Setup: Get Your API Key step!
Step 4: Activate Virtual Environment (if not already active)
source .adk_env/bin/activate
You should see (.adk_env) at the beginning of your terminal prompt.
Step 5: Run the ADK Web Interface
adk web
Step 6: Open Your Browser
- Open your browser and go to the URL shown in terminal (usually
http://localhost:8000) - In the top-left dropdown, select
agent - Start chatting with your day trip planning agent!
You will see conversation like: 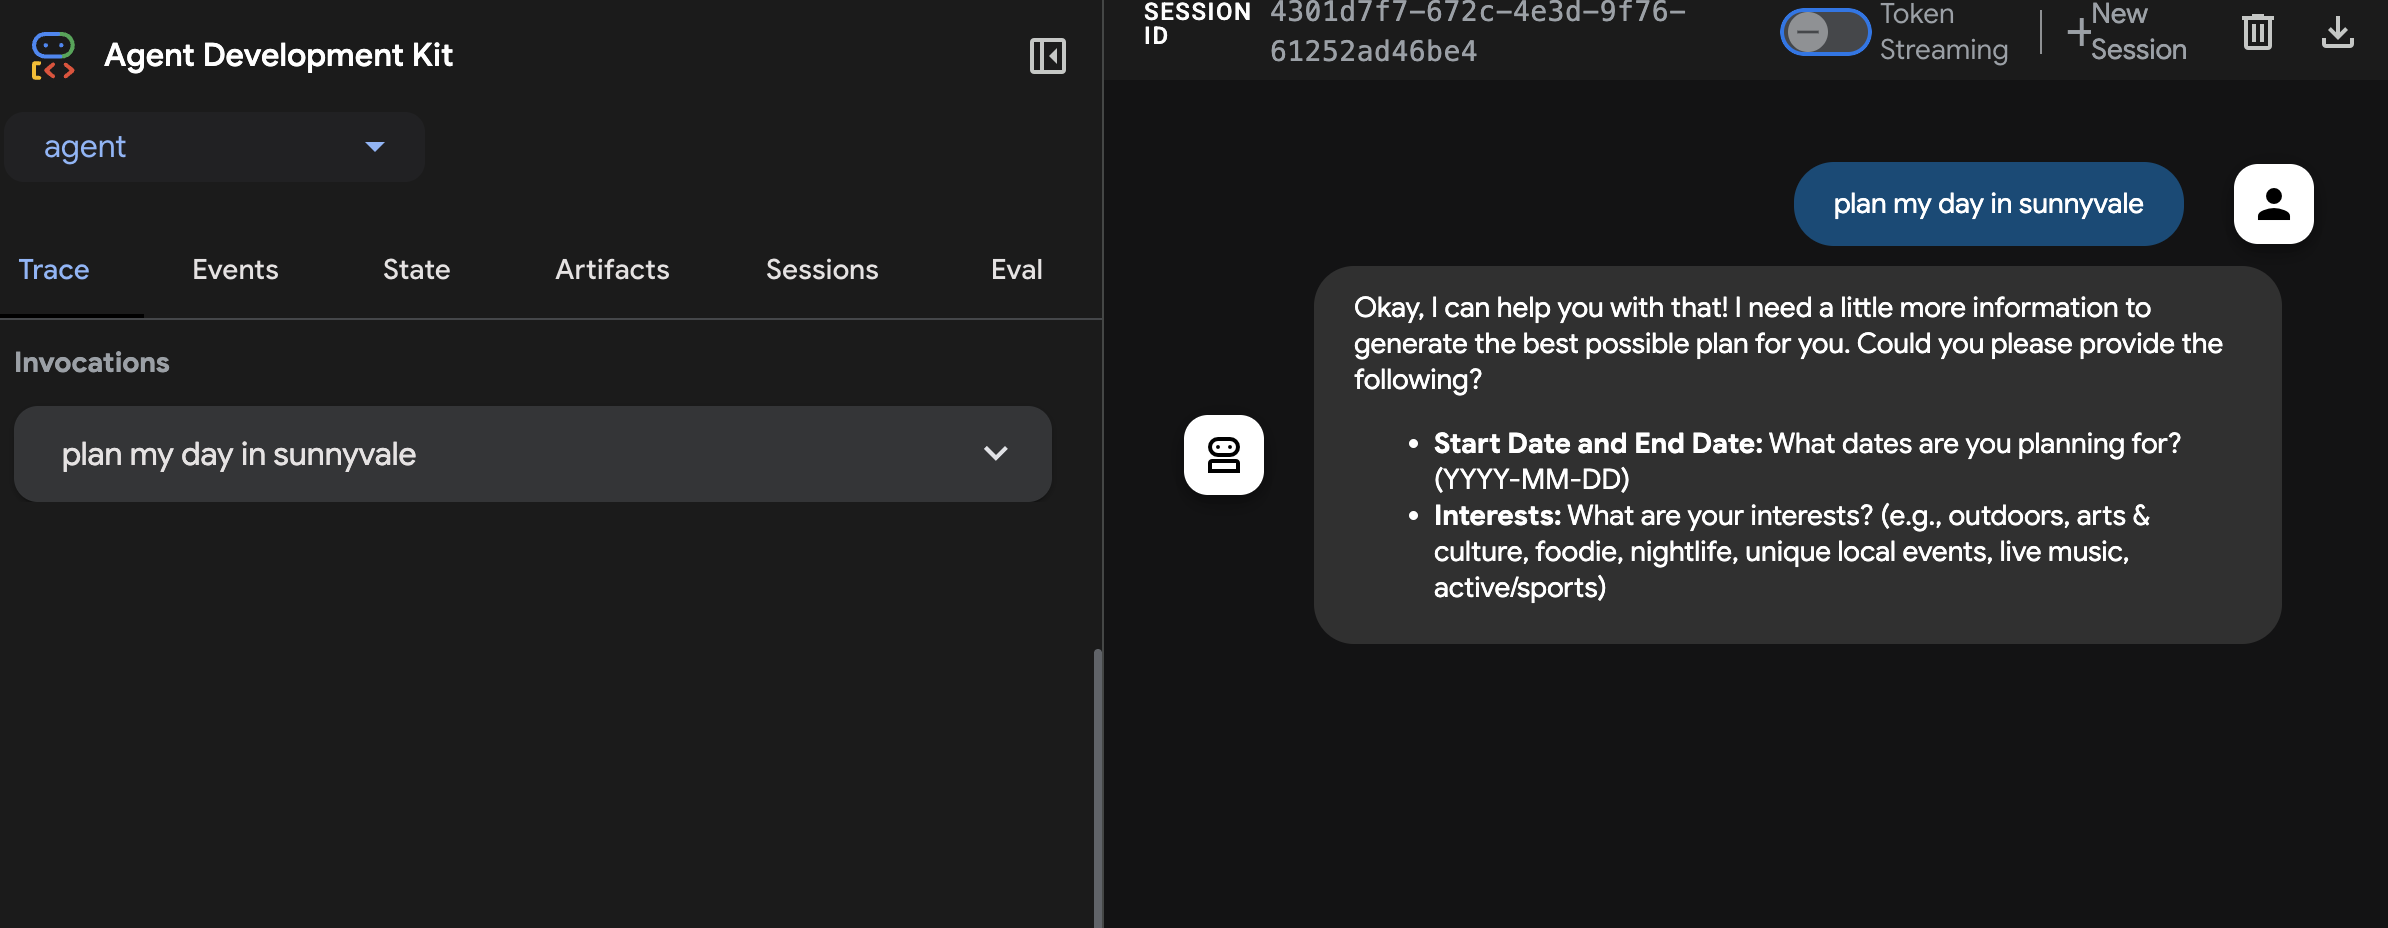
Deactivating the Environment
When you're done working with the project:
deactivate
This command works the same on both Mac/Linux and Windows. You'll notice the (.adk_env) prefix disappears from your terminal prompt.
Mac Troubleshooting
- Python not found: Use
python3instead ofpython - Permission denied: Run
chmod +x setup_venv.shbefore running the script
12. Appendix: ADK Web - 🪟 For Windows Users
This guide will walk you through setting up and running the ADK Day Trip Planning Agent on your local machine.
Prerequisites
- Python 3.8 or higher
- Python 3.9+: Installs google-adk==1.5.0 (latest version with full features)
- Python 3.8: Installs google-adk==0.3.0 (compatible version)
- Google AI Studio API key (from the Setup step above)
- Internet connection
Step 1: Clone the Repository
Open Command Prompt or PowerShell and run:
git clone https://github.com/cuppibla/ADK_Basic.git
cd ADK_Basic
Step 2: Set Up Virtual Environment and Install Dependencies
Option A: Automated Setup (Recommended)
# Run the setup script in Command Prompt
setup_venv.bat
Option B: Manual Setup
For Command Prompt:
# Create virtual environment
python -m venv .adk_env

# Activate virtual environment
.adk_env\Scripts\activate

# Install dependencies
pip install --upgrade pip
pip install -r requirements.txt
For PowerShell:
# Create virtual environment
python -m venv .adk_env

# Activate virtual environment
.adk_env\Scripts\Activate.ps1

# Install dependencies
pip install --upgrade pip
pip install -r requirements.txt
Step 3: 🔥 IMPORTANT - Create Environment Variables
⚠️ Don't skip this step! Create a .env file in the agent/ directory:
# Create the .env file
type nul > agent\.env

# Open it in Notepad
notepad agent\.env
Add these lines to the file:
GOOGLE_GENAI_USE_VERTEXAI=FALSE
GOOGLE_API_KEY=your_actual_api_key_here
🚨 CRITICAL: Replace your_actual_api_key_here with your actual API key from the Setup: Get Your API Key step!
Step 4: Activate Virtual Environment (if not already active)
Command Prompt:
.adk_env\Scripts\activate
PowerShell:
.adk_env\Scripts\Activate.ps1
You should see (.adk_env) at the beginning of your prompt.
Step 5: Run the ADK Web Interface
adk web
Step 6: Open Your Browser
- Open your browser and go to the URL shown in terminal (usually
http://localhost:8000) - In the top-left dropdown, select
agent - Start chatting with your day trip planning agent!
Windows Troubleshooting
- PowerShell execution policy error: Run
Set-ExecutionPolicy -ExecutionPolicy RemoteSigned -Scope CurrentUser
You will see conversation like:
Deactivating the Environment
When you're done working with the project:
deactivate
This command works the same on both Mac/Linux and Windows. You'll notice the (.adk_env) prefix disappears from your terminal prompt.