
1. 簡介
Google Pay API 會運用使用者儲存在 Google 帳戶中的付款資訊,方便他們隨時隨地輕鬆付款。在本研究室中,您將利用 Android 專用的 Google Pay 用戶端程式庫,建立更快速、便利及安全的結帳程序,讓經過簡化的範例行動應用程式可提供更優質的結帳體驗,同時還能促成更多轉換並提高顧客滿意度。
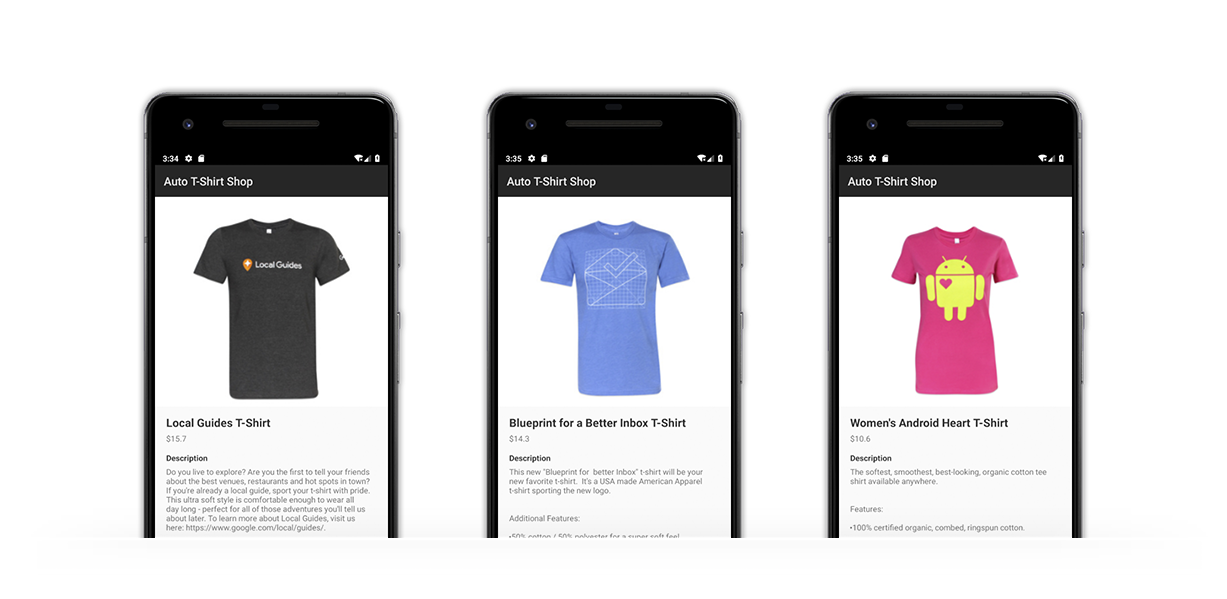
汽車 T 恤店是創新的商店,採用人工智慧技術的最新進展,並會參考風格偏好、天氣、時令和時尚趨勢等資訊,推薦最適合購買的商品。
參與度相關的指標都有超水準的表現,但遺憾的是,這些數據也反映出結帳過程中的高放棄率。該公司決定解決這個問題,其中一位專案擁有者召回了 Google Pay 針對其他類似網站帶來的承諾成果,因此他們決定放手一試,並信任您負責整合工作。
總覽
本程式碼研究室會逐步說明如何將 Google Pay 整合至現有應用程式,包括判斷使用者能否使用 Google Pay 支援的付款方式付款、放置及設計付款按鈕,以及執行交易。
在本程式碼研究室中,您可以瞭解如何:
- 將 Google Pay 整合至現有的 Android 應用程式
- 判斷使用者是否準備好使用 Google Pay 付款
- 將 Google Pay 按鈕新增至使用者介面
- 使用 Google Pay 完成付款作業
必要條件
- Git
- Android Studio 或 Android 應用程式的替代開發環境
- 已安裝最新版 Google Play 服務的 Android 裝置或模擬器
支援
如果遇到問題,google-pay/android-quickstart GitHub 存放區提供完整的解決方案供您參考。
2. 開始操作
從 GitHub 複製存放區
使用下列指令將存放區複製到電腦的資料夾內:
git clone https://github.com/google-pay/android-quickstart
您也可以視需要下載 ZIP 封存檔:
重點瀏覽範例應用程式
如您所見,存放區的檔案結構並不複雜。本程式碼研究室的主要目標是讓您能配合現有和未來的應用程式調整這項整合程序,不受您選擇使用的程式設計語言、程式庫或工具限制。
3. 在 Android Studio 中開啟專案
您複製的 GitHub 存放區含有基本活動的 Android 專案。在這個步驟中,您將在這個活動中編輯,驗證 Google Pay 已準備就緒,並顯示 Google Pay 按鈕。
- 開啟 Android Studio
- 依序選取「檔案」和「開啟」
- 選取存放區中的
kotlin目錄 - 選取「開啟」
將 Google Pay 程式庫新增為 build.gradle 檔案中的依附元件
- 開啟模組層級的 Gradle 建構檔案 (
kotlin/app/build.gradle.kts) - 將 Google Pay 資料庫新增至「
dependencies」部分
implementation "com.google.android.gms:play-services-wallet:19.3.0"
- 儲存檔案
- 依序選取「File」和「Sync Project with Gradle Files」。
在 Android 資訊清單檔案中啟用 Google Pay API
最後,在資訊清單檔案的 application 節點內新增 meta-data 元素:
<meta-data
    android:name="com.google.android.gms.wallet.api.enabled"
    android:value="true" />
4. 決定 Google Pay 按鈕在介面中的位置
檢視畫面中的版面配置和整體刊登位置,是影響使用者完成付款交易的機率的重要因素。只要在 Google Pay 中輕觸幾下,即可選擇付款方式,為使用者提供新的付款方式選項和時間。舉例來說,您可以在流程中較早加入快速結帳選項,例如商品詳細資料檢視畫面的區域,方便使用者快速支付喜歡單項商品的費用。
決定使用者介面的排列方式後,下一步就是加入 Google Pay 按鈕。您可以設定按鈕的某些視覺功能,例如類型、主題和圓角圓角。例如:
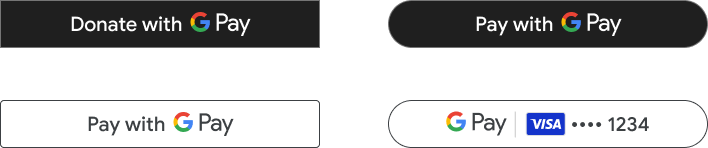
Google Pay 程式庫提供一個檢視畫面,簡化將按鈕新增至使用者介面的流程。如果您使用 XML 建構版面配置,請按照下列步驟操作:
<com.google.android.gms.wallet.button.PayButton
    android:id="@+id/googlePayButton"
    android:layout_width="match_parent"
    android:layout_height="wrap_content" />
您之後會透過程式初始化按鈕 (請參閱範例)。
如果您使用的是 Jetpack Compose,請在 build.gradle 或 build.gradle.kts 檔案中加入下列依附元件的最新版本:
implementation "com.google.pay.button:compose-pay-button:1.0.0"
然後將 Google Pay 按鈕新增至 Compose 版面配置,如下所示:
PayButton(
    modifier = Modifier
        .testTag("payButton")
        .fillMaxWidth(),
    onClick = onGooglePayButtonClick,
    allowedPaymentMethods = PaymentsUtil.allowedPaymentMethods.toString()
)
請查看 GitHub 中的範例,進一步瞭解如何建立可接受的付款方式清單。
5. 初始化及設定 Google Pay API
建立 API 用戶端例項
如要開始使用 API,您必須將用戶端物件例項化,此物件可用於呼叫 Google Pay API。活動或控制器建立完畢後,您就可以開始執行這項作業:
private val paymentsClient: PaymentsClient = createPaymentsClient(context)

fun createPaymentsClient(context: Context): PaymentsClient {
    val walletOptions = Wallet.WalletOptions.Builder()
            .setEnvironment(WalletConstants.ENVIRONMENT_TEST).build()
    return Wallet.getPaymentsClient(context, walletOptions)
}
付款用戶端是透過 WalletOptions 物件初始化。將環境設為 ENVIRONMENT_TEST,即可測試付款資訊測試。準備好發出實際付款交易時,您可以將環境屬性更新為 ENVIRONMENT_PRODUCTION。
Google Pay 要求剖析
針對 Google Pay API 發出要求時,必須在要求中加入幾個設定參數,例如您指定的 API 版本。以本程式碼研究室為例,這個物件還會包含應用程式接受的付款方式相關資訊。最終結構如下所示:
{
    apiVersion: number,
    apiVersionMinor: number,
    allowedPaymentMethods: Array
}
allowedPaymentMethods 屬性採用一份付款方式清單。您必須為每種付款方式加入下列屬性:
{
    type: 'CARD',
    parameters: {
        allowedCardNetworks: Array.<string>,
        allowedAuthMethods: Array.<string>
    }
}
設定付款方式
舉例來說,您只能以權杖化和主要帳號 (PAN) 表單接受 Mastercard 和 Visa 的卡片付款。您的付款方式會如下所示:
private val baseCardPaymentMethod =
    JSONObject()
        .put("type", "CARD")
        .put("parameters", JSONObject()
            .put("allowedCardNetworks", JSONArray(listOf("VISA", "MASTERCARD")))
            .put("allowedAuthMethods", JSONArray(listOf("PAN_ONLY", "CRYPTOGRAM_3DS")))
        )
全面整合使用
我們來複習一下。您已經定義應用程式可接受的一種付款方式,且即將搭配 2.0 版的 API 運作。產生的設定應如下所示:
private val baseCardPaymentMethod = JSONObject()
    .put("type", "CARD")
    .put("parameters", JSONObject()
        .put("allowedCardNetworks", JSONArray(listOf("VISA", "MASTERCARD")))
        .put("allowedAuthMethods", JSONArray(listOf("PAN_ONLY", "CRYPTOGRAM_3DS")))
    )

private val googlePayBaseConfiguration = JSONObject()
    .put("apiVersion", 2)
    .put("apiVersionMinor", 0)
    .put("allowedPaymentMethods",  JSONArray(listOf(baseCardPaymentMethod)))
}
6. 判斷透過 Google Pay 付款的完備性
使用 isReadyToPay 要求可讓您判斷應用程式中的使用者是否能透過 Google Pay 付款。並據此調整應用程式中的使用者體驗。
這項要求會要求您指定 Google Pay API 的版本,以及應用程式中允許的付款方式清單。這正是先前步驟所定義基本設定物件包含的內容:
private suspend fun fetchCanUseGooglePay(): Boolean {
    val request = IsReadyToPayRequest.fromJson(googlePayBaseConfiguration.toString())
    return paymentsClient.isReadyToPay(request).await()
}
Google Pay API 之外,會使用 Task 解析遠端呼叫。Tasks API 可讓您使用協同程式解析 Task 作業。瞭解詳情
如您所見,確認您是否已準備好「透過 Google Pay 付款」功能會傳回布林值物件。如果結果是肯定的,下一步就是在使用者介面中顯示 Google Pay 按鈕。否則,請考慮顯示支援其他付款方式的其他使用者介面。
顯示 Google Pay 按鈕
現在,回到使用者介面,並根據上一次呼叫的結果更新 Google Pay 按鈕的位置。這個範例使用類別保留檢視區塊狀態,此狀態會根據對 isReadyToPay 的呼叫進行更新。
if (payUiState !is PaymentUiState.NotStarted) {
    PayButton(
        modifier = Modifier
            .testTag("payButton")
            .fillMaxWidth(),
        onClick = onGooglePayButtonClick,
        allowedPaymentMethods = PaymentsUtil.allowedPaymentMethods.toString()
    )
}
7. 現在要付款了!
### 準備付款要求
此時,您已載入 Google Pay API,並判定應用程式中的使用者可以透過 Google Pay 付款。因此,您已在 UI 中顯示 Google Pay 付款按鈕,使用者隨時可以啟動交易程序。現在,請載入使用者可用付款方式的付款畫面。
與呼叫 isReadyToPay 類似,這項要求需要先前定義的基本設定物件屬性 (apiVersion、apiVersionMinor 和 allowedPaymentMethods)。這次還需要名為 tokenizationSpecification 的新屬性和其他參數來說明交易,以及要求帳單和運送地址或使用者等資訊電子郵件地址或電話號碼。
#### 「tokenizationSpecification」資源
權杖化規格決定如何處理使用者所選付款方式,並用於完成交易。
系統支援兩種不同的處理機制。如果要在 PCI DSS 相容伺服器內處理付款交易,請使用 DIRECT 規格類型。在這個範例中,您會使用付款閘道處理付款,因此必須設定 PAYMENT_GATEWAY 規格類型:
private val tokenizationSpecification = JSONObject()
    .put("type", "PAYMENT_GATEWAY")
    .put("parameters", JSONObject(mapOf(
            "gateway" to "example",
            "gatewayMerchantId" to "exampleGatewayMerchantId")))
}
您可以在 parameters 專區中指定 Google Pay API 支援的供應商清單中的閘道,以及各個閘道所需的額外設定。針對本研究室,您將使用 example 閘道,此閘道會傳回所執行交易的測試結果。
其他參數
同樣地,您也可以要求使用者提供更多詳細資料,以便順利下單。請參閱以下範例,瞭解如何加入 billingAddressRequired 和 billingAddressParameters 屬性,指出這筆交易的使用者帳單地址是完整格式,並包含電話號碼:
private val cardPaymentMethod = JSONObject()
    .put("type", "CARD")
    .put("tokenizationSpecification", tokenizationSpecification)
    .put("parameters", JSONObject()
        .put("allowedCardNetworks", JSONArray(listOf("VISA", "MASTERCARD")))
        .put("allowedAuthMethods", JSONArray(listOf("PAN_ONLY", "CRYPTOGRAM_3DS")))
        .put("billingAddressRequired", true)
        .put("billingAddressParameters", JSONObject(mapOf("format" to "FULL")))
    )
#### 提供交易的其他資訊
transactionInfo 屬性包含一個物件,其中包含交易相關的財務詳細資料,也就是價格和貨幣代碼 (ISO 4217 Alpha 格式),以及價格狀態,可能是「最終」或「預估」,視交易性質而定 (例如:價格可能會因指定運送地址而異):
private val transactionInfo = JSONObject()
    .put("totalPrice", "123.45")
    .put("totalPriceStatus", "FINAL")
    .put("currencyCode", "USD")
}
#### 新增商家資訊
付款要求會在 merchantInfo 屬性中,接收執行要求的商家相關資訊。在本程式碼研究室中,您將專注於兩項屬性:
merchantId會保留與您的帳戶相關聯的 ID。您可以在「付款與」錢包主控台。請注意,使用TEST環境時,系統不會評估這個欄位。merchantName是使用者會看到的應用程式或機構名稱。這項資訊會顯示在 Google Pay 付款畫面中,方便使用者進一步瞭解要求作業的使用者。
準備就緒後,只要將商家相關資訊新增至 paymentDataRequest 物件即可:
private val merchantInfo = JSONObject()
    .put("merchantName", "Example Merchant")
    .put("merchantId", "01234567890123456789")
發出要求並處理結果
現在,將設定物件帶入一起,並傳遞至 loadPaymentData 要求:
private val paymentDataRequestJson = JSONObject(googlePayBaseConfiguration.toString())
    .put("allowedPaymentMethods", JSONArray().put(cardPaymentMethod))
    .put("transactionInfo", transactionInfo)
    .put("merchantInfo", merchantInfo)
這時,您已萬事俱備,可向 Google Pay API 詢問有效的付款方式。方法是在 PaymentsClient 物件中使用 loadPaymentData 方法,傳入您剛定義的設定:
fun getLoadPaymentDataTask(): Task<PaymentData> {
    val request = PaymentDataRequest.fromJson(paymentDataRequestJson.toString())
    return paymentsClient.loadPaymentData(request)
}

private fun requestPayment() {
    val task = getLoadPaymentDataTask()
    task.addOnCompleteListener(paymentDataLauncher::launch)
}
Google Pay API 會使用 Activity Result API 傳回結果。這個 API 包含合約,以簡化處理結果及回應結果的方式。這個範例使用 GetPaymentDataResult 合約,其中包含付款結果和作業相關資訊:
private val paymentDataLauncher = registerForActivityResult(GetPaymentDataResult()) { taskResult ->
    when (taskResult.status.statusCode) {
        CommonStatusCodes.SUCCESS -> {
            taskResult.result!!.let {
                Log.i("Google Pay result:", it.toJson())
                // TODO something with the result
            }
        }
        CommonStatusCodes.CANCELED -> // The user canceled
        AutoResolveHelper.RESULT_ERROR -> // The API returned an error (it.status: Status)
        CommonStatusCodes.INTERNAL_ERROR -> // Handle other unexpected errors
    }
}
呼叫這個方法可觸發顯示 Google Pay 付款畫面的程序。如果沒有任何設定錯誤,您可以看到與目前登入帳戶相關聯的有效付款方式清單。
選取完畢後,工作表就會關閉,結果會回傳至活動,並由上方定義的活動結果啟動器擷取。
如果選取成功,系統會透過 PaymentData 物件傳回結果,其中包含所選付款方式的相關資訊:
{
  "apiVersionMinor": 0,
  "apiVersion": 2,
  "paymentMethodData": {
    "description": "Visa •••• 1234",
    "tokenizationData": {
      "type": "PAYMENT_GATEWAY",
      "token": "examplePaymentMethodToken"
    },
    "type": "CARD",
    "info": {
      "cardNetwork": "VISA",
      "cardDetails": "1234",
      "billingAddress": {
        "phoneNumber": ...,
        ...
      }
    }
  }
}
您現在可以使用此付款方式透過付款閘道完成交易:
private fun handlePaymentSuccess(paymentData: PaymentData) {
    val paymentMethodToken = paymentData
            .getJSONObject("tokenizationData")
            .getString("token")

    // Sample TODO: Use this token to perform a payment through your payment gateway
}
8. 恭喜!
您已成功將 Google Pay 新增至 Android 應用程式。
### 後續步驟
- 在應用程式中測試 Google Pay
- 在 Pay &Video 360 中取得商家 ID,錢包主控台
- 查看整合檢查清單
### 瞭解詳情
- 前往 API 參考資料
- 如果看到錯誤,可排解整合問題
- 請參閱文件中的整合教學課程,瞭解如何使用其他程式設計語言和程式庫。
- 如需完整的實際示範,請參閱 GitHub 中的範例應用程式