
1. Introduction
In this hands-on session, you will move beyond basic, stateless chatbots to create a Smart Cafe Concierge–an AI agent powered by Gemini that acts as a friendly barista. It takes coffee orders tracked in session state, remembers long-term dietary preferences in user-scoped state, and persists everything to a Cloud SQL PostgreSQL database. By the end, your agent remembers that you're lactose intolerant even after you restart the application and start a brand new conversation.
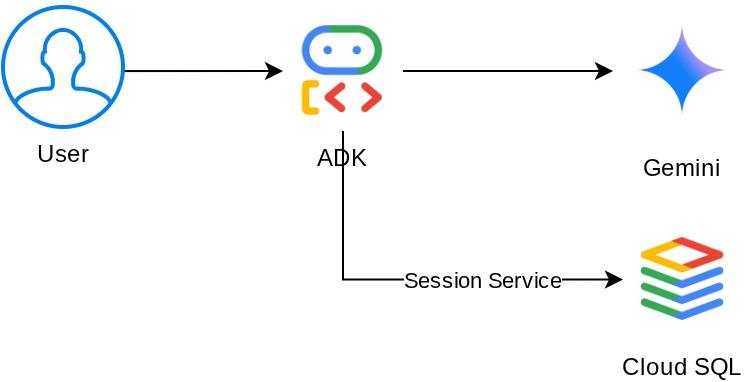
Here is the system architecture that we will build
Prerequisites
- A Google Cloud account with a trial billing account
- Basic familiarity with Python
- No prior experience with ADK, AI agents, or Cloud SQL required
What you'll learn
- Create an AI agent using Google's Agent Development Kit (ADK) with custom tools
- Define tools that read and write session state via
ToolContext - Distinguish between session-scoped state and user-scoped state (
user:prefix) - Provision a Cloud SQL PostgreSQL instance and connect to it from Cloud Shell
- Migrate from local storage (which is default when you use
adk webcommand) toDatabaseSessionServicefor persistent storage with dedicated database - Verify that agent memory persists across application restarts and across separate conversation sessions
What you'll need
- A working computer and a reliable internet connection.
- A browser, such as Chrome, to access Google Cloud Console
- A curious mind and an eagerness to learn.
2. Set Up Your Environment
This step prepares your Cloud Shell environment and configures your Google Cloud project
Open Cloud Shell
Open Cloud Shell in your browser. Cloud Shell provides a pre-configured environment with all the tools you need for this codelab. Click Authorize when prompted to
Your interface should look similar to this

This will be our main interface, IDE on top, terminal on the bottom
Set up your working directory
Create your working directory. All code you write in this codelab lives here — separate from the reference repo:
# Create your working directory
mkdir -p ~/build-agent-adk-cloudsql

# Change cloudshell workspace and working directory into previously created dir
cloudshell workspace ~/build-agent-adk-cloudsql && cd ~/build-agent-adk-cloudsql
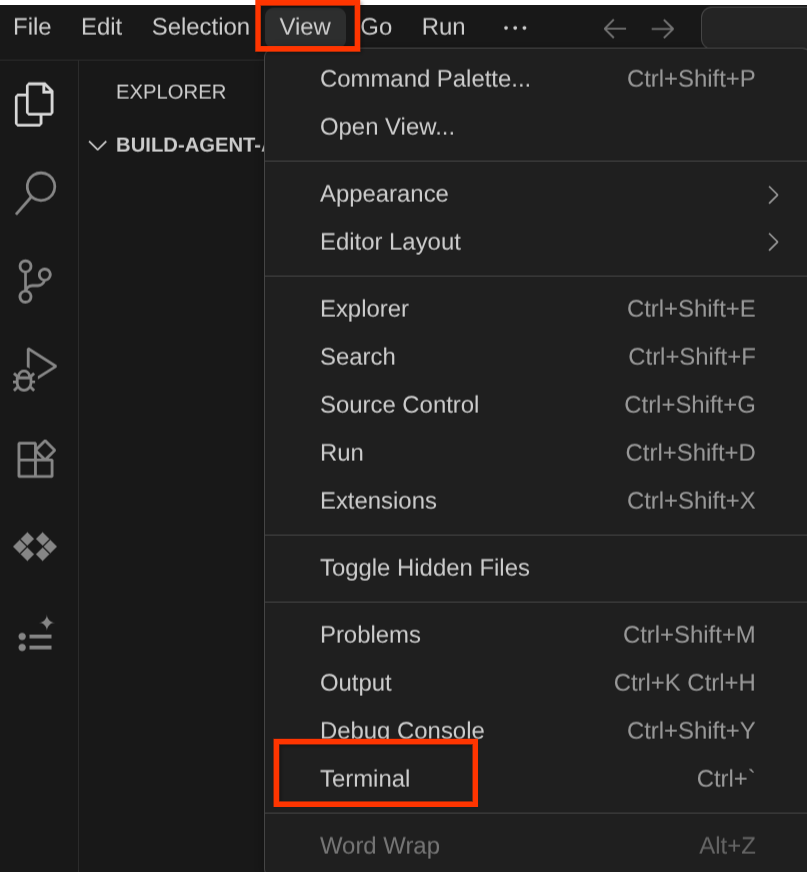
To spawn your terminal find View -> Terminal
Set up your Google Cloud project and initial environment variables
Download the project setup script into your working directory:
curl -sL https://raw.githubusercontent.com/alphinside/cloud-trial-project-setup/main/setup_verify_trial_project.sh -o setup_verify_trial_project.sh
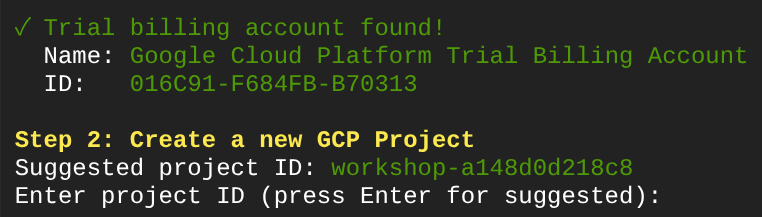
Run the script. It verifies your trial billing account, creates a new project (or validates an existing one), saves your project ID to a .env file in the current directory, and sets the active project in terminal
bash setup_verify_trial_project.sh && source .env
When running this, you will be prompted with suggested project ID name, you can press Enter to continue
After waiting for a while, if you see this output in your console, then you are ready to go to next step 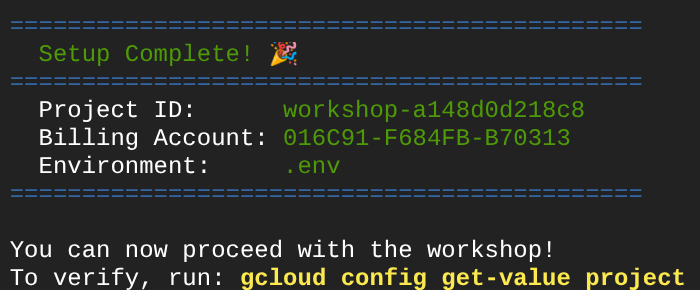
The executed script do the following steps:
- Verify you have an active trial billing account
- Check for an existing project in
.env(if any) - Create a new project or reuse the existing one
- Link the trial billing account to your project
- Save the project ID to .env
- Set the project as the active gcloud project
Verify the project is set correctly by checking the yellow text next to your working directory in the Cloud Shell terminal prompt. It should display your project ID.

Enable required APIs
Enable the Google Cloud APIs needed for this codelab:
gcloud services enable \
  aiplatform.googleapis.com \
  sqladmin.googleapis.com \
  compute.googleapis.com
- Vertex AI API (
aiplatform.googleapis.com) — your agent uses Gemini models through Vertex AI. - Cloud SQL Admin API (
sqladmin.googleapis.com) — you provision and manage a PostgreSQL instance for persistent storage. - Compute Engine API (
compute.googleapis.com) — required for creating Cloud SQL instances.
Config Gemini and Cloud products region
Before continuing, let's also set up the necessary location/region configuration for the product that we interact with. Add the following configuration to our .env file
# This is for our Gemini endpoint
echo "GOOGLE_CLOUD_LOCATION=global" >> .env

# This is for our other Cloud products
echo "REGION=us-central1" >> .env

source .env
Let's continue to the next step
3. Set Up Cloud SQL
This step provisions a Cloud SQL PostgreSQL instance and switches your agent from in-memory to database-backed storage. Instance creation takes a few minutes, so you'll start it first and we can still continue our discussion on to the next topic while waiting for it to be finished
Start the instance creation
Add the database password to your .env file and reload it, we will use cafe-agent-pwd-2025 as the password.
echo "DB_PASSWORD=cafe-agent-pwd-2025" >> .env
source .env
Run this command to create a Cloud SQL PostgreSQL instance. It takes a few minutes to complete — leave it running and continue to the next section.
gcloud sql instances create cafe-concierge-db \
  --database-version=POSTGRES_17 \
  --edition=ENTERPRISE \
  --region=${REGION} \
  --availability-type=ZONAL \
  --project=${GOOGLE_CLOUD_PROJECT} \
  --tier=db-f1-micro \
  --root-password=${DB_PASSWORD} \
  --quiet &
Several notes about the above command:
db-f1-microis the smallest (and cheapest) Cloud SQL tier — sufficient for this codelab.--root-passwordsets the password for the default postgres user.- The suffix
&in the command runs the command in the background so you can keep working.
The process will be run in background, however the console output will occasionally shown in the current terminal. Let's open a new terminal tab in Cloud Shell (click the + icon) so we can be more focused.

Navigate to your working directory again and activate the project using the previous setup script.
cd ~/build-agent-adk-cloudsql
bash setup_verify_trial_project.sh && source .env
Then, let's continue to the next section
4. Build the Cafe Concierge Agent
This step creates the project structure for your ADK agent and defines a basic Cafe Concierge with a menu tool.
Initialize the Python project
This codelab uses uv, a fast Python package manager that handles virtual environments and dependencies in one tool. It's pre-installed in Cloud Shell.
Initialize a Python project and add the ADK as a dependency:
uv init
uv add google-adk==1.25.0 asyncpg
uv init creates a pyproject.toml and a virtual environment. uv add installs the dependency and records it in pyproject.toml.
Initialize the agent project structure
ADK expects a specific folder layout: a directory named after your agent containing __init__.py, agent.py, and also .env inside the agent directory
ADK has built-in command to help you establish this quickly, run the following command
uv run adk create cafe_concierge \
    --model gemini-2.5-flash \
    --project ${GOOGLE_CLOUD_PROJECT} \
    --region ${GOOGLE_CLOUD_LOCATION}
This command will create an agent structure with gemini-2.5-flash as the brain. Your directory should now look like this:
build-agent-adk-cloudsql/
├── cafe_concierge/
│   ├── __init__.py
│   ├── agent.py
│   └── .env
├── pyproject.toml
├── .env
├── .venv/
└── ...
Write the agent
Open cafe_concierge/agent.py in the Cloud Shell Editor
cloudshell edit cafe_concierge/agent.py
and overwrite the file with the following code
# cafe_concierge/agent.py
from google.adk.agents import LlmAgent
from google.adk.tools import ToolContext

CAFE_MENU = {
    "espresso": {
        "price": 3.50,
        "description": "Rich and bold single shot",
        "tags": ["vegan", "dairy-free", "gluten-free"],
    },
    "latte": {
        "price": 5.00,
        "description": "Espresso with steamed milk",
        "tags": ["gluten-free"],
    },
    "oat milk latte": {
        "price": 5.50,
        "description": "Espresso with steamed oat milk",
        "tags": ["vegan", "dairy-free", "gluten-free"],
    },
    "cappuccino": {
        "price": 4.50,
        "description": "Espresso with equal parts steamed milk and foam",
        "tags": ["gluten-free"],
    },
    "cold brew": {
        "price": 4.00,
        "description": "Slow-steeped for 12 hours, served over ice",
        "tags": ["vegan", "dairy-free", "gluten-free"],
    },
    "matcha latte": {
        "price": 5.50,
        "description": "Ceremonial grade matcha with steamed milk",
        "tags": ["gluten-free"],
    },
    "croissant": {
        "price": 3.00,
        "description": "Buttery, flaky French pastry",
        "tags": [],
    },
    "banana bread": {
        "price": 3.50,
        "description": "Homemade with walnuts",
        "tags": ["vegan"],
    },
}


def get_menu() -> dict:
    """Returns the full cafe menu with prices, descriptions, and dietary tags.

    Use this tool when the customer asks what's available, wants to see
    the menu, or asks about specific items.
    """
    return CAFE_MENU


root_agent = LlmAgent(
    name="cafe_concierge",
    model="gemini-2.5-flash",
    instruction="""You are a friendly and knowledgeable barista at "The Cloud Cafe".

Your job:
- Help customers browse the menu and answer questions about items.
- Take coffee and food orders.
- Remember and respect dietary preferences.

Be conversational, warm, and concise. If a customer mentions a dietary
restriction, acknowledge it and suggest suitable options from the menu.
""",
    tools=[get_menu],
)
This defines a basic agent with one tool: get_menu(). The agent can answer questions about the menu but can't track orders or remember preferences yet.
Verify the agent runs
Start the ADK dev UI from your working directory:
cd ~/build-agent-adk-cloudsql
uv run adk web
Open the URL shown in the terminal (typically http://localhost:8000) using Cloud Shell's Web Preview feature. Select cafe_concierge from the agent dropdown in the top-left corner.
Type the following text on the chat bar and verify the agent responds with menu items and prices.
What's on the menu?
Stop the dev UI with Ctrl+C before proceeding.
5. Add Stateful Order Management
The agent can show the menu, but it can't take orders or remember preferences. This step adds four tools that use ADK's state system to track orders within a conversation and store dietary preferences across conversations.
Understand session events and state
Every ADK conversation lives inside a Session object. A session tracks two distinct things: events and state. Understanding the difference is key to building agents that remember the right things in the right way.
Events are the chronological log of everything that happens in a conversation. Every user message, every agent response, every tool call and its return value — each one is recorded as an Event and appended to the session's events list. Events are immutable: once recorded, they never change. Think of events as the full transcript of a conversation.
State is a key-value scratchpad that the agent reads and writes during a conversation. Unlike events, state is mutable — values change as the conversation evolves. State is where the agent stores structured data it needs to act on: the current order, the customer's preferences, a running total. Think of state as sticky notes the agent keeps beside the transcript.
Here's how they relate:
Tools read and write state through ToolContext — an object that ADK automatically injects into any tool function that declares it as a parameter. You don't create it yourself. Through tool_context.state, a tool can read and write the session's state scratchpad. ADK inspects the function signature: parameters with type ToolContext are injected, all other parameters are filled by the LLM based on the conversation.
When a tool writes to tool_context.state, ADK records that change as a state_delta inside the event. The SessionService then applies the delta to the session's current state. This means state changes are always traceable back to the event that caused them. This is also true for other form of context such as callback_context
Understand state prefixes
State keys use prefixes to control their scope:
Prefix | Scope | Survives restart? (with DB) |
(none) | Current session only | Yes |
| All sessions for this user | Yes |
| All sessions, all users | Yes |
| Current invocation only | No |
In this codelab you use two of these prefixes: unprefixed keys for session-scoped data (the current order — relevant only to this conversation) and user: keys for user-scoped data (dietary preferences — relevant across all conversations for this user).
Add the stateful tools
Open cafe_concierge/agent.py in the Cloud Shell Editor.
cloudshell edit cafe_concierge/agent.py
Then, add the following four functions above the root_agent definition:
# cafe_concierge/agent.py (add below get_menu, above root_agent)

def place_order(tool_context: ToolContext, items: list[str]) -> dict:
    """Places an order for the specified menu items.

    Use this tool when the customer confirms they want to order something.

    Args:
        tool_context: Provided automatically by ADK.
        items: A list of menu item names the customer wants to order.
    """
    valid_items = []
    invalid_items = []
    total = 0.0

    for item in items:
        item_lower = item.lower()
        if item_lower in CAFE_MENU:
            valid_items.append(item_lower)
            total += CAFE_MENU[item_lower]["price"]
        else:
            invalid_items.append(item)

    if not valid_items:
        return {"error": f"None of these items are on our menu: {invalid_items}"}

    order = {"items": valid_items, "total": round(total, 2)}
    tool_context.state["current_order"] = order

    result = {"order": order}
    if invalid_items:
        result["warning"] = f"These items are not on our menu: {invalid_items}"
    return result


def get_order_summary(tool_context: ToolContext) -> dict:
    """Returns the current order summary for this session.

    Use this tool when the customer asks about their current order,
    wants to review what they ordered, or asks for the total.

    Args:
        tool_context: Provided automatically by ADK.
    """
    order = tool_context.state.get("current_order")
    if order:
        return {"order": order}
    return {"message": "No order has been placed yet in this session."}


def set_dietary_preference(tool_context: ToolContext, preference: str) -> dict:
    """Saves a dietary preference that persists across all conversations.

    Use this tool when the customer mentions a dietary restriction or
    preference (e.g., "I'm vegan", "I'm lactose intolerant",
    "I have a nut allergy").

    Args:
        tool_context: Provided automatically by ADK.
        preference: The dietary preference to save (e.g., "vegan",
            "lactose intolerant", "nut allergy").
    """
    existing = tool_context.state.get("user:dietary_preferences", [])
    if not isinstance(existing, list):
        existing = []

    preference_lower = preference.lower().strip()
    if preference_lower not in existing:
        existing.append(preference_lower)

    tool_context.state["user:dietary_preferences"] = existing
    return {
        "saved": preference_lower,
        "all_preferences": existing,
    }


def get_dietary_preferences(tool_context: ToolContext) -> dict:
    """Retrieves the customer's saved dietary preferences.

    Use this tool when you need to check the customer's dietary
    restrictions before making recommendations.

    Args:
        tool_context: Provided automatically by ADK.
    """
    preferences = tool_context.state.get("user:dietary_preferences", [])
    if preferences:
        return {"preferences": preferences}
    return {"message": "No dietary preferences saved yet."}
Two things to notice:
place_orderandget_order_summaryuse unprefixed keys (current_order). This state is tied to the current session — a new conversation starts with an empty order.set_dietary_preferenceandget_dietary_preferencesuse theuser:prefix (user:dietary_preferences). This state is shared across all sessions for the same user.
Update the agent with new tools and instructions
Replace the existing root_agent definition at the bottom of the file with:
# cafe_concierge/agent.py (replace the existing root_agent)

root_agent = LlmAgent(
    name="cafe_concierge",
    model="gemini-2.5-flash",
    instruction="""You are a friendly and knowledgeable barista at "The Cloud Cafe".

Your job:
- Help customers browse the menu and answer questions about items.
- Take coffee and food orders.
- Remember and respect dietary preferences.

The customer's saved dietary preferences are: {user:dietary_preferences?}

IMPORTANT RULES:
- When a customer mentions a dietary restriction, ALWAYS save it using the
  set_dietary_preference tool before doing anything else.
- Before recommending items, check the customer's dietary preferences. If they
  have preferences saved, only recommend items compatible with those
  restrictions. Check the menu item tags to determine compatibility.
- When placing an order, confirm the items and total with the customer.

Be conversational, warm, and concise.
""",
    tools=[
        get_menu,
        place_order,
        get_order_summary,
        set_dietary_preference,
        get_dietary_preferences,
    ],
)
The instruction uses the state injection template {user:dietary_preferences?} to inject this customer's saved preferences directly into the prompt.
Verify the complete file
Your cafe_concierge/agent.py should now contain:
- The
CAFE_MENUdictionary - Five tool functions:
get_menu,place_order,get_order_summary,set_dietary_preference,get_dietary_preferences - The
root_agentdefinition with all five tools
6. Test the Agent with the ADK Dev UI
This step runs the agent and exercises all the stateful features: ordering, preference tracking, and cross-session memory (within the same process). You'll also inspect the Events and State panels to see how ADK tracks the conversation internally.
Start the dev UI
cd ~/build-agent-adk-cloudsql
uv run adk web
Open the Web Preview on port 8000 and select cafe_concierge from the dropdown.
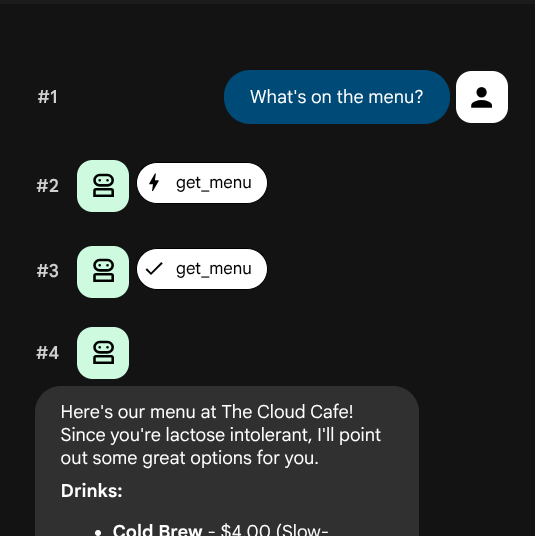
Conversation 1: Place an order and set preferences
Try these prompts in sequence:
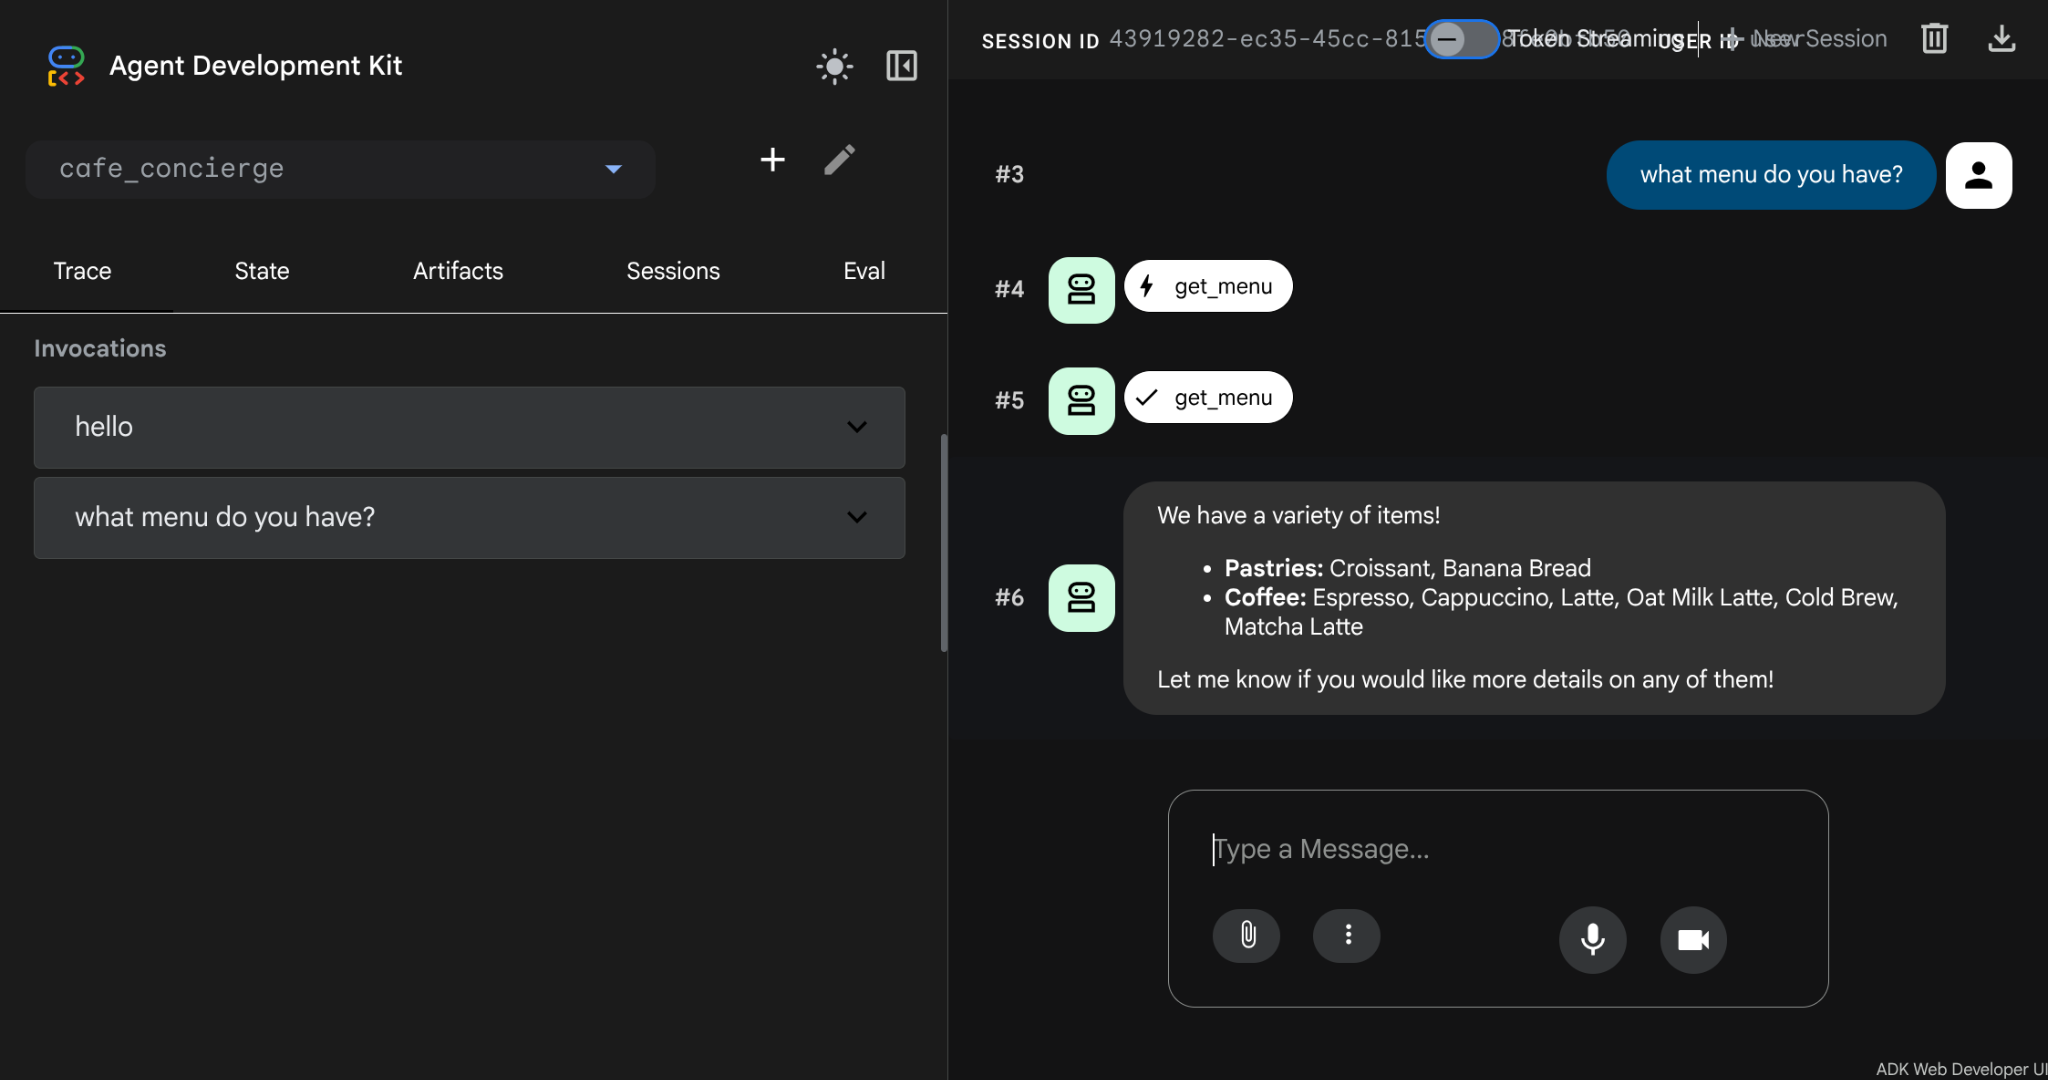
What's on the menu?
I'm lactose intolerant
What would you recommend?
I'll have an oat milk latte and a banana bread
What's my order?
Inspect session events
All of the Event will be captured and displayed on the web UI, you will see that in the chatbox it is not only your prompt and response, but also also tool_call and tool_response
You should see a list of events in order. Each event has an author (who produced it) and a type (what kind of interaction it represents):
Author | Type | What it respresents |
|
| A message you typed in the chat |
|
| The agent's text response |
|
| The agent decided to call a tool (shows function name + arguments) |
|
| The return value from a tool call |
Click on one of the tool_call events — for example, the set_dietary_preference call. You should see:
- Function name:
set_dietary_preference - Arguments:
{"preference": "lactose intolerant"}
Now click on the corresponding tool_response event directly below it. You should see the return value:
- Response:
{"saved": "lactose intolerant", "all_preferences": ["lactose intolerant"]}
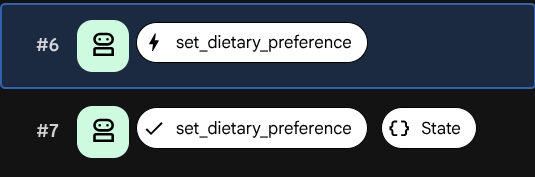
Look for the state_delta field inside the tool_response event. This shows exactly what state changed as a result of this tool call:
state_delta: {"user:dietary_preferences": ["lactose intolerant"]}
Every state change is traceable to a specific event. This is how ADK ensures the state scratchpad stays in sync with the conversation history.
Inspect session state
Click the State tab. Unlike the events log (which shows the full history), the state tab shows a snapshot of what the agent knows right now — the current value of every state key.
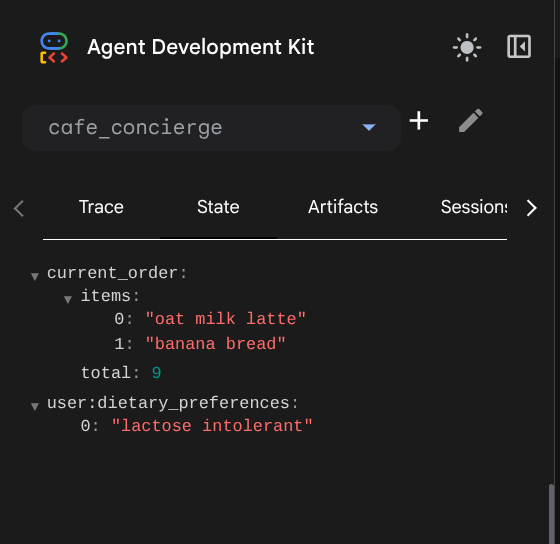
You should see two entries:
current_order—{"items": ["oat milk latte", "banana bread"], "total": 9.0}user:dietary_preferences—["lactose intolerant"]
Notice the difference in key names:
current_orderhas no prefix — it's session-scoped. It exists only in this conversation and disappears when the session ends.user:dietary_preferenceshas theuser:prefix — it's user-scoped. It's shared across every session for this user.
This distinction is invisible in the code (both use tool_context.state), but it controls how far the data reaches. You'll see this play out in the next test.
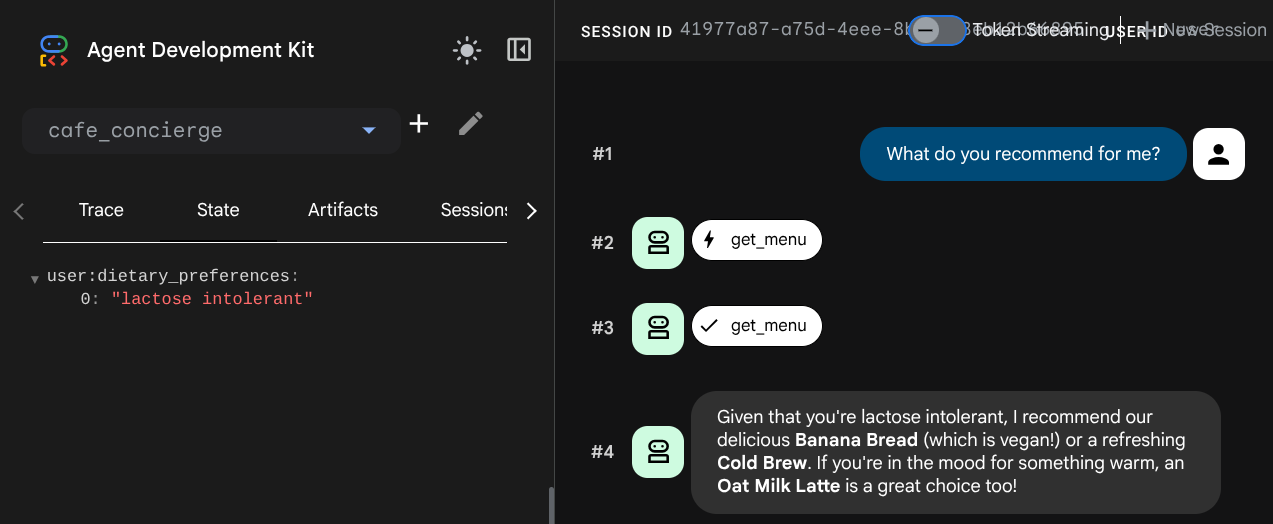
Conversation 2: Verify cross-session user state
Click the New Session button in the dev UI to start a fresh conversation. This creates a new session for the same user.

Try this prompt:
What do you recommend for me?
Check the State tab in the new session. The user:dietary_preferences key carries over, but current_order is gone — that state was tied to the previous session.
7. Observe Local Storage Limitation
The agent remembers preferences across sessions — but only while the local storage exists. This step demonstrates the fundamental limitation of local storage.
Start the agent again
You stopped the dev UI at the end of the previous step. Now let's remove the local storage and start it again, to simulate serverless environment which is stateless:
cd ~/build-agent-adk-cloudsql
rm -f cafe_concierge/.adk/session.db
uv run adk web
Now, open the Web Preview on port 8000 and select cafe_concierge.
Test preference recall
Type:
Do you remember my dietary preferences?
The agent has no recollection. The dietary preferences, the order history — all gone.
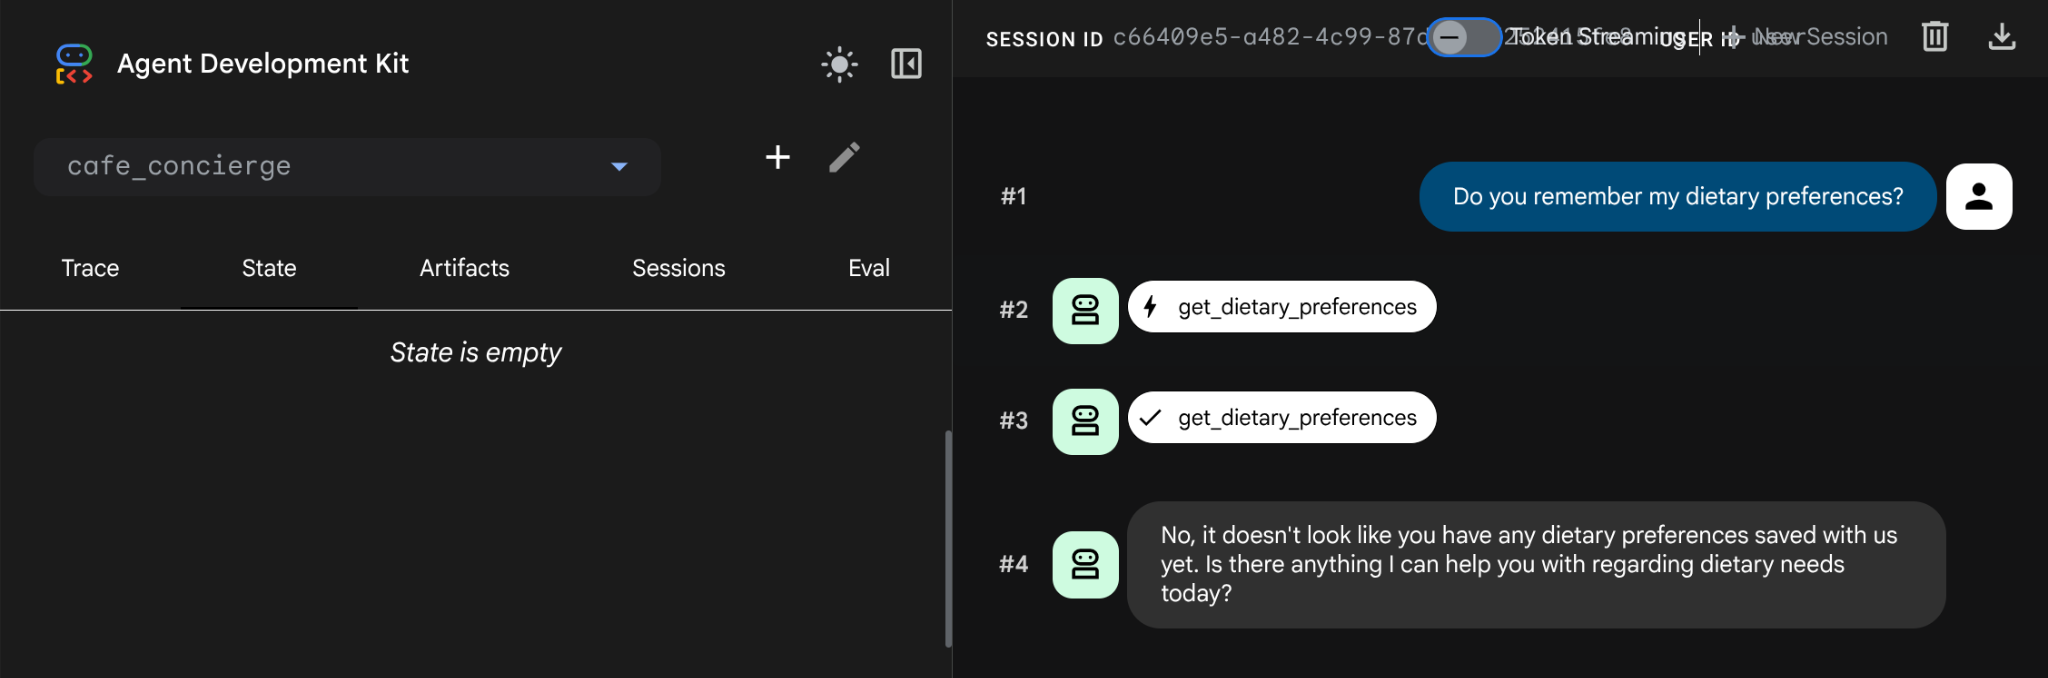
Everything was wiped clean when we deleted the local storage, which typically happened when we utilize a serverless environment. The session.db stores all state in process memory. Removing it erases all of it.
The solution: specify DatabaseSessionService, which in this tutorial will store all session data in a PostgreSQL in Cloud SQL database. The agent code and tools stay exactly the same — only the storage backend changes.
Stop the dev UI with Ctrl+C before proceeding.
8. Revisit Database Setup
At this point, our database instance creation is supposed to be already finished. Let's verify it, run the following command
gcloud sql instances describe cafe-concierge-db --format="value(state)"
You should see the following output, mark it as finished
RUNNABLE
Create the database
Create a dedicated database for the agent's session data:
gcloud sql databases create agent_db --instance=cafe-concierge-db
Start the Cloud SQL Auth Proxy
Cloud SQL Auth Proxy provides a secure, authenticated connection from Cloud Shell to your Cloud SQL instance without needing to whitelist IP addresses. It's already pre-installed on the cloud shell.
cloud-sql-proxy ${GOOGLE_CLOUD_PROJECT}:${REGION}:cafe-concierge-db --port 5432 &
The & suffix in the command makes the proxy run in the background. You should see output confirming the proxy is ready like shown below
[your-project-id:your-region:cafe-concierge-db] Listening on 127.0.0.1:5432
The proxy has started successfully and is ready for new connections!
Verify the connection
Test that you can connect to the database through the proxy:
psql "host=127.0.0.1 port=5432 dbname=agent_db user=postgres password=$DB_PASSWORD" -c "SELECT 'Connection ok' AS status;"
You should see:
      status
---------------------
 Connection ok
(1 row)
9. Verify Persistent Memory Across Sessions
This step proves that your agent's memory survives reset when we ensure that cafe_concierge/.adk/session_db (the local database) is removed and spans across conversation sessions.
Start the agent
Make sure the Cloud SQL Auth Proxy is still running (check with jobs). If it's not, restart it:
if ss -tlnp | grep -q ':5432 '; then
  echo "Cloud SQL Auth Proxy is already running."
else
  cloud-sql-proxy ${GOOGLE_CLOUD_PROJECT}:${REGION}:cafe-concierge-db --port 5432 &
fi
And then, let's start the ADK dev UI by specifying the database as the session service
uv run adk web --session_service_uri postgresql+asyncpg://postgres:${DB_PASSWORD}@127.0.0.1:5432/agent_db
Open the Web Preview on port 8000 and select cafe_concierge.
Test 1: Place an order and set preferences
In the first session, run through these prompts:
Show me the menu
I'm vegan
What can I eat?
I'll have a cold brew and banana bread
Test 2: Survive a restart
Stop the dev UI with Ctrl+C and ensure the local session.db is removed
rm -f cafe_concierge/.adk/session.db
Then, re-run the dev UI server
uv run adk web --session_service_uri postgresql+asyncpg://postgres:${DB_PASSWORD}@127.0.0.1:5432/agent_db
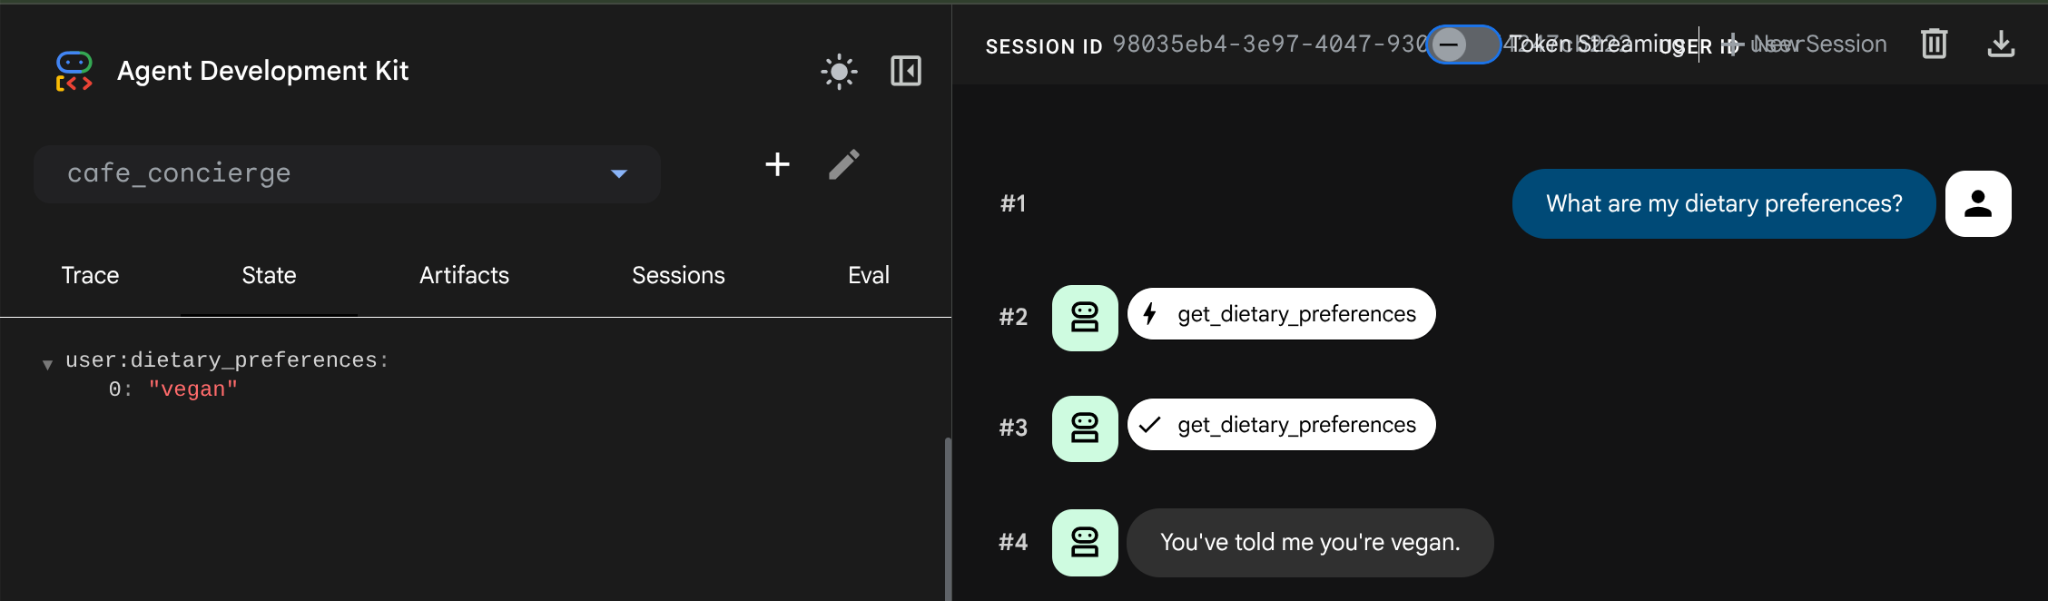
Open the Web Preview on port 8000, select cafe_concierge, and start a new session. Then ask
What are my dietary preferences?
The agent responds with your saved preferences — vegan. The data survived the restart because it's now stored in PostgreSQL, not in local storage. This will be the same case if we create new session as the user: state carries over to every new session for this user.
Inspect the database directly
Open a new terminal tab in Cloud Shell and query the database to see the stored data:
psql "host=127.0.0.1 port=5432 dbname=agent_db user=postgres password=$DB_PASSWORD" -c "\dt"
You should see tables that ADK created automatically to store sessions, events, and state like this example
                List of relations
 Schema |         Name          | Type  |  Owner
--------+-----------------------+-------+----------
 public | adk_internal_metadata | table | postgres
 public | app_states            | table | postgres
 public | events                | table | postgres
 public | sessions              | table | postgres
 public | user_states           | table | postgres
(5 rows)
Summary of state behavior
State key | Prefix | Scope | Shared across sessions? |
| (none) | Session | No |
|
| User | Yes |
10. Congratulations / Clean Up
Congratulations! You've successfully built a persistent, stateful AI agent using ADK and Cloud SQL.
What you've learned
- How to create an ADK agent with custom tools that read and write session state
- The difference between session-scoped state (no prefix) and user-scoped state (
user:prefix) - Why default adk local
session.dbis only suitable for development — all data is lost on removal (and easy to remove, no backup), not suitable for serverless deployment which is stateless - How to provision a Cloud SQL PostgreSQL instance and connect to it with Cloud SQL Auth Proxy
- How to connect to DatabaseSessionService with PostgreSQL on CloudSQL with a minimal code change — same tools, same agent, different backend
- How user-scoped state persists across separate conversation sessions
Clean up
To avoid incurring charges to your Google Cloud account, clean up the resources created in this codelab.
Option 1: Delete the project (recommended)
The easiest way to clean up is to delete the project. This removes all resources associated with the project.
gcloud projects delete ${GOOGLE_CLOUD_PROJECT}
Option 2: Delete individual resources
If you want to keep the project but remove only the resources created in this codelab:
gcloud sql instances delete cafe-concierge-db --quiet