
۱. مقدمه
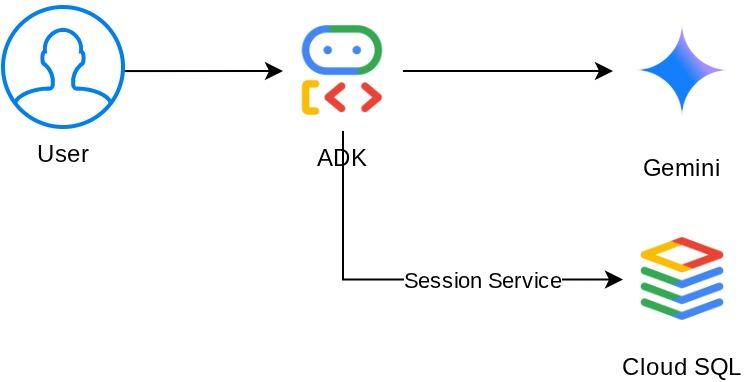
در این جلسه عملی، شما فراتر از چتباتهای ساده و بدون وضعیت، یک Smart Cafe Concierge ایجاد خواهید کرد - یک عامل هوش مصنوعی که توسط Gemini پشتیبانی میشود و به عنوان یک باریستای دوستانه عمل میکند. این عامل سفارشهای قهوه ردیابی شده در حالت جلسه را دریافت میکند، ترجیحات غذایی بلندمدت را در حالت کاربر-محور به خاطر میسپارد و همه چیز را در یک پایگاه داده Cloud SQL PostgreSQL ذخیره میکند. در پایان، عامل شما حتی پس از راهاندازی مجدد برنامه و شروع یک مکالمه کاملاً جدید، به خاطر میسپارد که شما به لاکتوز حساسیت دارید.
Here is the system architecture that we will build
پیشنیازها
- A Google Cloud account with a trial billing account
- Basic familiarity with Python
- No prior experience with ADK, AI agents, or Cloud SQL required
آنچه یاد خواهید گرفت
- Create an AI agent using Google's Agent Development Kit (ADK) with custom tools
- Define tools that read and write session state via
ToolContext - Distinguish between session-scoped state and user-scoped state (
user:prefix) - Provision a Cloud SQL PostgreSQL instance and connect to it from Cloud Shell
- Migrate from local storage (which is default when you use
adk webcommand) toDatabaseSessionServicefor persistent storage with dedicated database - Verify that agent memory persists across application restarts and across separate conversation sessions
آنچه نیاز دارید
- A working computer and a reliable internet connection.
- A browser, such as Chrome , to access Google Cloud Console
- A curious mind and an eagerness to learn.
2. Set Up Your Environment
This step prepares your Cloud Shell environment and configures your Google Cloud project
Open Cloud Shell
Open Cloud Shell in your browser. Cloud Shell provides a pre-configured environment with all the tools you need for this codelab. Click Authorize when prompted to
Your interface should look similar to this
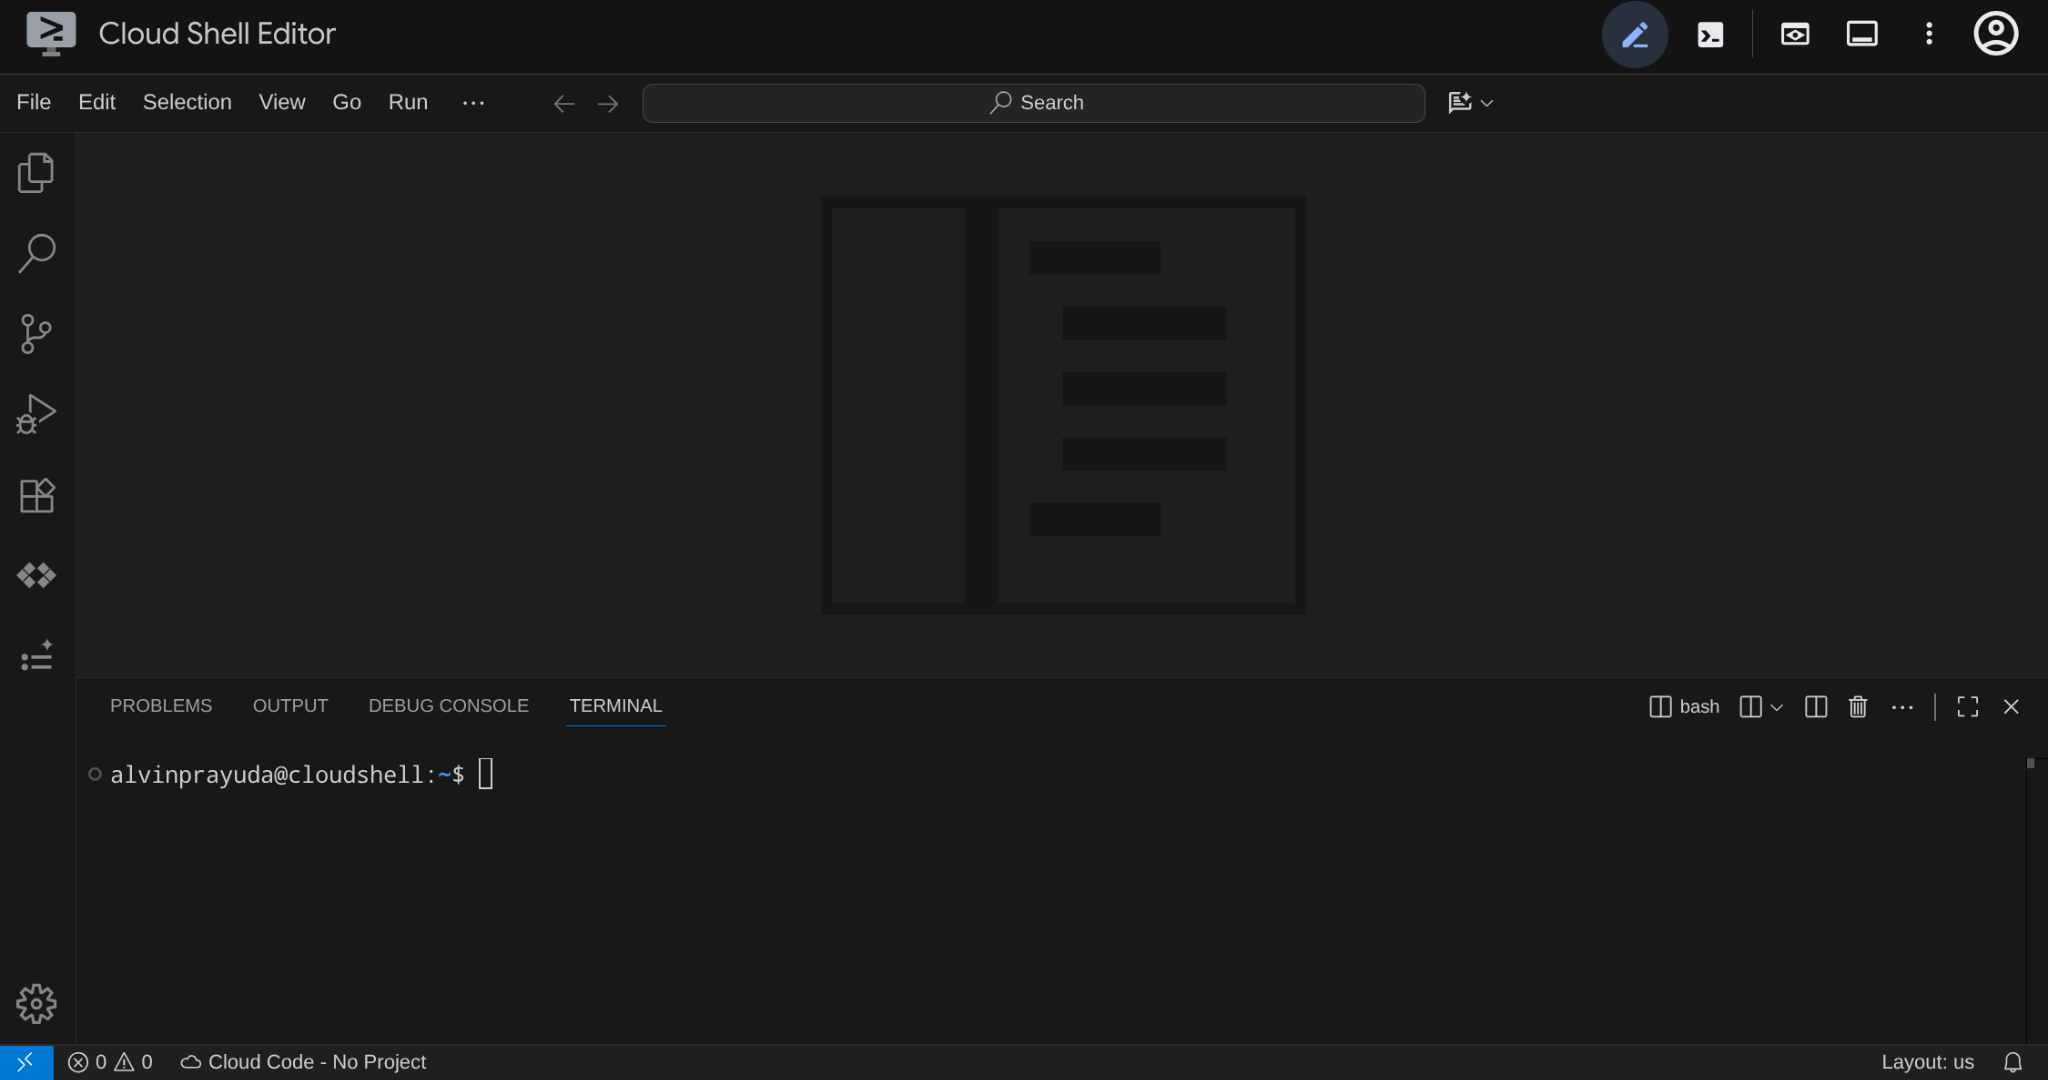
This will be our main interface, IDE on top, terminal on the bottom
Set up your working directory
Create your working directory. All code you write in this codelab lives here — separate from the reference repo:
# Create your working directory
mkdir -p ~/build-agent-adk-cloudsql

# Change cloudshell workspace and working directory into previously created dir
cloudshell workspace ~/build-agent-adk-cloudsql && cd ~/build-agent-adk-cloudsql
To spawn your terminal find View -> Terminal

Set up your Google Cloud project and initial environment variables
Download the project setup script into your working directory:
curl -sL https://raw.githubusercontent.com/alphinside/cloud-trial-project-setup/main/setup_verify_trial_project.sh -o setup_verify_trial_project.sh
اسکریپت را اجرا کنید. این اسکریپت حساب کاربری شما را در نسخه آزمایشی تأیید میکند، یک پروژه جدید ایجاد میکند (یا یک پروژه موجود را تأیید میکند)، شناسه پروژه شما را در یک فایل .env در دایرکتوری فعلی ذخیره میکند و پروژه فعال را در ترمینال تنظیم میکند.
bash setup_verify_trial_project.sh && source .env
When running this, you will be prompted with suggested project ID name, you can press Enter to continue
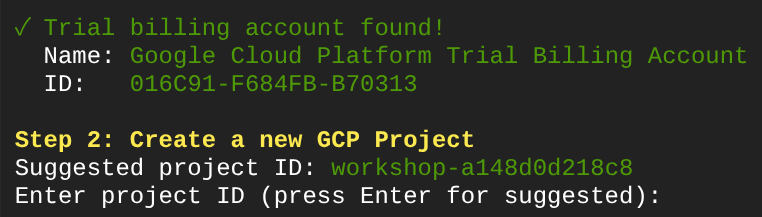
After waiting for a while, if you see this output in your console, then you are ready to go to next step 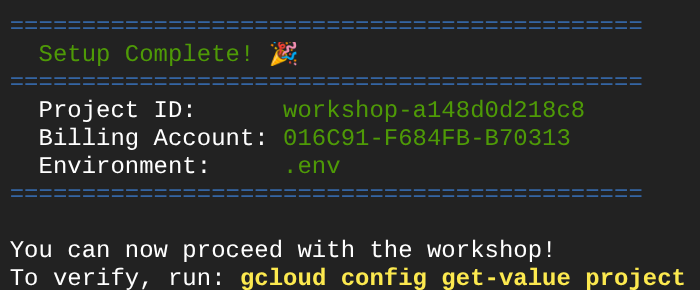
The executed script do the following steps:
- Verify you have an active trial billing account
- Check for an existing project in
.env(if any) - Create a new project or reuse the existing one
- Link the trial billing account to your project
- Save the project ID to .env
- Set the project as the active gcloud project
Verify the project is set correctly by checking the yellow text next to your working directory in the Cloud Shell terminal prompt. It should display your project ID.

Enable required APIs
Enable the Google Cloud APIs needed for this codelab:
gcloud services enable \
  aiplatform.googleapis.com \
  sqladmin.googleapis.com \
  compute.googleapis.com
- Vertex AI API (
aiplatform.googleapis.com) — your agent uses Gemini models through Vertex AI. - Cloud SQL Admin API (
sqladmin.googleapis.com) — you provision and manage a PostgreSQL instance for persistent storage. - Compute Engine API (
compute.googleapis.com) — required for creating Cloud SQL instances.
Config Gemini and Cloud products region
Before continuing, let's also set up the necessary location/region configuration for the product that we interact with. Add the following configuration to our .env file
# This is for our Gemini endpoint
echo "GOOGLE_CLOUD_LOCATION=global" >> .env

# This is for our other Cloud products
echo "REGION=us-central1" >> .env

source .env
Let's continue to the next step
3. Set Up Cloud SQL
این مرحله یک نمونه Cloud SQL PostgreSQL را فراهم میکند و عامل شما را از حافظه داخلی به فضای ذخیرهسازی تحت پشتیبانی پایگاه داده تغییر میدهد. ایجاد نمونه چند دقیقه طول میکشد، بنابراین ابتدا آن را شروع میکنید و ما میتوانیم در حالی که منتظر پایان آن هستیم، بحث خود را در مورد موضوع بعدی ادامه دهیم.
Start the instance creation
Add the database password to your .env file and reload it, we will use cafe-agent-pwd-2025 as the password.
echo "DB_PASSWORD=cafe-agent-pwd-2025" >> .env
source .env
Run this command to create a Cloud SQL PostgreSQL instance. It takes a few minutes to complete — leave it running and continue to the next section .
gcloud sql instances create cafe-concierge-db \
  --database-version=POSTGRES_17 \
  --edition=ENTERPRISE \
  --region=${REGION} \
  --availability-type=ZONAL \
  --project=${GOOGLE_CLOUD_PROJECT} \
  --tier=db-f1-micro \
  --root-password=${DB_PASSWORD} \
  --quiet &
Several notes about the above command:
-
db-f1-microis the smallest (and cheapest) Cloud SQL tier — sufficient for this codelab. -
--root-passwordsets the password for the default postgres user. - The suffix
&in the command runs the command in the background so you can keep working.
این فرآیند در پسزمینه اجرا خواهد شد، با این حال خروجی کنسول گاهی اوقات در ترمینال فعلی نمایش داده میشود. بیایید یک تب ترمینال جدید در Cloud Shell باز کنیم (روی نماد + کلیک کنیم) تا بتوانیم بیشتر متمرکز شویم.

Navigate to your working directory again and activate the project using the previous setup script.
cd ~/build-agent-adk-cloudsql
bash setup_verify_trial_project.sh && source .env
Then, let's continue to the next section
4. Build the Cafe Concierge Agent
This step creates the project structure for your ADK agent and defines a basic Cafe Concierge with a menu tool.
Initialize the Python project
This codelab uses uv , a fast Python package manager that handles virtual environments and dependencies in one tool. It's pre-installed in Cloud Shell.
Initialize a Python project and add the ADK as a dependency:
uv init
uv add google-adk==1.25.0 asyncpg
uv init creates a pyproject.toml and a virtual environment. uv add installs the dependency and records it in pyproject.toml .
ساختار پروژه عامل را مقداردهی اولیه کنید
ADK expects a specific folder layout: a directory named after your agent containing __init__.py , agent.py , and also .env inside the agent directory
ADK has built-in command to help you establish this quickly, run the following command
uv run adk create cafe_concierge \
    --model gemini-2.5-flash \
    --project ${GOOGLE_CLOUD_PROJECT} \
    --region ${GOOGLE_CLOUD_LOCATION}
This command will create an agent structure with gemini-2.5-flash as the brain. Your directory should now look like this:
build-agent-adk-cloudsql/
├── cafe_concierge/
│   ├── __init__.py
│   ├── agent.py
│   └── .env
├── pyproject.toml
├── .env
├── .venv/
└── ...
Write the agent
Open cafe_concierge/agent.py in the Cloud Shell Editor
cloudshell edit cafe_concierge/agent.py
and overwrite the file with the following code
# cafe_concierge/agent.py
from google.adk.agents import LlmAgent
from google.adk.tools import ToolContext

CAFE_MENU = {
    "espresso": {
        "price": 3.50,
        "description": "Rich and bold single shot",
        "tags": ["vegan", "dairy-free", "gluten-free"],
    },
    "latte": {
        "price": 5.00,
        "description": "Espresso with steamed milk",
        "tags": ["gluten-free"],
    },
    "oat milk latte": {
        "price": 5.50,
        "description": "Espresso with steamed oat milk",
        "tags": ["vegan", "dairy-free", "gluten-free"],
    },
    "cappuccino": {
        "price": 4.50,
        "description": "Espresso with equal parts steamed milk and foam",
        "tags": ["gluten-free"],
    },
    "cold brew": {
        "price": 4.00,
        "description": "Slow-steeped for 12 hours, served over ice",
        "tags": ["vegan", "dairy-free", "gluten-free"],
    },
    "matcha latte": {
        "price": 5.50,
        "description": "Ceremonial grade matcha with steamed milk",
        "tags": ["gluten-free"],
    },
    "croissant": {
        "price": 3.00,
        "description": "Buttery, flaky French pastry",
        "tags": [],
    },
    "banana bread": {
        "price": 3.50,
        "description": "Homemade with walnuts",
        "tags": ["vegan"],
    },
}


def get_menu() -> dict:
    """Returns the full cafe menu with prices, descriptions, and dietary tags.

    Use this tool when the customer asks what's available, wants to see
    the menu, or asks about specific items.
    """
    return CAFE_MENU


root_agent = LlmAgent(
    name="cafe_concierge",
    model="gemini-2.5-flash",
    instruction="""You are a friendly and knowledgeable barista at "The Cloud Cafe".

Your job:
- Help customers browse the menu and answer questions about items.
- Take coffee and food orders.
- Remember and respect dietary preferences.

Be conversational, warm, and concise. If a customer mentions a dietary
restriction, acknowledge it and suggest suitable options from the menu.
""",
    tools=[get_menu],
)
This defines a basic agent with one tool: get_menu() . The agent can answer questions about the menu but can't track orders or remember preferences yet.
Verify the agent runs
Start the ADK dev UI from your working directory:
cd ~/build-agent-adk-cloudsql
uv run adk web
Open the URL shown in the terminal (typically http://localhost:8000 ) using Cloud Shell's Web Preview feature. Select cafe_concierge from the agent dropdown in the top-left corner.
Type the following text on the chat bar and verify the agent responds with menu items and prices.
What's on the menu?
Stop the dev UI with Ctrl+C before proceeding.
5. Add Stateful Order Management
عامل میتواند منو را نشان دهد، اما نمیتواند سفارشها را دریافت کند یا ترجیحات را به خاطر بسپارد. این مرحله چهار ابزار اضافه میکند که از سیستم وضعیت ADK برای ردیابی سفارشها در یک مکالمه و ذخیره ترجیحات غذایی در مکالمات استفاده میکنند.
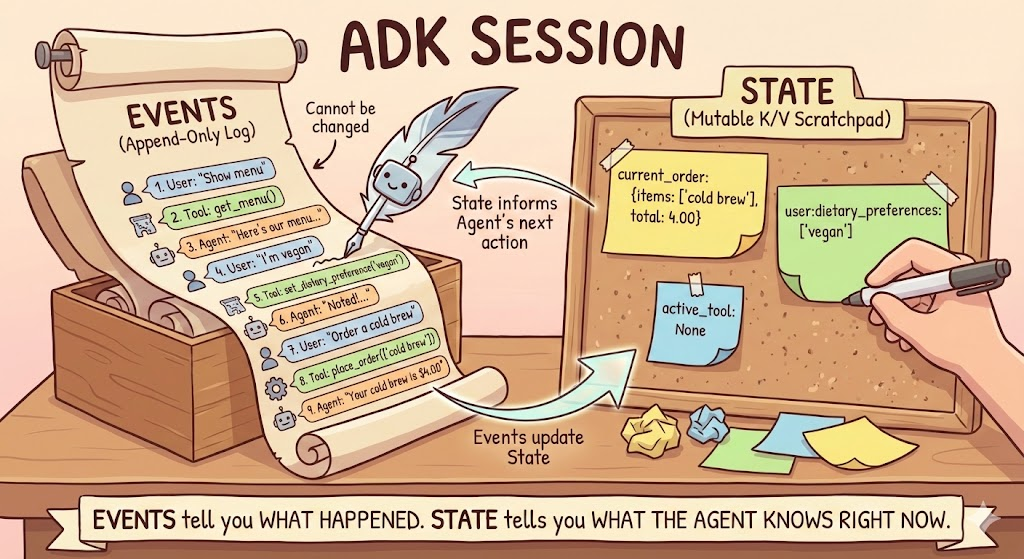
Understand session events and state
هر مکالمه ADK درون یک شیء Session قرار دارد. یک Session دو چیز متمایز را ردیابی میکند: رویدادها و وضعیت . درک این تفاوت، کلید ساخت عاملهایی است که چیزهای درست را به روش درست به خاطر میسپارند.
رویدادها ، گزارش زمانی هر اتفاقی هستند که در یک مکالمه رخ میدهد. هر پیام کاربر، هر پاسخ عامل، هر فراخوانی ابزار و مقدار بازگشتی آن - هر یک به عنوان یک Event ثبت شده و به لیست رویدادهای جلسه اضافه میشود. رویدادها تغییرناپذیر هستند: پس از ثبت، هرگز تغییر نمیکنند. رویدادها را به عنوان متن کامل یک مکالمه در نظر بگیرید.
وضعیت (State) یک دفترچه یادداشت کلید-مقدار است که عامل در طول مکالمه آن را میخواند و مینویسد. برخلاف رویدادها، وضعیت (state) قابل تغییر است - مقادیر با پیشرفت مکالمه تغییر میکنند. وضعیت جایی است که عامل دادههای ساختاریافتهای را که برای اقدام روی آنها نیاز دارد، ذخیره میکند: سفارش فعلی، تنظیمات برگزیده مشتری، یک جمع کل در حال اجرا. وضعیت را به عنوان یادداشتهای چسبانی در نظر بگیرید که عامل در کنار متن یادداشت نگه میدارد.
Here's how they relate:
ابزارها از طریق ToolContext وضعیت را میخوانند و مینویسند - شیءای که ADK به طور خودکار به هر تابع ابزاری که آن را به عنوان پارامتر اعلام میکند، تزریق میکند. شما خودتان آن را ایجاد نمیکنید. از طریق tool_context.state ، یک ابزار میتواند دفترچه یادداشت وضعیت جلسه را بخواند و بنویسد. ADK امضای تابع را بررسی میکند: پارامترهایی با نوع ToolContext تزریق میشوند، تمام پارامترهای دیگر توسط LLM بر اساس مکالمه پر میشوند.
وقتی ابزاری در tool_context.state مینویسد، ADK آن تغییر را به عنوان یک state_delta درون رویداد ثبت میکند. سپس SessionService دلتا را به وضعیت فعلی جلسه اعمال میکند. این بدان معناست که تغییرات وضعیت همیشه تا رویدادی که باعث آنها شده است قابل ردیابی هستند. این موضوع در مورد سایر انواع context مانند callback_context نیز صادق است.
Understand state prefixes
State keys use prefixes to control their scope:
پیشوند | دامنه | Survives restart? (with DB) |
(none) | Current session only | بله |
| تمام جلسات این کاربر | بله |
| All sessions, all users | بله |
| فقط فراخوانی فعلی | خیر |
در این آزمایشگاه کد، شما از دو مورد از این پیشوندها استفاده میکنید: کلیدهای بدون پیشوند برای دادههای مربوط به جلسه (ترتیب فعلی - فقط مربوط به این مکالمه) و کلیدهای user: برای دادههای مربوط به کاربر (ترجیحات غذایی - مربوط به تمام مکالمات این کاربر).
ابزارهای stateful را اضافه کنید
Open cafe_concierge/agent.py in the Cloud Shell Editor.
cloudshell edit cafe_concierge/agent.py
Then, add the following four functions above the root_agent definition:
# cafe_concierge/agent.py (add below get_menu, above root_agent)

def place_order(tool_context: ToolContext, items: list[str]) -> dict:
    """Places an order for the specified menu items.

    Use this tool when the customer confirms they want to order something.

    Args:
        tool_context: Provided automatically by ADK.
        items: A list of menu item names the customer wants to order.
    """
    valid_items = []
    invalid_items = []
    total = 0.0

    for item in items:
        item_lower = item.lower()
        if item_lower in CAFE_MENU:
            valid_items.append(item_lower)
            total += CAFE_MENU[item_lower]["price"]
        else:
            invalid_items.append(item)

    if not valid_items:
        return {"error": f"None of these items are on our menu: {invalid_items}"}

    order = {"items": valid_items, "total": round(total, 2)}
    tool_context.state["current_order"] = order

    result = {"order": order}
    if invalid_items:
        result["warning"] = f"These items are not on our menu: {invalid_items}"
    return result


def get_order_summary(tool_context: ToolContext) -> dict:
    """Returns the current order summary for this session.

    Use this tool when the customer asks about their current order,
    wants to review what they ordered, or asks for the total.

    Args:
        tool_context: Provided automatically by ADK.
    """
    order = tool_context.state.get("current_order")
    if order:
        return {"order": order}
    return {"message": "No order has been placed yet in this session."}


def set_dietary_preference(tool_context: ToolContext, preference: str) -> dict:
    """Saves a dietary preference that persists across all conversations.

    Use this tool when the customer mentions a dietary restriction or
    preference (e.g., "I'm vegan", "I'm lactose intolerant",
    "I have a nut allergy").

    Args:
        tool_context: Provided automatically by ADK.
        preference: The dietary preference to save (e.g., "vegan",
            "lactose intolerant", "nut allergy").
    """
    existing = tool_context.state.get("user:dietary_preferences", [])
    if not isinstance(existing, list):
        existing = []

    preference_lower = preference.lower().strip()
    if preference_lower not in existing:
        existing.append(preference_lower)

    tool_context.state["user:dietary_preferences"] = existing
    return {
        "saved": preference_lower,
        "all_preferences": existing,
    }


def get_dietary_preferences(tool_context: ToolContext) -> dict:
    """Retrieves the customer's saved dietary preferences.

    Use this tool when you need to check the customer's dietary
    restrictions before making recommendations.

    Args:
        tool_context: Provided automatically by ADK.
    """
    preferences = tool_context.state.get("user:dietary_preferences", [])
    if preferences:
        return {"preferences": preferences}
    return {"message": "No dietary preferences saved yet."}
دو نکته قابل توجه:
-
place_orderandget_order_summaryuse unprefixed keys (current_order). This state is tied to the current session — a new conversation starts with an empty order. -
set_dietary_preferenceandget_dietary_preferencesuse theuser:prefix (user:dietary_preferences). This state is shared across all sessions for the same user.
بهروزرسانی عامل با ابزارها و دستورالعملهای جدید
Replace the existing root_agent definition at the bottom of the file with:
# cafe_concierge/agent.py (replace the existing root_agent)

root_agent = LlmAgent(
    name="cafe_concierge",
    model="gemini-2.5-flash",
    instruction="""You are a friendly and knowledgeable barista at "The Cloud Cafe".

Your job:
- Help customers browse the menu and answer questions about items.
- Take coffee and food orders.
- Remember and respect dietary preferences.

The customer's saved dietary preferences are: {user:dietary_preferences?}

IMPORTANT RULES:
- When a customer mentions a dietary restriction, ALWAYS save it using the
  set_dietary_preference tool before doing anything else.
- Before recommending items, check the customer's dietary preferences. If they
  have preferences saved, only recommend items compatible with those
  restrictions. Check the menu item tags to determine compatibility.
- When placing an order, confirm the items and total with the customer.

Be conversational, warm, and concise.
""",
    tools=[
        get_menu,
        place_order,
        get_order_summary,
        set_dietary_preference,
        get_dietary_preferences,
    ],
)
The instruction uses the state injection template {user:dietary_preferences?} to inject this customer's saved preferences directly into the prompt.
فایل کامل را تأیید کنید
cafe_concierge/agent.py شما اکنون باید شامل موارد زیر باشد:
- فرهنگ لغت
CAFE_MENU - Five tool functions:
get_menu,place_order,get_order_summary,set_dietary_preference,get_dietary_preferences - تعریف
root_agentبا هر پنج ابزار
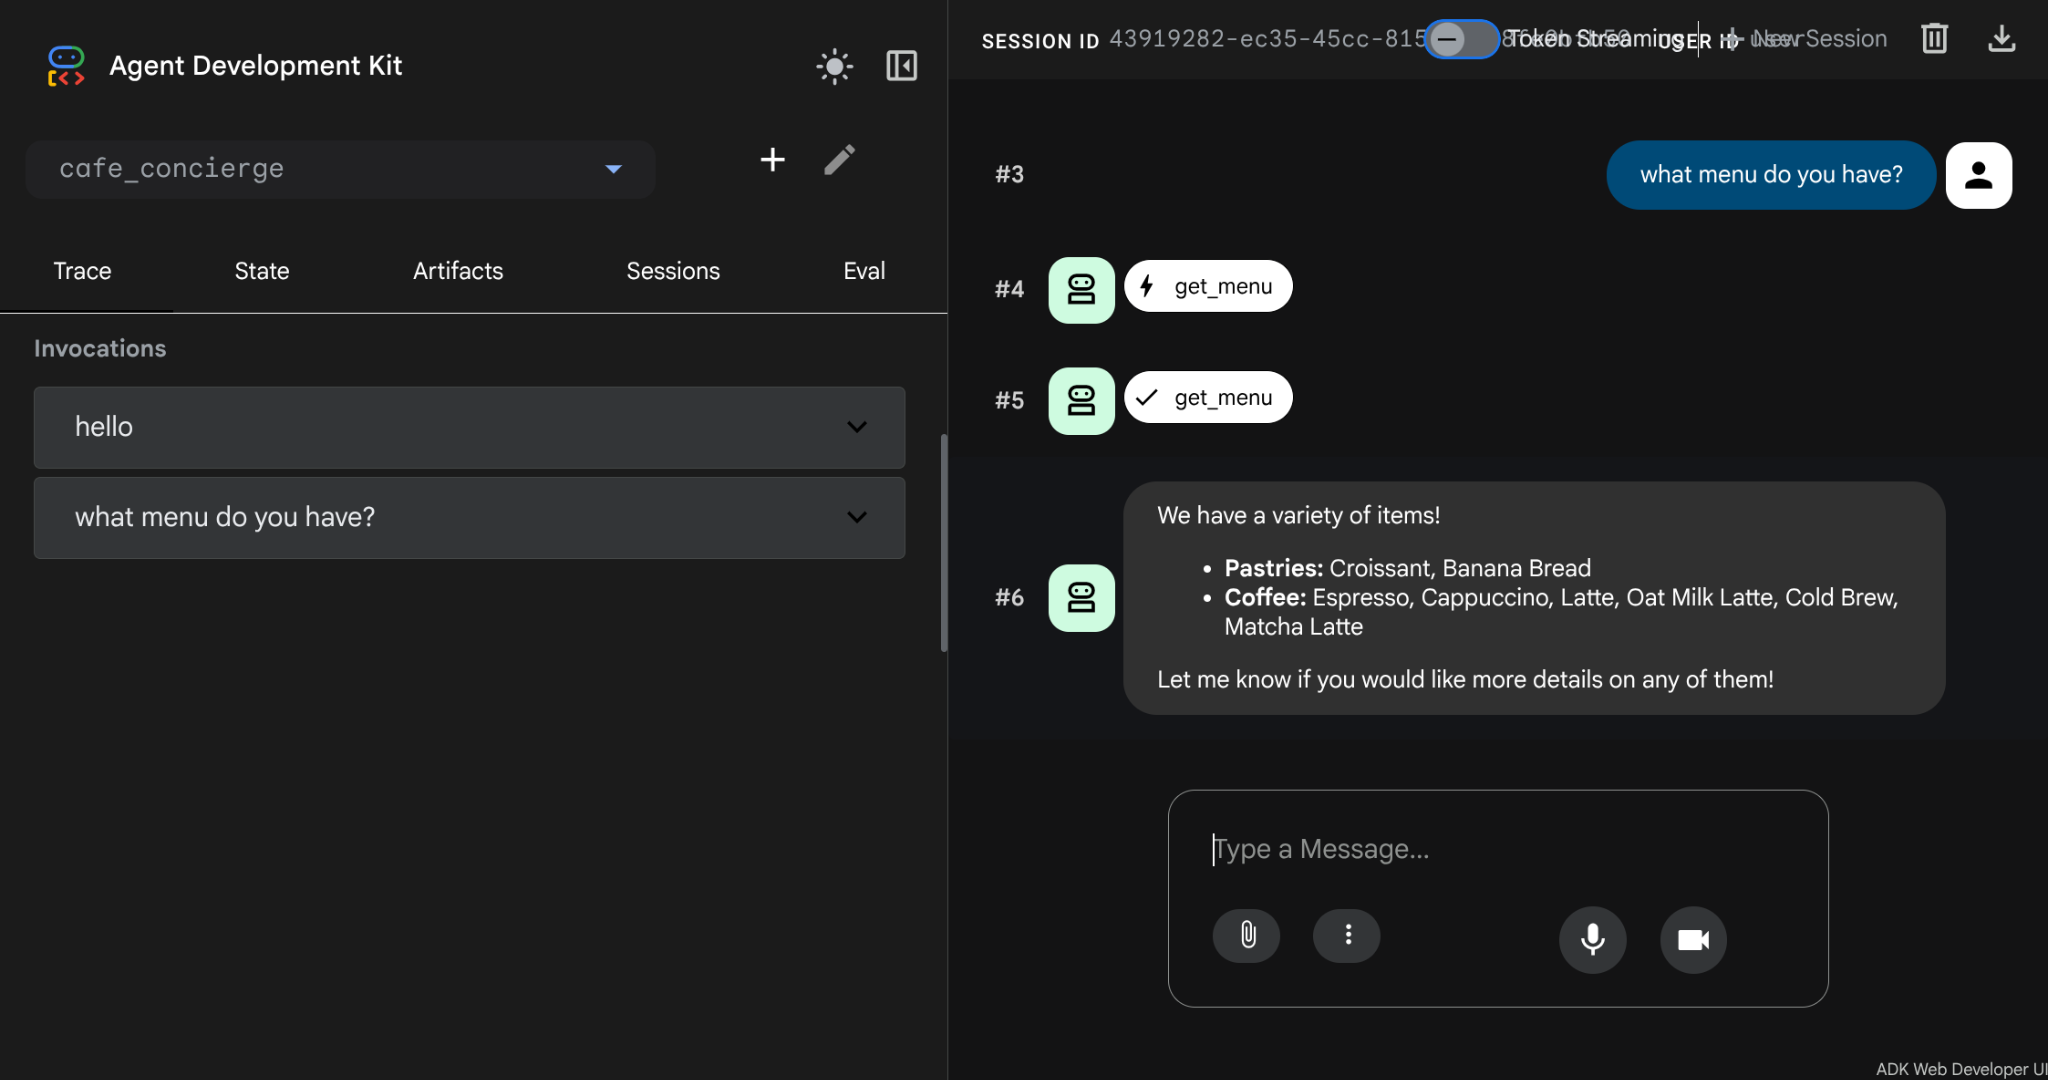
۶. تست عامل با رابط کاربری ADK Dev
این مرحله، عامل را اجرا میکند و تمام ویژگیهای حالتمند (stateful) را اعمال میکند: مرتبسازی، ردیابی ترجیحات و حافظه بین جلسات (در همان فرآیند). همچنین پنلهای رویدادها و وضعیت را بررسی خواهید کرد تا ببینید ADK چگونه مکالمه را به صورت داخلی ردیابی میکند.
رابط کاربری توسعهدهنده را شروع کنید
cd ~/build-agent-adk-cloudsql
uv run adk web
پیشنمایش وب را روی پورت ۸۰۰۰ باز کنید و از منوی کشویی cafe_concierge را انتخاب کنید.
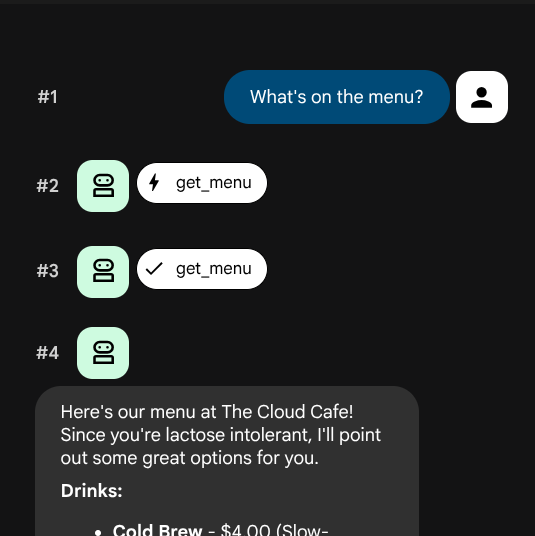
مکالمه ۱: ثبت سفارش و تنظیم تنظیمات برگزیده
این دستورالعملها را به ترتیب امتحان کنید:
What's on the menu?
I'm lactose intolerant
What would you recommend?
I'll have an oat milk latte and a banana bread
What's my order?
رویدادهای جلسه را بررسی کنید
تمام رویداد ضبط شده و در رابط کاربری وب نمایش داده میشود، خواهید دید که در چت باکس نه تنها اعلان و پاسخ شما، بلکه tool_call و tool_response نیز نمایش داده میشود.
شما باید لیستی از رویدادها را به ترتیب ببینید. هر رویداد یک نویسنده (که آن را تولید کرده است) و یک نوع (چه نوع تعاملی را نشان میدهد) دارد:
نویسنده | نوع | آنچه نشان دهنده آن است |
| | پیامی که در چت تایپ کردهاید |
| | پاسخ پیامکی نماینده |
| | عامل تصمیم گرفت ابزاری را فراخوانی کند (نام تابع + آرگومانها را نشان میدهد) |
| | مقدار برگشتی از فراخوانی یک ابزار |
روی یکی از رویدادهای tool_call کلیک کنید - برای مثال، فراخوانی set_dietary_preference . باید این را ببینید:
- نام تابع :
set_dietary_preference - آرگومانها :
{"preference": "lactose intolerant"}
حالا روی رویداد tool_response مربوطه که درست زیر آن قرار دارد کلیک کنید. باید مقدار برگشتی را ببینید:
- پاسخ :
{"saved": "lactose intolerant", "all_preferences": ["lactose intolerant"]}
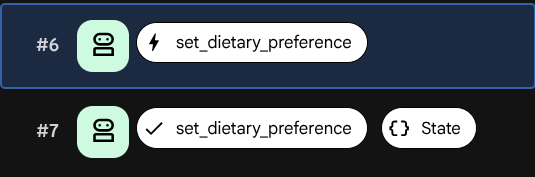
به دنبال فیلد state_delta در رویداد tool_response بگردید. این فیلد دقیقاً نشان میدهد که چه وضعیتی در نتیجهی فراخوانی این ابزار تغییر کرده است:
state_delta: {"user:dietary_preferences": ["lactose intolerant"]}
هر تغییر وضعیت تا یک رویداد خاص قابل ردیابی است. اینگونه است که ADK تضمین میکند که دفترچه یادداشت وضعیت با تاریخچه مکالمات همگام میماند.
بررسی وضعیت جلسه
روی برگه وضعیت (State) کلیک کنید. برخلاف گزارش رویدادها (event log) (که تاریخچه کامل را نشان میدهد)، برگه وضعیت (state tab) تصویری از آنچه عامل در حال حاضر میداند را نشان میدهد - مقدار فعلی هر کلید وضعیت (state key).
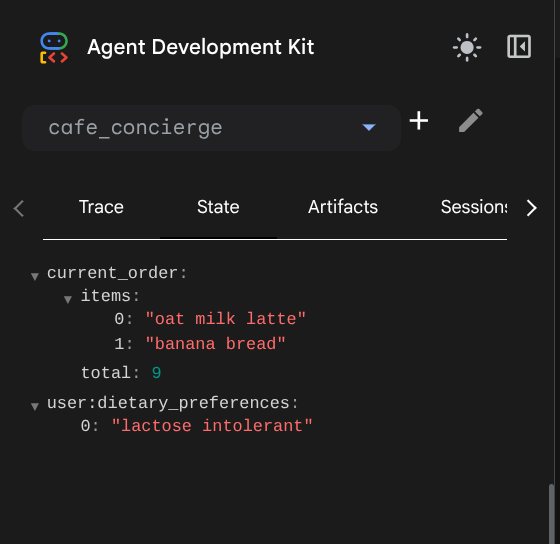
شما باید دو ورودی را ببینید:
-
current_order—{"items": ["oat milk latte", "banana bread"], "total": 9.0} -
user:dietary_preferences—["lactose intolerant"]
به تفاوت نام کلیدها توجه کنید:
-
current_orderهیچ پیشوندی ندارد — محدود به جلسه است. فقط در این مکالمه وجود دارد و با پایان جلسه ناپدید میشود. -
user:dietary_preferencesپیشوندuser:را دارد — این تنظیمات به کاربر اختصاص داده شده است. این تنظیمات در هر جلسه برای این کاربر به اشتراک گذاشته میشود.
این تمایز در کد قابل مشاهده نیست (هر دو tool_context.state استفاده میکنند)، اما میزان دسترسی دادهها را کنترل میکند. در آزمایش بعدی این موضوع را مشاهده خواهید کرد.
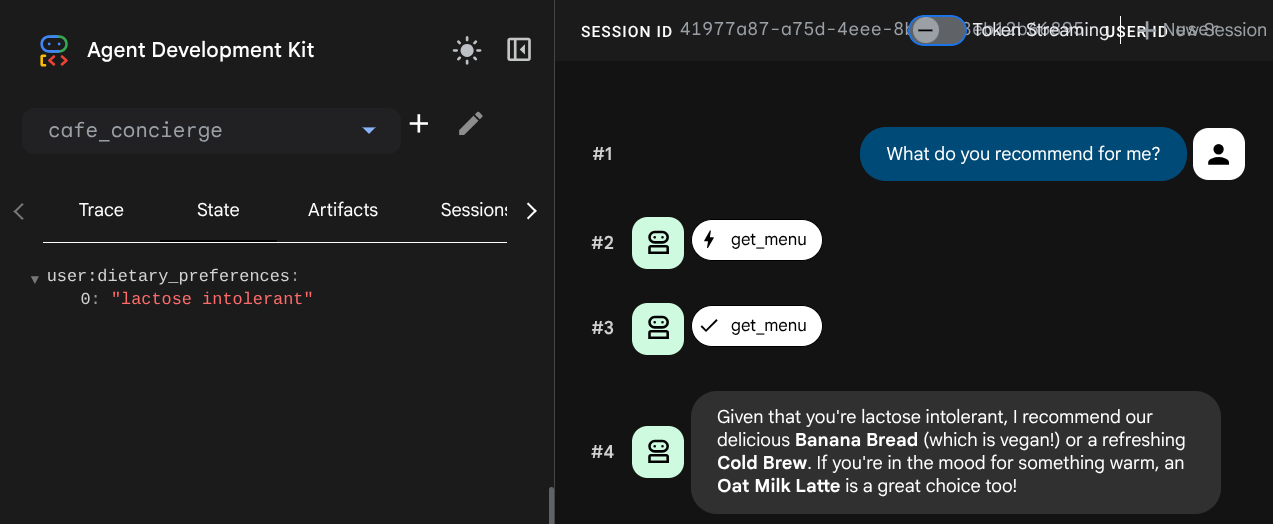
مکالمه ۲: بررسی وضعیت کاربر در جلسات متقابل
برای شروع یک مکالمه جدید، روی دکمه «جلسه جدید» در رابط کاربری توسعهدهندگان کلیک کنید. این کار یک جلسه جدید برای همان کاربر ایجاد میکند.

این دستور را امتحان کنید:
What do you recommend for me?
تب State را در جلسه جدید بررسی کنید. کلید user:dietary_preferences باقی میماند، اما current_order حذف شده است - آن وضعیت به جلسه قبلی گره خورده بود.
7. Observe Local Storage Limitation
عامل تنظیمات برگزیده را در طول جلسات به خاطر میسپارد - اما فقط تا زمانی که فضای ذخیرهسازی محلی وجود داشته باشد. این مرحله محدودیت اساسی فضای ذخیرهسازی محلی را نشان میدهد.
Start the agent again
شما رابط کاربری توسعه (dev UI) را در پایان مرحله قبل متوقف کردید. حالا بیایید حافظه محلی را حذف کرده و دوباره آن را راهاندازی کنیم تا محیط بدون سرور (serverless) که بدون وضعیت (stateless) است را شبیهسازی کنیم:
cd ~/build-agent-adk-cloudsql
rm -f cafe_concierge/.adk/session.db
uv run adk web
حالا، پیشنمایش وب را روی پورت ۸۰۰۰ باز کنید و cafe_concierge را انتخاب کنید.
Test preference recall
نوع:
Do you remember my dietary preferences?
نماینده هیچ چیزی به خاطر نمیآورد. ترجیحات غذایی، سابقه سفارش - همه از بین رفتهاند.
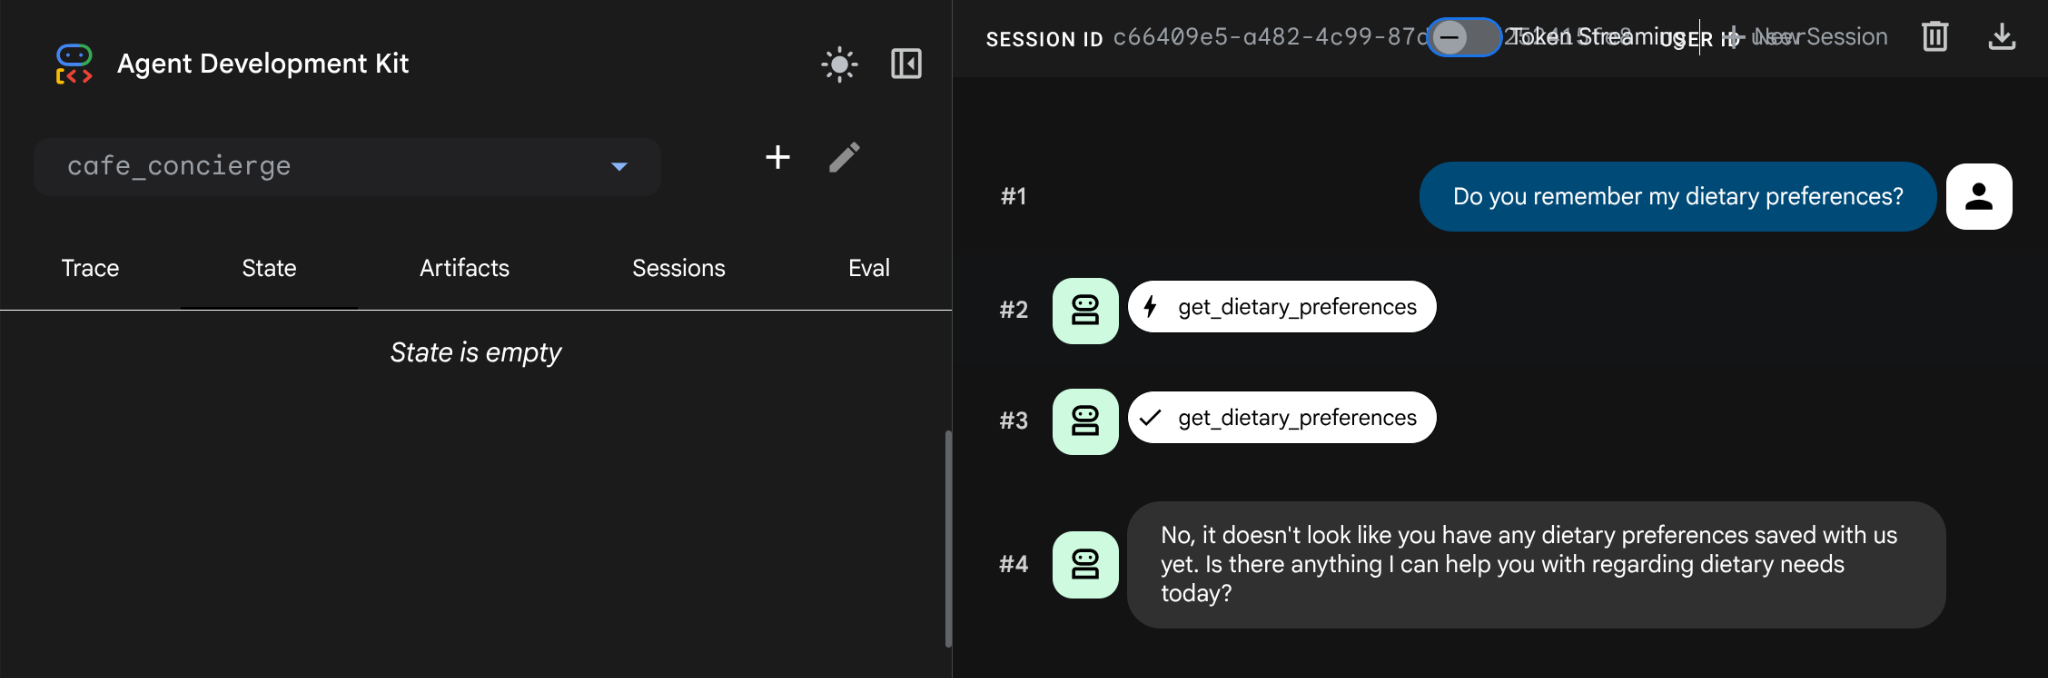
وقتی حافظه محلی را حذف کردیم، همه چیز پاک شد، که معمولاً وقتی از یک محیط بدون سرور استفاده میکنیم اتفاق میافتد. session.db تمام وضعیتها را در حافظه پردازش ذخیره میکند. حذف آن، همه چیز را پاک میکند.
راه حل: DatabaseSessionService را مشخص کنید، که در این آموزش تمام دادههای جلسه را در یک پایگاه داده PostgreSQL در Cloud SQL ذخیره میکند. کد و ابزارهای عامل دقیقاً یکسان باقی میمانند - فقط backend ذخیرهسازی تغییر میکند.
Stop the dev UI with Ctrl+C before proceeding.
8. Revisit Database Setup
در این مرحله، ایجاد نمونه پایگاه داده ما قرار است از قبل تمام شده باشد. بیایید آن را تأیید کنیم، دستور زیر را اجرا کنید
gcloud sql instances describe cafe-concierge-db --format="value(state)"
باید خروجی زیر را ببینید، آن را به عنوان پایان یافته علامت گذاری کنید
RUNNABLE
Create the database
یک پایگاه داده اختصاصی برای دادههای جلسه عامل ایجاد کنید:
gcloud sql databases create agent_db --instance=cafe-concierge-db
Start the Cloud SQL Auth Proxy
پروکسی احراز هویت ابری SQL، بدون نیاز به قرار دادن آدرسهای IP در لیست سفید، یک اتصال امن و احراز هویت شده از Cloud Shell به نمونه Cloud SQL شما فراهم میکند. این پروکسی از قبل روی پوسته ابری نصب شده است.
cloud-sql-proxy ${GOOGLE_CLOUD_PROJECT}:${REGION}:cafe-concierge-db --port 5432 &
پسوند & در دستور باعث میشود پروکسی در پسزمینه اجرا شود. باید خروجی را مشاهده کنید که تأیید میکند پروکسی آماده است، مانند تصویر زیر.
[your-project-id:your-region:cafe-concierge-db] Listening on 127.0.0.1:5432
The proxy has started successfully and is ready for new connections!
Verify the connection
بررسی کنید که آیا میتوانید از طریق پروکسی به پایگاه داده متصل شوید:
psql "host=127.0.0.1 port=5432 dbname=agent_db user=postgres password=$DB_PASSWORD" -c "SELECT 'Connection ok' AS status;"
You should see:
      status
---------------------
 Connection ok
(1 row)
9. Verify Persistent Memory Across Sessions
این مرحله ثابت میکند که حافظه عامل شما پس از ریست شدن، در صورتی که مطمئن شویم cafe_concierge/.adk/session_db (پایگاه داده محلی) حذف شده و در جلسات مکالمه اعمال میشود، همچنان قابل استفاده است.
Start the agent
مطمئن شوید که Cloud SQL Auth Proxy هنوز در حال اجرا است (با jobs بررسی کنید). اگر اینطور نیست، آن را مجدداً راه اندازی کنید:
if ss -tlnp | grep -q ':5432 '; then
  echo "Cloud SQL Auth Proxy is already running."
else
  cloud-sql-proxy ${GOOGLE_CLOUD_PROJECT}:${REGION}:cafe-concierge-db --port 5432 &
fi
و سپس، بیایید رابط کاربری توسعه ADK را با مشخص کردن پایگاه داده به عنوان سرویس جلسه شروع کنیم.
uv run adk web --session_service_uri postgresql+asyncpg://postgres:${DB_PASSWORD}@127.0.0.1:5432/agent_db
پیشنمایش وب را روی پورت ۸۰۰۰ باز کنید و cafe_concierge را انتخاب کنید.
Test 1: Place an order and set preferences
In the first session, run through these prompts:
Show me the menu
I'm vegan
What can I eat?
I'll have a cold brew and banana bread
Test 2: Survive a restart
رابط کاربری توسعهدهندگان را با Ctrl+C متوقف کنید و مطمئن شوید که session.db محلی حذف شده است.
rm -f cafe_concierge/.adk/session.db
Then, re-run the dev UI server
uv run adk web --session_service_uri postgresql+asyncpg://postgres:${DB_PASSWORD}@127.0.0.1:5432/agent_db
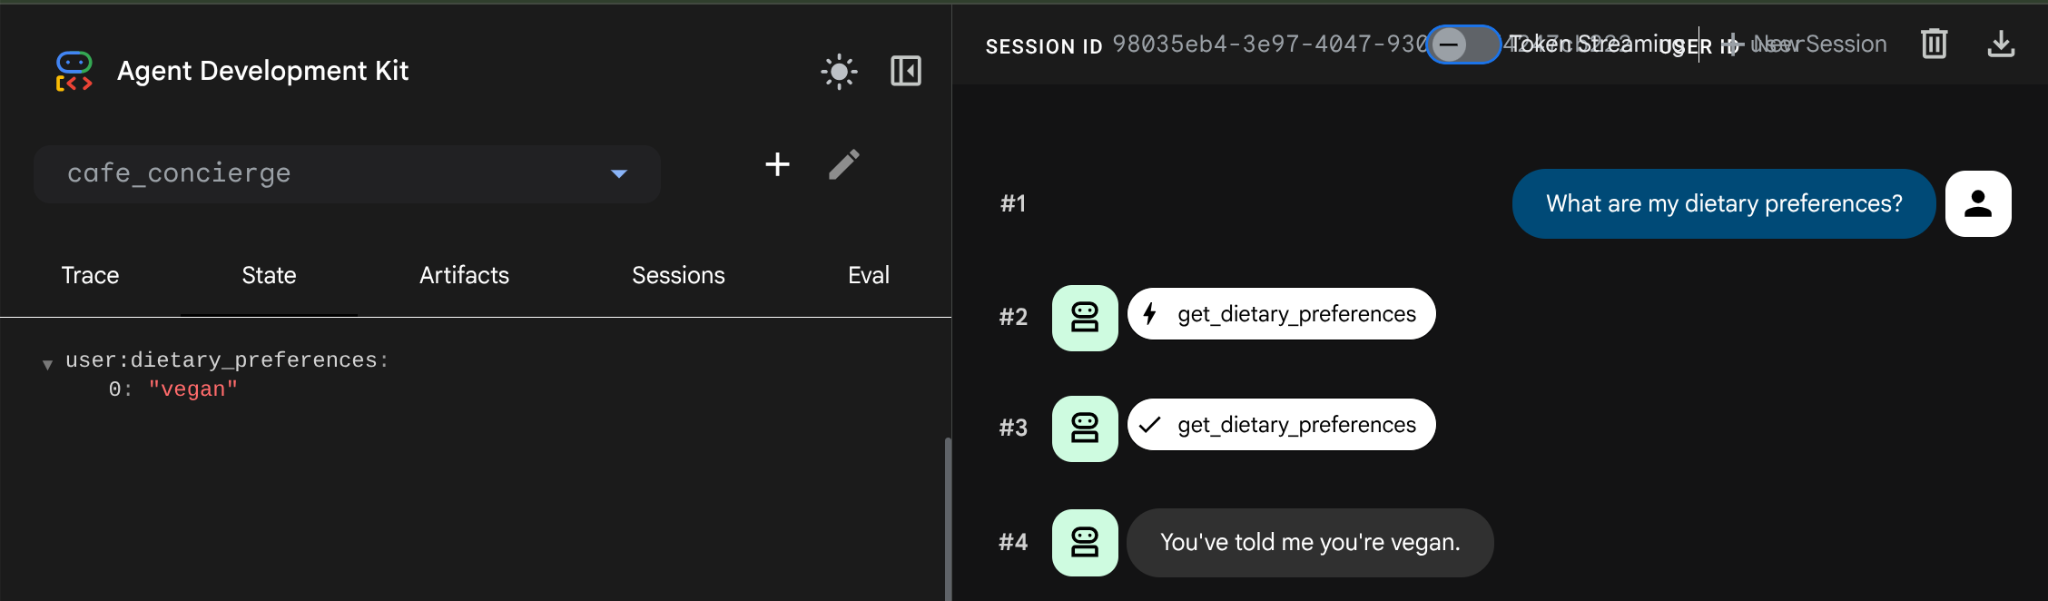
پیشنمایش وب را روی پورت ۸۰۰۰ باز کنید، cafe_concierge را انتخاب کنید و یک جلسه جدید را شروع کنید. سپس بپرسید
What are my dietary preferences?
عامل با تنظیمات ذخیره شده شما پاسخ میدهد - vegan . دادهها پس از راهاندازی مجدد باقی ماندند زیرا اکنون در PostgreSQL ذخیره شدهاند، نه در حافظه محلی. اگر جلسه جدیدی ایجاد کنیم user: به هر جلسه جدید برای این کاربر منتقل میشود.
Inspect the database directly
یک تب ترمینال جدید در Cloud Shell باز کنید و برای مشاهده دادههای ذخیره شده، از پایگاه داده کوئری بگیرید:
psql "host=127.0.0.1 port=5432 dbname=agent_db user=postgres password=$DB_PASSWORD" -c "\dt"
شما باید جداولی را که ADK به طور خودکار برای ذخیره جلسات، رویدادها و حالت ایجاد کرده است، مانند این مثال، ببینید.
                List of relations
 Schema |         Name          | Type  |  Owner
--------+-----------------------+-------+----------
 public | adk_internal_metadata | table | postgres
 public | app_states            | table | postgres
 public | events                | table | postgres
 public | sessions              | table | postgres
 public | user_states           | table | postgres
(5 rows)
Summary of state behavior
State key | پیشوند | دامنه | Shared across sessions? |
| (none) | جلسه | خیر |
| | کاربر | بله |
10. Congratulations / Clean Up
تبریک! شما با موفقیت یک عامل هوش مصنوعی پایدار و دارای وضعیت با استفاده از ADK و Cloud SQL ساختید.
What you've learned
- نحوه ایجاد یک عامل ADK با ابزارهای سفارشی که وضعیت جلسه را میخوانند و مینویسند
- تفاوت بین وضعیت محدود به جلسه (بدون پیشوند) و وضعیت محدود به کاربر (
user:پیشوند) - چرا adk پیشفرض local
session.dbفقط برای توسعه مناسب است - تمام دادهها هنگام حذف از بین میروند (و حذف آنها آسان است، بدون پشتیبان)، برای استقرار بدون سرور که بدون وضعیت است مناسب نیست. - نحوه تهیه یک نمونه Cloud SQL PostgreSQL و اتصال به آن با Cloud SQL Auth Proxy
- نحوه اتصال به DatabaseSessionService با PostgreSQL در CloudSQL با حداقل تغییر کد - همان ابزارها، همان عامل، backend متفاوت
- چگونه وضعیتِ تحتِ محدودهی کاربر در جلسات مکالمهی جداگانه باقی میماند
تمیز کردن
برای جلوگیری از تحمیل هزینه به حساب Google Cloud خود، منابع ایجاد شده در این codelab را پاک کنید.
Option 1: Delete the project (recommended)
سادهترین راه برای پاکسازی، حذف پروژه است. این کار تمام منابع مرتبط با پروژه را حذف میکند.
gcloud projects delete ${GOOGLE_CLOUD_PROJECT}
گزینه ۲: حذف منابع تکی
اگر میخواهید پروژه را نگه دارید اما فقط منابع ایجاد شده در این codelab را حذف کنید:
gcloud sql instances delete cafe-concierge-db --quiet