
1. 📖 परिचय

क्या आपको कभी अपने सभी निजी खर्चों को मैनेज करने में परेशानी हुई है और आपने उन्हें मैनेज करने में आलस दिखाया है? मैं भी! इसलिए, इस कोडलैब में हम निजी खर्चों को मैनेज करने वाला एक असिस्टेंट बनाएँगे. यह असिस्टेंट, Gemini 2.5 की मदद से हमारे सभी काम करेगा! अपलोड की गई रसीदों को मैनेज करने से लेकर, यह विश्लेषण करने तक कि आपने कॉफ़ी खरीदने पर पहले ही बहुत ज़्यादा खर्च कर दिया है!
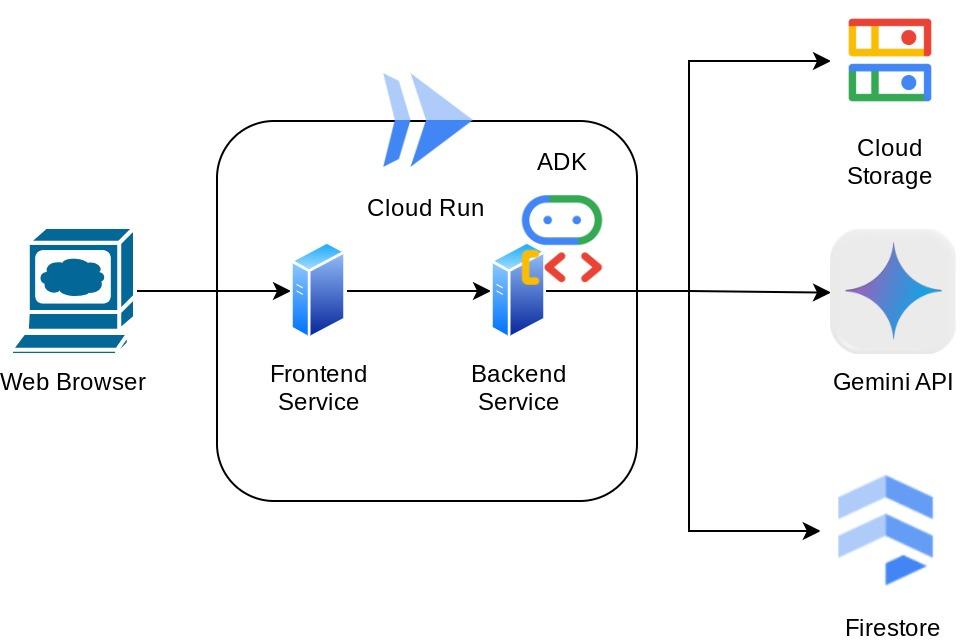
इस असिस्टेंट को वेब ब्राउज़र के ज़रिए ऐक्सेस किया जा सकेगा. यह चैट वेब इंटरफ़ेस के तौर पर उपलब्ध होगी. इसमें असिस्टेंट से बातचीत की जा सकती है, रसीदों की कुछ इमेज अपलोड की जा सकती हैं, और असिस्टेंट से उन्हें सेव करने के लिए कहा जा सकता है. इसके अलावा, कुछ रसीदें खोजकर उनकी फ़ाइल पाई जा सकती है और खर्च का विश्लेषण किया जा सकता है. यह सब Google Agent Development Kit फ़्रेमवर्क पर बनाया गया है
ऐप्लिकेशन को दो सेवाओं में बांटा गया है: फ़्रंटएंड और बैकएंड. इससे आपको तुरंत प्रोटोटाइप बनाने और यह समझने में मदद मिलती है कि यह कैसा दिखता है. साथ ही, यह भी समझने में मदद मिलती है कि दोनों को इंटिग्रेट करने के लिए, एपीआई अनुबंध कैसा दिखता है.
कोडलैब के ज़रिए, आपको यहां दिया गया तरीका अपनाना होगा:
- अपना Google Cloud प्रोजेक्ट तैयार करें और उस पर सभी ज़रूरी एपीआई चालू करें
- Google Cloud Storage पर बकेट और Firestore पर डेटाबेस सेट अप करना
- Firestore इंडेक्सिंग बनाना
- कोडिंग एनवायरमेंट के लिए Workspace सेट अप करना
- ADK एजेंट के सोर्स कोड, टूल, प्रॉम्प्ट वगैरह को स्ट्रक्चर करना
- ADK के लोकल वेब डेवलपमेंट यूज़र इंटरफ़ेस का इस्तेमाल करके एजेंट की जांच करना
- Gradio लाइब्रेरी का इस्तेमाल करके, चैट इंटरफ़ेस वाली फ़्रंटएंड सेवा बनाएं. इससे कुछ क्वेरी भेजी जा सकेंगी और रसीद की इमेज अपलोड की जा सकेंगी
- FastAPI का इस्तेमाल करके, बैकएंड सर्विस - एचटीटीपी सर्वर बनाएं. इसमें हमारा एडीके एजेंट कोड, SessionService, और Artifact Service मौजूद होती है
- Cloud Run पर ऐप्लिकेशन को डिप्लॉय करने के लिए, एनवायरमेंट वैरिएबल और ज़रूरी फ़ाइलों को मैनेज करना
- ऐप्लिकेशन को Cloud Run पर डिप्लॉय करें
आर्किटेक्चर की खास जानकारी
ज़रूरी शर्तें
- Python के साथ काम करने में सहज हों
- एचटीटीपी सेवा का इस्तेमाल करके, बुनियादी फ़ुल-स्टैक आर्किटेक्चर के बारे में जानकारी
आपको क्या सीखने को मिलेगा
- Gradio की मदद से, वेब ऐप्लिकेशन के फ़्रंटएंड का प्रोटोटाइप बनाना
- FastAPI और Pydantic का इस्तेमाल करके बैकएंड सेवा डेवलप करना
- ADK एजेंट को डिज़ाइन करना और उसकी कई क्षमताओं का इस्तेमाल करना
- टूल का इस्तेमाल
- सेशन और आर्टफ़ैक्ट मैनेजमेंट
- Gemini को भेजे जाने से पहले, इनपुट में बदलाव करने के लिए कॉलबैक का इस्तेमाल
- BuiltInPlanner का इस्तेमाल करके, टास्क को बेहतर तरीके से पूरा करना
- ADK के लोकल वेब इंटरफ़ेस की मदद से, तेज़ी से डीबग करना
- ADK कॉलबैक का इस्तेमाल करके, प्रॉम्प्ट इंजीनियरिंग और Gemini के अनुरोध में बदलाव करने की मदद से, जानकारी को पार्स करने और उसे वापस पाने के ज़रिए मल्टीमॉडल इंटरैक्शन को ऑप्टिमाइज़ करने की रणनीति
- वेक्टर डेटाबेस के तौर पर Firestore का इस्तेमाल करके, एजेंटिक रिट्रीवल ऑगमेंटेड जनरेशन
- Pydantic-settings की मदद से, YAML फ़ाइल में एनवायरमेंट वैरिएबल मैनेज करना
- Dockerfile का इस्तेमाल करके, Cloud Run पर ऐप्लिकेशन डिप्लॉय करना और YAML फ़ाइल की मदद से एनवायरमेंट वैरिएबल उपलब्ध कराना
आपको इन चीज़ों की ज़रूरत होगी
- Chrome वेब ब्राउज़र
- Gmail खाता
- ऐसा Cloud प्रोजेक्ट जिसमें बिलिंग की सुविधा चालू हो
यह कोडलैब, सभी लेवल के डेवलपर के लिए बनाया गया है. इसमें शुरुआती डेवलपर भी शामिल हैं. इसमें सैंपल ऐप्लिकेशन में Python का इस्तेमाल किया गया है. हालांकि, यहां दिए गए कॉन्सेप्ट को समझने के लिए, Python के बारे में जानकारी होना ज़रूरी नहीं है.
2. 🚀 शुरू करने से पहले
Cloud Console में चालू प्रोजेक्ट चुनना
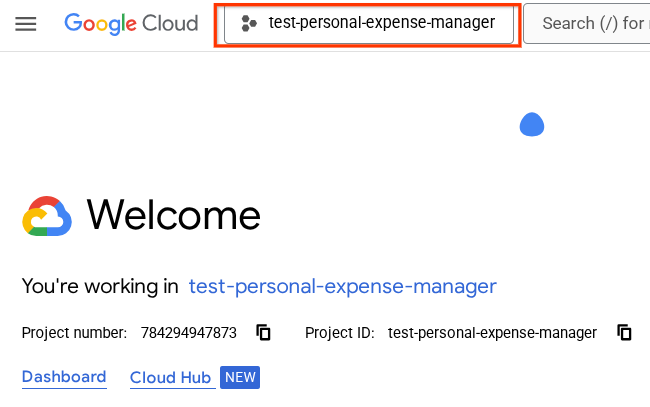
इस कोडलैब में यह माना गया है कि आपके पास पहले से ही बिलिंग की सुविधा वाला Google Cloud प्रोजेक्ट है. अगर आपके पास यह सुविधा अभी तक नहीं है, तो इसे इस्तेमाल करने के लिए यहां दिया गया तरीका अपनाएं.
- Google Cloud Console में, प्रोजेक्ट चुनने वाले पेज पर, Google Cloud प्रोजेक्ट चुनें या बनाएं.
- पक्का करें कि आपके Cloud प्रोजेक्ट के लिए बिलिंग चालू हो. किसी प्रोजेक्ट के लिए बिलिंग चालू है या नहीं, यह देखने का तरीका जानें.
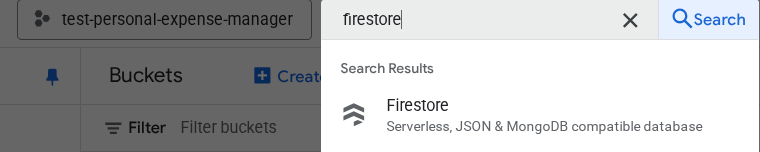
Firestore डेटाबेस तैयार करना
इसके बाद, हमें एक Firestore डेटाबेस भी बनाना होगा. नेटिव मोड में Firestore, एक NoSQL दस्तावेज़ डेटाबेस है. इसे ऑटोमैटिक स्केलिंग, बेहतर परफ़ॉर्मेंस, और ऐप्लिकेशन डेवलपमेंट को आसान बनाने के लिए बनाया गया है. यह एक वेक्टर डेटाबेस के तौर पर भी काम कर सकता है. इससे हमारे लैब के लिए, रीट्रिवल ऑगमेंटेड जनरेशन (आरएजी) तकनीक का इस्तेमाल किया जा सकता है.
- सर्च बार पर "firestore" खोजें और Firestore प्रॉडक्ट पर क्लिक करें
- इसके बाद, Create A Firestore Database बटन पर क्लिक करें
- डेटाबेस आईडी के नाम के तौर पर (डिफ़ॉल्ट) का इस्तेमाल करें और Standard Edition को चुना हुआ रहने दें. इस लैब के डेमो के लिए, Firestore Native का इस्तेमाल करें. साथ ही, सुरक्षा के Open नियमों का इस्तेमाल करें.
- आपको यह भी दिखेगा कि इस डेटाबेस में मुफ़्त में इस्तेमाल करने की सुविधा उपलब्ध है! इसके बाद, डेटाबेस बनाएं बटन पर क्लिक करें

इन चरणों के बाद, आपको उस Firestore डेटाबेस पर रीडायरेक्ट कर दिया जाएगा जिसे आपने अभी-अभी बनाया है
Cloud Shell टर्मिनल में क्लाउड प्रोजेक्ट सेट अप करना
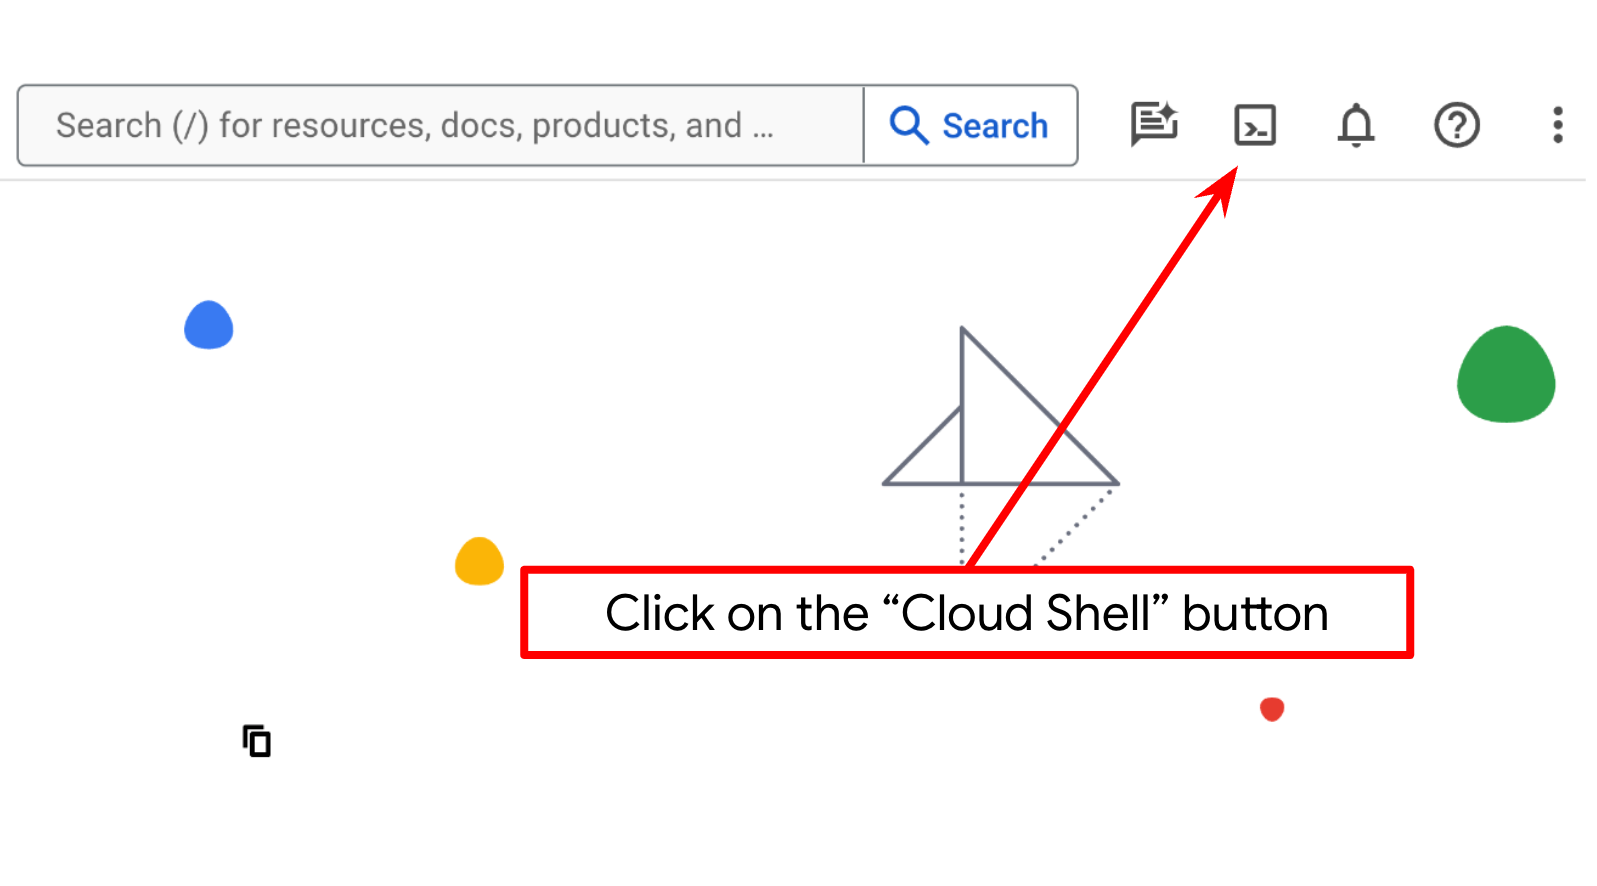
- आपको Cloud Shell का इस्तेमाल करना होगा. यह Google Cloud में चलने वाला कमांड-लाइन एनवायरमेंट है. इसमें bq पहले से लोड होता है. Google Cloud Console में सबसे ऊपर मौजूद, Cloud Shell चालू करें पर क्लिक करें.
- Cloud Shell से कनेक्ट होने के बाद, यह देखने के लिए कि आपकी पुष्टि हो चुकी है और प्रोजेक्ट को आपके प्रोजेक्ट आईडी पर सेट किया गया है, इस कमांड का इस्तेमाल करें:
gcloud auth list
- यह पुष्टि करने के लिए कि gcloud कमांड को आपके प्रोजेक्ट के बारे में पता है, Cloud Shell में यह कमांड चलाएं.
gcloud config list project
- अगर आपका प्रोजेक्ट सेट नहीं है, तो इसे सेट करने के लिए इस निर्देश का इस्तेमाल करें:
gcloud config set project <YOUR_PROJECT_ID>
इसके अलावा, PROJECT_ID आईडी को कंसोल में भी देखा जा सकता है

इस पर क्लिक करने से, आपको अपने सभी प्रोजेक्ट और प्रोजेक्ट आईडी दाईं ओर दिखेंगे

- नीचे दिए गए निर्देश का इस्तेमाल करके, ज़रूरी एपीआई चालू करें. इसमें कुछ मिनट लग सकते हैं. इसलिए, कृपया इंतज़ार करें.
gcloud services enable aiplatform.googleapis.com \
                       firestore.googleapis.com \
                       run.googleapis.com \
                       cloudbuild.googleapis.com \
                       cloudresourcemanager.googleapis.com
कमांड के सही तरीके से लागू होने पर, आपको यहां दिखाए गए मैसेज जैसा कोई मैसेज दिखेगा:
Operation "operations/..." finished successfully.
gcloud कमांड के बजाय, कंसोल का इस्तेमाल करके भी ऐसा किया जा सकता है. इसके लिए, हर प्रॉडक्ट को खोजें या इस लिंक का इस्तेमाल करें.
अगर कोई एपीआई छूट जाता है, तो उसे लागू करने के दौरान कभी भी चालू किया जा सकता है.
gcloud कमांड और उनके इस्तेमाल के बारे में जानने के लिए, दस्तावेज़ देखें.
Google Cloud Storage बकेट तैयार करना
इसके बाद, हमें उसी टर्मिनल से GCS बकेट को तैयार करना होगा, ताकि अपलोड की गई फ़ाइल को सेव किया जा सके. बकेट बनाने के लिए, यह निर्देश चलाएं. इसके लिए, आपको एक यूनीक और काम का बकेट नाम चाहिए होगा. यह नाम, निजी खर्च के असिस्टेंट के रसीदों से जुड़ा होना चाहिए. इसलिए, हम आपके प्रोजेक्ट आईडी के साथ इस बकेट नाम का इस्तेमाल करेंगे
gsutil mb -l us-central1 gs://personal-expense-{your-project-id}
इससे यह आउटपुट दिखेगा
Creating gs://personal-expense-{your-project-id}
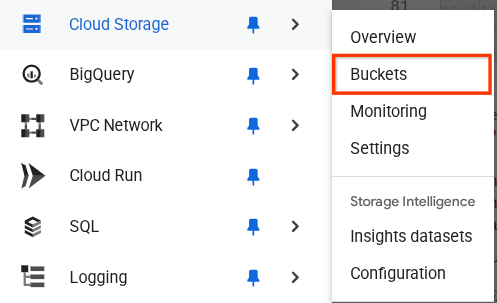
इसकी पुष्टि करने के लिए, ब्राउज़र में सबसे ऊपर बाईं ओर मौजूद नेविगेशन मेन्यू पर जाएं. इसके बाद, Cloud Storage -> Bucket चुनें
Search के लिए Firestore इंडेक्स बनाना
Firestore एक NoSQL डेटाबेस है. यह डेटा मॉडल में बेहतर परफ़ॉर्मेंस और फ़्लेक्सिबिलिटी देता है. हालांकि, मुश्किल क्वेरी के मामले में इसकी कुछ सीमाएं हैं. हम कुछ कंपाउंड मल्टी फ़ील्ड क्वेरी और वेक्टर सर्च का इस्तेमाल करने वाले हैं. इसलिए, हमें पहले कुछ इंडेक्स बनाने होंगे. इस बारे में ज़्यादा जानने के लिए, यह दस्तावेज़ पढ़ें
- कंपाउंड क्वेरी के लिए इंडेक्स बनाने के लिए, यह कमांड चलाएं
gcloud firestore indexes composite create \
        --collection-group=personal-expense-assistant-receipts \
        --field-config field-path=total_amount,order=ASCENDING \
        --field-config field-path=transaction_time,order=ASCENDING \
        --field-config field-path=__name__,order=ASCENDING \
        --database="(default)"
- वेक्टर सर्च की सुविधा इस्तेमाल करने के लिए, इस कोड को चलाएं
gcloud firestore indexes composite create \
        --collection-group="personal-expense-assistant-receipts" \
        --query-scope=COLLECTION \
        --field-config field-path="embedding",vector-config='{"dimension":"768", "flat": "{}"}' \
        --database="(default)"
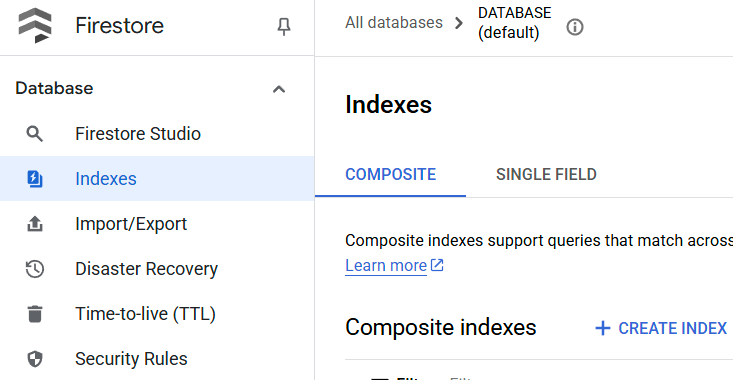
बनाए गए इंडेक्स को देखने के लिए, Cloud Console में Firestore पर जाएं. इसके बाद, (डिफ़ॉल्ट) डेटाबेस इंस्टेंस पर क्लिक करें. इसके बाद, नेविगेशन बार पर इंडेक्स चुनें
Cloud Shell Editor पर जाएं और ऐप्लिकेशन की वर्किंग डायरेक्ट्री सेट अप करें
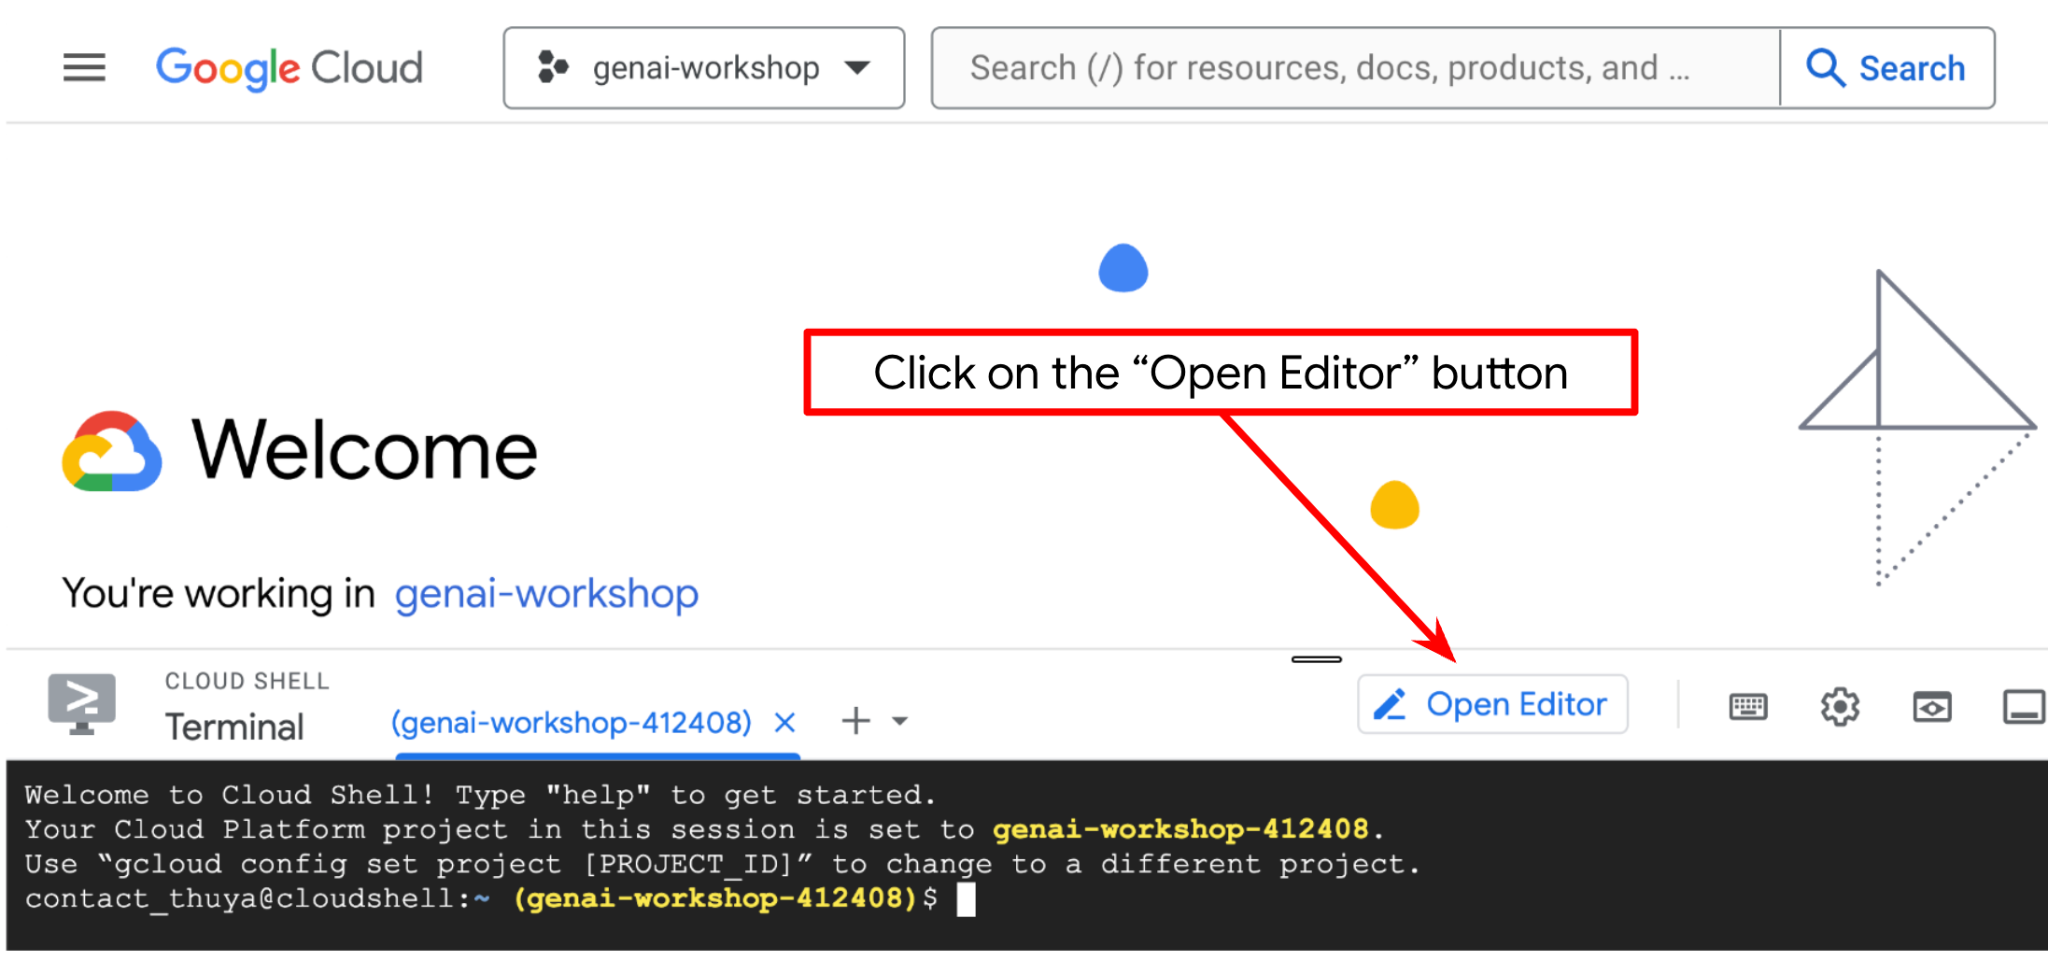
अब हम कोडिंग से जुड़े कुछ काम करने के लिए, कोड एडिटर सेट अप कर सकते हैं. इसके लिए, हम Cloud Shell Editor का इस्तेमाल करेंगे
- 'एडिटर खोलें' बटन पर क्लिक करें. इससे Cloud Shell Editor खुल जाएगा. यहां हम अपना कोड लिख सकते हैं
- इसके बाद, हमें यह भी देखना होगा कि शेल को आपके पास मौजूद सही PROJECT ID के लिए पहले से कॉन्फ़िगर किया गया है या नहीं. अगर आपको टर्मिनल में $से पहले ( ) के अंदर वैल्यू दिखती है ( नीचे दिए गए स्क्रीनशॉट में, वैल्यू "adk-multimodal-tool" है), तो यह वैल्यू आपके चालू शेल सेशन के लिए कॉन्फ़िगर किए गए प्रोजेक्ट को दिखाती है.

अगर दिखाई गई वैल्यू पहले से ही सही है, तो अगले निर्देश को छोड़ा जा सकता है. हालांकि, अगर यह सही नहीं है या मौजूद नहीं है, तो यह कमांड चलाएं
gcloud config set project <YOUR_PROJECT_ID>
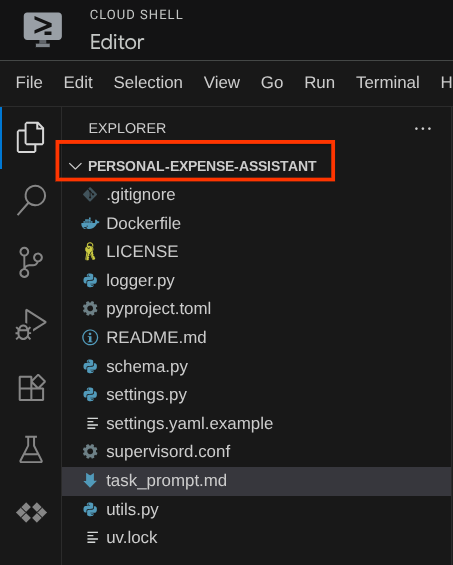
- इसके बाद, कोड सीखने की इस लैब के लिए, टेंप्लेट की वर्किंग डायरेक्ट्री को Github से क्लोन करें. इसके लिए, यहां दिया गया निर्देश चलाएं. इससे personal-expense-assistant डायरेक्ट्री में वर्किंग डायरेक्ट्री बन जाएगी
git clone https://github.com/alphinside/personal-expense-assistant-adk-codelab-starter.git personal-expense-assistant
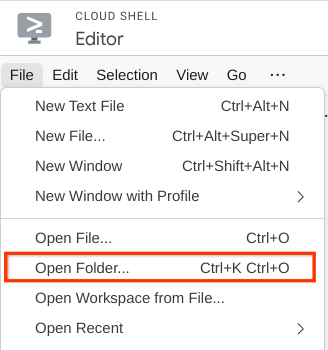
- इसके बाद, Cloud Shell Editor के सबसे ऊपर वाले सेक्शन पर जाएं और File->Open Folder पर क्लिक करें. इसके बाद, अपनी username डायरेक्ट्री ढूंढें और personal-expense-assistant डायरेक्ट्री ढूंढें. इसके बाद, OK बटन पर क्लिक करें. इससे चुनी गई डायरेक्ट्री, मुख्य वर्किंग डायरेक्ट्री बन जाएगी. इस उदाहरण में, उपयोगकर्ता नाम alvinprayuda है. इसलिए, डायरेक्ट्री का पाथ यहां दिखाया गया है

अब आपका Cloud Shell Editor ऐसा दिखना चाहिए
एनवायरमेंट सेटअप करना
Python वर्चुअल एनवायरमेंट तैयार करना
अगला चरण, डेवलपमेंट एनवायरमेंट तैयार करना है. आपका मौजूदा चालू टर्मिनल, personal-expense-assistant वर्किंग डायरेक्ट्री में होना चाहिए. इस कोडलैब में, Python 3.12 का इस्तेमाल किया जाएगा. साथ ही, Python के वर्शन और वर्चुअल एनवायरमेंट को बनाने और मैनेज करने की ज़रूरत को आसान बनाने के लिए, हम uv python project manager का इस्तेमाल करेंगे
- अगर आपने अब तक टर्मिनल नहीं खोला है, तो टर्मिनल -> नया टर्मिनल पर क्लिक करके इसे खोलें. इसके अलावा, Ctrl + Shift + C का इस्तेमाल करके भी इसे खोला जा सकता है. इससे ब्राउज़र के सबसे नीचे एक टर्मिनल विंडो खुलेगी

- अब
uvका इस्तेमाल करके वर्चुअल एनवायरमेंट शुरू करें. इन निर्देशों को चलाएं
cd ~/personal-expense-assistant
uv sync --frozen
इससे .venv डायरेक्ट्री बन जाएगी और डिपेंडेंसी इंस्टॉल हो जाएंगी. pyproject.toml की झलक से, आपको इस तरह दिखाई गई डिपेंडेंसी के बारे में जानकारी मिलेगी
dependencies = [
    "datasets>=3.5.0",
    "google-adk==1.18",
    "google-cloud-firestore>=2.20.1",
    "gradio>=5.23.1",
    "pydantic>=2.10.6",
    "pydantic-settings[yaml]>=2.8.1",
]
कॉन्फ़िगरेशन फ़ाइलें सेट अप करना
अब हमें इस प्रोजेक्ट के लिए कॉन्फ़िगरेशन फ़ाइलें सेट अप करनी होंगी. हम YAML फ़ाइल से कॉन्फ़िगरेशन पढ़ने के लिए, pydantic-settings का इस्तेमाल करते हैं.
हमने settings.yaml.example में फ़ाइल का टेंप्लेट पहले ही दे दिया है. हमें फ़ाइल को कॉपी करके , उसका नाम settings.yaml रखना होगा. फ़ाइल बनाने के लिए, यह निर्देश चलाएं
cp settings.yaml.example settings.yaml
इसके बाद, इस वैल्यू को फ़ाइल में कॉपी करें
GCLOUD_LOCATION: "us-central1"
GCLOUD_PROJECT_ID: "your-project-id"
BACKEND_URL: "http://localhost:8081/chat"
STORAGE_BUCKET_NAME: "personal-expense-{your-project-id}"
DB_COLLECTION_NAME: "personal-expense-assistant-receipts"
इस कोडलैब के लिए, हम GCLOUD_LOCATION, BACKEND_URL, और DB_COLLECTION_NAME के लिए पहले से कॉन्फ़िगर की गई वैल्यू का इस्तेमाल करेंगे .
अब हम अगले चरण पर जा सकते हैं. इसमें एजेंट और फिर सेवाएं बनाई जाएंगी
3. 🚀 Google ADK और Gemini 2.5 का इस्तेमाल करके एजेंट बनाना
ADK के डायरेक्ट्री स्ट्रक्चर के बारे में जानकारी
आइए, सबसे पहले यह जानते हैं कि ADK में क्या-क्या सुविधाएं उपलब्ध हैं और एजेंट कैसे बनाया जाता है. ADK के पूरे दस्तावेज़ को इस यूआरएल पर ऐक्सेस किया जा सकता है . ADK, सीएलआई कमांड को लागू करने के लिए कई सुविधाएं देता है. इनमें से कुछ यहां दिए गए हैं :
- एजेंट डायरेक्ट्री स्ट्रक्चर सेट अप करना
- सीएलआई के इनपुट और आउटपुट के ज़रिए, बातचीत करने की सुविधा को तुरंत आज़माएं
- लोकल डेवलपमेंट यूज़र इंटरफ़ेस (यूआई) वेब इंटरफ़ेस को तुरंत सेटअप करना
अब, CLI कमांड का इस्तेमाल करके एजेंट डायरेक्ट्री स्ट्रक्चर बनाते हैं. यह कमांड चलाएं.
uv run adk create expense_manager_agent
जब पूछा जाए, तो मॉडल gemini-2.5-flash और Vertex AI बैकएंड चुनें. इसके बाद, विज़र्ड आपसे प्रोजेक्ट आईडी और जगह की जानकारी मांगेगा. डिफ़ॉल्ट विकल्पों को स्वीकार करने के लिए, Enter दबाएं या ज़रूरत के हिसाब से उनमें बदलाव करें. बस यह देख लें कि आपने इस लैब में पहले बनाया गया सही प्रोजेक्ट आईडी इस्तेमाल किया हो. आउटपुट ऐसा दिखेगा:
Choose a model for the root agent:
1. gemini-2.5-flash
2. Other models (fill later)
Choose model (1, 2): 1
1. Google AI
2. Vertex AI
Choose a backend (1, 2): 2

You need an existing Google Cloud account and project, check out this link for details:
https://google.github.io/adk-docs/get-started/quickstart/#gemini---google-cloud-vertex-ai

Enter Google Cloud project ID [going-multimodal-lab]:
Enter Google Cloud region [us-central1]:

Agent created in /home/username/personal-expense-assistant/expense_manager_agent:
- .env
- __init__.py
- agent.py
इससे एजेंट डायरेक्ट्री का यह स्ट्रक्चर बन जाएगा
expense_manager_agent/
├── __init__.py
├── .env
├── agent.py
init.py और agent.py की जांच करने पर, आपको यह कोड दिखेगा
# __init__.py

from . import agent
# agent.py

from google.adk.agents import Agent

root_agent = Agent(
    model='gemini-2.5-flash',
    name='root_agent',
    description='A helpful assistant for user questions.',
    instruction='Answer user questions to the best of your knowledge',
)
अब इसे चलाने के लिए, यह कमांड डालें
uv run adk run expense_manager_agent
टेस्टिंग पूरी होने के बाद, एजेंट से बाहर निकलने के लिए exit टाइप करें या Ctrl+D दबाएं.
खर्च मैनेज करने वाला एजेंट बनाना
आइए, खर्च मैनेज करने वाला एजेंट बनाएं! expense_manager_agent/agent.py फ़ाइल खोलें और नीचे दिए गए कोड को कॉपी करें. इसमें root_agent शामिल होगा.
# expense_manager_agent/agent.py

from google.adk.agents import Agent
from expense_manager_agent.tools import (
    store_receipt_data,
    search_receipts_by_metadata_filter,
    search_relevant_receipts_by_natural_language_query,
    get_receipt_data_by_image_id,
)
from expense_manager_agent.callbacks import modify_image_data_in_history
import os
from settings import get_settings
from google.adk.planners import BuiltInPlanner
from google.genai import types

SETTINGS = get_settings()
os.environ["GOOGLE_CLOUD_PROJECT"] = SETTINGS.GCLOUD_PROJECT_ID
os.environ["GOOGLE_CLOUD_LOCATION"] = SETTINGS.GCLOUD_LOCATION
os.environ["GOOGLE_GENAI_USE_VERTEXAI"] = "TRUE"

# Get the code file directory path and read the task prompt file
current_dir = os.path.dirname(os.path.abspath(__file__))
prompt_path = os.path.join(current_dir, "task_prompt.md")
with open(prompt_path, "r") as file:
    task_prompt = file.read()

root_agent = Agent(
    name="expense_manager_agent",
    model="gemini-2.5-flash",
    description=(
        "Personal expense agent to help user track expenses, analyze receipts, and manage their financial records"
    ),
    instruction=task_prompt,
    tools=[
        store_receipt_data,
        get_receipt_data_by_image_id,
        search_receipts_by_metadata_filter,
        search_relevant_receipts_by_natural_language_query,
    ],
    planner=BuiltInPlanner(
        thinking_config=types.ThinkingConfig(
            thinking_budget=2048,
        )
    ),
    before_model_callback=modify_image_data_in_history,
)
कोड के बारे में जानकारी
इस स्क्रिप्ट में, एजेंट को शुरू करने की सुविधा शामिल है. इसमें हम इन चीज़ों को शुरू करते हैं:
- इस्तेमाल किए जाने वाले मॉडल को
gemini-2.5-flashपर सेट करें - सिस्टम प्रॉम्प्ट के तौर पर एजेंट के बारे में जानकारी और निर्देश सेट अप करें. यह जानकारी
task_prompt.mdसे पढ़ी जा रही है - एजेंट के फ़ंक्शन को काम करने के लिए ज़रूरी टूल उपलब्ध कराएं
- Gemini 2.5 Flash की सूझ-बूझ वाली क्षमताओं का इस्तेमाल करके, फ़ाइनल जवाब जनरेट करने या टास्क पूरा करने से पहले प्लानिंग की सुविधा चालू करना
- Gemini को अनुरोध भेजने से पहले, कॉल बैक इंटरसेप्ट सेट अप करें. इससे अनुमान लगाने से पहले, भेजी जाने वाली इमेज के डेटा की संख्या को सीमित किया जा सकेगा
4. 🚀 एजेंट टूल कॉन्फ़िगर करना
खर्च मैनेज करने वाला हमारा एजेंट, ये काम कर पाएगा:
- रसीद की इमेज से डेटा निकालना और डेटा और फ़ाइल को सेव करना
- खर्च के डेटा पर सटीक खोज करना
- खर्च के डेटा के आधार पर कॉन्टेक्स्ट के हिसाब से खोज करना
इसलिए, हमें इस सुविधा को चालू करने के लिए सही टूल की ज़रूरत है. expense_manager_agent डायरेक्ट्री में एक नई फ़ाइल बनाएं और उसका नाम tools.py रखें
touch expense_manager_agent/tools.py
expense_manage_agent/tools.py खोलें. इसके बाद, यहां दिया गया कोड कॉपी करें
# expense_manager_agent/tools.py

import datetime
from typing import Dict, List, Any
from google.cloud import firestore
from google.cloud.firestore_v1.vector import Vector
from google.cloud.firestore_v1 import FieldFilter
from google.cloud.firestore_v1.base_query import And
from google.cloud.firestore_v1.base_vector_query import DistanceMeasure
from settings import get_settings
from google import genai

SETTINGS = get_settings()
DB_CLIENT = firestore.Client(
    project=SETTINGS.GCLOUD_PROJECT_ID
)  # Will use "(default)" database
COLLECTION = DB_CLIENT.collection(SETTINGS.DB_COLLECTION_NAME)
GENAI_CLIENT = genai.Client(
    vertexai=True, location=SETTINGS.GCLOUD_LOCATION, project=SETTINGS.GCLOUD_PROJECT_ID
)
EMBEDDING_DIMENSION = 768
EMBEDDING_FIELD_NAME = "embedding"
INVALID_ITEMS_FORMAT_ERR = """
Invalid items format. Must be a list of dictionaries with 'name', 'price', and 'quantity' keys."""
RECEIPT_DESC_FORMAT = """
Store Name: {store_name}
Transaction Time: {transaction_time}
Total Amount: {total_amount}
Currency: {currency}
Purchased Items:
{purchased_items}
Receipt Image ID: {receipt_id}
"""


def sanitize_image_id(image_id: str) -> str:
    """Sanitize image ID by removing any leading/trailing whitespace."""
    if image_id.startswith("[IMAGE-"):
        image_id = image_id.split("ID ")[1].split("]")[0]

    return image_id.strip()


def store_receipt_data(
    image_id: str,
    store_name: str,
    transaction_time: str,
    total_amount: float,
    purchased_items: List[Dict[str, Any]],
    currency: str = "IDR",
) -> str:
    """
    Store receipt data in the database.

    Args:
        image_id (str): The unique identifier of the image. For example IMAGE-POSITION 0-ID 12345,
            the ID of the image is 12345.
        store_name (str): The name of the store.
        transaction_time (str): The time of purchase, in ISO format ("YYYY-MM-DDTHH:MM:SS.ssssssZ").
        total_amount (float): The total amount spent.
        purchased_items (List[Dict[str, Any]]): A list of items purchased with their prices. Each item must have:
            - name (str): The name of the item.
            - price (float): The price of the item.
            - quantity (int, optional): The quantity of the item. Defaults to 1 if not provided.
        currency (str, optional): The currency of the transaction, can be derived from the store location.
            If unsure, default is "IDR".

    Returns:
        str: A success message with the receipt ID.

    Raises:
        Exception: If the operation failed or input is invalid.
    """
    try:
        # In case of it provide full image placeholder, extract the id string
        image_id = sanitize_image_id(image_id)

        # Check if the receipt already exists
        doc = get_receipt_data_by_image_id(image_id)

        if doc:
            return f"Receipt with ID {image_id} already exists"

        # Validate transaction time
        if not isinstance(transaction_time, str):
            raise ValueError(
                "Invalid transaction time: must be a string in ISO format 'YYYY-MM-DDTHH:MM:SS.ssssssZ'"
            )
        try:
            datetime.datetime.fromisoformat(transaction_time.replace("Z", "+00:00"))
        except ValueError:
            raise ValueError(
                "Invalid transaction time format. Must be in ISO format 'YYYY-MM-DDTHH:MM:SS.ssssssZ'"
            )

        # Validate items format
        if not isinstance(purchased_items, list):
            raise ValueError(INVALID_ITEMS_FORMAT_ERR)

        for _item in purchased_items:
            if (
                not isinstance(_item, dict)
                or "name" not in _item
                or "price" not in _item
            ):
                raise ValueError(INVALID_ITEMS_FORMAT_ERR)

            if "quantity" not in _item:
                _item["quantity"] = 1

        # Create a combined text from all receipt information for better embedding
        result = GENAI_CLIENT.models.embed_content(
            model="text-embedding-004",
            contents=RECEIPT_DESC_FORMAT.format(
                store_name=store_name,
                transaction_time=transaction_time,
                total_amount=total_amount,
                currency=currency,
                purchased_items=purchased_items,
                receipt_id=image_id,
            ),
        )

        embedding = result.embeddings[0].values

        doc = {
            "receipt_id": image_id,
            "store_name": store_name,
            "transaction_time": transaction_time,
            "total_amount": total_amount,
            "currency": currency,
            "purchased_items": purchased_items,
            EMBEDDING_FIELD_NAME: Vector(embedding),
        }

        COLLECTION.add(doc)

        return f"Receipt stored successfully with ID: {image_id}"
    except Exception as e:
        raise Exception(f"Failed to store receipt: {str(e)}")


def search_receipts_by_metadata_filter(
    start_time: str,
    end_time: str,
    min_total_amount: float = -1.0,
    max_total_amount: float = -1.0,
) -> str:
    """
    Filter receipts by metadata within a specific time range and optionally by amount.

    Args:
        start_time (str): The start datetime for the filter (in ISO format, e.g. 'YYYY-MM-DDTHH:MM:SS.ssssssZ').
        end_time (str): The end datetime for the filter (in ISO format, e.g. 'YYYY-MM-DDTHH:MM:SS.ssssssZ').
        min_total_amount (float): The minimum total amount for the filter (inclusive). Defaults to -1.
        max_total_amount (float): The maximum total amount for the filter (inclusive). Defaults to -1.

    Returns:
        str: A string containing the list of receipt data matching all applied filters.

    Raises:
        Exception: If the search failed or input is invalid.
    """
    try:
        # Validate start and end times
        if not isinstance(start_time, str) or not isinstance(end_time, str):
            raise ValueError("start_time and end_time must be strings in ISO format")
        try:
            datetime.datetime.fromisoformat(start_time.replace("Z", "+00:00"))
            datetime.datetime.fromisoformat(end_time.replace("Z", "+00:00"))
        except ValueError:
            raise ValueError("start_time and end_time must be strings in ISO format")

        # Start with the base collection reference
        query = COLLECTION

        # Build the composite query by properly chaining conditions
        # Notes that this demo assume 1 user only,
        # need to refactor the query for multiple user
        filters = [
            FieldFilter("transaction_time", ">=", start_time),
            FieldFilter("transaction_time", "<=", end_time),
        ]

        # Add optional filters
        if min_total_amount != -1:
            filters.append(FieldFilter("total_amount", ">=", min_total_amount))

        if max_total_amount != -1:
            filters.append(FieldFilter("total_amount", "<=", max_total_amount))

        # Apply the filters
        composite_filter = And(filters=filters)
        query = query.where(filter=composite_filter)

        # Execute the query and collect results
        search_result_description = "Search by Metadata Results:\n"
        for doc in query.stream():
            data = doc.to_dict()
            data.pop(
                EMBEDDING_FIELD_NAME, None
            )  # Remove embedding as it's not needed for display

            search_result_description += f"\n{RECEIPT_DESC_FORMAT.format(**data)}"

        return search_result_description
    except Exception as e:
        raise Exception(f"Error filtering receipts: {str(e)}")


def search_relevant_receipts_by_natural_language_query(
    query_text: str, limit: int = 5
) -> str:
    """
    Search for receipts with content most similar to the query using vector search.
    This tool can be use for user query that is difficult to translate into metadata filters.
    Such as store name or item name which sensitive to string matching.
    Use this tool if you cannot utilize the search by metadata filter tool.

    Args:
        query_text (str): The search text (e.g., "coffee", "dinner", "groceries").
        limit (int, optional): Maximum number of results to return (default: 5).

    Returns:
        str: A string containing the list of contextually relevant receipt data.

    Raises:
        Exception: If the search failed or input is invalid.
    """
    try:
        # Generate embedding for the query text
        result = GENAI_CLIENT.models.embed_content(
            model="text-embedding-004", contents=query_text
        )
        query_embedding = result.embeddings[0].values

        # Notes that this demo assume 1 user only,
        # need to refactor the query for multiple user
        vector_query = COLLECTION.find_nearest(
            vector_field=EMBEDDING_FIELD_NAME,
            query_vector=Vector(query_embedding),
            distance_measure=DistanceMeasure.EUCLIDEAN,
            limit=limit,
        )

        # Execute the query and collect results
        search_result_description = "Search by Contextual Relevance Results:\n"
        for doc in vector_query.stream():
            data = doc.to_dict()
            data.pop(
                EMBEDDING_FIELD_NAME, None
            )  # Remove embedding as it's not needed for display
            search_result_description += f"\n{RECEIPT_DESC_FORMAT.format(**data)}"

        return search_result_description
    except Exception as e:
        raise Exception(f"Error searching receipts: {str(e)}")


def get_receipt_data_by_image_id(image_id: str) -> Dict[str, Any]:
    """
    Retrieve receipt data from the database using the image_id.

    Args:
        image_id (str): The unique identifier of the receipt image. For example, if the placeholder is
            [IMAGE-ID 12345], the ID to use is 12345.

    Returns:
        Dict[str, Any]: A dictionary containing the receipt data with the following keys:
            - receipt_id (str): The unique identifier of the receipt image.
            - store_name (str): The name of the store.
            - transaction_time (str): The time of purchase in UTC.
            - total_amount (float): The total amount spent.
            - currency (str): The currency of the transaction.
            - purchased_items (List[Dict[str, Any]]): List of items purchased with their details.
        Returns an empty dictionary if no receipt is found.
    """
    # In case of it provide full image placeholder, extract the id string
    image_id = sanitize_image_id(image_id)

    # Query the receipts collection for documents with matching receipt_id (image_id)
    # Notes that this demo assume 1 user only,
    # need to refactor the query for multiple user
    query = COLLECTION.where(filter=FieldFilter("receipt_id", "==", image_id)).limit(1)
    docs = list(query.stream())

    if not docs:
        return {}

    # Get the first matching document
    doc_data = docs[0].to_dict()
    doc_data.pop(EMBEDDING_FIELD_NAME, None)

    return doc_data
कोड के बारे में जानकारी
टूल के फ़ंक्शन को लागू करने के लिए, हम इन दो मुख्य बातों को ध्यान में रखकर टूल डिज़ाइन करते हैं:
- रसीद के डेटा को पार्स करना और इमेज आईडी स्ट्रिंग प्लेसहोल्डर
[IMAGE-ID <hash-of-image-1>]का इस्तेमाल करके, उसे ओरिजनल फ़ाइल पर मैप करना - Firestore डेटाबेस का इस्तेमाल करके डेटा सेव करना और उसे वापस पाना
"store_receipt_data" टूल
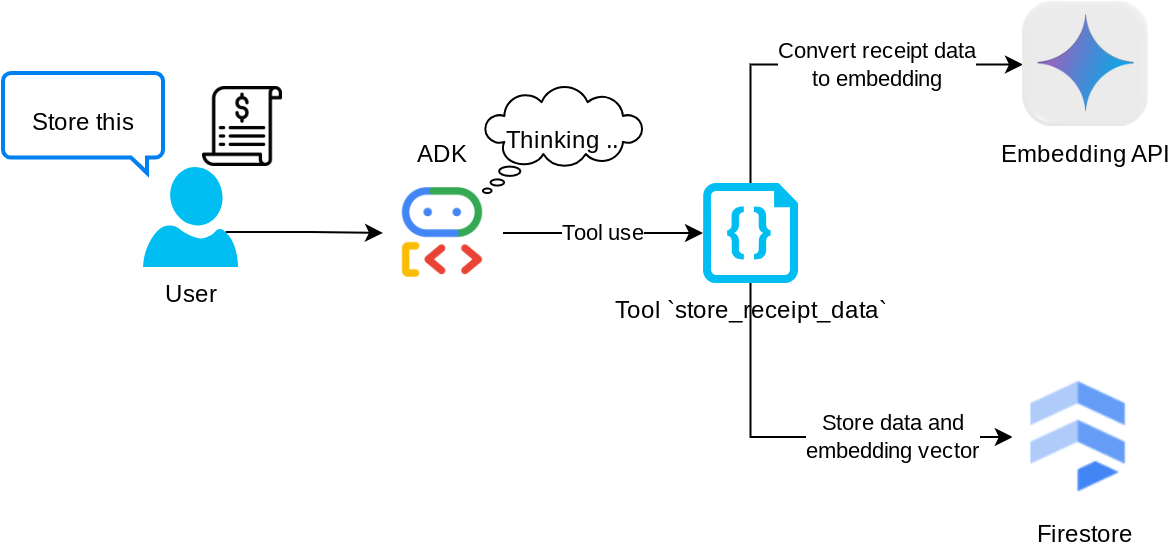
यह टूल, ऑप्टिकल कैरेक्टर रिकॉग्निशन टूल है. यह इमेज डेटा से ज़रूरी जानकारी को पार्स करेगा. साथ ही, इमेज आईडी स्ट्रिंग की पहचान करेगा और उन्हें एक साथ मैप करेगा, ताकि उन्हें Firestore डेटाबेस में सेव किया जा सके.
इसके अलावा, यह टूल रसीद के कॉन्टेंट को text-embedding-004 का इस्तेमाल करके एम्बेडिंग में बदलता है, ताकि सभी मेटाडेटा और एम्बेडिंग को एक साथ सेव और इंडेक्स किया जा सके. क्वेरी या कॉन्टेक्स्ट के हिसाब से खोज करने की सुविधा चालू की गई.
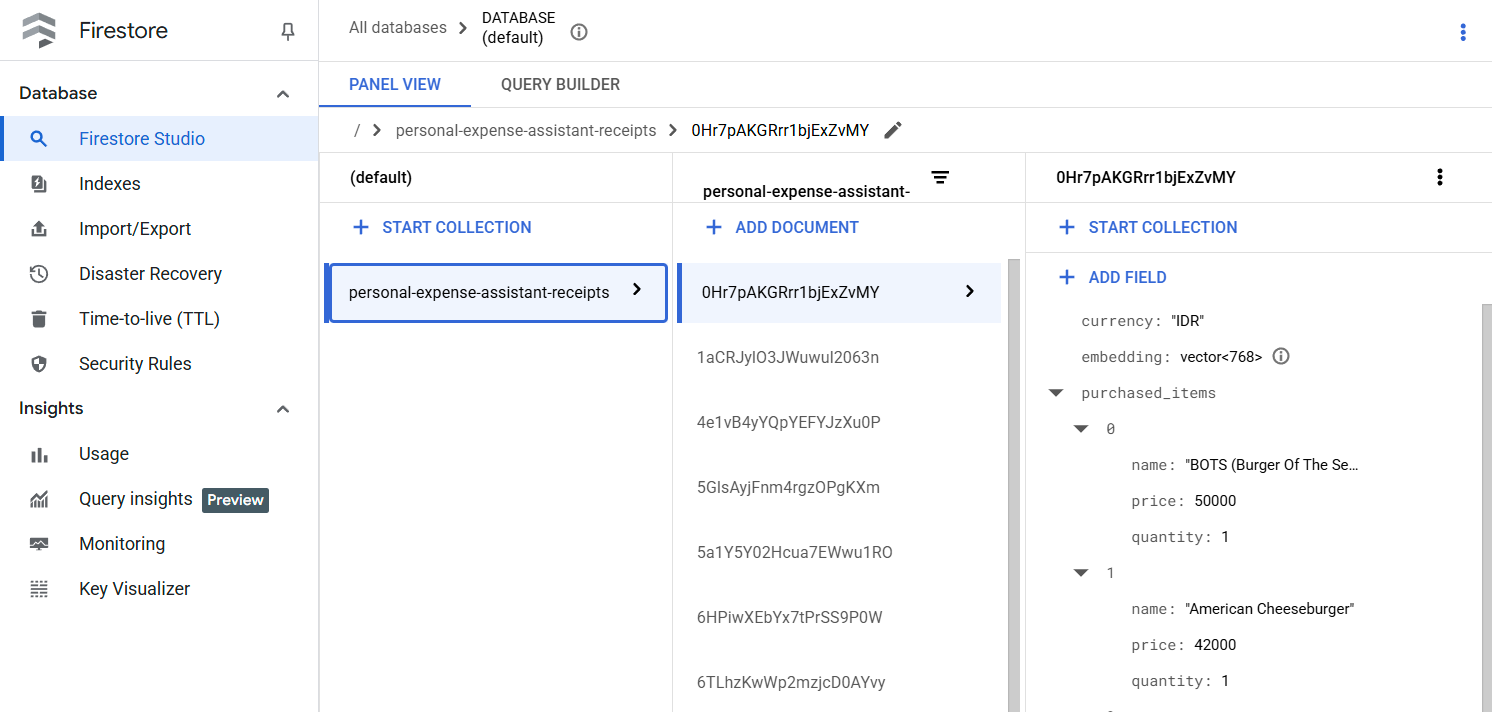
इस टूल को इस्तेमाल करने के बाद, आपको दिखेगा कि रसीद का डेटा पहले से ही Firestore डेटाबेस में इंडेक्स किया गया है. यह डेटा, यहां दिखाया गया है
"search_receipts_by_metadata_filter" टूल
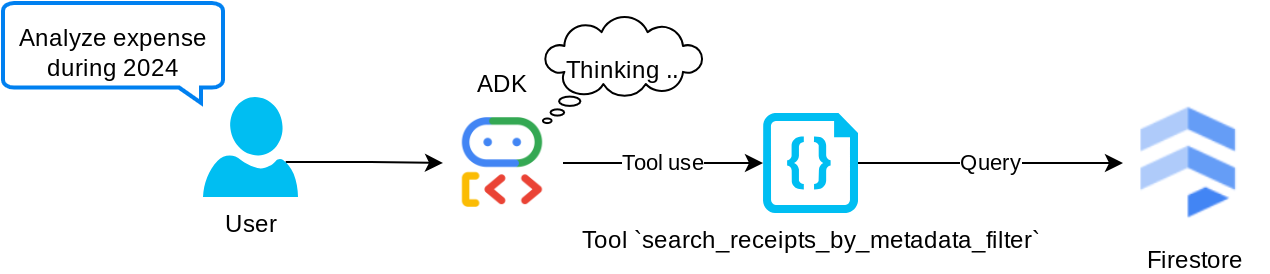
यह टूल, उपयोगकर्ता की क्वेरी को मेटाडेटा क्वेरी फ़िल्टर में बदलता है. इससे तारीख की सीमा और/या कुल लेन-देन के हिसाब से खोज की जा सकती है. यह मैच किए गए सभी रसीद डेटा को वापस लाएगा. इस प्रोसेस में, हम एम्बेडिंग फ़ील्ड को हटा देंगे, क्योंकि एजेंट को कॉन्टेक्स्ट समझने के लिए इसकी ज़रूरत नहीं होती
"search_relevant_receipts_by_natural_language_query" टूल
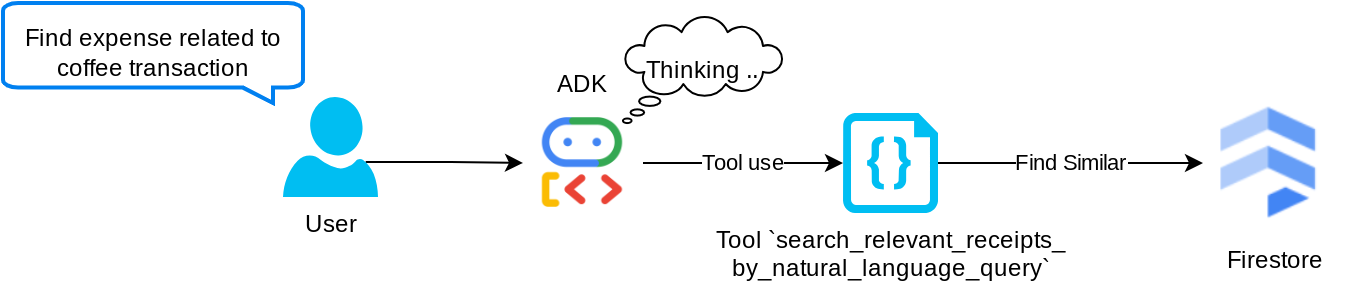
यह हमारा रीट्रिवल ऑगमेंटेड जनरेशन (आरएजी) टूल है. हमारा एजेंट, वेक्टर डेटाबेस से काम की रसीदें पाने के लिए, अपनी क्वेरी डिज़ाइन कर सकता है. साथ ही, वह यह भी तय कर सकता है कि इस टूल का इस्तेमाल कब करना है. एजेंटिक आरएजी अप्रोच की परिभाषाओं में से एक यह है कि एजेंट को यह फ़ैसला लेने की अनुमति दी जाती है कि वह इस आरएजी टूल का इस्तेमाल करेगा या नहीं. साथ ही, उसे अपनी क्वेरी डिज़ाइन करने की अनुमति भी दी जाती है.
हम इसे न सिर्फ़ अपनी क्वेरी बनाने की अनुमति देते हैं, बल्कि यह भी चुनने की अनुमति देते हैं कि इसे कितने काम के दस्तावेज़ों को वापस पाना है. सही प्रॉम्प्ट इंजीनियरिंग के साथ इस्तेमाल करने पर, जैसे कि
# Example prompt

Always filter the result from tool
search_relevant_receipts_by_natural_language_query as the returned
result may contain irrelevant information
इससे यह टूल, एक असरदार टूल बन जाएगा. इसकी मदद से, लगभग कुछ भी खोजा जा सकेगा. हालांकि, सबसे मिलते-जुलते आइटम खोजने की सुविधा सटीक नहीं होती. इसलिए, हो सकता है कि आपको उम्मीद के मुताबिक सभी नतीजे न मिलें.
5. 🚀 कॉल बैक के ज़रिए बातचीत के कॉन्टेक्स्ट में बदलाव करना
Google ADK की मदद से, हम एजेंट के रनटाइम को अलग-अलग लेवल पर "इंटरसेप्ट" कर सकते हैं. इस सुविधा के बारे में ज़्यादा जानने के लिए, यह दस्तावेज़ पढ़ें . इस लैब में, हम before_model_callback का इस्तेमाल करते हैं. इससे एलएलएम को अनुरोध भेजने से पहले, उसमें बदलाव किया जा सकता है. ऐसा इसलिए किया जाता है, ताकि बातचीत के पुराने इतिहास के कॉन्टेक्स्ट में मौजूद इमेज डेटा को हटाया जा सके. साथ ही, सिर्फ़ उपयोगकर्ता के पिछले तीन इंटरैक्शन में मौजूद इमेज डेटा को शामिल किया जा सके. इससे एलएलएम ज़्यादा असरदार तरीके से काम कर पाता है
हालांकि, हम अब भी चाहते हैं कि एजेंट के पास इमेज डेटा का कॉन्टेक्स्ट हो, ताकि ज़रूरत पड़ने पर वह उसका इस्तेमाल कर सके. इसलिए, हम बातचीत में हर इमेज बाइट डेटा के बाद, स्ट्रिंग इमेज आईडी प्लेसहोल्डर जोड़ने का एक तरीका जोड़ते हैं. इससे एजेंट को इमेज आईडी को उसकी असल फ़ाइल के डेटा से लिंक करने में मदद मिलेगी. इसका इस्तेमाल इमेज सेव करने या वापस पाने के समय किया जा सकता है. स्ट्रक्चर कुछ ऐसा दिखेगा
<image-byte-data-1>
[IMAGE-ID <hash-of-image-1>]
<image-byte-data-2>
[IMAGE-ID <hash-of-image-2>]
And so on..
इसके अलावा, जब बातचीत के इतिहास में बाइट डेटा पुराना हो जाता है, तब भी स्ट्रिंग आइडेंटिफ़ायर मौजूद रहता है. इससे टूल का इस्तेमाल करके डेटा को ऐक्सेस किया जा सकता है. इमेज का डेटा हटाने के बाद, इतिहास के स्ट्रक्चर का उदाहरण
[IMAGE-ID <hash-of-image-1>]
[IMAGE-ID <hash-of-image-2>]
And so on..
आइए प्रारंभ करें! expense_manager_agent डायरेक्ट्री में एक नई फ़ाइल बनाएं और उसका नाम callbacks.py रखें
touch expense_manager_agent/callbacks.py
expense_manager_agent/callbacks.py फ़ाइल खोलें. इसके बाद, नीचे दिया गया कोड कॉपी करें
# expense_manager_agent/callbacks.py

import hashlib
from google.genai import types
from google.adk.agents.callback_context import CallbackContext
from google.adk.models.llm_request import LlmRequest


def modify_image_data_in_history(
    callback_context: CallbackContext, llm_request: LlmRequest
) -> None:
    # The following code will modify the request sent to LLM
    # We will only keep image data in the last 3 user messages using a reverse and counter approach

    # Count how many user messages we've processed
    user_message_count = 0

    # Process the reversed list
    for content in reversed(llm_request.contents):
        # Only count for user manual query, not function call
        if (content.role == "user") and (content.parts[0].function_response is None):
            user_message_count += 1
            modified_content_parts = []

            # Check any missing image ID placeholder for any image data
            # Then remove image data from conversation history if more than 3 user messages
            for idx, part in enumerate(content.parts):
                if part.inline_data is None:
                    modified_content_parts.append(part)
                    continue

                if (
                    (idx + 1 >= len(content.parts))
                    or (content.parts[idx + 1].text is None)
                    or (not content.parts[idx + 1].text.startswith("[IMAGE-ID "))
                ):
                    # Generate hash ID for the image and add a placeholder
                    image_data = part.inline_data.data
                    hasher = hashlib.sha256(image_data)
                    image_hash_id = hasher.hexdigest()[:12]
                    placeholder = f"[IMAGE-ID {image_hash_id}]"

                    # Only keep image data in the last 3 user messages
                    if user_message_count <= 3:
                        modified_content_parts.append(part)

                    modified_content_parts.append(types.Part(text=placeholder))

                else:
                    # Only keep image data in the last 3 user messages
                    if user_message_count <= 3:
                        modified_content_parts.append(part)

            # This will modify the contents inside the llm_request
            content.parts = modified_content_parts
6. 🚀 प्रॉम्प्ट
जटिल इंटरैक्शन और क्षमताओं वाला एजेंट डिज़ाइन करने के लिए, हमें एक ऐसा प्रॉम्प्ट ढूंढना होगा जो एजेंट को सही तरीके से गाइड कर सके. इससे एजेंट, हमारी ज़रूरत के हिसाब से काम कर पाएगा.
पहले, हमारे पास बातचीत के इतिहास में इमेज डेटा को मैनेज करने का एक तरीका था. साथ ही, हमारे पास ऐसे टूल भी थे जिनका इस्तेमाल करना आसान नहीं था. जैसे, search_relevant_receipts_by_natural_language_query. हम चाहते हैं कि एजेंट, सही रसीद की इमेज खोज सके और उसे हमें भेज सके. इसका मतलब है कि हमें इस पूरी जानकारी को प्रॉम्प्ट के सही स्ट्रक्चर में देना होगा
हम एजेंट से कहेंगे कि वह आउटपुट को इस मार्कडाउन फ़ॉर्मैट में स्ट्रक्चर करे, ताकि सोचने की प्रोसेस, फ़ाइनल जवाब, और अटैचमेंट ( अगर कोई हो) को पार्स किया जा सके
# THINKING PROCESS

Thinking process here

# FINAL RESPONSE

Response to the user here

Attachments put inside json block

{
    "attachments": [
      "[IMAGE-ID <hash-id-1>]",
      "[IMAGE-ID <hash-id-2>]",
      ...
    ]
}
खर्च मैनेज करने वाले एजेंट के व्यवहार के बारे में हमारी शुरुआती उम्मीदों को पूरा करने के लिए, आइए इस प्रॉम्प्ट का इस्तेमाल करें. task_prompt.md फ़ाइल हमारी मौजूदा वर्किंग डायरेक्ट्री में पहले से मौजूद होनी चाहिए. हालांकि, हमें इसे expense_manager_agent डायरेक्ट्री में ले जाना होगा. इसे दूसरी जगह ले जाने के लिए, यह कमांड चलाएं
mv task_prompt.md expense_manager_agent/task_prompt.md
7. 🚀 एजेंट की जांच करना
अब सीएलआई के ज़रिए एजेंट से कम्यूनिकेट करने की कोशिश करें. इसके लिए, यह निर्देश चलाएं
uv run adk run expense_manager_agent
आपको इस तरह का आउटपुट दिखेगा. इसमें एजेंट के साथ बारी-बारी से चैट की जा सकती है. हालांकि, इस इंटरफ़ेस के ज़रिए सिर्फ़ टेक्स्ट भेजा जा सकता है
Log setup complete: /tmp/agents_log/agent.xxxx_xxx.log
To access latest log: tail -F /tmp/agents_log/agent.latest.log
Running agent root_agent, type exit to exit.
user: hello
[root_agent]: Hello there! How can I help you today?
user:
अब, सीएलआई इंटरैक्शन के अलावा, एडीके हमें डेवलपमेंट यूज़र इंटरफ़ेस (यूआई) की सुविधा भी देता है. इससे हम इंटरैक्शन के दौरान क्या हो रहा है, इसकी जांच कर सकते हैं. लोकल डेवलपमेंट यूज़र इंटरफ़ेस (यूआई) सर्वर शुरू करने के लिए, यह कमांड चलाएं
uv run adk web --port 8080
इससे आपको इस उदाहरण जैसा आउटपुट मिलेगा. इसका मतलब है कि अब वेब इंटरफ़ेस को ऐक्सेस किया जा सकता है
INFO:     Started server process [xxxx]
INFO:     Waiting for application startup.

+-----------------------------------------------------------------------------+
| ADK Web Server started                                                      |
|                                                                             |
| For local testing, access at http://localhost:8080.                         |
+-----------------------------------------------------------------------------+

INFO:     Application startup complete.
INFO:     Uvicorn running on http://0.0.0.0:8080 (Press CTRL+C to quit)
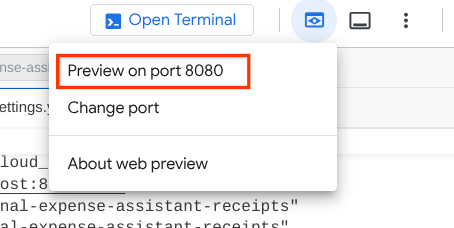
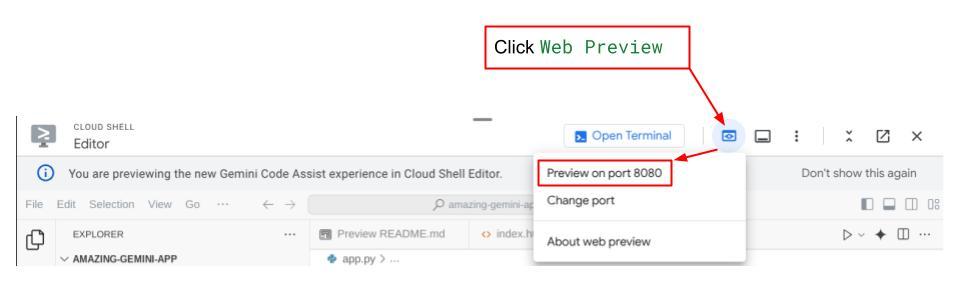
अब इसे देखने के लिए, Cloud Shell Editor के सबसे ऊपर मौजूद वेब प्रीव्यू बटन पर क्लिक करें. इसके बाद, पोर्ट 8080 पर प्रीव्यू करें को चुनें
आपको यह वेब पेज दिखेगा. इसमें सबसे ऊपर बाईं ओर मौजूद ड्रॉप-डाउन बटन से, उपलब्ध एजेंट चुने जा सकते हैं. हमारे मामले में, यह expense_manager_agent होना चाहिए. इसके बाद, बॉट से इंटरैक्ट किया जा सकता है. आपको बाईं ओर मौजूद विंडो में, एजेंट के रनटाइम के दौरान लॉग की जानकारी के बारे में कई तरह की जानकारी दिखेगी
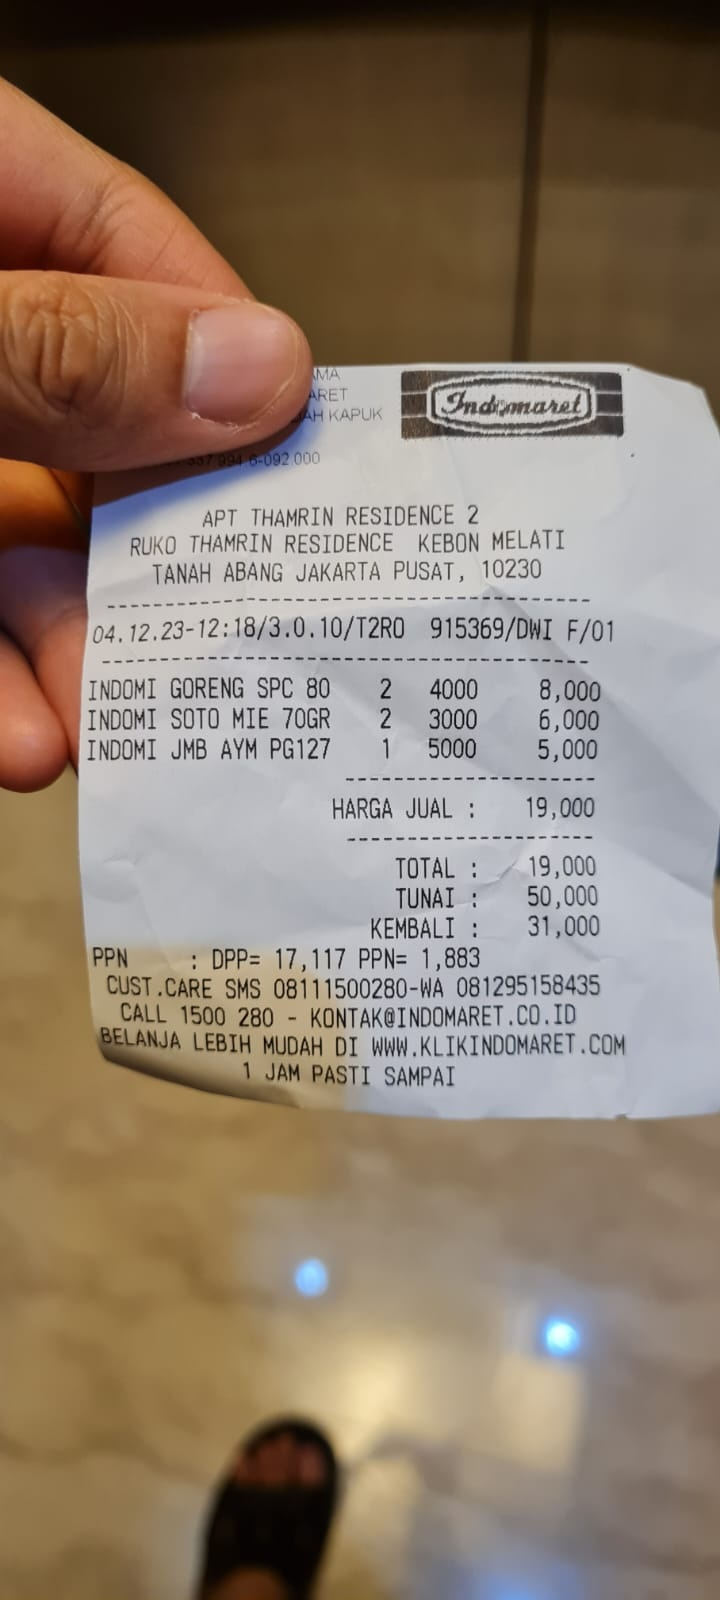
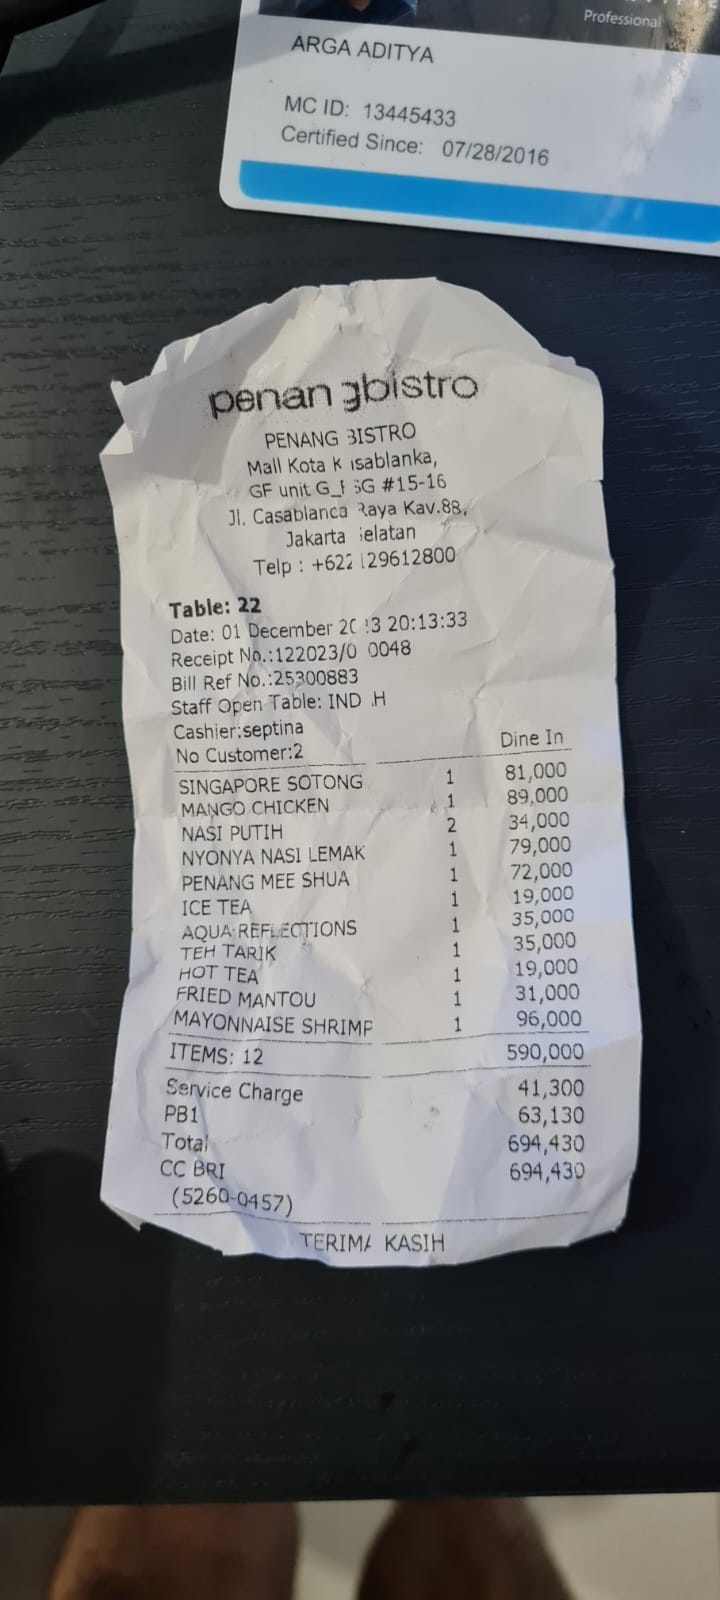
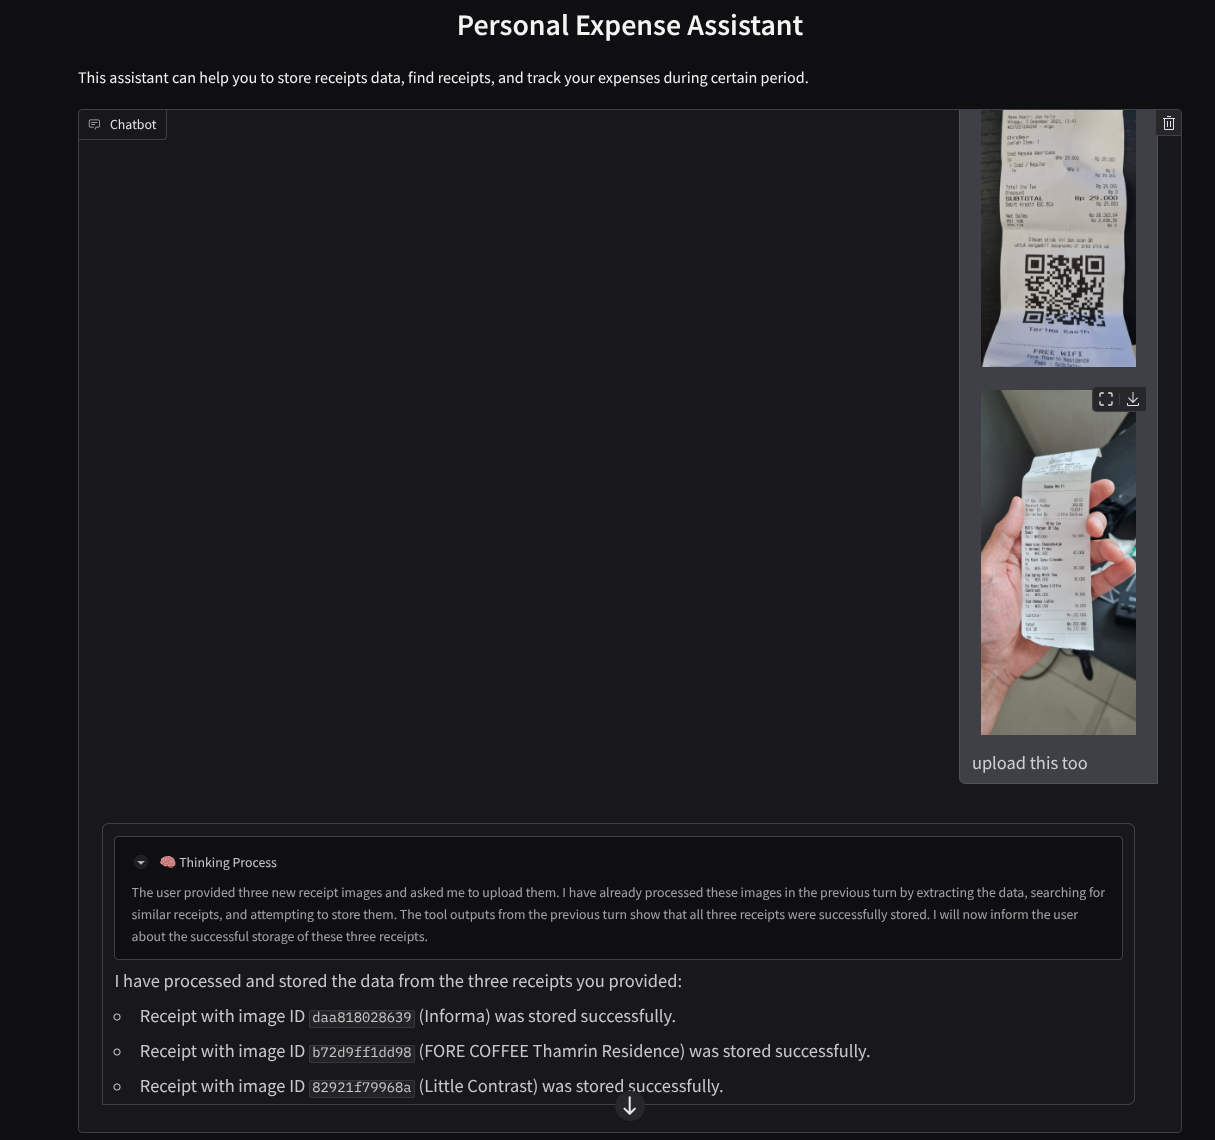
आइए, कुछ कार्रवाइयाँ करके देखते हैं! इन दो उदाहरण रसीदों को अपलोड करें ( सोर्स : Hugging face datasets mousserlane/id_receipt_dataset ) . हर इमेज पर राइट क्लिक करें और इमेज इस तरह सेव करें.. को चुनें ( इससे रसीद की इमेज डाउनलोड हो जाएगी). इसके बाद, "क्लिप" आइकॉन पर क्लिक करके, फ़ाइल को बॉट पर अपलोड करें. साथ ही, यह बताएं कि आपको इन रसीदों को सेव करना है
इसके बाद, कुछ खोजने या फ़ाइल वापस पाने के लिए, यहां दी गई क्वेरी आज़माएं
- "साल 2023 के दौरान हुए खर्च और उसके कुल योग की जानकारी दो"
- "मुझे Indomaret से मिली रसीद की फ़ाइल दिखाओ"
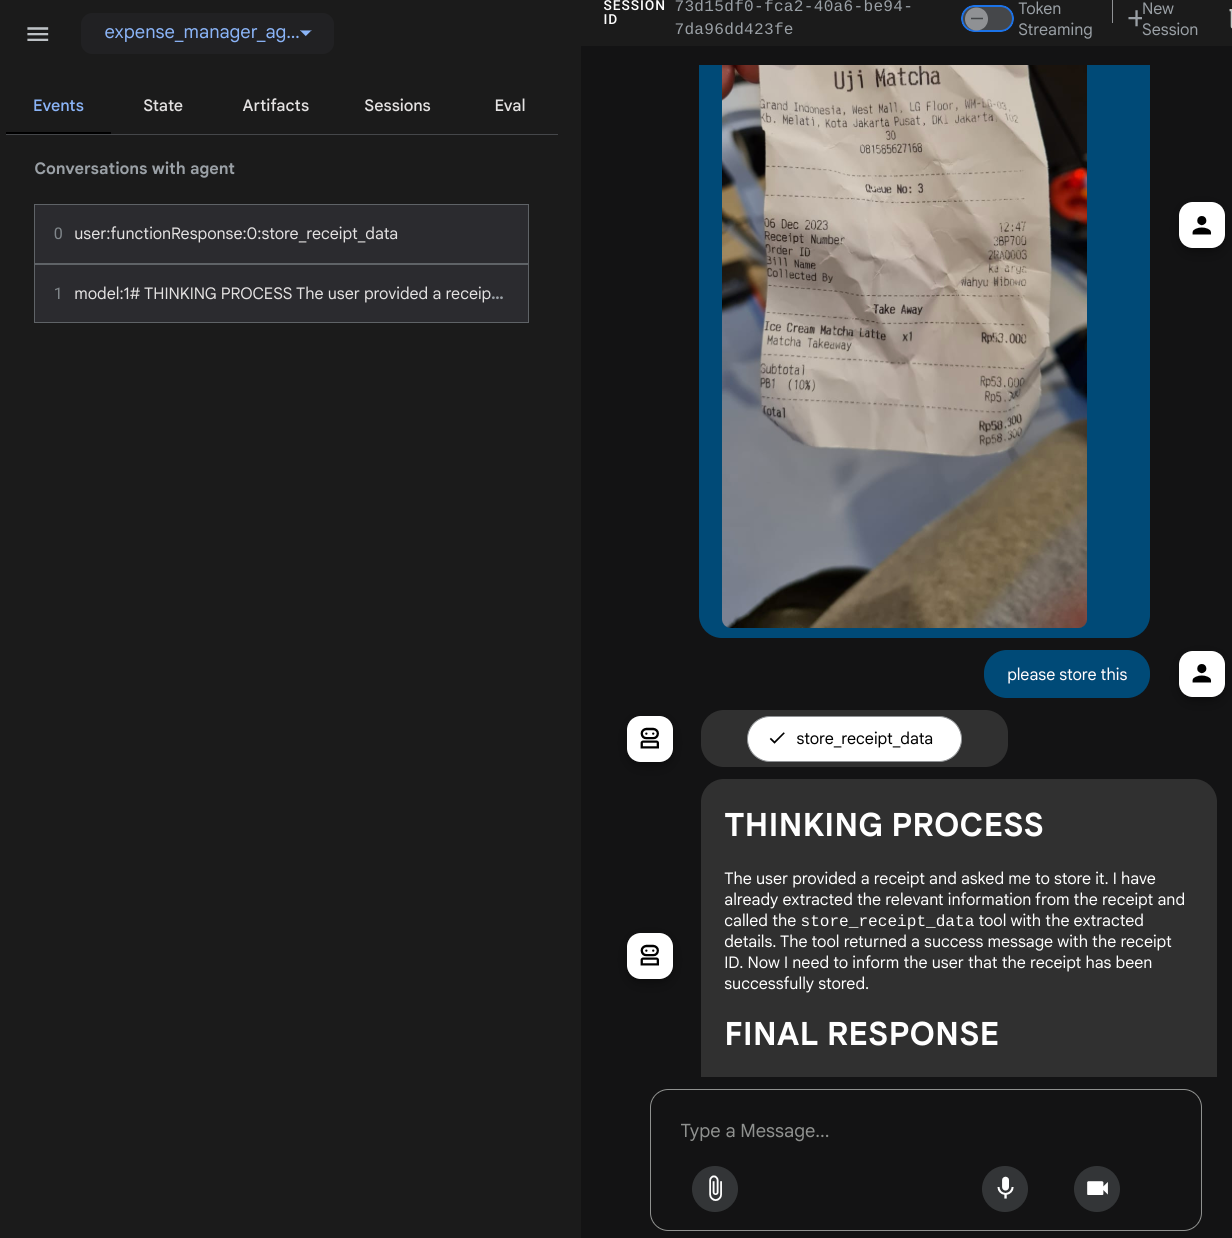
कुछ टूल का इस्तेमाल करते समय, डेवलपमेंट यूज़र इंटरफ़ेस (यूआई) में चल रही प्रोसेस की जांच की जा सकती है
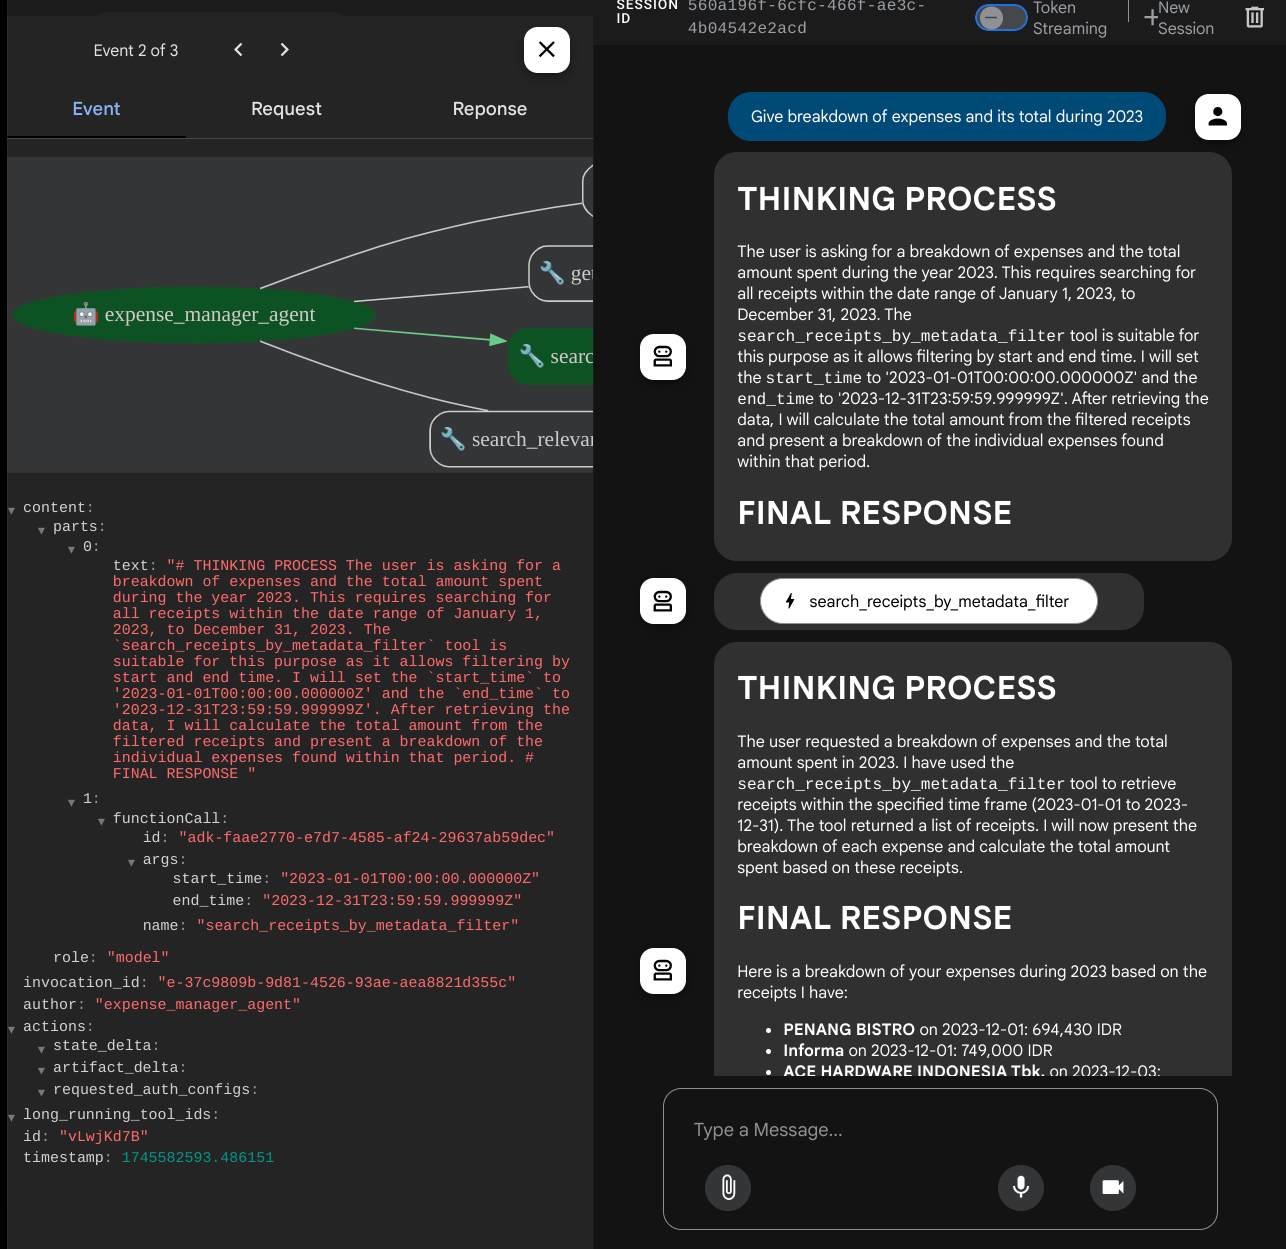
देखें कि एजेंट आपको कैसे जवाब देता है. साथ ही, यह देखें कि क्या वह task_prompt.py में दिए गए सभी नियमों का पालन करता है. बधाई हो! अब आपके पास पूरी तरह से काम करने वाला डेवलपमेंट एजेंट है.
अब इसे पूरा करने का समय है. इसके लिए, आपको बेहतर यूज़र इंटरफ़ेस (यूआई) और इमेज फ़ाइल को अपलोड और डाउनलोड करने की सुविधाएं देनी होंगी.
8. 🚀 Gradio का इस्तेमाल करके फ़्रंटएंड सेवा बनाना
हम चैट का एक ऐसा वेब इंटरफ़ेस बनाएंगे जो इस तरह दिखेगा
इसमें एक चैट इंटरफ़ेस होता है. इसमें उपयोगकर्ताओं के लिए एक इनपुट फ़ील्ड होता है, ताकि वे टेक्स्ट भेज सकें और रसीद की इमेज फ़ाइलें अपलोड कर सकें.
हम फ़्रंटएंड सेवा को Gradio का इस्तेमाल करके बनाएंगे.
नई फ़ाइल बनाएं और उसका नाम frontend.py रखें
touch frontend.py
इसके बाद, यहां दिए गए कोड को कॉपी करें और सेव करें
import mimetypes
import gradio as gr
import requests
import base64
from typing import List, Dict, Any
from settings import get_settings
from PIL import Image
import io
from schema import ImageData, ChatRequest, ChatResponse


SETTINGS = get_settings()


def encode_image_to_base64_and_get_mime_type(image_path: str) -> ImageData:
    """Encode a file to base64 string and get MIME type.

    Reads an image file and returns the base64-encoded image data and its MIME type.

    Args:
        image_path: Path to the image file to encode.

    Returns:
        ImageData object containing the base64 encoded image data and its MIME type.
    """
    # Read the image file
    with open(image_path, "rb") as file:
        image_content = file.read()

    # Get the mime type
    mime_type = mimetypes.guess_type(image_path)[0]

    # Base64 encode the image
    base64_data = base64.b64encode(image_content).decode("utf-8")

    # Return as ImageData object
    return ImageData(serialized_image=base64_data, mime_type=mime_type)


def decode_base64_to_image(base64_data: str) -> Image.Image:
    """Decode a base64 string to PIL Image.

    Converts a base64-encoded image string back to a PIL Image object
    that can be displayed or processed further.

    Args:
        base64_data: Base64 encoded string of the image.

    Returns:
        PIL Image object of the decoded image.
    """
    # Decode the base64 string and convert to PIL Image
    image_data = base64.b64decode(base64_data)
    image_buffer = io.BytesIO(image_data)
    image = Image.open(image_buffer)

    return image


def get_response_from_llm_backend(
    message: Dict[str, Any],
    history: List[Dict[str, Any]],
) -> List[str | gr.Image]:
    """Send the message and history to the backend and get a response.

    Args:
        message: Dictionary containing the current message with 'text' and optional 'files' keys.
        history: List of previous message dictionaries in the conversation.

    Returns:
        List containing text response and any image attachments from the backend service.
    """
    # Extract files and convert to base64
    image_data = []
    if uploaded_files := message.get("files", []):
        for file_path in uploaded_files:
            image_data.append(encode_image_to_base64_and_get_mime_type(file_path))

    # Prepare the request payload
    payload = ChatRequest(
        text=message["text"],
        files=image_data,
        session_id="default_session",
        user_id="default_user",
    )

    # Send request to backend
    try:
        response = requests.post(SETTINGS.BACKEND_URL, json=payload.model_dump())
        response.raise_for_status()  # Raise exception for HTTP errors

        result = ChatResponse(**response.json())
        if result.error:
            return [f"Error: {result.error}"]

        chat_responses = []

        if result.thinking_process:
            chat_responses.append(
                gr.ChatMessage(
                    role="assistant",
                    content=result.thinking_process,
                    metadata={"title": "🧠 Thinking Process"},
                )
            )

        chat_responses.append(gr.ChatMessage(role="assistant", content=result.response))

        if result.attachments:
            for attachment in result.attachments:
                image_data = attachment.serialized_image
                chat_responses.append(gr.Image(decode_base64_to_image(image_data)))

        return chat_responses
    except requests.exceptions.RequestException as e:
        return [f"Error connecting to backend service: {str(e)}"]


if __name__ == "__main__":
    demo = gr.ChatInterface(
        get_response_from_llm_backend,
        title="Personal Expense Assistant",
        description="This assistant can help you to store receipts data, find receipts, and track your expenses during certain period.",
        type="messages",
        multimodal=True,
        textbox=gr.MultimodalTextbox(file_count="multiple", file_types=["image"]),
    )

    demo.launch(
        server_name="0.0.0.0",
        server_port=8080,
    )
इसके बाद, हम यहां दिए गए निर्देश का इस्तेमाल करके, फ़्रंटएंड सेवा को चलाने की कोशिश कर सकते हैं. main.py फ़ाइल का नाम बदलकर frontend.py करना न भूलें
uv run frontend.py
आपको Cloud Console में, इससे मिलता-जुलता आउटपुट दिखेगा
* Running on local URL:  http://0.0.0.0:8080

To create a public link, set `share=True` in `launch()`.
इसके बाद, लोकल यूआरएल लिंक पर ctrl+क्लिक करके, वेब इंटरफ़ेस देखा जा सकता है. इसके अलावा, Cloud Editor में सबसे ऊपर दाईं ओर मौजूद वेब प्रीव्यू बटन पर क्लिक करके भी, फ़्रंटएंड ऐप्लिकेशन को ऐक्सेस किया जा सकता है. इसके बाद, पोर्ट 8080 पर प्रीव्यू करें को चुनें
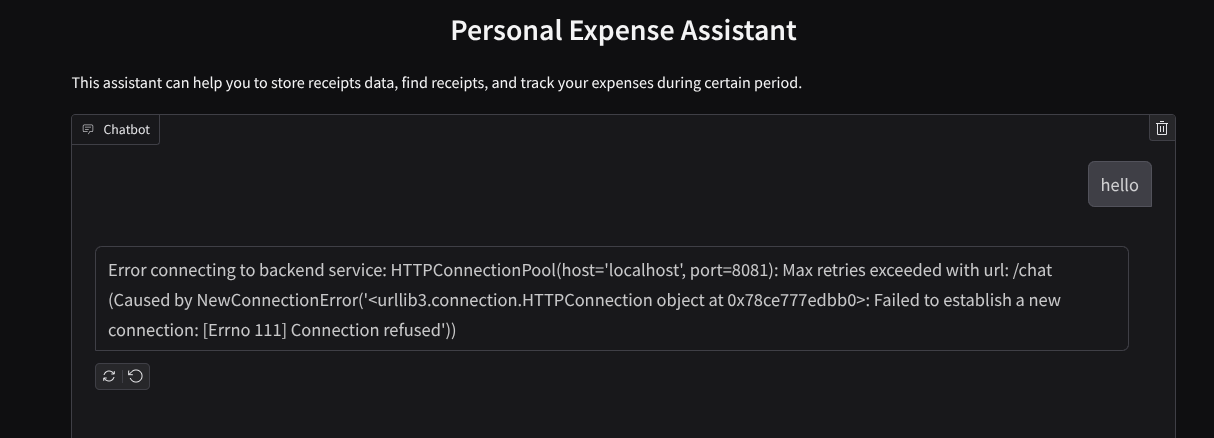
आपको वेब इंटरफ़ेस दिखेगा. हालांकि, चैट सबमिट करने की कोशिश करते समय आपको गड़बड़ी का मैसेज मिलेगा. ऐसा इसलिए होगा, क्योंकि बैकएंड सेवा को अब तक सेट अप नहीं किया गया है
अब सेवा को चलने दें और इसे अभी बंद न करें. हम बैकएंड सेवा को किसी अन्य टर्मिनल टैब में चलाएंगे
कोड के बारे में जानकारी
इस फ़्रंटएंड कोड में, हमने सबसे पहले उपयोगकर्ता को टेक्स्ट भेजने और एक से ज़्यादा फ़ाइलें अपलोड करने की सुविधा दी है. Gradio की मदद से, gr.ChatInterface और gr.MultimodalTextbox को मिलाकर, इस तरह की सुविधा बनाई जा सकती है
अब फ़ाइल और टेक्स्ट को बैकएंड में भेजने से पहले, हमें फ़ाइल का माइमटाइप पता लगाना होगा, क्योंकि बैकएंड को इसकी ज़रूरत होती है. हमें इमेज फ़ाइल के बाइट को base64 में कोड में बदलना होगा. साथ ही, इसे माइम टाइप के साथ भेजना होगा.
class ImageData(BaseModel):
    """Model for image data with hash identifier.

    Attributes:
        serialized_image: Optional Base64 encoded string of the image content.
        mime_type: MIME type of the image.
    """

    serialized_image: str
    mime_type: str
फ़्रंटएंड और बैकएंड के बीच इंटरैक्शन के लिए इस्तेमाल किया गया स्कीमा, schema.py में तय किया गया है. हम स्कीमा में डेटा की पुष्टि करने के लिए, Pydantic BaseModel का इस्तेमाल करते हैं
जवाब मिलने पर, हम पहले ही यह तय कर लेते हैं कि जवाब का कौन-सा हिस्सा सोचने की प्रोसेस, फ़ाइनल जवाब, और अटैचमेंट है. इसलिए, हम Gradio कॉम्पोनेंट का इस्तेमाल करके, हर कॉम्पोनेंट को यूज़र इंटरफ़ेस (यूआई) कॉम्पोनेंट के साथ दिखा सकते हैं.
class ChatResponse(BaseModel):
    """Model for a chat response.

    Attributes:
        response: The text response from the model.
        thinking_process: Optional thinking process of the model.
        attachments: List of image data to be displayed to the user.
        error: Optional error message if something went wrong.
    """

    response: str
    thinking_process: str = ""
    attachments: List[ImageData] = []
    error: Optional[str] = None
9. 🚀 FastAPI का इस्तेमाल करके बैकएंड सेवा बनाना
इसके बाद, हमें बैकएंड बनाना होगा. यह हमारे एजेंट को अन्य कॉम्पोनेंट के साथ शुरू कर सकता है, ताकि एजेंट रनटाइम को एक्ज़ीक्यूट किया जा सके.
नई फ़ाइल बनाएं और उसका नाम backend.py रखें
touch backend.py
इसके बाद, इस कोड को कॉपी करें
from expense_manager_agent.agent import root_agent as expense_manager_agent
from google.adk.sessions import InMemorySessionService
from google.adk.runners import Runner
from google.adk.events import Event
from fastapi import FastAPI, Body, Depends
from typing import AsyncIterator
from types import SimpleNamespace
import uvicorn
from contextlib import asynccontextmanager
from utils import (
    extract_attachment_ids_and_sanitize_response,
    download_image_from_gcs,
    extract_thinking_process,
    format_user_request_to_adk_content_and_store_artifacts,
)
from schema import ImageData, ChatRequest, ChatResponse
import logger
from google.adk.artifacts import GcsArtifactService
from settings import get_settings

SETTINGS = get_settings()
APP_NAME = "expense_manager_app"


# Application state to hold service contexts
class AppContexts(SimpleNamespace):
    """A class to hold application contexts with attribute access"""

    session_service: InMemorySessionService = None
    artifact_service: GcsArtifactService = None
    expense_manager_agent_runner: Runner = None


# Initialize application state
app_contexts = AppContexts()


@asynccontextmanager
async def lifespan(app: FastAPI):
    # Initialize service contexts during application startup
    app_contexts.session_service = InMemorySessionService()
    app_contexts.artifact_service = GcsArtifactService(
        bucket_name=SETTINGS.STORAGE_BUCKET_NAME
    )
    app_contexts.expense_manager_agent_runner = Runner(
        agent=expense_manager_agent,  # The agent we want to run
        app_name=APP_NAME,  # Associates runs with our app
        session_service=app_contexts.session_service,  # Uses our session manager
        artifact_service=app_contexts.artifact_service,  # Uses our artifact manager
    )

    logger.info("Application started successfully")
    yield
    logger.info("Application shutting down")
    # Perform cleanup during application shutdown if necessary


# Helper function to get application state as a dependency
async def get_app_contexts() -> AppContexts:
    return app_contexts


# Create FastAPI app
app = FastAPI(title="Personal Expense Assistant API", lifespan=lifespan)


@app.post("/chat", response_model=ChatResponse)
async def chat(
    request: ChatRequest = Body(...),
    app_context: AppContexts = Depends(get_app_contexts),
) -> ChatResponse:
    """Process chat request and get response from the agent"""

    # Prepare the user's message in ADK format and store image artifacts
    content = await format_user_request_to_adk_content_and_store_artifacts(
        request=request,
        app_name=APP_NAME,
        artifact_service=app_context.artifact_service,
    )

    final_response_text = "Agent did not produce a final response."  # Default

    # Use the session ID from the request or default if not provided
    session_id = request.session_id
    user_id = request.user_id

    # Create session if it doesn't exist
    if not await app_context.session_service.get_session(
        app_name=APP_NAME, user_id=user_id, session_id=session_id
    ):
        await app_context.session_service.create_session(
            app_name=APP_NAME, user_id=user_id, session_id=session_id
        )

    try:
        # Process the message with the agent
        # Type annotation: runner.run_async returns an AsyncIterator[Event]
        events_iterator: AsyncIterator[Event] = (
            app_context.expense_manager_agent_runner.run_async(
                user_id=user_id, session_id=session_id, new_message=content
            )
        )
        async for event in events_iterator:  # event has type Event
            # Key Concept: is_final_response() marks the concluding message for the turn
            if event.is_final_response():
                if event.content and event.content.parts:
                    # Extract text from the first part
                    final_response_text = event.content.parts[0].text
                elif event.actions and event.actions.escalate:
                    # Handle potential errors/escalations
                    final_response_text = f"Agent escalated: {event.error_message or 'No specific message.'}"
                break  # Stop processing events once the final response is found

        logger.info(
            "Received final response from agent", raw_final_response=final_response_text
        )

        # Extract and process any attachments and thinking process in the response
        base64_attachments = []
        sanitized_text, attachment_ids = extract_attachment_ids_and_sanitize_response(
            final_response_text
        )
        sanitized_text, thinking_process = extract_thinking_process(sanitized_text)

        # Download images from GCS and replace hash IDs with base64 data
        for image_hash_id in attachment_ids:
            # Download image data and get MIME type
            result = await download_image_from_gcs(
                artifact_service=app_context.artifact_service,
                image_hash=image_hash_id,
                app_name=APP_NAME,
                user_id=user_id,
                session_id=session_id,
            )
            if result:
                base64_data, mime_type = result
                base64_attachments.append(
                    ImageData(serialized_image=base64_data, mime_type=mime_type)
                )

        logger.info(
            "Processed response with attachments",
            sanitized_response=sanitized_text,
            thinking_process=thinking_process,
            attachment_ids=attachment_ids,
        )

        return ChatResponse(
            response=sanitized_text,
            thinking_process=thinking_process,
            attachments=base64_attachments,
        )

    except Exception as e:
        logger.error("Error processing chat request", error_message=str(e))
        return ChatResponse(
            response="", error=f"Error in generating response: {str(e)}"
        )


# Only run the server if this file is executed directly
if __name__ == "__main__":
    uvicorn.run(app, host="0.0.0.0", port=8081)
इसके बाद, हम बैकएंड सेवा को चलाने की कोशिश कर सकते हैं. याद रखें कि पिछले चरण में हमने फ़्रंटएंड सेवा को सही तरीके से चलाया था. अब हमें नया टर्मिनल खोलना होगा और इस बैकएंड सेवा को चलाने की कोशिश करनी होगी
- नया टर्मिनल बनाएं. सबसे नीचे मौजूद टर्मिनल पर जाएं और नया टर्मिनल बनाने के लिए, "+" बटन ढूंढें. इसके अलावा, नया टर्मिनल खोलने के लिए Ctrl + Shift + C दबाएं

- इसके बाद, पक्का करें कि आप वर्किंग डायरेक्ट्री personal-expense-assistant में हों. इसके बाद, यह कमांड चलाएँ
uv run backend.py
- अगर यह प्रोसेस पूरी हो जाती है, तो आपको इस तरह का आउटपुट दिखेगा
INFO:     Started server process [xxxxx]
INFO:     Waiting for application startup.
INFO:     Application startup complete.
INFO:     Uvicorn running on http://0.0.0.0:8081 (Press CTRL+C to quit)
कोड के बारे में जानकारी
ADK एजेंट, SessionService, और ArtifactService को शुरू करना
बैकएंड सेवा में एजेंट को चलाने के लिए, हमें एक Runner बनाना होगा. यह SessionService और हमारे एजेंट, दोनों को लेता है. SessionService, बातचीत के इतिहास और स्थिति को मैनेज करेगा. इसलिए, Runner के साथ इंटिग्रेट होने पर, यह हमारे एजेंट को चालू बातचीत का कॉन्टेक्स्ट पाने की सुविधा देगा.
हम अपलोड की गई फ़ाइल को मैनेज करने के लिए, ArtifactService का भी इस्तेमाल करते हैं. ADK सेशन और आर्टफ़ैक्ट के बारे में ज़्यादा जानकारी यहां दी गई है
...

@asynccontextmanager
async def lifespan(app: FastAPI):
    # Initialize service contexts during application startup
    app_contexts.session_service = InMemorySessionService()
    app_contexts.artifact_service = GcsArtifactService(
        bucket_name=SETTINGS.STORAGE_BUCKET_NAME
    )
    app_contexts.expense_manager_agent_runner = Runner(
        agent=expense_manager_agent,  # The agent we want to run
        app_name=APP_NAME,  # Associates runs with our app
        session_service=app_contexts.session_service,  # Uses our session manager
        artifact_service=app_contexts.artifact_service,  # Uses our artifact manager
    )

    logger.info("Application started successfully")
    yield
    logger.info("Application shutting down")
    # Perform cleanup during application shutdown if necessary

...
इस डेमो में, हमने InMemorySessionService और GcsArtifactService का इस्तेमाल किया है, ताकि इन्हें हमारे एजेंट Runner के साथ इंटिग्रेट किया जा सके. बातचीत का इतिहास मेमोरी में सेव होता है. इसलिए, बैकएंड सेवा बंद होने या फिर से शुरू होने पर, यह मिट जाएगा. हम इन्हें FastAPI ऐप्लिकेशन के लाइफ़साइकल में शुरू करते हैं, ताकि इन्हें /chat रूट में डिपेंडेंसी के तौर पर इंजेक्ट किया जा सके.
GcsArtifactService की मदद से इमेज अपलोड और डाउनलोड करना
अपलोड की गई सभी इमेज को GcsArtifactService, आर्टफ़ैक्ट के तौर पर सेव करेगा. इसे utils.py में मौजूद format_user_request_to_adk_content_and_store_artifacts फ़ंक्शन में देखा जा सकता है
...

# Prepare the user's message in ADK format and store image artifacts
content = await asyncio.to_thread(
    format_user_request_to_adk_content_and_store_artifacts,
    request=request,
    app_name=APP_NAME,
    artifact_service=app_context.artifact_service,
)

...
एजेंट रनर जिन अनुरोधों को प्रोसेस करेगा उन्हें types.Content टाइप में फ़ॉर्मैट किया जाना चाहिए. फ़ंक्शन के अंदर, हम हर इमेज डेटा को प्रोसेस करते हैं और उसके आईडी को निकालते हैं, ताकि उसे इमेज आईडी प्लेसहोल्डर से बदला जा सके.
रेगुलर एक्सप्रेशन का इस्तेमाल करके इमेज आईडी निकालने के बाद, अटैचमेंट डाउनलोड करने के लिए इसी तरह के तरीके का इस्तेमाल किया जाता है:
...
sanitized_text, attachment_ids = extract_attachment_ids_and_sanitize_response(
    final_response_text
)
sanitized_text, thinking_process = extract_thinking_process(sanitized_text)

# Download images from GCS and replace hash IDs with base64 data
for image_hash_id in attachment_ids:
    # Download image data and get MIME type
    result = await asyncio.to_thread(
        download_image_from_gcs,
        artifact_service=app_context.artifact_service,
        image_hash=image_hash_id,
        app_name=APP_NAME,
        user_id=user_id,
        session_id=session_id,
    )
...
10. 🚀 इंटिग्रेशन टेस्ट
अब आपको अलग-अलग Cloud Console टैब में कई सेवाएं चलती हुई दिखेंगी:
- पोर्ट 8080 पर चलने वाली फ़्रंटएंड सेवा
* Running on local URL:  http://0.0.0.0:8080

To create a public link, set `share=True` in `launch()`.
- बैकएंड सेवा, पोर्ट 8081 पर चलती है
INFO:     Started server process [xxxxx]
INFO:     Waiting for application startup.
INFO:     Application startup complete.
INFO:     Uvicorn running on http://0.0.0.0:8081 (Press CTRL+C to quit)
मौजूदा स्थिति में, आपको रसीद की इमेज अपलोड करने और पोर्ट 8080 पर वेब ऐप्लिकेशन से Assistant के साथ आसानी से चैट करने की सुविधा मिलनी चाहिए.
Cloud Shell Editor के सबसे ऊपर मौजूद वेब की झलक देखें बटन पर क्लिक करें. इसके बाद, पोर्ट 8080 पर झलक देखें को चुनें
अब Assistant से कुछ बातचीत करते हैं!
ये रसीदें डाउनलोड करें. रसीद के डेटा की तारीख की सीमा साल 2023-2024 के बीच है. साथ ही, Assistant से इसे सेव/अपलोड करने के लिए कहें
- Receipt Drive ( सोर्स Hugging face datasets
mousserlane/id_receipt_dataset)
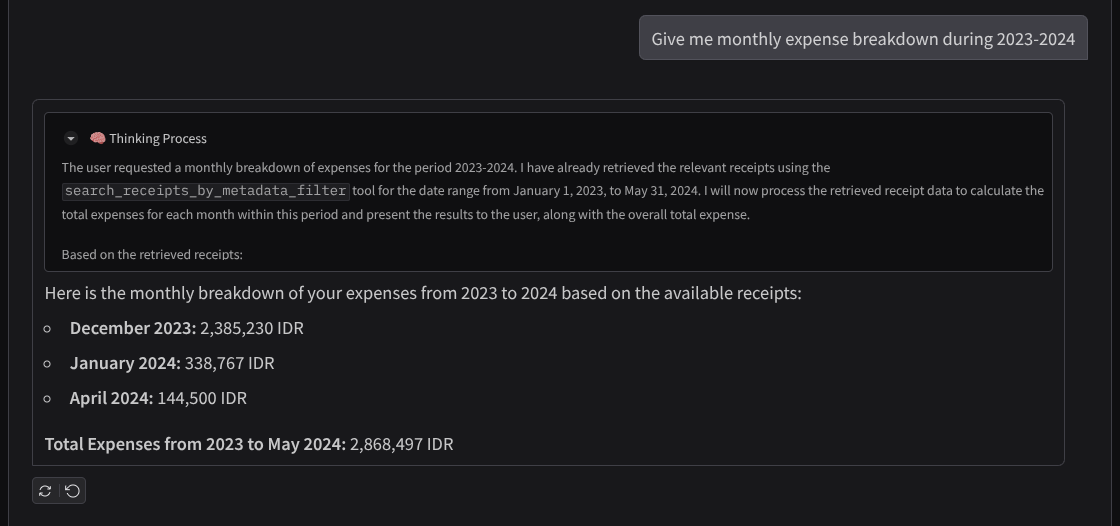
अलग-अलग तरह के सवाल पूछना
- "मुझे 2023-2024 के दौरान, हर महीने के खर्च की जानकारी दो"
- "मुझे कॉफ़ी के लेन-देन की रसीद दिखाओ"
- "मुझे Yakiniku Like से मिला रसीद का फ़ाइल दिखाओ"
- वगैरह
यहां बातचीत के कुछ स्निपेट दिए गए हैं
11. 🚀 Cloud Run पर डिप्लॉय करना
अब हम इस बेहतरीन ऐप्लिकेशन को कहीं से भी ऐक्सेस करना चाहते हैं. इसके लिए, हम इस ऐप्लिकेशन को पैकेज कर सकते हैं और इसे Cloud Run पर डिप्लॉय कर सकते हैं. इस डेमो के लिए, इस सेवा को सार्वजनिक सेवा के तौर पर दिखाया जाएगा. इसे अन्य लोग ऐक्सेस कर सकते हैं. हालांकि, ध्यान रखें कि इस तरह के ऐप्लिकेशन के लिए यह सबसे सही तरीका नहीं है, क्योंकि यह निजी ऐप्लिकेशन के लिए ज़्यादा सही है
इस कोडलैब में, हम फ़्रंटएंड और बैकएंड, दोनों सेवाओं को एक कंटेनर में रखेंगे. इन दोनों सेवाओं को मैनेज करने के लिए, हमें supervisord की मदद की ज़रूरत होगी. supervisord.conf फ़ाइल की जांच की जा सकती है. साथ ही, उस Dockerfile की जांच की जा सकती है जिसमें हमने supervisord को एंट्रीपॉइंट के तौर पर सेट किया है.
इस समय, हमारे पास Cloud Run पर ऐप्लिकेशन डिप्लॉय करने के लिए ज़रूरी सभी फ़ाइलें मौजूद हैं. इसलिए, अब हम इसे डिप्लॉय करते हैं. Cloud Shell टर्मिनल पर जाएं और पक्का करें कि मौजूदा प्रोजेक्ट, आपके एक्टिव प्रोजेक्ट के लिए कॉन्फ़िगर किया गया हो. अगर ऐसा नहीं है, तो प्रोजेक्ट आईडी सेट करने के लिए, gcloud configure कमांड का इस्तेमाल करें:
gcloud config set project [PROJECT_ID]
इसके बाद, इसे Cloud Run पर डिप्लॉय करने के लिए, यहां दिया गया कमांड चलाएं.
gcloud run deploy personal-expense-assistant \
                  --source . \
                  --port=8080 \
                  --allow-unauthenticated \
                  --env-vars-file=settings.yaml \
                  --memory 1024Mi \
                  --region us-central1
अगर आपको Docker इमेज के लिए आर्टफ़ैक्ट रजिस्ट्री बनाने की पुष्टि करने के लिए कहा जाता है, तो बस Y जवाब दें. ध्यान दें कि हम यहां बिना पुष्टि किए ऐक्सेस करने की अनुमति दे रहे हैं, क्योंकि यह एक डेमो ऐप्लिकेशन है. हमारा सुझाव है कि आप अपने एंटरप्राइज़ और प्रोडक्शन ऐप्लिकेशन के लिए, पुष्टि करने के सही तरीके का इस्तेमाल करें.
डप्लॉयमेंट पूरा होने के बाद, आपको यहां दिए गए लिंक जैसा लिंक मिलेगा:
https://personal-expense-assistant-*******.us-central1.run.app
अब गुप्त विंडो या अपने मोबाइल डिवाइस से ऐप्लिकेशन का इस्तेमाल करें. यह पहले से ही लाइव होना चाहिए.
12. 🎯 चैलेंज
अब आपको अपनी खोज करने की क्षमता को बेहतर बनाने का मौका मिला है. क्या आपके पास कोड में बदलाव करने का तरीका है, ताकि बैकएंड एक साथ कई उपयोगकर्ताओं को सेवा दे सके? किन कॉम्पोनेंट को अपडेट करना है?
13. 🧹 मिटाएं
इस कोडलैब में इस्तेमाल किए गए संसाधनों के लिए, अपने Google Cloud खाते से शुल्क न लिए जाने के लिए, यह तरीका अपनाएं:
- Google Cloud Console में, संसाधन मैनेज करें पेज पर जाएं.
- प्रोजेक्ट की सूची में, वह प्रोजेक्ट चुनें जिसे आपको मिटाना है. इसके बाद, मिटाएं पर क्लिक करें.
- डायलॉग बॉक्स में, प्रोजेक्ट आईडी टाइप करें. इसके बाद, प्रोजेक्ट मिटाने के लिए बंद करें पर क्लिक करें.
- इसके अलावा, कंसोल पर Cloud Run पर जाकर, अभी-अभी डिप्लॉय की गई सेवा को चुनें और मिटाएं.