
1. 📖 บทนำ

คุณเคยรู้สึกหงุดหงิดและขี้เกียจจัดการค่าใช้จ่ายส่วนตัวทั้งหมดไหม ฉันด้วย ดังนั้นใน Codelab นี้ เราจะสร้างผู้ช่วยจัดการค่าใช้จ่ายส่วนตัวที่ขับเคลื่อนโดย Gemini 2.5 เพื่อทำงานที่น่าเบื่อทั้งหมดให้เรา ตั้งแต่การจัดการใบเสร็จที่อัปโหลดไปจนถึงการวิเคราะห์ว่าคุณใช้จ่ายมากเกินไปในการซื้อกาแฟหรือไม่
คุณจะเข้าถึงผู้ช่วยนี้ได้ผ่านเว็บเบราว์เซอร์ในรูปแบบของอินเทอร์เฟซเว็บแชท ซึ่งคุณสามารถสื่อสารกับผู้ช่วย อัปโหลดรูปภาพใบเสร็จ และขอให้ผู้ช่วยจัดเก็บรูปภาพเหล่านั้น หรืออาจต้องการค้นหาใบเสร็จเพื่อรับไฟล์และวิเคราะห์ค่าใช้จ่ายบางอย่าง และทั้งหมดนี้สร้างขึ้นบนเฟรมเวิร์ก Google Agent Development Kit
แอปพลิเคชันเองก็แยกออกเป็น 2 บริการ ได้แก่ ฟรอนท์เอนด์และแบ็กเอนด์ ซึ่งช่วยให้คุณสร้างต้นแบบอย่างรวดเร็วและลองใช้งานได้ รวมถึงทำความเข้าใจลักษณะของสัญญา API เพื่อผสานรวมทั้ง 2 บริการ
ใน Codelab นี้ คุณจะได้ใช้แนวทางแบบทีละขั้นตอนดังนี้
- เตรียมโปรเจ็กต์ Google Cloud และเปิดใช้ API ที่จำเป็นทั้งหมดในโปรเจ็กต์
- ตั้งค่า Bucket ใน Google Cloud Storage และฐานข้อมูลใน Firestore
- สร้างการจัดทำดัชนี Firestore
- ตั้งค่าพื้นที่ทำงานสำหรับสภาพแวดล้อมการเขียนโค้ด
- การจัดโครงสร้างซอร์สโค้ด เครื่องมือ พรอมต์ ฯลฯ ของ Agent ใน ADK
- การทดสอบเอเจนต์โดยใช้ UI การพัฒนาเว็บในเครื่องของ ADK
- สร้างบริการส่วนหน้า - อินเทอร์เฟซแชทโดยใช้ไลบรารี Gradio เพื่อส่งคำค้นหาและอัปโหลดรูปภาพใบเสร็จ
- สร้างบริการแบ็กเอนด์ - เซิร์ฟเวอร์ HTTP โดยใช้ FastAPI ซึ่งเป็นที่อยู่ของโค้ด ADK Agent, SessionService และ Artifact Service
- จัดการตัวแปรสภาพแวดล้อมและตั้งค่าไฟล์ที่จำเป็นต่อการทำให้แอปพลิเคชันใช้งานได้ใน Cloud Run
- ติดตั้งใช้งานแอปพลิเคชันไปยัง Cloud Run
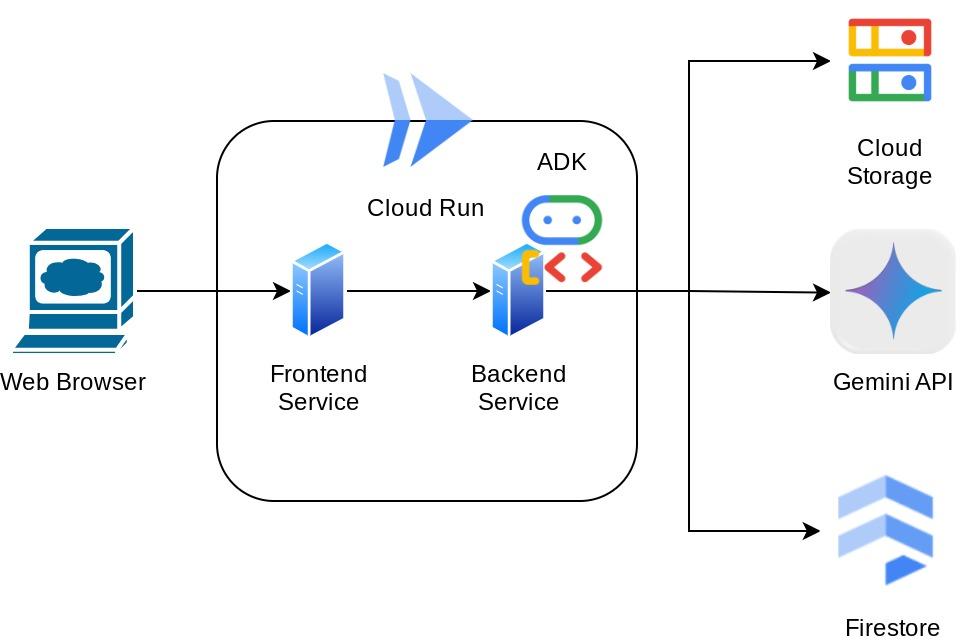
ภาพรวมสถาปัตยกรรม
ข้อกำหนดเบื้องต้น
- ทำงานกับ Python ได้อย่างคล่องแคล่ว
- ความเข้าใจเกี่ยวกับสถาปัตยกรรม Full-Stack พื้นฐานโดยใช้บริการ HTTP
สิ่งที่คุณจะได้เรียนรู้
- การสร้างต้นแบบเว็บส่วนหน้าด้วย Gradio
- การพัฒนาบริการแบ็กเอนด์ด้วย FastAPI และ Pydantic
- การออกแบบสถาปัตยกรรมของ ADK Agent ขณะใช้ความสามารถต่างๆ
- การใช้งานเครื่องมือ
- การจัดการเซสชันและอาร์ติแฟกต์
- การใช้ฟังก์ชันเรียกกลับเพื่อแก้ไขอินพุตก่อนส่งไปยัง Gemini
- การใช้ BuiltInPlanner เพื่อปรับปรุงการทำงานโดยการวางแผน
- การแก้ไขข้อบกพร่องอย่างรวดเร็วผ่านอินเทอร์เฟซเว็บในเครื่องของ ADK
- กลยุทธ์ในการเพิ่มประสิทธิภาพการโต้ตอบแบบหลายรูปแบบผ่านการแยกวิเคราะห์และการดึงข้อมูลผ่านวิศวกรรมพรอมต์ (Prompt Engineering) และการแก้ไขคำขอของ Gemini โดยใช้ Callback ของ ADK
- การสร้างที่เพิ่มประสิทธิภาพการดึงข้อมูลแบบเป็น Agent โดยใช้ Firestore เป็นฐานข้อมูลเวกเตอร์
- จัดการตัวแปรสภาพแวดล้อมในไฟล์ YAML ด้วย Pydantic-settings
- ติดตั้งใช้งานแอปพลิเคชันไปยัง Cloud Run โดยใช้ Dockerfile และระบุตัวแปรสภาพแวดล้อมด้วยไฟล์ YAML
สิ่งที่คุณต้องมี
- เว็บเบราว์เซอร์ Chrome
- บัญชี Gmail
- โปรเจ็กต์ Cloud ที่เปิดใช้การเรียกเก็บเงิน
Codelab นี้ออกแบบมาสำหรับนักพัฒนาซอฟต์แวร์ทุกระดับ (รวมถึงผู้เริ่มต้น) โดยใช้ Python ในแอปพลิเคชันตัวอย่าง อย่างไรก็ตาม คุณไม่จำเป็นต้องมีความรู้เกี่ยวกับ Python เพื่อทำความเข้าใจแนวคิดที่นำเสนอ
2. 🚀 ก่อนเริ่มต้น
เลือกโปรเจ็กต์ที่ใช้งานอยู่ใน Cloud Console
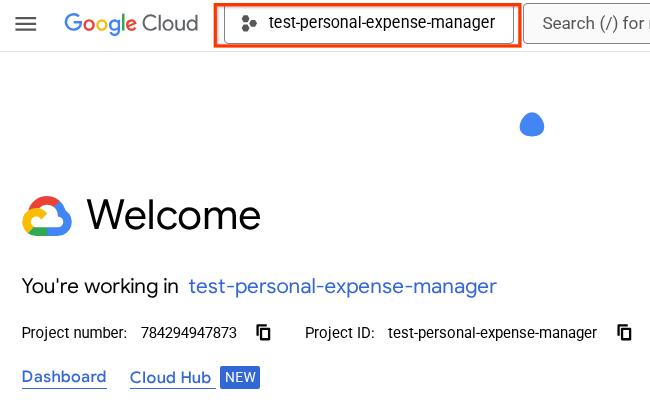
Codelab นี้ถือว่าคุณมีโปรเจ็กต์ที่อยู่ในระบบคลาวด์ของ Google ที่เปิดใช้การเรียกเก็บเงินอยู่แล้ว หากยังไม่มี ให้ทำตามวิธีการด้านล่างเพื่อเริ่มต้นใช้งาน
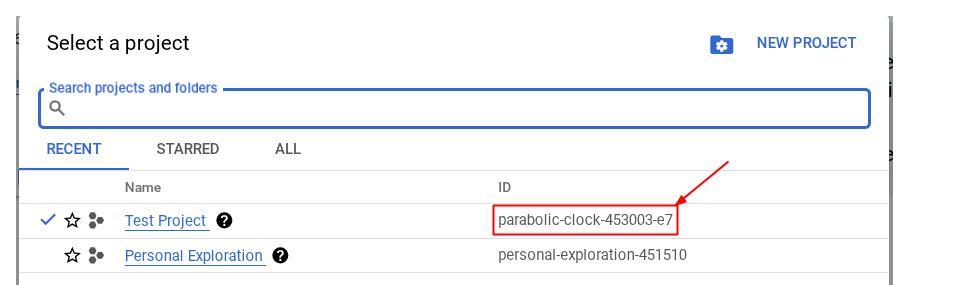
- ในคอนโซล Google Cloud ให้เลือกหรือสร้างโปรเจ็กต์ Google Cloud ในหน้าตัวเลือกโปรเจ็กต์
- ตรวจสอบว่าได้เปิดใช้การเรียกเก็บเงินสำหรับโปรเจ็กต์ที่อยู่ในระบบคลาวด์แล้ว ดูวิธีตรวจสอบว่าได้เปิดใช้การเรียกเก็บเงินในโปรเจ็กต์แล้วหรือไม่
เตรียมฐานข้อมูล Firestore
จากนั้นเราจะต้องสร้างฐานข้อมูล Firestore ด้วย Firestore ในโหมด Native คือฐานข้อมูลเอกสาร NoSQL ที่สร้างขึ้นมาสำหรับการปรับขนาดอัตโนมัติโดยมีประสิทธิภาพสูงและพัฒนาแอปพลิเคชันได้อย่างง่ายดาย นอกจากนี้ยังทำหน้าที่เป็นฐานข้อมูลเวกเตอร์ที่รองรับเทคนิคการสร้างแบบดึงข้อมูลเสริมสำหรับห้องทดลองของเราได้อีกด้วย
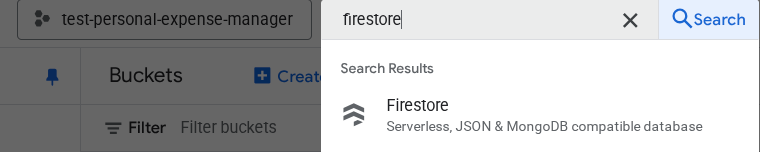
- ค้นหา "firestore" ในแถบค้นหา แล้วคลิกผลิตภัณฑ์ Firestore
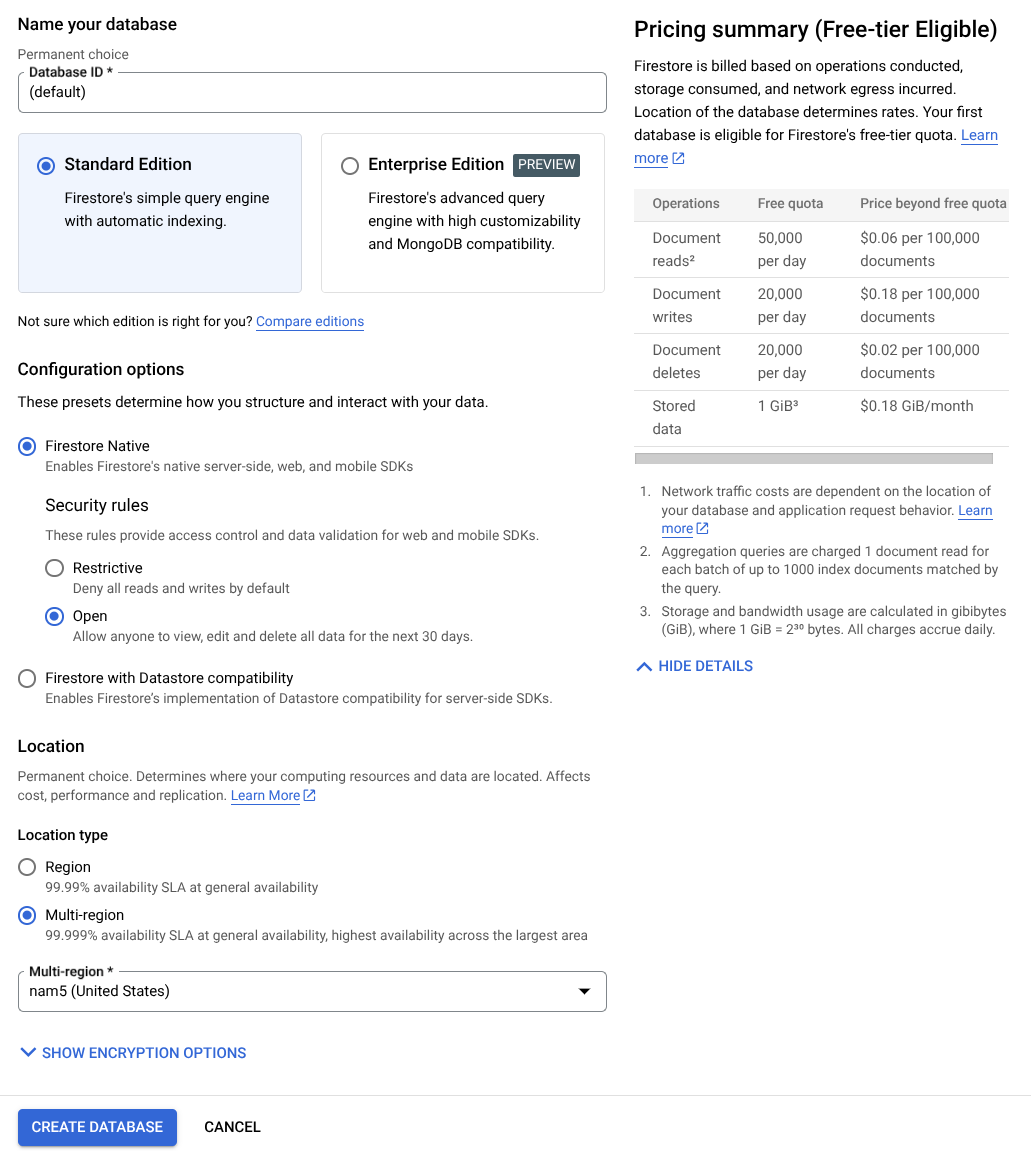
- จากนั้นคลิกปุ่มสร้างฐานข้อมูล Firestore
- ใช้ (ค่าเริ่มต้น) เป็นชื่อรหัสฐานข้อมูล และเลือกรุ่นมาตรฐานไว้ เพื่อประโยชน์ของการสาธิตในแล็บนี้ ให้ใช้ Firestore Native กับกฎความปลอดภัยแบบเปิด
- นอกจากนี้ คุณจะเห็นว่าฐานข้อมูลนี้มี Free-tier Usage YEAY! หลังจากนั้น ให้คลิกปุ่มสร้างฐานข้อมูล
หลังจากทำตามขั้นตอนเหล่านี้แล้ว ระบบควรเปลี่ยนเส้นทางคุณไปยังฐานข้อมูล Firestore ที่คุณเพิ่งสร้างขึ้น
ตั้งค่าโปรเจ็กต์ Cloud ในเทอร์มินัล Cloud Shell
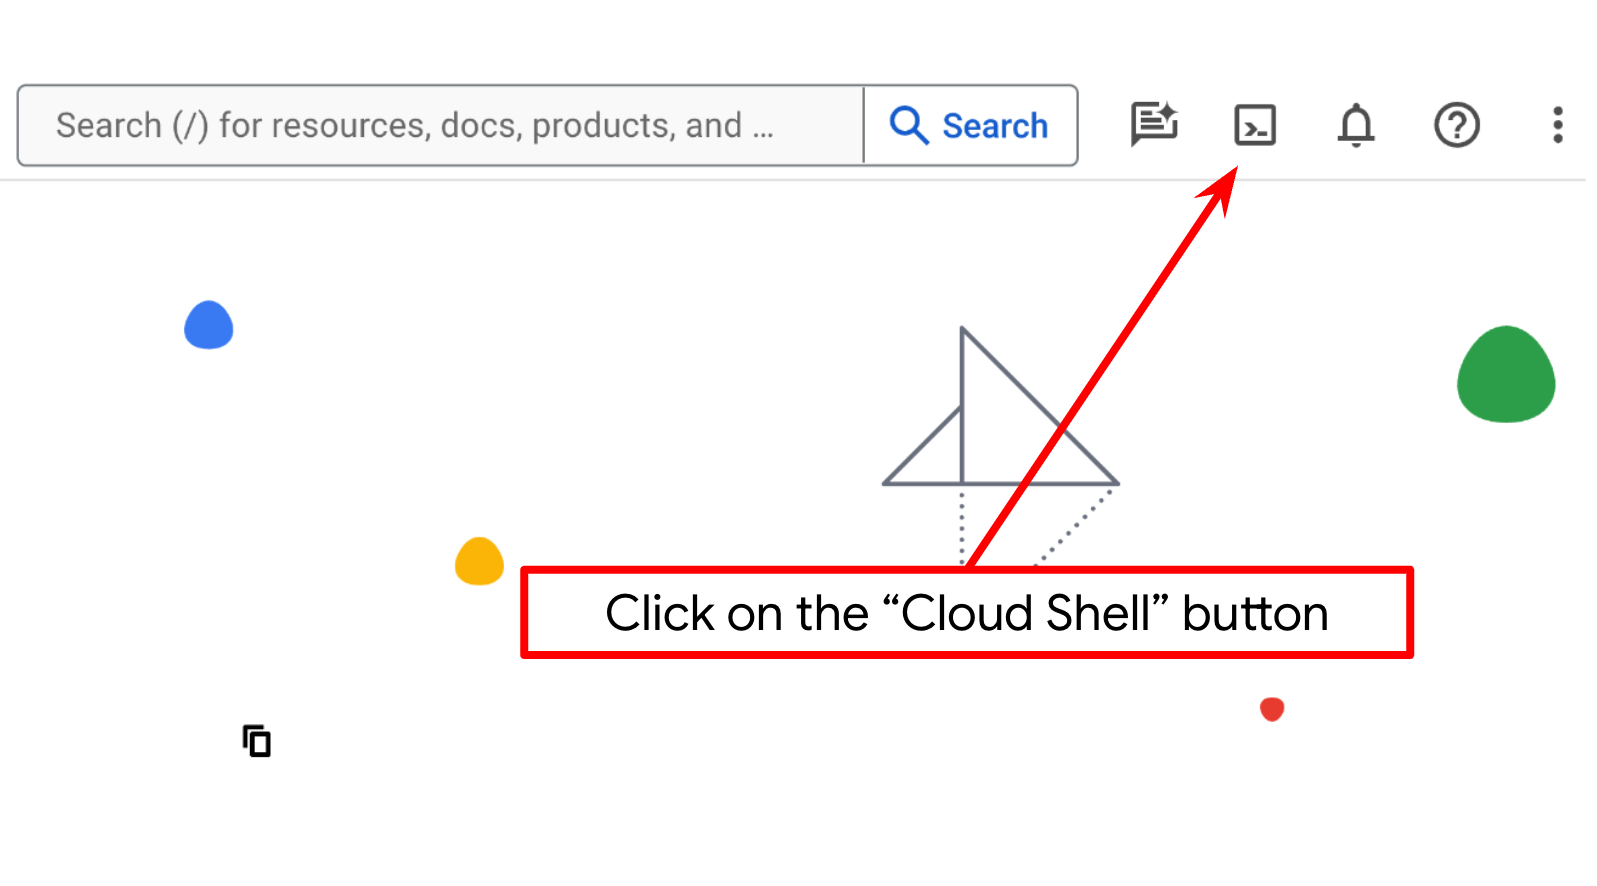
- คุณจะใช้ Cloud Shell ซึ่งเป็นสภาพแวดล้อมบรรทัดคำสั่งที่ทำงานใน Google Cloud และโหลด bq ไว้ล่วงหน้า คลิกเปิดใช้งาน Cloud Shell ที่ด้านบนของคอนโซล Google Cloud
- เมื่อเชื่อมต่อกับ Cloud Shell แล้ว ให้ตรวจสอบว่าคุณได้รับการตรวจสอบสิทธิ์แล้วและตั้งค่าโปรเจ็กต์เป็นรหัสโปรเจ็กต์โดยใช้คำสั่งต่อไปนี้
gcloud auth list
- เรียกใช้คำสั่งต่อไปนี้ใน Cloud Shell เพื่อยืนยันว่าคำสั่ง gcloud รู้จักโปรเจ็กต์ของคุณ
gcloud config list project
- หากไม่ได้ตั้งค่าโปรเจ็กต์ ให้ใช้คำสั่งต่อไปนี้เพื่อตั้งค่า
gcloud config set project <YOUR_PROJECT_ID>
หรือคุณจะดู PROJECT_ID id ในคอนโซลก็ได้

คลิก แล้วคุณจะเห็นโปรเจ็กต์ทั้งหมดและรหัสโปรเจ็กต์ทางด้านขวา
- เปิดใช้ API ที่จำเป็นผ่านคำสั่งที่แสดงด้านล่าง การดำเนินการนี้อาจใช้เวลาสักครู่ โปรดอดใจรอ
gcloud services enable aiplatform.googleapis.com \
                       firestore.googleapis.com \
                       run.googleapis.com \
                       cloudbuild.googleapis.com \
                       cloudresourcemanager.googleapis.com
เมื่อเรียกใช้คำสั่งสำเร็จ คุณควรเห็นข้อความที่คล้ายกับข้อความที่แสดงด้านล่าง
Operation "operations/..." finished successfully.
คุณสามารถใช้คอนโซลแทนคำสั่ง gcloud ได้โดยค้นหาแต่ละผลิตภัณฑ์หรือใช้ลิงก์นี้
หากพลาด API ใดไป คุณก็เปิดใช้ได้เสมอในระหว่างการติดตั้งใช้งาน
โปรดดูคำสั่งและการใช้งาน gcloud ในเอกสารประกอบ
เตรียม Bucket ของ Google Cloud Storage
จากนั้นในเทอร์มินัลเดียวกัน เราจะต้องเตรียม Bucket ของ GCS เพื่อจัดเก็บไฟล์ที่อัปโหลด เรียกใช้คำสั่งต่อไปนี้เพื่อสร้างที่เก็บข้อมูล คุณจะต้องมีชื่อที่เก็บข้อมูลที่ไม่ซ้ำกันแต่เกี่ยวข้องกับใบเสร็จของผู้ช่วยค่าใช้จ่ายส่วนตัว ดังนั้นเราจะใช้ชื่อที่เก็บข้อมูลต่อไปนี้ร่วมกับรหัสโปรเจ็กต์ของคุณ
gsutil mb -l us-central1 gs://personal-expense-{your-project-id}
โดยจะแสดงเอาต์พุตต่อไปนี้
Creating gs://personal-expense-{your-project-id}
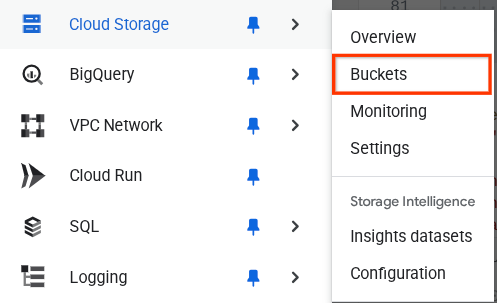
คุณสามารถยืนยันได้โดยไปที่เมนูการนำทางที่ด้านซ้ายบนของเบราว์เซอร์ แล้วเลือก Cloud Storage -> Bucket
การสร้างดัชนี Firestore สำหรับการค้นหา
Firestore เป็นฐานข้อมูล NoSQL โดยกำเนิด ซึ่งมีประสิทธิภาพและความยืดหยุ่นที่เหนือกว่าในโมเดลข้อมูล แต่มีข้อจำกัดเมื่อต้องใช้การค้นหาที่ซับซ้อน เนื่องจากเราวางแผนที่จะใช้การค้นหาแบบหลายฟิลด์แบบผสมและการค้นหาเวกเตอร์ เราจึงต้องสร้างดัชนีบางอย่างก่อน คุณอ่านรายละเอียดเพิ่มเติมได้ในเอกสารประกอบนี้
- เรียกใช้คำสั่งต่อไปนี้เพื่อสร้างดัชนีเพื่อรองรับการค้นหาแบบผสม
gcloud firestore indexes composite create \
        --collection-group=personal-expense-assistant-receipts \
        --field-config field-path=total_amount,order=ASCENDING \
        --field-config field-path=transaction_time,order=ASCENDING \
        --field-config field-path=__name__,order=ASCENDING \
        --database="(default)"
- และเรียกใช้คำสั่งนี้เพื่อรองรับการค้นหาเวกเตอร์
gcloud firestore indexes composite create \
        --collection-group="personal-expense-assistant-receipts" \
        --query-scope=COLLECTION \
        --field-config field-path="embedding",vector-config='{"dimension":"768", "flat": "{}"}' \
        --database="(default)"
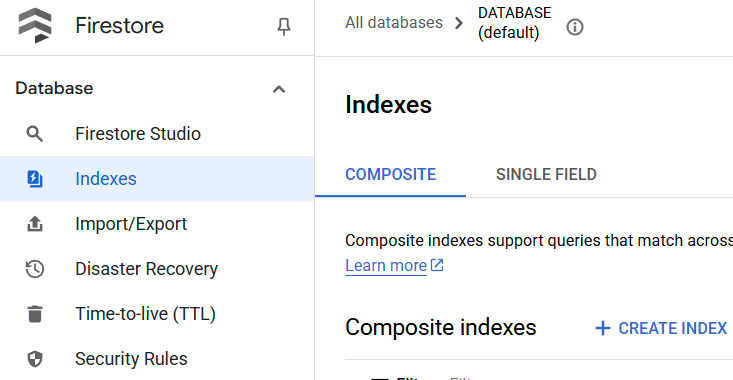
คุณตรวจสอบดัชนีที่สร้างขึ้นได้โดยไปที่ Firestore ใน Cloud Console แล้วคลิกอินสแตนซ์ฐานข้อมูล (ค่าเริ่มต้น) และเลือกดัชนีในแถบนำทาง
ไปที่ Cloud Shell Editor และตั้งค่าไดเรกทอรีการทำงานของแอปพลิเคชัน
ตอนนี้เราสามารถตั้งค่าตัวแก้ไขโค้ดเพื่อเขียนโค้ดได้แล้ว เราจะใช้ Cloud Shell Editor สำหรับการดำเนินการนี้
- คลิกปุ่ม "เปิดเครื่องมือแก้ไข" ซึ่งจะเปิด Cloud Shell Editor และเราจะเขียนโค้ดที่นี่ได้
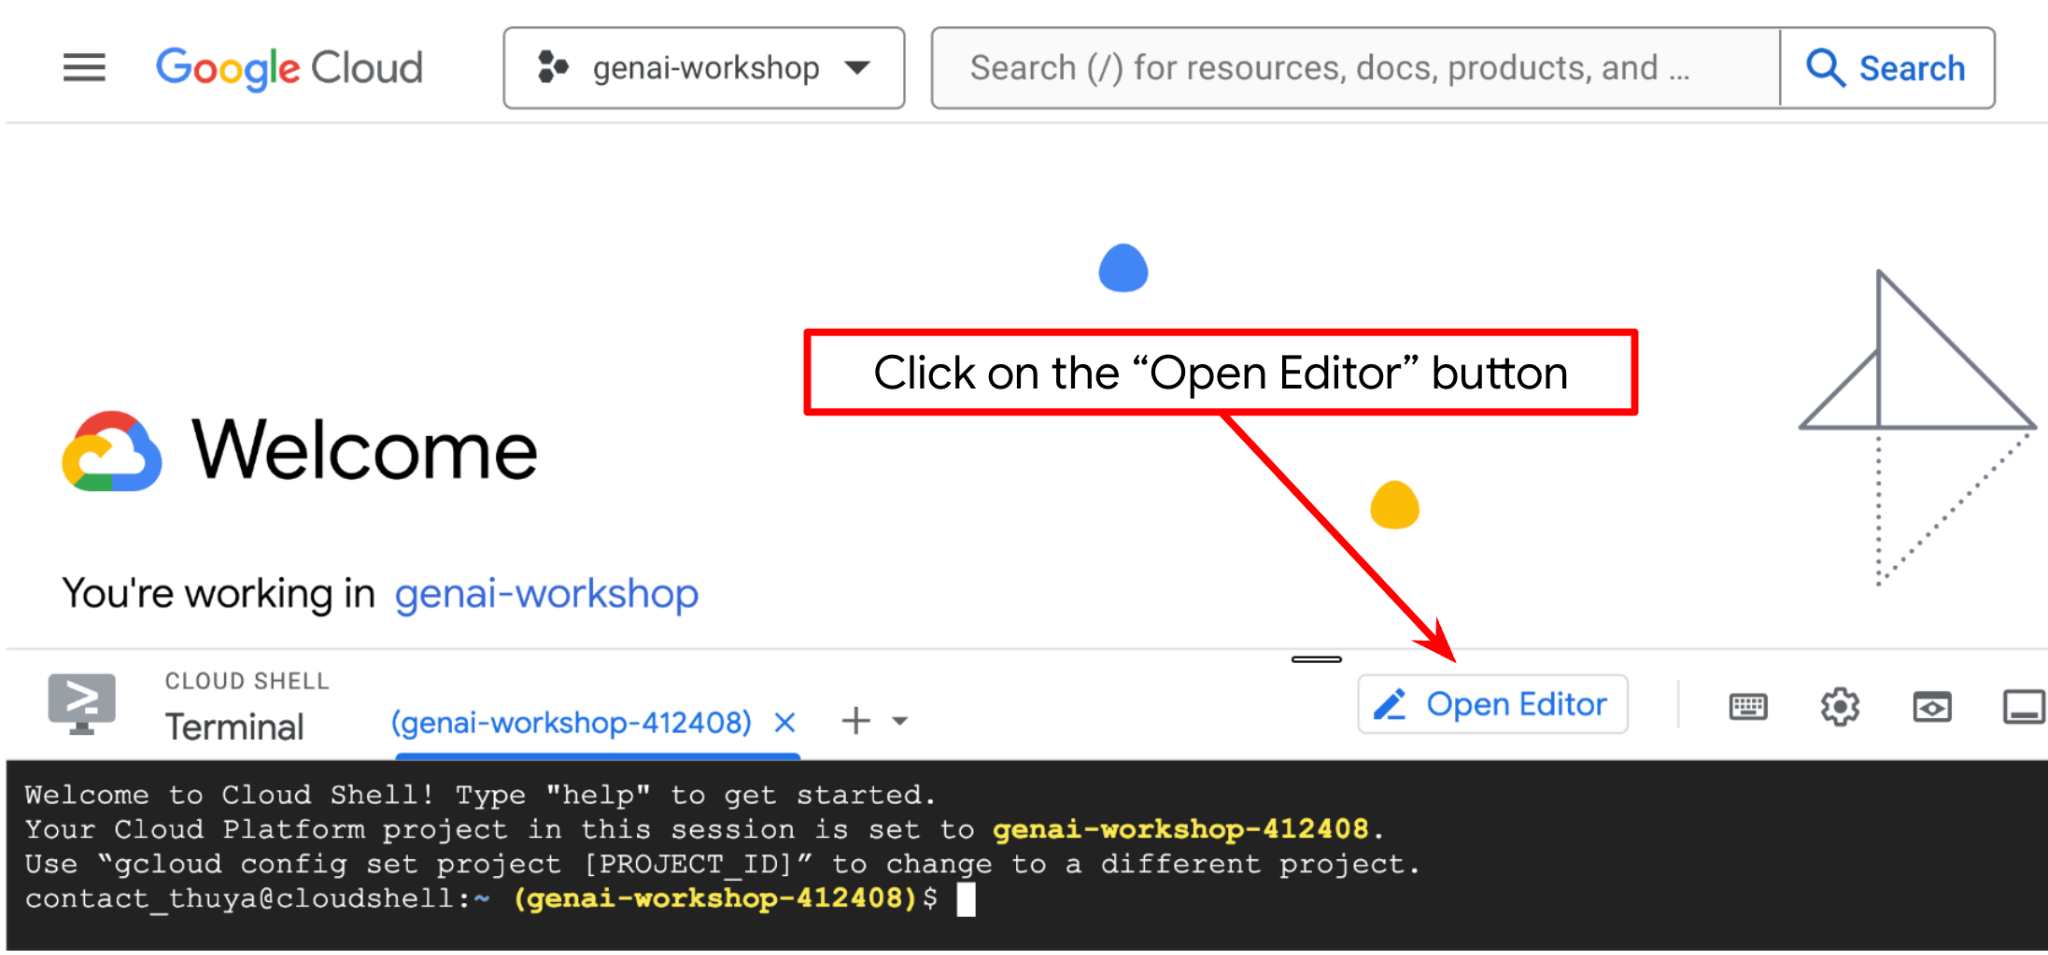
- จากนั้นเรายังต้องตรวจสอบด้วยว่ามีการกำหนดค่า Shell ให้กับ PROJECT ID ที่ถูกต้องที่คุณมีอยู่แล้วหรือไม่ หากคุณเห็นว่ามีค่าอยู่ภายใน ( ) ก่อนไอคอน $ ในเทอร์มินัล ( ในภาพหน้าจอด้านล่าง ค่าคือ "adk-multimodal-tool") ค่านี้จะแสดงโปรเจ็กต์ที่กำหนดค่าไว้สำหรับเซสชัน Shell ที่ใช้งานอยู่

หากค่าที่แสดงถูกต้องอยู่แล้ว คุณก็ข้ามคำสั่งถัดไปได้ แต่หากไม่ถูกต้องหรือไม่มี ให้เรียกใช้คำสั่งต่อไปนี้
gcloud config set project <YOUR_PROJECT_ID>
- จากนั้นมาโคลนไดเรกทอรีการทำงานของเทมเพลตสำหรับ Codelab นี้จาก Github โดยเรียกใช้คำสั่งต่อไปนี้ ซึ่งจะสร้างไดเรกทอรีการทำงานในไดเรกทอรี personal-expense-assistant
git clone https://github.com/alphinside/personal-expense-assistant-adk-codelab-starter.git personal-expense-assistant
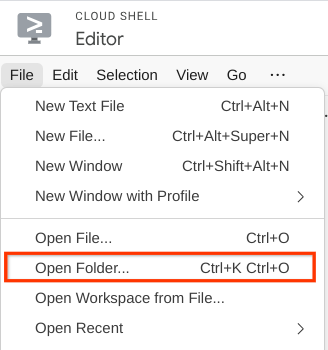
- หลังจากนั้น ให้ไปที่ส่วนบนของ Cloud Shell Editor แล้วคลิกไฟล์->เปิดโฟลเดอร์ ค้นหาไดเรกทอรี username แล้วค้นหาไดเรกทอรี personal-expense-assistant จากนั้นคลิกปุ่มตกลง ซึ่งจะทำให้ไดเรกทอรีที่เลือกเป็นไดเรกทอรีการทำงานหลัก ในตัวอย่างนี้ ชื่อผู้ใช้คือ alvinprayuda ดังนั้นเส้นทางไดเรกทอรีจึงแสดงอยู่ด้านล่าง

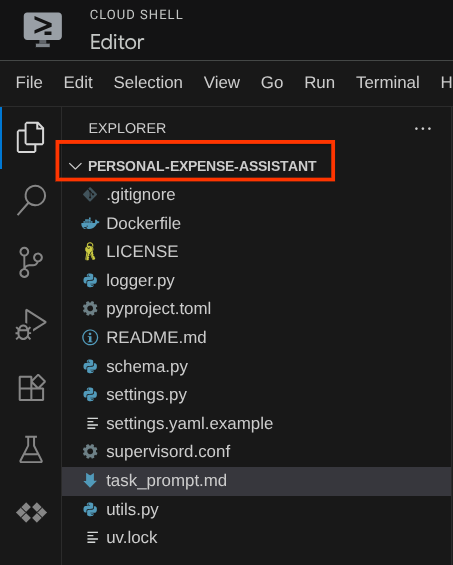
ตอนนี้ Cloud Shell Editor ควรมีลักษณะดังนี้
การตั้งค่าสภาพแวดล้อม
เตรียมสภาพแวดล้อมเสมือนของ Python
ขั้นตอนถัดไปคือการเตรียมสภาพแวดล้อมในการพัฒนาซอฟต์แวร์ เทอร์มินัลที่ใช้งานอยู่ในปัจจุบันควรอยู่ในไดเรกทอรีการทำงาน personal-expense-assistant เราจะใช้ Python 3.12 ใน Codelab นี้ และจะใช้ตัวจัดการโปรเจ็กต์ Python ของ uv เพื่อลดความซับซ้อนในการสร้างและจัดการเวอร์ชัน Python และสภาพแวดล้อมเสมือน
- หากยังไม่ได้เปิดเทอร์มินัล ให้เปิดโดยคลิกเทอร์มินัล -> เทอร์มินัลใหม่ หรือใช้ Ctrl + Shift + C ซึ่งจะเปิดหน้าต่างเทอร์มินัลที่ส่วนล่างของเบราว์เซอร์

- ตอนนี้มาเริ่มต้นสภาพแวดล้อมเสมือนโดยใช้
uvกัน เรียกใช้คำสั่งต่อไปนี้
cd ~/personal-expense-assistant
uv sync --frozen
การดำเนินการนี้จะสร้างไดเรกทอรี .venv และติดตั้งทรัพยากร Dependency การดูpyproject.toml อย่างรวดเร็วจะให้ข้อมูลเกี่ยวกับทรัพยากร Dependency ที่แสดงดังนี้
dependencies = [
    "datasets>=3.5.0",
    "google-adk==1.18",
    "google-cloud-firestore>=2.20.1",
    "gradio>=5.23.1",
    "pydantic>=2.10.6",
    "pydantic-settings[yaml]>=2.8.1",
]
ตั้งค่าไฟล์การกำหนดค่า
ตอนนี้เราจะต้องตั้งค่าไฟล์การกำหนดค่าสำหรับโปรเจ็กต์นี้ เราใช้ pydantic-settings เพื่ออ่านการกำหนดค่าจากไฟล์ YAML
เราได้ระบุเทมเพลตไฟล์ไว้ใน settings.yaml.example แล้ว คุณจะต้องคัดลอกไฟล์และเปลี่ยนชื่อเป็น settings.yaml เรียกใช้คำสั่งนี้เพื่อสร้างไฟล์
cp settings.yaml.example settings.yaml
จากนั้นคัดลอกค่าต่อไปนี้ลงในไฟล์
GCLOUD_LOCATION: "us-central1"
GCLOUD_PROJECT_ID: "your-project-id"
BACKEND_URL: "http://localhost:8081/chat"
STORAGE_BUCKET_NAME: "personal-expense-{your-project-id}"
DB_COLLECTION_NAME: "personal-expense-assistant-receipts"
สำหรับ Codelab นี้ เราจะใช้ค่าที่กำหนดค่าไว้ล่วงหน้าสำหรับ GCLOUD_LOCATION, BACKEND_URL, และ DB_COLLECTION_NAME
ตอนนี้เราจะไปที่ขั้นตอนถัดไปได้แล้ว นั่นคือการสร้างเอเจนต์และบริการ
3. 🚀 สร้าง Agent โดยใช้ Google ADK และ Gemini 2.5
ข้อมูลเบื้องต้นเกี่ยวกับโครงสร้างไดเรกทอรี ADK
มาเริ่มสำรวจสิ่งที่ ADK มีให้และวิธีสร้าง Agent กัน ดูเอกสารประกอบทั้งหมดของ ADK ได้ในURL นี้ ADK มีเครื่องมือมากมายให้เราใช้ในการเรียกใช้คำสั่ง CLI ตัวอย่างเช่น
- ตั้งค่าโครงสร้างไดเรกทอรีของ Agent
- ลองโต้ตอบอย่างรวดเร็วผ่านอินพุตเอาต์พุตของ CLI
- ตั้งค่าอินเทอร์เฟซเว็บ UI การพัฒนาในเครื่องอย่างรวดเร็ว
ตอนนี้เรามาสร้างโครงสร้างไดเรกทอรีของ Agent โดยใช้คำสั่ง CLI กัน เรียกใช้คำสั่งต่อไปนี้
uv run adk create expense_manager_agent
เมื่อระบบถาม ให้เลือกรุ่น gemini-2.5-flash และแบ็กเอนด์ Vertex AI จากนั้นวิซาร์ดจะขอรหัสโปรเจ็กต์และตำแหน่ง คุณจะยอมรับตัวเลือกเริ่มต้นโดยกด Enter หรือเปลี่ยนตัวเลือกตามที่จำเป็นก็ได้ เพียงตรวจสอบอีกครั้งว่าคุณใช้รหัสโปรเจ็กต์ที่ถูกต้องซึ่งสร้างไว้ก่อนหน้านี้ในแล็บนี้ เอาต์พุตจะมีลักษณะดังนี้
Choose a model for the root agent:
1. gemini-2.5-flash
2. Other models (fill later)
Choose model (1, 2): 1
1. Google AI
2. Vertex AI
Choose a backend (1, 2): 2

You need an existing Google Cloud account and project, check out this link for details:
https://google.github.io/adk-docs/get-started/quickstart/#gemini---google-cloud-vertex-ai

Enter Google Cloud project ID [going-multimodal-lab]:
Enter Google Cloud region [us-central1]:

Agent created in /home/username/personal-expense-assistant/expense_manager_agent:
- .env
- __init__.py
- agent.py
ซึ่งจะสร้างโครงสร้างไดเรกทอรีของเอเจนต์ดังต่อไปนี้
expense_manager_agent/
├── __init__.py
├── .env
├── agent.py
และหากตรวจสอบ init.py และ agent.py คุณจะเห็นโค้ดนี้
# __init__.py

from . import agent
# agent.py

from google.adk.agents import Agent

root_agent = Agent(
    model='gemini-2.5-flash',
    name='root_agent',
    description='A helpful assistant for user questions.',
    instruction='Answer user questions to the best of your knowledge',
)
ตอนนี้คุณทดสอบได้โดยเรียกใช้
uv run adk run expense_manager_agent
เมื่อทดสอบเสร็จแล้ว คุณจะออกจากเอเจนต์ได้โดยพิมพ์ exit หรือกด Ctrl+D
การสร้างเอเจนต์ Expense Manager
มาสร้างเอเจนต์จัดการค่าใช้จ่ายกัน เปิดไฟล์ expense_manager_agent/agent.py แล้วคัดลอกโค้ดด้านล่างซึ่งจะมี root_agent
# expense_manager_agent/agent.py

from google.adk.agents import Agent
from expense_manager_agent.tools import (
    store_receipt_data,
    search_receipts_by_metadata_filter,
    search_relevant_receipts_by_natural_language_query,
    get_receipt_data_by_image_id,
)
from expense_manager_agent.callbacks import modify_image_data_in_history
import os
from settings import get_settings
from google.adk.planners import BuiltInPlanner
from google.genai import types

SETTINGS = get_settings()
os.environ["GOOGLE_CLOUD_PROJECT"] = SETTINGS.GCLOUD_PROJECT_ID
os.environ["GOOGLE_CLOUD_LOCATION"] = SETTINGS.GCLOUD_LOCATION
os.environ["GOOGLE_GENAI_USE_VERTEXAI"] = "TRUE"

# Get the code file directory path and read the task prompt file
current_dir = os.path.dirname(os.path.abspath(__file__))
prompt_path = os.path.join(current_dir, "task_prompt.md")
with open(prompt_path, "r") as file:
    task_prompt = file.read()

root_agent = Agent(
    name="expense_manager_agent",
    model="gemini-2.5-flash",
    description=(
        "Personal expense agent to help user track expenses, analyze receipts, and manage their financial records"
    ),
    instruction=task_prompt,
    tools=[
        store_receipt_data,
        get_receipt_data_by_image_id,
        search_receipts_by_metadata_filter,
        search_relevant_receipts_by_natural_language_query,
    ],
    planner=BuiltInPlanner(
        thinking_config=types.ThinkingConfig(
            thinking_budget=2048,
        )
    ),
    before_model_callback=modify_image_data_in_history,
)
คำอธิบายโค้ด
สคริปต์นี้มีการเริ่มต้นตัวแทนที่เราเริ่มต้นสิ่งต่อไปนี้
- ตั้งค่าโมเดลที่จะใช้เป็น
gemini-2.5-flash - ตั้งค่าคำอธิบายและวิธีการของตัวแทนเป็นพรอมต์ของระบบซึ่งอ่านจาก
task_prompt.md - จัดหาเครื่องมือที่จำเป็นเพื่อรองรับฟังก์ชันการทำงานของเอเจนต์
- เปิดใช้การวางแผนก่อนสร้างคำตอบสุดท้ายหรือการดำเนินการโดยใช้ความสามารถในการคิดของ Gemini 2.5 Flash
- ตั้งค่าการสกัดกั้นการเรียกกลับก่อนส่งคำขอไปยัง Gemini เพื่อจำกัดจำนวนข้อมูลรูปภาพที่ส่งก่อนทำการคาดการณ์
4. 🚀 การกำหนดค่าเครื่องมือตัวแทน
เอเจนต์ผู้จัดการค่าใช้จ่ายของเราจะมีความสามารถต่อไปนี้
- ดึงข้อมูลจากรูปภาพใบเสร็จ และจัดเก็บข้อมูลและไฟล์
- การค้นหาที่ตรงกันในข้อมูลค่าใช้จ่าย
- การค้นหาตามบริบทในข้อมูลค่าใช้จ่าย
ดังนั้นเราจึงต้องมีเครื่องมือที่เหมาะสมเพื่อรองรับฟังก์ชันนี้ สร้างไฟล์ใหม่ในไดเรกทอรี expense_manager_agent และตั้งชื่อเป็น tools.py
touch expense_manager_agent/tools.py
เปิด expense_manage_agent/tools.py แล้วคัดลอกโค้ดด้านล่าง
# expense_manager_agent/tools.py

import datetime
from typing import Dict, List, Any
from google.cloud import firestore
from google.cloud.firestore_v1.vector import Vector
from google.cloud.firestore_v1 import FieldFilter
from google.cloud.firestore_v1.base_query import And
from google.cloud.firestore_v1.base_vector_query import DistanceMeasure
from settings import get_settings
from google import genai

SETTINGS = get_settings()
DB_CLIENT = firestore.Client(
    project=SETTINGS.GCLOUD_PROJECT_ID
)  # Will use "(default)" database
COLLECTION = DB_CLIENT.collection(SETTINGS.DB_COLLECTION_NAME)
GENAI_CLIENT = genai.Client(
    vertexai=True, location=SETTINGS.GCLOUD_LOCATION, project=SETTINGS.GCLOUD_PROJECT_ID
)
EMBEDDING_DIMENSION = 768
EMBEDDING_FIELD_NAME = "embedding"
INVALID_ITEMS_FORMAT_ERR = """
Invalid items format. Must be a list of dictionaries with 'name', 'price', and 'quantity' keys."""
RECEIPT_DESC_FORMAT = """
Store Name: {store_name}
Transaction Time: {transaction_time}
Total Amount: {total_amount}
Currency: {currency}
Purchased Items:
{purchased_items}
Receipt Image ID: {receipt_id}
"""


def sanitize_image_id(image_id: str) -> str:
    """Sanitize image ID by removing any leading/trailing whitespace."""
    if image_id.startswith("[IMAGE-"):
        image_id = image_id.split("ID ")[1].split("]")[0]

    return image_id.strip()


def store_receipt_data(
    image_id: str,
    store_name: str,
    transaction_time: str,
    total_amount: float,
    purchased_items: List[Dict[str, Any]],
    currency: str = "IDR",
) -> str:
    """
    Store receipt data in the database.

    Args:
        image_id (str): The unique identifier of the image. For example IMAGE-POSITION 0-ID 12345,
            the ID of the image is 12345.
        store_name (str): The name of the store.
        transaction_time (str): The time of purchase, in ISO format ("YYYY-MM-DDTHH:MM:SS.ssssssZ").
        total_amount (float): The total amount spent.
        purchased_items (List[Dict[str, Any]]): A list of items purchased with their prices. Each item must have:
            - name (str): The name of the item.
            - price (float): The price of the item.
            - quantity (int, optional): The quantity of the item. Defaults to 1 if not provided.
        currency (str, optional): The currency of the transaction, can be derived from the store location.
            If unsure, default is "IDR".

    Returns:
        str: A success message with the receipt ID.

    Raises:
        Exception: If the operation failed or input is invalid.
    """
    try:
        # In case of it provide full image placeholder, extract the id string
        image_id = sanitize_image_id(image_id)

        # Check if the receipt already exists
        doc = get_receipt_data_by_image_id(image_id)

        if doc:
            return f"Receipt with ID {image_id} already exists"

        # Validate transaction time
        if not isinstance(transaction_time, str):
            raise ValueError(
                "Invalid transaction time: must be a string in ISO format 'YYYY-MM-DDTHH:MM:SS.ssssssZ'"
            )
        try:
            datetime.datetime.fromisoformat(transaction_time.replace("Z", "+00:00"))
        except ValueError:
            raise ValueError(
                "Invalid transaction time format. Must be in ISO format 'YYYY-MM-DDTHH:MM:SS.ssssssZ'"
            )

        # Validate items format
        if not isinstance(purchased_items, list):
            raise ValueError(INVALID_ITEMS_FORMAT_ERR)

        for _item in purchased_items:
            if (
                not isinstance(_item, dict)
                or "name" not in _item
                or "price" not in _item
            ):
                raise ValueError(INVALID_ITEMS_FORMAT_ERR)

            if "quantity" not in _item:
                _item["quantity"] = 1

        # Create a combined text from all receipt information for better embedding
        result = GENAI_CLIENT.models.embed_content(
            model="text-embedding-004",
            contents=RECEIPT_DESC_FORMAT.format(
                store_name=store_name,
                transaction_time=transaction_time,
                total_amount=total_amount,
                currency=currency,
                purchased_items=purchased_items,
                receipt_id=image_id,
            ),
        )

        embedding = result.embeddings[0].values

        doc = {
            "receipt_id": image_id,
            "store_name": store_name,
            "transaction_time": transaction_time,
            "total_amount": total_amount,
            "currency": currency,
            "purchased_items": purchased_items,
            EMBEDDING_FIELD_NAME: Vector(embedding),
        }

        COLLECTION.add(doc)

        return f"Receipt stored successfully with ID: {image_id}"
    except Exception as e:
        raise Exception(f"Failed to store receipt: {str(e)}")


def search_receipts_by_metadata_filter(
    start_time: str,
    end_time: str,
    min_total_amount: float = -1.0,
    max_total_amount: float = -1.0,
) -> str:
    """
    Filter receipts by metadata within a specific time range and optionally by amount.

    Args:
        start_time (str): The start datetime for the filter (in ISO format, e.g. 'YYYY-MM-DDTHH:MM:SS.ssssssZ').
        end_time (str): The end datetime for the filter (in ISO format, e.g. 'YYYY-MM-DDTHH:MM:SS.ssssssZ').
        min_total_amount (float): The minimum total amount for the filter (inclusive). Defaults to -1.
        max_total_amount (float): The maximum total amount for the filter (inclusive). Defaults to -1.

    Returns:
        str: A string containing the list of receipt data matching all applied filters.

    Raises:
        Exception: If the search failed or input is invalid.
    """
    try:
        # Validate start and end times
        if not isinstance(start_time, str) or not isinstance(end_time, str):
            raise ValueError("start_time and end_time must be strings in ISO format")
        try:
            datetime.datetime.fromisoformat(start_time.replace("Z", "+00:00"))
            datetime.datetime.fromisoformat(end_time.replace("Z", "+00:00"))
        except ValueError:
            raise ValueError("start_time and end_time must be strings in ISO format")

        # Start with the base collection reference
        query = COLLECTION

        # Build the composite query by properly chaining conditions
        # Notes that this demo assume 1 user only,
        # need to refactor the query for multiple user
        filters = [
            FieldFilter("transaction_time", ">=", start_time),
            FieldFilter("transaction_time", "<=", end_time),
        ]

        # Add optional filters
        if min_total_amount != -1:
            filters.append(FieldFilter("total_amount", ">=", min_total_amount))

        if max_total_amount != -1:
            filters.append(FieldFilter("total_amount", "<=", max_total_amount))

        # Apply the filters
        composite_filter = And(filters=filters)
        query = query.where(filter=composite_filter)

        # Execute the query and collect results
        search_result_description = "Search by Metadata Results:\n"
        for doc in query.stream():
            data = doc.to_dict()
            data.pop(
                EMBEDDING_FIELD_NAME, None
            )  # Remove embedding as it's not needed for display

            search_result_description += f"\n{RECEIPT_DESC_FORMAT.format(**data)}"

        return search_result_description
    except Exception as e:
        raise Exception(f"Error filtering receipts: {str(e)}")


def search_relevant_receipts_by_natural_language_query(
    query_text: str, limit: int = 5
) -> str:
    """
    Search for receipts with content most similar to the query using vector search.
    This tool can be use for user query that is difficult to translate into metadata filters.
    Such as store name or item name which sensitive to string matching.
    Use this tool if you cannot utilize the search by metadata filter tool.

    Args:
        query_text (str): The search text (e.g., "coffee", "dinner", "groceries").
        limit (int, optional): Maximum number of results to return (default: 5).

    Returns:
        str: A string containing the list of contextually relevant receipt data.

    Raises:
        Exception: If the search failed or input is invalid.
    """
    try:
        # Generate embedding for the query text
        result = GENAI_CLIENT.models.embed_content(
            model="text-embedding-004", contents=query_text
        )
        query_embedding = result.embeddings[0].values

        # Notes that this demo assume 1 user only,
        # need to refactor the query for multiple user
        vector_query = COLLECTION.find_nearest(
            vector_field=EMBEDDING_FIELD_NAME,
            query_vector=Vector(query_embedding),
            distance_measure=DistanceMeasure.EUCLIDEAN,
            limit=limit,
        )

        # Execute the query and collect results
        search_result_description = "Search by Contextual Relevance Results:\n"
        for doc in vector_query.stream():
            data = doc.to_dict()
            data.pop(
                EMBEDDING_FIELD_NAME, None
            )  # Remove embedding as it's not needed for display
            search_result_description += f"\n{RECEIPT_DESC_FORMAT.format(**data)}"

        return search_result_description
    except Exception as e:
        raise Exception(f"Error searching receipts: {str(e)}")


def get_receipt_data_by_image_id(image_id: str) -> Dict[str, Any]:
    """
    Retrieve receipt data from the database using the image_id.

    Args:
        image_id (str): The unique identifier of the receipt image. For example, if the placeholder is
            [IMAGE-ID 12345], the ID to use is 12345.

    Returns:
        Dict[str, Any]: A dictionary containing the receipt data with the following keys:
            - receipt_id (str): The unique identifier of the receipt image.
            - store_name (str): The name of the store.
            - transaction_time (str): The time of purchase in UTC.
            - total_amount (float): The total amount spent.
            - currency (str): The currency of the transaction.
            - purchased_items (List[Dict[str, Any]]): List of items purchased with their details.
        Returns an empty dictionary if no receipt is found.
    """
    # In case of it provide full image placeholder, extract the id string
    image_id = sanitize_image_id(image_id)

    # Query the receipts collection for documents with matching receipt_id (image_id)
    # Notes that this demo assume 1 user only,
    # need to refactor the query for multiple user
    query = COLLECTION.where(filter=FieldFilter("receipt_id", "==", image_id)).limit(1)
    docs = list(query.stream())

    if not docs:
        return {}

    # Get the first matching document
    doc_data = docs[0].to_dict()
    doc_data.pop(EMBEDDING_FIELD_NAME, None)

    return doc_data
คำอธิบายโค้ด
ในการติดตั้งใช้งานฟังก์ชันเครื่องมือนี้ เราออกแบบเครื่องมือโดยอิงตามแนวคิดหลัก 2 ข้อต่อไปนี้
- แยกวิเคราะห์ข้อมูลใบเสร็จและแมปกับไฟล์ต้นฉบับโดยใช้ตัวยึดตำแหน่งสตริงรหัสรูปภาพ
[IMAGE-ID <hash-of-image-1>] - การจัดเก็บและการเรียกข้อมูลโดยใช้ฐานข้อมูล Firestore
เครื่องมือ "store_receipt_data"
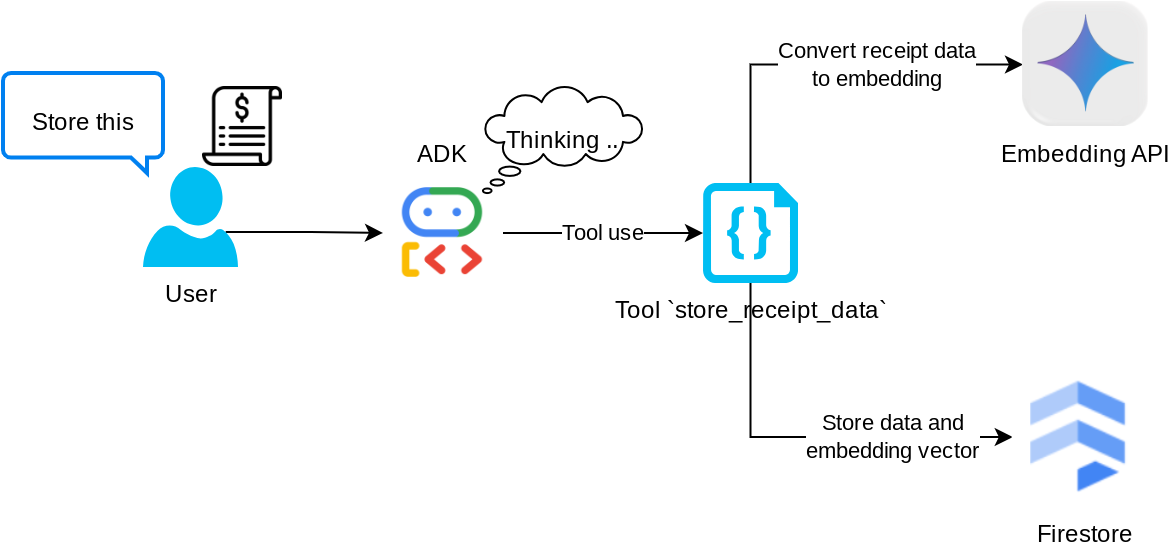
เครื่องมือนี้คือเครื่องมือการรู้จำอักขระด้วยภาพ ซึ่งจะแยกวิเคราะห์ข้อมูลที่จำเป็นจากข้อมูลรูปภาพ พร้อมทั้งจดจำสตริงรหัสรูปภาพและจับคู่เพื่อจัดเก็บไว้ในฐานข้อมูล Firestore
นอกจากนี้ เครื่องมือนี้ยังแปลงเนื้อหาของใบเสร็จเป็นการฝังโดยใช้ text-embedding-004 เพื่อให้ระบบจัดเก็บและจัดทำดัชนีข้อมูลเมตาทั้งหมดและการฝังไว้ด้วยกัน ช่วยให้ดึงข้อมูลได้อย่างยืดหยุ่นไม่ว่าจะด้วยการค้นหาตามคำค้นหาหรือการค้นหาตามบริบท
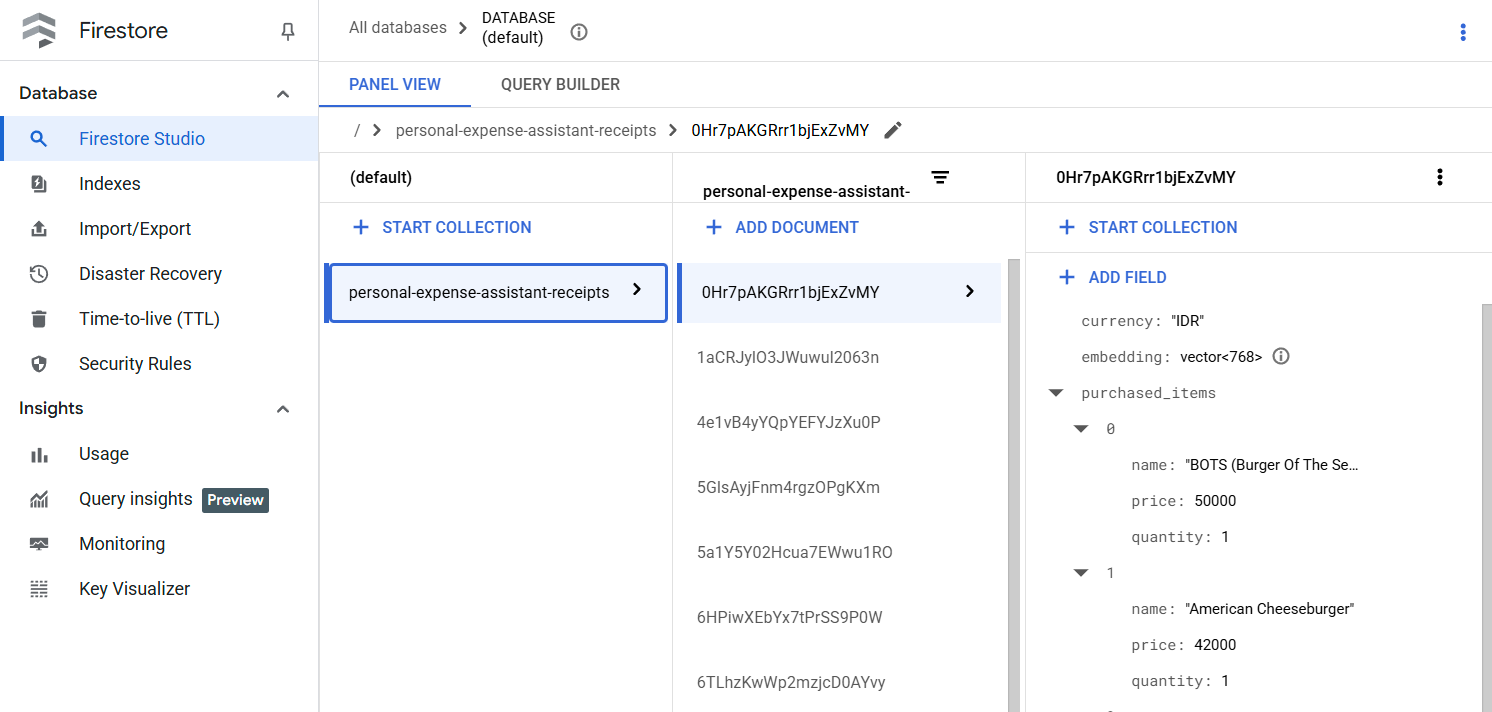
หลังจากเรียกใช้เครื่องมือนี้เรียบร้อยแล้ว คุณจะเห็นว่าระบบได้จัดทำดัชนีข้อมูลใบเสร็จในฐานข้อมูล Firestore แล้ว ดังที่แสดงด้านล่าง
เครื่องมือ "search_receipts_by_metadata_filter"
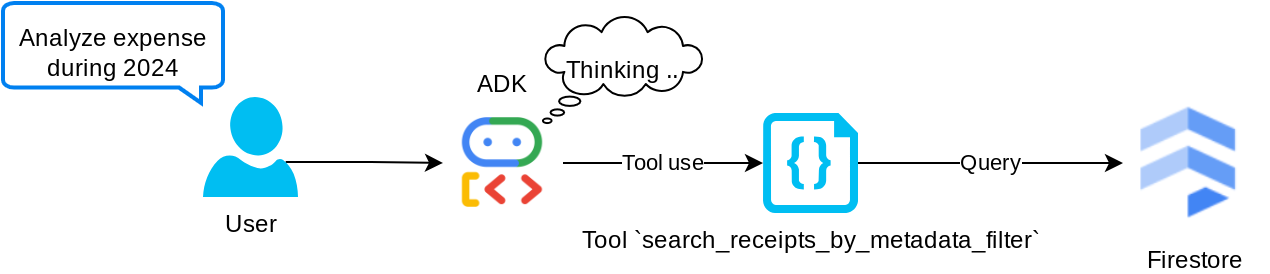
เครื่องมือนี้จะแปลงคำค้นหาของผู้ใช้เป็นตัวกรองการค้นหาข้อมูลเมตาที่รองรับการค้นหาตามช่วงวันที่และ/หรือธุรกรรมทั้งหมด โดยจะแสดงข้อมูลใบเสร็จที่ตรงกันทั้งหมด ซึ่งในกระบวนการนี้เราจะทิ้งช่องการฝังเนื่องจาก Agent ไม่จำเป็นต้องใช้เพื่อทำความเข้าใจตามบริบท
เครื่องมือ "search_relevant_receipts_by_natural_language_query"
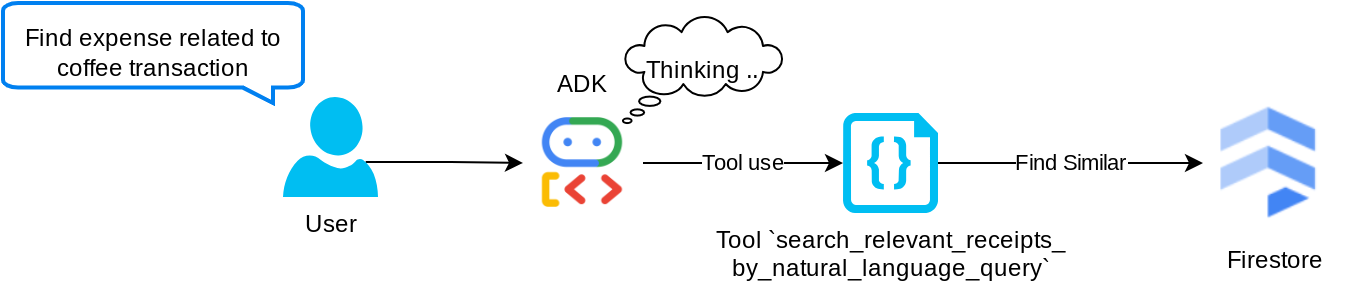
นี่คือเครื่องมือ Retrieval Augmented Generation (RAG) ของเรา เอเจนต์ของเรามีความสามารถในการออกแบบคําค้นหาของตนเองเพื่อดึงใบเสร็จที่เกี่ยวข้องจากฐานข้อมูลเวกเตอร์ และยังเลือกได้ว่าจะใช้เครื่องมือนี้เมื่อใด แนวคิดของการอนุญาตให้ตัวแทนตัดสินใจด้วยตนเองว่าจะใช้เครื่องมือ RAG นี้หรือไม่และออกแบบคําค้นหาของตนเองเป็นหนึ่งในคําจํากัดความของแนวทาง Agentic RAG
เราไม่เพียงอนุญาตให้สร้างคําค้นหาของตัวเองเท่านั้น แต่ยังอนุญาตให้เลือกจํานวนเอกสารที่เกี่ยวข้องที่ต้องการดึงข้อมูลด้วย เมื่อรวมกับวิศวกรรมพรอมต์ (Prompt Engineering) ที่เหมาะสม เช่น
# Example prompt

Always filter the result from tool
search_relevant_receipts_by_natural_language_query as the returned
result may contain irrelevant information
ซึ่งจะทำให้เครื่องมือนี้เป็นเครื่องมือที่มีประสิทธิภาพที่สามารถค้นหาได้เกือบทุกอย่าง แม้ว่าอาจไม่ได้ผลลัพธ์ที่คาดไว้ทั้งหมดเนื่องจากลักษณะที่ไม่ตรงกันของการค้นหาเพื่อนบ้านที่ใกล้ที่สุด
5. 🚀 การแก้ไขบริบทการสนทนาผ่านการเรียกกลับ
Google ADK ช่วยให้เรา "สกัดกั้น" รันไทม์ของเอเจนต์ได้ในระดับต่างๆ ดูข้อมูลเพิ่มเติมเกี่ยวกับความสามารถโดยละเอียดนี้ได้ในเอกสารประกอบนี้ ในห้องทดลองนี้ เราใช้ before_model_callback เพื่อแก้ไขคำขอก่อนส่งไปยัง LLM เพื่อนำข้อมูลรูปภาพในบริบทประวัติการสนทนาเก่าออก ( รวมเฉพาะข้อมูลรูปภาพในการโต้ตอบของผู้ใช้ 3 ครั้งล่าสุด) เพื่อประสิทธิภาพ
อย่างไรก็ตาม เรายังคงต้องการให้ตัวแทนมีบริบทข้อมูลรูปภาพเมื่อจำเป็น ดังนั้นเราจึงเพิ่มกลไกในการเพิ่มตัวยึดตำแหน่งรหัสรูปภาพสตริงหลังข้อมูลไบต์ของรูปภาพแต่ละรายการในการสนทนา ซึ่งจะช่วยให้ตัวแทนลิงก์รหัสรูปภาพกับข้อมูลไฟล์จริงได้ ซึ่งสามารถใช้ได้ทั้งในเวลาจัดเก็บหรือดึงข้อมูลรูปภาพ โครงสร้างจะมีลักษณะดังนี้
<image-byte-data-1>
[IMAGE-ID <hash-of-image-1>]
<image-byte-data-2>
[IMAGE-ID <hash-of-image-2>]
And so on..
และเมื่อข้อมูลไบต์ล้าสมัยในประวัติการสนทนา ตัวระบุสตริงจะยังคงอยู่เพื่อให้เข้าถึงข้อมูลได้ด้วยความช่วยเหลือจากการใช้งานเครื่องมือ ตัวอย่างโครงสร้างประวัติหลังจากนำข้อมูลรูปภาพออก
[IMAGE-ID <hash-of-image-1>]
[IMAGE-ID <hash-of-image-2>]
And so on..
มาเริ่มต้นกันเลย! สร้างไฟล์ใหม่ในไดเรกทอรี expense_manager_agent และตั้งชื่อว่า callbacks.py
touch expense_manager_agent/callbacks.py
เปิดไฟล์ expense_manager_agent/callbacks.py แล้วคัดลอกโค้ดด้านล่าง
# expense_manager_agent/callbacks.py

import hashlib
from google.genai import types
from google.adk.agents.callback_context import CallbackContext
from google.adk.models.llm_request import LlmRequest


def modify_image_data_in_history(
    callback_context: CallbackContext, llm_request: LlmRequest
) -> None:
    # The following code will modify the request sent to LLM
    # We will only keep image data in the last 3 user messages using a reverse and counter approach

    # Count how many user messages we've processed
    user_message_count = 0

    # Process the reversed list
    for content in reversed(llm_request.contents):
        # Only count for user manual query, not function call
        if (content.role == "user") and (content.parts[0].function_response is None):
            user_message_count += 1
            modified_content_parts = []

            # Check any missing image ID placeholder for any image data
            # Then remove image data from conversation history if more than 3 user messages
            for idx, part in enumerate(content.parts):
                if part.inline_data is None:
                    modified_content_parts.append(part)
                    continue

                if (
                    (idx + 1 >= len(content.parts))
                    or (content.parts[idx + 1].text is None)
                    or (not content.parts[idx + 1].text.startswith("[IMAGE-ID "))
                ):
                    # Generate hash ID for the image and add a placeholder
                    image_data = part.inline_data.data
                    hasher = hashlib.sha256(image_data)
                    image_hash_id = hasher.hexdigest()[:12]
                    placeholder = f"[IMAGE-ID {image_hash_id}]"

                    # Only keep image data in the last 3 user messages
                    if user_message_count <= 3:
                        modified_content_parts.append(part)

                    modified_content_parts.append(types.Part(text=placeholder))

                else:
                    # Only keep image data in the last 3 user messages
                    if user_message_count <= 3:
                        modified_content_parts.append(part)

            # This will modify the contents inside the llm_request
            content.parts = modified_content_parts
6. 🚀 พรอมต์
การออกแบบเอเจนต์ที่มีการโต้ตอบและความสามารถที่ซับซ้อนทำให้เราต้องค้นหาพรอมต์ที่เหมาะสมเพื่อเป็นแนวทางให้เอเจนต์ทำงานตามที่เราต้องการ
ก่อนหน้านี้เรามีกลไกในการจัดการข้อมูลรูปภาพในประวัติการสนทนา และยังมีเครื่องมือที่อาจใช้งานได้ไม่สะดวก เช่น search_relevant_receipts_by_natural_language_query. เรายังต้องการให้ตัวแทนค้นหาและดึงรูปภาพใบเสร็จที่ถูกต้องมาให้เราได้ด้วย ซึ่งหมายความว่าเราต้องสื่อสารข้อมูลทั้งหมดนี้อย่างเหมาะสมในโครงสร้างพรอมต์ที่เหมาะสม
เราจะขอให้ตัวแทนจัดโครงสร้างเอาต์พุตเป็นรูปแบบมาร์กดาวน์ต่อไปนี้เพื่อแยกวิเคราะห์กระบวนการคิด คำตอบสุดท้าย และไฟล์แนบ ( หากมี)
# THINKING PROCESS

Thinking process here

# FINAL RESPONSE

Response to the user here

Attachments put inside json block

{
    "attachments": [
      "[IMAGE-ID <hash-id-1>]",
      "[IMAGE-ID <hash-id-2>]",
      ...
    ]
}
มาเริ่มด้วยพรอมต์ต่อไปนี้เพื่อให้เป็นไปตามความคาดหวังเบื้องต้นเกี่ยวกับลักษณะการทำงานของเอเจนต์ผู้จัดการค่าใช้จ่าย ไฟล์ task_prompt.md ควรอยู่ในไดเรกทอรีการทำงานที่มีอยู่แล้ว แต่เราต้องย้ายไฟล์นี้ไปไว้ในไดเรกทอรี expense_manager_agent เรียกใช้คำสั่งต่อไปนี้เพื่อย้าย
mv task_prompt.md expense_manager_agent/task_prompt.md
7. 🚀 การทดสอบเอเจนต์
ตอนนี้มาลองสื่อสารกับเอเจนต์ผ่าน CLI กัน โดยเรียกใช้คำสั่งต่อไปนี้
uv run adk run expense_manager_agent
โดยจะแสดงเอาต์พุตในลักษณะนี้ ซึ่งคุณจะแชทกับตัวแทนได้ แต่จะส่งข้อความได้เฉพาะผ่านอินเทอร์เฟซนี้เท่านั้น
Log setup complete: /tmp/agents_log/agent.xxxx_xxx.log
To access latest log: tail -F /tmp/agents_log/agent.latest.log
Running agent root_agent, type exit to exit.
user: hello
[root_agent]: Hello there! How can I help you today?
user:
ตอนนี้ ADK ไม่เพียงแต่ช่วยให้เราโต้ตอบกับ CLI ได้เท่านั้น แต่ยังช่วยให้เรามี UI สำหรับการพัฒนาเพื่อโต้ตอบและตรวจสอบสิ่งที่เกิดขึ้นระหว่างการโต้ตอบได้อีกด้วย เรียกใช้คำสั่งต่อไปนี้เพื่อเริ่มเซิร์ฟเวอร์ UI สำหรับการพัฒนาในเครื่อง
uv run adk web --port 8080
ซึ่งจะสร้างเอาต์พุตคล้ายกับตัวอย่างต่อไปนี้ ซึ่งหมายความว่าเราเข้าถึงอินเทอร์เฟซเว็บได้แล้ว
INFO:     Started server process [xxxx]
INFO:     Waiting for application startup.

+-----------------------------------------------------------------------------+
| ADK Web Server started                                                      |
|                                                                             |
| For local testing, access at http://localhost:8080.                         |
+-----------------------------------------------------------------------------+

INFO:     Application startup complete.
INFO:     Uvicorn running on http://0.0.0.0:8080 (Press CTRL+C to quit)
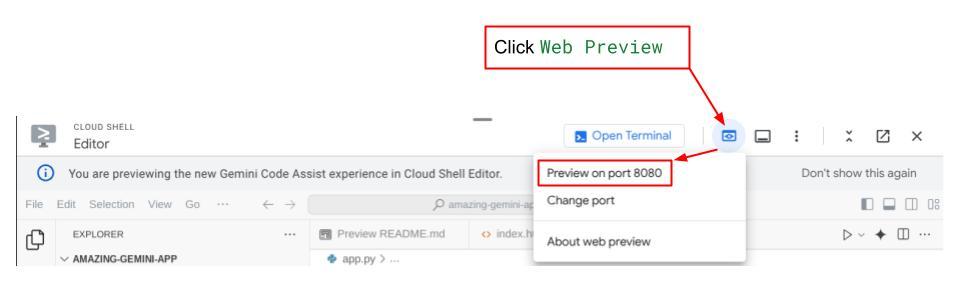
ตอนนี้หากต้องการตรวจสอบ ให้คลิกปุ่มตัวอย่างเว็บที่ด้านบนของ Cloud Shell Editor แล้วเลือกแสดงตัวอย่างบนพอร์ต 8080
คุณจะเห็นหน้าเว็บต่อไปนี้ ซึ่งคุณสามารถเลือกตัวแทนที่พร้อมให้บริการได้ที่ปุ่มเมนูแบบเลื่อนลงด้านซ้ายบน ( ในกรณีของเราควรเป็น expense_manager_agent) และโต้ตอบกับบ็อต คุณจะเห็นข้อมูลมากมายเกี่ยวกับรายละเอียดบันทึกในระหว่างรันไทม์ของเอเจนต์ในหน้าต่างด้านซ้าย
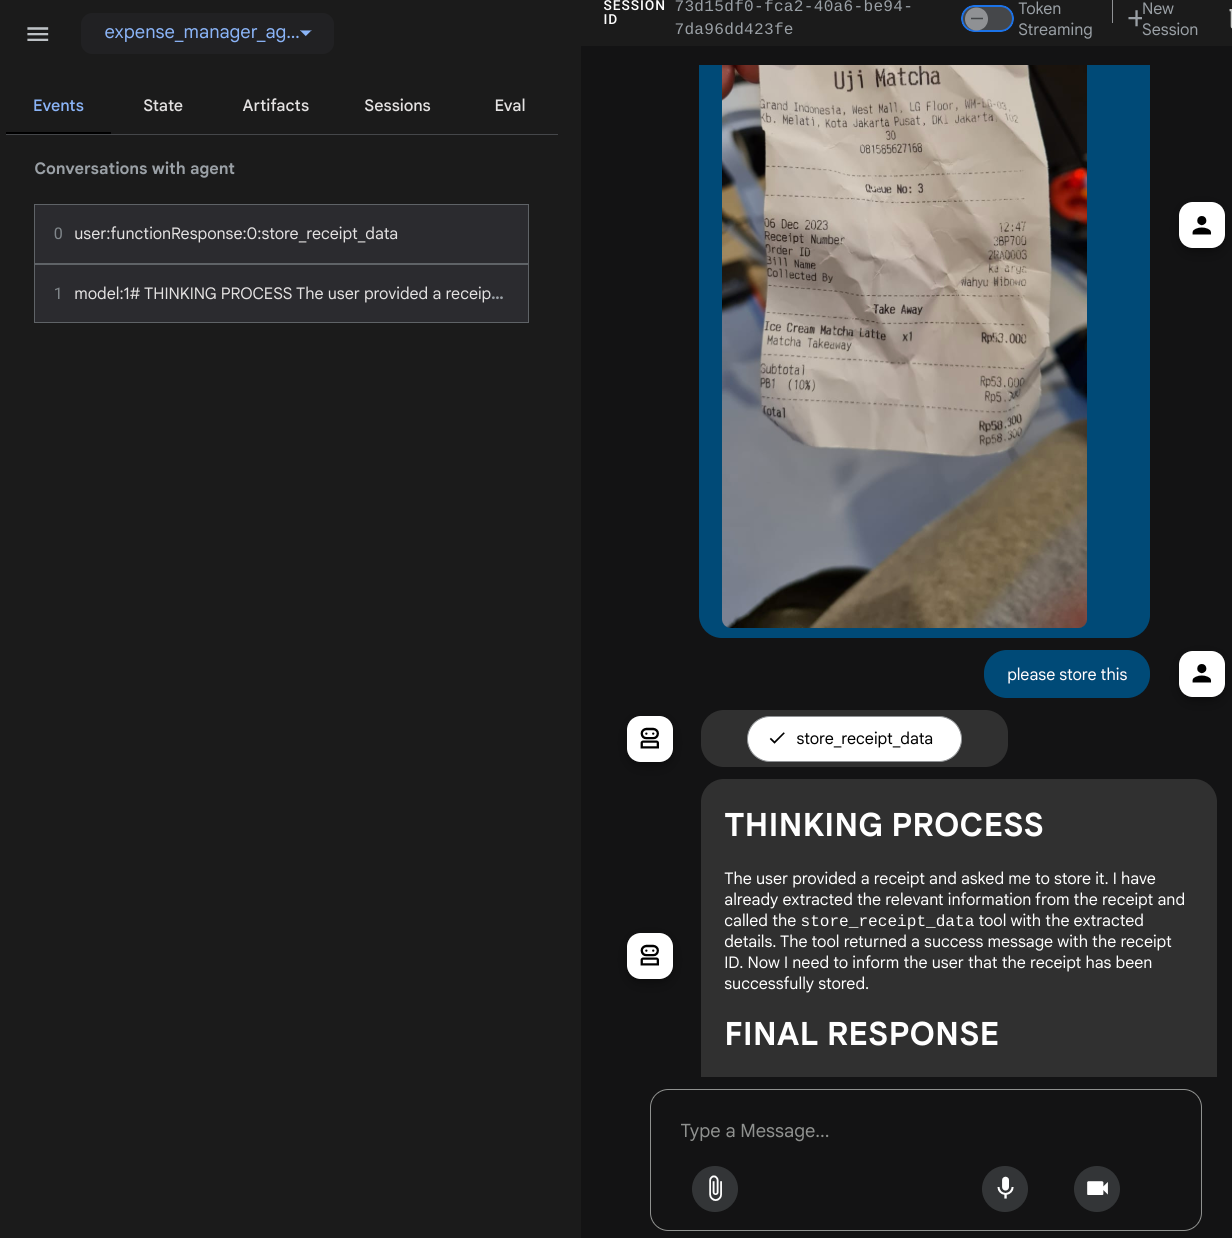
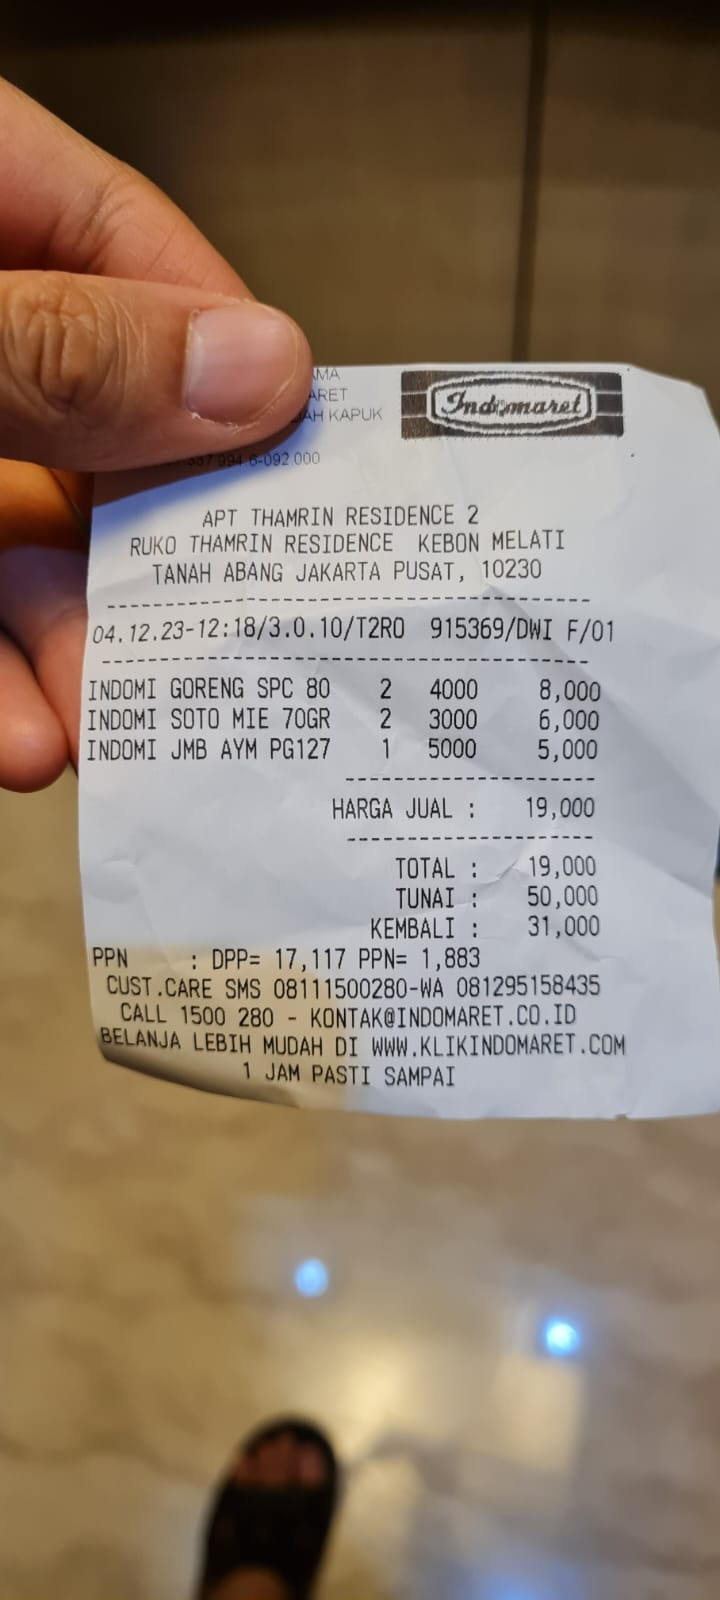
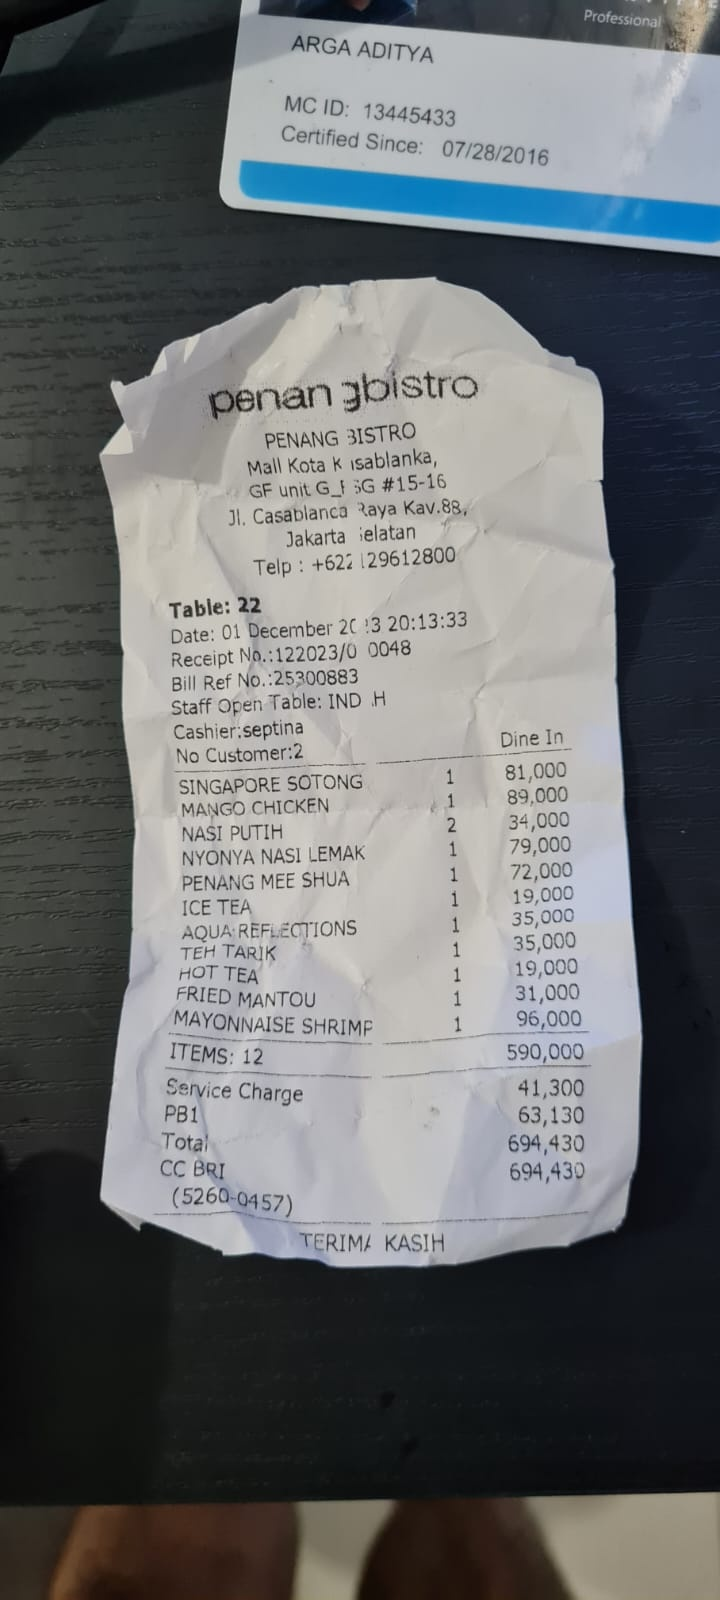
มาลองใช้การดำเนินการกัน อัปโหลดใบเสร็จตัวอย่าง 2 รายการนี้ ( แหล่งที่มา : ชุดข้อมูล Hugging Face mousserlane/id_receipt_dataset ) คลิกขวาที่แต่ละรูปภาพ แล้วเลือกบันทึกรูปภาพเป็น.. ( การดำเนินการนี้จะดาวน์โหลดรูปภาพใบเสร็จ) จากนั้นอัปโหลดไฟล์ไปยังบ็อตโดยคลิกไอคอน "คลิป" แล้วบอกว่าคุณต้องการจัดเก็บใบเสร็จเหล่านี้
หลังจากนั้น ให้ลองใช้คำค้นหาต่อไปนี้เพื่อค้นหาหรือดึงข้อมูลไฟล์
- "แสดงรายละเอียดค่าใช้จ่ายและยอดรวมในช่วงปี 2023"
- "ส่งไฟล์ใบเสร็จจาก Indomaret ให้ฉันหน่อย"
เมื่อใช้เครื่องมือบางอย่าง คุณจะตรวจสอบสิ่งที่เกิดขึ้นใน UI การพัฒนาได้
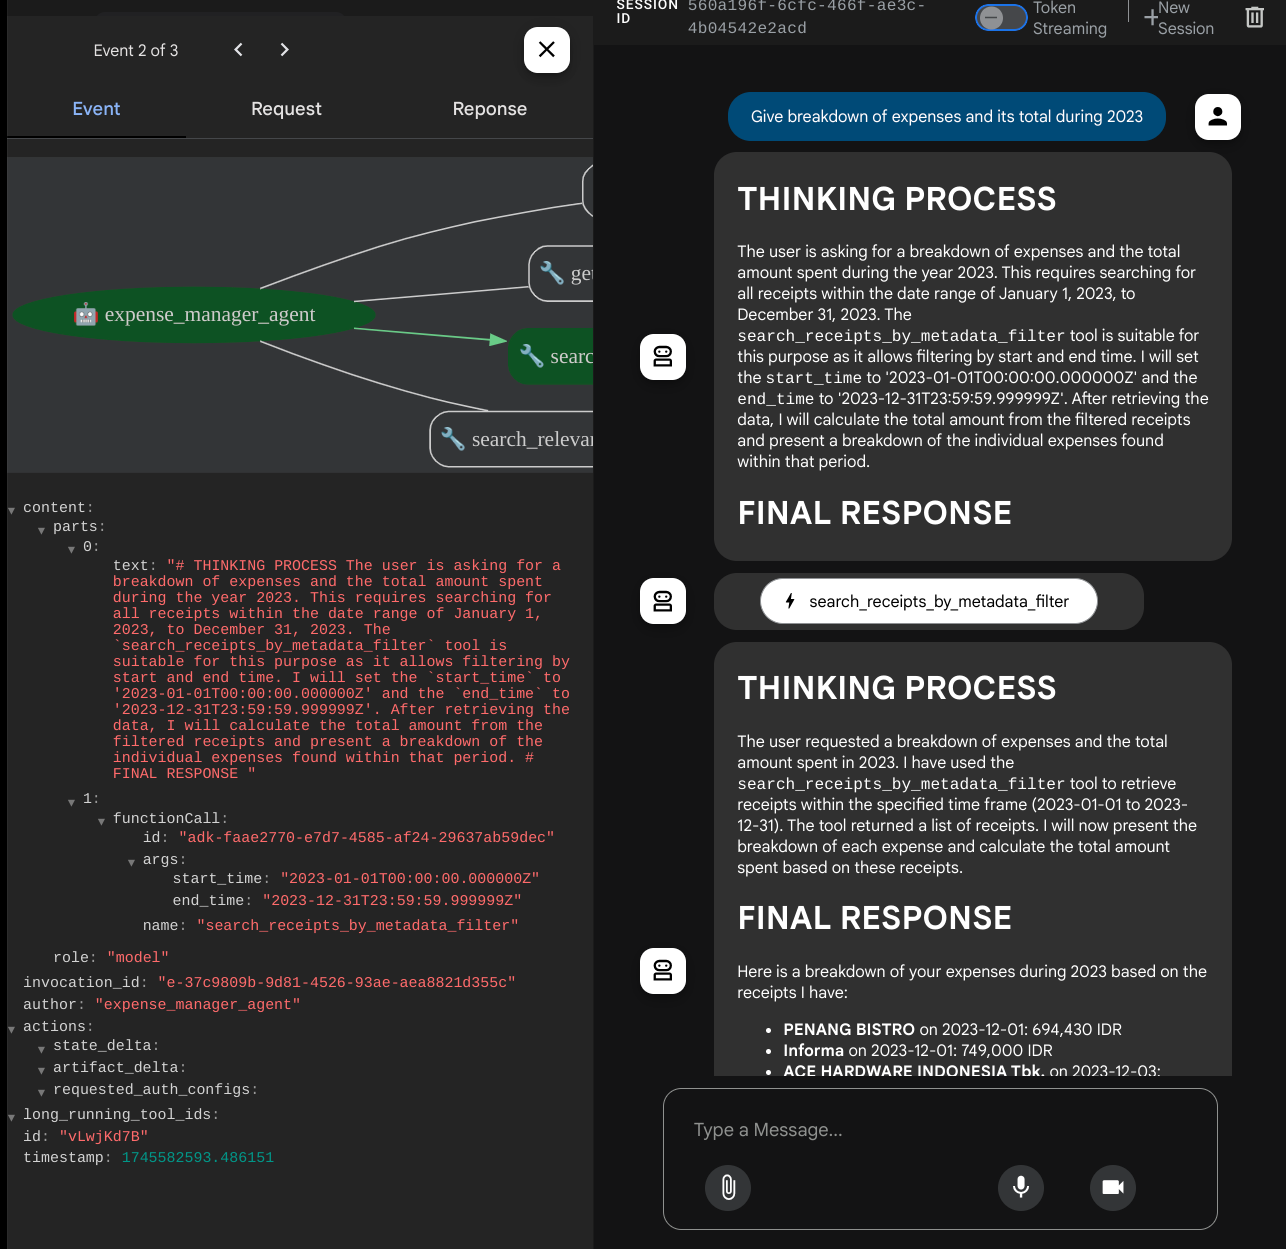
ดูว่าเอเจนต์ตอบสนองต่อคุณอย่างไร และตรวจสอบว่าเอเจนต์ปฏิบัติตามกฎทั้งหมดที่ระบุไว้ในพรอมต์ภายใน task_prompt.py หรือไม่ ยินดีด้วยนะ ตอนนี้คุณมีตัวแทนการพัฒนาที่ทำงานได้อย่างสมบูรณ์แล้ว
ตอนนี้ก็ถึงเวลาที่จะทำให้แอปสมบูรณ์ด้วย UI ที่เหมาะสมและสวยงาม รวมถึงความสามารถในการอัปโหลดและดาวน์โหลดไฟล์รูปภาพ
8. 🚀 สร้างบริการส่วนหน้าโดยใช้ Gradio
เราจะสร้างอินเทอร์เฟซเว็บแชทที่มีลักษณะดังนี้
โดยมีอินเทอร์เฟซแชทพร้อมช่องป้อนข้อมูลให้ผู้ใช้ส่งข้อความและอัปโหลดไฟล์รูปภาพใบเสร็จ
เราจะสร้างบริการส่วนหน้าโดยใช้ Gradio
สร้างไฟล์ใหม่และตั้งชื่อว่า frontend.py
touch frontend.py
จากนั้นคัดลอกโค้ดต่อไปนี้และบันทึกไว้
import mimetypes
import gradio as gr
import requests
import base64
from typing import List, Dict, Any
from settings import get_settings
from PIL import Image
import io
from schema import ImageData, ChatRequest, ChatResponse


SETTINGS = get_settings()


def encode_image_to_base64_and_get_mime_type(image_path: str) -> ImageData:
    """Encode a file to base64 string and get MIME type.

    Reads an image file and returns the base64-encoded image data and its MIME type.

    Args:
        image_path: Path to the image file to encode.

    Returns:
        ImageData object containing the base64 encoded image data and its MIME type.
    """
    # Read the image file
    with open(image_path, "rb") as file:
        image_content = file.read()

    # Get the mime type
    mime_type = mimetypes.guess_type(image_path)[0]

    # Base64 encode the image
    base64_data = base64.b64encode(image_content).decode("utf-8")

    # Return as ImageData object
    return ImageData(serialized_image=base64_data, mime_type=mime_type)


def decode_base64_to_image(base64_data: str) -> Image.Image:
    """Decode a base64 string to PIL Image.

    Converts a base64-encoded image string back to a PIL Image object
    that can be displayed or processed further.

    Args:
        base64_data: Base64 encoded string of the image.

    Returns:
        PIL Image object of the decoded image.
    """
    # Decode the base64 string and convert to PIL Image
    image_data = base64.b64decode(base64_data)
    image_buffer = io.BytesIO(image_data)
    image = Image.open(image_buffer)

    return image


def get_response_from_llm_backend(
    message: Dict[str, Any],
    history: List[Dict[str, Any]],
) -> List[str | gr.Image]:
    """Send the message and history to the backend and get a response.

    Args:
        message: Dictionary containing the current message with 'text' and optional 'files' keys.
        history: List of previous message dictionaries in the conversation.

    Returns:
        List containing text response and any image attachments from the backend service.
    """
    # Extract files and convert to base64
    image_data = []
    if uploaded_files := message.get("files", []):
        for file_path in uploaded_files:
            image_data.append(encode_image_to_base64_and_get_mime_type(file_path))

    # Prepare the request payload
    payload = ChatRequest(
        text=message["text"],
        files=image_data,
        session_id="default_session",
        user_id="default_user",
    )

    # Send request to backend
    try:
        response = requests.post(SETTINGS.BACKEND_URL, json=payload.model_dump())
        response.raise_for_status()  # Raise exception for HTTP errors

        result = ChatResponse(**response.json())
        if result.error:
            return [f"Error: {result.error}"]

        chat_responses = []

        if result.thinking_process:
            chat_responses.append(
                gr.ChatMessage(
                    role="assistant",
                    content=result.thinking_process,
                    metadata={"title": "🧠 Thinking Process"},
                )
            )

        chat_responses.append(gr.ChatMessage(role="assistant", content=result.response))

        if result.attachments:
            for attachment in result.attachments:
                image_data = attachment.serialized_image
                chat_responses.append(gr.Image(decode_base64_to_image(image_data)))

        return chat_responses
    except requests.exceptions.RequestException as e:
        return [f"Error connecting to backend service: {str(e)}"]


if __name__ == "__main__":
    demo = gr.ChatInterface(
        get_response_from_llm_backend,
        title="Personal Expense Assistant",
        description="This assistant can help you to store receipts data, find receipts, and track your expenses during certain period.",
        type="messages",
        multimodal=True,
        textbox=gr.MultimodalTextbox(file_count="multiple", file_types=["image"]),
    )

    demo.launch(
        server_name="0.0.0.0",
        server_port=8080,
    )
หลังจากนั้น เราจะลองเรียกใช้บริการส่วนหน้าด้วยคำสั่งต่อไปนี้ อย่าลืมเปลี่ยนชื่อไฟล์ main.py เป็น frontend.py
uv run frontend.py
คุณจะเห็นเอาต์พุตที่คล้ายกับเอาต์พุตนี้ในคอนโซลระบบคลาวด์
* Running on local URL:  http://0.0.0.0:8080

To create a public link, set `share=True` in `launch()`.
หลังจากนั้น คุณจะตรวจสอบอินเทอร์เฟซเว็บได้เมื่อกด Ctrl+คลิกลิงก์ URL ในเครื่อง หรือจะเข้าถึงแอปพลิเคชันฟรอนท์เอนด์โดยคลิกปุ่มตัวอย่างเว็บที่ด้านขวาบนของ Cloud Editor แล้วเลือกแสดงตัวอย่างบนพอร์ต 8080 ก็ได้
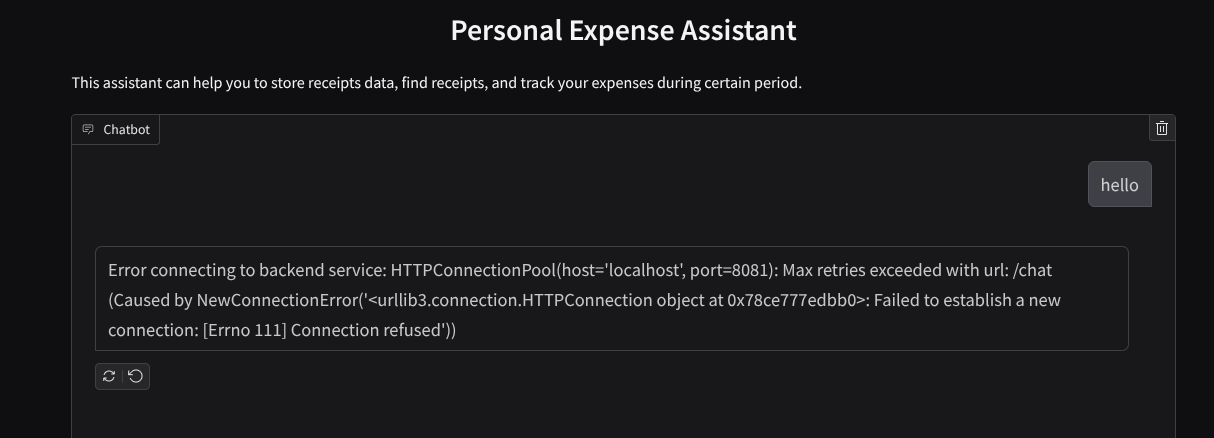
คุณจะเห็นอินเทอร์เฟซเว็บ แต่จะได้รับข้อผิดพลาดที่คาดไว้เมื่อพยายามส่งแชทเนื่องจากยังไม่ได้ตั้งค่าบริการแบ็กเอนด์
ตอนนี้ปล่อยให้บริการทำงานและอย่าเพิ่งปิด เราจะเรียกใช้บริการแบ็กเอนด์ในแท็บเทอร์มินัลอื่น
คำอธิบายโค้ด
ในโค้ดส่วนหน้า เราจะให้ผู้ใช้ส่งข้อความและอัปโหลดไฟล์หลายไฟล์ก่อน Gradio ช่วยให้เราสร้างฟังก์ชันการทำงานประเภทนี้ได้ด้วยเมธอด gr.ChatInterface ที่ใช้ร่วมกับ gr.MultimodalTextbox
ตอนนี้ก่อนที่จะส่งไฟล์และข้อความไปยังแบ็กเอนด์ เราต้องพิจารณาประเภท MIME ของไฟล์เนื่องจากแบ็กเอนด์จำเป็นต้องใช้ นอกจากนี้ เรายังต้องเข้ารหัสไบต์ของไฟล์รูปภาพเป็น base64 และส่งพร้อมกับประเภท MIME
class ImageData(BaseModel):
    """Model for image data with hash identifier.

    Attributes:
        serialized_image: Optional Base64 encoded string of the image content.
        mime_type: MIME type of the image.
    """

    serialized_image: str
    mime_type: str
สคีมาที่ใช้สำหรับการโต้ตอบส่วนหน้ากับส่วนหลังจะกำหนดไว้ใน schema.py เราใช้ Pydantic BaseModel เพื่อบังคับใช้การตรวจสอบข้อมูลในสคีมา
เมื่อได้รับคำตอบ เราจะแยกส่วนที่เป็นกระบวนการคิด คำตอบสุดท้าย และไฟล์แนบ ดังนั้นเราจึงใช้คอมโพเนนต์ Gradio เพื่อแสดงแต่ละคอมโพเนนต์ด้วยคอมโพเนนต์ UI ได้
class ChatResponse(BaseModel):
    """Model for a chat response.

    Attributes:
        response: The text response from the model.
        thinking_process: Optional thinking process of the model.
        attachments: List of image data to be displayed to the user.
        error: Optional error message if something went wrong.
    """

    response: str
    thinking_process: str = ""
    attachments: List[ImageData] = []
    error: Optional[str] = None
9. 🚀 สร้างบริการแบ็กเอนด์โดยใช้ FastAPI
จากนั้นเราจะต้องสร้างแบ็กเอนด์ที่สามารถเริ่มต้น Agent พร้อมกับคอมโพเนนต์อื่นๆ เพื่อให้สามารถเรียกใช้ Agent Runtime ได้
สร้างไฟล์ใหม่และตั้งชื่อว่า backend.py
touch backend.py
และคัดลอกโค้ดต่อไปนี้
from expense_manager_agent.agent import root_agent as expense_manager_agent
from google.adk.sessions import InMemorySessionService
from google.adk.runners import Runner
from google.adk.events import Event
from fastapi import FastAPI, Body, Depends
from typing import AsyncIterator
from types import SimpleNamespace
import uvicorn
from contextlib import asynccontextmanager
from utils import (
    extract_attachment_ids_and_sanitize_response,
    download_image_from_gcs,
    extract_thinking_process,
    format_user_request_to_adk_content_and_store_artifacts,
)
from schema import ImageData, ChatRequest, ChatResponse
import logger
from google.adk.artifacts import GcsArtifactService
from settings import get_settings

SETTINGS = get_settings()
APP_NAME = "expense_manager_app"


# Application state to hold service contexts
class AppContexts(SimpleNamespace):
    """A class to hold application contexts with attribute access"""

    session_service: InMemorySessionService = None
    artifact_service: GcsArtifactService = None
    expense_manager_agent_runner: Runner = None


# Initialize application state
app_contexts = AppContexts()


@asynccontextmanager
async def lifespan(app: FastAPI):
    # Initialize service contexts during application startup
    app_contexts.session_service = InMemorySessionService()
    app_contexts.artifact_service = GcsArtifactService(
        bucket_name=SETTINGS.STORAGE_BUCKET_NAME
    )
    app_contexts.expense_manager_agent_runner = Runner(
        agent=expense_manager_agent,  # The agent we want to run
        app_name=APP_NAME,  # Associates runs with our app
        session_service=app_contexts.session_service,  # Uses our session manager
        artifact_service=app_contexts.artifact_service,  # Uses our artifact manager
    )

    logger.info("Application started successfully")
    yield
    logger.info("Application shutting down")
    # Perform cleanup during application shutdown if necessary


# Helper function to get application state as a dependency
async def get_app_contexts() -> AppContexts:
    return app_contexts


# Create FastAPI app
app = FastAPI(title="Personal Expense Assistant API", lifespan=lifespan)


@app.post("/chat", response_model=ChatResponse)
async def chat(
    request: ChatRequest = Body(...),
    app_context: AppContexts = Depends(get_app_contexts),
) -> ChatResponse:
    """Process chat request and get response from the agent"""

    # Prepare the user's message in ADK format and store image artifacts
    content = await format_user_request_to_adk_content_and_store_artifacts(
        request=request,
        app_name=APP_NAME,
        artifact_service=app_context.artifact_service,
    )

    final_response_text = "Agent did not produce a final response."  # Default

    # Use the session ID from the request or default if not provided
    session_id = request.session_id
    user_id = request.user_id

    # Create session if it doesn't exist
    if not await app_context.session_service.get_session(
        app_name=APP_NAME, user_id=user_id, session_id=session_id
    ):
        await app_context.session_service.create_session(
            app_name=APP_NAME, user_id=user_id, session_id=session_id
        )

    try:
        # Process the message with the agent
        # Type annotation: runner.run_async returns an AsyncIterator[Event]
        events_iterator: AsyncIterator[Event] = (
            app_context.expense_manager_agent_runner.run_async(
                user_id=user_id, session_id=session_id, new_message=content
            )
        )
        async for event in events_iterator:  # event has type Event
            # Key Concept: is_final_response() marks the concluding message for the turn
            if event.is_final_response():
                if event.content and event.content.parts:
                    # Extract text from the first part
                    final_response_text = event.content.parts[0].text
                elif event.actions and event.actions.escalate:
                    # Handle potential errors/escalations
                    final_response_text = f"Agent escalated: {event.error_message or 'No specific message.'}"
                break  # Stop processing events once the final response is found

        logger.info(
            "Received final response from agent", raw_final_response=final_response_text
        )

        # Extract and process any attachments and thinking process in the response
        base64_attachments = []
        sanitized_text, attachment_ids = extract_attachment_ids_and_sanitize_response(
            final_response_text
        )
        sanitized_text, thinking_process = extract_thinking_process(sanitized_text)

        # Download images from GCS and replace hash IDs with base64 data
        for image_hash_id in attachment_ids:
            # Download image data and get MIME type
            result = await download_image_from_gcs(
                artifact_service=app_context.artifact_service,
                image_hash=image_hash_id,
                app_name=APP_NAME,
                user_id=user_id,
                session_id=session_id,
            )
            if result:
                base64_data, mime_type = result
                base64_attachments.append(
                    ImageData(serialized_image=base64_data, mime_type=mime_type)
                )

        logger.info(
            "Processed response with attachments",
            sanitized_response=sanitized_text,
            thinking_process=thinking_process,
            attachment_ids=attachment_ids,
        )

        return ChatResponse(
            response=sanitized_text,
            thinking_process=thinking_process,
            attachments=base64_attachments,
        )

    except Exception as e:
        logger.error("Error processing chat request", error_message=str(e))
        return ChatResponse(
            response="", error=f"Error in generating response: {str(e)}"
        )


# Only run the server if this file is executed directly
if __name__ == "__main__":
    uvicorn.run(app, host="0.0.0.0", port=8081)
หลังจากนั้นเราจะลองเรียกใช้บริการแบ็กเอนด์ โปรดทราบว่าในขั้นตอนก่อนหน้า เราได้เรียกใช้บริการส่วนหน้าแล้ว ตอนนี้เราจะต้องเปิดเทอร์มินัลใหม่และลองเรียกใช้บริการแบ็กเอนด์นี้
- สร้างเทอร์มินัลใหม่ ไปที่เทอร์มินัลในพื้นที่ด้านล่าง แล้วมองหาปุ่ม "+" เพื่อสร้างเทอร์มินัลใหม่ หรือจะกด Ctrl + Shift + C เพื่อเปิดเทอร์มินัลใหม่ก็ได้

- หลังจากนั้น ให้ตรวจสอบว่าคุณอยู่ในไดเรกทอรีการทำงาน personal-expense-assistant แล้วเรียกใช้คำสั่งต่อไปนี้
uv run backend.py
- หากสำเร็จ ระบบจะแสดงเอาต์พุตดังนี้
INFO:     Started server process [xxxxx]
INFO:     Waiting for application startup.
INFO:     Application startup complete.
INFO:     Uvicorn running on http://0.0.0.0:8081 (Press CTRL+C to quit)
คำอธิบายโค้ด
การเริ่มต้น ADK Agent, SessionService และ ArtifactService
หากต้องการเรียกใช้เอเจนต์ในบริการแบ็กเอนด์ เราจะต้องสร้าง Runner ที่ใช้ทั้ง SessionService และเอเจนต์ของเรา SessionService จะจัดการประวัติการสนทนาและสถานะ ดังนั้นเมื่อผสานรวมกับ Runner แล้ว จะทำให้ตัวแทนของเรามีความสามารถในการรับบริบทของการสนทนาที่กำลังดำเนินอยู่
นอกจากนี้ เรายังใช้ ArtifactService เพื่อจัดการไฟล์ที่อัปโหลดด้วย อ่านรายละเอียดเพิ่มเติมเกี่ยวกับ Session และ Artifacts ของ ADK ได้ที่นี่
...

@asynccontextmanager
async def lifespan(app: FastAPI):
    # Initialize service contexts during application startup
    app_contexts.session_service = InMemorySessionService()
    app_contexts.artifact_service = GcsArtifactService(
        bucket_name=SETTINGS.STORAGE_BUCKET_NAME
    )
    app_contexts.expense_manager_agent_runner = Runner(
        agent=expense_manager_agent,  # The agent we want to run
        app_name=APP_NAME,  # Associates runs with our app
        session_service=app_contexts.session_service,  # Uses our session manager
        artifact_service=app_contexts.artifact_service,  # Uses our artifact manager
    )

    logger.info("Application started successfully")
    yield
    logger.info("Application shutting down")
    # Perform cleanup during application shutdown if necessary

...
ในการสาธิตนี้ เราใช้ InMemorySessionService และ GcsArtifactService เพื่อผสานรวมกับเอเจนต์ Runner เนื่องจากระบบจะจัดเก็บประวัติการสนทนาไว้ในหน่วยความจำ ประวัติการสนทนาจึงจะหายไปเมื่อมีการปิดหรือรีสตาร์ทบริการแบ็กเอนด์ เราเริ่มต้นใช้งานสิ่งเหล่านี้ภายในวงจรการใช้งานแอปพลิเคชัน FastAPI เพื่อแทรกเป็น Dependency ในเส้นทาง /chat
การอัปโหลดและดาวน์โหลดรูปภาพด้วย GcsArtifactService
ระบบจะจัดเก็บรูปภาพที่อัปโหลดทั้งหมดเป็นอาร์ติแฟกต์โดย GcsArtifactService คุณสามารถตรวจสอบได้ในฟังก์ชัน format_user_request_to_adk_content_and_store_artifacts ภายใน utils.py
...

# Prepare the user's message in ADK format and store image artifacts
content = await asyncio.to_thread(
    format_user_request_to_adk_content_and_store_artifacts,
    request=request,
    app_name=APP_NAME,
    artifact_service=app_context.artifact_service,
)

...
คำขอทั้งหมดที่ตัวเรียกใช้ของเอเจนต์จะประมวลผลต้องจัดรูปแบบเป็นประเภท types.Content ภายในฟังก์ชัน เรายังประมวลผลข้อมูลรูปภาพแต่ละรายการและดึงรหัสเพื่อแทนที่ด้วยตัวยึดตำแหน่งรหัสรูปภาพ
ระบบจะใช้กลไกที่คล้ายกันในการดาวน์โหลดไฟล์แนบหลังจากแยก ID รูปภาพโดยใช้ Regex
...
sanitized_text, attachment_ids = extract_attachment_ids_and_sanitize_response(
    final_response_text
)
sanitized_text, thinking_process = extract_thinking_process(sanitized_text)

# Download images from GCS and replace hash IDs with base64 data
for image_hash_id in attachment_ids:
    # Download image data and get MIME type
    result = await asyncio.to_thread(
        download_image_from_gcs,
        artifact_service=app_context.artifact_service,
        image_hash=image_hash_id,
        app_name=APP_NAME,
        user_id=user_id,
        session_id=session_id,
    )
...
10. 🚀 การทดสอบการผสานรวม
ตอนนี้คุณควรมีบริการหลายอย่างที่ทำงานในแท็บคอนโซลระบบคลาวด์ต่างๆ ดังนี้
- บริการส่วนหน้าทำงานที่พอร์ต 8080
* Running on local URL:  http://0.0.0.0:8080

To create a public link, set `share=True` in `launch()`.
- บริการแบ็กเอนด์ทำงานที่พอร์ต 8081
INFO:     Started server process [xxxxx]
INFO:     Waiting for application startup.
INFO:     Application startup complete.
INFO:     Uvicorn running on http://0.0.0.0:8081 (Press CTRL+C to quit)
ในสถานะปัจจุบัน คุณควรจะอัปโหลดรูปภาพใบเสร็จและแชทกับผู้ช่วยได้อย่างราบรื่นจากเว็บแอปพลิเคชันบนพอร์ต 8080
คลิกปุ่มตัวอย่างเว็บที่ด้านบนของ Cloud Shell Editor แล้วเลือกแสดงตัวอย่างบนพอร์ต 8080
ทีนี้มาโต้ตอบกับ Assistant กัน
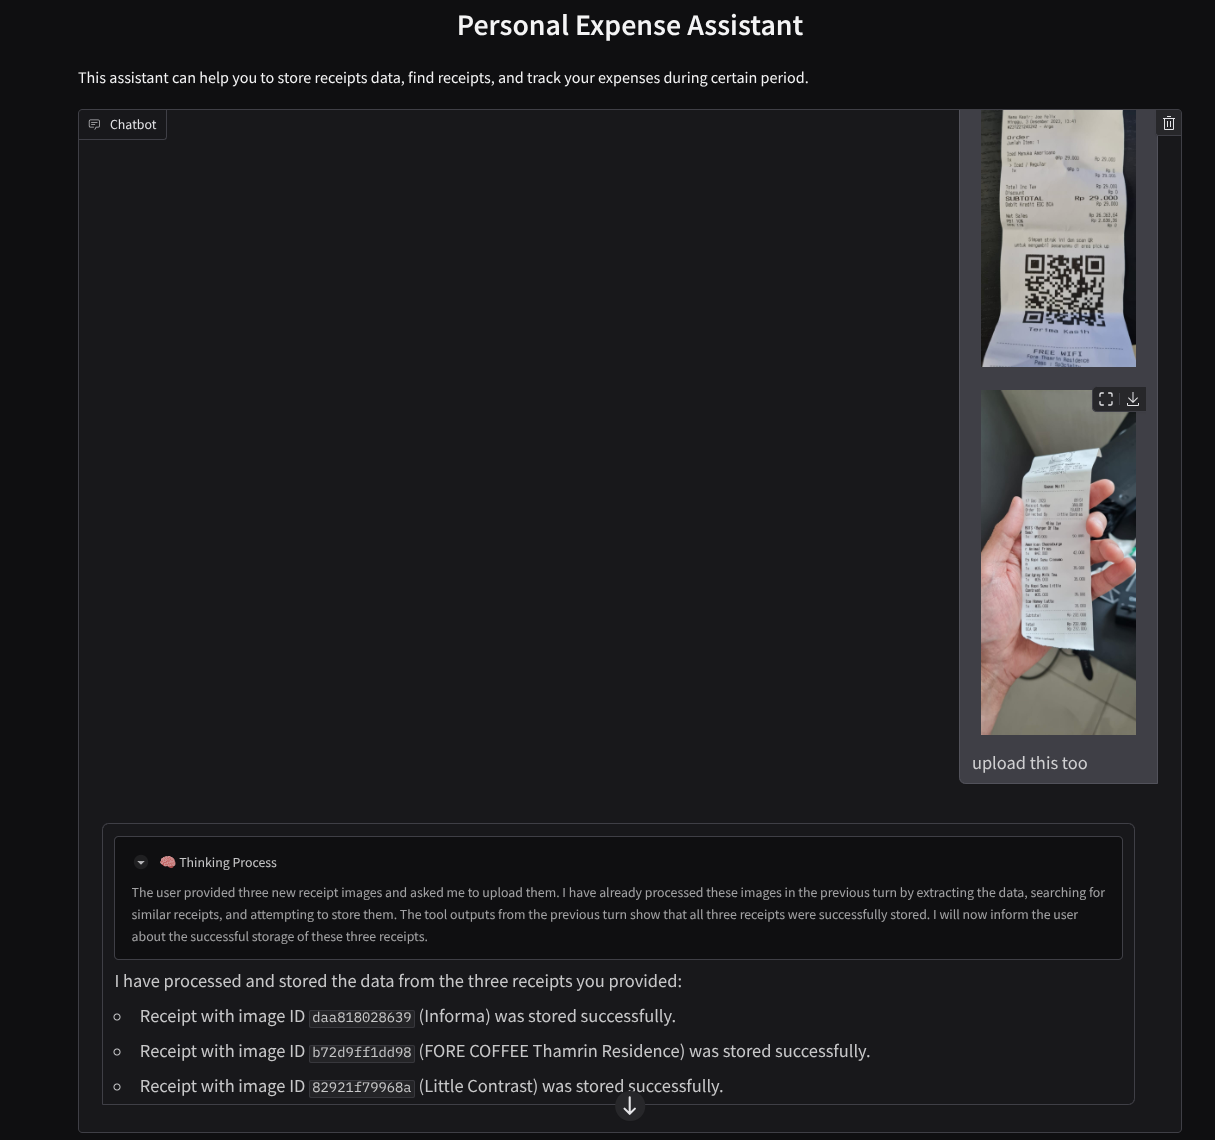
ดาวน์โหลดใบเสร็จต่อไปนี้ ช่วงวันที่ของข้อมูลใบเสร็จเหล่านี้อยู่ระหว่างปี 2023-2024 และขอให้ผู้ช่วยจัดเก็บ/อัปโหลด
- Receipt Drive ( แหล่งที่มาของชุดข้อมูล Hugging Face
mousserlane/id_receipt_dataset)
ถามเรื่องต่างๆ
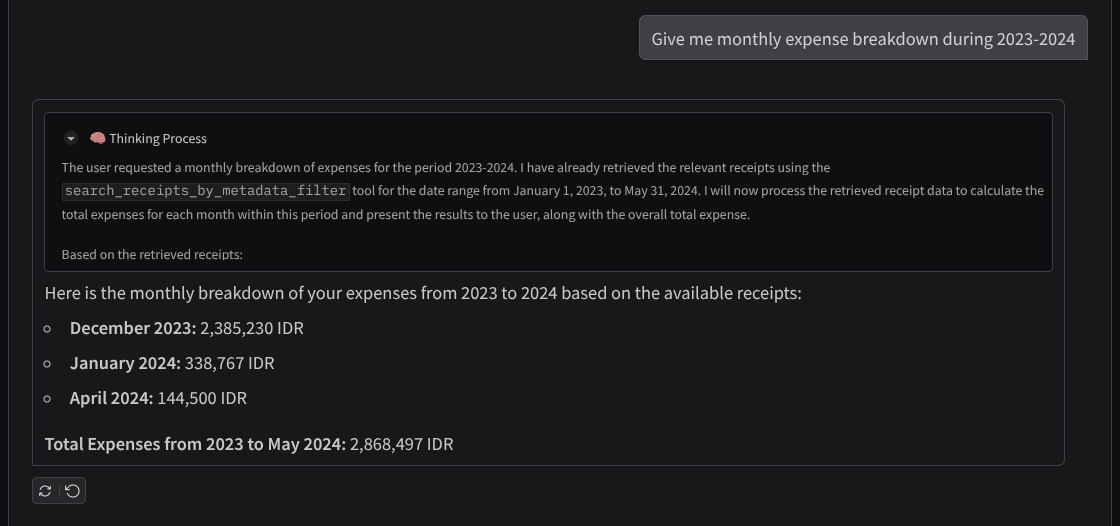
- "แสดงรายละเอียดค่าใช้จ่ายรายเดือนในช่วงปี 2023-2024 ให้ฉันหน่อย"
- "ขอดูใบเสร็จสำหรับการทำธุรกรรมซื้อกาแฟหน่อย"
- "ส่งไฟล์ใบเสร็จจาก Yakiniku Like ให้หน่อย"
- ฯลฯ
ตัวอย่างการโต้ตอบที่ประสบความสำเร็จมีดังนี้
11. 🚀 การติดตั้งใช้งานกับ Cloud Run
แน่นอนว่าเราต้องการเข้าถึงแอปที่ยอดเยี่ยมนี้จากทุกที่ หากต้องการทำเช่นนั้น เราสามารถแพ็กเกจแอปพลิเคชันนี้และทำให้ใช้งานได้กับ Cloud Run ในการสาธิตนี้ บริการนี้จะแสดงเป็นบริการสาธารณะที่ผู้อื่นเข้าถึงได้ อย่างไรก็ตาม โปรดทราบว่านี่ไม่ใช่แนวทางปฏิบัติแนะนำสำหรับแอปพลิเคชันประเภทนี้ เนื่องจากเหมาะสำหรับแอปพลิเคชันส่วนบุคคลมากกว่า
ใน Codelab นี้ เราจะใส่ทั้งบริการส่วนหน้าและบริการแบ็กเอนด์ไว้ในคอนเทนเนอร์เดียว เราจะต้องใช้ความช่วยเหลือจาก supervisord เพื่อจัดการทั้ง 2 บริการ คุณตรวจสอบไฟล์ supervisord.conf และดู Dockerfile ที่เราตั้งค่า supervisord เป็นจุดแรกเข้าได้
ตอนนี้เรามีไฟล์ทั้งหมดที่จำเป็นต่อการทําให้แอปพลิเคชันใช้งานได้ใน Cloud Run แล้ว มาทำให้แอปพลิเคชันใช้งานได้กันเลย ไปที่เทอร์มินัล Cloud Shell และตรวจสอบว่าได้กำหนดค่าโปรเจ็กต์ปัจจุบันเป็นโปรเจ็กต์ที่ใช้งานอยู่แล้ว หากยังไม่ได้กำหนดค่า ให้ใช้คำสั่ง gcloud configure เพื่อตั้งค่ารหัสโปรเจ็กต์
gcloud config set project [PROJECT_ID]
จากนั้นเรียกใช้คำสั่งต่อไปนี้เพื่อนำไปใช้งานใน Cloud Run
gcloud run deploy personal-expense-assistant \
                  --source . \
                  --port=8080 \
                  --allow-unauthenticated \
                  --env-vars-file=settings.yaml \
                  --memory 1024Mi \
                  --region us-central1
หากระบบแจ้งให้คุณรับทราบการสร้างรีจิสทรีของ Artifact สำหรับที่เก็บ Docker เพียงตอบว่า Y โปรดทราบว่าเราอนุญาตการเข้าถึงที่ไม่ต้องมีการตรวจสอบสิทธิ์ที่นี่เนื่องจากนี่เป็นแอปพลิเคชันสาธิต เราขอแนะนำให้ใช้การตรวจสอบสิทธิ์ที่เหมาะสมสำหรับแอปพลิเคชันระดับองค์กรและการใช้งานจริง
เมื่อการติดตั้งใช้งานเสร็จสมบูรณ์แล้ว คุณจะได้รับลิงก์ที่คล้ายกับลิงก์ด้านล่าง
https://personal-expense-assistant-*******.us-central1.run.app
คุณสามารถใช้แอปพลิเคชันจากหน้าต่างที่ไม่ระบุตัวตนหรืออุปกรณ์เคลื่อนที่ได้เลย โดยควรจะพร้อมใช้งานแล้ว
12. 🎯 ภารกิจ
ตอนนี้ถึงเวลาที่คุณจะเฉิดฉายและขัดเกลาทักษะการสำรวจแล้ว คุณมีความสามารถในการเปลี่ยนโค้ดเพื่อให้แบ็กเอนด์รองรับผู้ใช้หลายคนได้ไหม ต้องอัปเดตคอมโพเนนต์ใดบ้าง
13. 🧹 ล้างข้อมูล
โปรดทำตามขั้นตอนต่อไปนี้เพื่อเลี่ยงไม่ให้เกิดการเรียกเก็บเงินกับบัญชี Google Cloud สำหรับทรัพยากรที่ใช้ในโค้ดแล็บนี้
- ในคอนโซล Google Cloud ให้ไปที่หน้าจัดการทรัพยากร
- ในรายการโปรเจ็กต์ ให้เลือกโปรเจ็กต์ที่ต้องการลบ แล้วคลิกลบ
- ในกล่องโต้ตอบ ให้พิมพ์รหัสโปรเจ็กต์ แล้วคลิกปิดเพื่อลบโปรเจ็กต์
- หรือคุณจะไปที่ Cloud Run ในคอนโซล เลือกบริการที่คุณเพิ่งติดตั้งใช้งาน แล้วลบก็ได้