
1. 📖 简介
您是否曾因个人开支太多而感到烦恼,但又懒得管理?我同意!因此,在此 Codelab 中,我们将构建一个个人支出管理助理,该助理由 Gemini 2.5 提供支持,可为我们处理所有杂务!从管理上传的收据到分析您是否已经花费了太多钱来购买咖啡!
该助理将通过聊天网页界面的形式在网络浏览器中提供,您可以在其中与助理进行交流,上传一些收据图片并让助理存储这些图片,或者可能想要搜索一些收据以获取文件并进行一些费用分析。而这一切都基于 Google 智能体开发套件框架构建
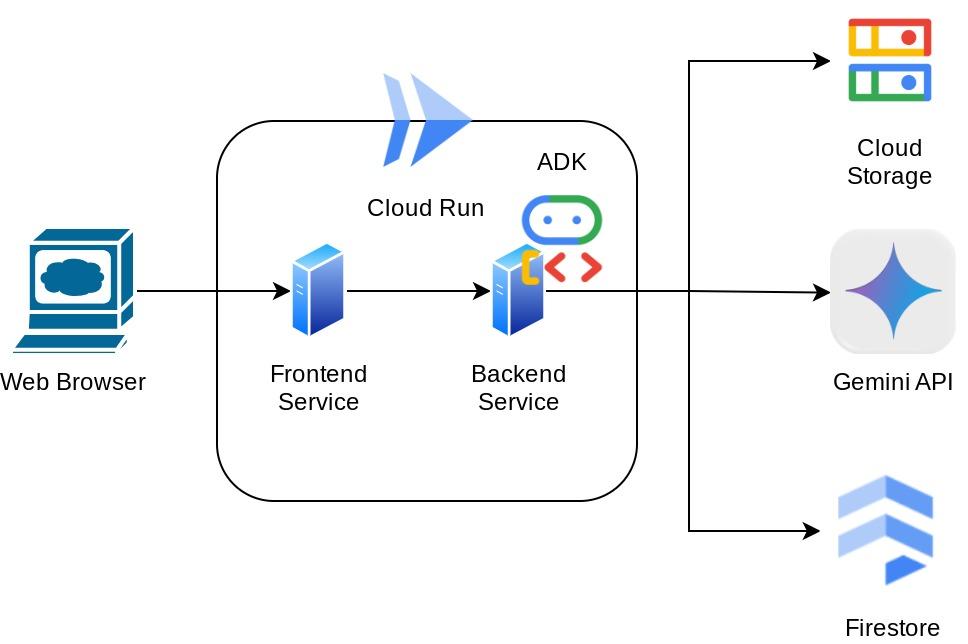
应用本身分为 2 个服务:前端和后端;让您可以快速构建原型并体验其效果,还可以了解 API 合同如何集成这两个服务。
在此 Codelab 中,您将采用以下分步方法:
- 准备好您的 Google Cloud 云项目,并在其中启用所有必需的 API
- 在 Google Cloud Storage 上设置存储分区,并在 Firestore 上设置数据库
- 创建 Firestore 索引
- 为编码环境设置工作区
- 构建 ADK 智能体源代码、工具、提示等
- 使用 ADK 本地 Web 开发界面测试智能体
- 使用 Gradio 库构建前端服务(聊天界面),以发送一些查询并上传收据图片
- 构建后端服务 - 使用 FastAPI 的 HTTP 服务器,其中包含我们的 ADK 代理代码、SessionService 和 Artifact Service
- 管理环境变量并设置将应用部署到 Cloud Run 所需的文件
- 将应用部署到 Cloud Run
架构概览
前提条件
- 能够熟练使用 Python
- 了解使用 HTTP 服务的全栈基本架构
学习内容
- 使用 Gradio 进行前端 Web 原型设计
- 使用 FastAPI 和 Pydantic 进行后端服务开发
- 在利用 ADK 的多种功能的同时设计 ADK 代理
- 工具使用
- 会话和制品管理
- 在发送到 Gemini 之前用于输入修改的回调利用率
- 利用 BuiltInPlanner 通过规划来改进任务执行
- 通过 ADK 本地 Web 界面进行快速调试
- 通过提示工程和使用 ADK 回调的 Gemini 请求修改,实现信息解析和检索,从而优化多模态交互的策略
- 使用 Firestore 作为向量数据库的 Agentic 检索增强生成
- 使用 Pydantic-settings 管理 YAML 文件中的环境变量
- 使用 Dockerfile 将应用部署到 Cloud Run,并通过 YAML 文件提供环境变量
所需条件
- Chrome 网络浏览器
- Gmail 账号
- 启用了结算功能的 Cloud 项目
此 Codelab 专为各种水平的开发者(包括新手)设计,并在示例应用中使用 Python。不过,您无需具备 Python 知识即可理解所介绍的概念。
2. 🚀 开始前须知
在 Cloud 控制台中选择有效项目
此 Codelab 假定您已拥有一个启用了结算功能的 Google Cloud 项目。如果您还没有,可以按照以下说明开始使用。
- 在 Google Cloud Console 的项目选择器页面上,选择或创建一个 Google Cloud 项目。
- 确保您的 Cloud 项目已启用结算功能。了解如何检查项目是否已启用结算功能。
准备 Firestore 数据库
接下来,我们还需要创建一个 Firestore 数据库。原生模式 Firestore 是一个 NoSQL 文档数据库,以可自动扩缩、性能出色和易于进行应用开发为设计目标。它还可以充当向量数据库,支持实验室的检索增强生成技术。
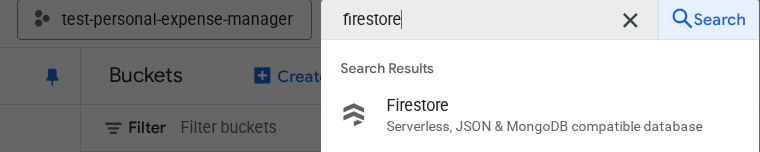
- 在搜索栏中搜索“firestore”,然后点击 Firestore 产品
- 然后,点击创建 Firestore 数据库按钮
- 使用 (default) 作为数据库 ID 名称,并保持 Standard Edition 处于选中状态。为了演示本实验,请使用具有开放安全规则的 Firestore Native。
- 您还会注意到,此数据库实际上具有免费层级使用量 YEAY!然后,点击创建数据库按钮
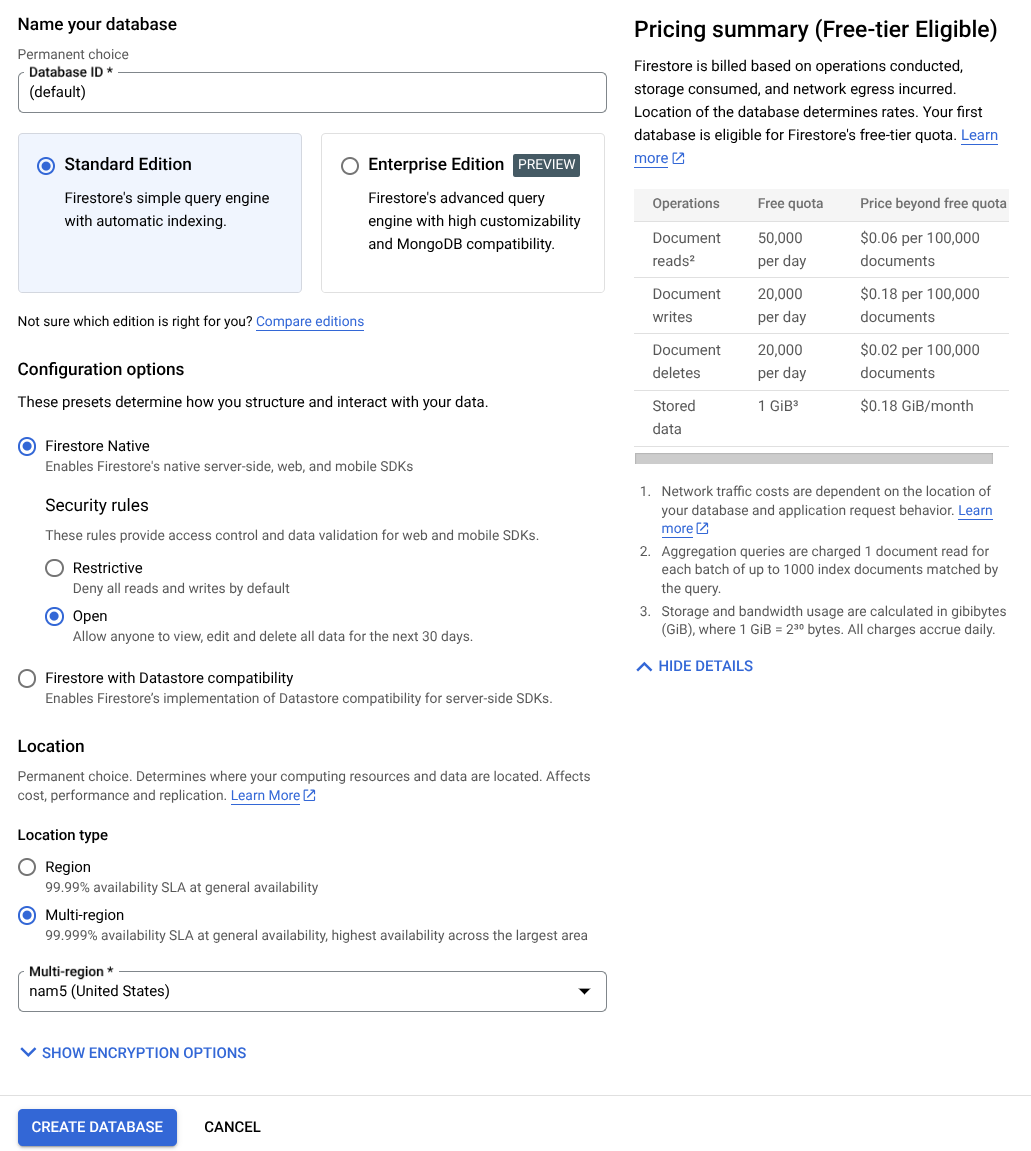
完成这些步骤后,您应该已被重定向到刚刚创建的 Firestore 数据库
在 Cloud Shell 终端中设置 Cloud 项目
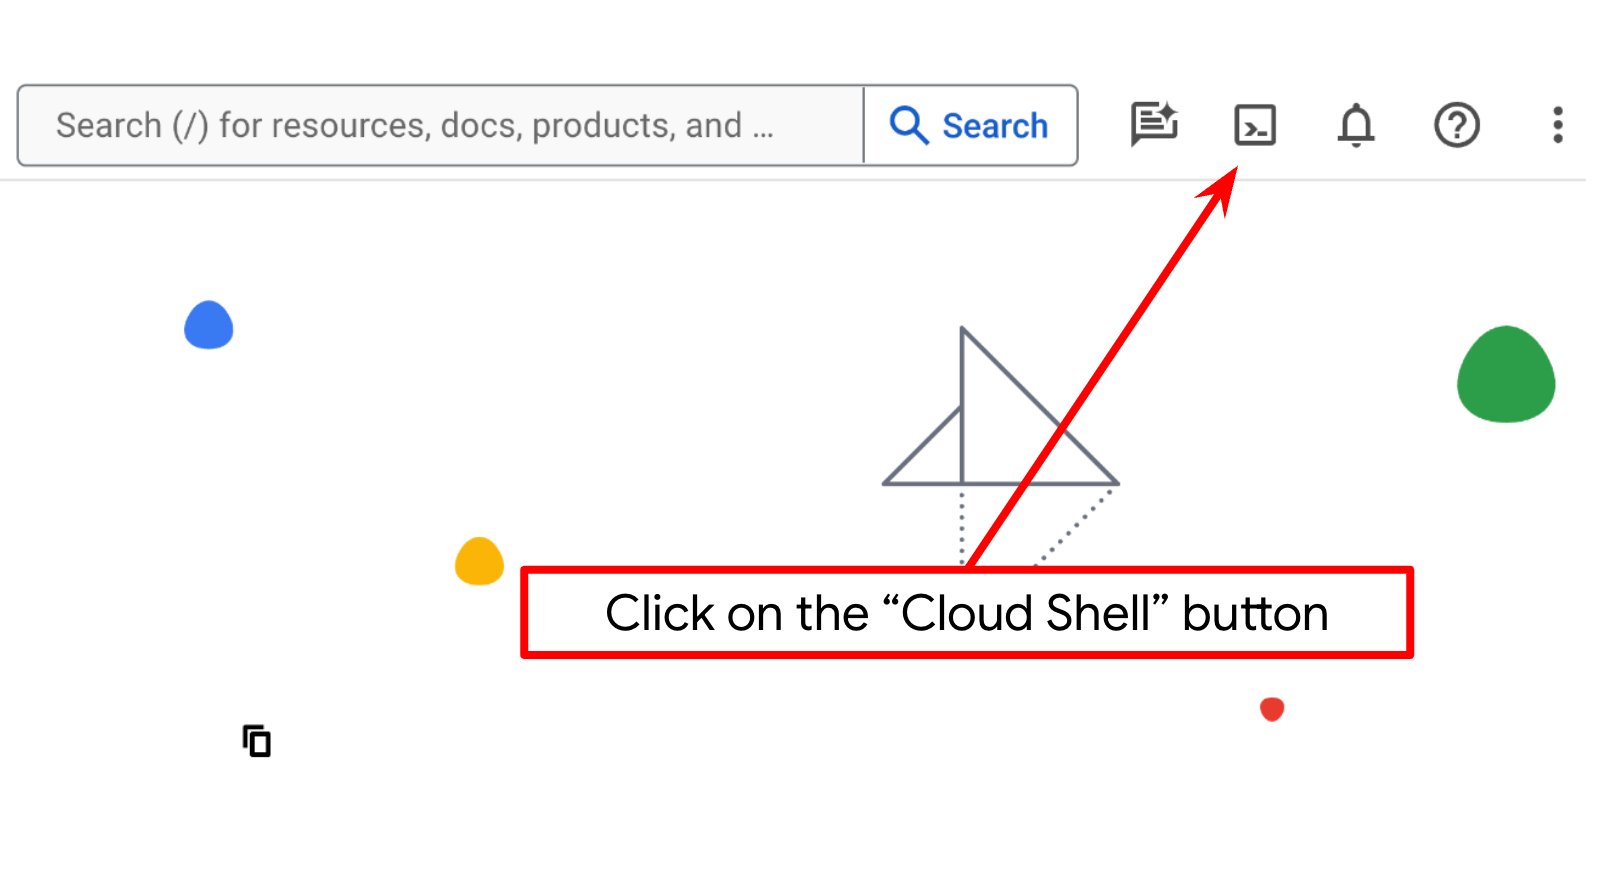
- 您将使用 Cloud Shell,这是一个在 Google Cloud 中运行的命令行环境,它预加载了 bq。点击 Google Cloud 控制台顶部的“激活 Cloud Shell”。
- 连接到 Cloud Shell 后,您可以使用以下命令检查自己是否已通过身份验证,以及项目是否已设置为您的项目 ID:
gcloud auth list
- 在 Cloud Shell 中运行以下命令,以确认 gcloud 命令了解您的项目。
gcloud config list project
- 如果项目未设置,请使用以下命令进行设置:
gcloud config set project <YOUR_PROJECT_ID>
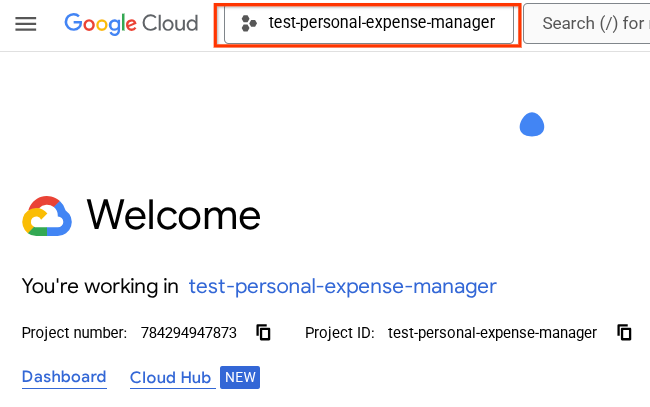
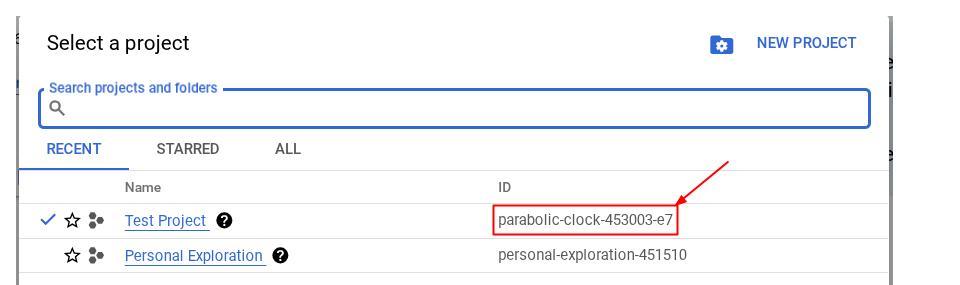
或者,您也可以在控制台中看到 PROJECT_ID ID

点击该项目,您将看到所有项目,以及右侧的项目 ID
- 通过以下命令启用所需的 API。这可能需要几分钟的时间,请耐心等待。
gcloud services enable aiplatform.googleapis.com \
                       firestore.googleapis.com \
                       run.googleapis.com \
                       cloudbuild.googleapis.com \
                       cloudresourcemanager.googleapis.com
成功执行该命令后,您应该会看到类似如下所示的消息:
Operation "operations/..." finished successfully.
除了使用 gcloud 命令,您还可以通过控制台搜索每个产品或使用此链接。
如果遗漏了任何 API,您始终可以在实施过程中启用它。
如需了解 gcloud 命令和用法,请参阅文档。
准备 Google Cloud Storage 存储分区
接下来,在同一终端中,我们需要准备 GCS 存储分区来存储上传的文件。运行以下命令以创建存储分区,您需要提供一个唯一但相关的存储分区名称,该名称应与个人支出助理收据相关,因此我们将使用以下存储分区名称并将其与您的项目 ID 结合使用
gsutil mb -l us-central1 gs://personal-expense-{your-project-id}
系统会显示以下输出
Creating gs://personal-expense-{your-project-id}
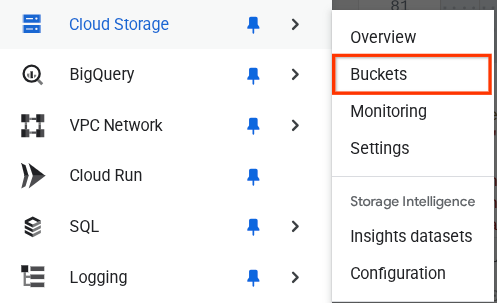
您可以前往浏览器左上角的导航菜单,然后选择 Cloud Storage -> 存储分区,验证这一点
为搜索创建 Firestore 索引
Firestore 本身是一种 NoSQL 数据库,在数据模型方面具有卓越的性能和灵活性,但在处理复杂查询方面存在限制。由于我们计划使用一些复合多字段查询和向量搜索,因此需要先创建一些索引。如需详细了解,请参阅此文档
- 运行以下命令以创建支持复合查询的索引
gcloud firestore indexes composite create \
        --collection-group=personal-expense-assistant-receipts \
        --field-config field-path=total_amount,order=ASCENDING \
        --field-config field-path=transaction_time,order=ASCENDING \
        --field-config field-path=__name__,order=ASCENDING \
        --database="(default)"
- 并运行此命令以支持向量搜索
gcloud firestore indexes composite create \
        --collection-group="personal-expense-assistant-receipts" \
        --query-scope=COLLECTION \
        --field-config field-path="embedding",vector-config='{"dimension":"768", "flat": "{}"}' \
        --database="(default)"
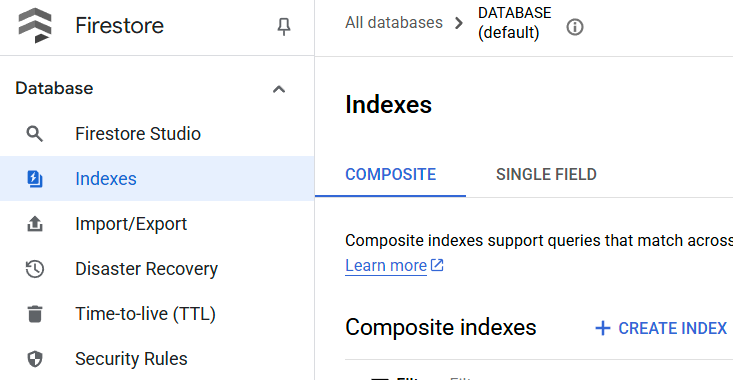
您可以在 Cloud 控制台中访问 Firestore,然后点击(默认)数据库实例,并在导航栏中选择索引,以检查创建的索引
前往 Cloud Shell 编辑器并设置应用工作目录
现在,我们可以设置代码编辑器来执行一些编码操作。我们将使用 Cloud Shell 编辑器来完成此
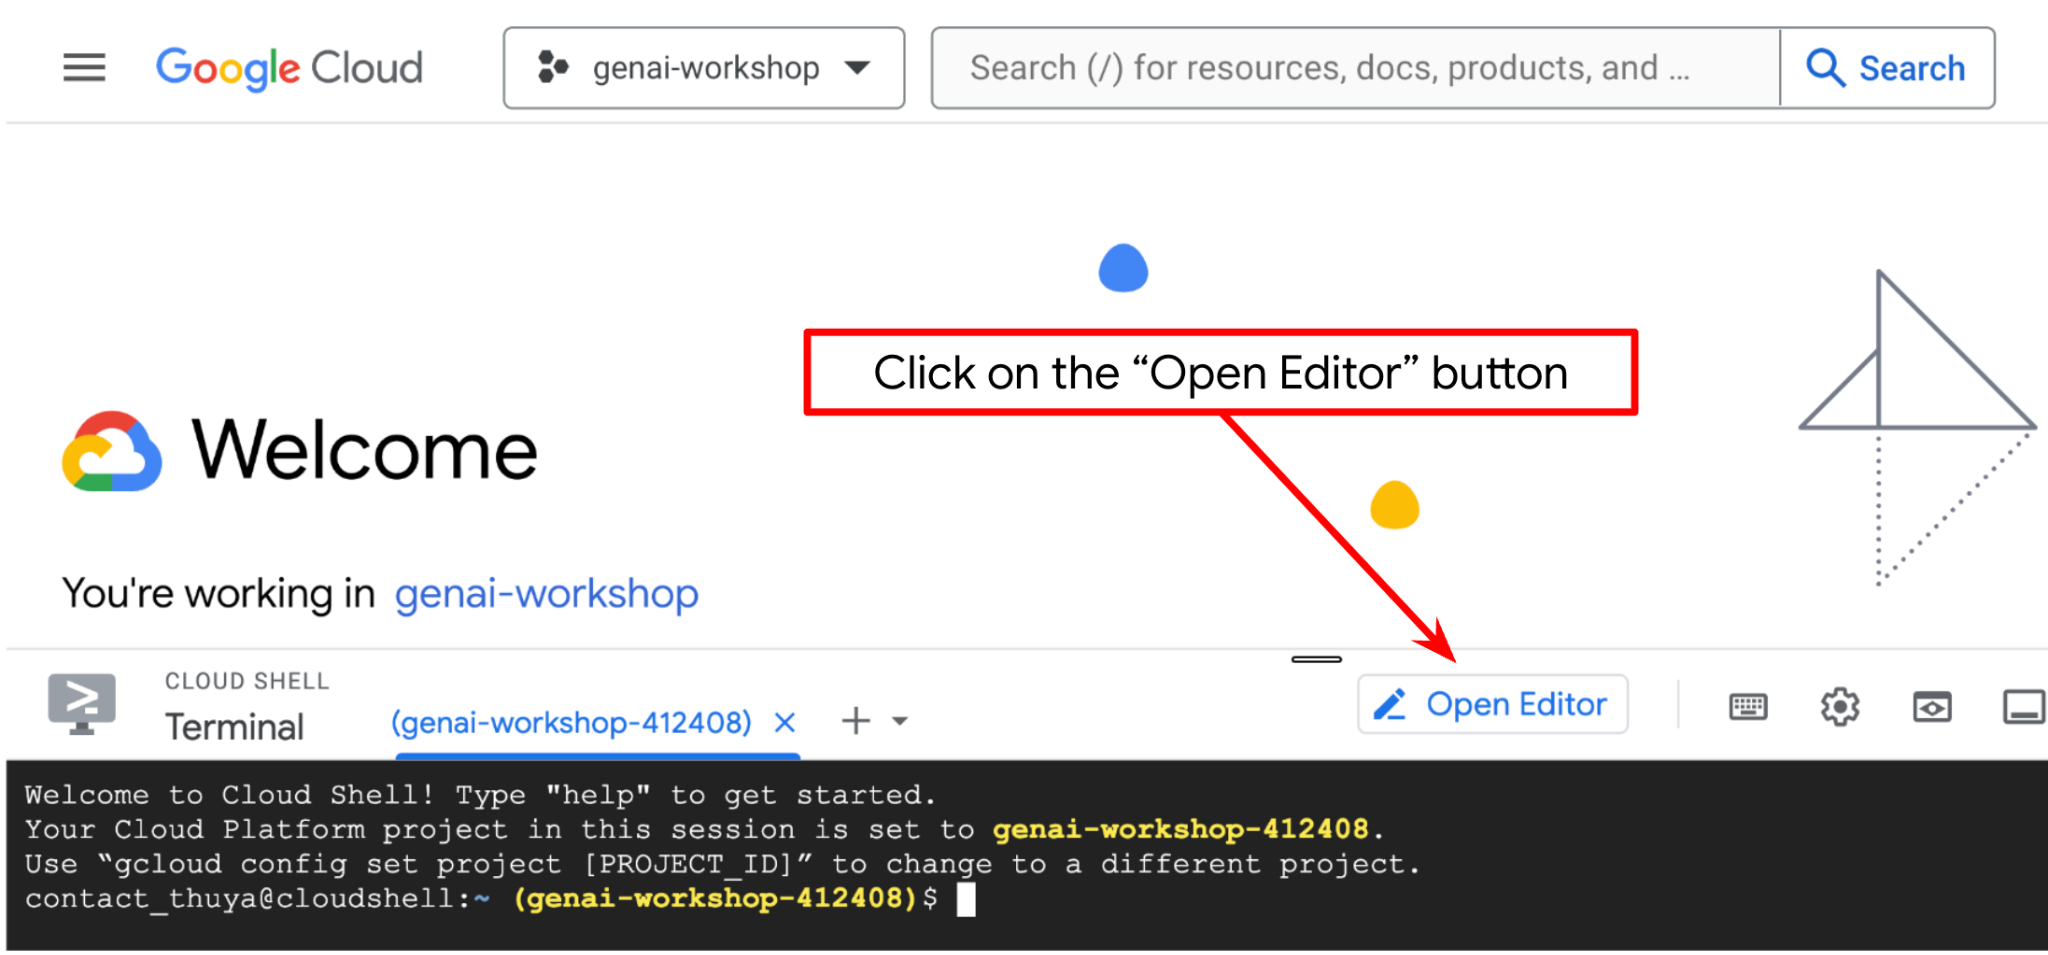
- 点击“打开编辑器”按钮,系统会打开 Cloud Shell 编辑器,我们可以在这里编写代码
- 接下来,我们还需要检查 shell 是否已配置为正确的 PROJECT ID。如果您看到终端中 $符号前的 ( ) 内有值(在下面的屏幕截图中,该值为 “adk-multimodal-tool”),则表示您的有效 shell 会话已配置项目。

如果显示的值已正确,您可以跳过下一个命令。不过,如果该值不正确或缺失,请运行以下命令
gcloud config set project <YOUR_PROJECT_ID>
- 接下来,我们从 GitHub 克隆此 Codelab 的模板工作目录,运行以下命令。它将在 personal-expense-assistant 目录中创建工作目录
git clone https://github.com/alphinside/personal-expense-assistant-adk-codelab-starter.git personal-expense-assistant
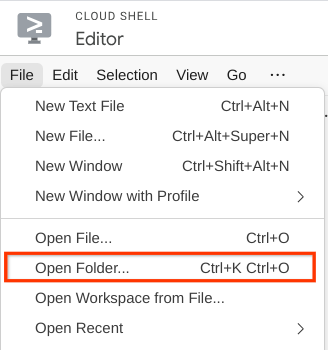
- 之后,前往 Cloud Shell 编辑器的顶部部分,依次点击文件->打开文件夹,找到您的用户名目录和 personal-expense-assistant 目录,然后点击确定按钮。这样一来,所选目录就会成为主工作目录。在此示例中,用户名为 alvinprayuda,因此目录路径如下所示

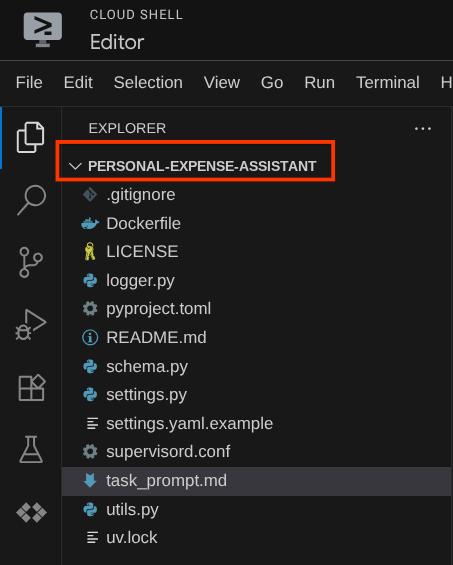
现在,您的 Cloud Shell 编辑器应如下所示
环境设置
准备 Python 虚拟环境
下一步是准备开发环境。当前活跃的终端应位于 personal-expense-assistant 工作目录中。在本 Codelab 中,我们将使用 Python 3.12,并使用 uv Python 项目管理器来简化创建和管理 Python 版本和虚拟环境的需求
- 如果您尚未打开终端,请依次点击终端 -> 新建终端,或使用 Ctrl + Shift + C,这将在浏览器底部打开一个终端窗口

- 现在,我们使用
uv初始化虚拟环境,运行以下命令
cd ~/personal-expense-assistant
uv sync --frozen
这会创建 .venv 目录并安装依赖项。快速浏览一下 pyproject.toml,您会看到如下所示的依赖项信息
dependencies = [
    "datasets>=3.5.0",
    "google-adk==1.18",
    "google-cloud-firestore>=2.20.1",
    "gradio>=5.23.1",
    "pydantic>=2.10.6",
    "pydantic-settings[yaml]>=2.8.1",
]
设置配置文件
现在,我们需要为此项目设置配置文件。我们使用 pydantic-settings 从 YAML 文件中读取配置。
我们已在 settings.yaml.example 中提供了文件模板,我们需要复制该文件并将其重命名为 settings.yaml。运行此命令以创建文件
cp settings.yaml.example settings.yaml
然后,将以下值复制到文件中
GCLOUD_LOCATION: "us-central1"
GCLOUD_PROJECT_ID: "your-project-id"
BACKEND_URL: "http://localhost:8081/chat"
STORAGE_BUCKET_NAME: "personal-expense-{your-project-id}"
DB_COLLECTION_NAME: "personal-expense-assistant-receipts"
在此 Codelab 中,我们将使用 GCLOUD_LOCATION,、BACKEND_URL, 和 DB_COLLECTION_NAME 的预配置值。
现在,我们可以进入下一步,构建代理,然后构建服务
3. 🚀 使用 Google ADK 和 Gemini 2.5 构建智能体
ADK 目录结构简介
我们先来了解一下 ADK 的功能以及如何构建代理。您可以通过此网址访问 ADK 的完整文档。ADK 在其 CLI 命令执行中提供了许多实用程序。其中一些如下所示:
- 设置代理目录结构
- 通过 CLI 输入/输出快速尝试互动
- 快速设置本地开发界面网页界面
现在,我们使用 CLI 命令创建代理目录结构。运行以下命令:
uv run adk create expense_manager_agent
当系统询问时,选择模型 gemini-2.5-flash 和 Vertex AI 后端。然后,向导会要求您提供项目 ID 和位置。您可以按 Enter 键接受默认选项,也可以根据需要更改这些选项。只需仔细检查您是否使用了本实验中之前创建的正确项目 ID 即可。输出将如下所示:
Choose a model for the root agent:
1. gemini-2.5-flash
2. Other models (fill later)
Choose model (1, 2): 1
1. Google AI
2. Vertex AI
Choose a backend (1, 2): 2

You need an existing Google Cloud account and project, check out this link for details:
https://google.github.io/adk-docs/get-started/quickstart/#gemini---google-cloud-vertex-ai

Enter Google Cloud project ID [going-multimodal-lab]:
Enter Google Cloud region [us-central1]:

Agent created in /home/username/personal-expense-assistant/expense_manager_agent:
- .env
- __init__.py
- agent.py
它将创建以下代理目录结构
expense_manager_agent/
├── __init__.py
├── .env
├── agent.py
如果您检查 init.py 和 agent.py,您会看到以下代码
# __init__.py

from . import agent
# agent.py

from google.adk.agents import Agent

root_agent = Agent(
    model='gemini-2.5-flash',
    name='root_agent',
    description='A helpful assistant for user questions.',
    instruction='Answer user questions to the best of your knowledge',
)
现在,您可以运行以下命令来测试它
uv run adk run expense_manager_agent
测试完成后,您可以输入 exit 或按 Ctrl+D 退出代理。
构建费用管理代理
让我们来构建费用管理代理!打开 expense_manager_agent/agent.py 文件,然后复制以下代码,其中将包含 root_agent。
# expense_manager_agent/agent.py

from google.adk.agents import Agent
from expense_manager_agent.tools import (
    store_receipt_data,
    search_receipts_by_metadata_filter,
    search_relevant_receipts_by_natural_language_query,
    get_receipt_data_by_image_id,
)
from expense_manager_agent.callbacks import modify_image_data_in_history
import os
from settings import get_settings
from google.adk.planners import BuiltInPlanner
from google.genai import types

SETTINGS = get_settings()
os.environ["GOOGLE_CLOUD_PROJECT"] = SETTINGS.GCLOUD_PROJECT_ID
os.environ["GOOGLE_CLOUD_LOCATION"] = SETTINGS.GCLOUD_LOCATION
os.environ["GOOGLE_GENAI_USE_VERTEXAI"] = "TRUE"

# Get the code file directory path and read the task prompt file
current_dir = os.path.dirname(os.path.abspath(__file__))
prompt_path = os.path.join(current_dir, "task_prompt.md")
with open(prompt_path, "r") as file:
    task_prompt = file.read()

root_agent = Agent(
    name="expense_manager_agent",
    model="gemini-2.5-flash",
    description=(
        "Personal expense agent to help user track expenses, analyze receipts, and manage their financial records"
    ),
    instruction=task_prompt,
    tools=[
        store_receipt_data,
        get_receipt_data_by_image_id,
        search_receipts_by_metadata_filter,
        search_relevant_receipts_by_natural_language_query,
    ],
    planner=BuiltInPlanner(
        thinking_config=types.ThinkingConfig(
            thinking_budget=2048,
        )
    ),
    before_model_callback=modify_image_data_in_history,
)
代码说明
此脚本包含我们的代理启动,我们在其中初始化了以下内容:
- 将要使用的模型设置为
gemini-2.5-flash - 将代理描述和指令设置为从
task_prompt.md读取的系统提示 - 提供支持代理功能的必要工具
- 在生成最终回答或执行操作之前,使用 Gemini 2.5 Flash 的思考能力启用规划
- 在向 Gemini 发送请求之前设置回调拦截,以限制在进行预测之前发送的图片数据量
4. 🚀 配置代理工具
我们的费用管理智能体将具备以下功能:
- 从收据图片中提取数据,并存储数据和文件
- 对费用数据进行确切搜索
- 对费用数据进行情境搜索
因此,我们需要合适的工具来支持此功能。在 expense_manager_agent 目录下创建一个新文件,并将其命名为 tools.py
touch expense_manager_agent/tools.py
打开 expense_manage_agent/tools.py,然后复制以下代码
# expense_manager_agent/tools.py

import datetime
from typing import Dict, List, Any
from google.cloud import firestore
from google.cloud.firestore_v1.vector import Vector
from google.cloud.firestore_v1 import FieldFilter
from google.cloud.firestore_v1.base_query import And
from google.cloud.firestore_v1.base_vector_query import DistanceMeasure
from settings import get_settings
from google import genai

SETTINGS = get_settings()
DB_CLIENT = firestore.Client(
    project=SETTINGS.GCLOUD_PROJECT_ID
)  # Will use "(default)" database
COLLECTION = DB_CLIENT.collection(SETTINGS.DB_COLLECTION_NAME)
GENAI_CLIENT = genai.Client(
    vertexai=True, location=SETTINGS.GCLOUD_LOCATION, project=SETTINGS.GCLOUD_PROJECT_ID
)
EMBEDDING_DIMENSION = 768
EMBEDDING_FIELD_NAME = "embedding"
INVALID_ITEMS_FORMAT_ERR = """
Invalid items format. Must be a list of dictionaries with 'name', 'price', and 'quantity' keys."""
RECEIPT_DESC_FORMAT = """
Store Name: {store_name}
Transaction Time: {transaction_time}
Total Amount: {total_amount}
Currency: {currency}
Purchased Items:
{purchased_items}
Receipt Image ID: {receipt_id}
"""


def sanitize_image_id(image_id: str) -> str:
    """Sanitize image ID by removing any leading/trailing whitespace."""
    if image_id.startswith("[IMAGE-"):
        image_id = image_id.split("ID ")[1].split("]")[0]

    return image_id.strip()


def store_receipt_data(
    image_id: str,
    store_name: str,
    transaction_time: str,
    total_amount: float,
    purchased_items: List[Dict[str, Any]],
    currency: str = "IDR",
) -> str:
    """
    Store receipt data in the database.

    Args:
        image_id (str): The unique identifier of the image. For example IMAGE-POSITION 0-ID 12345,
            the ID of the image is 12345.
        store_name (str): The name of the store.
        transaction_time (str): The time of purchase, in ISO format ("YYYY-MM-DDTHH:MM:SS.ssssssZ").
        total_amount (float): The total amount spent.
        purchased_items (List[Dict[str, Any]]): A list of items purchased with their prices. Each item must have:
            - name (str): The name of the item.
            - price (float): The price of the item.
            - quantity (int, optional): The quantity of the item. Defaults to 1 if not provided.
        currency (str, optional): The currency of the transaction, can be derived from the store location.
            If unsure, default is "IDR".

    Returns:
        str: A success message with the receipt ID.

    Raises:
        Exception: If the operation failed or input is invalid.
    """
    try:
        # In case of it provide full image placeholder, extract the id string
        image_id = sanitize_image_id(image_id)

        # Check if the receipt already exists
        doc = get_receipt_data_by_image_id(image_id)

        if doc:
            return f"Receipt with ID {image_id} already exists"

        # Validate transaction time
        if not isinstance(transaction_time, str):
            raise ValueError(
                "Invalid transaction time: must be a string in ISO format 'YYYY-MM-DDTHH:MM:SS.ssssssZ'"
            )
        try:
            datetime.datetime.fromisoformat(transaction_time.replace("Z", "+00:00"))
        except ValueError:
            raise ValueError(
                "Invalid transaction time format. Must be in ISO format 'YYYY-MM-DDTHH:MM:SS.ssssssZ'"
            )

        # Validate items format
        if not isinstance(purchased_items, list):
            raise ValueError(INVALID_ITEMS_FORMAT_ERR)

        for _item in purchased_items:
            if (
                not isinstance(_item, dict)
                or "name" not in _item
                or "price" not in _item
            ):
                raise ValueError(INVALID_ITEMS_FORMAT_ERR)

            if "quantity" not in _item:
                _item["quantity"] = 1

        # Create a combined text from all receipt information for better embedding
        result = GENAI_CLIENT.models.embed_content(
            model="text-embedding-004",
            contents=RECEIPT_DESC_FORMAT.format(
                store_name=store_name,
                transaction_time=transaction_time,
                total_amount=total_amount,
                currency=currency,
                purchased_items=purchased_items,
                receipt_id=image_id,
            ),
        )

        embedding = result.embeddings[0].values

        doc = {
            "receipt_id": image_id,
            "store_name": store_name,
            "transaction_time": transaction_time,
            "total_amount": total_amount,
            "currency": currency,
            "purchased_items": purchased_items,
            EMBEDDING_FIELD_NAME: Vector(embedding),
        }

        COLLECTION.add(doc)

        return f"Receipt stored successfully with ID: {image_id}"
    except Exception as e:
        raise Exception(f"Failed to store receipt: {str(e)}")


def search_receipts_by_metadata_filter(
    start_time: str,
    end_time: str,
    min_total_amount: float = -1.0,
    max_total_amount: float = -1.0,
) -> str:
    """
    Filter receipts by metadata within a specific time range and optionally by amount.

    Args:
        start_time (str): The start datetime for the filter (in ISO format, e.g. 'YYYY-MM-DDTHH:MM:SS.ssssssZ').
        end_time (str): The end datetime for the filter (in ISO format, e.g. 'YYYY-MM-DDTHH:MM:SS.ssssssZ').
        min_total_amount (float): The minimum total amount for the filter (inclusive). Defaults to -1.
        max_total_amount (float): The maximum total amount for the filter (inclusive). Defaults to -1.

    Returns:
        str: A string containing the list of receipt data matching all applied filters.

    Raises:
        Exception: If the search failed or input is invalid.
    """
    try:
        # Validate start and end times
        if not isinstance(start_time, str) or not isinstance(end_time, str):
            raise ValueError("start_time and end_time must be strings in ISO format")
        try:
            datetime.datetime.fromisoformat(start_time.replace("Z", "+00:00"))
            datetime.datetime.fromisoformat(end_time.replace("Z", "+00:00"))
        except ValueError:
            raise ValueError("start_time and end_time must be strings in ISO format")

        # Start with the base collection reference
        query = COLLECTION

        # Build the composite query by properly chaining conditions
        # Notes that this demo assume 1 user only,
        # need to refactor the query for multiple user
        filters = [
            FieldFilter("transaction_time", ">=", start_time),
            FieldFilter("transaction_time", "<=", end_time),
        ]

        # Add optional filters
        if min_total_amount != -1:
            filters.append(FieldFilter("total_amount", ">=", min_total_amount))

        if max_total_amount != -1:
            filters.append(FieldFilter("total_amount", "<=", max_total_amount))

        # Apply the filters
        composite_filter = And(filters=filters)
        query = query.where(filter=composite_filter)

        # Execute the query and collect results
        search_result_description = "Search by Metadata Results:\n"
        for doc in query.stream():
            data = doc.to_dict()
            data.pop(
                EMBEDDING_FIELD_NAME, None
            )  # Remove embedding as it's not needed for display

            search_result_description += f"\n{RECEIPT_DESC_FORMAT.format(**data)}"

        return search_result_description
    except Exception as e:
        raise Exception(f"Error filtering receipts: {str(e)}")


def search_relevant_receipts_by_natural_language_query(
    query_text: str, limit: int = 5
) -> str:
    """
    Search for receipts with content most similar to the query using vector search.
    This tool can be use for user query that is difficult to translate into metadata filters.
    Such as store name or item name which sensitive to string matching.
    Use this tool if you cannot utilize the search by metadata filter tool.

    Args:
        query_text (str): The search text (e.g., "coffee", "dinner", "groceries").
        limit (int, optional): Maximum number of results to return (default: 5).

    Returns:
        str: A string containing the list of contextually relevant receipt data.

    Raises:
        Exception: If the search failed or input is invalid.
    """
    try:
        # Generate embedding for the query text
        result = GENAI_CLIENT.models.embed_content(
            model="text-embedding-004", contents=query_text
        )
        query_embedding = result.embeddings[0].values

        # Notes that this demo assume 1 user only,
        # need to refactor the query for multiple user
        vector_query = COLLECTION.find_nearest(
            vector_field=EMBEDDING_FIELD_NAME,
            query_vector=Vector(query_embedding),
            distance_measure=DistanceMeasure.EUCLIDEAN,
            limit=limit,
        )

        # Execute the query and collect results
        search_result_description = "Search by Contextual Relevance Results:\n"
        for doc in vector_query.stream():
            data = doc.to_dict()
            data.pop(
                EMBEDDING_FIELD_NAME, None
            )  # Remove embedding as it's not needed for display
            search_result_description += f"\n{RECEIPT_DESC_FORMAT.format(**data)}"

        return search_result_description
    except Exception as e:
        raise Exception(f"Error searching receipts: {str(e)}")


def get_receipt_data_by_image_id(image_id: str) -> Dict[str, Any]:
    """
    Retrieve receipt data from the database using the image_id.

    Args:
        image_id (str): The unique identifier of the receipt image. For example, if the placeholder is
            [IMAGE-ID 12345], the ID to use is 12345.

    Returns:
        Dict[str, Any]: A dictionary containing the receipt data with the following keys:
            - receipt_id (str): The unique identifier of the receipt image.
            - store_name (str): The name of the store.
            - transaction_time (str): The time of purchase in UTC.
            - total_amount (float): The total amount spent.
            - currency (str): The currency of the transaction.
            - purchased_items (List[Dict[str, Any]]): List of items purchased with their details.
        Returns an empty dictionary if no receipt is found.
    """
    # In case of it provide full image placeholder, extract the id string
    image_id = sanitize_image_id(image_id)

    # Query the receipts collection for documents with matching receipt_id (image_id)
    # Notes that this demo assume 1 user only,
    # need to refactor the query for multiple user
    query = COLLECTION.where(filter=FieldFilter("receipt_id", "==", image_id)).limit(1)
    docs = list(query.stream())

    if not docs:
        return {}

    # Get the first matching document
    doc_data = docs[0].to_dict()
    doc_data.pop(EMBEDDING_FIELD_NAME, None)

    return doc_data
代码说明
在此工具函数实现中,我们围绕以下 2 个主要想法设计工具:
- 解析收据数据并使用图片 ID 字符串占位符
[IMAGE-ID <hash-of-image-1>]映射到原始文件 - 使用 Firestore 数据库存储和检索数据
工具“store_receipt_data”
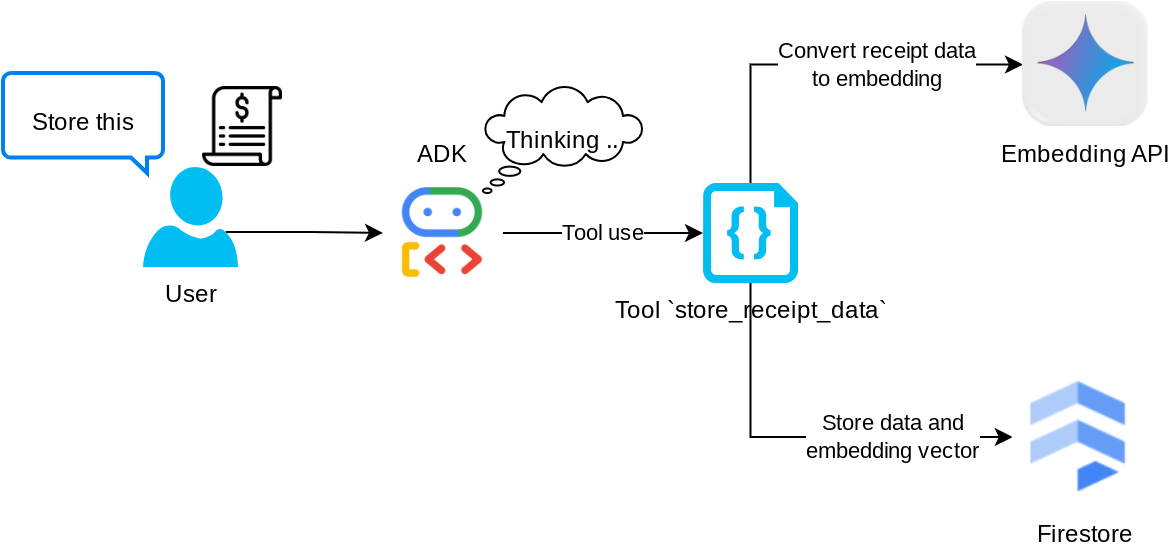
此工具是光学字符识别工具,它将从图片数据中解析所需的信息,同时识别图片 ID 字符串,并将它们映射在一起以存储在 Firestore 数据库中。
此外,此工具还会使用 text-embedding-004 将收据的内容转换为嵌入,以便将所有元数据和嵌入一起存储并编入索引。支持通过查询或情境搜索来检索。
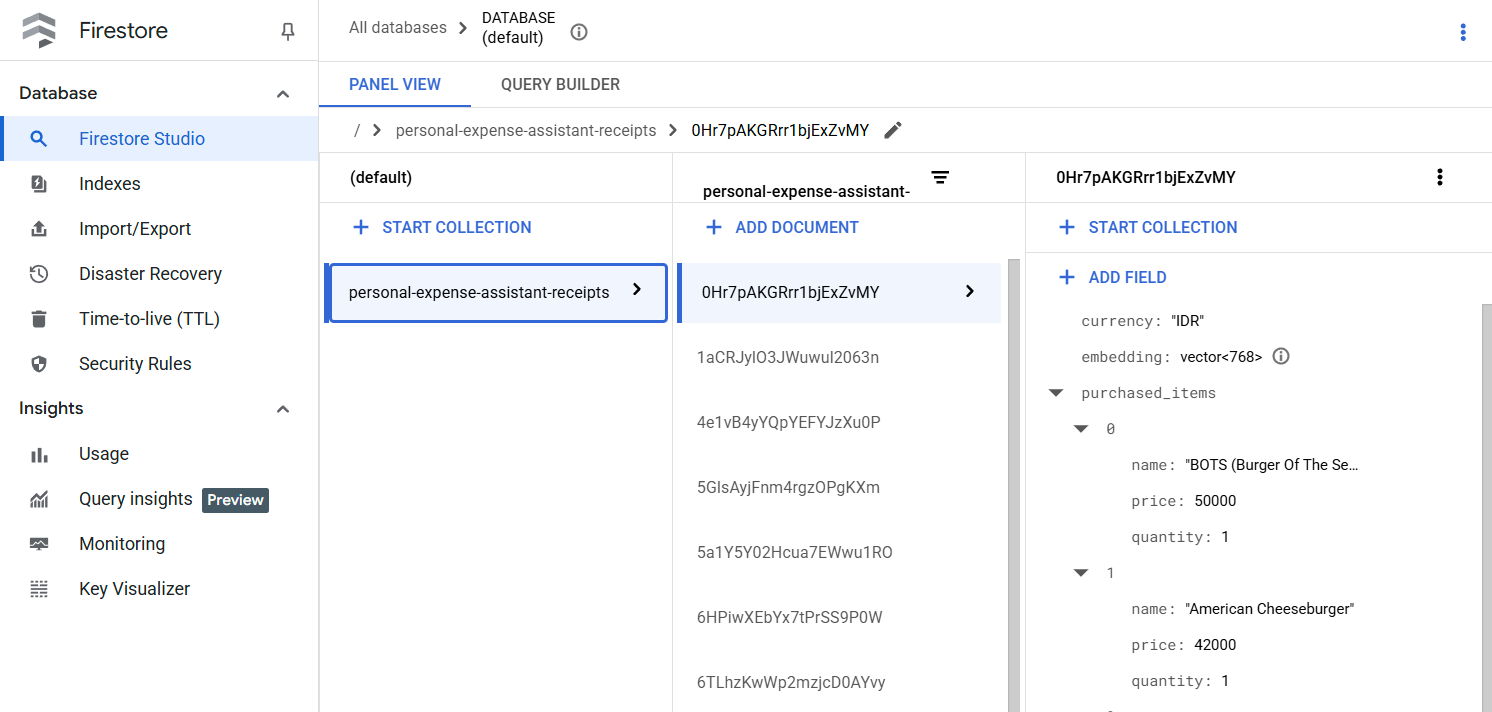
成功执行此工具后,您会看到 Firestore 数据库中已编入索引的收据数据,如下所示
工具“search_receipts_by_metadata_filter”
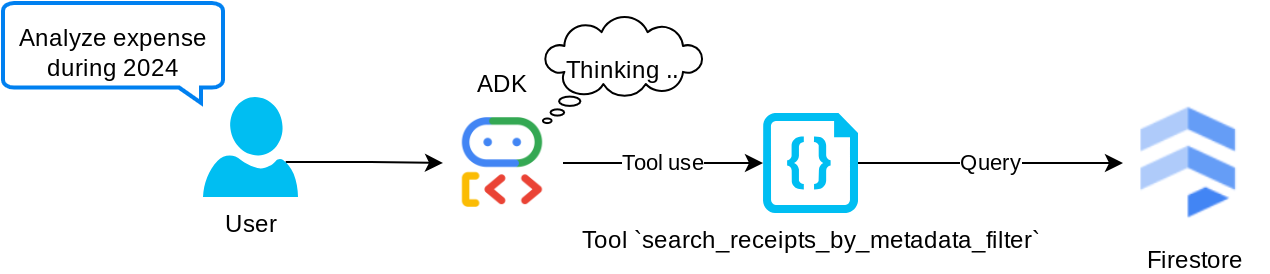
此工具会将用户查询转换为元数据查询过滤条件,支持按日期范围和/或总交易金额进行搜索。它将返回所有匹配的收据数据,在此过程中,我们将舍弃嵌入字段,因为代理不需要该字段来了解上下文
工具“search_relevant_receipts_by_natural_language_query”
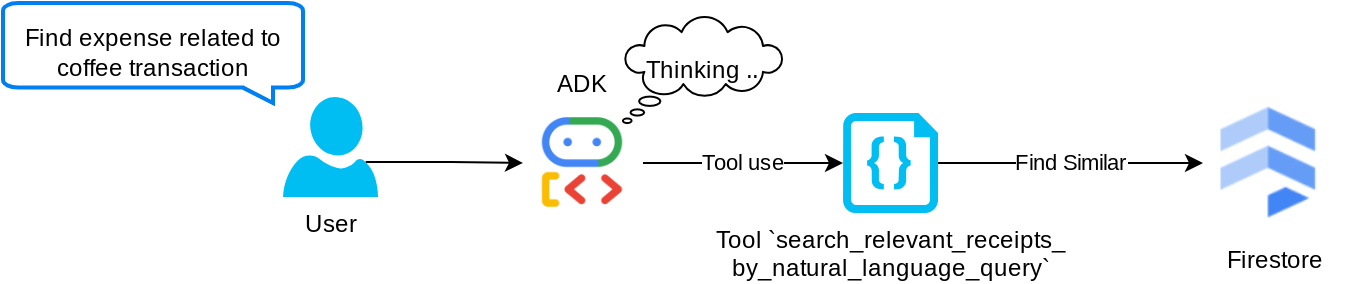
这是我们的检索增强生成 (RAG) 工具。我们的代理能够自行设计查询,从向量数据库中检索相关收据,并且还可以选择何时使用此工具。Agentic RAG 方法的定义之一是,允许智能体自行决定是否使用此 RAG 工具并设计自己的查询。
我们不仅允许它构建自己的查询,还允许它选择要检索的相关文档数量。结合适当的提示工程,例如:
# Example prompt

Always filter the result from tool
search_relevant_receipts_by_natural_language_query as the returned
result may contain irrelevant information
这将使该工具成为一个强大的工具,能够搜索几乎任何内容,但由于最近邻搜索的非精确性,它可能无法返回所有预期结果。
5. 🚀 通过回调修改对话上下文
Google ADK 使我们能够在各种级别“拦截”代理运行时。如需详细了解此功能,请参阅此文档。在此实验中,我们利用 before_model_callback 在将请求发送到 LLM 之前对其进行修改,以移除旧对话历史记录上下文中的图片数据(仅包含最近 3 次用户互动中的图片数据),从而提高效率
不过,我们仍希望代理在需要时能够获取图片数据上下文。因此,我们添加了一种机制,用于在对话中每个图片字节数据后添加字符串图片 ID 占位符。这有助于代理将图片 ID 与其实际文件数据相关联,以便在存储或检索图片时使用。结构如下所示
<image-byte-data-1>
[IMAGE-ID <hash-of-image-1>]
<image-byte-data-2>
[IMAGE-ID <hash-of-image-2>]
And so on..
当对话历史记录中的字节数据过时时,字符串标识符仍然存在,因此仍可借助工具使用来访问数据。移除图片数据后的历史记录结构示例
[IMAGE-ID <hash-of-image-1>]
[IMAGE-ID <hash-of-image-2>]
And so on..
我们开始吧!在 expense_manager_agent 目录下创建一个新文件,并将其命名为 callbacks.py
touch expense_manager_agent/callbacks.py
打开 expense_manager_agent/callbacks.py 文件,然后复制以下代码
# expense_manager_agent/callbacks.py

import hashlib
from google.genai import types
from google.adk.agents.callback_context import CallbackContext
from google.adk.models.llm_request import LlmRequest


def modify_image_data_in_history(
    callback_context: CallbackContext, llm_request: LlmRequest
) -> None:
    # The following code will modify the request sent to LLM
    # We will only keep image data in the last 3 user messages using a reverse and counter approach

    # Count how many user messages we've processed
    user_message_count = 0

    # Process the reversed list
    for content in reversed(llm_request.contents):
        # Only count for user manual query, not function call
        if (content.role == "user") and (content.parts[0].function_response is None):
            user_message_count += 1
            modified_content_parts = []

            # Check any missing image ID placeholder for any image data
            # Then remove image data from conversation history if more than 3 user messages
            for idx, part in enumerate(content.parts):
                if part.inline_data is None:
                    modified_content_parts.append(part)
                    continue

                if (
                    (idx + 1 >= len(content.parts))
                    or (content.parts[idx + 1].text is None)
                    or (not content.parts[idx + 1].text.startswith("[IMAGE-ID "))
                ):
                    # Generate hash ID for the image and add a placeholder
                    image_data = part.inline_data.data
                    hasher = hashlib.sha256(image_data)
                    image_hash_id = hasher.hexdigest()[:12]
                    placeholder = f"[IMAGE-ID {image_hash_id}]"

                    # Only keep image data in the last 3 user messages
                    if user_message_count <= 3:
                        modified_content_parts.append(part)

                    modified_content_parts.append(types.Part(text=placeholder))

                else:
                    # Only keep image data in the last 3 user messages
                    if user_message_count <= 3:
                        modified_content_parts.append(part)

            # This will modify the contents inside the llm_request
            content.parts = modified_content_parts
6. 🚀 提示
设计具有复杂互动和功能的智能体需要我们找到足够好的提示来引导智能体,以便它能够按照我们希望的方式运行。
之前,我们有一种机制来处理对话记录中的图片数据,还有一些可能不太容易使用的工具,例如 search_relevant_receipts_by_natural_language_query.。我们还希望代理能够搜索并检索正确的收据图片。这意味着我们需要在适当的提示结构中正确传达所有这些信息
我们将要求代理将输出内容整理为以下 Markdown 格式,以便解析思考过程、最终回答和附件(如有)
# THINKING PROCESS

Thinking process here

# FINAL RESPONSE

Response to the user here

Attachments put inside json block

{
    "attachments": [
      "[IMAGE-ID <hash-id-1>]",
      "[IMAGE-ID <hash-id-2>]",
      ...
    ]
}
我们先从以下提示开始,以实现我们对费用管理代理行为的初步预期。task_prompt.md 文件应已存在于我们现有的工作目录中,但我们需要将其移至 expense_manager_agent 目录下。运行以下命令来移动它
mv task_prompt.md expense_manager_agent/task_prompt.md
7. 🚀 测试代理
现在,我们尝试通过 CLI 与代理进行通信,运行以下命令
uv run adk run expense_manager_agent
系统会显示如下输出,您可以在其中与代理轮流聊天,但只能通过此界面发送文本
Log setup complete: /tmp/agents_log/agent.xxxx_xxx.log
To access latest log: tail -F /tmp/agents_log/agent.latest.log
Running agent root_agent, type exit to exit.
user: hello
[root_agent]: Hello there! How can I help you today?
user:
现在,除了 CLI 互动之外,ADK 还允许我们使用开发界面来互动和检查互动期间发生的情况。运行以下命令以启动本地开发界面服务器
uv run adk web --port 8080
它将生成类似于以下示例的输出,这意味着我们已经可以访问 Web 界面了
INFO:     Started server process [xxxx]
INFO:     Waiting for application startup.

+-----------------------------------------------------------------------------+
| ADK Web Server started                                                      |
|                                                                             |
| For local testing, access at http://localhost:8080.                         |
+-----------------------------------------------------------------------------+

INFO:     Application startup complete.
INFO:     Uvicorn running on http://0.0.0.0:8080 (Press CTRL+C to quit)
现在,如需检查,请点击 Cloud Shell 编辑器顶部区域的网页预览按钮,然后选择在端口 8080 上预览
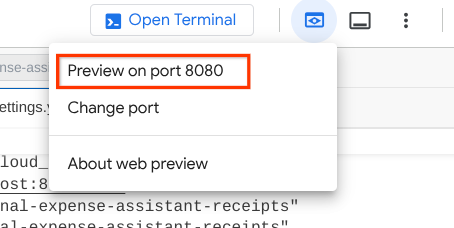
您将看到以下网页,您可以在左上角的下拉按钮中选择可用的代理(在本例中应为 expense_manager_agent),并与机器人互动。您将在左侧窗口中看到有关代理运行时日志详情的许多信息
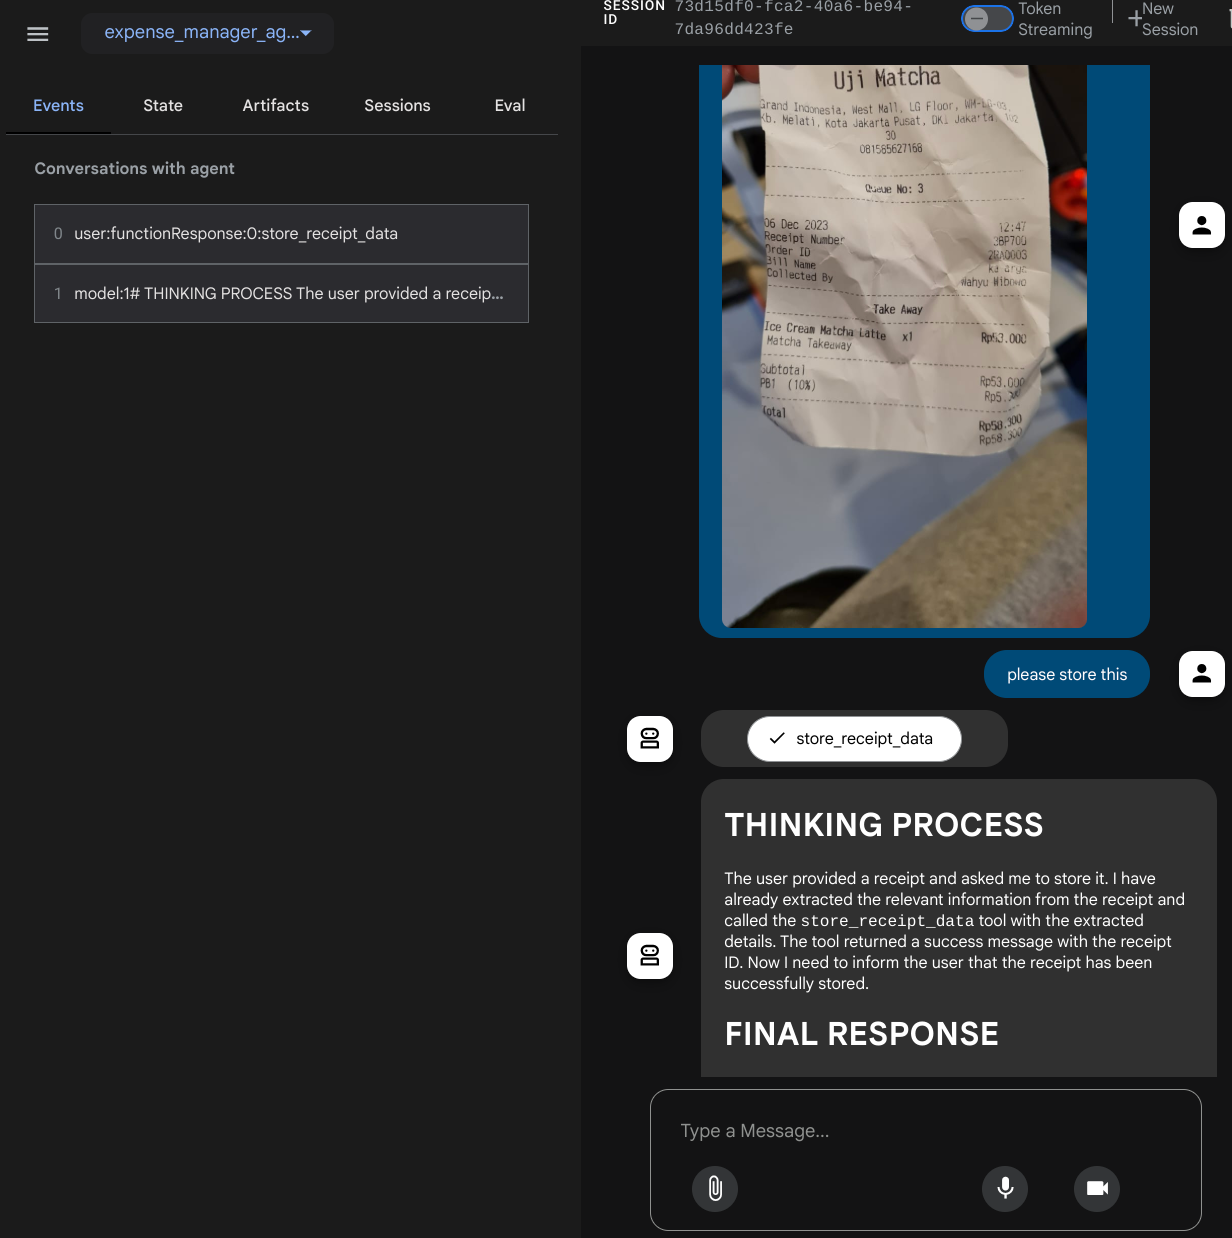
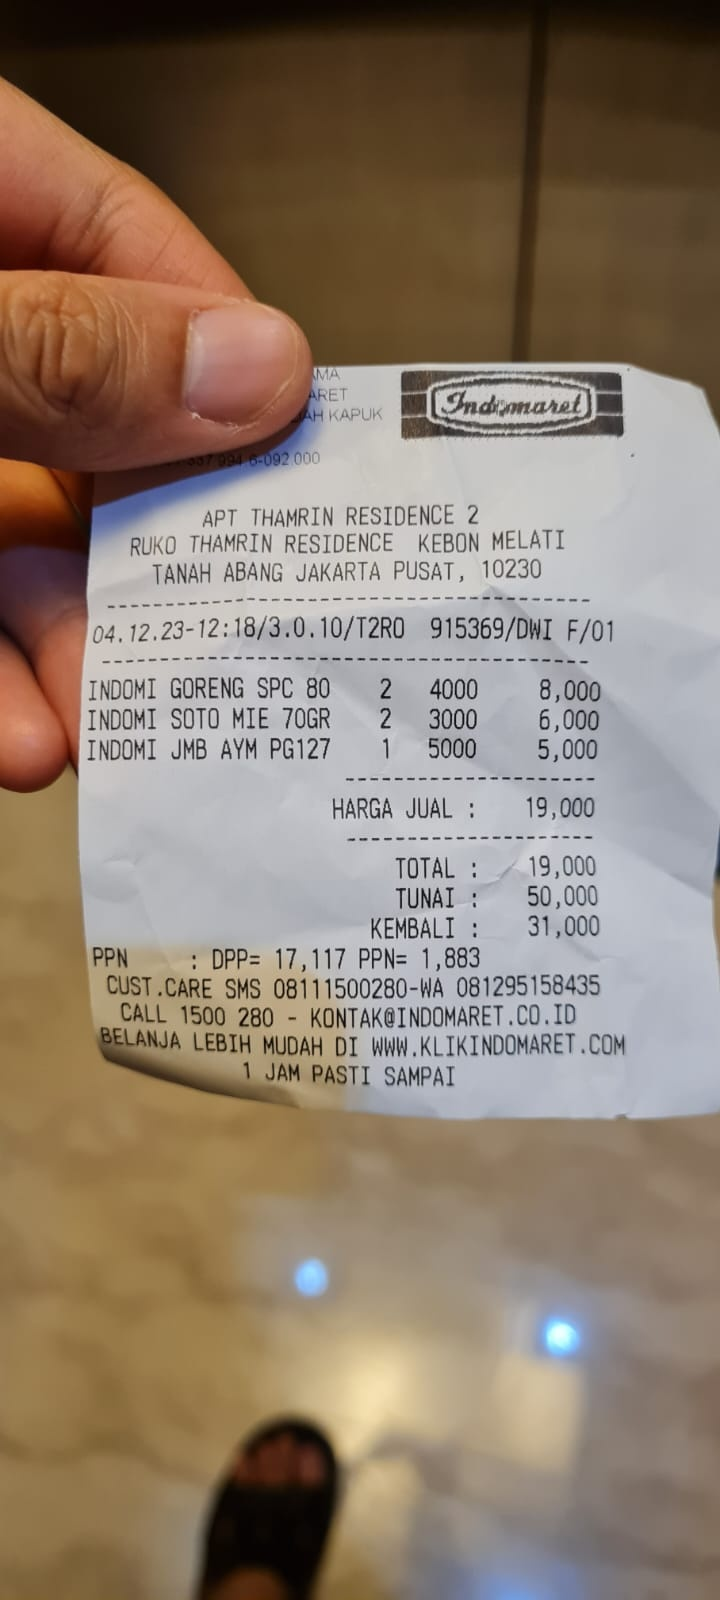
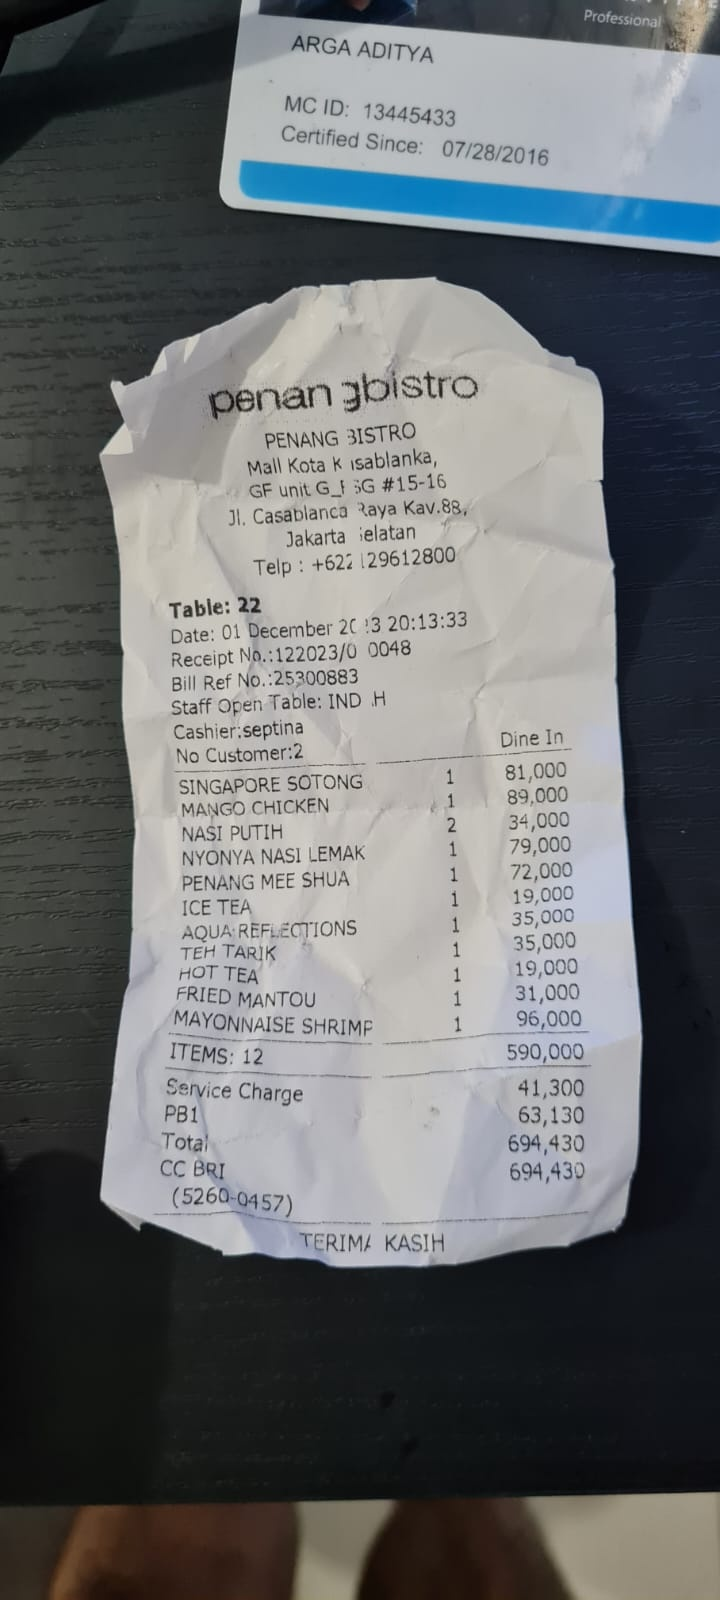
我们来尝试一些操作!上传以下 2 张收据示例(来源:Hugging Face 数据集 mousserlane/id_receipt_dataset)。右键点击每张图片,然后选择图片另存为…。(系统会下载收据图片),然后点击“剪辑”图标将文件上传到聊天机器人,并说明您要存储这些收据
之后,尝试使用以下查询执行一些搜索或文件检索操作
- “Give breakdown of expenses and its total during 2023”(提供 2023 年的费用明细及其总额)
- “Give me receipt file from Indomaret”(给我 Indomaret 的收据文件)
使用某些工具时,您可以检查开发界面中发生的情况
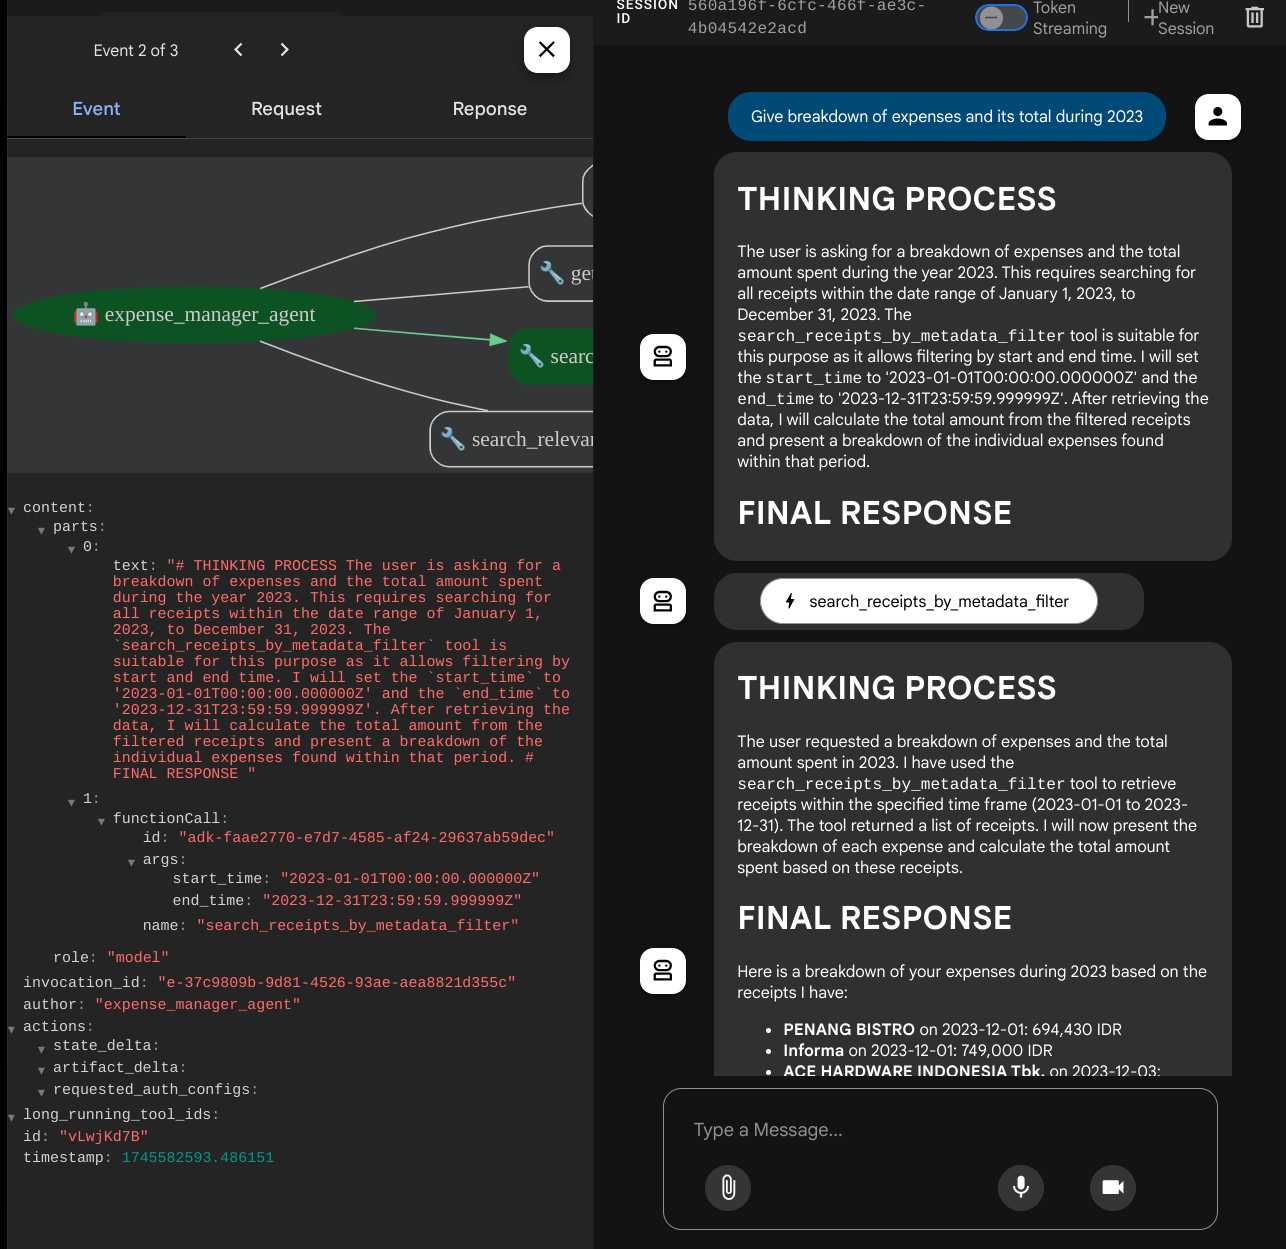
查看代理对您的回答,并检查其是否符合 task_prompt.py 中提示内提供的所有规则。恭喜!现在,您已拥有一个可正常运行的完整开发代理。
现在,我们需要完善它,使其具有适当且美观的界面,并能够上传和下载图片文件。
8. 🚀 使用 Gradio 构建前端服务
我们将构建一个如下所示的聊天 Web 界面
它包含一个聊天界面,其中有一个输入字段,供用户发送文本和上传收据图片文件。
我们将使用 Gradio 构建前端服务。
创建新文件并将其命名为 frontend.py
touch frontend.py
然后复制以下代码并保存
import mimetypes
import gradio as gr
import requests
import base64
from typing import List, Dict, Any
from settings import get_settings
from PIL import Image
import io
from schema import ImageData, ChatRequest, ChatResponse


SETTINGS = get_settings()


def encode_image_to_base64_and_get_mime_type(image_path: str) -> ImageData:
    """Encode a file to base64 string and get MIME type.

    Reads an image file and returns the base64-encoded image data and its MIME type.

    Args:
        image_path: Path to the image file to encode.

    Returns:
        ImageData object containing the base64 encoded image data and its MIME type.
    """
    # Read the image file
    with open(image_path, "rb") as file:
        image_content = file.read()

    # Get the mime type
    mime_type = mimetypes.guess_type(image_path)[0]

    # Base64 encode the image
    base64_data = base64.b64encode(image_content).decode("utf-8")

    # Return as ImageData object
    return ImageData(serialized_image=base64_data, mime_type=mime_type)


def decode_base64_to_image(base64_data: str) -> Image.Image:
    """Decode a base64 string to PIL Image.

    Converts a base64-encoded image string back to a PIL Image object
    that can be displayed or processed further.

    Args:
        base64_data: Base64 encoded string of the image.

    Returns:
        PIL Image object of the decoded image.
    """
    # Decode the base64 string and convert to PIL Image
    image_data = base64.b64decode(base64_data)
    image_buffer = io.BytesIO(image_data)
    image = Image.open(image_buffer)

    return image


def get_response_from_llm_backend(
    message: Dict[str, Any],
    history: List[Dict[str, Any]],
) -> List[str | gr.Image]:
    """Send the message and history to the backend and get a response.

    Args:
        message: Dictionary containing the current message with 'text' and optional 'files' keys.
        history: List of previous message dictionaries in the conversation.

    Returns:
        List containing text response and any image attachments from the backend service.
    """
    # Extract files and convert to base64
    image_data = []
    if uploaded_files := message.get("files", []):
        for file_path in uploaded_files:
            image_data.append(encode_image_to_base64_and_get_mime_type(file_path))

    # Prepare the request payload
    payload = ChatRequest(
        text=message["text"],
        files=image_data,
        session_id="default_session",
        user_id="default_user",
    )

    # Send request to backend
    try:
        response = requests.post(SETTINGS.BACKEND_URL, json=payload.model_dump())
        response.raise_for_status()  # Raise exception for HTTP errors

        result = ChatResponse(**response.json())
        if result.error:
            return [f"Error: {result.error}"]

        chat_responses = []

        if result.thinking_process:
            chat_responses.append(
                gr.ChatMessage(
                    role="assistant",
                    content=result.thinking_process,
                    metadata={"title": "🧠 Thinking Process"},
                )
            )

        chat_responses.append(gr.ChatMessage(role="assistant", content=result.response))

        if result.attachments:
            for attachment in result.attachments:
                image_data = attachment.serialized_image
                chat_responses.append(gr.Image(decode_base64_to_image(image_data)))

        return chat_responses
    except requests.exceptions.RequestException as e:
        return [f"Error connecting to backend service: {str(e)}"]


if __name__ == "__main__":
    demo = gr.ChatInterface(
        get_response_from_llm_backend,
        title="Personal Expense Assistant",
        description="This assistant can help you to store receipts data, find receipts, and track your expenses during certain period.",
        type="messages",
        multimodal=True,
        textbox=gr.MultimodalTextbox(file_count="multiple", file_types=["image"]),
    )

    demo.launch(
        server_name="0.0.0.0",
        server_port=8080,
    )
之后,我们可以尝试运行前端服务,使用以下命令。别忘了将 main.py 文件重命名为 frontend.py
uv run frontend.py
您将在云控制台中看到类似于以下内容的输出
* Running on local URL:  http://0.0.0.0:8080

To create a public link, set `share=True` in `launch()`.
之后,您可以 Ctrl+点击本地网址链接,查看 Web 界面。或者,您也可以点击 Cloud Editor 右上角的网页预览按钮,然后选择在端口 8080 上预览,以访问前端应用

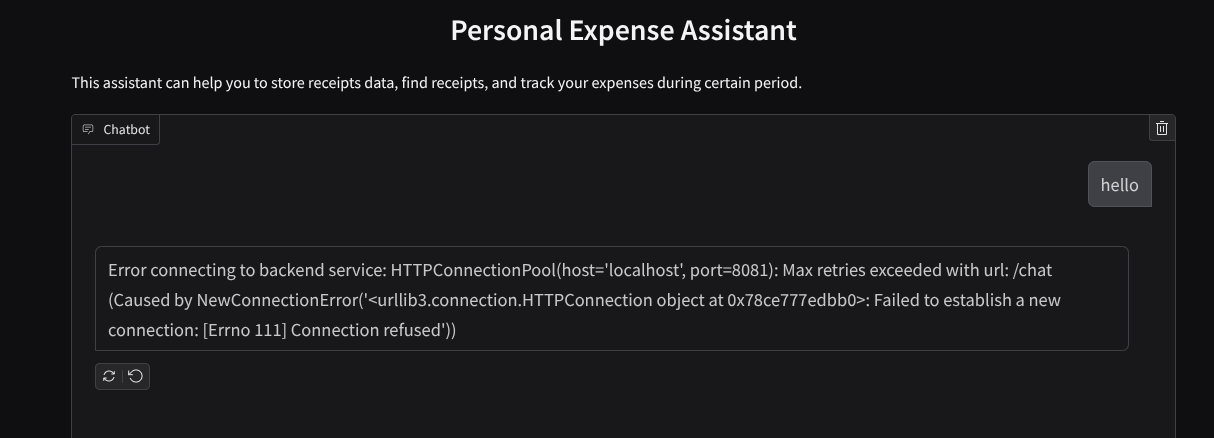
您将看到 Web 界面,但由于后端服务尚未设置,因此在尝试提交对话时会收到预期错误
现在,让服务运行,暂时不要终止它。我们将在另一个终端标签页中运行后端服务
代码说明
在此前端代码中,我们首先允许用户发送文本和上传多个文件。借助 Gradio,我们可以通过 gr.ChatInterface 方法与 gr.MultimodalTextbox 相结合来创建此类功能
现在,在将文件和文本发送到后端之前,我们需要确定文件的 MIME 类型,因为后端需要此信息。我们还需要将图片文件字节编码为 base64,并将其与 MIME 类型一起发送。
class ImageData(BaseModel):
    """Model for image data with hash identifier.

    Attributes:
        serialized_image: Optional Base64 encoded string of the image content.
        mime_type: MIME type of the image.
    """

    serialized_image: str
    mime_type: str
用于前端-后端交互的架构在 schema.py 中定义。我们利用 Pydantic BaseModel 在架构中强制执行数据验证
收到回答时,我们已经将思考过程、最终回答和附件分开。因此,我们可以利用 Gradio 组件通过界面组件显示每个组件。
class ChatResponse(BaseModel):
    """Model for a chat response.

    Attributes:
        response: The text response from the model.
        thinking_process: Optional thinking process of the model.
        attachments: List of image data to be displayed to the user.
        error: Optional error message if something went wrong.
    """

    response: str
    thinking_process: str = ""
    attachments: List[ImageData] = []
    error: Optional[str] = None
9. 🚀 使用 FastAPI 构建后端服务
接下来,我们需要构建后端,该后端可以初始化我们的代理以及其他组件,以便能够执行代理运行时。
创建新文件,并将其命名为 backend.py
touch backend.py
并复制以下代码
from expense_manager_agent.agent import root_agent as expense_manager_agent
from google.adk.sessions import InMemorySessionService
from google.adk.runners import Runner
from google.adk.events import Event
from fastapi import FastAPI, Body, Depends
from typing import AsyncIterator
from types import SimpleNamespace
import uvicorn
from contextlib import asynccontextmanager
from utils import (
    extract_attachment_ids_and_sanitize_response,
    download_image_from_gcs,
    extract_thinking_process,
    format_user_request_to_adk_content_and_store_artifacts,
)
from schema import ImageData, ChatRequest, ChatResponse
import logger
from google.adk.artifacts import GcsArtifactService
from settings import get_settings

SETTINGS = get_settings()
APP_NAME = "expense_manager_app"


# Application state to hold service contexts
class AppContexts(SimpleNamespace):
    """A class to hold application contexts with attribute access"""

    session_service: InMemorySessionService = None
    artifact_service: GcsArtifactService = None
    expense_manager_agent_runner: Runner = None


# Initialize application state
app_contexts = AppContexts()


@asynccontextmanager
async def lifespan(app: FastAPI):
    # Initialize service contexts during application startup
    app_contexts.session_service = InMemorySessionService()
    app_contexts.artifact_service = GcsArtifactService(
        bucket_name=SETTINGS.STORAGE_BUCKET_NAME
    )
    app_contexts.expense_manager_agent_runner = Runner(
        agent=expense_manager_agent,  # The agent we want to run
        app_name=APP_NAME,  # Associates runs with our app
        session_service=app_contexts.session_service,  # Uses our session manager
        artifact_service=app_contexts.artifact_service,  # Uses our artifact manager
    )

    logger.info("Application started successfully")
    yield
    logger.info("Application shutting down")
    # Perform cleanup during application shutdown if necessary


# Helper function to get application state as a dependency
async def get_app_contexts() -> AppContexts:
    return app_contexts


# Create FastAPI app
app = FastAPI(title="Personal Expense Assistant API", lifespan=lifespan)


@app.post("/chat", response_model=ChatResponse)
async def chat(
    request: ChatRequest = Body(...),
    app_context: AppContexts = Depends(get_app_contexts),
) -> ChatResponse:
    """Process chat request and get response from the agent"""

    # Prepare the user's message in ADK format and store image artifacts
    content = await format_user_request_to_adk_content_and_store_artifacts(
        request=request,
        app_name=APP_NAME,
        artifact_service=app_context.artifact_service,
    )

    final_response_text = "Agent did not produce a final response."  # Default

    # Use the session ID from the request or default if not provided
    session_id = request.session_id
    user_id = request.user_id

    # Create session if it doesn't exist
    if not await app_context.session_service.get_session(
        app_name=APP_NAME, user_id=user_id, session_id=session_id
    ):
        await app_context.session_service.create_session(
            app_name=APP_NAME, user_id=user_id, session_id=session_id
        )

    try:
        # Process the message with the agent
        # Type annotation: runner.run_async returns an AsyncIterator[Event]
        events_iterator: AsyncIterator[Event] = (
            app_context.expense_manager_agent_runner.run_async(
                user_id=user_id, session_id=session_id, new_message=content
            )
        )
        async for event in events_iterator:  # event has type Event
            # Key Concept: is_final_response() marks the concluding message for the turn
            if event.is_final_response():
                if event.content and event.content.parts:
                    # Extract text from the first part
                    final_response_text = event.content.parts[0].text
                elif event.actions and event.actions.escalate:
                    # Handle potential errors/escalations
                    final_response_text = f"Agent escalated: {event.error_message or 'No specific message.'}"
                break  # Stop processing events once the final response is found

        logger.info(
            "Received final response from agent", raw_final_response=final_response_text
        )

        # Extract and process any attachments and thinking process in the response
        base64_attachments = []
        sanitized_text, attachment_ids = extract_attachment_ids_and_sanitize_response(
            final_response_text
        )
        sanitized_text, thinking_process = extract_thinking_process(sanitized_text)

        # Download images from GCS and replace hash IDs with base64 data
        for image_hash_id in attachment_ids:
            # Download image data and get MIME type
            result = await download_image_from_gcs(
                artifact_service=app_context.artifact_service,
                image_hash=image_hash_id,
                app_name=APP_NAME,
                user_id=user_id,
                session_id=session_id,
            )
            if result:
                base64_data, mime_type = result
                base64_attachments.append(
                    ImageData(serialized_image=base64_data, mime_type=mime_type)
                )

        logger.info(
            "Processed response with attachments",
            sanitized_response=sanitized_text,
            thinking_process=thinking_process,
            attachment_ids=attachment_ids,
        )

        return ChatResponse(
            response=sanitized_text,
            thinking_process=thinking_process,
            attachments=base64_attachments,
        )

    except Exception as e:
        logger.error("Error processing chat request", error_message=str(e))
        return ChatResponse(
            response="", error=f"Error in generating response: {str(e)}"
        )


# Only run the server if this file is executed directly
if __name__ == "__main__":
    uvicorn.run(app, host="0.0.0.0", port=8081)
之后,我们可以尝试运行后端服务。请注意,我们在上一步中运行了前端服务,现在需要打开新终端并尝试运行此后端服务
- 创建新终端。前往底部区域的终端,然后找到“+”按钮以创建新终端。或者,您也可以按 Ctrl + Shift + C 打开新终端

- 之后,确保您位于工作目录 personal-expense-assistant 中,然后运行以下命令
uv run backend.py
- 如果成功,则会显示如下输出
INFO:     Started server process [xxxxx]
INFO:     Waiting for application startup.
INFO:     Application startup complete.
INFO:     Uvicorn running on http://0.0.0.0:8081 (Press CTRL+C to quit)
代码说明
初始化 ADK 代理、SessionService 和 ArtifactService
为了在后端服务中运行代理,我们需要创建一个同时包含 SessionService 和代理的 Runner。SessionService 将管理对话历史记录和状态,因此在与 Runner 集成后,它将使我们的代理能够接收正在进行的对话的上下文。
我们还利用 ArtifactService 来处理上传的文件。您可以点击此处详细了解 ADK 的会话和制品
...

@asynccontextmanager
async def lifespan(app: FastAPI):
    # Initialize service contexts during application startup
    app_contexts.session_service = InMemorySessionService()
    app_contexts.artifact_service = GcsArtifactService(
        bucket_name=SETTINGS.STORAGE_BUCKET_NAME
    )
    app_contexts.expense_manager_agent_runner = Runner(
        agent=expense_manager_agent,  # The agent we want to run
        app_name=APP_NAME,  # Associates runs with our app
        session_service=app_contexts.session_service,  # Uses our session manager
        artifact_service=app_contexts.artifact_service,  # Uses our artifact manager
    )

    logger.info("Application started successfully")
    yield
    logger.info("Application shutting down")
    # Perform cleanup during application shutdown if necessary

...
在此演示中,我们将使用 InMemorySessionService 和 GcsArtifactService 与代理 Runner 集成。由于对话历史记录存储在内存中,因此一旦后端服务被终止或重启,对话历史记录就会丢失。我们在 FastAPI 应用生命周期内初始化这些对象,以便在 /chat 路由中作为依赖项注入。
使用 GcsArtifactService 上传和下载映像
所有上传的图片都将由 GcsArtifactService 存储为制品,您可以在 utils.py 中的 format_user_request_to_adk_content_and_store_artifacts 函数内检查这一点
...

# Prepare the user's message in ADK format and store image artifacts
content = await asyncio.to_thread(
    format_user_request_to_adk_content_and_store_artifacts,
    request=request,
    app_name=APP_NAME,
    artifact_service=app_context.artifact_service,
)

...
所有将由代理运行程序处理的请求都需要格式化为 types.Content 类型。在该函数内,我们还会处理每张图片数据并提取其 ID,以便替换为图片 ID 占位符。
在通过正则表达式提取图片 ID 后,系统会采用类似的机制来下载附件:
...
sanitized_text, attachment_ids = extract_attachment_ids_and_sanitize_response(
    final_response_text
)
sanitized_text, thinking_process = extract_thinking_process(sanitized_text)

# Download images from GCS and replace hash IDs with base64 data
for image_hash_id in attachment_ids:
    # Download image data and get MIME type
    result = await asyncio.to_thread(
        download_image_from_gcs,
        artifact_service=app_context.artifact_service,
        image_hash=image_hash_id,
        app_name=APP_NAME,
        user_id=user_id,
        session_id=session_id,
    )
...
10. 🚀 集成测试
现在,您应该已在不同的 Cloud 控制台标签页中运行了多项服务:
- 前端服务在端口 8080 上运行
* Running on local URL:  http://0.0.0.0:8080

To create a public link, set `share=True` in `launch()`.
- 后端服务在端口 8081 上运行
INFO:     Started server process [xxxxx]
INFO:     Waiting for application startup.
INFO:     Application startup complete.
INFO:     Uvicorn running on http://0.0.0.0:8081 (Press CTRL+C to quit)
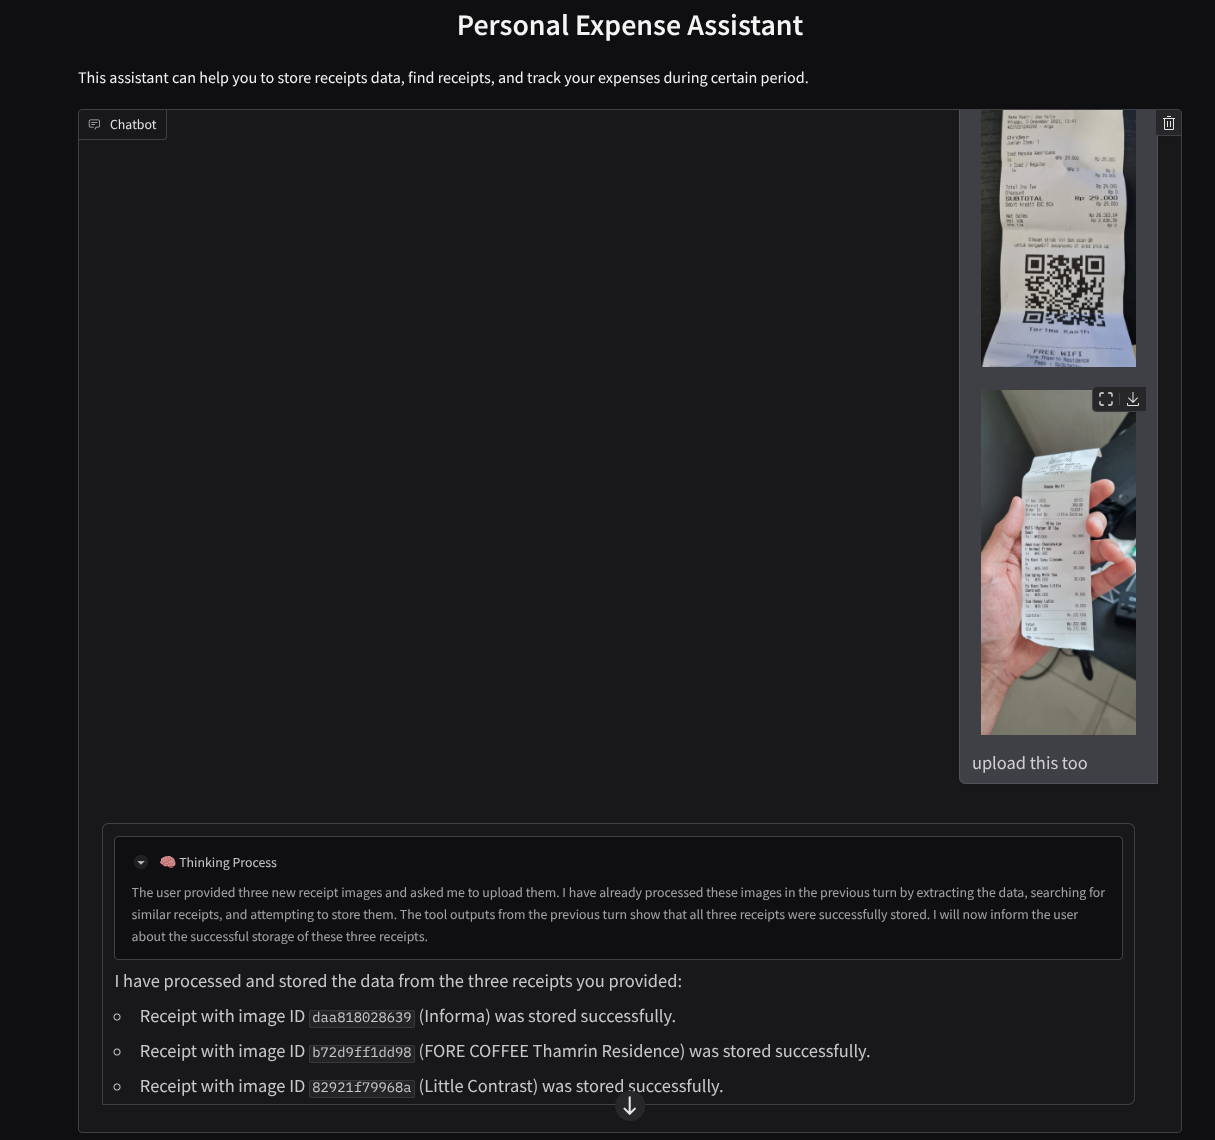
目前,您应该能够上传收据图片,并通过端口 8080 上的 Web 应用与助理顺畅对话。
点击 Cloud Shell 编辑器顶部区域的网页预览按钮,然后选择在端口 8080 上预览
现在,我们来与助理互动一下!
下载以下收据。这些收据数据日期范围介于 2023 年至 2024 年之间,并要求助理存储/上传这些数据
- Receipt Drive(来源:Hugging Face 数据集
mousserlane/id_receipt_dataset)
询问各种问题
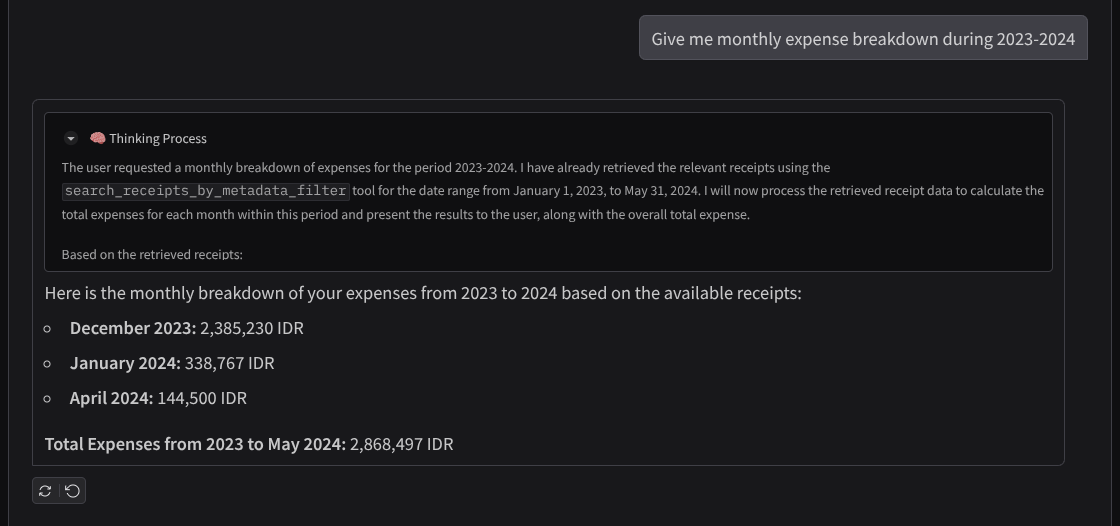
- 给我 2023 年至 2024 年的每月支出明细
- “Show me receipt for coffee transaction”
- “给我 Yakiniku Like 的收据文件”
- 等等
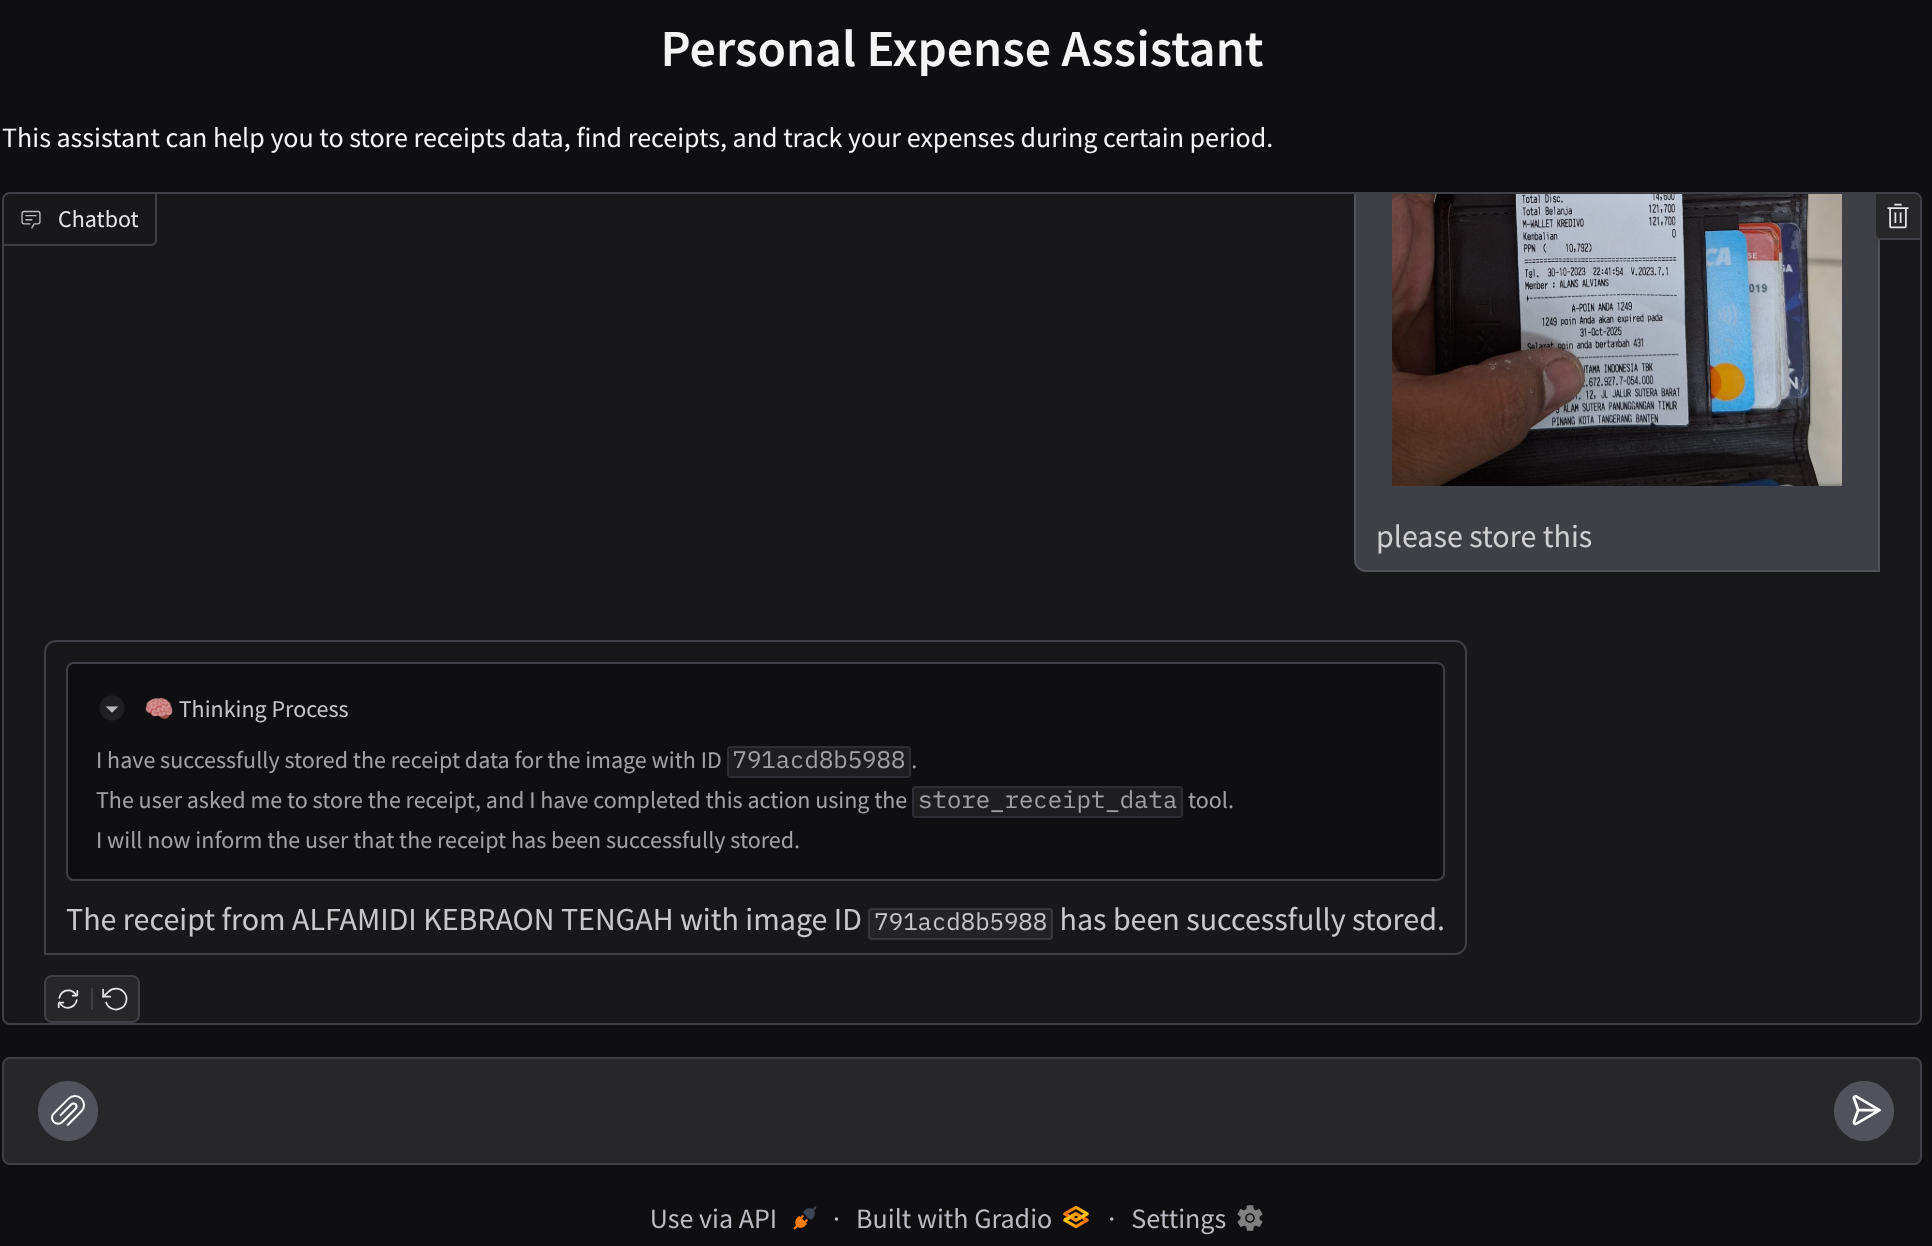
以下是成功互动的简短示例
11. 🚀 部署到 Cloud Run
当然,我们希望随时随地都能访问这款出色的应用。为此,我们可以将此应用打包并将其部署到 Cloud Run。为了便于演示,此服务将作为可供他人访问的公共服务公开。不过,请注意,这并非此类应用的最佳实践,因为这种做法更适合个人应用
在此 Codelab 中,我们将前端和后端服务都放在 1 个容器中。我们需要借助 supervisord 来管理这两个服务。您可以检查 supervisord.conf 文件和 Dockerfile,确认我们已将 supervisord 设置为入口点。
此时,我们已拥有将应用部署到 Cloud Run 所需的所有文件,接下来部署应用。前往 Cloud Shell 终端,确保当前项目已配置为您的有效项目。如果不是,您需要使用 gcloud configure 命令设置项目 ID:
gcloud config set project [PROJECT_ID]
然后,运行以下命令以将其部署到 Cloud Run。
gcloud run deploy personal-expense-assistant \
                  --source . \
                  --port=8080 \
                  --allow-unauthenticated \
                  --env-vars-file=settings.yaml \
                  --memory 1024Mi \
                  --region us-central1
如果系统提示您确认要为 Docker 代码库创建制品注册表,只需回答 Y 即可。请注意,我们在此处允许未经身份验证的访问,因为这是一个演示应用。建议为企业和生产应用使用适当的身份验证。
部署完成后,您应该会获得类似于以下内容的链接:
https://personal-expense-assistant-*******.us-central1.run.app
接下来,您可以在无痕式窗口或移动设备上使用您的应用。该功能应该已经上线。
12. 🎯 挑战
现在,是时候展现您的探索技能了。您是否具备更改代码的能力,以便后端可以容纳多个用户?哪些组件需要更新?
13. 🧹 清理
为避免系统因本 Codelab 中使用的资源向您的 Google Cloud 账号收取费用,请按照以下步骤操作: