
1. Introduction
A Private Service Connect interface is a resource that lets a producer Virtual Private Cloud (VPC) network initiate connections to various destinations in a consumer VPC network. Producer and consumer networks can be in different projects and organizations.
If a network attachment accepts a connection from a Private Service Connect interface, Google Cloud allocates the interface an IP address from a consumer subnet that's specified by the network attachment. The consumer and producer networks are connected and can communicate by using internal IP addresses.
A connection between a network attachment and a Private Service Connect interface is similar to the connection between a Private Service Connect endpoint and a service attachment, but it has two key differences:
- A network attachment lets a producer network initiate connections to a consumer network (managed service egress), while an endpoint lets a consumer network initiate connections to a producer network (managed service ingress).
- A Private Service Connect interface connection is transitive. This means that a producer network can communicate with other networks that are connected to the consumer network.
 Figure:1
Vertex AI PSC-Interface reachability considerations
- Vertex AI PSC-Interface is capable of routing traffic to destinations in a VPC or on-premises within the RFC1918 address block.
- PSC-Interface targeting non RFC-1918 address blocks requires an explicit proxy deployed in the consumer's VPC with a RFC-1918 address. Within the Vertex AI deployment, the proxy must be defined along with a FQDN of the target endpoint. See figure 1 that represents the explicit proxy mode Secure Web proxy (SWP) configured in the consumer VPC to facilitate routing to the following non RFC-1918 CIDRs:
- 240.0.0.0/4
- 203.0.113.0/24
- 10.10.20.0/28 no proxy required, falls into the RFC-1918 range.
- Internet Egress
Connection to the Internet for the Google Managed Tenant Network:
Vertex AI PSC-Interface without VPC-SC
- When you configure your deployment with only a PSC Interface, it retains its default internet access. This outbound traffic egresses directly from the Google-managed tenant network.
Vertex AI PSC-Interface with VPC-SC
- When your project is part of a VPC Service Controls perimeter, the Google-managed tenant's default internet access is blocked by the perimeter to prevent data exfiltration.
- To allow the deployment access to the public internet in this scenario, you must explicitly configure a secure egress path that routes traffic through your VPC that is connected to Vertex AI. Deploying a Proxy Server inside the VPC network with RFC 1918 address, paired with a Cloud NAT gateway is one way to achieve this. Note that you could also use Secure Web proxy to forward the traffic to the Internet. Creation of Secure Web Proxy, automatically creates a Cloud NAT gateway.
For additional information, refer to the following resources:
Set up a Private Service Connect interface for Vertex AI resources | Google Cloud
What you'll build
In this tutorial, you're going to build a comprehensive Vertex AI Pipelines deployment with Private Service Connect (PSC) Interface to allow connectivity from the producer to the consumer's compute as illustrated in Figure 1 targeting non RFC 1918 endpoint in class-e-subnet.
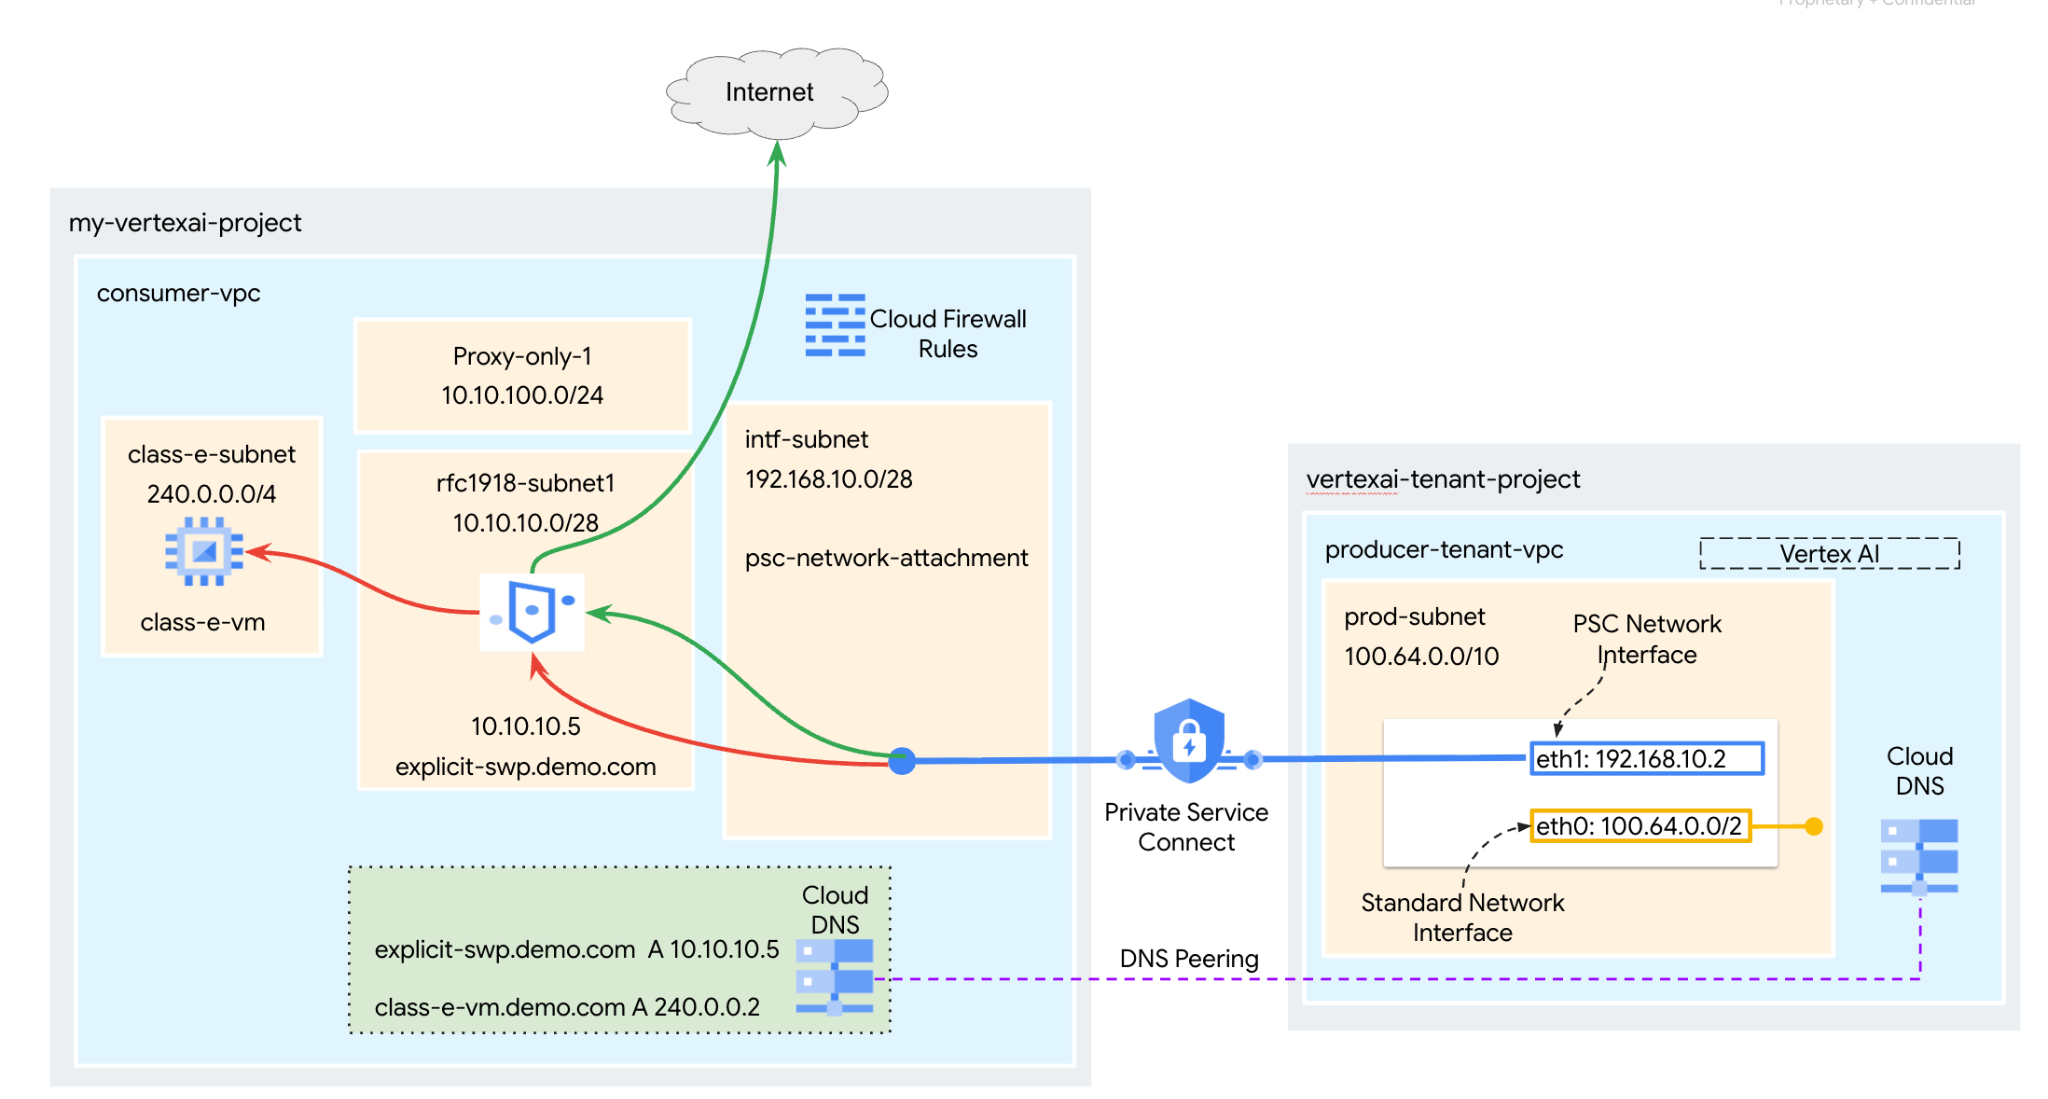 Figure 2
You'll create a single psc-network-attachment in the consumer VPC leveraging DNS peering to resolve the consumers VMs in the tenant project hosting Vertex AI Training resulting in the following use cases:
Deploy Vertex AI Pipelines and configure Secure Web Proxy in an explicit proxy mode, allowing it to perform a wget against a VM in the Class E subnet.
What you'll learn
- How to create a network attachment
- How a producer can use a network attachment to create a PSC interface
- How to establish DNS Peering to resolve private domains configured in Consumer VPC Network from the Google Managed VPC Networks
- How to forward the traffic from Vertex AI PSC Interface to Secure Web Proxy
- How to establish communication to non-RFC-1918 IP Address space from Vertex AI Pipelines
What you'll need
Google Cloud Project
IAM Permissions
- Compute Network Admin (roles/compute.networkAdmin)
- Compute Instance Admin (roles/compute.instanceAdmin)
- Compute Security Admin (roles/compute.securityAdmin)
- Security Policy Admin(roles/compute.orgSecurityPolicyAdmin)
- DNS Administrator (roles/dns.admin)
- IAP-secured Tunnel User (roles/iap.tunnelResourceAccessor)
- Logging Admin (roles/logging.admin)
- Notebooks Admin (roles/notebooks.admin)
- Project IAM Admin (roles/resourcemanager.projectIamAdmin)
- Service Account Admin (roles/iam.serviceAccountAdmin)
- Service Account User (roles/iam.serviceAccountUser)
- Service Usage Admin (roles/serviceusage.serviceUsageAdmin)
2. Before you begin
Update the project to support the tutorial
This tutorial makes use of $variables to aid gcloud configuration implementation in Cloud Shell.
Inside Cloud Shell, perform the following:
gcloud config list project
gcloud config set project [YOUR-PROJECT-ID]
projectid=YOUR-PROJECT-ID
echo $projectid
API Enablement
Inside Cloud Shell, perform the following:
gcloud services enable "compute.googleapis.com"
gcloud services enable "aiplatform.googleapis.com"
gcloud services enable "dns.googleapis.com"
gcloud services enable "notebooks.googleapis.com"
gcloud services enable "storage.googleapis.com"
gcloud services enable "cloudresourcemanager.googleapis.com"
gcloud services enable "artifactregistry.googleapis.com"
gcloud services enable "cloudbuild.googleapis.com"
gcloud services enable "networkservices.googleapis.com"
gcloud services enable "networksecurity.googleapis.com"
gcloud services enable "certificatemanager.googleapis.com"
3. Consumer Setup
Create the Consumer VPC
Inside Cloud Shell, perform the following:
gcloud compute networks create consumer-vpc --project=$projectid --subnet-mode=custom
Create the consumer subnets
Inside Cloud Shell, perform the following:
gcloud compute networks subnets create class-e-subnet --project=$projectid --range=240.0.0.0/4 --network=consumer-vpc --region=us-central1
Inside Cloud Shell, perform the following:
gcloud compute networks subnets create rfc1918-subnet1 --project=$projectid --range=10.10.10.0/28 --network=consumer-vpc --region=us-central1 --enable-private-ip-google-access
Create the proxy-only subnet
gcloud compute networks subnets create proxy-only-uscentral1 \
    --purpose=REGIONAL_MANAGED_PROXY \
    --role=ACTIVE \
    --region=us-central1 \
    --network=consumer-vpc \
    --range=10.10.100.0/26
Create the Private Service Connect Network Attachment subnet
Inside Cloud Shell, perform the following:
gcloud compute networks subnets create intf-subnet \
--project=$projectid \
--range=192.168.10.0/28 \
--network=consumer-vpc \
--region=us-central1 \
--enable-private-ip-google-access
Cloud Router and NAT configuration
Google Cloud Secure Web Proxy automatically provisions and manages a Cloud NAT gateway and an associated Cloud Router in the region where it's deployed.
4. Enable IAP
To allow IAP (Identity Aware proxy) to connect to your VM instances, create a firewall rule that:
- Applies to all VM instances that you want to be accessible by using IAP.
- Allows ingress traffic from the IP range 35.235.240.0/20. This range contains all IP addresses that IAP uses for TCP forwarding.
Inside Cloud Shell, create the IAP firewall rule.
gcloud compute firewall-rules create ssh-iap-consumer \
    --network consumer-vpc \
    --allow tcp:22 \
    --source-ranges=35.235.240.0/20
5. Create consumer VM instances
Inside Cloud Shell, create the consumer VM instance, class-e-vm.
gcloud compute instances create class-e-vm \
    --project=$projectid \
    --machine-type=e2-micro \
    --image-family debian-11 \
    --no-address \
    --shielded-secure-boot \
    --image-project debian-cloud \
    --zone us-central1-a \
    --subnet=class-e-subnet \
    --private-network-ip=240.0.0.2
6. Secure Web Proxy
Secure Web Proxy's Explicit Mode (or Explicit Proxy Routing Mode) is a deployment method where the client workloads must be explicitly configured to use the SWP's internal IP address or Fully Qualified Domain Name and port as their forwarding proxy.
In the steps below, ensure to modify YOUR-PROJECT-ID to your Project ID
Create a Web proxy:
In Cloud Shell, Create the policy.yaml file using a text editor:
cat > policy.yaml << EOF
description: basic Secure Web Proxy policy
name: projects/$projectid/locations/us-central1/gatewaySecurityPolicies/policy1
EOF
In Cloud Shell, generate the Secure Web Proxy policy:
gcloud network-security gateway-security-policies import policy1 \
    --source=policy.yaml \
    --location=us-central1
In the following section, create a rule to allow access to the class-e-vm based on the host sessionMatcher.
In Cloud Shell, Create the rule1.yaml file using a text editor:
cat > rule1.yaml << EOF
name: projects/$projectid/locations/us-central1/gatewaySecurityPolicies/policy1/rules/allow-nonrfc-classe
description: Allow nonrfc class-e
enabled: true
priority: 1
basicProfile: ALLOW
sessionMatcher: host() == 'class-e-vm.demo.com'
EOF
In the following section, create a rule to allow the Jupyter notebook access to allow apache2 installation on the "class-e" VM.
In Cloud Shell, Create the rule2.yaml file using a text editor:
cat > rule2.yaml << EOF
name: projects/$projectid/locations/us-central1/gatewaySecurityPolicies/policy1/rules/allow-apache2
description: Allow Apache2 install on class-e VM
enabled: true
priority: 2
basicProfile: ALLOW
sessionMatcher: inIpRange(source.ip,'240.0.0.2')
EOF
In Cloud Shell, generate security policy rule1:
gcloud network-security gateway-security-policies rules import allow-nonrfc-classe \
    --source=rule1.yaml \
    --location=us-central1 \
    --gateway-security-policy=policy1
In Cloud Shell, generate security policy rule2:
gcloud network-security gateway-security-policies rules import allow-apache2 \
    --source=rule2.yaml \
    --location=us-central1 \
    --gateway-security-policy=policy1
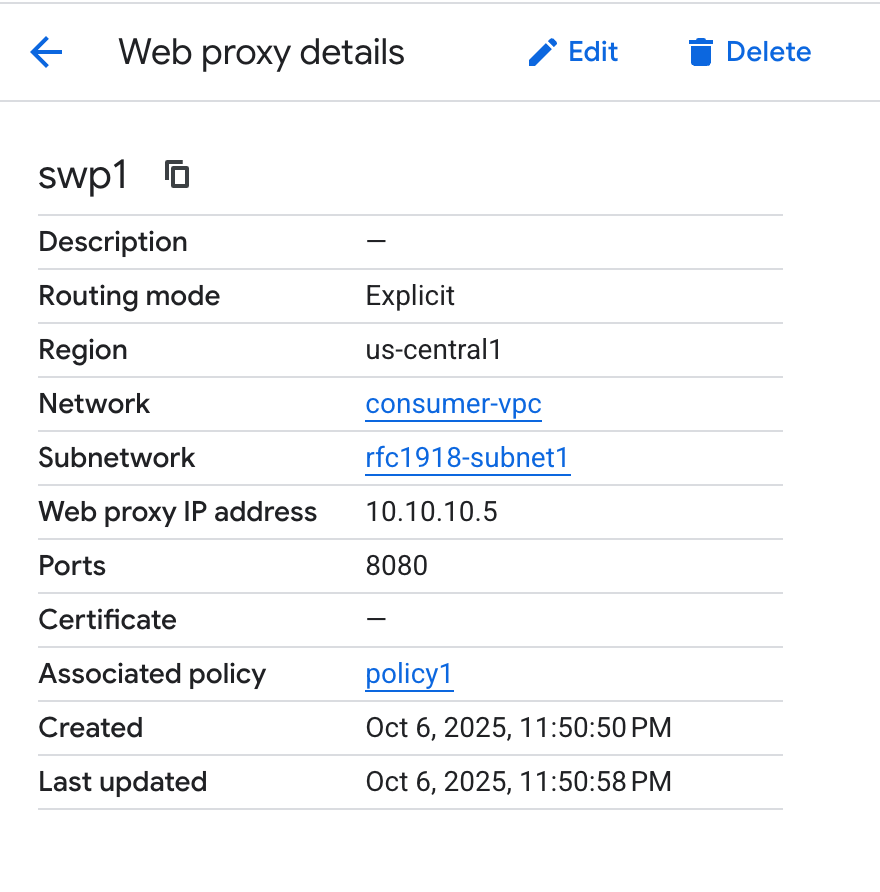
To support Vertex AI Training, configure the Secure Web Proxy gateway with these settings:
- Listening Port: Use the same port configured in Vertex AI application's code explicit proxy settings (e.g., 8080).
- Address: Assign a private IP address from the RFC 1918 range.
- Routing Mode: Set this to EXPLICIT_ROUTING_MODE
In Cloud Shell, create a gateway.yaml file to define the Secure Web Proxy gateway:
cat > gateway.yaml << EOF
name: projects/$projectid/locations/us-central1/gateways/swp1
type: SECURE_WEB_GATEWAY
addresses: ["10.10.10.5"]
ports: [8080]
gatewaySecurityPolicy: projects/$projectid/locations/us-central1/gatewaySecurityPolicies/policy1
network: projects/$projectid/global/networks/consumer-vpc
subnetwork: projects/$projectid/regions/us-central1/subnetworks/rfc1918-subnet1
routingMode: EXPLICIT_ROUTING_MODE
EOF
In Cloud Shell, generate the Secure Web Proxy instance:
gcloud network-services gateways import swp1 \
    --source=gateway.yaml \
    --location=us-central1
A Secure Web Proxy can take several minutes to deploy.
7. Private Service Connect network attachment
Network attachments are regional resources that represent the consumer side of a Private Service Connect interface. You associate a single subnet with a network attachment, and the producer assigns IPs to the Private Service Connect interface from that subnet. The subnet must be in the same region as the network attachment. A network attachment must be in the same region as the producer service.
Create the network attachment
Inside Cloud Shell, create the network attachment.
gcloud compute network-attachments create psc-network-attachment \
    --region=us-central1 \
    --connection-preference=ACCEPT_MANUAL \
    --subnets=intf-subnet
Note: You do not have to explicitly mention the accepted project ID in this attachment, when vertex AI is configured Google Managed tenant project will automatically get added as if it is configured "Accept Automatically"
List the network attachments
Inside Cloud Shell, list the network attachment.
gcloud compute network-attachments list
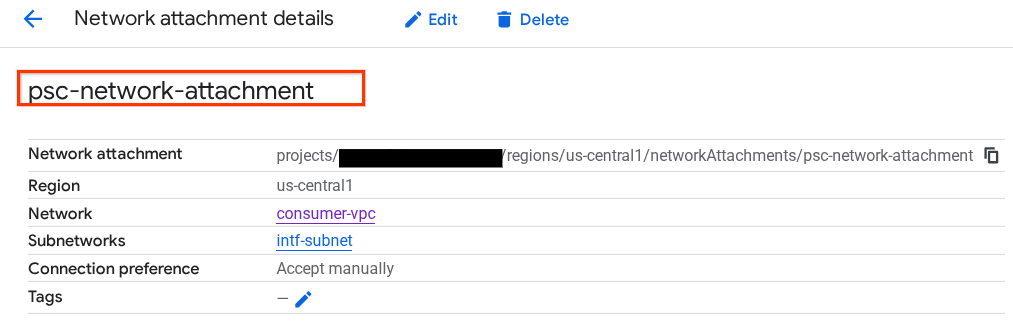
Describe the network attachments
Inside Cloud Shell, describe the network attachment.
gcloud compute network-attachments describe psc-network-attachment --region=us-central1
Make note of the PSC network attachment name, psc-network-attachment, that will be used by the producer when creating the Private Service Connect Interface.
To view the PSC Network Attachment URL in Cloud Console, navigate to the following:
Network Services → Private Service Connect → Network Attachment → psc-network-attachment
8. Private DNS Zone
You'll create a Cloud DNS Zone for demo.com and populate it with A records that point to your VMs' IP addresses. Later, DNS peering will be deployed in the Vertex AI Pipelines job, which will allow it to access the consumer's DNS records.
Inside Cloud Shell, perform the following:
gcloud dns --project=$projectid managed-zones create private-dns-codelab --description="" --dns-name="demo.com." --visibility="private" --networks="https://compute.googleapis.com/compute/v1/projects/$projectid/global/networks/consumer-vpc"
Inside Cloud Shell, create the records set for the VM, class-e-vm, ensure to update the IP Address based on your environment's output.
gcloud dns --project=$projectid record-sets create class-e-vm.demo.com. --zone="private-dns-codelab" --type="A" --ttl="300" --rrdatas="240.0.0.2"
Inside Cloud Shell, create the records set for the Secure Web Proxy, ensure to update the IP Address based on your environment's output.
gcloud dns --project=$projectid record-sets create explicit-swp.demo.com. --zone="private-dns-codelab" --type="A" --ttl="300" --rrdatas="10.10.10.5"
Create a Cloud Firewall rule to allow access from the PSC Interface
In the following section, create a firewall rule that allows traffic originating from the PSC Network Attachment access to the RFC 1918 compute resources in the consumers VPC.
In Cloud Shell, create the ingress firewall rule that allows access from the proxy-only subnet subnet to the class-e subnet. As SWP initiates connection with the proxy-only subnet as source address.
gcloud compute firewall-rules create allow-access-to-class-e \
    --network=consumer-vpc \
    --action=ALLOW \
    --rules=ALL \
    --direction=INGRESS \
    --priority=1000 \
    --source-ranges="10.10.100.0/28" \
    --destination-ranges="240.0.0.0/4" \
    --enable-logging
9. Create a Jupyter Notebook
The following section guides you through creating a Jupyter Notebook. This notebook will be used to deploy a Vertex AI Pipelines Job that sends a wget from Vertex AI Pipelines to the test instances. The datapath between Vertex AI Pipelines and the consumer network containing the instances uses a Private Service Connect interface.
Create a user managed service account
In the following section, you will create a service account that will be associated with the Vertex AI Workbench instance used in the tutorial.
In the tutorial, the service account will have the following roles applied:
- Storage Admin
- Vertex AI User
- Artifact Registry Administrator
- Cloud Build Editor
- IAM Service Account User
Login to Cloud Shell and perform the following;
Create the service account.
gcloud iam service-accounts create notebook-sa \
    --display-name="notebook-sa"
Update the service account with the role Storage Admin.
gcloud projects add-iam-policy-binding $projectid --member="serviceAccount:notebook-sa@$projectid.iam.gserviceaccount.com" --role="roles/storage.admin"
Update the service account with the role AI Platform User.
gcloud projects add-iam-policy-binding $projectid --member="serviceAccount:notebook-sa@$projectid.iam.gserviceaccount.com" --role="roles/aiplatform.user"
Update the service account with the role Artifact Registry Admin.
gcloud projects add-iam-policy-binding $projectid --member="serviceAccount:notebook-sa@$projectid.iam.gserviceaccount.com" --role="roles/artifactregistry.admin"
Update the service account with the role Cloud Build Editor.
gcloud projects add-iam-policy-binding $projectid --member="serviceAccount:notebook-sa@$projectid.iam.gserviceaccount.com" --role="roles/cloudbuild.builds.editor"
Allow the notebook service account to use the Compute Engine default service account.
gcloud iam service-accounts add-iam-policy-binding \
    $(gcloud projects describe $(gcloud config get-value project) --format='value(projectNumber)')-compute@developer.gserviceaccount.com \
    --member="serviceAccount:notebook-sa@$projectid.iam.gserviceaccount.com" \
    --role="roles/iam.serviceAccountUser"
10. Create a Vertex AI Workbench Instance
In the following section, create a Vertex AI Workbench instance that incorporates the previously created service account, notebook-sa.
Inside Cloud Shell create the private client instance.
gcloud workbench instances create workbench-tutorial --vm-image-project=cloud-notebooks-managed --vm-image-family=workbench-instances --machine-type=n1-standard-4 --location=us-central1-a --subnet-region=us-central1 --subnet=rfc1918-subnet1 --disable-public-ip --shielded-secure-boot=true --shielded-integrity-monitoring=true --shielded-vtpm=true --service-account-email=notebook-sa@$projectid.iam.gserviceaccount.com
11. Vertex AI Service Agent Update
Vertex AI acts on your behalf to perform operations such as obtaining an IP address from the PSC Network Attachment subnet used to create the PSC Interface. To do so, Vertex AI uses a service agent (listed below) that requires Network Admin permission.
service-$projectnumber@gcp-sa-aiplatform.iam.gserviceaccount.com
Note: Before updating service agent permissions, navigate to Vertex AI in Cloud Console to ensure the Vertex AI API is enabled.
Inside Cloud Shell:
Obtain your project number.
gcloud projects describe $projectid | grep projectNumber
Set your project number.
projectnumber=YOUR-PROJECT-NUMBER
Create a service account for AI Platform. Skip this step if you have an existing service account in your project.
gcloud beta services identity create --service=aiplatform.googleapis.com --project=$projectnumber
Update the service agent account with the role compute.networkAdmin.
gcloud projects add-iam-policy-binding $projectid --member="serviceAccount:service-$projectnumber@gcp-sa-aiplatform.iam.gserviceaccount.com" --role="roles/compute.networkAdmin"
Update the service agent account with the role dns.peer
gcloud projects add-iam-policy-binding $projectid --member="serviceAccount:service-$projectnumber@gcp-sa-aiplatform.iam.gserviceaccount.com" --role="roles/dns.peer"
Default Service Account Update
Enable the Compute Engine API and grant your default service account access to Vertex AI. Note that it might take some time for the access change to propagate.
Use Cloud Shell to update the default service account as follows:
Update the default service account with the role aiplatform.user
gcloud projects add-iam-policy-binding $projectid \
  --member="serviceAccount:$projectnumber-compute@developer.gserviceaccount.com" \
    --role="roles/aiplatform.user"
Update the default service account with the role storage.admin
gcloud projects add-iam-policy-binding $projectid \
  --member="serviceAccount:$projectnumber-compute@developer.gserviceaccount.com" \
    --role="roles/storage.admin"
Update the default service account with the role artifactregistry.admin
gcloud projects add-iam-policy-binding $projectid \
  --member="serviceAccount:$projectnumber-compute@developer.gserviceaccount.com" \
    --role="roles/artifactregistry.admin"
12. Install Apache2 and Enable Tcpdump on ‘class-e-vm':
From the class-e-vm install apache2 via Secure Web Proxy:
Open a new Cloud Shell tab, update your project variable and ssh into the class-e-vm
gcloud compute ssh --zone us-central1-a "class-e-vm" --tunnel-through-iap --project $projectid
sudo apt-get -o Acquire::http::Proxy="http://10.10.10.5:8080" update
sudo apt-get -o Acquire::http::Proxy="http://10.10.10.5:8080" install apache2 -y
sudo service apache2 restart
echo 'class-e Server !!' | sudo tee /var/www/html/index.html
Execute tcpdump filtering on the proxy-only subnet, used by the Secure Web Proxy to forward the traffic to the targets.
From the class-e-vm OS execute tcpdump filtering on the proxy-vm subnet..
sudo tcpdump -i any net 10.10.100.0/24 -nn
Note: Make sure that you are turning on the Private Google Access on the workbench-tutorial instance subnet for the JupyterLab Session to open.
13. Deploy Vertex AI Pipelines Job
In the following section, you will create a notebook to perform a successful wget from Vertex AI Pipelines to the explicit proxy. This allows you to reach non-RFC 1918 VMs, such as the class-e-vm. An explicit proxy is not required for Vertex AI Pipelines to access rfc1918-vm, as its target is an RFC 1918 IP address.
Run the training job in the Vertex AI Workbench instance.
- In the Google Cloud console, go to the instances tab on the Vertex AI Workbench page.
- Next to your Vertex AI Workbench instance's name (workbench-tutorial), click Open JupyterLab. Your Vertex AI Workbench instance opens in JupyterLab.
- Select File > New > Notebook
- Select Kernel > Python 3
In your JupyterLab notebook, create a new cell, update and run the following. Ensure to update PROJECT_ID with your environment's details.
import json
import requests
import pprint

PROJECT_ID = 'YOUR-PROJECT-ID' #Enter your project ID
PROJECT_NUMBER=!gcloud projects list --filter="project_id:$PROJECT_ID" --format="value(PROJECT_NUMBER)"
PROJECT_NUMBER=str(PROJECT_NUMBER).strip('[').strip(']').strip("'")
print(PROJECT_NUMBER)
In your JupyterLab notebook, create a new cell and run the following.
# us-central1 is used for the codelab
REGION = "us-central1" #@param {type:"string"}
SERVICE_NAME = "aiplatform" #@param {type:"string"}
SERVICE ="{}.googleapis.com".format(SERVICE_NAME)
ENDPOINT="{}-{}.googleapis.com".format(REGION, SERVICE_NAME)
API_VERSION = "v1" # @param {type: "string"}

LOCATION = REGION
In your JupyterLab notebook, create a new cell and run the config below, note the following highlights:
- proxy_server = "http://explicit-swp.demo.com:8080"
- An FQDN is associated with the proxy vm deployed in the consumer VPC. We are using DNS peering to resolve the FQDN in a later step.
%%writefile main.py

import logging
import socket
import sys
import os

def make_api_request(url: str, proxy_vm_ip: str, proxy_vm_port: str):
    """
    Makes a GET request to a nonRFC-1918 API and saves the response.

    Args:
        url: The URL of the API to send the request to.
    """
    import requests

    try:
        # response = requests.get(url)
        proxy_server = f"http://explicit-swp.demo.com:8080" # replace it with your Secure Web proxy Ip-address and the port.

        proxies = {
          "http": proxy_server,
          "https": proxy_server,
        }

        response = requests.get(url, proxies=proxies)
        logging.info(response.text)

        response.raise_for_status()  # Raise an exception for bad status codes
        logging.info(f"Successfully fetched data from {url}")
    except requests.exceptions.RequestException as e:
        logging.error(f"An error occurred: {e}")
        raise e

if __name__ == '__main__':
  # Configure logging to print clearly to the console
  logging.basicConfig(
      level=logging.INFO,
      format='%(levelname)s: %(message)s',
      stream=sys.stdout
  )
  url_to_test = os.environ['NONRFC_URL']
  proxy_vm_ip = os.environ['PROXY_VM_IP']
  proxy_vm_port = os.environ['PROXY_VM_PORT']

  logging.info(f"url_to_test: {url_to_test}")
  logging.info(f"proxy_vm_ip: {proxy_vm_ip}")
  logging.info(f"proxy_vm_port: {proxy_vm_port}")
  make_api_request(url_to_test, proxy_vm_ip, proxy_vm_port)
In your JupyterLab notebook, create a new cell and run the following.
%%writefile Dockerfile
FROM python:3.9-slim

RUN apt-get update && \
  apt-get install -y iputils-ping && \
  apt-get install -y wget

RUN pip install cloudml-hypertune requests kfp

COPY main.py /main.py

ENTRYPOINT ["python3", "/main.py"]
In your JupyterLab notebook, create a new cell and run the following.
!gcloud artifacts repositories create pipelines-test-repo-psc --repository-format=docker --location=us-central1
In your JupyterLab notebook, create a new cell and run the following.
IMAGE_PROJECT = PROJECT_ID
IMAGE_REPO = 'pipelines-test-repo-psc'
IMAGE_NAME = 'nonrfc-ip-call'
TAG = 'v1'

IMAGE_URI= f'us-central1-docker.pkg.dev/{IMAGE_PROJECT}/{IMAGE_REPO}/{IMAGE_NAME}:{TAG}'
IMAGE_URI
In your JupyterLab notebook, create a new cell and run the following.
!gcloud auth configure-docker us-docker.pkg.dev --quiet
In your JupyterLab notebook, create a new cell and run the following. Disregard the error (gcloud.builds.submit) if present.
!gcloud builds submit --tag {IMAGE_URI} --region=us-central1
In your JupyterLab notebook, create and run the cell below, note the following highlights:
- DNS Peering to consumer VPCs is configured using dnsPeeringConfigs (dnsPeeringConfigs) for the domain name demo.com.
- The explicit routing mode web proxy here is explicit-swp.demo.com. Resolution is handled via DNS peering within the consumer's VPC.
- Port 8080 is the listening port (default) configured in Secure Web Proxy
wgetto class-e-vm-demo.com is resolved through DNS peering- The code specifies the "psc-network-attachment" for Vertex, enabling it to utilize the network attachment subnet to deploy two PSC Interface instances.
import json
from datetime import datetime


JOB_ID_PREFIX='test_psci-nonRFC' #@param {type:"string"}
JOB_ID = '{}_{}'.format(JOB_ID_PREFIX, datetime.now().strftime("%Y%m%d%H%M%S"))

# PSC-I configs

PRODUCER_PROJECT_ID = PROJECT_ID
DNS_DOMAIN = 'class-e-vm.demo.com' #@param {type:"string"}
NON_RFC_URL = f"http://{DNS_DOMAIN}"

PROXY_VM_IP = "explicit-swp.demo.com" #@param {type:"string"}
PROXY_VM_PORT = "8080" #@param {type:"string"}

CUSTOM_JOB = {
  "display_name": JOB_ID,
  "job_spec": {
      "worker_pool_specs": [
          {
           "machine_spec": {
             "machine_type": "n1-standard-4",
           },
           "replica_count": 1,
           "container_spec": {
             "image_uri": IMAGE_URI,
             "env": [{
               "name": "NONRFC_URL",
               "value": NON_RFC_URL
             },
             {
               "name": "PROXY_VM_IP",
               "value": PROXY_VM_IP
             },
             {
               "name": "PROXY_VM_PORT",
               "value": PROXY_VM_PORT
             }]
           },
         },
      ],
      "enable_web_access": True,
      "psc_interface_config": {
        "network_attachment": "psc-network-attachment",
        "dns_peering_configs": [
          {
            "domain": "demo.com.",
            "target_project": PROJECT_ID,
            "target_network": "consumer-vpc"
          },
        ]
      },
  }
}

print(json.dumps(CUSTOM_JOB, indent=2))
In your JupyterLab notebook, create a new cell and run the following.
import requests
bearer_token = !gcloud auth application-default print-access-token
headers = {
    'Content-Type': 'application/json',
    'Authorization': 'Bearer {}'.format(bearer_token[0]),
}

request_uri = f"https://{REGION}-aiplatform.googleapis.com/{API_VERSION}/projects/{PROJECT_NUMBER}/locations/{REGION}/customJobs/"

print("request_uri: ", request_uri)
In your JupyterLab notebook, create a new cell and run the following.
response_autopush = requests.post(request_uri, json=CUSTOM_JOB, headers=headers)
response = response_autopush
print("response:", response)
if response.reason == 'OK':
  job_name = response.json()['name']
  job_id = job_name.split('/')[-1]
  print("Created Job: ", response.json()['name'])
else:
  print(response.text)
In your JupyterLab notebook, create a new cell and run the following.
# Print KFP SDK version (should be >= 1.6)
! python3 -c "import kfp; print('KFP SDK version: {}'.format(kfp.__version__))"

# Print AI Platform version
! python3 -c "from google.cloud import aiplatform; print('AI Platform version: {}'.format(aiplatform.__version__))"
In your JupyterLab notebook, create a new cell and run the following.
BUCKET_URI = "your-unique-bucket" # Provide a globally unique bucket name
In your JupyterLab notebook, create a new cell and run the following.
!gcloud storage buckets create gs://{BUCKET_URI}
In your JupyterLab notebook, create a new cell and run the following.
# pipeline parameters
CACHE_PIPELINE = False # @param {type: "string"}
_DEFAULT_IMAGE = IMAGE_URI
BUCKET_URI = "gs://{BUCKET_URI}"  # @param {type: "string"}
PIPELINE_ROOT = f"{BUCKET_URI}/pipeline_root/intro"
PIPELINE_DISPLAY_NAME = "pipeline_nonRFCIP" # @param {type: "string"}
In your JupyterLab notebook, create a new cell and run the following.
from re import S
import kfp
from kfp import dsl
from kfp.dsl import container_component, ContainerSpec
from kfp import compiler
from google.cloud import aiplatform


# ==== Component with env variable ====

@container_component
def dns_peering_test_op(dns_domain: str, proxy_vm_ip:str, proxy_vm_port:str):
    return ContainerSpec(
        image=_DEFAULT_IMAGE,
        command=["bash", "-c"],
        args=[
            """
            apt-get update && apt-get install inetutils-traceroute inetutils-ping netcat-openbsd curl -y

            echo "Local IP(s): $(hostname -I)"

            echo "Attempting to trace route to %s"
            traceroute -w 1 -m 7 "%s"

            echo "Sending curl requests to http://%s via proxy %s:%s and recording trace..."
            if curl -L -v --trace-ascii /dev/stdout -x http://%s:%s "http://%s"; then
                echo "Curl request succeeded!"
            else
                echo "Curl request failed!"
                exit 1
            fi
            """ % (dns_domain, dns_domain, dns_domain, proxy_vm_ip, proxy_vm_port, proxy_vm_ip, proxy_vm_port, dns_domain)

        ]
    )

# ==== Pipeline ====
@dsl.pipeline(
    name="dns-peering-test-pipeline",
    description="Test DNS Peering using env variable",
    pipeline_root=PIPELINE_ROOT,
)
def dns_peering_test_pipeline(dns_domain: str, proxy_vm_ip:str, proxy_vm_port:str):
    dns_test_task = dns_peering_test_op(dns_domain=dns_domain, proxy_vm_ip=proxy_vm_ip, proxy_vm_port=proxy_vm_port)
    dns_test_task.set_caching_options(enable_caching=CACHE_PIPELINE)

# ==== Compile pipeline ====
if __name__ == "__main__":
    aiplatform.init(project=PROJECT_ID, location=LOCATION)

    compiler.Compiler().compile(
        pipeline_func=dns_peering_test_pipeline,
        package_path="dns_peering_test_pipeline.yaml",
    )
    print("✅ Pipeline compiled to dns_peering_test_pipeline.yaml")
In your JupyterLab notebook, create a new cell and run the following.
# Define the PipelineJob body; see API Reference https://cloud.google.com/vertex-ai/docs/reference/rest/v1/projects.locations.pipelineJobs/create

import requests, json
import datetime

bearer_token = !gcloud auth application-default print-access-token
headers = {
    'Content-Type': 'application/json',
    'Authorization': 'Bearer {}'.format(bearer_token[0]),
}

request_uri = f"https://{REGION}-aiplatform.googleapis.com/{API_VERSION}/projects/{PROJECT_NUMBER}/locations/{REGION}/pipelineJobs/"

print("request_uri: ", request_uri)
14. PSC Interface Validation
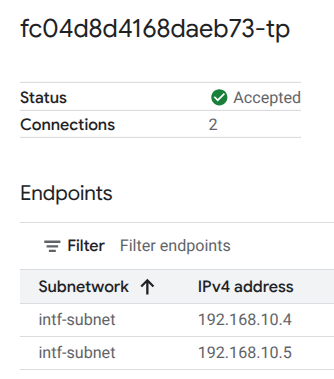
You can also view the Network Attachment IPs used by Vertax AI Pipelines by navigating to the following:
Network Services → Private Service Connect → Network Attachment → psc-network-attachment
Select the tenant project (project name ending in -tp)
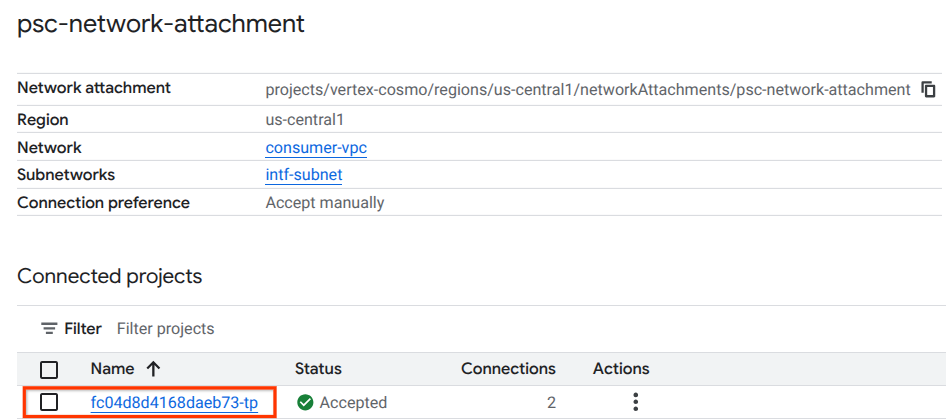
The highlighted field denotes the IP address used by Vertex AI Pipelines from the PSC Network Attachment.
15. Cloud Logging Validation
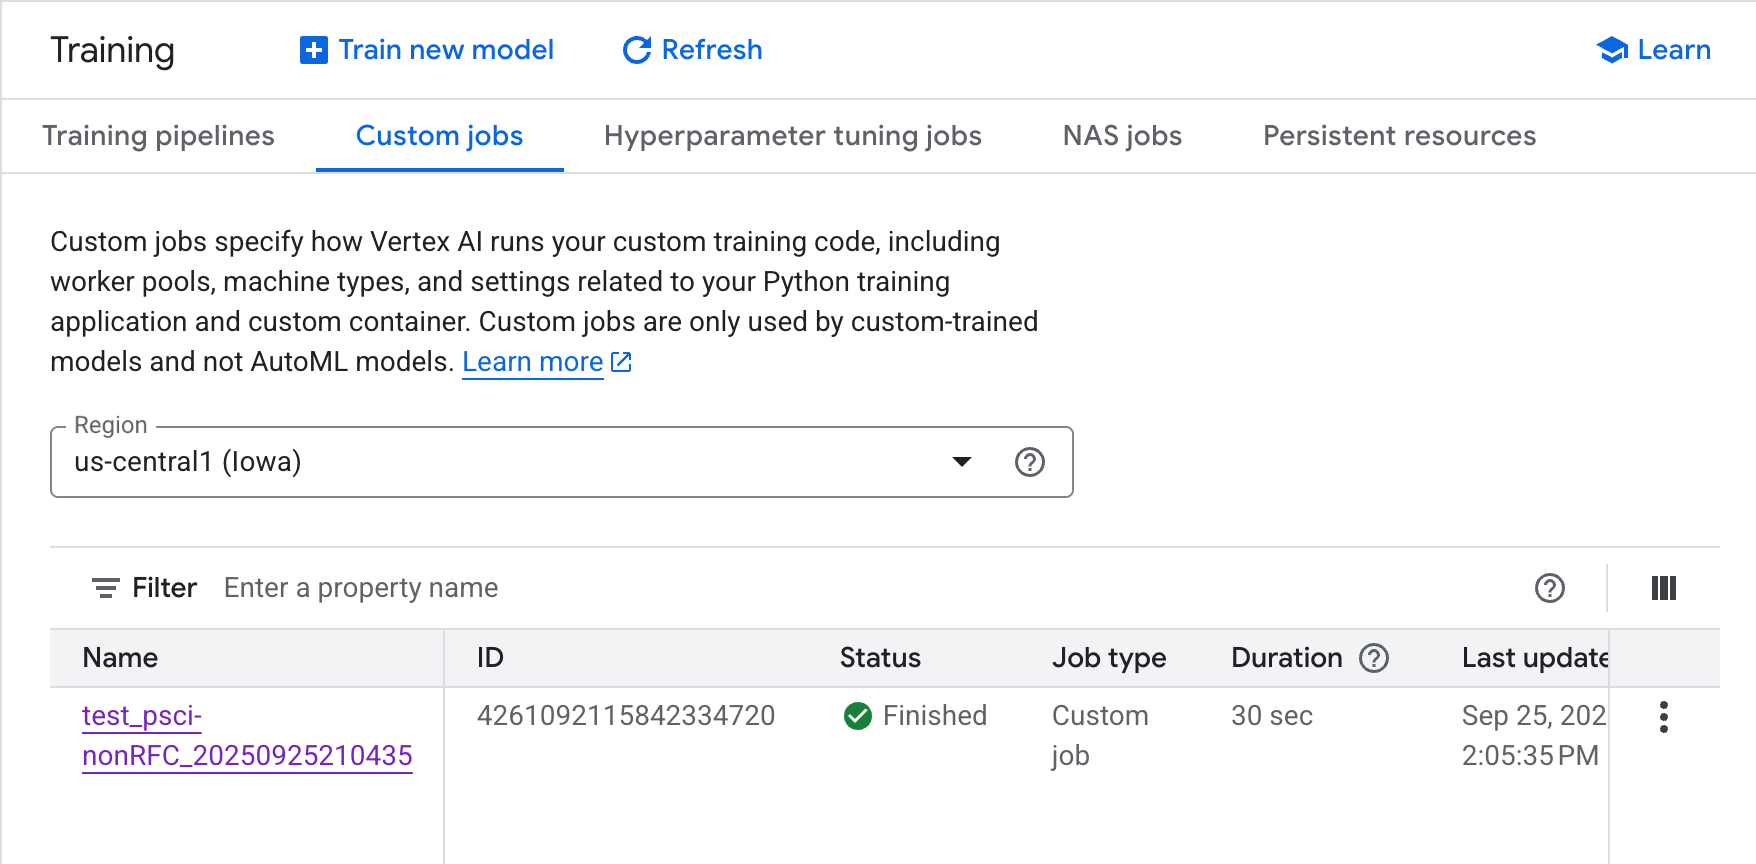
The Vertex AI Pipelines job will take approximately 14 minutes to run the first time, subsequent runs are much shorter. To validate a successful outcome perform the following:
Navigate to Vertex AI → Training → Custom jobs
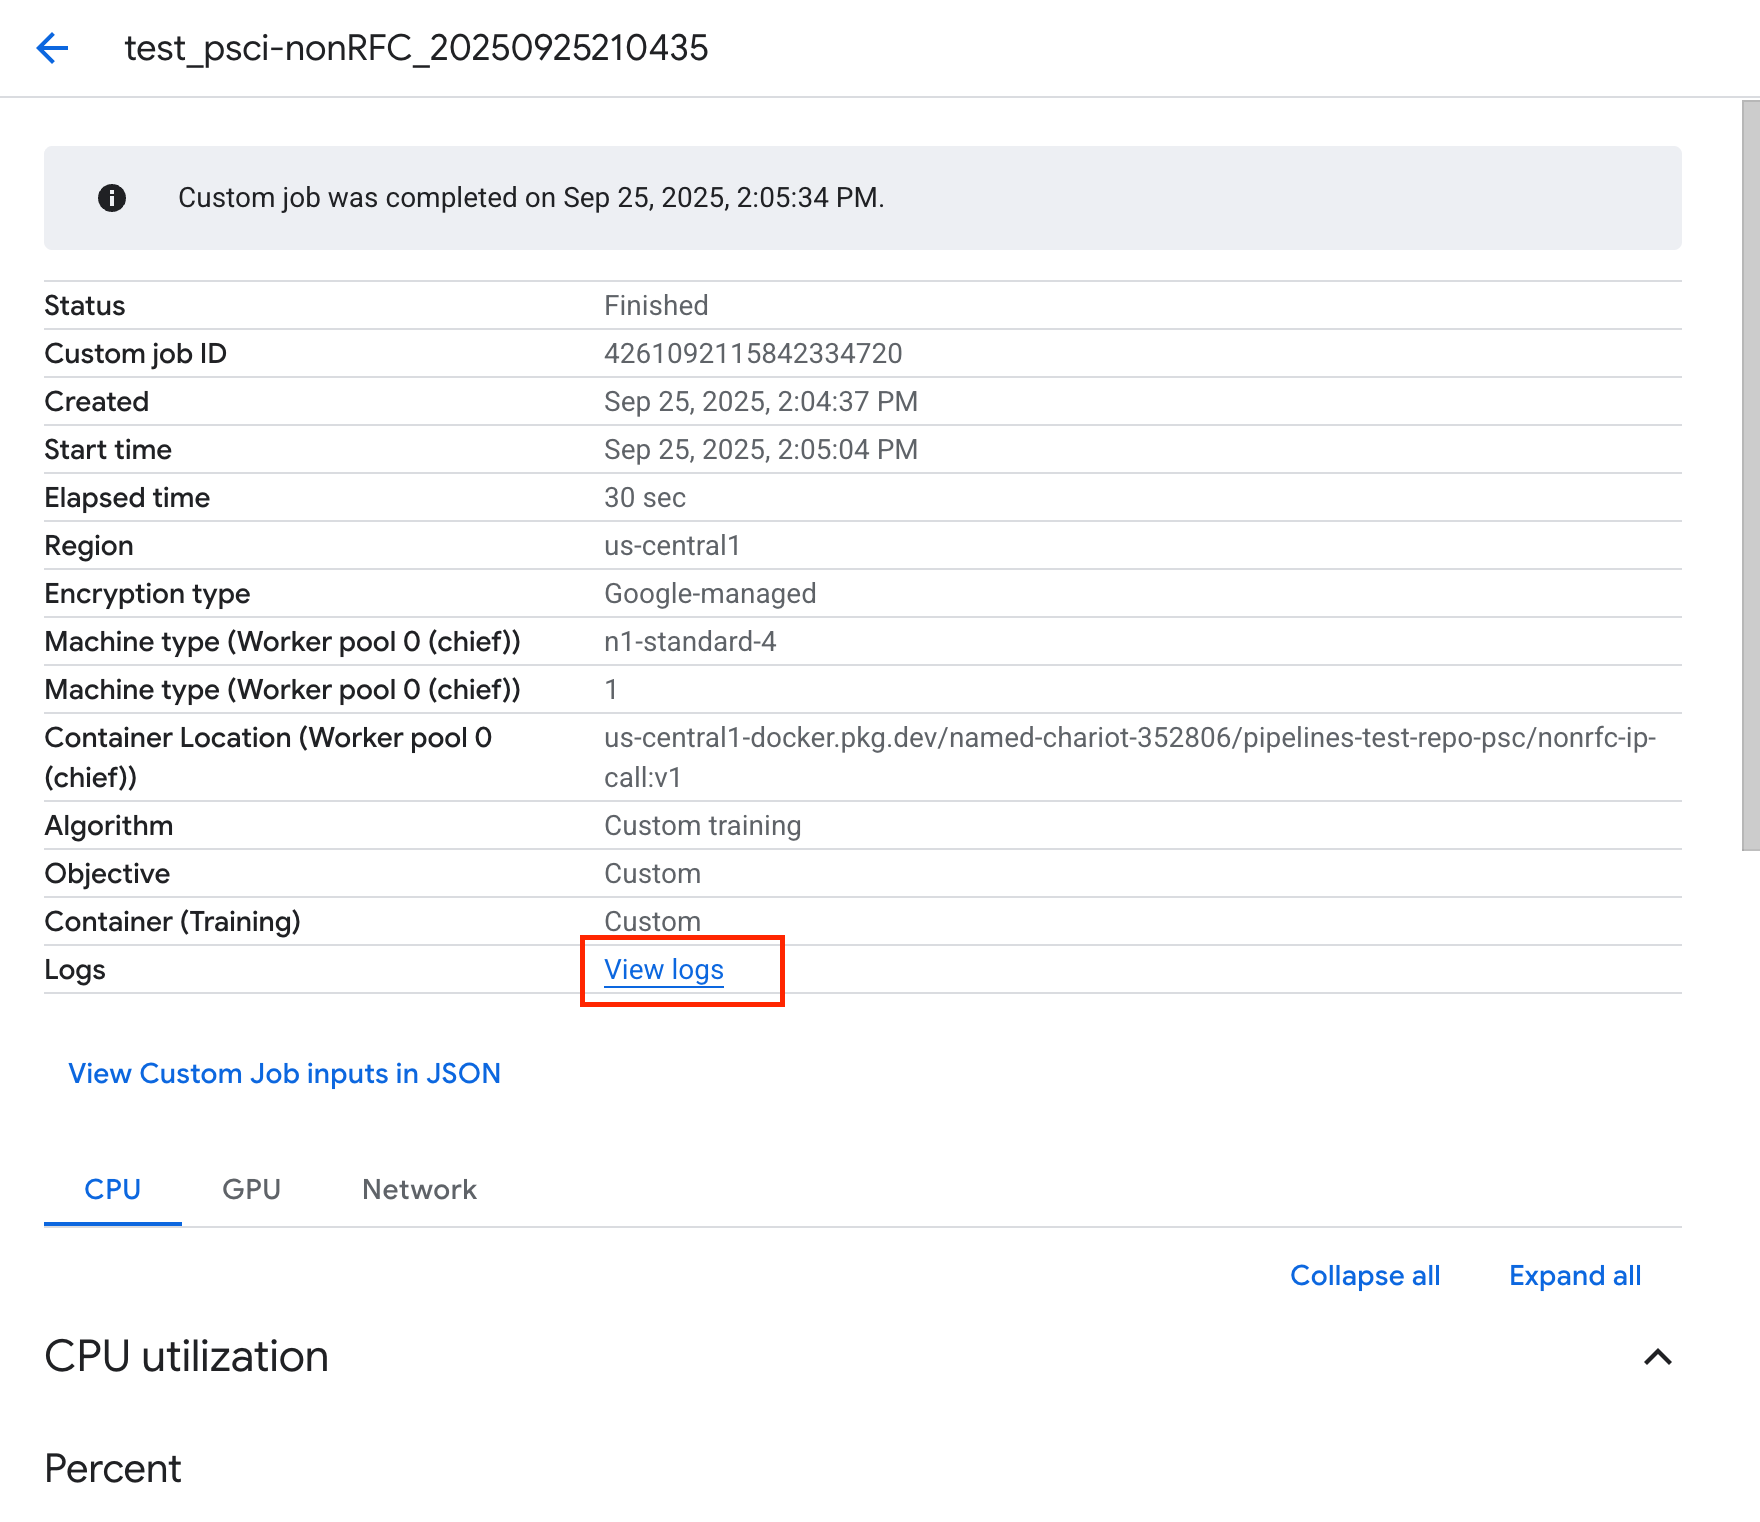
Select the executed custom job
Select View Logs
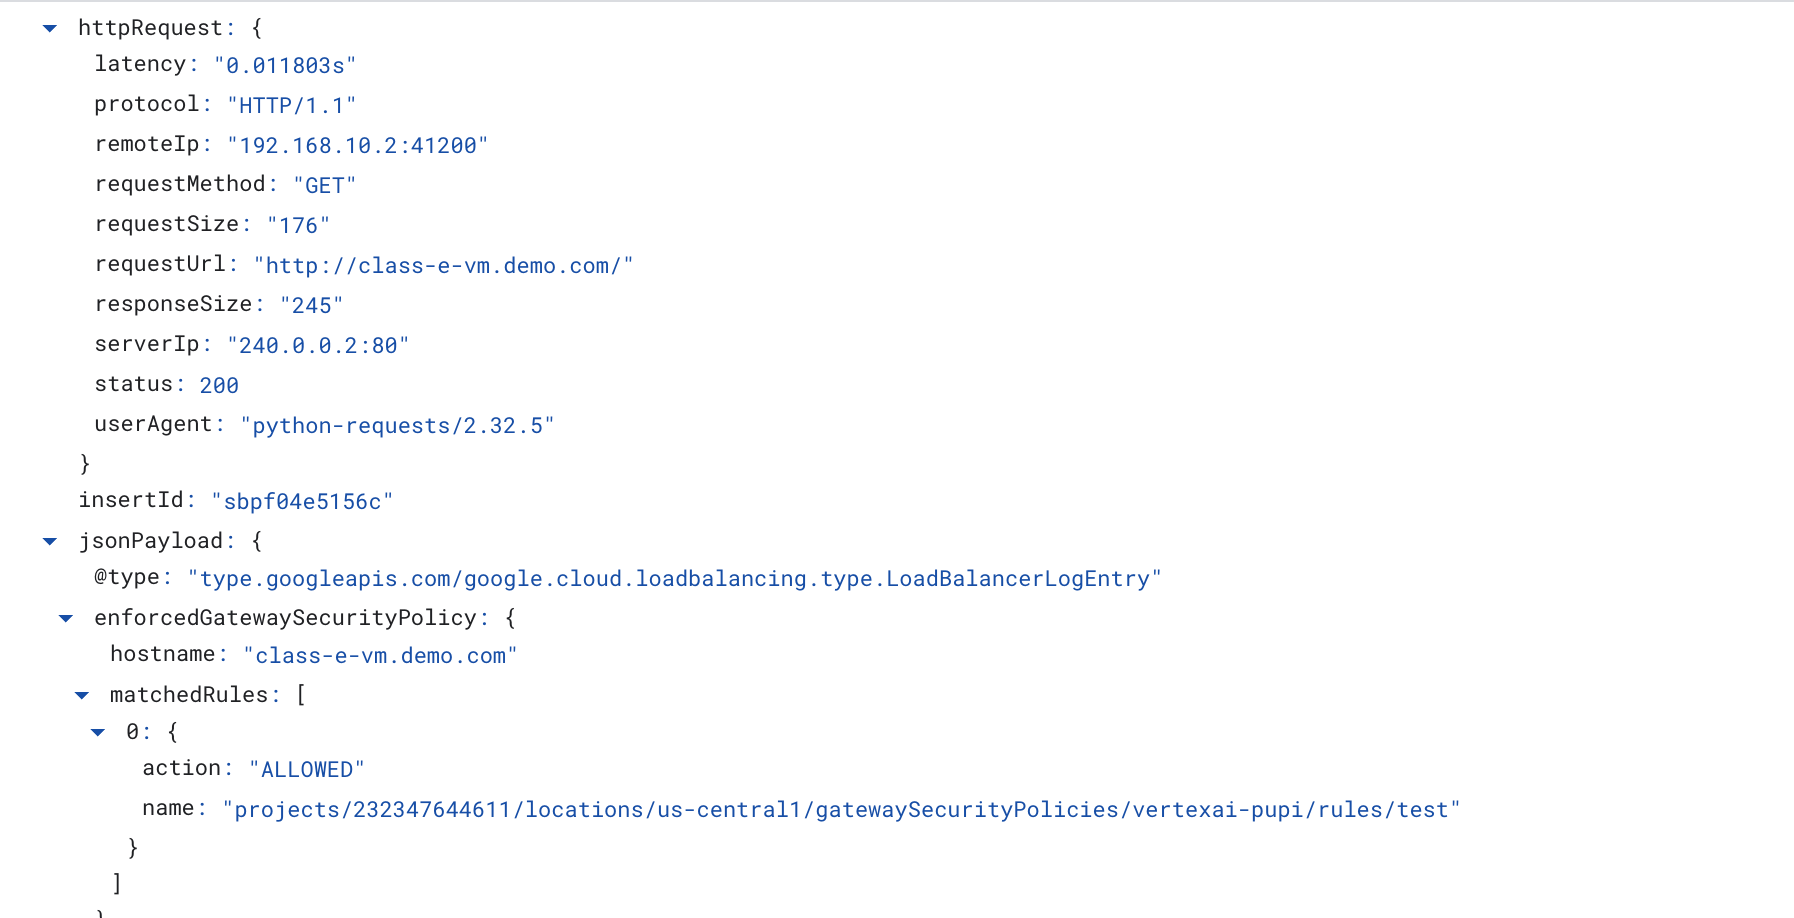
Once Cloud Logging is available, select Run Query that generates the highlighted selection below that confirms a successful wget from Vertex AI Pipelines to the class-e-vm.

16. TCPDump Validation
Let's review the TCPDUMP output that further validates the connectivity to compute instances:
From class-e-vm observe the HTTP GET and 200 OK
XXXXXXXXX@class-e-vm:~$ sudo tcpdump -i any net 10.10.100.0/28 -nn
tcpdump: data link type LINUX_SLL2
tcpdump: verbose output suppressed, use -v[v]... for full protocol decode
listening on any, link-type LINUX_SLL2 (Linux cooked v2), snapshot length 262144 bytes
05:51:14.173641 ens4  In  IP 10.10.100.8.55306 > 240.0.0.2.80: Flags [S], seq 1747181041, win 65535, options [mss 1420,sackOK,TS val 3942828403 ecr 0,nop,wscale 8], length 0
05:51:14.173668 ens4  Out IP 240.0.0.2.80 > 10.10.100.8.55306: Flags [S.], seq 3013226100, ack 1747181042, win 64768, options [mss 1420,sackOK,TS val 1886125065 ecr 3942828403,nop,wscale 7], length 0
05:51:14.174977 ens4  In  IP 10.10.100.8.55306 > 240.0.0.2.80: Flags [.], ack 1, win 1054, options [nop,nop,TS val 3942828405 ecr 1886125065], length 0
05:51:14.175066 ens4  In  IP 10.10.100.8.55306 > 240.0.0.2.80: Flags [P.], seq 1:223, ack 1, win 1054, options [nop,nop,TS val 3942828405 ecr 1886125065], length 222: HTTP: GET / HTTP/1.1
05:51:14.175096 ens4  Out IP 240.0.0.2.80 > 10.10.100.8.55306: Flags [.], ack 223, win 505, options [nop,nop,TS val 1886125066 ecr 3942828405], length 0
05:51:14.239042 ens4  Out IP 240.0.0.2.80 > 10.10.100.8.55306: Flags [P.], seq 1:246, ack 223, win 505, options [nop,nop,TS val 1886125130 ecr 3942828405], length 245: HTTP: HTTP/1.1 200 OK
17. Clean up
From Cloud Shell, delete tutorial components.
gcloud workbench instances delete workbench-tutorial --project=$projectid --location=us-central1-a

gcloud network-security gateway-security-policies rules delete allow-nonrfc-classe \
    --gateway-security-policy=policy1 \
    --location=us-central1

gcloud network-security gateway-security-policies rules delete allow-apache2 \
    --gateway-security-policy=policy1 \
    --location=us-central1

gcloud network-security gateway-security-policies delete policy1 \
    --location=us-central1
gcloud network-services gateways delete swp1 \
    --location=us-central1

gcloud compute network-attachments delete psc-network-attachment --region=us-central1 --quiet

gcloud compute networks subnets delete intf-subnet rfc1918-subnet1 --region=us-central1 --quiet

gcloud dns record-sets delete class-e-vm.demo.com --zone=private-dns-codelab  --type=A
gcloud dns record-sets delete explicit-swp.demo.com --zone=private-dns-codelab  --type=A

gcloud dns managed-zones delete private-dns-codelab

gcloud computeinstances delete class-e-vm --project=$projectid --zone=us-central1-a --quiet
gcloud compute networks delete consumer-vpc --quiet
18. Congratulations
Congratulations, you've successfully configured and validated a connection between Vertex AI Pipelines Private Service Connect Interface to non RFC IP ranges via Secure Web Proxy.
You created the consumer infrastructure, and you added a network attachment that allowed the producer to create a multi-NIC VM to bridge consumer and producer communication. You learned how to create DNS peering while deploying an explicit proxy in the consumer VPC network that allowed connectivity to the class-e-vm instance that is not routable directly from Vertex.

What's next?
Further reading & Videos
Reference docs
- Vertex AI networking access overview | Google Cloud
- About accessing Vertex AI services through Private Service Connect interfaces | Google Cloud
- Use Private Service Connect interface for Vertex AI Training | Google Cloud
- Set up a Private Service Connect interface for Vertex AI resources | Google Cloud
- You could also associate a service account along with the host address or ip-address etc to forward the traffic to SWP in explicit routing mode. Please follow the CEL Language document for more examples.