
1. 簡介
本程式碼研究室提供資料從業人員的技術藍圖。這份指南著重於「程式碼優先」的資料管理方法,說明如何將健全的品質和中繼資料管理機制直接嵌入開發生命週期。Dataplex Universal Catalog 的核心功能是智慧型資料架構,可讓機構集中管理、監控及治理整個資產中的資料,包括資料湖泊和資料倉儲。
本程式碼研究室會展示如何運用 Dataplex、BigQuery 和 Gemini CLI,將複雜資料扁平化、以程式輔助方式剖析資料、產生智慧資料品質規則建議,以及部署自動品質掃描。主要目標是擺脫容易出錯且難以擴充的手動 UI 驅動程序,改為建立穩健的「以程式碼形式呈現的政策」架構,並控管版本。
必要條件
- Google Cloud 控制台的基本知識
- 指令列介面和 Google Cloud Shell 的基本技能
課程內容
- 如何使用具體化檢視表,將巢狀 BigQuery 資料攤平,以進行全面剖析。
- 如何使用 Dataplex Python 用戶端程式庫,以程式輔助方式觸發及管理 Dataplex 剖析檔掃描作業。
- 如何匯出設定檔資料,並將其結構化為生成式 AI 模型的輸入內容。
- 如何設計 Gemini CLI 的提示,分析設定檔資料並產生符合 Dataplex 規範的 YAML 規則檔案。
- 互動式人機迴圈 (HITL) 程序在驗證 AI 生成設定時的重要性。
- 如何將產生的規則部署為自動資料品質掃描作業。
軟硬體需求
- Google Cloud 帳戶和 Google Cloud 專案
- 網路瀏覽器,例如 Chrome
重要概念:Dataplex 資料品質的支柱
瞭解 Dataplex 的核心元件,是制定有效資料品質策略的必要條件。
- 資料剖析掃描:Dataplex 工作,可分析資料並產生統計中繼資料,包括空值百分比、不重複值數量和值分布情形。這就是我們程式輔助的「探索」階段。
- 資料品質規則:定義資料必須符合的條件 (例如
NonNullExpectation、SetExpectation、RangeExpectation)。 - 生成式 AI 規則建議:使用大型語言模型 (例如 Gemini) 分析資料設定檔,並建議相關的資料品質規則。這有助於加快定義基準品質架構的程序。
- 資料品質掃描:Dataplex 工作,可根據一組預先定義或自訂規則驗證資料。
- 程式化控管:以程式碼 (例如 YAML 檔案和 Python 指令碼) 管理控管機制 (例如品質規則) 的核心主題。這項功能可自動化作業、進行版本管理,並整合至 CI/CD 管道。
- 人機迴圈 (HITL):將人類專業知識和監督納入自動化工作流程的重要控制點。如果是 AI 生成的設定,部署前必須經過 HITL 驗證,確保建議內容正確無誤、符合業務需求且安全無虞。
2. 設定和需求條件
啟動 Cloud Shell
雖然您可以透過筆電遠端操作 Google Cloud,但在本程式碼研究室中,您將使用 Google Cloud Shell,這是可在雲端執行的指令列環境。
在 Google Cloud 控制台中,點選右上工具列的 Cloud Shell 圖示:

佈建並連線至環境的作業很快就能完成。完成後,您應該會看到如下的內容:

這部虛擬機器搭載各種您需要的開發工具,提供永久的 5 GB 主目錄,而且在 Google Cloud 中運作,可大幅提升網路效能和驗證。您可以在瀏覽器中完成本程式碼研究室的所有作業。您不需要安裝任何軟體。
啟用必要的 API 並設定環境
在 Cloud Shell 中,確認專案 ID 是否已設定完畢:
export PROJECT_ID=$(gcloud config get-value project)
gcloud config set project $PROJECT_ID
export LOCATION="us-central1"
export BQ_LOCATION="us"
export DATASET_ID="dataplex_dq_codelab"
export TABLE_ID="ga4_transactions"

gcloud services enable dataplex.googleapis.com \
                       bigquery.googleapis.com \
                       serviceusage.googleapis.com
在本範例中,我們使用 us (多區域) 做為位置,因為我們要使用的公開範例資料也位於 us (多區域)。BigQuery 規定查詢的來源資料和目的地資料表必須位於相同位置。
建立專屬的 BigQuery 資料集
建立新的 BigQuery 資料集,存放範例資料和結果。
bq --location=us mk --dataset $PROJECT_ID:$DATASET_ID
準備範例資料
在本程式碼研究室中,您會使用公開資料集,內含 Google 商品網路商店的模糊處理電子商務資料。由於公開資料集為唯讀,您必須在自己的資料集中建立可變動的副本。下列 bq 指令會在 dataplex_dq_codelab 資料集中建立新的資料表 ga4_transactions。這項作業會複製單日 (2021-01-31) 的資料,確保掃描作業快速執行。
bq query \
--use_legacy_sql=false \
--destination_table=$PROJECT_ID:$DATASET_ID.$TABLE_ID \
--replace=true \
'SELECT * FROM `bigquery-public-data.ga4_obfuscated_sample_ecommerce.events_20210131`'
設定示範目錄
首先,請複製 GitHub 存放區,其中包含本程式碼研究室所需的資料夾結構和支援檔案。
git clone https://github.com/GoogleCloudPlatform/devrel-demos
cd devrel-demos/data-analytics/programmatic-dq
這個目錄現在是您的有效工作區。所有後續檔案都會建立於此。
3. 使用 Dataplex 剖析功能自動探索資料
Dataplex 資料剖析是強大的工具,可自動探索資料的統計資訊,例如空值百分比、唯一性和值的分佈情形。這個程序對於瞭解資料結構和品質至關重要。不過,Dataplex 剖析功能有已知限制,就是無法完整檢查巢狀或重複欄位 (例如 RECORD 或 ARRAY 類型) 內。這項功能可以識別資料欄是否為複雜類型,但無法剖析巢狀結構中的個別欄位。
為解決這個問題,我們會將資料平坦化為專為此用途建立的具體化檢視區塊。這項策略會將每個欄位設為頂層資料欄,讓 Dataplex 個別剖析每個欄位。
瞭解巢狀結構定義
首先,請檢查來源資料表的結構定義。Google Analytics 4 (GA4) 資料集包含多個巢狀和重複的資料欄。如要以程式輔助方式擷取完整結構定義 (包括所有巢狀結構),可以使用 bq show 指令,並將輸出內容儲存為 JSON 檔案。
bq show --schema --format=json $PROJECT_ID:$DATASET_ID.$TABLE_ID > bq_schema.json
檢查 bq_schema.json 檔案會發現複雜的結構,例如裝置、地理位置、電子商務和重複記錄項目。這些結構需要扁平化,才能有效進行剖析。
使用具體化檢視表將資料扁平化
建立具體化檢視表 (MV) 是解決這類巢狀資料問題最有效且實用的方法。MV 會預先計算扁平化結果,因此在查詢效能和成本方面具有顯著優勢,同時為分析師和剖析工具提供類似關聯的簡化結構。
您可能自然而然會想將所有內容攤平到單一巨型檢視畫面中,不過,這種直覺式做法隱藏著危險陷阱,可能導致嚴重資料損毀。接著來瞭解為何這是重大錯誤。
mv_ga4_user_session_flat.sql
CREATE OR REPLACE MATERIALIZED VIEW `$PROJECT_ID.$DATASET_ID.mv_ga4_user_session_flat`
OPTIONS (
  enable_refresh = true,
  refresh_interval_minutes = 30
) AS
SELECT
  event_date, event_timestamp, event_name, user_pseudo_id, user_id, stream_id, platform,
  device.category AS device_category,
  device.operating_system AS device_os,
  device.operating_system_version AS device_os_version,
  device.language AS device_language,
  device.web_info.browser AS device_browser,
  geo.continent AS geo_continent,
  geo.country AS geo_country,
  geo.region AS geo_region,
  geo.city AS geo_city,
  traffic_source.name AS traffic_source_name,
  traffic_source.medium AS traffic_source_medium,
  traffic_source.source AS traffic_source_source
FROM
  `$PROJECT_ID.$DATASET_ID.ga4_transactions`;
mv_ga4_ecommerce_transactions.sql
CREATE OR REPLACE MATERIALIZED VIEW `$PROJECT_ID.$DATASET_ID.mv_ga4_ecommerce_transactions`
OPTIONS (
  enable_refresh = true,
  refresh_interval_minutes = 30
) AS
SELECT
  event_date, event_timestamp, user_pseudo_id, ecommerce.transaction_id,
  ecommerce.total_item_quantity,
  ecommerce.purchase_revenue_in_usd,
  ecommerce.purchase_revenue,
  ecommerce.refund_value_in_usd,
  ecommerce.refund_value,
  ecommerce.shipping_value_in_usd,
  ecommerce.shipping_value,
  ecommerce.tax_value_in_usd,
  ecommerce.tax_value,
  ecommerce.unique_items
FROM
  `$PROJECT_ID.$DATASET_ID.ga4_transactions`
WHERE
  ecommerce.transaction_id IS NOT NULL;
mv_ga4_ecommerce_items.sql
CREATE OR REPLACE MATERIALIZED VIEW `$PROJECT_ID.$DATASET_ID.mv_ga4_ecommerce_items`
OPTIONS (
  enable_refresh = true,
  refresh_interval_minutes = 30
) AS
SELECT
  event_date, event_timestamp, event_name, user_pseudo_id, ecommerce.transaction_id,
  item.item_id,
  item.item_name,
  item.item_brand,
  item.item_variant,
  item.item_category,
  item.item_category2,
  item.item_category3,
  item.item_category4,
  item.item_category5,
  item.price_in_usd,
  item.price,
  item.quantity,
  item.item_revenue_in_usd,
  item.item_revenue,
  item.coupon,
  item.affiliation,
  item.item_list_name,
  item.promotion_name
FROM
  `$PROJECT_ID.$DATASET_ID.ga4_transactions`,
  UNNEST(items) AS item
WHERE
  ecommerce.transaction_id IS NOT NULL;
現在,請使用 bq 指令列工具執行這些範本。envsubst 指令會讀取每個檔案,將 $PROJECT_ID 和 $DATASET_ID 等變數替換為來自殼層環境的值,然後將最終的有效 SQL 傳送至 bq 查詢指令。
envsubst < mv_ga4_user_session_flat.sql | bq query --use_legacy_sql=false
envsubst < mv_ga4_ecommerce_transactions.sql | bq query --use_legacy_sql=false
envsubst < mv_ga4_ecommerce_items.sql | bq query --use_legacy_sql=false
透過 Python 用戶端執行設定檔掃描
現在我們有了平坦化、可剖析的檢視畫面,可以針對每個檢視畫面,以程式輔助方式建立及執行 Dataplex 資料剖析檔掃描作業。下列 Python 指令碼使用 google-cloud-dataplex 用戶端程式庫自動執行這個程序。
執行指令碼前,請務必在專案目錄中建立獨立的 Python 環境,這是最佳做法。這樣可確保專案的依附元件會分開管理,避免與 Cloud Shell 環境中的其他套件發生衝突。
# Create the virtual environment
python3 -m venv dq_venv

# Activate the environment
source dq_venv/bin/activate
現在,請在新啟用的環境中安裝 Dataplex 用戶端程式庫。
# Install the Dataplex client library
pip install google-cloud-dataplex
環境設定完成並安裝程式庫後,即可建立協調指令碼。
在 Cloud Shell 工具列中,按一下「開啟編輯器」。建立名為 1_run_dataplex_scans.py 的新檔案,然後將下列 Python 程式碼貼入其中。如果您複製 GitHub 存放區,這個檔案就會位於資料夾中。
這個指令碼會為每個具體化檢視區塊建立掃描 (如果尚未建立),執行掃描,然後輪詢直到所有掃描作業完成為止。
import os
import sys
import time
from google.cloud import dataplex_v1
from google.api_core.exceptions import AlreadyExists


def create_and_run_scan(
    client: dataplex_v1.DataScanServiceClient,
    project_id: str,
    location: str,
    data_scan_id: str,
    target_resource: str,
) -> dataplex_v1.DataScanJob | None:
    """
    Creates and runs a single data profile scan.
    Returns the executed Job object without waiting for completion.
    """
    parent = client.data_scan_path(project_id, location, data_scan_id).rsplit('/', 2)[0]
    scan_path = client.data_scan_path(project_id, location, data_scan_id)

    # 1. Create Data Scan (skips if it already exists)
    try:
        data_scan = dataplex_v1.DataScan()
        data_scan.data.resource = target_resource
        data_scan.data_profile_spec = dataplex_v1.DataProfileSpec()

        print(f"[INFO] Creating data scan '{data_scan_id}'...")
        client.create_data_scan(
            parent=parent,
            data_scan=data_scan,
            data_scan_id=data_scan_id
        ).result()  # Wait for creation to complete
        print(f"[SUCCESS] Data scan '{data_scan_id}' created.")
    except AlreadyExists:
        print(f"[INFO] Data scan '{data_scan_id}' already exists. Skipping creation.")
    except Exception as e:
        print(f"[ERROR] Error creating data scan '{data_scan_id}': {e}")
        return None

    # 2. Run Data Scan
    try:
        print(f"[INFO] Running data scan '{data_scan_id}'...")
        run_response = client.run_data_scan(name=scan_path)
        print(f"[SUCCESS] Job started for '{data_scan_id}'. Job ID: {run_response.job.name.split('/')[-1]}")
        return run_response.job
    except Exception as e:
        print(f"[ERROR] Error running data scan '{data_scan_id}': {e}")
        return None


def main():
    """Main execution function"""
    # --- Load configuration from environment variables ---
    PROJECT_ID = os.environ.get("PROJECT_ID")
    LOCATION = os.environ.get("LOCATION")
    DATASET_ID = os.environ.get("DATASET_ID")

    if not all([PROJECT_ID, LOCATION, DATASET_ID]):
        print("[ERROR] One or more required environment variables are not set.")
        print("Please ensure PROJECT_ID, LOCATION, and DATASET_ID are exported in your shell.")
        sys.exit(1)

    print(f"[INFO] Using Project: {PROJECT_ID}, Location: {LOCATION}, Dataset: {DATASET_ID}")

    # List of Materialized Views to profile
    TARGET_VIEWS = [
        "mv_ga4_user_session_flat",
        "mv_ga4_ecommerce_transactions",
        "mv_ga4_ecommerce_items"
    ]
    # ----------------------------------------------------

    client = dataplex_v1.DataScanServiceClient()
    running_jobs = []

    # 1. Create and run jobs for all target views
    print("\n--- Starting Data Profiling Job Creation and Execution ---")
    for view_name in TARGET_VIEWS:
        data_scan_id = f"profile-scan-{view_name.replace('_', '-')}"
        target_resource = f"//bigquery.googleapis.com/projects/{PROJECT_ID}/datasets/{DATASET_ID}/tables/{view_name}"

        job = create_and_run_scan(client, PROJECT_ID, LOCATION, data_scan_id, target_resource)
        if job:
            running_jobs.append(job)
    print("-------------------------------------------------------\n")

    if not running_jobs:
        print("[ERROR] No jobs were started. Exiting.")
        return

    # 2. Poll for all jobs to complete
    print("--- Monitoring job completion status (checking every 30 seconds) ---")
    completed_jobs = {}

    while running_jobs:
        jobs_to_poll_next = []

        print(f"\n[STATUS] Checking status for {len(running_jobs)} running jobs...")

        for job in running_jobs:
            job_id_short = job.name.split('/')[-1][:13]
            try:
                updated_job = client.get_data_scan_job(name=job.name)
                state = updated_job.state

                if state in (dataplex_v1.DataScanJob.State.RUNNING, dataplex_v1.DataScanJob.State.PENDING, dataplex_v1.DataScanJob.State.CANCELING):
                    print(f"  - Job {job_id_short}... Status: {state.name}")
                    jobs_to_poll_next.append(updated_job)
                else:
                    print(f"  - Job {job_id_short}... Status: {state.name} (Complete)")
                    completed_jobs[job.name] = updated_job

            except Exception as e:
                print(f"[ERROR] Could not check status for job {job_id_short}: {e}")

        running_jobs = jobs_to_poll_next

        if running_jobs:
            time.sleep(30)

    # 3. Print final results
    print("\n--------------------------------------------------")
    print("[SUCCESS] All data profiling jobs have completed.")
    print("\nFinal Job Status Summary:")
    for job_name, job in completed_jobs.items():
        job_id_short = job_name.split('/')[-1][:13]
        print(f"  - Job {job_id_short}: {job.state.name}")
        if job.state == dataplex_v1.DataScanJob.State.FAILED:
            print(f"    - Failure Message: {job.message}")

    print("\nNext step: Analyze the profile results and generate quality rules.")


if __name__ == "__main__":
    main()
現在,請從 Cloud Shell 終端機執行指令碼。
python 1_run_dataplex_scans.py
現在,指令碼會協調處理三個具體化檢視區塊的剖析作業,並提供即時狀態更新。完成後,您會取得每個檢視區塊的豐富機器可讀統計資料設定檔,可供工作流程的下一個階段使用:以 AI 技術生成資料品質規則。
您可以在 Google Cloud 控制台中查看完成的設定檔掃描作業。
- 在導覽選單中,前往「管理」部分的 Dataplex Universal Catalog 和「剖析檔」。
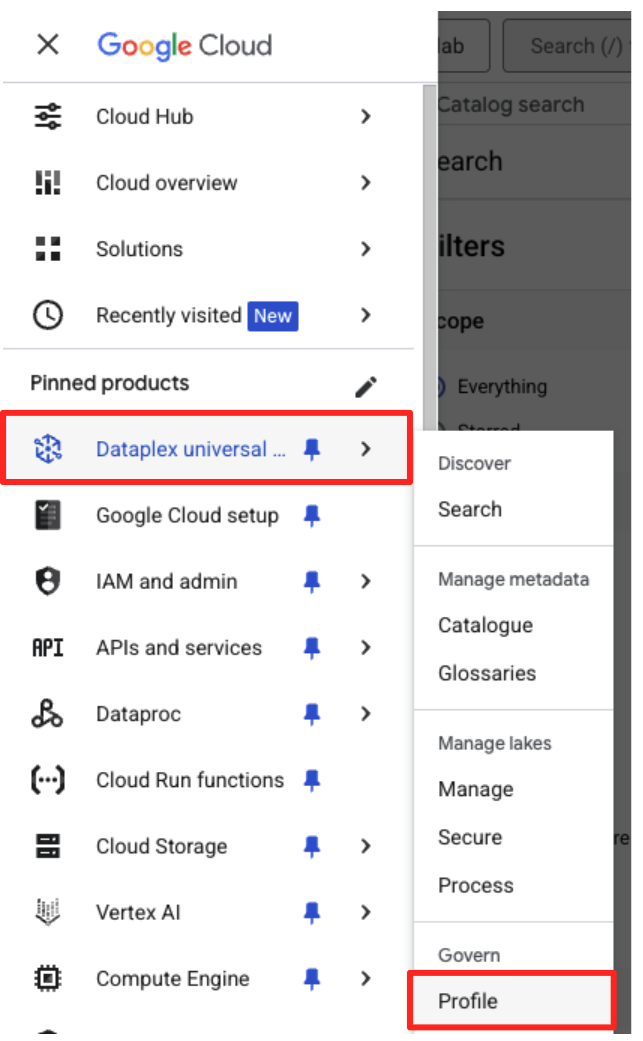
- 您應該會看到列出的三項個人資料掃描結果,以及最新的工作狀態。點選掃描作業即可查看詳細結果。
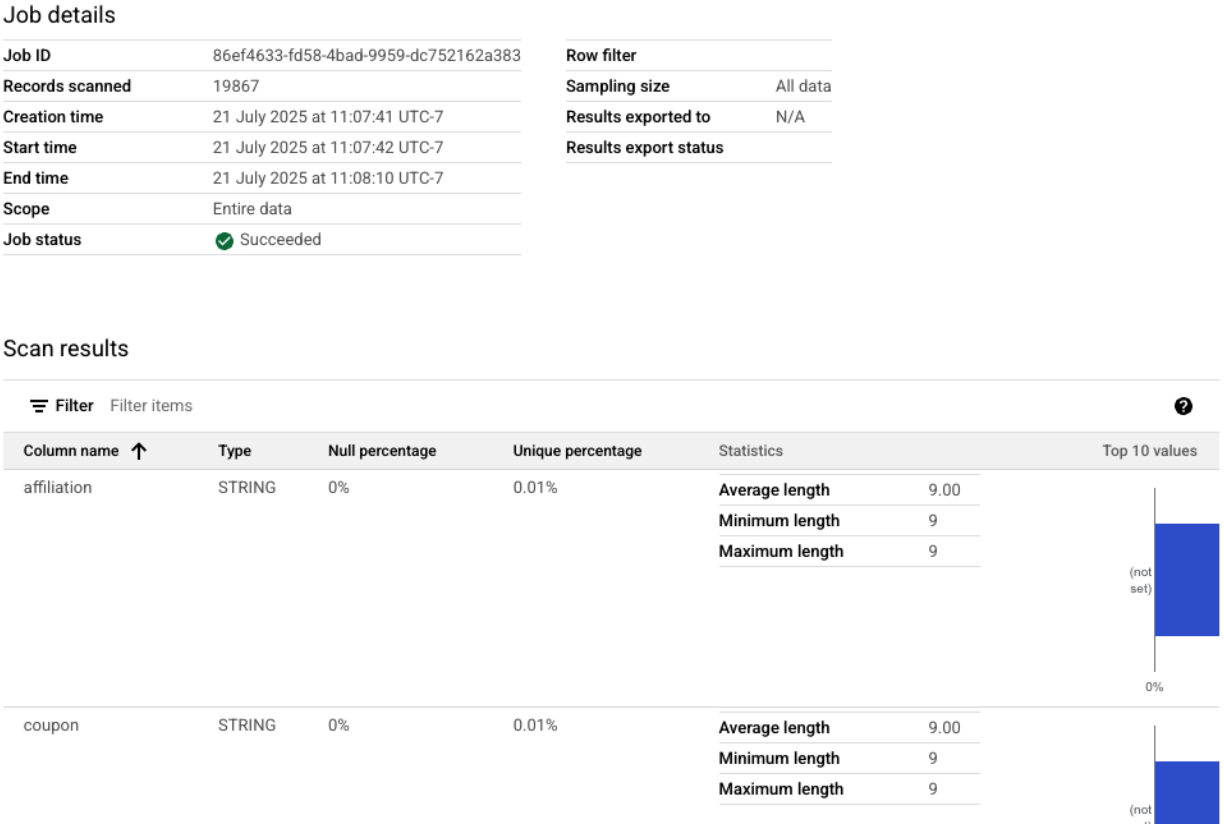
從 BigQuery 設定檔到 AI 就緒輸入
Dataplex 設定檔掃描作業已順利執行。雖然結果會顯示在 Dataplex API 中,但如要將結果做為生成式 AI 模型的輸入內容,我們需要將結果擷取到結構化的本機檔案中。
下列 Python 指令碼 2_dq_profile_save.py 會以程式輔助方式,找出 mv_ga4_user_session_flat 檢視的最新成功設定檔掃描作業。接著,系統會擷取完整的詳細設定檔結果,並儲存為名為 dq_profile_results.json 的本機 JSON 檔案。這個檔案將在下一個步驟中,直接做為 AI 分析的輸入內容。
在 Cloud Shell 編輯器中,建立名為 2_dq_profile_save.py 的新檔案,並將下列程式碼貼入其中。與上一步驟相同,如果您已複製存放區,可以略過建立檔案的步驟。
import os
import sys
import json
from google.cloud import dataplex_v1
from google.api_core.exceptions import NotFound
from google.protobuf.json_format import MessageToDict

# --- Configuration ---
# The Materialized View to analyze is fixed for this step.
TARGET_VIEW = "mv_ga4_user_session_flat"
OUTPUT_FILENAME = "dq_profile_results.json"


def save_to_json_file(content: dict, filename: str):
    """Saves the given dictionary content to a JSON file."""
    try:
        with open(filename, "w", encoding="utf-8") as f:
            # Use indent=2 for a readable, "pretty-printed" JSON file.
            json.dump(content, f, indent=2, ensure_ascii=False)
        print(f"\n[SUCCESS] Profile results were saved to '{filename}'.")
    except (IOError, TypeError) as e:
        print(f"[ERROR] An error occurred while saving the file: {e}")


def get_latest_successful_job(
    client: dataplex_v1.DataScanServiceClient,
    project_id: str,
    location: str,
    data_scan_id: str
) -> dataplex_v1.DataScanJob | None:
    """Finds and returns the most recently succeeded job for a given data scan."""
    scan_path = client.data_scan_path(project_id, location, data_scan_id)
    print(f"\n[INFO] Looking for the latest successful job for scan '{data_scan_id}'...")

    try:
        # List all jobs for the specified scan, which are ordered most-recent first.
        jobs_pager = client.list_data_scan_jobs(parent=scan_path)

        # Iterate through jobs to find the first one that succeeded.
        for job in jobs_pager:
            if job.state == dataplex_v1.DataScanJob.State.SUCCEEDED:
                return job

        # If no successful job is found after checking all pages.
        return None
    except NotFound:
        print(f"[WARN] No scan history found for '{data_scan_id}'.")
        return None


def main():
    """Main execution function."""
    # --- Load configuration from environment variables ---
    PROJECT_ID = os.environ.get("PROJECT_ID")
    LOCATION = os.environ.get("LOCATION")

    if not all([PROJECT_ID, LOCATION]):
        print("[ERROR] Required environment variables PROJECT_ID or LOCATION are not set.")
        sys.exit(1)

    print(f"[INFO] Using Project: {PROJECT_ID}, Location: {LOCATION}")
    print(f"--- Starting Profile Retrieval for: {TARGET_VIEW} ---")

    # Construct the data_scan_id based on the target view name.
    data_scan_id = f"profile-scan-{TARGET_VIEW.replace('_', '-')}"

    # 1. Initialize Dataplex client and get the latest successful job.
    client = dataplex_v1.DataScanServiceClient()
    latest_job = get_latest_successful_job(client, PROJECT_ID, LOCATION, data_scan_id)

    if not latest_job:
        print(f"\n[ERROR] No successful job record was found for '{data_scan_id}'.")
        print("Please ensure the 'run_dataplex_scans.py' script has completed successfully.")
        return

    job_id_short = latest_job.name.split('/')[-1]
    print(f"[SUCCESS] Found the latest successful job: '{job_id_short}'.")

    # 2. Fetch the full, detailed profile result for the job.
    print(f"[INFO] Retrieving detailed profile results for job '{job_id_short}'...")
    try:
        request = dataplex_v1.GetDataScanJobRequest(
            name=latest_job.name,
            view=dataplex_v1.GetDataScanJobRequest.DataScanJobView.FULL,
        )
        job_with_full_results = client.get_data_scan_job(request=request)
    except Exception as e:
        print(f"[ERROR] Failed to retrieve detailed job results: {e}")
        return

    # 3. Convert the profile result to a dictionary and save it to a JSON file.
    if job_with_full_results.data_profile_result:
        profile_dict = MessageToDict(job_with_full_results.data_profile_result._pb)
        save_to_json_file(profile_dict, OUTPUT_FILENAME)
    else:
        print("[WARN] The job completed, but no data profile result was found within it.")

    print("\n[INFO] Script finished successfully.")


if __name__ == "__main__":
    main()
現在,請從終端機執行指令碼:
python 2_dq_profile_save.py
完成後,目錄中會出現名為 dq_profile_results.json 的新檔案。這個檔案包含豐富詳細的統計中繼資料,我們將用來產生資料品質規則。如要檢查 dq_profile_results.json 的內容,請執行下列指令:
cat dq_profile_results.json
4. 使用 Gemini CLI 生成資料品質規則
安裝及設定 Gemini CLI
雖然您可以透過程式呼叫 Gemini API,但使用 Gemini CLI 等工具,能以強大的互動方式,直接將生成式 AI 整合至終端機工作流程。Gemini CLI 不只是聊天機器人,更是指令列工作流程工具,可讀取本機檔案、瞭解程式碼,並與 gcloud 等其他系統工具互動,自動執行複雜工作。因此非常適合我們的用途。
必要條件
首先,請確認您已具備必要條件:Cloud Shell 環境中必須安裝 Node.js 20 以上版本。如要查看版本,請執行 node -v。
安裝
Gemini CLI 有兩種使用方式:暫時安裝或永久安裝。我們將在此介紹這兩種方法。
您可以直接執行 Gemini CLI,不必永久安裝,就能使用單一工作階段。這是最乾淨且最快速的「試用」方式,因為這樣做不會修改環境。
在 Cloud Shell 終端機中執行下列指令:
npx https://github.com/google-gemini/gemini-cli
這項指令會暫時下載並執行 CLI 套件。
對於任何實際專案,建議的最佳做法是在專案目錄中在本機安裝 CLI。這種做法有幾個主要優點:
- 依附元件隔離:確保專案擁有自己的 CLI 版本,避免與其他專案發生版本衝突。
- 可重現性:任何複製專案的人都可以安裝完全相同的依附元件,讓設定可靠且可攜。
- 符合最佳做法:遵循管理 Node.js 專案依附元件的標準模型,避免全域 (-g) 安裝的陷阱。
如要在本機安裝 CLI,請從專案資料夾 (programmatic-dq) 執行下列指令:
npm install @google/gemini-cli
這會在 programmatic-dq 內建立 node_modules 資料夾。如要執行剛安裝的版本,請使用 npx 指令。
npx gemini
首次設定
無論選擇哪種方式,首次啟動 CLI 時,系統都會引導您完成一次性設定程序。

系統會提示你選擇顏色主題,然後進行驗證。最簡單的方法是按照提示登入 Google 帳戶。本程式碼研究室提供的免費方案就已足夠。
CLI 安裝及設定完畢後,即可繼續產生規則。CLI 會知道目前目錄中的檔案,這對下一個步驟至關重要。
產生資料品質規則
雖然可以要求 LLM 一次生成設定檔,但生成模型的非決定性特質表示輸出內容不一定完全符合 gcloud 等工具的嚴格架構。更可靠的方法是採用互動式多步驟程序,首先讓 AI 擔任分析師,提出計畫,然後由您 (人類專家) 審查並核准該計畫,最後 AI 才會根據您核准的指令生成最終程式碼。
這種做法可將簡單的指令轉換為協作工作階段,確保最終輸出內容準確無誤、經過驗證,且可供部署。
首先,我們會請 Gemini 分析統計資料,並扮演資料工程師的角色,提出行動計畫。我們明確告知它暫時不要寫入 YAML 檔案。這會將注意力集中在分析和理由上。
在互動式 Gemini CLI 工作階段中,貼上下列提示:
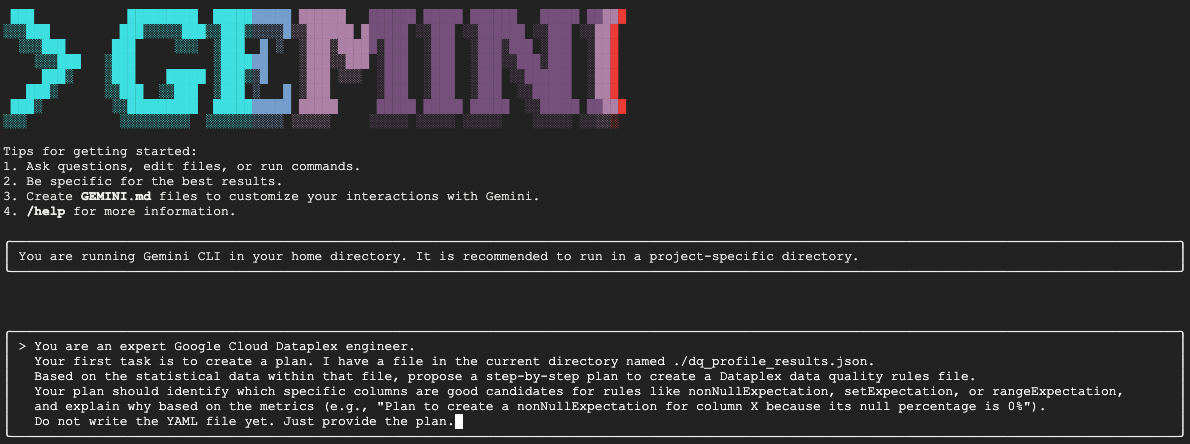
You are an expert Google Cloud Dataplex engineer.
Your first task is to create a plan. I have a file in the current directory named ./dq_profile_results.json.
Based on the statistical data within that file, propose a step-by-step plan to create a Dataplex data quality rules file.
Your plan should identify which specific columns are good candidates for rules like nonNullExpectation, setExpectation, or rangeExpectation, and explain why based on the metrics (e.g., "Plan to create a nonNullExpectation for column X because its null percentage is 0%").
Do not write the YAML file yet. Just provide the plan.
Gemini 會分析 JSON 檔案,並傳回類似下方的結構化計畫:
Plan to create Dataplex data quality rules

1. Create a row count rule:
  - Analysis: The profile shows a total of 26,489 rows.
  - Proposed Rule: I will implement a rowCount rule to ensure the table's row count remains within a healthy range (e.g., 20,000 to 30,000). This is a fundamental check to guard against major data loading failures or unexpected deletions.
2. Implement non-null expectation rules:
  - Analysis: The profiling results show that many columns have no null values. For example, event_date, event_timestamp, event_name, user_pseudo_id, stream_id, and platform all appear to be fully populated.
  - Proposed Rules: I will create nonNullExpectation rules for columns where the nullRatio is 0 or not present, indicating they are always expected to contain a value:
    - event_date
    - event_timestamp
    - event_name
    - user_pseudo_id
    - stream_id
    - platform
    - device_category
    - device_os
3. Implement set expectation rules:
  - Analysis: Several columns contain a small, finite set of values, making them ideal for set validation.
  - Proposed Rules: I will create setExpectation rules for these columns:
    - platform: It only contains the value "WEB".
    - device_category: It contains only "desktop", "mobile", and "tablet".
    - geo_continent: It has a well-defined list of continents.
traffic_source_medium: It has a small list of valid mediums like "organic", "(none)", and "referral".
4. Implement range expectation rules:
  - Analysis: The profile provides minimum and maximum values for numeric and string length fields.
  - Proposed Rules: I will create rangeExpectation rules for the following:
    - event_timestamp: The profile shows a clear min and max. I will use these values to create a range check.
    - event_date (String Length): The profile indicates that the minLength and maxLength are both 8, which is perfect for enforcing a YYYYMMDD format.
這是整個工作流程中最重要的一步:人機迴圈 (HITL) 審查。Gemini 生成的計畫完全是根據資料中的統計模式。因此無法瞭解您的業務背景、未來的資料變更,或資料背後的具體意圖。您是人類專家,負責驗證、修正及核准這項計畫,再將其轉換為程式碼。
請仔細查看 Gemini 提供的計畫。
- 這樣說可以理解嗎?
- 是否符合您的業務知識?
- 是否有任何統計上合理但實際上無用的規則?
Gemini 的輸出內容可能有所不同。您的目標是修正這項功能。
舉例來說,假設資料表在範例資料中具有固定數量的資料列,因此規劃建議使用 rowCount 規則。身為人類專家,您可能知道這個表格的大小每天都會增加,因此嚴格的列數規則並不實用,而且可能會導致誤報。這就是套用 AI 缺乏的業務情境資訊的絕佳範例。
現在,請向 Gemini 提供意見回饋,並下達最終指令來生成程式碼。請務必根據實際收到的方案和想進行的修正,調整下列提示。
下方的提示是範本,第一行是提供具體修正內容的位置。如果 Gemini 提供的計畫完全符合需求,不需要任何變更,只要刪除該行即可。
在同一個 Gemini 工作階段中,貼上改編後的下列提示:
[YOUR CORRECTIONS AND APPROVAL GO HERE. Examples:
- "The plan looks good. Please proceed."
- "The rowCount rule is not necessary, as the table size changes daily. The rest of the plan is approved. Please proceed."
- "For the setExpectation on the geo_continent column, please also include 'Antarctica'."]

Once you have incorporated my feedback, please generate the `dq_rules.yaml` file.

You must adhere to the following strict requirements:

- Schema Compliance: The YAML structure must strictly conform to the DataQualityRule specification. For a definitive source of truth, you must refer to the sample_rule.yaml file in the current directory and the DataQualityRule class definition in the local virtual environment path: ./dq_venv/.../google/cloud/dataplex_v1/types/data_quality.py.

- Data-Driven Values: All rule parameters, such as thresholds or expected values, must be derived directly from the statistical metrics in dq_profile_results.json.

- Rule Justification: For each rule, add a comment (#) on the line above explaining the justification, as you outlined in your plan.

- Output Purity: The final output must only be the raw YAML code block, perfectly formatted and ready for immediate deployment.
Gemini 現在會根據您經過人工驗證的精確指示,生成 YAML 內容。完成後,工作目錄中會出現名為 dq_rules.yaml 的新檔案。
建立並執行資料品質掃描作業
現在您已取得 AI 生成並經過真人驗證的 dq_rules.yaml 檔案,可以放心部署。
輸入 /quit 或按兩次 Ctrl+C,即可退出 Gemini CLI。
下列 gcloud 指令會建立新的 Dataplex 資料掃描資源。這時還不會執行掃描,只是向 Dataplex 註冊掃描的定義和設定 (我們的 YAML 檔案)。
在終端機中執行下列指令:
export DQ_SCAN="dq-scan"
gcloud dataplex datascans create data-quality $DQ_SCAN \
    --project=$PROJECT_ID \
    --location=$LOCATION \
    --data-quality-spec-file=dq_rules.yaml \
    --data-source-resource="//bigquery.googleapis.com/projects/$PROJECT_ID/datasets/$DATASET_ID/tables/mv_ga4_user_session_flat"
定義掃描作業後,即可觸發工作來執行掃描。
gcloud dataplex datascans run $DQ_SCAN --location=$LOCATION --project=$PROJECT_ID
這項指令會輸出工作 ID。您可以在 Google Cloud 控制台的 Dataplex 專區監控這項工作的狀態。完成後,結果會寫入 BigQuery 資料表以供分析。
5. 人機迴圈 (HITL) 的重要性
雖然使用 Gemini 加速規則生成非常強大,但請務必將 AI 視為高技能的副駕駛,而非完全自主的駕駛。人機迴圈 (HITL) 程序並非可選建議,而是任何穩健可靠資料管理工作流程中,不可或缺的基礎步驟。如果沒有嚴格的人工監督,就直接部署 AI 生成的構件,肯定會失敗。
您可以將 AI 生成的 dq_rules.yaml 視為由極快但缺乏經驗的 AI 開發人員提交的提取要求。必須經過您 (資深專家) 的詳盡審查,才能併入控管政策的「主要分支」並部署。這項審查作業對於降低大型語言模型固有的弱點至關重要。
以下詳細說明為何這項人工審查不可或缺,以及您必須特別注意的事項:
1. 脈絡驗證:AI 缺乏商業意識
- 大型語言模型的缺點:大型語言模型擅長處理模式和統計資料,但完全不瞭解您的業務情境。舉例來說,如果資料欄
new_campaign_id的空值比例為 98%,LLM 可能會基於統計原因忽略這個資料欄。 - 人類的重要角色:您是人類專家,知道
new_campaign_id欄位是昨天才新增的,因為下週要推出重大產品。您知道現在的空值比例應該很高,但預計會大幅下降。您也知道填入這項資料後,必須遵守特定格式。AI 無法推斷這類外部業務知識。您的職責是將這項業務情境套用至 AI 的統計建議,並視需要覆寫或擴增建議。
2. 正確性和精確度:防範幻覺和細微錯誤
- LLM 的缺點:LLM 可能會「自信地犯錯」。可能會「產生幻覺」或生成細微錯誤的程式碼。舉例來說,系統可能會產生 YAML 檔案,其中規則名稱正確,但參數無效,或是規則類型拼字錯誤 (例如 而不是正確的
setExpectation)。這些細微錯誤會導致部署失敗,但很難發現。setExpectations - 人類的重要角色:你的工作是擔任最終的 Linter 和結構定義驗證器。您必須仔細檢查產生的 YAML,是否符合官方 Dataplex
DataQualityRule規格。您不只是檢查「看起來是否正確」,而是要驗證語法和語意是否正確,確保 100% 符合目標 API。因此,程式碼研究室會提示 Gemini 參照結構定義檔案,以減少錯誤的機率,但最終驗證仍由您負責。
3. 安全與風險控管:避免產生後續影響
- LLM 的缺點:如果部署至正式環境的資料品質規則有瑕疵,可能會造成嚴重後果。如果 AI 建議的金融交易金額
rangeExpectation範圍過大,可能無法偵測到詐欺活動。反之,如果根據少量資料樣本建議過於嚴格的規則,可能會導致數千個誤判快訊湧入待命團隊,造成快訊疲乏,進而錯過實際問題。 - 人類的重要角色:您是安全工程師。您必須評估 AI 建議的每項規則,瞭解可能造成的下游影響。請自問:「如果這項規則失敗,這則快訊是否可做為採取行動的依據?如果這項規則誤判為通過,會有什麼風險?這項風險評估是人類獨有的能力,可權衡失敗成本與檢查效益。
4. 將治理視為持續性程序:納入前瞻知識
- LLM 的缺點:AI 的知識是根據資料的靜態快照 (特定時間點的設定檔結果) 而來。無法得知未來活動。
- 人的重要角色:控管策略必須具有前瞻性。您知道資料來源預計在下個月遷移,屆時 stream_id 會變更。您知道要將新國家/地區加入
geo_country清單。在 HITL 程序中,您會注入這項未來狀態知識,更新或暫時停用規則,以防在預定的業務或技術演進期間發生中斷。資料品質並非一次性設定,而是必須不斷演進的動態程序,而只有人才能引導這項演進。
總而言之,HITL 是不可或缺的品質保證和安全機制,可將 AI 驅動的管理機制從新穎但有風險的概念,轉變為負責任、可擴充的企業級做法。確保最終部署的政策不僅能透過 AI 加速制定,還經過人工驗證,結合機器的速度與人類專家的智慧和背景資訊。
不過,強調人為監督並不會降低 AI 的價值。相反地,生成式 AI 在加速 HITL 程序本身方面,扮演著至關重要的角色。
如果沒有 AI,資料工程師就必須:
- 手動編寫複雜的 SQL 查詢來分析資料 (例如
COUNT DISTINCT、AVG、MIN、MAX(每個資料欄各一)。 - 逐一分析結果試算表。
- 從頭開始撰寫 YAML 規則檔案的每一行,這項工作既繁瑣又容易出錯。
AI 會自動執行這些費時費力的步驟,這項工具就像不知疲倦的分析師,可立即處理統計資料剖析結果,並提供結構完善的政策「初稿」,完成度達 80%。
這從根本上改變了人類的工作性質。與其花費數小時手動處理資料和編寫樣板程式碼,人類專家可以立即專注於價值最高的工作:
- 套用重要業務情境。
- 驗證 AI 邏輯的正確性。
- 針對哪些規則真正重要做出策略性決策。
在這種合作關係中,AI 會處理「什麼」(統計模式是什麼?),讓人類可以專注於「為什麼」(為什麼這個模式對我們的業務很重要?) 和「所以呢」(所以我們的政策應該是什麼?)。因此,AI 不會取代迴圈,而是讓迴圈中的每個週期更快、更聰明,且影響力更大。
6. 清除環境
如要避免系統日後向您的 Google Cloud 帳戶收取本程式碼研究室所用資源的費用,請刪除含有相關資源的專案。不過,如果您想保留專案,可以刪除您建立的個別資源。
刪除 Dataplex 掃描作業
首先,請刪除您建立的剖析和品質掃描作業。為避免誤刪重要資源,這些指令會使用本程式碼研究室中建立的掃描作業的特定名稱。
# Delete the Data Quality Scan
gcloud dataplex datascans delete dq-scan \
    --location=us-central1 \
    --project=$PROJECT_ID --quiet

# Delete the Data Profile Scans
gcloud dataplex datascans delete profile-scan-mv-ga4-user-session-flat \
    --location=us-central1 \
    --project=$PROJECT_ID --quiet

gcloud dataplex datascans delete profile-scan-mv-ga4-ecommerce-transactions \
    --location=us-central1 \
    --project=$PROJECT_ID --quiet

gcloud dataplex datascans delete profile-scan-mv-ga4-ecommerce-items \
    --location=us-central1 \
    --project=$PROJECT_ID --quiet
刪除 BigQuery 資料集
接著刪除 BigQuery 資料集。這項指令無法復原,且會使用 -f (強制) 標記移除資料集和所有資料表,無需確認。
# Manually type this command to confirm you are deleting the correct dataset
bq rm -r -f --dataset $PROJECT_ID:dataplex_dq_codelab
7. 恭喜!
您已成功完成本程式碼研究室!
您已建構端對端程式輔助資料治理工作流程。您首先使用具體化檢視區塊,將複雜的 BigQuery 資料攤平,使其適合用於分析。然後以程式輔助方式執行 Dataplex 剖析掃描作業,產生統計中繼資料。最重要的是,您運用 Gemini CLI 分析設定檔輸出內容,並智慧地產生「政策即程式碼」構件 (dq_rules.yaml)。接著,您使用 CLI 將這項設定部署為自動化資料品質掃描,完成現代化且可擴充的治理策略。
您現在已掌握基本模式,可在 Google Cloud 上建構可靠、AI 加速且經過人工驗證的資料品質系統。
後續步驟
- 整合 CI/CD:取得 dq_rules.yaml 檔案並提交至 Git 存放區。建立 CI/CD 管道 (例如使用 Cloud Build 或 GitHub Actions),每當規則檔案更新時,自動部署 Dataplex 掃描作業。
- 探索自訂 SQL 規則:超越標準規則類型。Dataplex 支援自訂 SQL 規則,可強制執行更複雜的業務專屬邏輯,這些邏輯無法透過預先定義的檢查表示。這項強大功能可根據您的獨特需求調整驗證。
- 提高掃描效率並降低成本:對於非常大的資料表,您可以不必每次都掃描整個資料集,藉此提升效能並降低成本。您可以運用篩選器,將掃描範圍縮小至特定時間範圍或資料區隔,也可以設定取樣掃描,檢查一定比例的代表性資料。
- 將結果視覺化:每個 Dataplex 資料品質掃描的輸出內容都會寫入 BigQuery 資料表。將這個資料表連結至 Looker Studio,即可建立資訊主頁,追蹤一段時間內的資料品質分數,並依您定義的維度 (例如 完整性、有效性)。這樣一來,所有利害關係人都能主動監控。
- 分享最佳做法:鼓勵組織內分享知識,善用集體經驗並改善資料品質策略。培養資料信任文化,是充分發揮管理機制效益的關鍵。
- 閱讀說明文件: