
1. Introduction
This codelab provides a technical blueprint for data practitioners. It outlines a "code-first" approach to data governance, demonstrating how to embed robust quality and metadata management directly into the development lifecycle. At its core, Dataplex Universal Catalog acts as an intelligent data fabric, enabling organizations to centrally manage, monitor, and govern data across their entire estate—from data lakes to warehouses.
The codelab showcases how to leverage Dataplex, BigQuery, and the Gemini CLI to flatten complex data, programmatically profile it, generate intelligent data quality rule suggestions, and deploy automated quality scans. The primary objective is to move beyond manual, UI-driven processes—which are prone to error and difficult to scale—and instead establish a robust, version-controllable "policy-as-code" framework.
Prerequisites
- A basic understanding of the Google Cloud Console
- Basic skills in command line interface and Google Cloud Shell
What you'll learn
- How to flatten nested BigQuery data using Materialized Views to enable comprehensive profiling.
- How to programmatically trigger and manage Dataplex profile scans using the Dataplex Python Client Library.
- How to export profile data and structure it as an input for a generative AI model.
- How to engineer a prompt for the Gemini CLI to analyze profile data and generate a Dataplex-compliant YAML rule file.
- The importance of an interactive, human-in-the-loop (HITL) process for validating AI-generated configurations.
- How to deploy the generated rules as an automated data quality scan.
What you'll need
- A Google Cloud Account and Google Cloud Project
- A web browser such as Chrome
Key concepts: the pillars of Dataplex data quality
Understanding the core components of Dataplex is essential for building an effective data quality strategy.
- Data Profile Scan: A Dataplex job that analyzes data and generates statistical metadata, including null percentages, distinct value counts, and value distributions. This serves as our programmatic "discovery" phase.
- Data Quality Rules: Declarative statements defining the conditions your data must meet (e.g.,
NonNullExpectation,SetExpectation,RangeExpectation). - Generative AI for Rule Suggestion: Using a large language model (like Gemini) to analyze a data profile and suggest relevant data quality rules. This accelerates the process of defining a baseline quality framework.
- Data Quality Scan: A Dataplex job that validates data against a set of predefined or custom rules.
- Programmatic Governance: The central theme of managing governance controls (like quality rules) as code (e.g., in YAML files and Python scripts). This enables automation, versioning, and integration into CI/CD pipelines.
- Human-in-the-Loop (HITL): The critical control point of integrating human expertise and oversight into an automated workflow. For AI-generated configurations, HITL is essential for validating the correctness, business relevance, and safety of the suggestions before deployment.
2. Setup and requirements
Start Cloud Shell
While Google Cloud can be operated remotely from your laptop, in this codelab you will be using Google Cloud Shell, a command line environment running in the Cloud.
From the Google Cloud Console, click the Cloud Shell icon on the top right toolbar:

It should only take a few moments to provision and connect to the environment. When it is finished, you should see something like this:

This virtual machine is loaded with all the development tools you'll need. It offers a persistent 5GB home directory, and runs on Google Cloud, greatly enhancing network performance and authentication. All of your work in this codelab can be done within a browser. You do not need to install anything.
Enable required APIs and configure environment
Inside Cloud Shell, make sure that your project ID is setup:
export PROJECT_ID=$(gcloud config get-value project)
gcloud config set project $PROJECT_ID
export LOCATION="us-central1"
export BQ_LOCATION="us"
export DATASET_ID="dataplex_dq_codelab"
export TABLE_ID="ga4_transactions"

gcloud services enable dataplex.googleapis.com \
                       bigquery.googleapis.com \
                       serviceusage.googleapis.com
In the example we are using us (multi-region) as the location since the public sample data we will use is also located in the us (multi-region). BigQuery requires that the source data and the destination table for a query reside in the same location.
Create a dedicated BigQuery dataset
Create a new BigQuery dataset to house our sample data and results.
bq --location=us mk --dataset $PROJECT_ID:$DATASET_ID
Prepare the sample data
For this codelab, you will use a public dataset containing obfuscated e-commerce data from the Google Merchandise Store. Since public datasets are read-only, you must create a mutable copy in your own dataset. The following bq command creates a new table, ga4_transactions, in your dataplex_dq_codelab dataset. It copies data from a single day (2021-01-31) to ensure that the scans run quickly.
bq query \
--use_legacy_sql=false \
--destination_table=$PROJECT_ID:$DATASET_ID.$TABLE_ID \
--replace=true \
'SELECT * FROM `bigquery-public-data.ga4_obfuscated_sample_ecommerce.events_20210131`'
Setup the demo directory
To get started, you will clone a GitHub repository that contains the necessary folder structure and supporting files for this codelab.
git clone https://github.com/GoogleCloudPlatform/devrel-demos
cd devrel-demos/data-analytics/programmatic-dq
This directory is now your active working area. All subsequent files will be created here.
3. Automated data discovery with Dataplex profiling
Dataplex data profiling is a powerful tool for automatically discovering statistical information about your data, such as null percentages, uniqueness, and value distributions. This process is essential for understanding your data's structure and quality. However, a known limitation of Dataplex profiling is its inability to fully inspect nested or repeated fields (e.g., RECORD or ARRAY types) within a table. It can identify that a column is a complex type but cannot profile the individual fields within that nested structure.
To overcome this, we will flatten the data into purpose-built Materialized Views. This strategy makes every field a top-level column, enabling Dataplex to profile each one individually.
Understanding the nested schema
First, let's examine the schema of our source table. The Google Analytics 4 (GA4) dataset contains several nested and repeated columns. To programmatically retrieve the full schema, including all nested structures, you can use the bq show command and save the output as a JSON file.
bq show --schema --format=json $PROJECT_ID:$DATASET_ID.$TABLE_ID > bq_schema.json
Inspecting the bq_schema.json file reveals complex structures like device, geo, ecommerce, and repeated record items. These are the structures that require flattening for effective profiling.
Flattening data with Materialized Views
Creating Materialized Views (MVs) is the most effective and practical solution to this nested data challenge. By pre-calculating the flattened results, MVs offer significant advantages in query performance and cost, while providing a simpler, relational-like structure for analysts and profiling tools.
The natural first thought might be to flatten everything into a single, giant view. However, this intuitive approach hides a dangerous trap that can lead to severe data corruption. Let's explore why this is a critical mistake.
mv_ga4_user_session_flat.sql
CREATE OR REPLACE MATERIALIZED VIEW `$PROJECT_ID.$DATASET_ID.mv_ga4_user_session_flat`
OPTIONS (
  enable_refresh = true,
  refresh_interval_minutes = 30
) AS
SELECT
  event_date, event_timestamp, event_name, user_pseudo_id, user_id, stream_id, platform,
  device.category AS device_category,
  device.operating_system AS device_os,
  device.operating_system_version AS device_os_version,
  device.language AS device_language,
  device.web_info.browser AS device_browser,
  geo.continent AS geo_continent,
  geo.country AS geo_country,
  geo.region AS geo_region,
  geo.city AS geo_city,
  traffic_source.name AS traffic_source_name,
  traffic_source.medium AS traffic_source_medium,
  traffic_source.source AS traffic_source_source
FROM
  `$PROJECT_ID.$DATASET_ID.ga4_transactions`;
mv_ga4_ecommerce_transactions.sql
CREATE OR REPLACE MATERIALIZED VIEW `$PROJECT_ID.$DATASET_ID.mv_ga4_ecommerce_transactions`
OPTIONS (
  enable_refresh = true,
  refresh_interval_minutes = 30
) AS
SELECT
  event_date, event_timestamp, user_pseudo_id, ecommerce.transaction_id,
  ecommerce.total_item_quantity,
  ecommerce.purchase_revenue_in_usd,
  ecommerce.purchase_revenue,
  ecommerce.refund_value_in_usd,
  ecommerce.refund_value,
  ecommerce.shipping_value_in_usd,
  ecommerce.shipping_value,
  ecommerce.tax_value_in_usd,
  ecommerce.tax_value,
  ecommerce.unique_items
FROM
  `$PROJECT_ID.$DATASET_ID.ga4_transactions`
WHERE
  ecommerce.transaction_id IS NOT NULL;
mv_ga4_ecommerce_items.sql
CREATE OR REPLACE MATERIALIZED VIEW `$PROJECT_ID.$DATASET_ID.mv_ga4_ecommerce_items`
OPTIONS (
  enable_refresh = true,
  refresh_interval_minutes = 30
) AS
SELECT
  event_date, event_timestamp, event_name, user_pseudo_id, ecommerce.transaction_id,
  item.item_id,
  item.item_name,
  item.item_brand,
  item.item_variant,
  item.item_category,
  item.item_category2,
  item.item_category3,
  item.item_category4,
  item.item_category5,
  item.price_in_usd,
  item.price,
  item.quantity,
  item.item_revenue_in_usd,
  item.item_revenue,
  item.coupon,
  item.affiliation,
  item.item_list_name,
  item.promotion_name
FROM
  `$PROJECT_ID.$DATASET_ID.ga4_transactions`,
  UNNEST(items) AS item
WHERE
  ecommerce.transaction_id IS NOT NULL;
Now, execute these templates using the bq command-line tool. The envsubst command will read each file, substitute the variables like $PROJECT_ID and $DATASET_ID with their values from your shell environment, and pipe the final, valid SQL to the bq query command.
envsubst < mv_ga4_user_session_flat.sql | bq query --use_legacy_sql=false
envsubst < mv_ga4_ecommerce_transactions.sql | bq query --use_legacy_sql=false
envsubst < mv_ga4_ecommerce_items.sql | bq query --use_legacy_sql=false
Execute the profile scans via the Python client
Now that we have our flattened, profilable views, we can programmatically create and run Dataplex data profile scans for each one. The following Python script uses the google-cloud-dataplex client library to automate this process.
Before running the script, it is a critical best practice to create an isolated Python environment within your project directory. This ensures that the project's dependencies are managed separately, preventing conflicts with other packages in your Cloud Shell environment.
# Create the virtual environment
python3 -m venv dq_venv

# Activate the environment
source dq_venv/bin/activate
Now, install the Dataplex client library inside the newly activated environment.
# Install the Dataplex client library
pip install google-cloud-dataplex
With the environment set up and the library installed, you are ready to create the orchestration script.
In the Cloud Shell toolbar, click Open Editor. Create a new file named 1_run_dataplex_scans.py and paste the following Python code into it. If you clone the GitHub repository, this file is already in your folder.
This script will create a scan for each Materialized View (if it doesn't already exist), run the scan, and then poll until all scan jobs are complete.
import os
import sys
import time
from google.cloud import dataplex_v1
from google.api_core.exceptions import AlreadyExists


def create_and_run_scan(
    client: dataplex_v1.DataScanServiceClient,
    project_id: str,
    location: str,
    data_scan_id: str,
    target_resource: str,
) -> dataplex_v1.DataScanJob | None:
    """
    Creates and runs a single data profile scan.
    Returns the executed Job object without waiting for completion.
    """
    parent = client.data_scan_path(project_id, location, data_scan_id).rsplit('/', 2)[0]
    scan_path = client.data_scan_path(project_id, location, data_scan_id)

    # 1. Create Data Scan (skips if it already exists)
    try:
        data_scan = dataplex_v1.DataScan()
        data_scan.data.resource = target_resource
        data_scan.data_profile_spec = dataplex_v1.DataProfileSpec()

        print(f"[INFO] Creating data scan '{data_scan_id}'...")
        client.create_data_scan(
            parent=parent,
            data_scan=data_scan,
            data_scan_id=data_scan_id
        ).result()  # Wait for creation to complete
        print(f"[SUCCESS] Data scan '{data_scan_id}' created.")
    except AlreadyExists:
        print(f"[INFO] Data scan '{data_scan_id}' already exists. Skipping creation.")
    except Exception as e:
        print(f"[ERROR] Error creating data scan '{data_scan_id}': {e}")
        return None

    # 2. Run Data Scan
    try:
        print(f"[INFO] Running data scan '{data_scan_id}'...")
        run_response = client.run_data_scan(name=scan_path)
        print(f"[SUCCESS] Job started for '{data_scan_id}'. Job ID: {run_response.job.name.split('/')[-1]}")
        return run_response.job
    except Exception as e:
        print(f"[ERROR] Error running data scan '{data_scan_id}': {e}")
        return None


def main():
    """Main execution function"""
    # --- Load configuration from environment variables ---
    PROJECT_ID = os.environ.get("PROJECT_ID")
    LOCATION = os.environ.get("LOCATION")
    DATASET_ID = os.environ.get("DATASET_ID")

    if not all([PROJECT_ID, LOCATION, DATASET_ID]):
        print("[ERROR] One or more required environment variables are not set.")
        print("Please ensure PROJECT_ID, LOCATION, and DATASET_ID are exported in your shell.")
        sys.exit(1)

    print(f"[INFO] Using Project: {PROJECT_ID}, Location: {LOCATION}, Dataset: {DATASET_ID}")

    # List of Materialized Views to profile
    TARGET_VIEWS = [
        "mv_ga4_user_session_flat",
        "mv_ga4_ecommerce_transactions",
        "mv_ga4_ecommerce_items"
    ]
    # ----------------------------------------------------

    client = dataplex_v1.DataScanServiceClient()
    running_jobs = []

    # 1. Create and run jobs for all target views
    print("\n--- Starting Data Profiling Job Creation and Execution ---")
    for view_name in TARGET_VIEWS:
        data_scan_id = f"profile-scan-{view_name.replace('_', '-')}"
        target_resource = f"//bigquery.googleapis.com/projects/{PROJECT_ID}/datasets/{DATASET_ID}/tables/{view_name}"

        job = create_and_run_scan(client, PROJECT_ID, LOCATION, data_scan_id, target_resource)
        if job:
            running_jobs.append(job)
    print("-------------------------------------------------------\n")

    if not running_jobs:
        print("[ERROR] No jobs were started. Exiting.")
        return

    # 2. Poll for all jobs to complete
    print("--- Monitoring job completion status (checking every 30 seconds) ---")
    completed_jobs = {}

    while running_jobs:
        jobs_to_poll_next = []

        print(f"\n[STATUS] Checking status for {len(running_jobs)} running jobs...")

        for job in running_jobs:
            job_id_short = job.name.split('/')[-1][:13]
            try:
                updated_job = client.get_data_scan_job(name=job.name)
                state = updated_job.state

                if state in (dataplex_v1.DataScanJob.State.RUNNING, dataplex_v1.DataScanJob.State.PENDING, dataplex_v1.DataScanJob.State.CANCELING):
                    print(f"  - Job {job_id_short}... Status: {state.name}")
                    jobs_to_poll_next.append(updated_job)
                else:
                    print(f"  - Job {job_id_short}... Status: {state.name} (Complete)")
                    completed_jobs[job.name] = updated_job

            except Exception as e:
                print(f"[ERROR] Could not check status for job {job_id_short}: {e}")

        running_jobs = jobs_to_poll_next

        if running_jobs:
            time.sleep(30)

    # 3. Print final results
    print("\n--------------------------------------------------")
    print("[SUCCESS] All data profiling jobs have completed.")
    print("\nFinal Job Status Summary:")
    for job_name, job in completed_jobs.items():
        job_id_short = job_name.split('/')[-1][:13]
        print(f"  - Job {job_id_short}: {job.state.name}")
        if job.state == dataplex_v1.DataScanJob.State.FAILED:
            print(f"    - Failure Message: {job.message}")

    print("\nNext step: Analyze the profile results and generate quality rules.")


if __name__ == "__main__":
    main()
Now, execute the script from your Cloud Shell terminal.
python 1_run_dataplex_scans.py
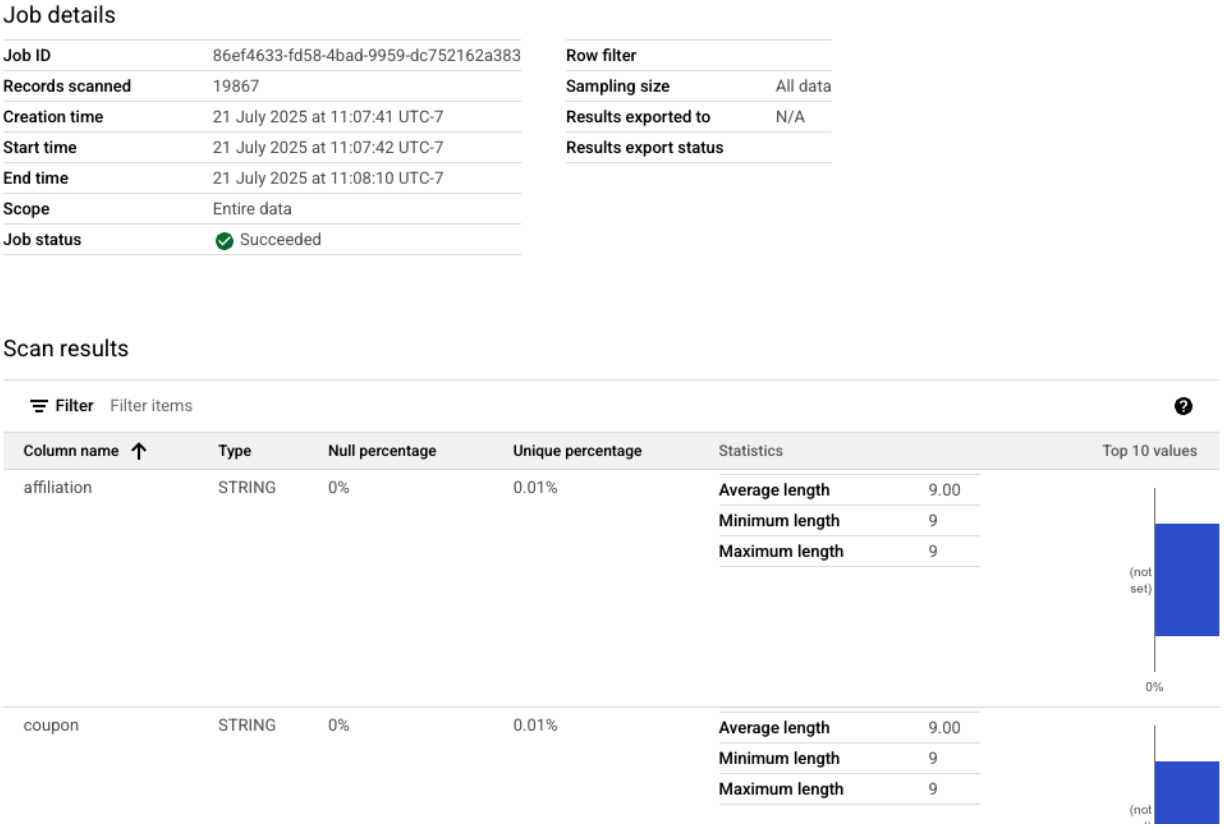
The script will now orchestrate the profiling of your three Materialized Views, providing real-time status updates. Once complete, you will have a rich, machine-readable statistical profile for each view, ready for the next stage of our workflow: AI-powered data quality rule generation.
You can see the completed profile scans in the Google Cloud Console.
- In the navigation menu, go to Dataplex Universal catalogue and Profile in the Govern section.
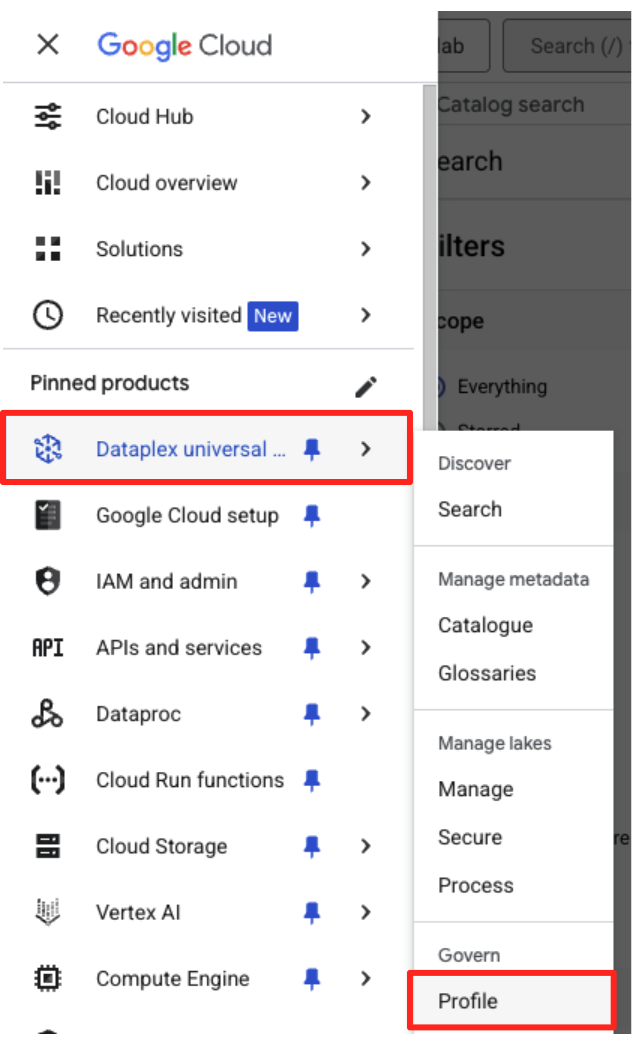
- You should see your three profile scans listed, along with their latest job status. You can click on a scan to view the detailed results.
From BigQuery profile to AI-ready input
The Dataplex profile scans have successfully run. While the results are available within the Dataplex API, to use them as input for a generative AI model, we need to extract them into a structured, local file.
The following Python script, 2_dq_profile_save.py, programmatically finds the latest successful profile scan job for our mv_ga4_user_session_flat view. It then retrieves the complete, detailed profile result and saves it as a local JSON file named dq_profile_results.json. This file will serve as the direct input for our AI analysis in the next step.
In your Cloud Shell editor, create a new file named 2_dq_profile_save.py and paste the following code into it. Same as the previous step, you can skip creating a file if you cloned the repository.
import os
import sys
import json
from google.cloud import dataplex_v1
from google.api_core.exceptions import NotFound
from google.protobuf.json_format import MessageToDict

# --- Configuration ---
# The Materialized View to analyze is fixed for this step.
TARGET_VIEW = "mv_ga4_user_session_flat"
OUTPUT_FILENAME = "dq_profile_results.json"


def save_to_json_file(content: dict, filename: str):
    """Saves the given dictionary content to a JSON file."""
    try:
        with open(filename, "w", encoding="utf-8") as f:
            # Use indent=2 for a readable, "pretty-printed" JSON file.
            json.dump(content, f, indent=2, ensure_ascii=False)
        print(f"\n[SUCCESS] Profile results were saved to '{filename}'.")
    except (IOError, TypeError) as e:
        print(f"[ERROR] An error occurred while saving the file: {e}")


def get_latest_successful_job(
    client: dataplex_v1.DataScanServiceClient,
    project_id: str,
    location: str,
    data_scan_id: str
) -> dataplex_v1.DataScanJob | None:
    """Finds and returns the most recently succeeded job for a given data scan."""
    scan_path = client.data_scan_path(project_id, location, data_scan_id)
    print(f"\n[INFO] Looking for the latest successful job for scan '{data_scan_id}'...")

    try:
        # List all jobs for the specified scan, which are ordered most-recent first.
        jobs_pager = client.list_data_scan_jobs(parent=scan_path)

        # Iterate through jobs to find the first one that succeeded.
        for job in jobs_pager:
            if job.state == dataplex_v1.DataScanJob.State.SUCCEEDED:
                return job

        # If no successful job is found after checking all pages.
        return None
    except NotFound:
        print(f"[WARN] No scan history found for '{data_scan_id}'.")
        return None


def main():
    """Main execution function."""
    # --- Load configuration from environment variables ---
    PROJECT_ID = os.environ.get("PROJECT_ID")
    LOCATION = os.environ.get("LOCATION")

    if not all([PROJECT_ID, LOCATION]):
        print("[ERROR] Required environment variables PROJECT_ID or LOCATION are not set.")
        sys.exit(1)

    print(f"[INFO] Using Project: {PROJECT_ID}, Location: {LOCATION}")
    print(f"--- Starting Profile Retrieval for: {TARGET_VIEW} ---")

    # Construct the data_scan_id based on the target view name.
    data_scan_id = f"profile-scan-{TARGET_VIEW.replace('_', '-')}"

    # 1. Initialize Dataplex client and get the latest successful job.
    client = dataplex_v1.DataScanServiceClient()
    latest_job = get_latest_successful_job(client, PROJECT_ID, LOCATION, data_scan_id)

    if not latest_job:
        print(f"\n[ERROR] No successful job record was found for '{data_scan_id}'.")
        print("Please ensure the 'run_dataplex_scans.py' script has completed successfully.")
        return

    job_id_short = latest_job.name.split('/')[-1]
    print(f"[SUCCESS] Found the latest successful job: '{job_id_short}'.")

    # 2. Fetch the full, detailed profile result for the job.
    print(f"[INFO] Retrieving detailed profile results for job '{job_id_short}'...")
    try:
        request = dataplex_v1.GetDataScanJobRequest(
            name=latest_job.name,
            view=dataplex_v1.GetDataScanJobRequest.DataScanJobView.FULL,
        )
        job_with_full_results = client.get_data_scan_job(request=request)
    except Exception as e:
        print(f"[ERROR] Failed to retrieve detailed job results: {e}")
        return

    # 3. Convert the profile result to a dictionary and save it to a JSON file.
    if job_with_full_results.data_profile_result:
        profile_dict = MessageToDict(job_with_full_results.data_profile_result._pb)
        save_to_json_file(profile_dict, OUTPUT_FILENAME)
    else:
        print("[WARN] The job completed, but no data profile result was found within it.")

    print("\n[INFO] Script finished successfully.")


if __name__ == "__main__":
    main()
Now, run the script from your terminal:
python 2_dq_profile_save.py
Upon successful completion, you will have a new file named dq_profile_results.json in your directory. This file contains the rich, detailed statistical metadata that we will use to generate data quality rules. If you want to check the contents of the dq_profile_results.json, execute the following command:
cat dq_profile_results.json
4. Generating data quality rules with the Gemini CLI
Install and configure the Gemini CLI
While you can call the Gemini API programmatically, using a tool like the Gemini CLI offers a powerful, interactive way to integrate generative AI directly into your terminal workflows. The Gemini CLI is not just a chatbot; it's a command-line workflow tool that can read your local files, understand your code, and interact with other system tools, like gcloud, to automate complex tasks. This makes it ideal for our use case.
Prerequisite
First, ensure you have the required prerequisite: Node.js version 20 or higher must be installed in your Cloud Shell environment. You can check your version by running node -v.
Installation
There are two ways to use the Gemini CLI: installing temporarily or installing more permanently. We will cover both methods here.
You can run the Gemini CLI directly for a single session without any permanent installation. This is the cleanest and quickest way to "try it out," as it keeps your environment completely unmodified.
In your Cloud Shell terminal, run:
npx https://github.com/google-gemini/gemini-cli
This command temporarily downloads and runs the CLI package.
For any real project, the recommended best practice is to install the CLI locally into your project directory. This approach has several key advantages:
- Dependency isolation: It ensures your project has its own version of the CLI, preventing version conflicts with other projects.
- Reproducibility: Anyone who clones your project can install the exact same dependencies, making your setup reliable and portable.
- Best practice alignment: It follows the standard model for managing Node.js project dependencies, avoiding the pitfalls of global (-g) installations.
To install the CLI locally, execute the following command from your project folder (programmatic-dq):
npm install @google/gemini-cli
This creates a node_modules folder inside programmatic-dq. To run the version you just installed, use the npx command.
npx gemini
First-time setup
Whichever method you choose, the first time you launch the CLI, it will guide through a one-time setup process.
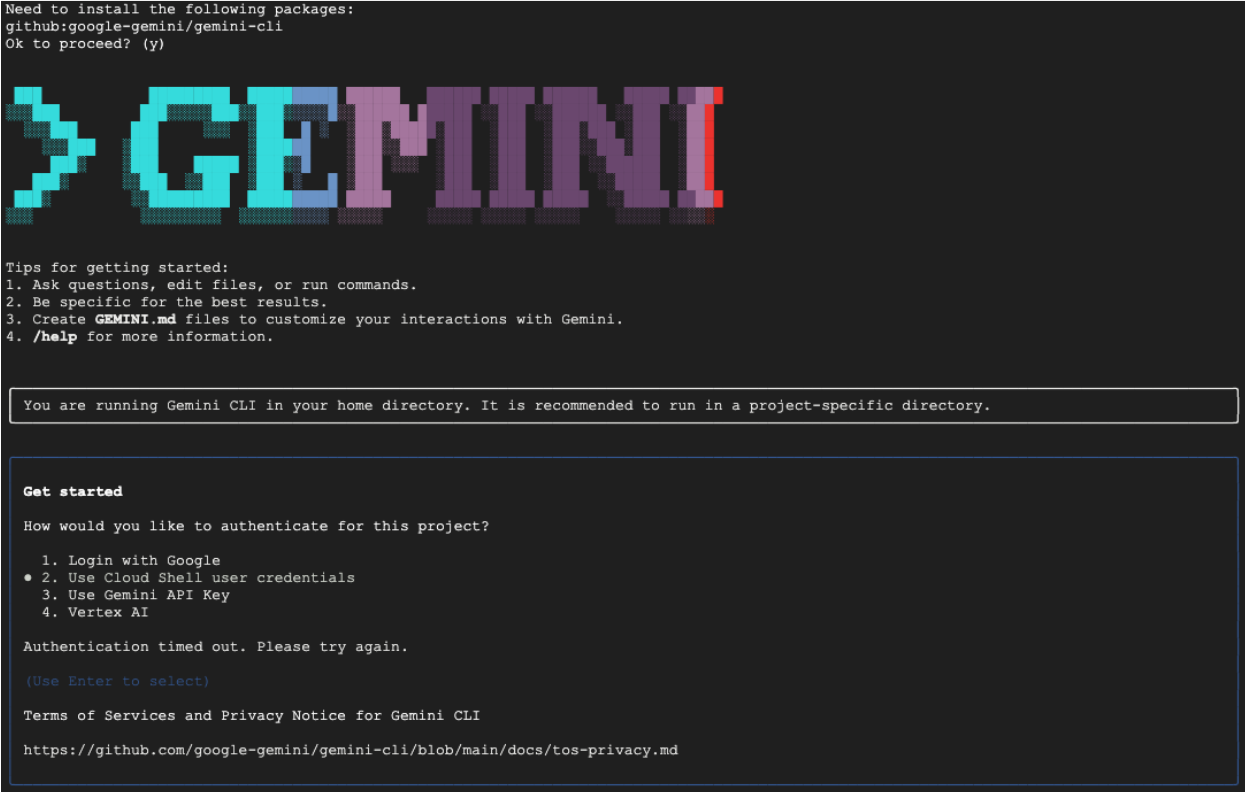
You will be prompted to pick a color theme and then to authenticate. The simplest method is to Sign in with your Google account when prompted. The free tier provided is sufficient for this codelab.
Now that the CLI is installed and configured, you are ready to proceed with generating the rules. The CLI is aware of the files in its current directory, which is critical for the next step.
Generate the data quality rules
While it's possible to ask an LLM to generate a configuration file in one shot, the non-deterministic nature of generative models means the output may not always be perfectly compliant with the strict schema required by tools like gcloud. A more reliable method is an interactive, multi-step process where you first have the AI act as an analyst to propose a plan, you (the human expert) review and approve that plan, and only then does the AI generate the final code based on your approved instructions.
This approach transforms the process from a simple command into a collaborative session, ensuring the final output is accurate, validated, and ready for deployment.
First, we will ask Gemini to analyze the statistical profile and act as an expert data engineer, proposing a plan of action. We are explicitly telling it not to write the YAML file yet. This focuses its attention on analysis and justification.
In your interactive Gemini CLI session, paste the following prompt:
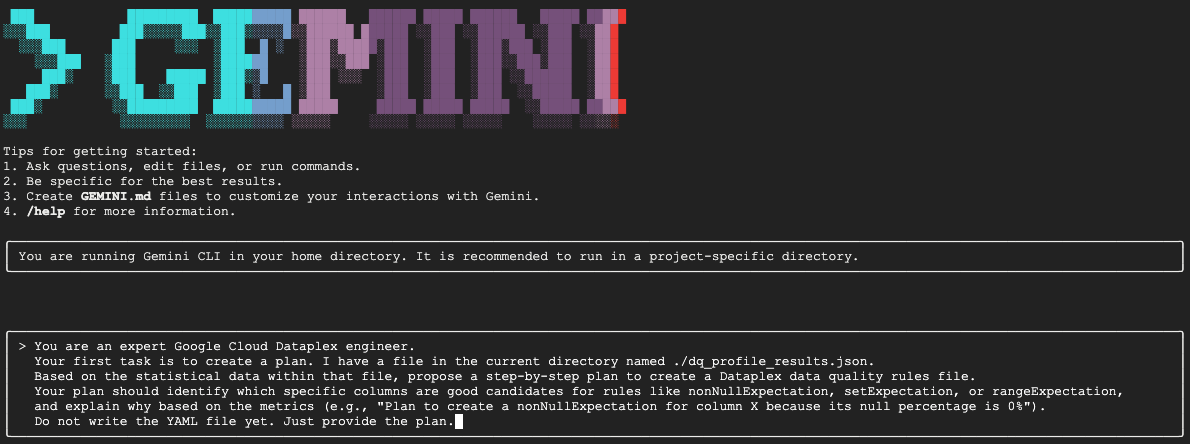
You are an expert Google Cloud Dataplex engineer.
Your first task is to create a plan. I have a file in the current directory named ./dq_profile_results.json.
Based on the statistical data within that file, propose a step-by-step plan to create a Dataplex data quality rules file.
Your plan should identify which specific columns are good candidates for rules like nonNullExpectation, setExpectation, or rangeExpectation, and explain why based on the metrics (e.g., "Plan to create a nonNullExpectation for column X because its null percentage is 0%").
Do not write the YAML file yet. Just provide the plan.
Gemini will analyze the JSON file and should return a structured plan similar to this:
Plan to create Dataplex data quality rules

1. Create a row count rule:
  - Analysis: The profile shows a total of 26,489 rows.
  - Proposed Rule: I will implement a rowCount rule to ensure the table's row count remains within a healthy range (e.g., 20,000 to 30,000). This is a fundamental check to guard against major data loading failures or unexpected deletions.
2. Implement non-null expectation rules:
  - Analysis: The profiling results show that many columns have no null values. For example, event_date, event_timestamp, event_name, user_pseudo_id, stream_id, and platform all appear to be fully populated.
  - Proposed Rules: I will create nonNullExpectation rules for columns where the nullRatio is 0 or not present, indicating they are always expected to contain a value:
    - event_date
    - event_timestamp
    - event_name
    - user_pseudo_id
    - stream_id
    - platform
    - device_category
    - device_os
3. Implement set expectation rules:
  - Analysis: Several columns contain a small, finite set of values, making them ideal for set validation.
  - Proposed Rules: I will create setExpectation rules for these columns:
    - platform: It only contains the value "WEB".
    - device_category: It contains only "desktop", "mobile", and "tablet".
    - geo_continent: It has a well-defined list of continents.
traffic_source_medium: It has a small list of valid mediums like "organic", "(none)", and "referral".
4. Implement range expectation rules:
  - Analysis: The profile provides minimum and maximum values for numeric and string length fields.
  - Proposed Rules: I will create rangeExpectation rules for the following:
    - event_timestamp: The profile shows a clear min and max. I will use these values to create a range check.
    - event_date (String Length): The profile indicates that the minLength and maxLength are both 8, which is perfect for enforcing a YYYYMMDD format.
This is the most critical step in the entire workflow: the Human-in-the-Loop (HITL) review. The plan generated by Gemini is based purely on statistical patterns in the data. It has no understanding of your business context, future data changes, or the specific intent behind your data. Your role as the human expert is to validate, correct, and approve this plan before turning it into code.
Carefully review the plan Gemini has provided.
- Does it make sense?
- Does it align with your business knowledge?
- Are there any statistically sound but practically useless rules?
The output you receive from Gemini may vary. Your goal is to refine it.
For instance, imagine the plan suggests a rowCount rule because the table has a fixed number of rows in the sample data. As a human expert, you might know that this table's size is expected to grow daily, making a strict row count rule impractical and likely to cause false alerts. This is a perfect example of applying business context that the AI lacks.
Now, you will provide feedback to Gemini and give it the final command to generate the code. You must adapt the following prompt based on the plan you actually received and the corrections you want to make.
The prompt below is a template. The first line is where you will provide your specific corrections. If the plan Gemini gave you is perfect and needs no changes, you can simply delete that line.
In the same Gemini session, paste your adapted version of the following prompt:
[YOUR CORRECTIONS AND APPROVAL GO HERE. Examples:
- "The plan looks good. Please proceed."
- "The rowCount rule is not necessary, as the table size changes daily. The rest of the plan is approved. Please proceed."
- "For the setExpectation on the geo_continent column, please also include 'Antarctica'."]

Once you have incorporated my feedback, please generate the `dq_rules.yaml` file.

You must adhere to the following strict requirements:

- Schema Compliance: The YAML structure must strictly conform to the DataQualityRule specification. For a definitive source of truth, you must refer to the sample_rule.yaml file in the current directory and the DataQualityRule class definition in the local virtual environment path: ./dq_venv/.../google/cloud/dataplex_v1/types/data_quality.py.

- Data-Driven Values: All rule parameters, such as thresholds or expected values, must be derived directly from the statistical metrics in dq_profile_results.json.

- Rule Justification: For each rule, add a comment (#) on the line above explaining the justification, as you outlined in your plan.

- Output Purity: The final output must only be the raw YAML code block, perfectly formatted and ready for immediate deployment.
Gemini will now generate the YAML content based on your precise, human-validated instructions. Upon completion, you will find a new file named dq_rules.yaml in your working directory.
Create and run the data quality scan
Now that you have an AI-generated, human-validated dq_rules.yaml file, you can confidently deploy it.
Exit the Gemini CLI by typing /quit or pressing Ctrl+C twice.
The following gcloud command creates a new Dataplex data scan resource. It doesn't run the scan yet; it simply registers the scan's definition and configuration (our YAML file) with Dataplex.
Execute this command in your terminal:
export DQ_SCAN="dq-scan"
gcloud dataplex datascans create data-quality $DQ_SCAN \
    --project=$PROJECT_ID \
    --location=$LOCATION \
    --data-quality-spec-file=dq_rules.yaml \
    --data-source-resource="//bigquery.googleapis.com/projects/$PROJECT_ID/datasets/$DATASET_ID/tables/mv_ga4_user_session_flat"
With the scan now defined, you can trigger a job to execute it.
gcloud dataplex datascans run $DQ_SCAN --location=$LOCATION --project=$PROJECT_ID
This command will output a job ID. You can monitor the status of this job in the Dataplex section of the Google Cloud Console. Once complete, the results will be written to a BigQuery table for analysis.
5. The critical role of Human-In-The-Loop (HITL)
While using Gemini to accelerate rule generation is incredibly powerful, it is crucial to treat the AI as a highly skilled co-pilot, not a fully autonomous pilot. The Human-in-the-Loop (HITL) process is not an optional suggestion; it is a non-negotiable, foundational step in any robust and trustworthy data governance workflow. Simply deploying AI-generated artifacts without rigorous human oversight is a recipe for failure.
Think of the AI-generated dq_rules.yaml as a pull request submitted by an extremely fast but inexperienced AI developer. It requires a thorough review from a senior human expert—you—before it can be merged into the "main branch" of your governance policy and deployed. This review is essential for mitigating the inherent weaknesses of Large Language Models.
Here is a detailed breakdown of why this human review is indispensable and what you must specifically look for:
1. Contextual validation: The AI lacks business awareness
- The LLM's weakness: An LLM is a master of patterns and statistics, but it has zero understanding of your business context. For example, if a column,
new_campaign_idhas a 98% null ratio, an LLM might ignore this column for a statistical reason. - The human's critical role: You, the human expert, know that the
new_campaign_idfield was just added yesterday for a major product launch next week. You know that its null ratio should be high now but is expected to drop significantly. You also know that once it's populated, it must follow a specific format. The AI cannot possibly infer this external business knowledge. Your role is to apply this business context to the AI's statistical suggestions, overriding or augmenting them as necessary.
2. Correctness and precision: Guarding against hallucination and subtle errors
- The LLM's weakness: LLMs can be "confidently wrong." They can "hallucinate" or generate code that is subtly incorrect. For example, it might generate a YAML file with a correctly named rule but an invalid parameter, or it might misspell a rule type (e.g.,
setExpectationsinstead of the correctsetExpectation). These subtle errors will cause the deployment to fail, but they can be hard to spot. - The human's critical role: Your job is to act as the ultimate linter and schema validator. You must meticulously check the generated YAML against the official Dataplex
DataQualityRulespecification. You are not just checking if it "looks right"; you are validating its syntactic and semantic correctness to ensure it is 100% compliant with the target API. This is why the codelab prompts Gemini to reference the schema files—to reduce the chance of error—but the final verification rests with you.
3. Safety and risk mitigation: Preventing downstream consequences
- The LLM's weakness: A flawed data quality rule deployed to production can have severe consequences. If the AI suggests a
rangeExpectationfor a financial transaction amount that is too wide, it could fail to detect fraudulent activity. Conversely, if it suggests a rule that is too strict based on a small data sample, it could flood your on-call team with thousands of false-positive alerts, leading to alert fatigue and causing real issues to be missed. - The human's critical role: You are the safety engineer. You must assess the potential downstream impact of every single rule the AI suggests. Ask yourself: "What happens if this rule fails? Is the alert actionable? What is the risk if this rule incorrectly passes?" This risk assessment is a uniquely human capability that weighs the cost of failure against the benefit of the check.
4. Governance as a continuous process: Incorporating forward-looking knowledge
- The LLM's weakness: The AI's knowledge is based on a static snapshot of the data—the profile results from a specific point in time. It has no knowledge of future events.
- The human's critical role: Your governance strategy must be forward-looking. You know that a data source is scheduled to be migrated next month, which will change the stream_id. You know that a new country is being added to the
geo_countrylist. The HITL process is where you inject this future-state knowledge, updating or temporarily disabling rules to prevent breakages during planned business or technical evolutions. Data quality is not a one-time setup; it's a living process that must evolve, and only a human can guide that evolution.
In summary, HITL is the essential quality assurance and safety mechanism that transforms AI-driven governance from a novel but risky idea into a responsible, scalable, and enterprise-grade practice. It ensures that the final policies deployed are not just AI-accelerated but are also human-validated, combining the speed of machines with the wisdom and context of human experts.
However, this emphasis on human oversight does not diminish the value of the AI. On the contrary, the generative AI plays a crucial role in accelerating the HITL process itself.
Without the AI, a data engineer would have to:
- Manually write complex SQL queries to profile the data (e.g.,
COUNT DISTINCT,AVG,MIN,MAXfor every column). - Painstakingly analyze the results spreadsheet by spreadsheet.
- Write every single line of the YAML rule file from scratch, a tedious and error-prone task.
The AI automates these laborious, time-consuming steps. It acts as a tireless analyst that instantly processes the statistical profile and provides a well-structured, 80% complete "first draft" of the policy.
This fundamentally changes the nature of the human's work. Instead of spending hours on manual data crunching and boilerplate coding, the human expert can immediately focus on the highest-value tasks:
- Applying critical business context.
- Validating the correctness of the AI's logic.
- Making strategic decisions about which rules are truly important.
In this partnership, the AI handles the "what" (what are the statistical patterns?), freeing up the human to focus on the "why" (why is this pattern important to our business?) and the "so what" (so what should our policy be?). Therefore, AI doesn't replace the loop; it makes each cycle through the loop faster, smarter, and more impactful.
6. Cleaning up your environment
To avoid incurring future charges to your Google Cloud account for the resources used in this codelab, you should delete the project that contains the resources. However, if you wish to keep the project, you can delete the individual resources you created.
Delete the Dataplex scans
First, delete the profile and quality scans you created. To prevent accidental deletion of important resources, these commands use the specific names of the scans created in this codelab.
# Delete the Data Quality Scan
gcloud dataplex datascans delete dq-scan \
    --location=us-central1 \
    --project=$PROJECT_ID --quiet

# Delete the Data Profile Scans
gcloud dataplex datascans delete profile-scan-mv-ga4-user-session-flat \
    --location=us-central1 \
    --project=$PROJECT_ID --quiet

gcloud dataplex datascans delete profile-scan-mv-ga4-ecommerce-transactions \
    --location=us-central1 \
    --project=$PROJECT_ID --quiet

gcloud dataplex datascans delete profile-scan-mv-ga4-ecommerce-items \
    --location=us-central1 \
    --project=$PROJECT_ID --quiet
Delete the BigQuery Dataset
Next, delete the BigQuery dataset. This command is irreversible and uses the -f (force) flag to remove the dataset and all its tables without confirmation.
# Manually type this command to confirm you are deleting the correct dataset
bq rm -r -f --dataset $PROJECT_ID:dataplex_dq_codelab
7. Congratulations!
You have successfully completed the codelab!
You've built an end-to-end, programmatic data governance workflow. You started by using Materialized Views to flatten complex BigQuery data, making it suitable for analysis. You then programmatically ran Dataplex profile scans to generate statistical metadata. Most importantly, you leveraged the Gemini CLI to analyze the profile output and intelligently generate a "policy-as-code" artifact (dq_rules.yaml). You then used the CLI to deploy this configuration as an automated Data Quality Scan, closing the loop on a modern, scalable governance strategy.
You are now equipped with the fundamental pattern for building reliable, AI-accelerated, and human-validated data quality systems on Google Cloud.
What's Next?
- Integrate with CI/CD: Take the dq_rules.yaml file and commit it to a Git repository. Create a CI/CD pipeline (e.g., using Cloud Build or GitHub Actions) that automatically deploys the Dataplex scan whenever the rule file is updated.
- Explore custom SQL rules: Go beyond the standard rule types. Dataplex supports custom SQL rules to enforce more complex, business-specific logic that cannot be expressed with predefined checks. This is a powerful feature for tailoring validation to your unique requirements.
- Optimize scans for efficiency and cost: For very large tables, you can improve performance and reduce costs by not always scanning the entire dataset. Explore using filters to narrow the scan to specific time frames or data segments, or configure sampled scans to check a representative percentage of your data.
- Visualize the results: The output of every Dataplex data quality scan is written to a BigQuery table. Connect this table to Looker Studio to build dashboards that track your data quality scores over time, aggregated by the dimensions you defined (e.g., Completeness, Validity). This makes monitoring proactive and visible to all stakeholders.
- Share best practices: Encourage knowledge sharing within your organization to leverage collective experience and improve your data quality strategy. Fostering a culture of data trust is key to making the most of your governance efforts.
- Read the documentation: