
۱. مقدمه
پتانسیل استفاده از هوش مصنوعی مولد برای ایجاد طرح تست، ناشی از توانایی آن در حل دو مورد از بزرگترین چالشها در تضمین کیفیت مدرن است: سرعت و جامعیت. در چرخههای سریع Agile و DevOps امروزی، نوشتن دستی طرحهای تست دقیق، یک گلوگاه قابل توجه است که کل فرآیند تست را به تأخیر میاندازد. یک عامل مبتنی بر هوش مصنوعی مولد میتواند داستانهای کاربر و الزامات فنی را برای تولید یک طرح تست کامل در عرض چند دقیقه، نه چند روز، دریافت کند و تضمین کند که فرآیند QA با توسعه همگام است. علاوه بر این، هوش مصنوعی در شناسایی سناریوهای پیچیده، موارد حاشیهای و مسیرهای منفی که ممکن است یک انسان نادیده بگیرد، عالی عمل میکند و منجر به بهبود بسیار زیاد پوشش تست و کاهش قابل توجه اشکالاتی میشود که به مرحله تولید میرسند.
In this codelab, we will explore how to build such an agent which can retrieve the product requirements documents from Confluence and capable of giving constructive feedback and also generate a comprehensive test plan which can be exported into a CSV file.
Through the codelab, you will employ a step by step approach as follows:
- Prepare your Google Cloud project and Enable all the required API on it
- Setup workspace for your coding environment
- آمادهسازی سرور محلی mcp برای کانفلوئنس
- Structuring ADK agent source code, prompt, and tools to connect to MCP server
- Understanding utilization of Artifact Service and Tool Contexts
- Testing the agent using ADK local Web Development UI
- مدیریت متغیرهای محیطی و تنظیم فایلهای مورد نیاز برای استقرار برنامه در Cloud Run
- برنامه را روی Cloud Run مستقر کنید
نمای کلی معماری
پیشنیازها
- کار راحت با پایتون
- An understanding of basic full-stack architecture using HTTP service
آنچه یاد خواهید گرفت
- Architecting ADK Agent while utilizing it's several capabilities
- استفاده از ابزار با ابزار سفارشی و MCP
- Setting up file output by agent using Artifact Service management
- Utilizing BuiltInPlanner to improve task execution by doing planning with Gemini 2.5 Flash thinking capabilities
- تعامل و اشکالزدایی از طریق رابط وب ADK
- Deploy application to Cloud Run using Dockerfile and provide environment variables
آنچه نیاز دارید
- مرورگر وب کروم
- یک حساب جیمیل
- یک پروژه ابری با قابلیت پرداخت صورتحساب
- (Optional) Confluence Space with Product Requirement Documents page(s)
This codelab, designed for developers of all levels (including beginners), uses Python in its sample application. However, Python knowledge isn't required for understanding the concepts presented. Not to worry on the Confluence space if you don't have one, we will provide credentials for trying this codelab
۲. قبل از شروع
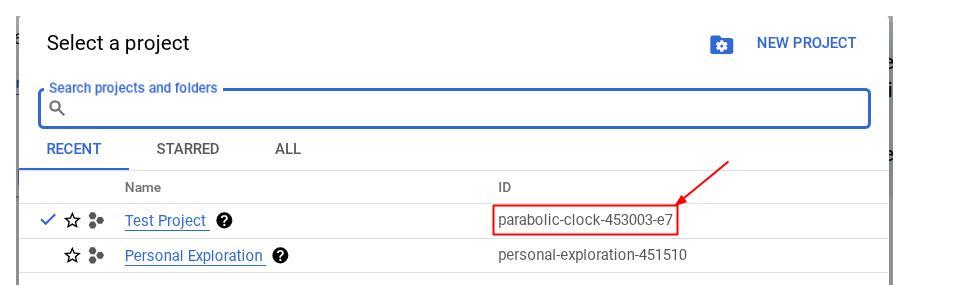
پروژه فعال را در کنسول ابری انتخاب کنید
This codelab assumes that you already have a Google Cloud project with billing enabled. If you do not have it yet, you can follow the instructions below to get started.
- در کنسول گوگل کلود ، در صفحه انتخاب پروژه، یک پروژه گوگل کلود را انتخاب یا ایجاد کنید.
- مطمئن شوید که صورتحساب برای پروژه ابری شما فعال است. یاد بگیرید که چگونه بررسی کنید که آیا صورتحساب در یک پروژه فعال است یا خیر .
Setup Cloud Project in Cloud Shell Terminal
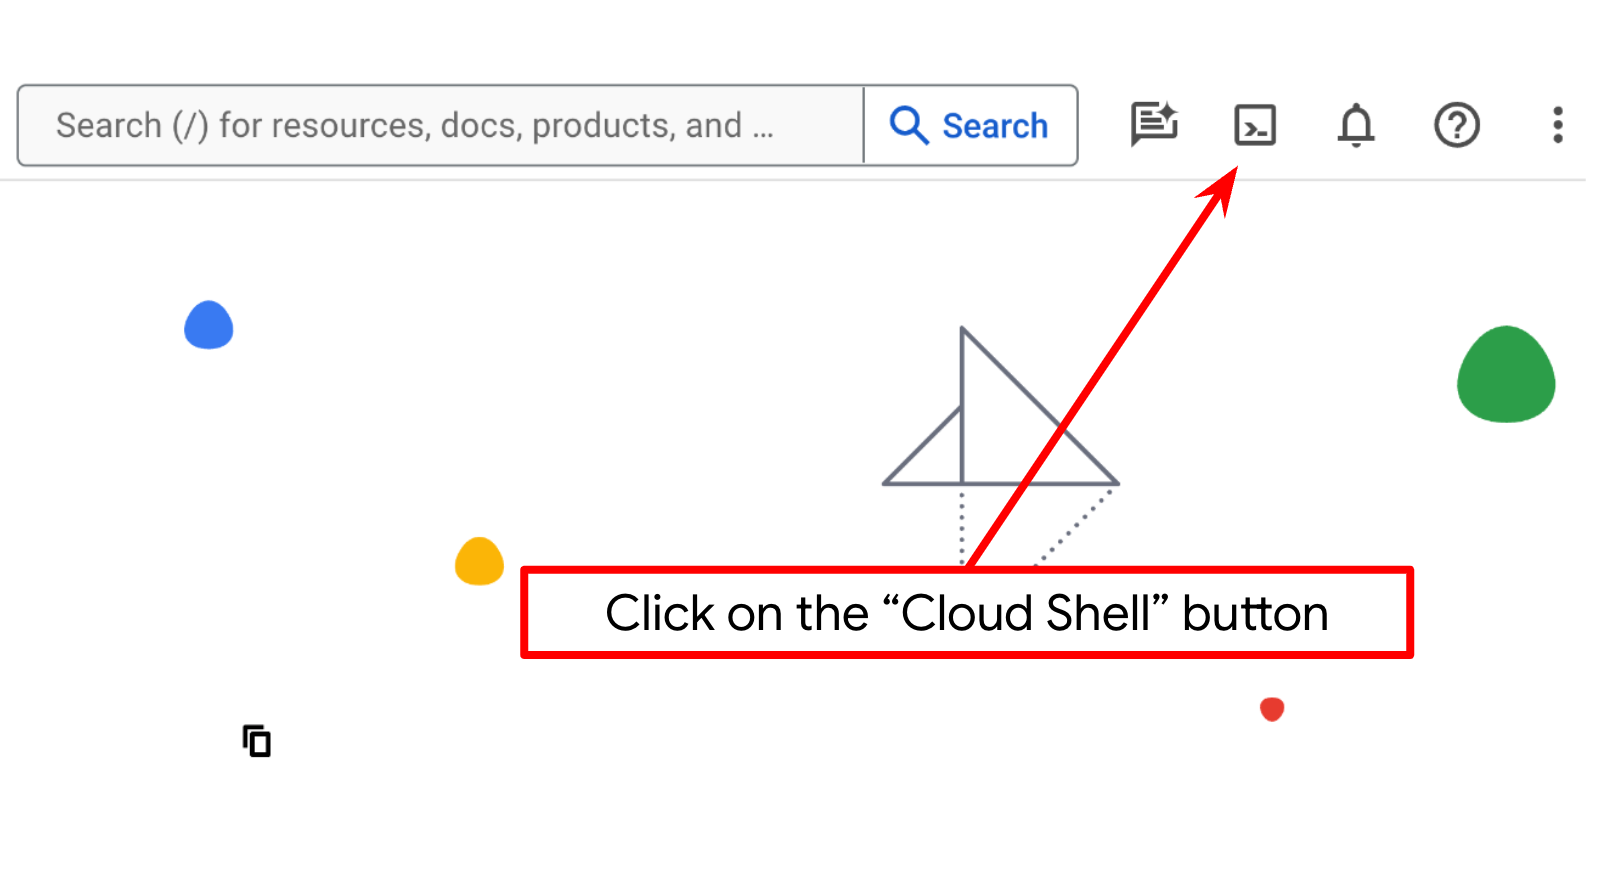
- You'll use Cloud Shell , a command-line environment running in Google Cloud. Click Activate Cloud Shell at the top of the Google Cloud console.
- پس از اتصال به Cloud Shell، با استفاده از دستور زیر بررسی میکنید که آیا از قبل احراز هویت شدهاید و پروژه روی شناسه پروژه شما تنظیم شده است یا خیر:
gcloud auth list
- دستور زیر را در Cloud Shell اجرا کنید تا تأیید شود که دستور gcloud از پروژه شما اطلاع دارد.
gcloud config list project
- اگر پروژه شما تنظیم نشده است، از دستور زیر برای تنظیم آن استفاده کنید:
gcloud config set project <YOUR_PROJECT_ID>
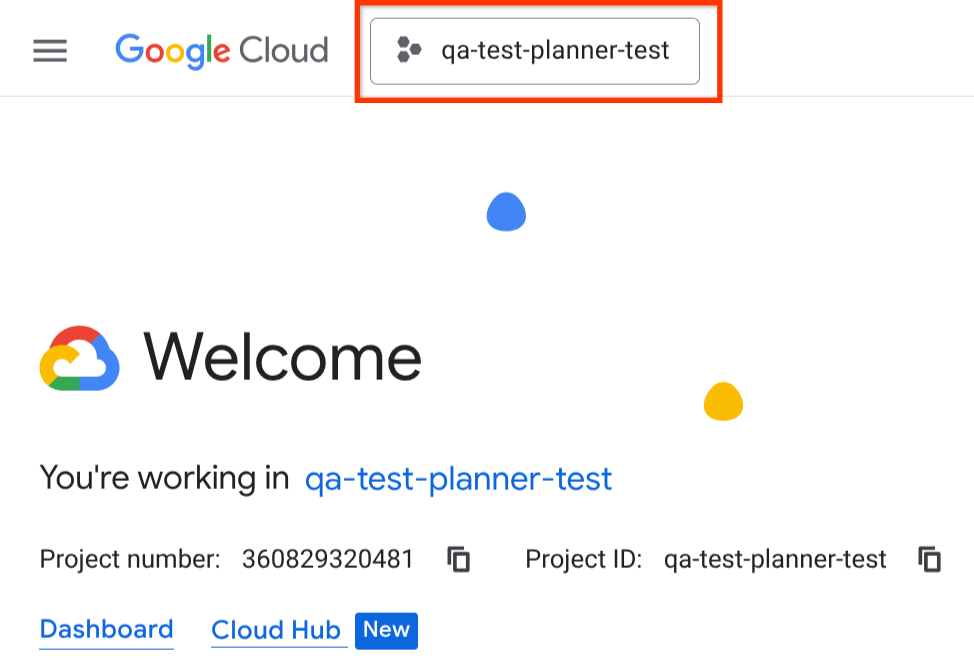
از طرف دیگر، میتوانید شناسه PROJECT_ID را در کنسول نیز مشاهده کنید.

Click it and you will all of your project and the project ID on the right side
- API های مورد نیاز را از طریق دستور زیر فعال کنید. این کار ممکن است چند دقیقه طول بکشد، پس لطفاً صبور باشید.
gcloud services enable aiplatform.googleapis.com \
                       run.googleapis.com \
                       cloudbuild.googleapis.com \
                       cloudresourcemanager.googleapis.com
در صورت اجرای موفقیتآمیز دستور، باید پیامی مشابه آنچه در زیر نشان داده شده است را مشاهده کنید:
Operation "operations/..." finished successfully.
جایگزین دستور gcloud از طریق کنسول با جستجوی هر محصول یا استفاده از این لینک است.
If any API is missed, you can always enable it during the course of the implementation.
Refer documentation for gcloud commands and usage.
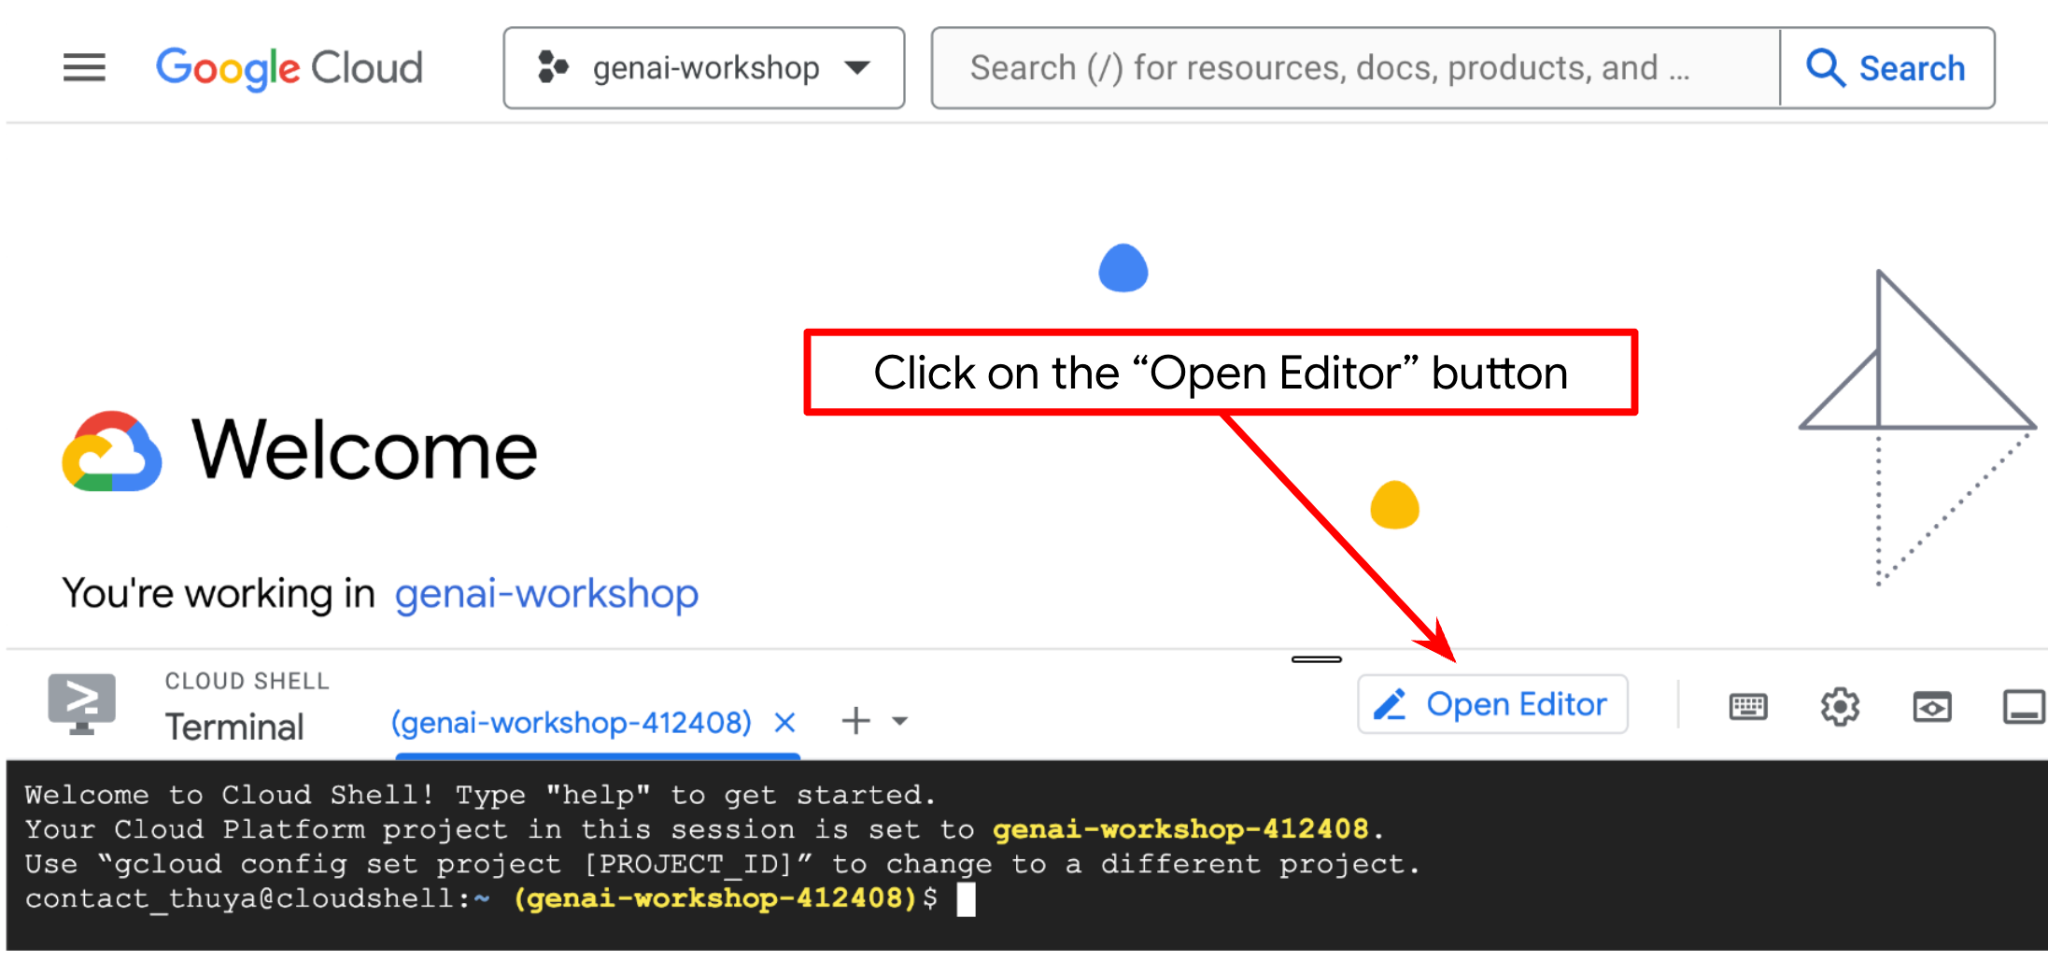
به ویرایشگر Cloud Shell و فهرست راهنمای کار برنامه راهاندازی بروید
حالا میتوانیم ویرایشگر کد خود را برای انجام برخی کارهای کدنویسی تنظیم کنیم. برای این کار از ویرایشگر Cloud Shell استفاده خواهیم کرد.
- روی دکمهی Open Editor کلیک کنید، این کار یک ویرایشگر Cloud Shell باز میکند، میتوانیم کد خود را اینجا بنویسیم
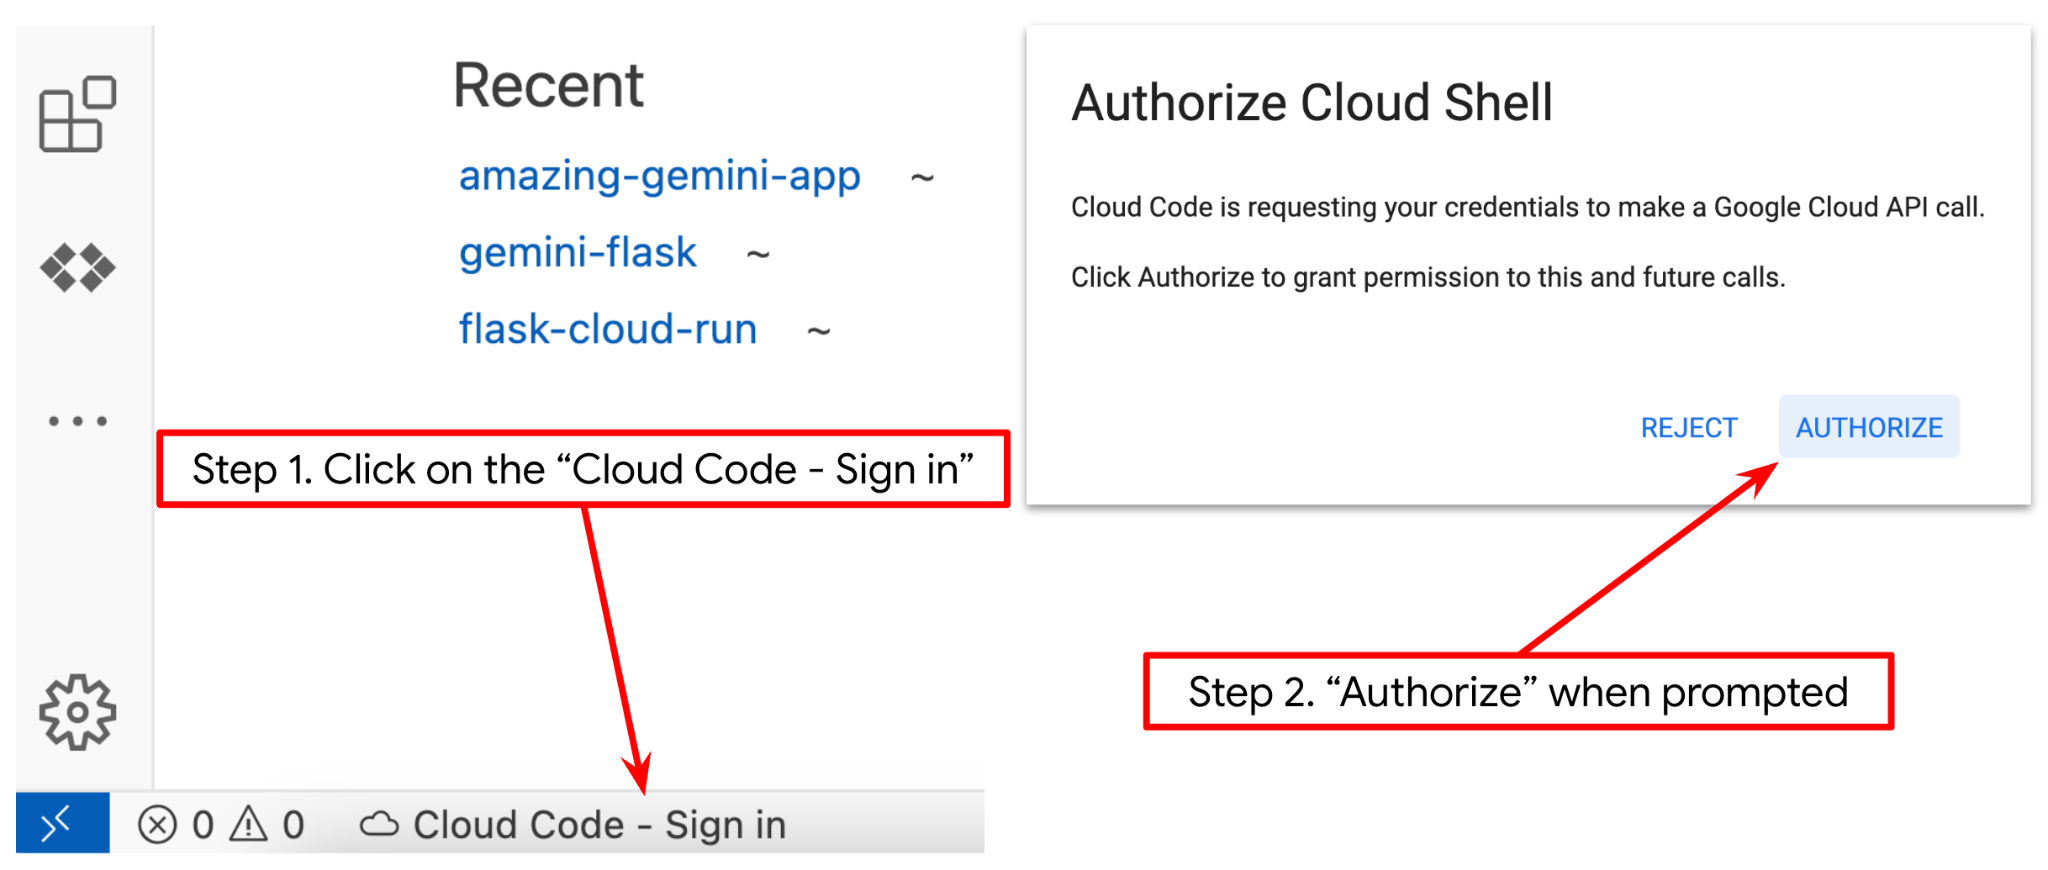
- Make sure the Cloud Code project is set in the bottom left corner (status bar) of the Cloud Shell editor, as highlighted in the image below and is set to the active Google Cloud project where you have billing enabled. Authorize if prompted. If you already follow previous command, the button may also point directly to your activated project instead of sign in button
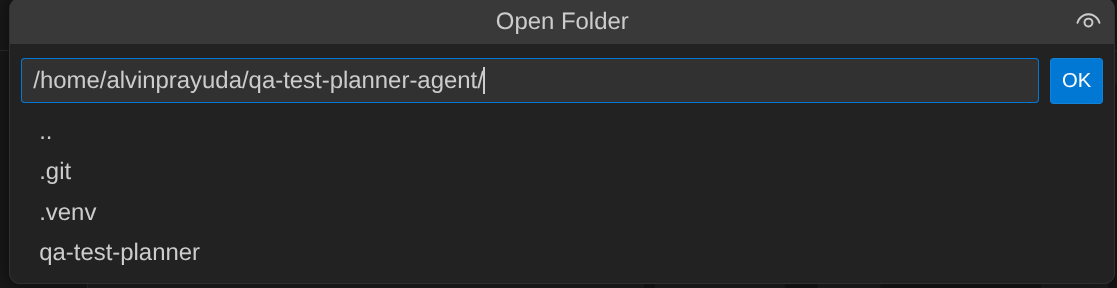
- در مرحله بعد، بیایید دایرکتوری کاری قالب را برای این codelab از Github کپی کنیم، دستور زیر را اجرا کنید. این دستور دایرکتوری کاری را در دایرکتوری qa-test-planner-agent ایجاد میکند.
git clone https://github.com/alphinside/qa-test-planner-agent.git qa-test-planner-agent
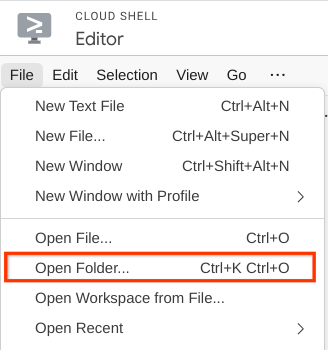
- After that, go to the top section of the Cloud Shell Editor and click File->Open Folder, find your username directory and find the qa-test-planner-agent directory then click the OK button. This will make the chosen directory as the main working directory. In this example, the username is alvinprayuda , hence the directory path is shown below
حالا، ویرایشگر Cloud Shell شما باید به این شکل باشد

تنظیمات محیط
Prepare Python Virtual Environment
مرحله بعدی آمادهسازی محیط توسعه است. ترمینال فعال فعلی شما باید در دایرکتوری کاری qa-test-planner-agent باشد. ما در این آزمایشگاه کد از پایتون ۳.۱۲ استفاده خواهیم کرد و از uv python project manager برای سادهسازی نیاز به ایجاد و مدیریت نسخه پایتون و محیط مجازی استفاده خواهیم کرد.
- اگر هنوز ترمینال را باز نکردهاید، با کلیک روی ترمینال -> ترمینال جدید ، یا با استفاده از Ctrl + Shift + C آن را باز کنید، این کار یک پنجره ترمینال در قسمت پایین مرورگر باز میکند.

- Download
uvand install python 3.12 with the following command
curl -LsSf https://astral.sh/uv/0.7.19/install.sh | sh && \
source $HOME/.local/bin/env && \
uv python install 3.12
- Now let's initialize the virtual environment using
uv, Run this command
uv sync --frozen
این دستور دایرکتوری .venv را ایجاد کرده و وابستگیها را نصب میکند. نگاهی سریع به فایل pyproject.toml اطلاعاتی در مورد وابستگیها به شما میدهد که به این صورت نشان داده شده است.
dependencies = [
    "google-adk>=1.5.0",
    "mcp-atlassian>=0.11.9",
    "pandas>=2.3.0",
    "python-dotenv>=1.1.1",
]
- برای آزمایش محیط مجازی، فایل جدید main.py را ایجاد کنید و کد زیر را در آن کپی کنید.
def main():
   print("Hello from qa-test-planner-agent")

if __name__ == "__main__":
   main()
- Then, run the following command
uv run main.py
خروجی مانند زیر دریافت خواهید کرد
Using CPython 3.12
Creating virtual environment at: .venv
Hello from qa-test-planner-agent!
این نشان میدهد که پروژه پایتون به درستی راهاندازی شده است.
حالا میتوانیم به مرحله بعدی برویم، ساخت عامل و سپس سرویسها
3. Build the Agent using Google ADK and Gemini 2.5
Introduction to ADK Directory Structure
Let's start by exploring what ADK has to offer and how to build the agent. ADK complete documentation can be accessed in this URL . ADK offers us many utilities within its CLI command execution. Some of them are the following :
- Setup the agent directory structure
- Quickly try interaction via CLI input output
- رابط کاربری وب توسعه محلی را به سرعت راهاندازی کنید
حالا، بیایید ساختار دایرکتوری agent را با استفاده از دستور CLI ایجاد کنیم. دستور زیر را اجرا کنید
uv run adk create qa_test_planner \
   --model gemini-2.5-flash \
   --project {your-project-id} \
   --region global
ساختار دایرکتوری agent زیر را در دایرکتوری کاری فعلی شما ایجاد خواهد کرد.
qa_test_planner/
├── __init__.py
├── .env
├── agent.py
و اگر init.py و agent.py را بررسی کنید، این کد را خواهید دید.
# __init__.py

from . import agent
# agent.py

from google.adk.agents import Agent

root_agent = Agent(
    model='gemini-2.5-flash',
    name='root_agent',
    description='A helpful assistant for user questions.',
    instruction='Answer user questions to the best of your knowledge',
)
Building Our QA Test Planner Agent
بیایید عامل برنامهریز آزمون تضمین کیفیت خود را بسازیم! فایل qa_test_planner / agent.py را باز کنید و کد زیر را که شامل root_agent است، کپی کنید.
# qa_test_planner/agent.py

from google.adk.agents import Agent
from google.adk.tools.mcp_tool.mcp_toolset import (
    MCPToolset,
    StdioConnectionParams,
    StdioServerParameters,
)
from google.adk.planners import BuiltInPlanner
from google.genai import types
from dotenv import load_dotenv
import os
from pathlib import Path
from pydantic import BaseModel
from typing import Literal
import tempfile
import pandas as pd
from google.adk.tools import ToolContext


load_dotenv(dotenv_path=Path(__file__).parent / ".env")

confluence_tool = MCPToolset(
    connection_params=StdioConnectionParams(
        server_params=StdioServerParameters(
            command="uvx",
            args=[
                "mcp-atlassian",
                f"--confluence-url={os.getenv('CONFLUENCE_URL')}",
                f"--confluence-username={os.getenv('CONFLUENCE_USERNAME')}",
                f"--confluence-token={os.getenv('CONFLUENCE_TOKEN')}",
                "--enabled-tools=confluence_search,confluence_get_page,confluence_get_page_children",
            ],
            env={},
        ),
        timeout=60,
    ),
)


class TestPlan(BaseModel):
    test_case_key: str
    test_type: Literal["manual", "automatic"]
    summary: str
    preconditions: str
    test_steps: str
    expected_result: str
    associated_requirements: str


async def write_test_tool(
    prd_id: str, test_cases: list[dict], tool_context: ToolContext
):
    """A tool to write the test plan into file

    Args:
        prd_id: Product requirement document ID
        test_cases: List of test case dictionaries that should conform to these fields:
            - test_case_key: str
            - test_type: Literal["manual","automatic"]
            - summary: str
            - preconditions: str
            - test_steps: str
            - expected_result: str
            - associated_requirements: str

    Returns:
        A message indicating success or failure of the validation and writing process
    """
    validated_test_cases = []
    validation_errors = []

    # Validate each test case
    for i, test_case in enumerate(test_cases):
        try:
            validated_test_case = TestPlan(**test_case)
            validated_test_cases.append(validated_test_case)
        except Exception as e:
            validation_errors.append(f"Error in test case {i + 1}: {str(e)}")

    # If validation errors exist, return error message
    if validation_errors:
        return {
            "status": "error",
            "message": "Validation failed",
            "errors": validation_errors,
        }

    # Write validated test cases to CSV
    try:
        # Convert validated test cases to a pandas DataFrame
        data = []
        for tc in validated_test_cases:
            data.append(
                {
                    "Test Case ID": tc.test_case_key,
                    "Type": tc.test_type,
                    "Summary": tc.summary,
                    "Preconditions": tc.preconditions,
                    "Test Steps": tc.test_steps,
                    "Expected Result": tc.expected_result,
                    "Associated Requirements": tc.associated_requirements,
                }
            )

        # Create DataFrame from the test case data
        df = pd.DataFrame(data)

        if not df.empty:
            # Create a temporary file with .csv extension
            with tempfile.NamedTemporaryFile(suffix=".csv", delete=False) as temp_file:
                # Write DataFrame to the temporary CSV file
                df.to_csv(temp_file.name, index=False)
                temp_file_path = temp_file.name

            # Read the file bytes from the temporary file
            with open(temp_file_path, "rb") as f:
                file_bytes = f.read()

            # Create an artifact with the file bytes
            await tool_context.save_artifact(
                filename=f"{prd_id}_test_plan.csv",
                artifact=types.Part.from_bytes(data=file_bytes, mime_type="text/csv"),
            )

            # Clean up the temporary file
            os.unlink(temp_file_path)

            return {
                "status": "success",
                "message": (
                    f"Successfully wrote {len(validated_test_cases)} test cases to "
                    f"CSV file: {prd_id}_test_plan.csv"
                ),
            }
        else:
            return {"status": "warning", "message": "No test cases to write"}
    except Exception as e:
        return {
            "status": "error",
            "message": f"An error occurred while writing to CSV: {str(e)}",
        }


root_agent = Agent(
    model="gemini-2.5-flash",
    name="qa_test_planner_agent",
    description="You are an expert QA Test Planner and Product Manager assistant",
    instruction=f"""
Help user search any product requirement documents on Confluence. Furthermore you also can provide the following capabilities when asked:
- evaluate product requirement documents and assess it, then give expert input on what can be improved
- create a comprehensive test plan following Jira Xray mandatory field formatting, result showed as markdown table. Each test plan must also have explicit mapping on
    which user stories or requirements identifier it's associated to

Here is the Confluence space ID with it's respective document grouping:

- "{os.getenv("CONFLUENCE_PRD_SPACE_ID")}" : space to store Product Requirements Documents

Do not making things up, Always stick to the fact based on data you retrieve via tools.
""",
    tools=[confluence_tool, write_test_tool],
    planner=BuiltInPlanner(
        thinking_config=types.ThinkingConfig(
            include_thoughts=True,
            thinking_budget=2048,
        )
    ),
)
Setup Configuration Files
حالا باید تنظیمات پیکربندی اضافی را برای این پروژه اضافه کنیم، زیرا این عامل به دسترسی به Confluence نیاز دارد.
فایل qa_test_planner/.env را باز کنید و مقادیر متغیرهای محیطی زیر را در آن وارد کنید، مطمئن شوید که فایل .env حاصل، به این شکل باشد.
GOOGLE_GENAI_USE_VERTEXAI=1
GOOGLE_CLOUD_PROJECT={YOUR-CLOUD-PROJECT-ID}
GOOGLE_CLOUD_LOCATION=global
CONFLUENCE_URL={YOUR-CONFLUENCE-DOMAIN}
CONFLUENCE_USERNAME={YOUR-CONFLUENCE-USERNAME}
CONFLUENCE_TOKEN={YOUR-CONFLUENCE-API-TOKEN}
CONFLUENCE_PRD_SPACE_ID={YOUR-CONFLUENCE-SPACE-ID}
Unfortunately, this Confluence space cannot be made public, hence you can inspect these files to read the available Product Requirements Documents which will be available using above credentials.
Code Explanation
این اسکریپت شامل راهاندازی عامل ما است که در آن موارد زیر را مقداردهی اولیه میکنیم:
- Set the model to be used to
gemini-2.5-flash - Setup Confluence MCP Tools which will communicate via Stdio
- Setup
write_test_toolcustom tool to write test plan and dump csv to artifact - Setup the agent description and instruction
- فعال کردن برنامهریزی قبل از تولید پاسخ نهایی یا اجرا با استفاده از قابلیتهای تفکر Gemini 2.5 Flash
The agent itself, when powered by Gemini model with built in Thinking capabilities and configured with the planner arguments can show it's thinking capabilities and displayed on the web interface as well. The code to configure this is shown below
# qa-test-planner/agent.py

from google.adk.planners import BuiltInPlanner
from google.genai import types

...

# Provide the confluence tool to agent

root_agent = Agent(
    model="gemini-2.5-flash",
    name="qa_test_planner_agent",
    ...,
    tools=[confluence_tool, write_test_tool],
    planner=BuiltInPlanner(
        thinking_config=types.ThinkingConfig(
            include_thoughts=True,
            thinking_budget=2048,
        )
    ),

...
و قبل از انجام هر اقدامی، میتوانیم فرآیند تفکر آن را ببینیم
The Confluence MCP Tool
To connect to MCP Server from ADK, we need to utilize the MCPToolSet which can be imported from google.adk.tools.mcp_tool.mcp_toolset module. The code to initialized here shown below ( truncated for efficiency )
# qa-test-planner/agent.py

from google.adk.tools.mcp_tool.mcp_toolset import (
    MCPToolset,
    StdioConnectionParams,
    StdioServerParameters,
)

...

# Initialize the Confluence MCP Tool via Stdio Output

confluence_tool = MCPToolset(
    connection_params=StdioConnectionParams(
        server_params=StdioServerParameters(
            command="uvx",
            args=[
                "mcp-atlassian",
                f"--confluence-url={os.getenv('CONFLUENCE_URL')}",
                f"--confluence-username={os.getenv('CONFLUENCE_USERNAME')}",
                f"--confluence-token={os.getenv('CONFLUENCE_TOKEN')}",
                "--enabled-tools=confluence_search,confluence_get_page,confluence_get_page_children",
            ],
            env={},
        ),
        timeout=60,
    ),
)


...

# Provide the confluence tool to agent

root_agent = Agent(
    model="gemini-2.5-flash",
    name="qa_test_planner_agent",
    ...,
    tools=[confluence_tool, write_test_tool],

...
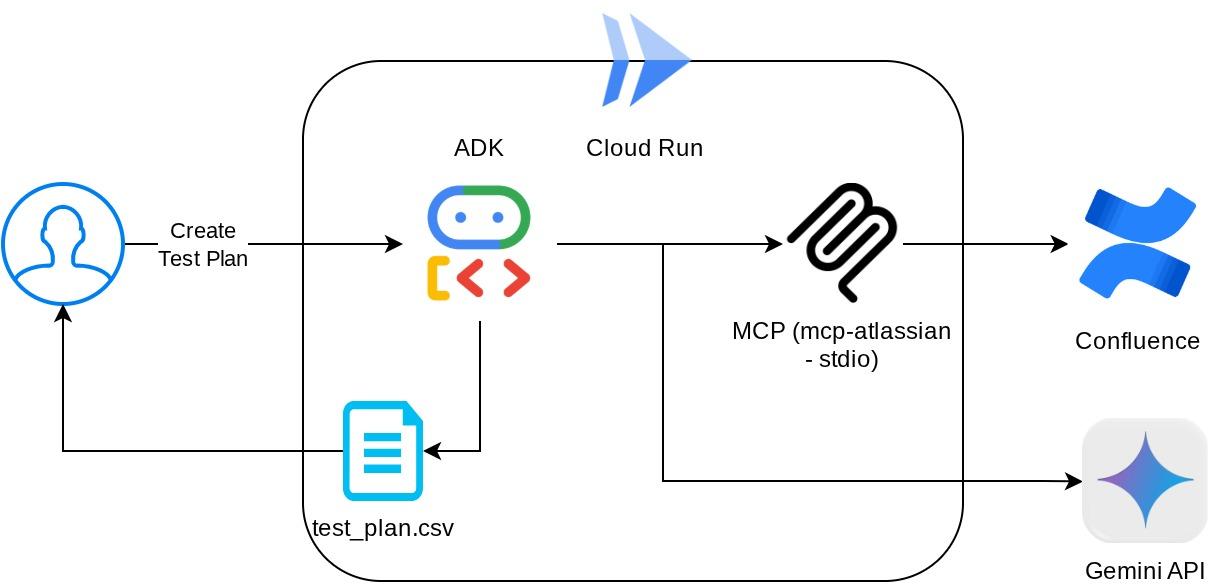
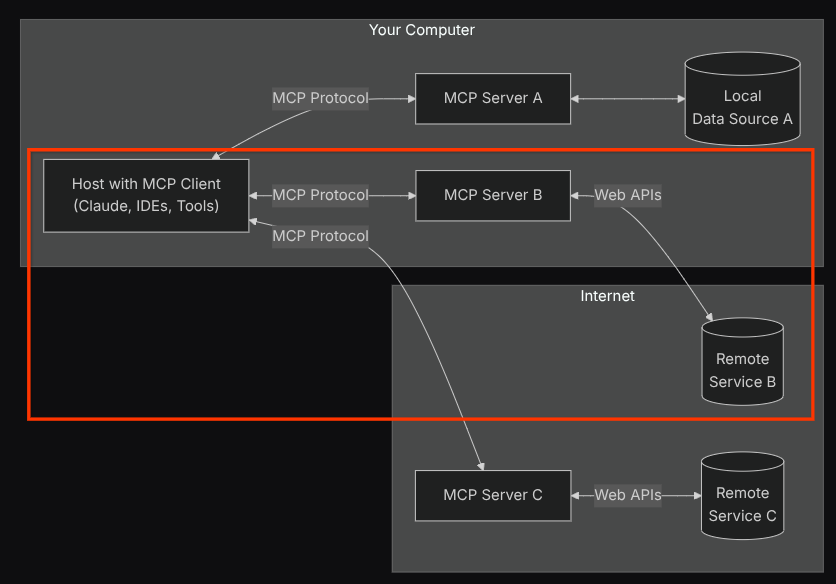
With this configuration, the agent will initialize the Confluence MCP Server as a separate process and it will handle communication with those processes via Studio I/O. This flow is illustrated at the following MCP architecture image marked inside the red box below.
Additionally within the command arguments of MCP initialization, we also limit the tools that can be utilized to only these tools: confluence_search, confluence_get_page, and confluence_get_page_children which support our QA test agent use cases. We utilize the community-contributed Atlassian MCP Server ( see full documentations for more details ) for this codelab tutorial.
Write Test Tool
After the agent receives context from the Confluence MCP Tool, it can construct the necessary test plan for the user. However we want to produce a file which contains this test plan so that it can be persisted and shared to the other person. In order to support this, we provide the custom tool write_test_tool below
# qa-test-planner/agent.py

...

async def write_test_tool(
    prd_id: str, test_cases: list[dict], tool_context: ToolContext
):
    """A tool to write the test plan into file

    Args:
        prd_id: Product requirement document ID
        test_cases: List of test case dictionaries that should conform to these fields:
            - test_case_key: str
            - test_type: Literal["manual","automatic"]
            - summary: str
            - preconditions: str
            - test_steps: str
            - expected_result: str
            - associated_requirements: str

    Returns:
        A message indicating success or failure of the validation and writing process
    """
    validated_test_cases = []
    validation_errors = []

    # Validate each test case
    for i, test_case in enumerate(test_cases):
        try:
            validated_test_case = TestPlan(**test_case)
            validated_test_cases.append(validated_test_case)
        except Exception as e:
            validation_errors.append(f"Error in test case {i + 1}: {str(e)}")

    # If validation errors exist, return error message
    if validation_errors:
        return {
            "status": "error",
            "message": "Validation failed",
            "errors": validation_errors,
        }

    # Write validated test cases to CSV
    try:
        # Convert validated test cases to a pandas DataFrame
        data = []
        for tc in validated_test_cases:
            data.append(
                {
                    "Test Case ID": tc.test_case_key,
                    "Type": tc.test_type,
                    "Summary": tc.summary,
                    "Preconditions": tc.preconditions,
                    "Test Steps": tc.test_steps,
                    "Expected Result": tc.expected_result,
                    "Associated Requirements": tc.associated_requirements,
                }
            )

        # Create DataFrame from the test case data
        df = pd.DataFrame(data)

        if not df.empty:
            # Create a temporary file with .csv extension
            with tempfile.NamedTemporaryFile(suffix=".csv", delete=False) as temp_file:
                # Write DataFrame to the temporary CSV file
                df.to_csv(temp_file.name, index=False)
                temp_file_path = temp_file.name

            # Read the file bytes from the temporary file
            with open(temp_file_path, "rb") as f:
                file_bytes = f.read()

            # Create an artifact with the file bytes
            await tool_context.save_artifact(
                filename=f"{prd_id}_test_plan.csv",
                artifact=types.Part.from_bytes(data=file_bytes, mime_type="text/csv"),
            )

            # Clean up the temporary file
            os.unlink(temp_file_path)

            return {
                "status": "success",
                "message": (
                    f"Successfully wrote {len(validated_test_cases)} test cases to "
                    f"CSV file: {prd_id}_test_plan.csv"
                ),
            }
        else:
            return {"status": "warning", "message": "No test cases to write"}
    except Exception as e:
        return {
            "status": "error",
            "message": f"An error occurred while writing to CSV: {str(e)}",
        }


...
تابعی که در بالا تعریف شده است، از قابلیتهای زیر پشتیبانی میکند:
- طرح آزمایشی تولید شده را بررسی کنید تا با مشخصات فیلد اجباری مطابقت داشته باشد، ما با استفاده از مدل Pydantic بررسی میکنیم و در صورت بروز خطا، پیام خطا را به عامل ارسال میکنیم.
- با استفاده از قابلیت pandas، نتیجه را به CSV منتقل کنید
- The generated file then saved as artifact using Artifact Service capabilities which can be accessed using ToolContext object that can be accessed on every tool calls
اگر فایلهای تولید شده را به عنوان مصنوع ذخیره کنیم، در زمان اجرای ADK به عنوان رویداد علامتگذاری میشود و میتواند بعداً در تعامل عامل در رابط وب نمایش داده شود.
With this, we can dynamically setup the file response from the agent, to be given to user.
4. Testing The Agent
Now let's try to communicate with the agent via CLI, run the following command
uv run adk run qa_test_planner
It will show output like this, where you can chat in turn with the agent, however you can only send text via this interface
Log setup complete: /tmp/agents_log/agent.xxxx_xxx.log
To access latest log: tail -F /tmp/agents_log/agent.latest.log
Running agent qa_test_planner_agent, type exit to exit.
user: hello
[qa_test_planner_agent]: Hello there! How can I help you today?
user:
It's nice to be able to chat with the agent via CLI. But, even better if we have a nice web chat with it and we can do that too! ADK also allows us to have a development UI to interact and inspect what's going on during the interaction. Run the following command to start the local development UI server
uv run adk web --port 8080
It will spawn output like the following example, means that we can already access the web interface
INFO:     Started server process [xxxx]
INFO:     Waiting for application startup.

+-----------------------------------------------------------------------------+
| ADK Web Server started                                                      |
|                                                                             |
| For local testing, access at http://localhost:8080.                         |
+-----------------------------------------------------------------------------+

INFO:     Application startup complete.
INFO:     Uvicorn running on http://0.0.0.0:8080 (Press CTRL+C to quit)
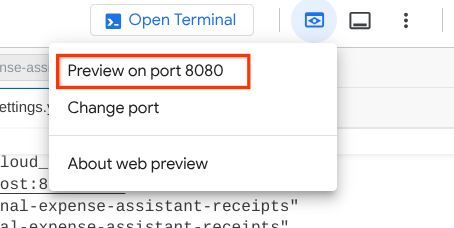
Now, to check it, click the Web Preview button on the top area of your Cloud Shell Editor and select Preview on port 8080
You will see the following web page where you can select available agents on the top left drop down button ( in our case it should be qa_test_planner ) and interact with the bot. You will see many informations about the log details during agent runtime in the left window
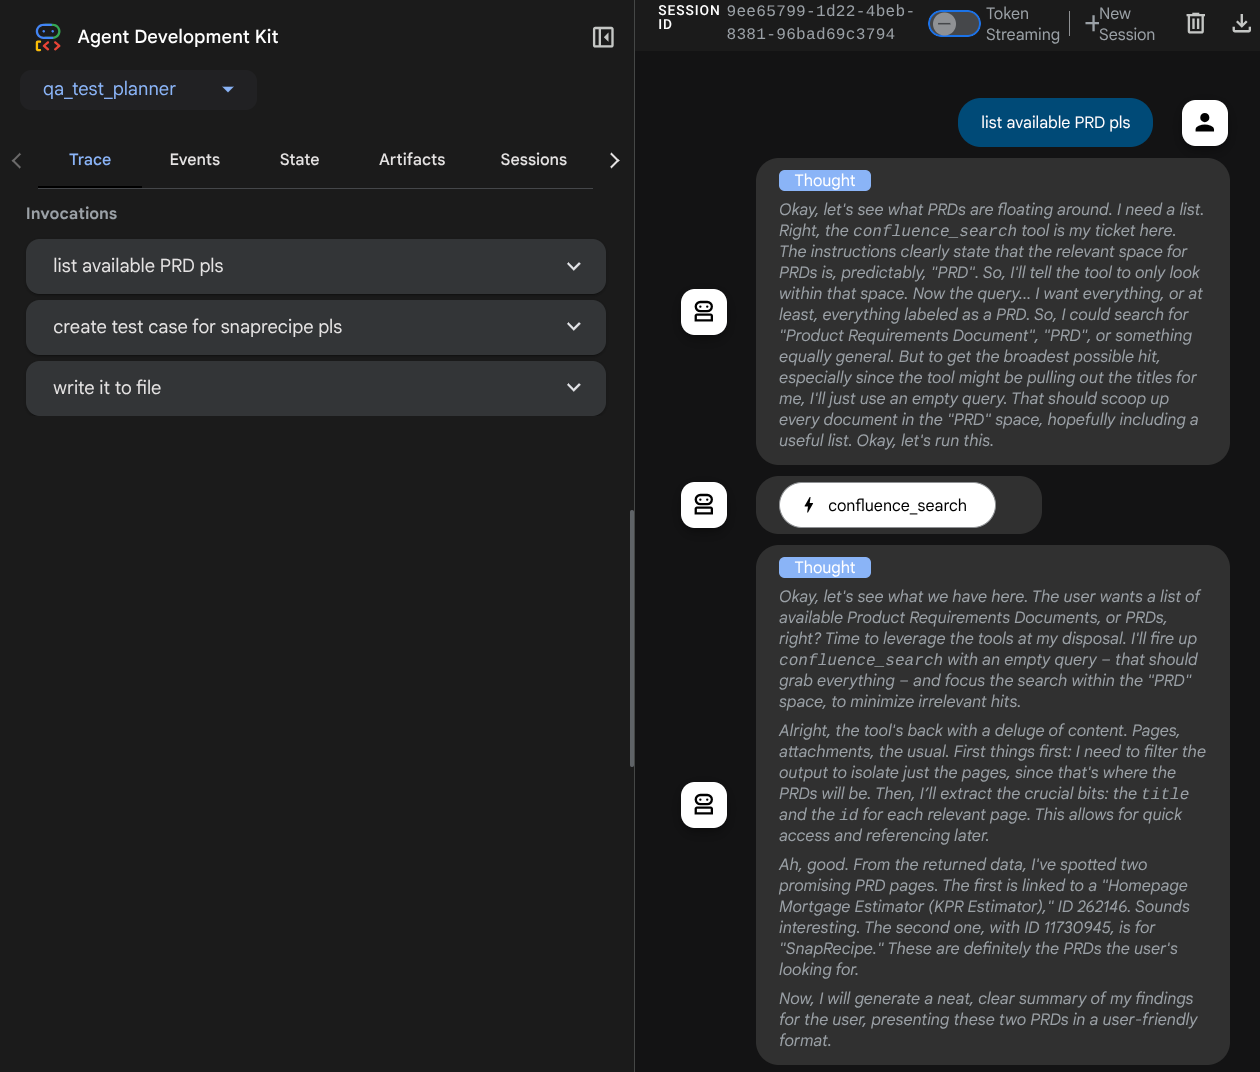
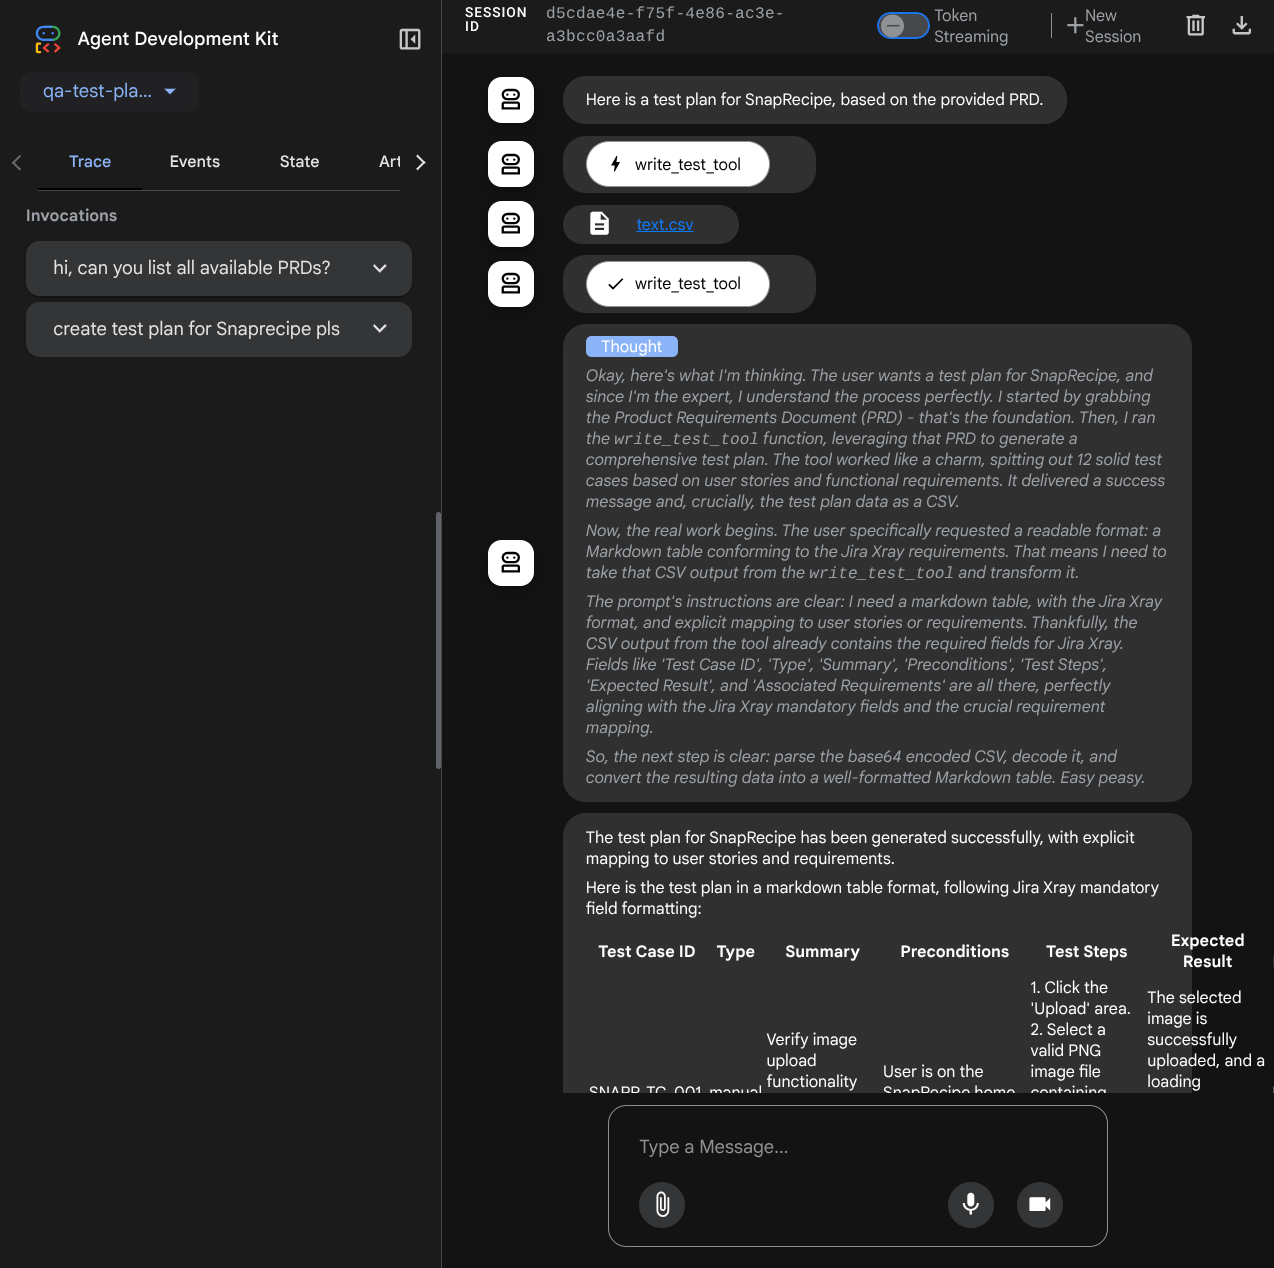
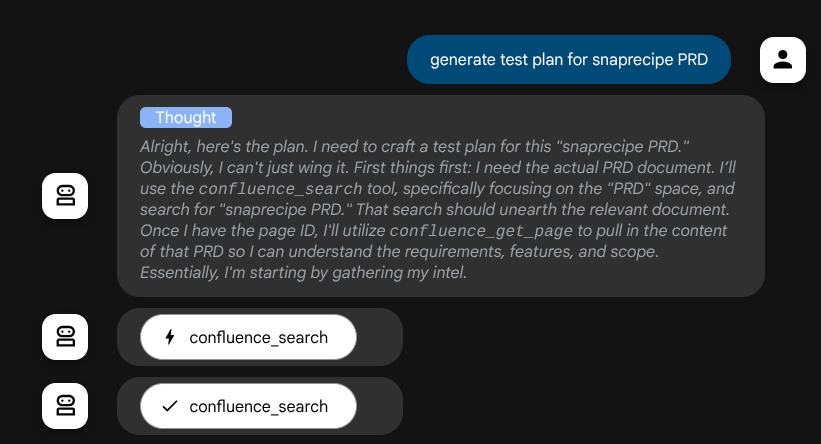
Let's try some actions! Chat with the agents with these prompts:
- " Please list all available PRDs "
- " Write test plan for Snaprecipe PRD "
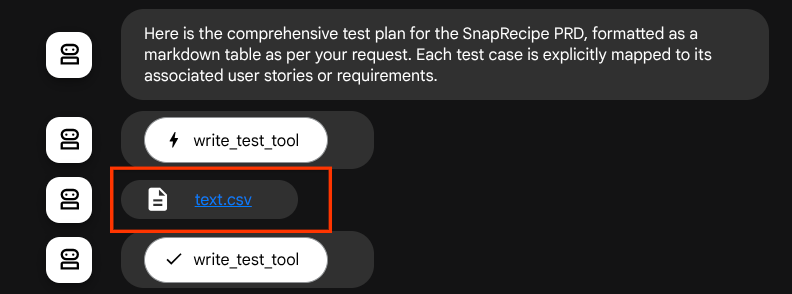
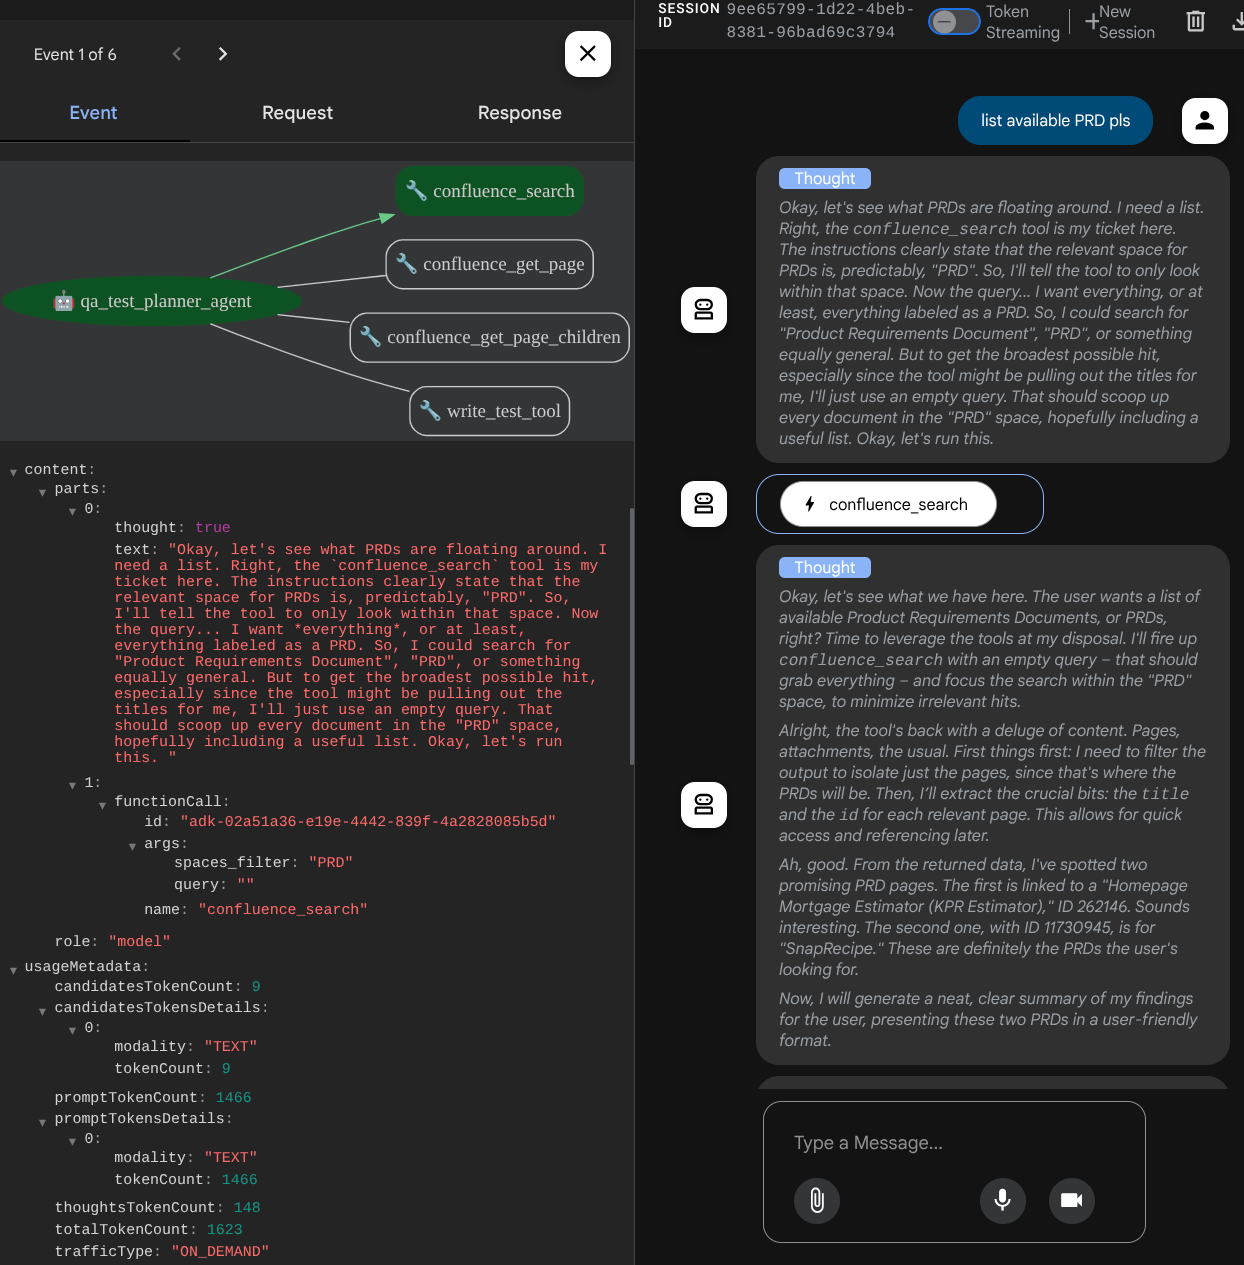
When it use some tools, you can inspect what's going on in the development UI
See how the agent responds to you and also inspect when we prompt for test file it will generate the test plan in CSV file as artifact
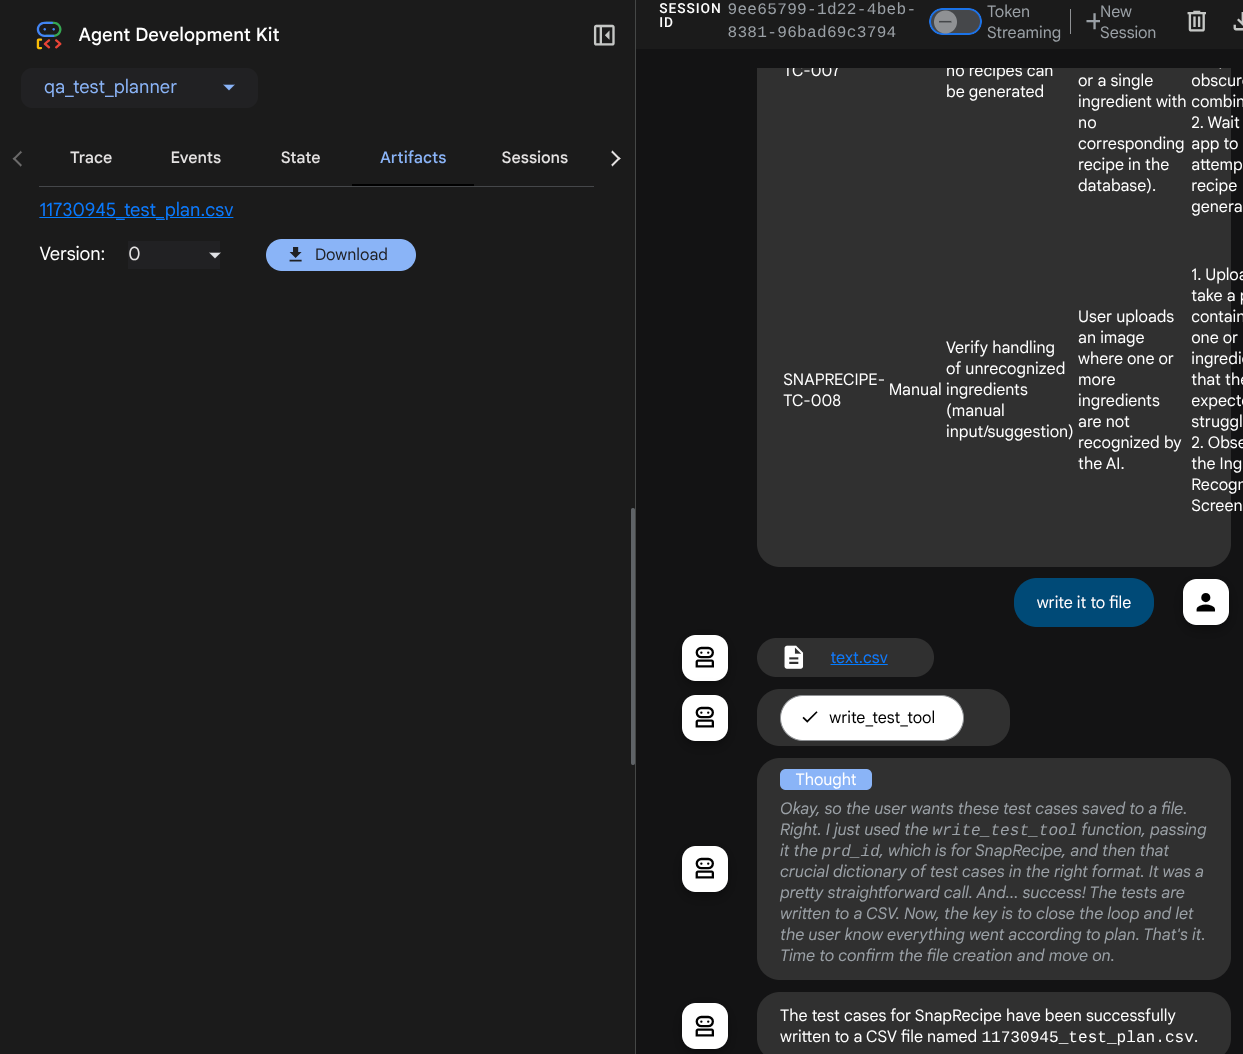
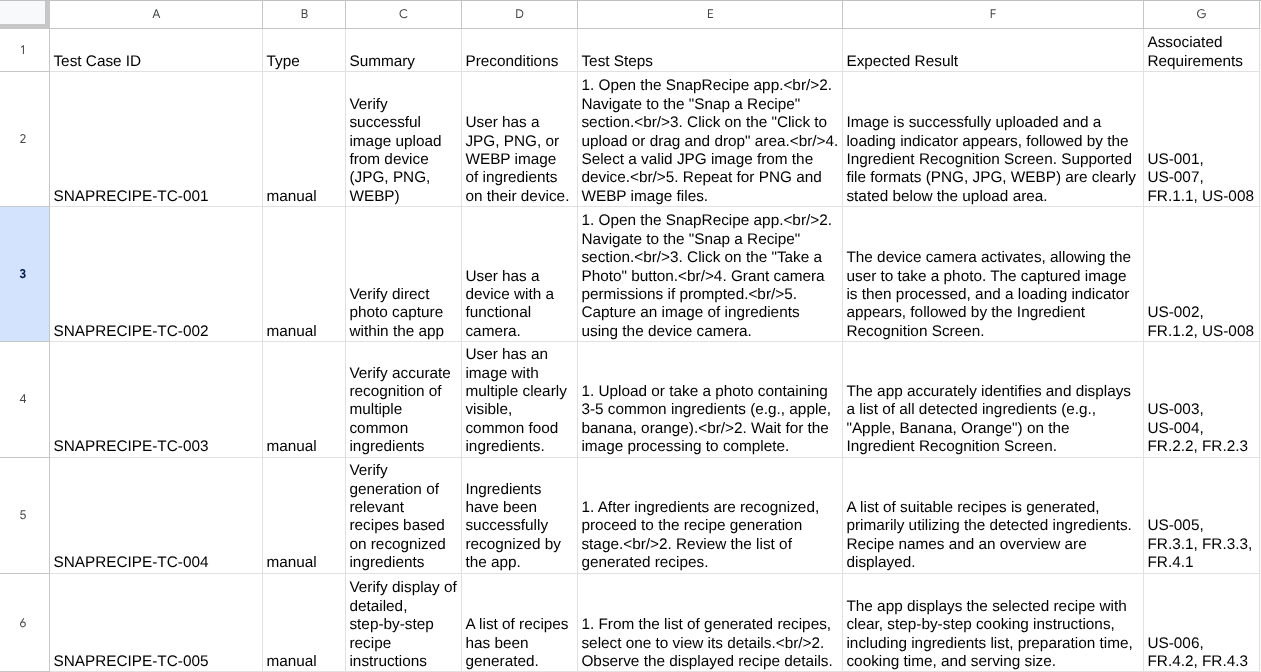
Now, you can check the content of the CSV by importing it to Google Sheet for example
Congratulations! Now you have a working QA Test Planner agent running locally! Now let's see how we can deploy it to Cloud Run so other people also can use it!
5. Deploying to Cloud Run
حالا، البته که میخواهیم از هر جایی به این برنامهی شگفتانگیز دسترسی داشته باشیم. برای انجام این کار، میتوانیم این برنامه را بستهبندی کرده و در Cloud Run مستقر کنیم. برای این دمو، این سرویس به عنوان یک سرویس عمومی که دیگران میتوانند به آن دسترسی داشته باشند، نمایش داده خواهد شد. با این حال، به خاطر داشته باشید که این بهترین روش نیست!
در دایرکتوری کاری فعلی شما، ما از قبل تمام فایلهای مورد نیاز برای استقرار برنامههایمان در Cloud Run - دایرکتوری agent، Dockerfile و server.py (اسکریپت سرویس اصلی) - را داریم. بیایید آن را مستقر کنیم. به ترمینال Cloud Shell بروید و مطمئن شوید که پروژه فعلی با پروژه فعال شما پیکربندی شده است، در غیر این صورت از دستور gcloud configure برای تنظیم شناسه پروژه استفاده کنید:
gcloud config set project [PROJECT_ID]
Then, run the following command to deploy it to Cloud Run.
gcloud run deploy qa-test-planner-agent \
                  --source . \
                  --port 8080 \
                  --project {YOUR_PROJECT_ID} \
                  --allow-unauthenticated \
                  --region us-central1 \
                  --update-env-vars GOOGLE_GENAI_USE_VERTEXAI=1 \
                  --update-env-vars GOOGLE_CLOUD_PROJECT={YOUR_PROJECT_ID} \
                  --update-env-vars GOOGLE_CLOUD_LOCATION=global \
                  --update-env-vars CONFLUENCE_URL={YOUR_CONFLUENCE_URL} \
                  --update-env-vars CONFLUENCE_USERNAME={YOUR_CONFLUENCE_USERNAME} \
                  --update-env-vars CONFLUENCE_TOKEN={YOUR_CONFLUENCE_TOKEN} \
                  --update-env-vars CONFLUENCE_PRD_SPACE_ID={YOUR_PRD_SPACE_ID} \
                  --memory 1G
اگر از شما خواسته شد که ایجاد یک رجیستری مصنوعات برای مخزن داکر را تأیید کنید، فقط با Y پاسخ دهید. توجه داشته باشید که ما در اینجا به افراد غیرمجاز اجازه دسترسی میدهیم زیرا این یک برنامه آزمایشی است. توصیه میشود از احراز هویت مناسب برای برنامههای سازمانی و تولیدی خود استفاده کنید.
Once the deployment is complete, you should get a link similar to the below:
https://qa-test-planner-agent-*******.us-central1.run.app
When you access the URL, you will enter the web dev UI similar to when you try it locally. Go ahead and use your application from the Incognito window or your mobile device. It should be live already.
Now let's try these different prompt again - sequentially, see what happen there:
- " Can you find PRD related to Mortgage Estimator? "
- " Give me feedback about what can we improve on that"
- " Write the test plan for it"
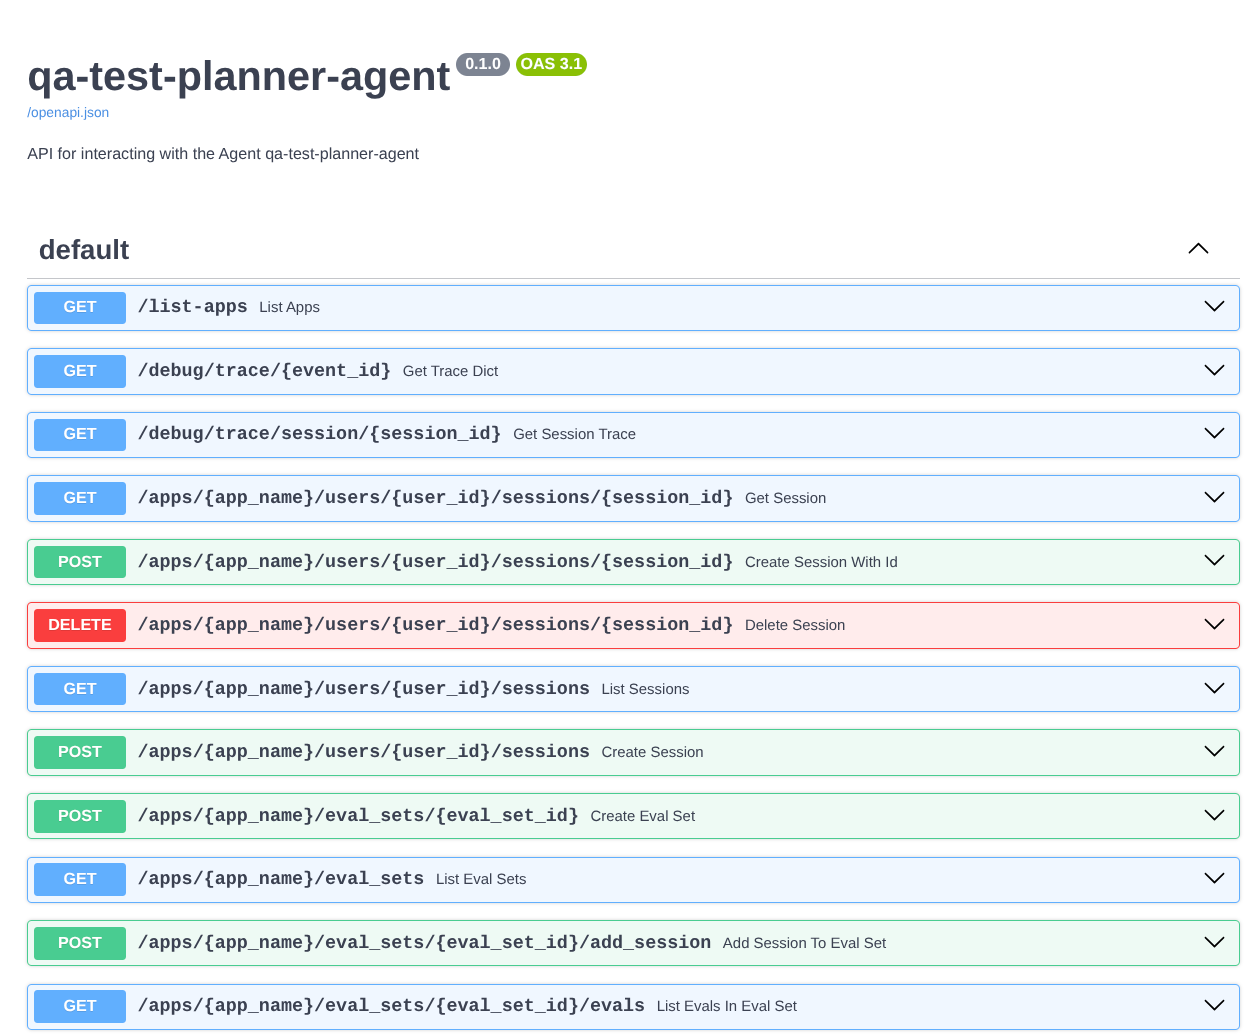
علاوه بر این، از آنجایی که ما عامل را به عنوان یک برنامه FastAPI اجرا میکنیم، میتوانیم تمام مسیرهای API را در مسیر /docs نیز بررسی کنیم. به عنوان مثال، اگر به آدرس اینترنتی مانند https://qa-test-planner-agent-*******.us-central1.run.app/docs دسترسی پیدا کنید، صفحه مستندات Swagger را مانند تصویر زیر مشاهده خواهید کرد.
Code Explanation
Now, let's inspect what file we need here for deployment, starting with server.py
# server.py

import os

from fastapi import FastAPI
from google.adk.cli.fast_api import get_fast_api_app

AGENT_DIR = os.path.dirname(os.path.abspath(__file__))

app_args = {"agents_dir": AGENT_DIR, "web": True}

app: FastAPI = get_fast_api_app(**app_args)

app.title = "qa-test-planner-agent"
app.description = "API for interacting with the Agent qa-test-planner-agent"


if __name__ == "__main__":
    import uvicorn

    uvicorn.run(app, host="0.0.0.0", port=8080)
ما میتوانیم به راحتی با استفاده از تابع get_fast_api_app ، عامل خود را به یک برنامه fastapi تبدیل کنیم. در این تابع، میتوانیم قابلیتهای مختلفی را تنظیم کنیم، به عنوان مثال پیکربندی سرویس جلسه، سرویس مصنوعات یا حتی ردیابی دادهها به ابر.
If you want to, you can also set the application lifecycle here. After that we can use uvicorn to run the Fast API application
After that, the Dockerfile will provide us the necessary steps to run the application
# Dockerfile

FROM python:3.12-slim

RUN pip install --no-cache-dir uv==0.7.13

WORKDIR /app

COPY . .

RUN uv sync --frozen

EXPOSE 8080

CMD ["uv", "run", "uvicorn", "server:app", "--host", "0.0.0.0", "--port", "8080"]
6. Challenge
Now it is your time to shine and polish your exploration skills. Can you also create a tool so that PRD review feedback is also written to a file?
7. Clean up
To avoid incurring charges to your Google Cloud account for the resources used in this codelab, follow these steps:
- In the Google Cloud console, go to the Manage resources page.
- In the project list, select the project that you want to delete, and then click Delete .
- In the dialog, type the project ID, and then click Shut down to delete the project.
- Alternatively you can go to Cloud Run on the console, select the service you just deployed and delete.