
1. はじめに

テストプランの作成に生成 AI を使用する可能性は、最新の品質保証における 2 つの最大の課題であるスピードと包括性を解決できることにあります。アジャイルと DevOps のサイクルが急速に進む今日では、詳細なテストプランを手動で作成することが大きなボトルネックとなり、テストプロセス全体が遅延します。生成 AI を活用したエージェントは、ユーザー ストーリーと技術要件を取り込んで、数日ではなく数分で徹底的なテストプランを作成できるため、QA プロセスを開発に遅れることなく進めることができます。さらに、AI は、人間が見落とす可能性のある複雑なシナリオ、エッジケース、ネガティブ パスを特定することに優れており、テストカバレッジを大幅に改善し、本番環境に移行するバグを大幅に削減できます。
この Codelab では、Confluence から製品要件ドキュメントを取得し、建設的なフィードバックを提供できるエージェントを構築する方法と、CSV ファイルにエクスポートできる包括的なテストプランを生成する方法について説明します。
この Codelab では、次の手順で進めます。
- Google Cloud プロジェクトを準備し、必要な API をすべて有効にする
- コーディング環境のワークスペースを設定する
- Confluence 用のローカル mcp-server を準備する
- ADK エージェントのソースコード、プロンプト、ツールを構造化して MCP サーバーに接続する
- Artifact Service と Tool Context の使用方法を理解する
- ADK ローカル ウェブ開発 UI を使用してエージェントをテストする
- 環境変数を管理し、アプリケーションを Cloud Run にデプロイするために必要なファイルを設定する
- アプリケーションを Cloud Run にデプロイする
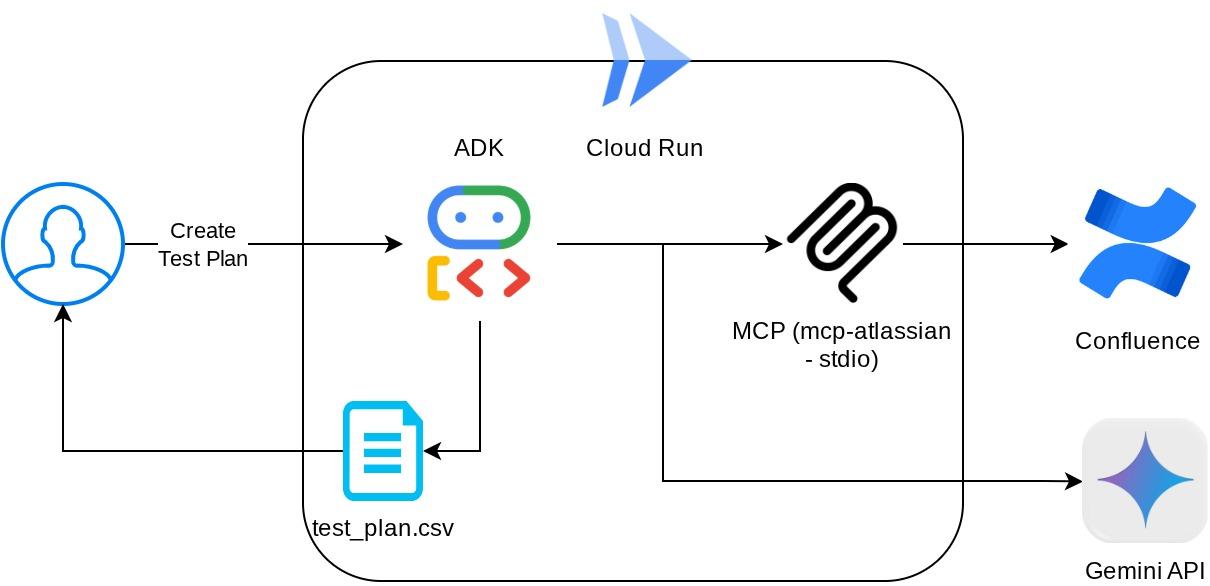
アーキテクチャの概要
前提条件
- Python の操作に慣れている
- HTTP サービスを使用した基本的なフルスタック アーキテクチャを理解している
学習内容
- ADK エージェントのアーキテクチャを設計し、その機能を活用する
- カスタムツールと MCP でツールを使用する
- Artifact Service の管理を使用して、エージェントによるファイル出力を設定する
- BuiltInPlanner を活用して、Gemini 2.5 Flash の思考機能で計画を立てることでタスクの実行を改善する
- ADK ウェブ インターフェースを介したインタラクションとデバッグ
- Dockerfile を使用してアプリケーションを Cloud Run にデプロイし、環境変数を提供する
必要なもの
- Chrome ウェブブラウザ
- Gmail アカウント
- 課金が有効になっている Cloud プロジェクト
- (省略可)製品要件ドキュメント ページを含む Confluence スペース
この Codelab は、初心者を含むあらゆるレベルのデベロッパーを対象としており、サンプル アプリケーションでは Python を使用しています。ただし、ここで説明するコンセプトを理解するために Python の知識は必要ありません。Confluence スペースがない場合でも、この Codelab を試すための認証情報を提供しますのでご安心ください。
2. 始める前に
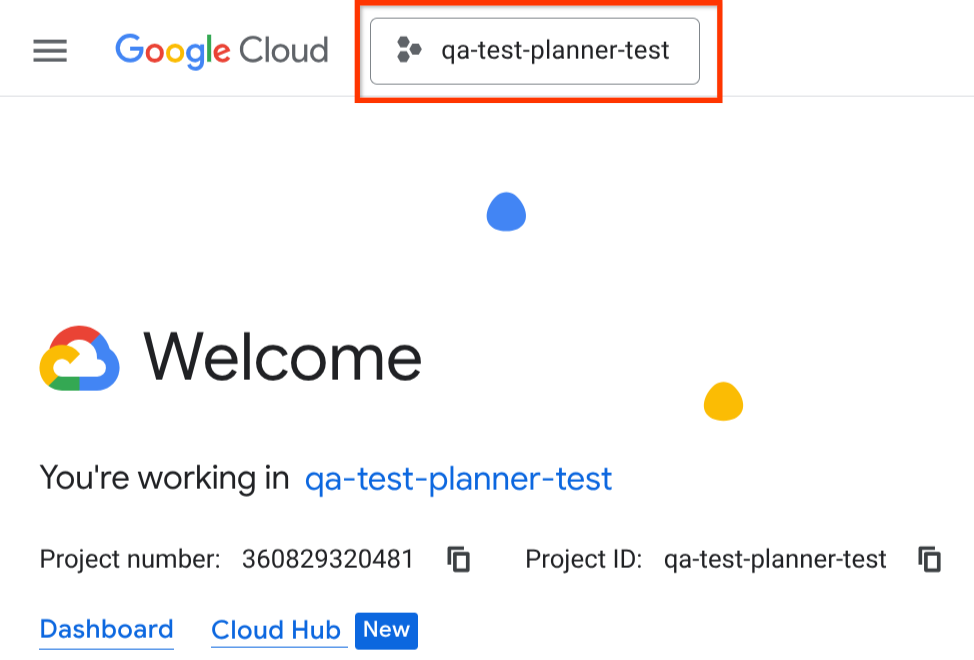
Cloud コンソールでアクティブなプロジェクトを選択する
この Codelab では、課金が有効になっている Google Cloud プロジェクトがすでにあることを前提としています。まだお持ちでない場合は、以下の手順に沿って開始してください。
- Google Cloud コンソールのプロジェクト選択ページで、Google Cloud プロジェクトを選択または作成します。
- Cloud プロジェクトに対して課金が有効になっていることを確認します。詳しくは、プロジェクトで課金が有効になっているかどうかを確認する方法をご覧ください。
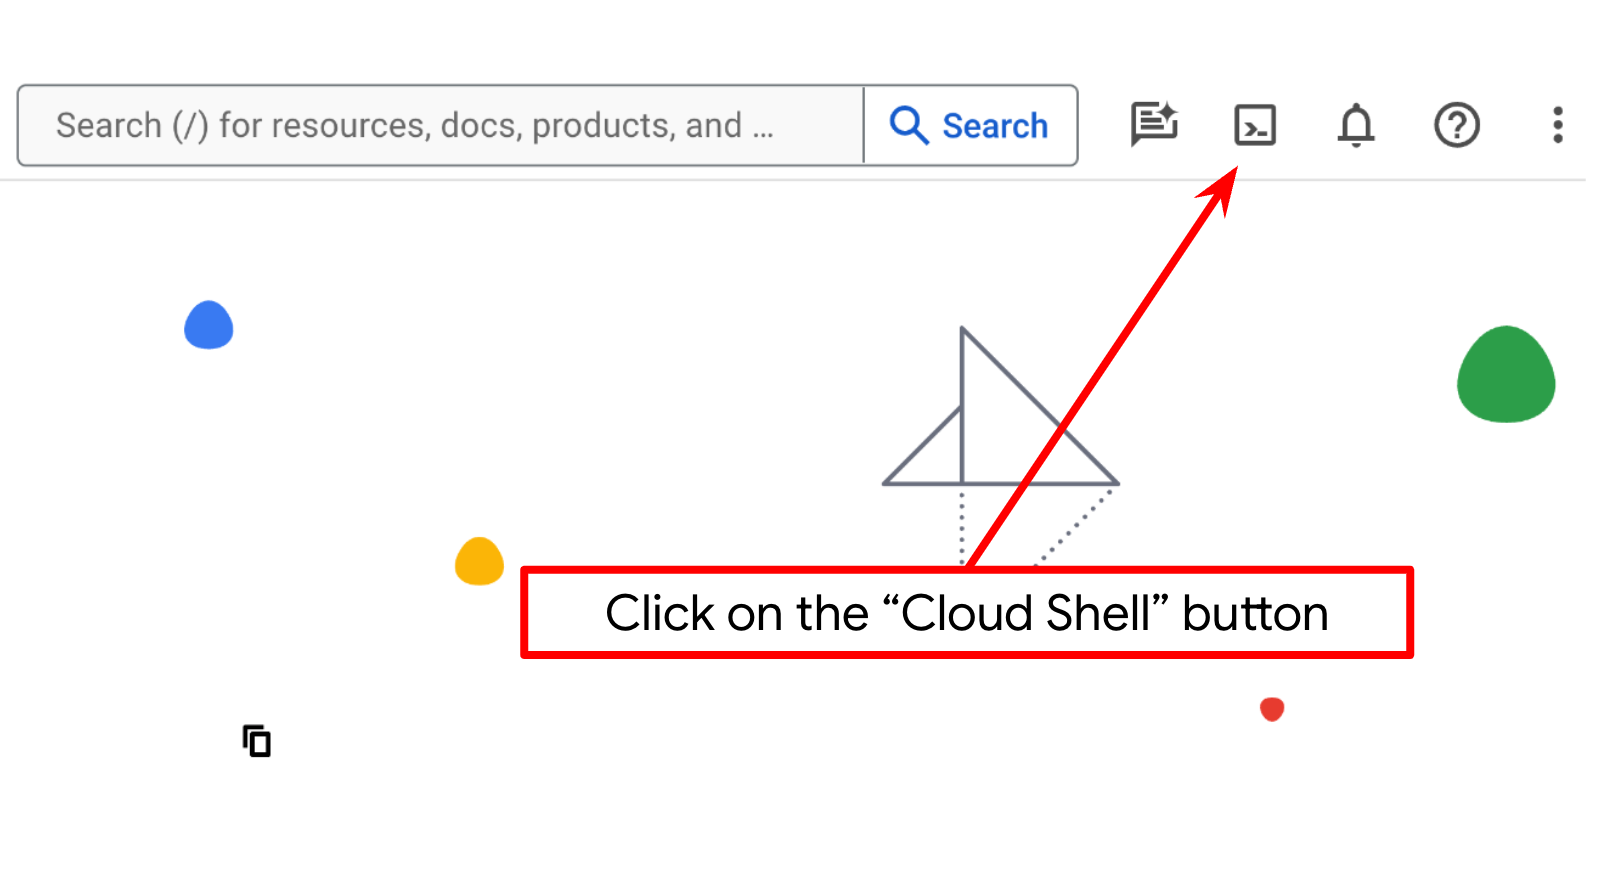
Cloud Shell ターミナルで Cloud プロジェクトを設定する
- Google Cloud 上で動作するコマンドライン環境の Cloud Shell を使用します。Google Cloud コンソールの上部にある「Cloud Shell をアクティブにする」アイコン をクリックします。
- Cloud Shell に接続したら、次のコマンドを使用して、すでに認証済みであることと、プロジェクトがプロジェクト ID に設定されていることを確認します。
gcloud auth list
- Cloud Shell で次のコマンドを実行して、gcloud コマンドがプロジェクトを認識していることを確認します。
gcloud config list project
- プロジェクトが設定されていない場合は、次のコマンドを使用して設定します。
gcloud config set project <YOUR_PROJECT_ID>
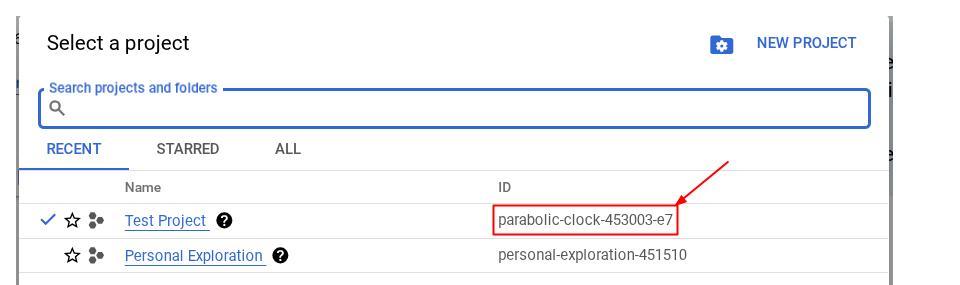
または、コンソールで PROJECT_ID ID を確認することもできます。

クリックすると、右側にすべてのプロジェクトとプロジェクト ID が表示されます。
- 以下のコマンドを使用して、必要な API を有効にします。これには数分かかることがあります。しばらくお待ちください。
gcloud services enable aiplatform.googleapis.com \
                       run.googleapis.com \
                       cloudbuild.googleapis.com \
                       cloudresourcemanager.googleapis.com
コマンドが正常に実行されると、次のようなメッセージが表示されます。
Operation "operations/..." finished successfully.
gcloud コマンドの代わりに、コンソールで各プロダクトを検索するか、こちらの リンクを使用することもできます。
API が見つからない場合は、実装中にいつでも有効にできます。
gcloud コマンドとその使用方法については、ドキュメントをご覧ください。
Cloud Shell エディタに移動してアプリケーションの作業ディレクトリを設定する
これで、コードエディタを設定してコーディングを開始できます。ここでは Cloud Shell エディタを使用します。
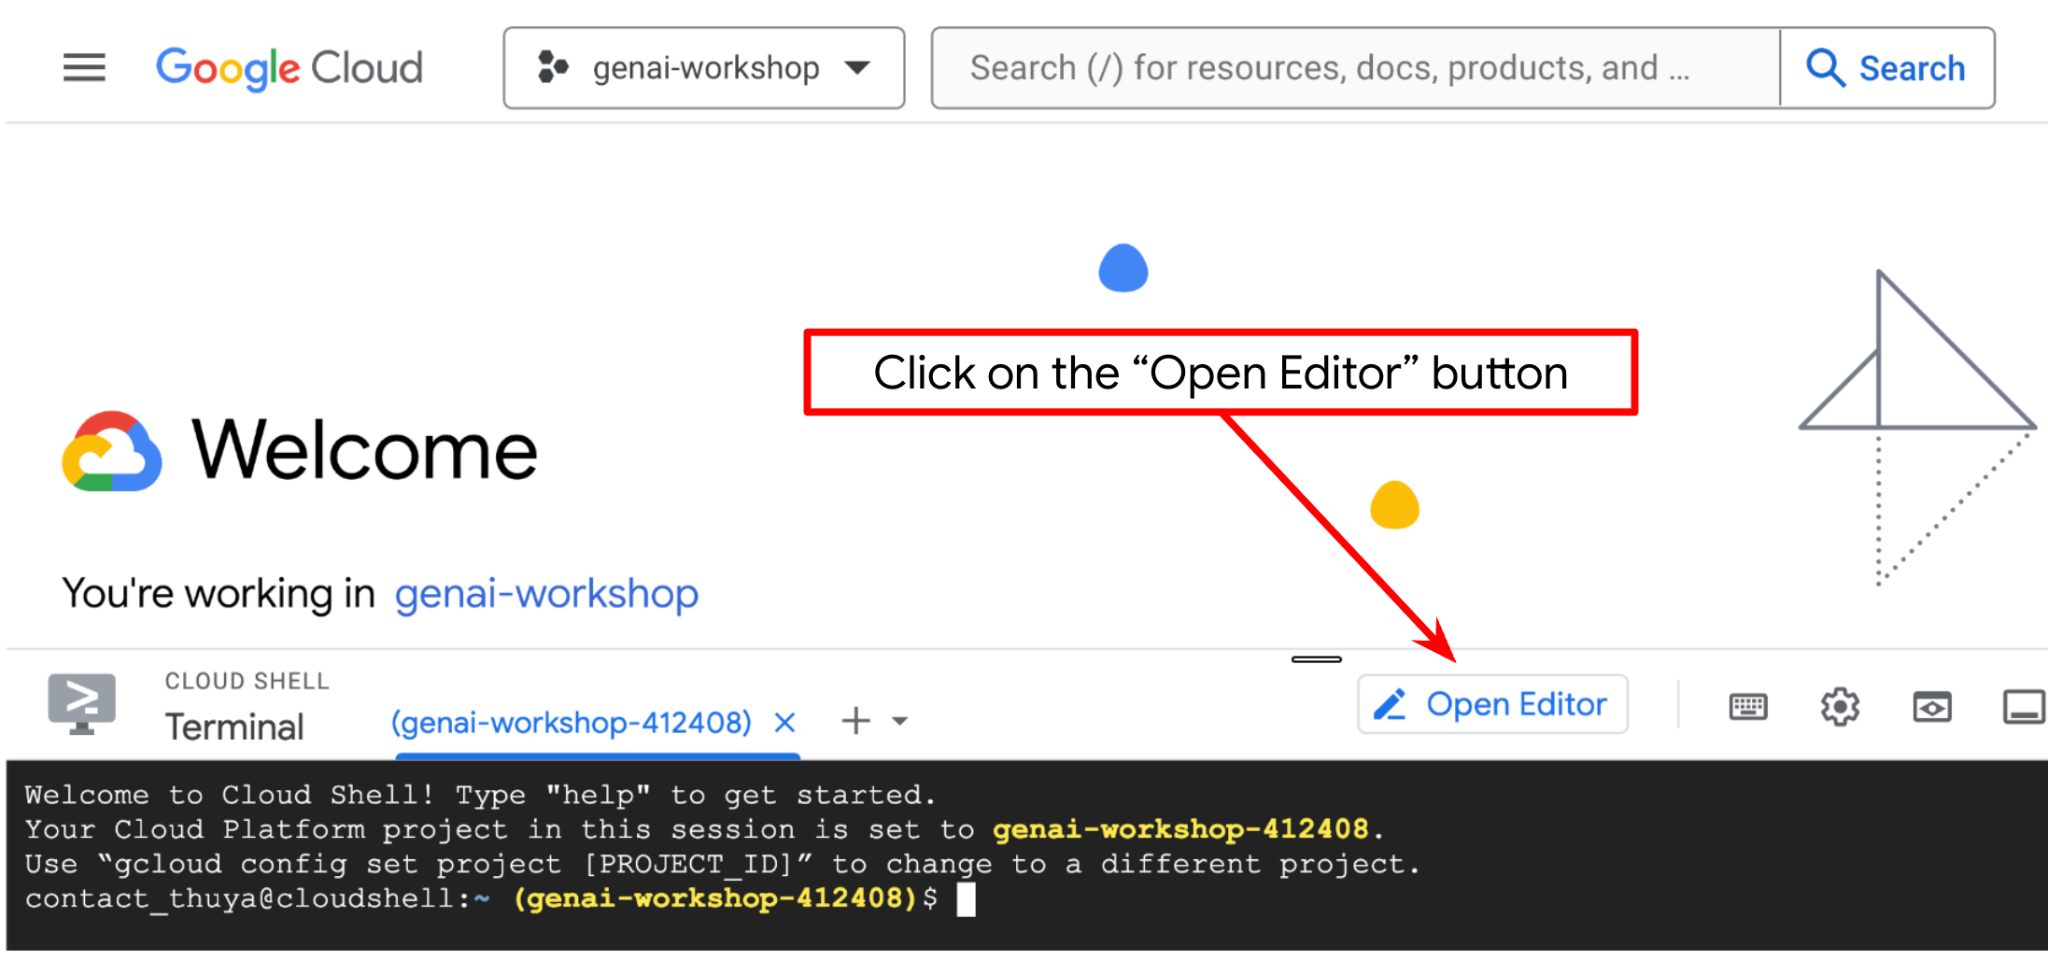
- [エディタを開く] ボタンをクリックすると、Cloud Shell エディタが開きます。ここにコードを記述できます。
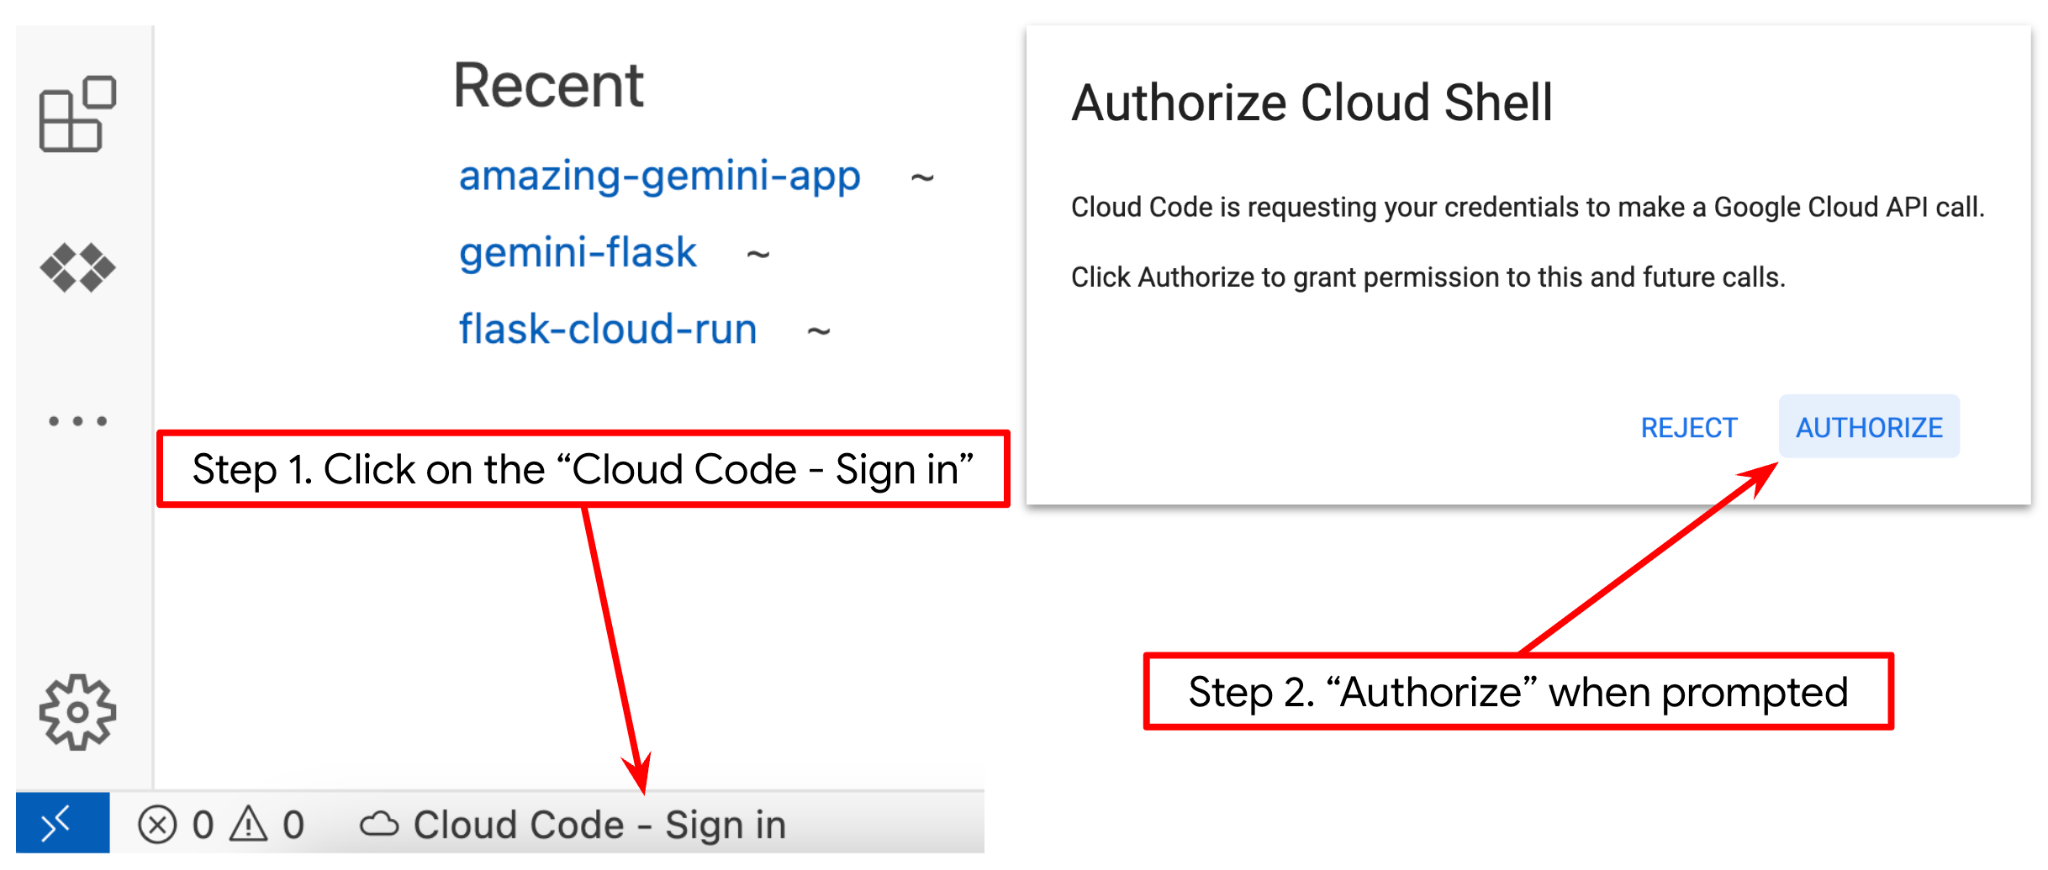
- 下の図に示すように、Cloud Shell エディタの左下隅(ステータスバー)に Cloud Code プロジェクトが設定され、課金が有効になっているアクティブな Google Cloud プロジェクトに設定されていることを確認します。[承認] をクリックします(求められた場合)。前のコマンドをすでに実行している場合、ボタンはログインボタンではなく、有効にしたプロジェクトを直接指している可能性があります。
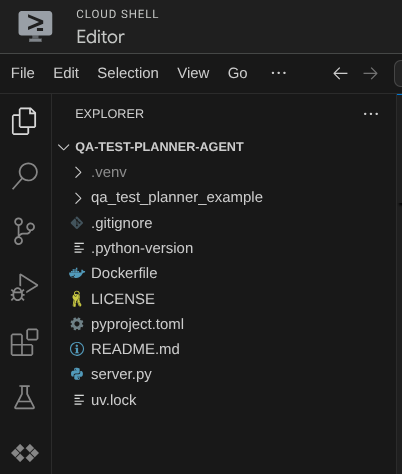
- 次に、この Codelab のテンプレート作業ディレクトリを Github からクローンします。次のコマンドを実行します。これにより、qa-test-planner-agent ディレクトリに作業ディレクトリが作成されます。
git clone https://github.com/alphinside/qa-test-planner-agent.git qa-test-planner-agent
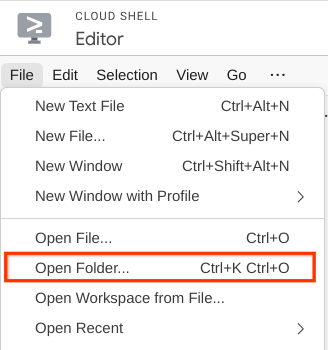
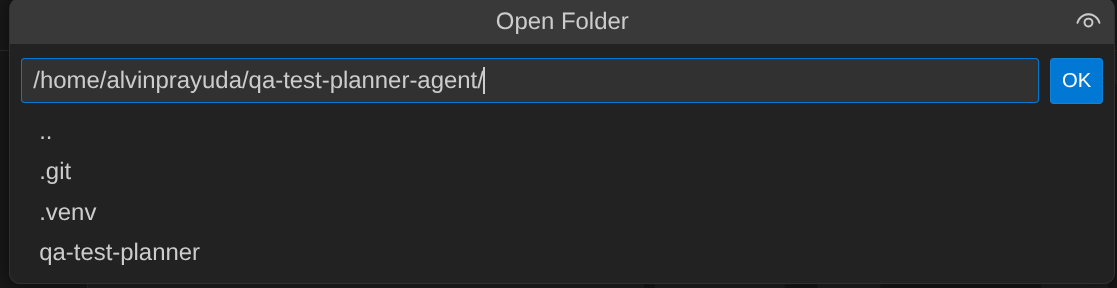
- 次に、Cloud Shell エディタの上部にある [ファイル -> フォルダを開く] をクリックし、ユーザー名 ディレクトリを見つけて、qa-test-planner-agent ディレクトリを見つけて [OK] ボタンをクリックします。これにより、選択したディレクトリがメインの作業ディレクトリになります。この例では、ユーザー名は alvinprayuda であるため、ディレクトリ パスは次のようになります。
これで、Cloud Shell エディタは次のようになります。
環境の設定
Python 仮想環境を準備する
次のステップは、開発環境を準備することです。現在アクティブなターミナルは、qa-test-planner-agent 作業ディレクトリ内にある必要があります。この Codelab では Python 3.12 を使用し、uv Python プロジェクト マネージャーを使用して、Python バージョンと仮想環境の作成と管理の必要性を簡素化します。
- まだターミナルを開いていない場合は、[ターミナル] -> [新しいターミナル] をクリックして開くか、Ctrl + Shift + C を使用します。これにより、ブラウザの下部にターミナル ウィンドウが開きます。

- 次のコマンドを使用して
uvをダウンロードし、Python 3.12 をインストールします。
curl -LsSf https://astral.sh/uv/0.7.19/install.sh | sh && \
source $HOME/.local/bin/env && \
uv python install 3.12
uvを使用して仮想環境を初期化します。次のコマンドを実行します。
uv sync --frozen
これにより、.venv ディレクトリが作成され、依存関係がインストールされます。pyproject.toml を簡単に確認すると、次のような依存関係に関する情報が表示されます。
dependencies = [
    "google-adk>=1.5.0",
    "mcp-atlassian>=0.11.9",
    "pandas>=2.3.0",
    "python-dotenv>=1.1.1",
]
- 仮想環境をテストするには、新しいファイル main.py を作成し、次のコードをコピーします。
def main():
   print("Hello from qa-test-planner-agent")

if __name__ == "__main__":
   main()
- そのうえで、次のコマンドを実行します。
uv run main.py
次のような出力が表示されます。
Using CPython 3.12
Creating virtual environment at: .venv
Hello from qa-test-planner-agent!
これは、Python プロジェクトが正しく設定されていることを示しています。
次のステップに進み、エージェントとサービスを構築します。
3. Google ADK と Gemini 2.5 を使用してエージェントを構築する
ADK のディレクトリ構造の概要
まず、ADK の機能とエージェントの構築方法について説明します。ADK の完全なドキュメントは、こちらの URL で確認できます。ADK には、CLI コマンドの実行で多くのユーティリティが用意されています。たとえば、次のようなものがあります。
- エージェント ディレクトリ構造を設定する
- CLI の入力 / 出力を介してインタラクションをすばやく試す
- ローカル開発 UI ウェブ インターフェースをすばやく設定する
次に、CLI コマンドを使用してエージェント ディレクトリ構造を作成します。次のコマンドを実行します。
uv run adk create qa_test_planner \
   --model gemini-2.5-flash \
   --project {your-project-id} \
   --region global
これにより、現在の作業ディレクトリに次のエージェント ディレクトリ構造が作成されます。
qa_test_planner/
├── __init__.py
├── .env
├── agent.py
init.py と agent.py を調べると、次のコードが表示されます。
# __init__.py

from . import agent
# agent.py

from google.adk.agents import Agent

root_agent = Agent(
    model='gemini-2.5-flash',
    name='root_agent',
    description='A helpful assistant for user questions.',
    instruction='Answer user questions to the best of your knowledge',
)
QA テスト プランナー エージェントを構築する
QA テスト プランナー エージェントを構築しましょう。qa_test_planner/agent.py ファイルを開き、root_agent を含む次のコードをコピーします。
# qa_test_planner/agent.py

from google.adk.agents import Agent
from google.adk.tools.mcp_tool.mcp_toolset import (
    MCPToolset,
    StdioConnectionParams,
    StdioServerParameters,
)
from google.adk.planners import BuiltInPlanner
from google.genai import types
from dotenv import load_dotenv
import os
from pathlib import Path
from pydantic import BaseModel
from typing import Literal
import tempfile
import pandas as pd
from google.adk.tools import ToolContext


load_dotenv(dotenv_path=Path(__file__).parent / ".env")

confluence_tool = MCPToolset(
    connection_params=StdioConnectionParams(
        server_params=StdioServerParameters(
            command="uvx",
            args=[
                "mcp-atlassian",
                f"--confluence-url={os.getenv('CONFLUENCE_URL')}",
                f"--confluence-username={os.getenv('CONFLUENCE_USERNAME')}",
                f"--confluence-token={os.getenv('CONFLUENCE_TOKEN')}",
                "--enabled-tools=confluence_search,confluence_get_page,confluence_get_page_children",
            ],
            env={},
        ),
        timeout=60,
    ),
)


class TestPlan(BaseModel):
    test_case_key: str
    test_type: Literal["manual", "automatic"]
    summary: str
    preconditions: str
    test_steps: str
    expected_result: str
    associated_requirements: str


async def write_test_tool(
    prd_id: str, test_cases: list[dict], tool_context: ToolContext
):
    """A tool to write the test plan into file

    Args:
        prd_id: Product requirement document ID
        test_cases: List of test case dictionaries that should conform to these fields:
            - test_case_key: str
            - test_type: Literal["manual","automatic"]
            - summary: str
            - preconditions: str
            - test_steps: str
            - expected_result: str
            - associated_requirements: str

    Returns:
        A message indicating success or failure of the validation and writing process
    """
    validated_test_cases = []
    validation_errors = []

    # Validate each test case
    for i, test_case in enumerate(test_cases):
        try:
            validated_test_case = TestPlan(**test_case)
            validated_test_cases.append(validated_test_case)
        except Exception as e:
            validation_errors.append(f"Error in test case {i + 1}: {str(e)}")

    # If validation errors exist, return error message
    if validation_errors:
        return {
            "status": "error",
            "message": "Validation failed",
            "errors": validation_errors,
        }

    # Write validated test cases to CSV
    try:
        # Convert validated test cases to a pandas DataFrame
        data = []
        for tc in validated_test_cases:
            data.append(
                {
                    "Test Case ID": tc.test_case_key,
                    "Type": tc.test_type,
                    "Summary": tc.summary,
                    "Preconditions": tc.preconditions,
                    "Test Steps": tc.test_steps,
                    "Expected Result": tc.expected_result,
                    "Associated Requirements": tc.associated_requirements,
                }
            )

        # Create DataFrame from the test case data
        df = pd.DataFrame(data)

        if not df.empty:
            # Create a temporary file with .csv extension
            with tempfile.NamedTemporaryFile(suffix=".csv", delete=False) as temp_file:
                # Write DataFrame to the temporary CSV file
                df.to_csv(temp_file.name, index=False)
                temp_file_path = temp_file.name

            # Read the file bytes from the temporary file
            with open(temp_file_path, "rb") as f:
                file_bytes = f.read()

            # Create an artifact with the file bytes
            await tool_context.save_artifact(
                filename=f"{prd_id}_test_plan.csv",
                artifact=types.Part.from_bytes(data=file_bytes, mime_type="text/csv"),
            )

            # Clean up the temporary file
            os.unlink(temp_file_path)

            return {
                "status": "success",
                "message": (
                    f"Successfully wrote {len(validated_test_cases)} test cases to "
                    f"CSV file: {prd_id}_test_plan.csv"
                ),
            }
        else:
            return {"status": "warning", "message": "No test cases to write"}
    except Exception as e:
        return {
            "status": "error",
            "message": f"An error occurred while writing to CSV: {str(e)}",
        }


root_agent = Agent(
    model="gemini-2.5-flash",
    name="qa_test_planner_agent",
    description="You are an expert QA Test Planner and Product Manager assistant",
    instruction=f"""
Help user search any product requirement documents on Confluence. Furthermore you also can provide the following capabilities when asked:
- evaluate product requirement documents and assess it, then give expert input on what can be improved
- create a comprehensive test plan following Jira Xray mandatory field formatting, result showed as markdown table. Each test plan must also have explicit mapping on
    which user stories or requirements identifier it's associated to

Here is the Confluence space ID with it's respective document grouping:

- "{os.getenv("CONFLUENCE_PRD_SPACE_ID")}" : space to store Product Requirements Documents

Do not making things up, Always stick to the fact based on data you retrieve via tools.
""",
    tools=[confluence_tool, write_test_tool],
    planner=BuiltInPlanner(
        thinking_config=types.ThinkingConfig(
            include_thoughts=True,
            thinking_budget=2048,
        )
    ),
)
構成ファイルを設定する
このエージェントは Confluence にアクセスする必要があるため、このプロジェクトに追加の構成設定を追加する必要があります。
qa_test_planner/.env を開き、次の環境変数の値を入力します。結果の .env ファイルは次のようになります。
GOOGLE_GENAI_USE_VERTEXAI=1
GOOGLE_CLOUD_PROJECT={YOUR-CLOUD-PROJECT-ID}
GOOGLE_CLOUD_LOCATION=global
CONFLUENCE_URL={YOUR-CONFLUENCE-DOMAIN}
CONFLUENCE_USERNAME={YOUR-CONFLUENCE-USERNAME}
CONFLUENCE_TOKEN={YOUR-CONFLUENCE-API-TOKEN}
CONFLUENCE_PRD_SPACE_ID={YOUR-CONFLUENCE-SPACE-ID}
残念ながら、この Confluence スペースは公開できません。そのため、これらのファイルを確認して、上記の認証情報を使用して利用できる製品要件ドキュメントを確認してください。
コードの説明
このスクリプトには、次のものを初期化するエージェントの初期化が含まれています。
- 使用するモデルを
gemini-2.5-flashに設定する - Stdio を介して通信する Confluence MCP ツールを設定する
- テストプランを作成して CSV をアーティファクトにダンプする
write_test_toolカスタムツールを設定する - エージェントの説明と手順を設定する
- Gemini 2.5 Flash の思考機能を使用して、最終的なレスポンスまたは実行を生成する前に計画を立てる
エージェント自体は、思考機能が組み込まれた Gemini モデルを搭載し、planner 引数で構成されている場合、思考機能をウェブ インターフェースに表示できます。この構成のコードを以下に示します。
# qa-test-planner/agent.py

from google.adk.planners import BuiltInPlanner
from google.genai import types

...

# Provide the confluence tool to agent

root_agent = Agent(
    model="gemini-2.5-flash",
    name="qa_test_planner_agent",
    ...,
    tools=[confluence_tool, write_test_tool],
    planner=BuiltInPlanner(
        thinking_config=types.ThinkingConfig(
            include_thoughts=True,
            thinking_budget=2048,
        )
    ),

...
アクションを実行する前に、思考プロセスを確認できます。
Confluence MCP ツール
ADK から MCP サーバーに接続するには、google.adk.tools.mcp_tool.mcp_toolset モジュールからインポートできる MCPToolSet を使用する必要があります。初期化するコードを以下に示します(効率化のため切り捨てられています)。
# qa-test-planner/agent.py

from google.adk.tools.mcp_tool.mcp_toolset import (
    MCPToolset,
    StdioConnectionParams,
    StdioServerParameters,
)

...

# Initialize the Confluence MCP Tool via Stdio Output

confluence_tool = MCPToolset(
    connection_params=StdioConnectionParams(
        server_params=StdioServerParameters(
            command="uvx",
            args=[
                "mcp-atlassian",
                f"--confluence-url={os.getenv('CONFLUENCE_URL')}",
                f"--confluence-username={os.getenv('CONFLUENCE_USERNAME')}",
                f"--confluence-token={os.getenv('CONFLUENCE_TOKEN')}",
                "--enabled-tools=confluence_search,confluence_get_page,confluence_get_page_children",
            ],
            env={},
        ),
        timeout=60,
    ),
)


...

# Provide the confluence tool to agent

root_agent = Agent(
    model="gemini-2.5-flash",
    name="qa_test_planner_agent",
    ...,
    tools=[confluence_tool, write_test_tool],

...
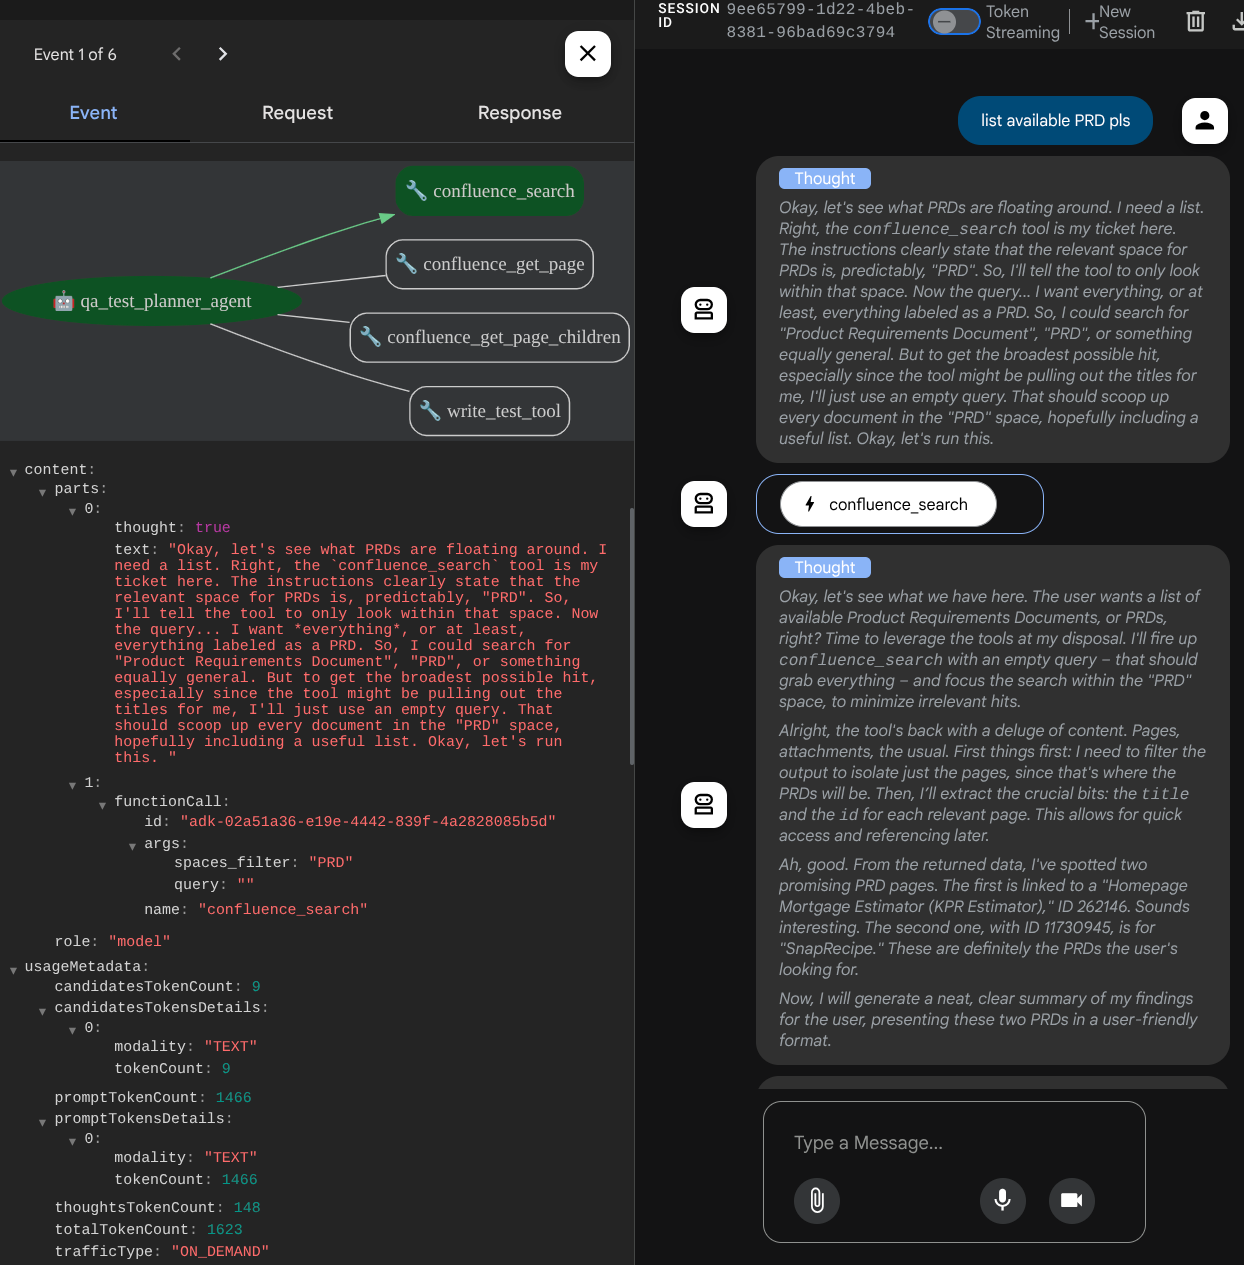
この構成では、エージェントは Confluence MCP サーバーを別のプロセスとして初期化し、Studio I/O を介してこれらのプロセスとの通信を処理します。このフローは、次の MCP アーキテクチャの図で、下の赤いボックスで示されています。
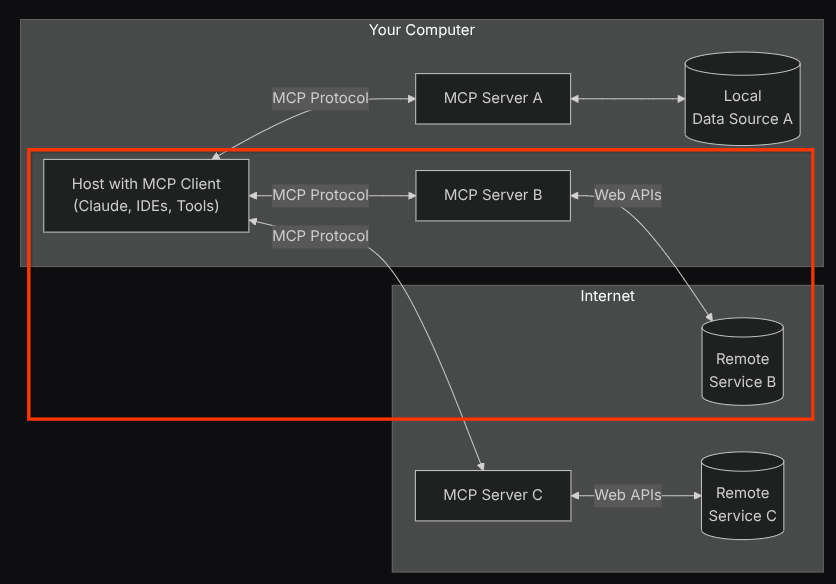
また、MCP の初期化のコマンド引数内では、使用できるツールを、QA テスト エージェントのユースケースをサポートする confluence_search、confluence_get_page、および confluence_get_page_children のみに制限しています。この Codelab チュートリアルでは、コミュニティ提供の Atlassian MCP サーバーを使用します(詳細については、 完全なドキュメントをご覧ください)。
テストツールを作成する
エージェントは Confluence MCP ツールからコンテキストを受け取ると、ユーザーに必要なテストプランを作成できます。ただし、このテストプランを含むファイルを作成して、永続化し、他のユーザーと共有できるようにします。これをサポートするために、次のカスタムツール write_test_tool を提供します。
# qa-test-planner/agent.py

...

async def write_test_tool(
    prd_id: str, test_cases: list[dict], tool_context: ToolContext
):
    """A tool to write the test plan into file

    Args:
        prd_id: Product requirement document ID
        test_cases: List of test case dictionaries that should conform to these fields:
            - test_case_key: str
            - test_type: Literal["manual","automatic"]
            - summary: str
            - preconditions: str
            - test_steps: str
            - expected_result: str
            - associated_requirements: str

    Returns:
        A message indicating success or failure of the validation and writing process
    """
    validated_test_cases = []
    validation_errors = []

    # Validate each test case
    for i, test_case in enumerate(test_cases):
        try:
            validated_test_case = TestPlan(**test_case)
            validated_test_cases.append(validated_test_case)
        except Exception as e:
            validation_errors.append(f"Error in test case {i + 1}: {str(e)}")

    # If validation errors exist, return error message
    if validation_errors:
        return {
            "status": "error",
            "message": "Validation failed",
            "errors": validation_errors,
        }

    # Write validated test cases to CSV
    try:
        # Convert validated test cases to a pandas DataFrame
        data = []
        for tc in validated_test_cases:
            data.append(
                {
                    "Test Case ID": tc.test_case_key,
                    "Type": tc.test_type,
                    "Summary": tc.summary,
                    "Preconditions": tc.preconditions,
                    "Test Steps": tc.test_steps,
                    "Expected Result": tc.expected_result,
                    "Associated Requirements": tc.associated_requirements,
                }
            )

        # Create DataFrame from the test case data
        df = pd.DataFrame(data)

        if not df.empty:
            # Create a temporary file with .csv extension
            with tempfile.NamedTemporaryFile(suffix=".csv", delete=False) as temp_file:
                # Write DataFrame to the temporary CSV file
                df.to_csv(temp_file.name, index=False)
                temp_file_path = temp_file.name

            # Read the file bytes from the temporary file
            with open(temp_file_path, "rb") as f:
                file_bytes = f.read()

            # Create an artifact with the file bytes
            await tool_context.save_artifact(
                filename=f"{prd_id}_test_plan.csv",
                artifact=types.Part.from_bytes(data=file_bytes, mime_type="text/csv"),
            )

            # Clean up the temporary file
            os.unlink(temp_file_path)

            return {
                "status": "success",
                "message": (
                    f"Successfully wrote {len(validated_test_cases)} test cases to "
                    f"CSV file: {prd_id}_test_plan.csv"
                ),
            }
        else:
            return {"status": "warning", "message": "No test cases to write"}
    except Exception as e:
        return {
            "status": "error",
            "message": f"An error occurred while writing to CSV: {str(e)}",
        }


...
上記の関数は、次の機能をサポートするためのものです。
- 生成されたテストプランが必須フィールドの仕様に準拠していることを確認します。Pydantic モデルを使用して確認し、エラーが発生した場合はエラー メッセージをエージェントに返します。
- pandas 機能を使用して結果を CSV にダンプする
- 生成されたファイルは、Artifact Service の機能を使用してアーティファクトとして保存されます。このアーティファクトには、すべてのツール呼び出しでアクセスできる ToolContext オブジェクトを使用してアクセスできます。
生成されたファイルをアーティファクトとして保存すると、ADK ランタイムでイベントとしてマークされ、ウェブ インターフェースでエージェントのインタラクションに表示されます。

これにより、エージェントからのファイル レスポンスを動的に設定して、ユーザーに提供できます。
4. エージェントをテストする
次に、CLI を介してエージェントと通信してみましょう。次のコマンドを実行します。
uv run adk run qa_test_planner
次のような出力が表示されます。エージェントと順番にチャットできますが、このインターフェースではテキストのみを送信できます。
Log setup complete: /tmp/agents_log/agent.xxxx_xxx.log
To access latest log: tail -F /tmp/agents_log/agent.latest.log
Running agent qa_test_planner_agent, type exit to exit.
user: hello
[qa_test_planner_agent]: Hello there! How can I help you today?
user:
CLI を介してエージェントとチャットできるのは便利です。さらに、ウェブチャットでエージェントとチャットすることもできます。ADK では、開発 UI を使用して、インタラクション中に何が起こっているかを確認することもできます。次のコマンドを実行して、ローカル開発 UI サーバーを起動します。
uv run adk web --port 8080
次の例のような出力が表示されます。これは、ウェブ インターフェースにアクセスできることを意味します。
INFO:     Started server process [xxxx]
INFO:     Waiting for application startup.

+-----------------------------------------------------------------------------+
| ADK Web Server started                                                      |
|                                                                             |
| For local testing, access at http://localhost:8080.                         |
+-----------------------------------------------------------------------------+

INFO:     Application startup complete.
INFO:     Uvicorn running on http://0.0.0.0:8080 (Press CTRL+C to quit)
確認するには、Cloud Shell エディタの上部にある [ウェブでプレビュー] ボタンをクリックし、[プレビューのポート: 8080] を選択します。
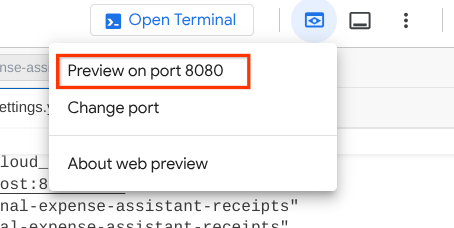
次のウェブページが表示されます。左上のプルダウン ボタンで利用可能なエージェント(この場合は qa_test_planner )を選択し、ボットとやり取りできます。左側のウィンドウには、エージェントの実行時のログの詳細情報が表示されます。
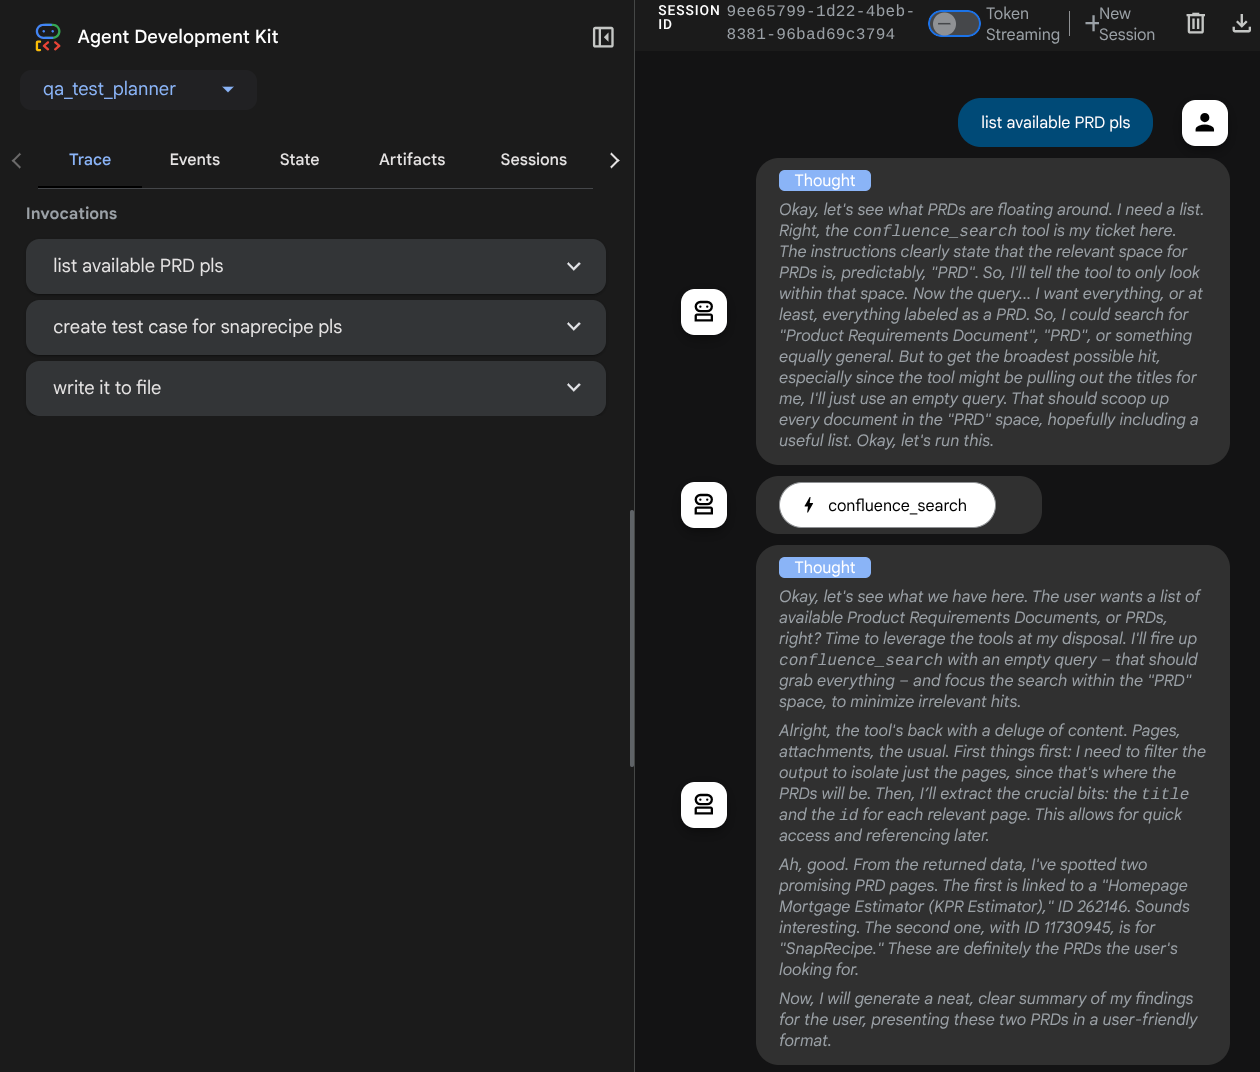
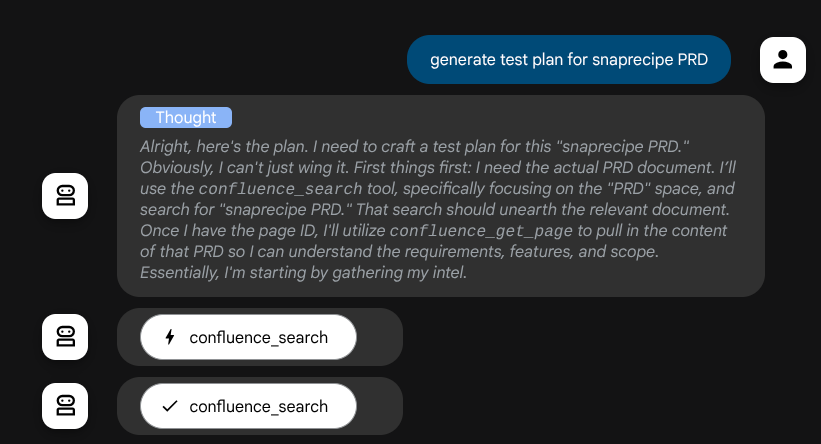
いくつか操作してみましょう。次のプロンプトを使用してエージェントとチャットします。
- 「利用可能な PRD をすべてリストしてください」
- 「Snaprecipe PRD のテストプランを作成してください」
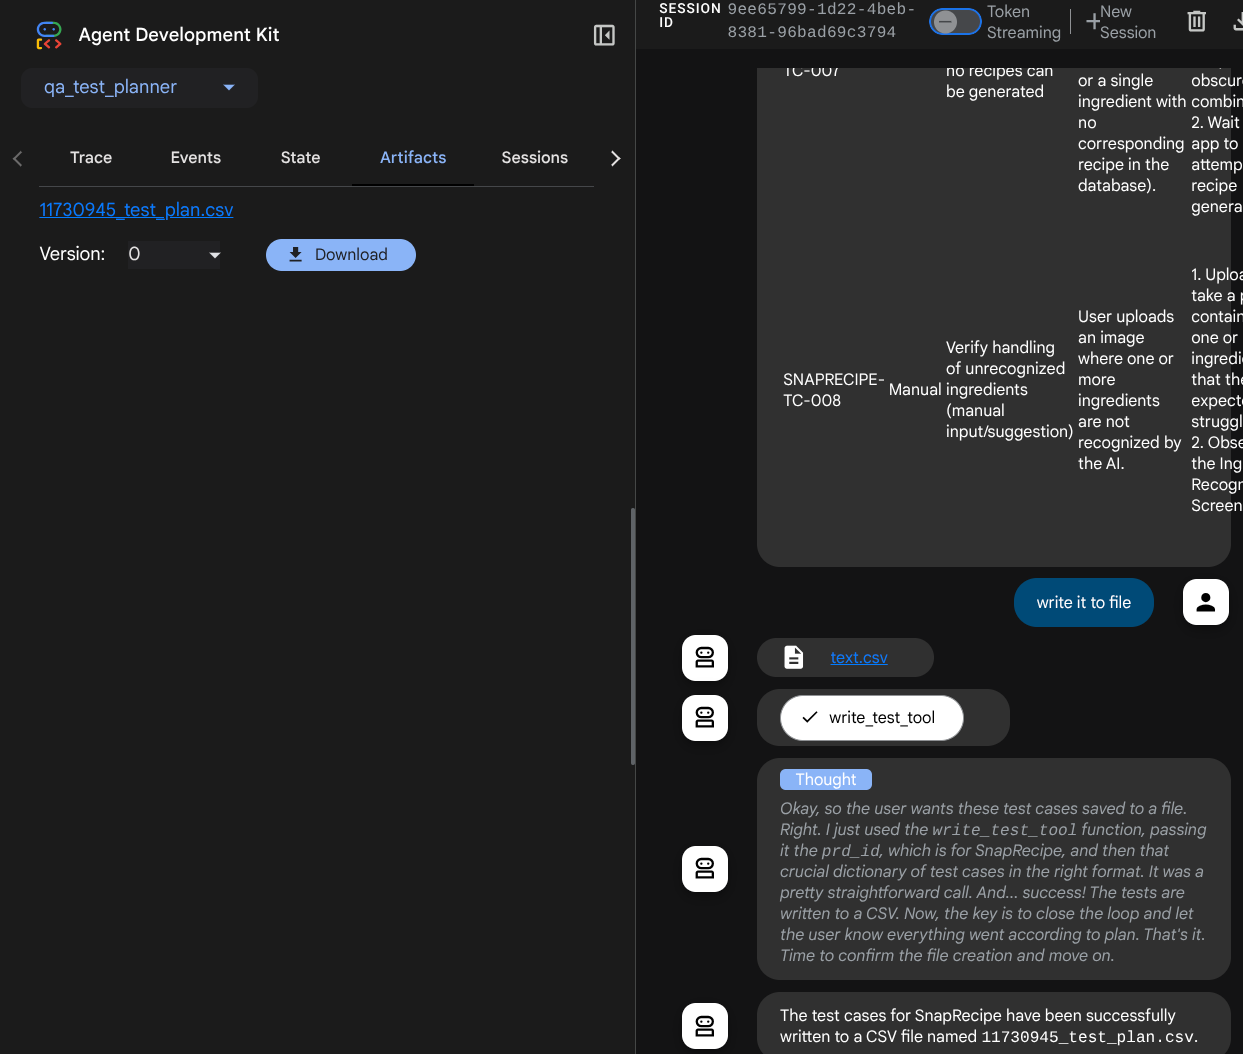
ツールを使用する場合は、開発 UI で何が起こっているかを確認できます。
エージェントがどのように応答するかを確認します。また、テストファイルを求めるプロンプトが表示されたら、テストプランが CSV ファイルにアーティファクトとして生成されます。
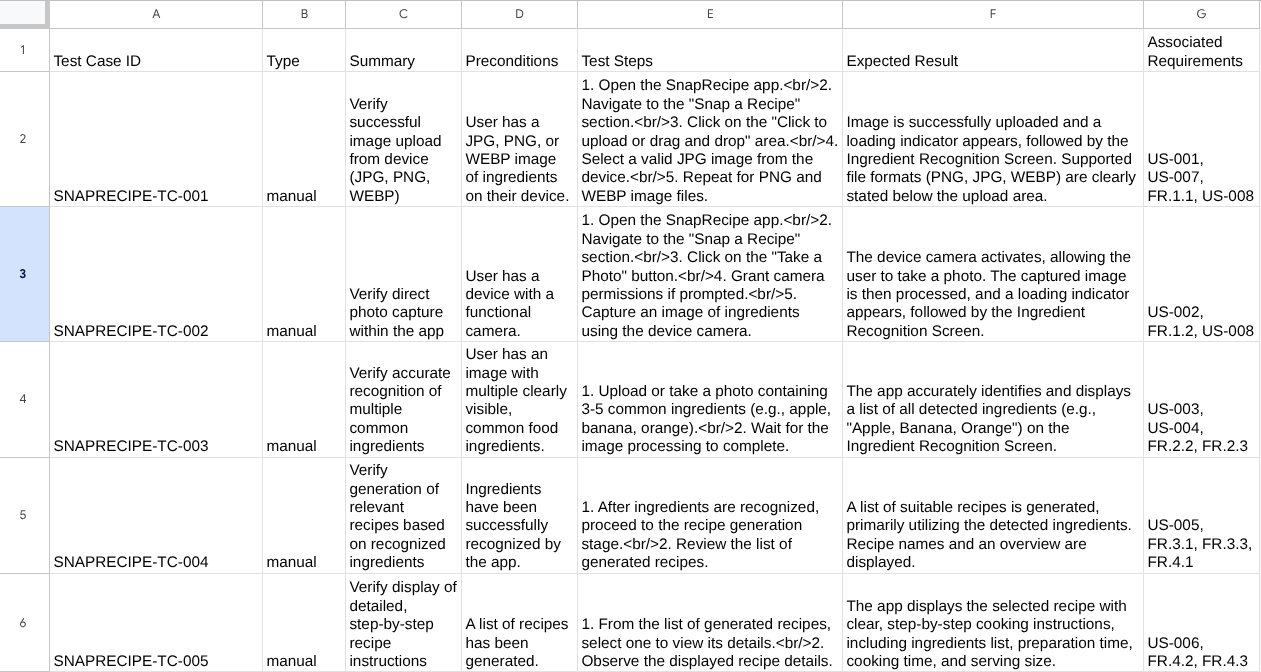
CSV の内容を確認するには、Google スプレッドシートにインポートします。
おめでとうございます。ローカルで実行される QA テスト プランナー エージェントができました。次に、他のユーザーも使用できるように、Cloud Run にデプロイする方法を見てみましょう。
5. Cloud Run にデプロイする
この優れたアプリには、どこからでもアクセスできるようにしたいと考えています。そのためには、このアプリケーションをパッケージ化して Cloud Run にデプロイします。このデモでは、このサービスは他のユーザーがアクセスできる公開サービスとして公開されます。ただし、これはベスト プラクティスではありません。
現在の作業ディレクトリには、アプリケーションを Cloud Run にデプロイするために必要なファイル(エージェント ディレクトリ、Dockerfile、server.py(メイン サービス スクリプト))がすべて揃っています。デプロイしましょう。Cloud Shell ターミナルに移動し、現在のプロジェクトがアクティブなプロジェクトに構成されていることを確認します。構成されていない場合は、gcloud configure コマンドを使用してプロジェクト ID を設定します。
gcloud config set project [PROJECT_ID]
次に、次のコマンドを実行して Cloud Run にデプロイします。
gcloud run deploy qa-test-planner-agent \
                  --source . \
                  --port 8080 \
                  --project {YOUR_PROJECT_ID} \
                  --allow-unauthenticated \
                  --region us-central1 \
                  --update-env-vars GOOGLE_GENAI_USE_VERTEXAI=1 \
                  --update-env-vars GOOGLE_CLOUD_PROJECT={YOUR_PROJECT_ID} \
                  --update-env-vars GOOGLE_CLOUD_LOCATION=global \
                  --update-env-vars CONFLUENCE_URL={YOUR_CONFLUENCE_URL} \
                  --update-env-vars CONFLUENCE_USERNAME={YOUR_CONFLUENCE_USERNAME} \
                  --update-env-vars CONFLUENCE_TOKEN={YOUR_CONFLUENCE_TOKEN} \
                  --update-env-vars CONFLUENCE_PRD_SPACE_ID={YOUR_PRD_SPACE_ID} \
                  --memory 1G
Docker リポジトリの Artifact Registry の作成を確認するよう求められたら、「Y 」と答えます。これはデモ アプリケーションであるため、未認証のアクセスを許可しています。エンタープライズ アプリケーションと本番環境アプリケーションには適切な認証を使用することをおすすめします。
デプロイが完了すると、次のようなリンクが表示されます。
https://qa-test-planner-agent-*******.us-central1.run.app
URL にアクセスすると、ローカルで試す場合と同様にウェブ開発 UI が表示されます。シークレット ウィンドウまたはモバイル デバイスからアプリケーションを使用します。すでに公開されているはずです。
次に、これらのプロンプトを順番に試して、何が起こるかを確認します。
- 「住宅ローン計算ツールに関連する PRD を見つけてください」」
- 「改善できる点についてフィードバックをください」
- 「テストプランを作成してください」
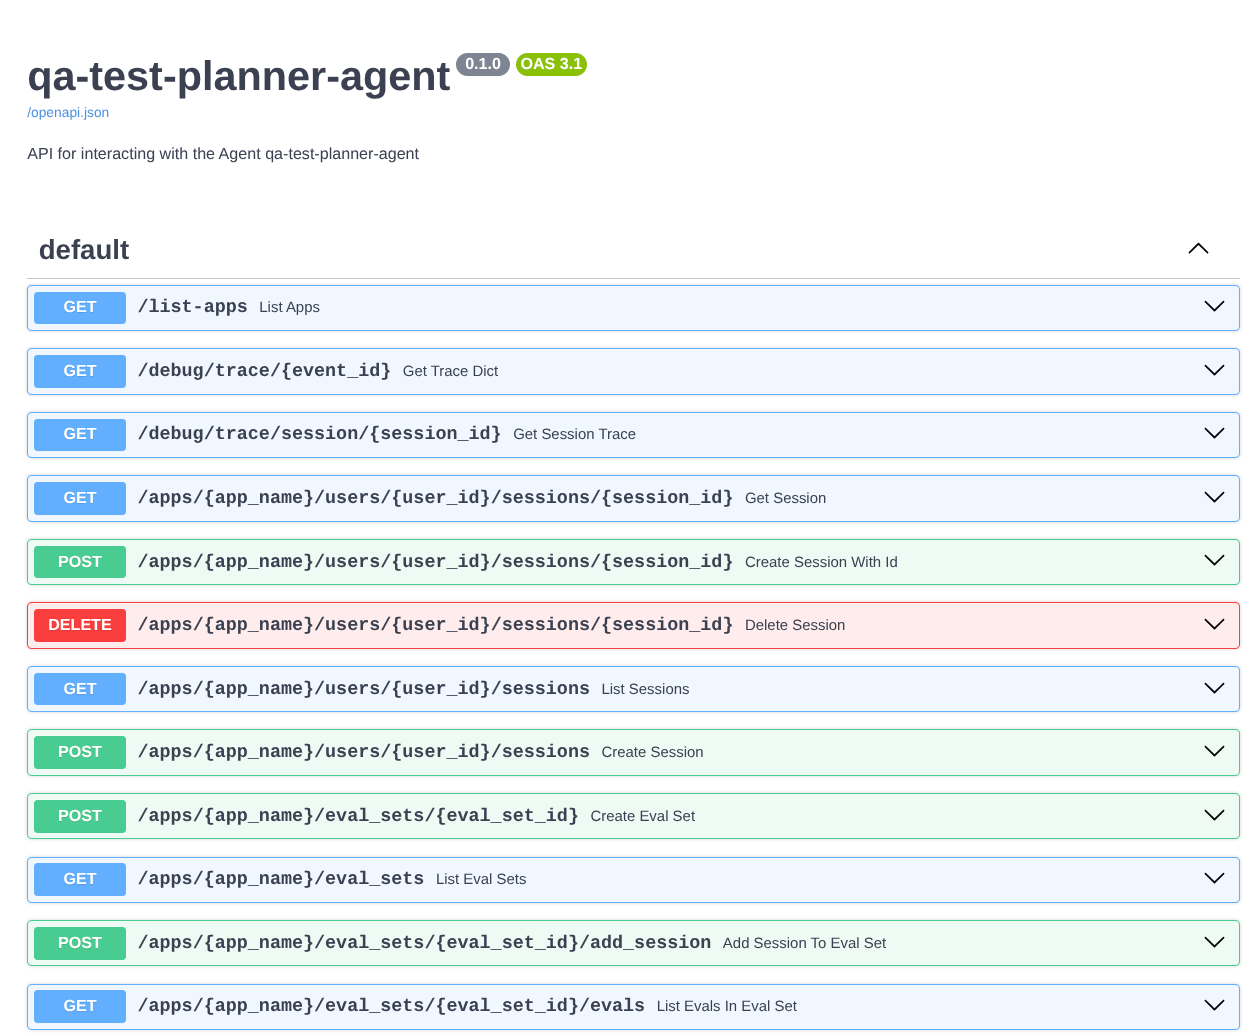
また、FastAPI アプリとしてエージェントを実行しているため、すべての API ルートを /docs ルートで確認することもできます。たとえば、https://qa-test-planner-agent-*******.us-central1.run.app/docs のような URL にアクセスすると、次のような Swagger ドキュメント ページが表示されます。
コードの説明
次に、デプロイに必要なファイルを確認します。まず server.py から始めます。
# server.py

import os

from fastapi import FastAPI
from google.adk.cli.fast_api import get_fast_api_app

AGENT_DIR = os.path.dirname(os.path.abspath(__file__))

app_args = {"agents_dir": AGENT_DIR, "web": True}

app: FastAPI = get_fast_api_app(**app_args)

app.title = "qa-test-planner-agent"
app.description = "API for interacting with the Agent qa-test-planner-agent"


if __name__ == "__main__":
    import uvicorn

    uvicorn.run(app, host="0.0.0.0", port=8080)
get_fast_api_app 関数を使用すると、エージェントを FastAPI アプリに簡単に変換できます。この関数では、セッション サービス、アーティファクト サービス、クラウドへのトレースデータの構成など、さまざまな機能を設定できます。
必要に応じて、ここでアプリケーションのライフサイクルを設定することもできます。その後、uvicorn を使用して Fast API アプリケーションを実行できます。
その後、Dockerfile にアプリケーションを実行するために必要な手順が示されます。
# Dockerfile

FROM python:3.12-slim

RUN pip install --no-cache-dir uv==0.7.13

WORKDIR /app

COPY . .

RUN uv sync --frozen

EXPOSE 8080

CMD ["uv", "run", "uvicorn", "server:app", "--host", "0.0.0.0", "--port", "8080"]
6. チャレンジ
探索スキルを磨きましょう。PRD レビューのフィードバックもファイルに書き込むツールを作成できますか?
7. クリーンアップ
この Codelab で使用したリソースについて、Google Cloud アカウントに課金されないようにするには、次の手順を行います。