
1. 簡介
生成式 AI 可解決現代品質保證的兩大難題:速度和全面性,因此非常適合用於建立測試計畫。在當今快速的敏捷和 DevOps 週期中,手動撰寫詳細的測試計畫是重大瓶頸,會延遲整個測試程序。AI 代理程式可快速吸收使用者故事和技術需求,在幾分鐘內 (而非幾天) 產生詳盡的測試計畫,確保 QA 程序與開發作業同步進行。此外,AI 擅長找出人類可能忽略的複雜情境、極端情況和負面路徑,因此能大幅提升測試涵蓋範圍,並顯著減少在生產環境中發生的錯誤。
在本程式碼研究室中,我們將探討如何建構這類服務專員,從 Confluence 擷取產品需求文件、提供建設性意見,以及產生可匯出為 CSV 檔案的完整測試計畫。
在本程式碼研究室中,您將逐步完成下列步驟:
- 準備 Google Cloud 專案,並啟用所有必要 API
- 設定程式碼環境的工作空間
- 準備 Confluence 適用的本機 mcp-server
- 建構 ADK 代理程式原始碼、提示和工具,以連線至 MCP 伺服器
- 瞭解 Artifact Service 和 Tool Context 的使用情形
- 使用 ADK 本機網頁開發 UI 測試代理
- 管理環境變數,並設定將應用程式部署至 Cloud Run 時所需的檔案
- 將應用程式部署至 Cloud Run
架構總覽
必要條件
- 熟悉 Python
- 瞭解使用 HTTP 服務的基本全端架構
課程內容
- 運用 ADK 代理的各項功能建構架構
- 使用自訂工具和 MCP 時的工具使用情況
- 使用 Artifact Service Management 設定代理程式的檔案輸出
- 運用 BuiltInPlanner,透過 Gemini 2.5 Flash 的思考能力進行規劃,提升工作執行效率
- 透過 ADK 網頁介面互動和偵錯
- 使用 Dockerfile 將應用程式部署至 Cloud Run,並提供環境變數
軟硬體需求
- Chrome 網路瀏覽器
- Gmail 帳戶
- 已啟用計費功能的 Cloud 專案
- (選用) 包含產品需求文件頁面的 Confluence 空間
本程式碼研究室適合各種程度的開發人員 (包括初學者),並使用 Python 撰寫範例應用程式。不過,您不需要具備 Python 知識,也能瞭解本文介紹的概念。如果沒有 Confluence 空間,請別擔心,我們會提供憑證,讓您試用本程式碼研究室
2. 事前準備
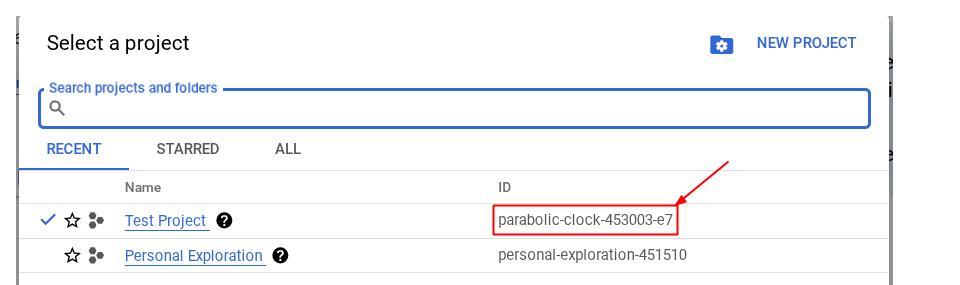
在 Cloud 控制台中選取有效專案
本程式碼研究室假設您已擁有啟用計費功能的 Google Cloud 專案。如果尚未取得,請按照下列指示操作。
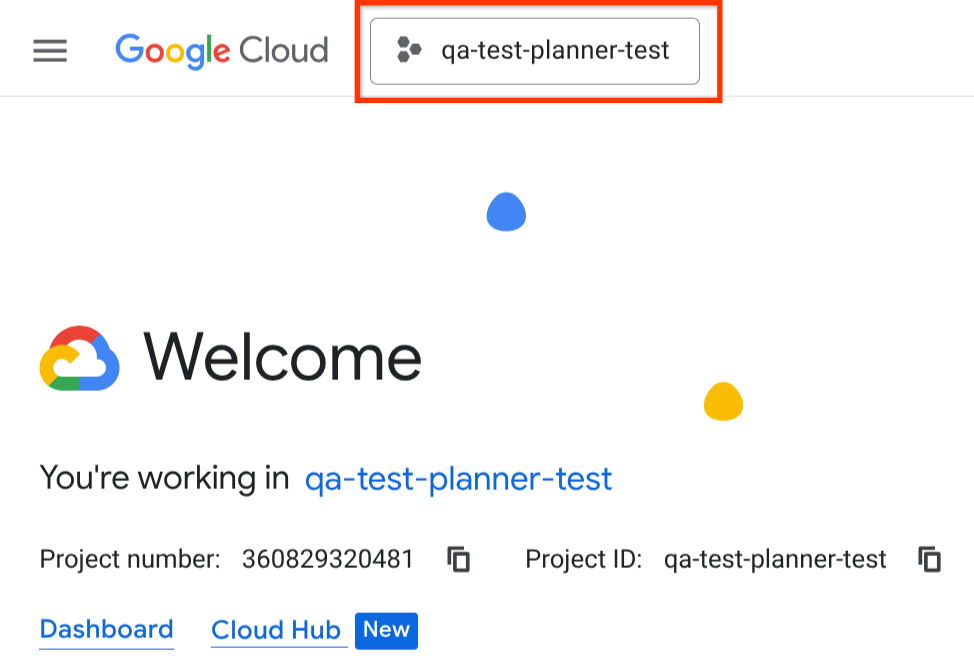
- 在 Google Cloud 控制台的專案選取器頁面中,選取或建立 Google Cloud 專案。
- 確認 Cloud 專案已啟用計費功能。瞭解如何檢查專案是否已啟用計費功能。
在 Cloud Shell 終端機中設定 Cloud 專案
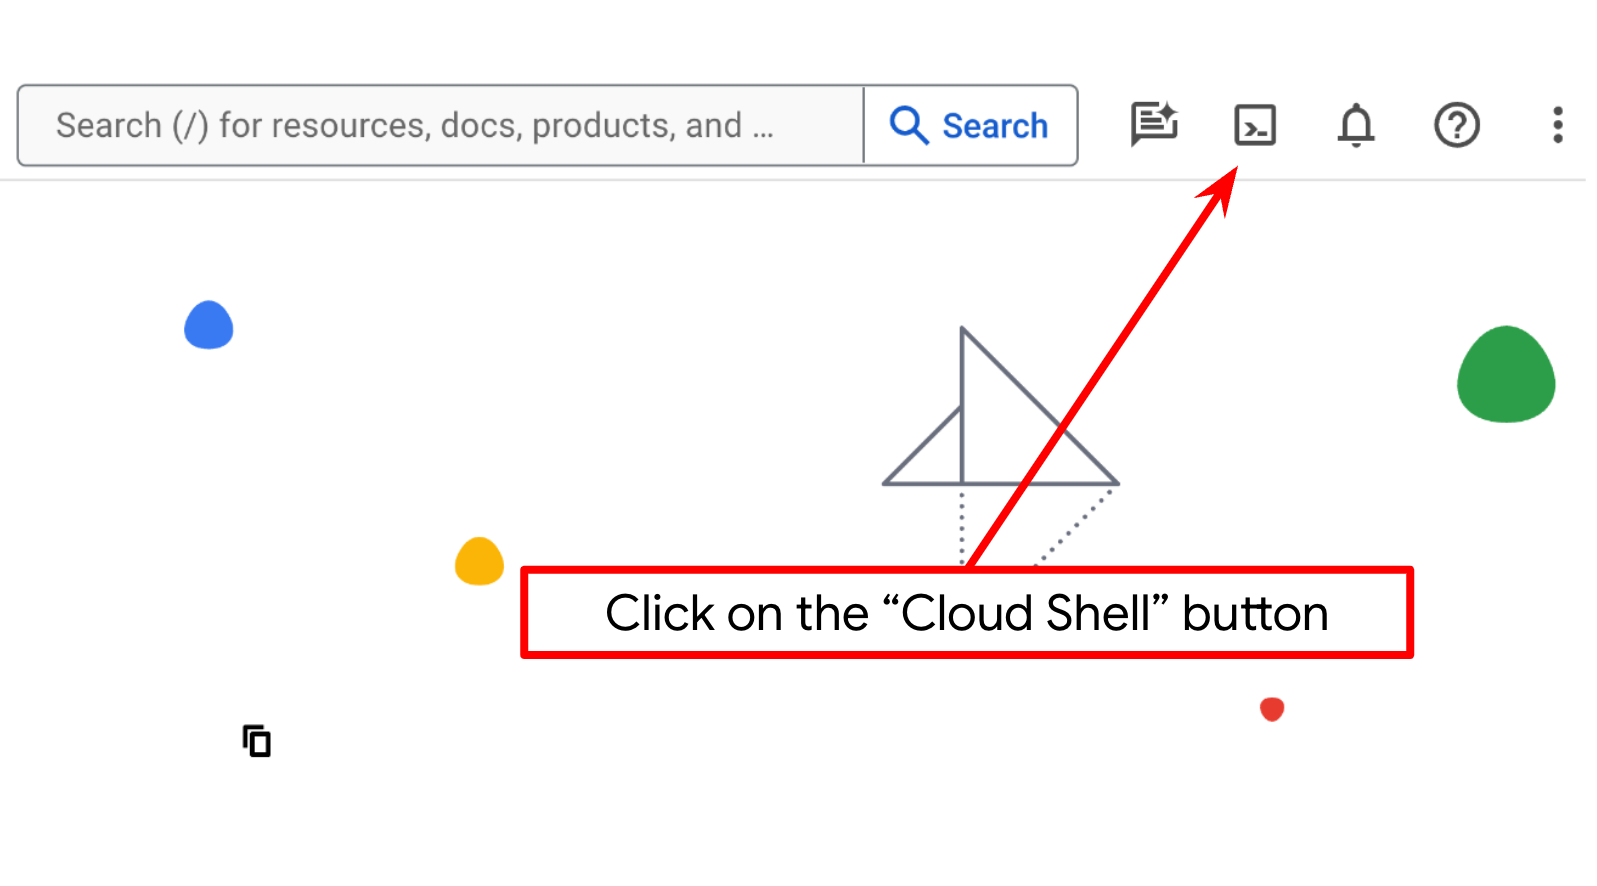
- 您將使用 Cloud Shell,這是 Google Cloud 中執行的指令列環境。點選 Google Cloud 控制台頂端的「啟用 Cloud Shell」。
- 連至 Cloud Shell 後,請使用下列指令確認驗證已完成,專案也已設為獲派的專案 ID:
gcloud auth list
- 在 Cloud Shell 中執行下列指令,確認 gcloud 指令已瞭解您的專案。
gcloud config list project
- 如果未設定專案,請使用下列指令來設定:
gcloud config set project <YOUR_PROJECT_ID>
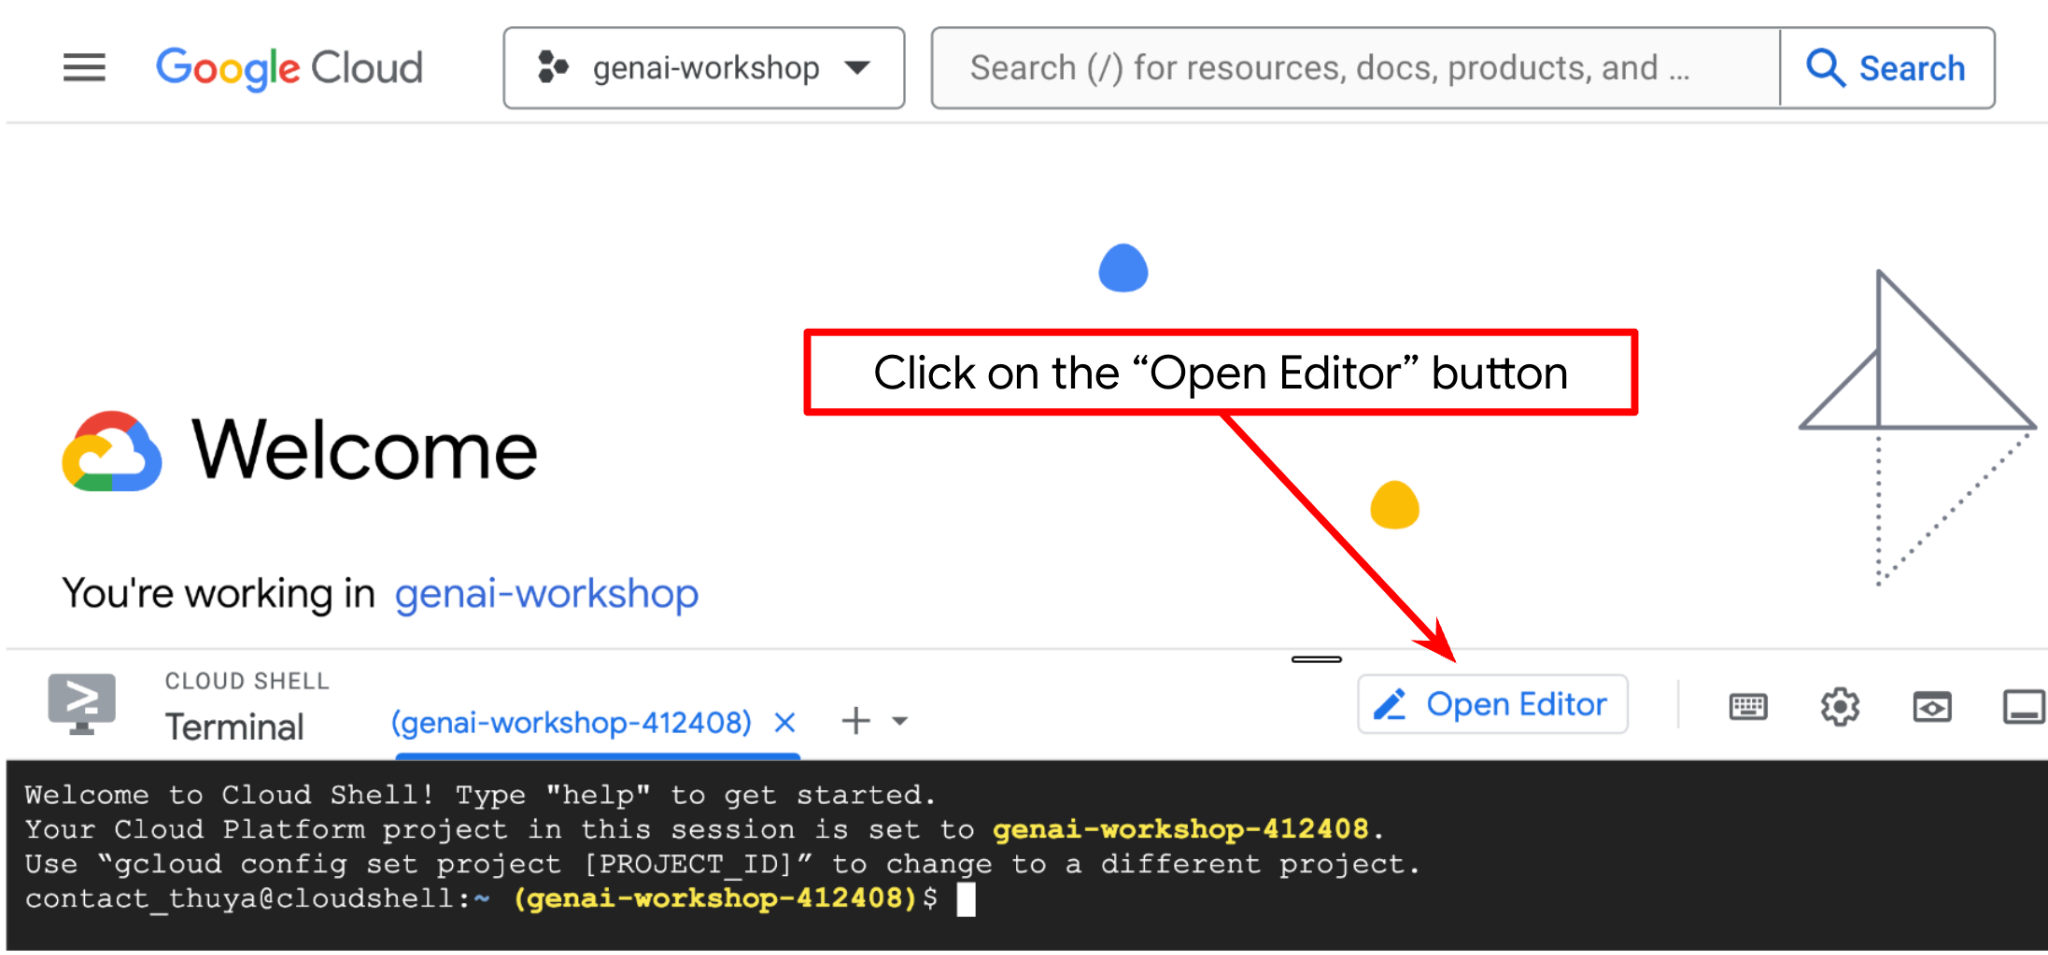
或者,您也可以在控制台中查看 PROJECT_ID id

點選後,右側會顯示所有專案和專案 ID
- 透過下列指令啟用必要的 API。這可能需要幾分鐘的時間,請耐心等候。
gcloud services enable aiplatform.googleapis.com \
                       run.googleapis.com \
                       cloudbuild.googleapis.com \
                       cloudresourcemanager.googleapis.com
成功執行指令後,您應該會看到類似下方的訊息:
Operation "operations/..." finished successfully.
除了使用 gcloud 指令,您也可以透過控制台搜尋各項產品,或使用這個連結。
如果遺漏任何 API,您隨時可以在實作過程中啟用。
如要瞭解 gcloud 指令和用法,請參閱說明文件。
前往 Cloud Shell 編輯器並設定應用程式工作目錄
現在,我們可以設定程式碼編輯器,進行一些程式設計工作。我們會使用 Cloud Shell 編輯器執行這項操作
- 按一下「Open Editor」(開啟編輯器) 按鈕,開啟 Cloud Shell 編輯器,即可在此編寫程式碼
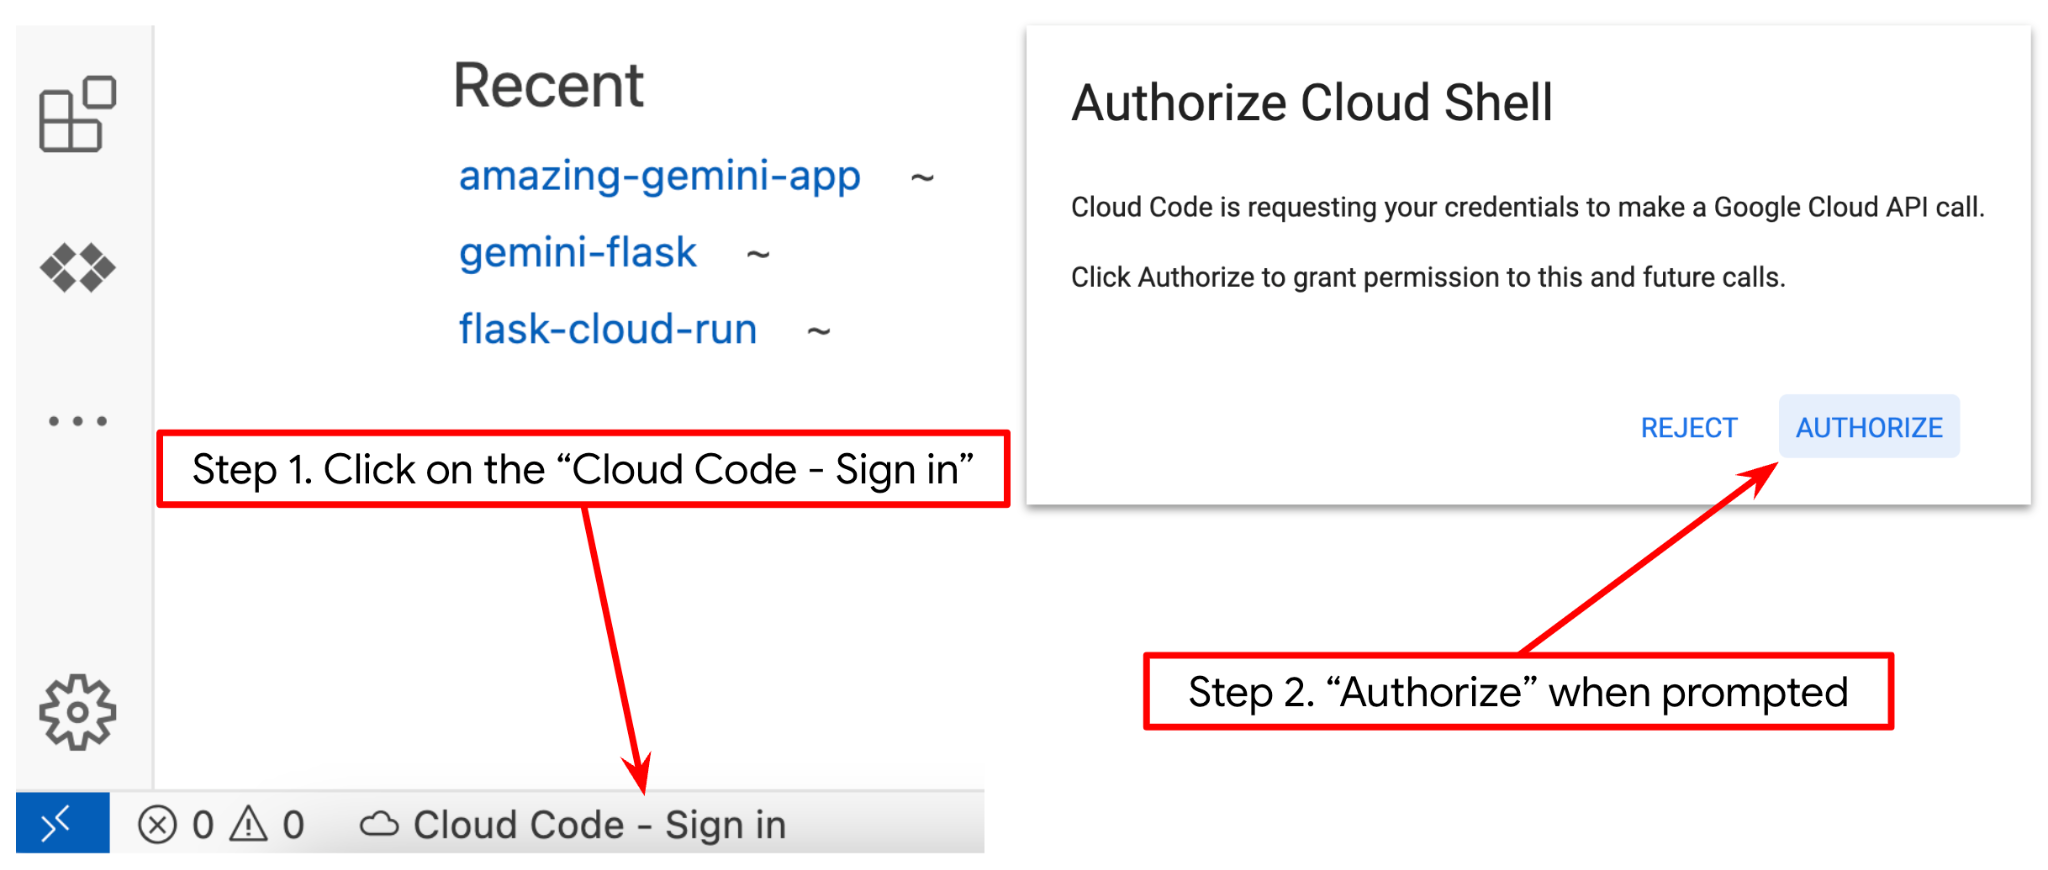
- 請確認 Cloud Shell 編輯器的左下角 (狀態列) 已設定 Cloud Code 專案,如下圖所示,且已設為啟用計費功能的有效 Google Cloud 專案。如果出現提示訊息,請點選「授權」。如果您已按照先前的指令操作,按鈕也可能會直接指向已啟用的專案,而不是登入按鈕
- 接著,請從 GitHub 複製本程式碼研究室的範本工作目錄,執行下列指令。系統會在 qa-test-planner-agent 目錄中建立工作目錄
git clone https://github.com/alphinside/qa-test-planner-agent.git qa-test-planner-agent
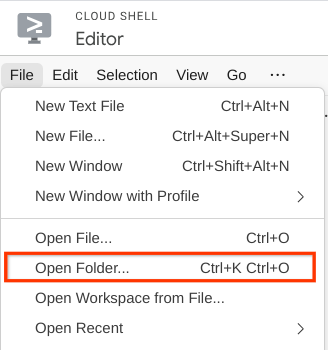
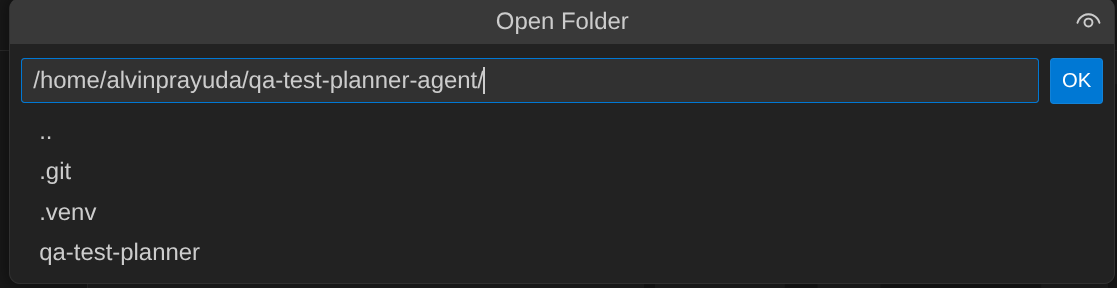
- 完成後,前往 Cloud Shell 編輯器頂端,依序點選「File」->「Open Folder」,找出「username」目錄,然後找出「qa-test-planner-agent」目錄,再點選「OK」按鈕。這會將所選目錄設為主要工作目錄。在本範例中,使用者名稱為 alvinprayuda,因此目錄路徑如下所示
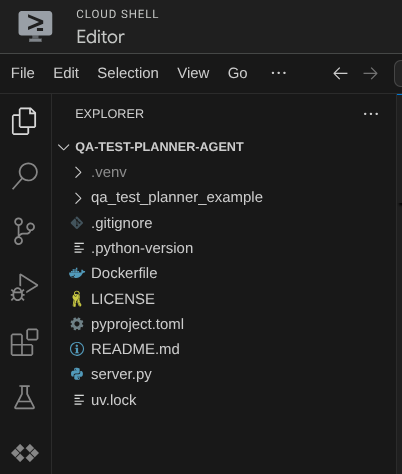
現在,Cloud Shell 編輯器應如下所示
環境設定
準備 Python 虛擬環境
下一步是準備開發環境。目前有效的終端機應位於 qa-test-planner-agent 工作目錄中。在本程式碼研究室中,我們將使用 Python 3.12,並使用 uv Python 專案管理工具,簡化建立及管理 Python 版本和虛擬環境的需求
- 如果尚未開啟終端機,請依序點選「Terminal」(終端機) ->「New Terminal」(新增終端機),或使用 Ctrl + Shift + C 鍵,在瀏覽器底部開啟終端機視窗

- 下載
uv,然後使用下列指令安裝 Python 3.12
curl -LsSf https://astral.sh/uv/0.7.19/install.sh | sh && \
source $HOME/.local/bin/env && \
uv python install 3.12
- 現在使用
uv初始化虛擬環境,請執行下列指令
uv sync --frozen
這會建立 .venv 目錄並安裝依附元件。快速瀏覽 pyproject.toml,即可查看依附元件的相關資訊,如下所示:
dependencies = [
    "google-adk>=1.5.0",
    "mcp-atlassian>=0.11.9",
    "pandas>=2.3.0",
    "python-dotenv>=1.1.1",
]
- 如要測試虛擬環境,請建立新的 main.py 檔案,並複製下列程式碼
def main():
   print("Hello from qa-test-planner-agent")

if __name__ == "__main__":
   main()
- 然後執行下列指令
uv run main.py
您會看到如下所示的輸出內容
Using CPython 3.12
Creating virtual environment at: .venv
Hello from qa-test-planner-agent!
這表示 Python 專案設定正確。
現在我們可以繼續下一個步驟,建構代理程式,然後建構服務
3. 使用 Google ADK 和 Gemini 2.5 建構代理
ADK 目錄結構簡介
首先,我們來瞭解 ADK 的功能,以及如何建構代理程式。如要查看 ADK 完整說明文件,請前往這個網址。ADK 在執行 CLI 指令時提供許多公用程式。部分範例如下:
- 設定代理程式目錄結構
- 透過 CLI 輸入/輸出快速試用互動功能
- 快速設定本機開發 UI 網頁介面
現在,我們來使用 CLI 指令建立代理目錄結構。執行下列指令
uv run adk create qa_test_planner \
   --model gemini-2.5-flash \
   --project {your-project-id} \
   --region global
這會在目前的工作目錄中建立下列代理程式目錄結構
qa_test_planner/
├── __init__.py
├── .env
├── agent.py
檢查 init.py 和 agent.py 時,您會看到這段程式碼
# __init__.py

from . import agent
# agent.py

from google.adk.agents import Agent

root_agent = Agent(
    model='gemini-2.5-flash',
    name='root_agent',
    description='A helpful assistant for user questions.',
    instruction='Answer user questions to the best of your knowledge',
)
建構 QA 測試規劃人員代理
我們來建構 QA 測試規劃代理!開啟 qa_test_planner/agent.py 檔案,然後複製下方的程式碼,其中會包含 root_agent。
# qa_test_planner/agent.py

from google.adk.agents import Agent
from google.adk.tools.mcp_tool.mcp_toolset import (
    MCPToolset,
    StdioConnectionParams,
    StdioServerParameters,
)
from google.adk.planners import BuiltInPlanner
from google.genai import types
from dotenv import load_dotenv
import os
from pathlib import Path
from pydantic import BaseModel
from typing import Literal
import tempfile
import pandas as pd
from google.adk.tools import ToolContext


load_dotenv(dotenv_path=Path(__file__).parent / ".env")

confluence_tool = MCPToolset(
    connection_params=StdioConnectionParams(
        server_params=StdioServerParameters(
            command="uvx",
            args=[
                "mcp-atlassian",
                f"--confluence-url={os.getenv('CONFLUENCE_URL')}",
                f"--confluence-username={os.getenv('CONFLUENCE_USERNAME')}",
                f"--confluence-token={os.getenv('CONFLUENCE_TOKEN')}",
                "--enabled-tools=confluence_search,confluence_get_page,confluence_get_page_children",
            ],
            env={},
        ),
        timeout=60,
    ),
)


class TestPlan(BaseModel):
    test_case_key: str
    test_type: Literal["manual", "automatic"]
    summary: str
    preconditions: str
    test_steps: str
    expected_result: str
    associated_requirements: str


async def write_test_tool(
    prd_id: str, test_cases: list[dict], tool_context: ToolContext
):
    """A tool to write the test plan into file

    Args:
        prd_id: Product requirement document ID
        test_cases: List of test case dictionaries that should conform to these fields:
            - test_case_key: str
            - test_type: Literal["manual","automatic"]
            - summary: str
            - preconditions: str
            - test_steps: str
            - expected_result: str
            - associated_requirements: str

    Returns:
        A message indicating success or failure of the validation and writing process
    """
    validated_test_cases = []
    validation_errors = []

    # Validate each test case
    for i, test_case in enumerate(test_cases):
        try:
            validated_test_case = TestPlan(**test_case)
            validated_test_cases.append(validated_test_case)
        except Exception as e:
            validation_errors.append(f"Error in test case {i + 1}: {str(e)}")

    # If validation errors exist, return error message
    if validation_errors:
        return {
            "status": "error",
            "message": "Validation failed",
            "errors": validation_errors,
        }

    # Write validated test cases to CSV
    try:
        # Convert validated test cases to a pandas DataFrame
        data = []
        for tc in validated_test_cases:
            data.append(
                {
                    "Test Case ID": tc.test_case_key,
                    "Type": tc.test_type,
                    "Summary": tc.summary,
                    "Preconditions": tc.preconditions,
                    "Test Steps": tc.test_steps,
                    "Expected Result": tc.expected_result,
                    "Associated Requirements": tc.associated_requirements,
                }
            )

        # Create DataFrame from the test case data
        df = pd.DataFrame(data)

        if not df.empty:
            # Create a temporary file with .csv extension
            with tempfile.NamedTemporaryFile(suffix=".csv", delete=False) as temp_file:
                # Write DataFrame to the temporary CSV file
                df.to_csv(temp_file.name, index=False)
                temp_file_path = temp_file.name

            # Read the file bytes from the temporary file
            with open(temp_file_path, "rb") as f:
                file_bytes = f.read()

            # Create an artifact with the file bytes
            await tool_context.save_artifact(
                filename=f"{prd_id}_test_plan.csv",
                artifact=types.Part.from_bytes(data=file_bytes, mime_type="text/csv"),
            )

            # Clean up the temporary file
            os.unlink(temp_file_path)

            return {
                "status": "success",
                "message": (
                    f"Successfully wrote {len(validated_test_cases)} test cases to "
                    f"CSV file: {prd_id}_test_plan.csv"
                ),
            }
        else:
            return {"status": "warning", "message": "No test cases to write"}
    except Exception as e:
        return {
            "status": "error",
            "message": f"An error occurred while writing to CSV: {str(e)}",
        }


root_agent = Agent(
    model="gemini-2.5-flash",
    name="qa_test_planner_agent",
    description="You are an expert QA Test Planner and Product Manager assistant",
    instruction=f"""
Help user search any product requirement documents on Confluence. Furthermore you also can provide the following capabilities when asked:
- evaluate product requirement documents and assess it, then give expert input on what can be improved
- create a comprehensive test plan following Jira Xray mandatory field formatting, result showed as markdown table. Each test plan must also have explicit mapping on
    which user stories or requirements identifier it's associated to

Here is the Confluence space ID with it's respective document grouping:

- "{os.getenv("CONFLUENCE_PRD_SPACE_ID")}" : space to store Product Requirements Documents

Do not making things up, Always stick to the fact based on data you retrieve via tools.
""",
    tools=[confluence_tool, write_test_tool],
    planner=BuiltInPlanner(
        thinking_config=types.ThinkingConfig(
            include_thoughts=True,
            thinking_budget=2048,
        )
    ),
)
設定檔
現在我們需要為這個專案新增額外設定,因為這個代理程式需要存取 Confluence
開啟 qa_test_planner/.env,並在其中加入下列環境變數值,確保產生的 .env 檔案如下所示
GOOGLE_GENAI_USE_VERTEXAI=1
GOOGLE_CLOUD_PROJECT={YOUR-CLOUD-PROJECT-ID}
GOOGLE_CLOUD_LOCATION=global
CONFLUENCE_URL={YOUR-CONFLUENCE-DOMAIN}
CONFLUENCE_USERNAME={YOUR-CONFLUENCE-USERNAME}
CONFLUENCE_TOKEN={YOUR-CONFLUENCE-API-TOKEN}
CONFLUENCE_PRD_SPACE_ID={YOUR-CONFLUENCE-SPACE-ID}
很抱歉,這個 Confluence 空間無法公開,因此您可以檢查這些檔案,使用上述憑證讀取可用的產品需求文件。
程式碼說明
這個指令碼包含代理程式啟動程序,我們會初始化下列項目:
- 設定要使用的模型
gemini-2.5-flash - 設定 Confluence MCP 工具,透過 Stdio 通訊
- 設定
write_test_tool自訂工具,編寫測試計畫並將 CSV 傾印至構件 - 設定代理程式說明和指令
- 使用 Gemini 2.5 Flash 的思考能力,在生成最終回覆或執行作業前啟用規劃功能
如果代理程式採用內建思考能力的 Gemini 模型,並設定 planner 引數,就能展現思考能力,並顯示在網頁介面上。設定這項功能的程式碼如下所示
# qa-test-planner/agent.py

from google.adk.planners import BuiltInPlanner
from google.genai import types

...

# Provide the confluence tool to agent

root_agent = Agent(
    model="gemini-2.5-flash",
    name="qa_test_planner_agent",
    ...,
    tools=[confluence_tool, write_test_tool],
    planner=BuiltInPlanner(
        thinking_config=types.ThinkingConfig(
            include_thoughts=True,
            thinking_budget=2048,
        )
    ),

...
在採取行動前,我們可以查看其思考過程
Confluence MCP 工具
如要從 ADK 連線至 MCP 伺服器,我們需要使用 MCPToolSet,這可從 google.adk.tools.mcp_tool.mcp_toolset 模組匯入。以下顯示在此處初始化的程式碼 ( 為提高效率而截斷)
# qa-test-planner/agent.py

from google.adk.tools.mcp_tool.mcp_toolset import (
    MCPToolset,
    StdioConnectionParams,
    StdioServerParameters,
)

...

# Initialize the Confluence MCP Tool via Stdio Output

confluence_tool = MCPToolset(
    connection_params=StdioConnectionParams(
        server_params=StdioServerParameters(
            command="uvx",
            args=[
                "mcp-atlassian",
                f"--confluence-url={os.getenv('CONFLUENCE_URL')}",
                f"--confluence-username={os.getenv('CONFLUENCE_USERNAME')}",
                f"--confluence-token={os.getenv('CONFLUENCE_TOKEN')}",
                "--enabled-tools=confluence_search,confluence_get_page,confluence_get_page_children",
            ],
            env={},
        ),
        timeout=60,
    ),
)


...

# Provide the confluence tool to agent

root_agent = Agent(
    model="gemini-2.5-flash",
    name="qa_test_planner_agent",
    ...,
    tools=[confluence_tool, write_test_tool],

...
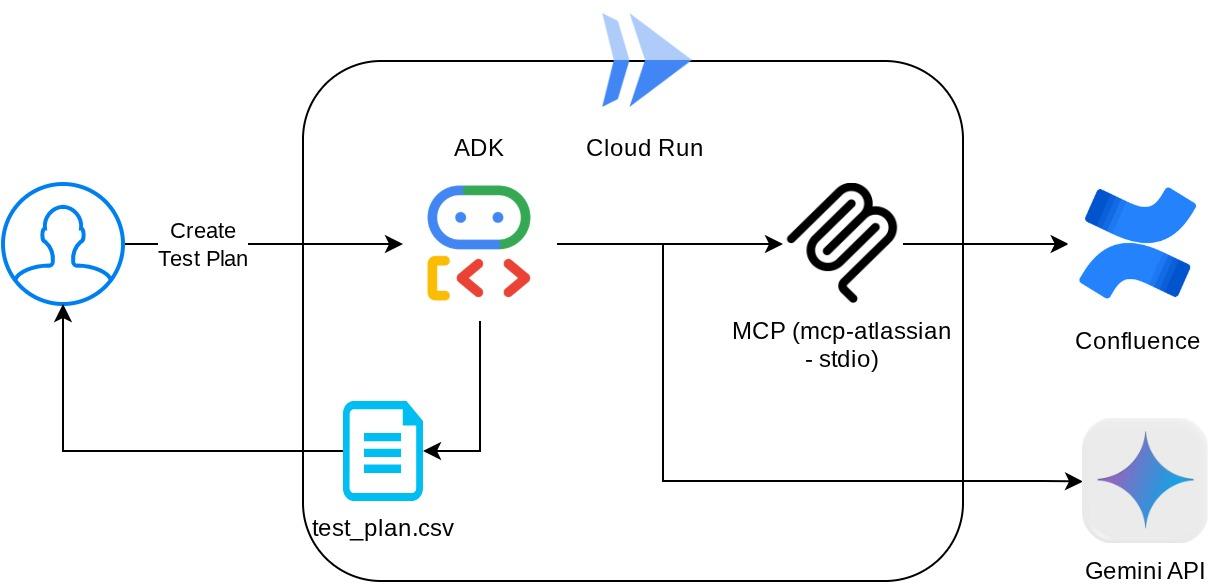
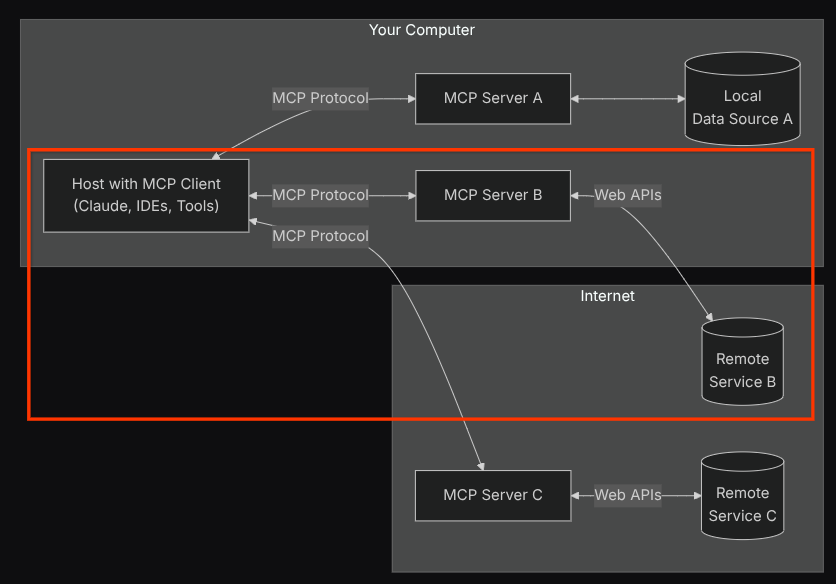
完成這項設定後,代理會將 Confluence MCP 伺服器初始化為個別程序,並透過 Studio I/O 處理與這些程序的通訊。下方的 MCP 架構圖片以紅框標示出這個流程。
此外,在 MCP 初始化指令引數中,我們也限制可使用的工具,僅限於 confluence_search、confluence_get_page 和 confluence_get_page_children,這些工具支援我們的 QA 測試代理使用案例。在本程式碼研究室教學課程中,我們使用社群貢獻的 Atlassian MCP 伺服器 ( 詳情請參閱完整說明文件)。
撰寫測試工具
代理程式從 Confluence MCP 工具接收情境後,即可為使用者建構必要的測試計畫。不過,我們想產生包含這項測試計畫的檔案,以便保留並與他人分享。為支援這項功能,我們在下方提供自訂工具 write_test_tool
# qa-test-planner/agent.py

...

async def write_test_tool(
    prd_id: str, test_cases: list[dict], tool_context: ToolContext
):
    """A tool to write the test plan into file

    Args:
        prd_id: Product requirement document ID
        test_cases: List of test case dictionaries that should conform to these fields:
            - test_case_key: str
            - test_type: Literal["manual","automatic"]
            - summary: str
            - preconditions: str
            - test_steps: str
            - expected_result: str
            - associated_requirements: str

    Returns:
        A message indicating success or failure of the validation and writing process
    """
    validated_test_cases = []
    validation_errors = []

    # Validate each test case
    for i, test_case in enumerate(test_cases):
        try:
            validated_test_case = TestPlan(**test_case)
            validated_test_cases.append(validated_test_case)
        except Exception as e:
            validation_errors.append(f"Error in test case {i + 1}: {str(e)}")

    # If validation errors exist, return error message
    if validation_errors:
        return {
            "status": "error",
            "message": "Validation failed",
            "errors": validation_errors,
        }

    # Write validated test cases to CSV
    try:
        # Convert validated test cases to a pandas DataFrame
        data = []
        for tc in validated_test_cases:
            data.append(
                {
                    "Test Case ID": tc.test_case_key,
                    "Type": tc.test_type,
                    "Summary": tc.summary,
                    "Preconditions": tc.preconditions,
                    "Test Steps": tc.test_steps,
                    "Expected Result": tc.expected_result,
                    "Associated Requirements": tc.associated_requirements,
                }
            )

        # Create DataFrame from the test case data
        df = pd.DataFrame(data)

        if not df.empty:
            # Create a temporary file with .csv extension
            with tempfile.NamedTemporaryFile(suffix=".csv", delete=False) as temp_file:
                # Write DataFrame to the temporary CSV file
                df.to_csv(temp_file.name, index=False)
                temp_file_path = temp_file.name

            # Read the file bytes from the temporary file
            with open(temp_file_path, "rb") as f:
                file_bytes = f.read()

            # Create an artifact with the file bytes
            await tool_context.save_artifact(
                filename=f"{prd_id}_test_plan.csv",
                artifact=types.Part.from_bytes(data=file_bytes, mime_type="text/csv"),
            )

            # Clean up the temporary file
            os.unlink(temp_file_path)

            return {
                "status": "success",
                "message": (
                    f"Successfully wrote {len(validated_test_cases)} test cases to "
                    f"CSV file: {prd_id}_test_plan.csv"
                ),
            }
        else:
            return {"status": "warning", "message": "No test cases to write"}
    except Exception as e:
        return {
            "status": "error",
            "message": f"An error occurred while writing to CSV: {str(e)}",
        }


...
上述宣告的函式支援下列功能:
- 檢查產生的測試計畫,確保符合必要欄位規格,我們使用 Pydantic 模型檢查,如果發生錯誤,我們會將錯誤訊息傳回給代理程式
- 使用 pandas 功能將結果傾印至 CSV
- 然後使用 Artifact Service 功能將產生的檔案儲存為構件,這項功能可透過每個工具呼叫中存取的 ToolContext 物件存取
如果我們將產生的檔案儲存為構件,系統會在 ADK 執行階段將其標示為事件,並在日後的網頁介面中顯示代理程式互動。
這樣一來,我們就能動態設定代理程式的檔案回覆,並提供給使用者。
4. 測試代理程式
現在試著透過 CLI 與代理程式通訊,請執行下列指令
uv run adk run qa_test_planner
系統會顯示類似下方的輸出內容,您可以在其中與代理程式輪流對話,但只能透過這個介面傳送文字
Log setup complete: /tmp/agents_log/agent.xxxx_xxx.log
To access latest log: tail -F /tmp/agents_log/agent.latest.log
Running agent qa_test_planner_agent, type exit to exit.
user: hello
[qa_test_planner_agent]: Hello there! How can I help you today?
user:
很高興能透過 CLI 與代理對話。但如果能與它進行愉快的網路聊天,那就更棒了,而我們也能做到這一點!ADK 也提供開發 UI,方便我們在互動期間進行互動及檢查。執行下列指令,啟動本機開發 UI 伺服器
uv run adk web --port 8080
這會產生類似下列範例的輸出內容,表示我們已可存取網頁介面
INFO:     Started server process [xxxx]
INFO:     Waiting for application startup.

+-----------------------------------------------------------------------------+
| ADK Web Server started                                                      |
|                                                                             |
| For local testing, access at http://localhost:8080.                         |
+-----------------------------------------------------------------------------+

INFO:     Application startup complete.
INFO:     Uvicorn running on http://0.0.0.0:8080 (Press CTRL+C to quit)
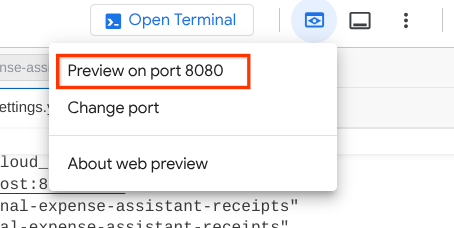
如要檢查,請點選 Cloud Shell 編輯器頂端的「Web Preview」(網頁預覽) 按鈕,然後選取「Preview on port 8080」(透過以下通訊埠預覽:8080)。
您會看到下列網頁,可以在左上方的下拉式按鈕中選取可用的代理程式 ( 在本例中應為 qa_test_planner),並與機器人互動。在左側視窗中,您會看到代理程式執行階段的記錄詳細資料
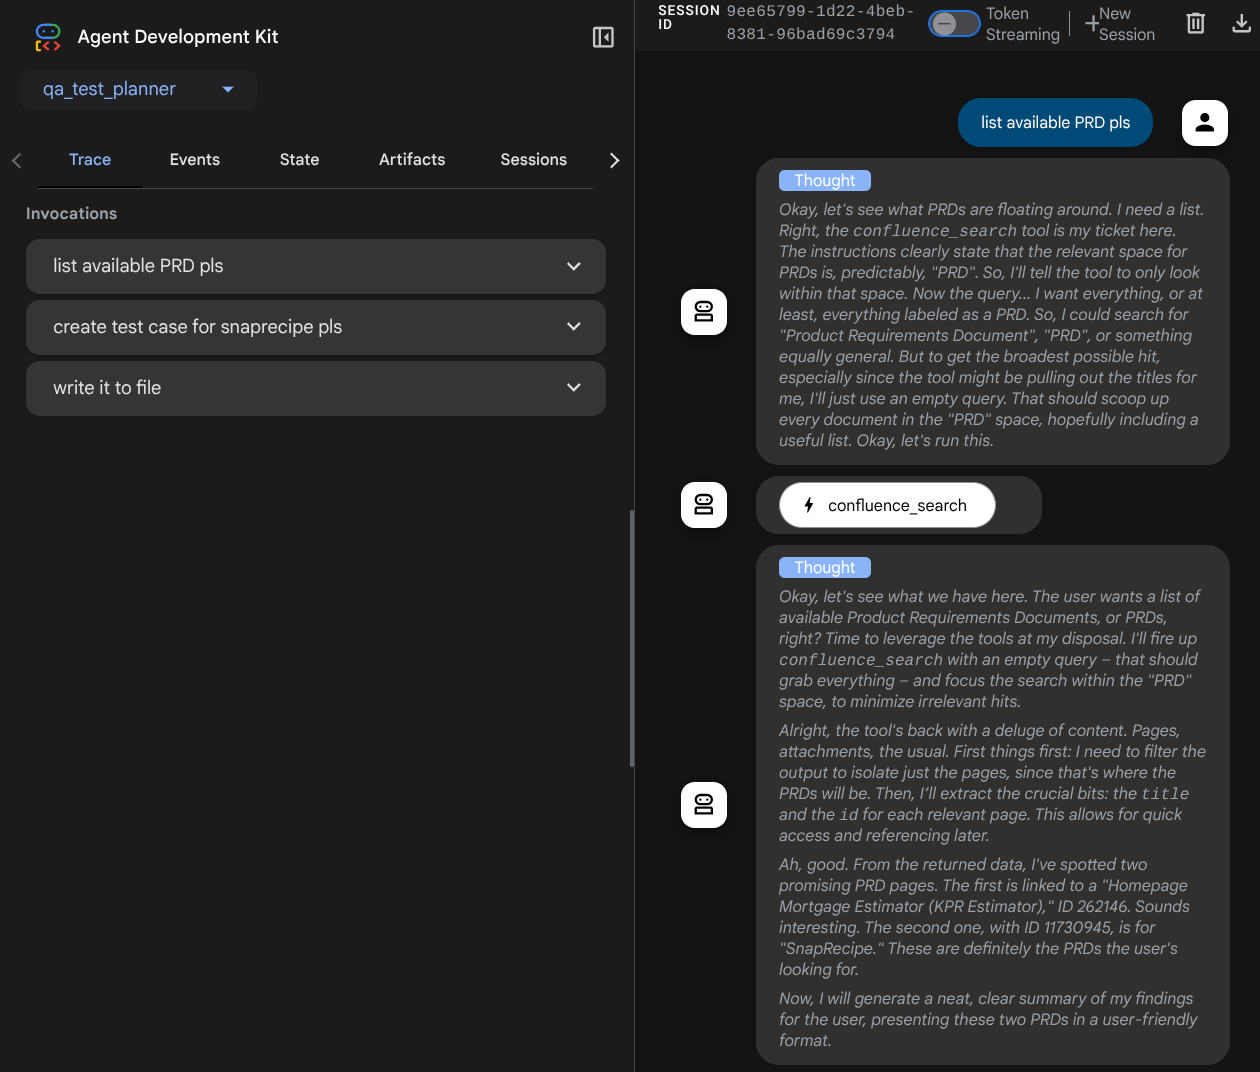
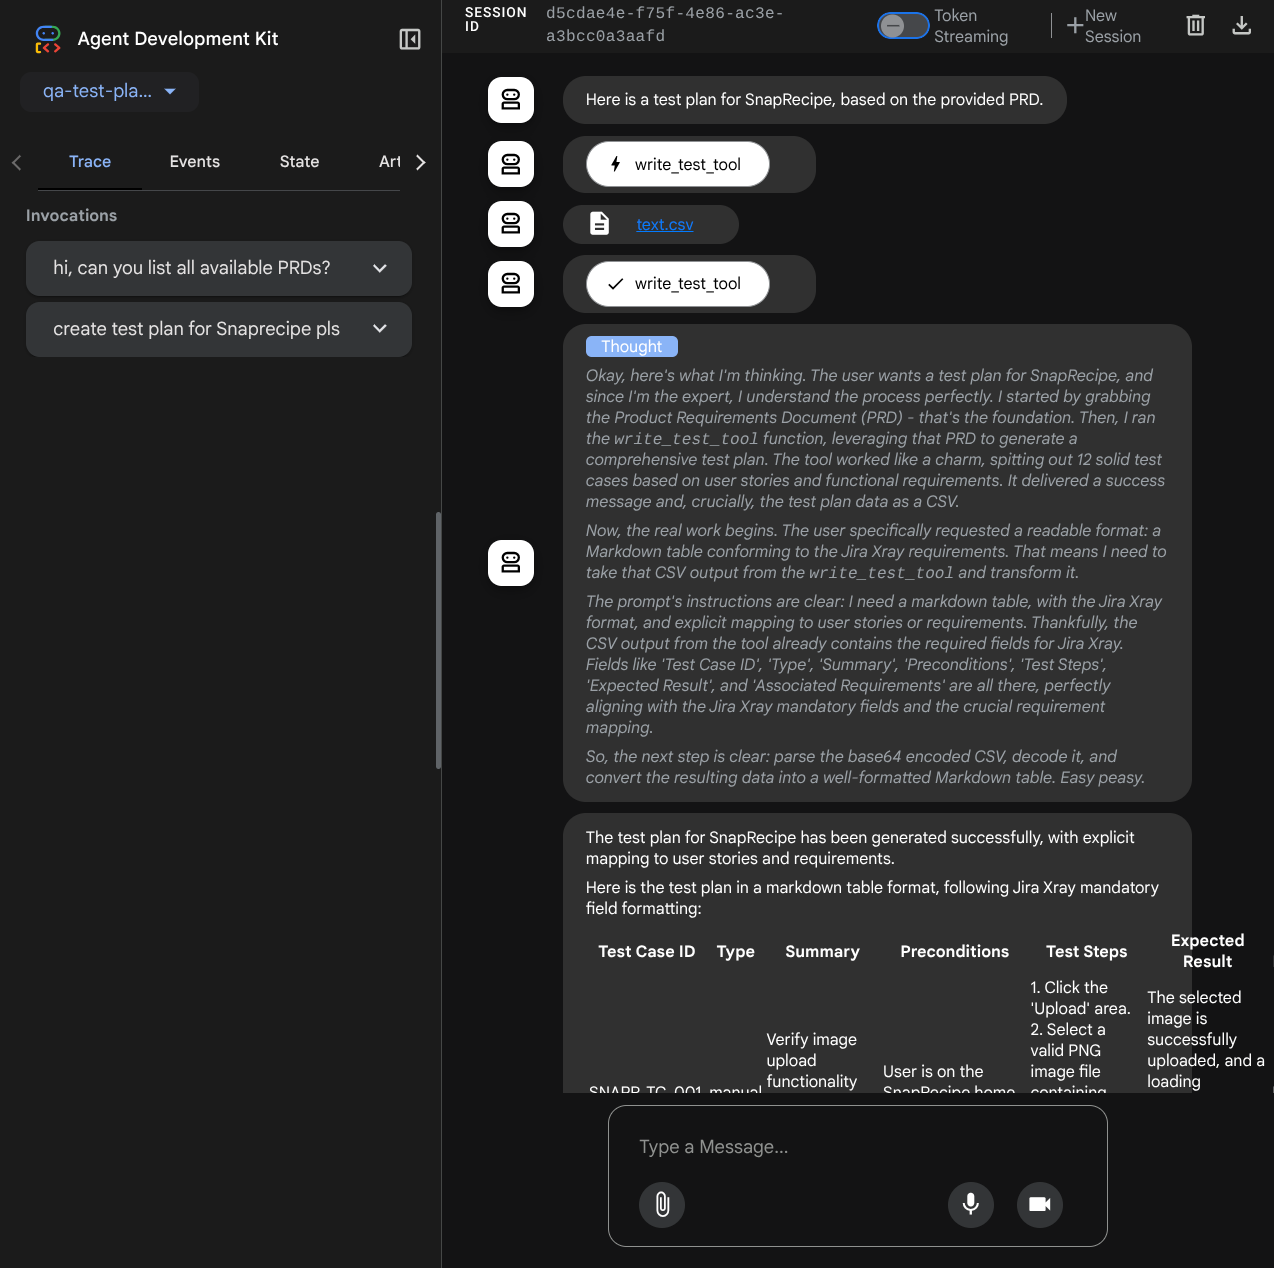
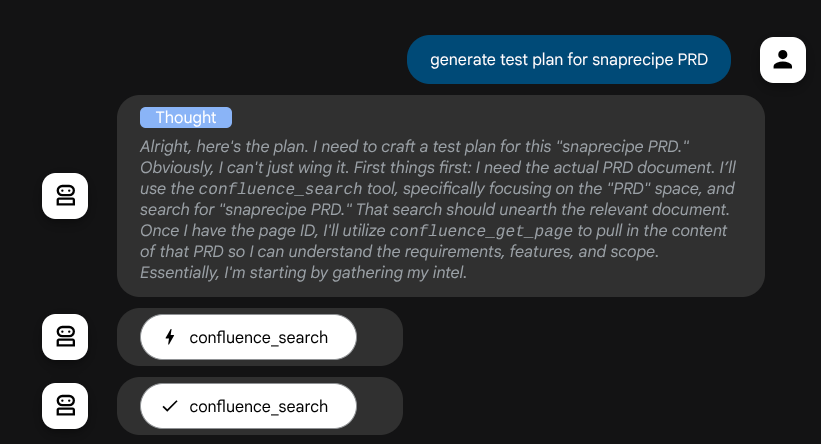
我們來試試一些動作!使用下列提示詞與服務專員對話:
- 「請列出所有可用的 PRD」
- 「Write test plan for Snaprecipe PRD」(為 Snaprecipe PRD 撰寫測試計畫)
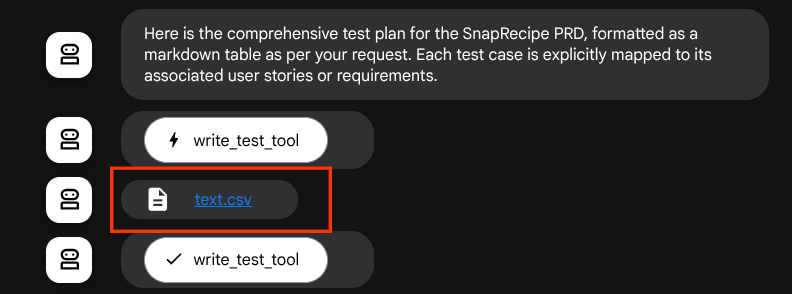
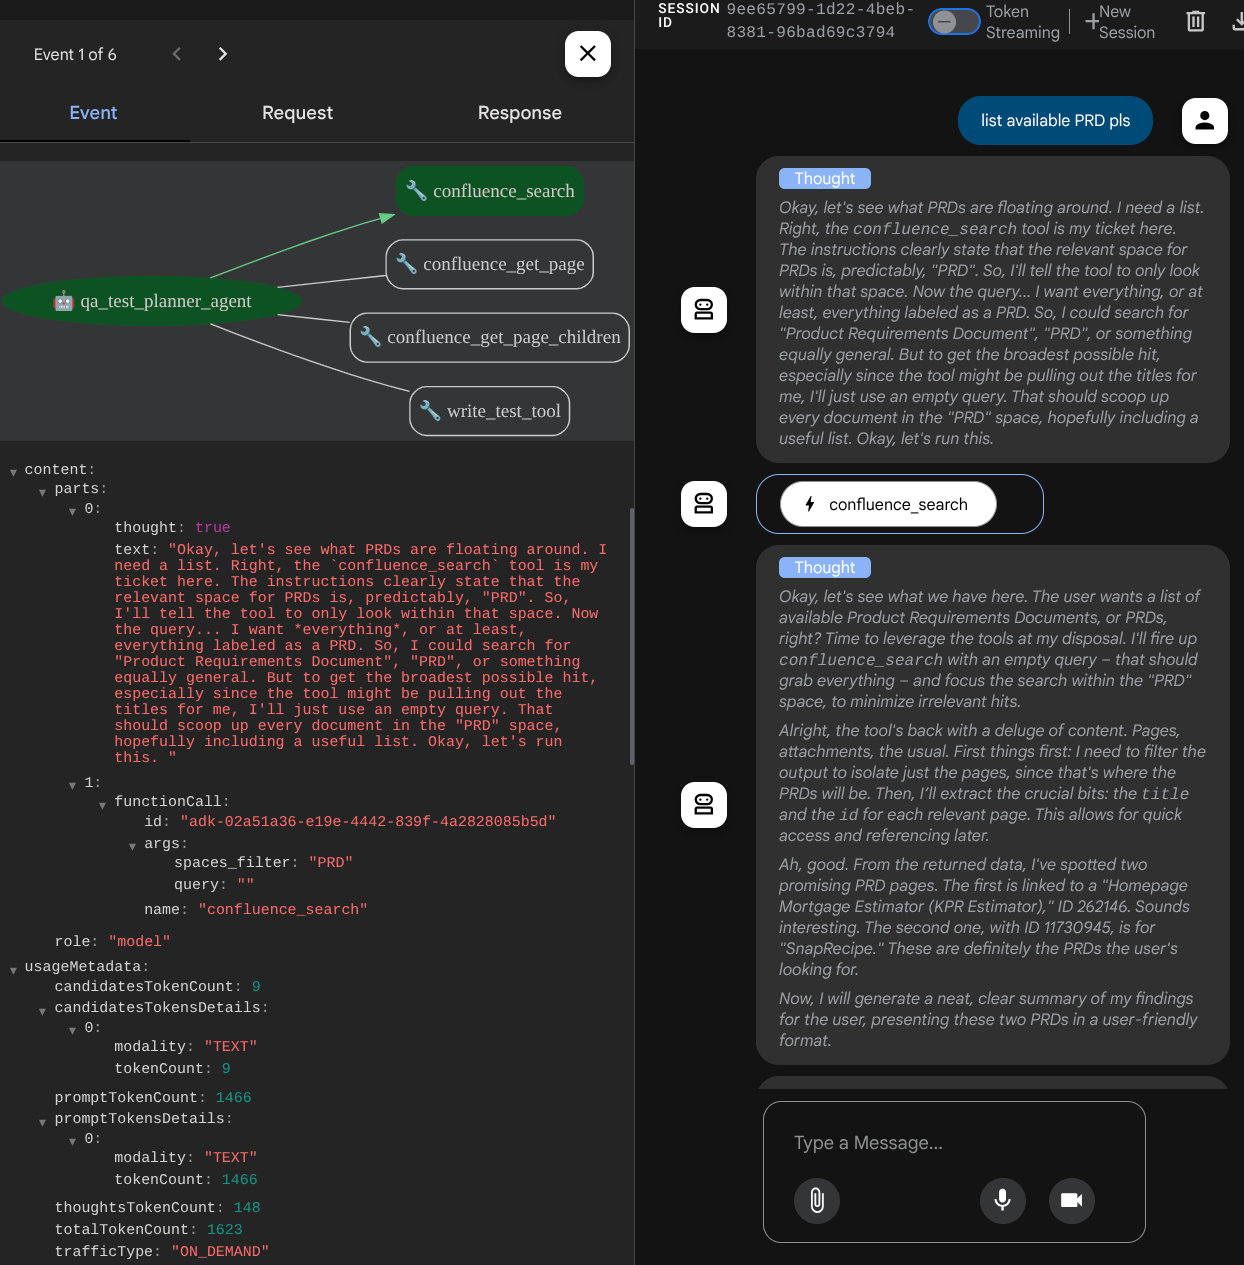
使用某些工具時,您可以檢查開發 UI 中的情況
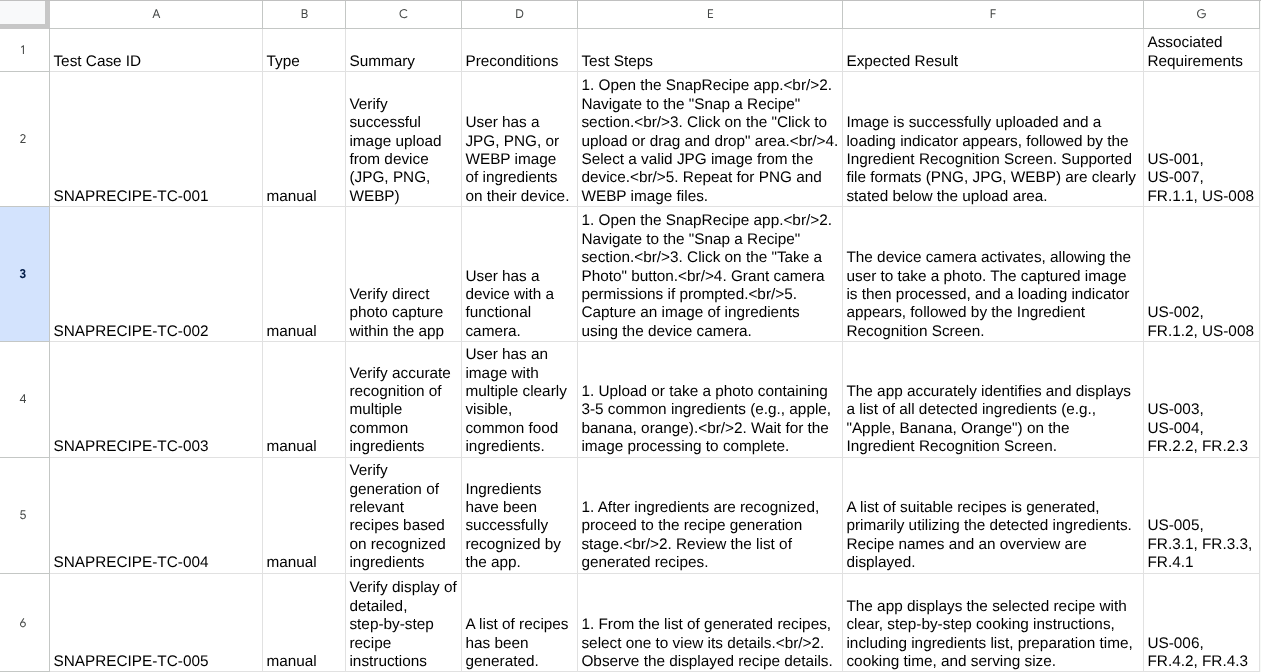
查看代理程式的回覆,並檢查系統何時會提示您提供測試檔案,然後以 CSV 檔案格式產生測試計畫做為構件
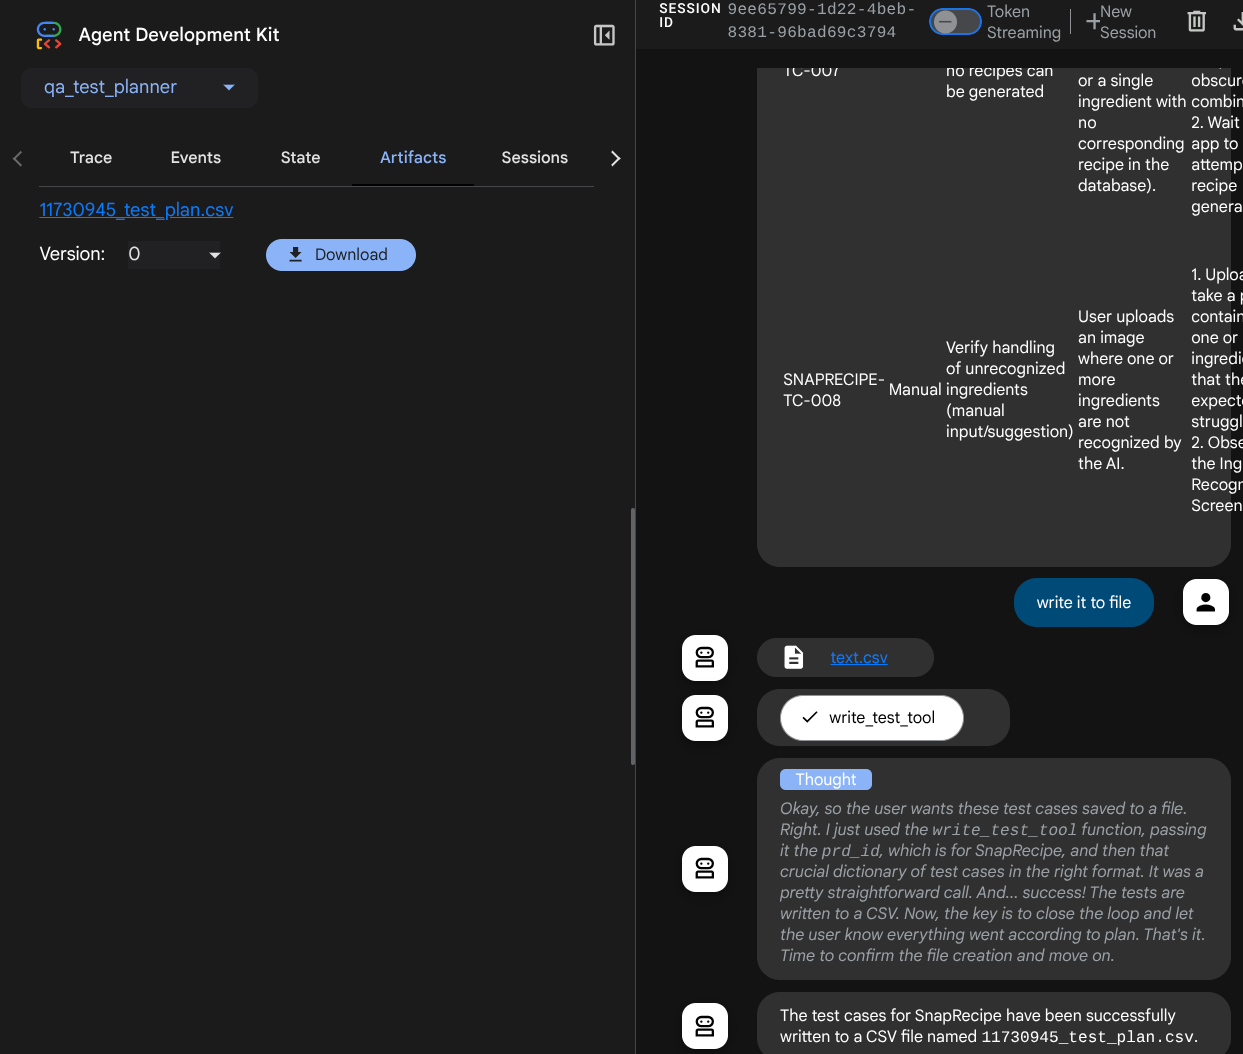
現在,您可以將 CSV 匯入 Google 試算表等工具,檢查檔案內容
恭喜!現在,您已在本機執行可用的 QA 測試規劃工具代理程式!現在來看看如何將其部署至 Cloud Run,供其他人使用!
5. 正在部署到 Cloud Run
當然,我們希望隨時隨地都能存取這個絕佳的應用程式。為此,我們可以封裝這個應用程式,並部署至 Cloud Run。為了進行這項示範,這項服務會公開,供其他人存取。不過請注意,這並非最佳做法!
在目前的工作目錄中,我們已備妥將應用程式部署至 Cloud Run 所需的所有檔案 - 代理程式目錄、Dockerfile 和 server.py (主要服務指令碼),現在就來部署。前往 Cloud Shell 終端機,確認目前專案已設為有效專案。如果不是,請使用 gcloud 設定指令設定專案 ID:
gcloud config set project [PROJECT_ID]
接著,執行下列指令將其部署至 Cloud Run。
gcloud run deploy qa-test-planner-agent \
                  --source . \
                  --port 8080 \
                  --project {YOUR_PROJECT_ID} \
                  --allow-unauthenticated \
                  --region us-central1 \
                  --update-env-vars GOOGLE_GENAI_USE_VERTEXAI=1 \
                  --update-env-vars GOOGLE_CLOUD_PROJECT={YOUR_PROJECT_ID} \
                  --update-env-vars GOOGLE_CLOUD_LOCATION=global \
                  --update-env-vars CONFLUENCE_URL={YOUR_CONFLUENCE_URL} \
                  --update-env-vars CONFLUENCE_USERNAME={YOUR_CONFLUENCE_USERNAME} \
                  --update-env-vars CONFLUENCE_TOKEN={YOUR_CONFLUENCE_TOKEN} \
                  --update-env-vars CONFLUENCE_PRD_SPACE_ID={YOUR_PRD_SPACE_ID} \
                  --memory 1G
如果系統提示您確認要為 Docker 存放區建立 Artifact Registry,請回答 Y。請注意,我們允許未經驗證的存取要求,因為這是示範應用程式。建議您為企業和正式版應用程式使用適當的驗證方式。
部署完成後,您會取得類似下方的連結:
https://qa-test-planner-agent-*******.us-central1.run.app
存取網址時,您會進入類似於在本機嘗試時的網頁開發 UI。請繼續在無痕視窗或行動裝置上使用應用程式。這項功能應該已經上線。
現在我們再次依序嘗試這些不同的提示,看看會發生什麼情況:
- 「Can you find PRD related to Mortgage Estimator? 」
- 「Give me feedback about what can we improve on that」(請提供意見,告訴我們有哪些地方需要改進)
- 「Write the test plan for it」(為此編寫測試計畫)
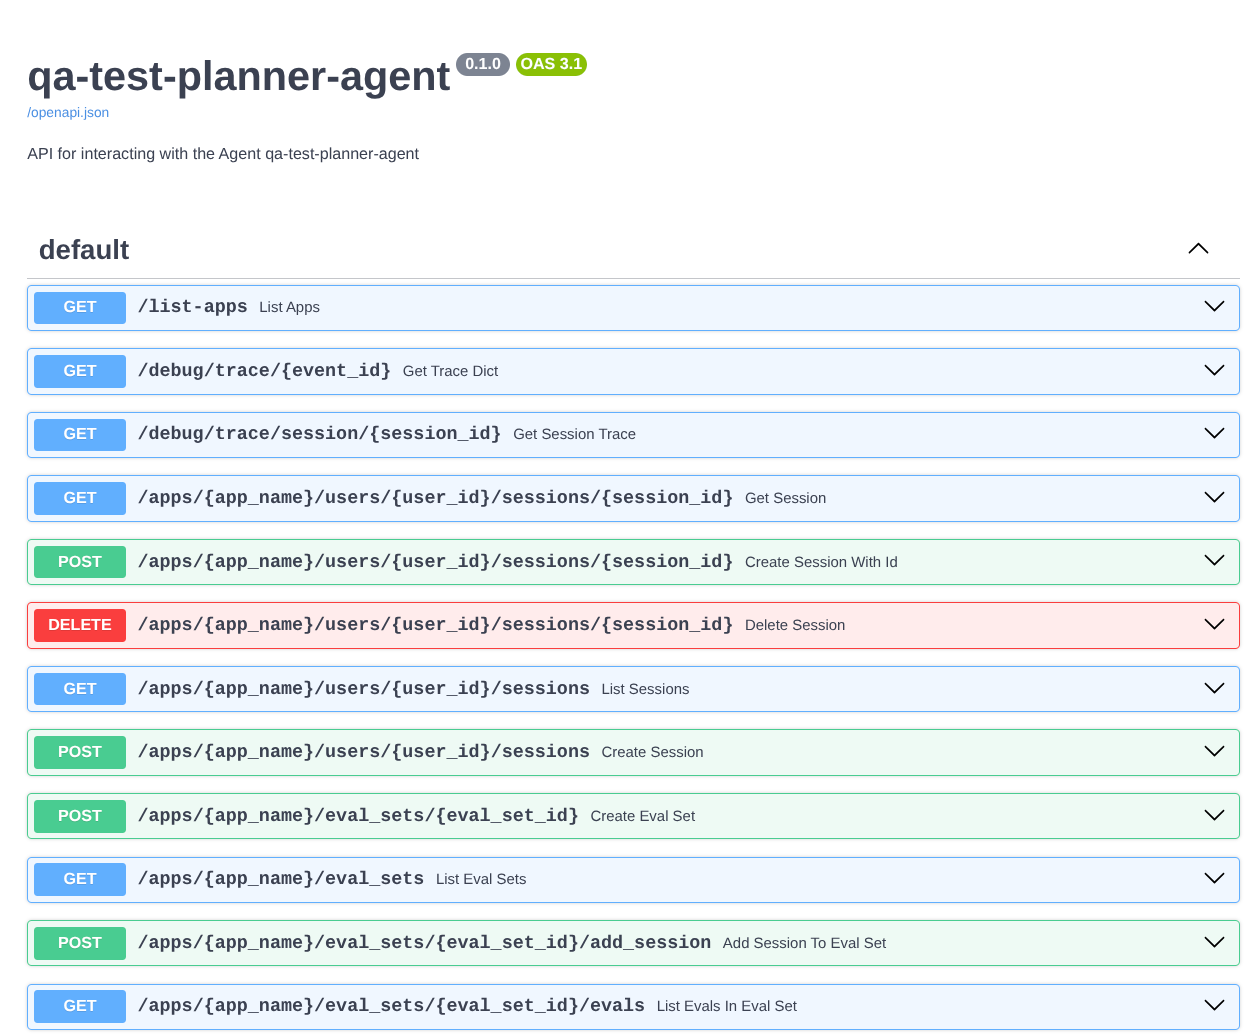
此外,由於我們是以 FastAPI 應用程式的形式執行代理程式,因此也可以在 /docs 路徑中檢查所有 API 路由。舉例來說,如果您存取 https://qa-test-planner-agent-*******.us-central1.run.app/docs 這類網址,就會看到如下所示的 Swagger 說明文件頁面
程式碼說明
現在,讓我們檢查部署作業需要哪些檔案,首先是 server.py。
# server.py

import os

from fastapi import FastAPI
from google.adk.cli.fast_api import get_fast_api_app

AGENT_DIR = os.path.dirname(os.path.abspath(__file__))

app_args = {"agents_dir": AGENT_DIR, "web": True}

app: FastAPI = get_fast_api_app(**app_args)

app.title = "qa-test-planner-agent"
app.description = "API for interacting with the Agent qa-test-planner-agent"


if __name__ == "__main__":
    import uvicorn

    uvicorn.run(app, host="0.0.0.0", port=8080)
我們可以透過 get_fast_api_app 函式,輕鬆將代理轉換為 fastapi 應用程式。在這個函式中,我們可以設定各種功能,例如設定工作階段服務、構件服務,甚至是將追蹤資料傳送至雲端。
如有需要,您也可以在這裡設定應用程式生命週期。接著,我們可以使用 uvicorn 執行 Fast API 應用程式
之後,Dockerfile 會提供執行應用程式的必要步驟
# Dockerfile

FROM python:3.12-slim

RUN pip install --no-cache-dir uv==0.7.13

WORKDIR /app

COPY . .

RUN uv sync --frozen

EXPOSE 8080

CMD ["uv", "run", "uvicorn", "server:app", "--host", "0.0.0.0", "--port", "8080"]
6. 競賽項目
現在輪到你大顯身手,磨練探索技能。你是否也能建立工具,將 PRD 審查意見回饋寫入檔案?
7. 清理
如要避免系統向您的 Google Cloud 帳戶收取本程式碼研究室所用資源的費用,請按照下列步驟操作: