
1. 概要
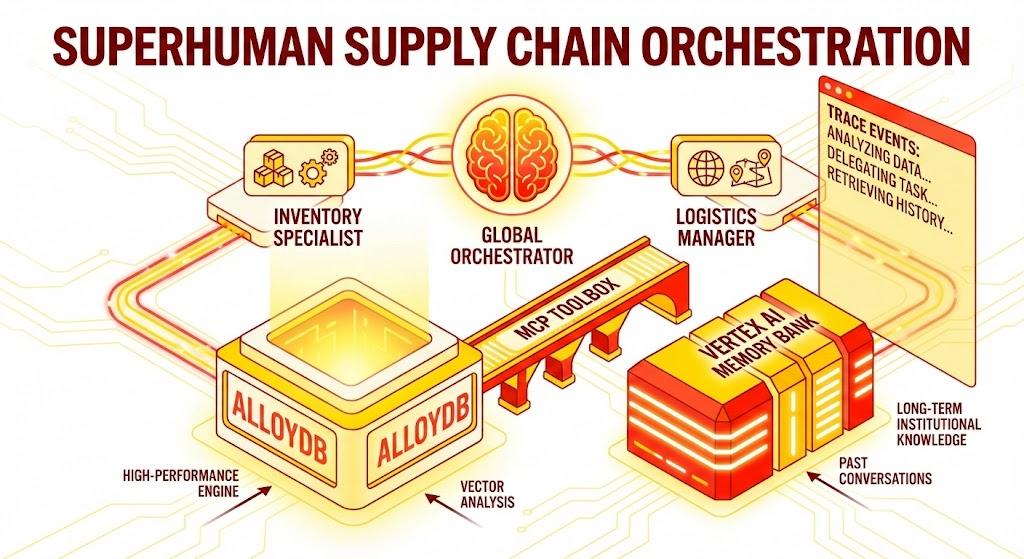
この Codelab では、サプライ チェーン オーケストレーター エージェントを構築します。このアプリケーションを使用すると、ユーザーは自然言語を使用して在庫の分析、ロジスティクスの追跡、サプライ チェーンのリスク管理を行うことができます。
Google の Agent Development Kit(ADK)を活用して、コンテキストを維持し、Vertex AI メモリバンクを介してユーザー設定を記憶し、MCP ツールボックスを介して AlloyDB に保存された大規模なデータセットとやり取りするマルチエージェント アーキテクチャを構築します。
作成するアプリの概要
次の要素で構成される Python Flask アプリケーション。
グローバル オーケストレーター エージェント: 会話フローと委任を管理するルート エージェント。
スペシャリスト エージェント: ドメイン固有のタスク用の「InventorySpecialist」と「LogisticsManager」。
メモリの統合: Vertex AI メモリバンクを使用した短期セッション メモリと長期メモリ。
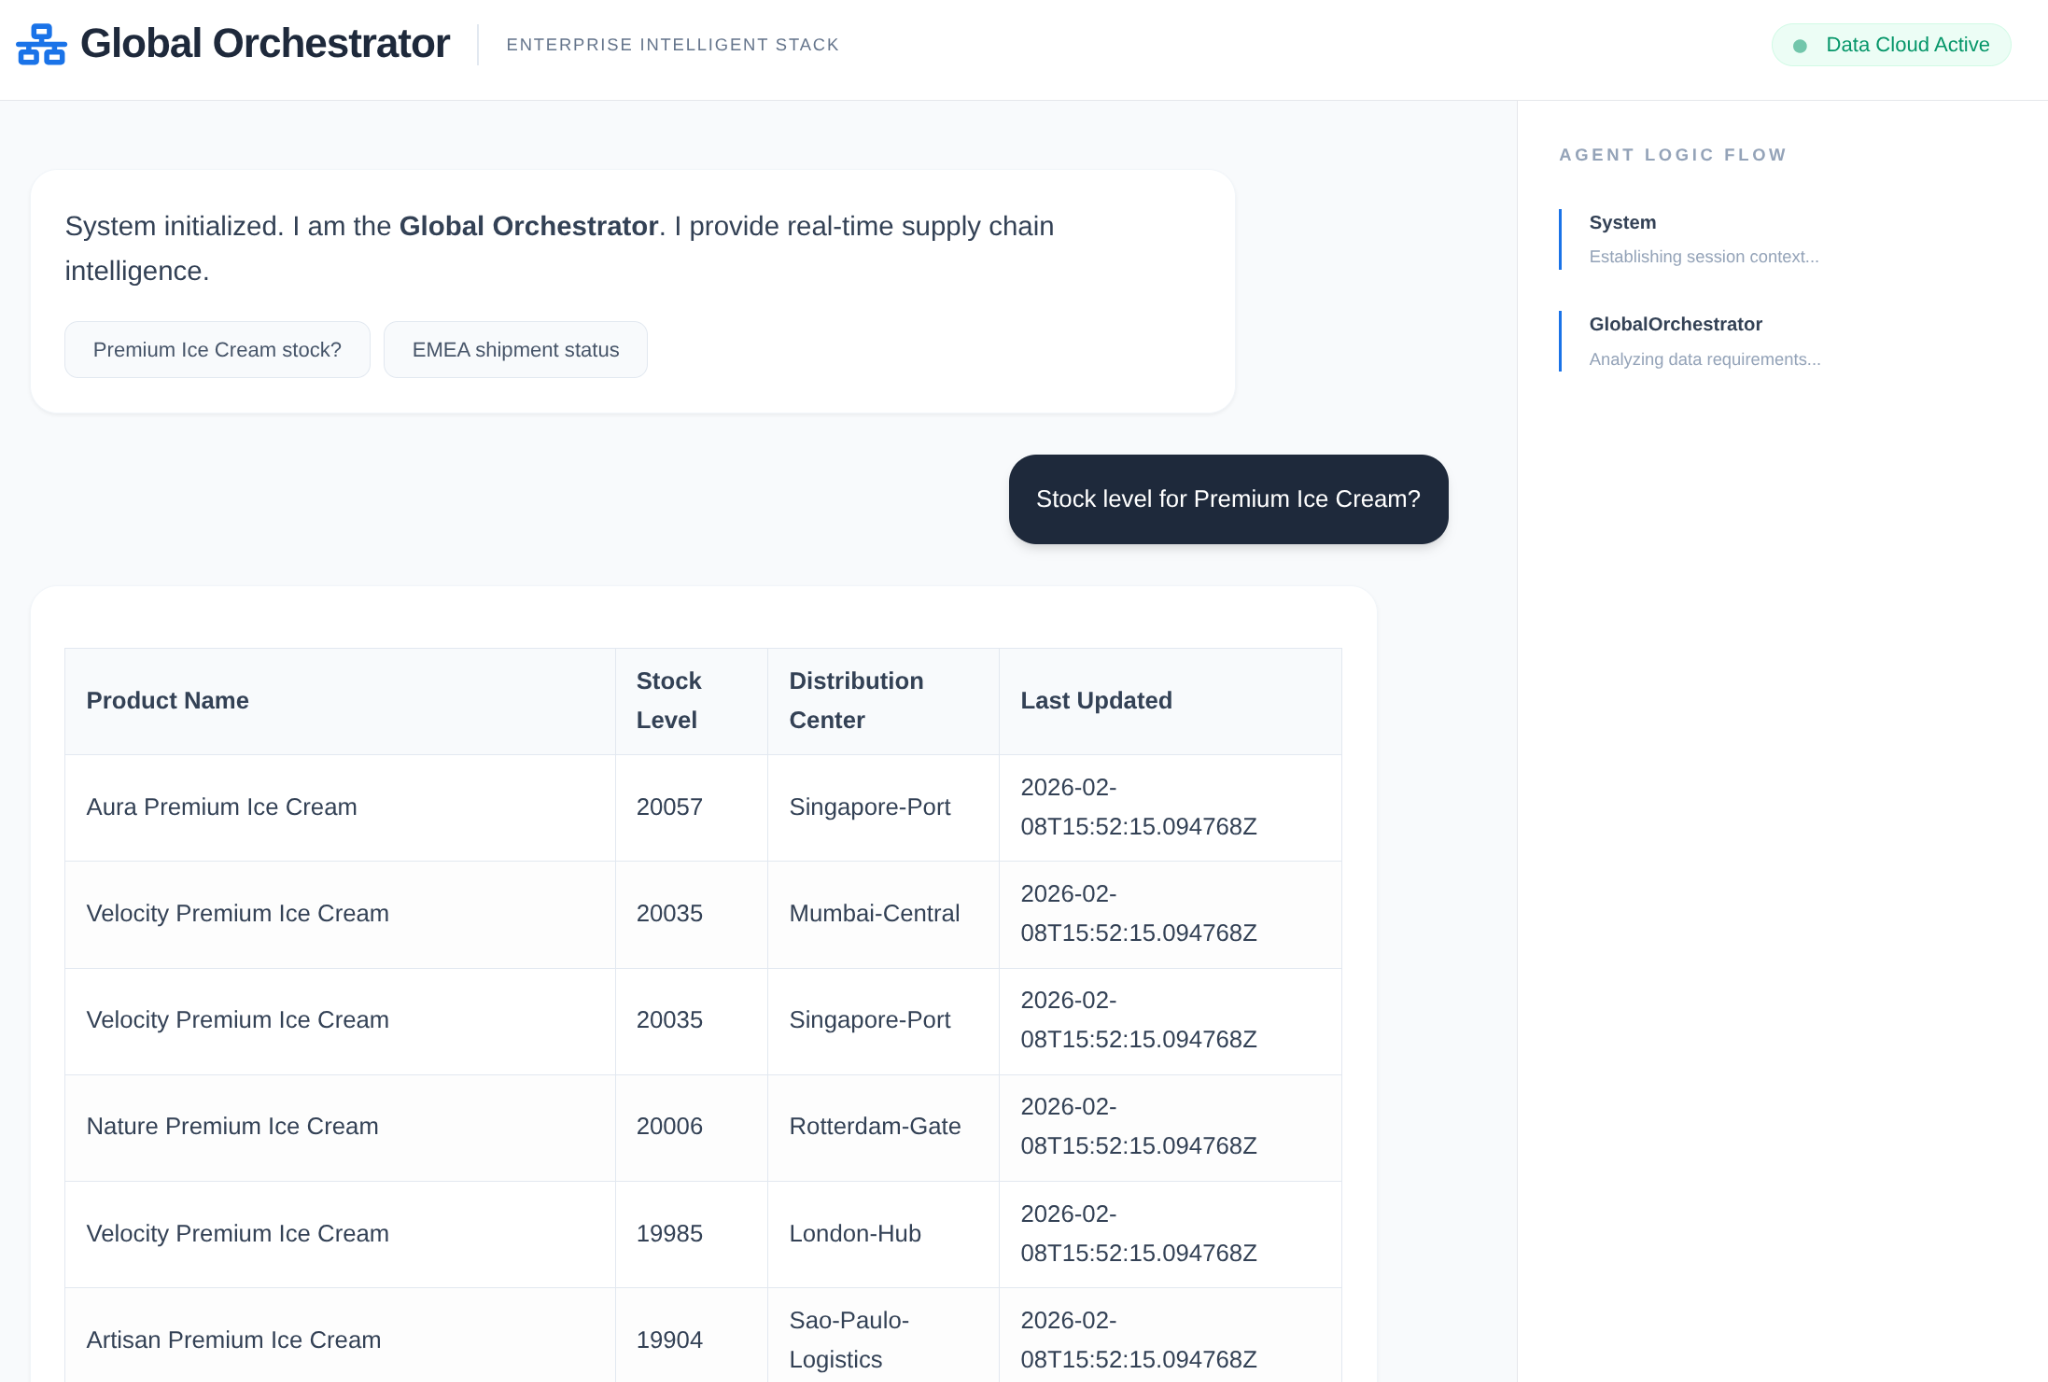
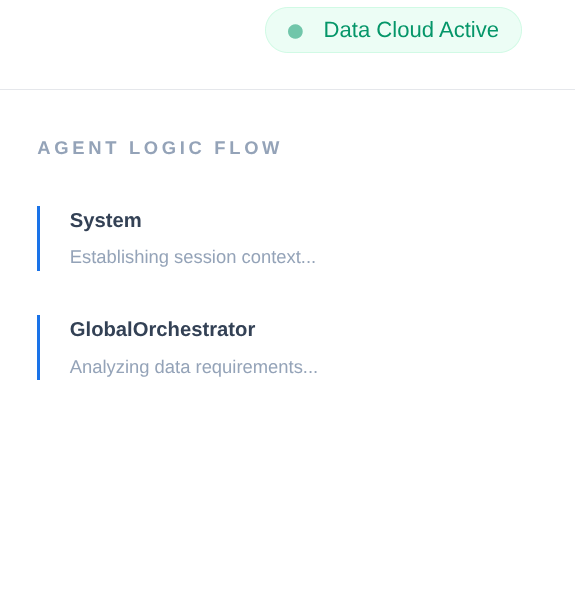
ナラティブ UI: エージェントの推論プロセス(トレース コンテキスト)を可視化するウェブ インターフェース。
学習内容
- Google ADK を使用して専門エージェントとサブエージェントを作成する方法。
- エージェントの長期記憶用に Vertex AI Memory Bank を統合する方法。
- MCP ツールボックスを使用してエージェントを AlloyDB データツールに接続する方法。
- ADK コールバックを実装して、エージェントの推論をトレースして可視化する方法。
- Cloud Run を使用してソリューションをデプロイする方法、またはローカルで実行する方法。
アーキテクチャ
テクノロジー スタック
- AlloyDB for PostgreSQL: 50,000 件以上のサプライ チェーン レコードを保持する高性能な運用データベースとして機能します。ベクトル検索と取得を強化します。
- データベース向け MCP ツールボックス: 「オーケストレーション マエストロ」として機能し、AlloyDB データをエージェントが呼び出すことができる実行可能なツールとして公開します。
- Agent Development Kit(ADK): エージェント、指示、ツールの定義に使用されるフレームワーク。
- Vertex AI メモリバンク: 長期記憶を提供し、エージェントがセッション間でユーザーの好みや過去のインタラクションを記憶できるようにします。
- Vertex AI セッション サービス: 短期的な会話コンテキストを管理します。
フロー
- ユーザーのクエリ: ユーザーが質問します(例: 「プレミアム アイスクリームの在庫を確認して」)。
- メモリの確認: オーケストレーターがメモリバンクで関連する過去の情報(「ユーザーは EMEA の地域マネージャーである」など)を確認します。
- 委任: オーケストレーターがタスクを InventorySpecialist に委任します。
- ツールの実行: スペシャリストは、MCP ツールボックスで提供されるツールを使用して AlloyDB にクエリを実行します。
- レスポンス: エージェントがデータを処理し、Markdown 形式のテーブルを返します。
- メモリ ストレージ: 重要なやり取りはメモリバンクに保存されます。
要件
2. 始める前に
プロジェクトを作成する
- Google Cloud コンソールのプロジェクト選択ページで、Google Cloud プロジェクトを選択または作成します。
- Cloud プロジェクトに対して課金が有効になっていることを確認します。詳しくは、プロジェクトで課金が有効になっているかどうかを確認する方法をご覧ください。
- Google Cloud 上で動作するコマンドライン環境の Cloud Shell を使用します。Google Cloud コンソールの上部にある [Cloud Shell をアクティブにする] をクリックします。
![[Cloud Shell をアクティブにする] ボタンの画像](https://codelabs.developers.google.com/static/scm-alloydb-adk-memorybank/img/91567e2f55467574.png?hl=ja)
- Cloud Shell に接続したら、次のコマンドを使用して、すでに認証済みであることと、プロジェクトがプロジェクト ID に設定されていることを確認します。
gcloud auth list
- Cloud Shell で次のコマンドを実行して、gcloud コマンドがプロジェクトを認識していることを確認します。
gcloud config list project
- プロジェクトが設定されていない場合は、次のコマンドを使用して設定します。
gcloud config set project <YOUR_PROJECT_ID>
- 必要な API を有効にする: リンクにアクセスして、API を有効にします。
または、この操作に gcloud コマンドを使用することもできます。gcloud コマンドとその使用方法については、ドキュメントをご覧ください。
注意点とトラブルシューティング
「ゴースト プロジェクト」 症候群 |
|
請求のバリケード | プロジェクトを有効にしたが、請求先アカウントを忘れた。AlloyDB は高性能エンジンです。ガソリン タンク(課金)が空の場合、起動しません。 |
API 伝播の遅延 | [API を有効にする] をクリックしたのに、コマンドラインに |
割り当て Quags | 新しいトライアル アカウントを使用している場合は、AlloyDB インスタンスのリージョン割り当てに達する可能性があります。 |
「非表示」サービス エージェント | AlloyDB サービス エージェントに |
3. データベースの設定
アプリケーションの中核となるのは AlloyDB for PostgreSQL です。強力なベクトル機能と統合されたカラム型エンジンを活用して、50,000 件を超える SCM レコードのエンベディングを生成しました。これにより、準リアルタイムのベクトル分析が可能になり、エージェントはミリ秒単位で大規模なデータセット全体にわたって在庫の異常やロジスティクスのリスクを特定できます。
このラボでは、テストデータのデータベースとして AlloyDB を使用します。クラスタを使用して、データベースやログなどのすべてのリソースを保持します。各クラスタには、データへのアクセス ポイントを提供するプライマリ インスタンスがあります。テーブルには実際のデータが格納されます。
テスト データセットを読み込む AlloyDB クラスタ、インスタンス、テーブルを作成しましょう。
- ボタンをクリックするか、以下のリンクを Google Cloud コンソールのユーザーがログインしているブラウザにコピーします。
または、請求先アカウントを利用したプロジェクトから Cloud Shell ターミナルに移動し、次のコマンドを使用して github リポジトリ のクローンを作成してプロジェクトに移動することもできます。
git clone https://github.com/AbiramiSukumaran/easy-alloydb-setup

cd easy-alloydb-setup
- この手順が完了すると、リポジトリがローカルの Cloud Shell エディタにクローンされ、プロジェクト フォルダから次のコマンドを実行できるようになります(プロジェクト ディレクトリにいることを確認することが重要です)。
sh run.sh
- UI を使用します(ターミナルのリンクをクリックするか、ターミナルの [ウェブでプレビュー] リンクをクリックします)。
- プロジェクト ID、クラスタ名、インスタンス名の詳細を入力して、開始します。
- ログがスクロールしている間にコーヒーを飲んで、舞台裏で何が行われているかについてはこちらをご覧ください。
注意点とトラブルシューティング
「忍耐」の問題 | データベース クラスタは重いインフラストラクチャです。ページを更新したり、「フリーズした」ように見える Cloud Shell セッションを強制終了したりすると、部分的にプロビジョニングされた「ゴースト」インスタンスが作成され、手動で介入しないと削除できなくなる可能性があります。 |
リージョンが一致しない |
|
ゾンビ クラスタ | 以前にクラスタに同じ名前を使用し、削除していない場合、スクリプトでクラスタ名がすでに存在すると表示されることがあります。クラスタ名はプロジェクト内で一意にする必要があります。 |
Cloud Shell のタイムアウト | コーヒー ブレイクに 30 分かかると、Cloud Shell がスリープ状態になり、 |
4. スキーマのプロビジョニング
AlloyDB クラスタとインスタンスが実行されたら、AlloyDB Studio の SQL エディタに移動して、AI 拡張機能を有効にしてスキーマをプロビジョニングします。
インスタンスの作成が完了するまで待つ必要がある場合があります。完了したら、クラスタの作成時に作成した認証情報を使用して AlloyDB にログインします。PostgreSQL の認証には次のデータを使用します。
- ユーザー名: 「
postgres」 - データベース: 「
postgres」 - パスワード: 「
alloydb」(または作成時に設定したパスワード)
AlloyDB Studio への認証が成功すると、エディタに SQL コマンドが入力されます。最後のウィンドウの右にあるプラス記号を使用して、複数のエディタ ウィンドウを追加できます。
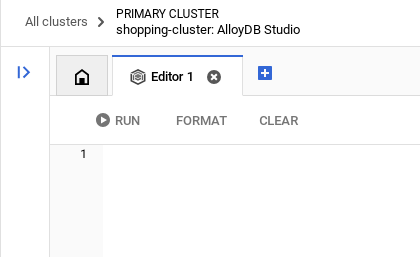
必要に応じて [実行]、[形式]、[クリア] オプションを使用して、エディタ ウィンドウに AlloyDB のコマンドを入力します。
拡張機能を有効にする
このアプリのビルドには、拡張機能 pgvector と google_ml_integration を使用します。pgvector 拡張機能を使用すると、ベクトル エンベディングを保存して検索できます。google_ml_integration 拡張機能は、Vertex AI 予測エンドポイントにアクセスして SQL で予測を取得するために使用する関数を提供します。次の DDL を実行して、これらの拡張機能を有効にします。
CREATE EXTENSION IF NOT EXISTS google_ml_integration CASCADE;
CREATE EXTENSION IF NOT EXISTS vector;
テーブルを作成する
AlloyDB Studio で次の DDL ステートメントを使用してテーブルを作成できます。
DROP TABLE IF EXISTS shipments;
DROP TABLE IF EXISTS products;

-- 1. Product Inventory Table

CREATE TABLE products (
id SERIAL PRIMARY KEY,
name VARCHAR(255) NOT NULL,
category VARCHAR(100),
stock_level INTEGER,
distribution_center VARCHAR(100),
region VARCHAR(50),
embedding vector(768),
last_updated TIMESTAMP DEFAULT CURRENT_TIMESTAMP
);

-- 2. Logistics & Shipments
CREATE TABLE shipments (
shipment_id SERIAL PRIMARY KEY,
product_id INTEGER REFERENCES products(id),
status VARCHAR(50), -- 'In Transit', 'Delayed', 'Delivered', 'Pending'
estimated_arrival TIMESTAMP,
route_efficiency_score DECIMAL(3, 2)
);
embedding 列では、一部のテキスト フィールドのベクトル値を保存できます。
データの取り込み
次の SQL ステートメントを実行して、products テーブルに 50,000 件のレコードを一括挿入します。
-- We use a CROSS JOIN pattern with realistic naming segments to create meaningful variety
DO $$
DECLARE
brand_names TEXT[] := ARRAY['Artisan', 'Nature', 'Elite', 'Pure', 'Global', 'Eco', 'Velocity', 'Heritage', 'Aura', 'Summit'];
product_types TEXT[] := ARRAY['Ice Cream', 'Body Wash', 'Laundry Detergent', 'Shampoo', 'Mayonnaise', 'Deodorant', 'Tea', 'Soup', 'Face Cream', 'Soap'];
variants TEXT[] := ARRAY['Classic', 'Gold', 'Premium', 'Eco-Friendly', 'Organic', 'Night-Repair', 'Extra-Fresh', 'Zero-Sugar', 'Sensitive', 'Maximum-Strength'];
regions TEXT[] := ARRAY['EMEA', 'APAC', 'LATAM', 'NAMER'];
dcs TEXT[] := ARRAY['London-Hub', 'Mumbai-Central', 'Sao-Paulo-Logistics', 'Singapore-Port', 'Rotterdam-Gate', 'New-York-DC'];
BEGIN
INSERT INTO products (name, category, stock_level, distribution_center, region)
SELECT
b || ' ' || v || ' ' || t as name,
CASE
WHEN t IN ('Ice Cream', 'Mayonnaise', 'Tea', 'Soup') THEN 'Food & Refreshment'
WHEN t IN ('Body Wash', 'Shampoo', 'Deodorant', 'Face Cream', 'Soap') THEN 'Personal Care'
ELSE 'Home Care'
END as category,
floor(random() * 20000 + 100)::int as stock_level,
dcs[floor(random() * 6 + 1)] as distribution_center,
regions[floor(random() * 4 + 1)] as region
FROM
unnest(brand_names) b,
unnest(variants) v,
unnest(product_types) t,
generate_series(1, 50); -- 10 * 10 * 10 * 50 = 50,000 records
END $$;
デモ固有のレコードを挿入して、経営幹部向けの質問に対する予測可能な回答を確保しましょう
-- These ensure you have predictable answers for specific "Executive" questions
INSERT INTO products (name, category, stock_level, distribution_center, region) VALUES
('Magnum Ultra Gold Limited Edition', 'Food & Refreshment', 45, 'Rotterdam-Gate', 'EMEA'),
('Dove Pro-Health Deep Moisture', 'Personal Care', 12000, 'Mumbai-Central', 'APAC'),
('Hellmanns Real Organic Mayonnaise', 'Food & Refreshment', 8000, 'London-Hub', 'EMEA');
配送データの挿入
-- Shipments Generation (More shipments than products)
INSERT INTO shipments (product_id, status, estimated_arrival, route_efficiency_score)
SELECT
id,
CASE
WHEN random() > 0.8 THEN 'Delayed'
WHEN random() > 0.4 THEN 'In Transit'
ELSE 'Delivered'
END,
NOW() + (random() * 10 || ' days')::interval,
(random() * 0.5 + 0.5)::decimal(3,2)
FROM products
WHERE random() > 0.3; -- Create shipments for ~70% of products


-- Add duplicate shipments for some products to show complex logistics
INSERT INTO shipments (product_id, status, estimated_arrival, route_efficiency_score)
SELECT id, 'In Transit', NOW() + INTERVAL '12 days', 0.88
FROM products
LIMIT 5000;
権限を付与
次のステートメントを実行して、「embedding」関数に対する実行権限を付与します。
GRANT EXECUTE ON FUNCTION embedding TO postgres;
AlloyDB サービス アカウントに Vertex AI ユーザーロールを付与する
Google Cloud IAM コンソールで、AlloyDB サービス アカウント(service-<<PROJECT_NUMBER>>@gcp-sa-alloydb.iam.gserviceaccount.com のような形式)に「Vertex AI ユーザー」ロールへのアクセス権を付与します。PROJECT_NUMBER にはプロジェクト番号が設定されます。
または、Cloud Shell ターミナルから次のコマンドを実行することもできます。
PROJECT_ID=$(gcloud config get-value project)


gcloud projects add-iam-policy-binding $PROJECT_ID \
  --member="serviceAccount:service-$(gcloud projects describe $PROJECT_ID --format="value(projectNumber)")@gcp-sa-alloydb.iam.gserviceaccount.com" \
--role="roles/aiplatform.user"
エンベディングを生成する
次に、特定の意味のあるテキスト フィールドのベクトル エンベディングを生成します。
WITH
 rows_to_update AS (
 SELECT
   id
 FROM
   products
 WHERE
   embedding IS NULL
 LIMIT
   5000 )
UPDATE
 products
SET
 embedding = ai.embedding('text-embedding-005', name || ' ' || category || ' ' || distribution_center || ' ' || region)::vector
FROM
 rows_to_update
WHERE
 products.id = rows_to_update.id
 AND embedding IS null;
上記のステートメントでは上限を 5,000 に設定しているため、列のエンベディングが NULL の行がテーブルに存在しなくなるまで、このステートメントを繰り返し実行してください。
注意点とトラブルシューティング
「パスワード忘れ」ループ | 「ワンクリック」設定を使用していて、パスワードを忘れた場合は、コンソールのインスタンスの基本情報ページに移動し、[編集] をクリックして |
「拡張機能が見つかりません」というエラー |
|
IAM 伝播のギャップ |
|
ベクトル ディメンションの不一致 |
|
プロジェクト ID の誤字脱字 |
|
5. ツールとツールボックスの設定
データベース向け MCP ツールボックスは、データベース用のオープンソース MCP サーバーです。これにより、接続プーリングや認証などの複雑な処理に対応して、ツールの開発をより簡単、迅速、セキュアに行うことができます。ツールボックスは、エージェントがデータベース内のデータにアクセスできるようにする生成 AI ツールの構築に役立ちます。
「指揮者」として Model Context Protocol(MCP)ツールボックス for Databases を使用します。エージェントと AlloyDB の間の標準化されたミドルウェアとして機能します。tools.yaml 構成を定義すると、ツールボックスは複雑なデータベース オペレーションを search_products_by_context や check_inventory_levels などのクリーンで実行可能なツールとして自動的に公開します。これにより、エージェント ロジック内で手動の接続プールやボイラープレート SQL を使用する必要がなくなります。
ツールボックス サーバーのインストール
Cloud Shell ターミナルで、新しいツール YAML ファイルとツールボックス バイナリを保存するフォルダを作成します。
mkdir scm-agent-toolbox

cd scm-agent-toolbox
その新しいフォルダ内で、次のコマンドセットを実行します。
# see releases page for other versions
export VERSION=0.27.0
curl -L -o toolbox https://storage.googleapis.com/mcp-toolbox-for-databases/v$VERSION/linux/amd64/toolbox
chmod +x toolbox
次に、Cloud Shell エディタに移動して、新しいフォルダ内に tools.yaml ファイルを作成し、このリポジトリ ファイルの内容を tools.yaml ファイルにコピーします。
sources:
    supply_chain_db:
        kind: "alloydb-postgres"
        project: "YOUR_PROJECT_ID"
        region: "us-central1"
        cluster: "YOUR_CLUSTER"
        instance: "YOUR_INSTANCE"
        database: "postgres"
        user: "postgres"
        password: "YOUR_PASSWORD"

tools:
  search_products_by_context:
    kind: postgres-sql
    source: supply_chain_db
    description: Find products in the inventory using natural language search and vector embeddings.
    parameters:
      - name: search_text
        type: string
        description: Description of the product or category the user is looking for.
    statement: |
     SELECT name, category, stock_level, distribution_center, region
      FROM products
      ORDER BY embedding <=> ai.embedding('text-embedding-005', $1)::vector
      LIMIT 5;

  check_inventory_levels:
    kind: postgres-sql
    source: supply_chain_db
    description: Get precise stock levels for a specific product name.
    parameters:
      - name: product_name
        type: string
        description: The exact or partial name of the product.
    statement: |
     SELECT name, stock_level, distribution_center, last_updated
      FROM products
      WHERE name ILIKE '%' || $1 || '%'
      ORDER BY stock_level DESC;

  track_shipment_status:
    kind: postgres-sql
    source: supply_chain_db
    description: Retrieve real-time logistics and shipping status for a specific region or product.
    parameters:
      - name: region
        type: string
        description: The geographical region to filter shipments (e.g., EMEA, APAC).
    statement: |
     SELECT p.name, s.status, s.estimated_arrival, s.route_efficiency_score
      FROM shipments s
      JOIN products p ON s.product_id = p.id
      WHERE p.region = $1
      ORDER BY s.estimated_arrival ASC;

  analyze_supply_chain_risk:
    kind: postgres-sql
    source: supply_chain_db
    description: Rerank and filter shipments based on risk profiles and efficiency scores using Google ML reranker.
    parameters:
      - name: risk_context
        type: string
        description: The business context for risk analysis (e.g., 'heatwave impact' or 'port strike').
    statement: |
     WITH initial_ranking AS (
      SELECT s.shipment_id, p.name, s.status, p.distribution_center,
      ROW_NUMBER() OVER () AS ref_number
      FROM shipments s
      JOIN products p ON s.product_id = p.id
      WHERE s.status != 'Delivered'
      LIMIT 10
      ),
      reranked_results AS (
      SELECT index, score FROM
      ai.rank(
      model_id => 'semantic-ranker-default-003',
      search_string => $1,
      documents => (SELECT ARRAY_AGG(name || ' at ' || distribution_center ORDER BY ref_number) FROM initial_ranking)
      )
      )
      SELECT i.name, i.status, i.distribution_center, r.score
      FROM initial_ranking i, reranked_results r
      WHERE i.ref_number = r.index
      ORDER BY r.score DESC;

toolsets:
   supply_chain_toolset:
     - search_products_by_context
     - check_inventory_levels
     - track_shipment_status
     - analyze_supply_chain_risk
ローカル サーバーで tools.yaml ファイルをテストします。
./toolbox --tools-file "tools.yaml"
UI でテストすることもできます。
./toolbox --ui
完璧です。すべてが正常に動作することを確認したら、次の手順で Cloud Run にデプロイします。
Cloud Run のデプロイ
- PROJECT_ID 環境変数を設定します。
export PROJECT_ID="my-project-id"
- gcloud CLI を初期化します。
gcloud init
gcloud config set project $PROJECT_ID
- 次の API が有効になっている必要があります。
gcloud services enable run.googleapis.com \
                       cloudbuild.googleapis.com \
                       artifactregistry.googleapis.com \
                       iam.googleapis.com \
                       secretmanager.googleapis.com
- バックエンド サービス アカウントがない場合は、作成します。
gcloud iam service-accounts create toolbox-identity
- Secret Manager を使用する権限を付与します。
gcloud projects add-iam-policy-binding $PROJECT_ID \
    --member serviceAccount:toolbox-identity@$PROJECT_ID.iam.gserviceaccount.com \
    --role roles/secretmanager.secretAccessor
- AlloyDB ソースに固有の追加の権限(roles/alloydb.client と roles/serviceusage.serviceUsageConsumer)をサービス アカウントに付与する
gcloud projects add-iam-policy-binding $PROJECT_ID \
    --member serviceAccount:toolbox-identity@$PROJECT_ID.iam.gserviceaccount.com \
    --role roles/alloydb.client


gcloud projects add-iam-policy-binding $PROJECT_ID \
    --member serviceAccount:toolbox-identity@$PROJECT_ID.iam.gserviceaccount.com \
    --role serviceusage.serviceUsageConsumer
- tools.yaml をシークレットとしてアップロードします。
gcloud secrets create tools-scm-agent --data-file=tools.yaml
- Secret がすでに存在し、Secret バージョンを更新する場合は、次のコマンドを実行します。
gcloud secrets versions add tools-scm-agent --data-file=tools.yaml
- Cloud Run に使用するコンテナ イメージに環境変数を設定します。
export IMAGE=us-central1-docker.pkg.dev/database-toolbox/toolbox/toolbox:latest
- 次のコマンドを使用して、ツールボックスを Cloud Run にデプロイします。
AlloyDB インスタンスで公開アクセスを有効にしている場合(推奨されません)、次のコマンドに沿って Cloud Run にデプロイします。
gcloud run deploy toolbox-scm-agent \
    --image $IMAGE \
    --service-account toolbox-identity \
    --region us-central1 \
    --set-secrets "/app/tools.yaml=tools-scm-agent:latest" \
    --args="--tools-file=/app/tools.yaml","--address=0.0.0.0","--port=8080" \
    --allow-unauthenticated
VPC ネットワークを使用している場合は、次のコマンドを使用します。
gcloud run deploy toolbox-scm-agent \
    --image $IMAGE \
    --service-account toolbox-identity \
    --region us-central1 \
    --set-secrets "/app/tools.yaml=tools-scm-agent:latest" \
    --args="--tools-file=/app/tools.yaml","--address=0.0.0.0","--port=8080" \
    # TODO(dev): update the following to match your VPC details
    --network <<YOUR_NETWORK_NAME>> \
    --subnet <<YOUR_SUBNET_NAME>> \
    --allow-unauthenticated
6. エージェントのセットアップ
Agent Development Kit(ADK)を使用して、モノリシックなプロンプトから専門的なマルチエージェント アーキテクチャに移行しました。
- InventorySpecialist: 商品の在庫と倉庫の指標に重点を置いています。
- LogisticsManager: 世界の配送ルートとリスク分析の専門家。
- GlobalOrchestrator: 推論を使用してタスクを委任し、結果を統合する「頭脳」。
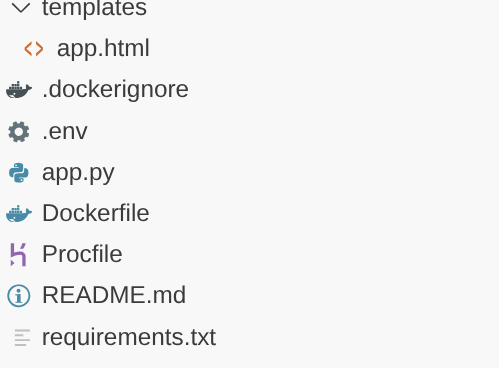
このリポジトリをプロジェクトにクローンして、内容を確認しましょう。
このクローンを作成するには、Cloud Shell ターミナル(ルート ディレクトリまたはこのプロジェクトを作成する場所)から次のコマンドを実行します。
git clone https://github.com/AbiramiSukumaran/scm-memory-agent
- これによりプロジェクトが作成されます。Cloud Shell エディタで確認できます。
- プロジェクトとインスタンスの値で .env ファイルを更新してください。
コードのチュートリアル
オーケストレーター エージェントの概要
Go to app.py and you should be able to see the following snippet:
orchestrator = adk.Agent(
    name="GlobalOrchestrator",
    model="gemini-2.5-flash",
    description="Global Supply Chain Orchestrator root agent.",
    instruction="""
    You are the Global Supply Chain Brain. You are responsible for products, inventory and logistics.
    You also have access to the memory tool, remember to include all the information that the tool can provide you with about the user before you respond.
    1. Understand intent and delegate to specialists. As the Global Orchestrator, you have access to the full conversation history with the user.
    When you transfer a query to a specialist agent, sub agent or tool, share the important facts and information from your memory to them so they can operate with the full context.
    2. Ensure the final response is professional and uses Markdown tables for data.
    3. If a specialist provides a long list, ensure only the top 10 items are shown initially.
    4. Conclude with a brief, high-level executive summary of what the data implies.
    """,
    tools=[adk.tools.preload_memory_tool.PreloadMemoryTool()],
    sub_agents=[inventory_agent, logistics_agent],

    #after_agent_callback=auto_save_session_to_memory_callback,
)
このスニペットは、ユーザーからの会話またはリクエストを受け取り、タスクに基づいて対応するサブエージェントまたはユーザーに対応するツールをルーティングするオーケストレーター エージェントであるルートの定義です。
- インベントリ エージェントを見てみましょう。
inventory_agent = adk.Agent(
    name="InventorySpecialist",
    model="gemini-2.5-flash",
    description="Specialist in product stock and warehouse data.",
    instruction="""
    Analyze inventory levels.
    1. Use 'search_products_by_context' or 'check_inventory_levels'.
    2. ALWAYS format results as a clean Markdown table.
    3. If there are many results, display only the TOP 10 most relevant ones.
    4. At the end, state: 'There are additional records available. Would you like to see more?'
    """,
    tools=tools
)
この特定の下位エージェントは、商品のコンテキスト検索や在庫レベルの確認などの在庫アクティビティに特化しています。
- 次に、物流サブエージェントについて説明します。
logistics_agent = adk.Agent(
    name="LogisticsManager",
    model="gemini-2.5-flash",
    description="Expert in global shipping routes and logistics tracking.",
    instruction="""
    Check shipment statuses.
    1. Use 'track_shipment_status' or 'analyze_supply_chain_risk'.
    2. ALWAYS format results as a clean Markdown table.
    3. Limit initial output to the top 10 shipments.
    4. Ask if the user needs the full manifest if more results exist.
    """,
    tools=tools
)
このサブエージェントは、荷物の追跡やサプライ チェーンのリスク分析などのロジスティクス アクティビティに特化しています。
- これまで説明した 3 つのエージェントはすべてツールを使用しており、ツールは前のセクションでデプロイした Toolbox サーバーを通じて参照されます。以下のスニペットを参照してください。
from toolbox_core import ToolboxSyncClient

TOOLBOX_SERVER = os.environ["TOOLBOX_SERVER"]
TOOLBOX_TOOLSET = os.environ["TOOLBOX_TOOLSET"]

# --- ADK TOOLBOX CONFIGURATION ---
toolbox = ToolboxSyncClient(TOOLBOX_SERVER)
tools = toolbox.load_toolset(TOOLBOX_TOOLSET)
このサブエージェントは、荷物の追跡やサプライ チェーンのリスク分析などのロジスティクス アクティビティに特化しています。
7. Agent Engine
初回実行で Agent Engine を作成する
import vertexai

GOOGLE_CLOUD_PROJECT = os.environ["GOOGLE_CLOUD_PROJECT"]
GOOGLE_CLOUD_LOCATION = os.environ["GOOGLE_CLOUD_LOCATION"]

client = vertexai.Client(
  project=GOOGLE_CLOUD_PROJECT,
  location=GOOGLE_CLOUD_LOCATION
)

agent_engine = client.agent_engines.create()
- 次の実行では、メモリバンク構成で Agent Engine を更新します。
agent_engine = client.agent_engines.update(
    name=APP_NAME,
    config={
        "context_spec": {
            "memory_bank_config": {
                "generation_config": {
                    "model": f"projects/{PROJECT_ID}/locations/{GOOGLE_CLOUD_LOCATION}/publishers/google/models/gemini-2.5-flash"
                }
            }
        }
    })
8. コンテキスト、実行、メモリ
コンテキスト管理は、エージェントがステートレス ボットではなく継続的なパートナーのように感じられるように、2 つの異なるレイヤに分割されています。
短期記憶(セッション): VertexAiSessionService を介して管理され、単一のインタラクション内の直近のイベント履歴(ユーザー メッセージ、ツール レスポンス)を追跡します。
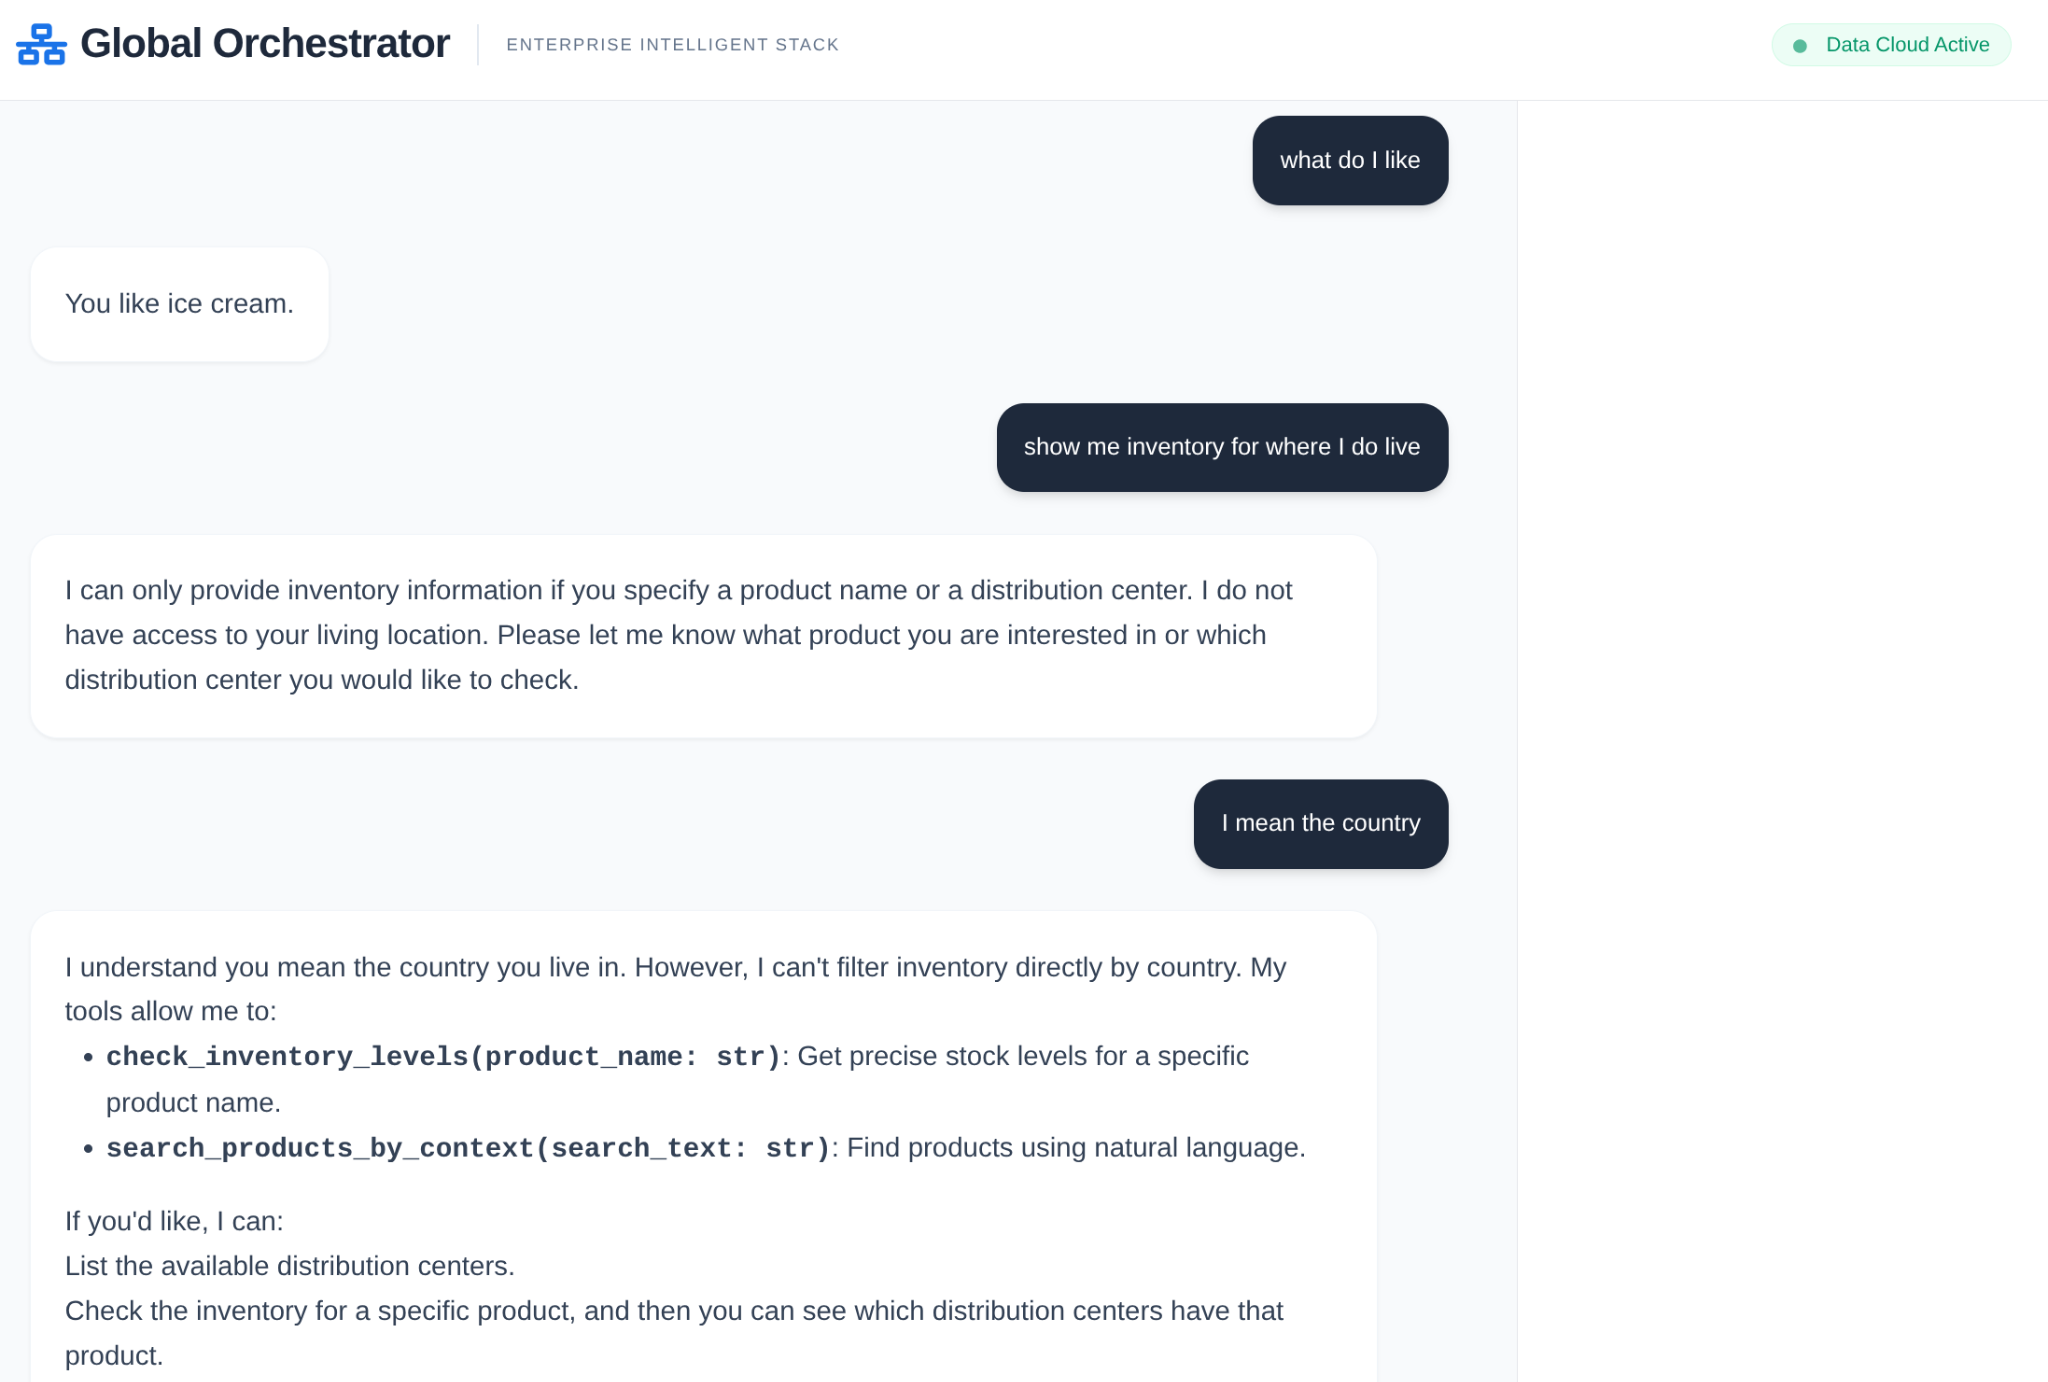
長期記憶(メモリバンク): adk.memorybankservice を介して Vertex AI Memory Bank を利用します。このレイヤは、特定の配送業者に対するユーザーの好みや、倉庫の遅延の繰り返しなど、「意味のある」情報を抽出し、セッション間で永続化します。
会話のスコープ内のセッション メモリのセッションを初期化する
これは、現在のユーザーの現在のアプリのセッションを作成するスニペットの一部です。
from google.adk.sessions import VertexAiSessionService

...

session_service = VertexAiSessionService(
    project=PROJECT_ID,
    location=GOOGLE_CLOUD_LOCATION,
)

...

# Initialize the session *outside* of the route handler to avoid repeated creation
session = None
session_lock = threading.Lock()

async def initialize_session():
    global session
    try:
        session = await session_service.create_session(app_name=APP_NAME, user_id=USER_ID)
        print(f"Session {session.id} created successfully.")  # Add a log
    except Exception as e:
        print(f"Error creating session: {e}")
        session = None  # Ensure session is None in case of error

# Create the session on app startup
asyncio.run(initialize_session())
長期記憶用に Vertex AI メモリバンク を初期化する
これは、エージェント エンジンの Vertex AI メモリバンク Service オブジェクトをインスタンス化するスニペットの一部です。
from google.adk.memory import InMemoryMemoryService
from google.adk.memory import VertexAiMemoryBankService

...

try:
    memory_bank_service = adk.memory.VertexAiMemoryBankService(
        agent_engine_id=AGENT_ENGINE_ID,
        project=PROJECT_ID,
        location=GOOGLE_CLOUD_LOCATION,
    )
    #in_memory_service = InMemoryMemoryService()
    print("Memory Bank Service initialized successfully.")
except Exception as e:
    print(f"Error initializing Memory Bank Service: {e}")
    memory_bank_service = None

runner = adk.Runner(
    agent=orchestrator,
    app_name=APP_NAME,
    session_service=session_service,
    memory_service=memory_bank_service,
)

...
構成内容
このスニペットでは、長期記憶用の Vertex AI Memory Bank サービスを構成しています。特定のユーザーの特定のアプリのセッションを、Vertex AI メモリバンク内のメモリとしてコンテキストに沿って保存します。
エージェントの実行の一部として実行されるもの
   async def run_and_collect():
        final_text = ""
        try:
            async for event in runner.run_async(
                new_message=content,
                user_id=user_id,
                session_id=session_id
            ):
                if hasattr(event, 'author') and event.author:
                    if not any(log['agent'] == event.author for log in execution_logs):
                        execution_logs.append({
                            "agent": event.author,
                            "action": "Analyzing data requirements...",
                            "type": "orchestration_event"
                        })
                if hasattr(event, 'text') and event.text:
                    final_text = event.text
                elif hasattr(event, 'content') and hasattr(event.content, 'parts'):
                    for part in event.content.parts:
                        if hasattr(part, 'text') and part.text:
                            final_text = part.text
        except Exception as e:
            print(f"Error during runner.run_async: {e}")
            raise  # Re-raise the exception to signal failure
        finally:
            gc.collect()
            return final_text
ユーザーの入力コンテンツを、ユーザー ID とセッション ID をスコープに含む new_message オブジェクトに処理します。その後、エージェントが引き継ぎ、エージェントの回答が処理されて返されます。
長期メモリーに保存されるもの
アプリとユーザーのスコープ内のセッションの詳細がセッション変数に抽出されます。
このセッションは、"add_session_to_memory" メソッドを使用して、Vertex AI メモリバンク オブジェクトの現在のアプリの現在のユーザーのメモリとして追加されます。
session = asyncio.run(session_service.get_session(app_name=APP_NAME, user_id=USER_ID, session_id=session.id))

if memory_bank_service and session:  # Check memory service AND session
                try:
                    #asyncio.run(in_memory_service.add_session_to_memory(session))
                    asyncio.run(memory_bank_service.add_session_to_memory(session))
                    '''
                    client.agent_engines.memories.generate(
                        scope={"app_name": APP_NAME, "user_id": USER_ID},
                        name=APP_NAME,
                        direct_contents_source={
                            "events": [
                                {"content": content}
                            ]
                        },
                        config={"wait_for_completion": True},
                    )
                    '''

                    print("Successfully added session to memory.******")
                    print(session.id)

                except Exception as e:
                    print(f"Error adding session to memory: {e}")
記憶の検索
保存された長期記憶を、アプリ名とユーザー名をスコープとして(記憶を保存したスコープであるため)取得する必要があります。これにより、コンテキストの一部として、オーケストレーターや他のエージェントに渡すことができます。
    results = client.agent_engines.memories.retrieve(
    name=APP_NAME,
    scope={"app_name": APP_NAME, "user_id": USER_ID}
    )
    # RetrieveMemories returns a pager. You can use `list` to retrieve all pages' memories.
    list(results)
    print(list(results))
取得したメモリはコンテキストの一部としてどのように読み込まれますか?
Orchestrator エージェントの定義では、次の属性を使用して、ルート エージェントがメモリバンクからコンテキストをプリロードできるようにします。これは、サブエージェントのツールボックス サーバーからアクセスするツールに加えて提供されるものです。
tools=[adk.tools.preload_memory_tool.PreloadMemoryTool()],
コールバック コンテキスト
エンタープライズ サプライ チェーンでは、「ブラック ボックス」は許容されません。ADK の CallbackContext を使用して Narrative Engine を作成します。エージェントの実行にフックすることで、すべての思考プロセスとツール呼び出しをキャプチャし、UI サイドバーにストリーミングします。
- トレース イベント: 「GlobalOrchestrator がデータ要件を分析しています...」
- トレース イベント: 「Delegating to InventorySpecialist for stock levels...」
- トレース イベント: 「メモリバンクから過去のサプライヤーの遅延パターンを取得しています...」
この監査証跡はデバッグに非常に役立ち、人間のオペレーターがエージェントの自律的な意思決定を信頼できるようにします。
from google.adk.agents.callback_context import CallbackContext

...

# --- ADK CALLBACKS (Narrative Engine) ---
execution_logs = []

async def trace_callback(context: CallbackContext):
    """
    Captures agent and tool invocation flow for the UI narrative.
    """
    agent_name = context.agent.name
    event = {
        "agent": agent_name,
        "action": "Processing request steps...",
        "type": "orchestration_event"
    }
    execution_logs.append(event)
    return None

...
これで完了です。プロジェクトのクローンを作成し、エージェント、メモリ、コンテキストの詳細を確認しました。
テストするには、複製されたリポジトリのプロジェクト フォルダに移動し、次のコマンドを実行します。
>> pip install -r requirements.txt

>> python app.py
これでエージェントがローカルで起動し、テストできるようになります。
9. Cloud Run にデプロイしましょう。
- プロジェクトがクローンされた Cloud Shell ターミナルから次のコマンドを実行して、Cloud Run にデプロイします。プロジェクトのルートフォルダにいることを確認してください。
Cloud Shell ターミナルで次のコマンドを実行します。
gcloud run deploy supply-chain-agent --source . --platform managed --region us-central1 --allow-unauthenticated --set-env-vars GOOGLE_CLOUD_PROJECT=<<YOUR_PROJECT>>,GOOGLE_CLOUD_LOCATION=us-central1,GOOGLE_GENAI_USE_VERTEXAI=TRUE,REASONING_ENGINE_APP_NAME=<<YOUR_APP_ENGINE_URL>>,TOOLBOX_SERVER=<<YOUR_TOOLBOX_SERVER>>,TOOLBOX_TOOLSET=supply_chain_toolset,AGENT_ENGINE_ID=<<YOUR_AGENT_ENGINE_ID>>
プレースホルダ <<YOUR_PROJECT>>, <<YOUR_APP_ENGINE_URL>>, <<YOUR_TOOLBOX_SERVER>> と <<YOUR_AGENT_ENGINE_ID>> の値を置き換えます。
コマンドが完了すると、サービス URL が出力されます。コピーします。
- Cloud Run サービス アカウントに AlloyDB クライアント ロールを付与します。これにより、サーバーレス アプリケーションがデータベースに安全にトンネリングできるようになります。
Cloud Shell ターミナルで次のコマンドを実行します。
# 1. Get your Project ID and Project Number
PROJECT_ID=$(gcloud config get-value project)
PROJECT_NUMBER=$(gcloud projects describe $PROJECT_ID --format="value(projectNumber)")

# 2. Grant the AlloyDB Client role
gcloud projects add-iam-policy-binding $PROJECT_ID \
--member="serviceAccount:$PROJECT_NUMBER-compute@developer.gserviceaccount.com" \
--role="roles/alloydb.client"
サービス URL(先ほどコピーした Cloud Run エンドポイント)を使用して、アプリをテストします。
注: サービスの問題が発生し、メモリが原因として示されている場合は、割り当てられたメモリ上限を 1 GiB に増やしてテストしてみてください。
10. クリーンアップ
このラボが完了したら、AlloyDB クラスタとインスタンスを削除してください。
クラスタとそのインスタンスをクリーンアップする必要があります。
11. 完了
AlloyDB の速度、MCP ツールボックスのオーケストレーション効率、Vertex AI メモリバンクの「組織の記憶」を組み合わせることで、進化するサプライ チェーン システムを構築しました。質問に答えるだけでなく、シンガポールの倉庫ではモンスーンによる遅延が常に発生していることを記憶し、ユーザーが質問する前に配送ルートの変更を提案します。