
1. What you will learn
AI Agent Vibe Full Stack
Welcome! You're about to learn the next critical skill in software development: how to effectively guide Artificial Intelligence to build, test, and deploy production-grade software. Generative AI isn't an "autopilot"; it's a powerful co-pilot that needs a skilled director.
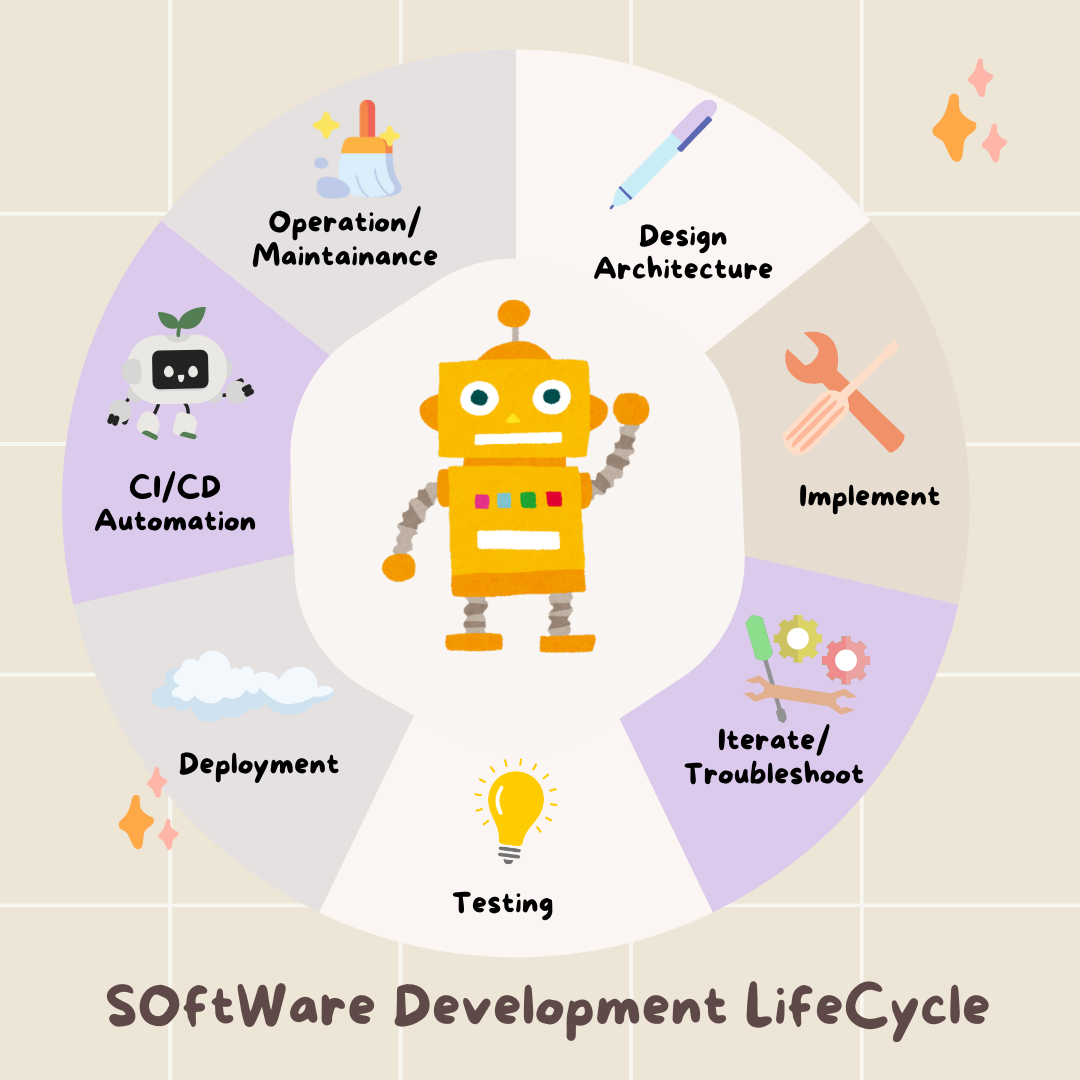
This workshop provides a structured, repeatable methodology for partnering with AI at every stage of the professional Software Development Lifecycle (SDLC). You will move from being a line-by-line code writer to a technical director—an architect with a vision and a general contractor who uses AI to execute that vision with precision. 🚀
By the end of this tutorial, you will have:
- Translated a high-level idea into a cloud architecture using AI.
- Generated a complete Python backend with targeted, specific prompts.
- Used AI as a pair programmer to debug and fix code.
- Delegated the creation of unit tests, including mocks, to AI.
- Generated production-ready Infrastructure as Code (IaC) with Terraform.
- Created a full CI/CD pipeline in GitHub Actions with a single prompt.
- Monitored and managed your live application using AI-powered operational tools.
You'll leave not just with a working app, but with a blueprint for AI-augmented development. Let's begin!
2. Prerequisites and Setup
Before we start, let's get your environment ready. This is a crucial step to ensure a smooth workshop experience.
Create a new GCP account and link your billing
To power our AI agents, we need two things: a Google Cloud Project to provide the foundation and a Gemini API Key to access Google's powerful models.
Step 1: Enable Billing Account
To run this codelab, you need a billing account with some credit. Use the credits from the banner at the top of this codelab to get started. If you are already connected to a billing account, you can skip this step.
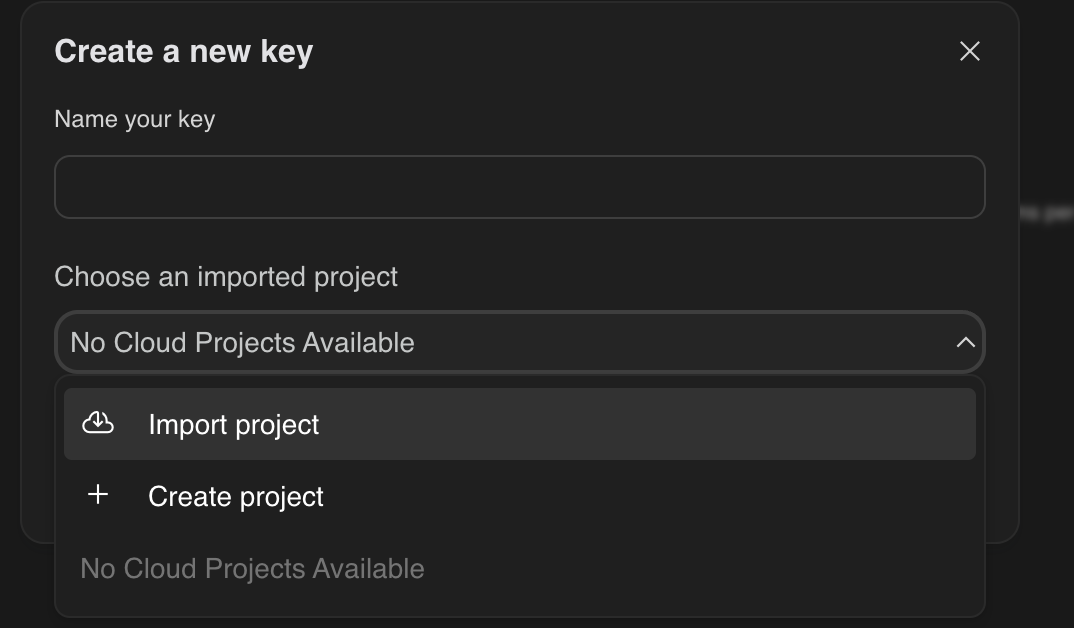
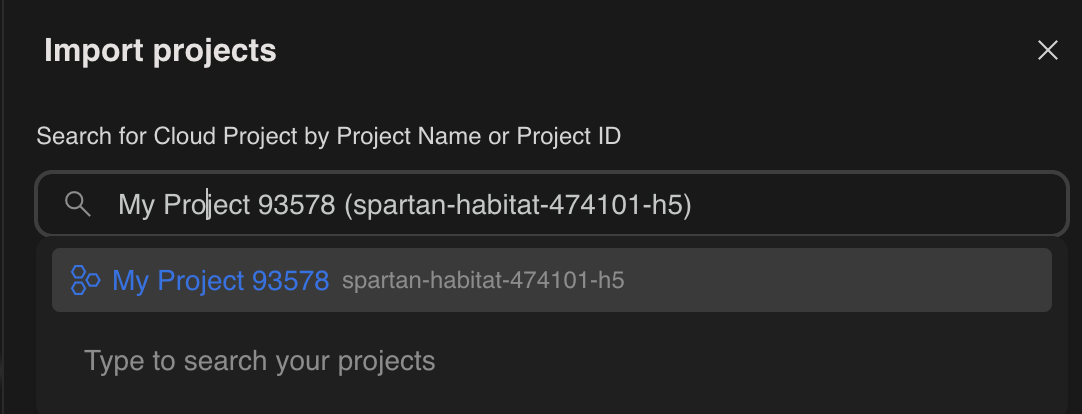
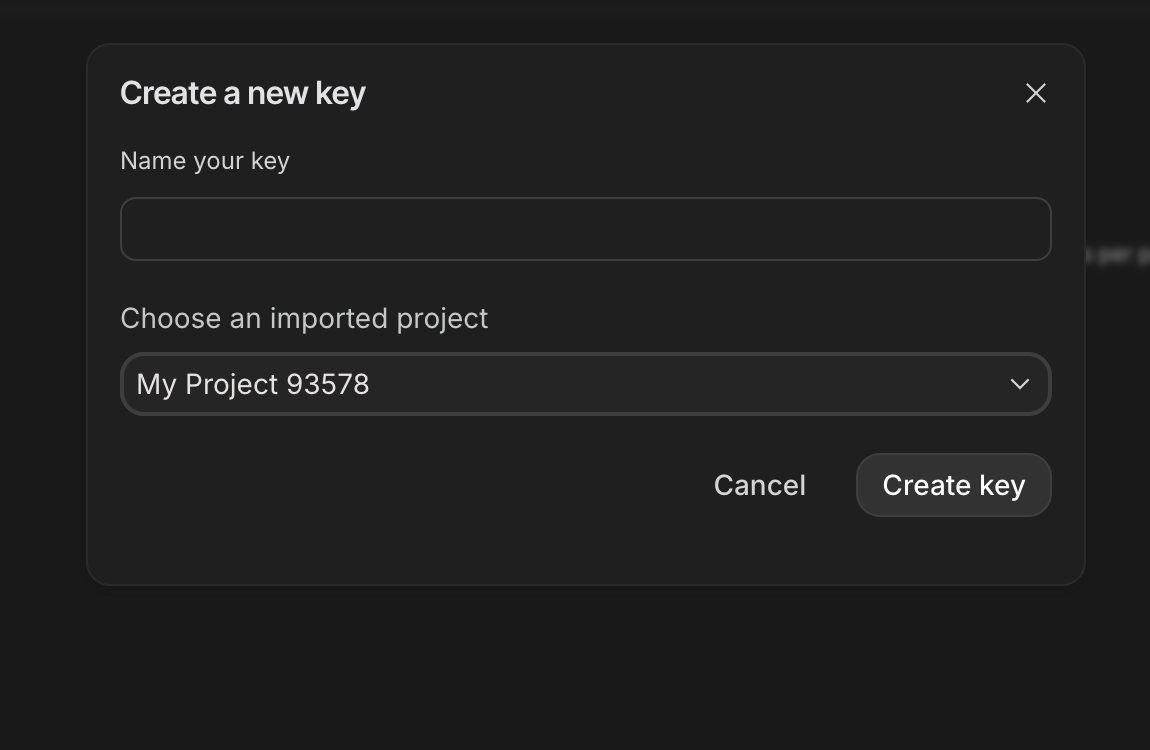
Step 2: Create A New GCP Project
- Go to Google Cloud Console and create a new project.
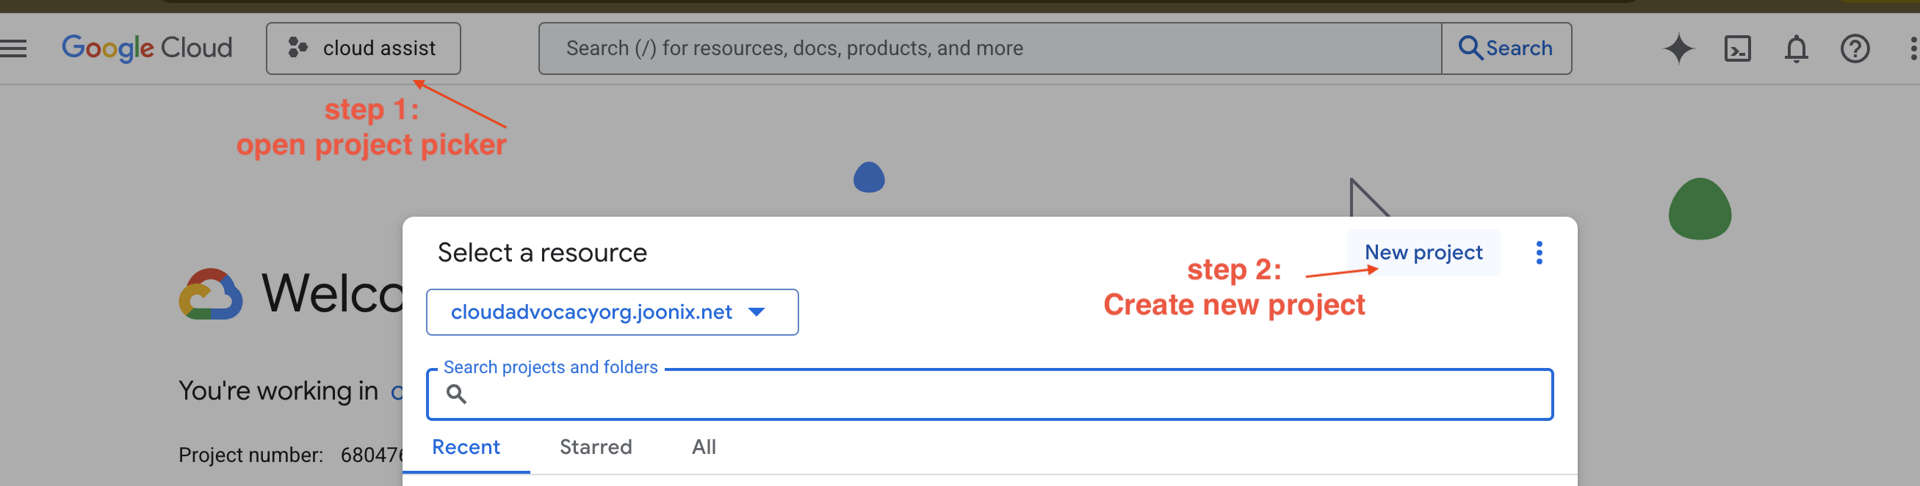
- Open left panel, click
Billing, check whether the billing account is linked to this gcp account.
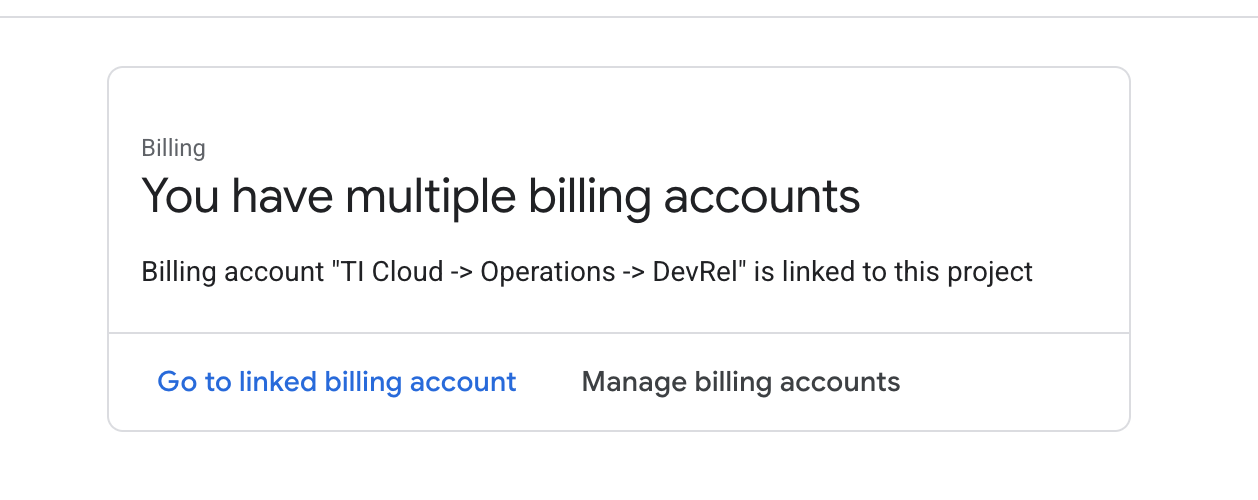
If you see this page, check the manage billing account, choose the Google Cloud Trial One and link to it.
Step 3: Generate Your Gemini API Key
Before you can secure the key, you need to have one.
- Navigate to the Google AI Studio : https://aistudio.google.com/
- Sign in with your Gmail account.
- Click the "Get API key" button, usually found on the left-hand navigation pane or in the top-right corner.

- In the "API keys" dialog, click "Create API key in new project".
- Choose the new project you created that has billing account set up.
- A new API key will be generated for you.
Copy this key immediately and store it somewhere safe temporarily (like a password manager or a secure note). This is the value you will use in the next steps.
GitHub Authentication
Open Cloud Shell, by go to Google Cloud Console, on the top right button "Activate Cloud Shell".
Step 1: Open Cloud Shell
👉Click "Activate Cloud Shell" at the top of the Google Cloud console (It's the terminal shape icon at the top of the Cloud Shell pane), 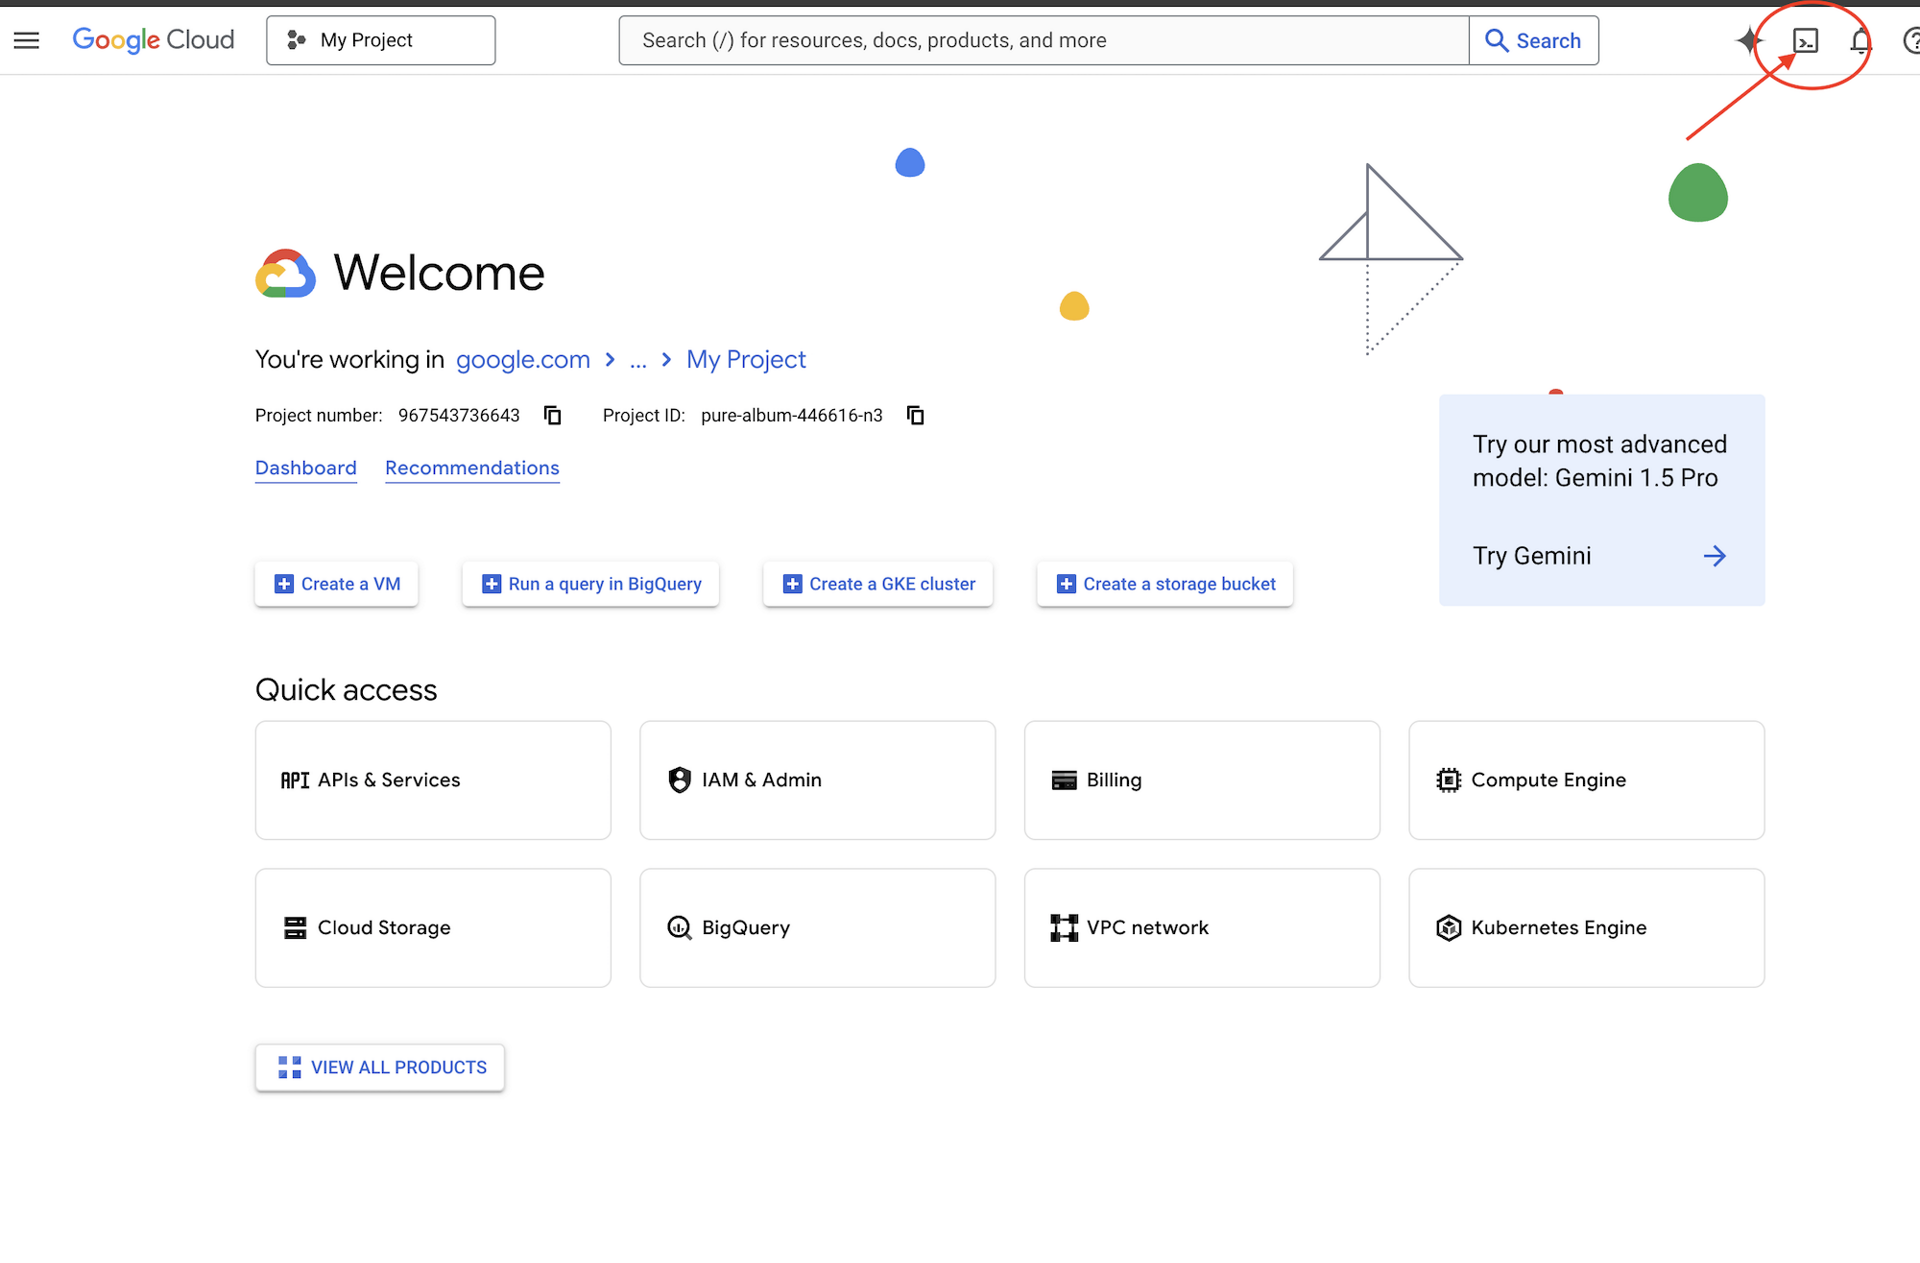
👉Click on the "Open Editor" button (it looks like an open folder with a pencil). This will open the Cloud Shell Code Editor in the window. You'll see a file explorer on the left side. 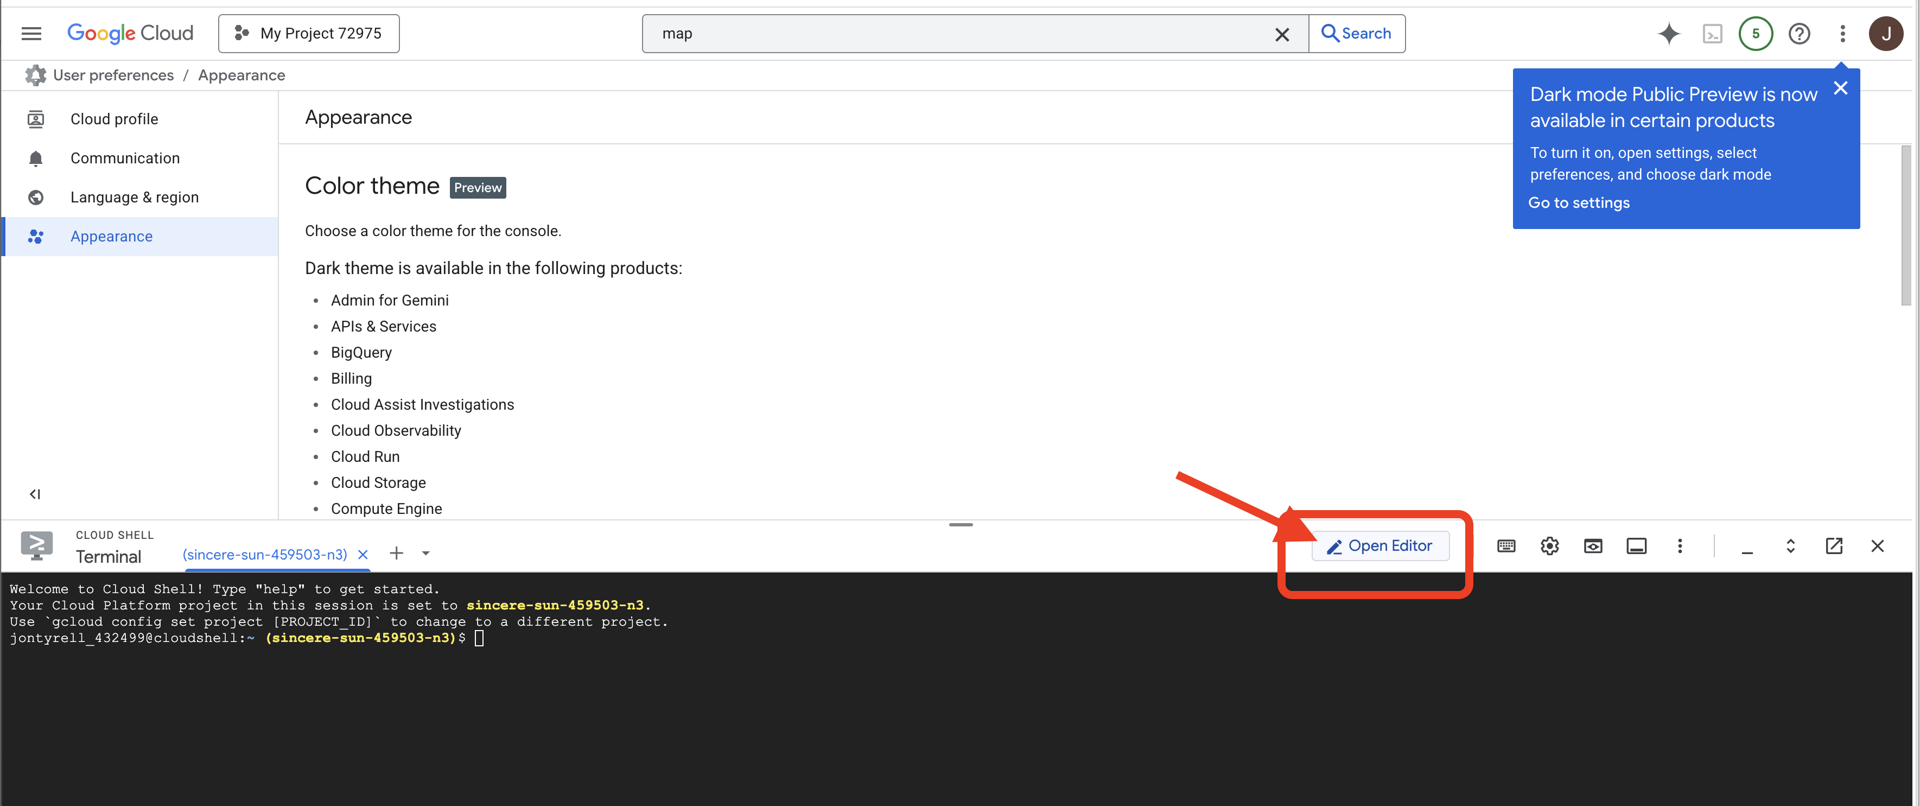
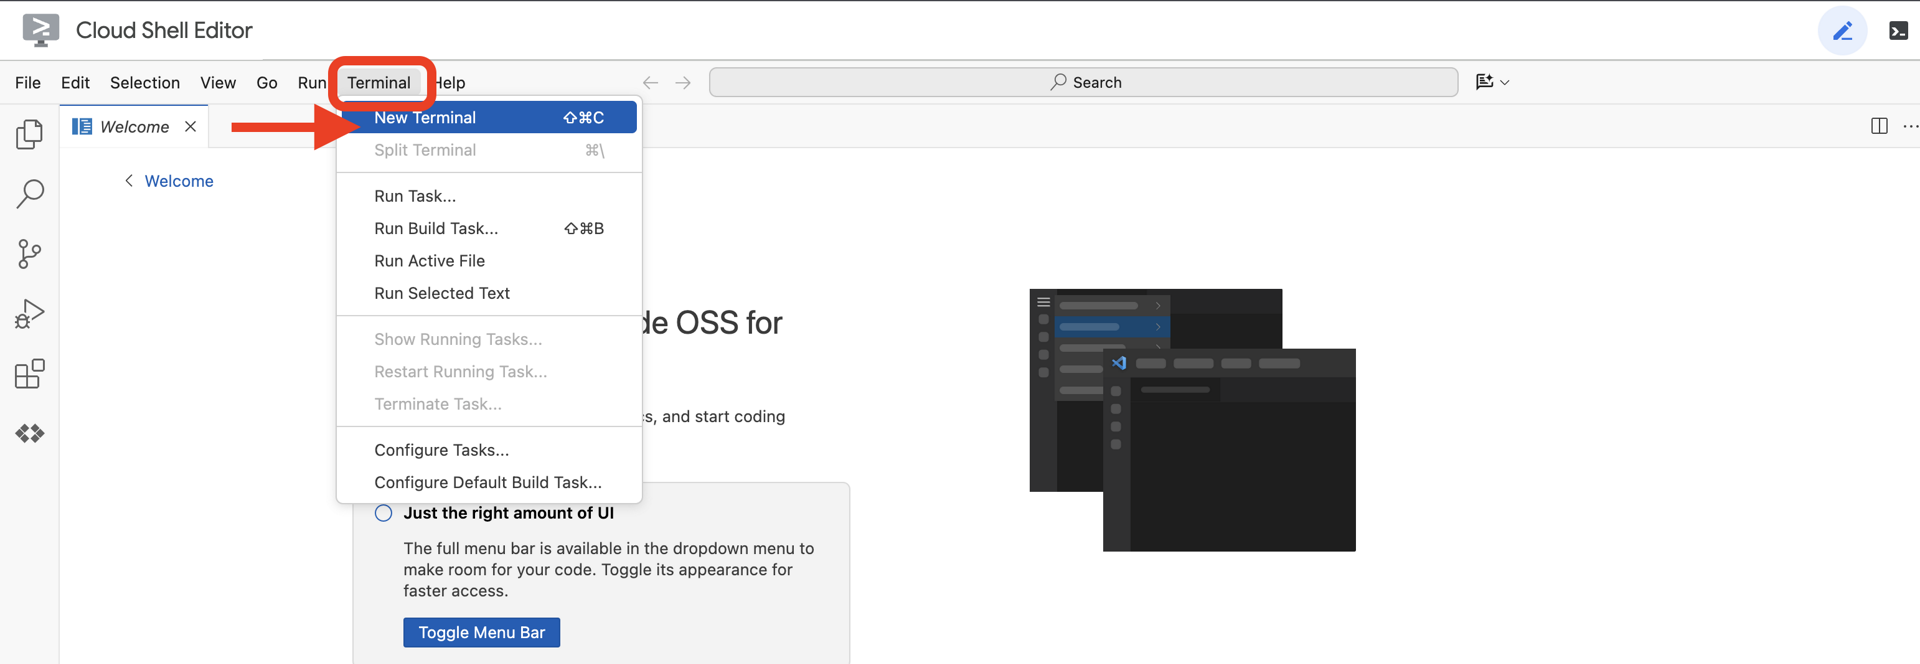
👉Once you have editor opened, open the terminal in the cloud IDE,
👉💻 In the terminal, verify that you're already authenticated and that the project is set to your project ID using the following command:
gcloud auth list
Step 2: Authenticate with GitHub & Fork
Authenticate with GitHub:
👉💻 Copy and paste the command to your cloud terminal:
gh auth login
- "Where do you use GitHub", choose "GitHub.com"
- "What is you preferred protocol for Git operations on this host?", choose "HTTPS"
- "Authenticate Git with your GitHub credentials?", choose "Yes"
- "How would you like to authenticate GitHub CLI?", choose "Login with a web browser"
important!! don't press "enter" yet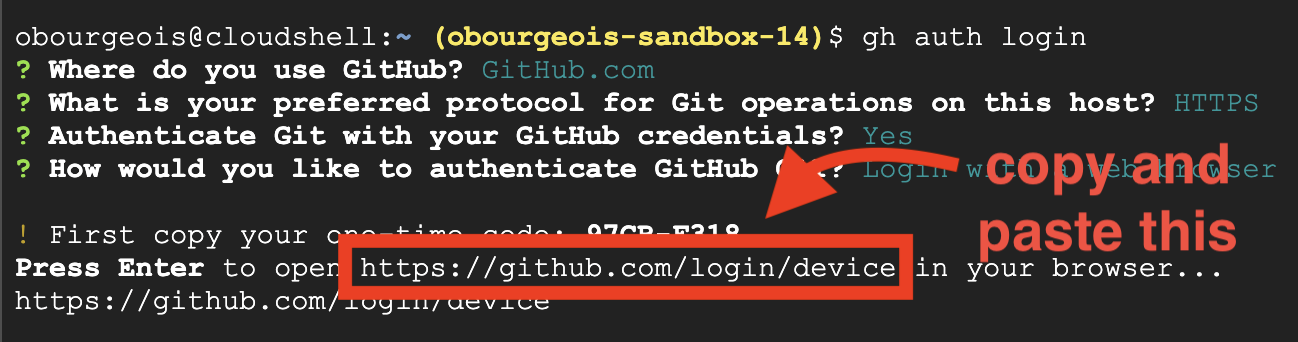
copy the code from the termnial to login verify page
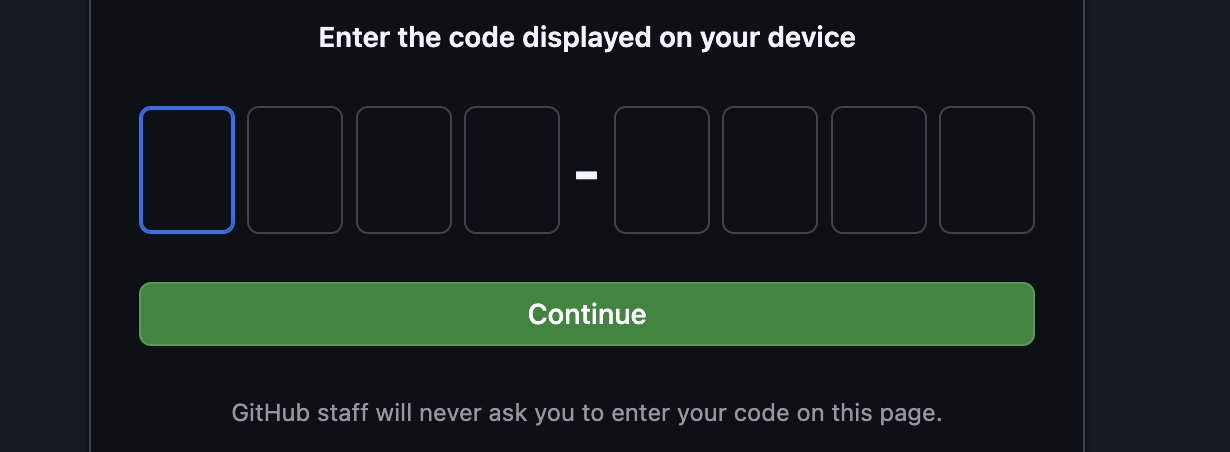
Once you finishing entering the code, go back to your Cloud Shell Terminal, press "enter" to proceed.

Step 4: Fork and Clone the repo:
👉💻 Copy and paste the command to your cloud terminal:
gh repo fork cuppibla/storygen-learning --clone=true
3. Architecture: From Idea to Blueprint with Cloud Assist
Every great project starts with a clear vision. We'll use our AI co-pilot, Cloud Assist, to design our app architecture.
Actions
- Open the Google Cloud Console: [https://console.cloud.google.com](Google Cloud Console)
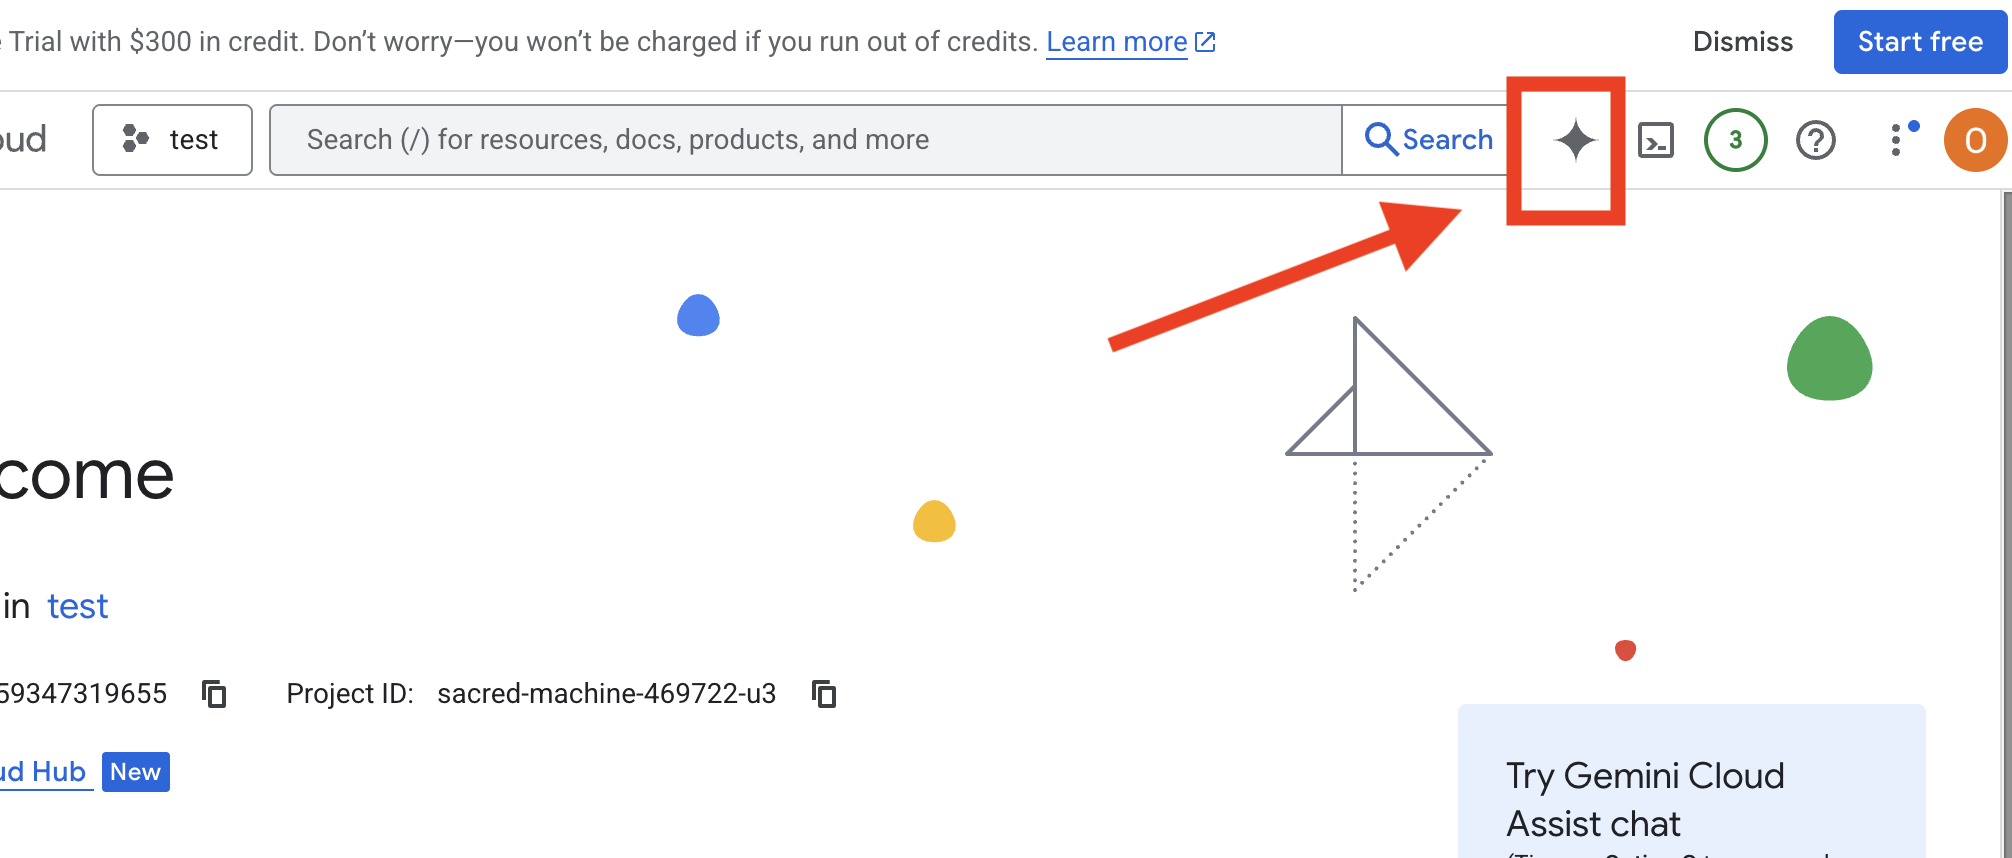
- On the top right corner, click "open Cloud Assist Chat"
Enable Cloud Assist
- Click
Get Gemini Assist, thenEnable Cloud Assist at no cost. - And Start Chatting!
 Provide the following detailed prompt to Cloud Assist:
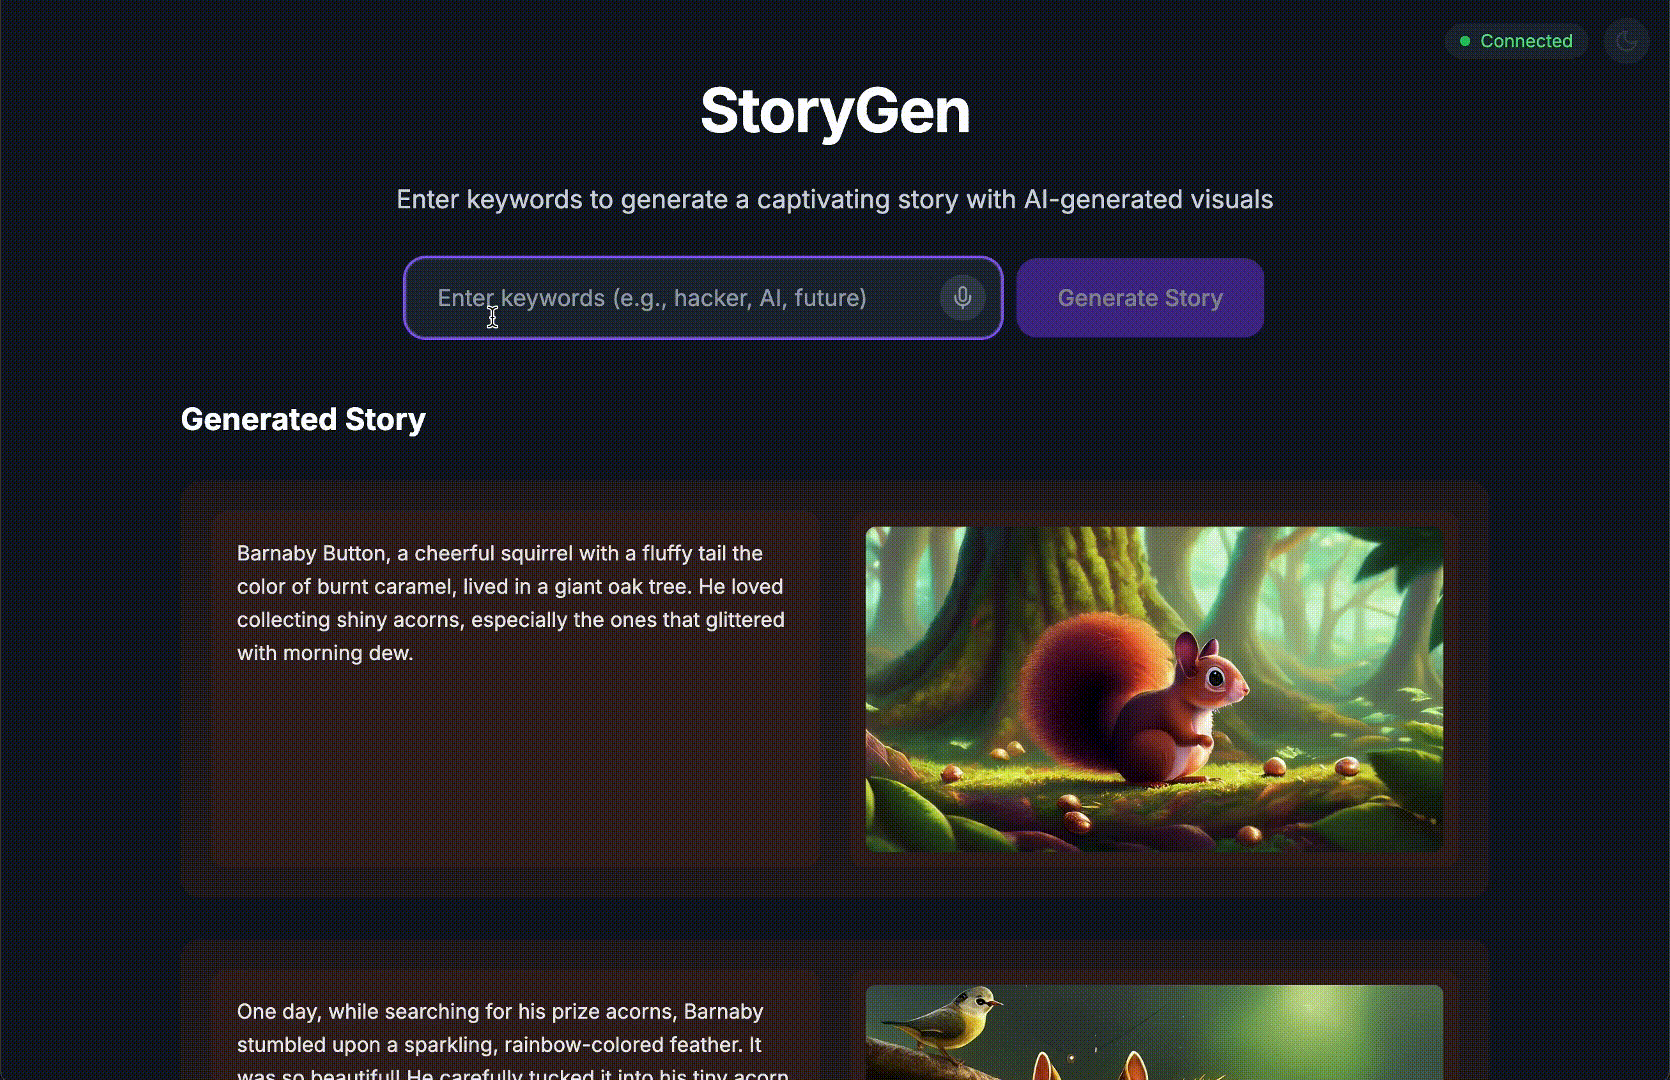
Input Your Idea
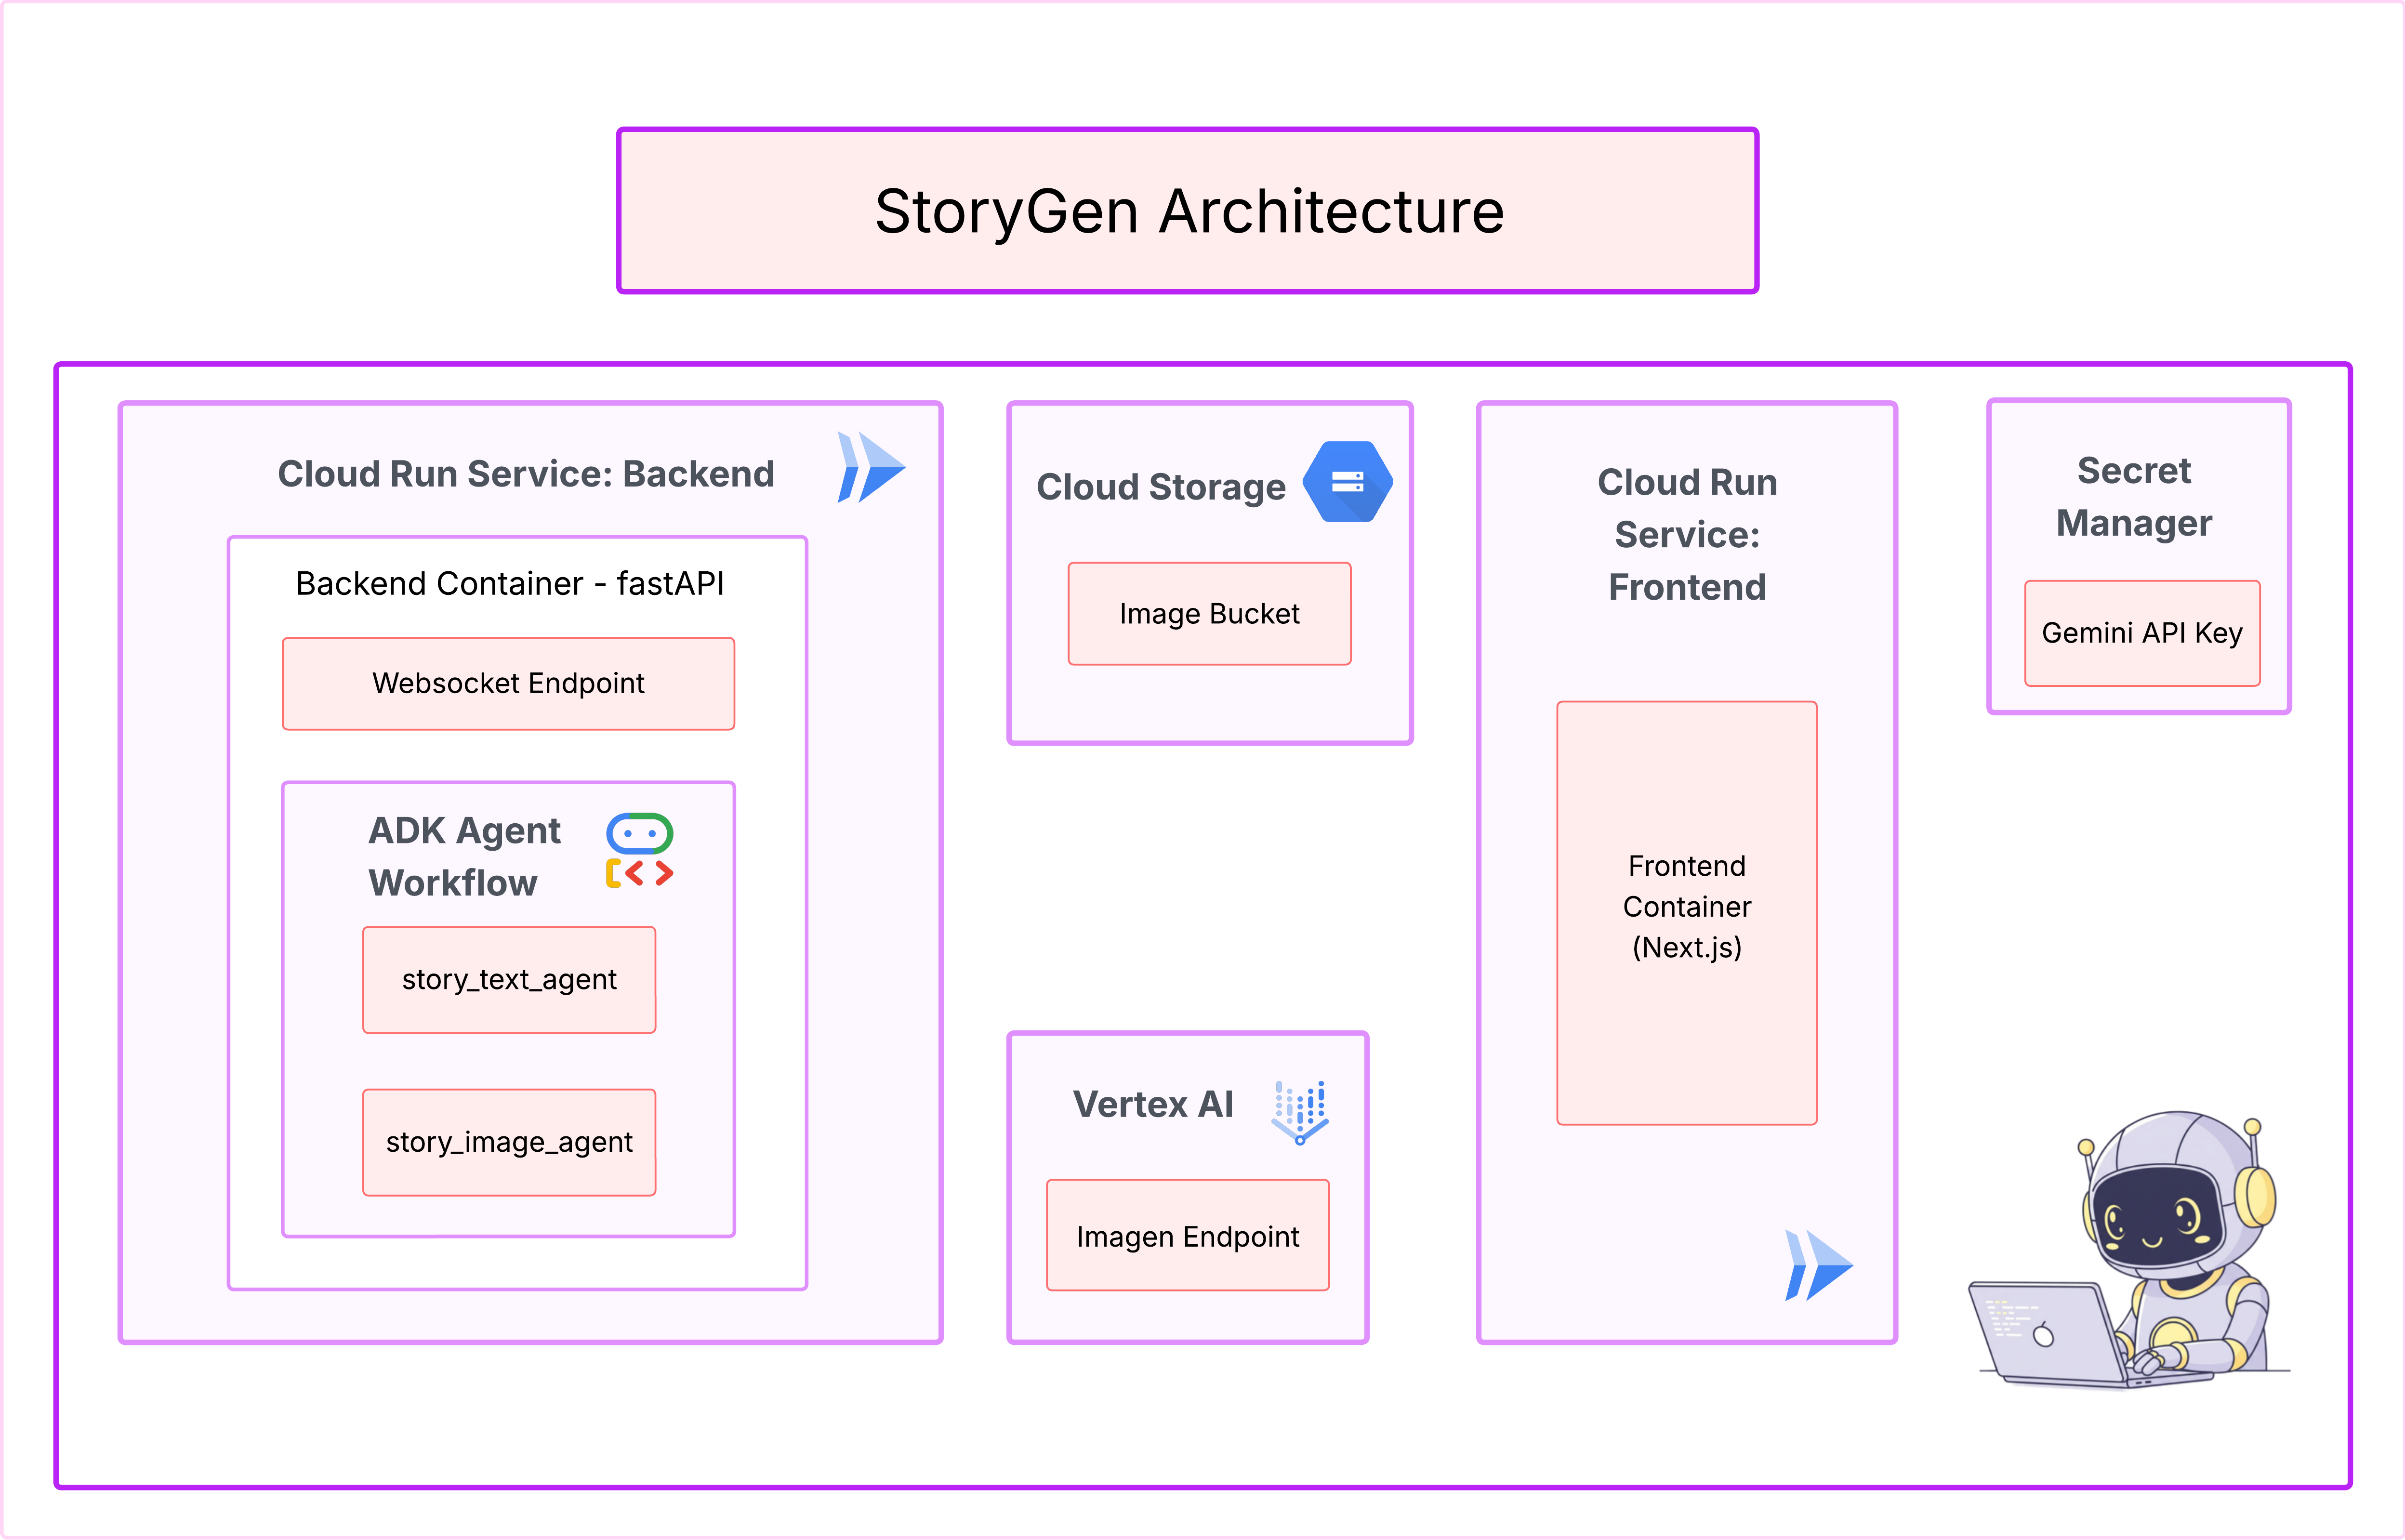
Generate a Python web application that uses AI to generate children's stories and illustrations. It has Python backend and React frontend host separately on Cloudrun. They communicate through Websocket. It needs to use a generative model for text and another for images. The generated images must be used by Imagen from Vertex AI and stored in a Google Cloud Storage bucket so that frontend can fetch from the bucket to render images. I do not want any load balancer or a database for the story text. We need a solution to store the API key.
Get Your App BluePrint
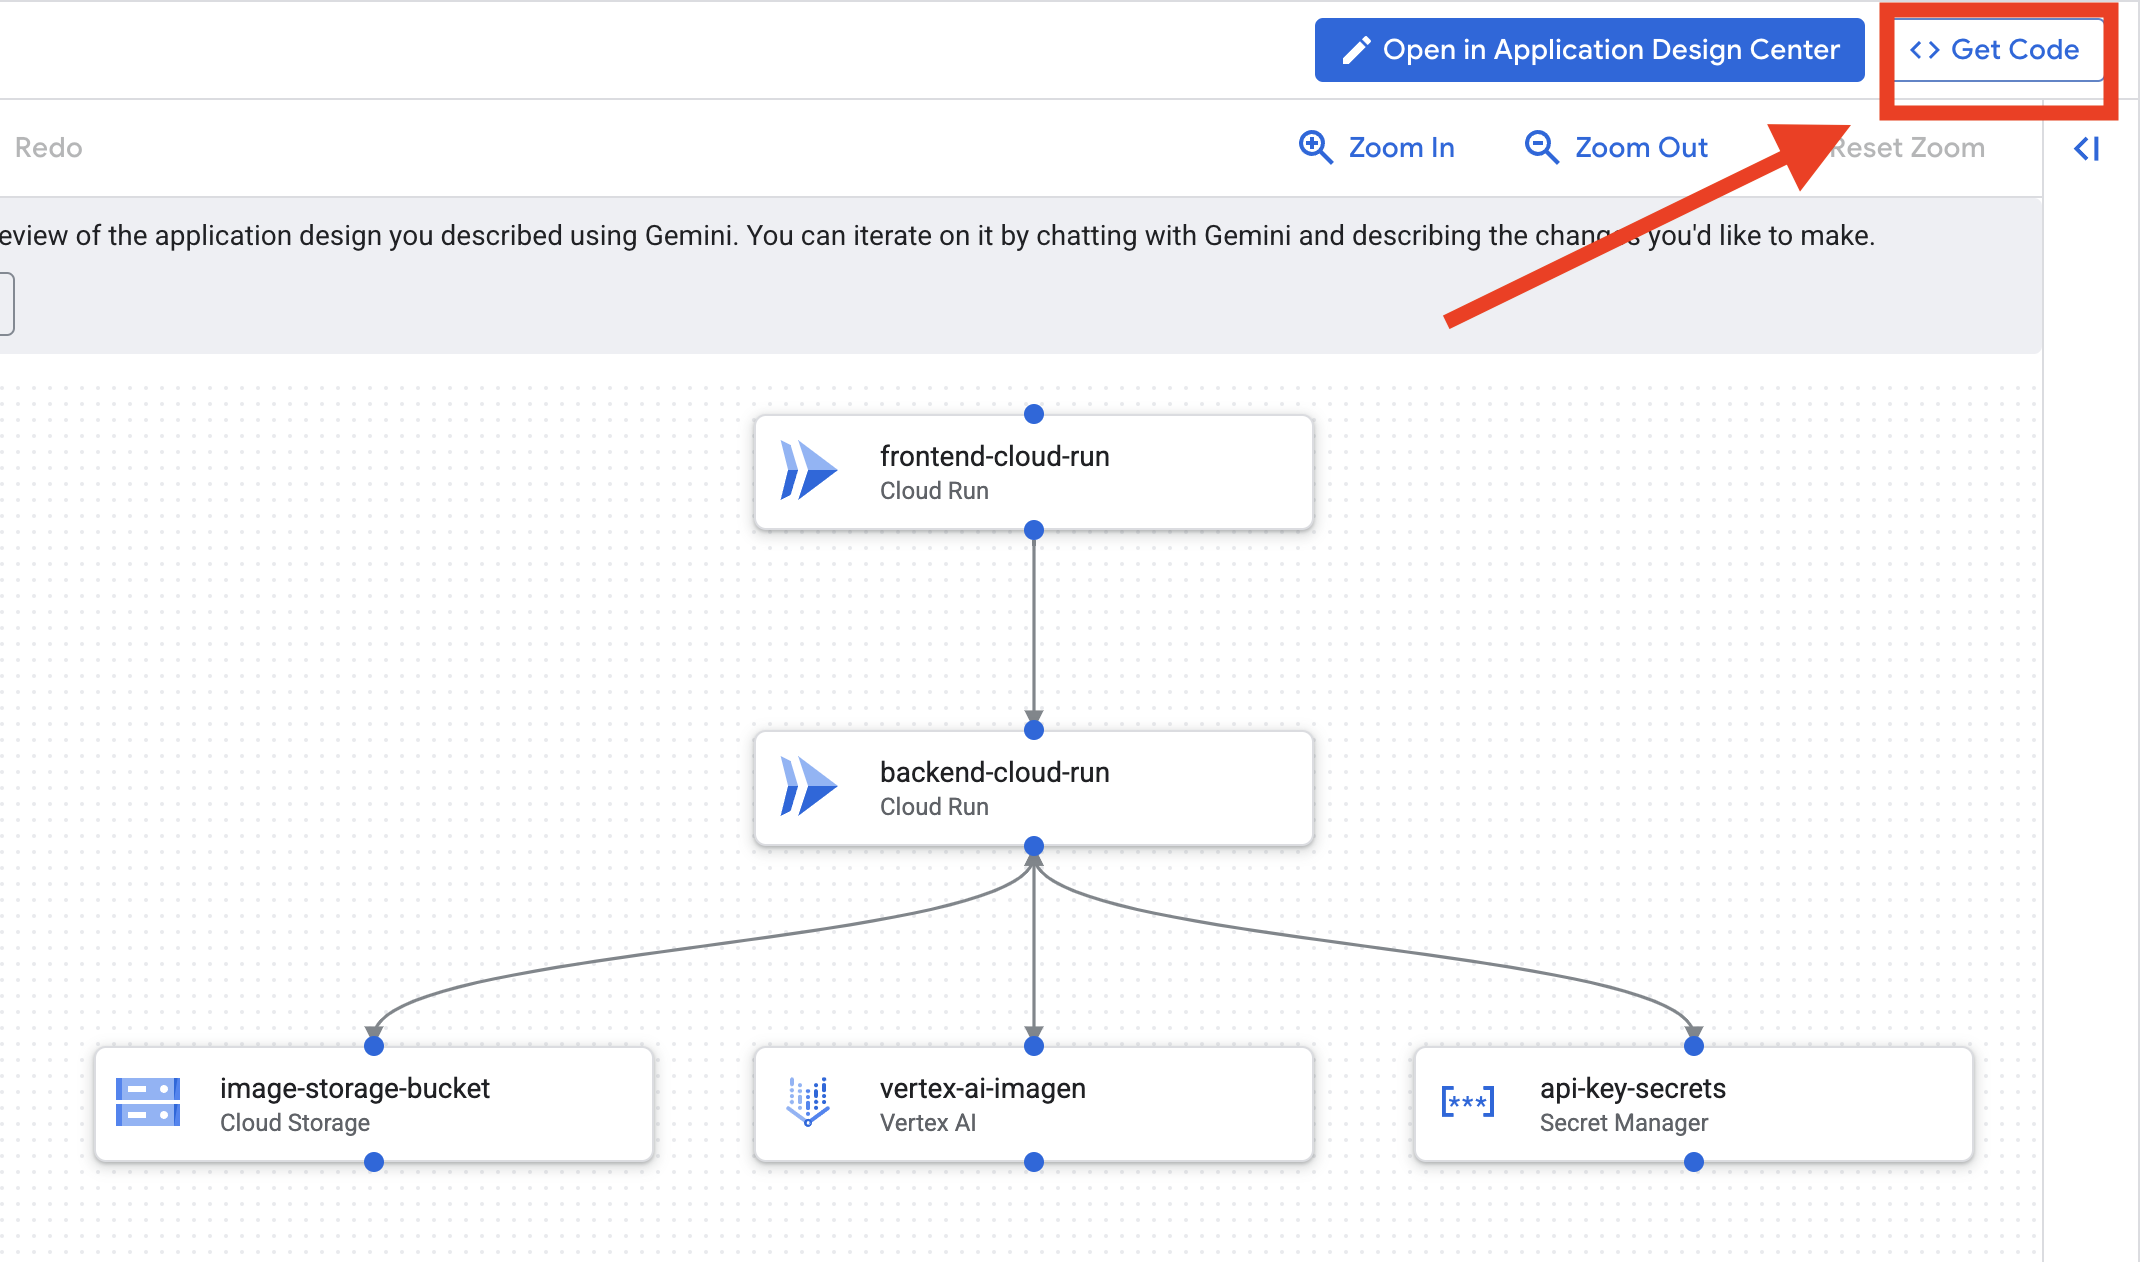
- Click: "Edit app design", you will see the diagram. Click the right top panel "<> Get Code" to download the Terraform code.
- Cloud Assist will generate an architecture diagram. This is our visual blueprint.
No Action needed with this code. Read below for more explanation
Understanding the Generated Terraform Code. You've just received a complete set of Terraform files from Cloud Assist. No action is required with this code for now, but let's quickly break down what it is and why it's so powerful.
What is Terraform? Terraform is an Infrastructure as Code (IaC) tool. Think of it as a blueprint for your cloud environment, written in code. Instead of manually clicking through the Google Cloud console to create services, storage, and permissions, you define all of those resources in these configuration files. Terraform then reads your blueprint and builds that exact environment for you automatically.
From Visual Plan to Executable Code. The architecture diagram Cloud Assist provided is your visual plan. The Terraform code is the machine-readable version of that same plan. It's the critical link that turns a design concept into a reproducible, automated reality. By defining your infrastructure in code, you can:
- Automate Creation: Reliably build the same environment over and over again.
- Use Version Control: Track changes to your infrastructure in Git, just like your application code.
- Prevent Errors: Avoid the manual mistakes that can happen when clicking through a web interface.
For this workshop, you won't need to run this Terraform code yourself. Think of it as the professional blueprint—the "answer key"—for the infrastructure you will build and deploy in the upcoming steps.
4. Development: Intro to Gemini CLI
👉💻 In your Cloud Shell terminal, navigate to your personal directory.
cd ~/storygen-learning
👉💻 Try Gemini for the first time.
clear
gemini --model=gemini-2.5-flash
If it ask you Do you want to connect Cloud Shell editor to Gemini CLI?, choose NO.
👉✨ Every gemini tool has description. Read them now. In the Gemini prompt, type:
In Gemini CLI
/help
👉✨ The Gemini CLI possesses its own set of built-in abilities. To inspect them:
In Gemini CLI
/tools
You'll see a list including ReadFile, WriteFile, and GoogleSearch. These are the default techniques you can call upon without needing to draw from an external arsenal.
👉✨ The Gemini Blade can hold "tactical awareness" (context) to guide its actions.
In Gemini CLI
/memory show
It is currently empty, a blank slate.
👉✨ First, add a persona to the agent's memory. This will define its area of expertise:
In Gemini CLI
/memory add "I am master at python development"
Run /memory show again to confirm your blade has absorbed this knowledge.
👉✨ To demonstrate how to reference files with the @ symbol, let's first create a "mission brief" file.
Open a new terminal and run the following command to create your mission file:
!echo "## Mission Objective: Create Imagen ADK Agent for Story Book" > mission.md
👉✨Now, command your Gemini CLI to analyze the briefing and report its findings:
In Gemini CLI
Explain the contents of the file @mission.md
Your primary weapon is now aware of its objective.
👉💻 Press Ctrl+C twice to exit the Gemini CLI
Learning:
How the Gemini CLI Gets Its Superpowers: gemini.md Before we continue, it's important to understand how the Gemini CLI can be tailored to a specific project. While you can use it as a general-purpose chat tool, its real power comes from a special configuration file: gemini.md.
When you run the gemini command, it automatically looks for a gemini.md file in the current directory. This file acts as a project-specific instruction manual for the AI. It can define three key things:
- Persona: You can tell the AI who it should be. For example, "You are an expert Python developer specializing in Google Cloud." This focuses its responses and style.
- Tools: You can give it access to specific files (@file.py) or even Google searches (@google). This provides the AI with the context it needs to answer questions about your project's code.
- Memory: You can provide facts or rules that the AI should always remember for this project, which helps maintain consistency.
By using a gemini.md file, you turn the generic Gemini model into a specialist assistant that is already briefed on your project's goals and has access to the right information.
5. Development: Building ADK with Gemini CLI
Environment Configuration
Go to your Cloud Shell, click on the "Open Terminal" button.
- Copy the environment template:
cd ~/storygen-learning
cp ~/storygen-learning/env.template ~/storygen-learning/.env
View Hidden File In the Editor If You Don't Find .env
- Click on View in the top menu bar.
- Select Toggle Hidden Files.
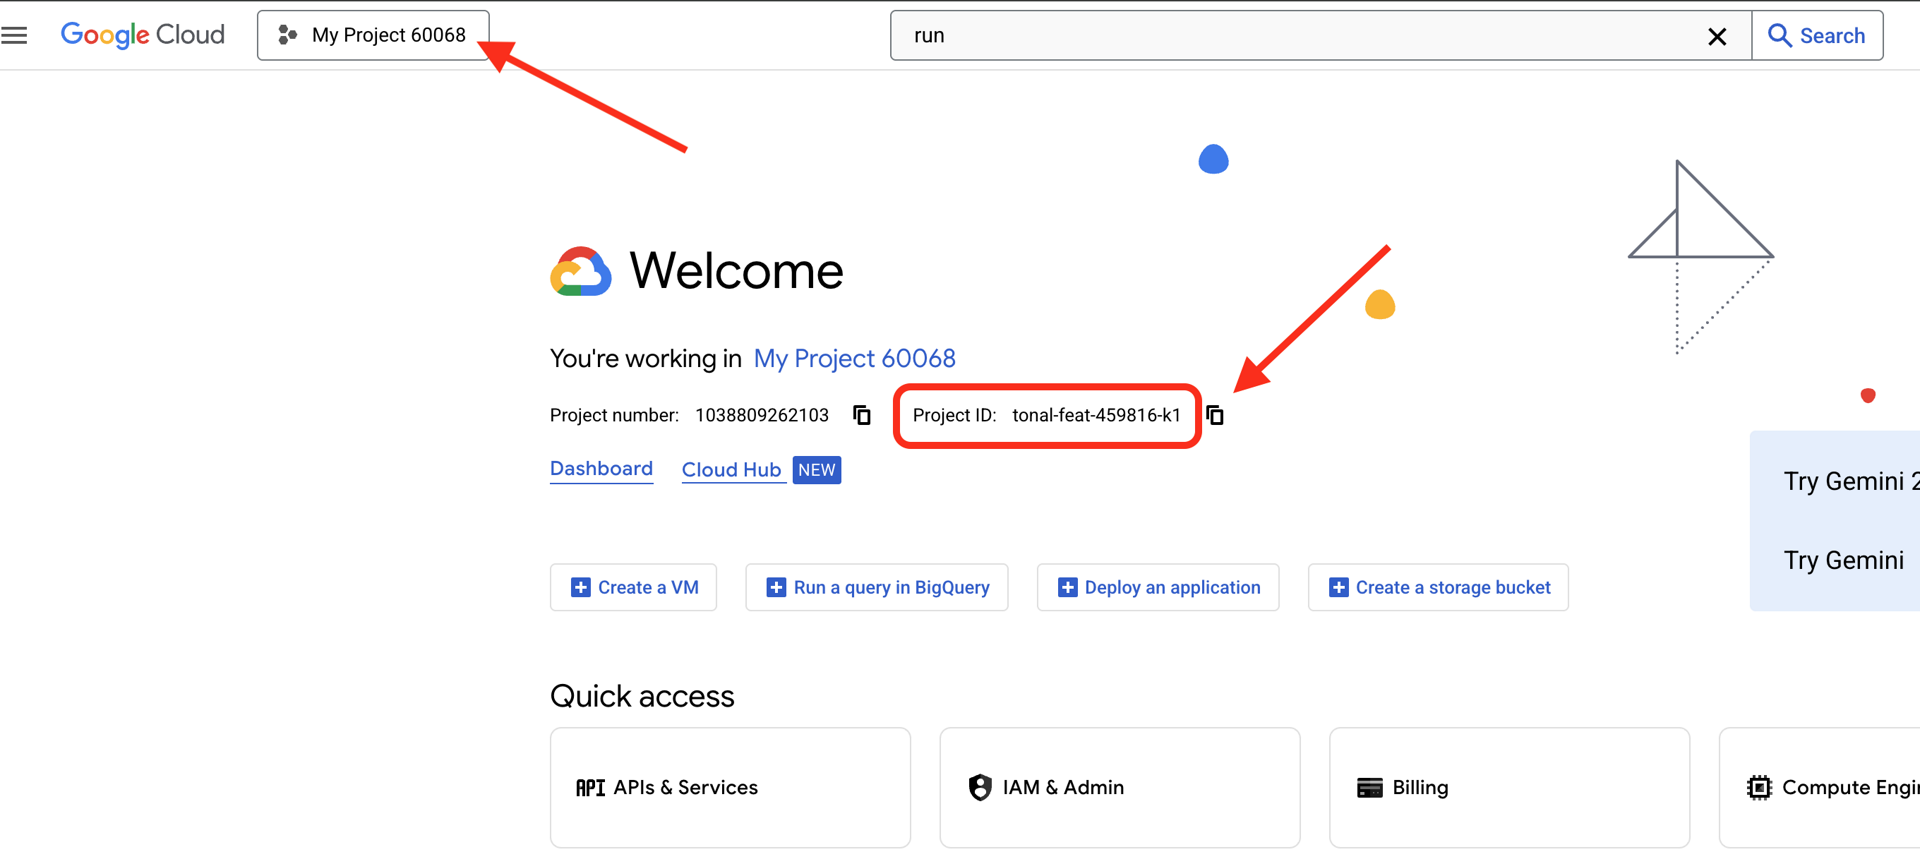
👉Find your Google Cloud Project ID:
- Open the Google Cloud Console: link
- Select the project you want to use for this workshop from the project drop down at the top of the page.
- Your Project ID is displayed in the Project info card on the Dashboard
👉Find your GitHub Username:
- Go to your GitHub and find your GitHub username
Editing .env file 2. Replace the following values in .env:
GOOGLE_API_KEY=[REPLACE YOUR API KEY HERE]
GOOGLE_CLOUD_PROJECT_ID=[REPLACE YOUR PROJECT ID]
GITHUB_USERNAME=[REPLACE YOUR USERNAME]
GENMEDIA_BUCKET=[REPLACE YOUR PROJECT ID]-bucket
e.g. If your project id is: testproject, you should put GOOGLE_CLOUD_PROJECT_ID=testproject and GENMEDIA_BUCKET=testproject-bucket
Setup Scripts
Go to 00_Starting_Here Open a new terminal (not in Gemini CLI)
cd ~/storygen-learning/00_Starting_Here
Run the complete setup:
./setup-complete.sh
You should see the setup results in the terminal
Build Your First Agent
Go to 01a_First_Agent_Ready Let's use Gemini CLI to create the ADK agent:**
cd ~/storygen-learning/01a_First_Agent_Ready
Open Gemini CLI
gemini
Inside Gamini CLI Window, try prompt:
I need you to help me create a Google ADK (Agent Development Kit) agent for story generation. I'm working on a children's storybook app that generates creative stories with visual scenes.

Please create a complete `agent.py` file that implements an LlmAgent using Google's ADK framework. The agent should:

**Requirements:**
1. Use the `google.adk.agents.LlmAgent` class
2. Use the "gemini-2.5-flash" model (supports streaming)
3. Be named "story_agent"
4. Generate structured stories with exactly 4 scenes each
5. Output valid JSON with story text, main characters, and scene data
6. No tools needed (images are handled separately)

**Agent Specifications:**
- **Model:** gemini-2.5-flash
- **Name:** story_agent
- **Description:** "Generates creative short stories and accompanying visual keyframes based on user-provided keywords and themes."
**Story Structure Required:**
- Exactly 4 scenes: Setup → Inciting Incident → Climax → Resolution
- 100-200 words total
- Simple, charming language for all audiences
- Natural keyword integration
**JSON Output Format:**

{
  "story": "Complete story text...",
  "main_characters": [
    {
      "name": "Character Name",
      "description": "VERY detailed visual description with specific colors, features, size, etc."
    }
  ],
  "scenes": [
    {
      "index": 1,
      "title": "The Setup",
      "description": "Scene action and setting WITHOUT character descriptions",
      "text": "Story text for this scene"
    }
    // ... 3 more scenes
  ]
}


**Key Instructions for the Agent:**
- Extract 1-2 main characters maximum
- Character descriptions should be extremely detailed and visual
- Scene descriptions focus on ACTION and SETTING only
- Do NOT repeat character appearance in scene descriptions
- Always respond with valid JSON

Please include a complete example in the instructions showing the exact format using keywords like "tiny robot", "lost kitten", "rainy city".

The file should start with necessary imports, define an empty tools list, include a print statement for initialization, and then create the LlmAgent with all the detailed instructions.

Can you create this agent in backend/story_agent/agent.py
Once you finished, turn Off Gemini CLI terminal with Control+C
—————————————— Optional, you can skip to Solution part——————————————–
Now Verify Your Change In ADK Web
cd ~/storygen-learning/01a_First_Agent_Ready/backend

source ../../.venv/bin/activate

adk web --port 8080
To continue, you'll need a command prompt.
Spin Up The Website
cd ~/storygen-learning/01a_First_Agent_Ready

./start.sh
If your change doesn't work, you would expect to see errors in ADK Web UI and Website.
——————————————– Solution Starting Here ——————————————–
Solution
End previous process with Control+C or you can open another terminal:
cd ~/storygen-learning/01b_First_Agent_Done
Spin Up the Website:
./start.sh
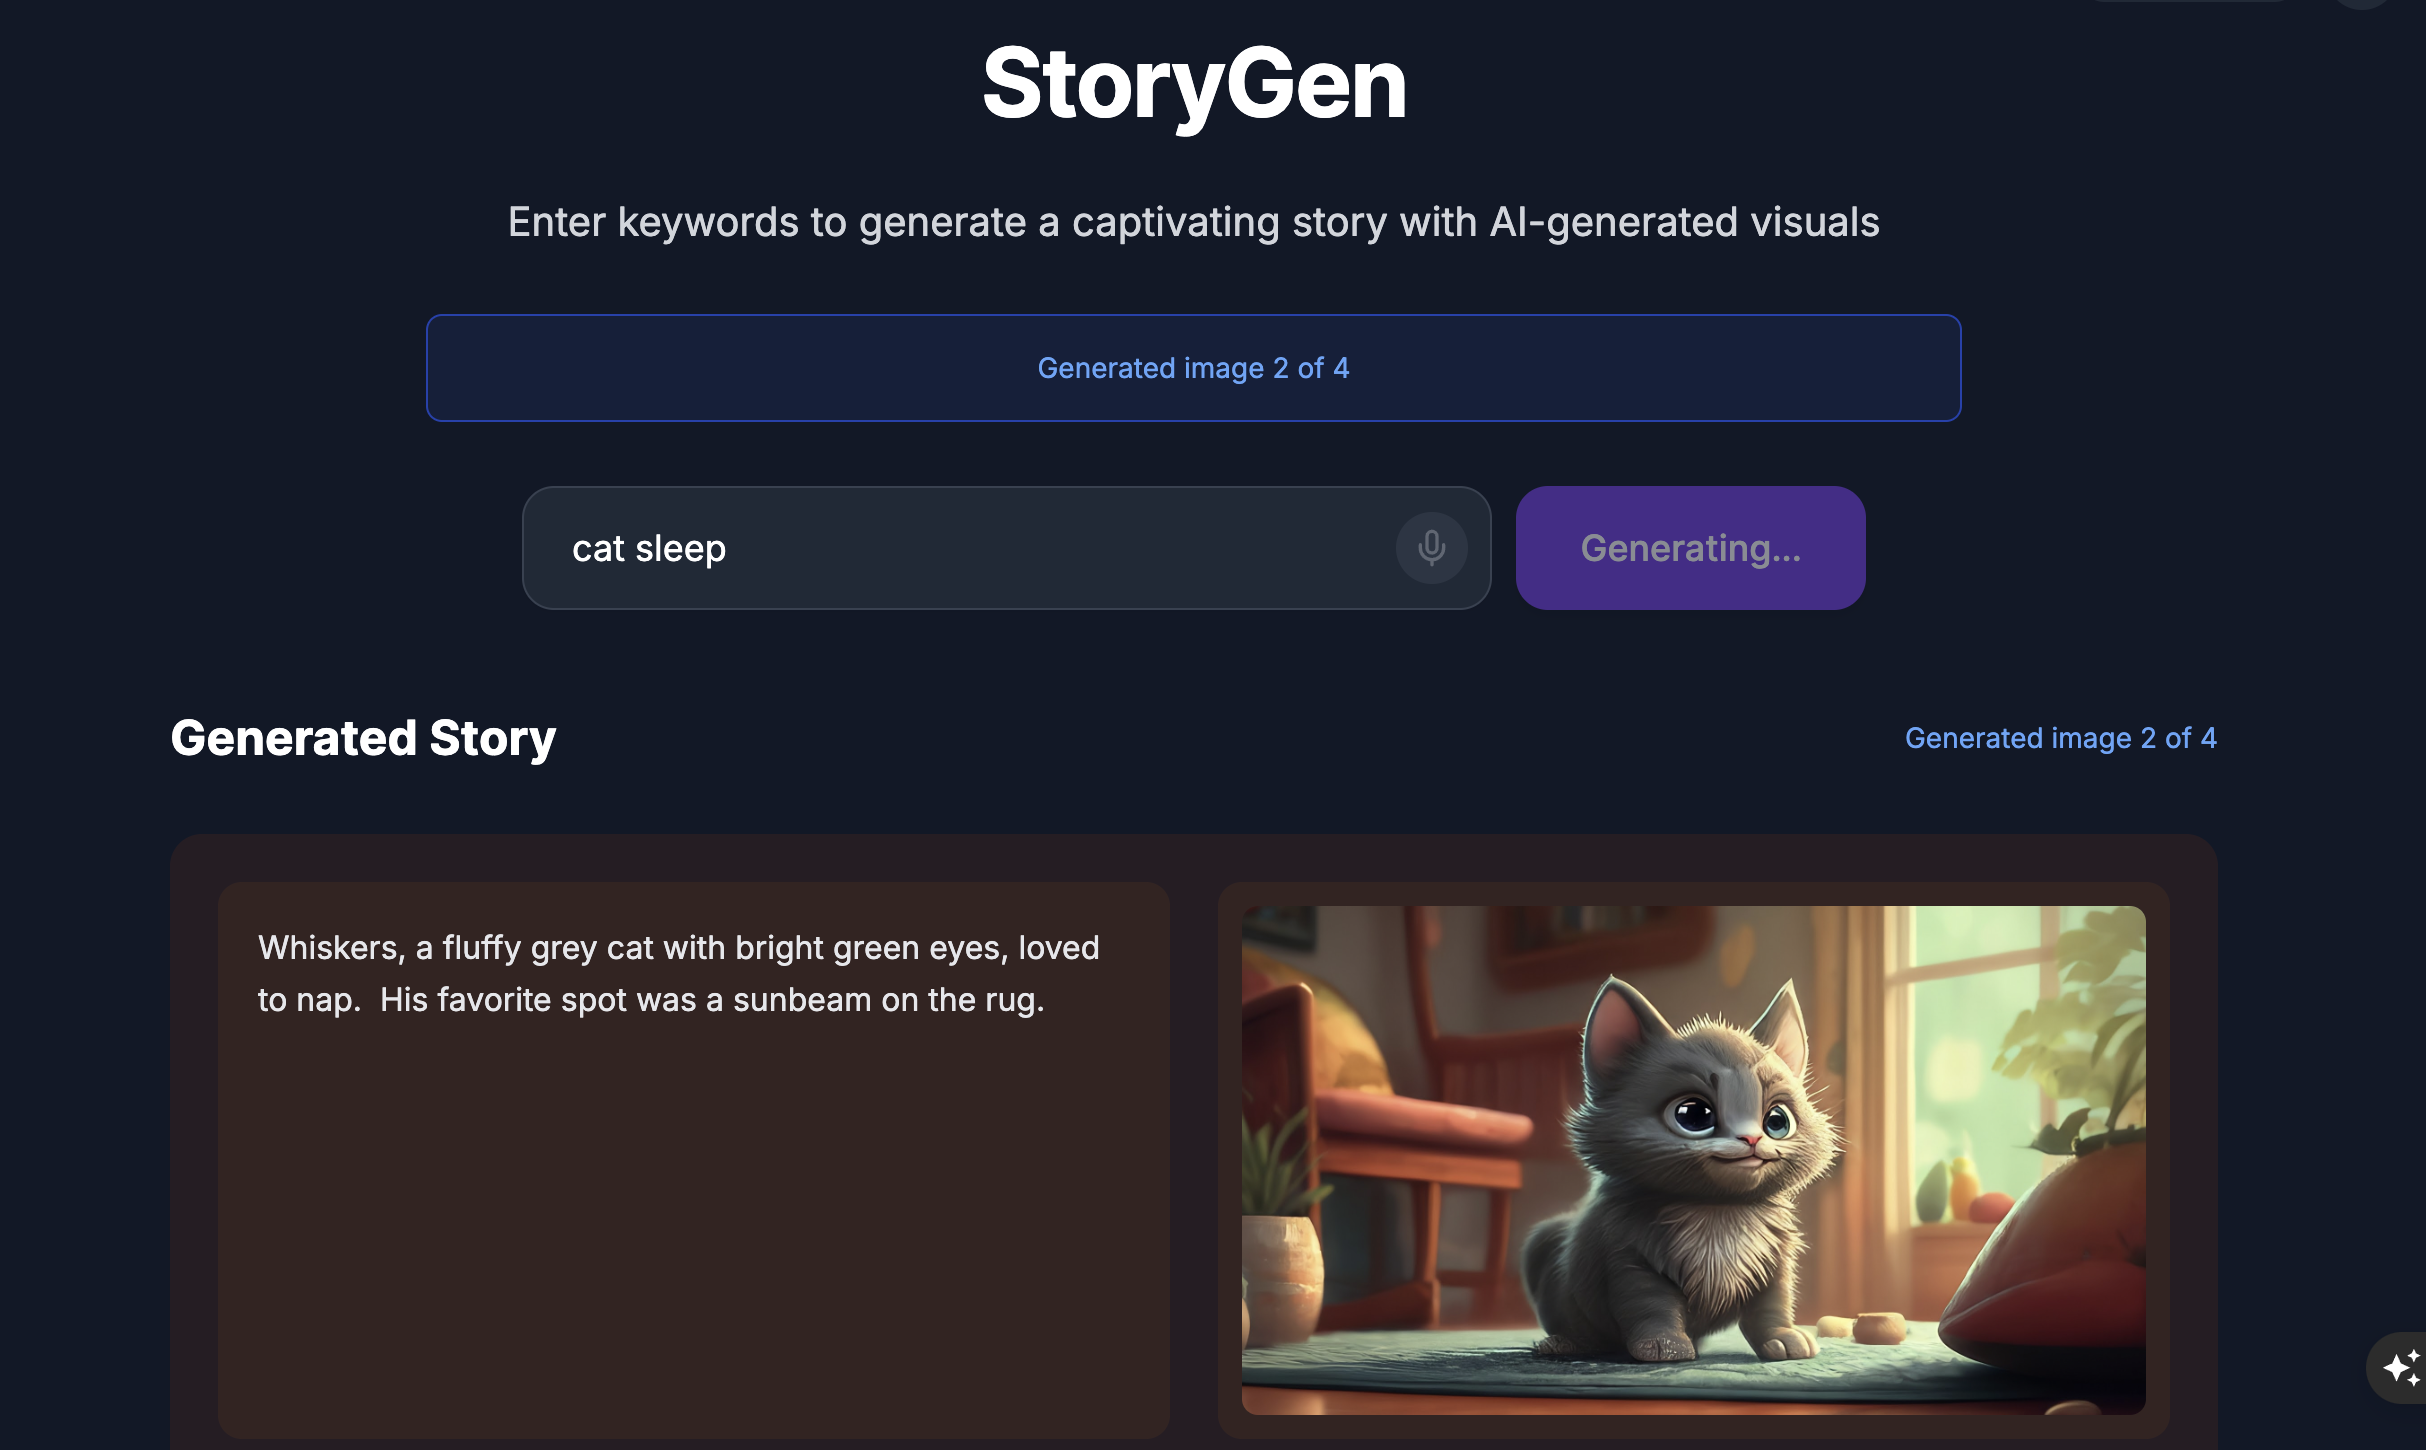
You will see the website:
Try the ADK UI: Open another terminal:
cd ~/storygen-learning/01b_First_Agent_Done/backend
source ../../.venv/bin/activate

adk web --port 8080
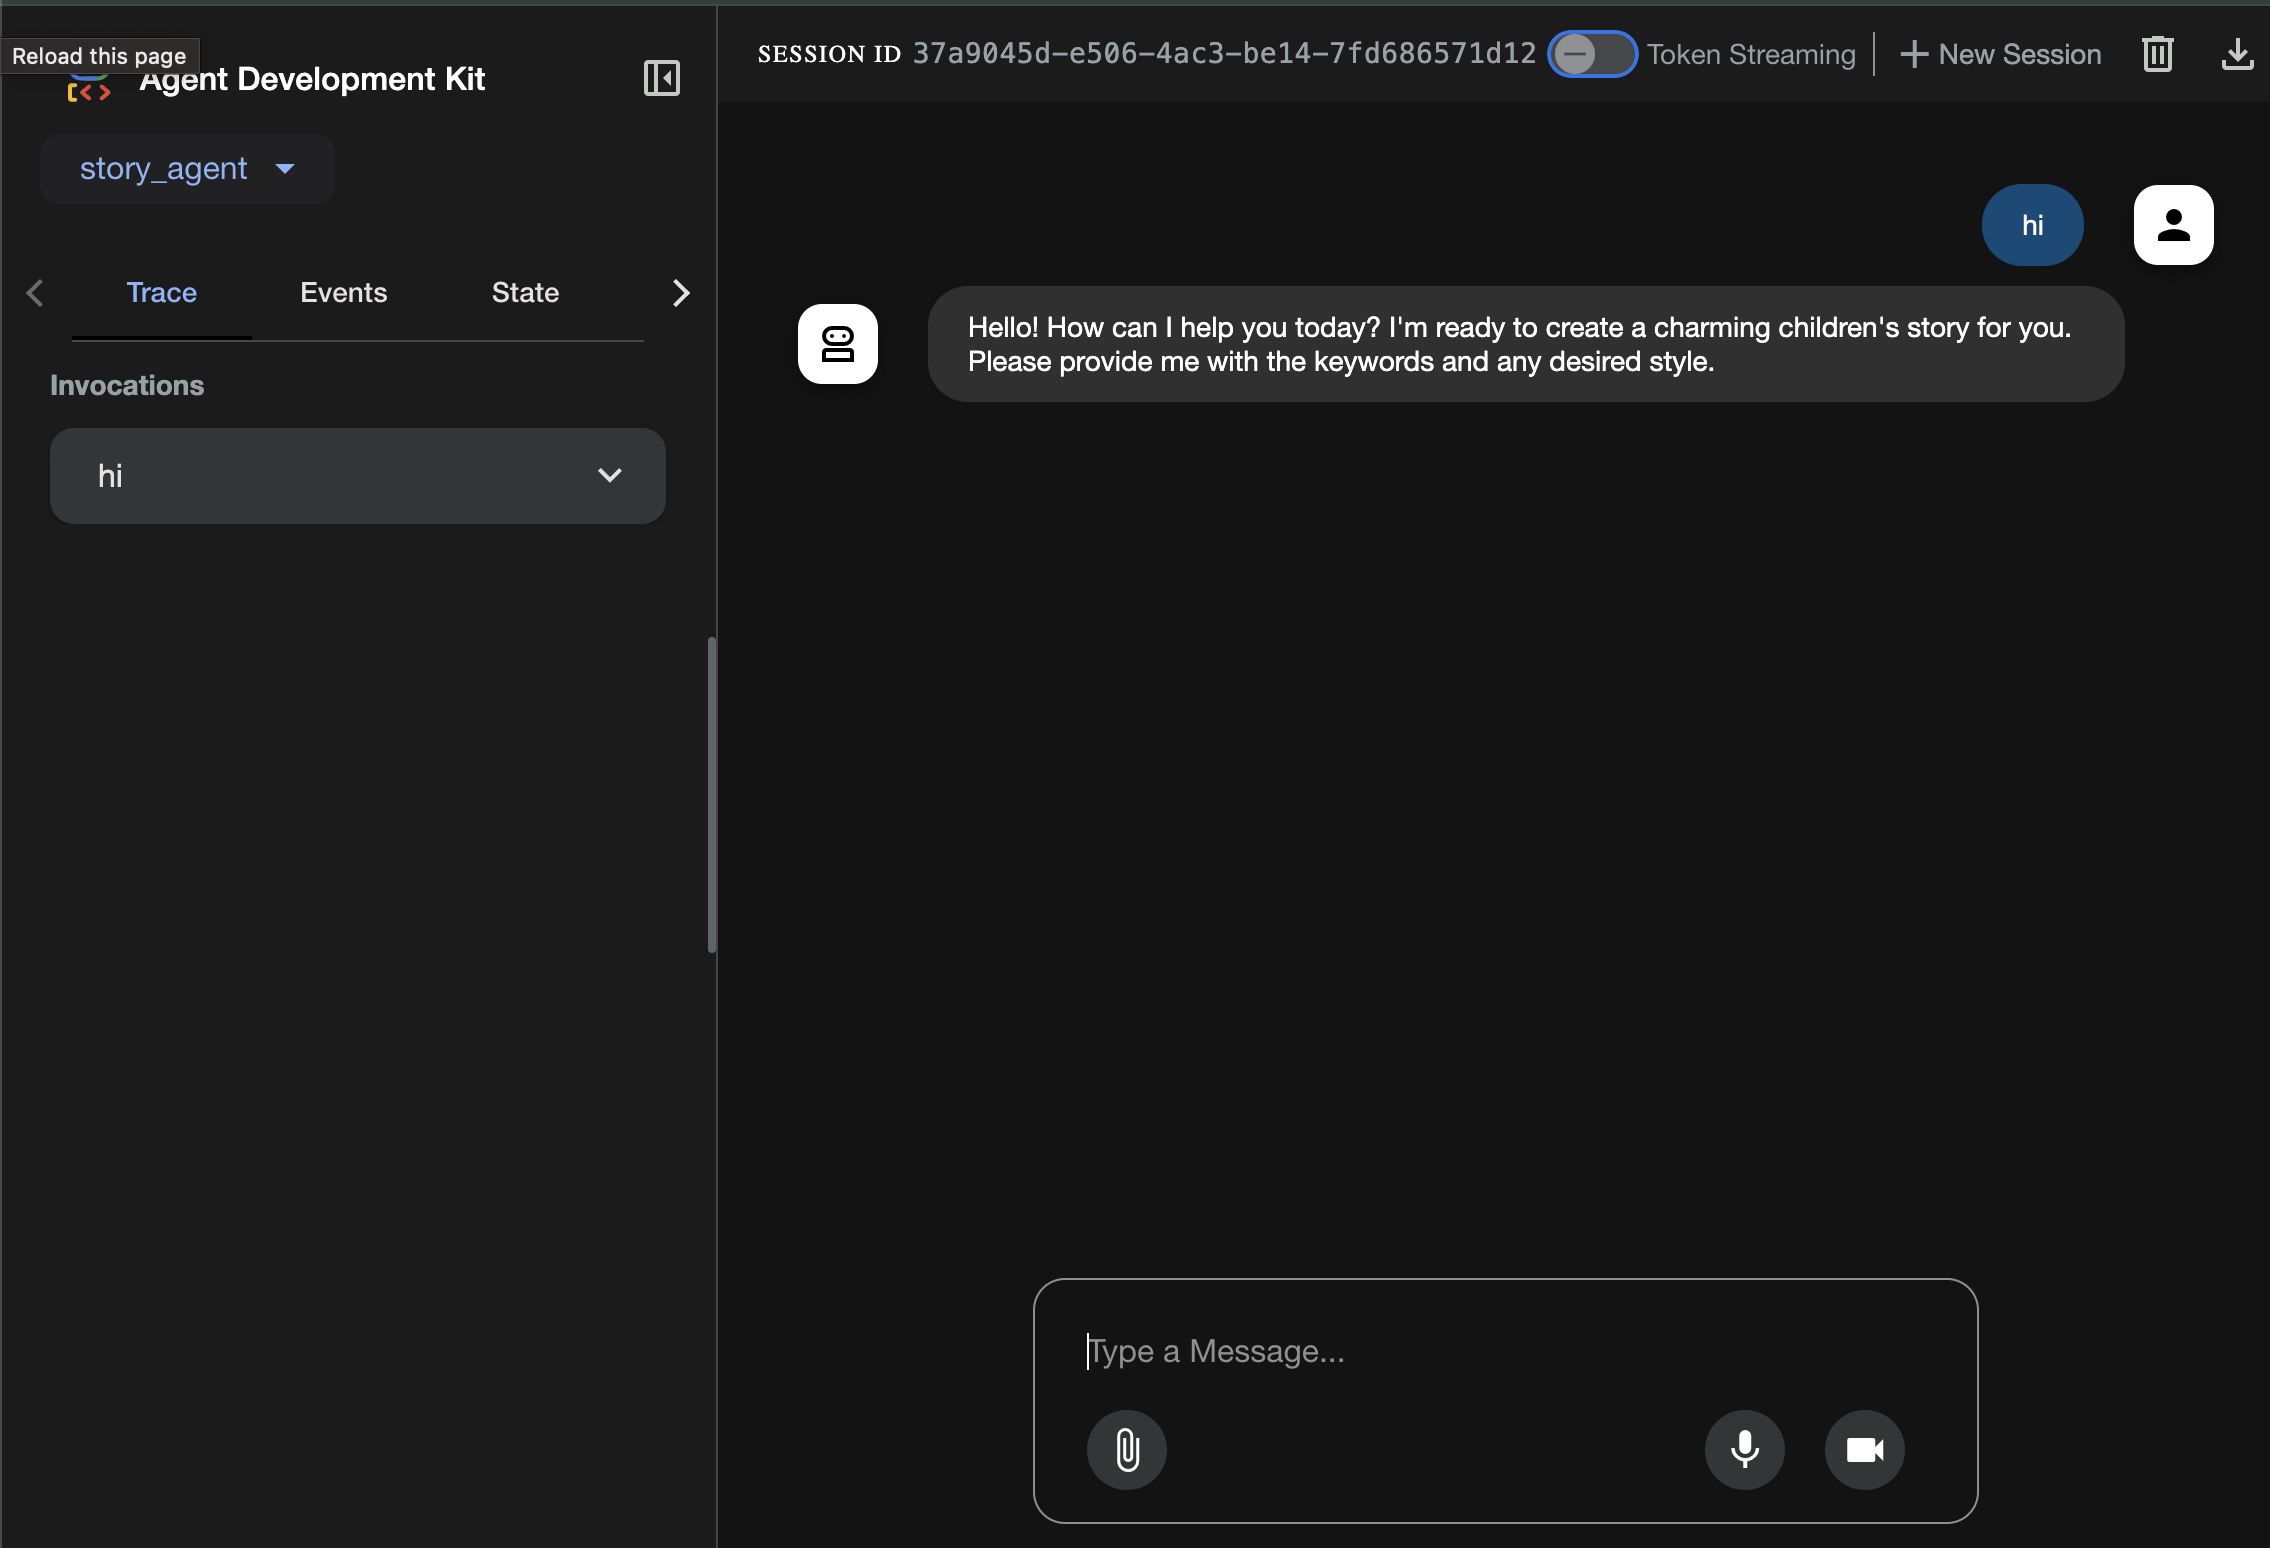
You will see the ADK UI where you can ask questions to the agent
Before moving to the next section, press Ctrl+C to end the process.
6. Development: Building ADK with Gemini CLI - (Context Engineering Way)
Initial Setup
Make sure we delete the agent file we generated before, in 01a_First_Agent_Ready/backend/story_agent/agent.py:
Go to 01a_First_Agent_Ready Let's use Gemini CLI to create the ADK agent:**
cd ~/storygen-learning/01a_First_Agent_Ready/backend
Open Gemini CLI
gemini
Inside Gamini CLI Window, try prompt:
Summarize the design doc @design.md for me, do not attempt to create file just yet.
👉💻 Exit Gemini for a moment by pressing Ctrl+C twice.
👉💻 In your terminal, run the following command to write the guideline file.
cat << 'EOF' > GEMINI.md
  ### **Coding Guidelines**
  **1. Python Best Practices:**

  *   **Type Hinting:** All function and method signatures should include type hints for arguments and return values.
  *   **Docstrings:** Every module, class, and function should have a docstring explaining its purpose, arguments, and return value, following a consistent format like reStructuredText or
  Google Style.
  *   **Linter & Formatter:** Use a linter like `ruff` or `pylint` and a code formatter like `black` to enforce a consistent style and catch potential errors.
  *   **Imports:** Organize imports into three groups: standard library, third-party libraries, and local application imports. Sort them alphabetically within each group.
  *   **Naming Conventions:**
      *   `snake_case` for variables, functions, and methods.
      *   `PascalCase` for classes.
      *   `UPPER_SNAKE_CASE` for constants.
  *   **Dependency Management:** All Python dependencies must be listed in a `requirements.txt` file.

  **2. Web APIs (FastAPI):**

  *   **Data Validation:** Use `pydantic` models for request and response data validation.
  *   **Dependency Injection:** Utilize FastAPI's dependency injection system for managing resources like database connections.
  *   **Error Handling:** Implement centralized error handling using middleware or exception handlers.
  *   **Asynchronous Code:** Use `async` and `await` for I/O-bound operations to improve performance.
EOF
cat GEMINI.md
With the laws inscribed, let's re-summon our AI partner and witness the magic of the artifact.
👉💻 Relaunch the Gemini CLI from the shadowblade directory:
cd ~/storygen-learning/01a_First_Agent_Ready/backend
clear
gemini
👉✨ Now, ask Gemini to show you what it's thinking about. The runes have been read.
/memory show
👉✨ This is the single, powerful command that will construct your agent. Issue it now:
You are an expert Python developer specializing in the Google Agent Development Kit (ADK). Your task is to write the complete, production-quality code for `agent.py` by following the technical specifications outlined in the provided design document verbatim.

Analyze the design document at `@design.md` and generate the corresponding Python code for `agent.py`.

I need you to generate a Python script based on the provided design document and reference examples. Follow these requirements:

Read the design document carefully - it contains the complete technical specification for the code you need to write
Follow the structure and patterns shown in the reference context files
Adhere to all Python best practices specified in the coding standards document
Implement every requirement mentioned in the design document exactly as specified
Use the exact variable names, function names, and string values mentioned in the specifications

The design document describes the complete architecture, dependencies, configuration, and logic flow. Your generated code must match these specifications precisely while following professional Python coding standards.
Generate clean, production-ready Python code that can be used immediately without modifications.
Once you finished, turn Off Gemini CLI terminal with Control+C
—————————————— Optional, you can skip to Solution part——————————————–
Now Verify Your Change In ADK Web
cd ~/storygen-learning/01a_First_Agent_Ready/backend

source ../../.venv/bin/activate

adk web --port 8080
To continue, you'll need a command prompt.
Spin Up The Website
cd ~/storygen-learning/01a_First_Agent_Ready

./start.sh
If your change doesn't work, you would expect to see errors in ADK Web UI and Website.
——————————————– Solution Starting Here ——————————————–
Solution
End previous process with Control+C or you can open another terminal:
cd ~/storygen-learning/01b_First_Agent_Done
Spin Up the Website:
./start.sh
You will see the website:
Try the ADK UI: Open another terminal:
cd ~/storygen-learning/01b_First_Agent_Done/backend
source ../../.venv/bin/activate

adk web --port 8080
You will see the ADK UI where you can ask questions to the agent
Before moving to the next section, press Ctrl+C to end the process.
7. Development: Build Your Custom Agent with Imagen

Generate the Imagen Tool (Second Agent)
cd ~/storygen-learning/02a_Image_Agent_Ready
Use Gemini CLI to create the image generation agent:
gemini generate "I need you to help me create a custom Google ADK (Agent Development Kit) agent for image generation. This is different from the story agent - this one handles image generation directly using the BaseAgent pattern for full control over tool execution.

Please create a complete `agent.py` file that implements a custom image generation agent. The agent should:

**Requirements:**
1. Use the `google.adk.agents.BaseAgent` class (NOT LlmAgent)
2. Be named "custom_image_agent"
3. Directly execute the ImagenTool without LLM intermediation
4. Handle JSON input with scene descriptions and character descriptions
5. Store results in session state for retrieval by main.py
6. Use async generators and yield Events

**Key Specifications:**
- **Class Name:** CustomImageAgent (inherits from BaseAgent)
- **Agent Name:** "custom_image_agent"
- **Tool:** Uses ImagenTool for direct image generation
- **Purpose:** Bypass LLM agent limitations and directly call ImagenTool

**Input Format:**
The agent should handle JSON input like:
{
  "scene_description": "Scene action and setting",
  "character_descriptions": {
    "CharacterName": "detailed visual description"
  }
}


**Core Method:** `async def _run_async_impl(self, ctx: InvocationContext) -> AsyncGenerator[Event, None]:`
   - Extract user message from `ctx.user_content.parts`
   - Parse JSON input or fallback to plain text
   - Extract scene_description and character_descriptions
   - Build image prompt with style prefix: "Children's book cartoon illustration with bright vibrant colors, simple shapes, friendly characters."
   - Include character descriptions for consistency
   - Call `await self.imagen_tool.run()` directly
   - Store results in `ctx.session.state["image_result"]`
   - Yield Event with results


 **Session State:**
   - Store JSON results in `ctx.session.state["image_result"]`
   - Include success/error status
   - Store actual image URLs or error messages

Expected Output Structure:
- Successful results stored as JSON with image URLs
- Error results stored as JSON with error messages
- Results accessible via session state in main.py

Can you create this agent in backend/story_image_agent/agent.py

"
—————————————— Optional, you can skip to Solution part——————————————–
Now Verify Your Change In ADK Web
cd ~/storygen-learning/02a_Image_Agent_Ready/backend

source ../../.venv/bin/activate

adk web --port 8080
Spin Up The Website
cd ~/storygen-learning/02a_Second_Agent_Ready

./start.sh
If your change doesn't work, you would expect to see errors in ADK Web UI and Website.
——————————————- Solution Starting Here ——————————————–
Solution
End previous process with Control+C or you can open another terminal:
# Open new terminal
cd ~/storygen-learning/02b_Image_Agent_Done
Spin Up the Website:
./start.sh
You will see the website:
Try the ADK UI: Open another terminal:
# Open new terminal
cd ~/storygen-learning/02b_Image_Agent_Done/backend

source ../../.venv/bin/activate

adk web --port 8080
You will see the ADK UI where you can ask questions to the agent:
Before moving to the next section, press Ctrl+C to end the process.
Learning
Our first agent was great at generating text, but now we need to generate images. For this task, we need more direct control. We don't want the LLM to decide whether to create an image; we want to command it to do so directly. This is the perfect job for a BaseAgent.
Unlike the declarative LlmAgent, a BaseAgent is imperative. This means you, the developer, write the exact step-by-step Python logic inside the _run_async_impl method. You have full control over the execution flow.
You would choose a BaseAgent when you need:
Deterministic Logic: The agent must follow a specific, unchangeable sequence of steps.
Direct Tool Execution: You want to call a tool directly without LLM intervention.
Complex Workflows: The process involves custom data manipulation, API calls, and logic that is too complex for an LLM to reliably infer from a prompt alone.
For our app, we will use a BaseAgent to receive the scene descriptions from the first agent and directly call the Imagen tool to guarantee an image is generated for each scene.
8. Testing: Agent Evaluation
Our app works, but we need an automated safety net of tests. This is a perfect task to delegate to our AI co-pilot.
Actions
cd ~/storygen-learning/03a_Agent_Evaluation_Ready/backend
Use Gemini CLI to write comprehensive tests:
Open Gemini CLI
gemini
Inside Gamini CLI Window, try prompt:
I need you to create comprehensive test files for my backend/story_agent in Google ADK. I need three specific JSON files that match the testing structure used in ADK evaluation.

**Context:**
- The story agent generates structured JSON stories with exactly 4 scenes
- It uses LlmAgent with no tools, just direct LLM responses
- Input: Keywords
- Output: JSON with story, main_characters, and scenes arrays

**Files to Create:**

### 1. `story_agent_eval.evalset.json` (Comprehensive Integration Tests)
Create a comprehensive evaluation set with:
- **eval_set_id**: "story_agent_comprehensive_evalset"
- **name**: "Story Agent Comprehensive Evaluation Set"
- **description**: "Comprehensive evaluation scenarios for story_agent covering various keyword combinations, edge cases, and story quality metrics"


Each eval_case should include:
- Full conversation arrays with invocation_id, user_content, final_response
- Complete expected JSON responses with detailed stories, characters, and 4 scenes
- session_input with app_name "story_agent"
- All fields: story (narrative text), main_characters (with detailed visual descriptions), scenes (with index, title, description, text)

### 2. `story_generation.test.json` (Unit Tests)
Create basic generation tests with:
- **eval_set_id**: "story_agent_basic_generation_tests"
- **name**: "Story Agent Basic Generation Tests"
- **description**: "Unit tests for story_agent focusing on JSON structure compliance, scene generation, and keyword integration"

### 3. `test_config.json` (Evaluation Configuration)
Create test configuration with:
- **criteria**: response_match_score: 0.7, tool_trajectory_avg_score: 1.0
- **custom_evaluators**:
  - json_structure_validator (validates required fields, scene count, character fields)
  - story_quality_metrics (word count 80-250, keyword integration threshold 0.8)
- **evaluation_notes**: Story agent specifics and trajectory expectations

**Important Requirements:**
1. All responses must be valid, parseable JSON
2. Stories must have exactly 4 scenes with indices 1-4
3. Each scene must have: index, title, description, text
4. Main characters must have detailed visual descriptions
5. No tool_uses expected (empty arrays) since story agent uses direct LLM
6. Word count should be 100-200 words total
7. Keywords must be naturally integrated into the narrative

Please generate all three files with realistic example stories and comprehensive test coverage matching the ADK evaluation format.
—————————————— Optional, you can skip to Solution part——————————————–
To See the Evaluation:
./run_adk_web_persistent.sh
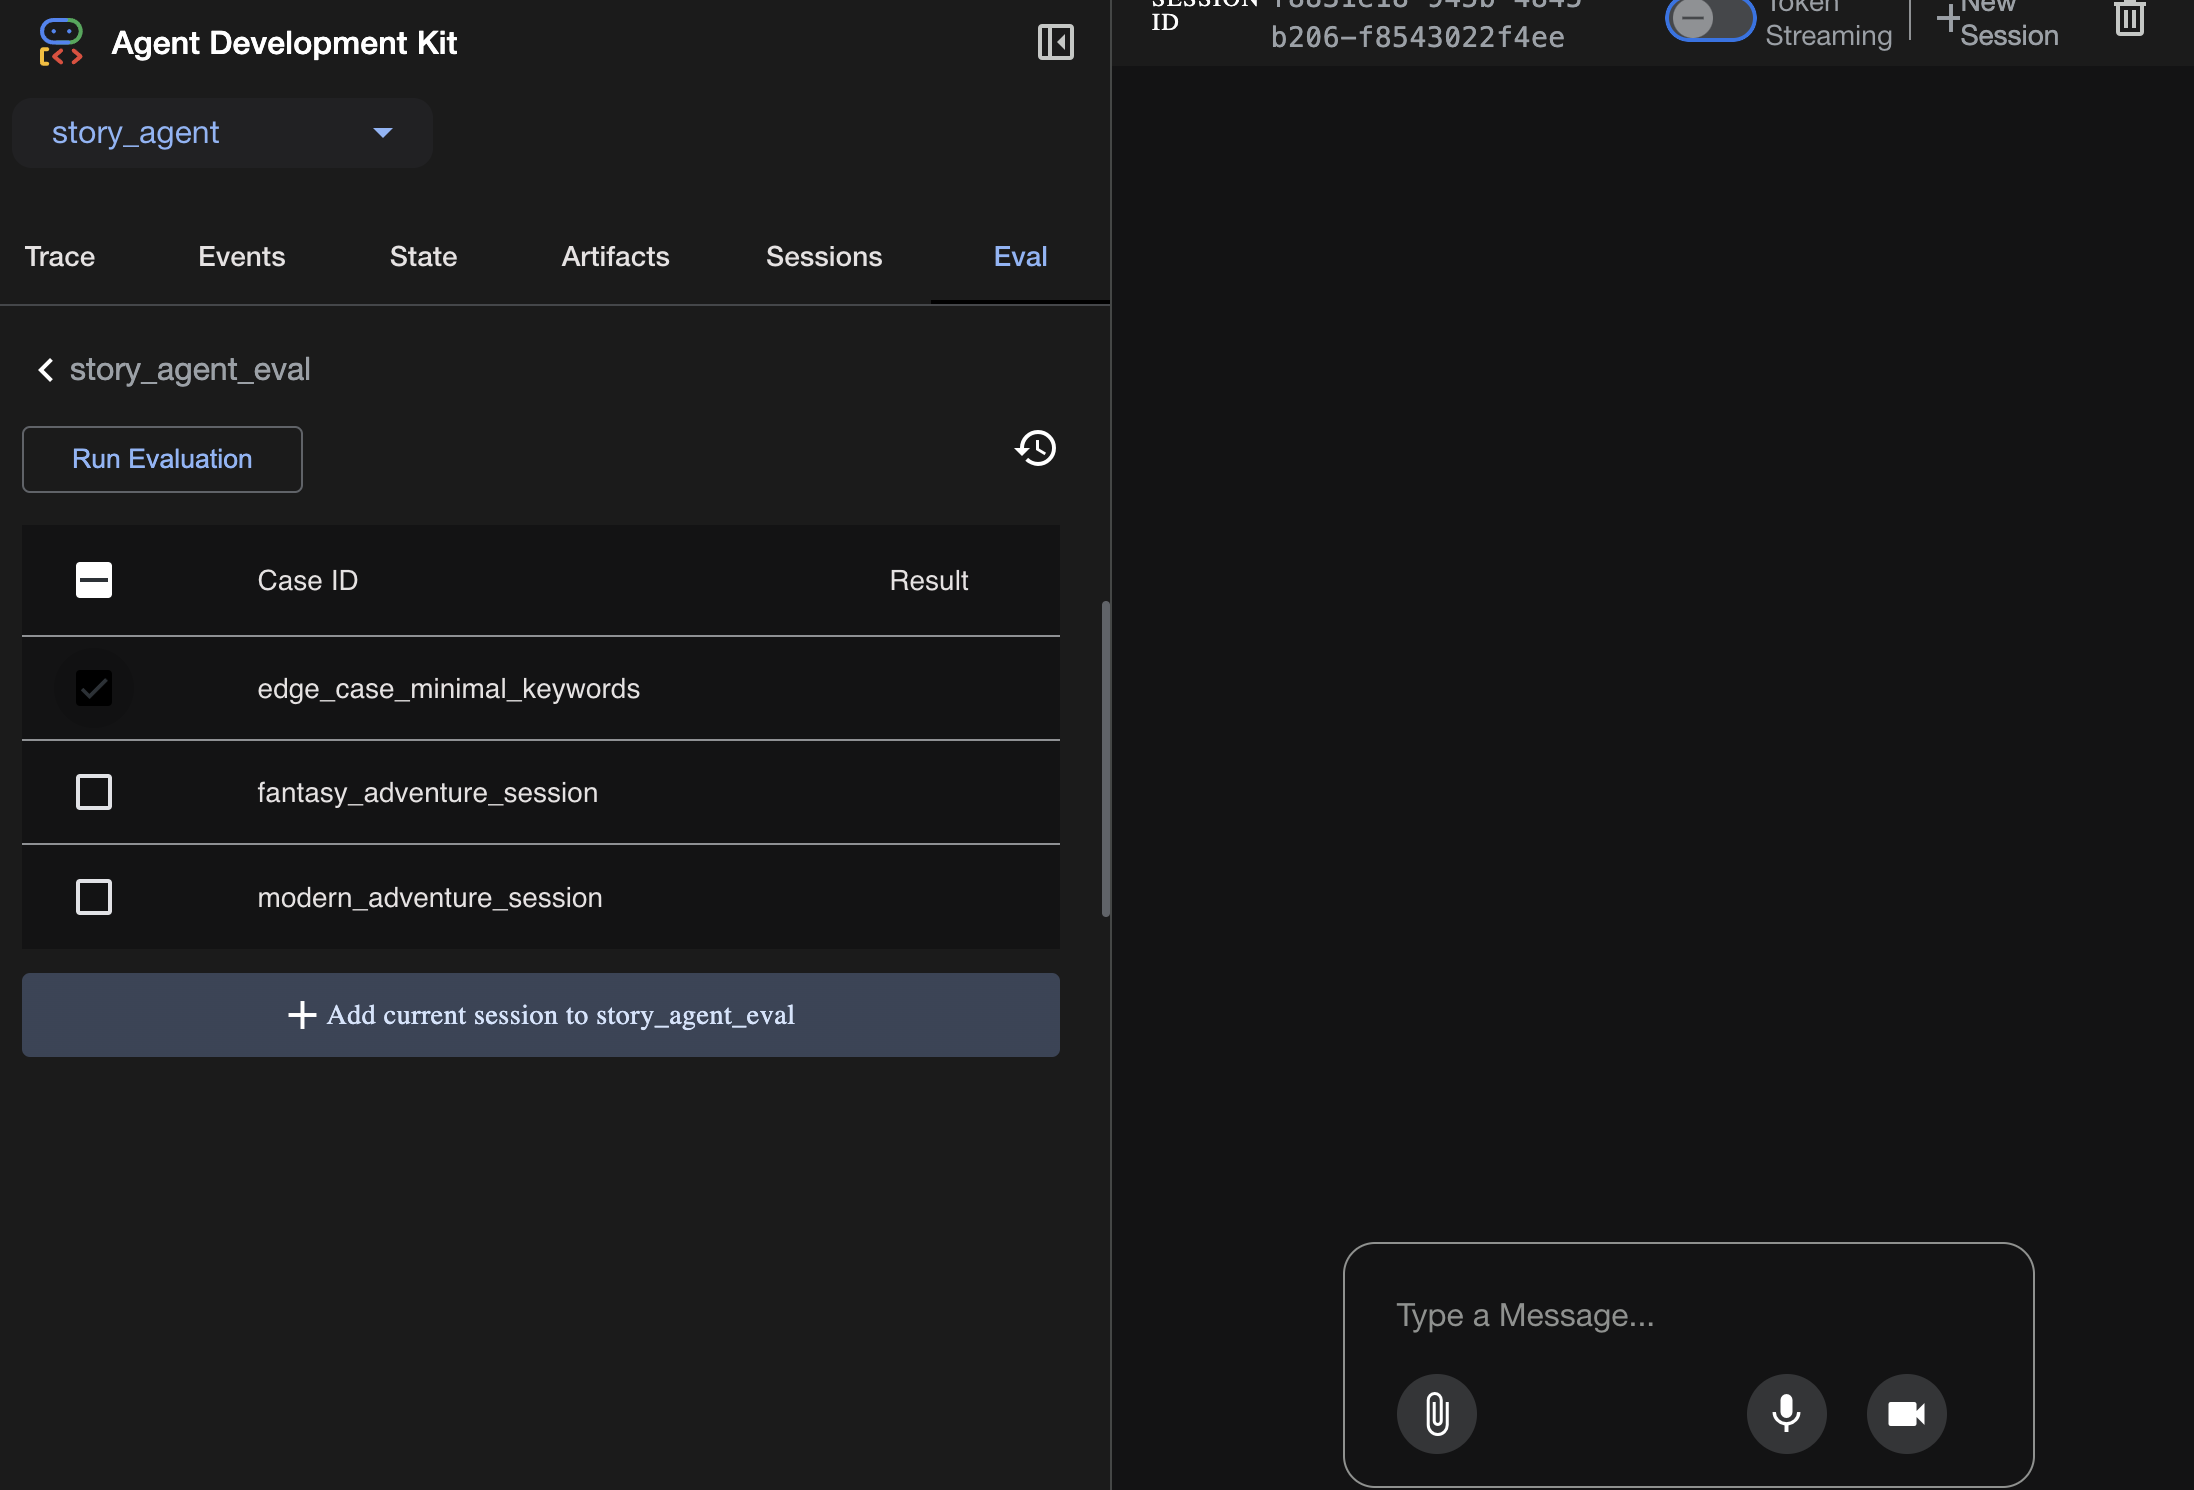
Go to eval tab on the ADK UI.
You should see the ADK Web UI with persistent testing capabilities
Key Learning Moment: AI is a powerful partner in automating quality assurance. It can handle the boilerplate of test writing, freeing you to focus on building features.
——————————————– Solution Starting Here ——————————————–
Solution
- Go to solution folder:
cd ~/storygen-learning/03b_Agent_Evaluation_Done/backend
- Open ADK Web UI
./run_adk_web_persistent.sh
You can see the test cases from Eval Tab:
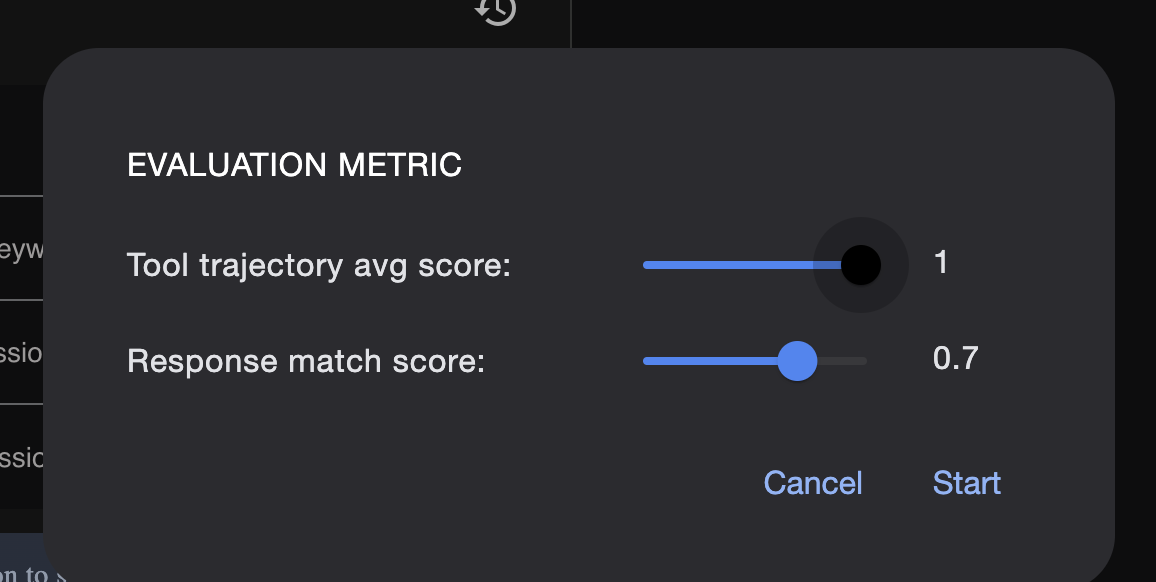
Adjust the metrics here:
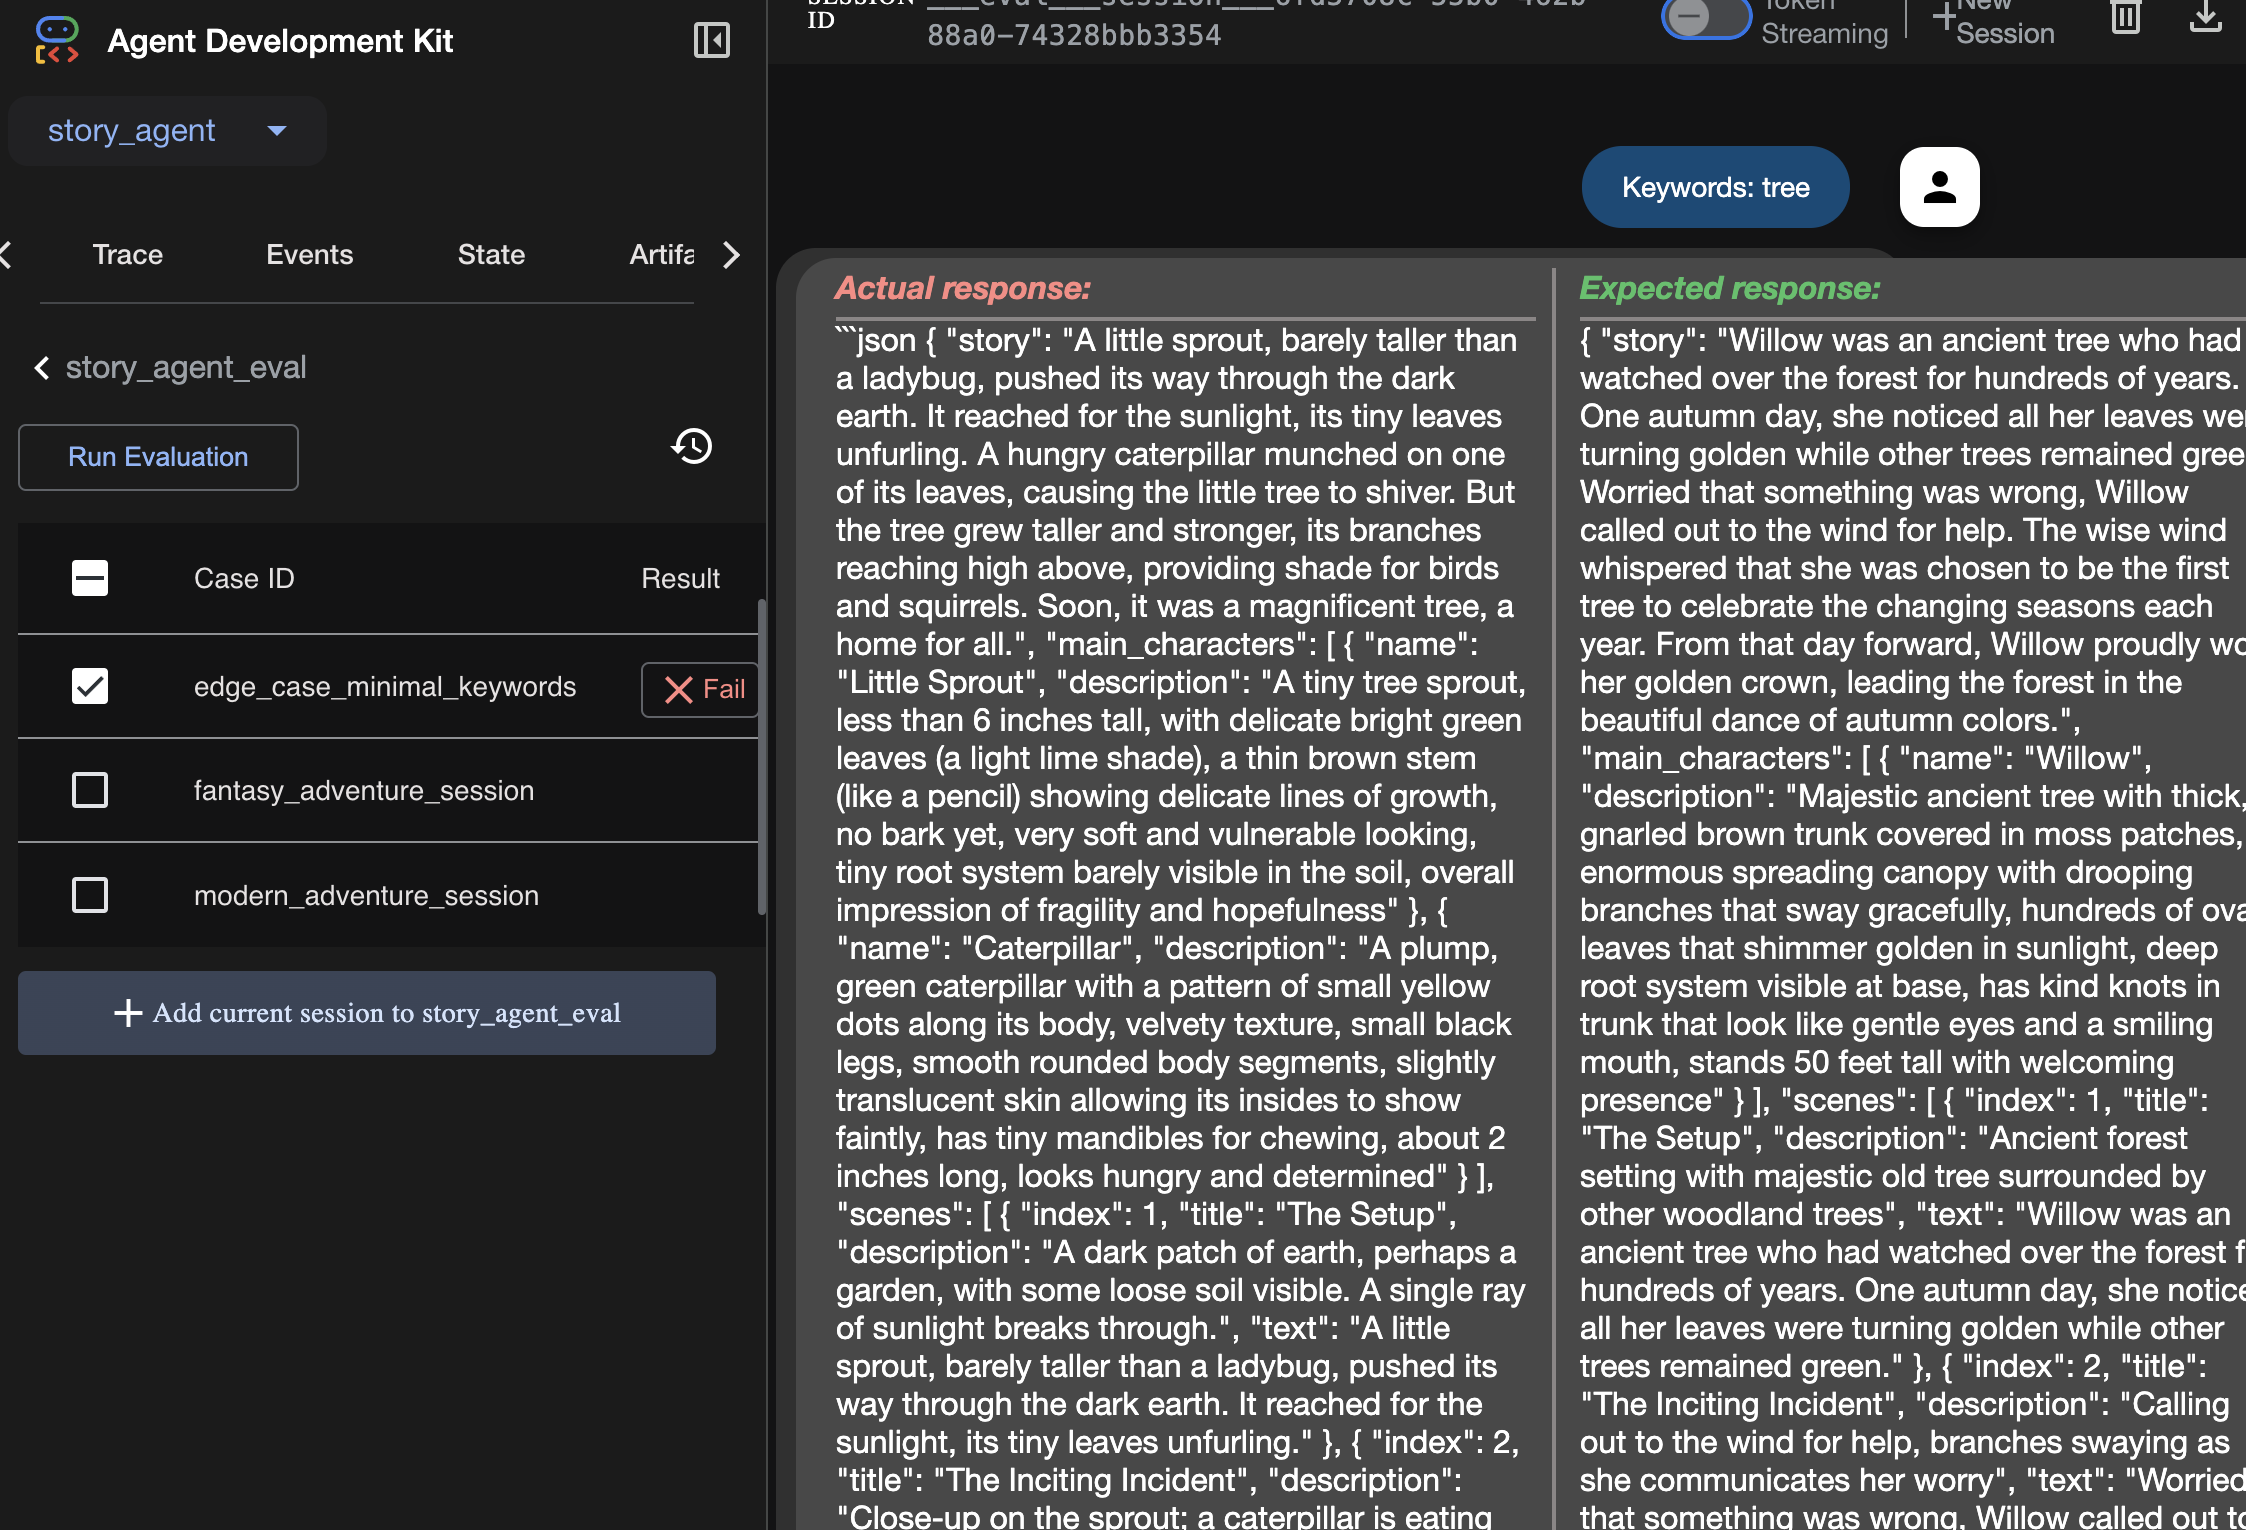
View the eval run result here:
Learning
An agent can "work" in that it runs without errors, but how do we know if it's producing the right output? Is the story good? Is the JSON format correct? This is where the ADK's evaluation framework comes in.
Agent evaluation is an automated testing system designed to measure the quality and correctness of your agent's responses. Instead of just checking for code errors, it checks if the agent's behavior meets your expectations. The framework primarily uses a few key files:
evalset.json: This is your master test suite. Each "eval case" inside this file contains a sample conversation (e.g., a user prompt) and the ideal, "golden" response you expect the agent to produce.
test_config.json: This file defines the rules for success. You set criteria here, such as:
response_match_score: How closely must the agent's response match the "golden" response? (A score of 1.0 means it must be identical).
custom_evaluators: You can create your own rules, like "The response must be valid JSON" or "The story must contain more than 100 words."
By running an evaluation, you can automatically test your agent against dozens of scenarios, ensuring that changes to your prompt or tools don't accidentally break its core functionality. It's a powerful safety net for building production-ready AI agents.
9. Infrastructure as Code (IaC): Building a Home in the Cloud
Our code is tested, but it needs a production-ready home. We'll use "Infrastructure as Code" to define our environment.
What is Docker?
Docker is a platform for creating and running applications in containers. Think of a container like a standardized shipping container for software. It bundles everything your application needs to run into a single, isolated package:
- The application code itself
- The required runtime (e.g., the specific version of Python)
- All system tools and libraries
This containerized application can then be run on any machine that has Docker installed, solving the classic "it works on my machine" problem.
In this section, we will ask Gemini to generate a Dockerfile, which is simply the recipe or blueprint for building our application's container image

Actions
cd ~/storygen-learning/04a_Manual_Deployment_Ready
Use Gemini CLI to create a Dockerfile for the backend: Open Gemini CLI
Gemini
Inside Gemini CLI, try prompt:
Create a manual deployment plan for my StoryGen app with Google Cloud Platform. I have a Next.js frontend, Python backend, and Terraform infrastructure.

Generate these deployment files:
1. **01-setup.sh** - Environment setup and authentication
2. **02-build-images.sh** - Build and push Docker images to Google Container Registry
3. **03-deploy-infrastructure.sh** - Deploy with Terraform and configure services
4. **load-env.sh** - Load environment variables for deployment

**Requirements:**
- Use Google Cloud Run for both frontend and backend
- Configure Imagen API and storage buckets
- Set up proper IAM permissions
- Use environment variables from .env file
- Include error handling and status checks

Keep scripts simple, well-commented, and production-ready for manual execution.
Solution:
cd ~/storygen-learning/04b_Manual_Deployment_Done
Run:
source ../.venv/bin/activate
./01-setup.sh
./02-build-images.sh
./03-deploy-infrastructure.sh
You should see the deployment results and infrastructure creation
10. Automation (CI/CD): The Digital Assembly Line
Deploying our application manually is a great way to understand the moving parts, but it's slow, requires manual effort, and can lead to human error. In professional software development, this entire process is automated using a practice called CI/CD.
CI/CD stands for Continuous Integration and Continuous Deployment. It's a method for automatically building, testing, and deploying your code every time you make a change.
- Continuous Integration (CI): This is the "build and test" phase. As soon as a developer pushes a code change to a shared repository (like GitHub), an automated system kicks in. It builds the application and runs all the tests (like the agent evaluations we created) to ensure the new code integrates correctly and doesn't introduce any bugs.
- Continuous Deployment (CD): This is the "release" phase. If the CI phase passes successfully, the system automatically deploys the new, tested version of the application to production, making it live for users.
This automated pipeline creates a "digital assembly line" that takes code from a developer's machine to production quickly, safely, and reliably. In this section, we will ask our AI assistant to build this assembly line for us using GitHub Actions and Google Cloud Build.
Actions
cd ~/storygen-learning/05a_CICD_Pipeline_Ready
Use Gemini CLI to build your CI/CD pipeline with GitHub:
Open Gemini CLI
Gemini
Inside Gemini CLI, try prompt:
Create a CI/CD pipeline for my StoryGen app using Google Cloud Build and GitHub integration.

Generate these automation files:
1. **cloudbuild.yaml** (for backend) - Automated build, test, and deploy pipeline
2. **GitHub Actions workflow** - Trigger builds on push/PR
3. **Deployment automation scripts** - Streamlined deployment process

**Requirements:**
- Auto-trigger on GitHub push to main branch
- Build and push Docker images
- Run automated tests if available
- Deploy to Google Cloud Run
- Environment-specific deployments (staging/prod)
- Notification on success/failure

Focus on fully automated deployment with minimal manual intervention. Include proper secret management and rollback capabilities.
——————————————– Solution Starting Here ——————————————–
Solution:
cd ~/storygen-learning/06_Final_Solution/
# Copy the GitHub workflow to parent folder
cp -r 06_Final_Solution/.GitHub ../../../.GitHub
Go back to the 06_Final_Solution folder and run the script:
cd ~/storygen-learning/06_Final_Solution/

./setup-cicd-complete.sh
You should see the CI/CD pipeline setup completion
Trigger the Workflow: Commit and push your code to main. Note that you need to set up your GitHub email and name to allow the permission.
git add .
git commit -m "feat: Add backend, IaC, and CI/CD workflow"
git push origin main
Go to the "Actions" tab in your GitHub repository to watch your automated deployment run.
11. Operations: The AI Control Tower
We're live! But the journey isn't over. This is "Day 2"—operations. Let's return to Cloud Assist to manage our running application.
Actions
- Navigate to your Cloud Run service in the Google Cloud console. Interact with your live app to generate some traffic and logs.
- Open the Cloud Assist pane and use it as an operational co-pilot with prompts like these:
Log Analysis:
Summarize the errors in my Cloud Run logs for the service 'genai-backend' from the last 15 minutes.
Performance Tuning:
My Cloud Run service 'genai-backend' has high startup latency. What are common causes for a Python app and how can I investigate with Cloud Trace?
Cost Optimization:
Analyze the costs for my 'genai-backend' service and its GCS bucket. Are there any opportunities to save money?
Key Learning Moment: The AI SDLC is a continuous loop. The same AI co-pilot that helped build the application is an indispensable partner for monitoring, troubleshooting, and optimizing it in production.