
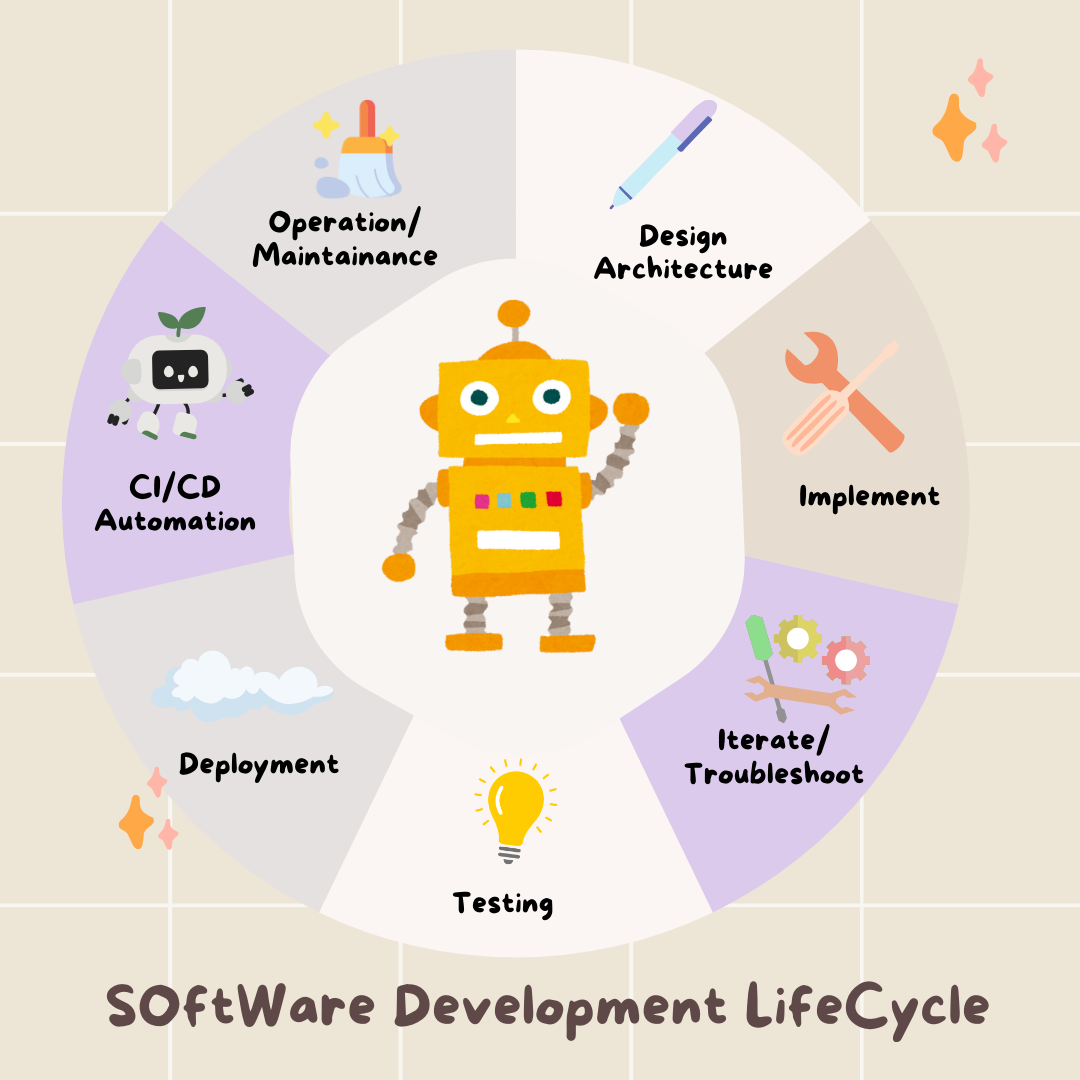
1. ما ستتعلمه
حزمة كاملة من أدوات الذكاء الاصطناعي
مرحبًا أنت على وشك تعلُّم المهارة الأساسية التالية في تطوير البرامج: كيفية توجيه الذكاء الاصطناعي بشكل فعّال لإنشاء برامج عالية الجودة واختبارها ونشرها. الذكاء الاصطناعي التوليدي ليس "طيارًا آليًا"، بل هو مساعد قوي يحتاج إلى مدير ماهر.
تقدّم ورشة العمل هذه منهجية منظَّمة وقابلة للتكرار للتعاون مع الذكاء الاصطناعي في كل مرحلة من مراحل دورة حياة تطوير البرامج (SDLC) الاحترافية. ستنتقل من كتابة الرموز البرمجية سطرًا بسطر إلى منصب المدير الفني، أي مهندس معماري لديه رؤية ومقاول عام يستخدم الذكاء الاصطناعي لتنفيذ هذه الرؤية بدقة. 🚀
في نهاية هذا البرنامج التعليمي، سيكون لديك:
- ترجمة فكرة عامة إلى بنية سحابية باستخدام الذكاء الاصطناعي
- تم إنشاء خلفية كاملة بلغة Python باستخدام طلبات موجّهة ومحدّدة.
- استخدام الذكاء الاصطناعي كمساعد برمجي لتصحيح الأخطاء وإصلاح الرموز البرمجية
- تفويض الذكاء الاصطناعي بإنشاء اختبارات الوحدة، بما في ذلك عمليات المحاكاة
- إنشاء بنية أساسية كرمز (IaC) جاهزة للإنتاج باستخدام Terraform
- تم إنشاء مسار كامل لعملية التكامل المستمر/التسليم المستمر في GitHub Actions باستخدام طلب واحد.
- مراقبة تطبيقك المباشر وإدارته باستخدام أدوات تشغيلية مستندة إلى الذكاء الاصطناعي
لن تخرج من هذا الحدث بتطبيق يعمل فحسب، بل ستتعلّم أيضًا كيفية الاستفادة من الذكاء الاصطناعي في عملية التطوير. لنبدأ!
2. المتطلّبات الأساسية والإعداد
قبل أن نبدأ، لنجهّز بيئتك. هذه خطوة مهمة لضمان تجربة سلسة في ورشة العمل.
إنشاء حساب جديد على Google Cloud Platform وربط الفوترة
لتشغيل وكلاء الذكاء الاصطناعي، نحتاج إلى عنصرَين: مشروع على Google Cloud لتوفير الأساس، ومفتاح Gemini API للوصول إلى نماذج Google الفعّالة.
الخطوة 1: تفعيل حساب الفوترة
لتشغيل هذا الدرس التطبيقي حول الترميز، يجب أن يكون لديك حساب الفوترة يتضمّن بعض الرصيد. استخدِم الرصيد من البانر في أعلى هذا الدرس التطبيقي للبدء. إذا كنت مرتبطًا بحساب فوترة، يمكنك تخطّي هذه الخطوة.
الخطوة 2: إنشاء مشروع جديد على Google Cloud Platform
- انتقِل إلى Google Cloud Console وأنشِئ مشروعًا جديدًا.
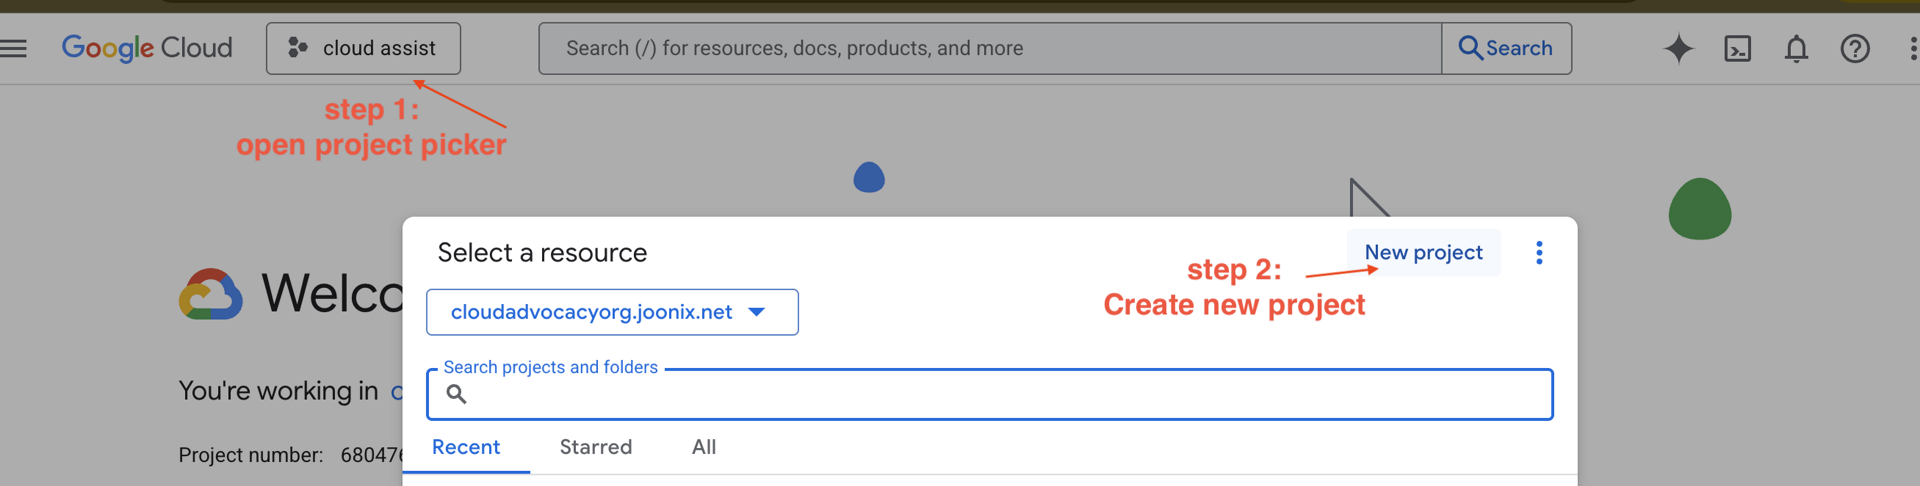
- افتح اللوحة اليمنى، وانقر على
Billing، وتحقّق ممّا إذا كان حساب الفوترة مرتبطًا بحساب Google Cloud Platform هذا.
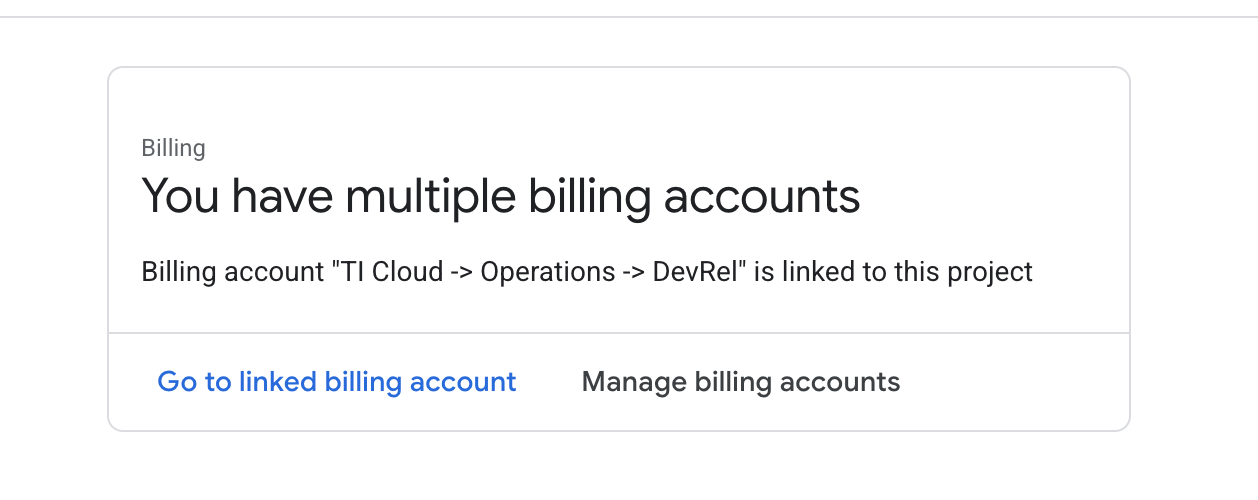
إذا ظهرت لك هذه الصفحة، تحقَّق من manage billing account، واختَر Google Cloud Trial One واربطه.
الخطوة 3: إنشاء مفتاح واجهة Gemini API
قبل أن تتمكّن من تأمين المفتاح، يجب أن يكون لديك مفتاح.
- انتقِل إلى Google AI Studio : https://aistudio.google.com/
- سجِّل الدخول باستخدام حسابك على Gmail.
- انقر على الزر "الحصول على مفتاح واجهة برمجة التطبيقات"، والذي يظهر عادةً في لوحة التنقّل على يمين الصفحة أو في أعلى يسارها.

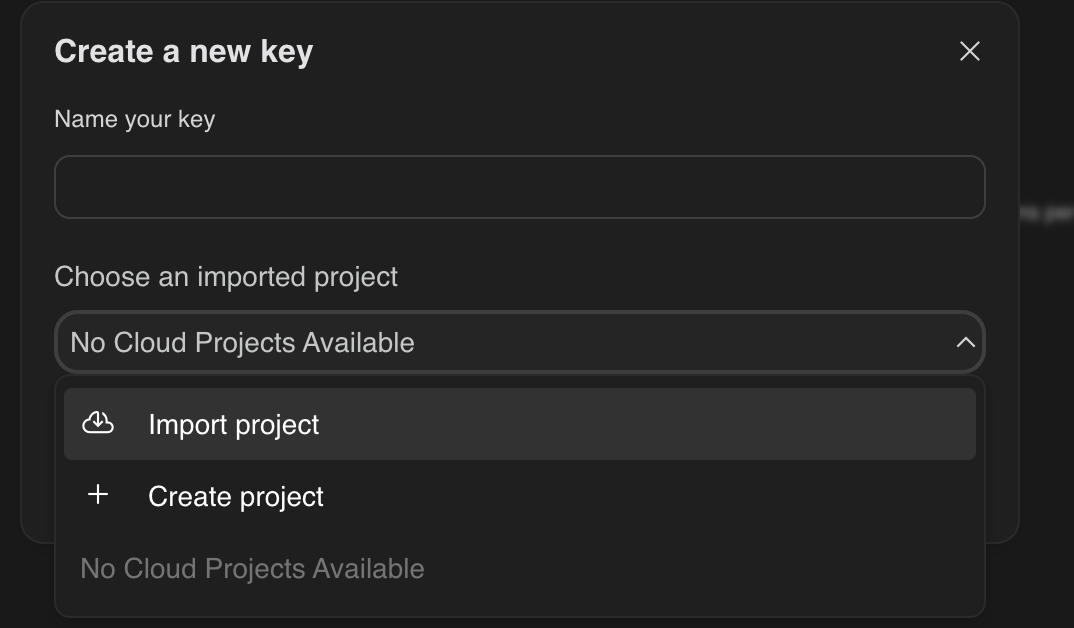
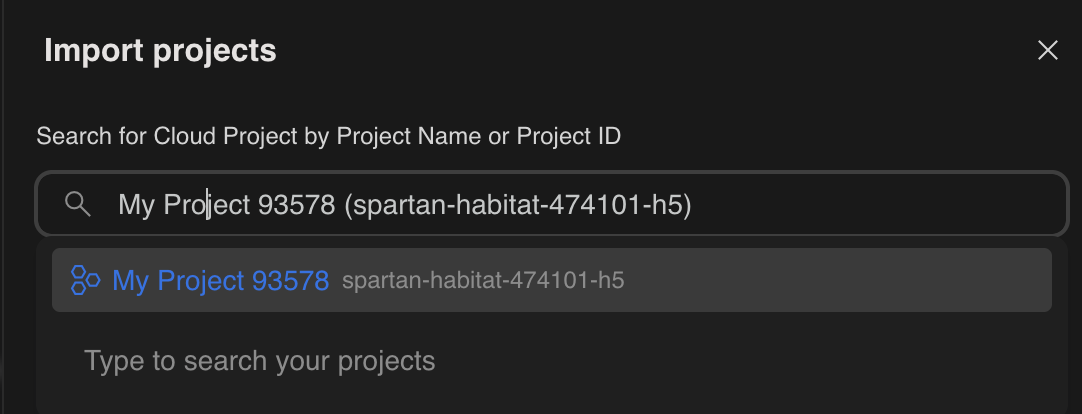
- في مربّع الحوار "مفاتيح واجهة برمجة التطبيقات"، انقر على "إنشاء مفتاح واجهة برمجة التطبيقات في مشروع جديد".
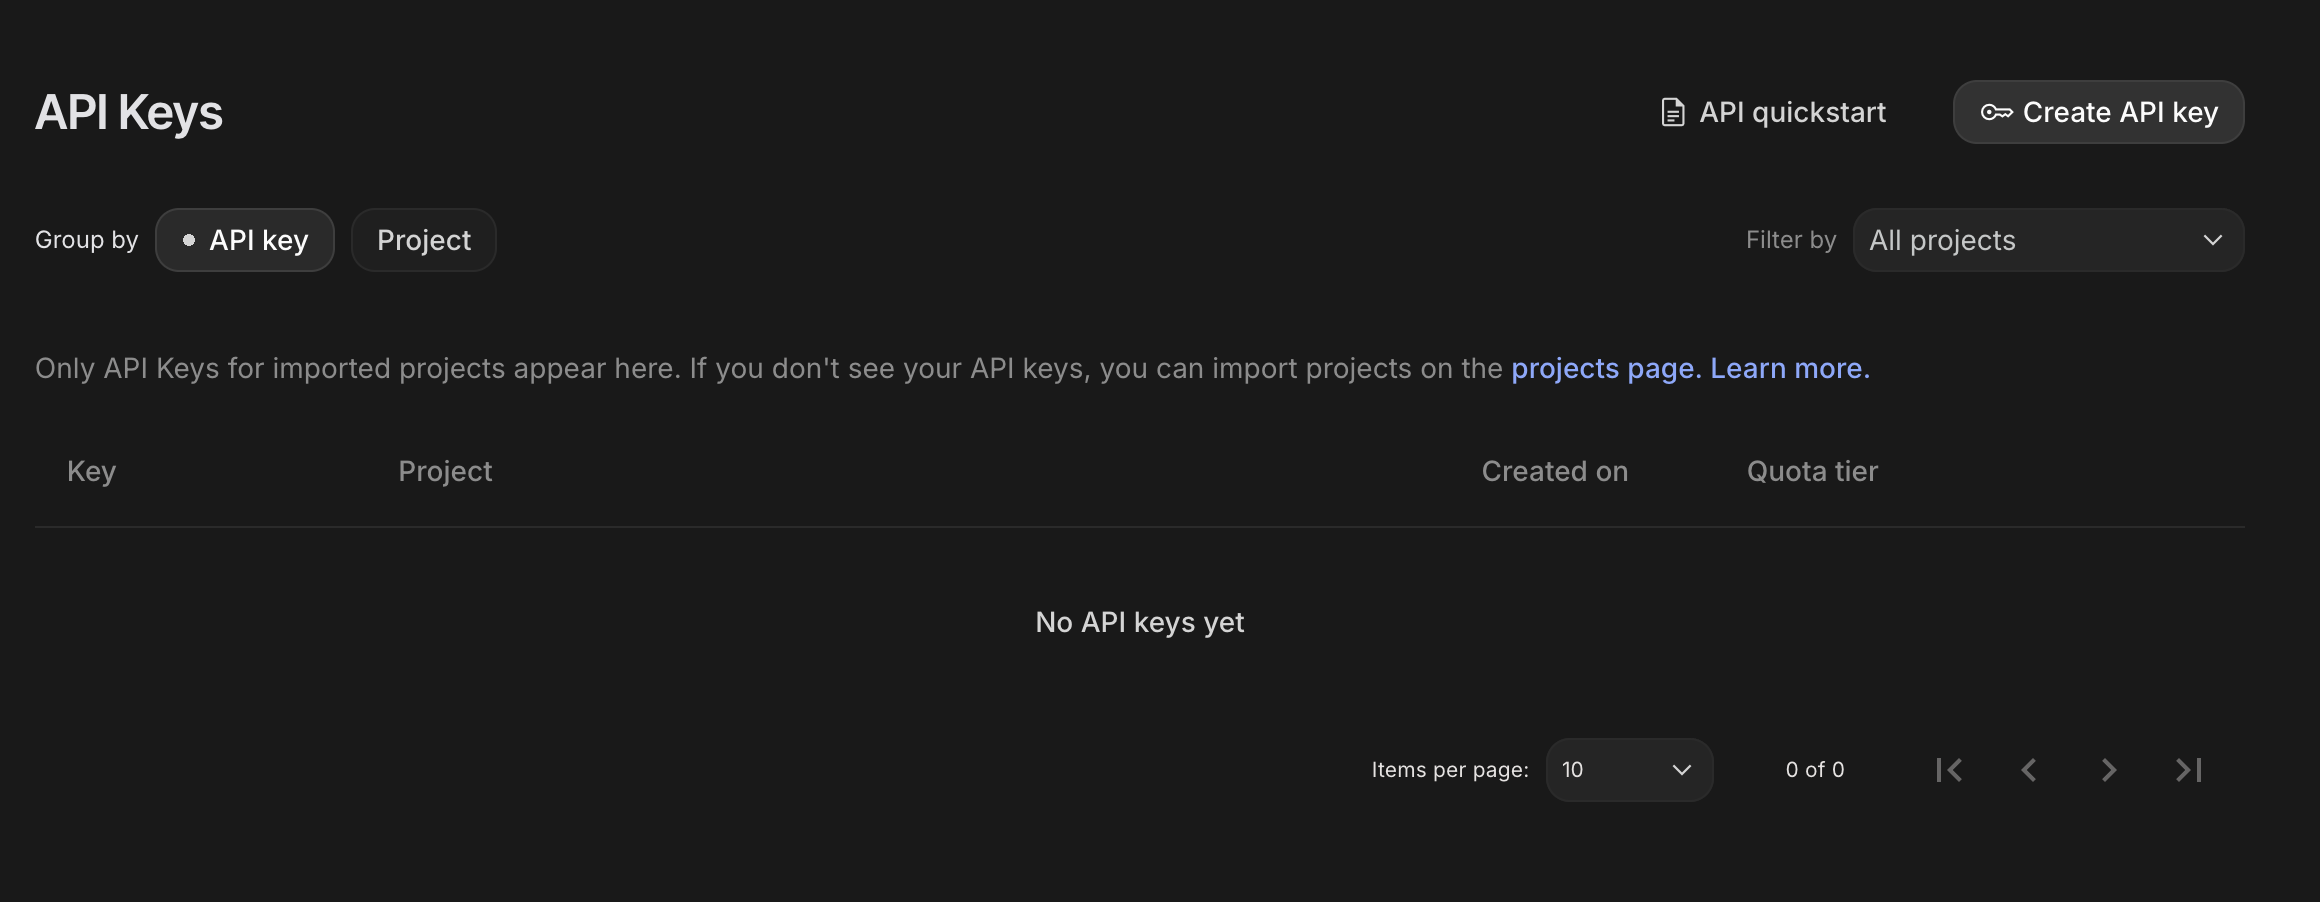
- اختَر المشروع الجديد الذي أنشأته والذي تم إعداد حساب الفوترة فيه.
- سيتم إنشاء مفتاح واجهة برمجة تطبيقات جديد لك.
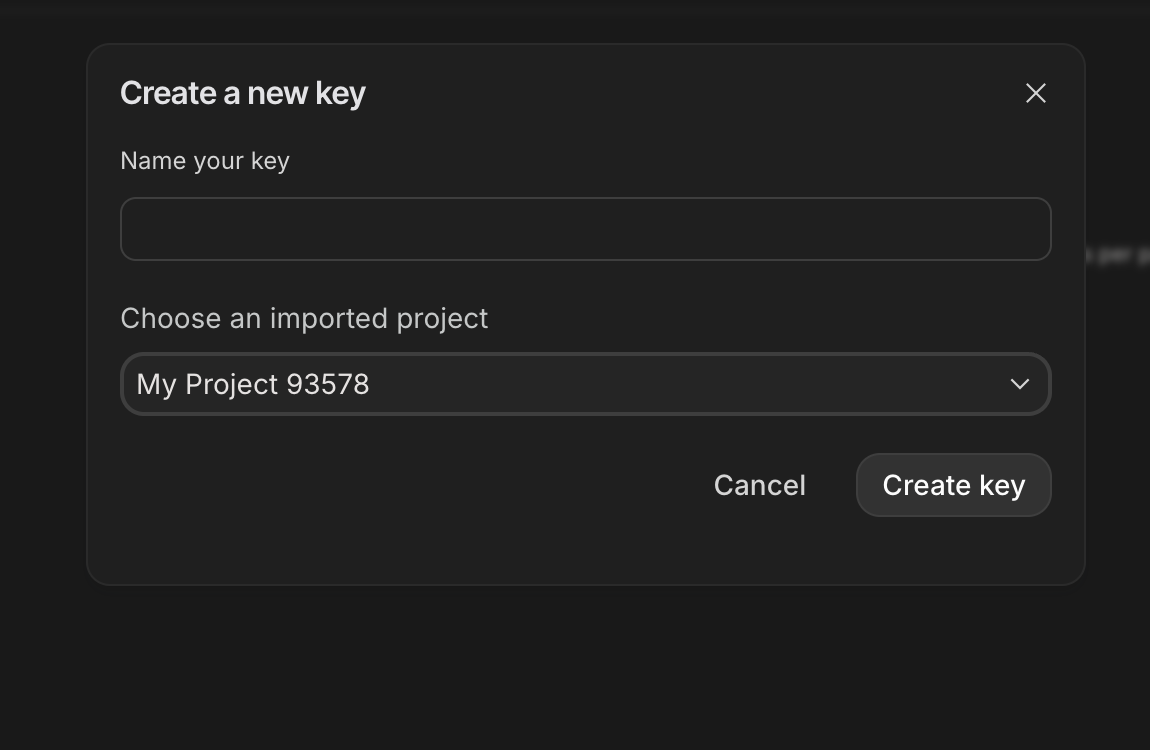
انسخ هذا المفتاح على الفور وخزِّنه مؤقتًا في مكان آمن (مثل برنامج مدير كلمات المرور أو ملاحظة آمنة). هذه هي القيمة التي ستستخدِمها في الخطوات التالية.
مصادقة GitHub
افتح Cloud Shell من خلال الانتقال إلى Google Cloud Console والنقر على الزر "تفعيل Cloud Shell" في أعلى يسار الصفحة.
الخطوة 1: فتح Cloud Shell
👉انقر على "تفعيل Cloud Shell" في أعلى وحدة تحكّم Google Cloud (رمز شكل الوحدة الطرفية في أعلى لوحة Cloud Shell)، 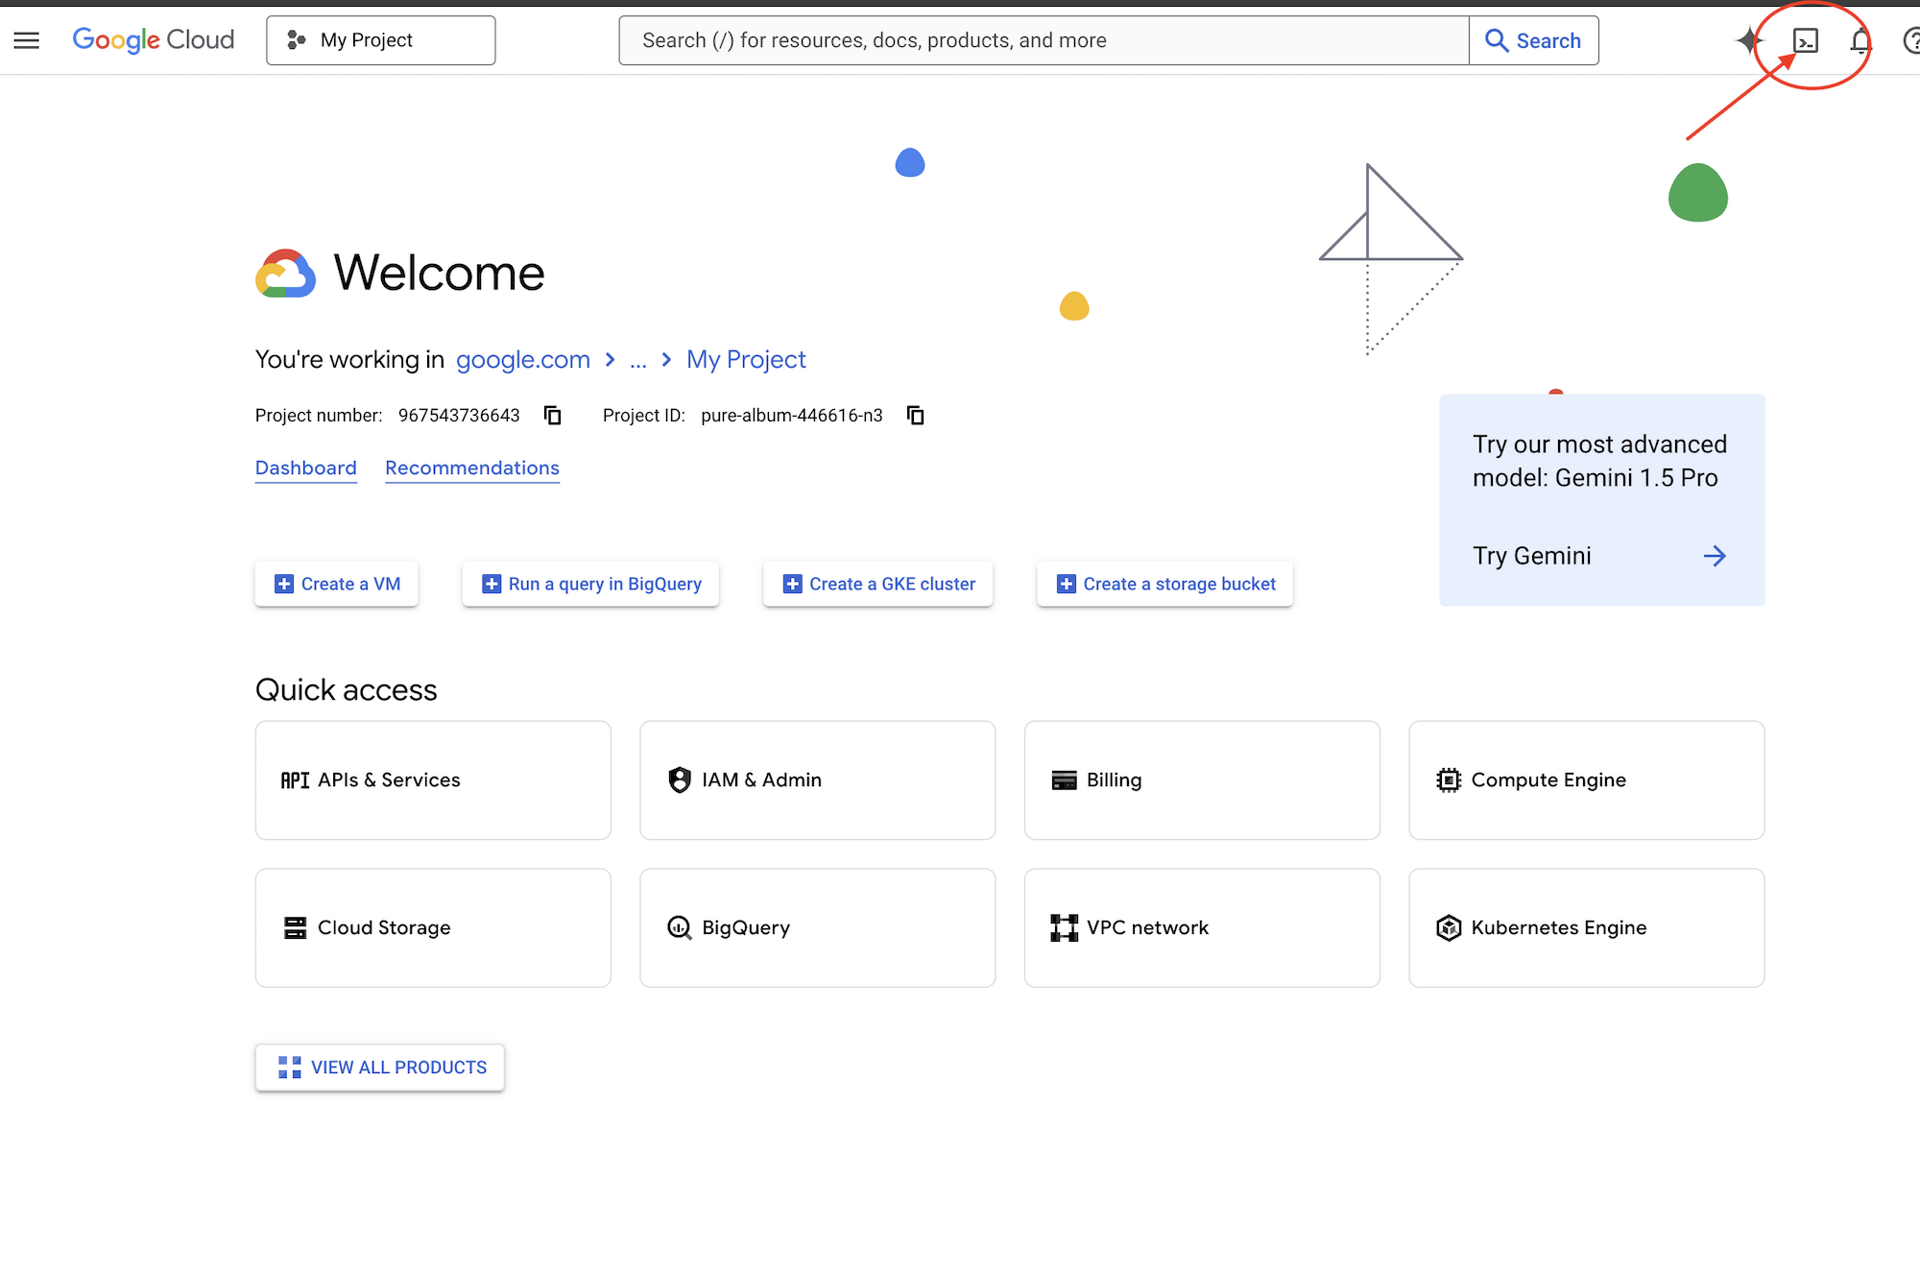
👉انقر على الزر "فتح المحرّر" (يبدو كملف مفتوح مع قلم رصاص). سيؤدي ذلك إلى فتح "محرِّر Cloud Shell للرموز" في النافذة. سيظهر لك مستكشف الملفات على الجانب الأيمن. 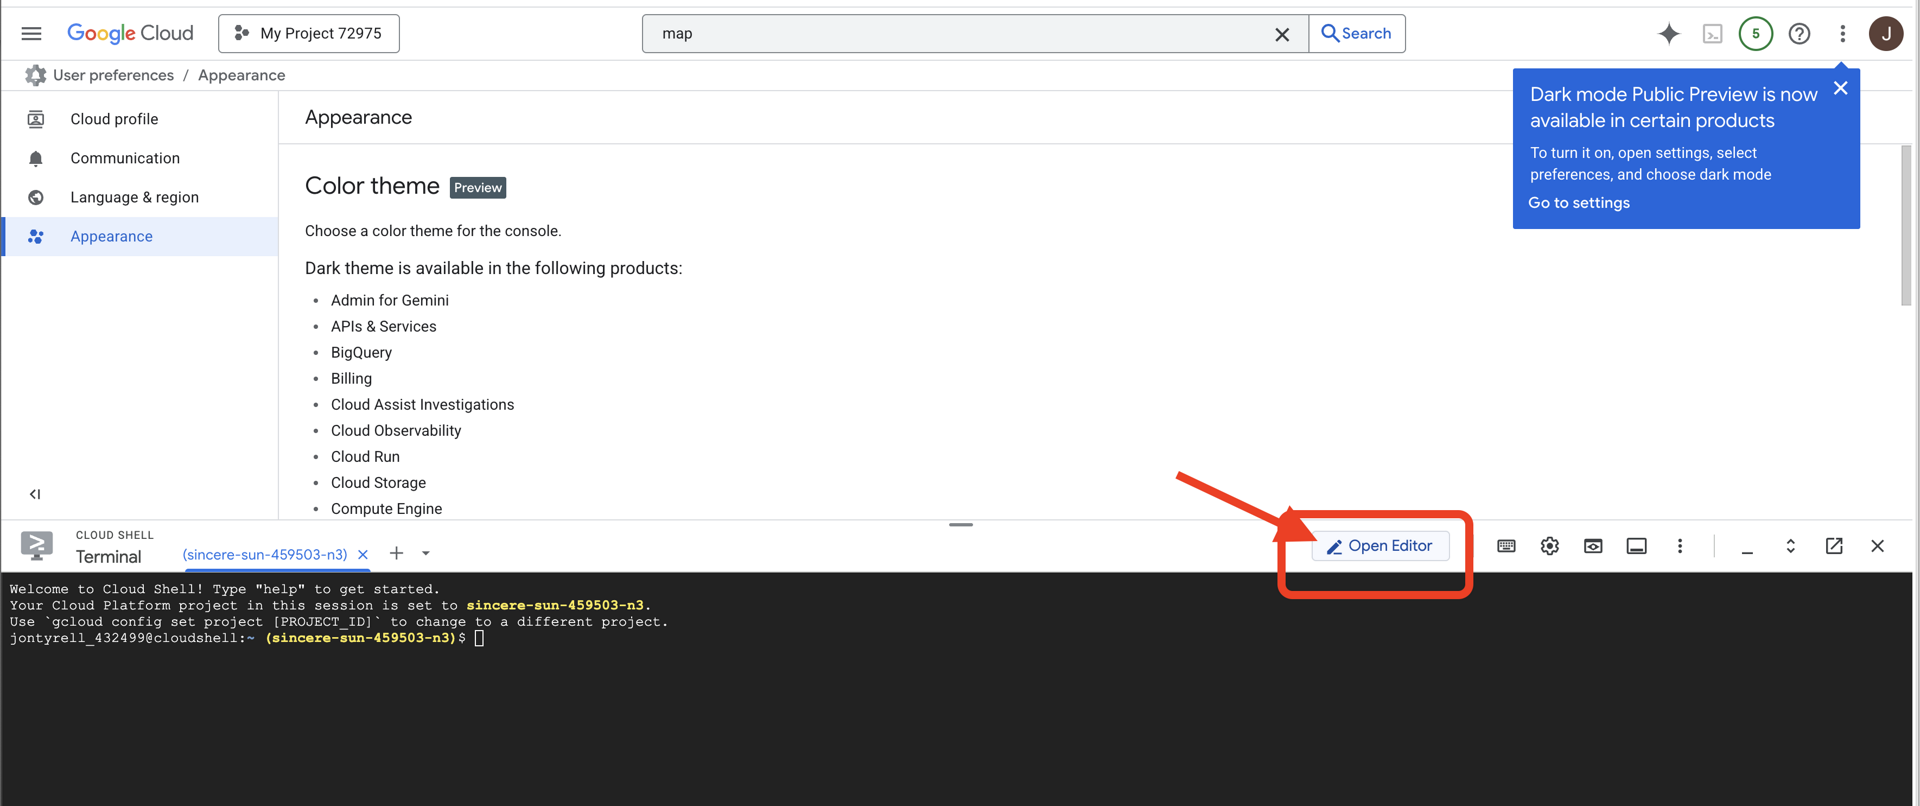
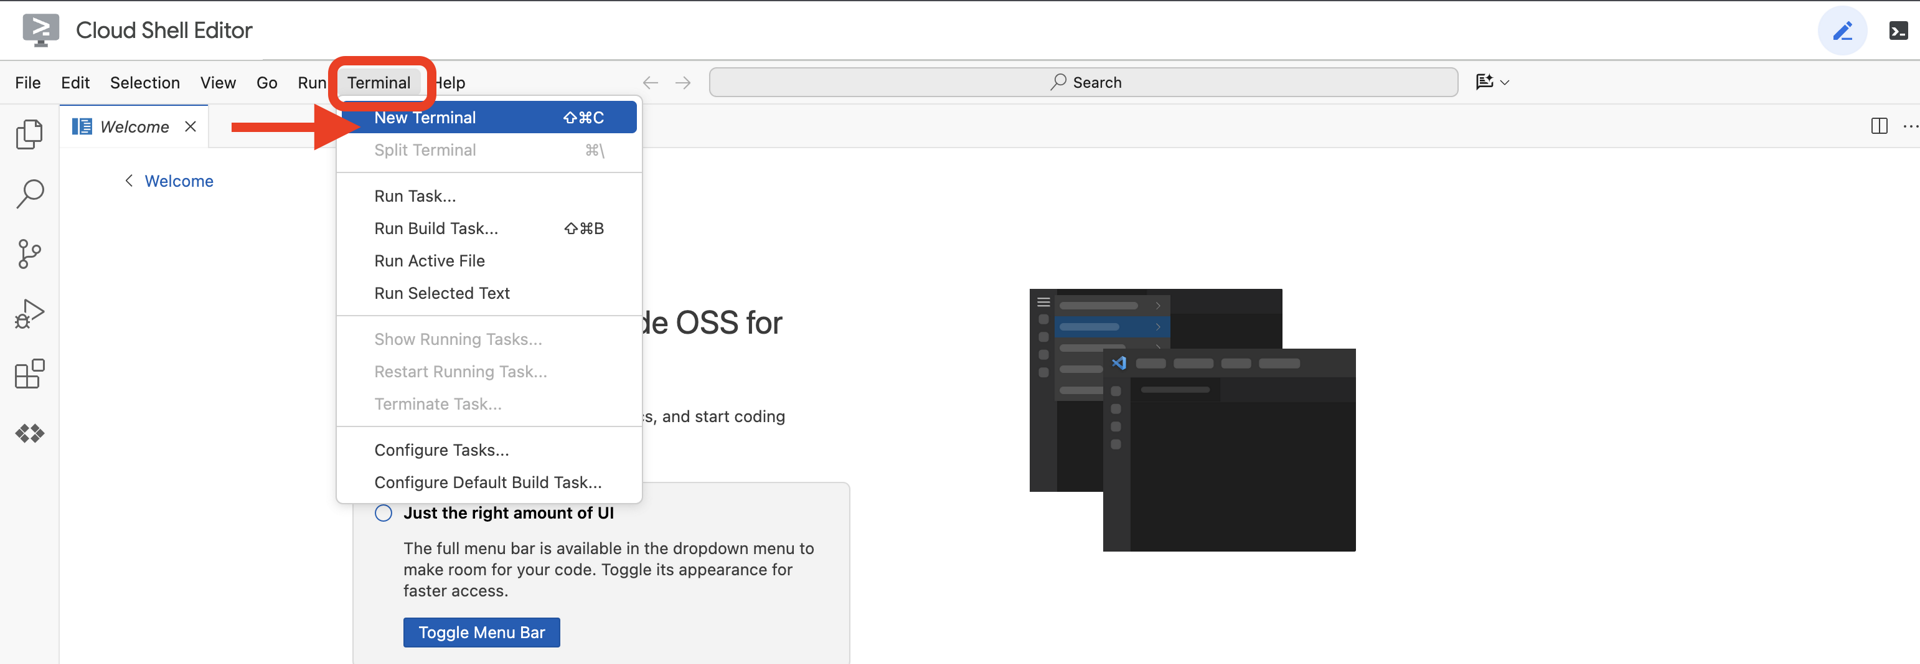
👉بعد فتح المحرِّر، افتح نافذة الأوامر في بيئة التطوير المتكاملة المستندة إلى السحابة الإلكترونية.
👉💻 في نافذة الوحدة الطرفية، تأكَّد من أنّك قد أثبتّ هويتك وأنّ المشروع مضبوط على رقم تعريف مشروعك باستخدام الأمر التالي:
gcloud auth list
الخطوة 2: المصادقة باستخدام GitHub وإنشاء نسخة طبق الأصل
المصادقة باستخدام GitHub:
👉💻 انسخ الأمر والصقه في نافذة سطر الأوامر على السحابة الإلكترونية:
gh auth login
- "أين تستخدم GitHub"، اختَر "GitHub.com"
- "ما هو البروتوكول المفضّل لديك لعمليات Git على هذا المضيف؟"، اختَر "HTTPS"
- "هل تريد مصادقة Git باستخدام بيانات اعتماد GitHub؟"، اختَر "نعم"
- "كيف تريد مصادقة GitHub CLI؟"، اختَر "تسجيل الدخول باستخدام متصفّح ويب"
مهم: لا تضغط على "Enter" بعد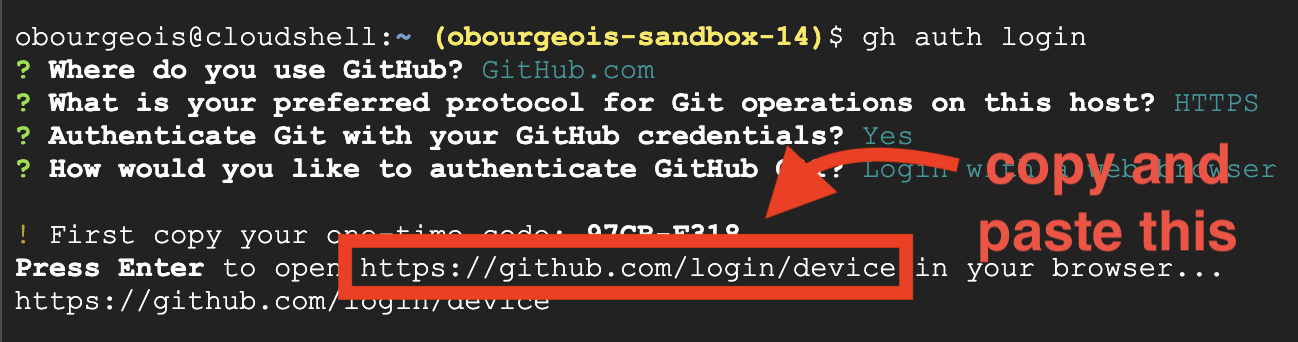
انسخ الرمز من نافذة الجهاز إلى صفحة تأكيد تسجيل الدخول
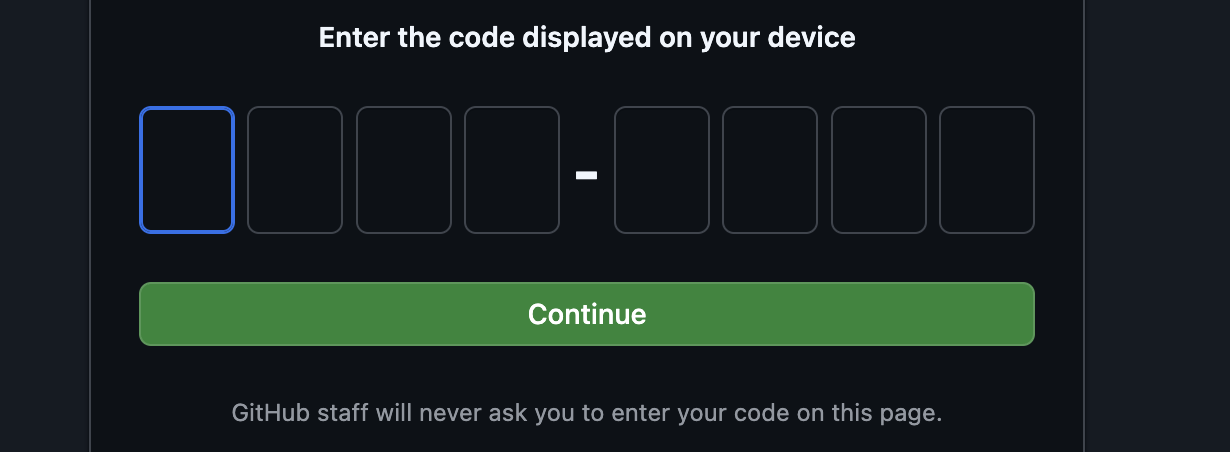
بعد الانتهاء من إدخال الرمز، ارجع إلى وحدة طرفية Cloud Shell، واضغط على "Enter" للمتابعة.

الخطوة 4: إنشاء نسخة من المستودع واستنساخها:
👉💻 انسخ الأمر والصقه في نافذة سطر الأوامر على السحابة الإلكترونية:
gh repo fork cuppibla/storygen-learning --clone=true
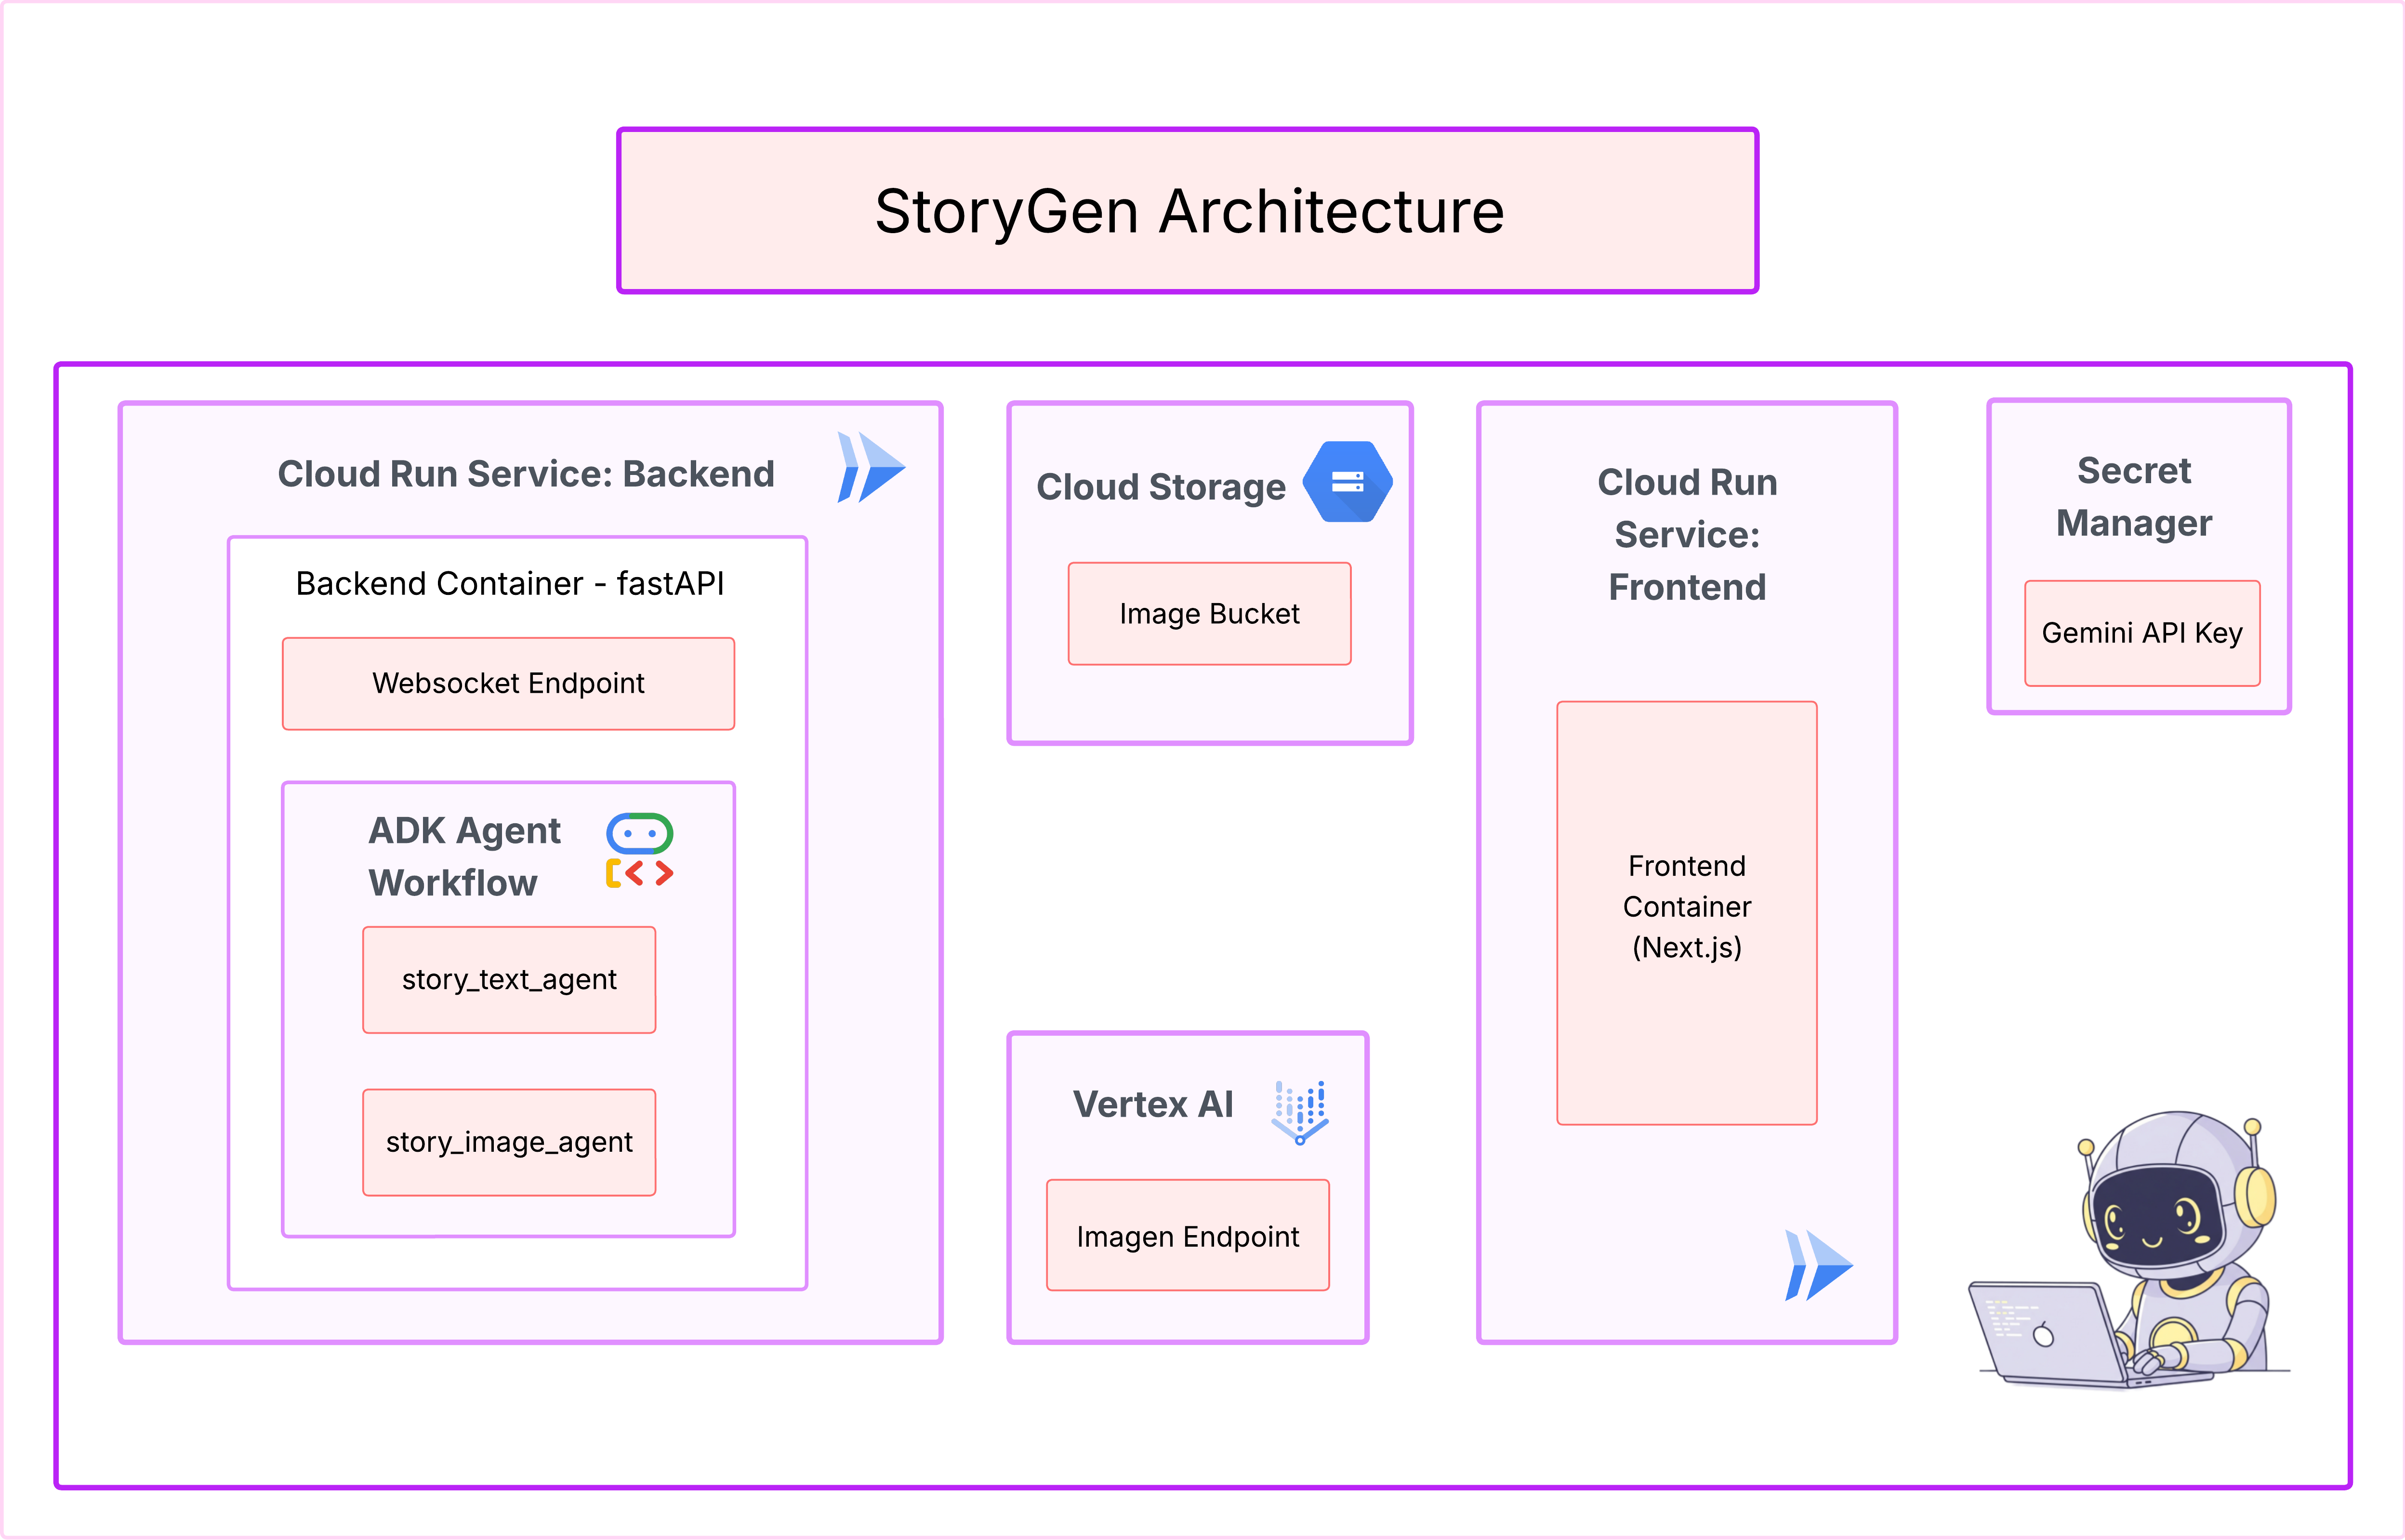
3- التصميم: من الفكرة إلى المخطط باستخدام Cloud Assist
يبدأ كل مشروع رائع برؤية واضحة. سنستخدم مساعدنا المستند إلى الذكاء الاصطناعي، Cloud Assist، لتصميم بنية تطبيقنا.
الإجراءات
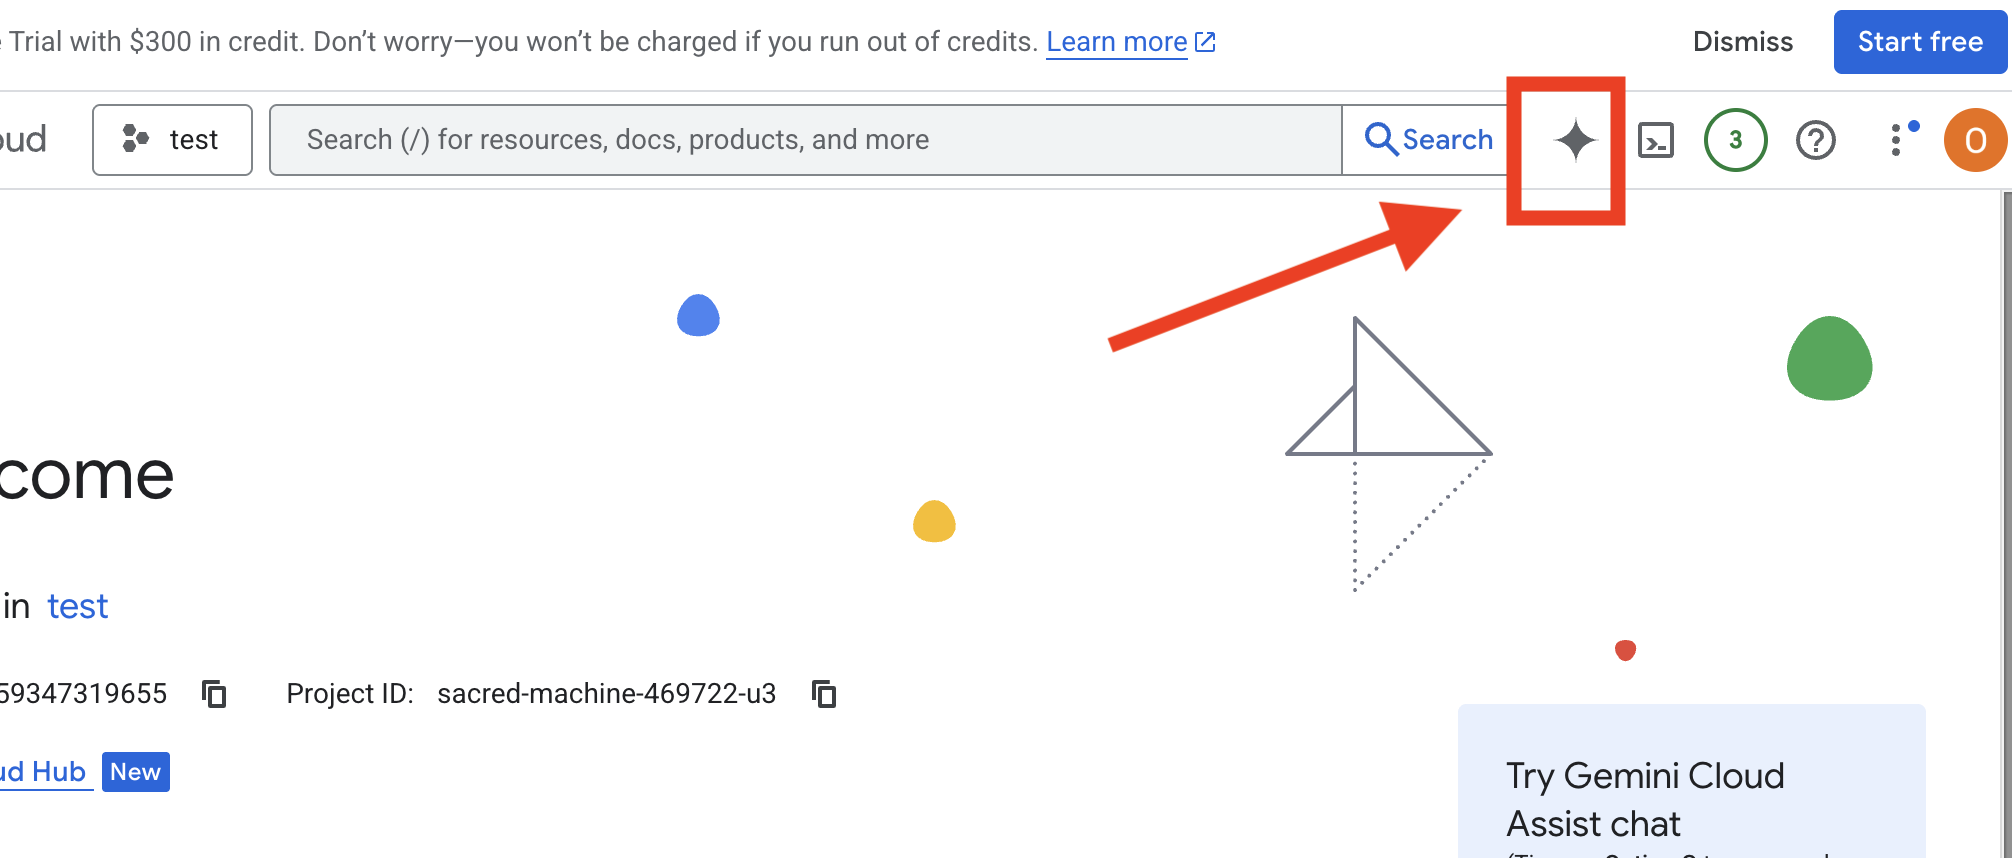
- افتح Google Cloud Console: [https://console.cloud.google.com](Google Cloud Console)
- في أعلى يسار الصفحة، انقر على "فتح نافذة Cloud Assist Chat"
تفعيل ميزة "المساعدة من السحابة الإلكترونية"
- انقر على
Get Gemini Assist، ثم علىEnable Cloud Assist at no cost. - وابدأ المحادثة.
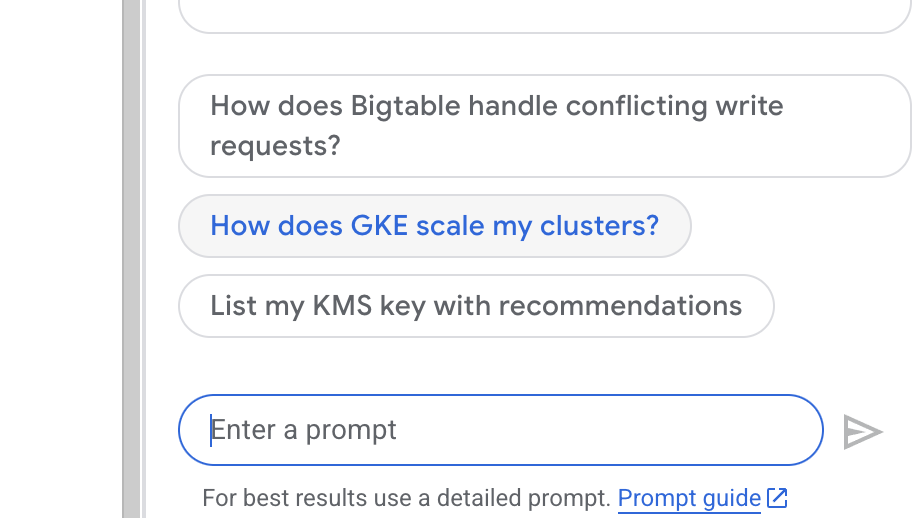 قدِّم الطلب التفصيلي التالي إلى Cloud Assist:
إدخال فكرتك
Generate a Python web application that uses AI to generate children's stories and illustrations. It has Python backend and React frontend host separately on Cloudrun. They communicate through Websocket. It needs to use a generative model for text and another for images. The generated images must be used by Imagen from Vertex AI and stored in a Google Cloud Storage bucket so that frontend can fetch from the bucket to render images. I do not want any load balancer or a database for the story text. We need a solution to store the API key.
الحصول على مخطط تطبيقك
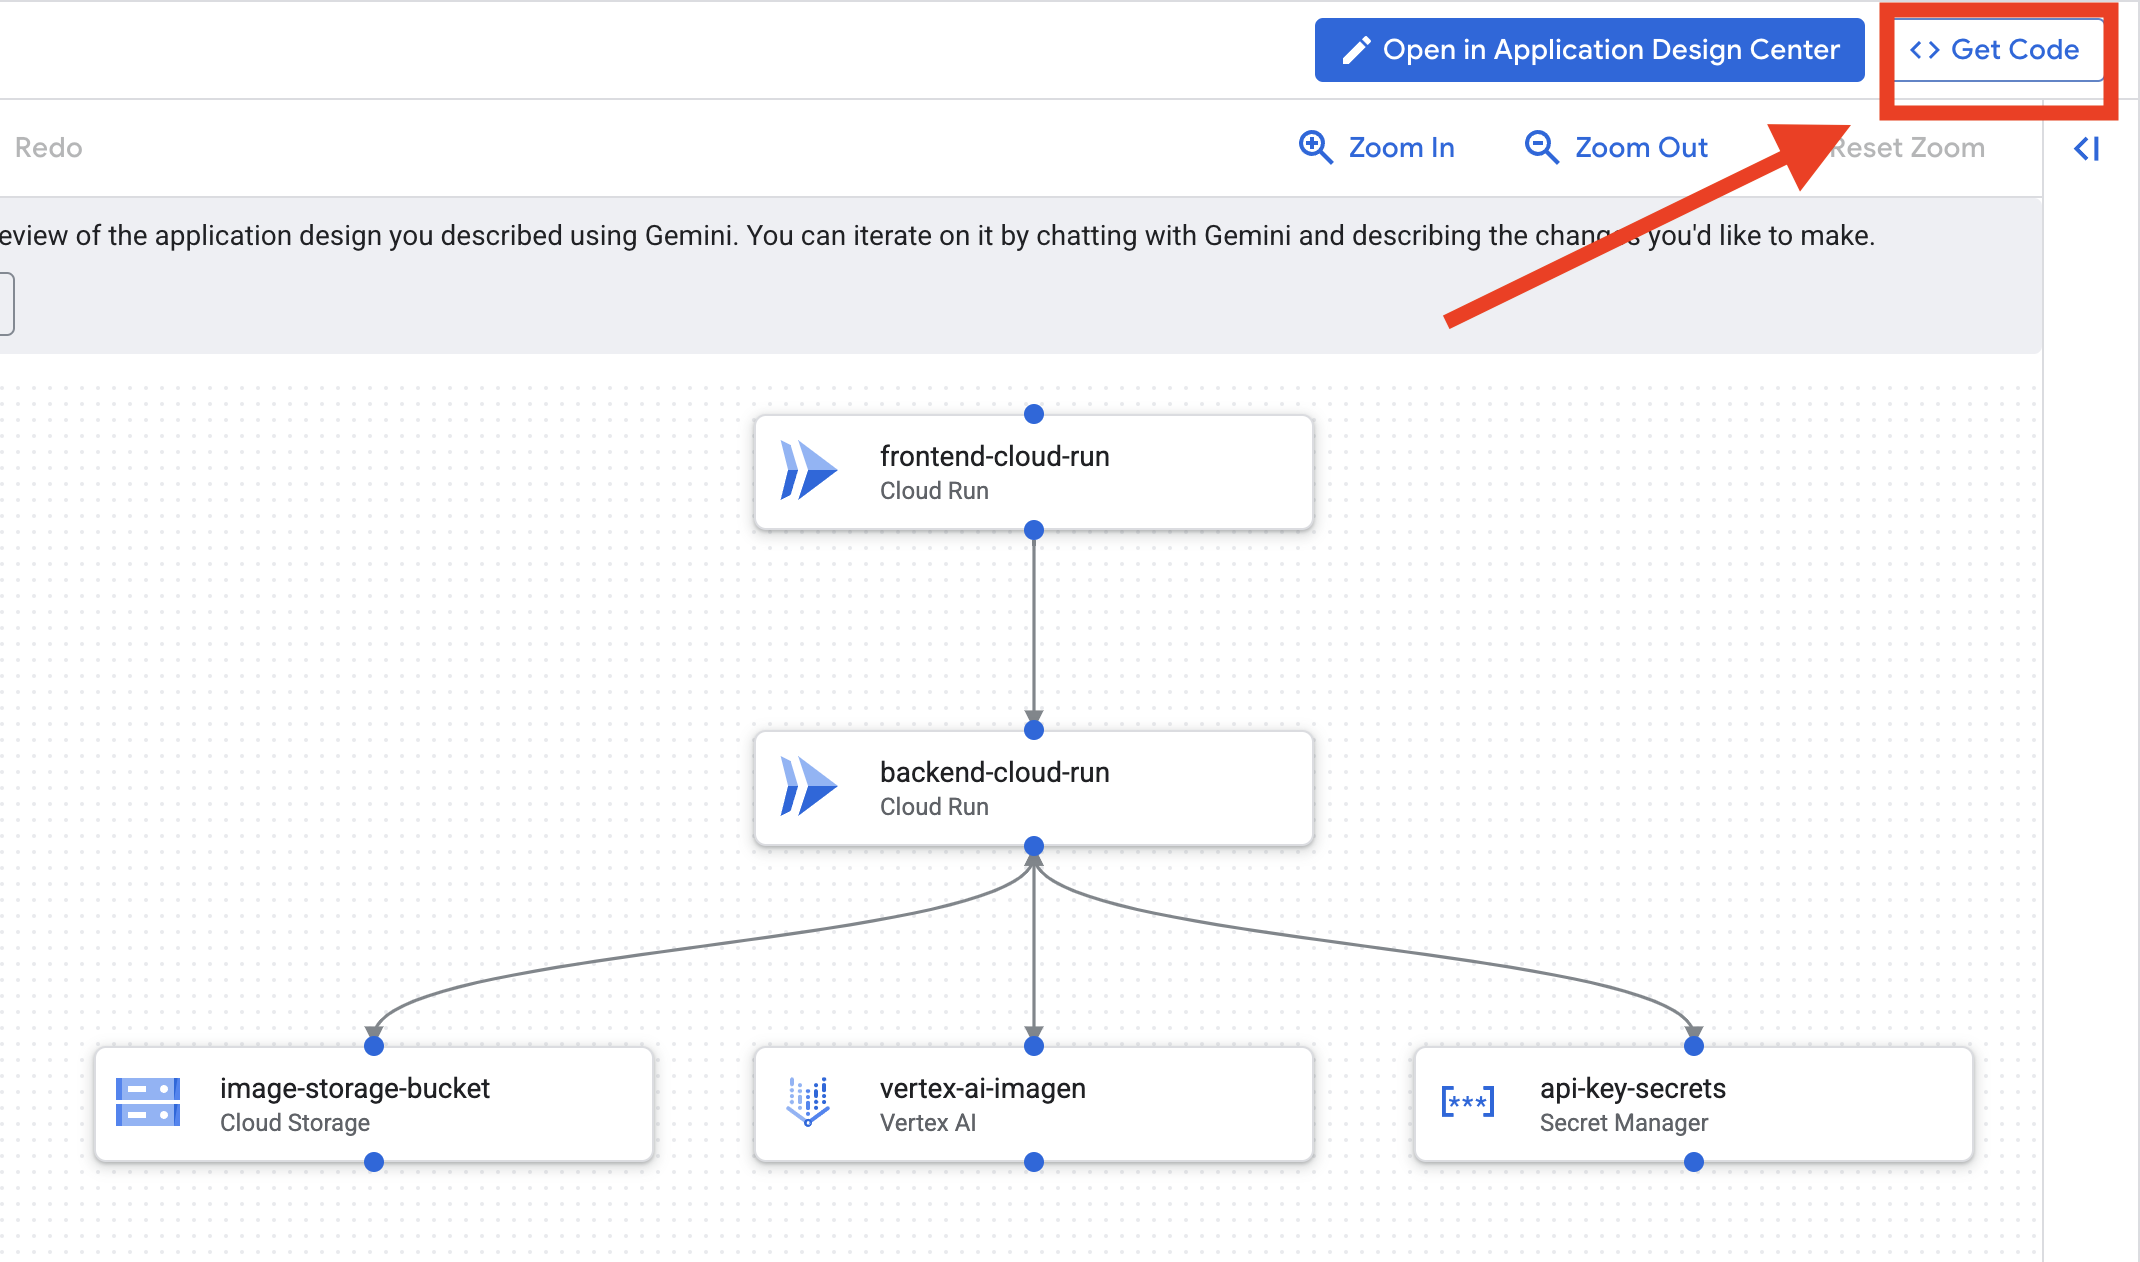
- انقر على "تعديل تصميم التطبيق"، وسيظهر لك الرسم البياني. انقر على اللوحة العلوية اليسرى "<> الحصول على الرمز" لتنزيل رمز Terraform.
- ستنشئ أداة Cloud Assist مخططًا للبنية. هذه هي خطتنا المرئية.
ليس عليك اتّخاذ أي إجراء بشأن هذا الرمز. يمكنك الاطّلاع على مزيد من التوضيح أدناه
التعرّف على رمز Terraform الذي تم إنشاؤه لقد تلقّيت للتو مجموعة كاملة من ملفات Terraform من Cloud Assist. ليس عليك اتّخاذ أي إجراء باستخدام هذا الرمز في الوقت الحالي، ولكن دعنا نوضّح سريعًا ماهيته وسبب فعاليته.
ما هي أداة Terraform؟ Terraform هي أداة "البنية الأساسية كرمز" (IaC). يمكنك اعتبارها مخططًا لبيئة السحابة الإلكترونية مكتوبًا بلغة البرمجة. بدلاً من النقر يدويًا في Google Cloud Console لإنشاء الخدمات ومساحة التخزين والأذونات، يمكنك تحديد جميع هذه الموارد في ملفات الإعداد هذه. بعد ذلك، يقرأ Terraform مخططك وينشئ لك هذه البيئة بالضبط تلقائيًا.
من الخطة المرئية إلى الرمز القابل للتنفيذ مخطط البنية الذي قدّمته Cloud Assist هو خطتك المرئية. رمز Terraform هو نسخة قابلة للقراءة آليًا من تلك الخطة نفسها. وهو الرابط المهم الذي يحوّل مفهوم التصميم إلى واقع آلي قابل للتكرار. من خلال تحديد البنية الأساسية في الرمز، يمكنك:
- أتمتة عملية الإنشاء: يمكنك إنشاء البيئة نفسها بشكل متكرّر وبطريقة موثوقة.
- استخدام نظام التحكّم في الإصدار: تتبُّع التغييرات التي تطرأ على البنية الأساسية في Git، تمامًا مثل الرمز البرمجي للتطبيق.
- تجنُّب الأخطاء: تجنَّب الأخطاء اليدوية التي يمكن أن تحدث عند النقر على واجهة ويب.
في ورشة العمل هذه، لن تحتاج إلى تشغيل رمز Terraform هذا بنفسك. يمكنك اعتبارها المخطط الاحترافي أو "مفتاح الإجابة" للبنية الأساسية التي ستنشئها وتنفّذها في الخطوات القادمة.
4. التطوير: مقدّمة حول Gemini CLI
👉💻 في نافذة Cloud Shell الطرفية، انتقِل إلى الدليل الشخصي.
cd ~/storygen-learning
👉💻 جرِّب Gemini للمرة الأولى.
clear
gemini --model=gemini-2.5-flash
إذا طُلب منك Do you want to connect Cloud Shell editor to Gemini CLI?، اختَر لا.
👉✨ يتضمّن كل تطبيق من تطبيقات Gemini وصفًا. يمكنك الاطّلاع عليها الآن. في طلب مُوجَّه إلى Gemini، اكتب ما يلي:
في Gemini CLI
/help
👉✨ يمتلك Gemini CLI مجموعة من القدرات المضمّنة. لفحصها، اتّبِع الخطوات التالية:
في Gemini CLI
/tools
ستظهر لك قائمة تتضمّن ReadFile وWriteFile وGoogleSearch. هذه هي الأساليب التلقائية التي يمكنك الاستعانة بها بدون الحاجة إلى استخدام مجموعة أدوات خارجية.
👉✨ يمكن أن يحمل Gemini Blade "وعيًا تكتيكيًا" (سياقًا) لتوجيه إجراءاته.
في Gemini CLI
/memory show
وهي فارغة حاليًا.
👉✨ أولاً، أضِف شخصية إلى ذاكرة الوكيل. سيحدّد ذلك مجال خبرته:
في Gemini CLI
/memory add "I am master at python development"
نفِّذ الأمر /memory show مرة أخرى للتأكّد من أنّ السكين قد استوعب هذه المعلومات.
👉✨ لتوضيح كيفية الإشارة إلى الملفات باستخدام الرمز @، لننشئ أولاً ملف "موجز المهمة".
افتح وحدة طرفية جديدة ونفِّذ الأمر التالي لإنشاء ملف المهمة:
!echo "## Mission Objective: Create Imagen ADK Agent for Story Book" > mission.md
👉✨الآن، اطلب من Gemini CLI تحليل الموجز وإعداد تقرير بالنتائج التي توصل إليها:
في Gemini CLI
Explain the contents of the file @mission.md
سلاحك الأساسي على دراية الآن بهدفه.
👉💻 اضغط على Ctrl+C مرّتين للخروج من Gemini CLI
قيد التعلّم:
كيفية حصول Gemini CLI على قدراته الفائقة: gemini.md قبل المتابعة، من المهم فهم كيفية تخصيص Gemini CLI لمشروع معيّن. على الرغم من إمكانية استخدامه كأداة دردشة عامة الأغراض، تكمن قوته الحقيقية في ملف إعداد خاص: gemini.md.
عند تشغيل الأمر gemini، يبحث تلقائيًا عن ملف gemini.md في الدليل الحالي. يعمل هذا الملف كدليل تعليمات خاص بالمشروع للذكاء الاصطناعي. يمكن أن تحدّد ثلاثة أمور رئيسية:
- الشخصية: يمكنك تحديد الشخصية التي يجب أن يتّبعها الذكاء الاصطناعي. على سبيل المثال، "أنت مطوّر خبير في لغة Python ومتخصّص في Google Cloud". يؤدي ذلك إلى تركيز ردوده وأسلوبه.
- الأدوات: يمكنك منحها إذن الوصول إلى ملفات معيّنة (@file.py) أو حتى عمليات بحث على Google (@google). يوفّر ذلك للذكاء الاصطناعي السياق اللازم للإجابة عن الأسئلة المتعلقة بالرمز البرمجي لمشروعك.
- الذاكرة: يمكنك تقديم حقائق أو قواعد يجب أن يتذكرها الذكاء الاصطناعي دائمًا لهذا المشروع، ما يساعد في الحفاظ على الاتساق.
باستخدام ملف gemini.md، يمكنك تحويل نموذج Gemini العام إلى مساعد متخصص تم إطلاعه مسبقًا على أهداف مشروعك ويمكنه الوصول إلى المعلومات المناسبة.
5- التطوير: إنشاء حزمة ADK باستخدام Gemini CLI
إعدادات البيئة
انتقِل إلى Cloud Shell، وانقر على الزر "فتح نافذة Terminal".
- انسخ نموذج البيئة:
cd ~/storygen-learning
cp ~/storygen-learning/env.template ~/storygen-learning/.env
عرض الملف المخفي في المحرّر إذا لم تعثر على ملف .env
- انقر على عرض في شريط القائمة العلوي.
- انقر على تبديل الملفات المخفية.
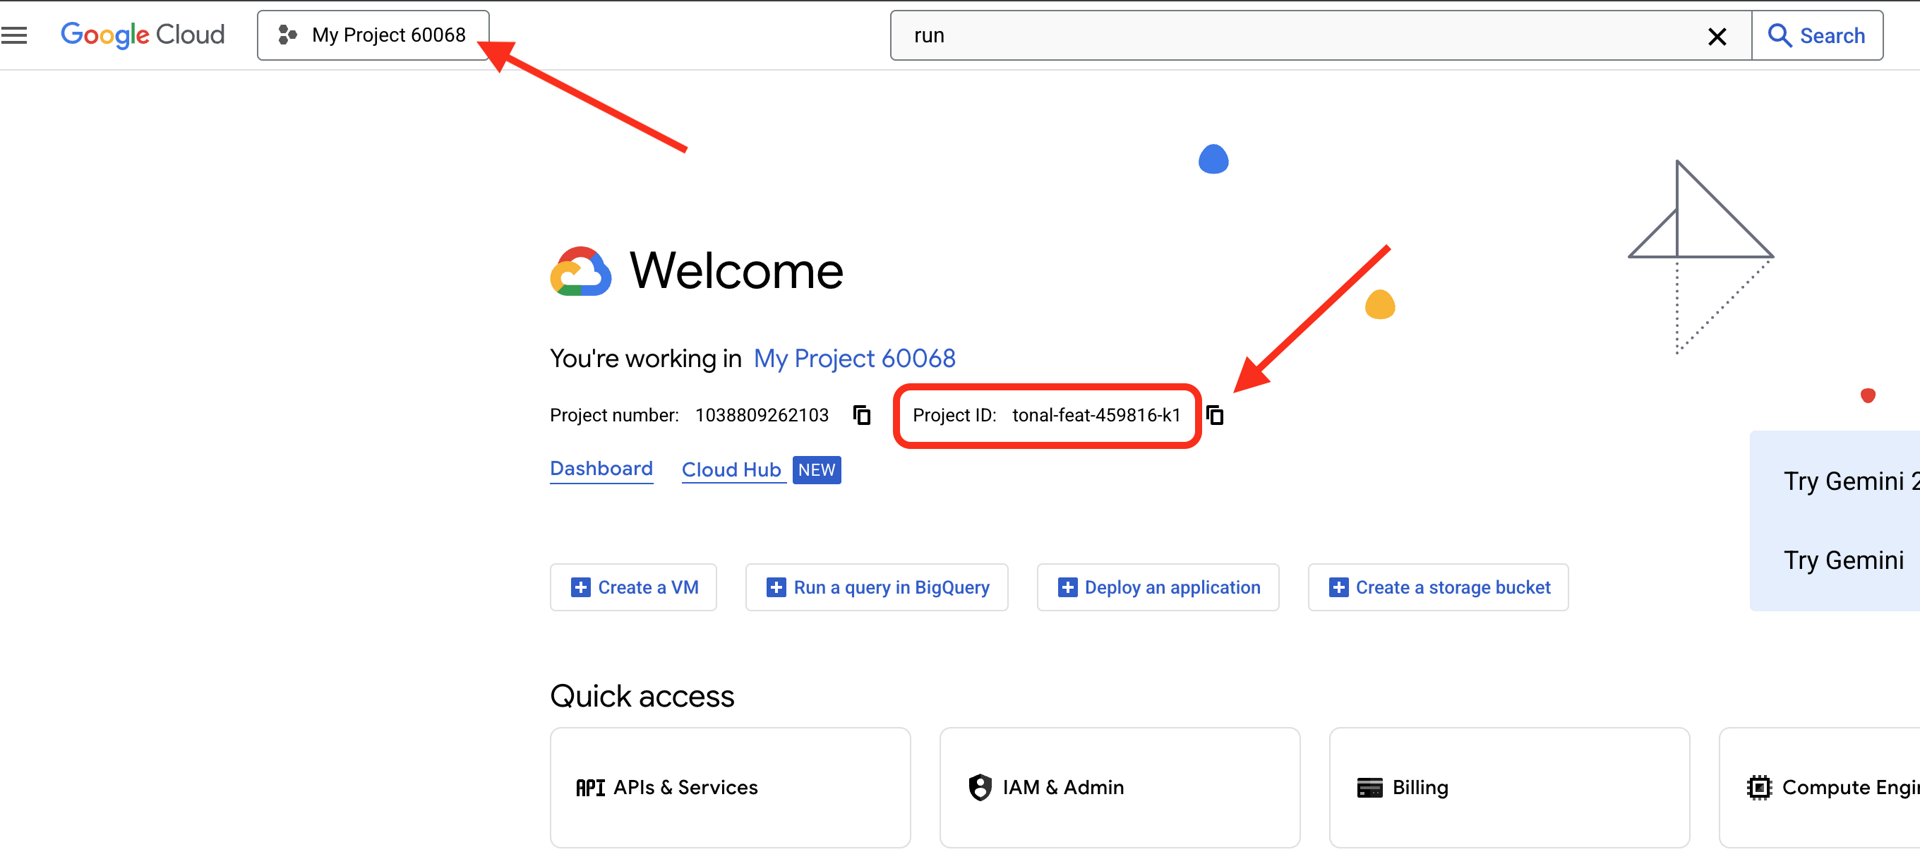
👉العثور على رقم تعريف مشروعك على Google Cloud:
- افتح Google Cloud Console: link
- اختَر المشروع الذي تريد استخدامه في ورشة العمل هذه من القائمة المنسدلة للمشروع في أعلى الصفحة.
- يظهر رقم تعريف مشروعك في بطاقة "معلومات المشروع" على "لوحة البيانات".
👉العثور على اسم المستخدم على GitHub:
- انتقِل إلى حسابك على GitHub وابحث عن اسم المستخدم الخاص بك على GitHub
تعديل ملف .env 2. استبدِل القيم التالية في .env:
GOOGLE_API_KEY=[REPLACE YOUR API KEY HERE]
GOOGLE_CLOUD_PROJECT_ID=[REPLACE YOUR PROJECT ID]
GITHUB_USERNAME=[REPLACE YOUR USERNAME]
GENMEDIA_BUCKET=[REPLACE YOUR PROJECT ID]-bucket
على سبيل المثال، إذا كان معرّف مشروعك هو: testproject، عليك وضع GOOGLE_CLOUD_PROJECT_ID=testproject وGENMEDIA_BUCKET=testproject-bucket
نصوص الإعداد
الانتقال إلى 00_Starting_Here فتح وحدة طرفية جديدة (خارج Gemini CLI)
cd ~/storygen-learning/00_Starting_Here
إكمال عملية الإعداد:
./setup-complete.sh
من المفترض أن تظهر لك نتائج الإعداد في نافذة الوحدة الطرفية
إنشاء الوكيل الأول
انتقِل إلى 01a_First_Agent_Ready لنستخدم Gemini CLI لإنشاء وكيل ADK:**
cd ~/storygen-learning/01a_First_Agent_Ready
فتح Gemini CLI
gemini
داخل نافذة Gamini CLI، جرِّب الطلب التالي:
I need you to help me create a Google ADK (Agent Development Kit) agent for story generation. I'm working on a children's storybook app that generates creative stories with visual scenes.

Please create a complete `agent.py` file that implements an LlmAgent using Google's ADK framework. The agent should:

**Requirements:**
1. Use the `google.adk.agents.LlmAgent` class
2. Use the "gemini-2.5-flash" model (supports streaming)
3. Be named "story_agent"
4. Generate structured stories with exactly 4 scenes each
5. Output valid JSON with story text, main characters, and scene data
6. No tools needed (images are handled separately)

**Agent Specifications:**
- **Model:** gemini-2.5-flash
- **Name:** story_agent
- **Description:** "Generates creative short stories and accompanying visual keyframes based on user-provided keywords and themes."
**Story Structure Required:**
- Exactly 4 scenes: Setup → Inciting Incident → Climax → Resolution
- 100-200 words total
- Simple, charming language for all audiences
- Natural keyword integration
**JSON Output Format:**

{
  "story": "Complete story text...",
  "main_characters": [
    {
      "name": "Character Name",
      "description": "VERY detailed visual description with specific colors, features, size, etc."
    }
  ],
  "scenes": [
    {
      "index": 1,
      "title": "The Setup",
      "description": "Scene action and setting WITHOUT character descriptions",
      "text": "Story text for this scene"
    }
    // ... 3 more scenes
  ]
}


**Key Instructions for the Agent:**
- Extract 1-2 main characters maximum
- Character descriptions should be extremely detailed and visual
- Scene descriptions focus on ACTION and SETTING only
- Do NOT repeat character appearance in scene descriptions
- Always respond with valid JSON

Please include a complete example in the instructions showing the exact format using keywords like "tiny robot", "lost kitten", "rainy city".

The file should start with necessary imports, define an empty tools list, include a print statement for initialization, and then create the LlmAgent with all the detailed instructions.

Can you create this agent in backend/story_agent/agent.py
بعد الانتهاء، أوقِف نافذة أوامر Gemini CLI باستخدام Control+C
—————————————— اختياري، يمكنك الانتقال إلى قسم الحل——————————————–
تأكيد التغيير في ADK Web
cd ~/storygen-learning/01a_First_Agent_Ready/backend

source ../../.venv/bin/activate

adk web --port 8080
للمتابعة، ستحتاج إلى موجه أوامر.
Spin Up The Website
cd ~/storygen-learning/01a_First_Agent_Ready

./start.sh
إذا لم ينجح التغيير، من المفترض أن تظهر لك أخطاء في واجهة مستخدم ADK على الويب والموقع الإلكتروني.
——————————————– الحلّ يبدأ هنا ——————————————–
Solution
أنهِ العملية السابقة باستخدام Control+C أو يمكنك فتح نافذة طرفية أخرى:
cd ~/storygen-learning/01b_First_Agent_Done
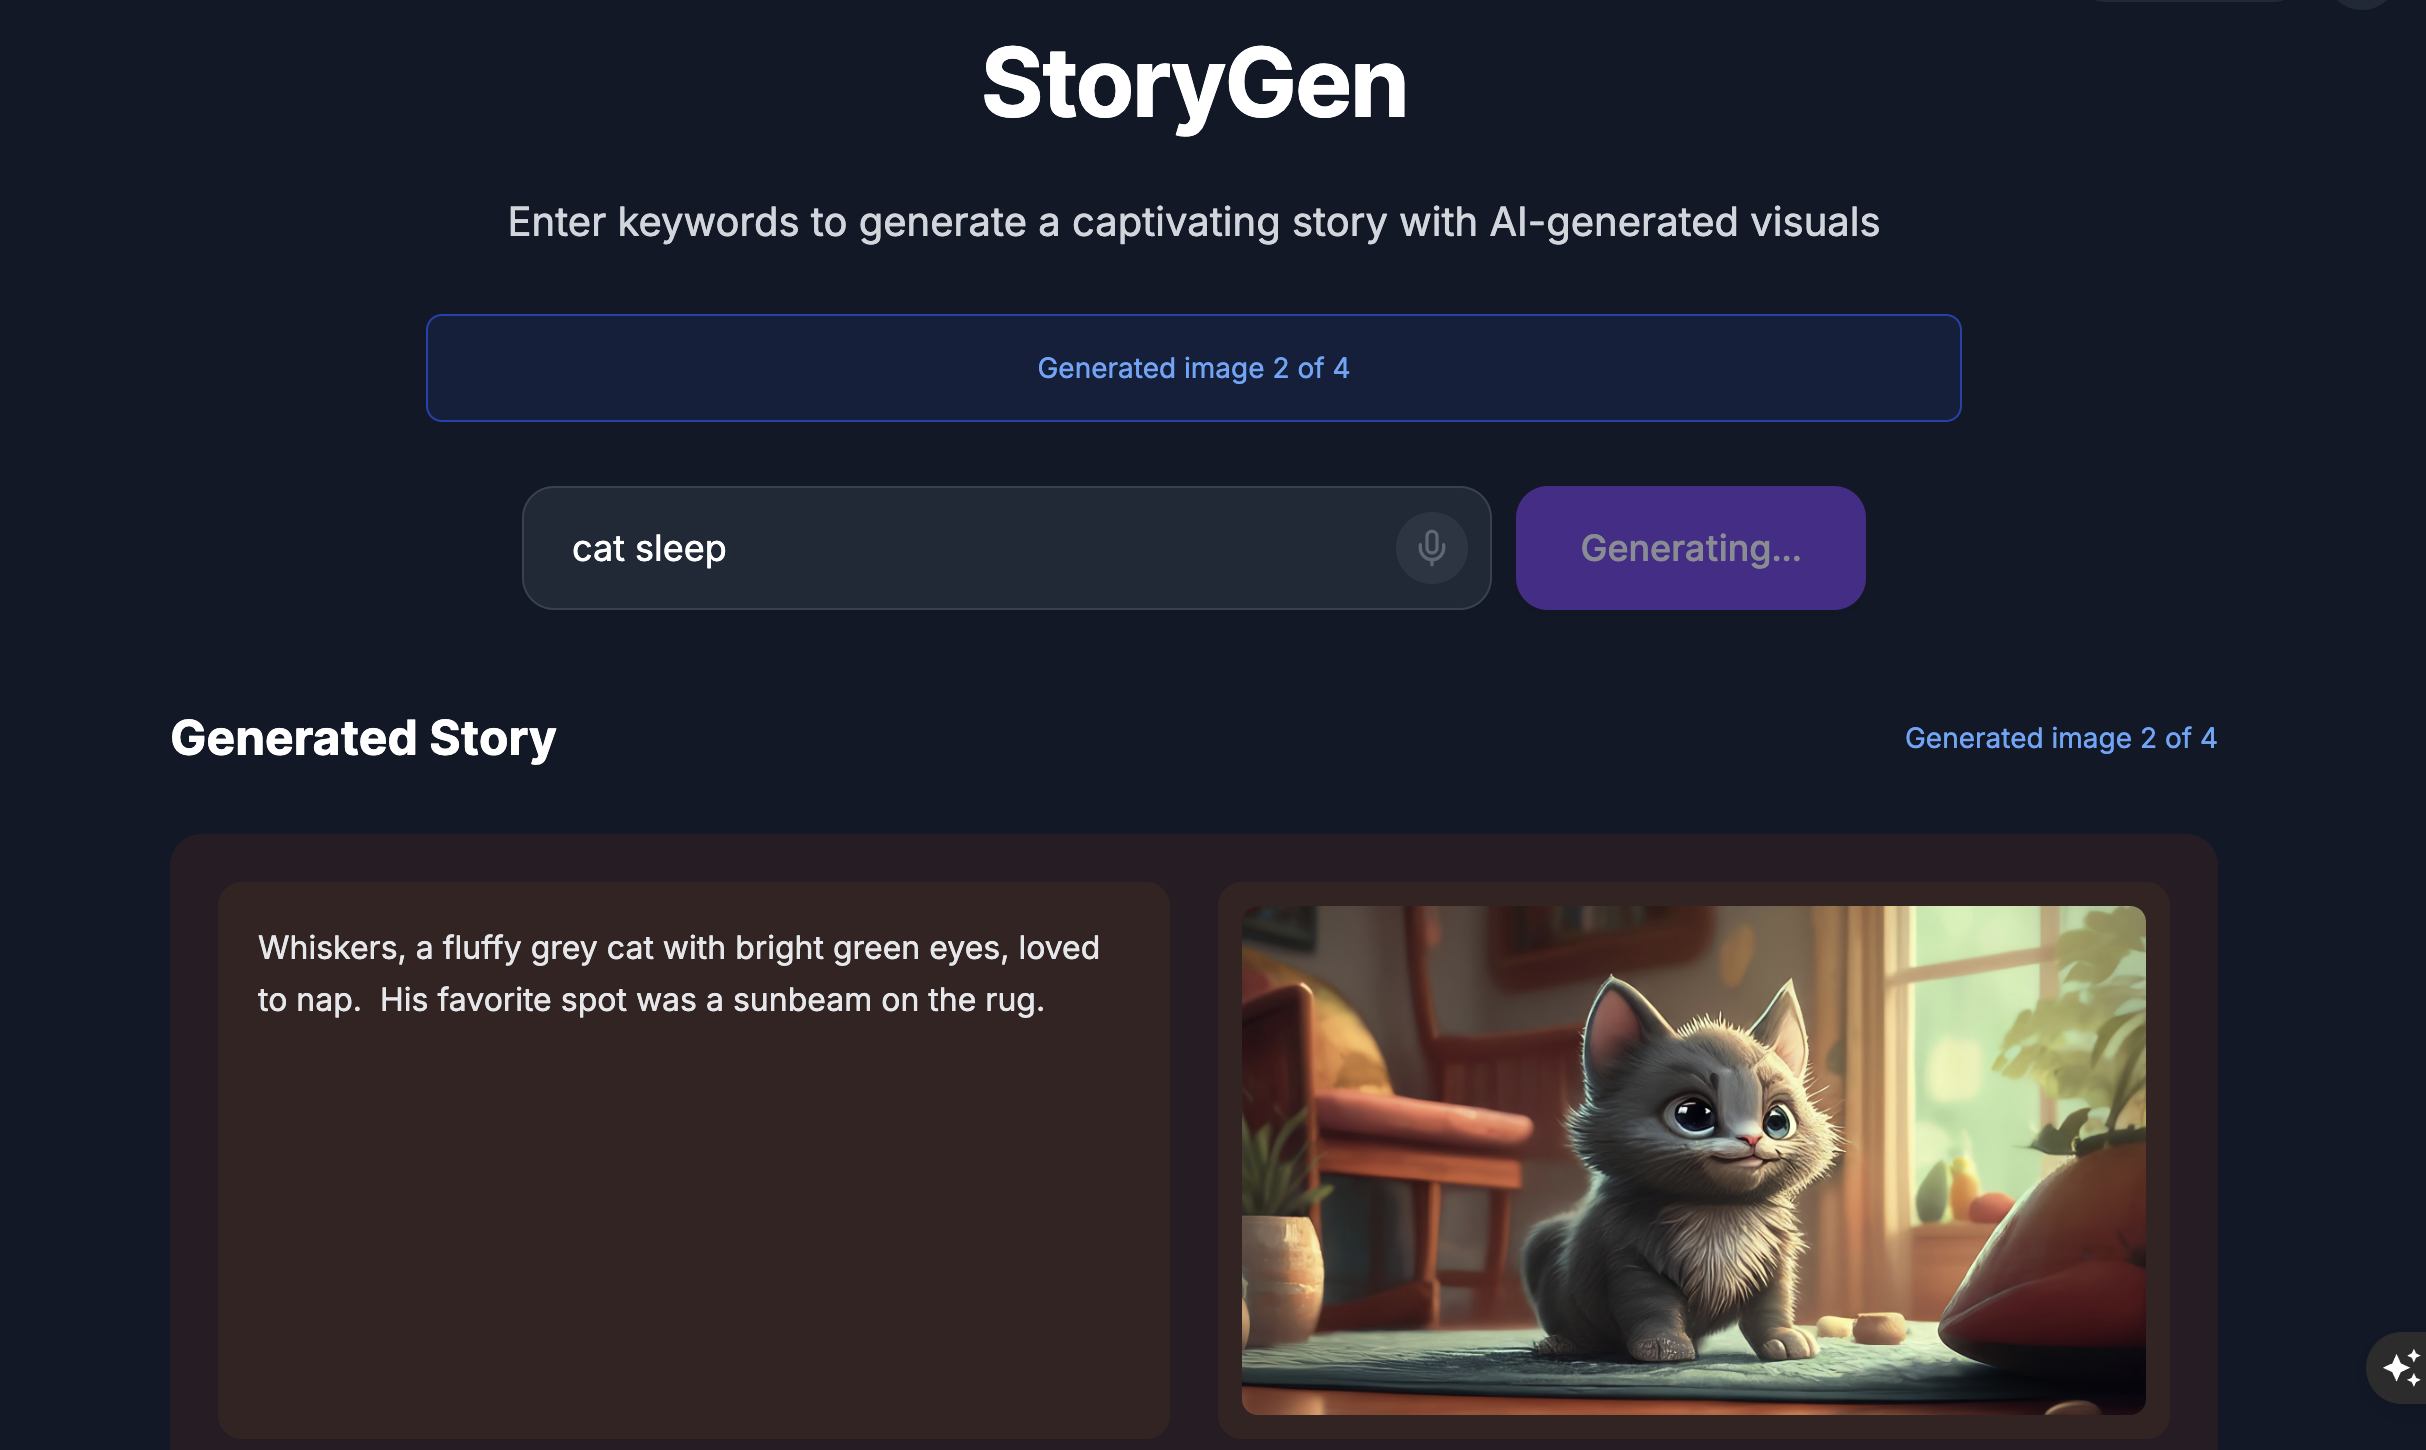
إنشاء الموقع الإلكتروني:
./start.sh
سيظهر لك الموقع الإلكتروني:
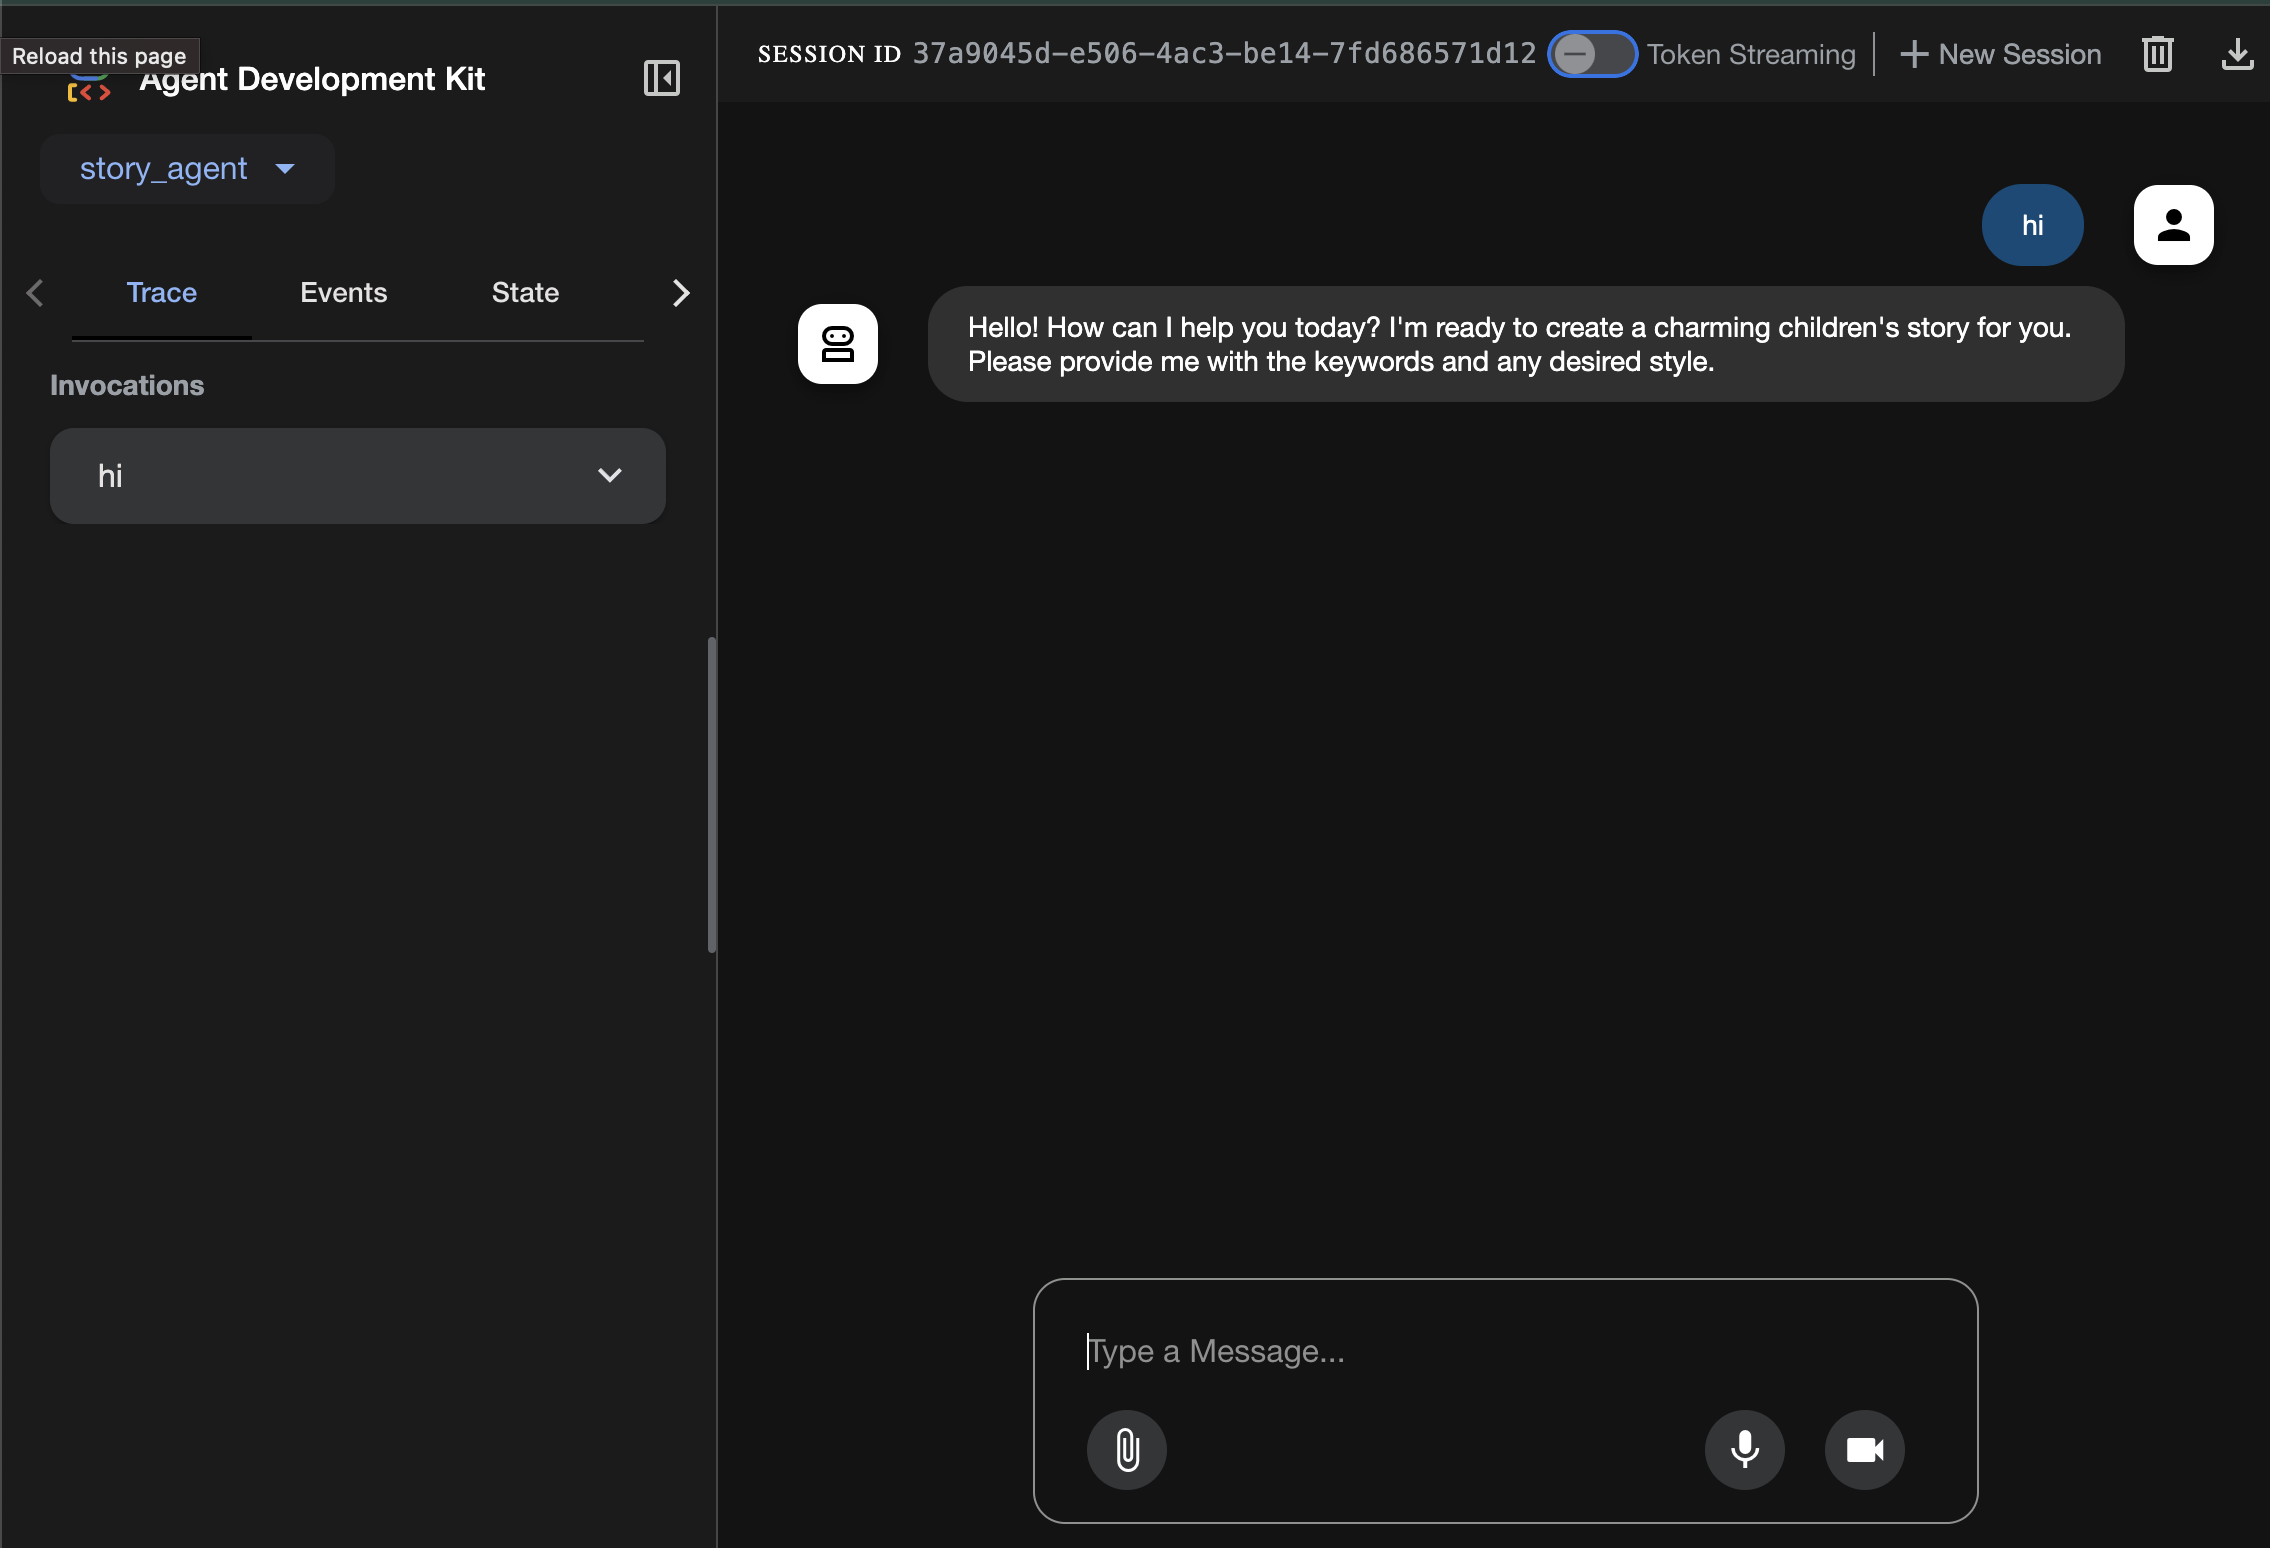
جرِّب واجهة مستخدم ADK: افتح نافذة وحدة طرفية أخرى:
cd ~/storygen-learning/01b_First_Agent_Done/backend
source ../../.venv/bin/activate

adk web --port 8080
ستظهر لك واجهة مستخدم "حزمة تطوير التطبيقات" حيث يمكنك طرح أسئلة على الوكيل
قبل الانتقال إلى القسم التالي، اضغط على Ctrl+C لإنهاء العملية.
6. التطوير: إنشاء حزمة ADK باستخدام Gemini CLI (طريقة هندسة السياق)
عملية الإعداد الأوّلية
تأكَّد من حذف ملف الوكيل الذي أنشأناه سابقًا، في 01a_First_Agent_Ready/backend/story_agent/agent.py:
انتقِل إلى 01a_First_Agent_Ready لنستخدم Gemini CLI لإنشاء وكيل ADK:**
cd ~/storygen-learning/01a_First_Agent_Ready/backend
فتح Gemini CLI
gemini
داخل نافذة Gamini CLI، جرِّب الطلب التالي:
Summarize the design doc @design.md for me, do not attempt to create file just yet.
👉💻 يمكنك الخروج من Gemini مؤقتًا من خلال الضغط على Ctrl+C مرّتين.
👉💻 في الوحدة الطرفية، نفِّذ الأمر التالي لكتابة ملف الإرشادات.
cat << 'EOF' > GEMINI.md
  ### **Coding Guidelines**
  **1. Python Best Practices:**

  *   **Type Hinting:** All function and method signatures should include type hints for arguments and return values.
  *   **Docstrings:** Every module, class, and function should have a docstring explaining its purpose, arguments, and return value, following a consistent format like reStructuredText or
  Google Style.
  *   **Linter & Formatter:** Use a linter like `ruff` or `pylint` and a code formatter like `black` to enforce a consistent style and catch potential errors.
  *   **Imports:** Organize imports into three groups: standard library, third-party libraries, and local application imports. Sort them alphabetically within each group.
  *   **Naming Conventions:**
      *   `snake_case` for variables, functions, and methods.
      *   `PascalCase` for classes.
      *   `UPPER_SNAKE_CASE` for constants.
  *   **Dependency Management:** All Python dependencies must be listed in a `requirements.txt` file.

  **2. Web APIs (FastAPI):**

  *   **Data Validation:** Use `pydantic` models for request and response data validation.
  *   **Dependency Injection:** Utilize FastAPI's dependency injection system for managing resources like database connections.
  *   **Error Handling:** Implement centralized error handling using middleware or exception handlers.
  *   **Asynchronous Code:** Use `async` and `await` for I/O-bound operations to improve performance.
EOF
cat GEMINI.md
بعد أن أصبحت القوانين مكتوبة، لنستدعِ شريكنا من الذكاء الاصطناعي مرة أخرى ونشاهد سحر الأداة.
👉💻 أعِد تشغيل Gemini CLI من دليل shadowblade:
cd ~/storygen-learning/01a_First_Agent_Ready/backend
clear
gemini
👉✨ الآن، اطلب من Gemini أن يعرض لك ما يفكر فيه. تمت قراءة الرونية.
/memory show
👉✨ هذا هو الأمر الفردي الفعّال الذي سينشئ الوكيل. إصدارها الآن:
You are an expert Python developer specializing in the Google Agent Development Kit (ADK). Your task is to write the complete, production-quality code for `agent.py` by following the technical specifications outlined in the provided design document verbatim.

Analyze the design document at `@design.md` and generate the corresponding Python code for `agent.py`.

I need you to generate a Python script based on the provided design document and reference examples. Follow these requirements:

Read the design document carefully - it contains the complete technical specification for the code you need to write
Follow the structure and patterns shown in the reference context files
Adhere to all Python best practices specified in the coding standards document
Implement every requirement mentioned in the design document exactly as specified
Use the exact variable names, function names, and string values mentioned in the specifications

The design document describes the complete architecture, dependencies, configuration, and logic flow. Your generated code must match these specifications precisely while following professional Python coding standards.
Generate clean, production-ready Python code that can be used immediately without modifications.
بعد الانتهاء، أوقِف نافذة أوامر Gemini CLI باستخدام Control+C
—————————————— اختياري، يمكنك الانتقال إلى قسم الحل——————————————–
تأكيد التغيير في ADK Web
cd ~/storygen-learning/01a_First_Agent_Ready/backend

source ../../.venv/bin/activate

adk web --port 8080
للمتابعة، ستحتاج إلى موجه أوامر.
Spin Up The Website
cd ~/storygen-learning/01a_First_Agent_Ready

./start.sh
إذا لم ينجح التغيير، من المفترض أن تظهر لك أخطاء في واجهة مستخدم ADK على الويب والموقع الإلكتروني.
——————————————– الحلّ يبدأ هنا ——————————————–
Solution
أنهِ العملية السابقة باستخدام Control+C أو يمكنك فتح نافذة طرفية أخرى:
cd ~/storygen-learning/01b_First_Agent_Done
إنشاء الموقع الإلكتروني:
./start.sh
سيظهر لك الموقع الإلكتروني:
جرِّب واجهة مستخدم ADK: افتح نافذة وحدة طرفية أخرى:
cd ~/storygen-learning/01b_First_Agent_Done/backend
source ../../.venv/bin/activate

adk web --port 8080
ستظهر لك واجهة مستخدم "حزمة تطوير التطبيقات" حيث يمكنك طرح أسئلة على الوكيل
قبل الانتقال إلى القسم التالي، اضغط على Ctrl+C لإنهاء العملية.
7. التطوير: إنشاء وكيل مخصّص باستخدام Imagen
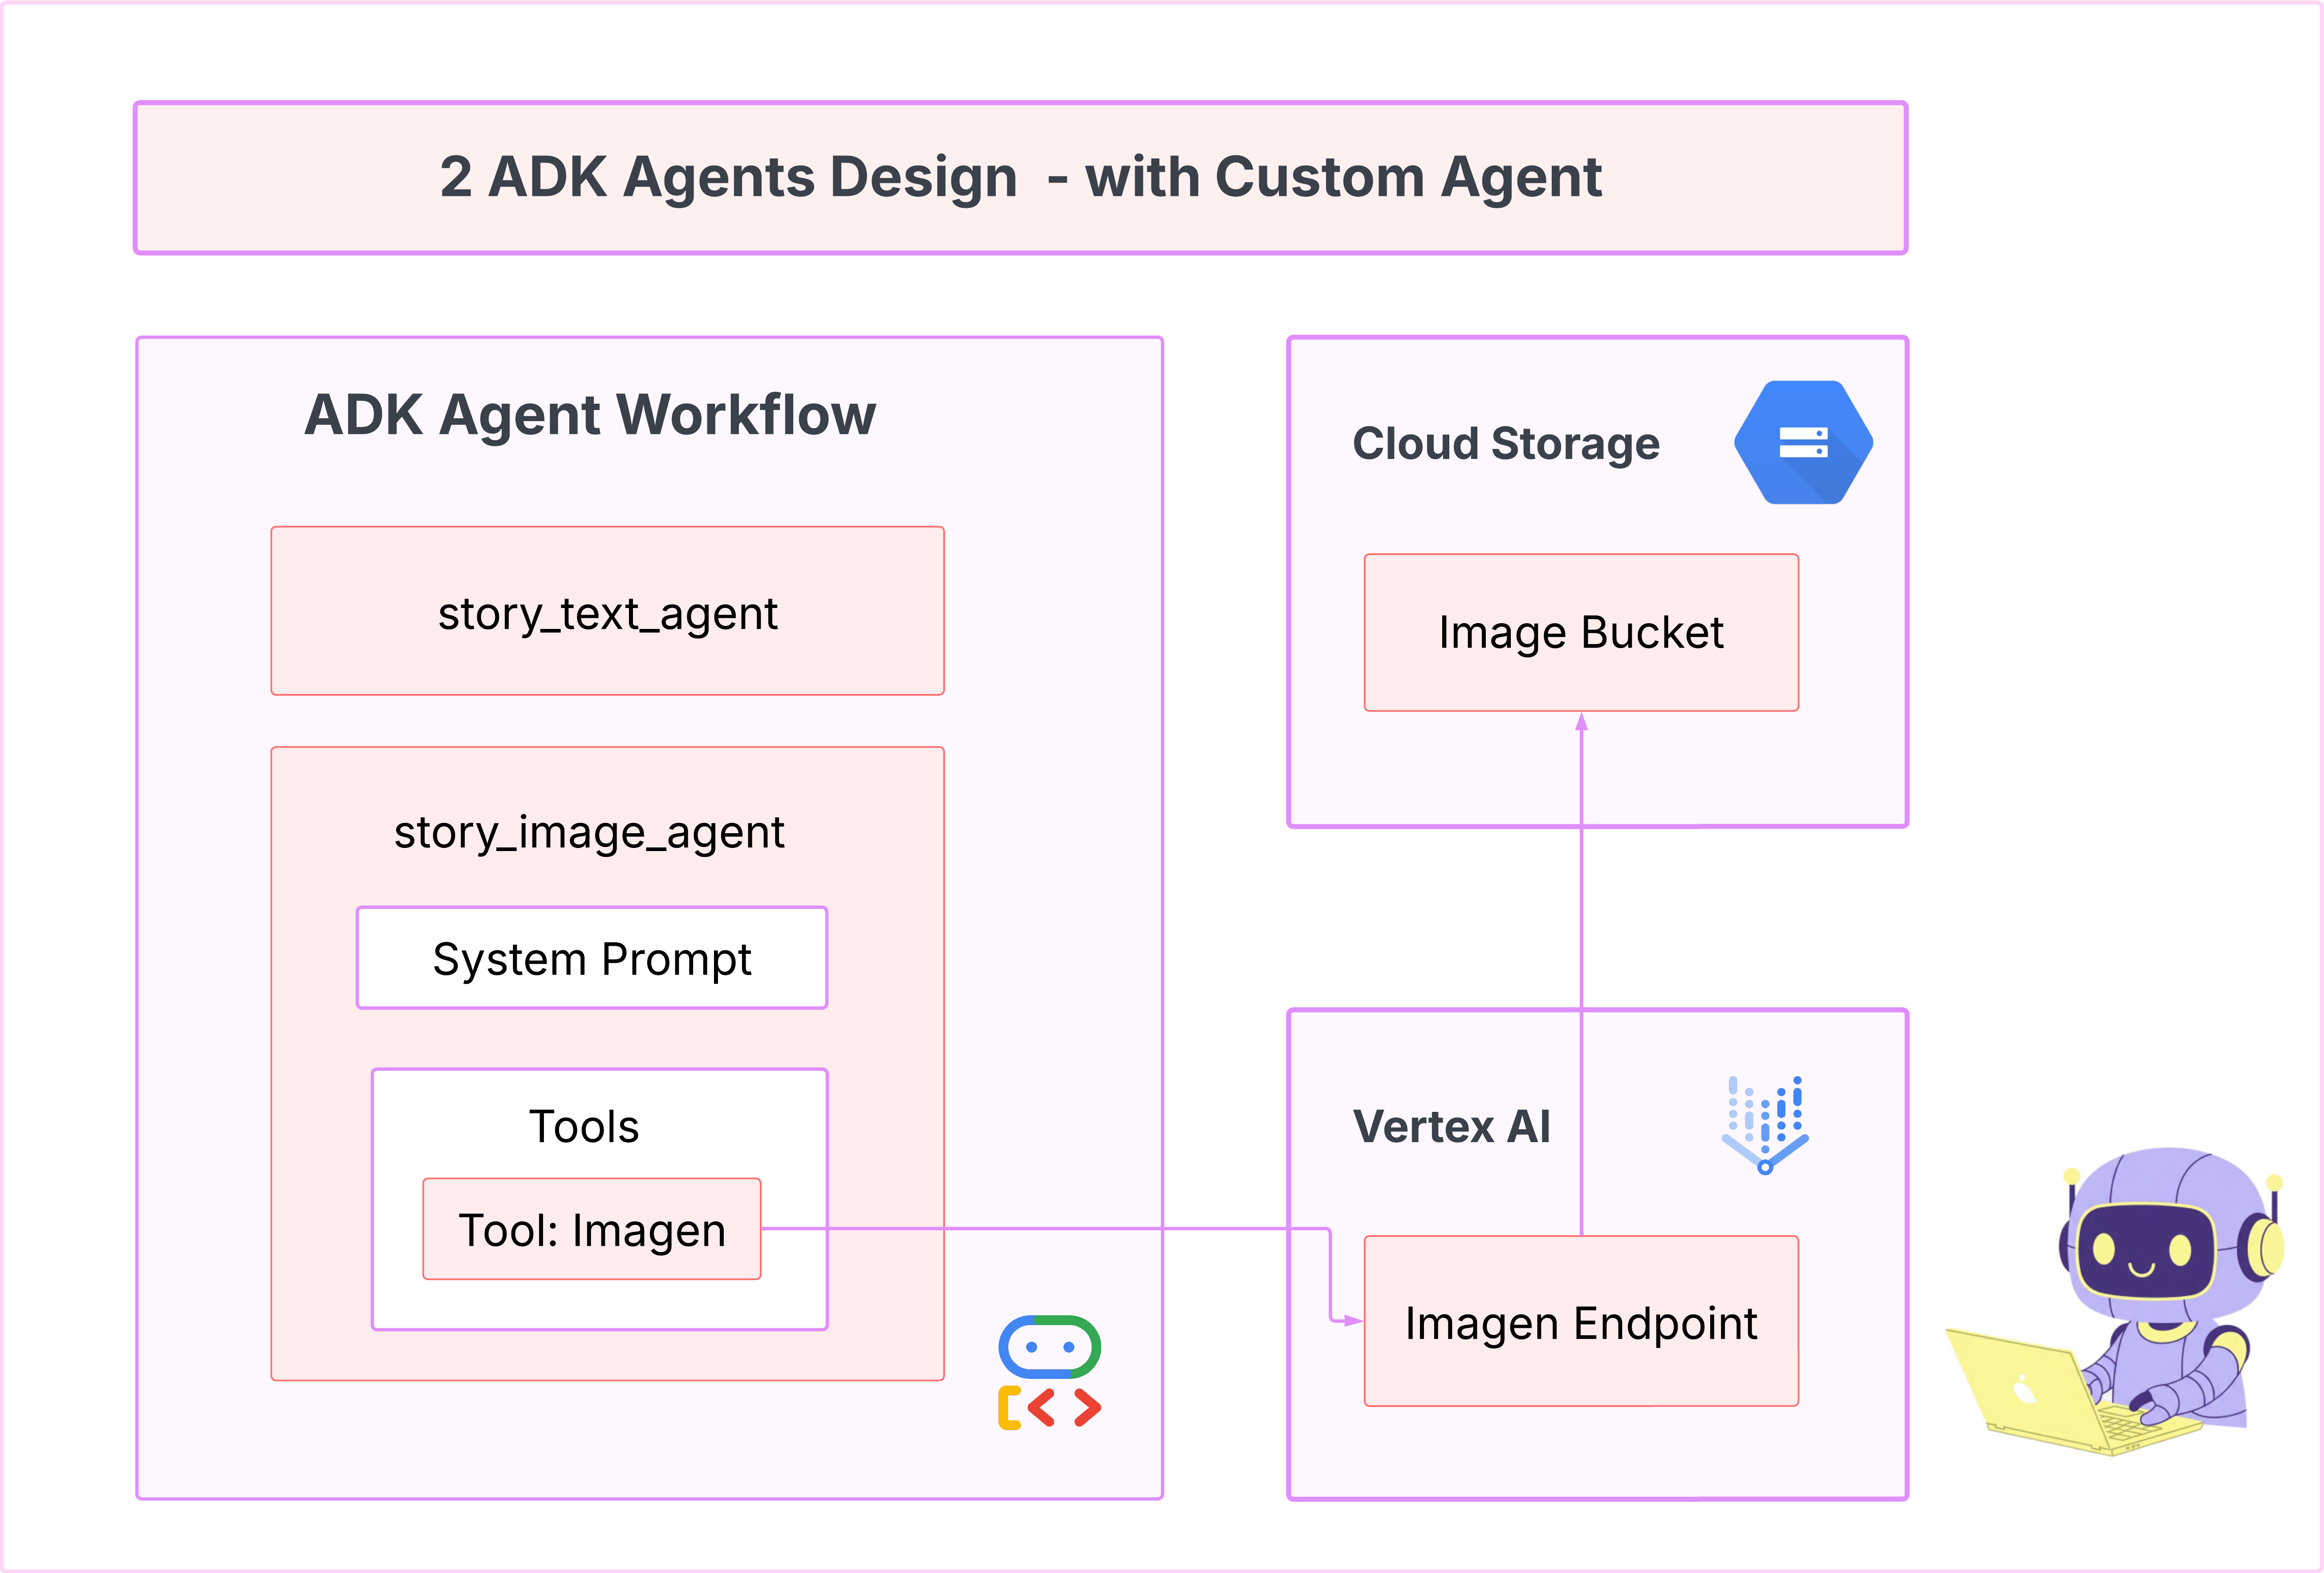
إنشاء أداة Imagen (الوكيل الثاني)
cd ~/storygen-learning/02a_Image_Agent_Ready
استخدام Gemini CLI لإنشاء وكيل إنشاء الصور:
gemini generate "I need you to help me create a custom Google ADK (Agent Development Kit) agent for image generation. This is different from the story agent - this one handles image generation directly using the BaseAgent pattern for full control over tool execution.

Please create a complete `agent.py` file that implements a custom image generation agent. The agent should:

**Requirements:**
1. Use the `google.adk.agents.BaseAgent` class (NOT LlmAgent)
2. Be named "custom_image_agent"
3. Directly execute the ImagenTool without LLM intermediation
4. Handle JSON input with scene descriptions and character descriptions
5. Store results in session state for retrieval by main.py
6. Use async generators and yield Events

**Key Specifications:**
- **Class Name:** CustomImageAgent (inherits from BaseAgent)
- **Agent Name:** "custom_image_agent"
- **Tool:** Uses ImagenTool for direct image generation
- **Purpose:** Bypass LLM agent limitations and directly call ImagenTool

**Input Format:**
The agent should handle JSON input like:
{
  "scene_description": "Scene action and setting",
  "character_descriptions": {
    "CharacterName": "detailed visual description"
  }
}


**Core Method:** `async def _run_async_impl(self, ctx: InvocationContext) -> AsyncGenerator[Event, None]:`
   - Extract user message from `ctx.user_content.parts`
   - Parse JSON input or fallback to plain text
   - Extract scene_description and character_descriptions
   - Build image prompt with style prefix: "Children's book cartoon illustration with bright vibrant colors, simple shapes, friendly characters."
   - Include character descriptions for consistency
   - Call `await self.imagen_tool.run()` directly
   - Store results in `ctx.session.state["image_result"]`
   - Yield Event with results


 **Session State:**
   - Store JSON results in `ctx.session.state["image_result"]`
   - Include success/error status
   - Store actual image URLs or error messages

Expected Output Structure:
- Successful results stored as JSON with image URLs
- Error results stored as JSON with error messages
- Results accessible via session state in main.py

Can you create this agent in backend/story_image_agent/agent.py

"
—————————————— اختياري، يمكنك الانتقال إلى قسم الحل——————————————–
تأكيد التغيير في ADK Web
cd ~/storygen-learning/02a_Image_Agent_Ready/backend

source ../../.venv/bin/activate

adk web --port 8080
Spin Up The Website
cd ~/storygen-learning/02a_Second_Agent_Ready

./start.sh
إذا لم ينجح التغيير، من المفترض أن تظهر لك أخطاء في واجهة مستخدم ADK على الويب والموقع الإلكتروني.
—————————————— الحلّ يبدأ من هنا ——————————————–
Solution
أنهِ العملية السابقة باستخدام Control+C أو يمكنك فتح نافذة طرفية أخرى:
# Open new terminal
cd ~/storygen-learning/02b_Image_Agent_Done
إنشاء الموقع الإلكتروني:
./start.sh
سيظهر لك الموقع الإلكتروني:
جرِّب واجهة مستخدم ADK: افتح نافذة وحدة طرفية أخرى:
# Open new terminal
cd ~/storygen-learning/02b_Image_Agent_Done/backend

source ../../.venv/bin/activate

adk web --port 8080
ستظهر لك واجهة مستخدم "حزمة تطوير التطبيقات" حيث يمكنك طرح أسئلة على الوكيل:
قبل الانتقال إلى القسم التالي، اضغط على Ctrl+C لإنهاء العملية.
التعلم
كان الوكيل الأول رائعًا في إنشاء النصوص، ولكننا نحتاج الآن إلى إنشاء صور. لهذه المهمة، نحتاج إلى تحكّم مباشر أكثر. لا نريد أن يقرّر النموذج اللغوي الكبير ما إذا كان سينشئ صورة أم لا، بل نريد أن نطلب منه ذلك مباشرةً. هذه هي الوظيفة المثالية لـ BaseAgent.
على عكس LlmAgent الإجرائي، يكون BaseAgent إلزاميًا. هذا يعني أنّك كمطوّر تكتب منطق Python الدقيق خطوة بخطوة داخل طريقة _run_async_impl. يمكنك التحكّم بشكل كامل في مسار التنفيذ.
يمكنك اختيار BaseAgent عندما تحتاج إلى:
المنطق الحتمي: يجب أن يتّبع الوكيل تسلسلاً محدّدًا وغير قابل للتغيير من الخطوات.
تنفيذ الأداة مباشرةً: تريد استدعاء أداة مباشرةً بدون تدخّل النموذج اللغوي الكبير.
عمليات سير العمل المعقّدة: تتضمّن العملية معالجة بيانات مخصّصة، وطلبات إلى واجهة برمجة التطبيقات، ومنطقًا معقّدًا جدًا بحيث لا يمكن لنموذج اللغة الكبير استنتاجه بشكل موثوق من طلب واحد فقط.
بالنسبة إلى تطبيقنا، سنستخدم BaseAgent لتلقّي أوصاف المشاهد من الوكيل الأول واستدعاء أداة Imagen مباشرةً لضمان إنشاء صورة لكل مشهد.
8. الاختبار: تقييم الوكيل
يعمل تطبيقنا، ولكنّنا نحتاج إلى شبكة أمان آلية من الاختبارات. هذه مهمة مثالية لتفويضها إلى مساعدنا المستند إلى الذكاء الاصطناعي.
الإجراءات
cd ~/storygen-learning/03a_Agent_Evaluation_Ready/backend
استخدام Gemini CLI لكتابة اختبارات شاملة:
فتح Gemini CLI
gemini
داخل نافذة Gamini CLI، جرِّب الطلب التالي:
I need you to create comprehensive test files for my backend/story_agent in Google ADK. I need three specific JSON files that match the testing structure used in ADK evaluation.

**Context:**
- The story agent generates structured JSON stories with exactly 4 scenes
- It uses LlmAgent with no tools, just direct LLM responses
- Input: Keywords
- Output: JSON with story, main_characters, and scenes arrays

**Files to Create:**

### 1. `story_agent_eval.evalset.json` (Comprehensive Integration Tests)
Create a comprehensive evaluation set with:
- **eval_set_id**: "story_agent_comprehensive_evalset"
- **name**: "Story Agent Comprehensive Evaluation Set"
- **description**: "Comprehensive evaluation scenarios for story_agent covering various keyword combinations, edge cases, and story quality metrics"


Each eval_case should include:
- Full conversation arrays with invocation_id, user_content, final_response
- Complete expected JSON responses with detailed stories, characters, and 4 scenes
- session_input with app_name "story_agent"
- All fields: story (narrative text), main_characters (with detailed visual descriptions), scenes (with index, title, description, text)

### 2. `story_generation.test.json` (Unit Tests)
Create basic generation tests with:
- **eval_set_id**: "story_agent_basic_generation_tests"
- **name**: "Story Agent Basic Generation Tests"
- **description**: "Unit tests for story_agent focusing on JSON structure compliance, scene generation, and keyword integration"

### 3. `test_config.json` (Evaluation Configuration)
Create test configuration with:
- **criteria**: response_match_score: 0.7, tool_trajectory_avg_score: 1.0
- **custom_evaluators**:
  - json_structure_validator (validates required fields, scene count, character fields)
  - story_quality_metrics (word count 80-250, keyword integration threshold 0.8)
- **evaluation_notes**: Story agent specifics and trajectory expectations

**Important Requirements:**
1. All responses must be valid, parseable JSON
2. Stories must have exactly 4 scenes with indices 1-4
3. Each scene must have: index, title, description, text
4. Main characters must have detailed visual descriptions
5. No tool_uses expected (empty arrays) since story agent uses direct LLM
6. Word count should be 100-200 words total
7. Keywords must be naturally integrated into the narrative

Please generate all three files with realistic example stories and comprehensive test coverage matching the ADK evaluation format.
—————————————— اختياري، يمكنك الانتقال إلى قسم الحل——————————————–
للاطّلاع على التقييم:
./run_adk_web_persistent.sh
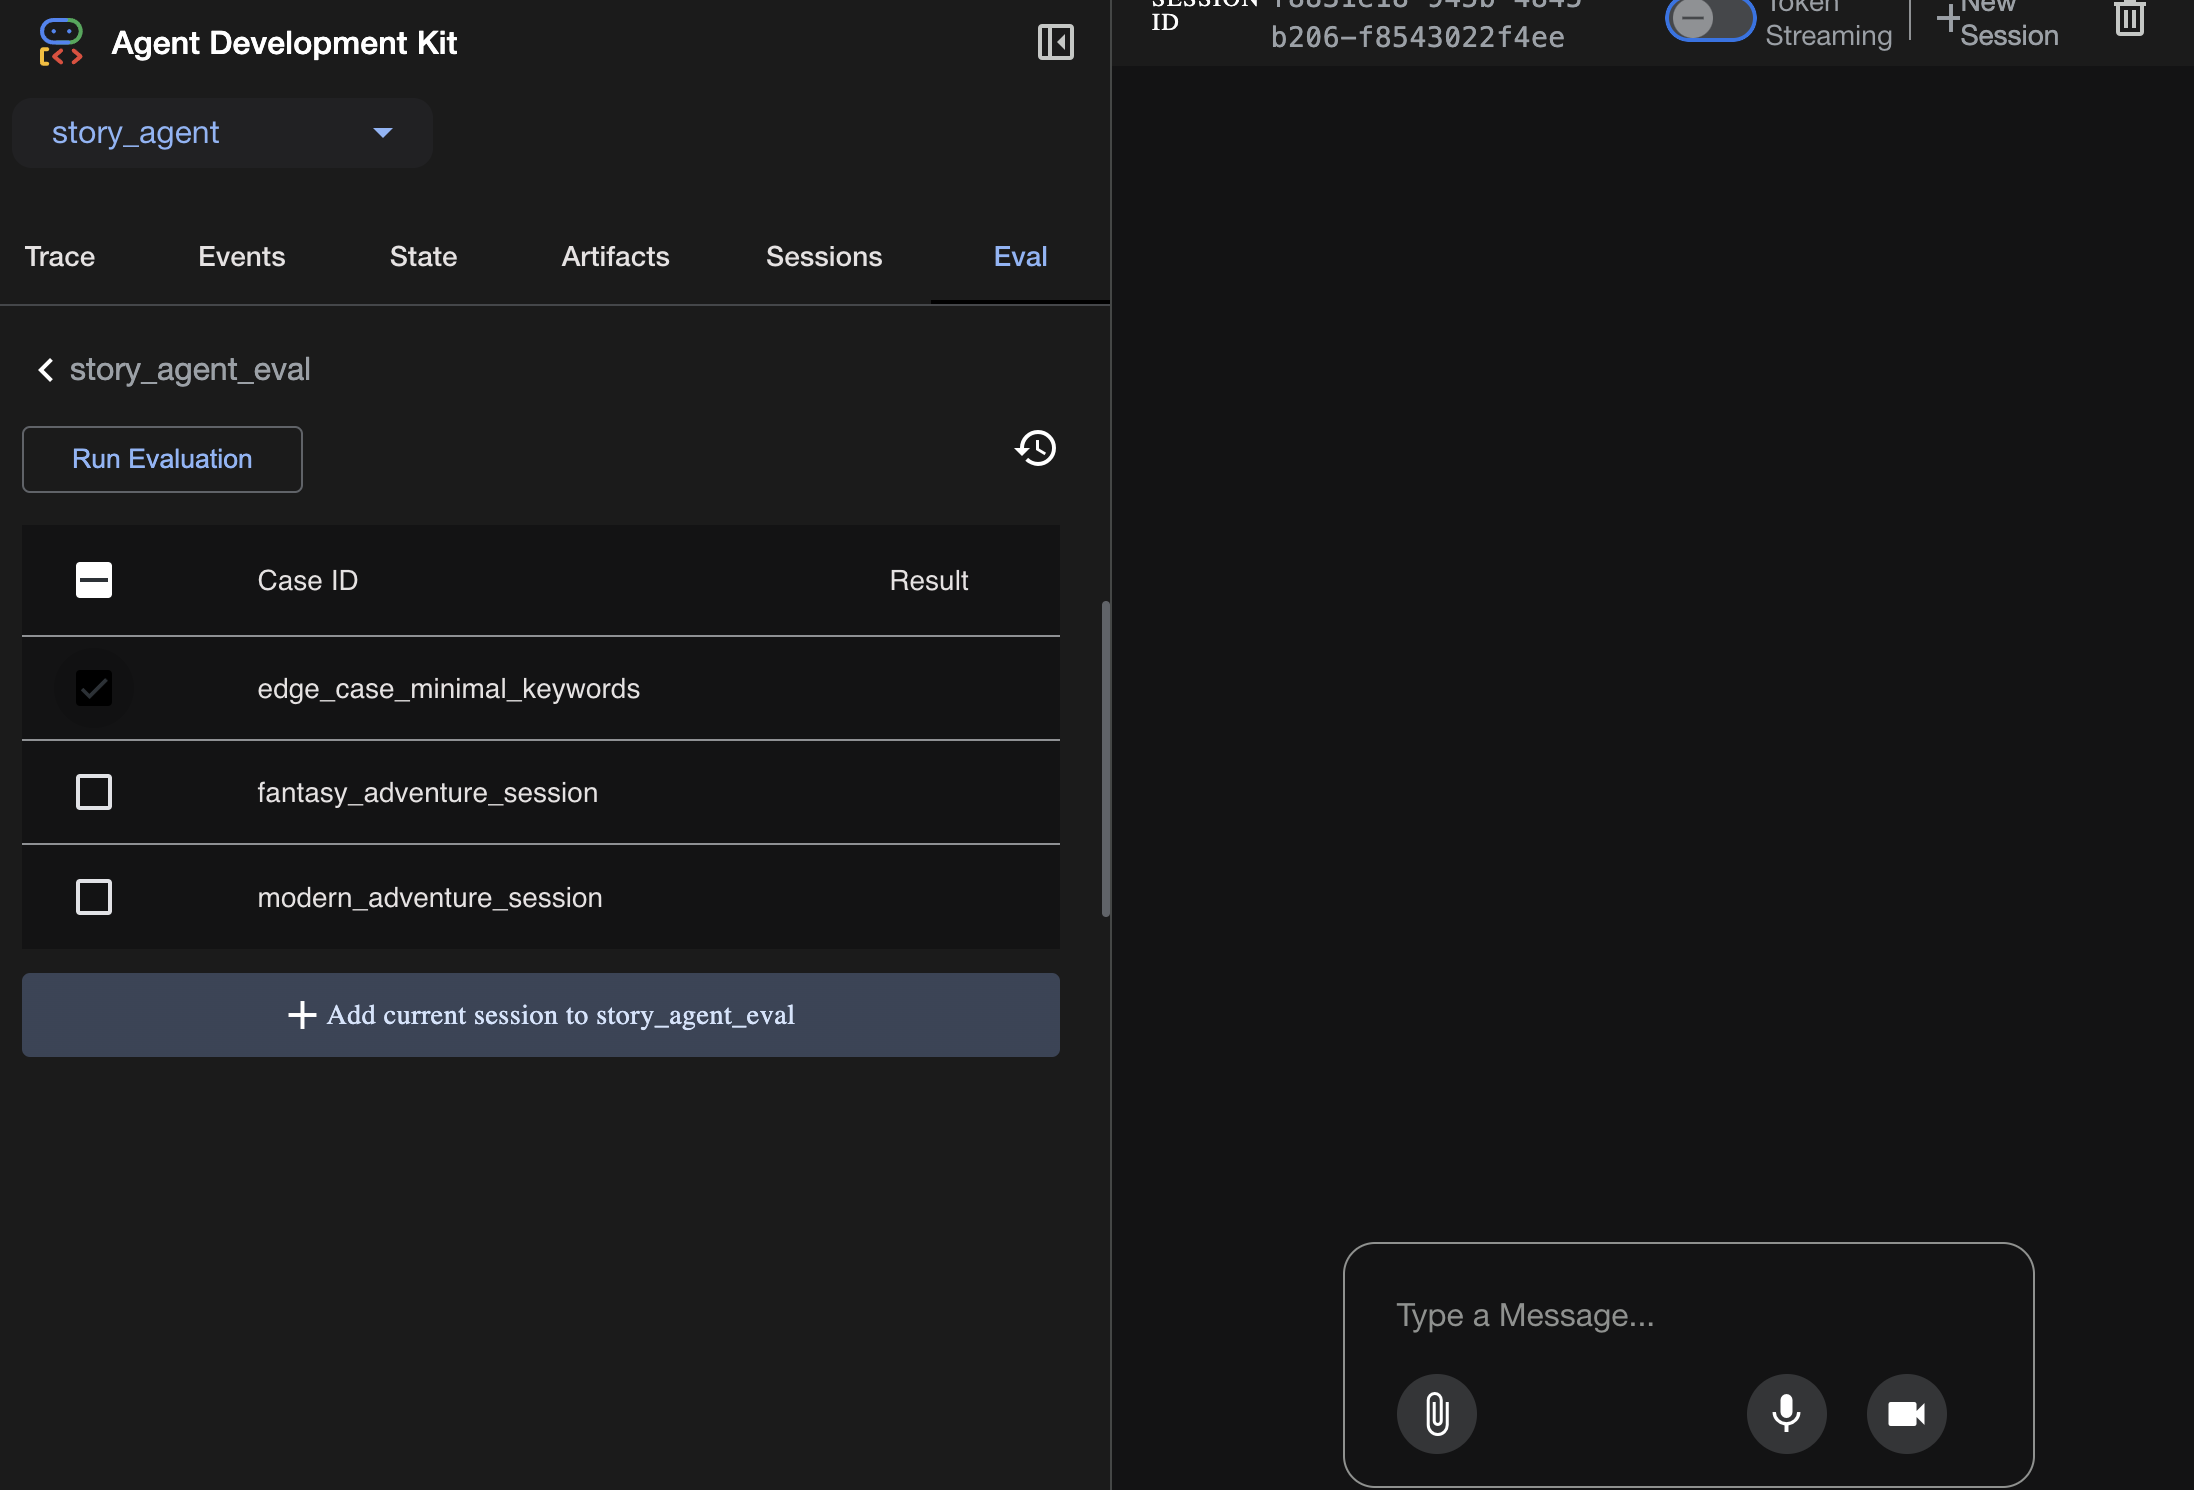
انتقِل إلى علامة التبويب eval في واجهة مستخدم "حزمة تطوير التطبيقات".
من المفترض أن تظهر لك واجهة مستخدم ADK على الويب مع إمكانات اختبار مستمرة
نقطة التعلّم الأساسية: الذكاء الاصطناعي هو شريك قوي في أتمتة ضمان الجودة. يمكنه التعامل مع الرموز النموذجية لكتابة الاختبارات، ما يتيح لك التركيز على إنشاء الميزات.
——————————————– الحلّ يبدأ هنا ——————————————–
Solution
- انتقِل إلى مجلد الحل:
cd ~/storygen-learning/03b_Agent_Evaluation_Done/backend
- فتح واجهة مستخدم ADK على الويب
./run_adk_web_persistent.sh
يمكنك الاطّلاع على حالات الاختبار من علامة التبويب Eval:
يمكنك تعديل المقاييس هنا:

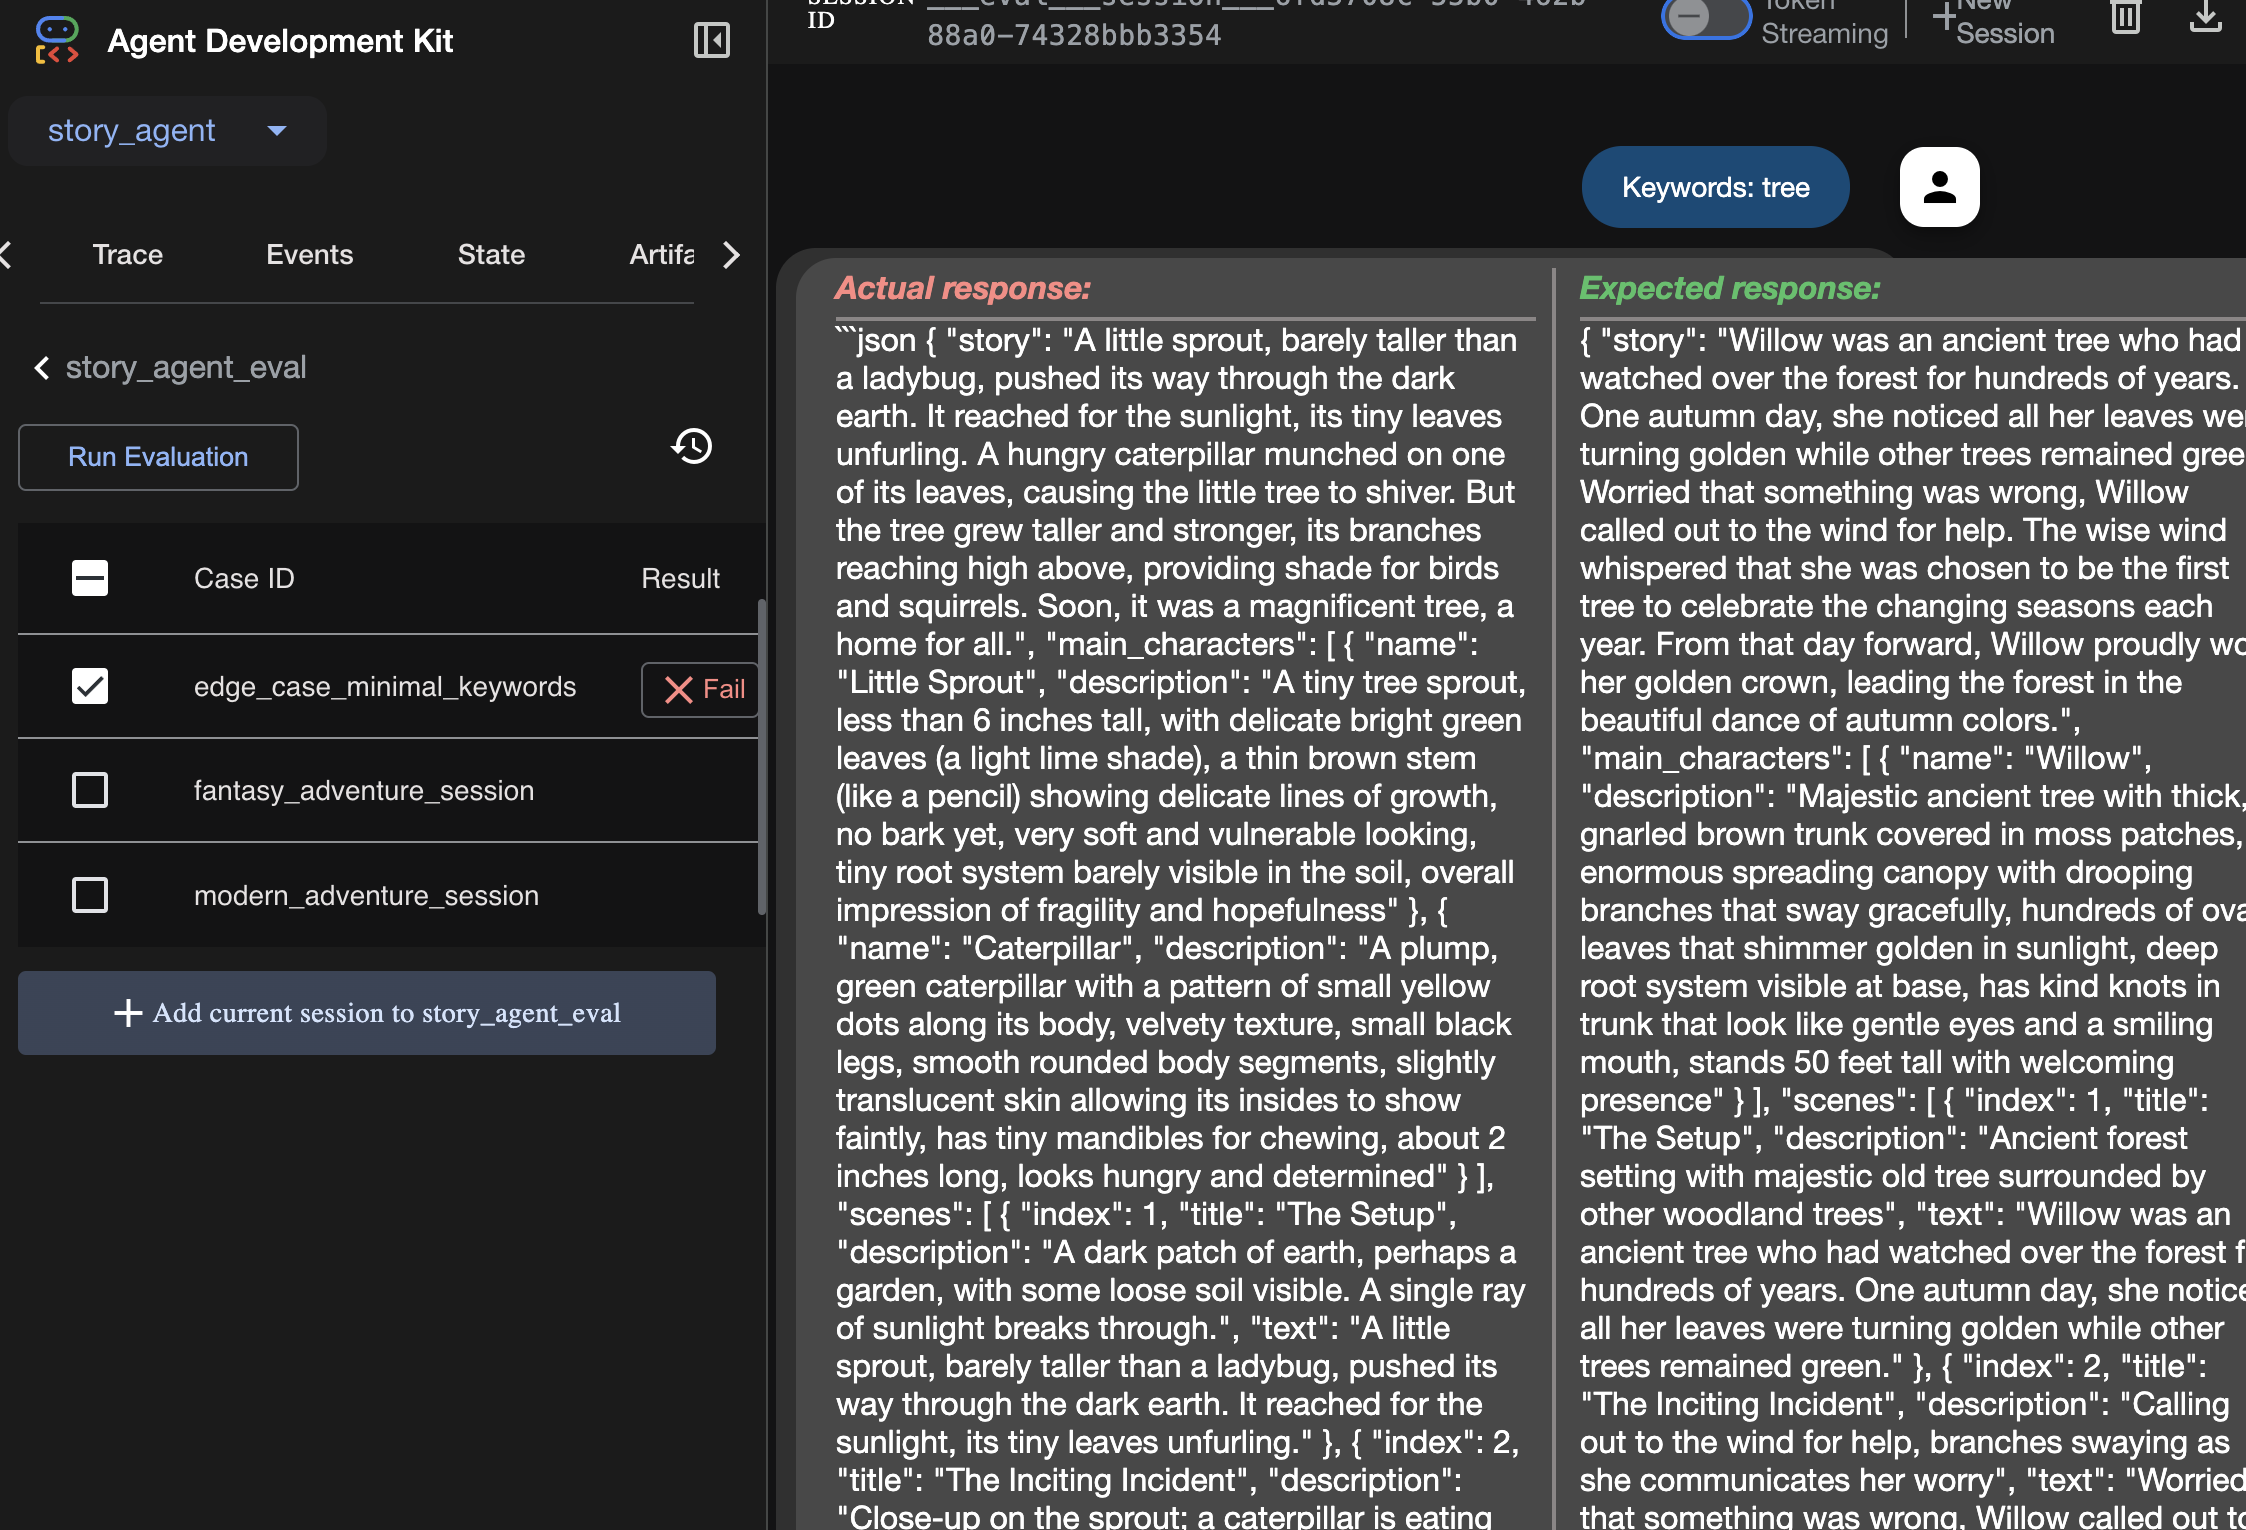
يمكنك الاطّلاع على نتيجة عملية التقييم هنا:
التعلم
يمكن أن "يعمل" الوكيل بمعنى أنّه ينفّذ المهام بدون أخطاء، ولكن كيف نعرف ما إذا كان ينتج النتائج الصحيحة؟ هل القصة جيدة؟ هل تنسيق JSON صحيح؟ وهنا يأتي دور إطار عمل التقييم في "حزمة تطوير التطبيقات".
تقييم الوكيل هو نظام اختبار آلي مصمّم لقياس جودة ردود الوكيل ومدى صحتها. بدلاً من مجرد التحقّق من أخطاء الرمز البرمجي، يتحقّق مما إذا كان سلوك الوكيل يلبي توقعاتك. يستخدم إطار العمل بشكل أساسي بعض الملفات الرئيسية:
evalset.json: هذه هي مجموعة الاختبار الرئيسية. يحتوي كل "حالة تقييم" داخل هذا الملف على محادثة نموذجية (مثل طلب مستخدم) والاستجابة المثالية التي تتوقّع أن يقدّمها الوكيل.
test_config.json: يحدّد هذا الملف قواعد النجاح. يمكنك ضبط معايير هنا، مثل:
response_match_score: ما مدى تطابق ردّ الوكيل مع الردّ "المثالي"؟ (تعني النتيجة 1.0 أنّه يجب أن يكون المحتوى مطابقًا تمامًا).
custom_evaluators: يمكنك إنشاء قواعدك الخاصة، مثل "يجب أن تكون الاستجابة بتنسيق JSON صالح" أو "يجب أن تتضمّن القصة أكثر من 100 كلمة".
من خلال إجراء تقييم، يمكنك اختبار وكيلك تلقائيًا في عشرات السيناريوهات، ما يضمن ألا تؤدي التغييرات في الطلب أو الأدوات إلى إيقاف وظيفته الأساسية عن طريق الخطأ. وهي شبكة أمان فعّالة لإنشاء وكلاء ذكاء اصطناعي جاهزين للإنتاج.
9- البنية التحتية كرمز (IaC): بناء منزل في السحابة الإلكترونية
تم اختبار الرمز البرمجي، ولكنّه يحتاج إلى بيئة إنتاج جاهزة. سنستخدم "البنية الأساسية كرمز" لتحديد بيئتنا.
ما هو Docker؟
Docker هي منصة لإنشاء التطبيقات وتشغيلها في حاويات. يمكنك اعتبار الحاوية بمثابة حاوية شحن موحّدة للبرامج. تجمع كل ما يحتاجه تطبيقك لتشغيله في حزمة واحدة معزولة:
- الرمز البرمجي للتطبيق نفسه
- وقت التشغيل المطلوب (مثل الإصدار المحدّد من Python)
- جميع أدوات النظام ومكتباته
ويمكن بعد ذلك تشغيل هذا التطبيق الذي تم وضعه في حاوية على أي جهاز مثبَّت عليه Docker، ما يحلّ مشكلة "يعمل على جهازي" الكلاسيكية.
في هذا القسم، سنطلب من Gemini إنشاء Dockerfile، وهو ببساطة وصفة أو مخطط لإنشاء صورة حاوية التطبيق.
الإجراءات
cd ~/storygen-learning/04a_Manual_Deployment_Ready
استخدام Gemini CLI لإنشاء ملف Dockerfile للخادم الخلفي: افتح Gemini CLI
Gemini
داخل Gemini CLI، جرِّب الطلب:
Create a manual deployment plan for my StoryGen app with Google Cloud Platform. I have a Next.js frontend, Python backend, and Terraform infrastructure.
Generate these deployment files:
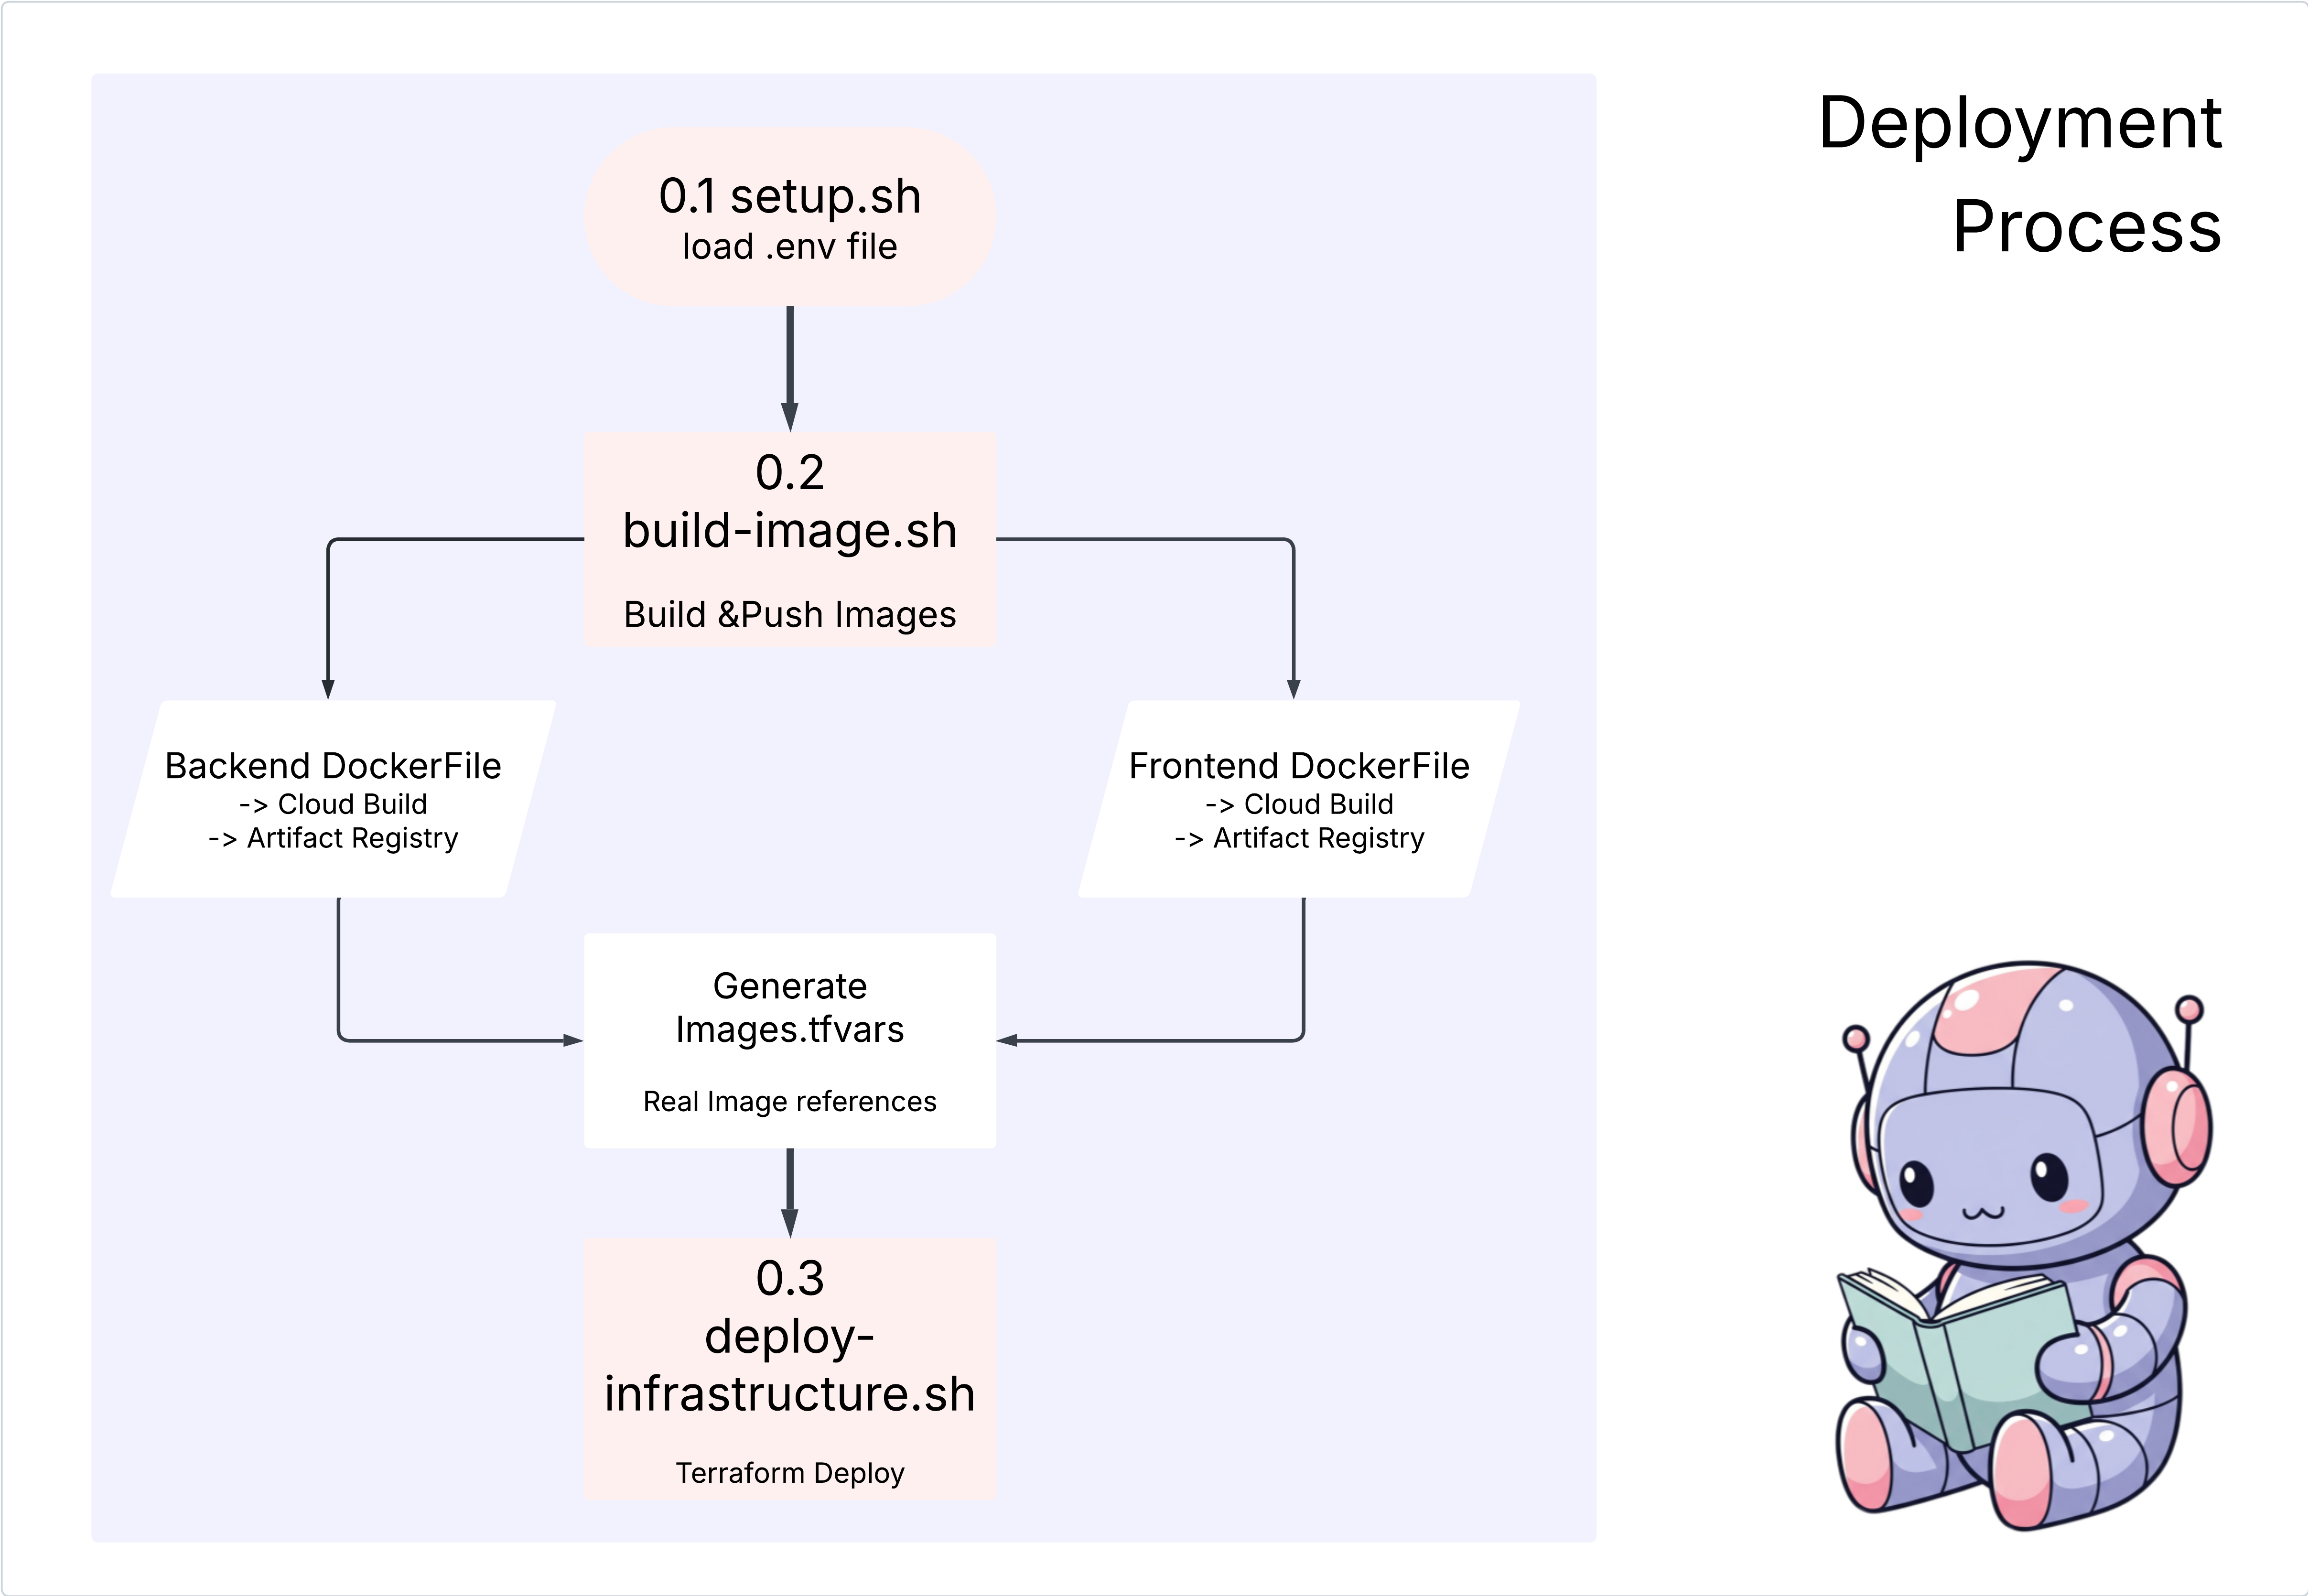
1. **01-setup.sh** - Environment setup and authentication
2. **02-build-images.sh** - Build and push Docker images to Google Container Registry
3. **03-deploy-infrastructure.sh** - Deploy with Terraform and configure services
4. **load-env.sh** - Load environment variables for deployment
**Requirements:**
- Use Google Cloud Run for both frontend and backend
- Configure Imagen API and storage buckets
- Set up proper IAM permissions
- Use environment variables from .env file
- Include error handling and status checks
Keep scripts simple, well-commented, and production-ready for manual execution.
الحلّ:
cd ~/storygen-learning/04b_Manual_Deployment_Done
التشغيل:
source ../.venv/bin/activate
./01-setup.sh
./02-build-images.sh
./03-deploy-infrastructure.sh
من المفترض أن تظهر لك نتائج النشر وعملية إنشاء البنية الأساسية
10. التشغيل الآلي (التكامل المستمر/التسليم المستمر): خط التجميع الرقمي
إنّ نشر تطبيقنا يدويًا هو طريقة رائعة لفهم الأجزاء المتحركة، ولكنّه بطيء ويتطلّب جهدًا يدويًا ويمكن أن يؤدي إلى أخطاء بشرية. في مجال تطوير البرامج الاحترافي، تتم أتمتة هذه العملية بالكامل باستخدام ممارسة تُعرف باسم "الدمج المستمر/النشر المستمر" (CI/CD).
يشير مصطلح CI/CD إلى التكامل المستمر والنشر المستمر. وهي طريقة لإنشاء الرمز البرمجي واختباره ونشره تلقائيًا في كل مرة تجري فيها تغييرًا.
- التكامل المستمر (CI): هذه هي مرحلة "الإنشاء والاختبار". ما إن يرسل المطوّر تغييرًا في الرمز إلى مستودع مشترك (مثل GitHub)، يبدأ نظام آلي بالعمل. تنشئ هذه العملية التطبيق وتنفّذ جميع الاختبارات (مثل تقييمات الوكيل التي أنشأناها) للتأكّد من أنّ الرمز الجديد مدمج بشكل صحيح ولا يتضمّن أي أخطاء.
- النشر المستمر (CD): هذه هي مرحلة "الإصدار". إذا اجتازت مرحلة التكامل المستمر بنجاح، ينشر النظام تلقائيًا الإصدار الجديد الذي تم اختباره من التطبيق في مرحلة الإنتاج، ما يجعله متاحًا للمستخدمين.
تنشئ هذه السلسلة المتكاملة من العمليات المبرمَجة "خط تجميع رقميًا" ينقل الرمز البرمجي من جهاز المطوّر إلى مرحلة الإصدار العلني بسرعة وأمان وموثوقية. في هذا القسم، سنطلب من مساعدنا المستند إلى الذكاء الاصطناعي إنشاء خط التجميع هذا باستخدام GitHub Actions وGoogle Cloud Build.
الإجراءات
cd ~/storygen-learning/05a_CICD_Pipeline_Ready
استخدام Gemini CLI لإنشاء مسار CI/CD باستخدام GitHub:
فتح Gemini CLI
Gemini
داخل Gemini CLI، جرِّب الطلب:
Create a CI/CD pipeline for my StoryGen app using Google Cloud Build and GitHub integration.

Generate these automation files:
1. **cloudbuild.yaml** (for backend) - Automated build, test, and deploy pipeline
2. **GitHub Actions workflow** - Trigger builds on push/PR
3. **Deployment automation scripts** - Streamlined deployment process

**Requirements:**
- Auto-trigger on GitHub push to main branch
- Build and push Docker images
- Run automated tests if available
- Deploy to Google Cloud Run
- Environment-specific deployments (staging/prod)
- Notification on success/failure

Focus on fully automated deployment with minimal manual intervention. Include proper secret management and rollback capabilities.
——————————————– الحلّ يبدأ هنا ——————————————–
الحلّ:
cd ~/storygen-learning/06_Final_Solution/
# Copy the GitHub workflow to parent folder
cp -r 06_Final_Solution/.GitHub ../../../.GitHub
ارجع إلى المجلد 06_Final_Solution ونفِّذ النص البرمجي:
cd ~/storygen-learning/06_Final_Solution/

./setup-cicd-complete.sh
من المفترض أن يظهر لك اكتمال عملية إعداد مسار CI/CD
تشغيل سير العمل: نفِّذ التغييرات وادفع الرمز إلى الفرع الرئيسي. يُرجى العِلم أنّه عليك إعداد عنوان بريدك الإلكتروني واسمك على GitHub للسماح بالإذن.
git add .
git commit -m "feat: Add backend, IaC, and CI/CD workflow"
git push origin main
انتقِل إلى علامة التبويب "الإجراءات" في مستودع GitHub لمشاهدة عملية النشر المبرمَجة.
11. العمليات: برج مراقبة الذكاء الاصطناعي
بدأ البث المباشر. لكنّ الرحلة لم تنتهِ بعد. هذا هو "اليوم الثاني"، أي العمليات. لنرجع إلى Cloud Assist لإدارة تطبيقنا قيد التشغيل.
الإجراءات
- انتقِل إلى خدمة Cloud Run في وحدة تحكّم Google Cloud. تفاعَل مع تطبيقك المباشر لإنشاء بعض الزيارات والسجلات.
- افتح لوحة Cloud Assist واستخدِمها كطيار مساعد تشغيلي من خلال طلبات مثل ما يلي:
تحليل السجلات:
Summarize the errors in my Cloud Run logs for the service 'genai-backend' from the last 15 minutes.
تحسين الأداء:
My Cloud Run service 'genai-backend' has high startup latency. What are common causes for a Python app and how can I investigate with Cloud Trace?
تحسين التكلفة:
Analyze the costs for my 'genai-backend' service and its GCS bucket. Are there any opportunities to save money?
نقطة أساسية للتعلم: دورة حياة تطوير البرامج المستندة إلى الذكاء الاصطناعي هي حلقة مستمرة. إنّ مساعد الذكاء الاصطناعي نفسه الذي ساعد في إنشاء التطبيق هو شريك لا غنى عنه لمراقبته وتحديد المشاكل وحلّها وتحسينه في مرحلة الإنتاج.