
1. מה תלמדו
AI Agent Vibe Full Stack
שלום! במאמר הזה נלמד אתכם את המיומנות הקריטית הבאה בפיתוח תוכנה: איך להנחות ביעילות בינה מלאכותית (AI) כדי לבנות, לבדוק ולפרוס תוכנה ברמת ייצור. AI גנרטיבי הוא לא 'טייס אוטומטי', אלא טייס משנה עוצמתי שזקוק לבמאי מיומן.
בסדנה הזו נציג מתודולוגיה מובנית וניתנת לשחזור לשיתוף פעולה עם AI בכל שלב במחזור החיים המקצועי של פיתוח תוכנה (SDLC). תעברו מכתיבת קוד שורה אחר שורה לתפקיד של מנהל טכני – אדריכל עם חזון וקבלן כללי שמשתמש ב-AI כדי להגשים את החזון הזה בדיוק רב. 🚀
בסוף המדריך הזה, יהיו לכם:
- תרגום רעיון כללי לארכיטקטורת ענן באמצעות AI.
- יצרתי קצה עורפי מלא של Python באמצעות הנחיות ספציפיות וממוקדות.
- השתמשתי ב-AI כמתכנת שותף כדי לנפות באגים ולתקן קוד.
- האצלת סמכויות ל-AI ליצירת בדיקות יחידה, כולל מוקאפים.
- יצירת תשתית כקוד (IaC) שמוכנה לייצור באמצעות Terraform.
- יצירת צינור עיבוד נתונים מלא של CI/CD ב-GitHub Actions באמצעות הנחיה אחת.
- ניטור וניהול של האפליקציה הפעילה באמצעות כלים תפעוליים מבוססי-AI.
לא רק שתצאו עם אפליקציה עובדת, אלא גם עם תוכנית לפיתוח בעזרת AI. בואו נתחיל!
2. דרישות מוקדמות והגדרה
לפני שמתחילים, צריך להכין את הסביבה. זהו שלב חשוב כדי להבטיח חוויה חלקה בסדנה.
יצירת חשבון GCP חדש וקישור החיוב
כדי להפעיל את סוכני ה-AI שלנו, אנחנו צריכים שני דברים: פרויקט ב-Google Cloud שיספק את הבסיס ומפתח Gemini API כדי לגשת למודלים המתקדמים של Google.
שלב 1: הפעלת חשבון לחיוב
כדי להריץ את ה-codelab הזה, צריך חשבון לחיוב עם קרדיט. כדי להתחיל, משתמשים בקרדיטים שמופיעים בבאנר בחלק העליון של ה-codelab. אם כבר קישרתם חשבון לחיוב, אתם יכולים לדלג על השלב הזה.
שלב 2: יצירת פרויקט חדש ב-GCP
- נכנסים אל מסוף Google Cloud ויוצרים פרויקט חדש.
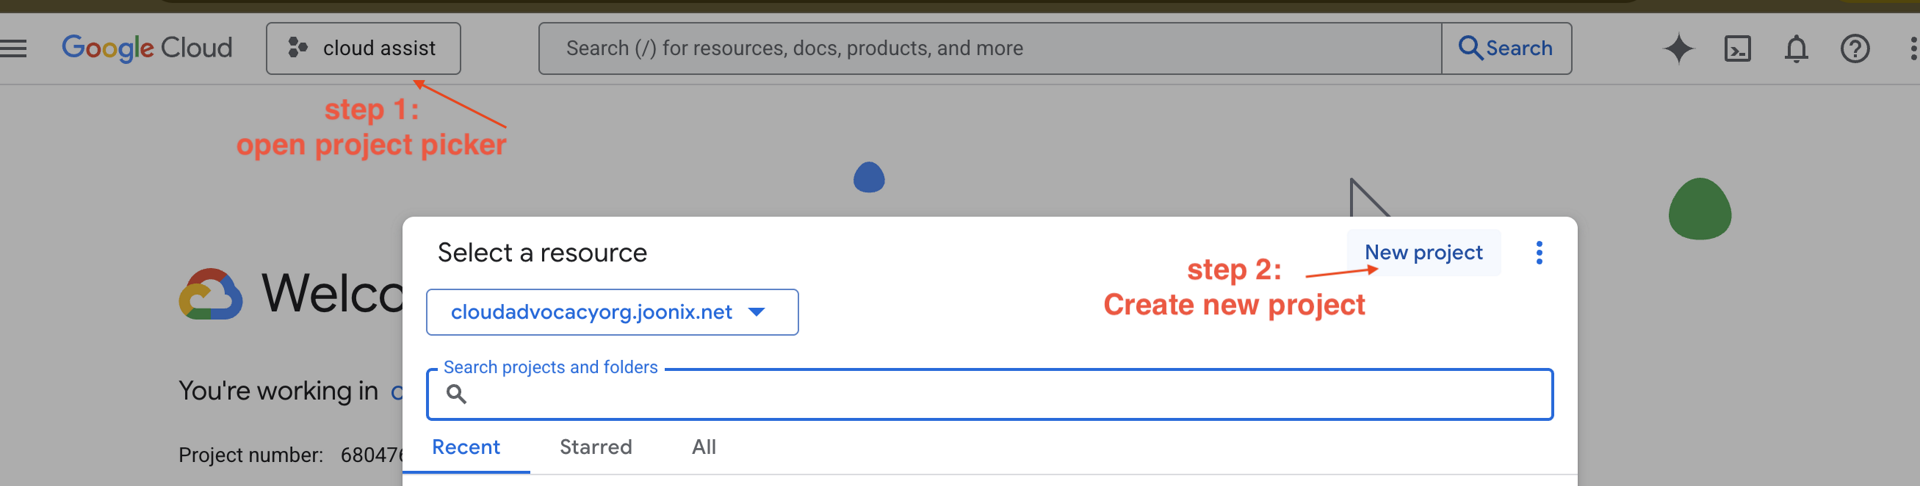
- פותחים את החלונית הימנית, לוחצים על
Billingובודקים אם החשבון לחיוב מקושר לחשבון GCP הזה.
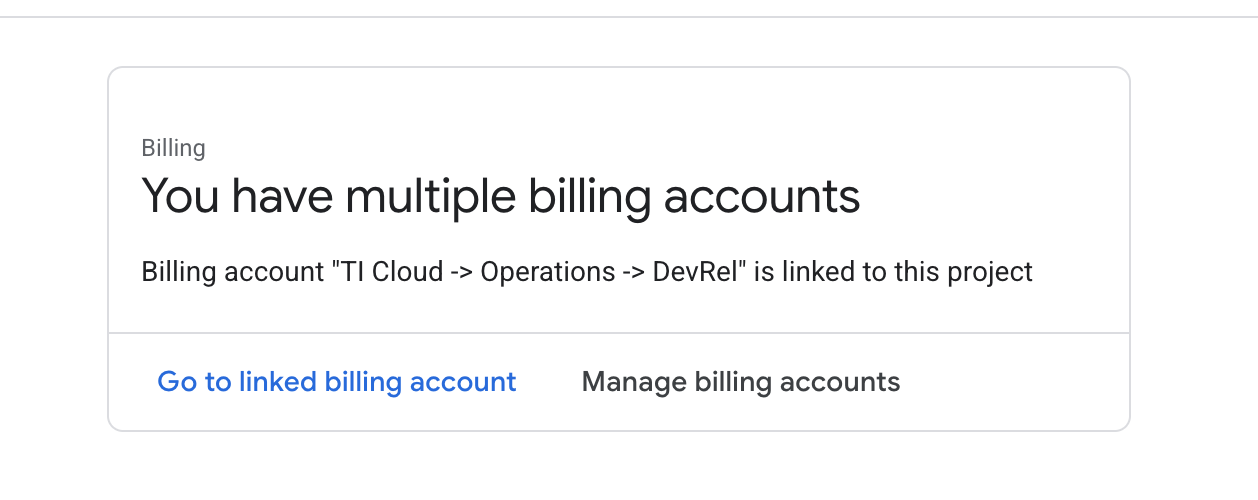
אם הדף הזה מופיע, מסמנים את התיבה manage billing account, בוחרים באפשרות Google Cloud Trial One ומקשרים אליה.
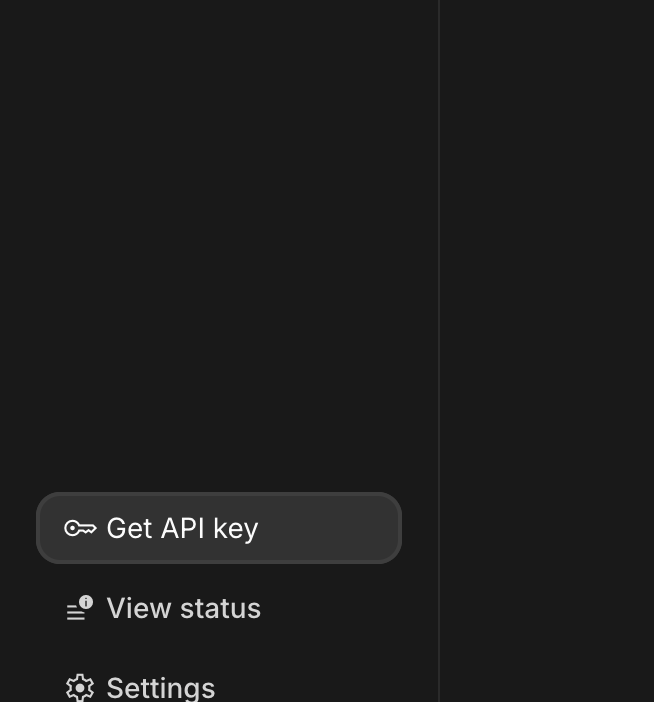
שלב 3: יצירת מפתח Gemini API
כדי לאבטח את המפתח, צריך קודם שיהיה לכם מפתח.
- עוברים אל Google AI Studio : https://aistudio.google.com/
- נכנסים באמצעות חשבון Gmail.
- לוחצים על הלחצן Get API key (קבלת מפתח API), שנמצא בדרך כלל בחלונית הניווט בצד ימין או בפינה השמאלית העליונה.
- בתיבת הדו-שיח מפתחות API, לוחצים על 'יצירת מפתח API בפרויקט חדש'.
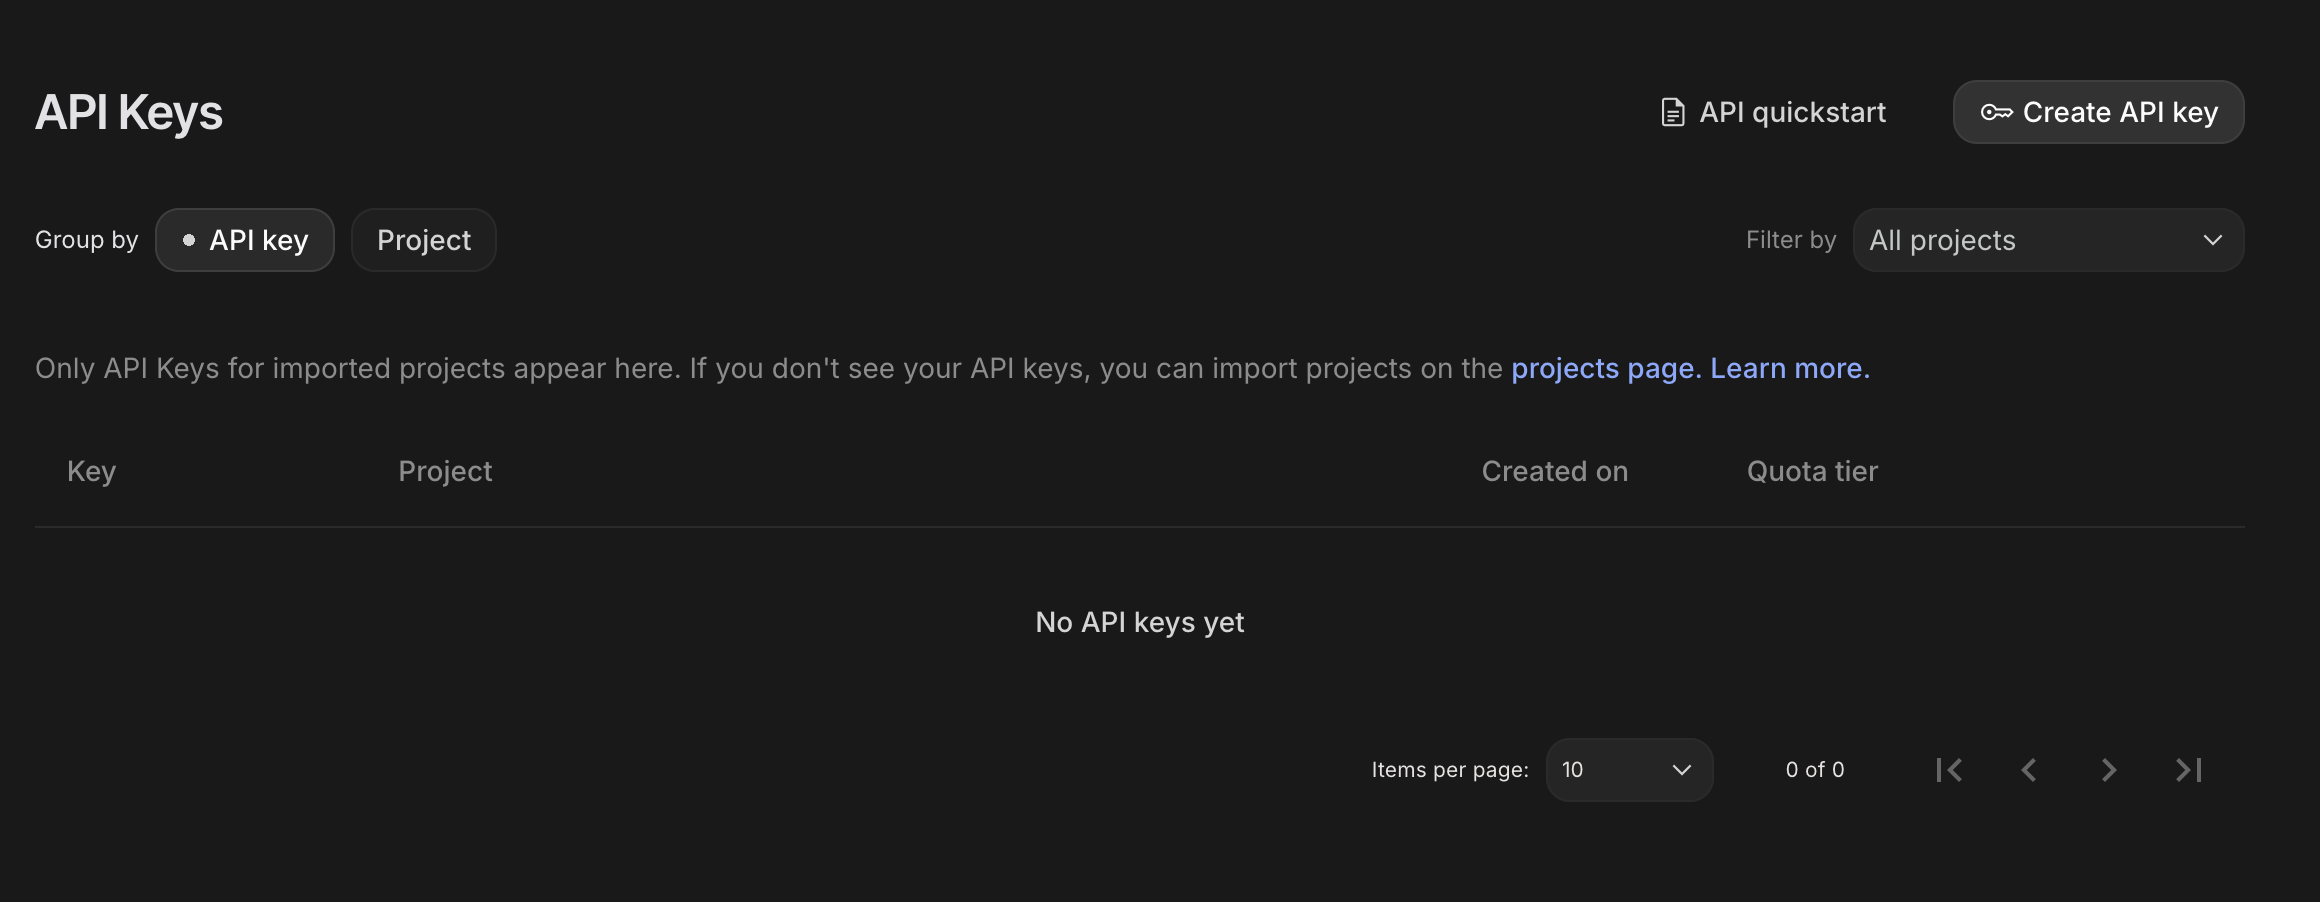
- בוחרים את הפרויקט החדש שיצרתם והגדרתם בו חשבון לחיוב.
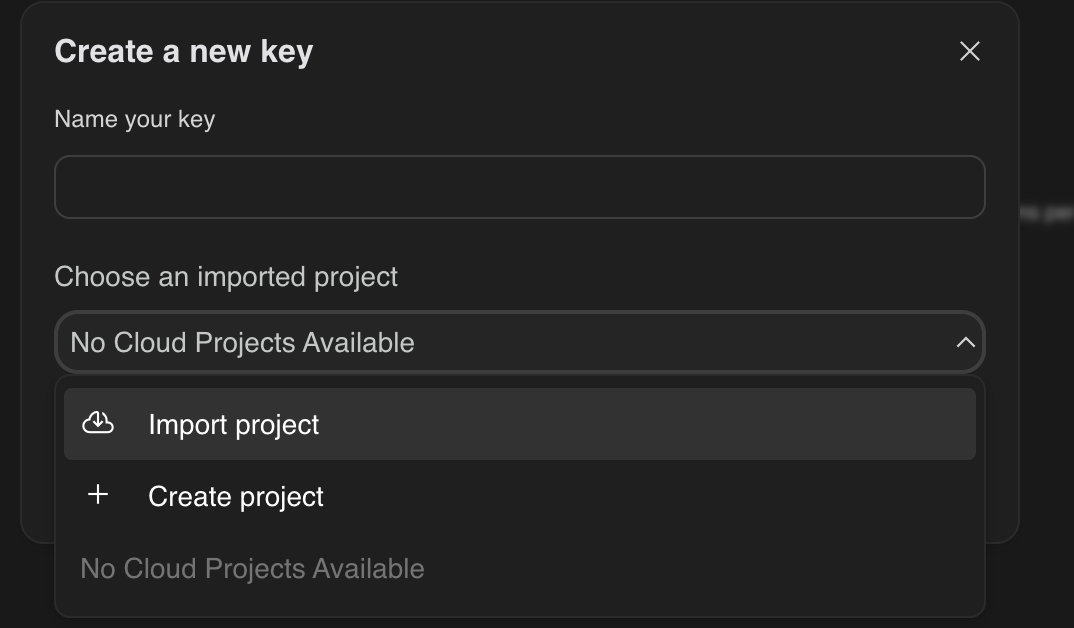
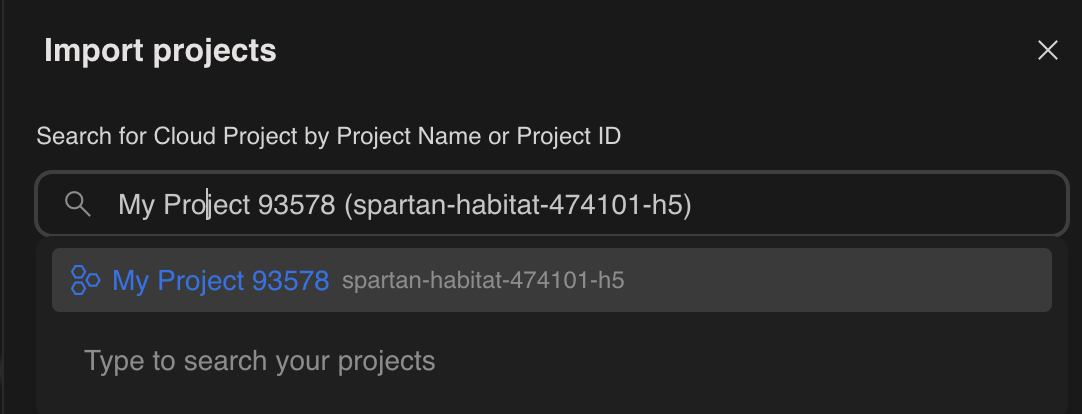
- המערכת תיצור בשבילכם מפתח API חדש.
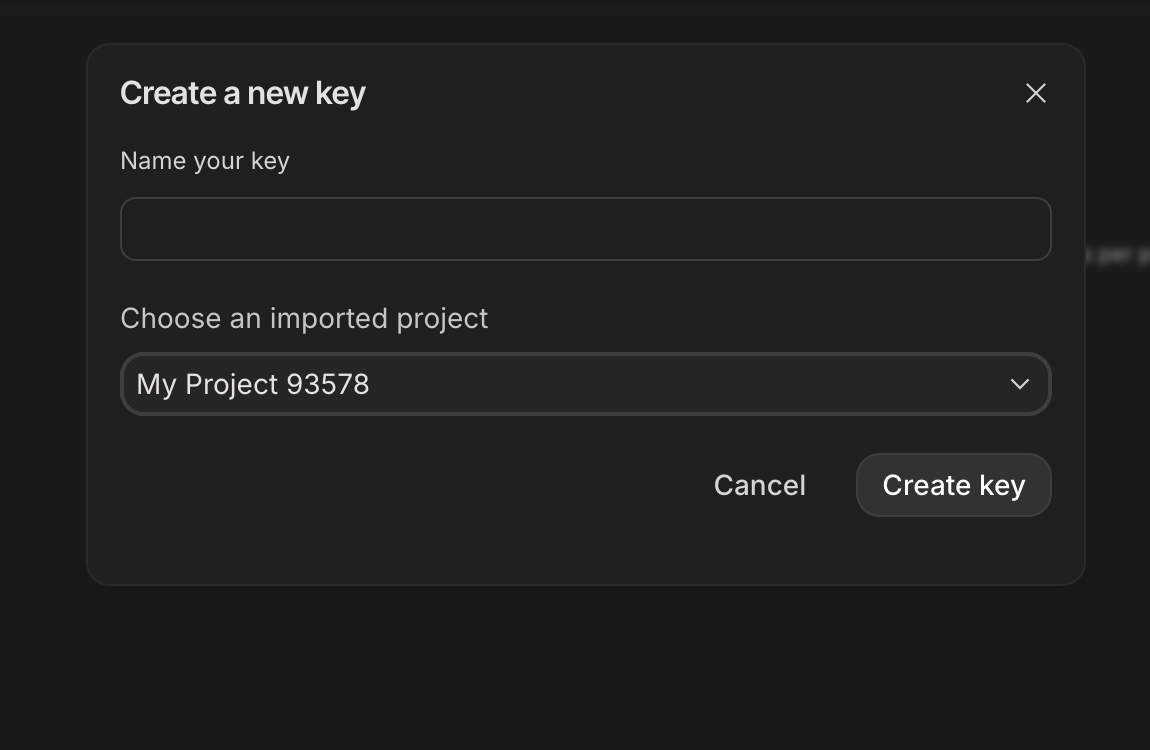
מעתיקים את המפתח הזה באופן מיידי ושומרים אותו במקום בטוח באופן זמני (למשל, במנהל סיסמאות או בהערה מאובטחת). זה הערך שתשתמשו בו בשלבים הבאים.
אימות ב-GitHub
פותחים את Cloud Shell דרך מסוף Google Cloud, לוחצים על הלחצן 'הפעלת Cloud Shell' בפינה הימנית העליונה.
שלב 1: פותחים את Cloud Shell
👈 לוחצים על 'הפעלת Cloud Shell' בחלק העליון של מסוף Google Cloud (זהו סמל הטרמינל בחלק העליון של חלונית Cloud Shell), 
👈 לוחצים על הלחצן 'פתיחת הכלי לעריכה' (הוא נראה כמו תיקייה פתוחה עם עיפרון). ייפתח חלון עם Cloud Shell Code Editor. בצד ימין יופיע סייר הקבצים. 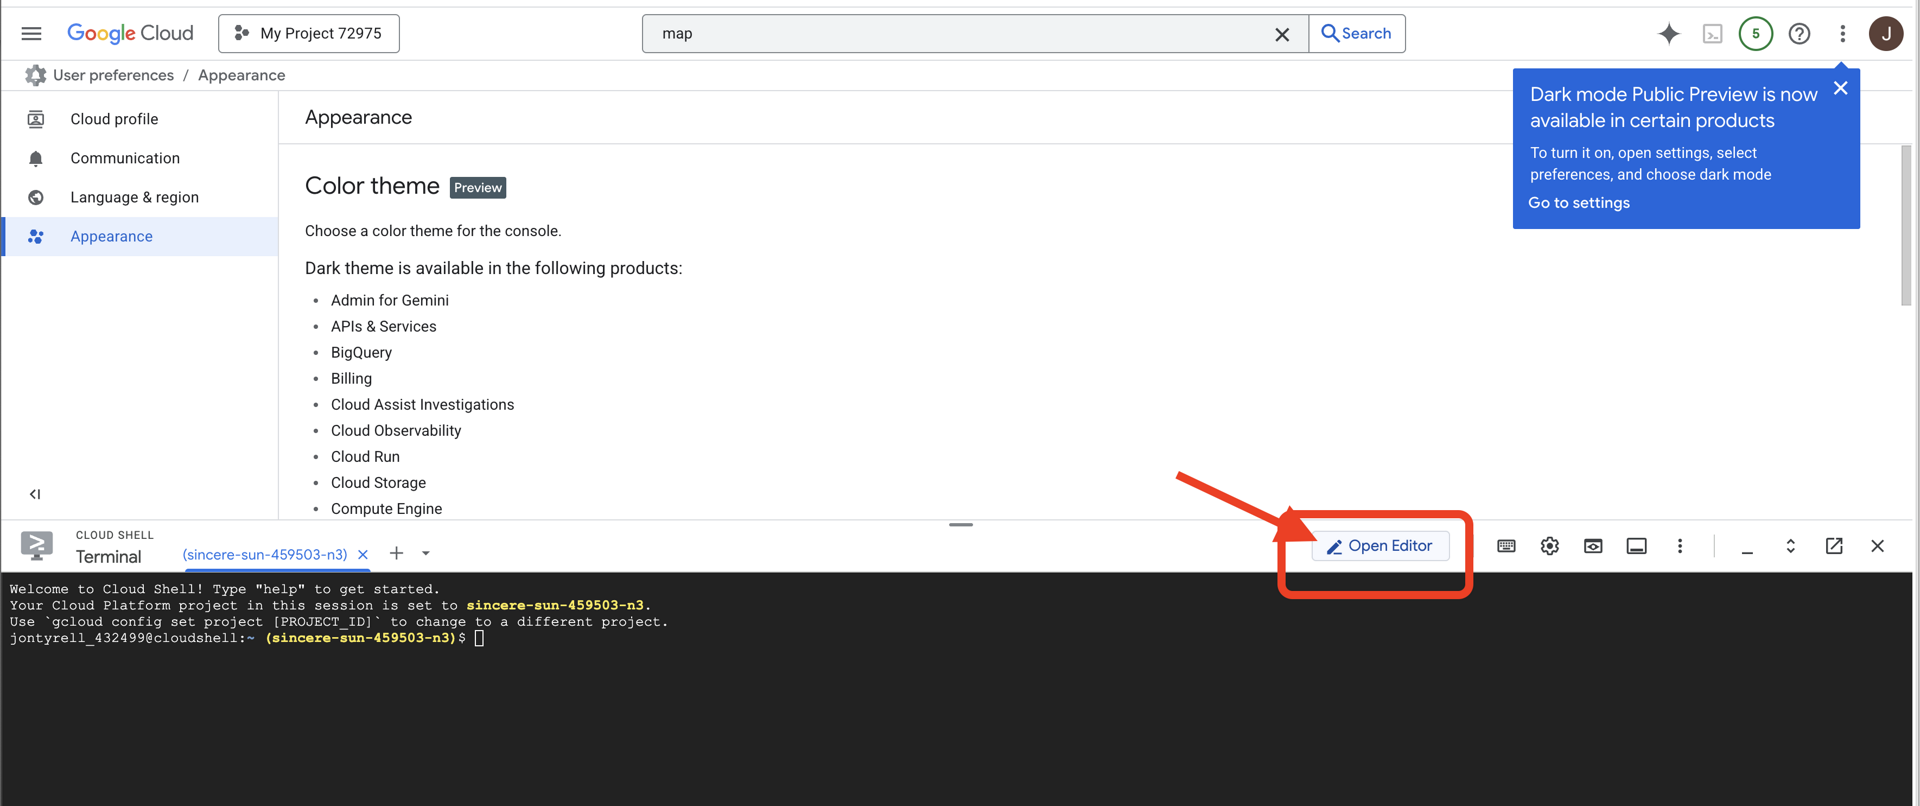
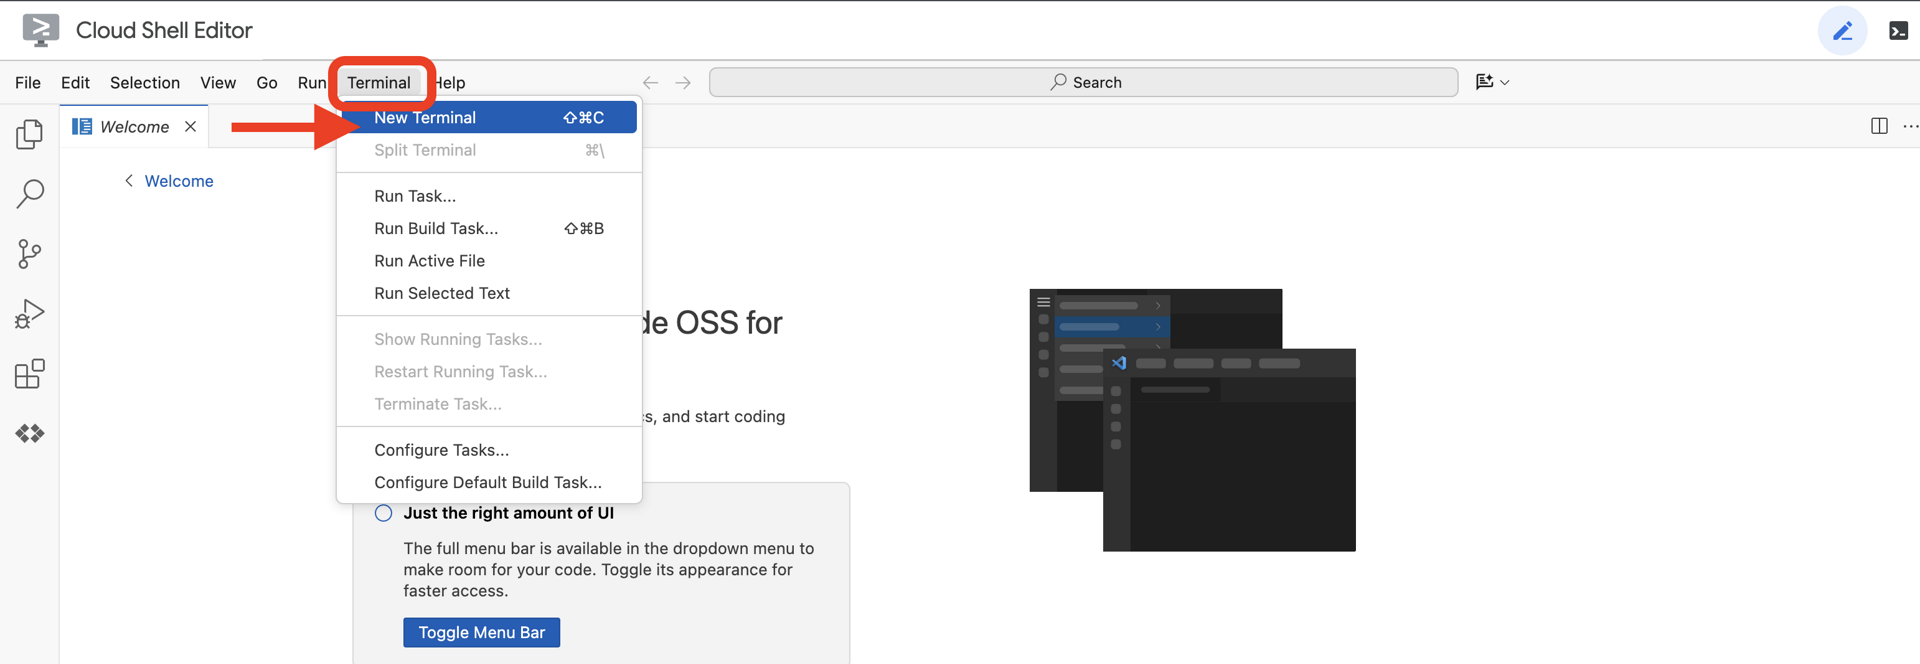
👈 אחרי שפותחים את העורך, פותחים את הטרמינל בסביבת הפיתוח המשולבת בענן.
👈💻 בטרמינל, מוודאים שכבר עברתם אימות ושהפרויקט מוגדר למזהה הפרויקט שלכם באמצעות הפקודה הבאה:
gcloud auth list
שלב 2: אימות באמצעות GitHub ויצירת עותק (Fork)
אימות באמצעות GitHub:
👈💻 מעתיקים את הפקודה ומדביקים אותה במסוף הענן:
gh auth login
- בשאלה 'איפה אתה משתמש ב-GitHub', בוחרים באפשרות 'GitHub.com'.
- "What is you preferred protocol for Git operations on this host?", choose "HTTPS"
- בשאלה 'האם לאמת את Git באמצעות פרטי הכניסה שלך ל-GitHub?', בוחרים באפשרות 'כן'.
- "איך רוצים לאמת את GitHub CLI?", בוחרים באפשרות "כניסה באמצעות דפדפן אינטרנט"
חשוב!! אל תקישו על Enter עדיין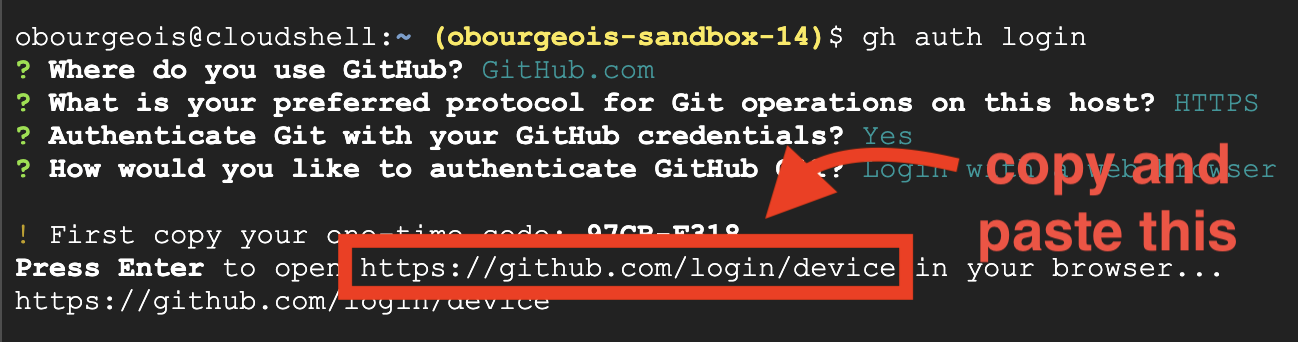
מעתיקים את הקוד מהטרמינל לדף האימות של הכניסה.
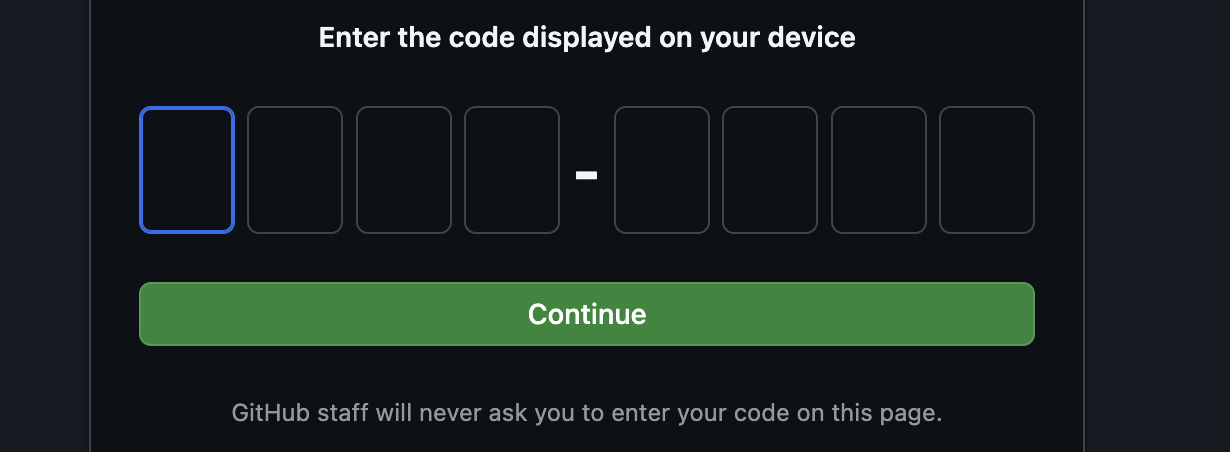
אחרי שמזינים את הקוד, חוזרים אל הטרמינל של Cloud Shell ומקישים על Enter כדי להמשיך.

שלב 4: יוצרים Fork ומשכפלים את המאגר:
👈💻 מעתיקים את הפקודה ומדביקים אותה במסוף הענן:
gh repo fork cuppibla/storygen-learning --clone=true
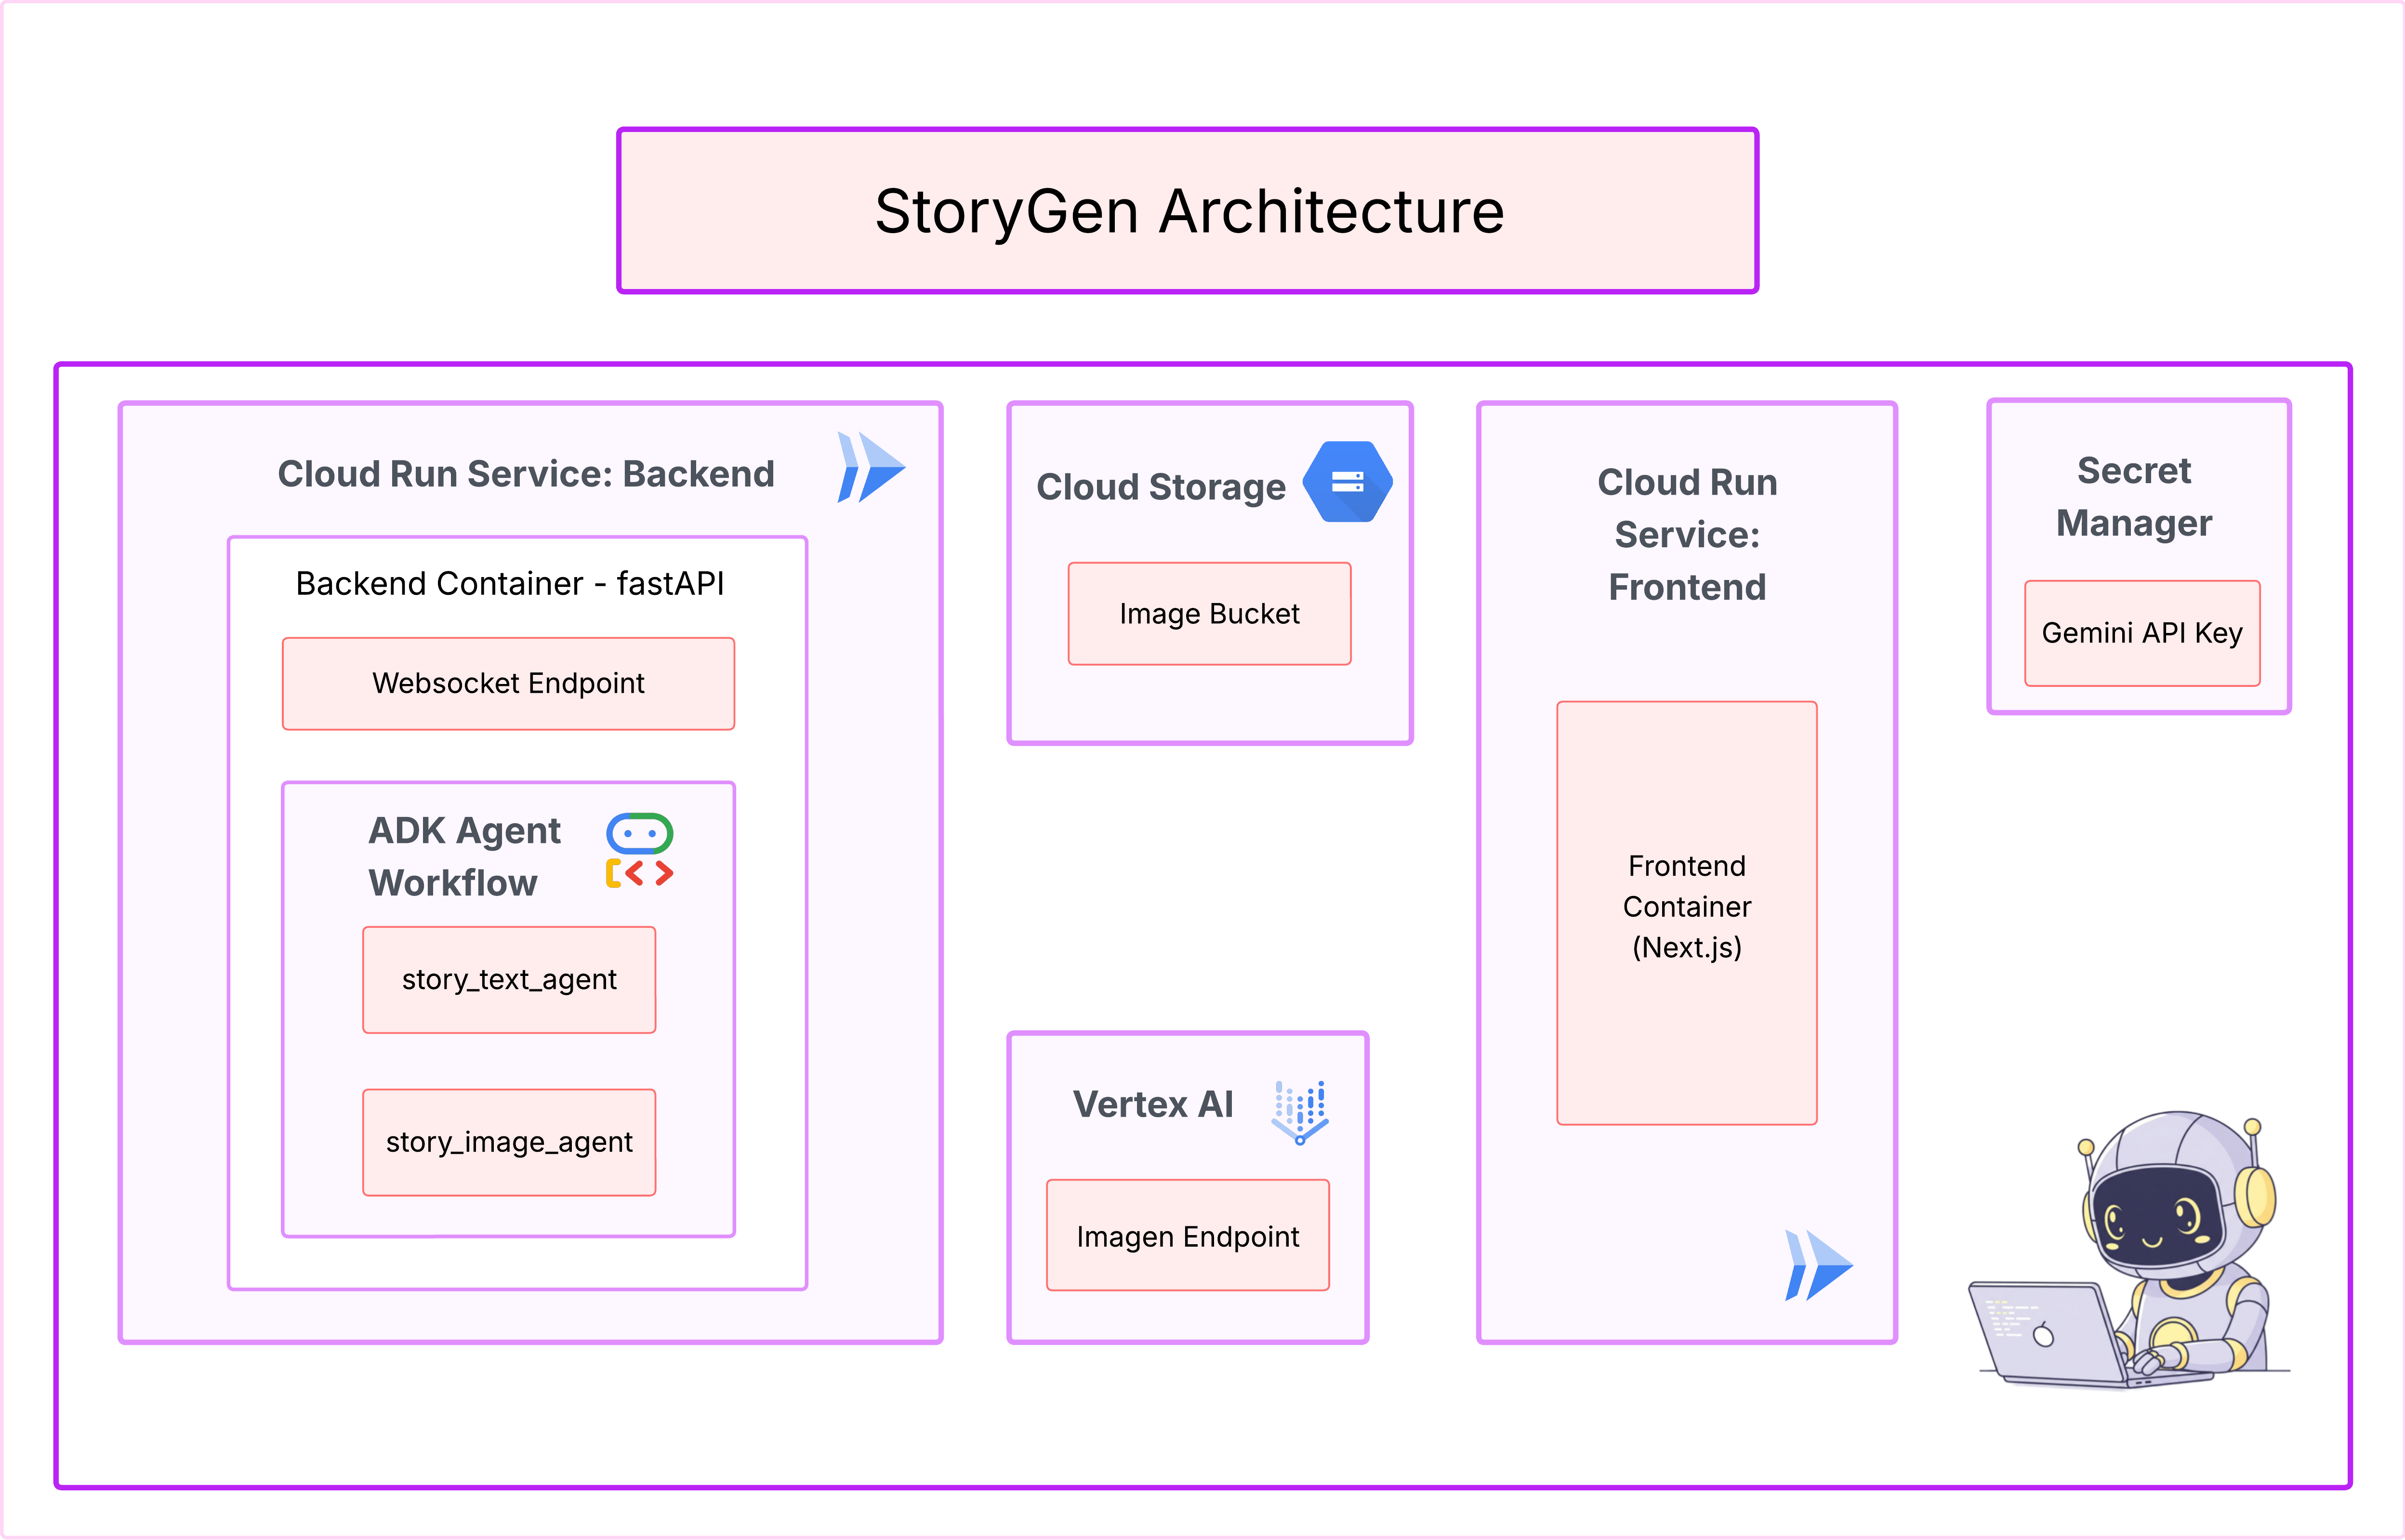
3. ארכיטקטורה: מרעיון לתוכנית פעולה באמצעות Cloud Assist
כל פרויקט מוצלח מתחיל בחזון ברור. נשתמש ב-Cloud Assist, העוזר הדיגיטלי שלנו שמבוסס על AI, כדי לתכנן את ארכיטקטורת האפליקציה.
פעולות
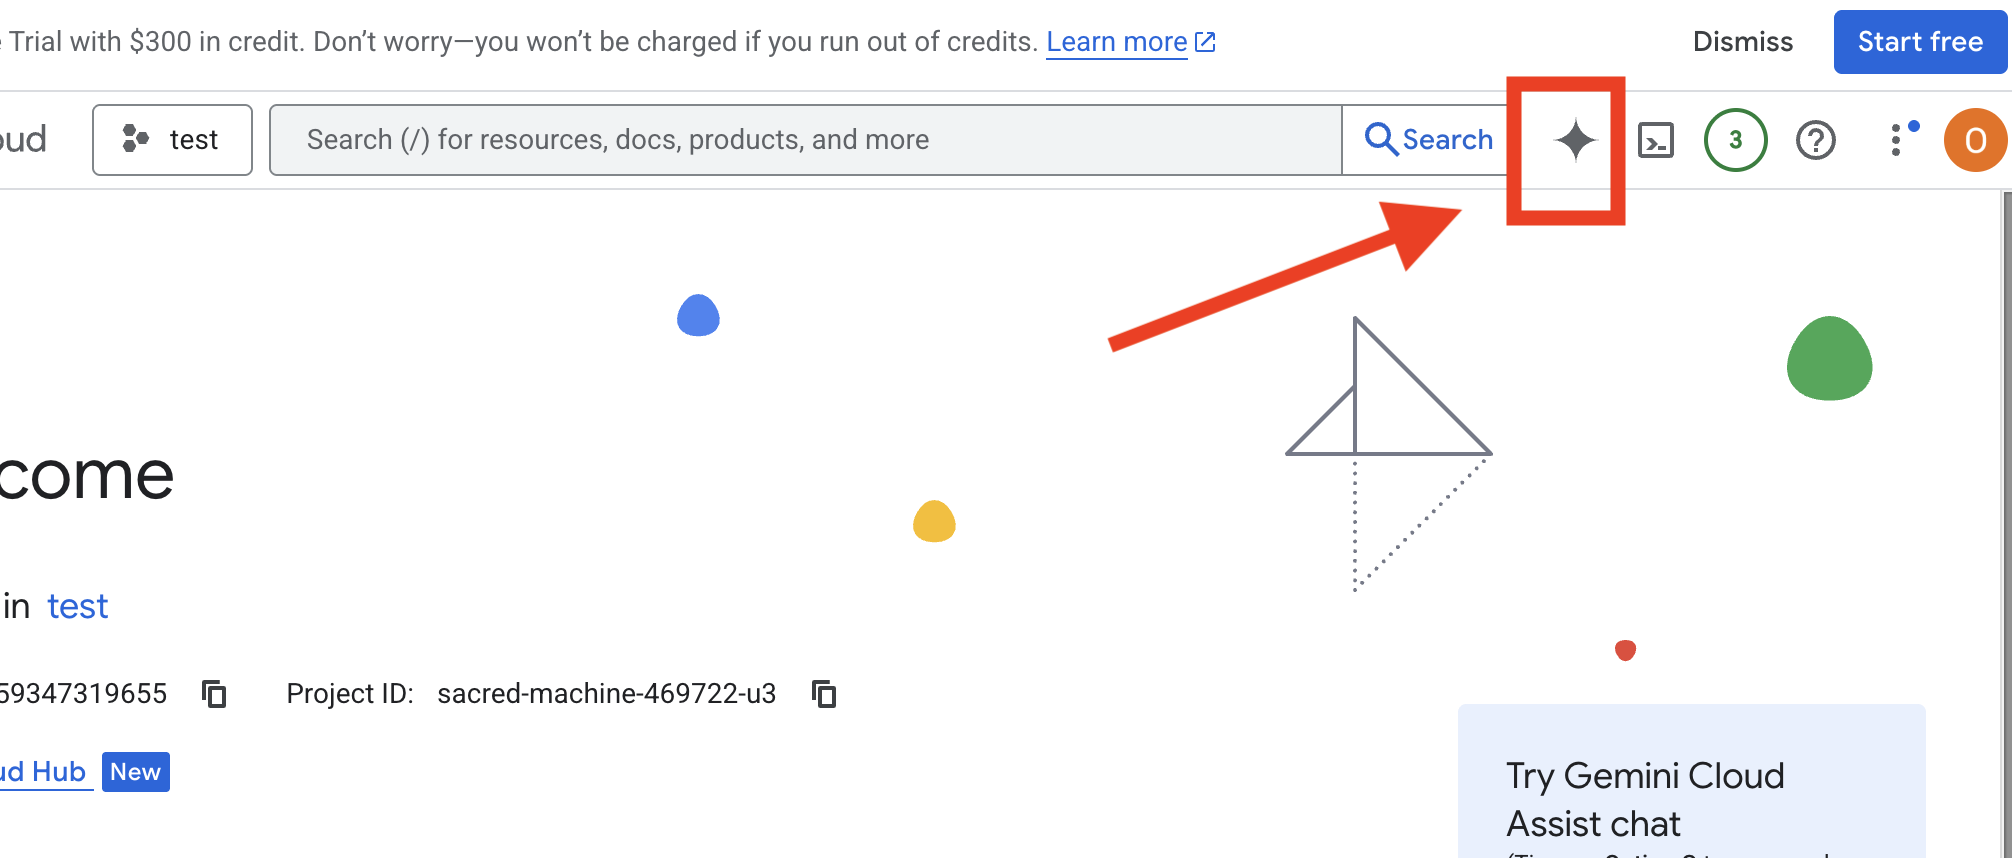
- פותחים את מסוף Google Cloud: [https://console.cloud.google.com](Google Cloud Console)
- בפינה השמאלית העליונה, לוחצים על 'פתיחת צ'אט עם Cloud Assist'.
הפעלת Cloud Assist
- לוחצים על
Get Gemini Assistואז עלEnable Cloud Assist at no cost. - ואז מתחילים לדבר בצ'אט.
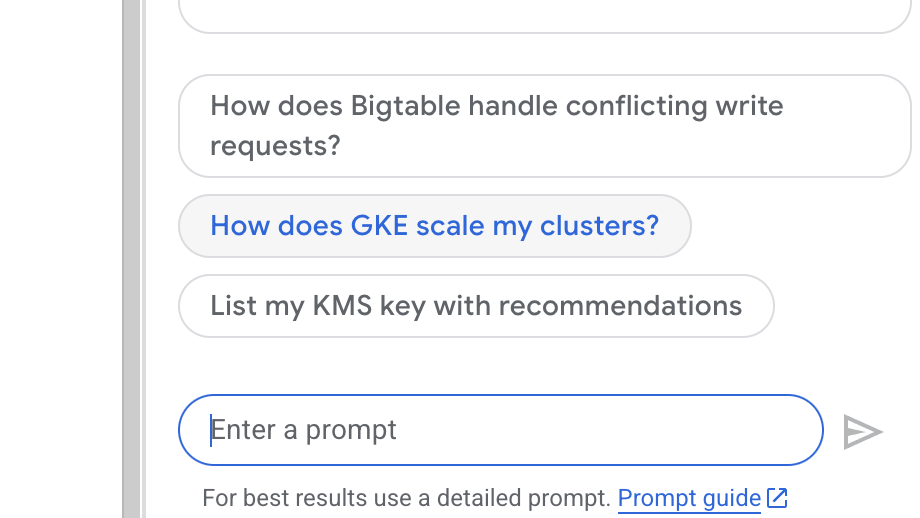 מעתיקים את ההנחיה המפורטת הבאה אל Cloud Assist:
הזנת הרעיון
Generate a Python web application that uses AI to generate children's stories and illustrations. It has Python backend and React frontend host separately on Cloudrun. They communicate through Websocket. It needs to use a generative model for text and another for images. The generated images must be used by Imagen from Vertex AI and stored in a Google Cloud Storage bucket so that frontend can fetch from the bucket to render images. I do not want any load balancer or a database for the story text. We need a solution to store the API key.
קבלת תוכנית האפליקציה
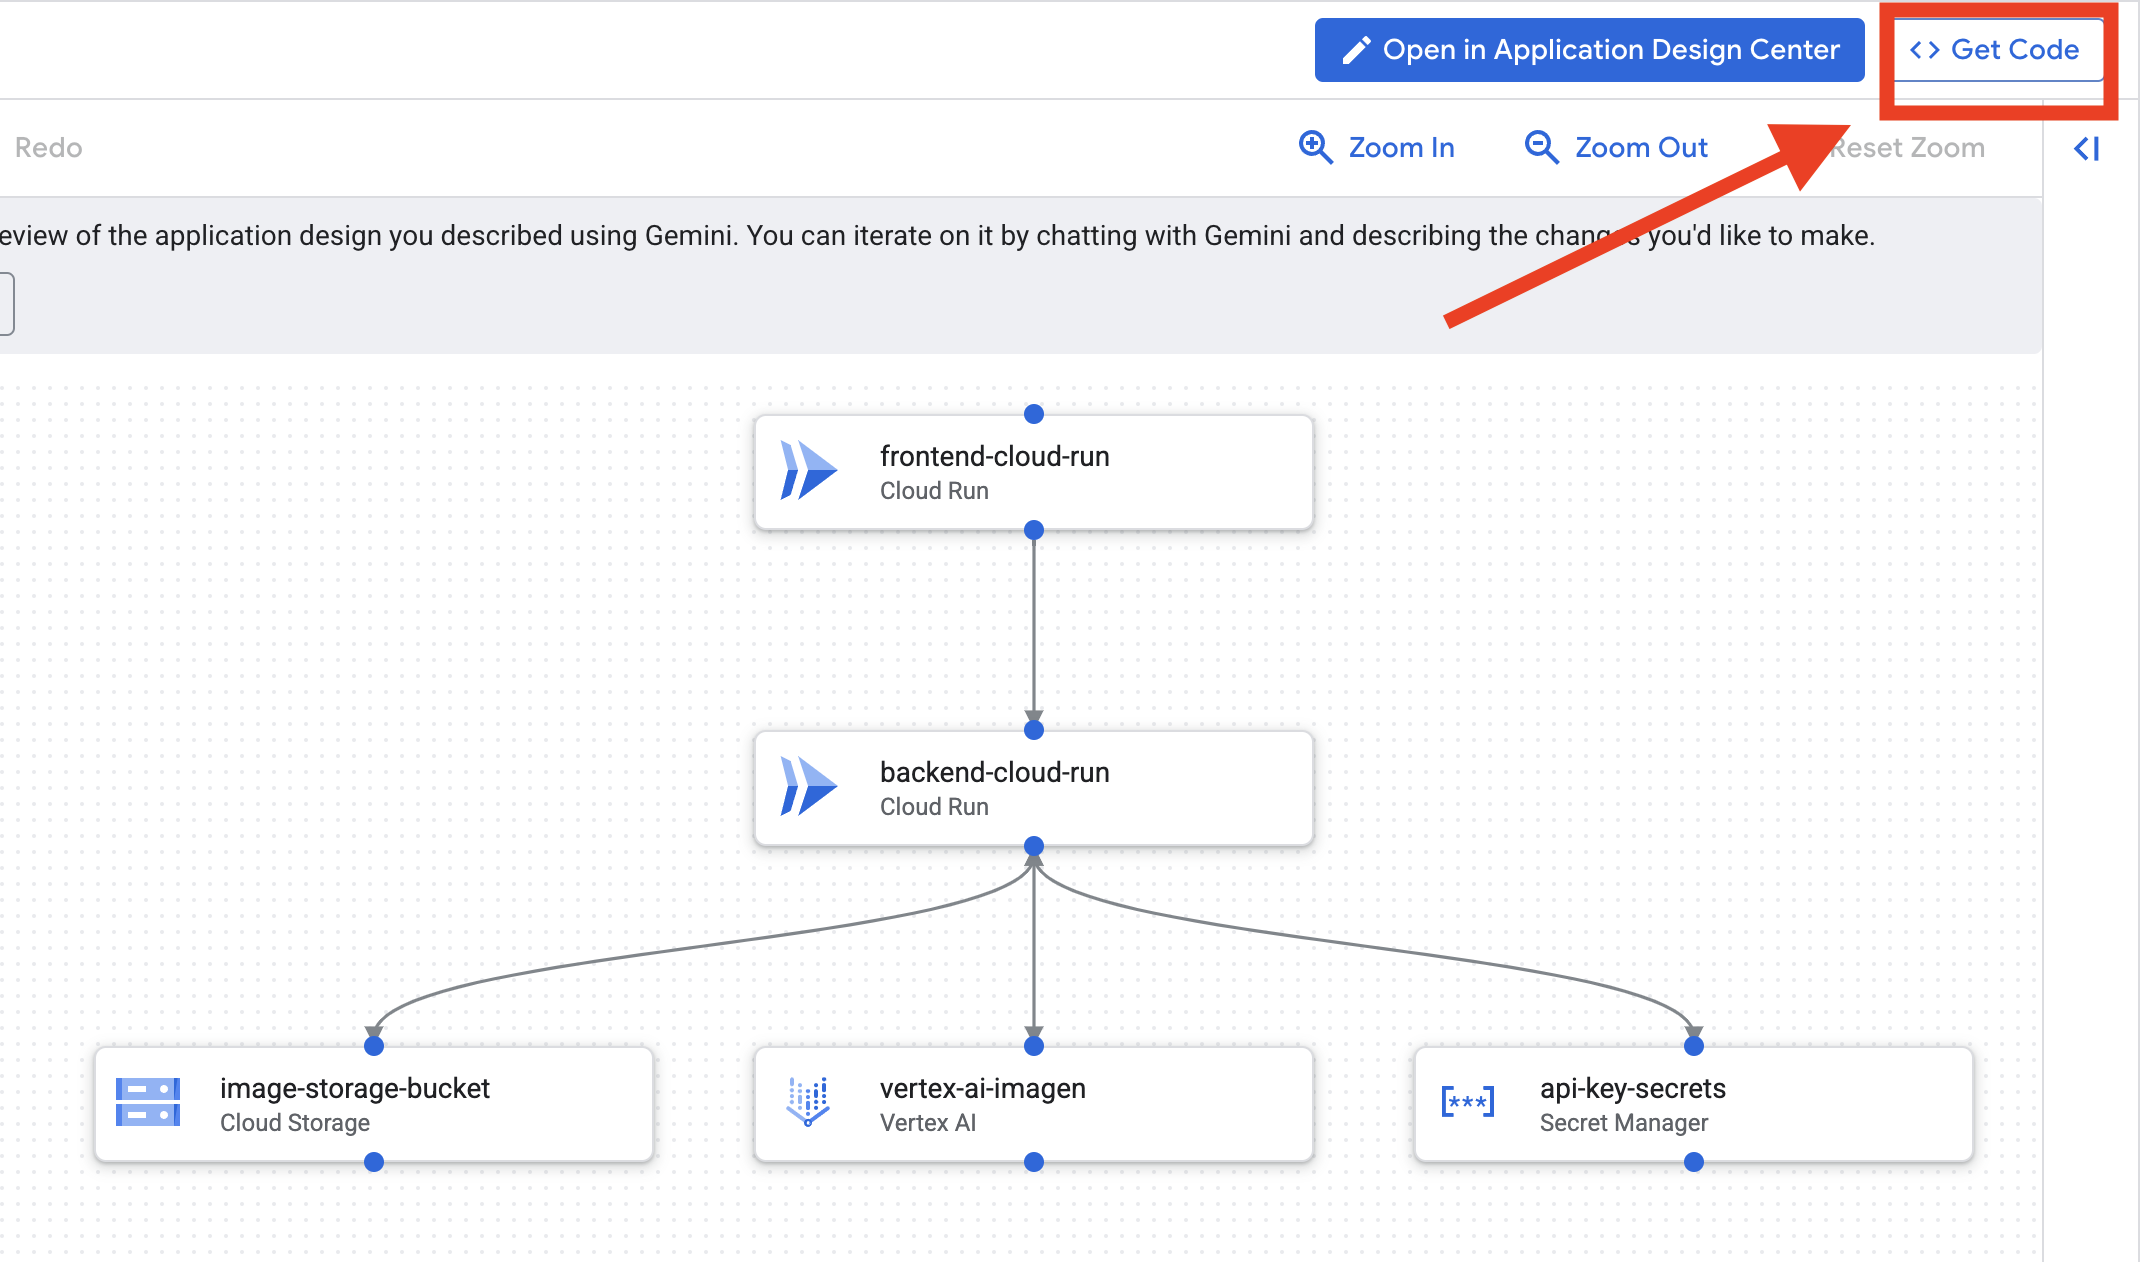
- לוחצים על 'עריכת עיצוב האפליקציה' ורואים את הדיאגרמה. לוחצים על החלונית הימנית העליונה "<> Get Code" (קבלת קוד) כדי להוריד את קוד Terraform.
- Cloud Assist ייצור תרשים ארכיטקטורה. זו התוכנית הוויזואלית שלנו.
לא צריך לעשות שום דבר עם הקוד הזה. הסבר נוסף מופיע בהמשך
הסבר על קוד Terraform שנוצר קיבלתם עכשיו קבוצה מלאה של קובצי Terraform מ-Cloud Assist. בשלב הזה לא נדרשת פעולה כלשהי עם הקוד הזה, אבל נסביר בקצרה מה הוא ולמה הוא כל כך יעיל.
מה זה Terraform? Terraform הוא כלי של תשתית כקוד (IaC). אפשר לחשוב על זה כעל תוכנית לסביבת הענן שלכם, שנכתבת בקוד. במקום ללחוץ באופן ידני במסוף Google Cloud כדי ליצור שירותים, אחסון והרשאות, אתם מגדירים את כל המשאבים האלה בקובצי ההגדרה האלה. לאחר מכן, Terraform קורא את התוכנית ומבנה את הסביבה המדויקת הזו בשבילכם באופן אוטומטי.
מתוכנית חזותית לקוד הפעלה. תרשים הארכיטקטורה ש-Cloud Assist סיפק הוא התוכנית החזותית שלכם. קוד Terraform הוא הגרסה שניתנת לקריאה על ידי מכונה של אותה תוכנית. זהו הקישור הקריטי שהופך קונספט עיצובי למציאות אוטומטית שניתן לשחזר. הגדרת התשתית בקוד מאפשרת לכם:
- יצירה אוטומטית: בנייה מהימנה של אותה סביבה שוב ושוב.
- שימוש בניהול גרסאות: מעקב אחר שינויים בתשתית ב-Git, בדיוק כמו בקוד האפליקציה.
- מניעת שגיאות: לא תצטרכו ללחוץ על ממשק אינטרנט, ולכן לא תהיה אפשרות לטעות.
בסדנה הזו לא תצטרכו להריץ את קוד Terraform בעצמכם. אפשר לחשוב על זה כעל תוכנית מקצועית – "מפתח התשובות" – לתשתית שתבנו ותפרסו בשלבים הבאים.
4. פיתוח: מבוא ל-Gemini CLI
👈💻 בטרמינל של Cloud Shell, עוברים לספרייה האישית.
cd ~/storygen-learning
👈💻 רוצים לנסות את Gemini בפעם הראשונה?
clear
gemini --model=gemini-2.5-flash
אם מוצגת בקשה Do you want to connect Cloud Shell editor to Gemini CLI?, בוחרים באפשרות לא.
👈✨ לכל כלי של Gemini יש תיאור. כדאי לקרוא אותם עכשיו. בהנחיה ל-Gemini, מקלידים:
ב-Gemini CLI
/help
👈✨ ל-Gemini CLI יש קבוצה משלו של יכולות מובנות. כדי לבדוק אותם:
ב-Gemini CLI
/tools
תוצג רשימה שכוללת את ReadFile, WriteFile ו-GoogleSearch. אלה הטכניקות שמוגדרות כברירת מחדל שאפשר להשתמש בהן בלי להסתמך על ארסנל חיצוני.
👈✨ Gemini Blade יכול להכיל "מודעות טקטית" (הקשר) כדי להנחות את הפעולות שלו.
ב-Gemini CLI
/memory show
הוא ריק כרגע.
👈✨ קודם צריך להוסיף פרסונה לזיכרון של הסוכן. כך מגדירים את תחום המומחיות:
ב-Gemini CLI
/memory add "I am master at python development"
מריצים שוב את /memory show כדי לוודא שהלהב ספג את הידע הזה.
👈✨ כדי להדגים איך יוצרים הפניה לקבצים באמצעות הסמל @, ניצור קודם קובץ בשם 'תדריך למשימה'.
פותחים טרמינל חדש ומריצים את הפקודה הבאה כדי ליצור את קובץ המשימה:
!echo "## Mission Objective: Create Imagen ADK Agent for Story Book" > mission.md
👉✨עכשיו, מזינים פקודה ל-Gemini CLI כדי לנתח את התדרוך ולדווח על הממצאים:
ב-Gemini CLI
Explain the contents of the file @mission.md
הנשק העיקרי שלכם מודע עכשיו למטרה שלו.
👈💻 לוחצים על Ctrl+C פעמיים כדי לצאת מ-Gemini CLI
למידה:
איך Gemini CLI מקבל את היכולות המתקדמות שלו: gemini.md לפני שנמשיך, חשוב להבין איך אפשר להתאים את Gemini CLI לפרויקט ספציפי. אפשר להשתמש בו ככלי צ'אט לשימוש כללי, אבל העוצמה האמיתית שלו נובעת מקובץ תצורה מיוחד: gemini.md.
כשמריצים את הפקודה gemini, היא מחפשת אוטומטית קובץ gemini.md בספרייה הנוכחית. הקובץ הזה משמש כהוראות הפעלה ספציפיות לפרויקט עבור ה-AI. אפשר להגדיר בו שלושה דברים עיקריים:
- פרסונה: אתם יכולים להגיד ל-AI מי הוא צריך להיות. לדוגמה, "אתה מפתח Python מומחה שמתמחה ב-Google Cloud". כך התשובות והסגנון שלו יהיו ממוקדים יותר.
- כלים: אתם יכולים לתת לו גישה לקבצים ספציפיים (@file.py) או אפילו לחיפושים ב-Google (@google). כך ה-AI מקבל את ההקשר שהוא צריך כדי לענות על שאלות לגבי הקוד של הפרויקט.
- זיכרון: אתם יכולים לספק עובדות או כללים שה-AI צריך לזכור תמיד לגבי הפרויקט הזה, כדי לשמור על עקביות.
כשמשתמשים בקובץ gemini.md, הופכים את מודל Gemini הגנרי לעוזר מומחה שכבר קיבל תדרוך לגבי המטרות של הפרויקט ויש לו גישה למידע הנכון.
5. פיתוח: יצירת ADK באמצעות Gemini CLI

הגדרת הסביבה
עוברים אל Cloud Shell ולוחצים על הלחצן Open Terminal (פתיחת טרמינל).
- מעתיקים את תבנית הסביבה:
cd ~/storygen-learning
cp ~/storygen-learning/env.template ~/storygen-learning/.env
הצגת קובץ מוסתר בעורך אם לא מוצאים את הקובץ .env
- לוחצים על תצוגה בסרגל התפריטים העליון.
- בוחרים באפשרות החלפת קבצים נסתרים.
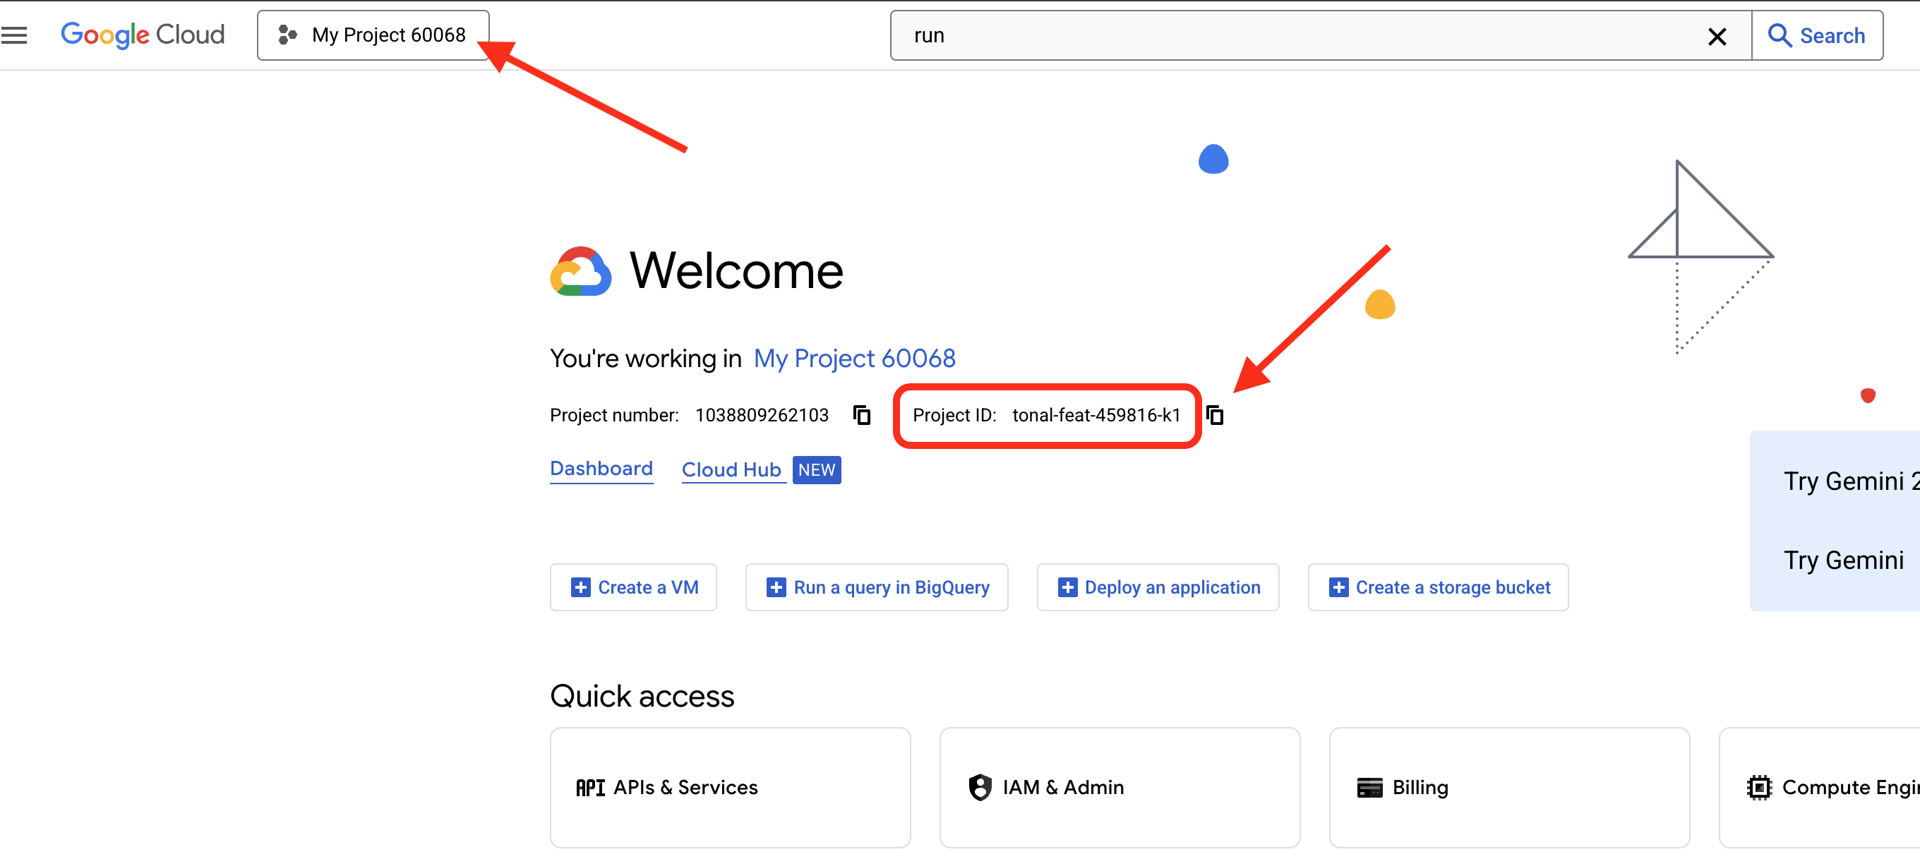
👈איך מוצאים את מזהה הפרויקט ב-Google Cloud:
- פותחים את מסוף Google Cloud: קישור
- בוחרים את הפרויקט שבו רוצים להשתמש בסדנה הזו מהתפריט הנפתח של הפרויקטים בחלק העליון של הדף.
- מזהה הפרויקט מוצג בכרטיסיית מידע של הפרויקט במרכז הבקרה
👈איך מוצאים את שם המשתמש ב-GitHub:
- נכנסים ל-GitHub ומחפשים את שם המשתמש ב-GitHub
עריכת קובץ .env 2. מחליפים את הערכים הבאים ב-.env:
GOOGLE_API_KEY=[REPLACE YOUR API KEY HERE]
GOOGLE_CLOUD_PROJECT_ID=[REPLACE YOUR PROJECT ID]
GITHUB_USERNAME=[REPLACE YOUR USERNAME]
GENMEDIA_BUCKET=[REPLACE YOUR PROJECT ID]-bucket
לדוגמה, אם מזהה הפרויקט הוא: testproject, צריך להזין GOOGLE_CLOUD_PROJECT_ID=testproject ו-GENMEDIA_BUCKET=testproject-bucket
הגדרת סקריפטים
עוברים אל 00_Starting_Here פותחים טרמינל חדש (לא ב-Gemini CLI)
cd ~/storygen-learning/00_Starting_Here
מריצים את תהליך ההגדרה המלא:
./setup-complete.sh
תוצאות ההגדרה אמורות להופיע במסוף
יצירת הסוכן הראשון
עוברים אל 01a_First_Agent_Ready נשתמש ב-Gemini CLI כדי ליצור את סוכן ADK:**
cd ~/storygen-learning/01a_First_Agent_Ready
פתיחת Gemini CLI
gemini
בחלון של Gemini CLI, מנסים את ההנחיה:
I need you to help me create a Google ADK (Agent Development Kit) agent for story generation. I'm working on a children's storybook app that generates creative stories with visual scenes.

Please create a complete `agent.py` file that implements an LlmAgent using Google's ADK framework. The agent should:

**Requirements:**
1. Use the `google.adk.agents.LlmAgent` class
2. Use the "gemini-2.5-flash" model (supports streaming)
3. Be named "story_agent"
4. Generate structured stories with exactly 4 scenes each
5. Output valid JSON with story text, main characters, and scene data
6. No tools needed (images are handled separately)

**Agent Specifications:**
- **Model:** gemini-2.5-flash
- **Name:** story_agent
- **Description:** "Generates creative short stories and accompanying visual keyframes based on user-provided keywords and themes."
**Story Structure Required:**
- Exactly 4 scenes: Setup → Inciting Incident → Climax → Resolution
- 100-200 words total
- Simple, charming language for all audiences
- Natural keyword integration
**JSON Output Format:**

{
  "story": "Complete story text...",
  "main_characters": [
    {
      "name": "Character Name",
      "description": "VERY detailed visual description with specific colors, features, size, etc."
    }
  ],
  "scenes": [
    {
      "index": 1,
      "title": "The Setup",
      "description": "Scene action and setting WITHOUT character descriptions",
      "text": "Story text for this scene"
    }
    // ... 3 more scenes
  ]
}


**Key Instructions for the Agent:**
- Extract 1-2 main characters maximum
- Character descriptions should be extremely detailed and visual
- Scene descriptions focus on ACTION and SETTING only
- Do NOT repeat character appearance in scene descriptions
- Always respond with valid JSON

Please include a complete example in the instructions showing the exact format using keywords like "tiny robot", "lost kitten", "rainy city".

The file should start with necessary imports, define an empty tools list, include a print statement for initialization, and then create the LlmAgent with all the detailed instructions.

Can you create this agent in backend/story_agent/agent.py
אחרי שמסיימים, משביתים את הטרמינל של Gemini CLI באמצעות Control+C.
—————————————— אופציונלי, אפשר לדלג לחלק הפתרון ——————————————
אימות השינוי ב-ADK Web
cd ~/storygen-learning/01a_First_Agent_Ready/backend

source ../../.venv/bin/activate

adk web --port 8080
כדי להמשיך, תצטרכו שורת פקודה.
Spin Up The Website
cd ~/storygen-learning/01a_First_Agent_Ready

./start.sh
אם השינוי לא פועל, צפויות להופיע שגיאות בממשק המשתמש של ADK Web ובאתר.
—————————————— הפתרון מתחיל כאן ———————————————
המוצר
מפסיקים את התהליך הקודם באמצעות Control+C או פותחים טרמינל אחר:
cd ~/storygen-learning/01b_First_Agent_Done
הפעלת האתר:
./start.sh
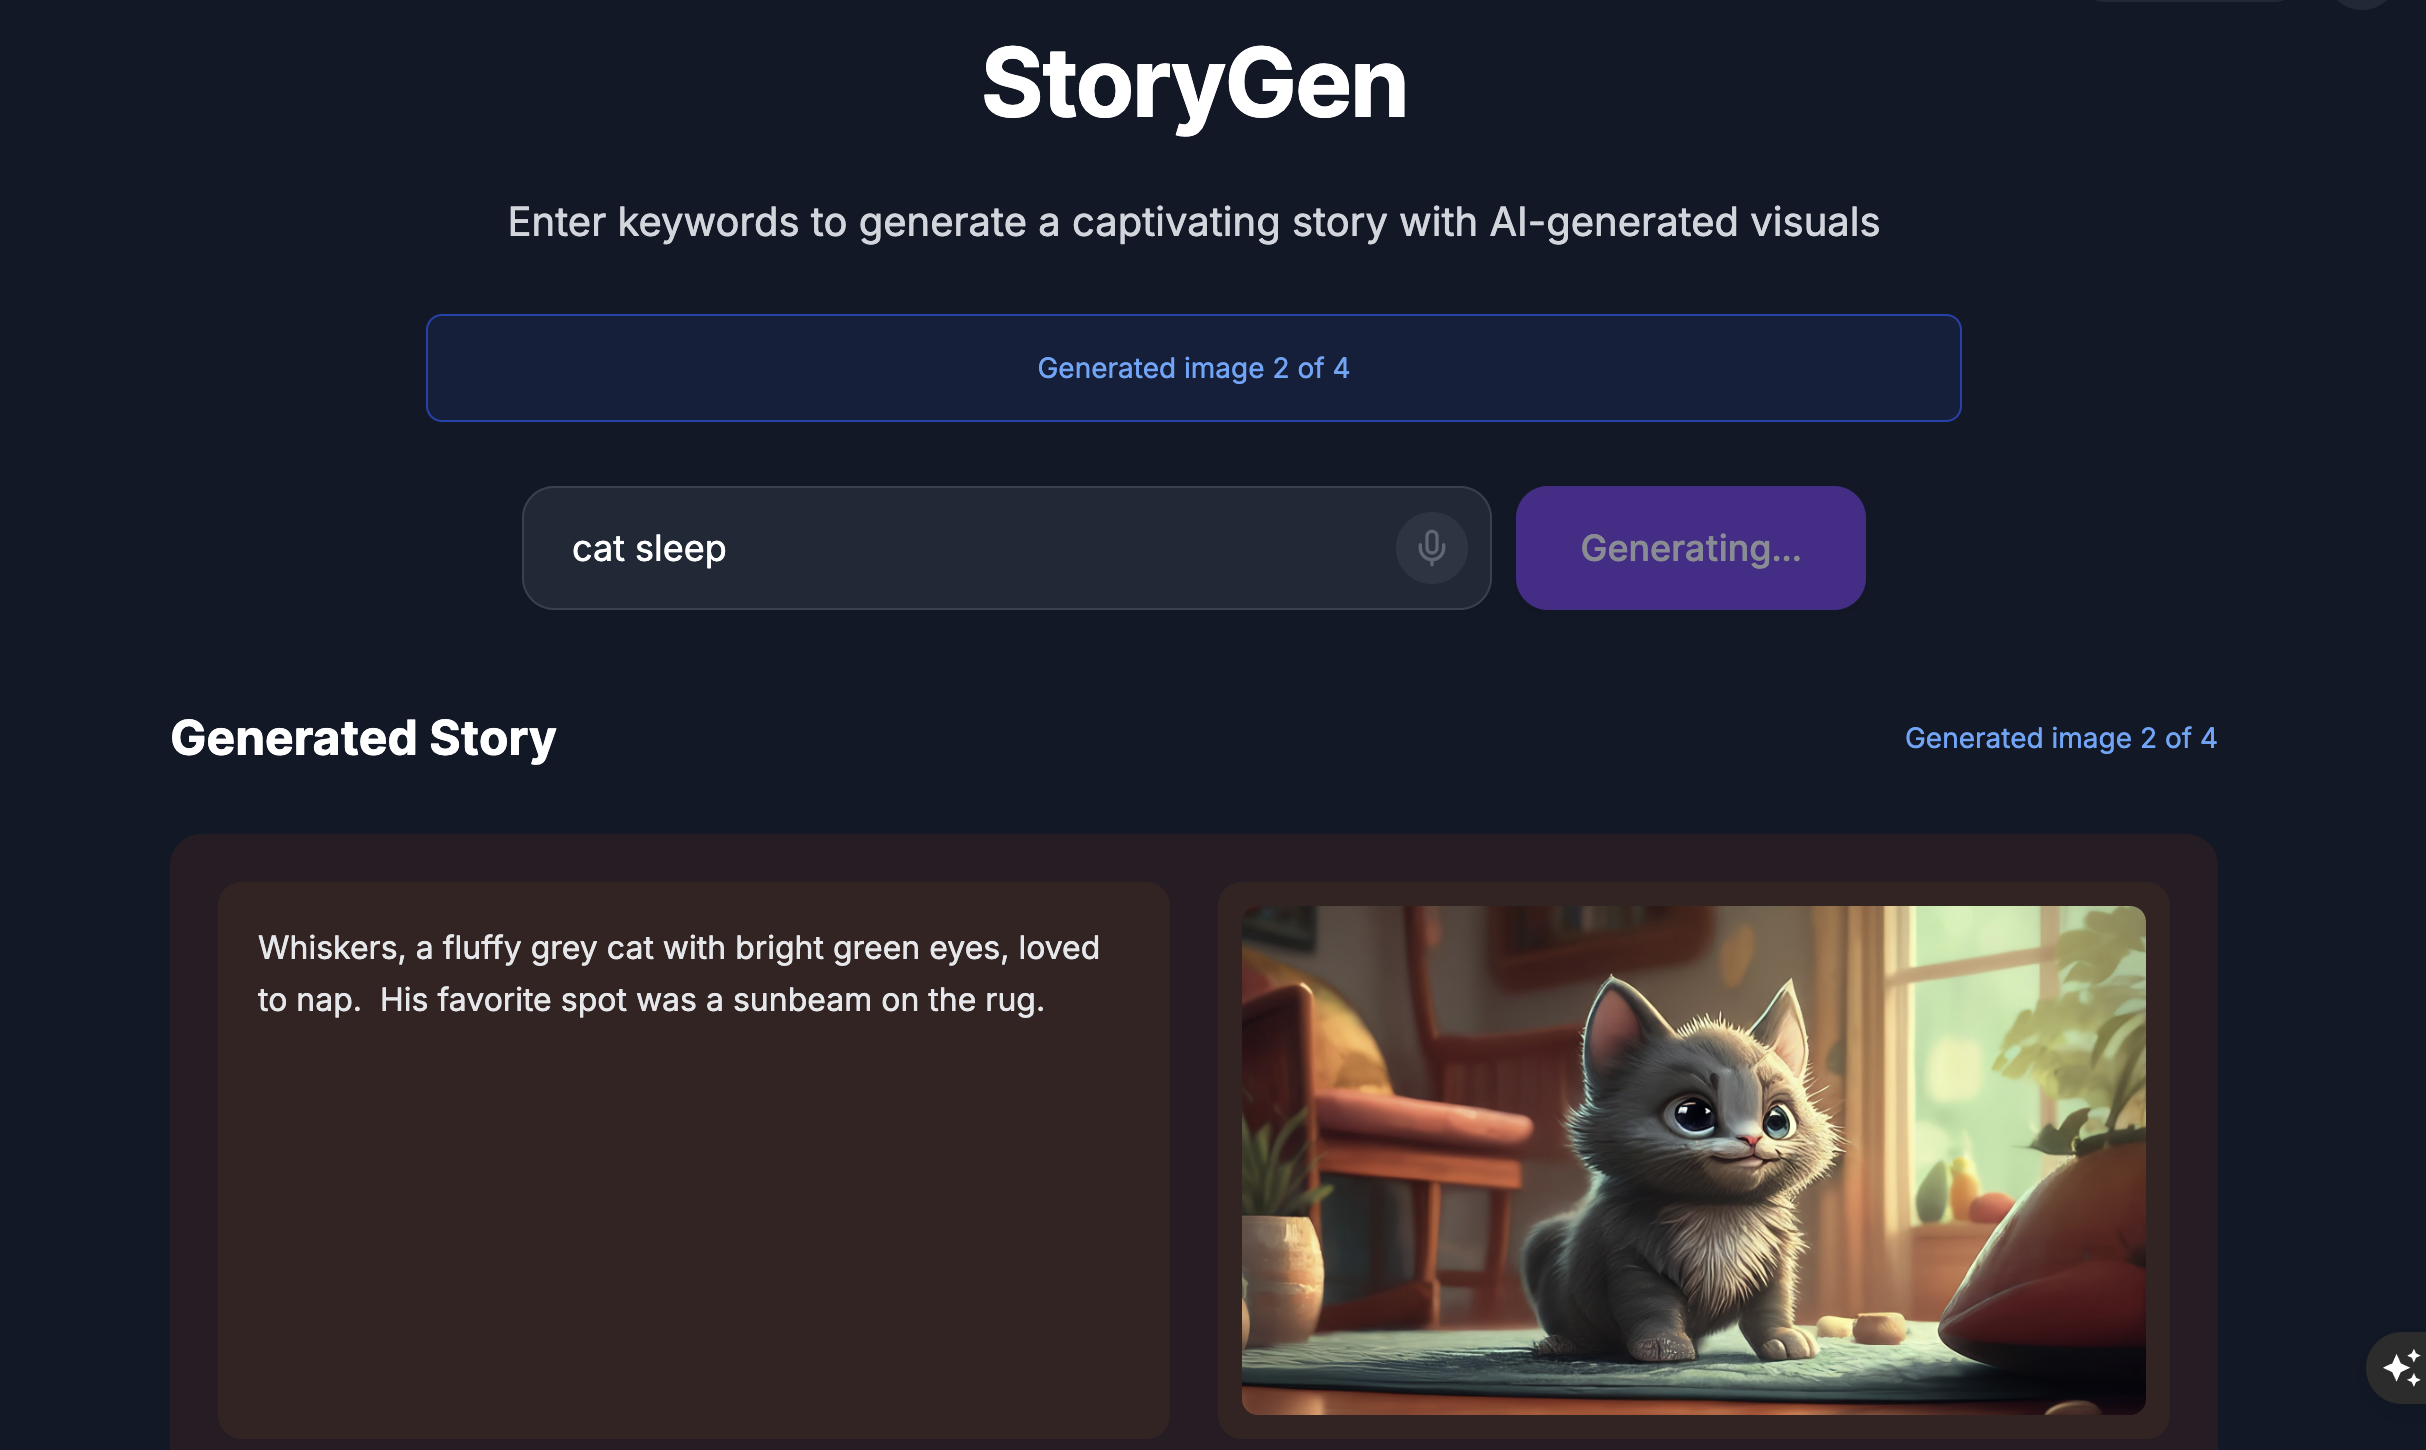
האתר יוצג:
מנסים את ממשק המשתמש של ADK: פותחים טרמינל נוסף:
cd ~/storygen-learning/01b_First_Agent_Done/backend
source ../../.venv/bin/activate

adk web --port 8080
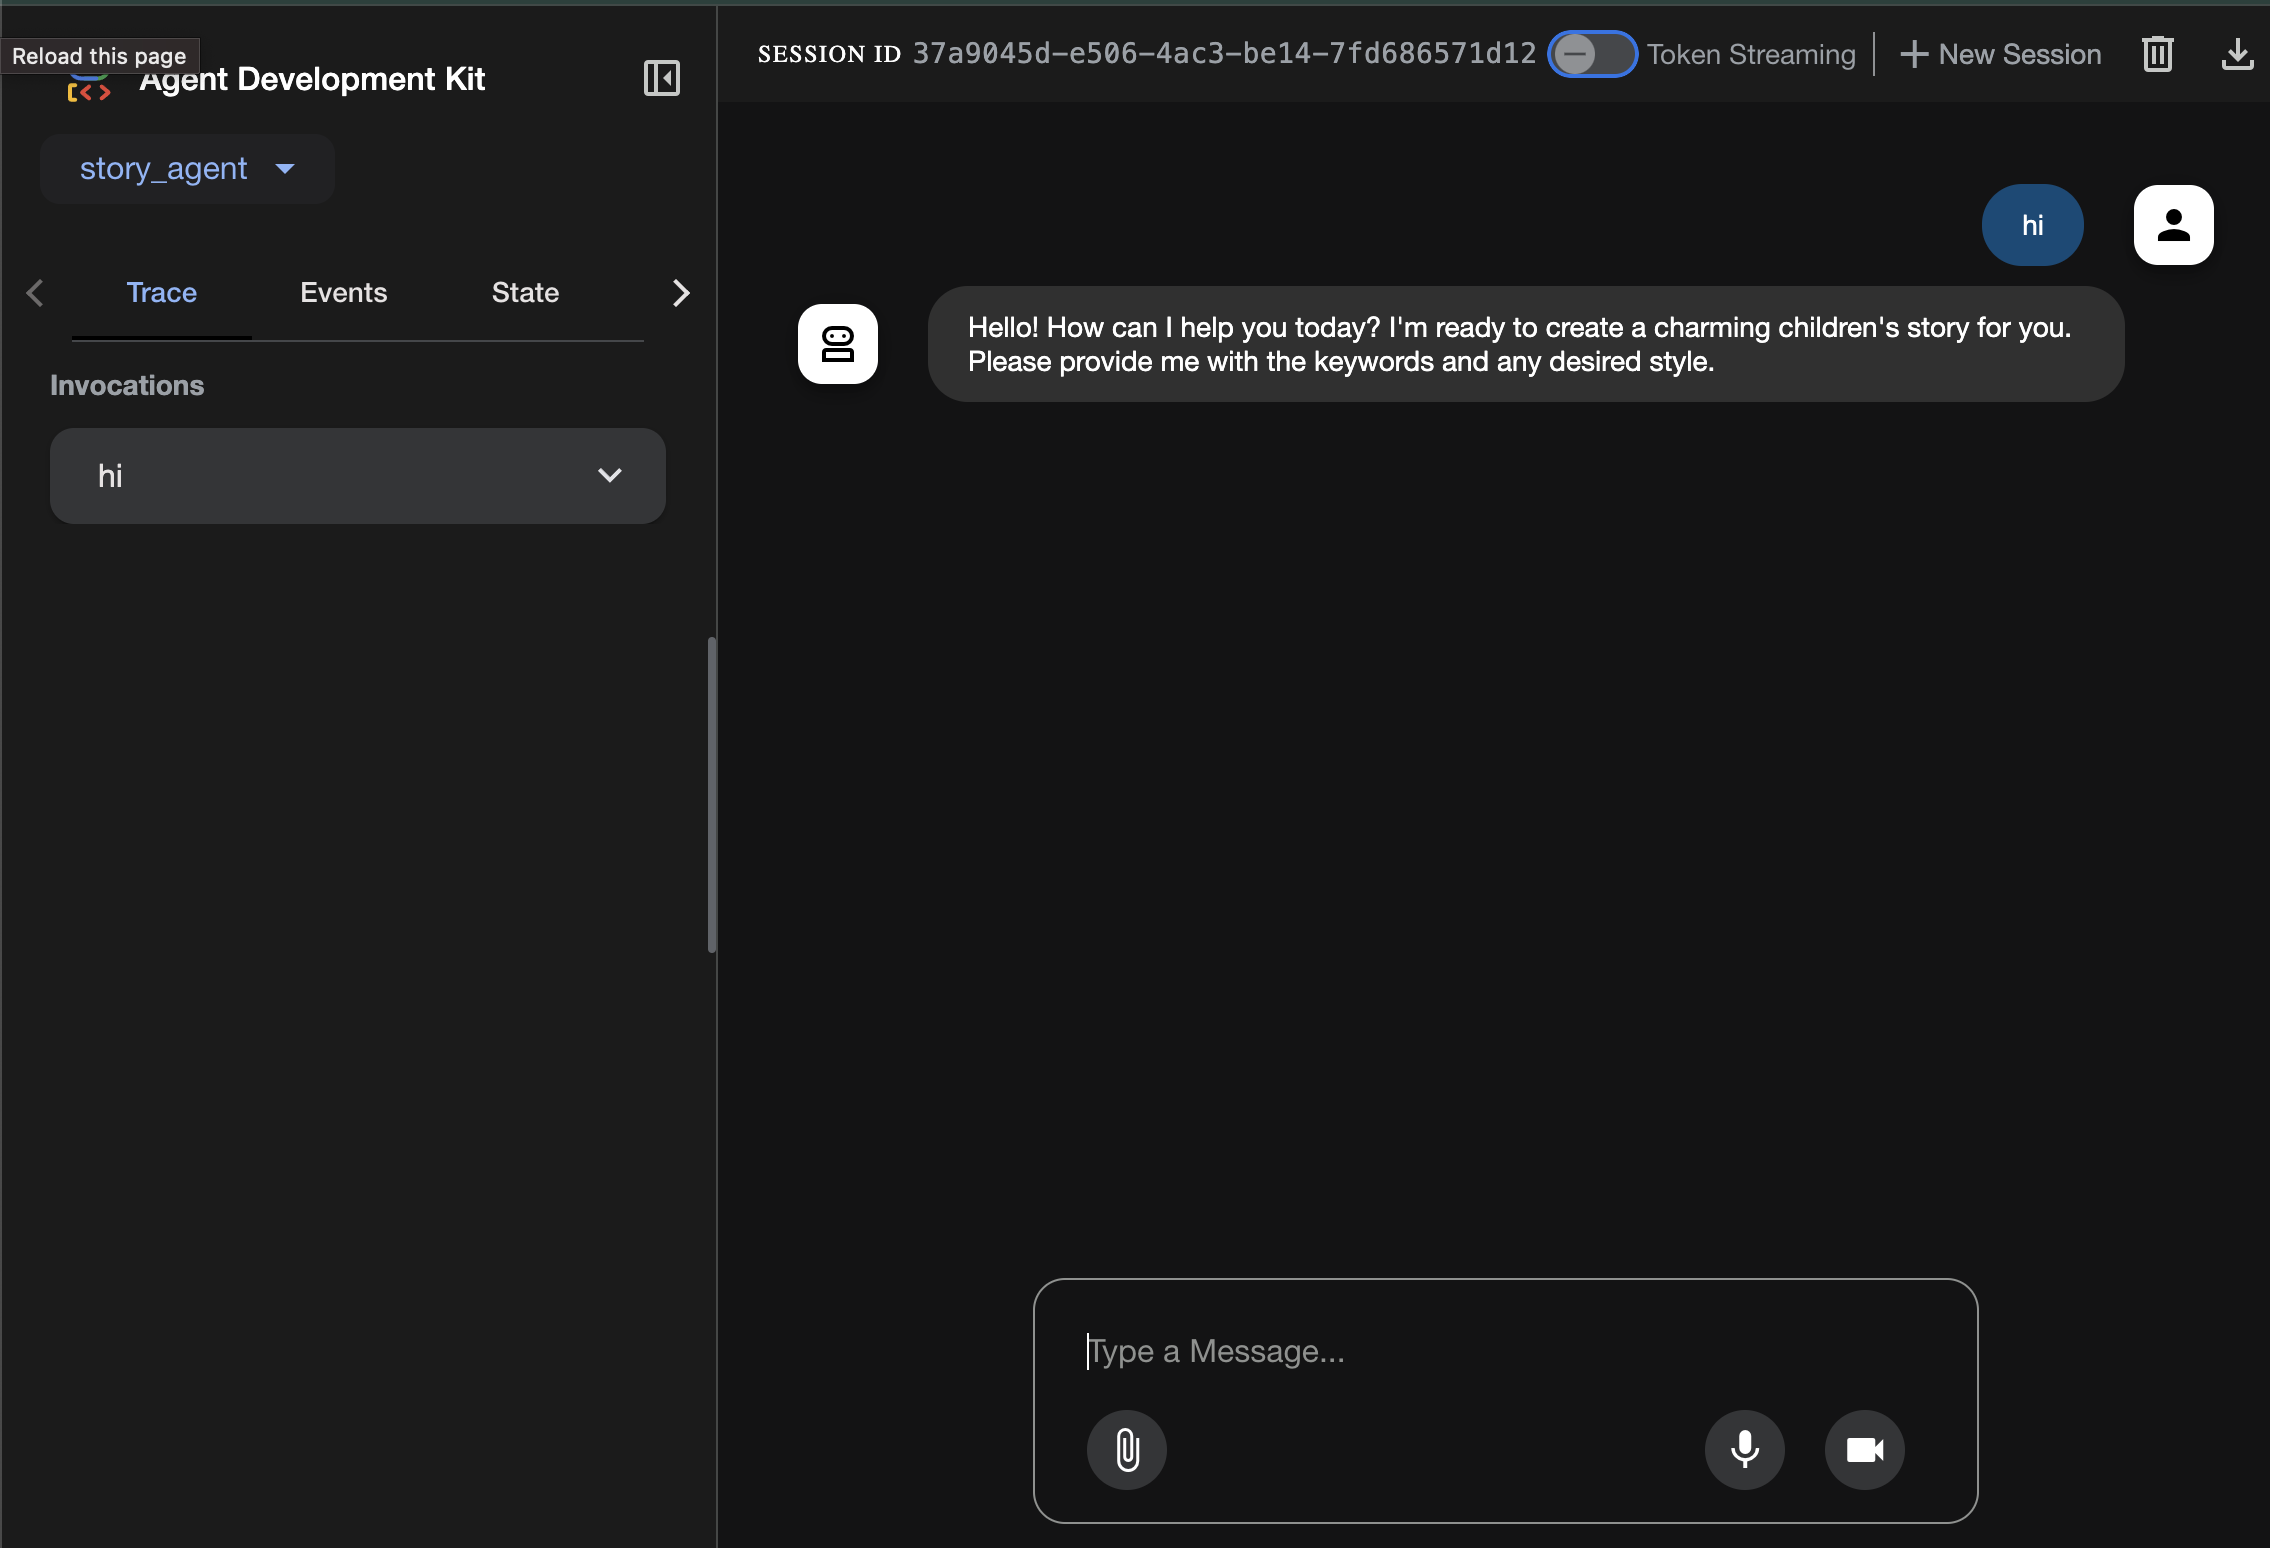
יוצג ממשק המשתמש של ADK שבו אפשר לשאול שאלות את הסוכן
לפני שעוברים לקטע הבא, מקישים על Ctrl+C כדי לסיים את התהליך.
6. פיתוח: יצירת ADK באמצעות Gemini CLI – (שיטה של הנדסת הקשר)
הגדרה ראשונית
מוודאים שמחקנו את קובץ הסוכן שיצרנו קודם, ב-01a_First_Agent_Ready/backend/story_agent/agent.py:
עוברים אל 01a_First_Agent_Ready נשתמש ב-Gemini CLI כדי ליצור את סוכן ADK:**
cd ~/storygen-learning/01a_First_Agent_Ready/backend
פתיחת Gemini CLI
gemini
בחלון של Gemini CLI, מנסים את ההנחיה:
Summarize the design doc @design.md for me, do not attempt to create file just yet.
👉💻 כדי לצאת מ-Gemini לרגע, לוחצים פעמיים על Ctrl+C.
👈💻 בטרמינל, מריצים את הפקודה הבאה כדי לכתוב את קובץ ההנחיות.
cat << 'EOF' > GEMINI.md
  ### **Coding Guidelines**
  **1. Python Best Practices:**

  *   **Type Hinting:** All function and method signatures should include type hints for arguments and return values.
  *   **Docstrings:** Every module, class, and function should have a docstring explaining its purpose, arguments, and return value, following a consistent format like reStructuredText or
  Google Style.
  *   **Linter & Formatter:** Use a linter like `ruff` or `pylint` and a code formatter like `black` to enforce a consistent style and catch potential errors.
  *   **Imports:** Organize imports into three groups: standard library, third-party libraries, and local application imports. Sort them alphabetically within each group.
  *   **Naming Conventions:**
      *   `snake_case` for variables, functions, and methods.
      *   `PascalCase` for classes.
      *   `UPPER_SNAKE_CASE` for constants.
  *   **Dependency Management:** All Python dependencies must be listed in a `requirements.txt` file.

  **2. Web APIs (FastAPI):**

  *   **Data Validation:** Use `pydantic` models for request and response data validation.
  *   **Dependency Injection:** Utilize FastAPI's dependency injection system for managing resources like database connections.
  *   **Error Handling:** Implement centralized error handling using middleware or exception handlers.
  *   **Asynchronous Code:** Use `async` and `await` for I/O-bound operations to improve performance.
EOF
cat GEMINI.md
אחרי שכתבנו את החוקים, נזמן מחדש את שותף ה-AI שלנו ונראה את הקסם של הארטיפקט.
👈💻 מפעילים מחדש את Gemini CLI מהספרייה shadowblade:
cd ~/storygen-learning/01a_First_Agent_Ready/backend
clear
gemini
👉✨ עכשיו, מבקשים מ-Gemini להראות לכם מה הוא חושב. הרונות נקראו.
/memory show
👈✨ זוהי הפקודה היחידה והעוצמתית שתבנה את הסוכן. אני רוצה להנפיק אותו עכשיו:
You are an expert Python developer specializing in the Google Agent Development Kit (ADK). Your task is to write the complete, production-quality code for `agent.py` by following the technical specifications outlined in the provided design document verbatim.

Analyze the design document at `@design.md` and generate the corresponding Python code for `agent.py`.

I need you to generate a Python script based on the provided design document and reference examples. Follow these requirements:

Read the design document carefully - it contains the complete technical specification for the code you need to write
Follow the structure and patterns shown in the reference context files
Adhere to all Python best practices specified in the coding standards document
Implement every requirement mentioned in the design document exactly as specified
Use the exact variable names, function names, and string values mentioned in the specifications

The design document describes the complete architecture, dependencies, configuration, and logic flow. Your generated code must match these specifications precisely while following professional Python coding standards.
Generate clean, production-ready Python code that can be used immediately without modifications.
אחרי שמסיימים, משביתים את הטרמינל של Gemini CLI באמצעות Control+C.
—————————————— אופציונלי, אפשר לדלג לחלק הפתרון ——————————————
אימות השינוי ב-ADK Web
cd ~/storygen-learning/01a_First_Agent_Ready/backend

source ../../.venv/bin/activate

adk web --port 8080
כדי להמשיך, תצטרכו שורת פקודה.
Spin Up The Website
cd ~/storygen-learning/01a_First_Agent_Ready

./start.sh
אם השינוי לא פועל, צפויות להופיע שגיאות בממשק המשתמש של ADK Web ובאתר.
—————————————— הפתרון מתחיל כאן ———————————————
המוצר
מפסיקים את התהליך הקודם באמצעות Control+C או פותחים טרמינל אחר:
cd ~/storygen-learning/01b_First_Agent_Done
הפעלת האתר:
./start.sh
האתר יוצג:
מנסים את ממשק המשתמש של ADK: פותחים טרמינל נוסף:
cd ~/storygen-learning/01b_First_Agent_Done/backend
source ../../.venv/bin/activate

adk web --port 8080
יוצג ממשק המשתמש של ADK שבו אפשר לשאול שאלות את הסוכן
לפני שעוברים לקטע הבא, מקישים על Ctrl+C כדי לסיים את התהליך.
7. פיתוח: יצירת סוכן בהתאמה אישית באמצעות Imagen
יצירת כלי Imagen (הסוכן השני)
cd ~/storygen-learning/02a_Image_Agent_Ready
משתמשים ב-Gemini CLI כדי ליצור את הסוכן ליצירת תמונות:
gemini generate "I need you to help me create a custom Google ADK (Agent Development Kit) agent for image generation. This is different from the story agent - this one handles image generation directly using the BaseAgent pattern for full control over tool execution.

Please create a complete `agent.py` file that implements a custom image generation agent. The agent should:

**Requirements:**
1. Use the `google.adk.agents.BaseAgent` class (NOT LlmAgent)
2. Be named "custom_image_agent"
3. Directly execute the ImagenTool without LLM intermediation
4. Handle JSON input with scene descriptions and character descriptions
5. Store results in session state for retrieval by main.py
6. Use async generators and yield Events

**Key Specifications:**
- **Class Name:** CustomImageAgent (inherits from BaseAgent)
- **Agent Name:** "custom_image_agent"
- **Tool:** Uses ImagenTool for direct image generation
- **Purpose:** Bypass LLM agent limitations and directly call ImagenTool

**Input Format:**
The agent should handle JSON input like:
{
  "scene_description": "Scene action and setting",
  "character_descriptions": {
    "CharacterName": "detailed visual description"
  }
}


**Core Method:** `async def _run_async_impl(self, ctx: InvocationContext) -> AsyncGenerator[Event, None]:`
   - Extract user message from `ctx.user_content.parts`
   - Parse JSON input or fallback to plain text
   - Extract scene_description and character_descriptions
   - Build image prompt with style prefix: "Children's book cartoon illustration with bright vibrant colors, simple shapes, friendly characters."
   - Include character descriptions for consistency
   - Call `await self.imagen_tool.run()` directly
   - Store results in `ctx.session.state["image_result"]`
   - Yield Event with results


 **Session State:**
   - Store JSON results in `ctx.session.state["image_result"]`
   - Include success/error status
   - Store actual image URLs or error messages

Expected Output Structure:
- Successful results stored as JSON with image URLs
- Error results stored as JSON with error messages
- Results accessible via session state in main.py

Can you create this agent in backend/story_image_agent/agent.py

"
—————————————— אופציונלי, אפשר לדלג לחלק הפתרון ——————————————
אימות השינוי ב-ADK Web
cd ~/storygen-learning/02a_Image_Agent_Ready/backend

source ../../.venv/bin/activate

adk web --port 8080
Spin Up The Website
cd ~/storygen-learning/02a_Second_Agent_Ready

./start.sh
אם השינוי לא פועל, צפויות להופיע שגיאות בממשק המשתמש של ADK Web ובאתר.
—————————————- Solution Starting Here ——————————————–
המוצר
מפסיקים את התהליך הקודם באמצעות Control+C או פותחים טרמינל אחר:
# Open new terminal
cd ~/storygen-learning/02b_Image_Agent_Done
הפעלת האתר:
./start.sh
האתר יוצג:
מנסים את ממשק המשתמש של ADK: פותחים טרמינל נוסף:
# Open new terminal
cd ~/storygen-learning/02b_Image_Agent_Done/backend

source ../../.venv/bin/activate

adk web --port 8080
יוצג ממשק המשתמש של ADK שבו אפשר לשאול שאלות את הסוכן:
לפני שעוברים לקטע הבא, מקישים על Ctrl+C כדי לסיים את התהליך.
למידה
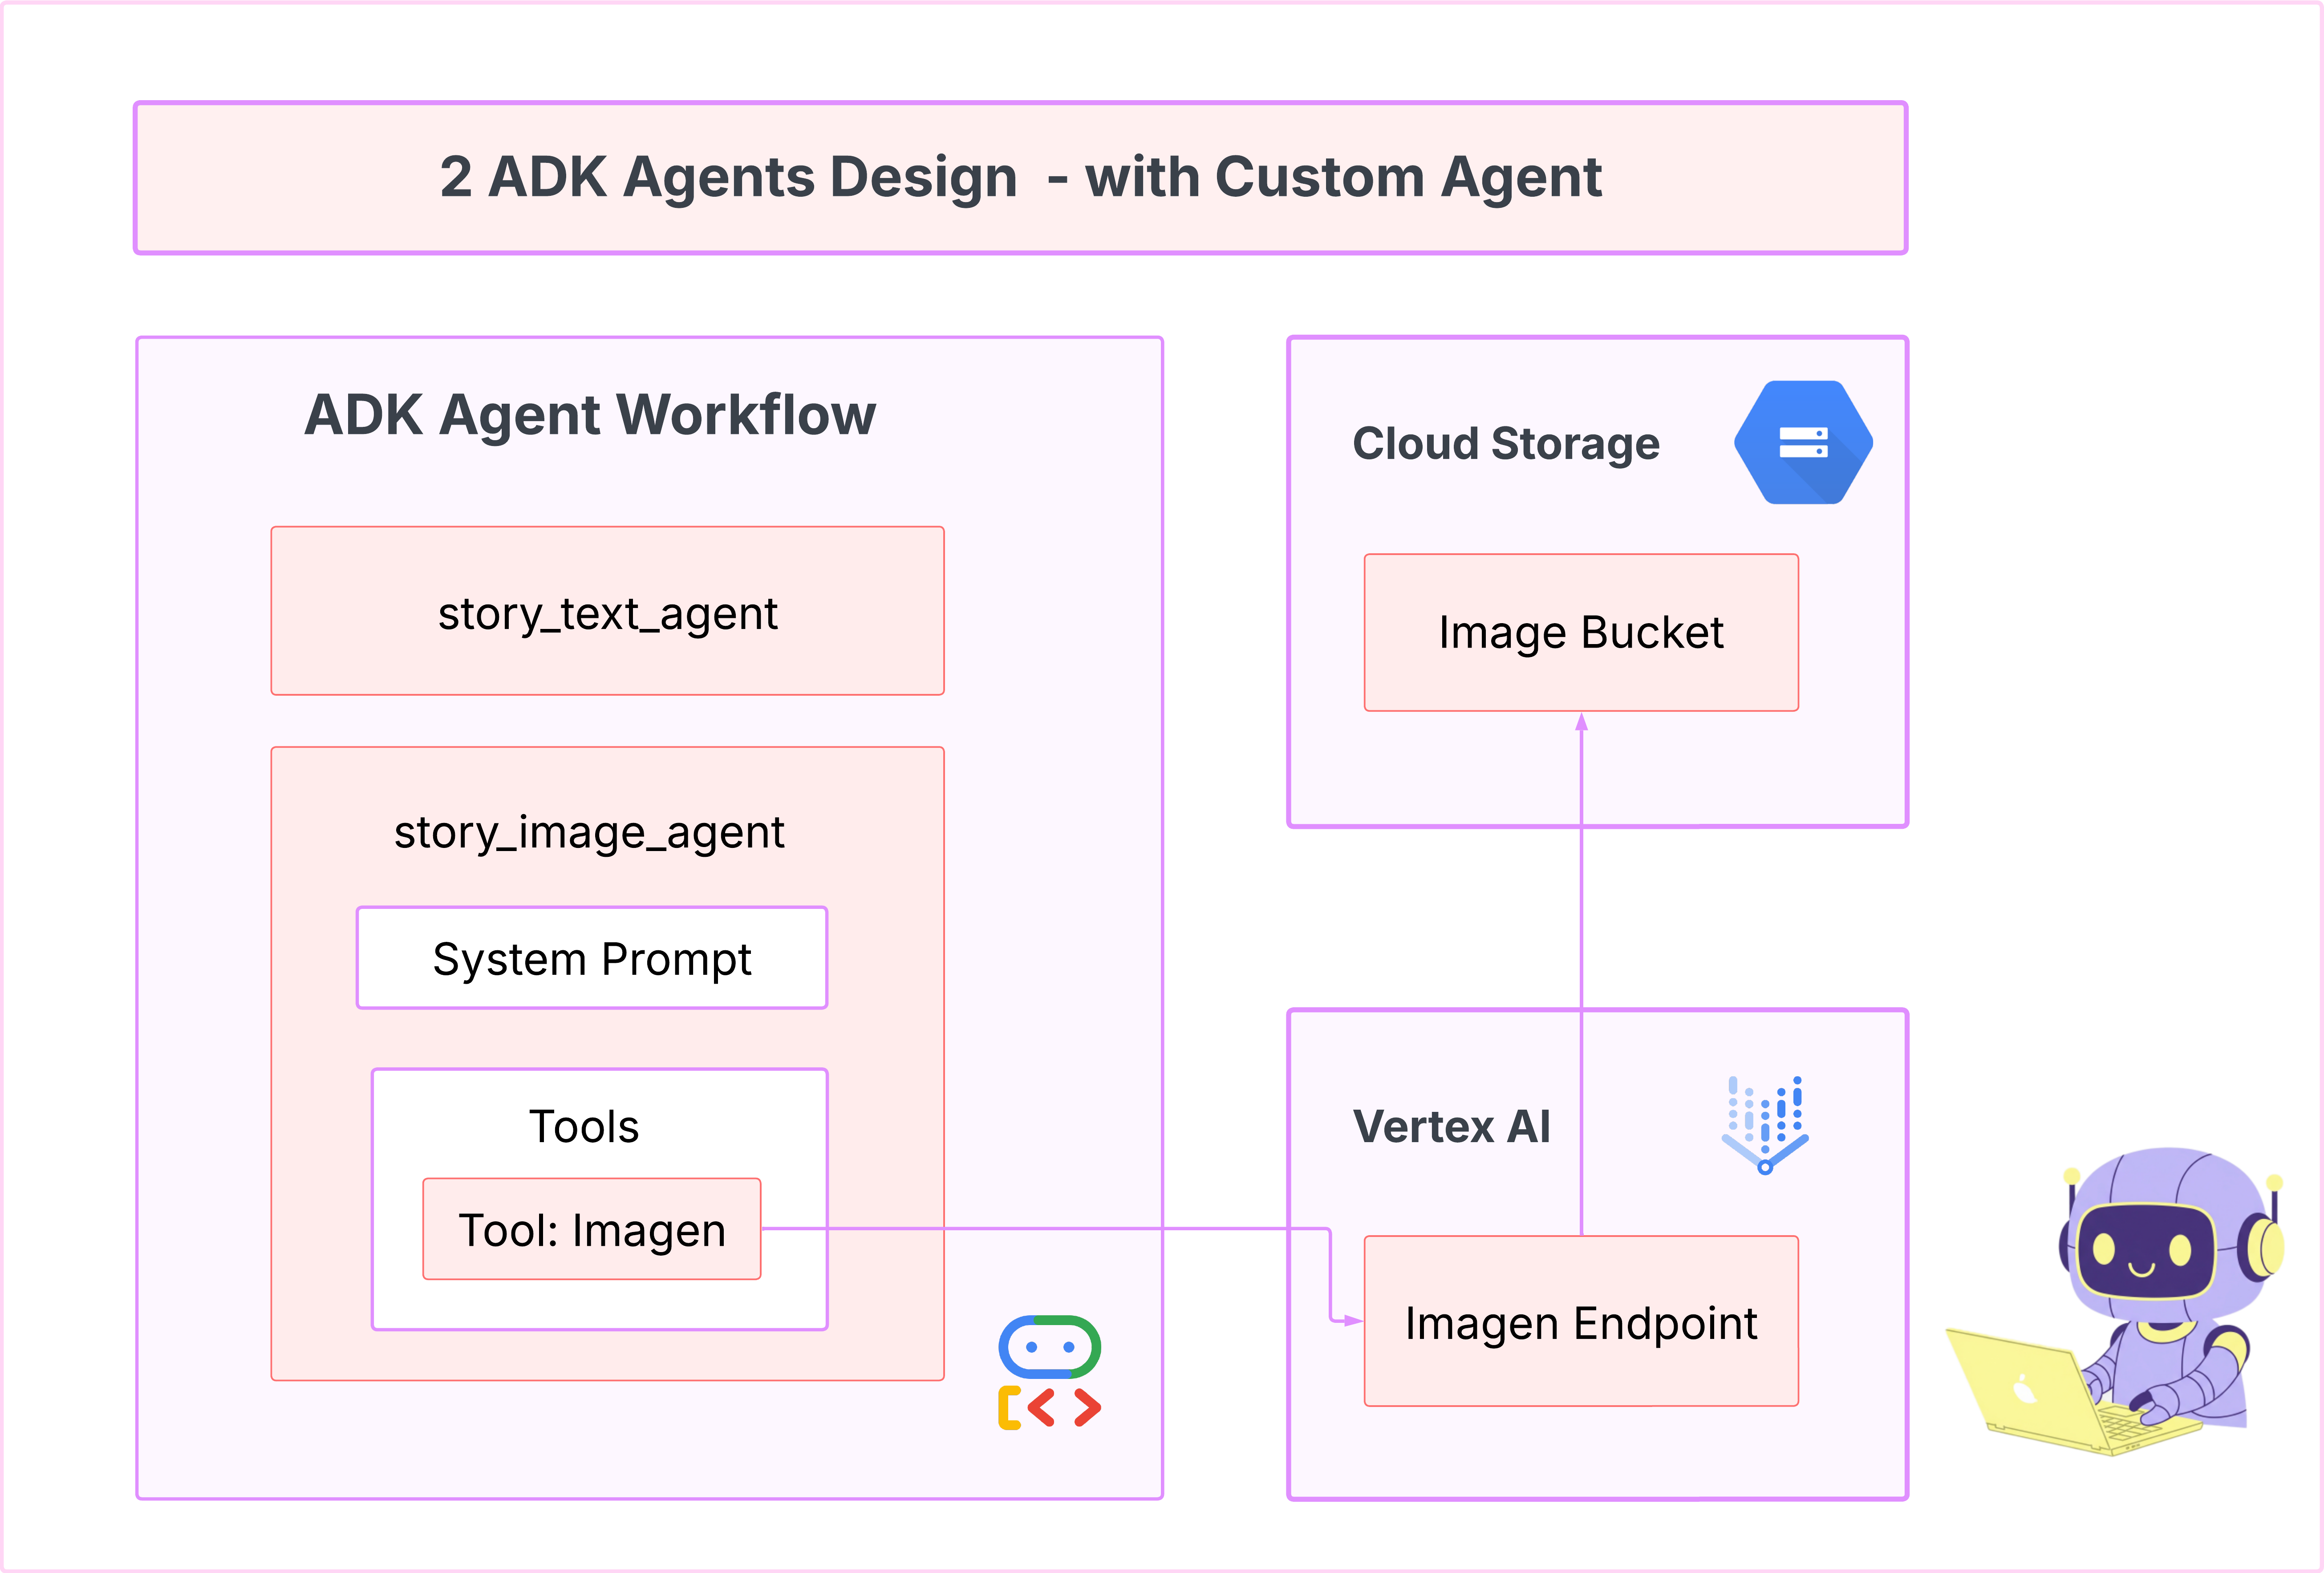
הסוכן הראשון שלנו היה מצוין ביצירת טקסט, אבל עכשיו אנחנו צריכים ליצור תמונות. למשימה הזו אנחנו צריכים שליטה ישירה יותר. אנחנו לא רוצים שמודל ה-LLM יחליט אם ליצור תמונה, אלא רוצים לתת לו פקודה ישירה לעשות זאת. זו עבודה מושלמת ל-BaseAgent.
בניגוד ל-LlmAgent הדקלרטיבי, BaseAgent הוא אימפרטיבי. כלומר, אתם, המפתחים, כותבים את הלוגיקה המדויקת של Python שלב אחר שלב בתוך השיטה _run_async_impl. יש לכם שליטה מלאה על זרימת הביצוע.
תבחרו BaseAgent כשאתם צריכים:
לוגיקה דטרמיניסטית: הסוכן צריך לפעול לפי רצף ספציפי של שלבים שלא ניתן לשנות.
הפעלה ישירה של כלי: אתם רוצים להפעיל כלי ישירות בלי התערבות של LLM.
זרימות עבודה מורכבות: התהליך כולל מניפולציה של נתונים בהתאמה אישית, קריאות ל-API ולוגיקה שמורכבת מדי בשביל ש-LLM יסיק אותה באופן מהימן רק מההנחיה.
באפליקציה שלנו, נשתמש ב-BaseAgent כדי לקבל את תיאורי הסצנות מהסוכן הראשון, ונקרא ישירות לכלי Imagen כדי להבטיח שתיצור תמונה לכל סצנה.
8. בדיקה: הערכת סוכן
האפליקציה שלנו פועלת, אבל אנחנו צריכים רשת ביטחון אוטומטית של בדיקות. זו משימה מושלמת להעביר לטייס המשנה שלנו מבוסס-AI.
פעולות
cd ~/storygen-learning/03a_Agent_Evaluation_Ready/backend
שימוש ב-Gemini CLI כדי לכתוב בדיקות מקיפות:
פתיחת Gemini CLI
gemini
בחלון של Gemini CLI, מנסים את ההנחיה:
I need you to create comprehensive test files for my backend/story_agent in Google ADK. I need three specific JSON files that match the testing structure used in ADK evaluation.

**Context:**
- The story agent generates structured JSON stories with exactly 4 scenes
- It uses LlmAgent with no tools, just direct LLM responses
- Input: Keywords
- Output: JSON with story, main_characters, and scenes arrays

**Files to Create:**

### 1. `story_agent_eval.evalset.json` (Comprehensive Integration Tests)
Create a comprehensive evaluation set with:
- **eval_set_id**: "story_agent_comprehensive_evalset"
- **name**: "Story Agent Comprehensive Evaluation Set"
- **description**: "Comprehensive evaluation scenarios for story_agent covering various keyword combinations, edge cases, and story quality metrics"


Each eval_case should include:
- Full conversation arrays with invocation_id, user_content, final_response
- Complete expected JSON responses with detailed stories, characters, and 4 scenes
- session_input with app_name "story_agent"
- All fields: story (narrative text), main_characters (with detailed visual descriptions), scenes (with index, title, description, text)

### 2. `story_generation.test.json` (Unit Tests)
Create basic generation tests with:
- **eval_set_id**: "story_agent_basic_generation_tests"
- **name**: "Story Agent Basic Generation Tests"
- **description**: "Unit tests for story_agent focusing on JSON structure compliance, scene generation, and keyword integration"

### 3. `test_config.json` (Evaluation Configuration)
Create test configuration with:
- **criteria**: response_match_score: 0.7, tool_trajectory_avg_score: 1.0
- **custom_evaluators**:
  - json_structure_validator (validates required fields, scene count, character fields)
  - story_quality_metrics (word count 80-250, keyword integration threshold 0.8)
- **evaluation_notes**: Story agent specifics and trajectory expectations

**Important Requirements:**
1. All responses must be valid, parseable JSON
2. Stories must have exactly 4 scenes with indices 1-4
3. Each scene must have: index, title, description, text
4. Main characters must have detailed visual descriptions
5. No tool_uses expected (empty arrays) since story agent uses direct LLM
6. Word count should be 100-200 words total
7. Keywords must be naturally integrated into the narrative

Please generate all three files with realistic example stories and comprehensive test coverage matching the ADK evaluation format.
—————————————— אופציונלי, אפשר לדלג לחלק הפתרון ——————————————
כדי לראות את ההערכה:
./run_adk_web_persistent.sh
עוברים לכרטיסייה eval בממשק המשתמש של ADK.
אמור להופיע ממשק משתמש אינטרנטי של ADK עם יכולות בדיקה קבועות
רגע משמעותי ללמידה: AI הוא שותף רב עוצמה באוטומציה של בקרת איכות. הוא יכול לטפל בקוד הסטנדרטי של כתיבת בדיקות, וכך מאפשר לכם להתמקד בפיתוח תכונות.
—————————————— הפתרון מתחיל כאן ———————————————
המוצר
- עוברים לתיקיית הפתרון:
cd ~/storygen-learning/03b_Agent_Evaluation_Done/backend
- פתיחת ממשק המשתמש באינטרנט של ADK
./run_adk_web_persistent.sh
אפשר לראות את תרחישי הבדיקה בכרטיסייה Eval:
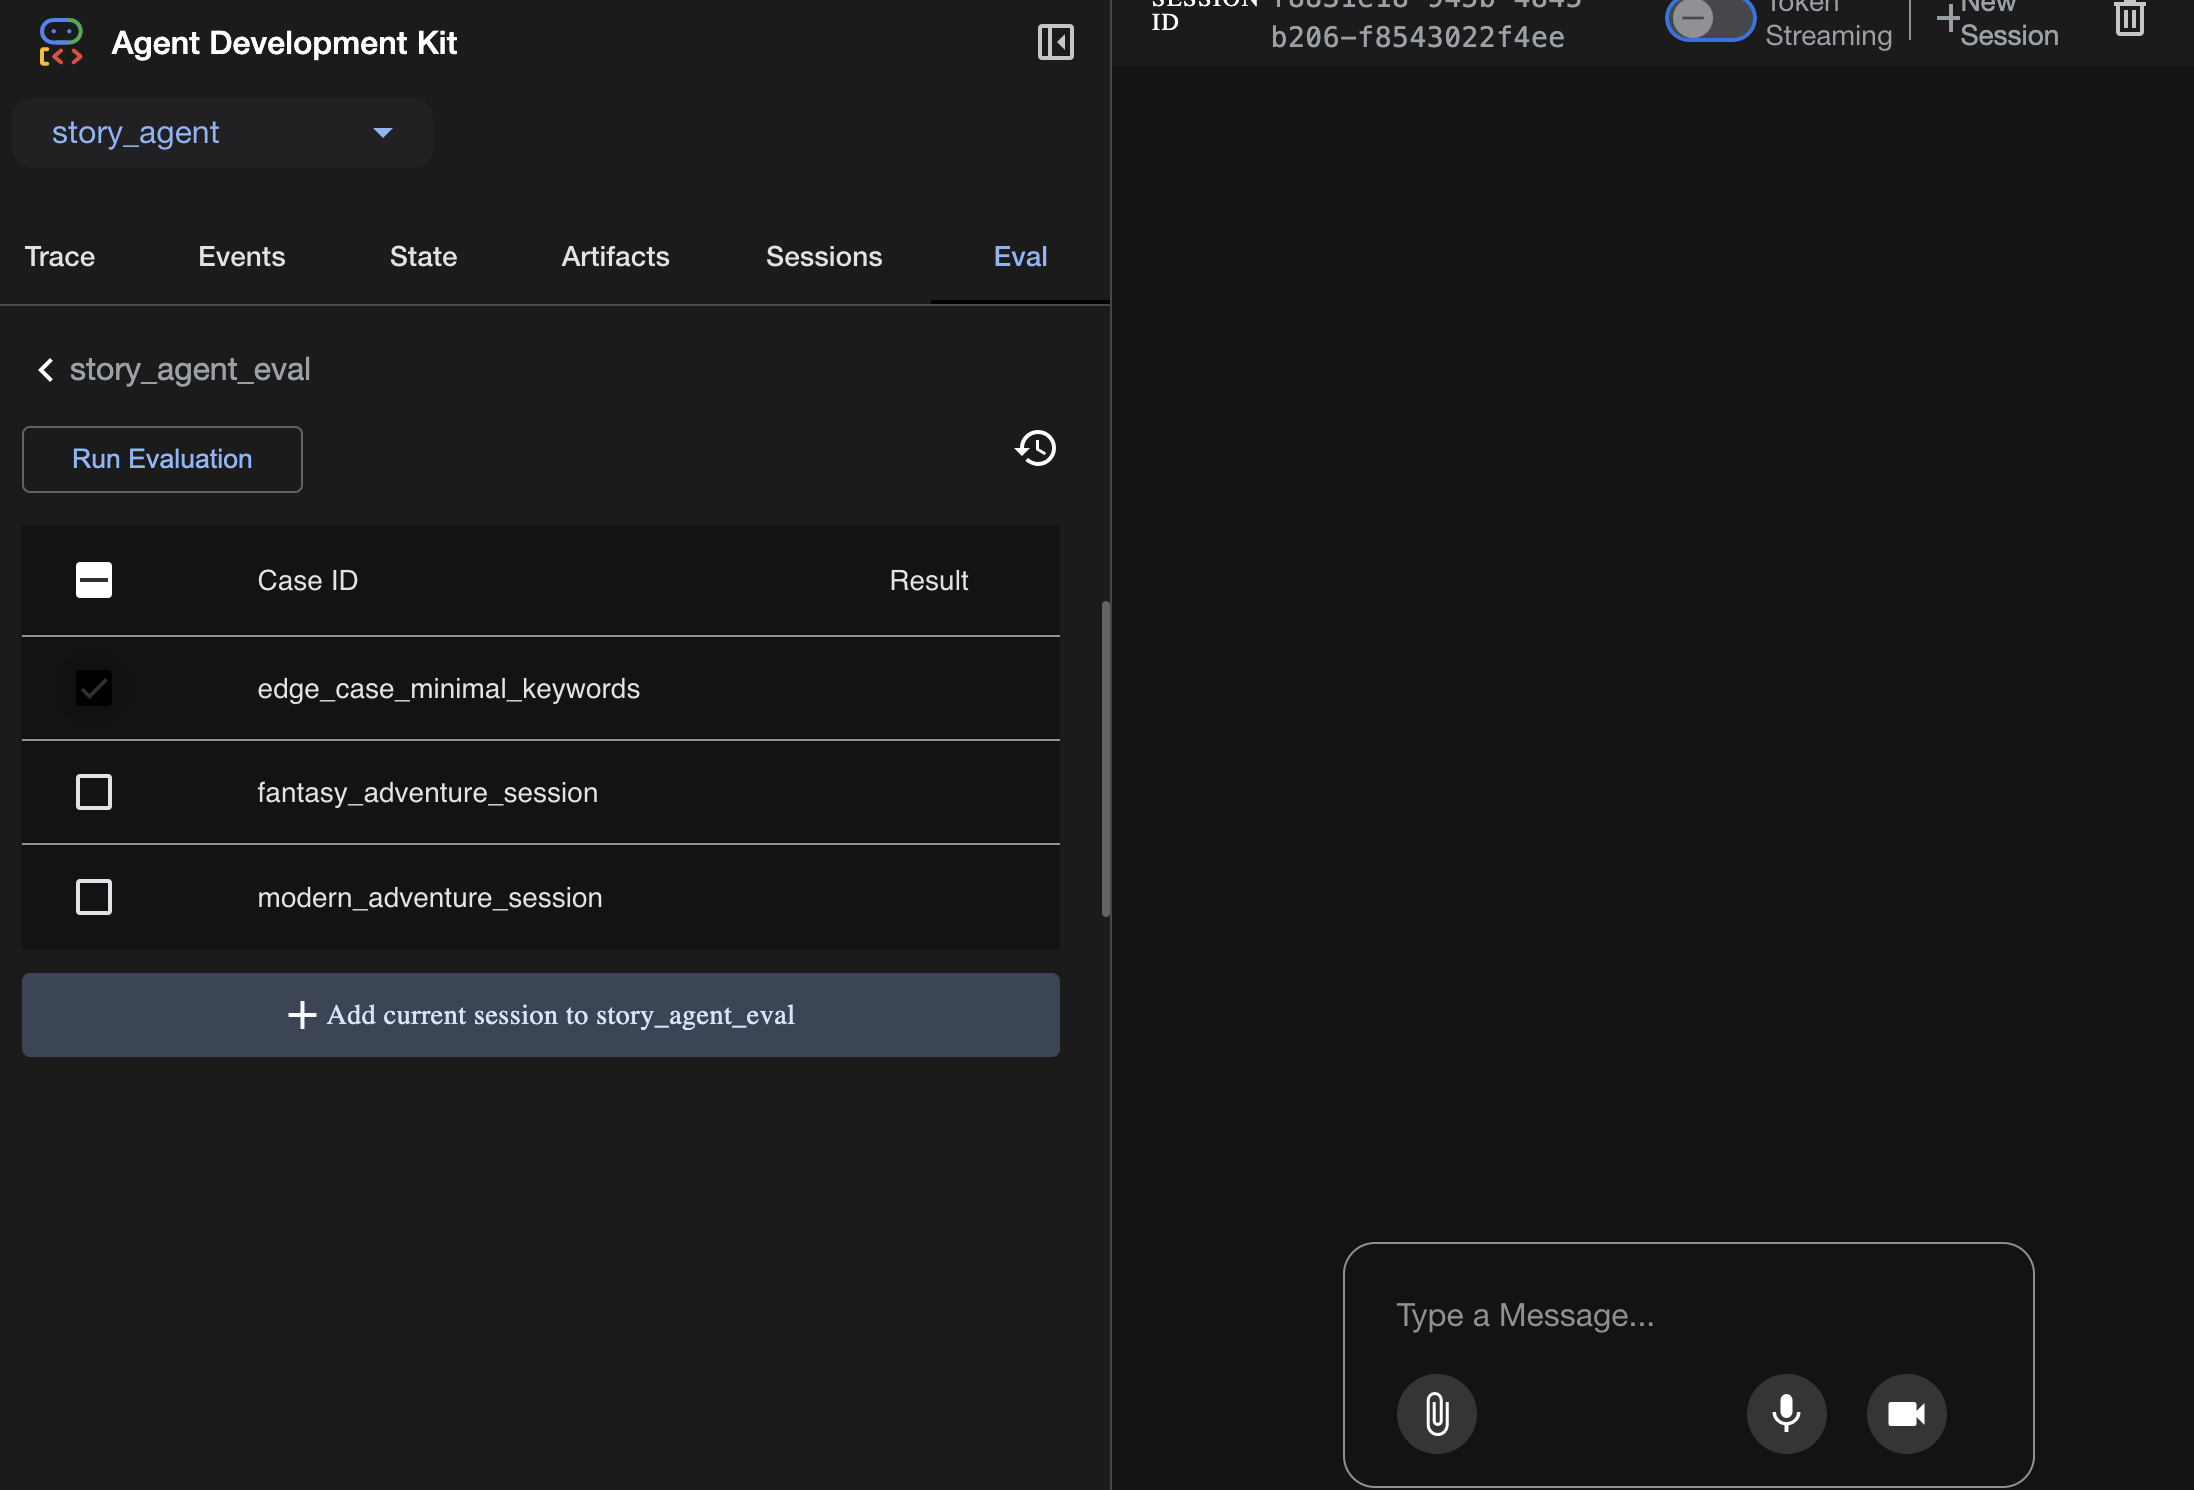
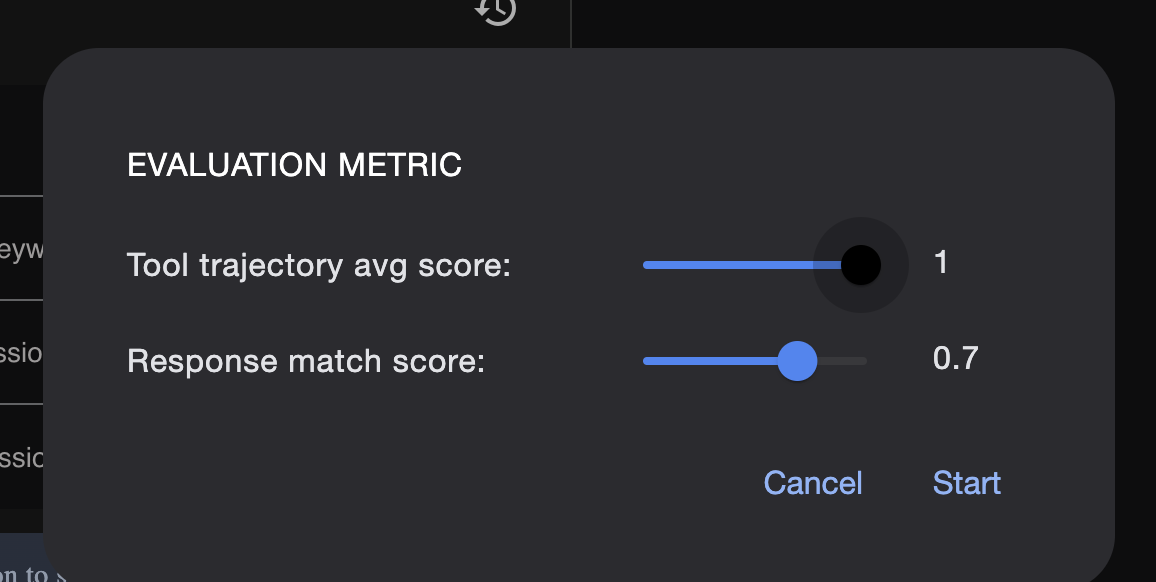
כאן אפשר לשנות את המדדים:
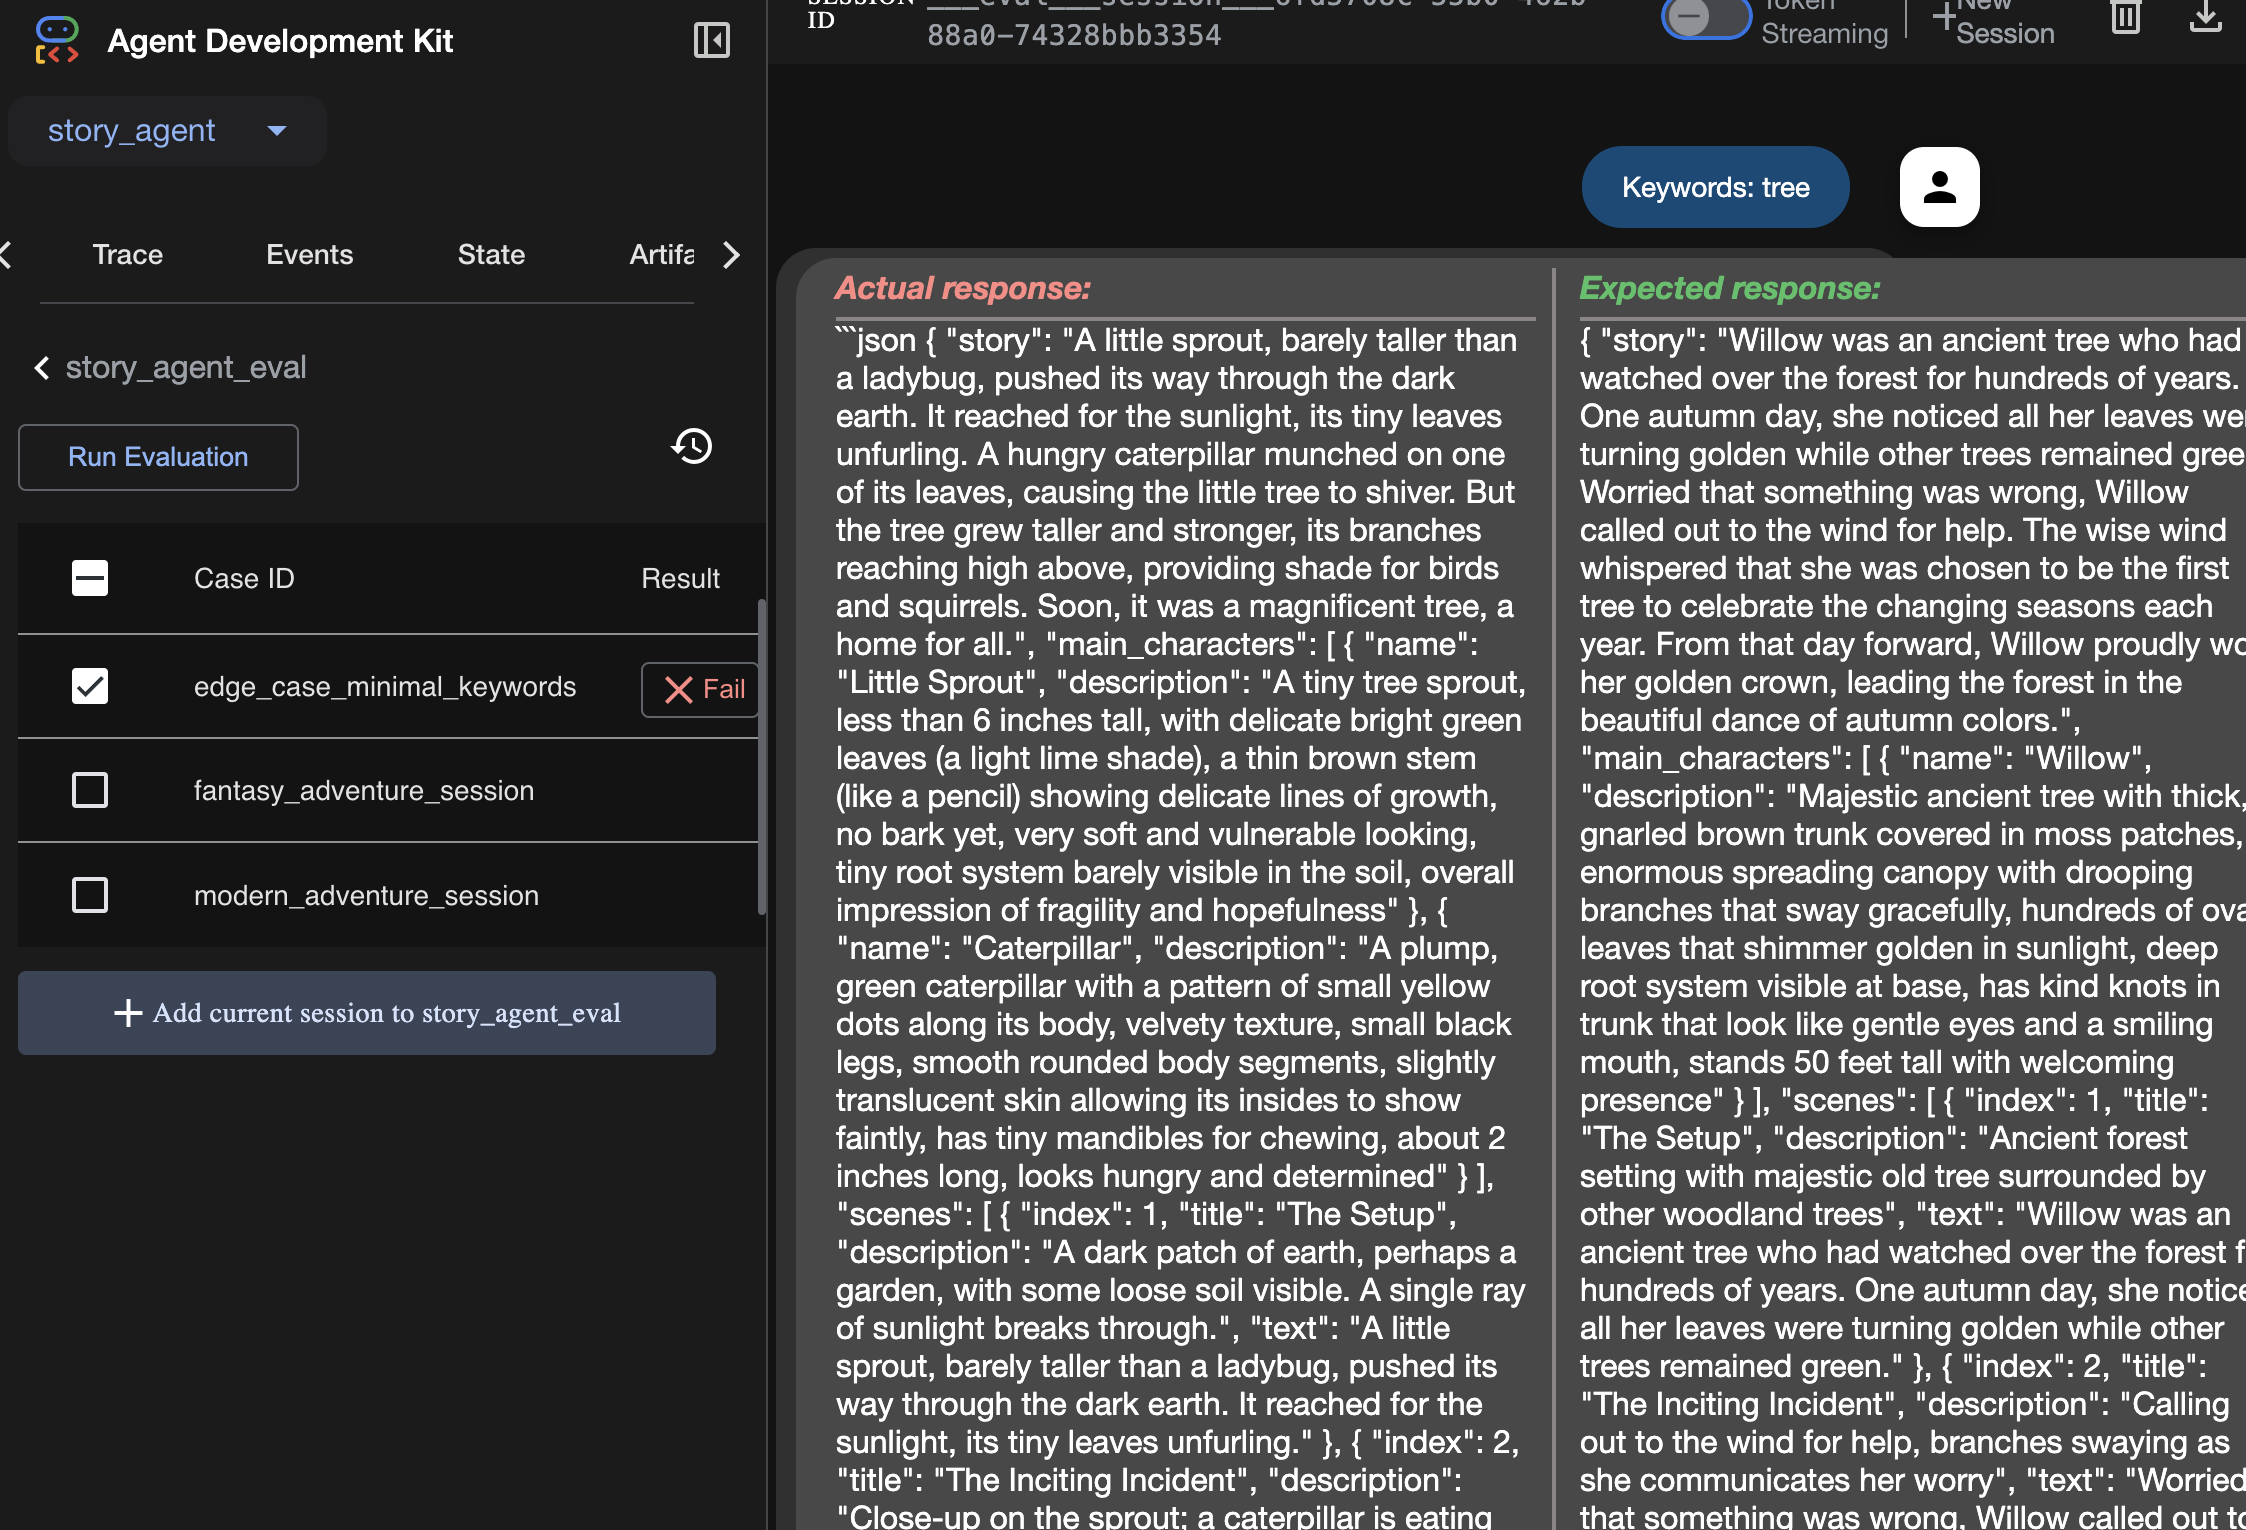
כאן אפשר לראות את תוצאת ההרצה של ההערכה:
למידה
סוכן יכול 'לעבוד' במובן שהוא פועל ללא שגיאות, אבל איך יודעים אם הוא מייצר את הפלט הנכון? הסיפור טוב? האם פורמט ה-JSON נכון? כאן נכנס לתמונה מסגרת ההערכה של ה-ADK.
הערכת הסוכן היא מערכת בדיקה אוטומטית שנועדה למדוד את האיכות והדיוק של התשובות של הסוכן. במקום רק לבדוק אם יש שגיאות בקוד, הוא בודק אם ההתנהגות של הנציג עומדת בציפיות שלכם. המסגרת משתמשת בעיקר בכמה קבצים מרכזיים:
evalset.json: חבילת הבדיקות הראשית. כל 'מקרה הערכה' בקובץ הזה מכיל שיחה לדוגמה (למשל, הנחיה למשתמש) ואת התשובה האידיאלית, 'מושלמת', שאתם מצפים שהסוכן יפיק.
test_config.json: בקובץ הזה מוגדרים כללי ההצלחה. כאן מגדירים קריטריונים, כמו:
response_match_score: עד כמה התשובה של הסוכן צריכה להיות דומה לתשובה ה"מושלמת"? (ציון של 1.0 פירושו שהם חייבים להיות זהים).
custom_evaluators: אתם יכולים ליצור כללים משלכם, כמו 'התשובה חייבת להיות JSON תקין' או 'הסיפור חייב להכיל יותר מ-100 מילים'.
כשמריצים הערכה, אפשר לבדוק אוטומטית את הנציג מול עשרות תרחישים, כדי לוודא ששינויים בהנחיה או בכלים לא פוגעים בטעות בפונקציונליות הבסיסית שלו. זוהי רשת ביטחון חזקה לבניית סוכני AI שמוכנים לייצור.
9. תשתית כקוד (IaC): בניית בית בענן
הקוד שלנו נבדק, אבל הוא צריך מקום מוכן לייצור. נשתמש במושג 'תשתית כקוד' כדי להגדיר את הסביבה שלנו.
מה זה Docker?
Docker היא פלטפורמה ליצירה ולהרצה של אפליקציות בקונטיינרים. אפשר לחשוב על קונטיינר כמו על קונטיינר משלוחים סטנדרטי לתוכנה. הוא כולל בחבילה אחת מבודדת את כל מה שהאפליקציה צריכה כדי לפעול:
- קוד האפליקציה עצמו
- סביבת זמן הריצה הנדרשת (לדוגמה, גרסה ספציפית של Python)
- כל הכלים והספריות של המערכת
אחר כך אפשר להריץ את האפליקציה הזו בכל מכונה שמותקן בה Docker, וכך לפתור את הבעיה הקלאסית של 'זה עובד במחשב שלי'.
בקטע הזה נבקש מ-Gemini ליצור קובץ Docker, שהוא פשוט המתכון או התוכנית ליצירת קובץ אימג' של קונטיינר של האפליקציה שלנו
פעולות
cd ~/storygen-learning/04a_Manual_Deployment_Ready
משתמשים ב-Gemini CLI כדי ליצור Dockerfile לקצה העורפי: פותחים את Gemini CLI
Gemini
ב-Gemini CLI, מנסים את ההנחיה:
Create a manual deployment plan for my StoryGen app with Google Cloud Platform. I have a Next.js frontend, Python backend, and Terraform infrastructure.
Generate these deployment files:
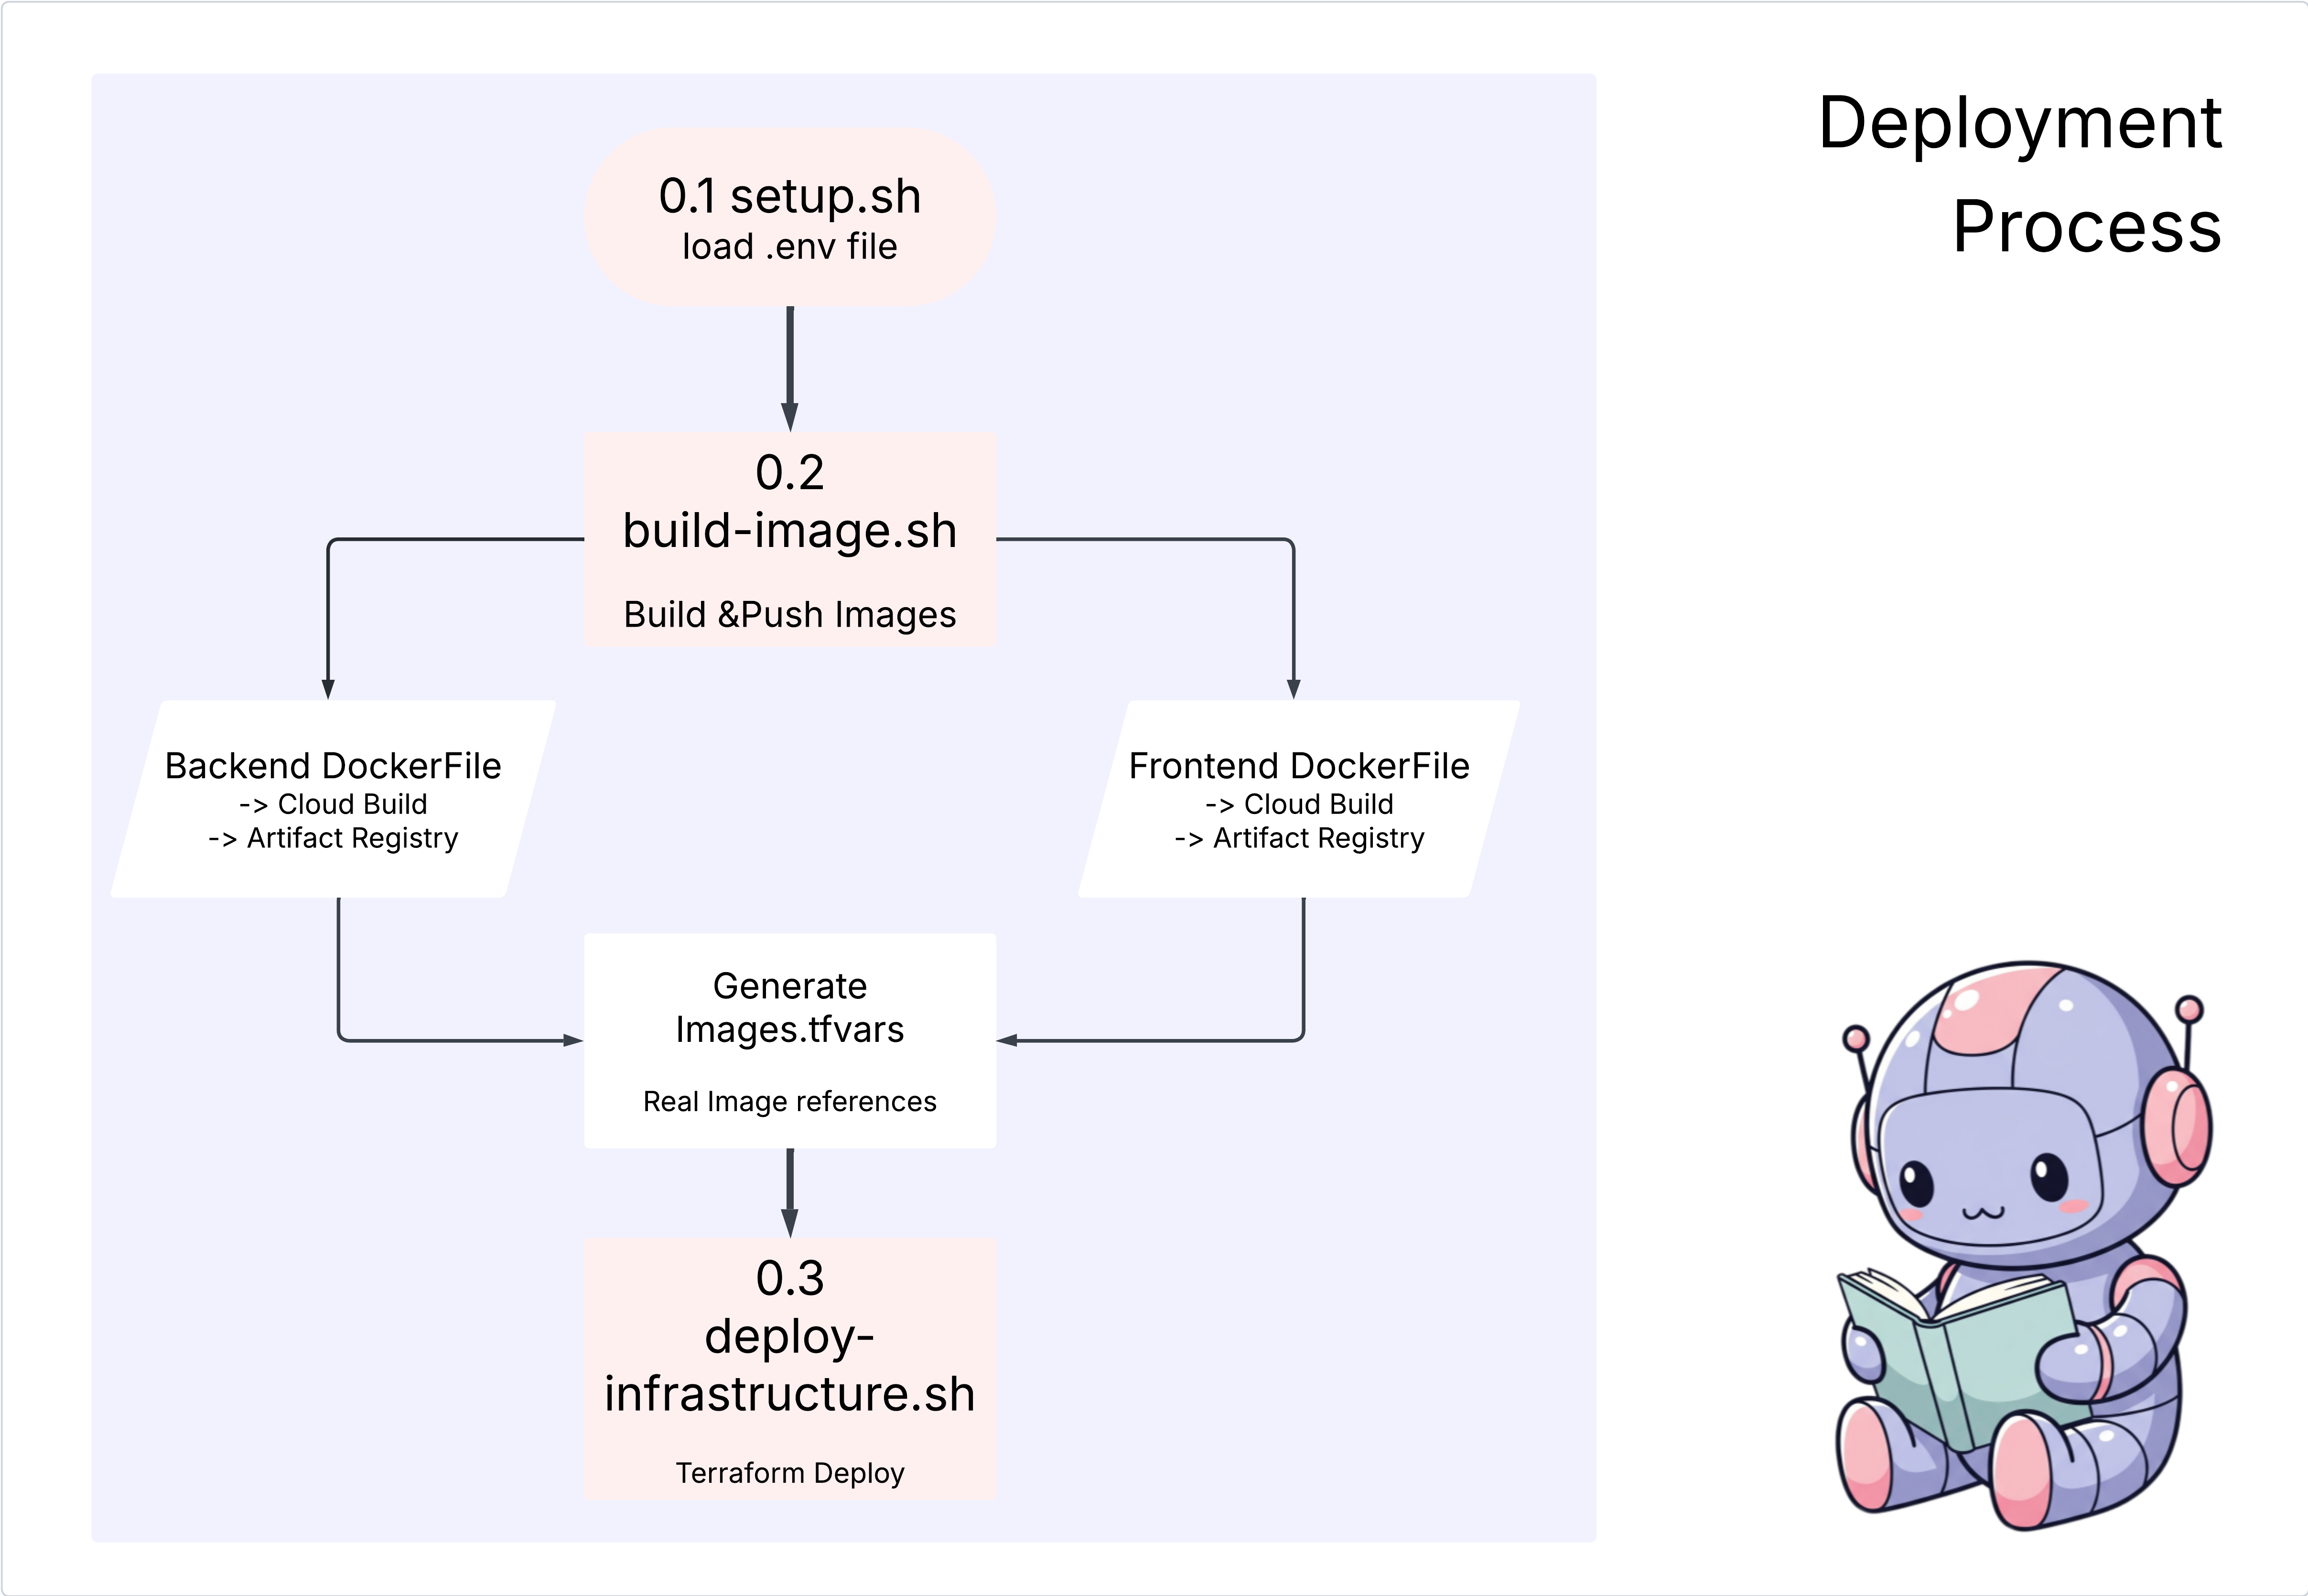
1. **01-setup.sh** - Environment setup and authentication
2. **02-build-images.sh** - Build and push Docker images to Google Container Registry
3. **03-deploy-infrastructure.sh** - Deploy with Terraform and configure services
4. **load-env.sh** - Load environment variables for deployment
**Requirements:**
- Use Google Cloud Run for both frontend and backend
- Configure Imagen API and storage buckets
- Set up proper IAM permissions
- Use environment variables from .env file
- Include error handling and status checks
Keep scripts simple, well-commented, and production-ready for manual execution.
הפתרון:
cd ~/storygen-learning/04b_Manual_Deployment_Done
הרצה:
source ../.venv/bin/activate
./01-setup.sh
./02-build-images.sh
./03-deploy-infrastructure.sh
אמורות להופיע תוצאות הפריסה ויצירת התשתית
10. אוטומציה (CI/CD): פס הייצור הדיגיטלי
פריסת האפליקציה שלנו באופן ידני היא דרך מצוינת להבין את החלקים הנעים, אבל היא איטית, דורשת מאמץ ידני ועלולה להוביל לטעויות אנוש. בפיתוח תוכנה מקצועי, התהליך הזה כולו מבוצע באופן אוטומטי באמצעות שיטה שנקראת CI/CD.
CI/CD מייצג אינטגרציה רציפה ופריסה רציפה. זו שיטה לבנייה, לבדיקה ולפריסה אוטומטית של הקוד בכל פעם שמבצעים בו שינוי.
- אינטגרציה רציפה (CI): זהו השלב של 'בנייה ובדיקה'. ברגע שמפתח מעלה שינוי בקוד למאגר משותף (כמו GitHub), מערכת אוטומטית מתחילה לפעול. הוא יוצר את האפליקציה ומריץ את כל הבדיקות (כמו הערכות הסוכן שיצרנו) כדי לוודא שהקוד החדש משתלב בצורה נכונה ולא גורם לבאגים.
- פריסה רציפה (CD): זהו שלב ה'השחרור'. אם שלב ה-CI עובר בהצלחה, המערכת פורסת באופן אוטומטי את הגרסה החדשה שנבדקה של האפליקציה בסביבת הייצור, והיא הופכת לזמינה למשתמשים.
פייפליין אוטומטי כזה יוצר 'פס ייצור דיגיטלי' שמעביר קוד ממחשב של מפתח למסלול לסביבת הייצור במהירות, בצורה בטוחה ואמינה. בקטע הזה נבקש מהעוזר הדיגיטלי מבוסס ה-AI שלנו לבנות את פס הייצור הזה בשבילנו באמצעות GitHub Actions ו-Google Cloud Build.
פעולות
cd ~/storygen-learning/05a_CICD_Pipeline_Ready
שימוש ב-Gemini CLI כדי ליצור צינור CI/CD עם GitHub:
פתיחת Gemini CLI
Gemini
ב-Gemini CLI, מנסים את ההנחיה:
Create a CI/CD pipeline for my StoryGen app using Google Cloud Build and GitHub integration.

Generate these automation files:
1. **cloudbuild.yaml** (for backend) - Automated build, test, and deploy pipeline
2. **GitHub Actions workflow** - Trigger builds on push/PR
3. **Deployment automation scripts** - Streamlined deployment process

**Requirements:**
- Auto-trigger on GitHub push to main branch
- Build and push Docker images
- Run automated tests if available
- Deploy to Google Cloud Run
- Environment-specific deployments (staging/prod)
- Notification on success/failure

Focus on fully automated deployment with minimal manual intervention. Include proper secret management and rollback capabilities.
—————————————— הפתרון מתחיל כאן ———————————————
הפתרון:
cd ~/storygen-learning/06_Final_Solution/
# Copy the GitHub workflow to parent folder
cp -r 06_Final_Solution/.GitHub ../../../.GitHub
חוזרים לתיקייה 06_Final_Solution ומריצים את הסקריפט:
cd ~/storygen-learning/06_Final_Solution/

./setup-cicd-complete.sh
אמורה להופיע הודעה על השלמת ההגדרה של צינור עיבוד הנתונים של CI/CD
הפעלת תהליך העבודה: מבצעים Commit ו-Push של הקוד אל main. שימו לב שצריך להגדיר את האימייל והשם ב-GitHub כדי לאשר את ההרשאה.
git add .
git commit -m "feat: Add backend, IaC, and CI/CD workflow"
git push origin main
עוברים לכרטיסייה Actions (פעולות) במאגר GitHub כדי לצפות בהרצת הפריסה האוטומטית.
11. תפעול: מרכז הבקרה של ה-AI
אנחנו בשידור חי! אבל המסע לא הסתיים. זהו "יום 2" – פעולות. נחזור אל Cloud Assist כדי לנהל את האפליקציה הפועלת.
פעולות
- נכנסים לשירות Cloud Run במסוף Google Cloud. כדי ליצור עומס תנועה קל ויומנים, מנהלים אינטראקציה עם האפליקציה הפעילה.
- פותחים את חלונית Cloud Assist ומשתמשים בה כעוזר וירטואלי תפעולי עם הנחיות כמו אלה:
ניתוח יומנים:
Summarize the errors in my Cloud Run logs for the service 'genai-backend' from the last 15 minutes.
שיפור הביצועים:
My Cloud Run service 'genai-backend' has high startup latency. What are common causes for a Python app and how can I investigate with Cloud Trace?
אופטימיזציית עלויות:
Analyze the costs for my 'genai-backend' service and its GCS bucket. Are there any opportunities to save money?
רגע חשוב ללמידה: מחזור החיים של פיתוח AI הוא לולאה מתמשכת. אותו טייס משנה מבוסס-AI שעזר לבנות את האפליקציה הוא שותף חיוני למעקב, לפתרון בעיות ולאופטימיזציה שלה בסביבת הייצור.