
1. आपको क्या सीखने को मिलेगा
एआई एजेंट Vibe Full Stack
आपका स्वागत है! अब आपको सॉफ़्टवेयर डेवलपमेंट की अगली ज़रूरी स्किल के बारे में पता चलेगा: प्रोडक्शन-ग्रेड सॉफ़्टवेयर बनाने, उसकी जांच करने, और उसे डिप्लॉय करने के लिए, आर्टिफ़िशियल इंटेलिजेंस को असरदार तरीके से गाइड कैसे करें. जनरेटिव एआई, "ऑटोपायलट" नहीं है. यह एक बेहतरीन को-पायलट है, जिसे एक कुशल डायरेक्टर की ज़रूरत होती है.
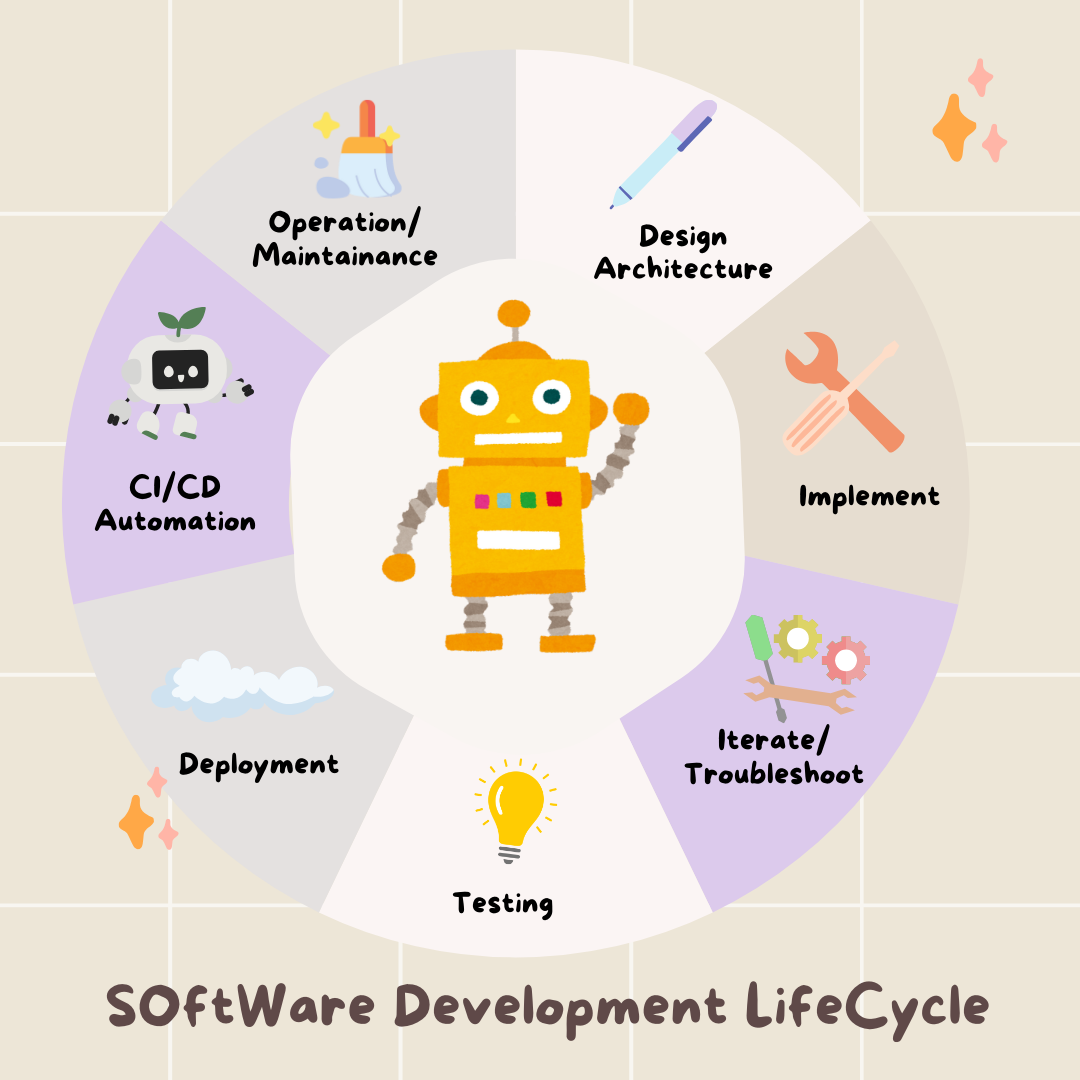
इस वर्कशॉप में, प्रोफ़ेशनल सॉफ़्टवेयर डेवलपमेंट लाइफ़साइकल (एसडीएलसी) के हर चरण में एआई के साथ मिलकर काम करने का एक स्ट्रक्चर्ड और दोहराया जा सकने वाला तरीका बताया गया है. आप लाइन-बाय-लाइन कोड लिखने वाले व्यक्ति से, टेक्निकल डायरेक्टर बन जाएंगे. यानी, एक ऐसे आर्किटेक्ट जिसके पास विज़न है और एक ऐसे जनरल कॉन्ट्रैक्टर जो एआई का इस्तेमाल करके, उस विज़न को सटीक तरीके से लागू करता है. 🚀
इस ट्यूटोरियल के आखिर तक, आपके पास ये चीज़ें होंगी:
- एआई का इस्तेमाल करके, किसी आइडिया को क्लाउड आर्किटेक्चर में बदला.
- टारगेट किए गए और खास प्रॉम्प्ट के साथ पूरा Python बैकएंड जनरेट किया गया.
- कोड को डीबग करने और उसे ठीक करने के लिए, एआई का इस्तेमाल पेयर प्रोग्रामर के तौर पर किया.
- एआई को यूनिट टेस्ट बनाने का काम सौंपा गया है. इसमें मॉक टेस्ट भी शामिल हैं.
- Terraform की मदद से, प्रोडक्शन के लिए तैयार इन्फ़्रास्ट्रक्चर एज़ कोड (IaC) जनरेट किया.
- एक प्रॉम्प्ट की मदद से, GitHub Actions में पूरी सीआई/सीडी पाइपलाइन बनाई.
- एआई की मदद से काम करने वाले टूल का इस्तेमाल करके, लाइव ऐप्लिकेशन को मॉनिटर और मैनेज किया.
आपको न सिर्फ़ काम करने वाला ऐप्लिकेशन मिलेगा, बल्कि एआई की मदद से डेवलपमेंट करने के लिए एक ब्लूप्रिंट भी मिलेगा. आइए शुरू करें!
2. ज़रूरी शर्तें और सेटअप
शुरू करने से पहले, अपने एनवायरमेंट को तैयार करें. वर्कशॉप में शामिल होने के लिए, यह एक ज़रूरी चरण है.
नया GCP खाता बनाना और उसे अपने बिलिंग खाते से लिंक करना
हमारे एआई एजेंट को काम करने के लिए, हमें दो चीज़ों की ज़रूरत होती है: एक Google Cloud प्रोजेक्ट, जो बुनियादी ढांचा उपलब्ध कराता है. दूसरा, Gemini API पासकोड, जो Google के बेहतरीन मॉडल को ऐक्सेस करने की अनुमति देता है.
पहला चरण: बिलिंग खाता चालू करना
इस कोडलैब को चलाने के लिए, आपके पास कुछ क्रेडिट वाला बिलिंग खाता होना चाहिए. शुरू करने के लिए, इस कोडलैब के सबसे ऊपर मौजूद बैनर में दिए गए क्रेडिट का इस्तेमाल करें. अगर आपका खाता पहले से ही किसी बिलिंग खाते से कनेक्ट है, तो इस चरण को छोड़ा जा सकता है.
दूसरा चरण: नया GCP प्रोजेक्ट बनाना
- Google Cloud Console पर जाएं और एक नया प्रोजेक्ट बनाएं.
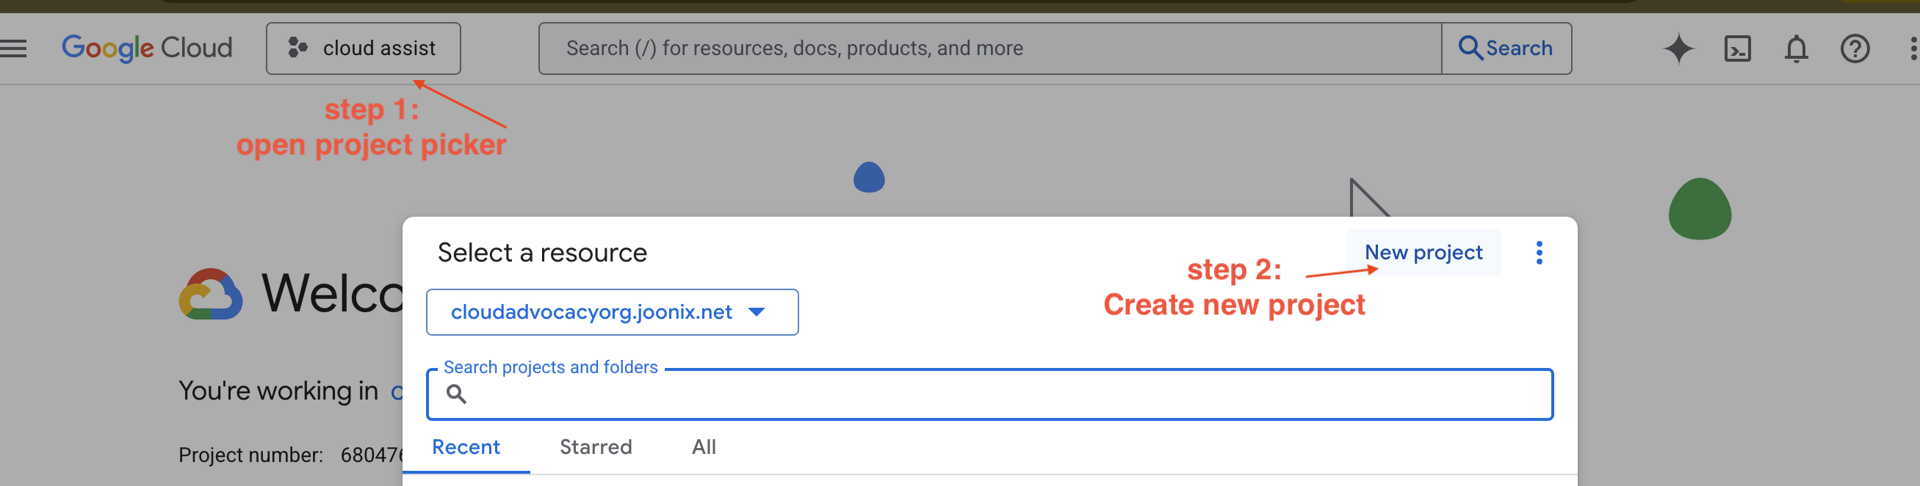
- बाईं ओर मौजूद पैनल खोलें और
Billingपर क्लिक करें. देखें कि बिलिंग खाता, इस GCP खाते से लिंक है या नहीं.
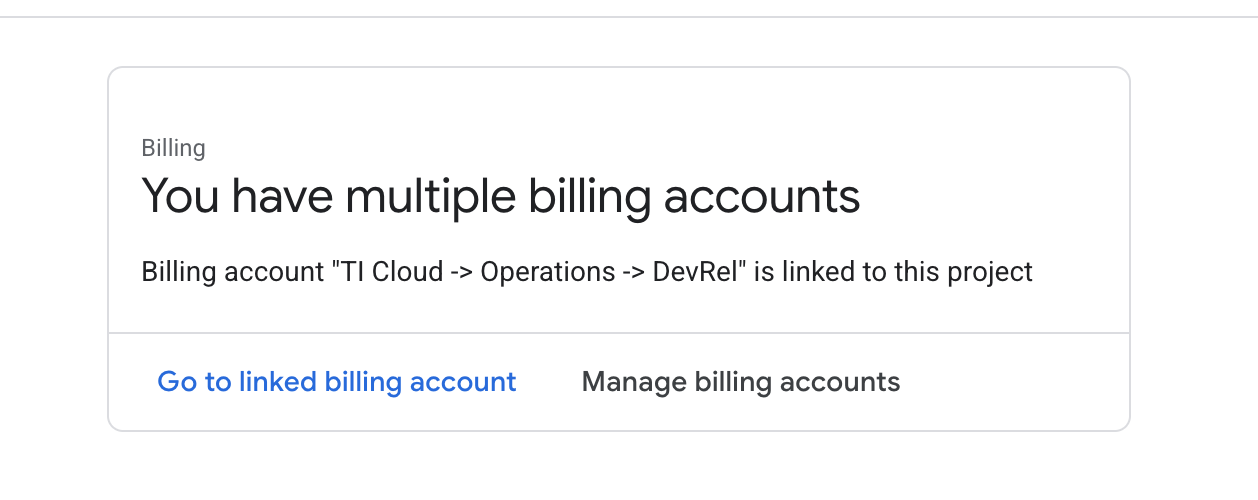
अगर आपको यह पेज दिखता है, तो manage billing account पर जाएं. इसके बाद, Google Cloud की बिना शुल्क वाली सदस्यता चुनें और उसे लिंक करें.
तीसरा चरण: Gemini API पासकोड जनरेट करना
कुंजी को सुरक्षित करने से पहले, आपके पास एक कुंजी होनी चाहिए.
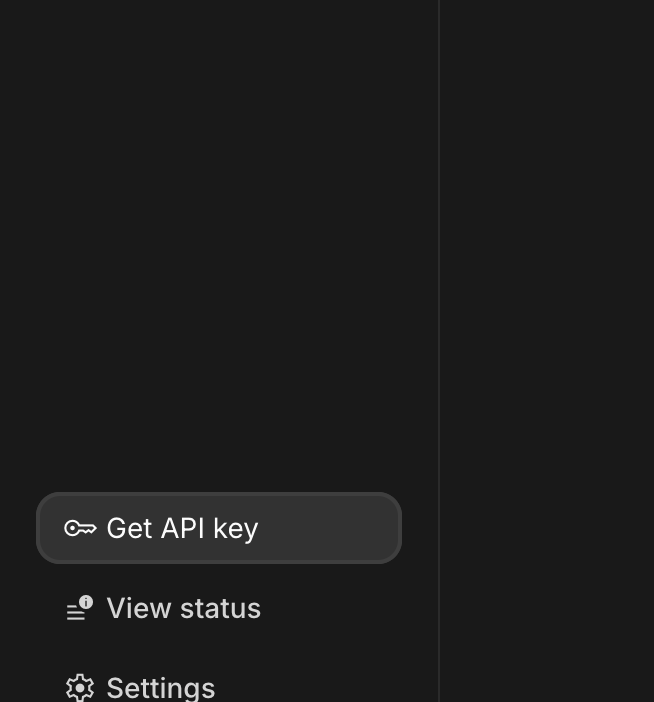
- Google AI Studio पर जाएं : https://aistudio.google.com/
- अपने Gmail खाते से साइन इन करें.
- "एपीआई कुंजी पाएं" बटन पर क्लिक करें. यह बटन आम तौर पर, बाईं ओर मौजूद नेविगेशन पैनल या सबसे ऊपर दाएं कोने में होता है.
- "एपीआई पासकोड" डायलॉग में, "नए प्रोजेक्ट में एपीआई पासकोड बनाएं" पर क्लिक करें.
- आपने जो नया प्रोजेक्ट बनाया है उसे चुनें. इस प्रोजेक्ट के लिए, बिलिंग खाता सेट अप किया गया हो.

- आपके लिए एक नई एपीआई कुंजी जनरेट की जाएगी.
इस कुंजी को तुरंत कॉपी करें और इसे कुछ समय के लिए किसी सुरक्षित जगह पर सेव करें. जैसे, पासवर्ड मैनेजर या सुरक्षित नोट. इस वैल्यू का इस्तेमाल अगले चरणों में किया जाएगा.
GitHub Authentication
Google Cloud Console पर जाकर, सबसे ऊपर दाईं ओर मौजूद "Cloud Shell चालू करें" बटन पर क्लिक करके, Cloud Shell खोलें.
पहला चरण: Cloud Shell खोलें
👉Google Cloud Console में सबसे ऊपर मौजूद, "Cloud Shell चालू करें" पर क्लिक करें (यह Cloud Shell पैनल में सबसे ऊपर मौजूद, टर्मिनल के आकार का आइकॉन है), 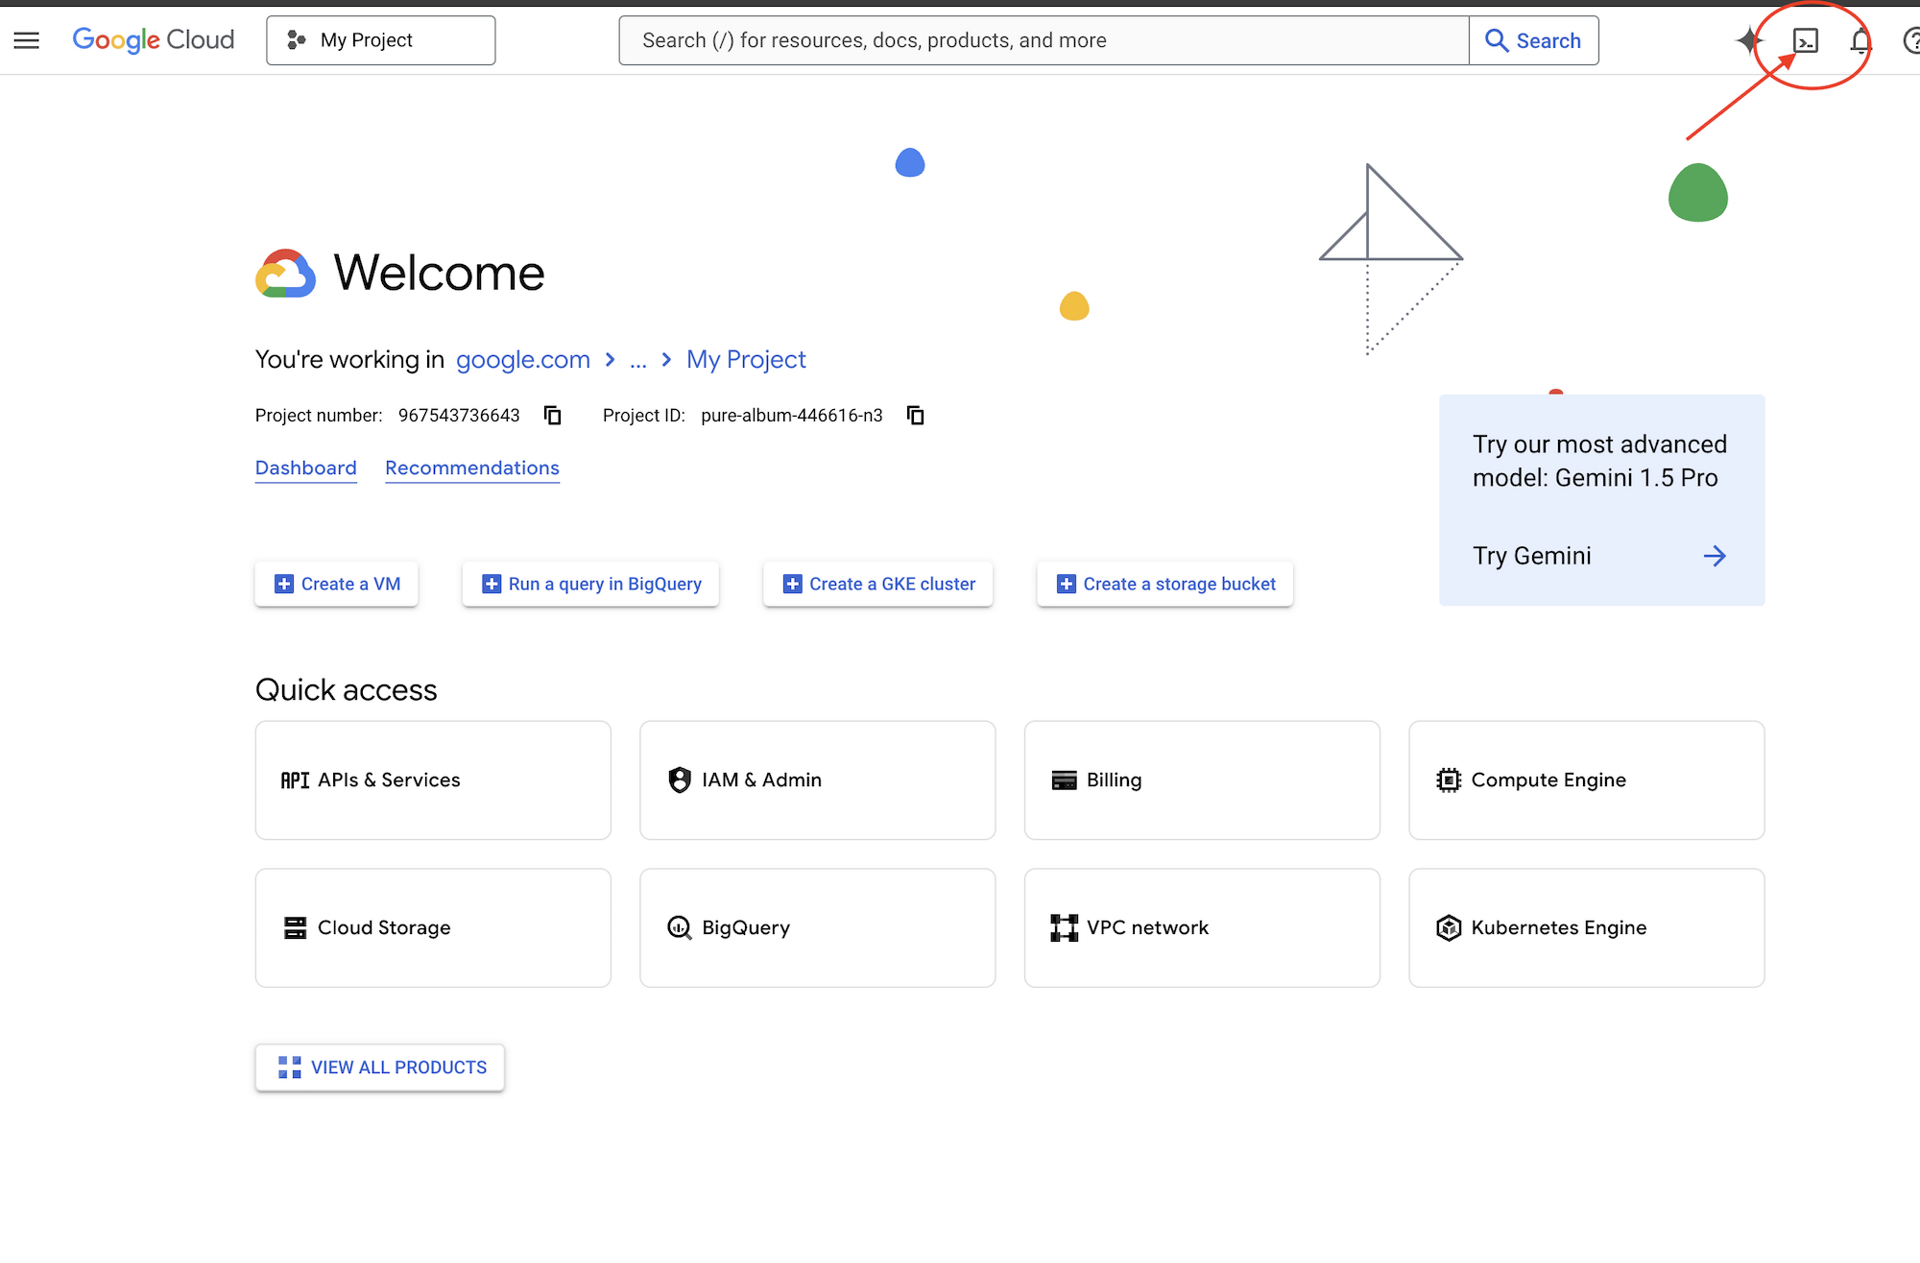
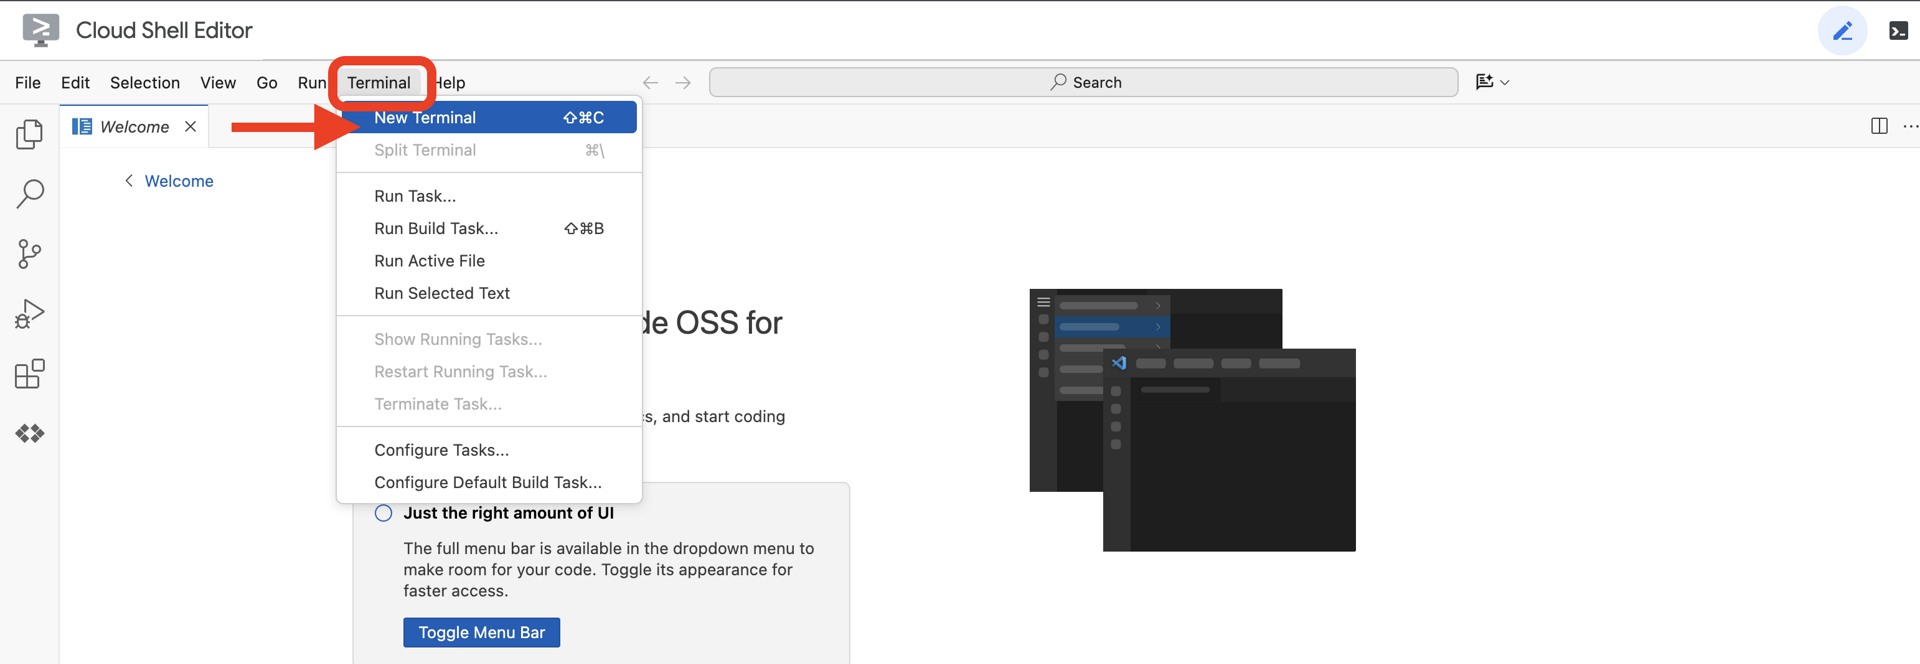
👉 "एडिटर खोलें" बटन पर क्लिक करें. यह बटन, पेंसिल वाले खुले फ़ोल्डर की तरह दिखता है. इससे विंडो में Cloud Shell Code Editor खुल जाएगा. आपको बाईं ओर फ़ाइल एक्सप्लोरर दिखेगा. 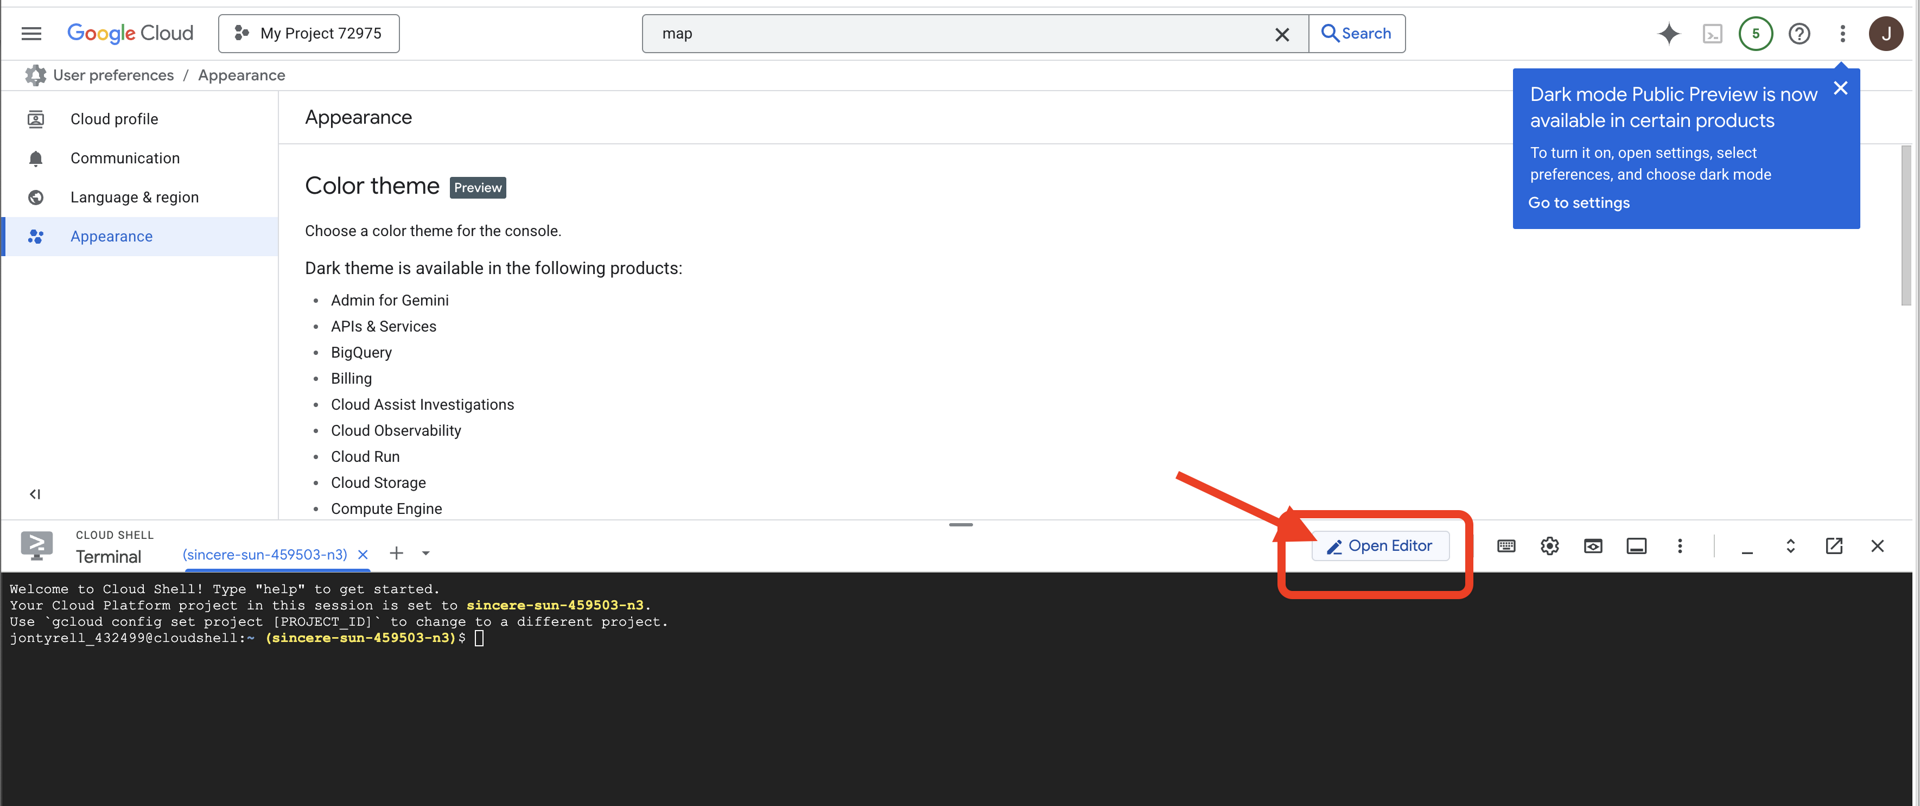
👉एडिटर खोलने के बाद, क्लाउड आईडीई में टर्मिनल खोलें,
👉💻 टर्मिनल में, पुष्टि करें कि आपने पहले ही पुष्टि कर ली है और प्रोजेक्ट को अपने प्रोजेक्ट आईडी पर सेट किया गया है. इसके लिए, यह कमांड इस्तेमाल करें:
gcloud auth list
दूसरा चरण: GitHub से पुष्टि करना और फ़ोर्क करना
GitHub से पुष्टि करें:
👉💻 कमांड को कॉपी करके अपने क्लाउड टर्मिनल में चिपकाएं:
gh auth login
- "GitHub का इस्तेमाल कहां किया जाता है" में जाकर, "GitHub.com" को चुनें
- "What is you preferred protocol for Git operations on this host?" में जाकर, "HTTPS" चुनें
- "Authenticate Git with your GitHub credentials?" में "Yes" चुनें
- "How would you like to authenticate GitHub CLI?" में जाकर, "Login with a web browser" चुनें
अहम जानकारी!! अभी "enter" न दबाएं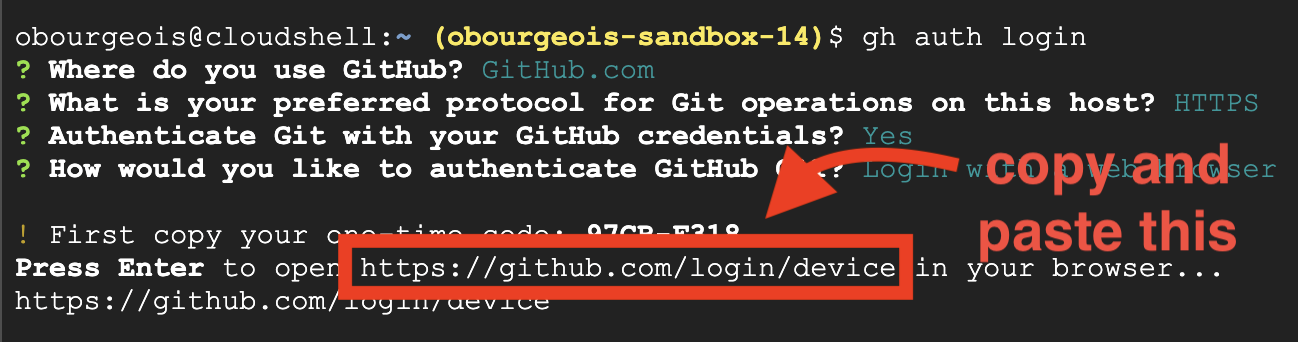
लॉगिन करने की पुष्टि करने वाले पेज पर, टर्मिनल से कोड कॉपी करें
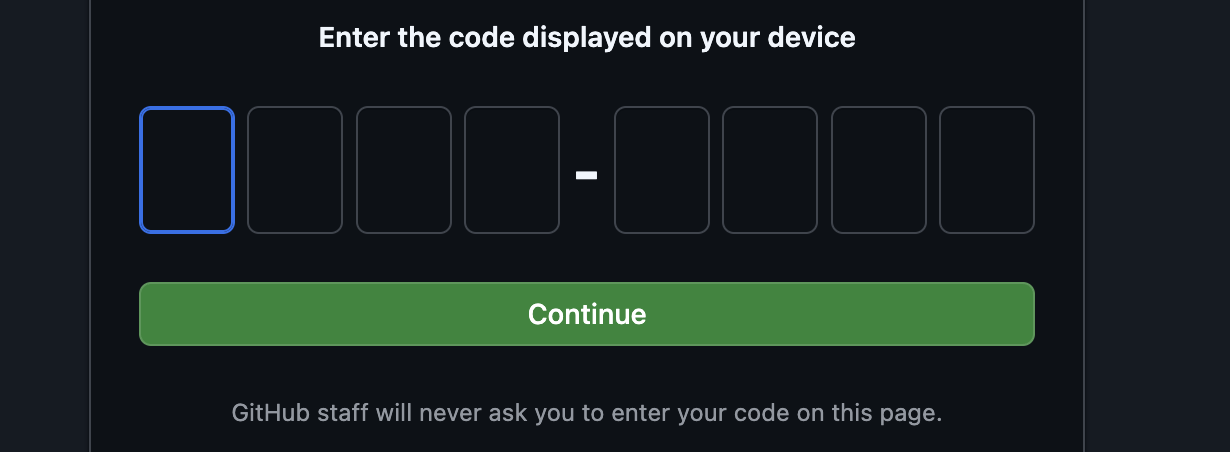
कोड डालने के बाद, वापस Cloud Shell टर्मिनल पर जाएं और आगे बढ़ने के लिए "enter" दबाएं.

चौथा चरण: रेपो को फ़ोर्क और क्लोन करें:
👉💻 कमांड को कॉपी करके अपने क्लाउड टर्मिनल में चिपकाएं:
gh repo fork cuppibla/storygen-learning --clone=true
3. आर्किटेक्चर: Cloud Assist की मदद से आइडिया से लेकर ब्लूप्रिंट तक
हर बेहतरीन प्रोजेक्ट की शुरुआत एक साफ़ विज़न से होती है. हम अपने ऐप्लिकेशन के आर्किटेक्चर को डिज़ाइन करने के लिए, एआई को-पायलट Cloud Assist का इस्तेमाल करेंगे.
कार्रवाइयां
- Google Cloud Console खोलें: [https://console.cloud.google.com](Google Cloud Console)
- सबसे ऊपर दाएं कोने में, "Cloud Assist Chat खोलें" पर क्लिक करें
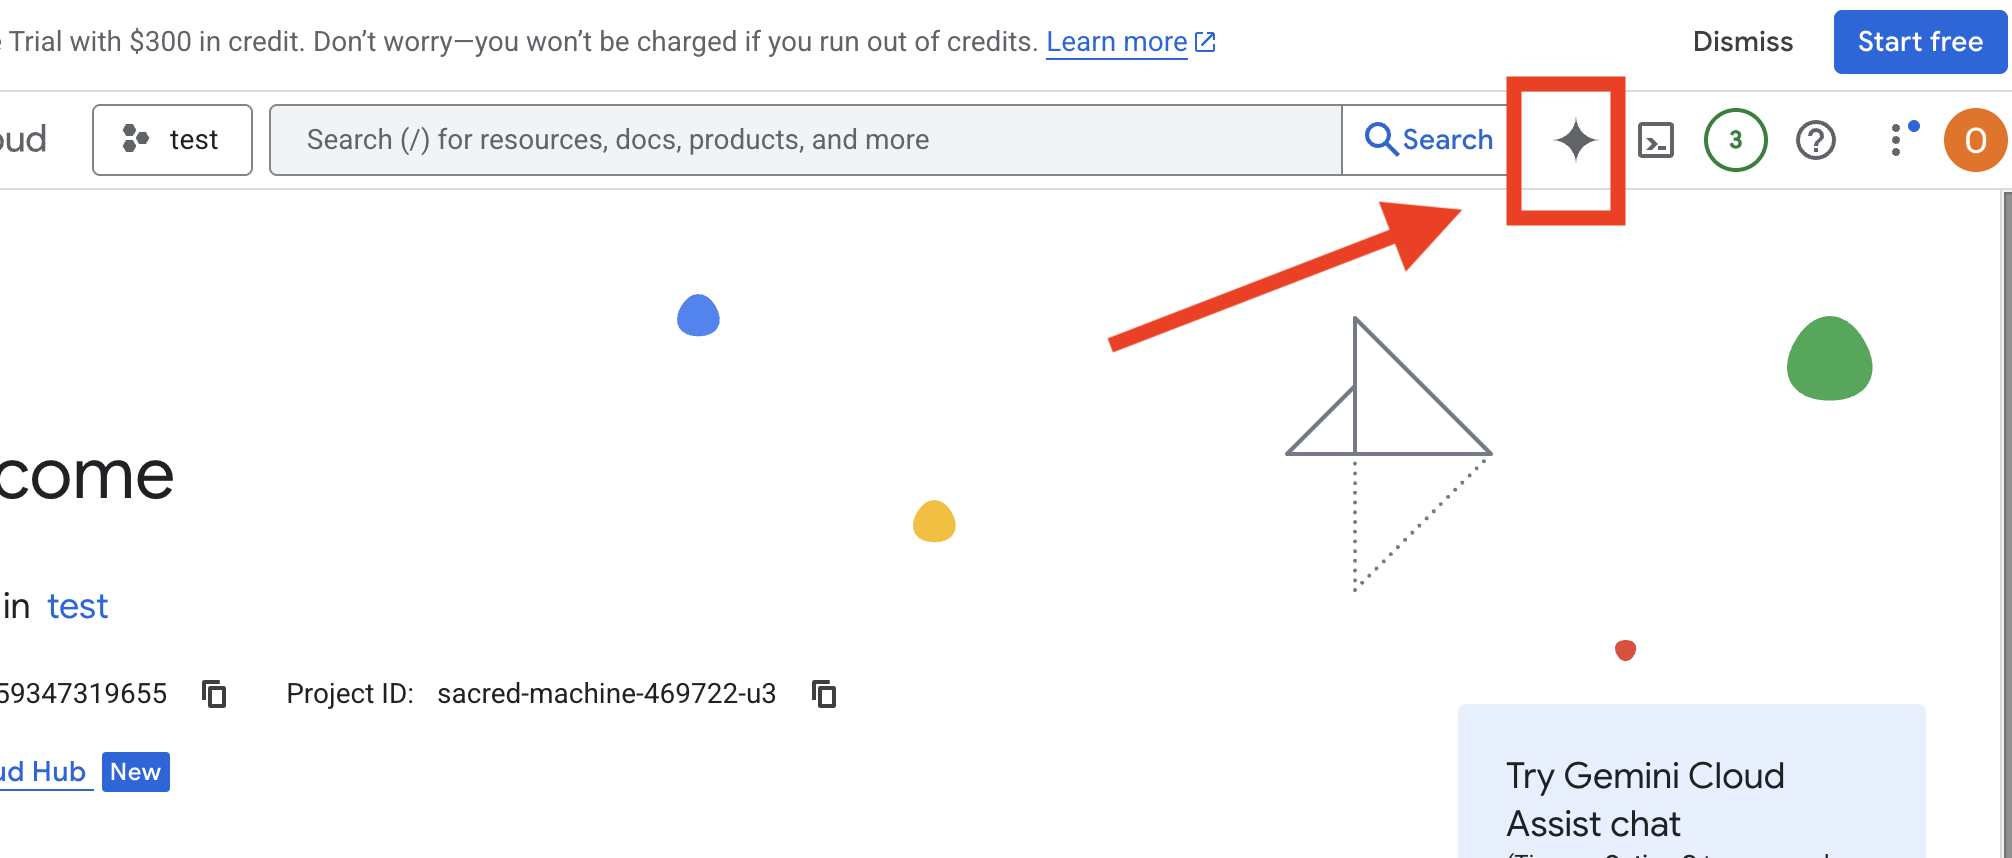
Cloud Assist की सुविधा चालू करना
Get Gemini Assistपर क्लिक करें. इसके बाद,Enable Cloud Assist at no costपर क्लिक करें.- इसके बाद, चैट करना शुरू करें!
 Cloud Assist को यह प्रॉम्प्ट दें:
अपना आइडिया सबमिट करें
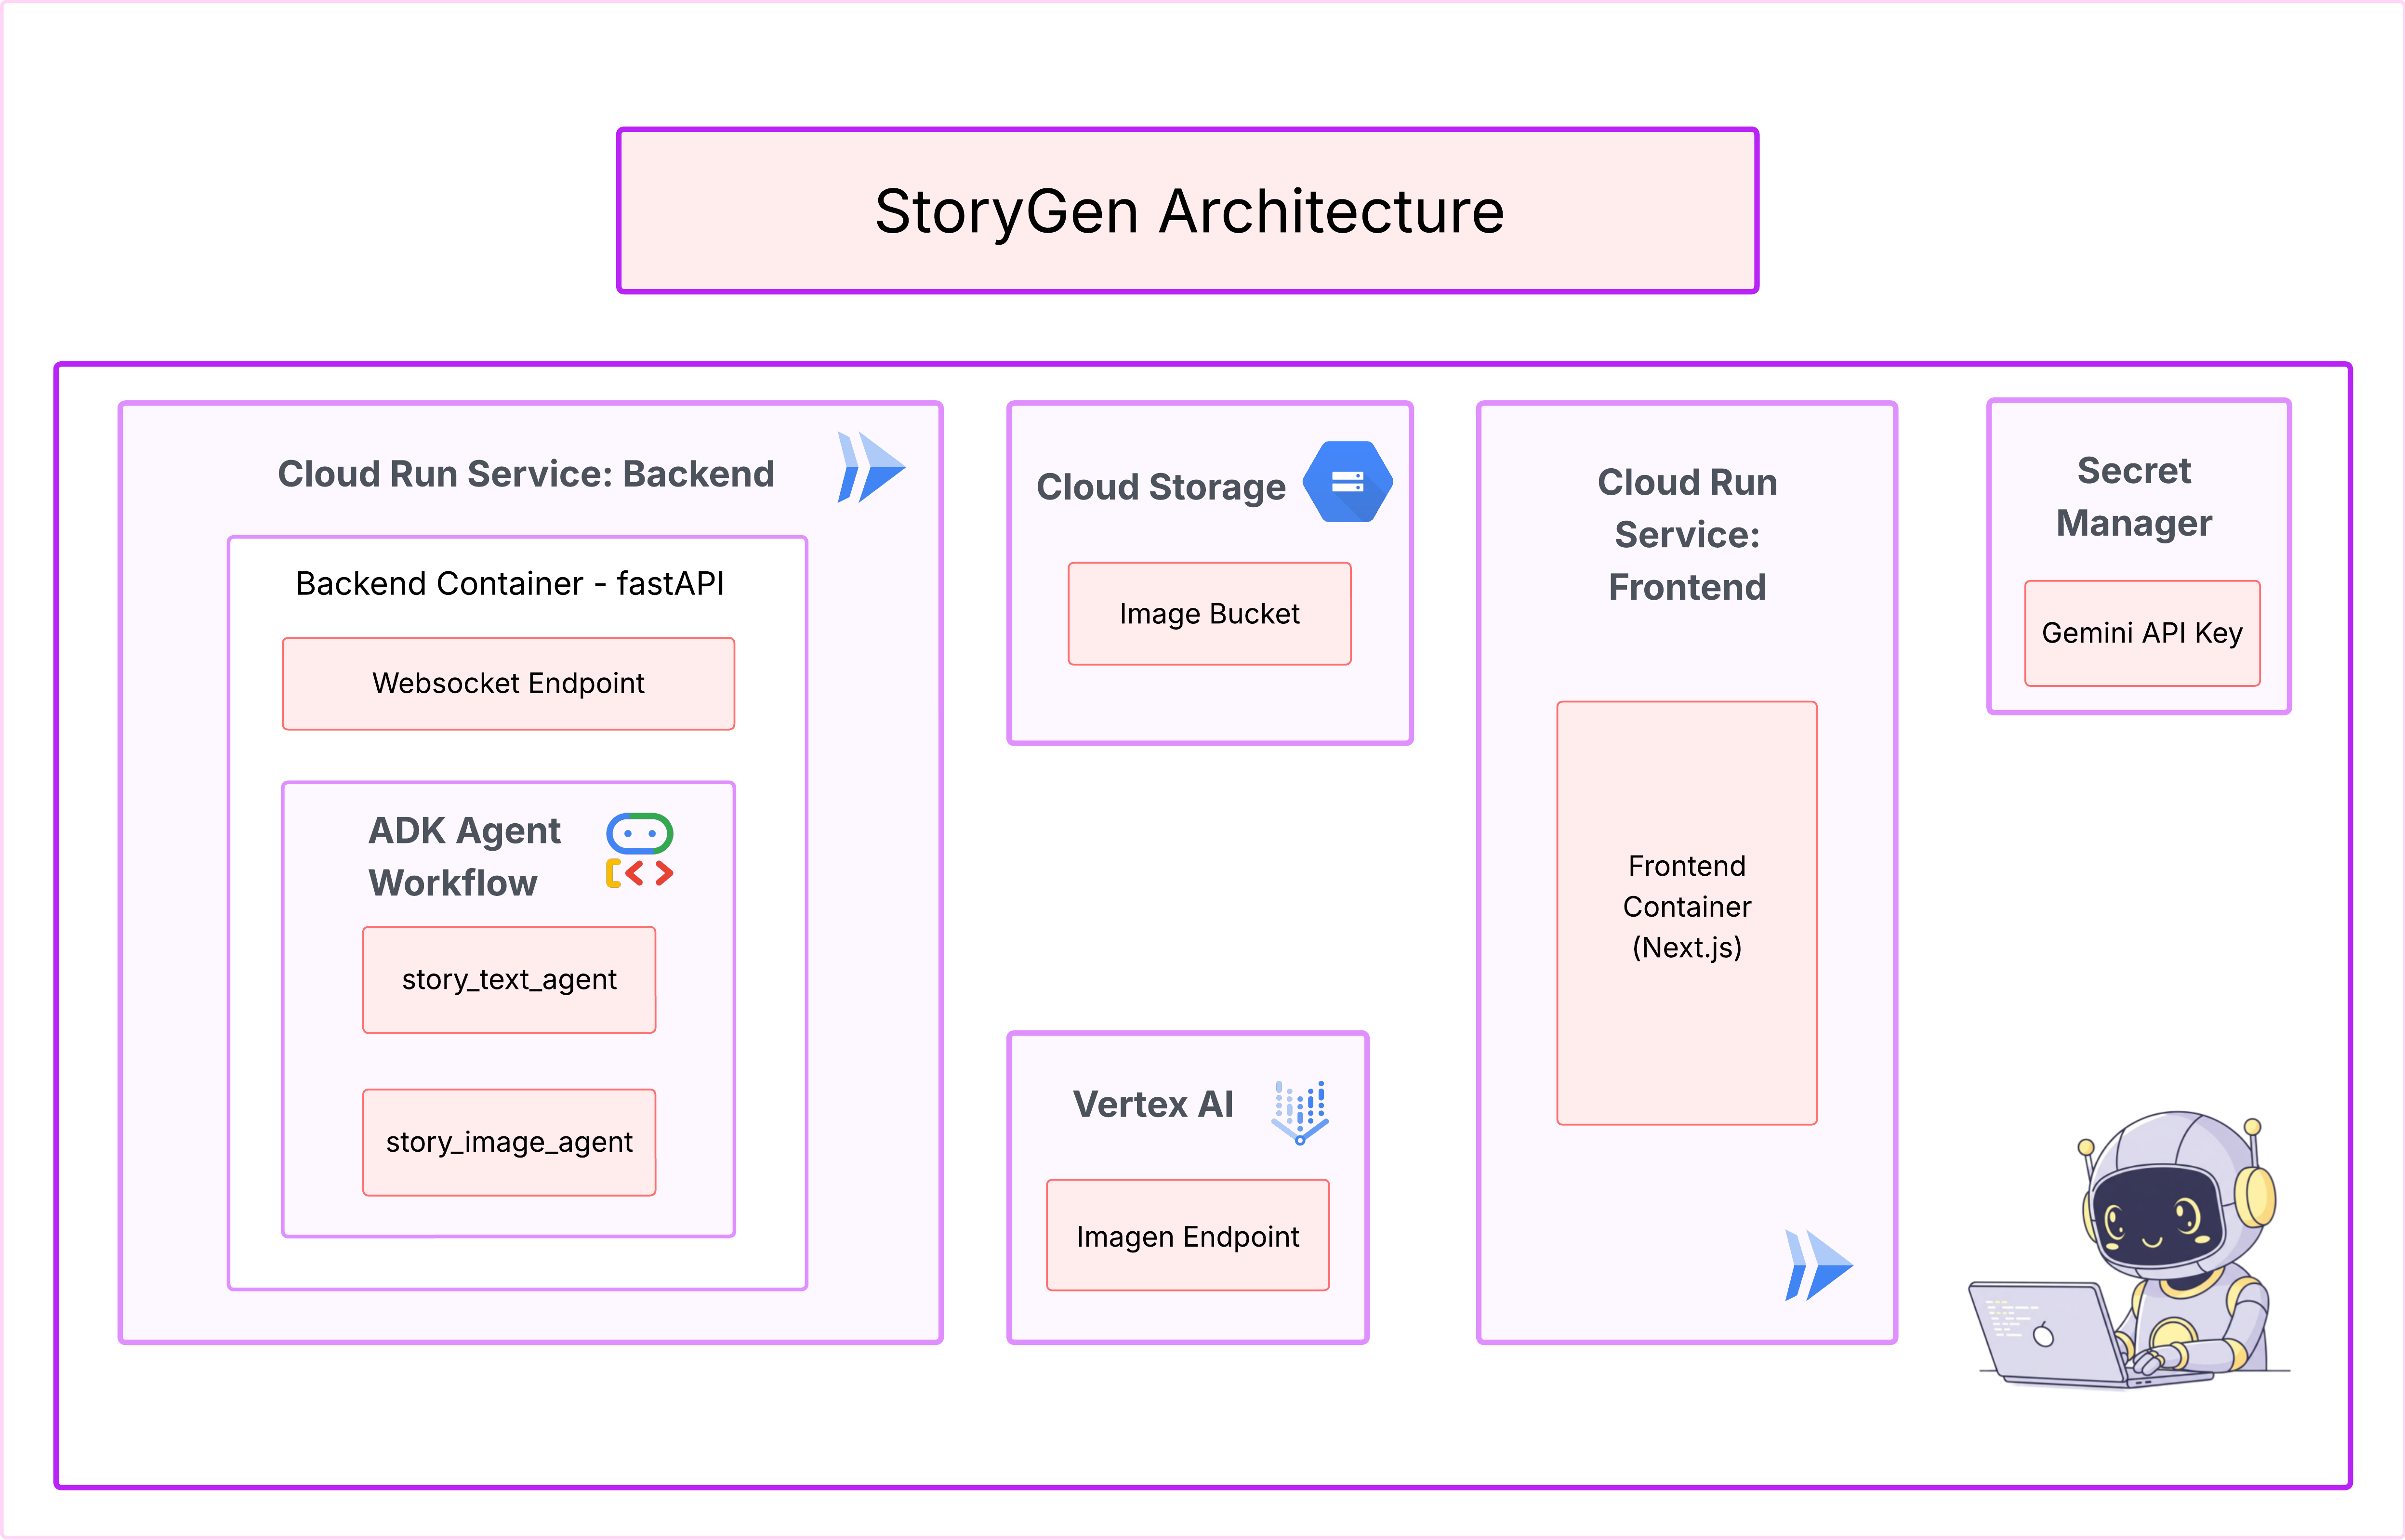
Generate a Python web application that uses AI to generate children's stories and illustrations. It has Python backend and React frontend host separately on Cloudrun. They communicate through Websocket. It needs to use a generative model for text and another for images. The generated images must be used by Imagen from Vertex AI and stored in a Google Cloud Storage bucket so that frontend can fetch from the bucket to render images. I do not want any load balancer or a database for the story text. We need a solution to store the API key.
अपने ऐप्लिकेशन का ब्लूप्रिंट पाना
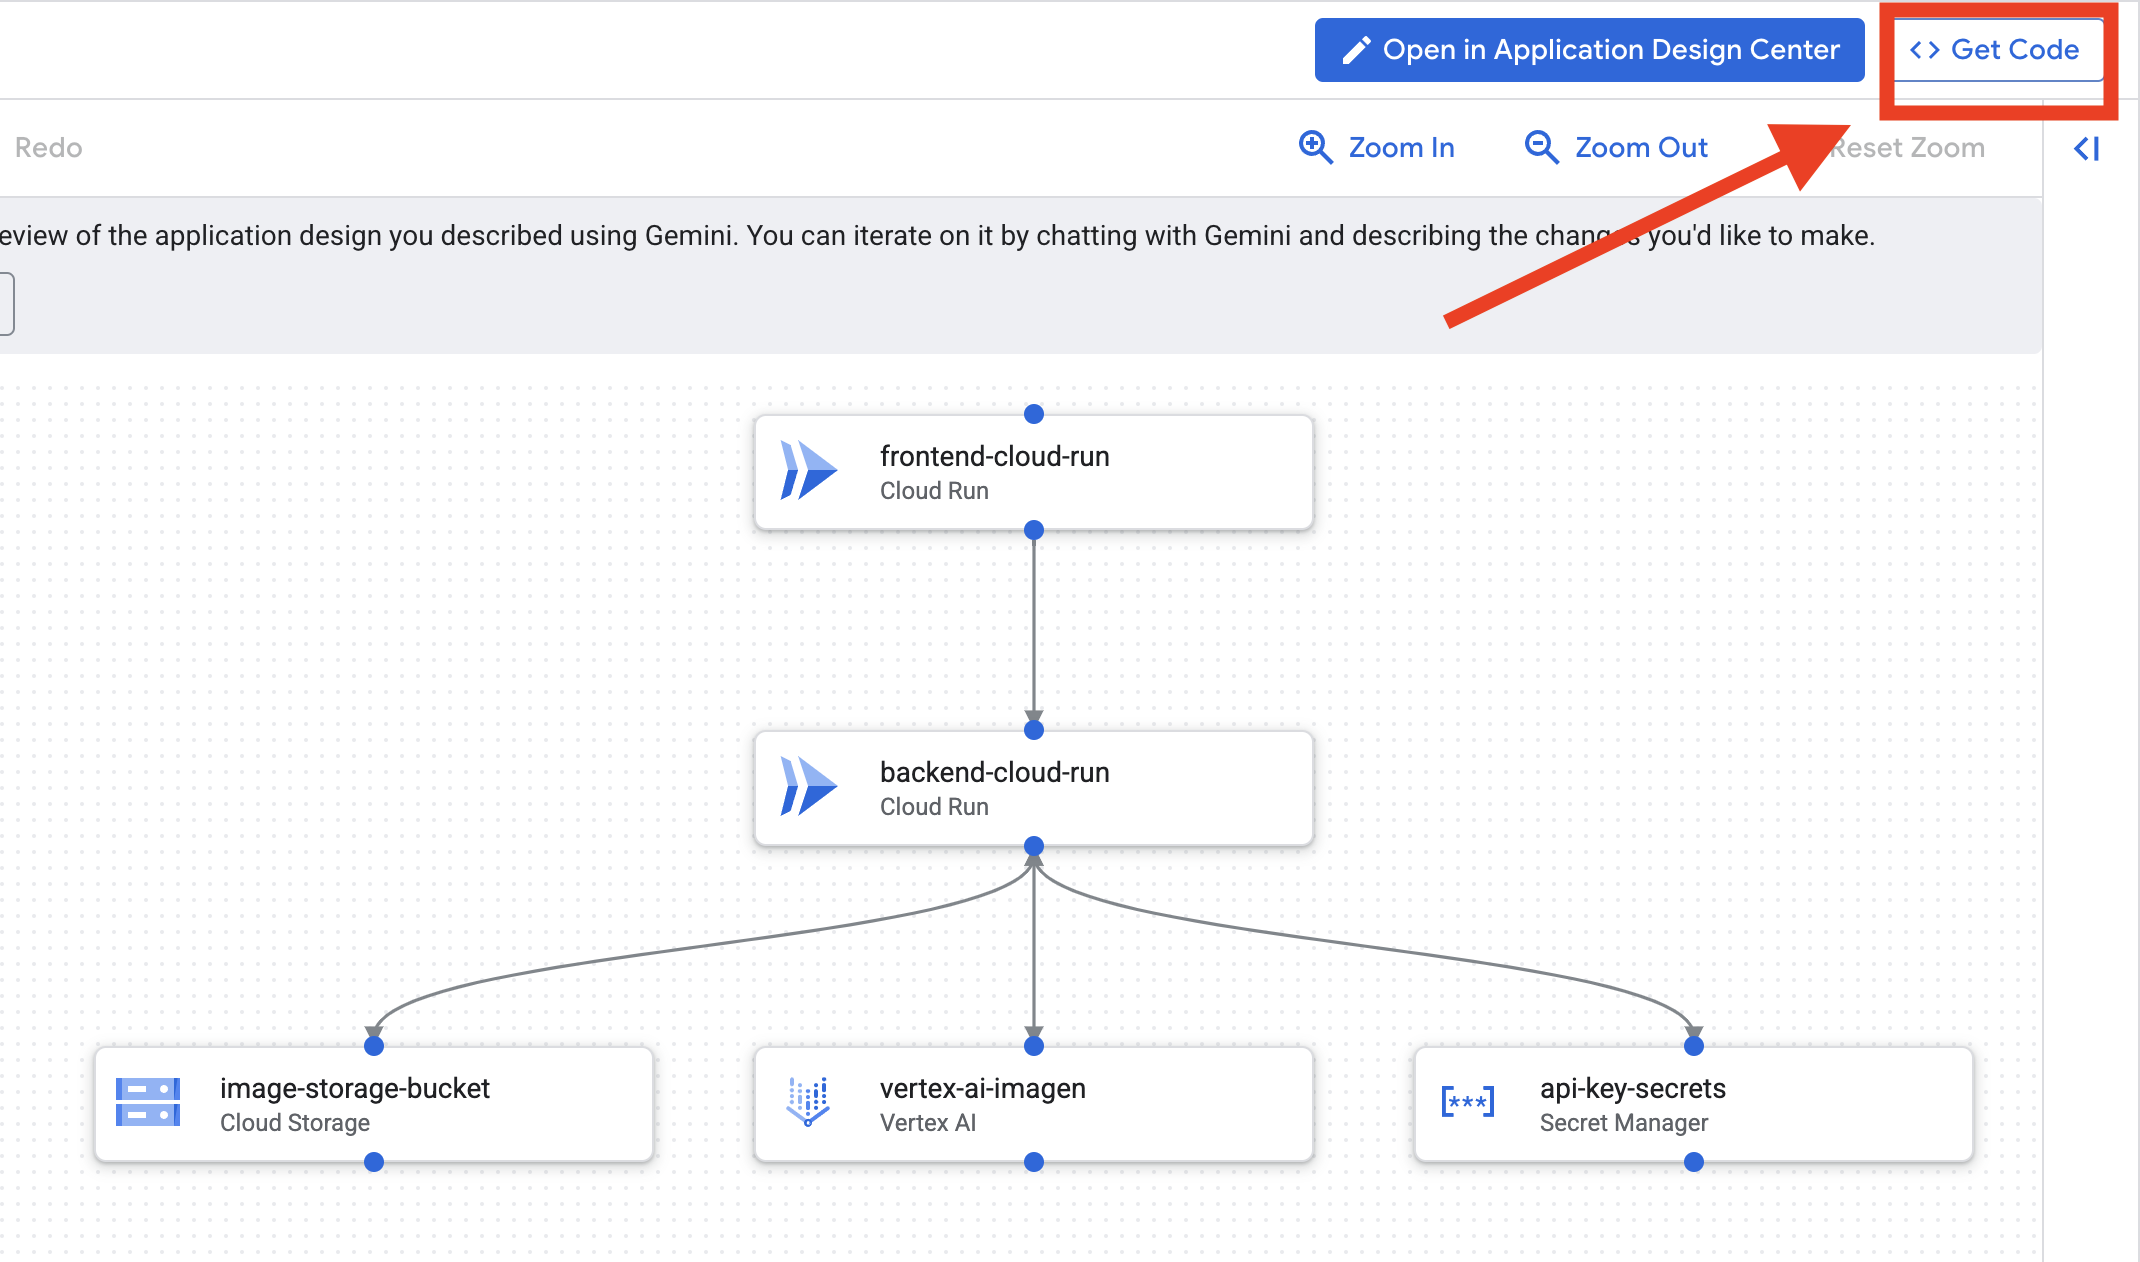
- "ऐप्लिकेशन के डिज़ाइन में बदलाव करें" पर क्लिक करें. आपको डायग्राम दिखेगा. Terraform कोड डाउनलोड करने के लिए, सबसे ऊपर दाईं ओर मौजूद पैनल में "<> Get Code" पर क्लिक करें.
- Cloud Assist, आर्किटेक्चर का एक डायग्राम जनरेट करेगा. यह हमारा विज़ुअल ब्लूप्रिंट है.
इस कोड के साथ कोई कार्रवाई करने की ज़रूरत नहीं है. ज़्यादा जानकारी के लिए यहां पढ़ें
जनरेट किए गए Terraform कोड को समझना. आपको Cloud Assist से, Terraform फ़ाइलों का पूरा सेट मिल गया है. फ़िलहाल, इस कोड के साथ कोई कार्रवाई करने की ज़रूरत नहीं है. हालांकि, आइए हम जल्दी से यह जान लेते हैं कि यह कोड क्या है और यह इतना असरदार क्यों है.
Terraform क्या है? Terraform, इंफ़्रास्ट्रक्चर ऐज़ कोड (IaC) टूल है. इसे कोड में लिखा गया, आपके क्लाउड एनवायरमेंट का ब्लूप्रिंट माना जा सकता है. Google Cloud Console में जाकर, मैन्युअल तरीके से सेवाओं, स्टोरेज, और अनुमतियों को बनाने के बजाय, इन कॉन्फ़िगरेशन फ़ाइलों में उन सभी संसाधनों को तय किया जाता है. इसके बाद, Terraform आपके ब्लूप्रिंट को पढ़कर, आपके लिए उसी एनवायरमेंट को अपने-आप बना देता है.
विज़ुअल प्लान से लेकर एक्ज़ीक्यूटेबल कोड तक. Cloud Assist ने जो आर्किटेक्चर डायग्राम दिया है वह आपका विज़ुअल प्लान है. टेराफ़ॉर्म कोड, उस प्लान का मशीन-रीडेबल वर्शन होता है. यह एक अहम लिंक है, जो डिज़ाइन कॉन्सेप्ट को दोहराई जा सकने वाली, ऑटोमेटेड हकीकत में बदल देता है. कोड में अपने इन्फ़्रास्ट्रक्चर को तय करके, ये काम किए जा सकते हैं:
- अपने-आप जनरेट होने की सुविधा: एक ही एनवायरमेंट को बार-बार भरोसेमंद तरीके से बनाया जा सकता है.
- वर्शन कंट्रोल का इस्तेमाल करें: अपने ऐप्लिकेशन कोड की तरह ही, Git में अपने इंफ़्रास्ट्रक्चर में हुए बदलावों को ट्रैक करें.
- गड़बड़ियों को रोकना: वेब इंटरफ़ेस पर क्लिक करते समय होने वाली मैन्युअल गड़बड़ियों से बचें.
इस वर्कशॉप के लिए, आपको इस Terraform कोड को खुद नहीं चलाना होगा. इसे प्रोफ़ेशनल ब्लूप्रिंट के तौर पर समझें. यह "आंसर की" है. इसका इस्तेमाल, आने वाले चरणों में बनाए जाने वाले और डिप्लॉय किए जाने वाले इन्फ़्रास्ट्रक्चर के लिए किया जाएगा.
4. डेवलपमेंट: Gemini CLI के बारे में जानकारी
👉💻 Cloud Shell टर्मिनल में, अपनी निजी डायरेक्ट्री पर जाएं.
cd ~/storygen-learning
👉💻 पहली बार Gemini को आज़माएं.
clear
gemini --model=gemini-2.5-flash
अगर आपसे Do you want to connect Cloud Shell editor to Gemini CLI? पूछा जाता है, तो नहीं चुनें.
👉✨ Gemini के हर टूल के बारे में जानकारी दी गई है. इन्हें अभी पढ़ें. Gemini के प्रॉम्प्ट में, यह टाइप करें:
Gemini CLI में
/help
👉✨ Gemini CLI में, पहले से मौजूद सुविधाओं का अपना सेट होता है. उनकी जांच करने के लिए:
Gemini CLI में
/tools
आपको ReadFile, WriteFile, और GoogleSearch की सूची दिखेगी. ये डिफ़ॉल्ट तकनीकें हैं. इनका इस्तेमाल करने के लिए, आपको किसी बाहरी टूल की ज़रूरत नहीं होती.
👉✨ Gemini Blade में "टैक्टिकल अवेयरनेस" (कॉन्टेक्स्ट) की जानकारी होती है, ताकि वह अपनी कार्रवाइयों के बारे में जानकारी दे सके.
Gemini CLI में
/memory show
फ़िलहाल, यह खाली है.
👉✨ सबसे पहले, एजेंट की मेमोरी में कोई पर्सोना जोड़ें. इससे यह तय होगा कि वह किस विषय में विशेषज्ञता रखता है:
Gemini CLI में
/memory add "I am master at python development"
/memory show को फिर से चलाएं, ताकि यह पुष्टि की जा सके कि आपके ब्लेड ने इस जानकारी को समझ लिया है.
👉✨ @ सिंबल का इस्तेमाल करके फ़ाइलों को रेफ़रंस करने का तरीका दिखाने के लिए, आइए सबसे पहले "मिशन की जानकारी" फ़ाइल बनाएं.
एक नया टर्मिनल खोलें और मिशन फ़ाइल बनाने के लिए, यह कमांड चलाएं:
!echo "## Mission Objective: Create Imagen ADK Agent for Story Book" > mission.md
👉✨अब, Gemini CLI को ब्रीफ़िंग का विश्लेषण करने और उसके नतीजों की रिपोर्ट बनाने का निर्देश दें:
Gemini CLI में
Explain the contents of the file @mission.md
आपके मुख्य हथियार को अब अपने लक्ष्य के बारे में पता है.
👉💻 Gemini CLI से बाहर निकलने के लिए, Ctrl+C को दो बार दबाएं
लर्निंग:
Gemini CLI को कैसे मिलती हैं सुपरपावर: gemini.md आगे बढ़ने से पहले, यह समझना ज़रूरी है कि Gemini CLI को किसी प्रोजेक्ट के हिसाब से कैसे बनाया जा सकता है. इसका इस्तेमाल, सामान्य तौर पर बातचीत करने वाले टूल के तौर पर किया जा सकता है. हालांकि, इसकी असली ताकत एक खास कॉन्फ़िगरेशन फ़ाइल से मिलती है: gemini.md.
gemini कमांड चलाने पर, यह मौजूदा डायरेक्ट्री में gemini.md फ़ाइल को अपने-आप ढूंढता है. यह फ़ाइल, एआई के लिए प्रोजेक्ट के हिसाब से निर्देश देने वाली मैन्युअल के तौर पर काम करती है. इससे तीन मुख्य चीज़ें तय की जा सकती हैं:
- पर्सोना: एआई को बताया जा सकता है कि उसे किस तरह से जवाब देना है. उदाहरण के लिए, "आप Google Cloud में विशेषज्ञता रखने वाले एक Python डेवलपर हैं." इससे, जवाबों और उनके अंदाज़ पर फ़ोकस किया जाता है.
- टूल: इसे खास फ़ाइलों (@file.py) या Google पर की गई खोजों (@google) का ऐक्सेस दिया जा सकता है. इससे एआई को वह कॉन्टेक्स्ट मिलता है जिसकी मदद से वह आपके प्रोजेक्ट के कोड से जुड़े सवालों के जवाब दे सकता है.
- मेमोरी: इस प्रोजेक्ट के लिए, एआई को ऐसे तथ्य या नियम दिए जा सकते हैं जिन्हें उसे हमेशा याद रखना चाहिए. इससे, जवाबों में एकरूपता बनाए रखने में मदद मिलती है.
gemini.md फ़ाइल का इस्तेमाल करके, Gemini के सामान्य मॉडल को एक विशेषज्ञ असिस्टेंट में बदला जा सकता है. इसे आपके प्रोजेक्ट के लक्ष्यों के बारे में पहले से ही जानकारी होती है और इसके पास सही जानकारी का ऐक्सेस होता है.
5. डेवलपमेंट: Gemini CLI की मदद से ADK बनाना
परिवेश का कॉन्फ़िगरेशन
अपने Cloud Shell पर जाएं और "टर्मिनल खोलें" बटन पर क्लिक करें.
- एनवायरमेंट टेंप्लेट कॉपी करें:
cd ~/storygen-learning
cp ~/storygen-learning/env.template ~/storygen-learning/.env
अगर आपको .env फ़ाइल नहीं मिलती है, तो एडिटर में छिपी हुई फ़ाइल देखें
- सबसे ऊपर मौजूद मेन्यू बार में, देखें पर क्लिक करें.
- छिपी हुई फ़ाइलें टॉगल करें को चुनें.
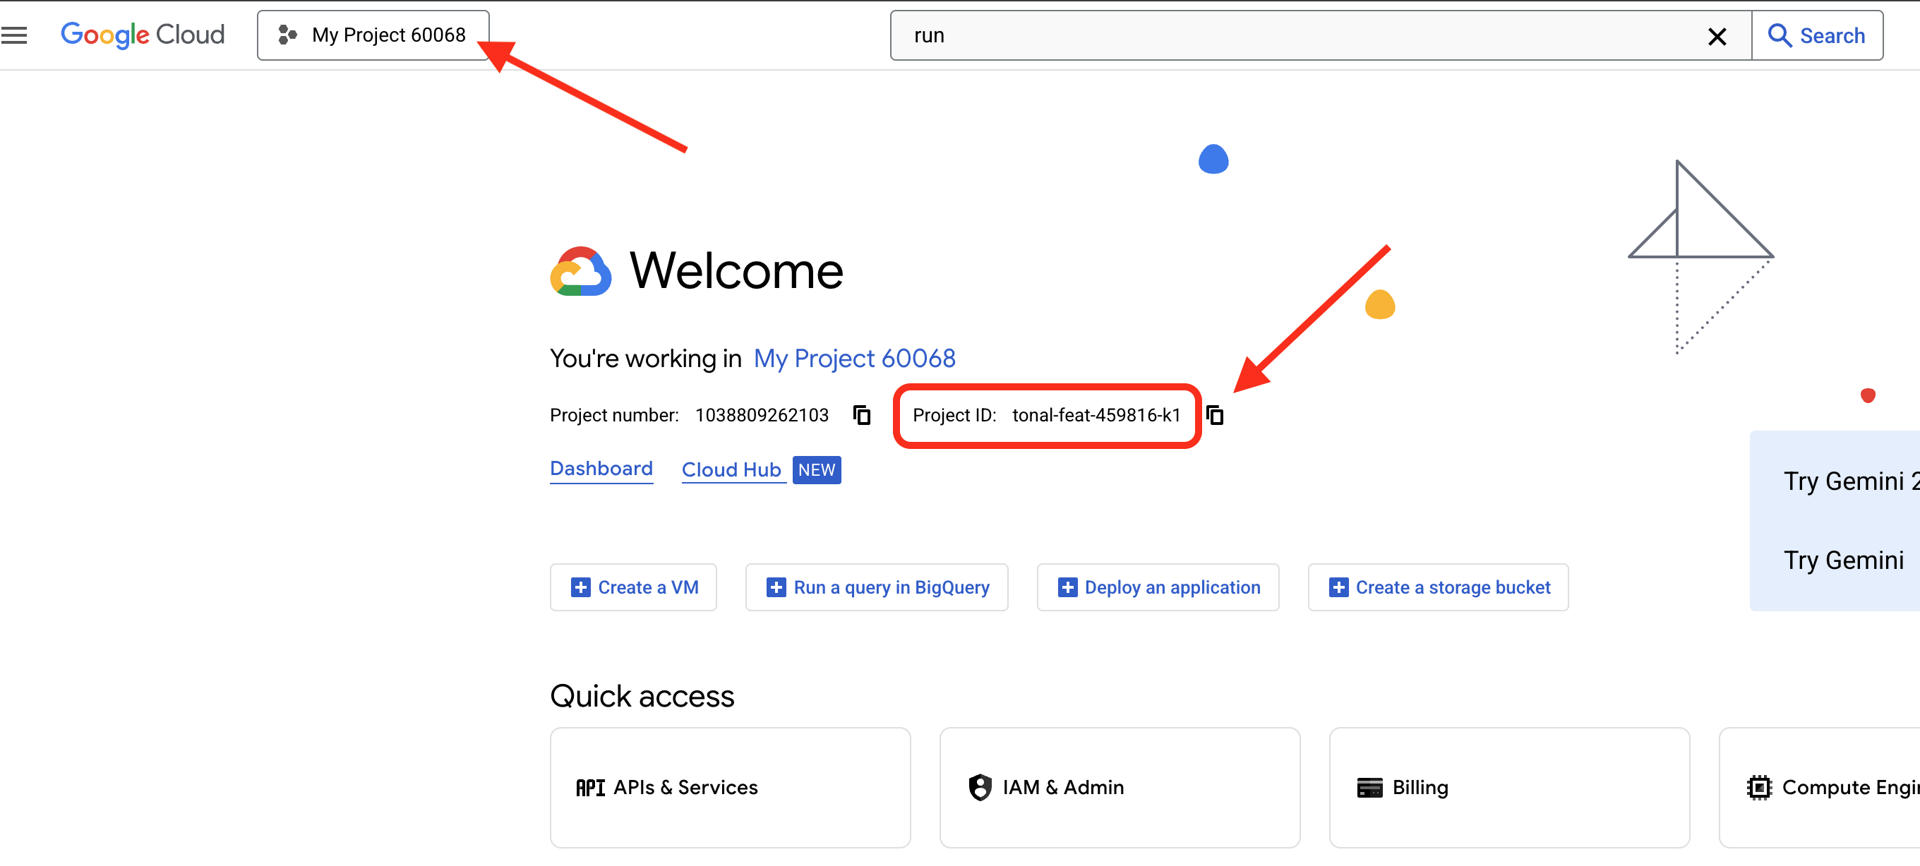
👉अपना Google Cloud प्रोजेक्ट आईडी ढूंढें:
- Google Cloud Console खोलें: लिंक
- पेज पर सबसे ऊपर मौजूद प्रोजेक्ट ड्रॉप-डाउन से, वह प्रोजेक्ट चुनें जिसका इस्तेमाल आपको इस वर्कशॉप के लिए करना है.
- आपका प्रोजेक्ट आईडी, डैशबोर्ड पर मौजूद प्रोजेक्ट की जानकारी देने वाले कार्ड में दिखता है
👉अपना GitHub यूज़रनेम ढूंढें:
- अपने GitHub खाते पर जाएं और अपना GitHub उपयोगकर्ता नाम ढूंढें
.env फ़ाइल में बदलाव करना 2. .env में मौजूद इन वैल्यू को बदलें:
GOOGLE_API_KEY=[REPLACE YOUR API KEY HERE]
GOOGLE_CLOUD_PROJECT_ID=[REPLACE YOUR PROJECT ID]
GITHUB_USERNAME=[REPLACE YOUR USERNAME]
GENMEDIA_BUCKET=[REPLACE YOUR PROJECT ID]-bucket
उदाहरण के लिए, अगर आपका प्रोजेक्ट आईडी testproject है, तो आपको GOOGLE_CLOUD_PROJECT_ID=testproject और GENMEDIA_BUCKET=testproject-bucket डालना चाहिए
स्क्रिप्ट सेटअप करना
00_Starting_Here पर जाएं नया टर्मिनल खोलें (Gemini सीएलआई में नहीं)
cd ~/storygen-learning/00_Starting_Here
पूरा सेटअप रन करें:
./setup-complete.sh
आपको टर्मिनल में सेटअप के नतीजे दिखेंगे
अपना पहला एजेंट बनाना
01a_First_Agent_Ready पर जाएँ आइए, ADK एजेंट बनाने के लिए Gemini CLI का इस्तेमाल करें:**
cd ~/storygen-learning/01a_First_Agent_Ready
Gemini CLI खोलें
gemini
Gemini CLI विंडो में, यह प्रॉम्प्ट आज़माएं:
I need you to help me create a Google ADK (Agent Development Kit) agent for story generation. I'm working on a children's storybook app that generates creative stories with visual scenes.

Please create a complete `agent.py` file that implements an LlmAgent using Google's ADK framework. The agent should:

**Requirements:**
1. Use the `google.adk.agents.LlmAgent` class
2. Use the "gemini-2.5-flash" model (supports streaming)
3. Be named "story_agent"
4. Generate structured stories with exactly 4 scenes each
5. Output valid JSON with story text, main characters, and scene data
6. No tools needed (images are handled separately)

**Agent Specifications:**
- **Model:** gemini-2.5-flash
- **Name:** story_agent
- **Description:** "Generates creative short stories and accompanying visual keyframes based on user-provided keywords and themes."
**Story Structure Required:**
- Exactly 4 scenes: Setup → Inciting Incident → Climax → Resolution
- 100-200 words total
- Simple, charming language for all audiences
- Natural keyword integration
**JSON Output Format:**

{
  "story": "Complete story text...",
  "main_characters": [
    {
      "name": "Character Name",
      "description": "VERY detailed visual description with specific colors, features, size, etc."
    }
  ],
  "scenes": [
    {
      "index": 1,
      "title": "The Setup",
      "description": "Scene action and setting WITHOUT character descriptions",
      "text": "Story text for this scene"
    }
    // ... 3 more scenes
  ]
}


**Key Instructions for the Agent:**
- Extract 1-2 main characters maximum
- Character descriptions should be extremely detailed and visual
- Scene descriptions focus on ACTION and SETTING only
- Do NOT repeat character appearance in scene descriptions
- Always respond with valid JSON

Please include a complete example in the instructions showing the exact format using keywords like "tiny robot", "lost kitten", "rainy city".

The file should start with necessary imports, define an empty tools list, include a print statement for initialization, and then create the LlmAgent with all the detailed instructions.

Can you create this agent in backend/story_agent/agent.py
जब आपको Gemini CLI टर्मिनल का इस्तेमाल नहीं करना हो, तब Control+C की मदद से इसे बंद करें
—————————————— ज़रूरी नहीं है, समाधान वाले हिस्से पर जाएं——————————————–
अब ADK Web में किए गए बदलाव की पुष्टि करें
cd ~/storygen-learning/01a_First_Agent_Ready/backend

source ../../.venv/bin/activate

adk web --port 8080
जारी रखने के लिए, आपको कमांड प्रॉम्प्ट की ज़रूरत होगी.
वेबसाइट को स्पिन अप करना
cd ~/storygen-learning/01a_First_Agent_Ready

./start.sh
अगर आपका बदलाव काम नहीं करता है, तो आपको ADK के वेब यूज़र इंटरफ़ेस (यूआई) और वेबसाइट में गड़बड़ियां दिखेंगी.
——————————————– Solution Starting Here ——————————————–
समाधान
Control+C का इस्तेमाल करके पिछली प्रोसेस बंद करें या कोई दूसरा टर्मिनल खोलें:
cd ~/storygen-learning/01b_First_Agent_Done
वेबसाइट को स्पिन अप करना:
./start.sh
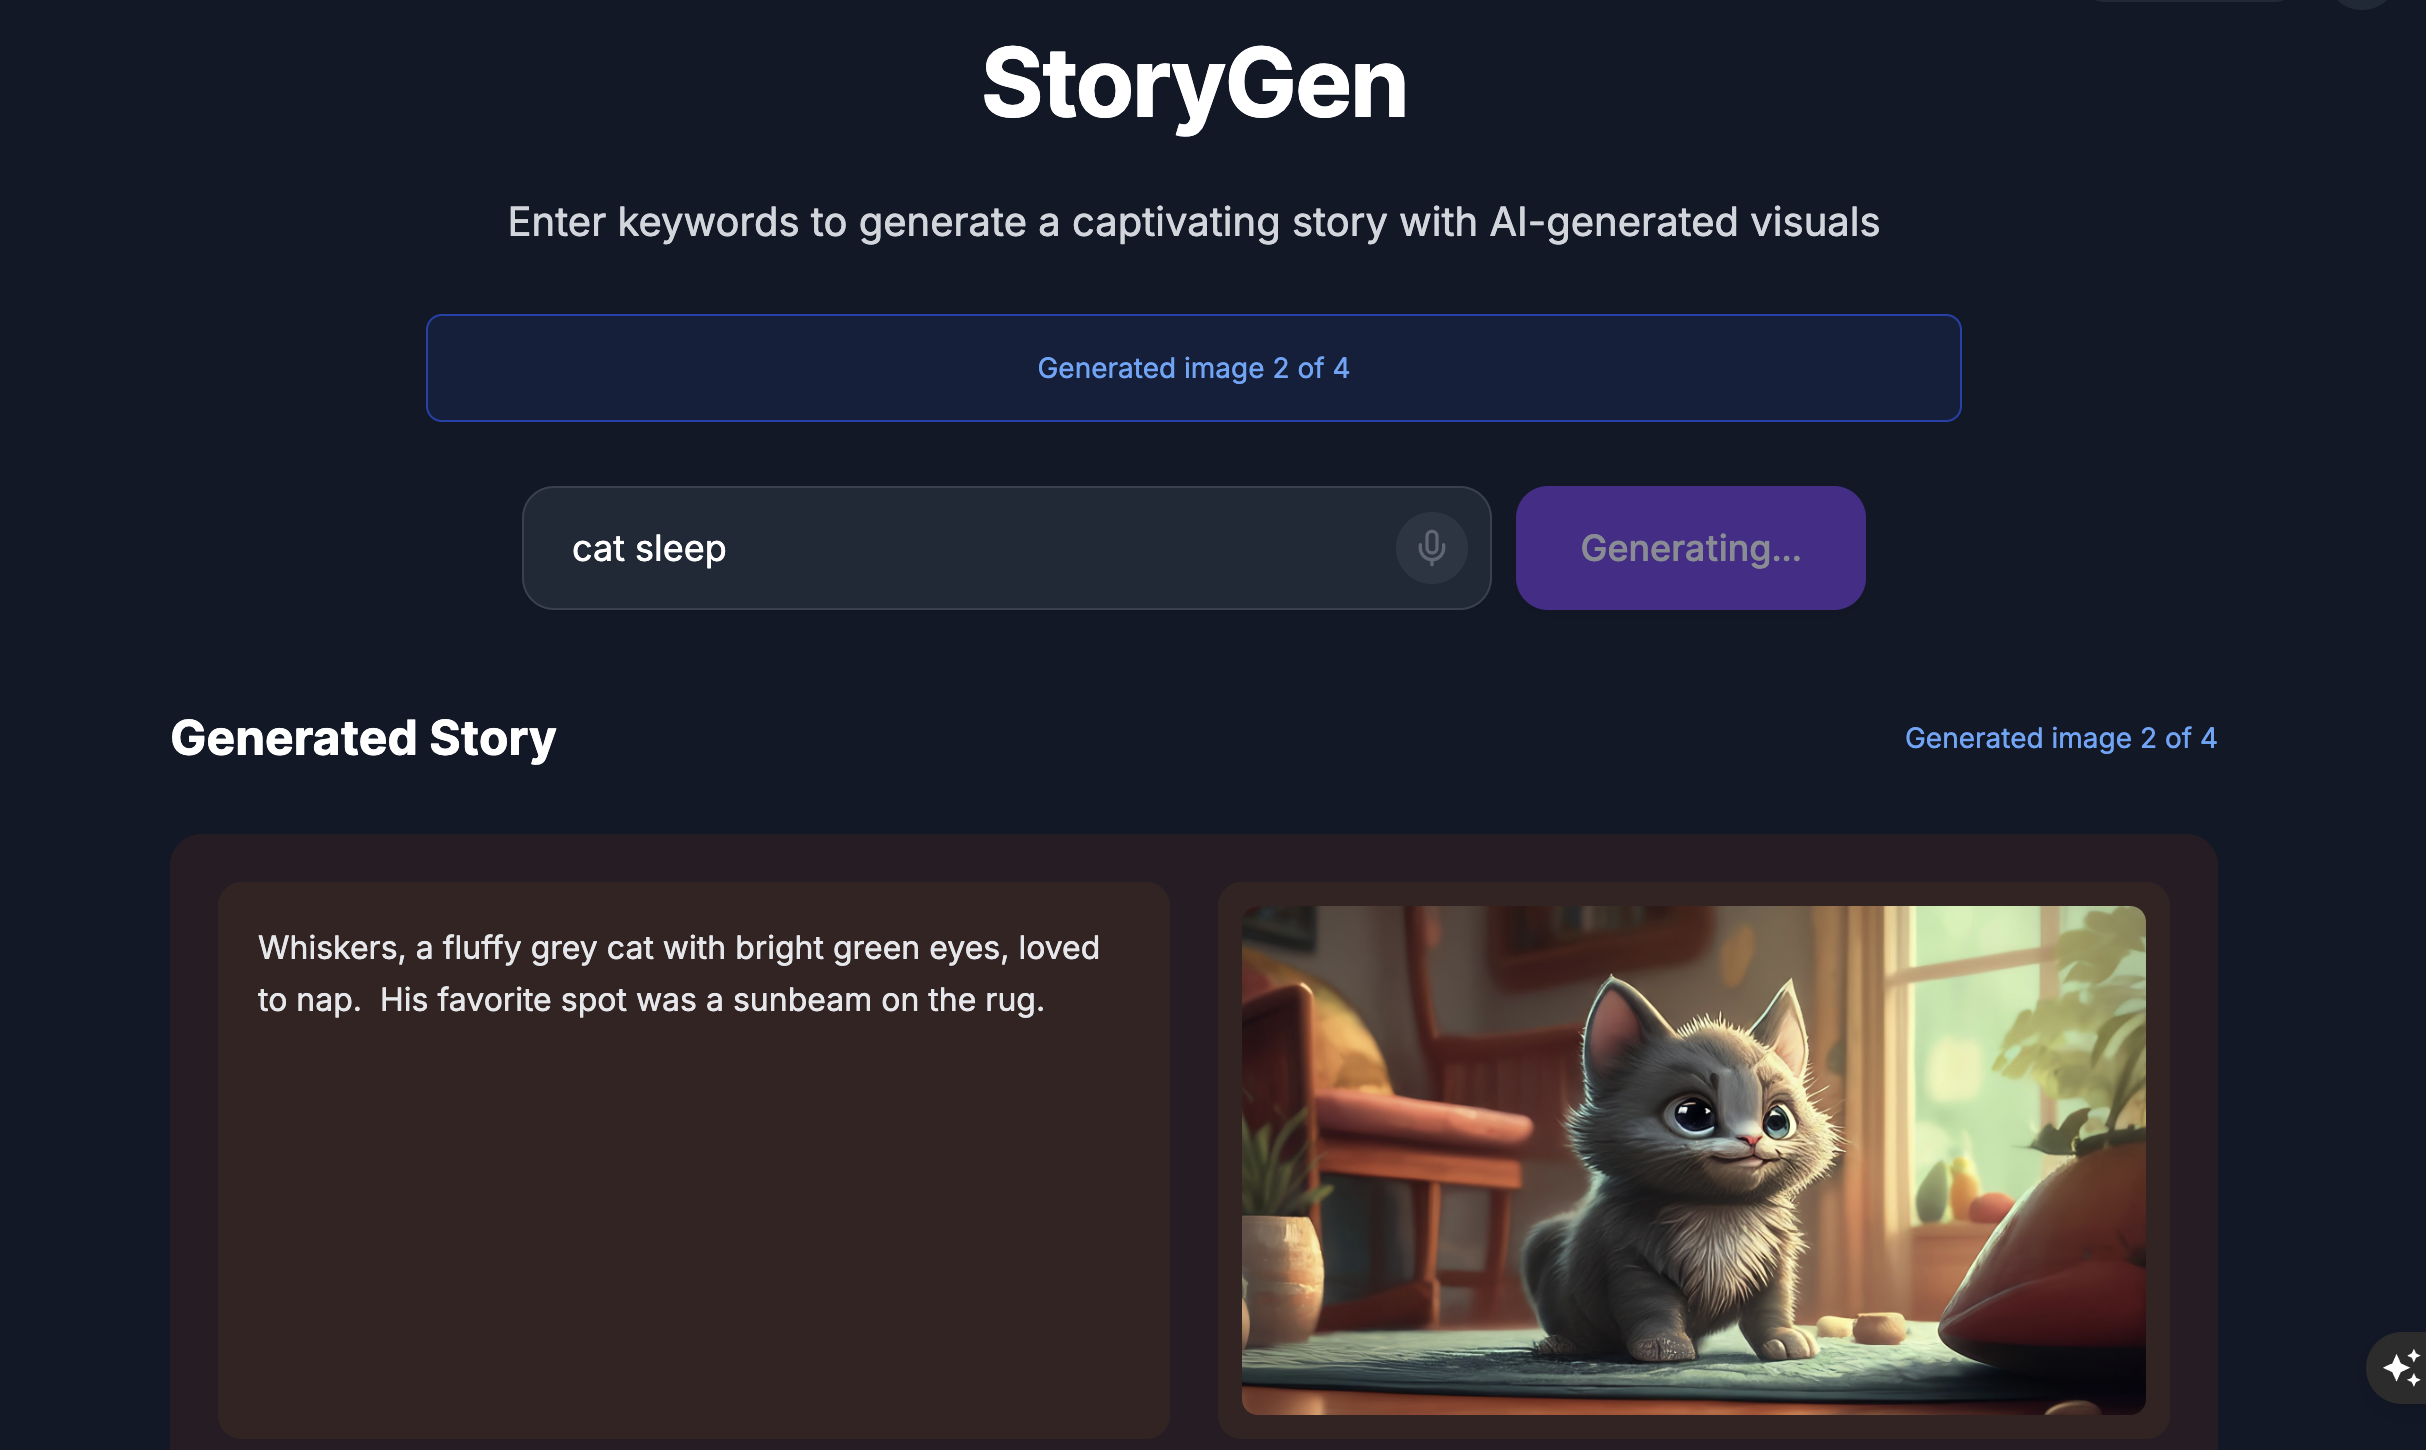
आपको यह वेबसाइट दिखेगी:
ADK यूज़र इंटरफ़ेस आज़माएं: कोई दूसरा टर्मिनल खोलें:
cd ~/storygen-learning/01b_First_Agent_Done/backend
source ../../.venv/bin/activate

adk web --port 8080
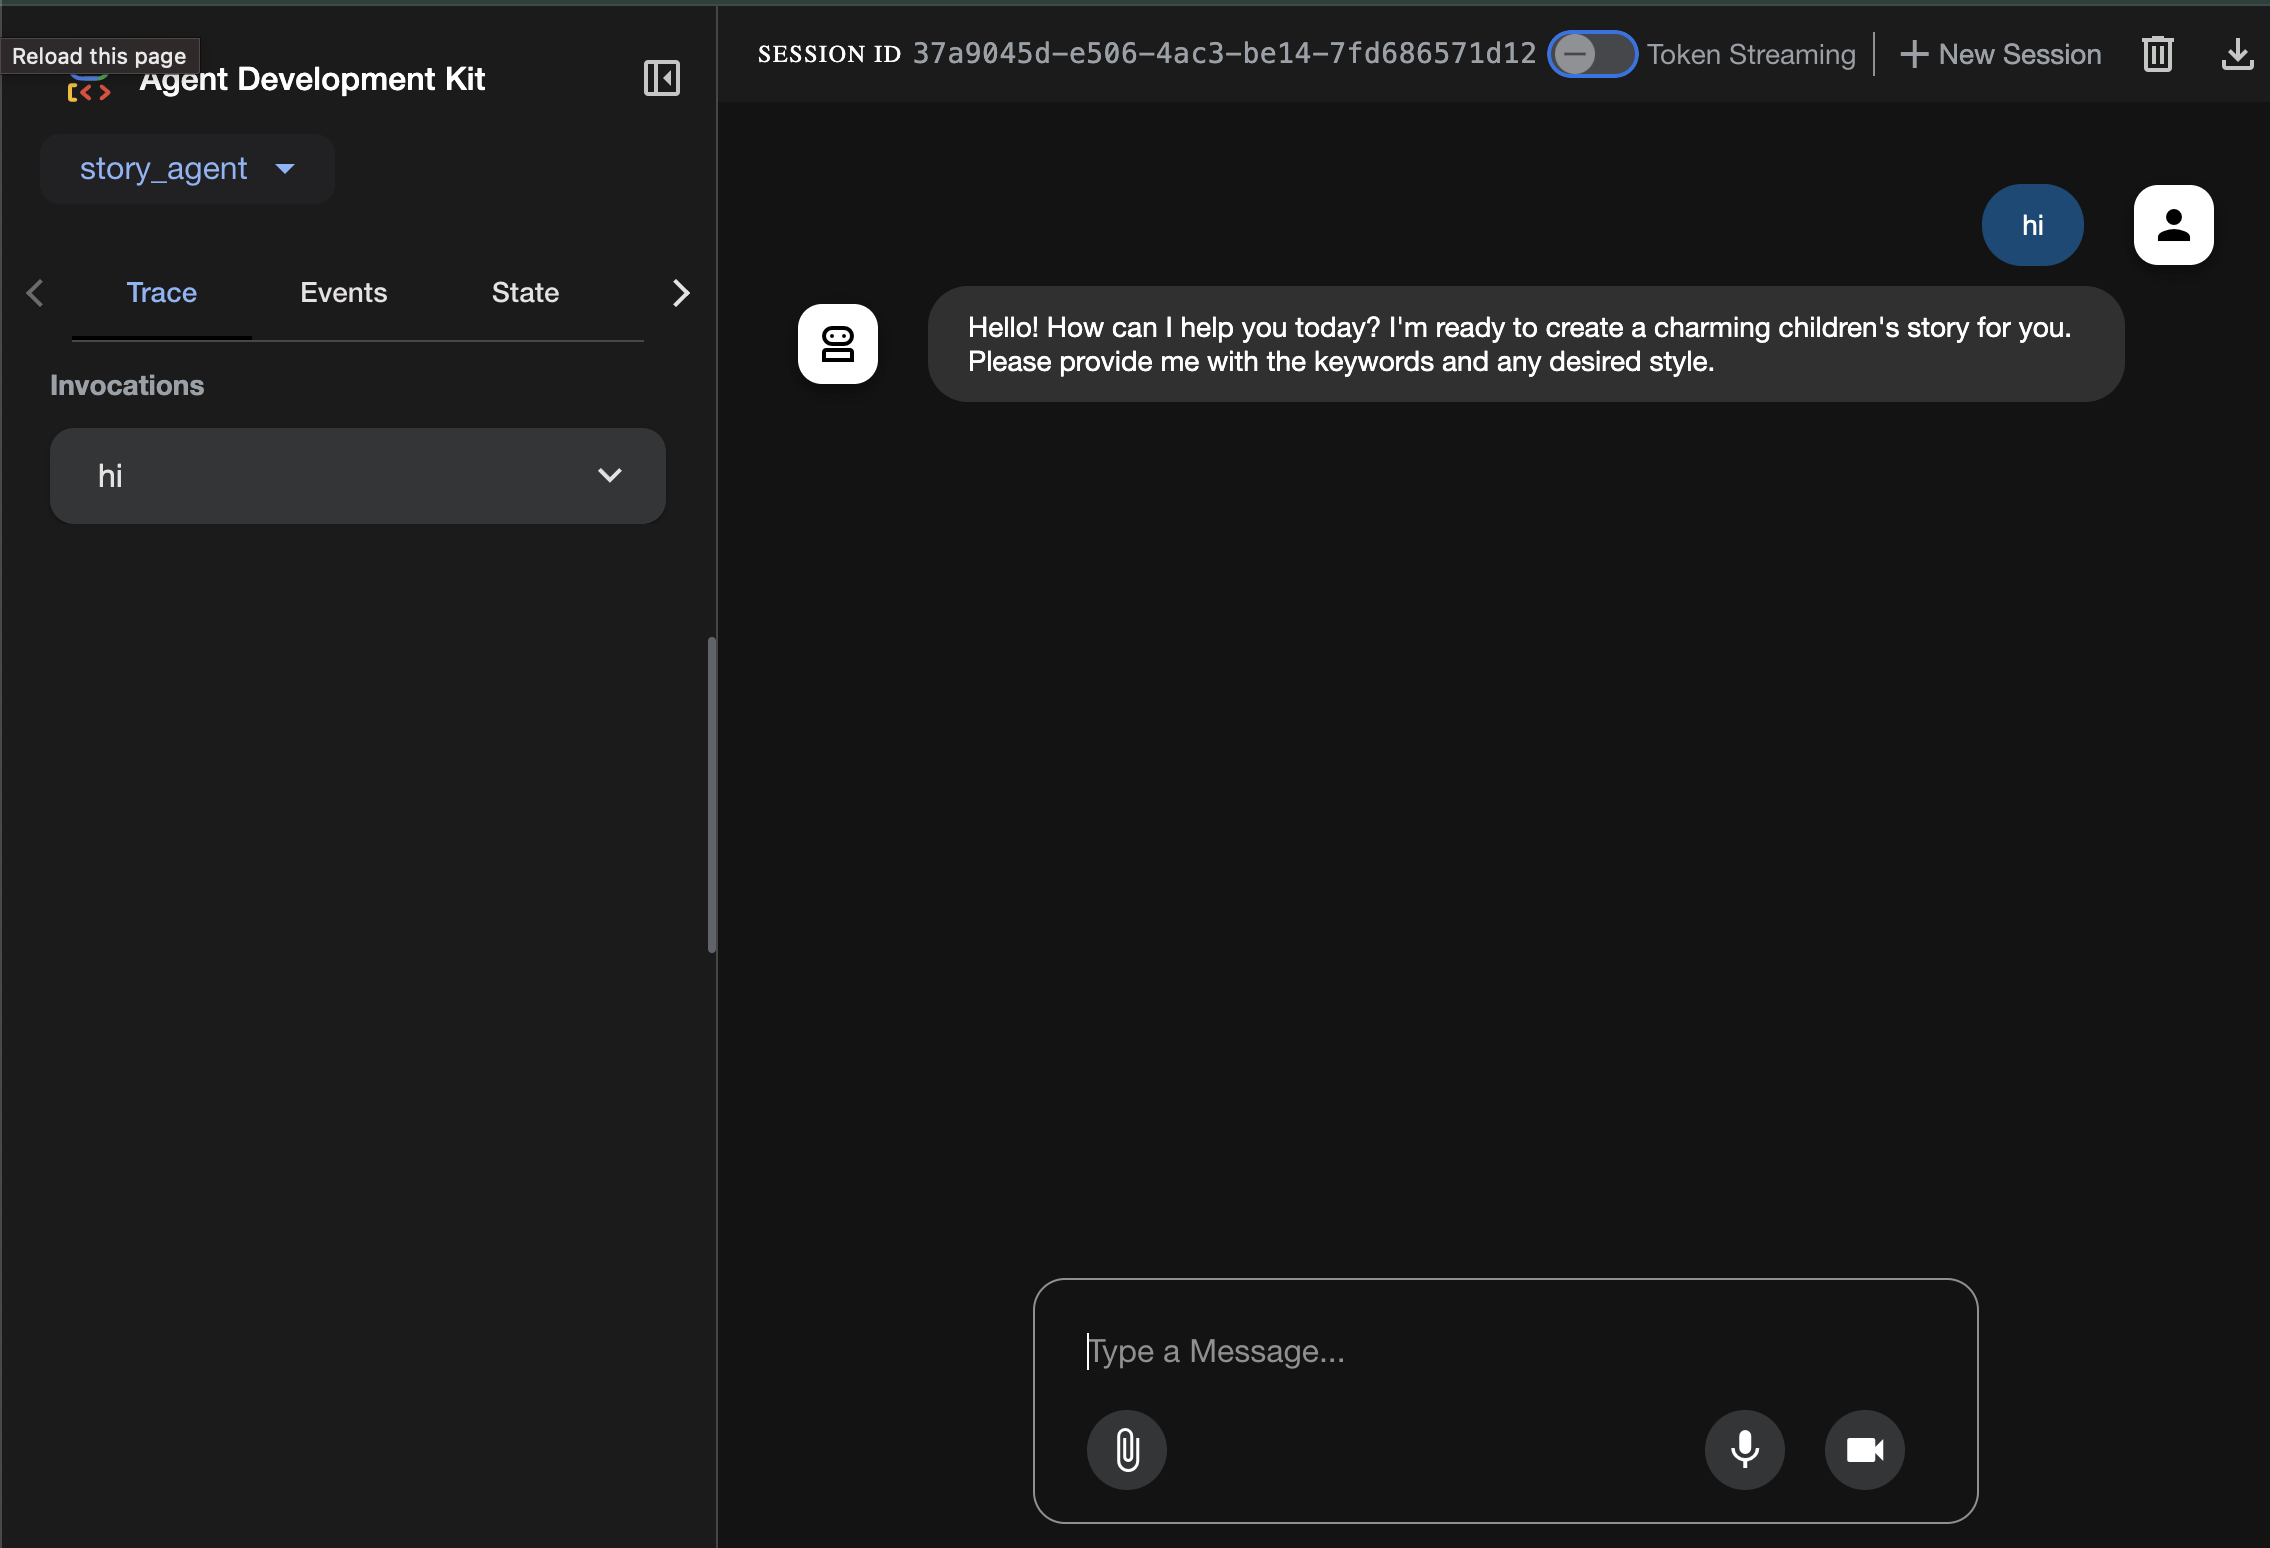
आपको ADK का यूज़र इंटरफ़ेस दिखेगा. यहां एजेंट से सवाल पूछे जा सकते हैं
अगले सेक्शन पर जाने से पहले, प्रोसेस को बंद करने के लिए Ctrl+C दबाएं.
6. डेवलपमेंट: Gemini CLI की मदद से ADK बनाना - (कॉन्टेक्स्ट इंजीनियरिंग का तरीका)
शुरुआती सेटअप
पक्का करें कि हमने 01a_First_Agent_Ready/backend/story_agent/agent.py में, पहले जनरेट की गई एजेंट फ़ाइल को मिटा दिया हो:
01a_First_Agent_Ready पर जाएँ आइए, ADK एजेंट बनाने के लिए Gemini CLI का इस्तेमाल करें:**
cd ~/storygen-learning/01a_First_Agent_Ready/backend
Gemini CLI खोलें
gemini
Gemini CLI विंडो में, यह प्रॉम्प्ट आज़माएं:
Summarize the design doc @design.md for me, do not attempt to create file just yet.
👉💻 Gemini को बंद करने के लिए, Ctrl+C को दो बार दबाएं.
👉💻 दिशा-निर्देशों वाली फ़ाइल लिखने के लिए, अपने टर्मिनल में यह कमांड चलाएं.
cat << 'EOF' > GEMINI.md
  ### **Coding Guidelines**
  **1. Python Best Practices:**

  *   **Type Hinting:** All function and method signatures should include type hints for arguments and return values.
  *   **Docstrings:** Every module, class, and function should have a docstring explaining its purpose, arguments, and return value, following a consistent format like reStructuredText or
  Google Style.
  *   **Linter & Formatter:** Use a linter like `ruff` or `pylint` and a code formatter like `black` to enforce a consistent style and catch potential errors.
  *   **Imports:** Organize imports into three groups: standard library, third-party libraries, and local application imports. Sort them alphabetically within each group.
  *   **Naming Conventions:**
      *   `snake_case` for variables, functions, and methods.
      *   `PascalCase` for classes.
      *   `UPPER_SNAKE_CASE` for constants.
  *   **Dependency Management:** All Python dependencies must be listed in a `requirements.txt` file.

  **2. Web APIs (FastAPI):**

  *   **Data Validation:** Use `pydantic` models for request and response data validation.
  *   **Dependency Injection:** Utilize FastAPI's dependency injection system for managing resources like database connections.
  *   **Error Handling:** Implement centralized error handling using middleware or exception handlers.
  *   **Asynchronous Code:** Use `async` and `await` for I/O-bound operations to improve performance.
EOF
cat GEMINI.md
कानूनों के बारे में जानकारी देने के बाद, आइए हम अपने एआई पार्टनर को फिर से बुलाएं और आर्टफ़ैक्ट का जादू देखें.
👉💻 shadowblade डायरेक्ट्री से Gemini CLI को फिर से लॉन्च करें:
cd ~/storygen-learning/01a_First_Agent_Ready/backend
clear
gemini
👉✨ अब Gemini से पूछें कि वह क्या सोच रहा है. रून पढ़ लिए गए हैं.
/memory show
👉✨ यह एक ऐसी कमांड है जो आपके एजेंट को बनाएगी. इसे अभी जारी करें:
You are an expert Python developer specializing in the Google Agent Development Kit (ADK). Your task is to write the complete, production-quality code for `agent.py` by following the technical specifications outlined in the provided design document verbatim.

Analyze the design document at `@design.md` and generate the corresponding Python code for `agent.py`.

I need you to generate a Python script based on the provided design document and reference examples. Follow these requirements:

Read the design document carefully - it contains the complete technical specification for the code you need to write
Follow the structure and patterns shown in the reference context files
Adhere to all Python best practices specified in the coding standards document
Implement every requirement mentioned in the design document exactly as specified
Use the exact variable names, function names, and string values mentioned in the specifications

The design document describes the complete architecture, dependencies, configuration, and logic flow. Your generated code must match these specifications precisely while following professional Python coding standards.
Generate clean, production-ready Python code that can be used immediately without modifications.
जब आपको Gemini CLI टर्मिनल का इस्तेमाल नहीं करना हो, तब Control+C की मदद से इसे बंद करें
—————————————— ज़रूरी नहीं है, समाधान वाले हिस्से पर जाएं——————————————–
अब ADK Web में किए गए बदलाव की पुष्टि करें
cd ~/storygen-learning/01a_First_Agent_Ready/backend

source ../../.venv/bin/activate

adk web --port 8080
जारी रखने के लिए, आपको कमांड प्रॉम्प्ट की ज़रूरत होगी.
वेबसाइट को स्पिन अप करना
cd ~/storygen-learning/01a_First_Agent_Ready

./start.sh
अगर आपका बदलाव काम नहीं करता है, तो आपको ADK के वेब यूज़र इंटरफ़ेस (यूआई) और वेबसाइट में गड़बड़ियां दिखेंगी.
——————————————– Solution Starting Here ——————————————–
समाधान
Control+C का इस्तेमाल करके पिछली प्रोसेस बंद करें या कोई दूसरा टर्मिनल खोलें:
cd ~/storygen-learning/01b_First_Agent_Done
वेबसाइट को स्पिन अप करना:
./start.sh
आपको यह वेबसाइट दिखेगी:
ADK यूज़र इंटरफ़ेस आज़माएं: कोई दूसरा टर्मिनल खोलें:
cd ~/storygen-learning/01b_First_Agent_Done/backend
source ../../.venv/bin/activate

adk web --port 8080
आपको ADK का यूज़र इंटरफ़ेस दिखेगा. यहां एजेंट से सवाल पूछे जा सकते हैं
अगले सेक्शन पर जाने से पहले, प्रोसेस को बंद करने के लिए Ctrl+C दबाएं.
7. डेवलपमेंट: Imagen की मदद से, अपनी पसंद के मुताबिक एजेंट बनाना
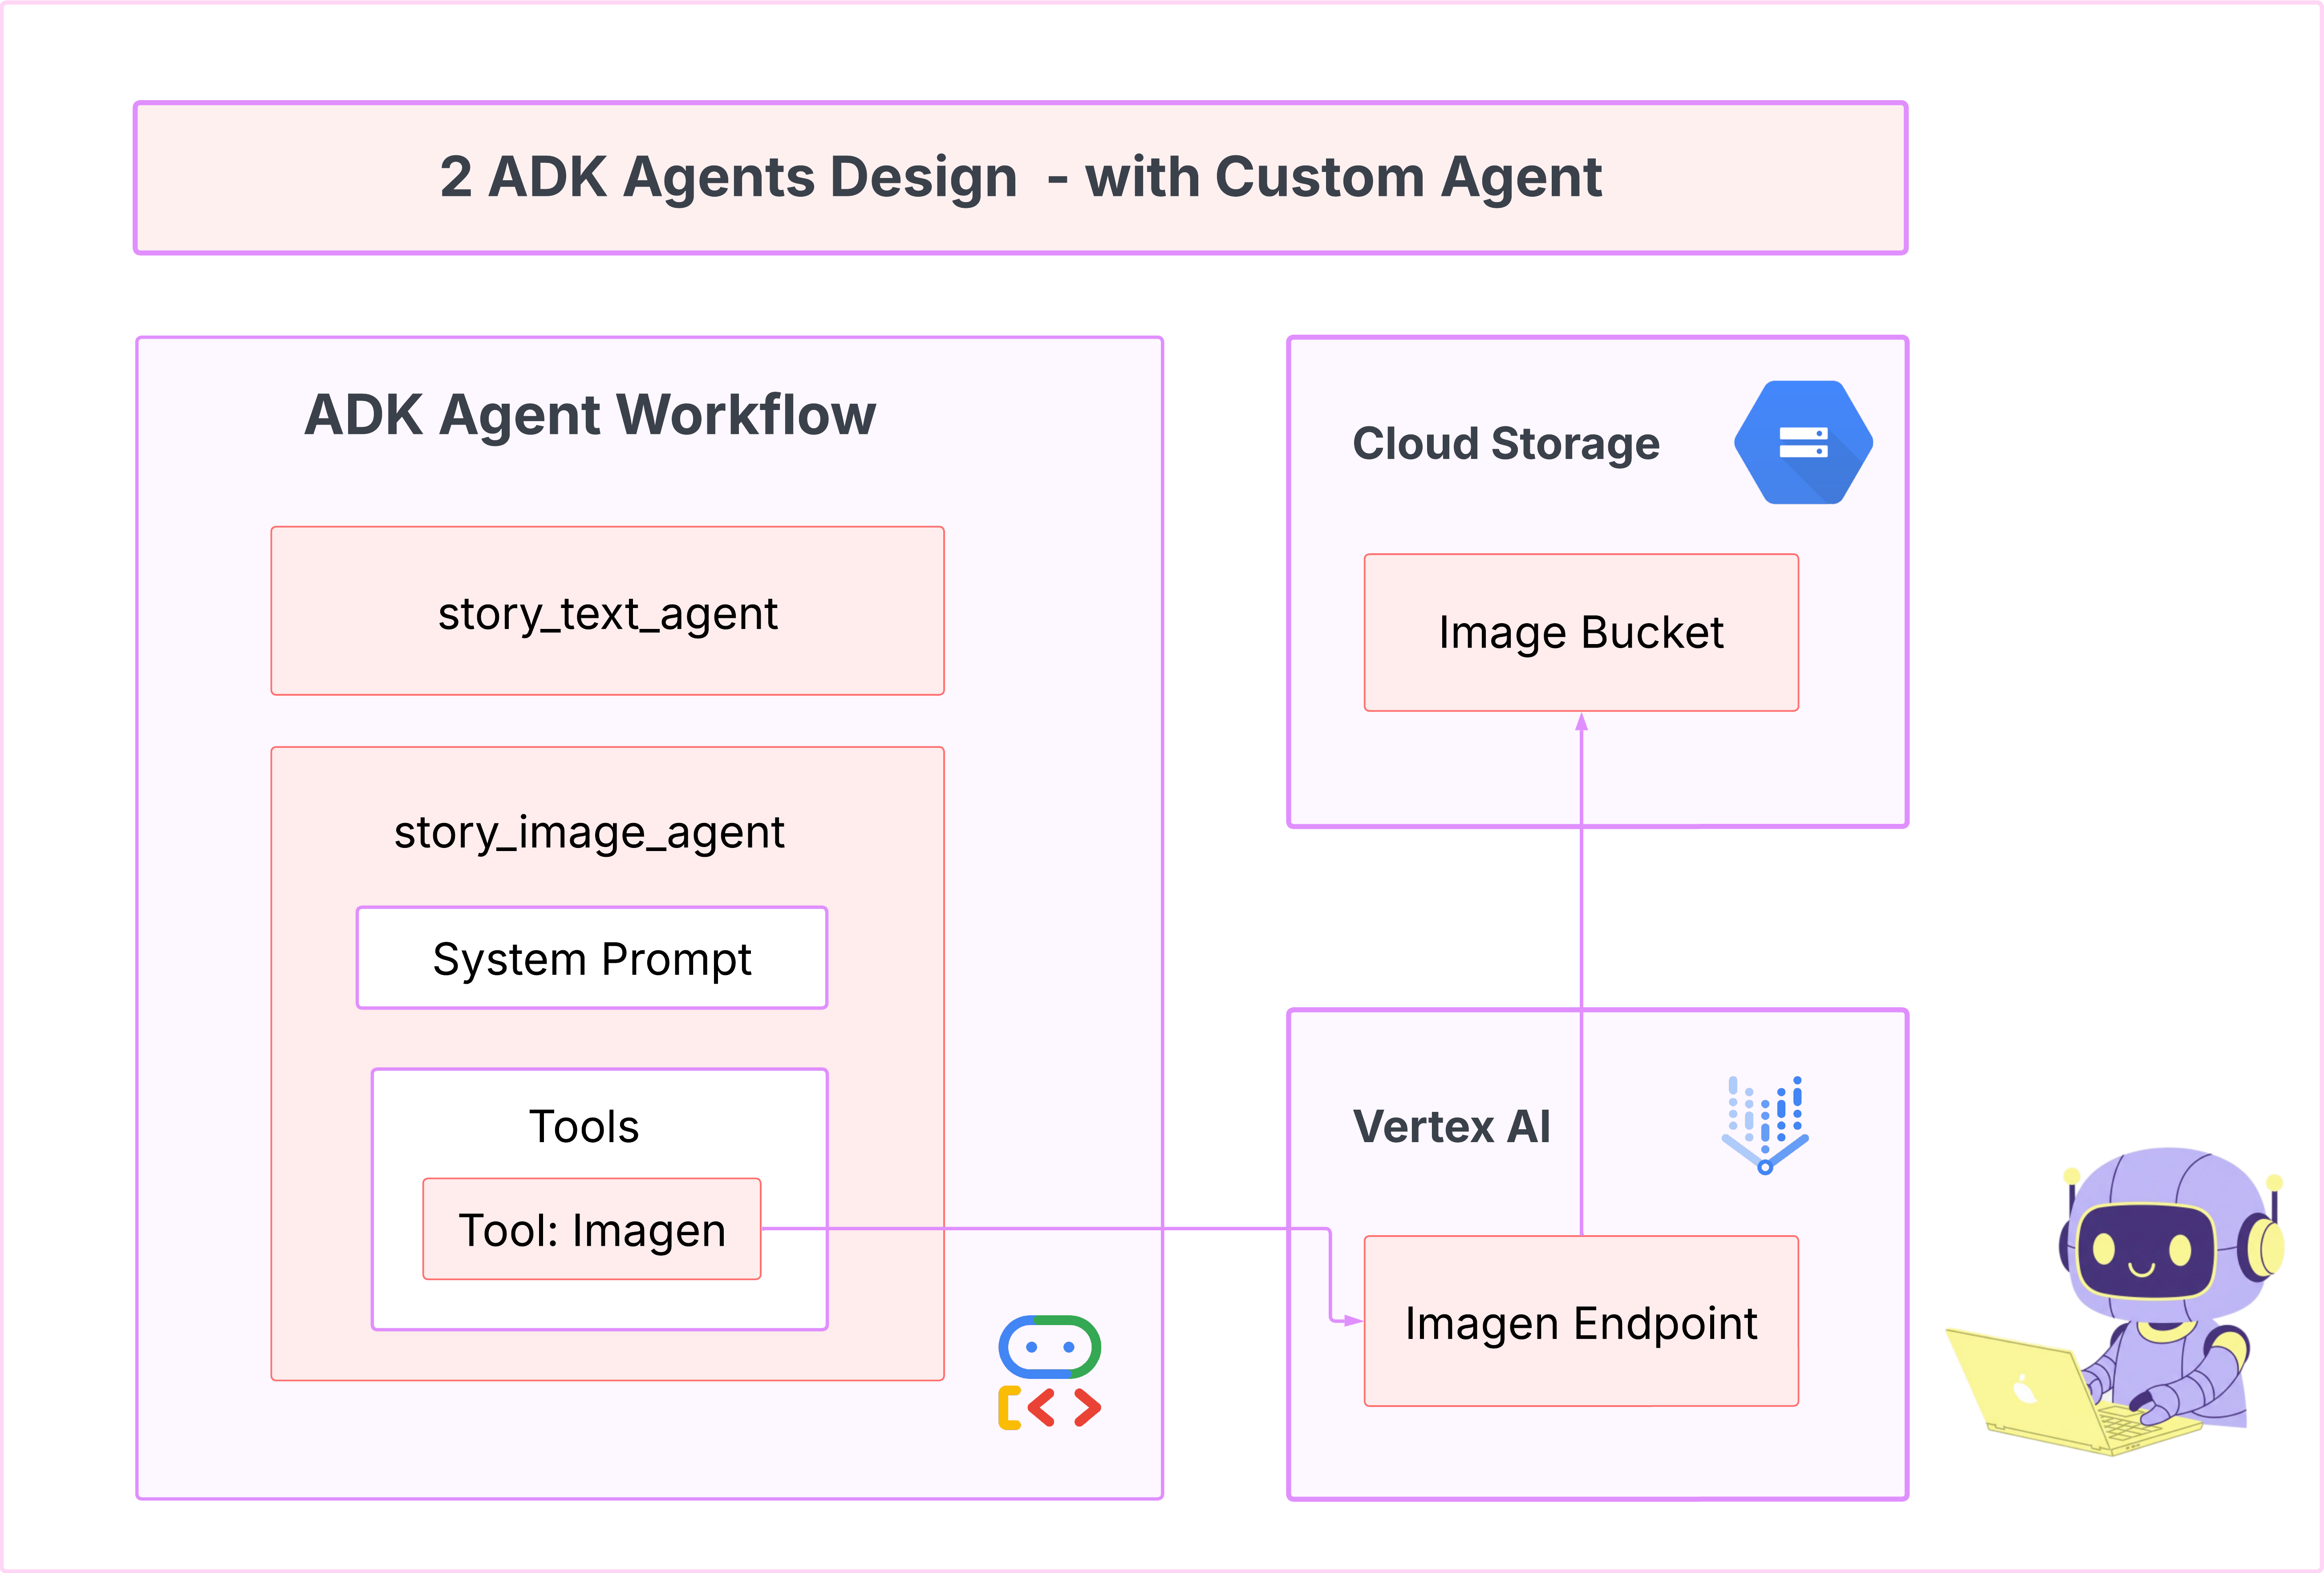
Imagen टूल (दूसरा एजेंट) जनरेट करें
cd ~/storygen-learning/02a_Image_Agent_Ready
इमेज जनरेट करने वाला एजेंट बनाने के लिए, Gemini CLI का इस्तेमाल करें:
gemini generate "I need you to help me create a custom Google ADK (Agent Development Kit) agent for image generation. This is different from the story agent - this one handles image generation directly using the BaseAgent pattern for full control over tool execution.

Please create a complete `agent.py` file that implements a custom image generation agent. The agent should:

**Requirements:**
1. Use the `google.adk.agents.BaseAgent` class (NOT LlmAgent)
2. Be named "custom_image_agent"
3. Directly execute the ImagenTool without LLM intermediation
4. Handle JSON input with scene descriptions and character descriptions
5. Store results in session state for retrieval by main.py
6. Use async generators and yield Events

**Key Specifications:**
- **Class Name:** CustomImageAgent (inherits from BaseAgent)
- **Agent Name:** "custom_image_agent"
- **Tool:** Uses ImagenTool for direct image generation
- **Purpose:** Bypass LLM agent limitations and directly call ImagenTool

**Input Format:**
The agent should handle JSON input like:
{
  "scene_description": "Scene action and setting",
  "character_descriptions": {
    "CharacterName": "detailed visual description"
  }
}


**Core Method:** `async def _run_async_impl(self, ctx: InvocationContext) -> AsyncGenerator[Event, None]:`
   - Extract user message from `ctx.user_content.parts`
   - Parse JSON input or fallback to plain text
   - Extract scene_description and character_descriptions
   - Build image prompt with style prefix: "Children's book cartoon illustration with bright vibrant colors, simple shapes, friendly characters."
   - Include character descriptions for consistency
   - Call `await self.imagen_tool.run()` directly
   - Store results in `ctx.session.state["image_result"]`
   - Yield Event with results


 **Session State:**
   - Store JSON results in `ctx.session.state["image_result"]`
   - Include success/error status
   - Store actual image URLs or error messages

Expected Output Structure:
- Successful results stored as JSON with image URLs
- Error results stored as JSON with error messages
- Results accessible via session state in main.py

Can you create this agent in backend/story_image_agent/agent.py

"
—————————————— ज़रूरी नहीं है, समाधान वाले हिस्से पर जाएं——————————————–
अब ADK Web में किए गए बदलाव की पुष्टि करें
cd ~/storygen-learning/02a_Image_Agent_Ready/backend

source ../../.venv/bin/activate

adk web --port 8080
वेबसाइट को स्पिन अप करना
cd ~/storygen-learning/02a_Second_Agent_Ready

./start.sh
अगर आपका बदलाव काम नहीं करता है, तो आपको ADK के वेब यूज़र इंटरफ़ेस (यूआई) और वेबसाइट में गड़बड़ियां दिखेंगी.
——————————————- यहां से समाधान शुरू हो रहा है ——————————————–
समाधान
Control+C का इस्तेमाल करके पिछली प्रोसेस बंद करें या कोई दूसरा टर्मिनल खोलें:
# Open new terminal
cd ~/storygen-learning/02b_Image_Agent_Done
वेबसाइट को स्पिन अप करना:
./start.sh
आपको यह वेबसाइट दिखेगी:
ADK यूज़र इंटरफ़ेस आज़माएं: कोई दूसरा टर्मिनल खोलें:
# Open new terminal
cd ~/storygen-learning/02b_Image_Agent_Done/backend

source ../../.venv/bin/activate

adk web --port 8080
आपको ADK का यूज़र इंटरफ़ेस दिखेगा. यहां एजेंट से सवाल पूछे जा सकते हैं:
अगले सेक्शन पर जाने से पहले, प्रोसेस को बंद करने के लिए Ctrl+C दबाएं.
लर्निंग
हमारा पहला एजेंट, टेक्स्ट जनरेट करने में बहुत अच्छा था. हालांकि, अब हमें इमेज जनरेट करनी हैं. इस टास्क के लिए, हमें ज़्यादा कंट्रोल की ज़रूरत है. हम नहीं चाहते कि एलएलएम यह तय करे कि इमेज बनानी है या नहीं. हम चाहते हैं कि हम उसे सीधे तौर पर ऐसा करने का निर्देश दें. यह BaseAgent के लिए सबसे सही काम है.
डिक्लेरेटिव LlmAgent के उलट, BaseAgent ज़रूरी होता है. इसका मतलब है कि डेवलपर के तौर पर आपको _run_async_impl तरीके के अंदर, Python लॉजिक को चरण-दर-चरण लिखना होगा. आपके पास एक्ज़ीक्यूशन फ़्लो पर पूरा कंट्रोल होता है.
आपको BaseAgent का इस्तेमाल तब करना चाहिए, जब आपको:
डिटरमिनिस्टिक लॉजिक: एजेंट को चरणों के एक खास और अपरिवर्तनीय क्रम का पालन करना होगा.
सीधे तौर पर टूल का इस्तेमाल करना: आपको एलएलएम के बिना सीधे तौर पर किसी टूल का इस्तेमाल करना है.
जटिल वर्कफ़्लो: इस प्रोसेस में, डेटा को अपनी ज़रूरत के हिसाब से बदलना, एपीआई कॉल करना, और ऐसा लॉजिक शामिल होता है जिसे एलएलएम सिर्फ़ प्रॉम्प्ट से भरोसेमंद तरीके से नहीं समझ सकता.
हम अपने ऐप्लिकेशन के लिए, BaseAgent का इस्तेमाल करेंगे. इससे हमें पहले एजेंट से सीन के बारे में जानकारी मिलेगी. साथ ही, हम सीधे तौर पर Imagen टूल को कॉल करेंगे, ताकि हर सीन के लिए इमेज जनरेट की जा सके.
8. टेस्टिंग: एजेंट का आकलन
हमारा ऐप्लिकेशन काम करता है, लेकिन हमें टेस्ट के लिए ऑटोमेटेड सेफ्टी नेट की ज़रूरत है. यह एक ऐसा काम है जिसे हमारे एआई को-पायलट को सौंपा जा सकता है.
कार्रवाइयां
cd ~/storygen-learning/03a_Agent_Evaluation_Ready/backend
ज़्यादा जानकारी वाले टेस्ट लिखने के लिए, Gemini CLI का इस्तेमाल करें:
Gemini CLI खोलें
gemini
Gemini CLI विंडो में, यह प्रॉम्प्ट आज़माएं:
I need you to create comprehensive test files for my backend/story_agent in Google ADK. I need three specific JSON files that match the testing structure used in ADK evaluation.

**Context:**
- The story agent generates structured JSON stories with exactly 4 scenes
- It uses LlmAgent with no tools, just direct LLM responses
- Input: Keywords
- Output: JSON with story, main_characters, and scenes arrays

**Files to Create:**

### 1. `story_agent_eval.evalset.json` (Comprehensive Integration Tests)
Create a comprehensive evaluation set with:
- **eval_set_id**: "story_agent_comprehensive_evalset"
- **name**: "Story Agent Comprehensive Evaluation Set"
- **description**: "Comprehensive evaluation scenarios for story_agent covering various keyword combinations, edge cases, and story quality metrics"


Each eval_case should include:
- Full conversation arrays with invocation_id, user_content, final_response
- Complete expected JSON responses with detailed stories, characters, and 4 scenes
- session_input with app_name "story_agent"
- All fields: story (narrative text), main_characters (with detailed visual descriptions), scenes (with index, title, description, text)

### 2. `story_generation.test.json` (Unit Tests)
Create basic generation tests with:
- **eval_set_id**: "story_agent_basic_generation_tests"
- **name**: "Story Agent Basic Generation Tests"
- **description**: "Unit tests for story_agent focusing on JSON structure compliance, scene generation, and keyword integration"

### 3. `test_config.json` (Evaluation Configuration)
Create test configuration with:
- **criteria**: response_match_score: 0.7, tool_trajectory_avg_score: 1.0
- **custom_evaluators**:
  - json_structure_validator (validates required fields, scene count, character fields)
  - story_quality_metrics (word count 80-250, keyword integration threshold 0.8)
- **evaluation_notes**: Story agent specifics and trajectory expectations

**Important Requirements:**
1. All responses must be valid, parseable JSON
2. Stories must have exactly 4 scenes with indices 1-4
3. Each scene must have: index, title, description, text
4. Main characters must have detailed visual descriptions
5. No tool_uses expected (empty arrays) since story agent uses direct LLM
6. Word count should be 100-200 words total
7. Keywords must be naturally integrated into the narrative

Please generate all three files with realistic example stories and comprehensive test coverage matching the ADK evaluation format.
—————————————— ज़रूरी नहीं है, समाधान वाले हिस्से पर जाएं——————————————–
आकलन देखने के लिए:
./run_adk_web_persistent.sh
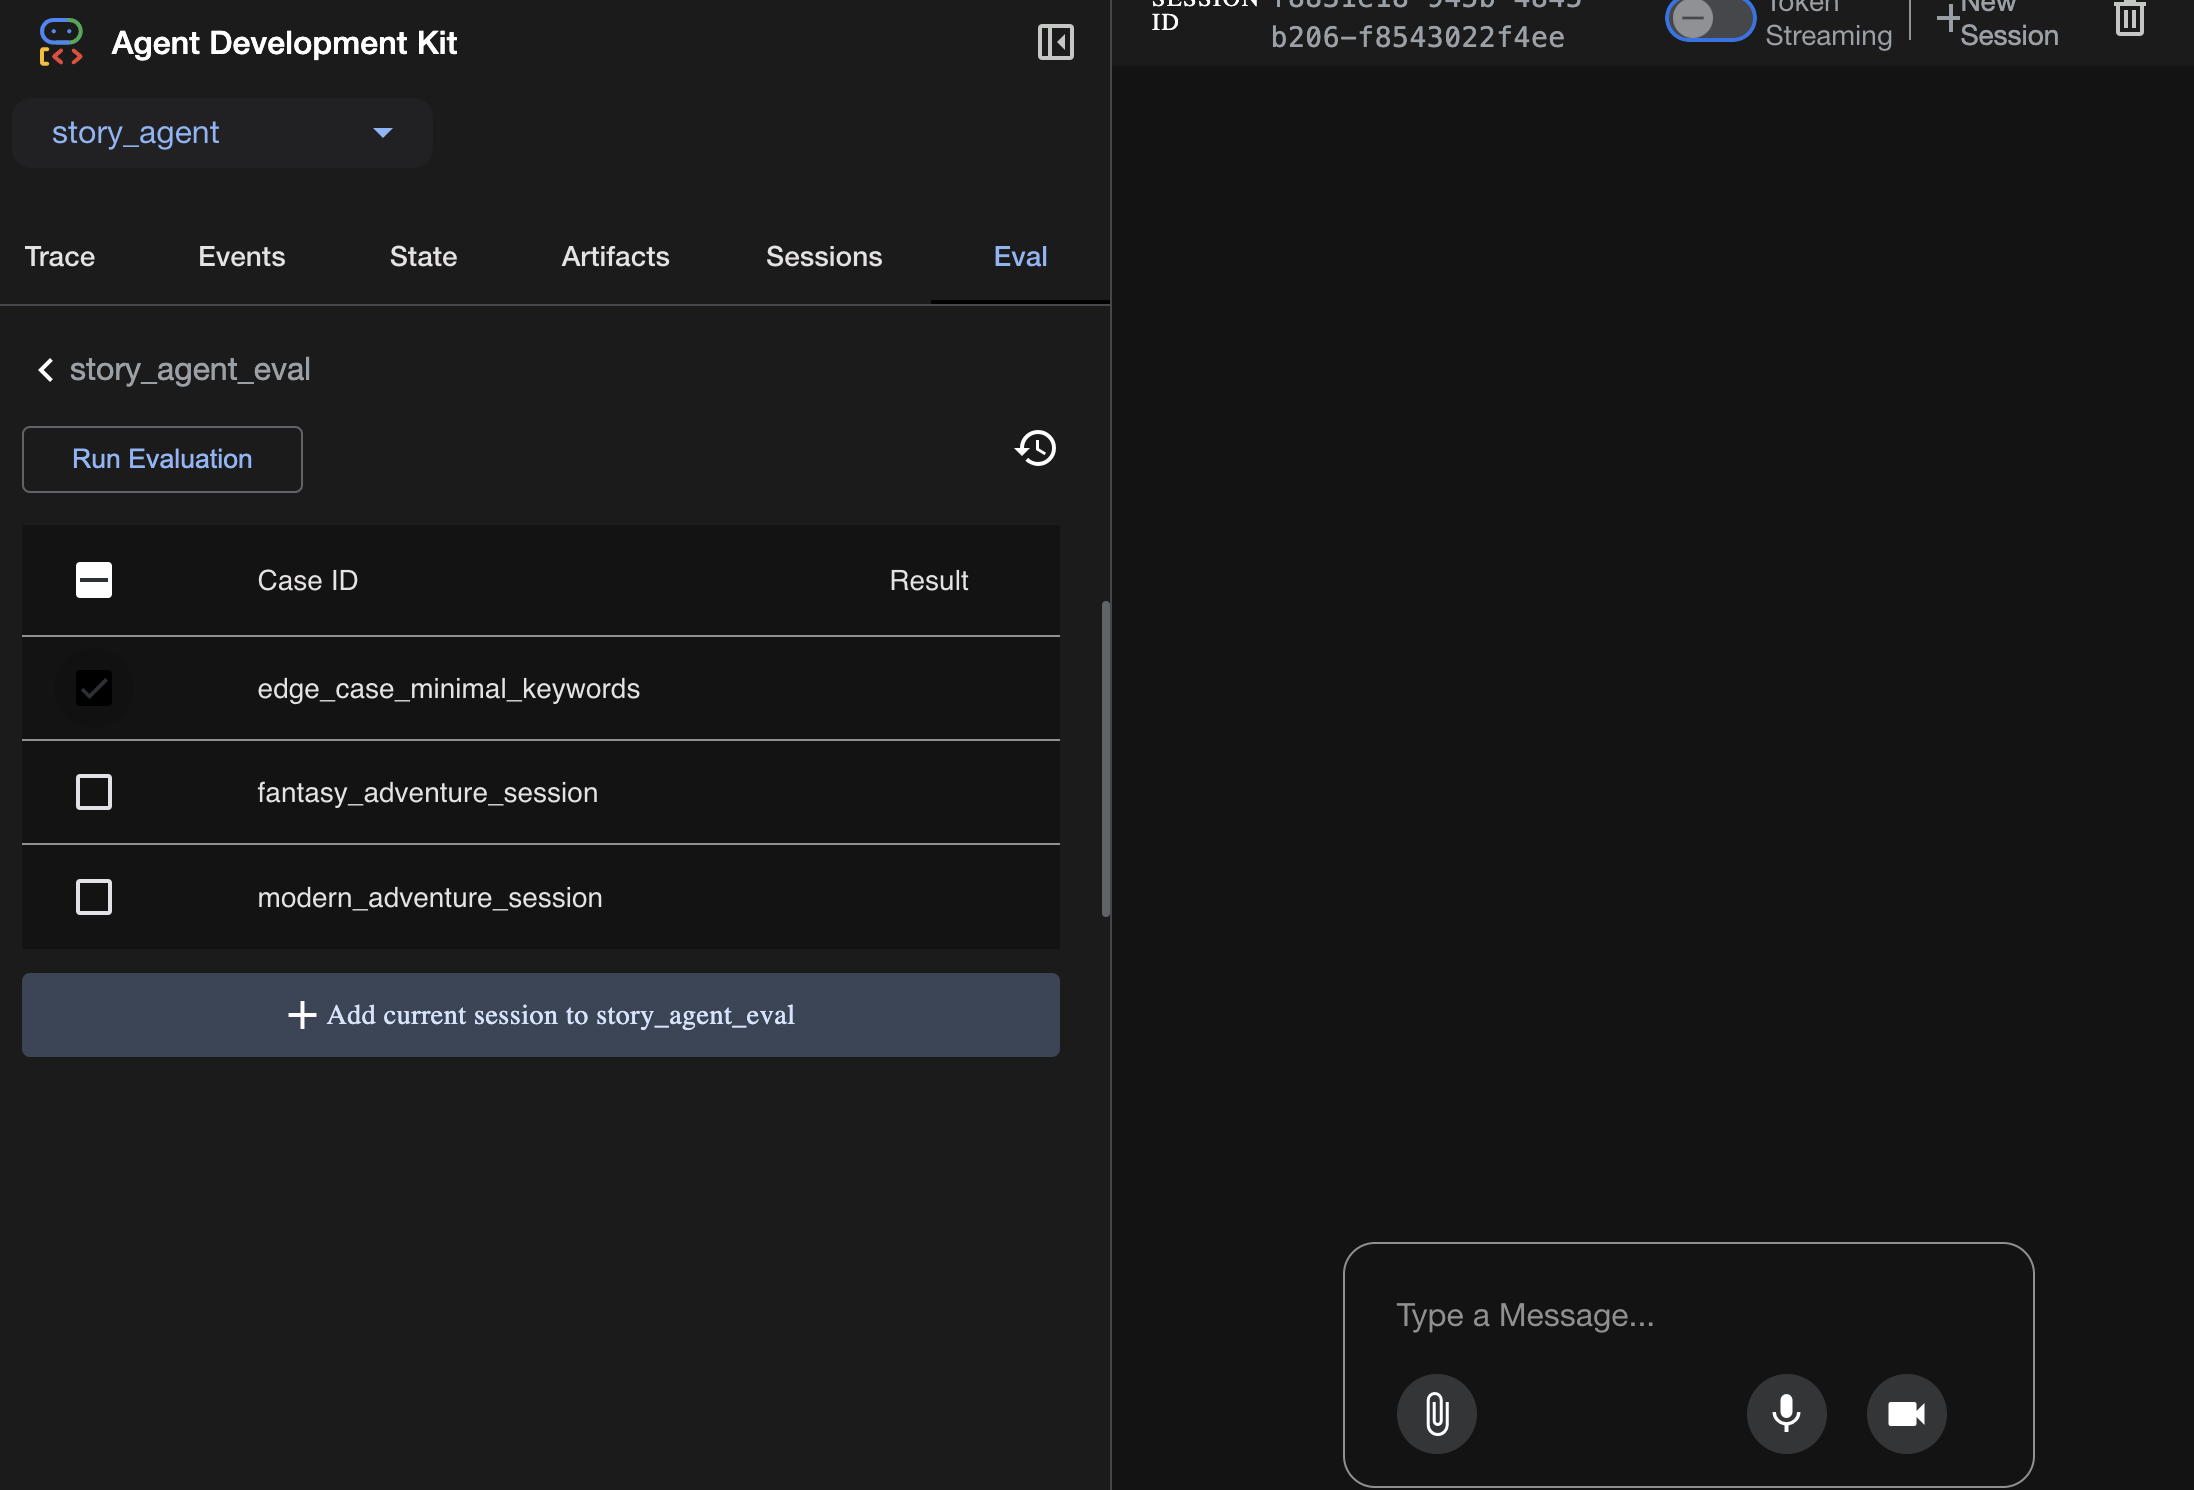
ADK के यूज़र इंटरफ़ेस (यूआई) पर eval टैब पर जाएं.
आपको ADK का वेब यूज़र इंटरफ़ेस (यूआई) दिखना चाहिए, जिसमें लगातार टेस्टिंग की जा सकती हो
सीखने के लिए मुख्य बातें: एआई, क्वालिटी अश्योरेंस को अपने-आप पूरा करने में मदद करता है. यह टेस्ट लिखने के लिए ज़रूरी जानकारी को अपने-आप भर सकता है, ताकि आप सुविधाओं को बनाने पर फ़ोकस कर सकें.
——————————————– Solution Starting Here ——————————————–
समाधान
- समाधान फ़ोल्डर पर जाएं:
cd ~/storygen-learning/03b_Agent_Evaluation_Done/backend
- ADK का वेब यूज़र इंटरफ़ेस (यूआई) खोलें
./run_adk_web_persistent.sh
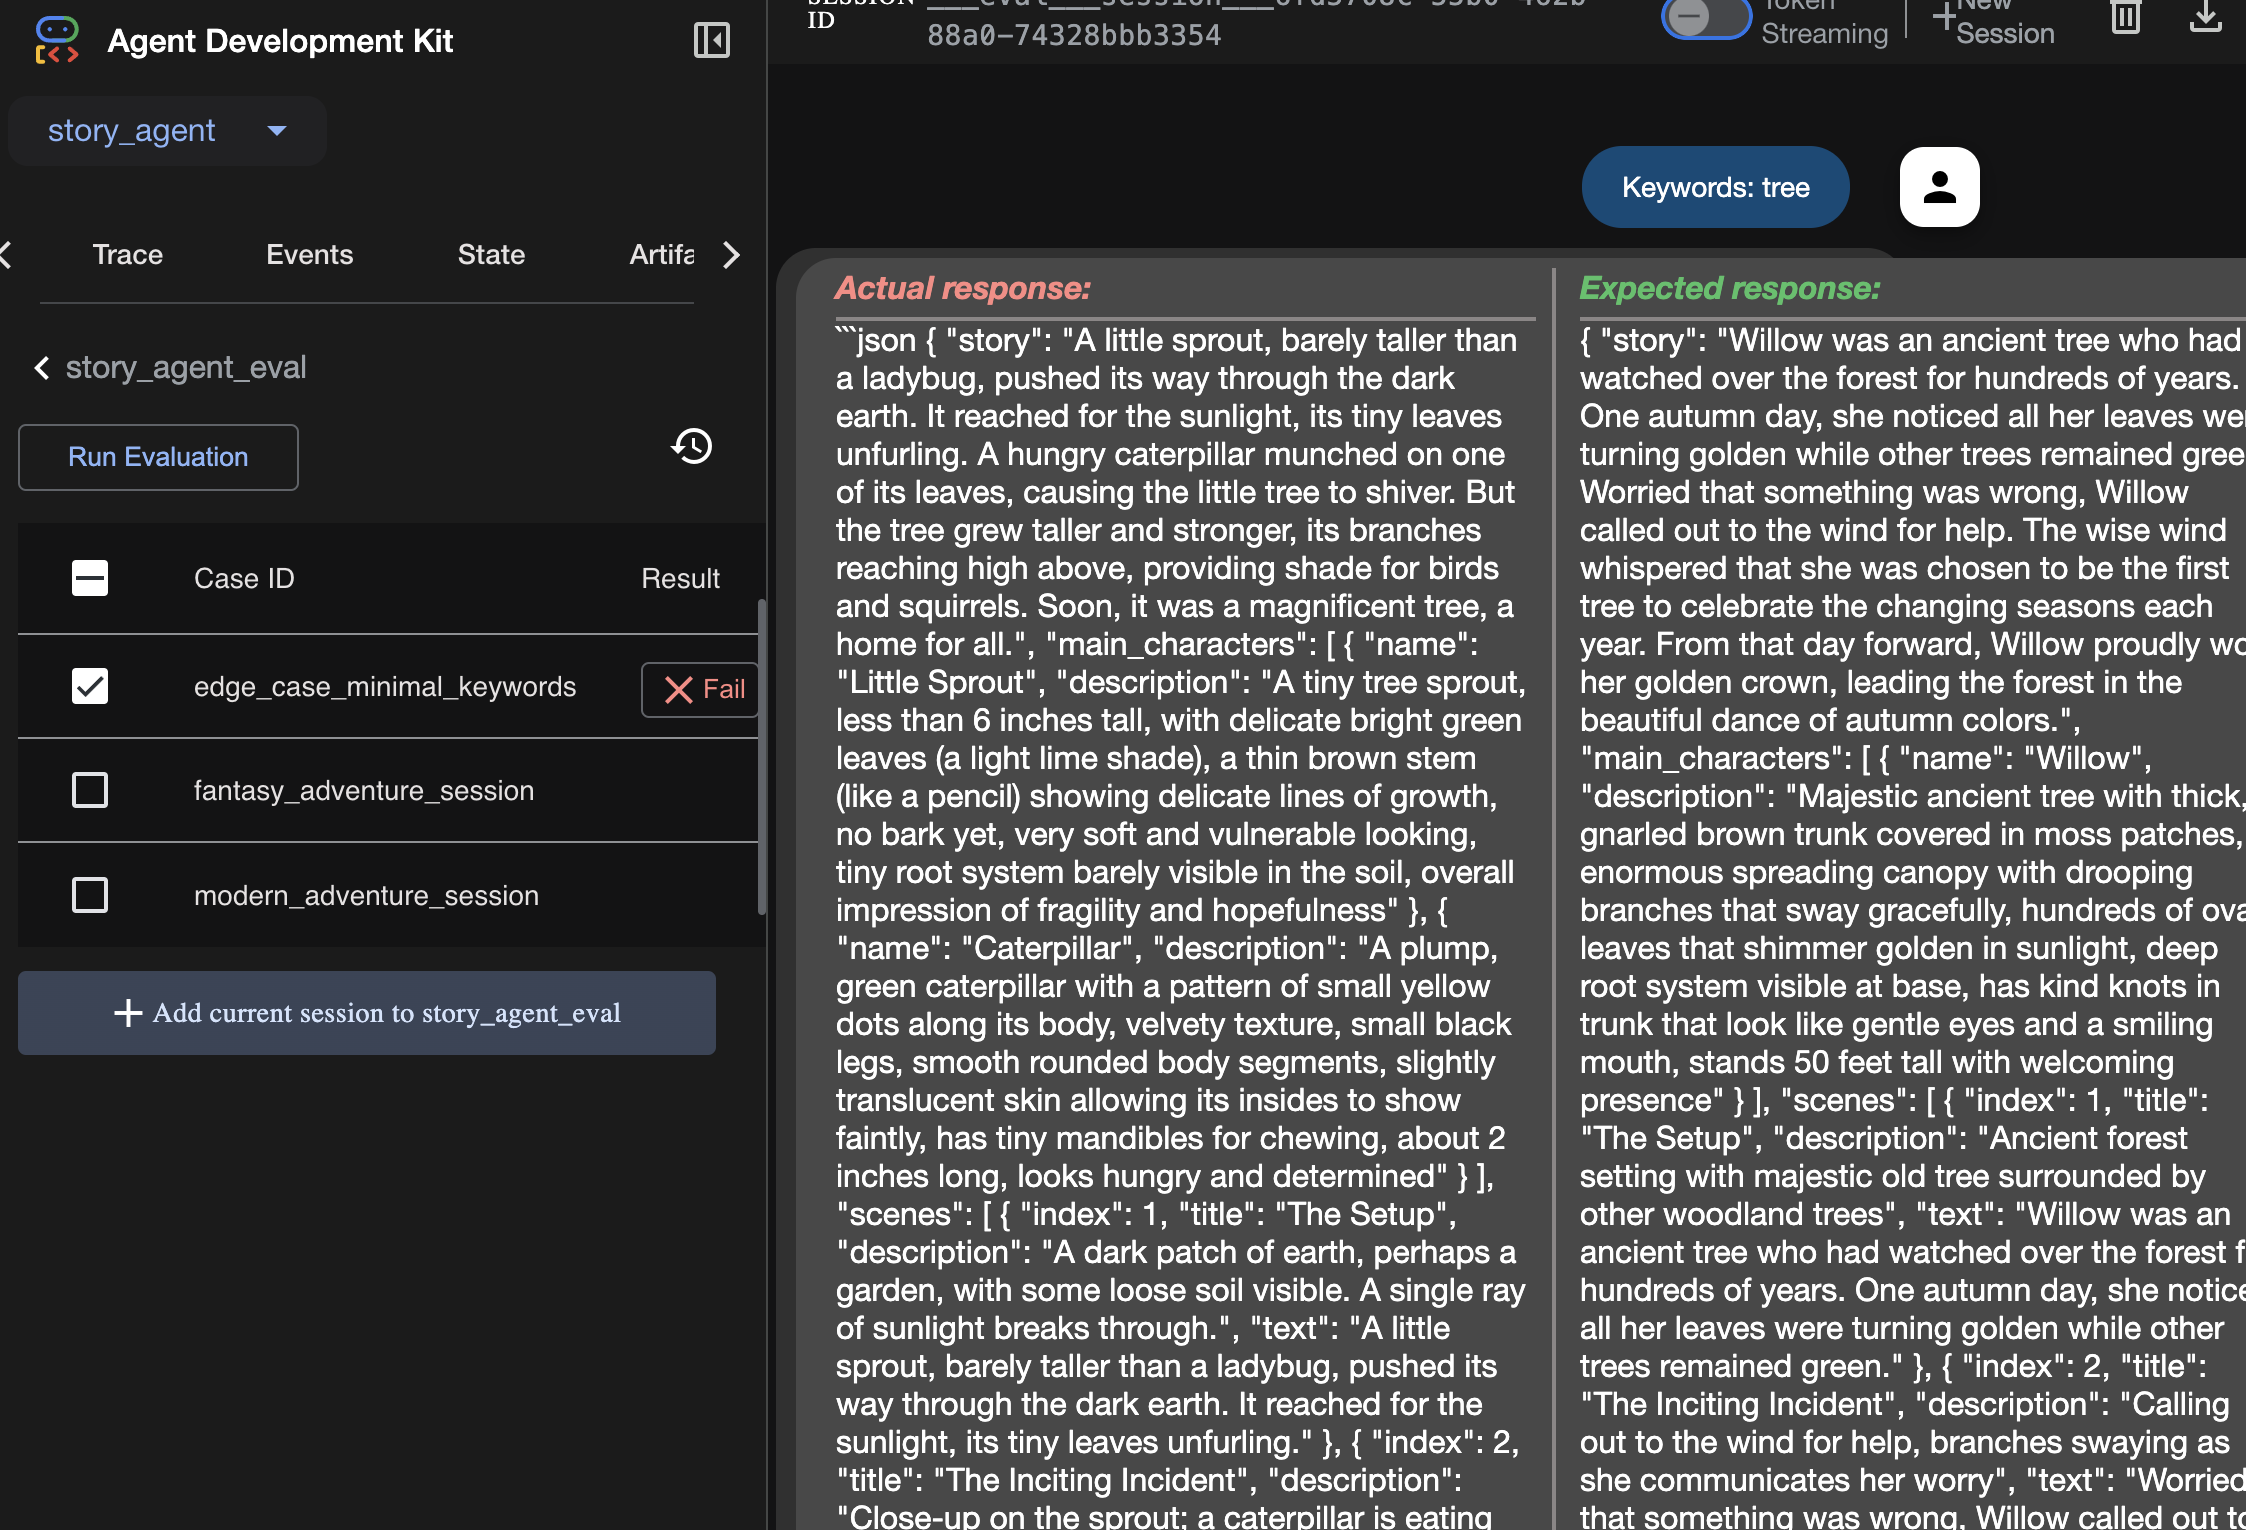
Eval टैब में जाकर, टेस्ट केस देखे जा सकते हैं:
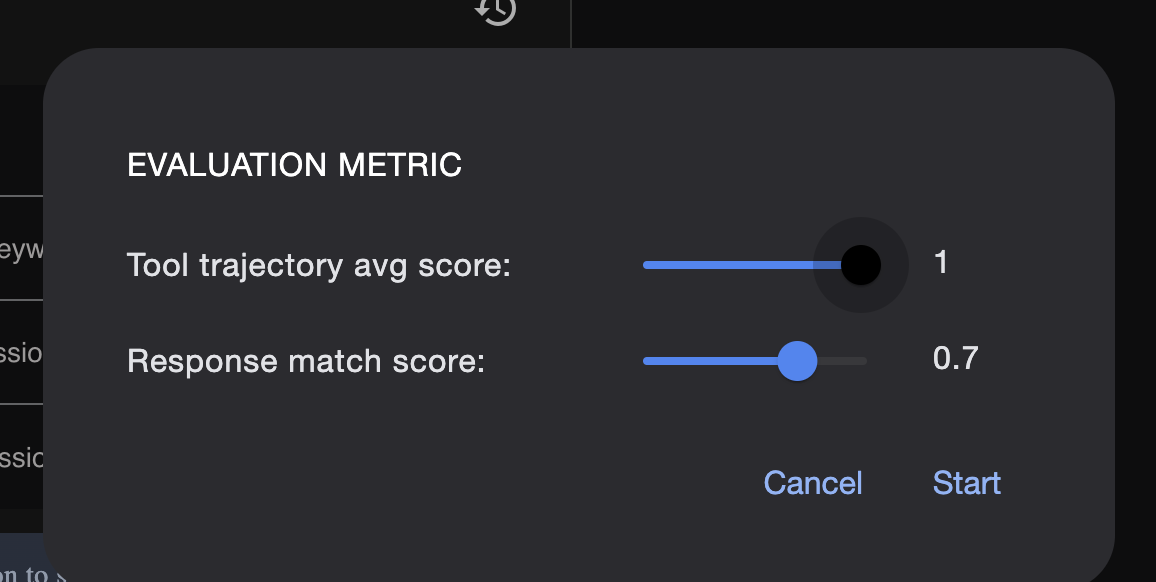
यहां मेट्रिक में बदलाव करें:
आकलन के नतीजे यहां देखें:
लर्निंग
कोई एजेंट बिना किसी गड़बड़ी के "काम" कर सकता है. हालांकि, हमें यह कैसे पता चलेगा कि वह सही आउटपुट दे रहा है? क्या कहानी अच्छी है? क्या JSON फ़ॉर्मैट सही है? ऐसे में, ADK का आकलन फ़्रेमवर्क काम आता है.
एजेंट के परफ़ॉर्मेंस का आकलन करने वाला सिस्टम, अपने-आप काम करता है. इसे इस तरह से डिज़ाइन किया गया है कि इससे आपके एजेंट के जवाबों की क्वालिटी और सटीक होने का पता चलता है. यह सिर्फ़ कोड में मौजूद गड़बड़ियों की जांच नहीं करता, बल्कि यह भी देखता है कि एजेंट का व्यवहार आपकी उम्मीदों के मुताबिक है या नहीं. फ़्रेमवर्क में मुख्य तौर पर इन फ़ाइलों का इस्तेमाल किया जाता है:
evalset.json: यह आपका मास्टर टेस्ट सुइट है. इस फ़ाइल में मौजूद हर "इवैल केस" में बातचीत का एक सैंपल (जैसे, उपयोगकर्ता का प्रॉम्प्ट) और आदर्श, "गोल्डन" जवाब होता है. यह वह जवाब होता है जो आपको एजेंट से चाहिए.
test_config.json: इस फ़ाइल में, टेस्ट के सफल होने के नियम तय किए जाते हैं. यहाँ मानदंड सेट किए जाते हैं. जैसे:
response_match_score: एजेंट का जवाब, "गोल्डन" जवाब से कितना मिलता-जुलता होना चाहिए? (स्कोर 1.0 का मतलब है कि यह एक जैसा होना चाहिए).
custom_evaluators: अपने नियम बनाए जा सकते हैं. जैसे, "जवाब, मान्य JSON फ़ॉर्मैट में होना चाहिए" या "कहानी में 100 से ज़्यादा शब्द होने चाहिए."
इवैलुएशन की सुविधा का इस्तेमाल करके, अपने एजेंट को कई तरह के उदाहरणों के हिसाब से अपने-आप टेस्ट किया जा सकता है. इससे यह पक्का किया जा सकता है कि आपके प्रॉम्प्ट या टूल में किए गए बदलावों की वजह से, एजेंट की मुख्य सुविधाएं गलती से बंद न हो जाएं. यह एआई एजेंट को प्रोडक्शन के लिए तैयार करने में मदद करने वाला एक बेहतरीन टूल है.
9. Infrastructure as Code (IaC): Building a Home in the Cloud
हमारे कोड की जांच हो चुकी है. हालांकि, इसे प्रोडक्शन के लिए तैयार होम की ज़रूरत है. हम अपने एनवायरमेंट को तय करने के लिए, "Infrastructure as Code" का इस्तेमाल करेंगे.
Docker क्या है?
Docker, कंटेनर में ऐप्लिकेशन बनाने और उन्हें चलाने का प्लैटफ़ॉर्म है. कंटेनर को सॉफ़्टवेयर के लिए, स्टैंडर्ड शिपिंग कंटेनर की तरह समझें. यह आपके ऐप्लिकेशन को चलाने के लिए ज़रूरी सभी चीज़ों को एक अलग पैकेज में बंडल करता है:
- ऐप्लिकेशन कोड
- ज़रूरी रनटाइम (जैसे, Python का कोई खास वर्शन)
- सभी सिस्टम टूल और लाइब्रेरी
इसके बाद, कंटेनर में मौजूद इस ऐप्लिकेशन को किसी भी ऐसी मशीन पर चलाया जा सकता है जिस पर Docker इंस्टॉल किया गया हो. इससे "यह मेरी मशीन पर काम करता है" वाली समस्या हल हो जाती है.
इस सेक्शन में, हम Gemini से Dockerfile जनरेट करने के लिए कहेंगे. यह हमारे ऐप्लिकेशन की कंटेनर इमेज बनाने के लिए, रेसिपी या ब्लूप्रिंट होता है
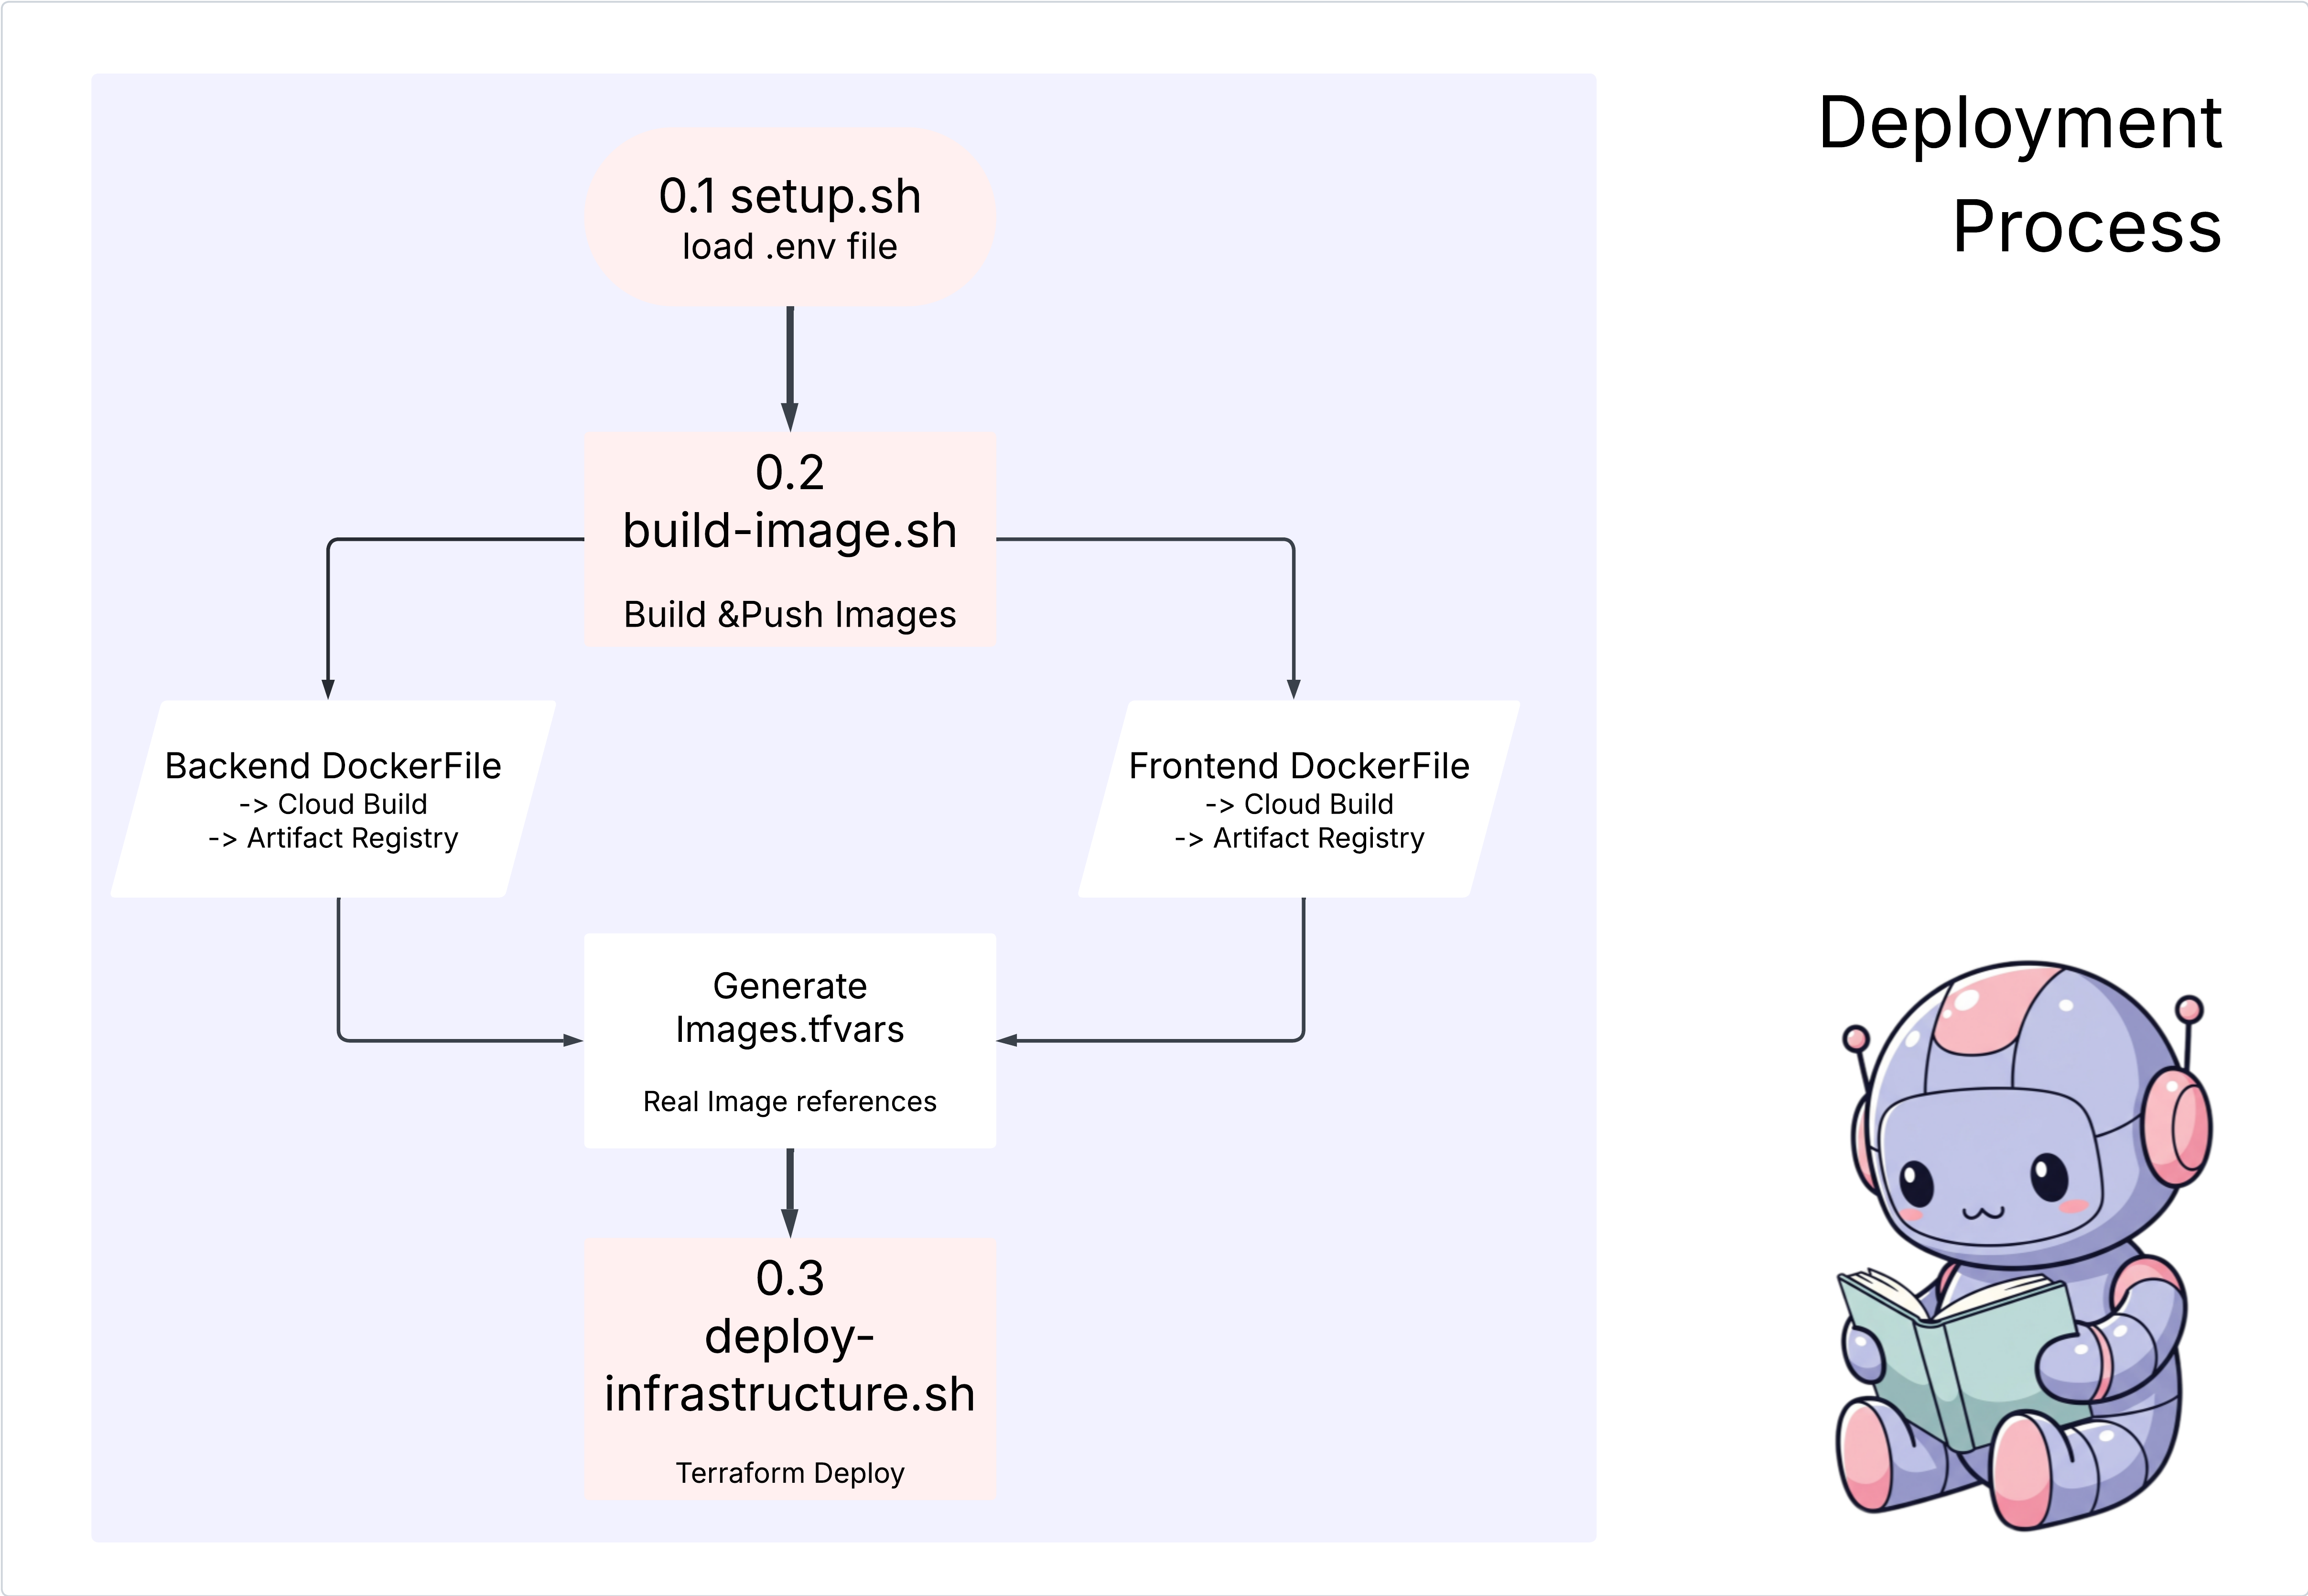
कार्रवाइयां
cd ~/storygen-learning/04a_Manual_Deployment_Ready
बैकएंड के लिए Dockerfile बनाने के लिए, Gemini CLI का इस्तेमाल करें: Gemini CLI खोलें
Gemini
Gemini CLI में, यह प्रॉम्प्ट आज़माएँ:
Create a manual deployment plan for my StoryGen app with Google Cloud Platform. I have a Next.js frontend, Python backend, and Terraform infrastructure.

Generate these deployment files:
1. **01-setup.sh** - Environment setup and authentication
2. **02-build-images.sh** - Build and push Docker images to Google Container Registry
3. **03-deploy-infrastructure.sh** - Deploy with Terraform and configure services
4. **load-env.sh** - Load environment variables for deployment

**Requirements:**
- Use Google Cloud Run for both frontend and backend
- Configure Imagen API and storage buckets
- Set up proper IAM permissions
- Use environment variables from .env file
- Include error handling and status checks

Keep scripts simple, well-commented, and production-ready for manual execution.
समाधान:
cd ~/storygen-learning/04b_Manual_Deployment_Done
रन:
source ../.venv/bin/activate
./01-setup.sh
./02-build-images.sh
./03-deploy-infrastructure.sh
आपको डिप्लॉयमेंट के नतीजे और इन्फ़्रास्ट्रक्चर बनाने की प्रोसेस दिखेगी
10. ऑटोमेशन (सीआई/सीडी): डिजिटल असेंबली लाइन
हमारे ऐप्लिकेशन को मैन्युअल तरीके से डिप्लॉय करना, काम करने वाले हिस्सों को समझने का एक बेहतरीन तरीका है. हालांकि, इसमें समय लगता है, मैन्युअल तरीके से काम करना पड़ता है, और मानवीय गड़बड़ी हो सकती है. प्रोफ़ेशनल सॉफ़्टवेयर डेवलपमेंट में, इस पूरी प्रोसेस को अपने-आप पूरा करने के लिए, सीआई/सीडी का इस्तेमाल किया जाता है.
सीआई/सीडी का मतलब लगातार इंटिग्रेशन और लगातार डिप्लॉयमेंट है. यह एक ऐसी प्रोसेस है जिसमें आपके कोड को अपने-आप बनाया, टेस्ट किया, और डिप्लॉय किया जाता है. ऐसा हर बार तब होता है, जब आप कोई बदलाव करते हैं.
- लगातार इंटिग्रेशन (सीआई): यह "बनाएं और जांच करें" फ़ेज़ होता है. जब कोई डेवलपर, शेयर की गई रिपॉज़िटरी (जैसे कि GitHub) में कोड में बदलाव करता है, तो अपने-आप काम करने वाला सिस्टम शुरू हो जाता है. यह ऐप्लिकेशन बनाता है और सभी टेस्ट (जैसे, हमने एजेंट के आकलन बनाए) चलाता है. इससे यह पक्का किया जाता है कि नया कोड सही तरीके से इंटिग्रेट हो गया है और उसमें कोई गड़बड़ी नहीं है.
- लगातार डिप्लॉयमेंट (सीडी): यह "रिलीज़" फ़ेज़ होता है. अगर सीआई फ़ेज़ पूरा हो जाता है, तो सिस्टम ऐप्लिकेशन के नए और टेस्ट किए गए वर्शन को प्रोडक्शन में अपने-आप डिप्लॉय कर देता है. इससे यह वर्शन, उपयोगकर्ताओं के लिए लाइव हो जाता है.
यह ऑटोमेटेड पाइपलाइन, "डिजिटल असेंबली लाइन" बनाती है. इससे डेवलपर की मशीन से प्रोडक्शन तक कोड को तेज़ी से, सुरक्षित तरीके से, और भरोसेमंद तरीके से पहुंचाया जा सकता है. इस सेक्शन में, हम अपने एआई असिस्टेंट से GitHub Actions और Google Cloud Build का इस्तेमाल करके, इस असेंबली लाइन को बनाने के लिए कहेंगे.
कार्रवाइयां
cd ~/storygen-learning/05a_CICD_Pipeline_Ready
GitHub के साथ CI/CD पाइपलाइन बनाने के लिए, Gemini CLI का इस्तेमाल करें:
Gemini CLI खोलें
Gemini
Gemini CLI में, यह प्रॉम्प्ट आज़माएँ:
Create a CI/CD pipeline for my StoryGen app using Google Cloud Build and GitHub integration.

Generate these automation files:
1. **cloudbuild.yaml** (for backend) - Automated build, test, and deploy pipeline
2. **GitHub Actions workflow** - Trigger builds on push/PR
3. **Deployment automation scripts** - Streamlined deployment process

**Requirements:**
- Auto-trigger on GitHub push to main branch
- Build and push Docker images
- Run automated tests if available
- Deploy to Google Cloud Run
- Environment-specific deployments (staging/prod)
- Notification on success/failure

Focus on fully automated deployment with minimal manual intervention. Include proper secret management and rollback capabilities.
——————————————– Solution Starting Here ——————————————–
समाधान:
cd ~/storygen-learning/06_Final_Solution/
# Copy the GitHub workflow to parent folder
cp -r 06_Final_Solution/.GitHub ../../../.GitHub
06_Final_Solution फ़ोल्डर पर वापस जाएं और स्क्रिप्ट चलाएं:
cd ~/storygen-learning/06_Final_Solution/

./setup-cicd-complete.sh
आपको CI/CD पाइपलाइन का सेटअप पूरा होने की सूचना दिखेगी
वर्कफ़्लो ट्रिगर करना: अपने कोड को मुख्य ब्रांच में कमिट करें और पुश करें. ध्यान दें कि अनुमति देने के लिए, आपको GitHub में अपना ईमेल पता और नाम सेट अप करना होगा.
git add .
git commit -m "feat: Add backend, IaC, and CI/CD workflow"
git push origin main
अपने-आप डिप्लॉय होने की प्रोसेस देखने के लिए, GitHub रिपॉज़िटरी में "ऐक्शन" टैब पर जाएं.
11. ऑपरेशंस: एआई कंट्रोल टावर
हम लाइव हैं! हालांकि, यह सफ़र अभी खत्म नहीं हुआ है. यह "दूसरे दिन" की कार्रवाई है. आइए, चालू ऐप्लिकेशन को मैनेज करने के लिए, Cloud Assist पर वापस जाएं.
कार्रवाइयां
- Google Cloud Console में जाकर, अपनी Cloud Run सेवा पर जाएं. अपने लाइव ऐप्लिकेशन के साथ इंटरैक्ट करें, ताकि कुछ ट्रैफ़िक और लॉग जनरेट किए जा सकें.
- Cloud Assist पैनल खोलें और इसे ऑपरेशनल को-पायलट के तौर पर इस्तेमाल करें. इसके लिए, इस तरह के प्रॉम्प्ट इस्तेमाल करें:
लॉग का विश्लेषण:
Summarize the errors in my Cloud Run logs for the service 'genai-backend' from the last 15 minutes.
परफ़ॉर्मेंस को बेहतर बनाना:
My Cloud Run service 'genai-backend' has high startup latency. What are common causes for a Python app and how can I investigate with Cloud Trace?
लागत ऑप्टिमाइज़ेशन:
Analyze the costs for my 'genai-backend' service and its GCS bucket. Are there any opportunities to save money?
सीखने के लिए मुख्य बातें: एआई एसडीएलसी एक लगातार चलने वाली प्रोसेस है. जिस एआई को-पायलट ने ऐप्लिकेशन बनाने में मदद की थी वह प्रोडक्शन में इसकी निगरानी करने, समस्या हल करने, और इसे ऑप्टिमाइज़ करने के लिए एक ज़रूरी पार्टनर है.