
1. 학습할 내용
AI 에이전트 바이브 풀 스택
환영합니다! 이제 소프트웨어 개발의 다음 중요한 기술인 인공지능을 효과적으로 안내하여 프로덕션 등급 소프트웨어를 빌드, 테스트, 배포하는 방법을 알아봅니다. 생성형 AI는 '자동 조종 장치'가 아니라 숙련된 감독이 필요한 강력한 부조종사입니다.
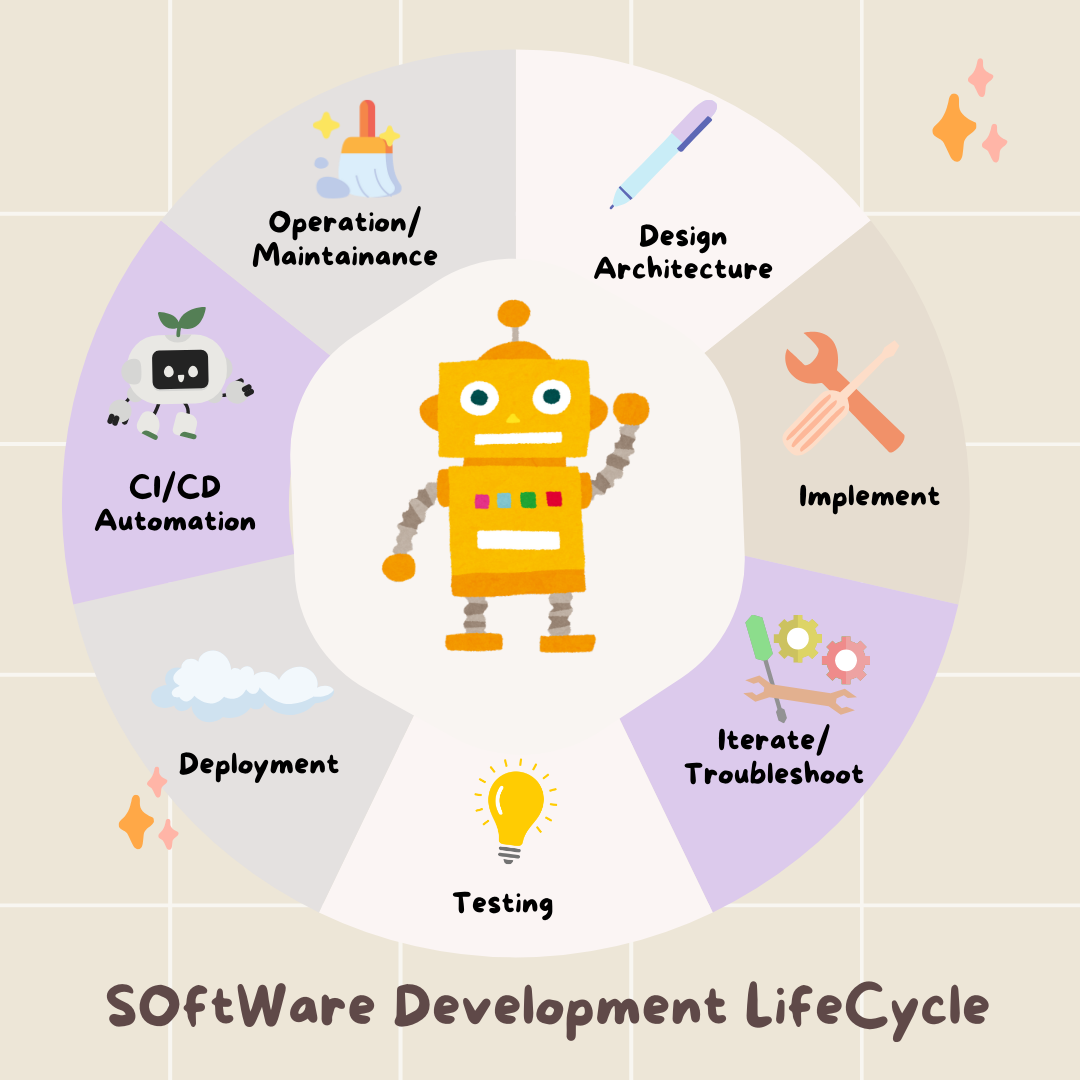
이 워크숍에서는 전문 소프트웨어 개발 수명 주기 (SDLC)의 모든 단계에서 AI와 협력하기 위한 구조화되고 반복 가능한 방법론을 제공합니다. 한 줄씩 코드를 작성하는 작성자에서 비전을 가진 건축가이자 AI를 사용하여 비전을 정확하게 실행하는 일반 계약자인 기술 디렉터로 성장할 수 있습니다. 🚀
이 튜토리얼을 마치면 다음을 수행할 수 있습니다.
- AI를 사용하여 대략적인 아이디어를 클라우드 아키텍처로 변환했습니다.
- 타겟팅된 구체적인 프롬프트로 완전한 Python 백엔드를 생성했습니다.
- AI를 페어링 프로그래머로 사용하여 코드를 디버그하고 수정했습니다.
- 모의를 포함한 단위 테스트 생성을 AI에 위임했습니다.
- Terraform을 사용하여 프로덕션 준비가 완료된 코드형 인프라 (IaC)를 생성했습니다.
- 단일 프롬프트로 GitHub Actions에서 전체 CI/CD 파이프라인을 만들었습니다.
- AI 기반 운영 도구를 사용하여 라이브 애플리케이션을 모니터링하고 관리했습니다.
작동하는 앱뿐만 아니라 AI 증강 개발을 위한 청사진도 얻을 수 있습니다. 지금부터 시작하겠습니다
2. 기본 요건 및 설정
시작하기 전에 환경을 준비하겠습니다. 원활한 워크숍 경험을 위해 이 단계를 반드시 완료해야 합니다.
새 GCP 계정 만들기 및 결제 연결
AI 에이전트를 지원하려면 기반을 제공하는 Google Cloud 프로젝트와 Google의 강력한 모델에 액세스할 수 있는 Gemini API 키가 필요합니다.
1단계: 결제 계정 사용 설정하기
이 Codelab을 실행하려면 크레딧이 있는 결제 계정이 필요합니다. 이 Codelab 상단의 배너에 있는 크레딧을 사용하여 시작하세요. 이미 결제 계정에 연결되어 있다면 이 단계를 건너뛰어도 됩니다.
2단계: 새 GCP 프로젝트 만들기
- Google Cloud 콘솔로 이동하여 새 프로젝트를 만듭니다.
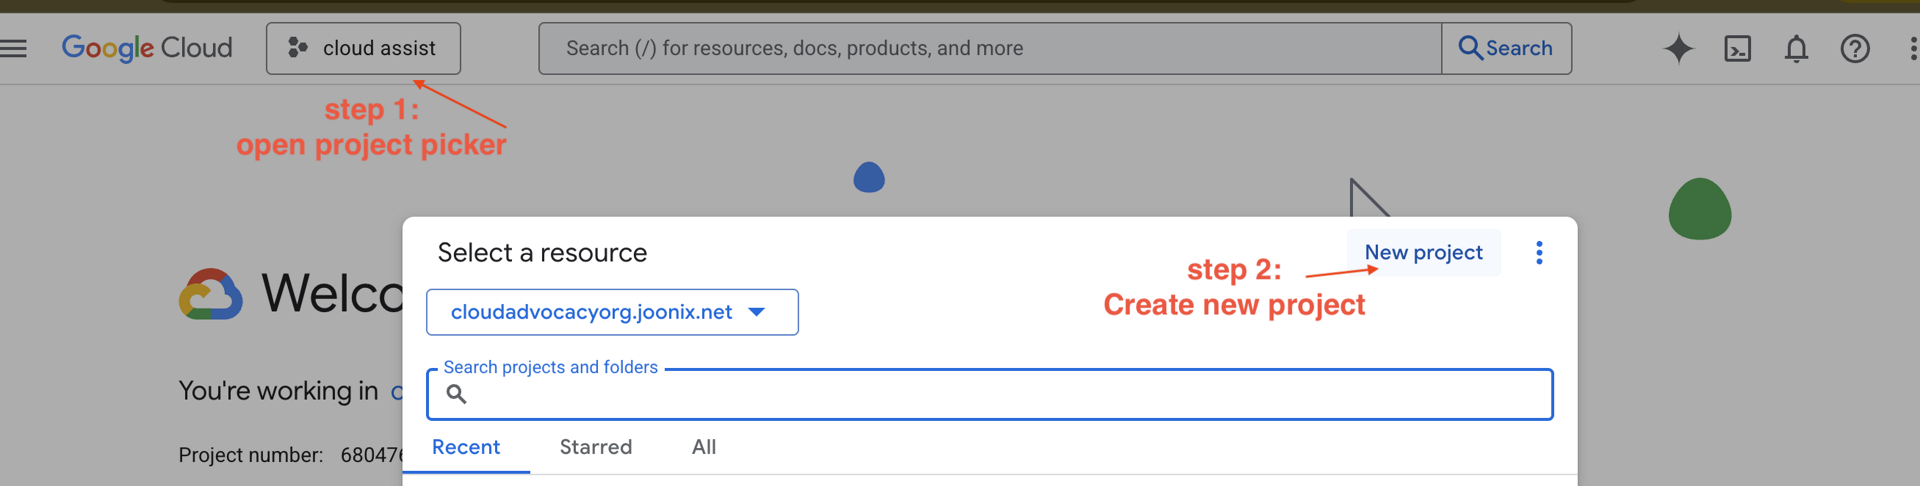
- 왼쪽 패널을 열고
Billing을 클릭하여 결제 계정이 이 GCP 계정에 연결되어 있는지 확인합니다.
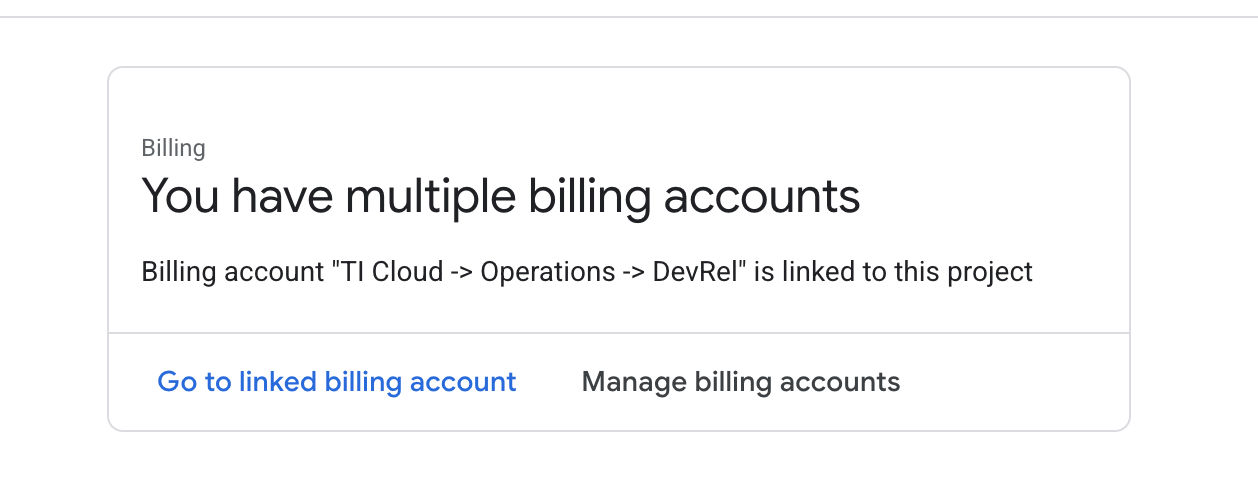
이 페이지가 표시되면 manage billing account을 확인하고 Google Cloud Trial One을 선택하여 연결합니다.
3단계: Gemini API 키 생성하기
키를 보호하려면 키가 있어야 합니다.
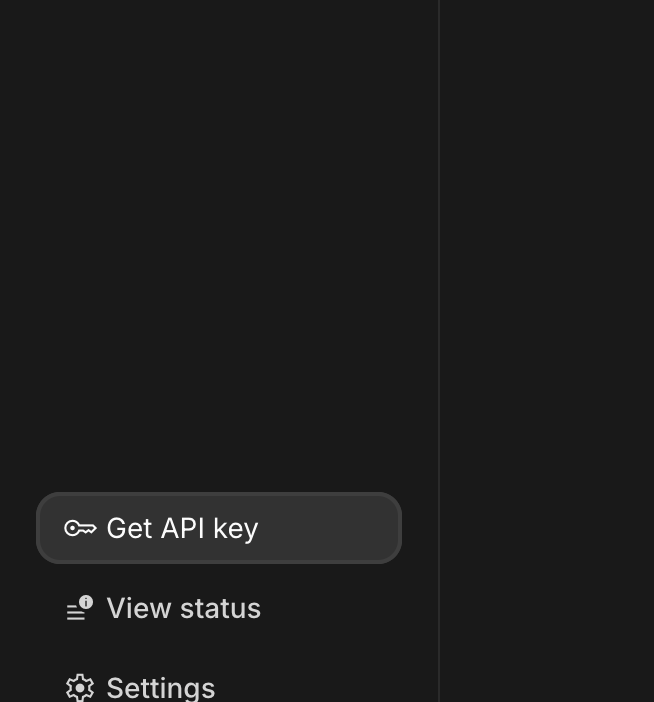
- Google AI Studio(https://aistudio.google.com/)로 이동합니다.
- Gmail 계정으로 로그인합니다.
- 일반적으로 왼쪽 탐색 창이나 오른쪽 상단에 있는 'API 키 가져오기' 버튼을 클릭합니다.
- 'API 키' 대화상자에서 '새 프로젝트에 API 키 만들기'를 클릭합니다.
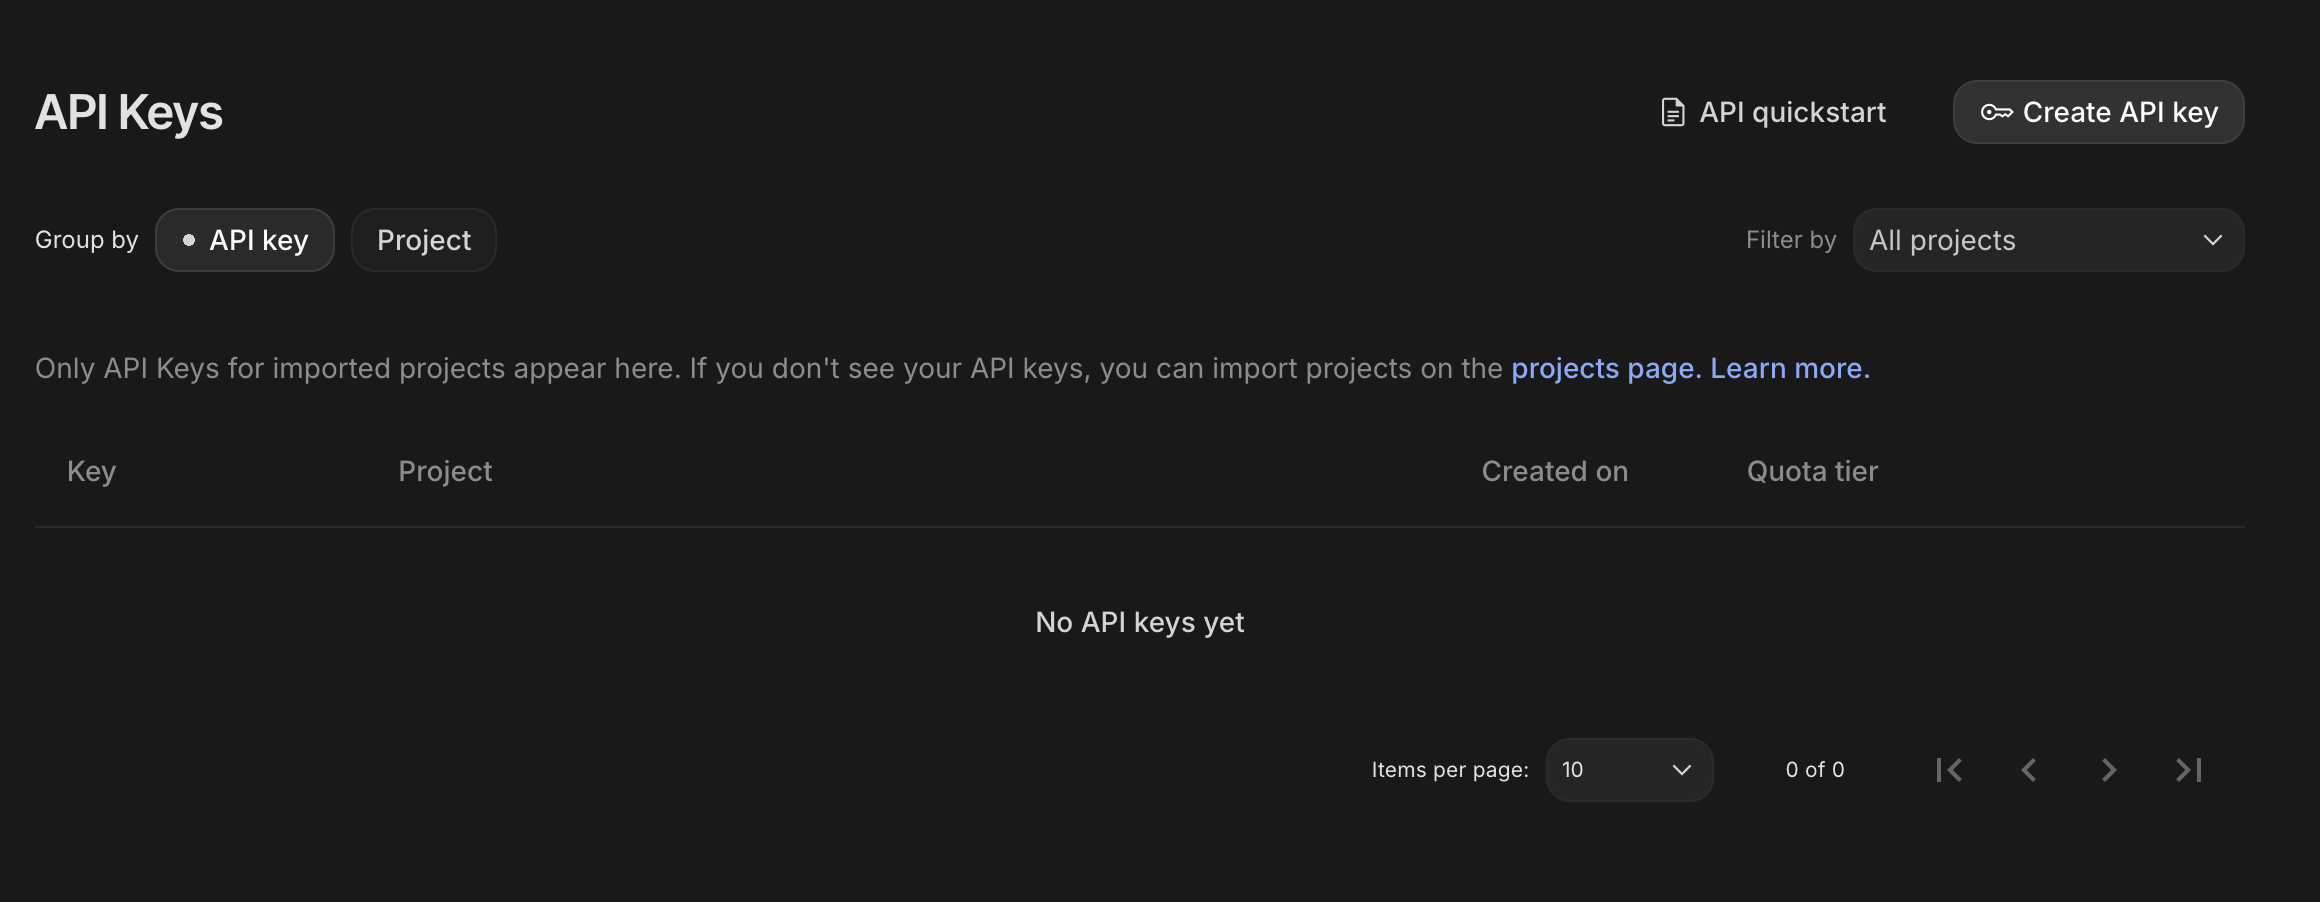
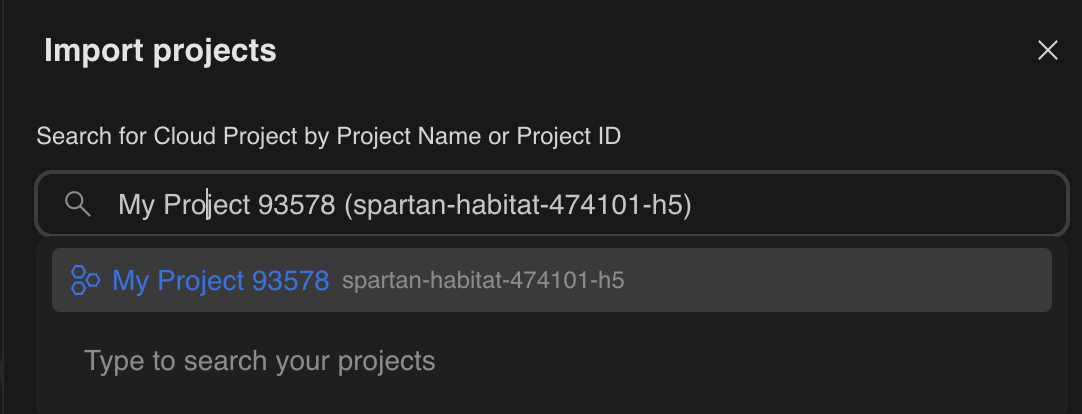
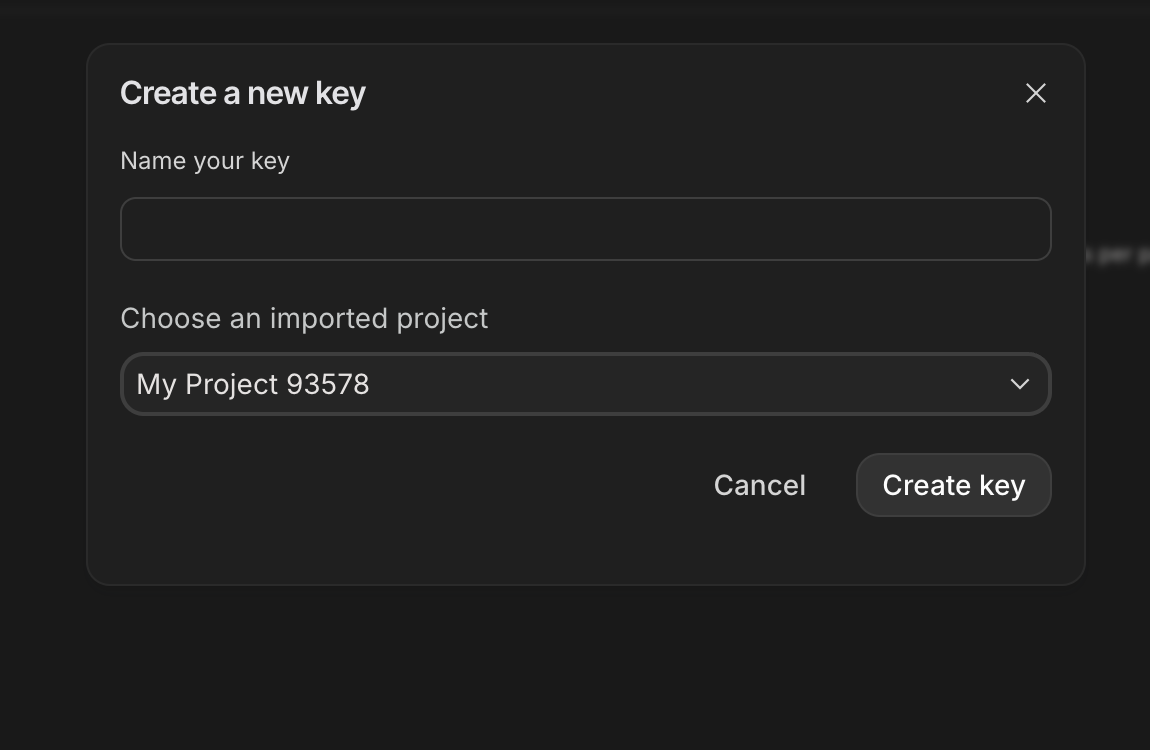
- 결제 계정이 설정된 새로 만든 프로젝트를 선택합니다.
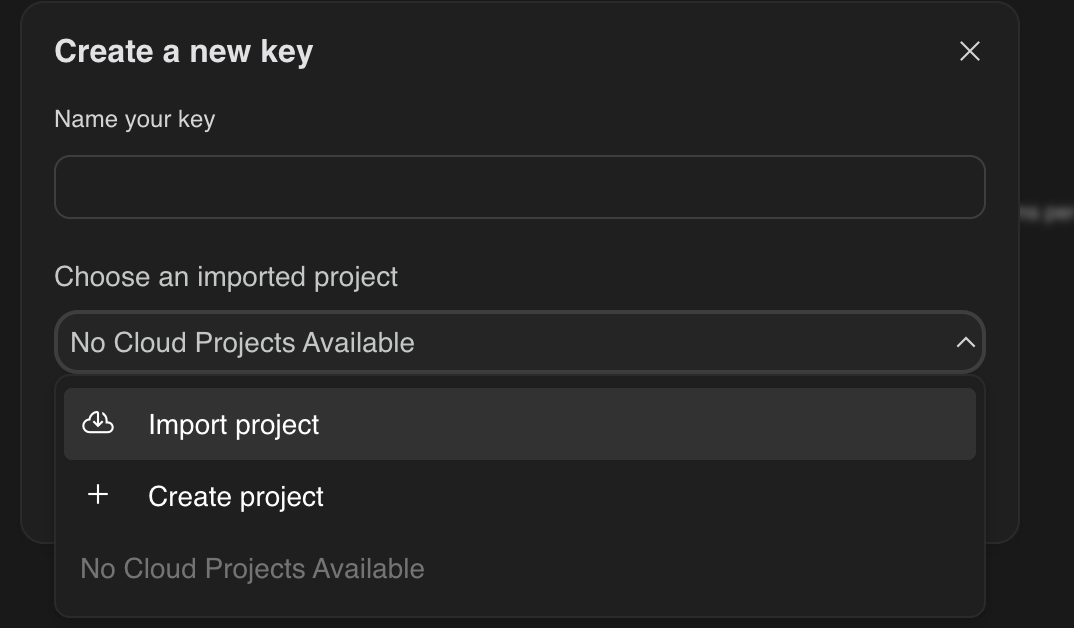
- 새 API 키가 생성됩니다.
이 키를 즉시 복사하여 비밀번호 관리자나 보안 메모와 같은 안전한 곳에 임시로 저장합니다. 이 값은 다음 단계에서 사용됩니다.
GitHub 인증
Google Cloud 콘솔로 이동하여 오른쪽 상단의 'Cloud Shell 활성화' 버튼을 클릭하여 Cloud Shell을 엽니다.
1단계: Cloud Shell 열기
👉Google Cloud 콘솔 상단에서 'Cloud Shell 활성화'를 클릭합니다 (Cloud Shell 창 상단의 터미널 모양 아이콘). 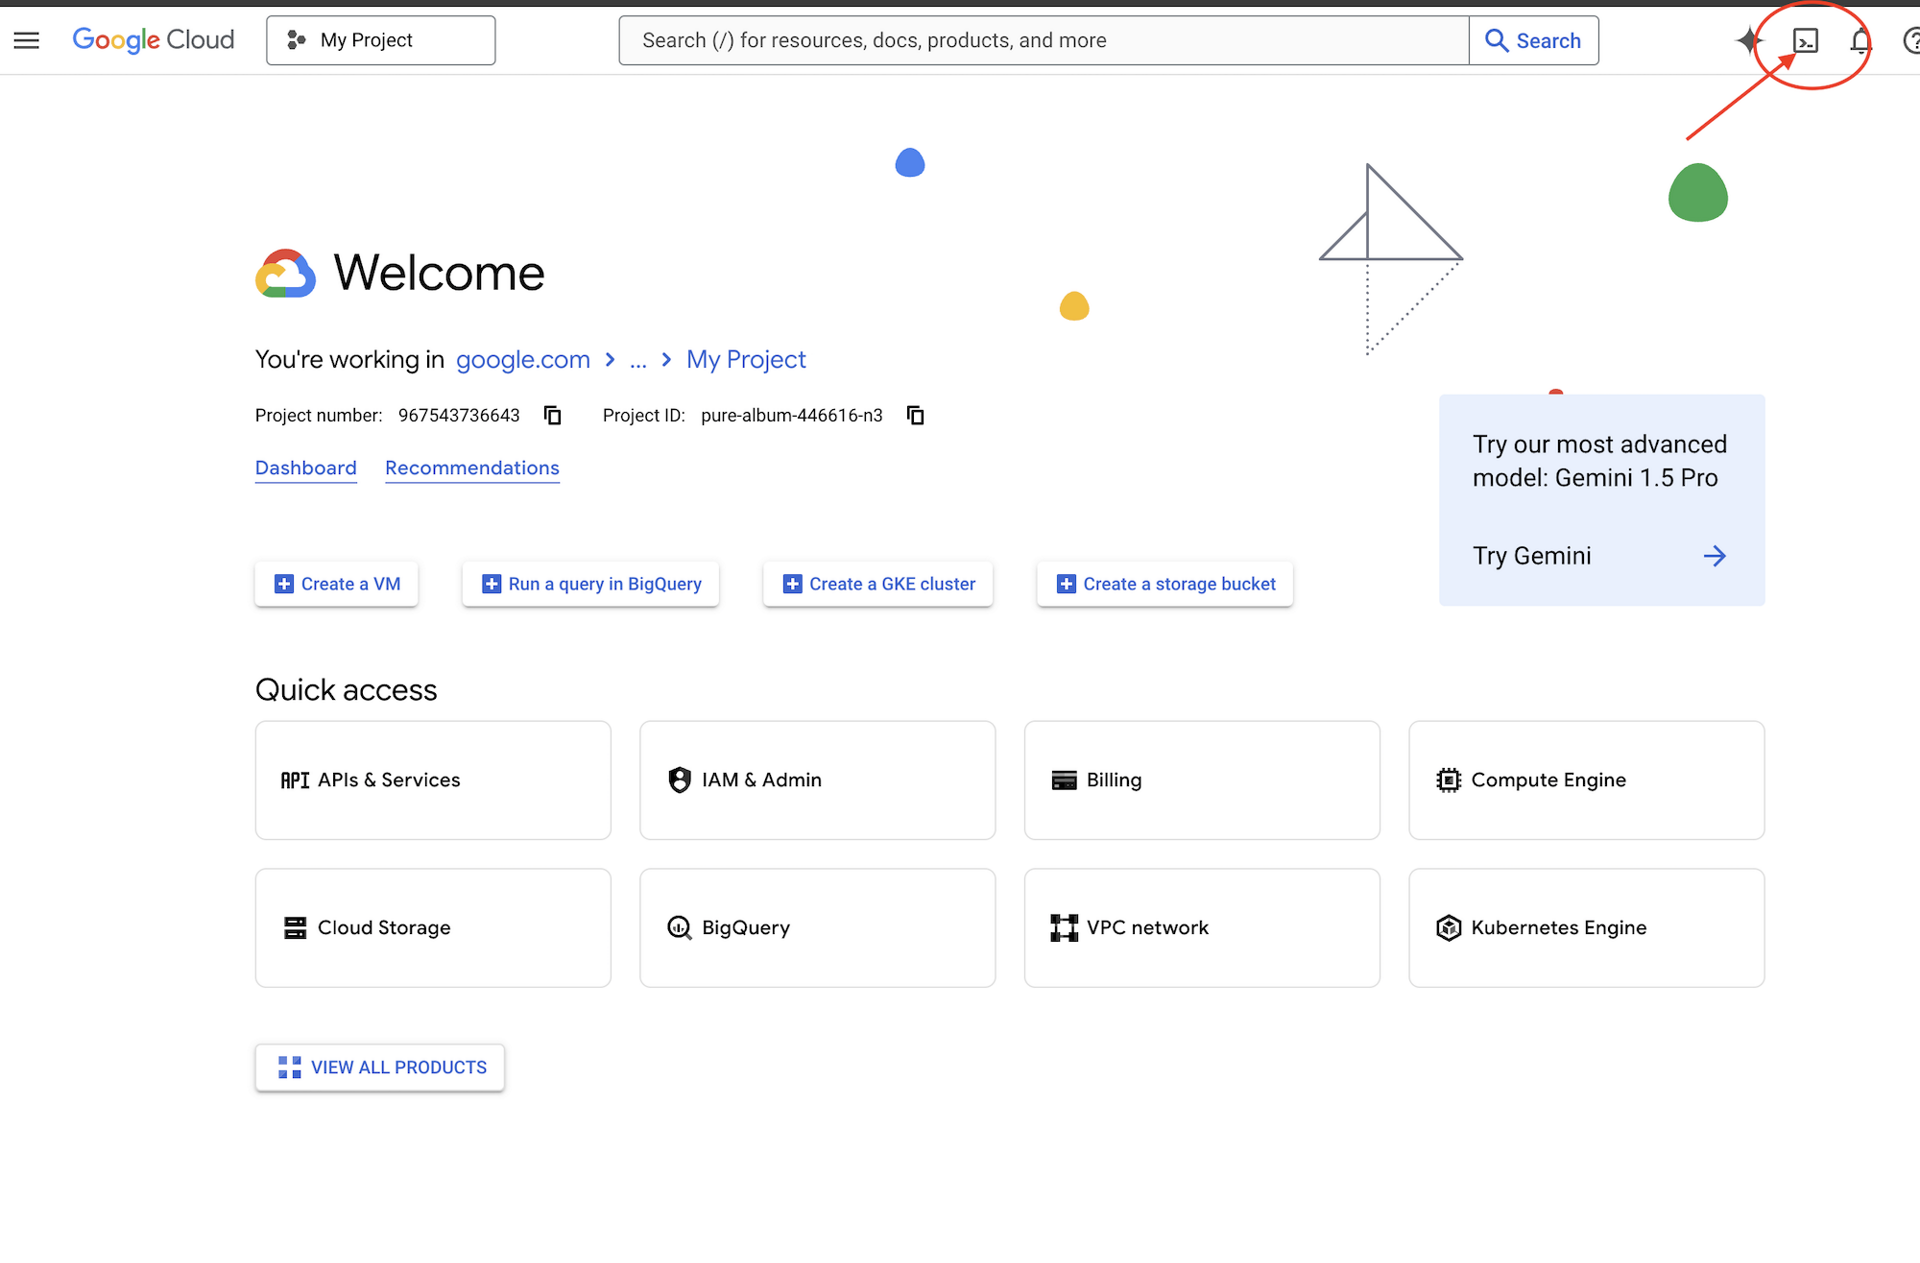
👉'편집기 열기' 버튼 (연필이 있는 열린 폴더 모양)을 클릭합니다. 그러면 창에 Cloud Shell 코드 편집기가 열립니다. 왼쪽에 파일 탐색기가 표시됩니다. 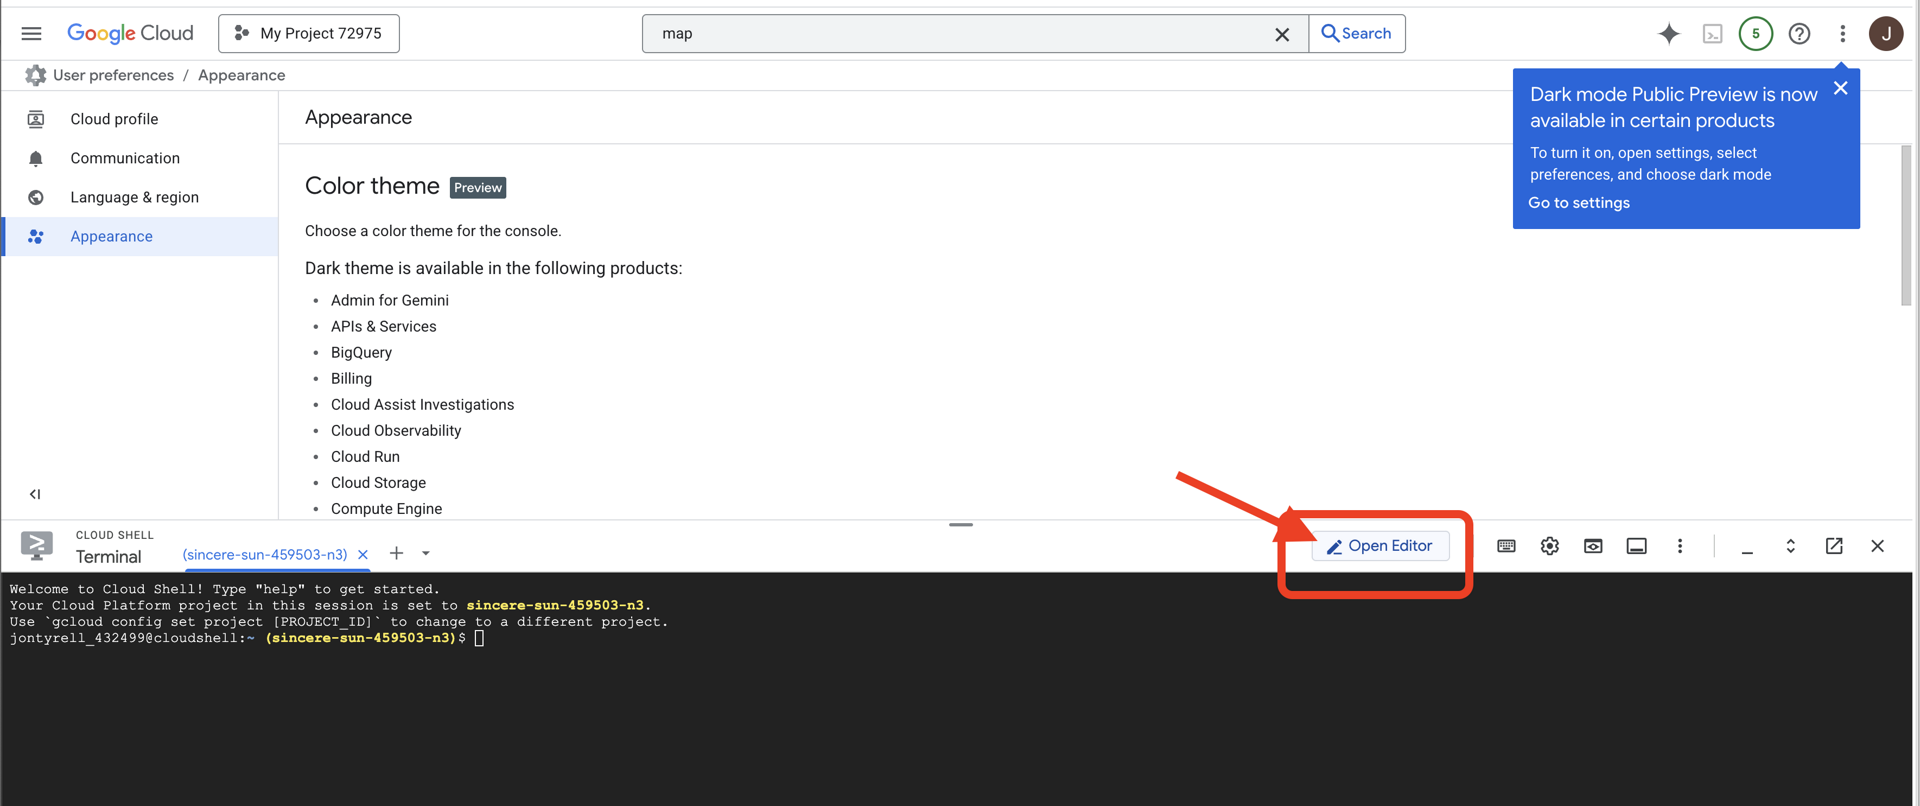
👉편집기를 연 후 클라우드 IDE에서 터미널을 엽니다.
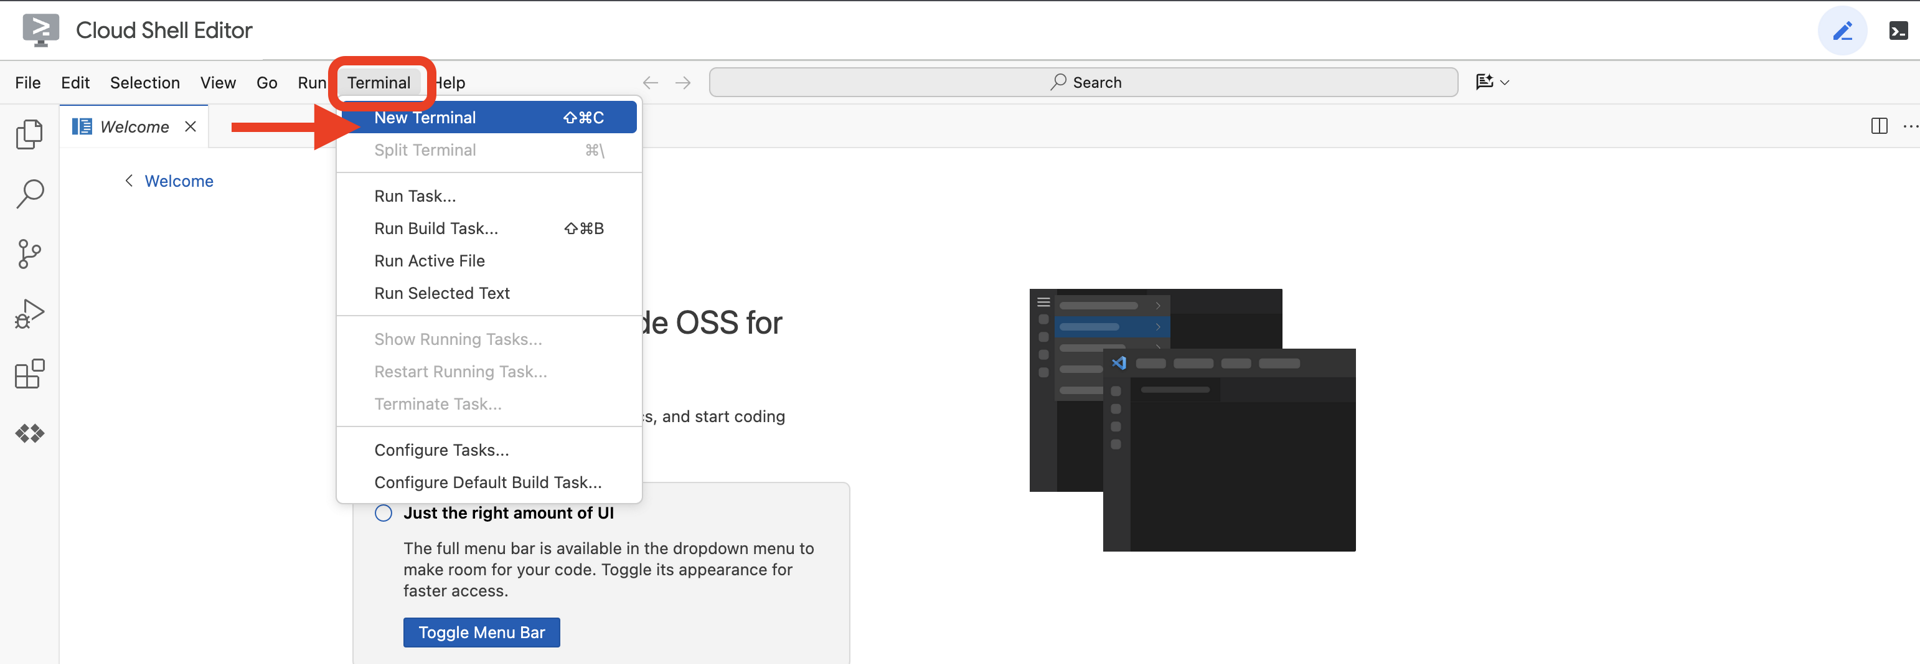
👉💻 터미널에서 다음 명령어를 사용하여 이미 인증되었는지, 프로젝트가 프로젝트 ID로 설정되었는지 확인합니다.
gcloud auth list
2단계: GitHub로 인증 및 포크
GitHub로 인증:
👉💻 명령어를 클라우드 터미널에 복사하여 붙여넣습니다.
gh auth login
- 'GitHub를 어디에서 사용하시나요?'에서 'GitHub.com'을 선택합니다.
- '이 호스트에서 Git 작업을 위한 기본 프로토콜은 무엇인가요?'에서 'HTTPS'를 선택합니다.
- 'GitHub 사용자 인증 정보로 Git을 인증하시겠습니까?'에서 '예'를 선택합니다.
- 'GitHub CLI를 인증하는 방법'에서 '웹브라우저로 로그인'을 선택합니다.
중요!! 아직 'Enter' 키를 누르지 마세요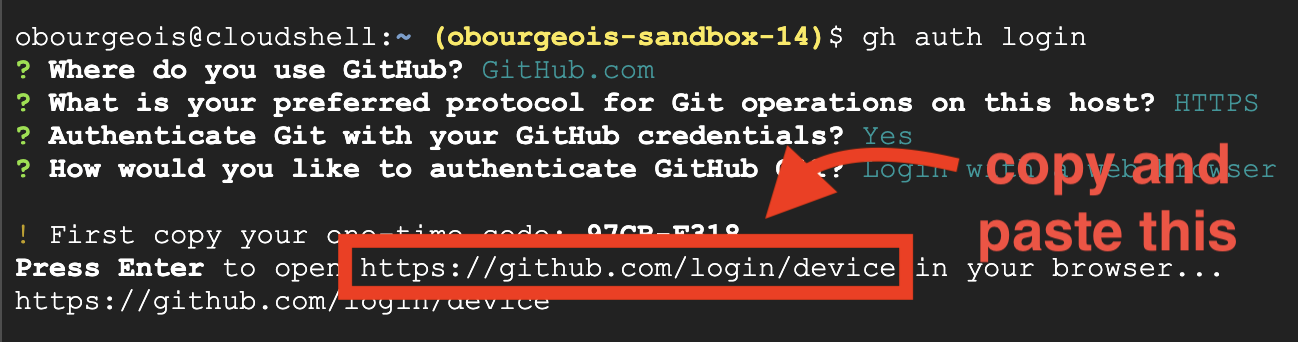
터미널에서 로그인 인증 페이지로 코드를 복사합니다.
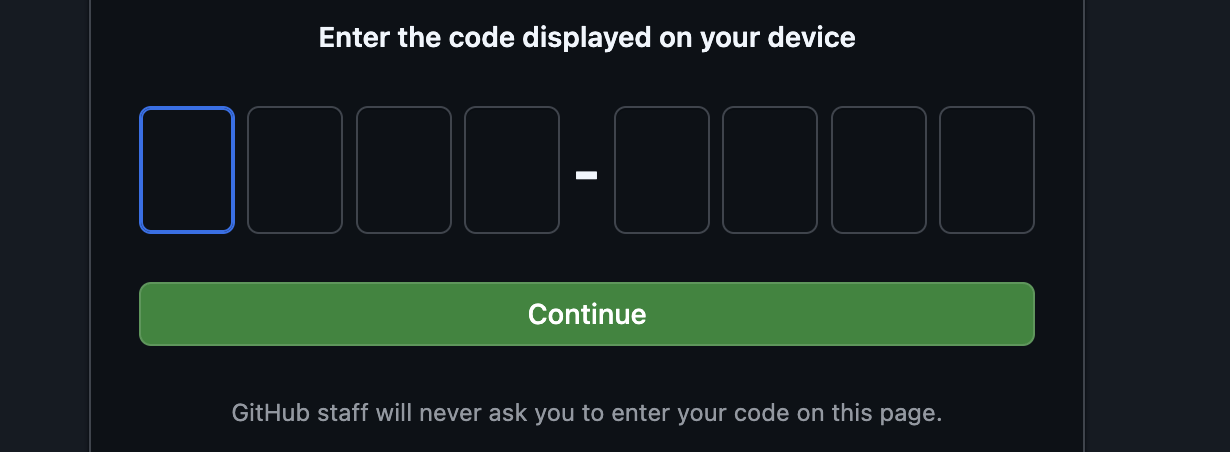
코드 입력을 완료한 후 Cloud Shell 터미널로 돌아가 'Enter' 키를 눌러 계속합니다.

4단계: 저장소 포크 및 클론
👉💻 명령어를 클라우드 터미널에 복사하여 붙여넣습니다.
gh repo fork cuppibla/storygen-learning --clone=true
3. 아키텍처: Cloud Assist를 사용하여 아이디어에서 청사진으로
모든 훌륭한 프로젝트는 명확한 비전에서 시작됩니다. AI 공동 파일럿인 Cloud Assist를 사용하여 앱 아키텍처를 설계합니다.
작업
- Google Cloud 콘솔을 엽니다([https://console.cloud.google.com](Google Cloud 콘솔)).
- 오른쪽 상단에서 'Cloud Assist 채팅 열기'를 클릭합니다.

Cloud Assist 사용 설정
Get Gemini Assist을 클릭한 다음Enable Cloud Assist at no cost을 클릭합니다.- 채팅을 시작하세요.
 Cloud Assist에 다음 세부 프롬프트를 제공합니다.
아이디어 입력
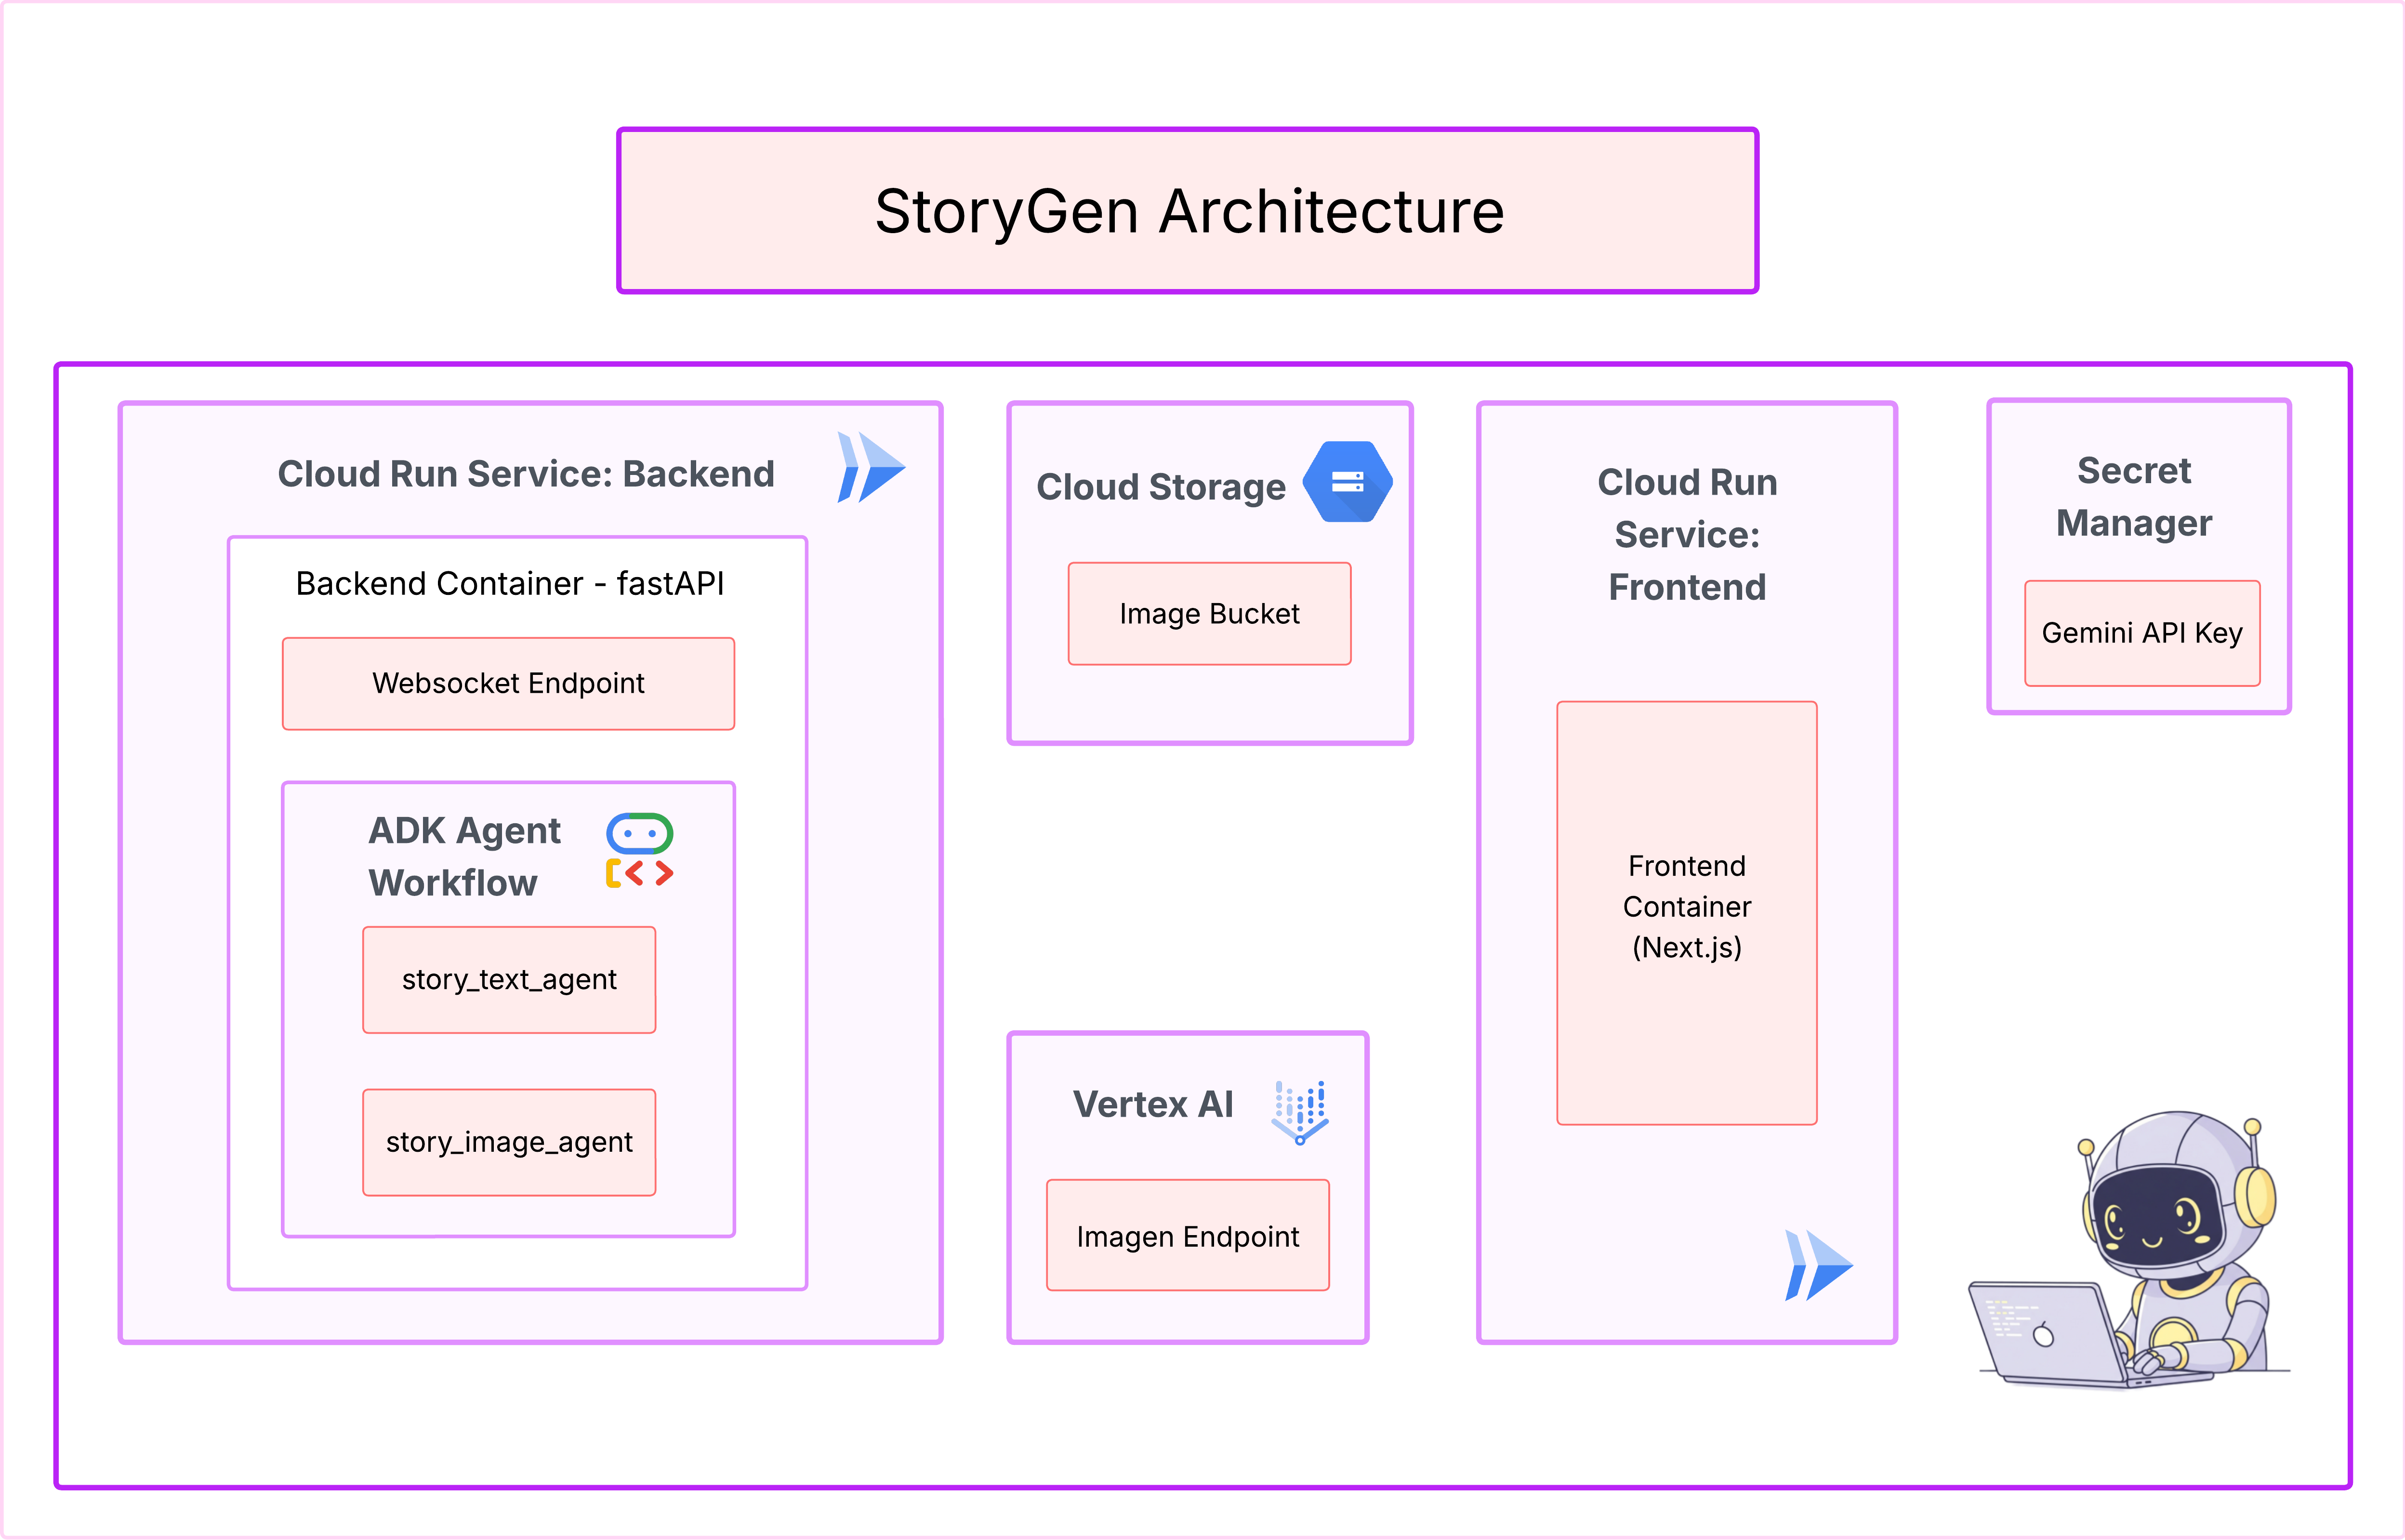
Generate a Python web application that uses AI to generate children's stories and illustrations. It has Python backend and React frontend host separately on Cloudrun. They communicate through Websocket. It needs to use a generative model for text and another for images. The generated images must be used by Imagen from Vertex AI and stored in a Google Cloud Storage bucket so that frontend can fetch from the bucket to render images. I do not want any load balancer or a database for the story text. We need a solution to store the API key.
앱 청사진 받기
- '앱 디자인 수정'을 클릭하면 다이어그램이 표시됩니다. 오른쪽 상단 패널 '<> 코드 가져오기'를 클릭하여 Terraform 코드를 다운로드합니다.
- Cloud Assist가 아키텍처 다이어그램을 생성합니다. 이것이 시각적 청사진입니다.

이 코드는 별도의 조치가 필요하지 않습니다. 자세한 내용은 아래를 참고하세요.
생성된 Terraform 코드 이해하기 Cloud Assist에서 전체 Terraform 파일 세트를 방금 받았습니다. 지금은 이 코드로 아무 작업도 할 필요가 없지만, 이 코드가 무엇이고 왜 그렇게 강력한지 간단히 살펴보겠습니다.
Terraform이란 무엇인가요? Terraform은 코드형 인프라 (IaC) 도구입니다. 코드에 작성된 클라우드 환경의 청사진이라고 생각하면 됩니다. Google Cloud 콘솔을 수동으로 클릭하여 서비스, 스토리지, 권한을 만드는 대신 이러한 구성 파일에서 모든 리소스를 정의합니다. 그러면 Terraform이 청사진을 읽고 정확한 환경을 자동으로 빌드합니다.
시각적 계획에서 실행 가능한 코드로 Cloud Assist에서 제공한 아키텍처 다이어그램은 시각적 계획입니다. Terraform 코드는 동일한 계획의 머신 판독 가능 버전입니다. 설계 개념을 재현 가능한 자동화된 현실로 전환하는 중요한 연결고리입니다. 코드로 인프라를 정의하면 다음 작업을 할 수 있습니다.
- 생성 자동화: 동일한 환경을 반복해서 안정적으로 빌드합니다.
- 버전 관리 사용: 애플리케이션 코드와 마찬가지로 Git에서 인프라 변경사항을 추적합니다.
- 오류 방지: 웹 인터페이스를 클릭할 때 발생할 수 있는 수동 오류를 방지합니다.
이 워크숍에서는 이 Terraform 코드를 직접 실행할 필요가 없습니다. 이 문서는 앞으로 진행할 단계에서 빌드하고 배포할 인프라의 전문 청사진, 즉 '답안'이라고 생각하면 됩니다.
4. 개발: Gemini CLI 소개
👉💻 Cloud Shell 터미널에서 개인 디렉터리로 이동합니다.
cd ~/storygen-learning
👉💻 Gemini를 처음 사용해 보세요.
clear
gemini --model=gemini-2.5-flash
Do you want to connect Cloud Shell editor to Gemini CLI?를 묻는 메시지가 표시되면 아니요를 선택합니다.
👉✨ 모든 Gemini 도구에 설명이 있습니다. 지금 읽어보세요. Gemini 프롬프트에 다음을 입력합니다.
Gemini CLI
/help
👉✨ Gemini CLI에는 자체 기본 제공 기능이 있습니다. 검사하려면 다음 단계를 따르세요.
Gemini CLI
/tools
ReadFile, WriteFile, GoogleSearch이 포함된 목록이 표시됩니다. 외부 무기고에서 가져올 필요 없이 사용할 수 있는 기본 기술입니다.
👉✨ Gemini 블레이드는 '전술적 인식' (컨텍스트)을 보유하여 작업을 안내할 수 있습니다.
Gemini CLI
/memory show
현재는 비어 있으며, 빈 슬레이트입니다.
👉✨ 먼저 에이전트의 메모리에 페르소나를 추가합니다. 이렇게 하면 전문 분야가 정의됩니다.
Gemini CLI
/memory add "I am master at python development"
/memory show을 다시 실행하여 블레이드가 이 지식을 흡수했는지 확인합니다.
👉✨ @ 기호로 파일을 참조하는 방법을 보여주기 위해 먼저 '미션 브리프' 파일을 만들어 보겠습니다.
새 터미널을 열고 다음 명령어를 실행하여 미션 파일을 만듭니다.
!echo "## Mission Objective: Create Imagen ADK Agent for Story Book" > mission.md
👉✨이제 Gemini CLI에 브리핑을 분석하고 결과를 보고하도록 명령합니다.
Gemini CLI
Explain the contents of the file @mission.md
이제 주 무기가 목표를 인식합니다.
👉💻 Ctrl+C를 두 번 눌러 Gemini CLI를 종료합니다.
학습:
Gemini CLI의 슈퍼파워: gemini.md 계속하기 전에 Gemini CLI를 특정 프로젝트에 맞게 맞춤설정하는 방법을 이해하는 것이 중요합니다. 일반적인 채팅 도구로 사용할 수 있지만, 실제 성능은 gemini.md라는 특수 구성 파일에서 비롯됩니다.
gemini 명령어를 실행하면 현재 디렉터리에서 gemini.md 파일을 자동으로 찾습니다. 이 파일은 AI를 위한 프로젝트별 사용 설명서 역할을 합니다. 다음 세 가지 주요 사항을 정의할 수 있습니다.
- 페르소나: AI에게 어떤 캐릭터가 되어야 하는지 알려줍니다. 예를 들어 '너는 Google Cloud를 전문으로 하는 숙련된 Python 개발자야.' 이렇게 하면 대답과 스타일이 집중됩니다.
- 도구: 특정 파일 (@file.py) 또는 Google 검색 (@google)에 대한 액세스 권한을 부여할 수 있습니다. 이렇게 하면 AI가 프로젝트 코드에 관한 질문에 답변하는 데 필요한 컨텍스트가 제공됩니다.
- 메모리: AI가 이 프로젝트에서 항상 기억해야 하는 사실이나 규칙을 제공하여 일관성을 유지할 수 있습니다.
gemini.md 파일을 사용하면 일반적인 Gemini 모델을 프로젝트 목표에 대해 이미 브리핑을 받았으며 적절한 정보에 액세스할 수 있는 전문 어시스턴트로 전환할 수 있습니다.
5. 개발: Gemini CLI로 ADK 빌드
환경 구성
Cloud Shell로 이동하여 '터미널 열기' 버튼을 클릭합니다.
- 환경 템플릿을 복사합니다.
cd ~/storygen-learning
cp ~/storygen-learning/env.template ~/storygen-learning/.env
.env를 찾을 수 없는 경우 편집기에서 숨겨진 파일 보기
- 상단 메뉴 바에서 보기를 클릭합니다.
- 숨은 파일 전환을 선택합니다.
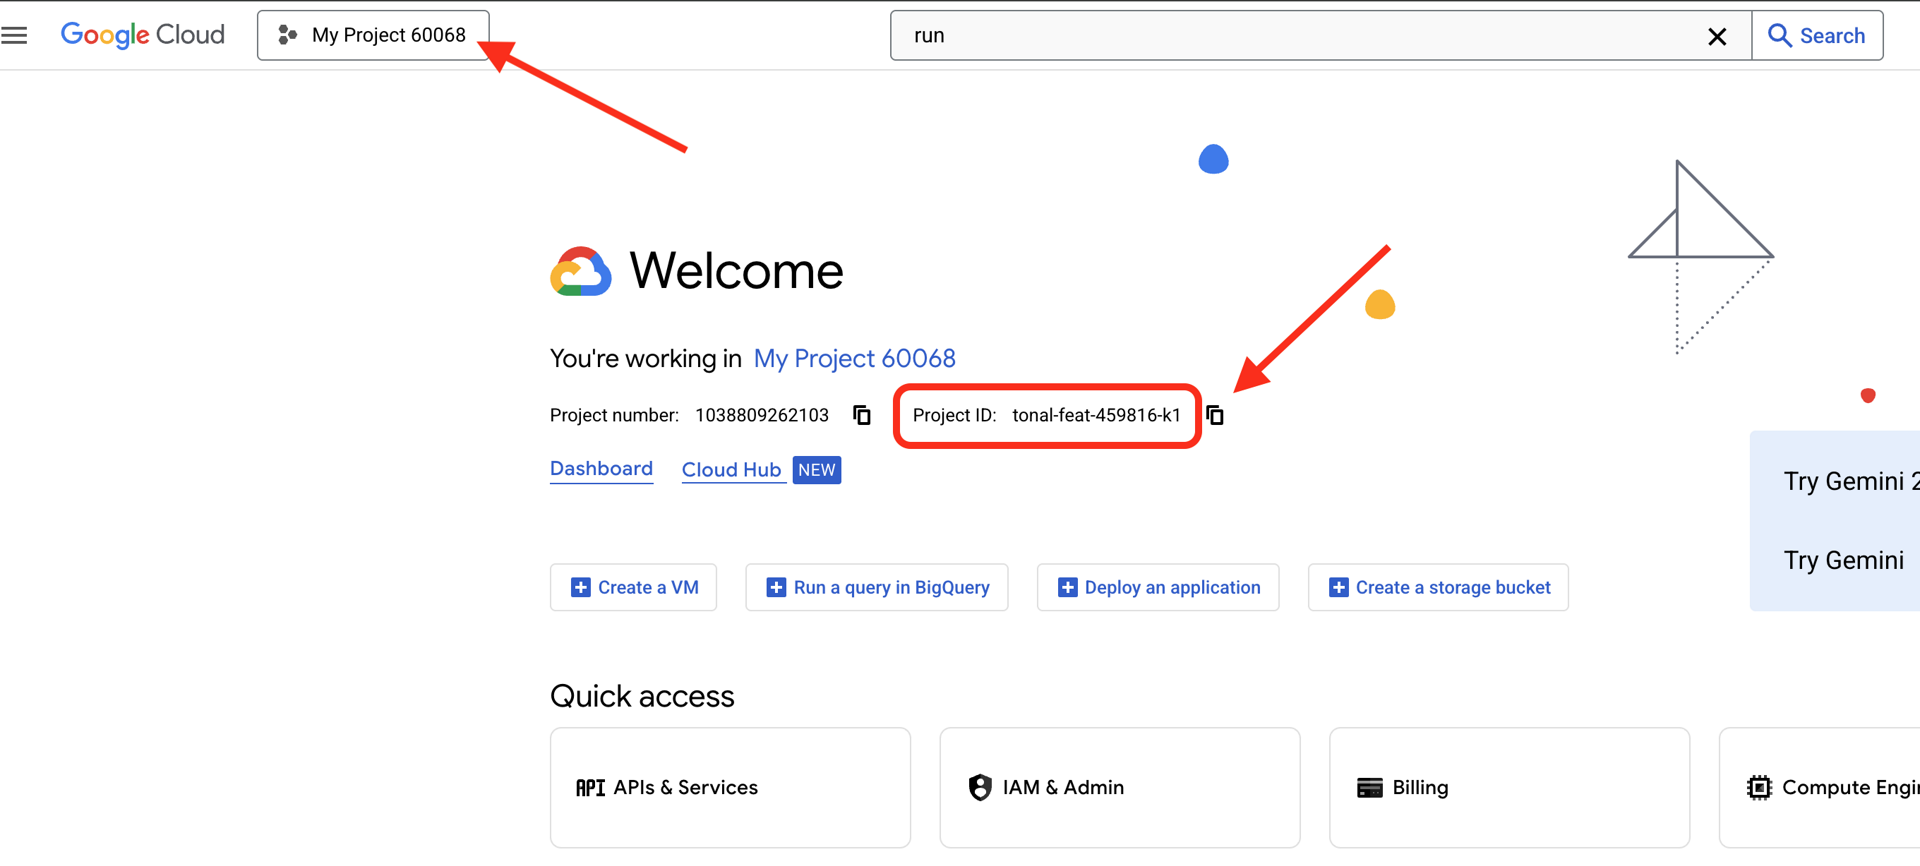
👉Google Cloud 프로젝트 ID를 찾습니다.
- Google Cloud 콘솔을 엽니다(링크).
- 페이지 상단의 프로젝트 드롭다운에서 이 워크숍에 사용할 프로젝트를 선택합니다.
- 프로젝트 ID는 대시보드의 프로젝트 정보 카드에 표시됩니다.
👉GitHub 사용자 이름 찾기:
- GitHub로 이동하여 GitHub 사용자 이름을 찾습니다.
.env 파일 수정 2. .env에서 다음 값을 바꿉니다.
GOOGLE_API_KEY=[REPLACE YOUR API KEY HERE]
GOOGLE_CLOUD_PROJECT_ID=[REPLACE YOUR PROJECT ID]
GITHUB_USERNAME=[REPLACE YOUR USERNAME]
GENMEDIA_BUCKET=[REPLACE YOUR PROJECT ID]-bucket
예를 들어 프로젝트 ID가 testproject이면 GOOGLE_CLOUD_PROJECT_ID=testproject 및 GENMEDIA_BUCKET=testproject-bucket를 입력해야 합니다.
설정 스크립트
00_Starting_Here로 이동 새 터미널을 엽니다 (Gemini CLI 아님).
cd ~/storygen-learning/00_Starting_Here
전체 설정 실행:
./setup-complete.sh
터미널에 설정 결과가 표시됩니다
첫 번째 에이전트 빌드
01a_First_Agent_Ready로 이동 Gemini CLI를 사용하여 ADK 에이전트를 만들어 보겠습니다.**
cd ~/storygen-learning/01a_First_Agent_Ready
Gemini CLI 열기
gemini
Gemini CLI 창에서 다음 프롬프트를 사용해 보세요.
I need you to help me create a Google ADK (Agent Development Kit) agent for story generation. I'm working on a children's storybook app that generates creative stories with visual scenes.

Please create a complete `agent.py` file that implements an LlmAgent using Google's ADK framework. The agent should:

**Requirements:**
1. Use the `google.adk.agents.LlmAgent` class
2. Use the "gemini-2.5-flash" model (supports streaming)
3. Be named "story_agent"
4. Generate structured stories with exactly 4 scenes each
5. Output valid JSON with story text, main characters, and scene data
6. No tools needed (images are handled separately)

**Agent Specifications:**
- **Model:** gemini-2.5-flash
- **Name:** story_agent
- **Description:** "Generates creative short stories and accompanying visual keyframes based on user-provided keywords and themes."
**Story Structure Required:**
- Exactly 4 scenes: Setup → Inciting Incident → Climax → Resolution
- 100-200 words total
- Simple, charming language for all audiences
- Natural keyword integration
**JSON Output Format:**

{
  "story": "Complete story text...",
  "main_characters": [
    {
      "name": "Character Name",
      "description": "VERY detailed visual description with specific colors, features, size, etc."
    }
  ],
  "scenes": [
    {
      "index": 1,
      "title": "The Setup",
      "description": "Scene action and setting WITHOUT character descriptions",
      "text": "Story text for this scene"
    }
    // ... 3 more scenes
  ]
}


**Key Instructions for the Agent:**
- Extract 1-2 main characters maximum
- Character descriptions should be extremely detailed and visual
- Scene descriptions focus on ACTION and SETTING only
- Do NOT repeat character appearance in scene descriptions
- Always respond with valid JSON

Please include a complete example in the instructions showing the exact format using keywords like "tiny robot", "lost kitten", "rainy city".

The file should start with necessary imports, define an empty tools list, include a print statement for initialization, and then create the LlmAgent with all the detailed instructions.

Can you create this agent in backend/story_agent/agent.py
완료되면 를 사용하여 Gemini CLI 터미널을 사용 중지합니다.Control+C
—————————————— 선택사항, 솔루션 파트로 건너뛰어도 됩니다.——————————————–
이제 ADK Web에서 변경사항 확인하기
cd ~/storygen-learning/01a_First_Agent_Ready/backend

source ../../.venv/bin/activate

adk web --port 8080
계속하려면 명령 프롬프트가 필요합니다.
웹사이트 실행
cd ~/storygen-learning/01a_First_Agent_Ready

./start.sh
변경사항이 작동하지 않으면 ADK 웹 UI 및 웹사이트에 오류가 표시됩니다.
—————————————— 여기부터 솔루션 시작 ——————————————–
해결 방법
Control+C로 이전 프로세스를 종료하거나 다른 터미널을 열 수 있습니다.
cd ~/storygen-learning/01b_First_Agent_Done
웹사이트 실행:
./start.sh
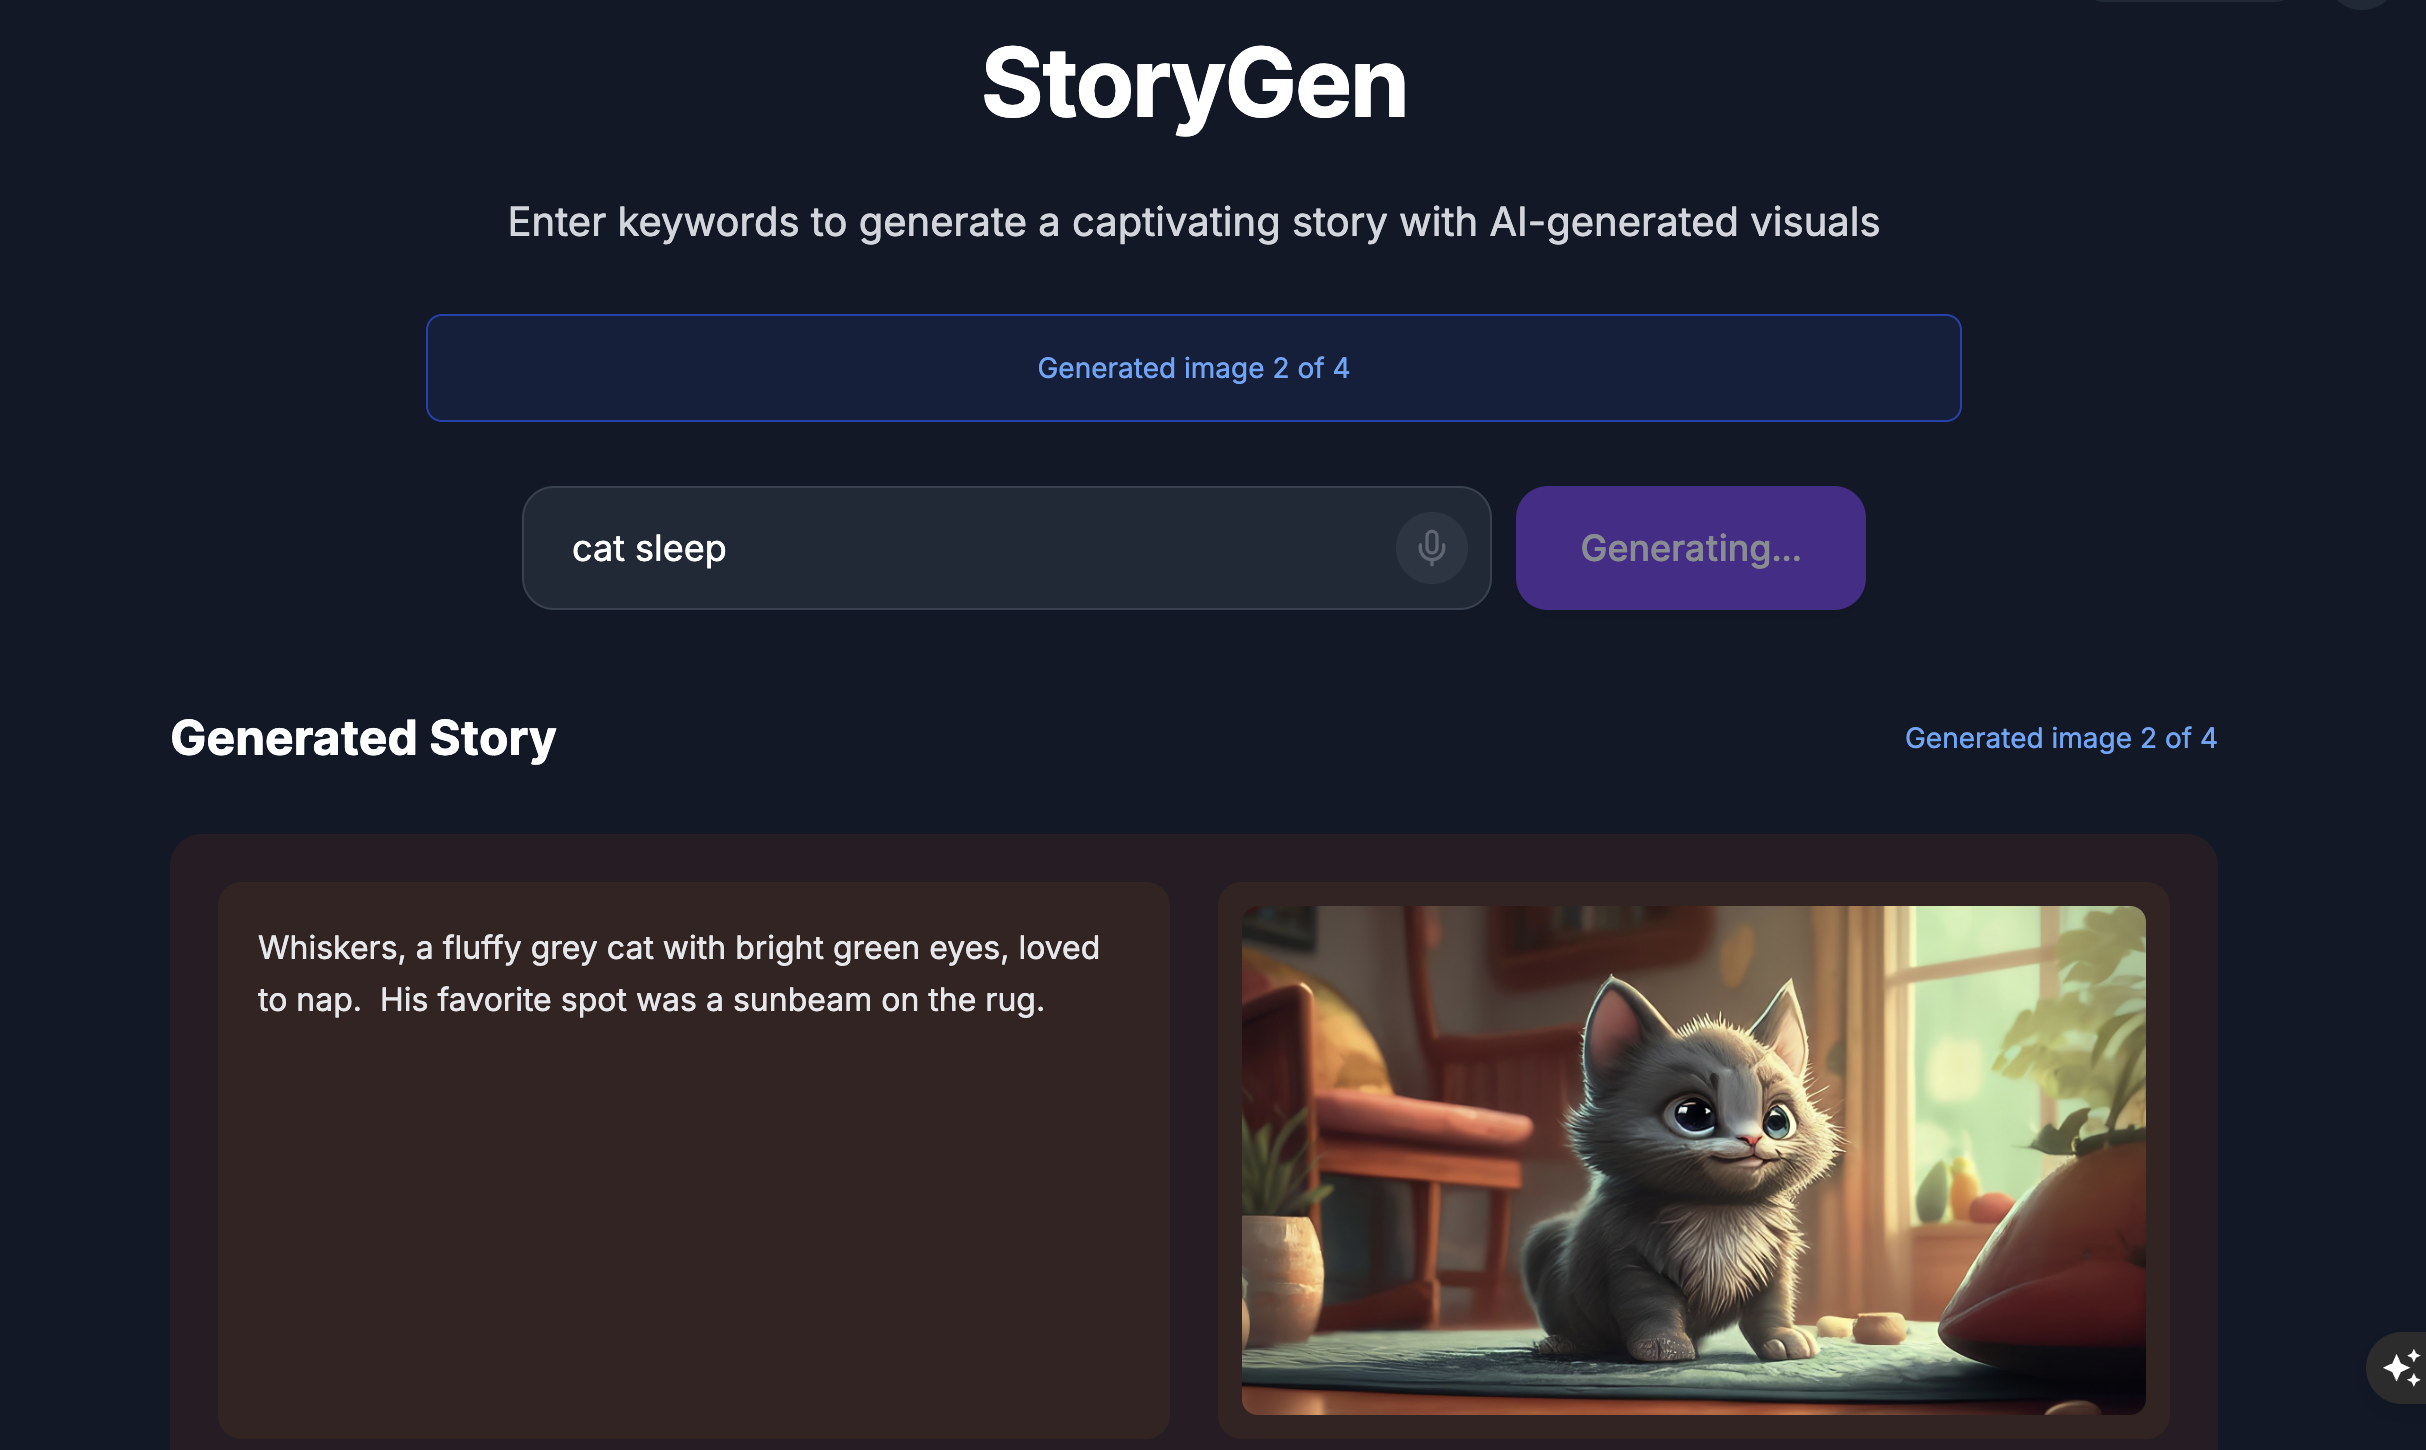
웹사이트가 다음과 같이 표시됩니다.
ADK UI 사용: 다른 터미널을 엽니다.
cd ~/storygen-learning/01b_First_Agent_Done/backend
source ../../.venv/bin/activate

adk web --port 8080
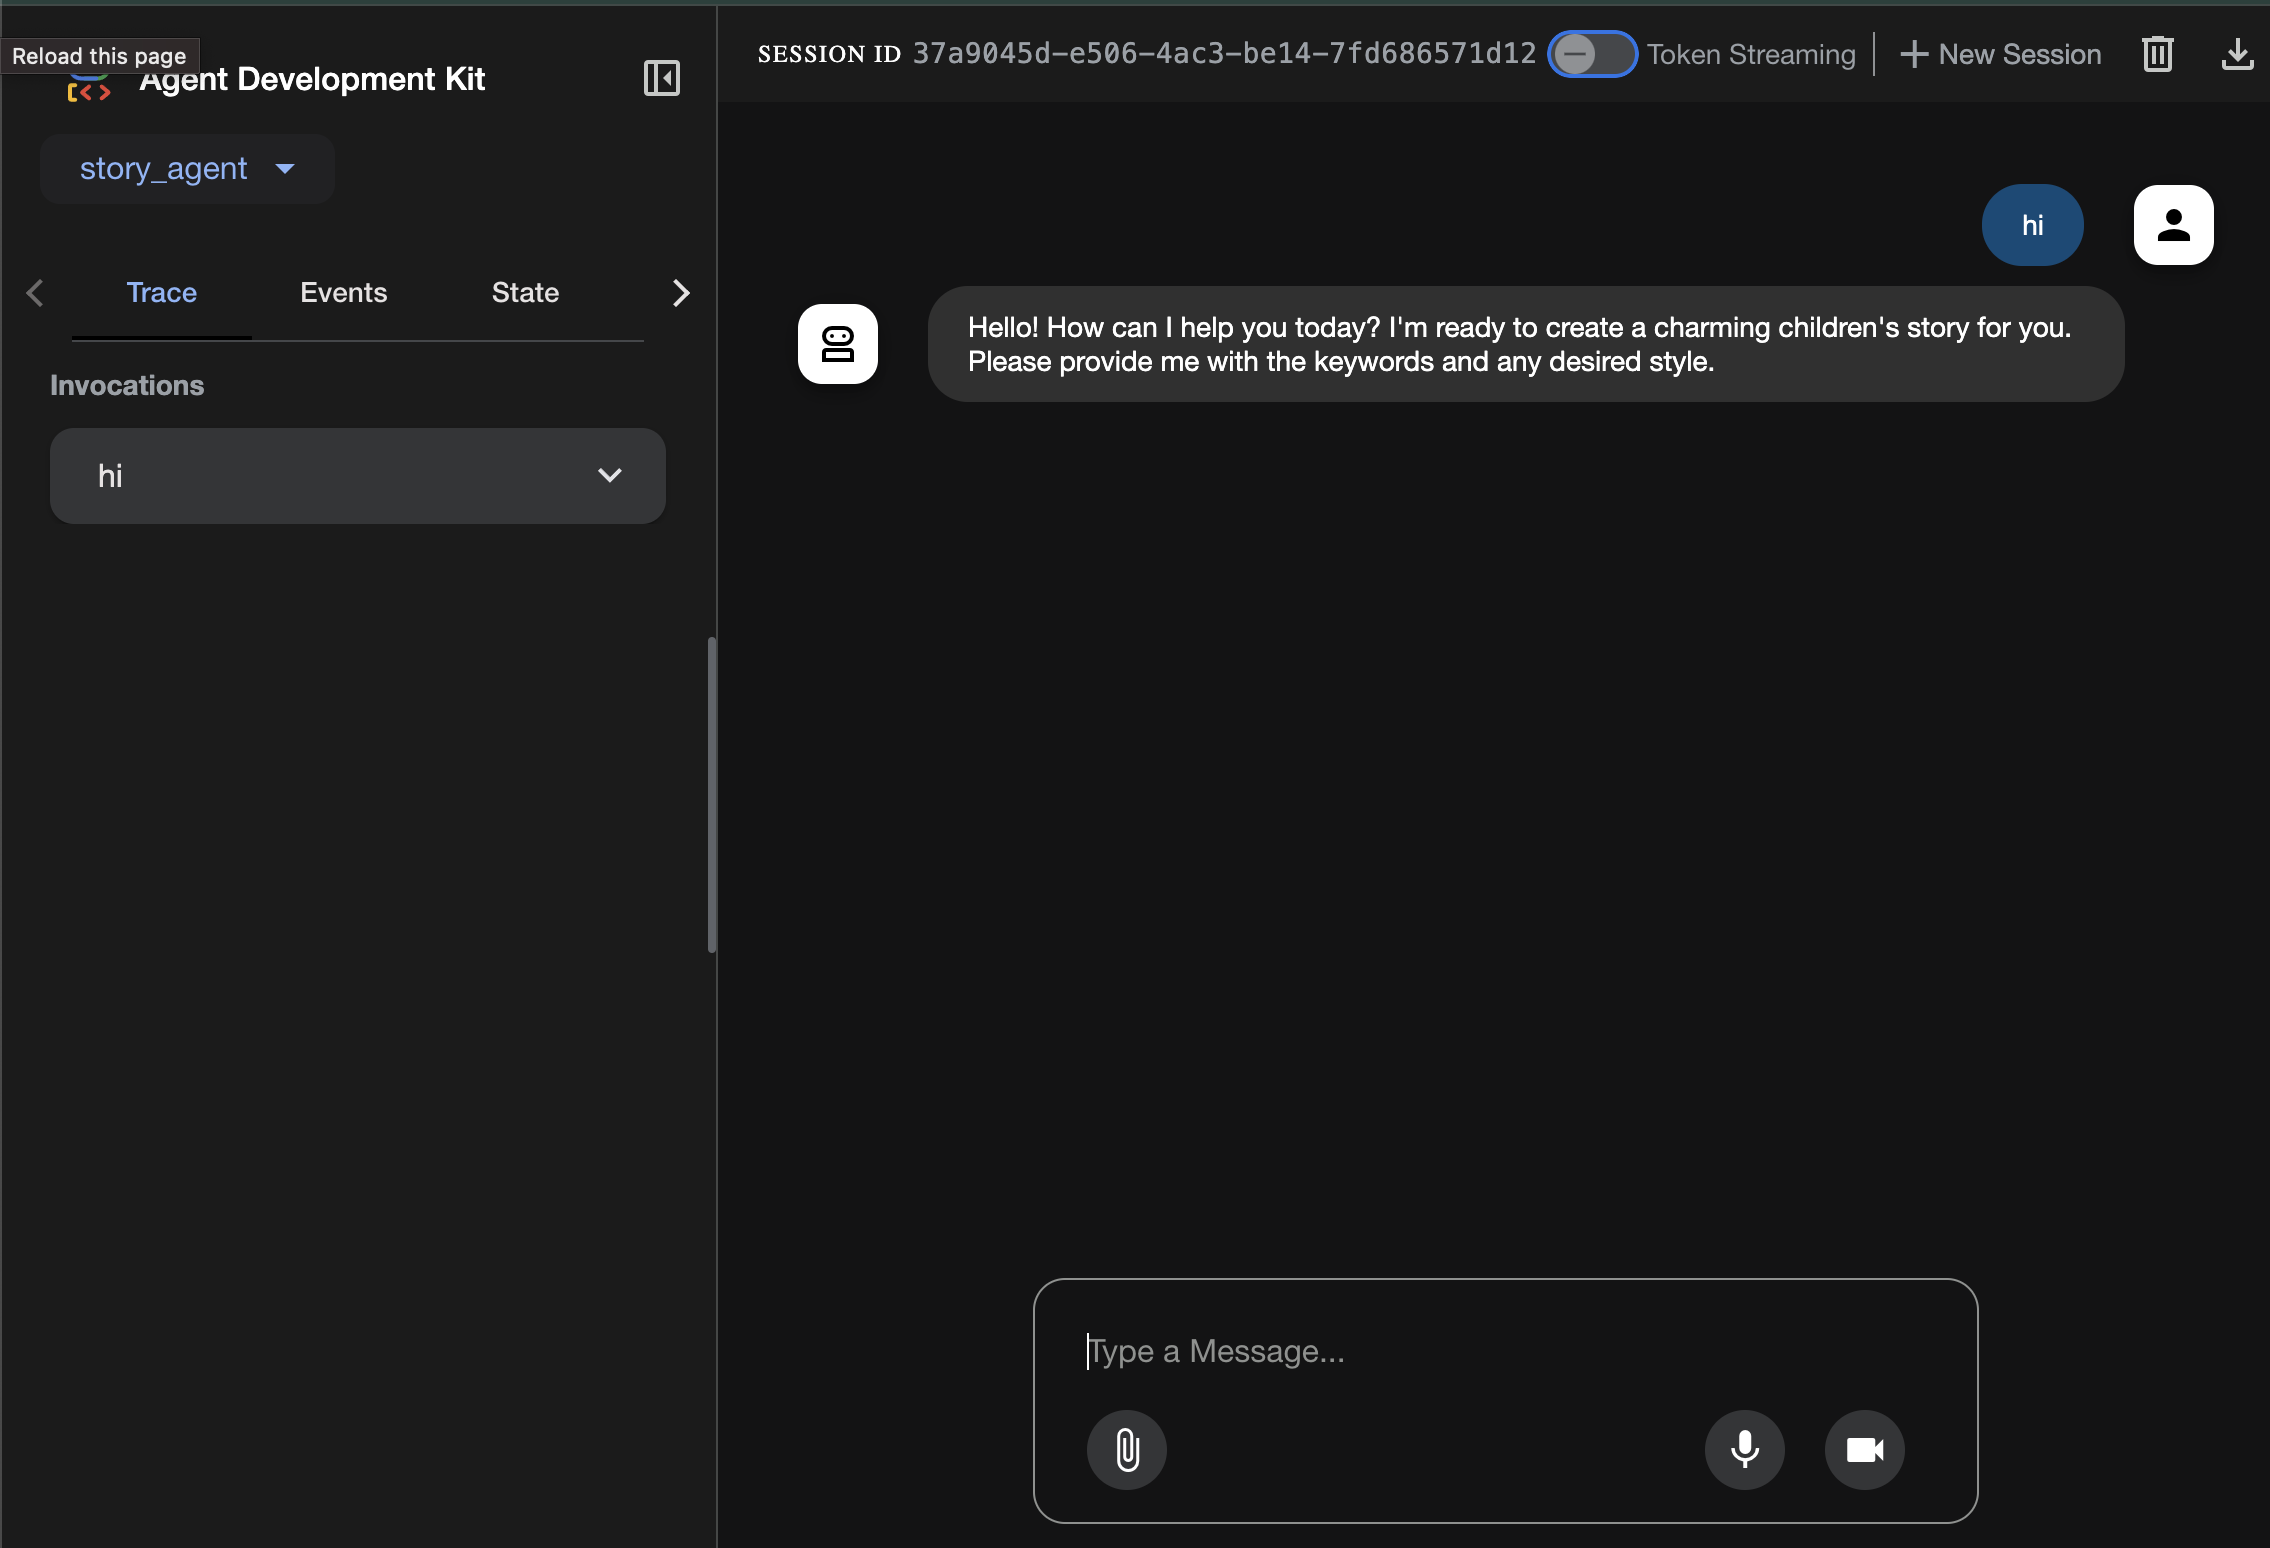
에이전트에게 질문할 수 있는 ADK UI가 표시됩니다.
다음 섹션으로 이동하기 전에 Ctrl+C를 눌러 프로세스를 종료합니다.
6. 개발: Gemini CLI로 ADK 빌드 - (컨텍스트 엔지니어링 방식)
초기 설정
이전 단계(01a_First_Agent_Ready/backend/story_agent/agent.py)에서 생성한 에이전트 파일을 삭제해야 합니다.
01a_First_Agent_Ready로 이동 Gemini CLI를 사용하여 ADK 에이전트를 만들어 보겠습니다.**
cd ~/storygen-learning/01a_First_Agent_Ready/backend
Gemini CLI 열기
gemini
Gemini CLI 창에서 다음 프롬프트를 사용해 보세요.
Summarize the design doc @design.md for me, do not attempt to create file just yet.
👉💻 Ctrl+C를 두 번 눌러 Gemini를 잠시 종료합니다.
👉💻 터미널에서 다음 명령어를 실행하여 가이드라인 파일을 작성합니다.
cat << 'EOF' > GEMINI.md
  ### **Coding Guidelines**
  **1. Python Best Practices:**

  *   **Type Hinting:** All function and method signatures should include type hints for arguments and return values.
  *   **Docstrings:** Every module, class, and function should have a docstring explaining its purpose, arguments, and return value, following a consistent format like reStructuredText or
  Google Style.
  *   **Linter & Formatter:** Use a linter like `ruff` or `pylint` and a code formatter like `black` to enforce a consistent style and catch potential errors.
  *   **Imports:** Organize imports into three groups: standard library, third-party libraries, and local application imports. Sort them alphabetically within each group.
  *   **Naming Conventions:**
      *   `snake_case` for variables, functions, and methods.
      *   `PascalCase` for classes.
      *   `UPPER_SNAKE_CASE` for constants.
  *   **Dependency Management:** All Python dependencies must be listed in a `requirements.txt` file.

  **2. Web APIs (FastAPI):**

  *   **Data Validation:** Use `pydantic` models for request and response data validation.
  *   **Dependency Injection:** Utilize FastAPI's dependency injection system for managing resources like database connections.
  *   **Error Handling:** Implement centralized error handling using middleware or exception handlers.
  *   **Asynchronous Code:** Use `async` and `await` for I/O-bound operations to improve performance.
EOF
cat GEMINI.md
법이 새겨졌으니 AI 파트너를 다시 소환하여 유물의 마법을 목격해 보겠습니다.
👉💻 shadowblade 디렉터리에서 Gemini CLI를 다시 실행합니다.
cd ~/storygen-learning/01a_First_Agent_Ready/backend
clear
gemini
👉✨ 이제 Gemini에게 생각하고 있는 내용을 보여 달라고 요청하세요. 룬을 읽었습니다.
/memory show
👉✨ 에이전트를 구성하는 강력한 단일 명령어입니다. 지금 발급하세요.
You are an expert Python developer specializing in the Google Agent Development Kit (ADK). Your task is to write the complete, production-quality code for `agent.py` by following the technical specifications outlined in the provided design document verbatim.

Analyze the design document at `@design.md` and generate the corresponding Python code for `agent.py`.

I need you to generate a Python script based on the provided design document and reference examples. Follow these requirements:

Read the design document carefully - it contains the complete technical specification for the code you need to write
Follow the structure and patterns shown in the reference context files
Adhere to all Python best practices specified in the coding standards document
Implement every requirement mentioned in the design document exactly as specified
Use the exact variable names, function names, and string values mentioned in the specifications

The design document describes the complete architecture, dependencies, configuration, and logic flow. Your generated code must match these specifications precisely while following professional Python coding standards.
Generate clean, production-ready Python code that can be used immediately without modifications.
완료되면 를 사용하여 Gemini CLI 터미널을 사용 중지합니다.Control+C
—————————————— 선택사항, 솔루션 파트로 건너뛰어도 됩니다.——————————————–
이제 ADK Web에서 변경사항 확인하기
cd ~/storygen-learning/01a_First_Agent_Ready/backend

source ../../.venv/bin/activate

adk web --port 8080
계속하려면 명령 프롬프트가 필요합니다.
웹사이트 실행
cd ~/storygen-learning/01a_First_Agent_Ready

./start.sh
변경사항이 작동하지 않으면 ADK 웹 UI 및 웹사이트에 오류가 표시됩니다.
—————————————— 여기부터 솔루션 시작 ——————————————–
해결 방법
Control+C로 이전 프로세스를 종료하거나 다른 터미널을 열 수 있습니다.
cd ~/storygen-learning/01b_First_Agent_Done
웹사이트 실행:
./start.sh
웹사이트가 다음과 같이 표시됩니다.
ADK UI 사용: 다른 터미널을 엽니다.
cd ~/storygen-learning/01b_First_Agent_Done/backend
source ../../.venv/bin/activate

adk web --port 8080
에이전트에게 질문할 수 있는 ADK UI가 표시됩니다.
다음 섹션으로 이동하기 전에 Ctrl+C를 눌러 프로세스를 종료합니다.
7. 개발: Imagen으로 맞춤 에이전트 빌드
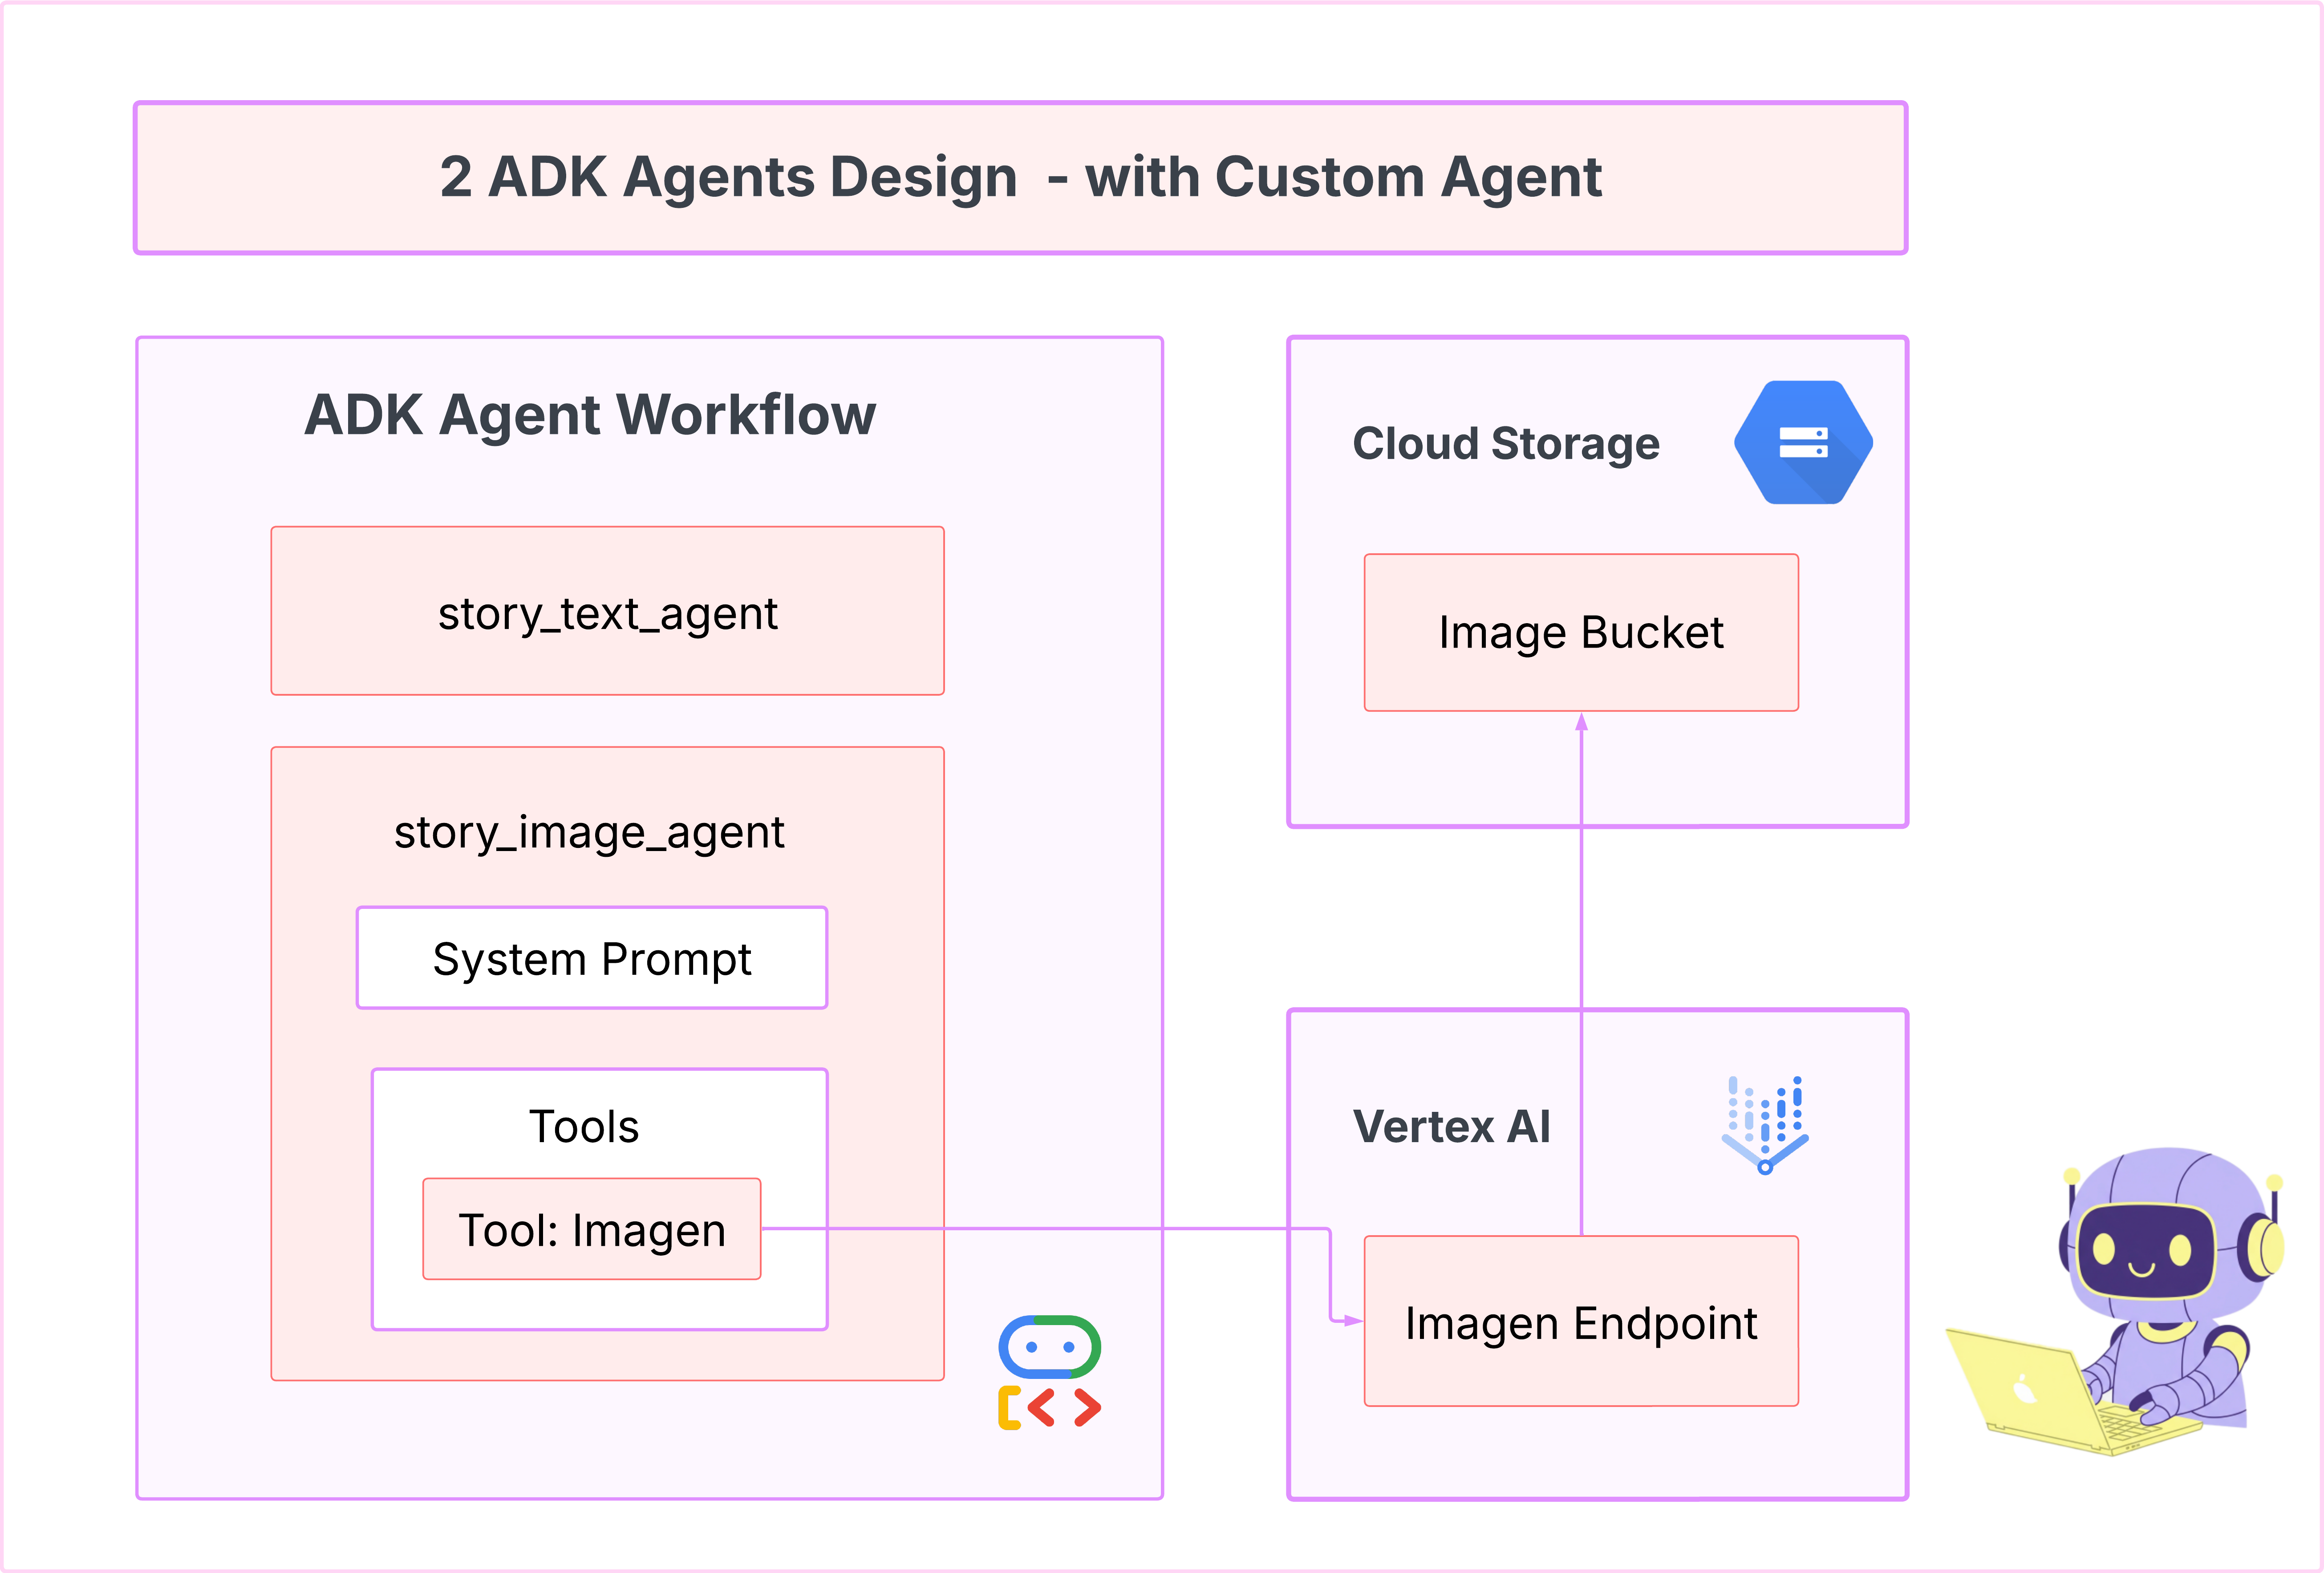
Imagen 도구 생성 (두 번째 에이전트)
cd ~/storygen-learning/02a_Image_Agent_Ready
Gemini CLI를 사용하여 이미지 생성 에이전트 만들기:
gemini generate "I need you to help me create a custom Google ADK (Agent Development Kit) agent for image generation. This is different from the story agent - this one handles image generation directly using the BaseAgent pattern for full control over tool execution.

Please create a complete `agent.py` file that implements a custom image generation agent. The agent should:

**Requirements:**
1. Use the `google.adk.agents.BaseAgent` class (NOT LlmAgent)
2. Be named "custom_image_agent"
3. Directly execute the ImagenTool without LLM intermediation
4. Handle JSON input with scene descriptions and character descriptions
5. Store results in session state for retrieval by main.py
6. Use async generators and yield Events

**Key Specifications:**
- **Class Name:** CustomImageAgent (inherits from BaseAgent)
- **Agent Name:** "custom_image_agent"
- **Tool:** Uses ImagenTool for direct image generation
- **Purpose:** Bypass LLM agent limitations and directly call ImagenTool

**Input Format:**
The agent should handle JSON input like:
{
  "scene_description": "Scene action and setting",
  "character_descriptions": {
    "CharacterName": "detailed visual description"
  }
}


**Core Method:** `async def _run_async_impl(self, ctx: InvocationContext) -> AsyncGenerator[Event, None]:`
   - Extract user message from `ctx.user_content.parts`
   - Parse JSON input or fallback to plain text
   - Extract scene_description and character_descriptions
   - Build image prompt with style prefix: "Children's book cartoon illustration with bright vibrant colors, simple shapes, friendly characters."
   - Include character descriptions for consistency
   - Call `await self.imagen_tool.run()` directly
   - Store results in `ctx.session.state["image_result"]`
   - Yield Event with results


 **Session State:**
   - Store JSON results in `ctx.session.state["image_result"]`
   - Include success/error status
   - Store actual image URLs or error messages

Expected Output Structure:
- Successful results stored as JSON with image URLs
- Error results stored as JSON with error messages
- Results accessible via session state in main.py

Can you create this agent in backend/story_image_agent/agent.py

"
—————————————— 선택사항, 솔루션 파트로 건너뛰어도 됩니다.——————————————–
이제 ADK Web에서 변경사항 확인하기
cd ~/storygen-learning/02a_Image_Agent_Ready/backend

source ../../.venv/bin/activate

adk web --port 8080
웹사이트 실행
cd ~/storygen-learning/02a_Second_Agent_Ready

./start.sh
변경사항이 작동하지 않으면 ADK 웹 UI 및 웹사이트에 오류가 표시됩니다.
—————————————- 여기부터 솔루션 시작 ——————————————–
해결 방법
Control+C로 이전 프로세스를 종료하거나 다른 터미널을 열 수 있습니다.
# Open new terminal
cd ~/storygen-learning/02b_Image_Agent_Done
웹사이트 실행:
./start.sh
웹사이트가 다음과 같이 표시됩니다.
ADK UI 사용: 다른 터미널을 엽니다.
# Open new terminal
cd ~/storygen-learning/02b_Image_Agent_Done/backend

source ../../.venv/bin/activate

adk web --port 8080
에이전트에게 질문할 수 있는 ADK UI가 표시됩니다.
다음 섹션으로 이동하기 전에 Ctrl+C를 눌러 프로세스를 종료합니다.
학습
첫 번째 에이전트는 텍스트를 생성하는 데는 뛰어났지만 이제 이미지를 생성해야 합니다. 이 작업에는 더 직접적인 제어가 필요합니다. LLM이 이미지를 만들지 여부를 결정하도록 하는 것이 아니라 직접 명령을 내리고 싶습니다. BaseAgent에 적합한 작업입니다.
선언적 LlmAgent와 달리 BaseAgent는 명령적입니다. 즉, 개발자는 _run_async_impl 메서드 내에 정확한 단계별 Python 로직을 작성합니다. 실행 흐름을 완전히 제어할 수 있습니다.
다음과 같은 경우 BaseAgent를 선택합니다.
결정적 논리: 에이전트는 변경할 수 없는 특정 단계 순서를 따라야 합니다.
직접 도구 실행: LLM 개입 없이 도구를 직접 호출하려는 경우
복잡한 워크플로: 이 프로세스에는 LLM이 프롬프트만으로는 안정적으로 추론하기에 너무 복잡한 맞춤 데이터 조작, API 호출, 로직이 포함됩니다.
앱에서는 BaseAgent를 사용하여 첫 번째 에이전트로부터 장면 설명을 받고 Imagen 도구를 직접 호출하여 각 장면의 이미지가 생성되도록 합니다.
8. 테스트: 에이전트 평가
앱은 작동하지만 자동화된 테스트 안전망이 필요합니다. AI 부조종사에게 위임하기에 완벽한 작업입니다.
작업
cd ~/storygen-learning/03a_Agent_Evaluation_Ready/backend
Gemini CLI를 사용하여 포괄적인 테스트 작성:
Gemini CLI 열기
gemini
Gemini CLI 창에서 다음 프롬프트를 사용해 보세요.
I need you to create comprehensive test files for my backend/story_agent in Google ADK. I need three specific JSON files that match the testing structure used in ADK evaluation.
**Context:**
- The story agent generates structured JSON stories with exactly 4 scenes
- It uses LlmAgent with no tools, just direct LLM responses
- Input: Keywords
- Output: JSON with story, main_characters, and scenes arrays
**Files to Create:**
### 1. `story_agent_eval.evalset.json` (Comprehensive Integration Tests)
Create a comprehensive evaluation set with:
- **eval_set_id**: "story_agent_comprehensive_evalset"
- **name**: "Story Agent Comprehensive Evaluation Set"
- **description**: "Comprehensive evaluation scenarios for story_agent covering various keyword combinations, edge cases, and story quality metrics"
Each eval_case should include:
- Full conversation arrays with invocation_id, user_content, final_response
- Complete expected JSON responses with detailed stories, characters, and 4 scenes
- session_input with app_name "story_agent"
- All fields: story (narrative text), main_characters (with detailed visual descriptions), scenes (with index, title, description, text)
### 2. `story_generation.test.json` (Unit Tests)
Create basic generation tests with:
- **eval_set_id**: "story_agent_basic_generation_tests"
- **name**: "Story Agent Basic Generation Tests"
- **description**: "Unit tests for story_agent focusing on JSON structure compliance, scene generation, and keyword integration"
### 3. `test_config.json` (Evaluation Configuration)
Create test configuration with:
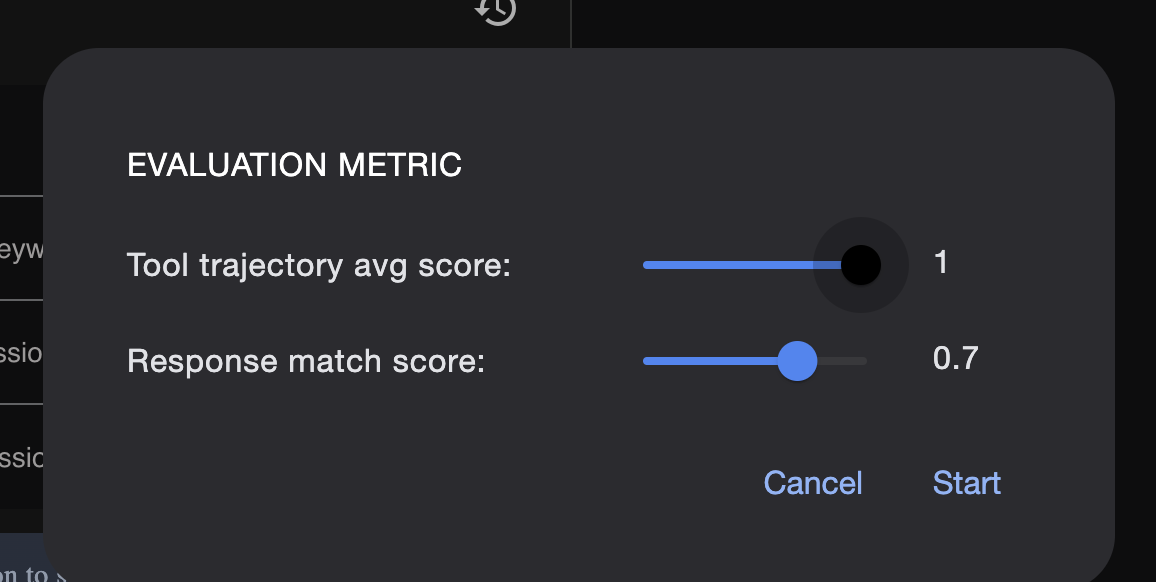
- **criteria**: response_match_score: 0.7, tool_trajectory_avg_score: 1.0
- **custom_evaluators**:
- json_structure_validator (validates required fields, scene count, character fields)
- story_quality_metrics (word count 80-250, keyword integration threshold 0.8)
- **evaluation_notes**: Story agent specifics and trajectory expectations
**Important Requirements:**
1. All responses must be valid, parseable JSON
2. Stories must have exactly 4 scenes with indices 1-4
3. Each scene must have: index, title, description, text
4. Main characters must have detailed visual descriptions
5. No tool_uses expected (empty arrays) since story agent uses direct LLM
6. Word count should be 100-200 words total
7. Keywords must be naturally integrated into the narrative
Please generate all three files with realistic example stories and comprehensive test coverage matching the ADK evaluation format.
—————————————— 선택사항, 솔루션 파트로 건너뛰어도 됩니다.——————————————–
평가를 확인하려면 다음 단계를 따르세요.
./run_adk_web_persistent.sh
ADK UI에서 eval 탭으로 이동합니다.
영구 테스트 기능이 있는 ADK 웹 UI가 표시됩니다.
주요 학습 내용: AI는 품질 보증을 자동화하는 강력한 파트너입니다. 테스트 작성의 상용구를 처리하여 기능 빌드에 집중할 수 있습니다.
—————————————— 여기부터 솔루션 시작 ——————————————–
해결 방법
- 솔루션 폴더로 이동합니다.
cd ~/storygen-learning/03b_Agent_Evaluation_Done/backend
- ADK 웹 UI 열기
./run_adk_web_persistent.sh
Eval 탭에서 테스트 사례를 확인할 수 있습니다.
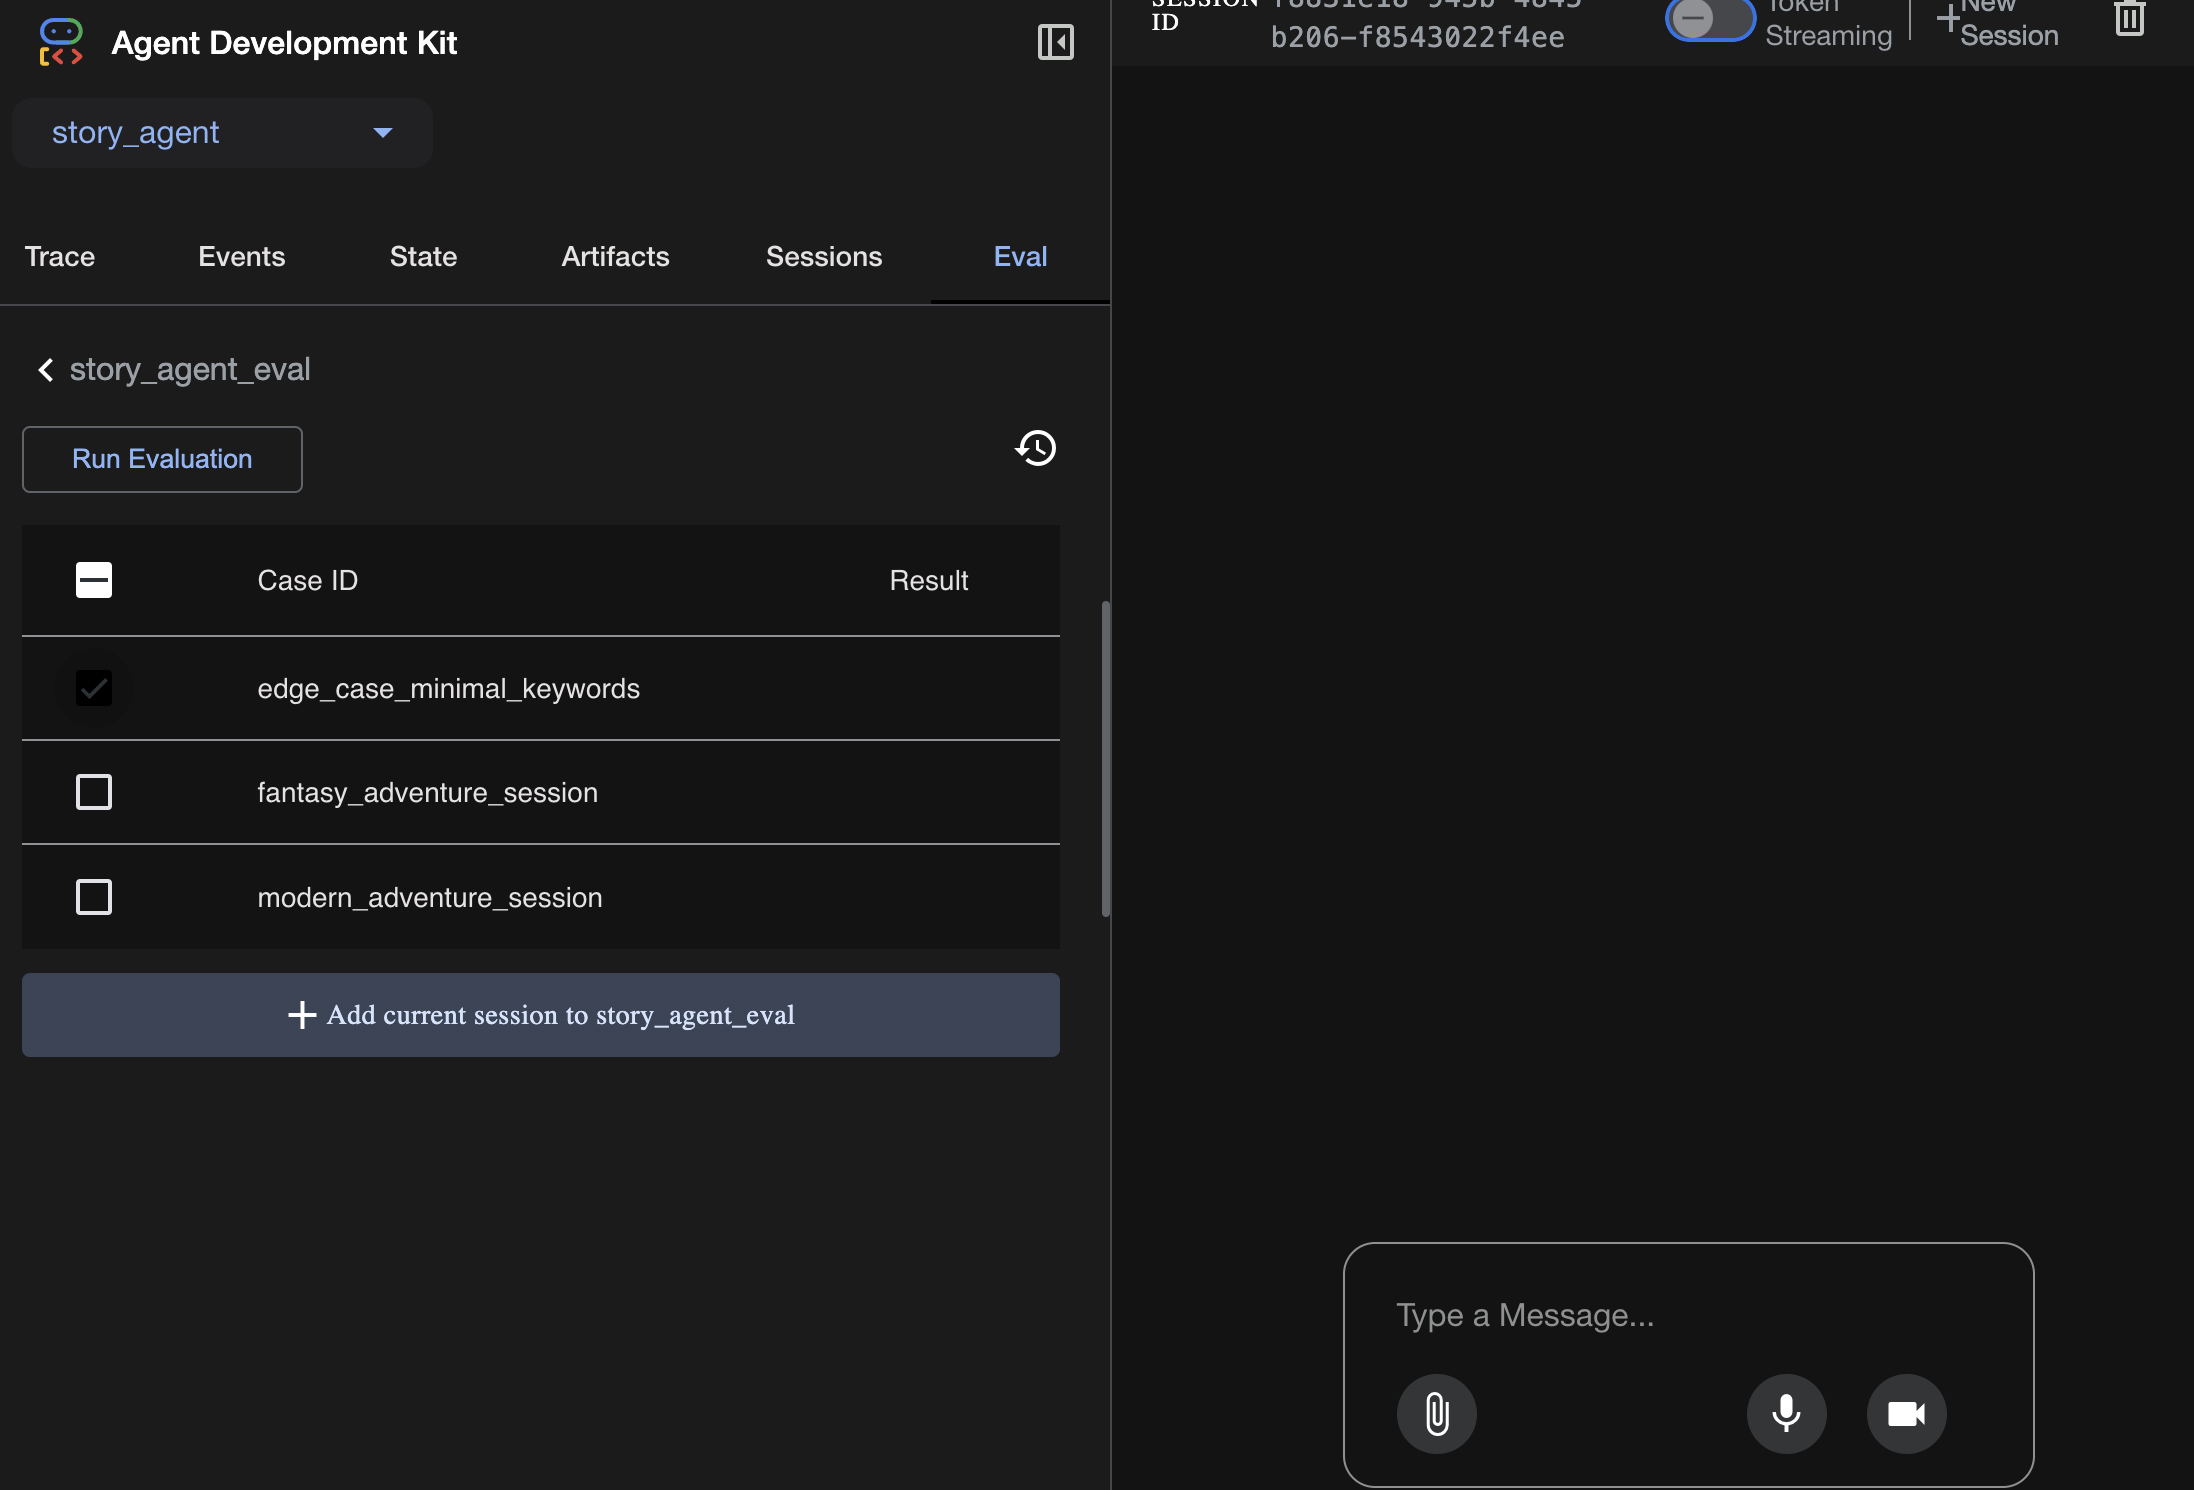
여기에서 측정항목을 조정합니다.
여기에서 평가 실행 결과를 확인하세요.

학습
에이전트가 오류 없이 실행된다는 의미에서 '작업'할 수 있지만 올바른 출력을 생성하는지 어떻게 알 수 있을까요? 이야기가 재미있나요? JSON 형식이 올바른가요? 이때 ADK의 평가 프레임워크가 사용됩니다.
에이전트 평가는 에이전트 대답의 품질과 정확성을 측정하도록 설계된 자동화된 테스트 시스템입니다. 코드 오류만 확인하는 대신 에이전트의 동작이 기대에 부합하는지 확인합니다. 프레임워크는 주로 다음과 같은 몇 가지 주요 파일을 사용합니다.
evalset.json: 마스터 테스트 모음입니다. 이 파일의 각 '평가 사례'에는 샘플 대화 (예: 사용자 프롬프트)와 에이전트가 생성할 것으로 예상되는 이상적인 '골든' 응답이 포함되어 있습니다.
test_config.json: 이 파일은 성공 규칙을 정의합니다. 여기에서 다음과 같은 기준을 설정합니다.
response_match_score: 에이전트의 대답이 '모범' 대답과 얼마나 유사해야 하나요? (점수 1.0은 동일해야 함을 의미합니다.)
custom_evaluators: '대답은 유효한 JSON이어야 합니다' 또는 '스토리에는 100단어 이상이 포함되어야 합니다'와 같은 자체 규칙을 만들 수 있습니다.
평가를 실행하면 수십 개의 시나리오에 대해 에이전트를 자동으로 테스트하여 프롬프트나 도구의 변경사항으로 인해 핵심 기능이 실수로 중단되지 않도록 할 수 있습니다. 프로덕션 환경에서 바로 사용할 수 있는 AI 에이전트를 빌드하기 위한 강력한 안전망입니다.
9. 코드형 인프라 (IaC): 클라우드에 홈 구축하기
코드는 테스트를 거쳤지만 프로덕션에 사용할 수 있는 홈이 필요합니다. '코드형 인프라'를 사용하여 환경을 정의합니다.
Docker란 무엇인가요?
Docker는 컨테이너에서 애플리케이션을 만들고 실행하기 위한 플랫폼입니다. 컨테이너는 표준화된 소프트웨어용 운송 컨테이너라고 생각하면 됩니다. 애플리케이션 실행에 필요한 모든 것이 하나의 격리된 패키지로 번들링됩니다.
- 애플리케이션 코드 자체
- 필요한 런타임 (예: 특정 버전의 Python)
- 모든 시스템 도구 및 라이브러리
그런 다음 이 컨테이너화된 애플리케이션을 Docker가 설치된 모든 머신에서 실행하여 일반적인 '내 기기에서는 작동해' 문제를 해결할 수 있습니다.
이 섹션에서는 Gemini에게 애플리케이션의 컨테이너 이미지를 빌드하기 위한 레시피 또는 청사진인 Dockerfile을 생성하도록 요청합니다.
작업
cd ~/storygen-learning/04a_Manual_Deployment_Ready
Gemini CLI를 사용하여 백엔드용 Dockerfile 만들기: Gemini CLI를 엽니다.
Gemini
Gemini CLI에서 다음 프롬프트를 사용해 보세요.
Create a manual deployment plan for my StoryGen app with Google Cloud Platform. I have a Next.js frontend, Python backend, and Terraform infrastructure.
Generate these deployment files:
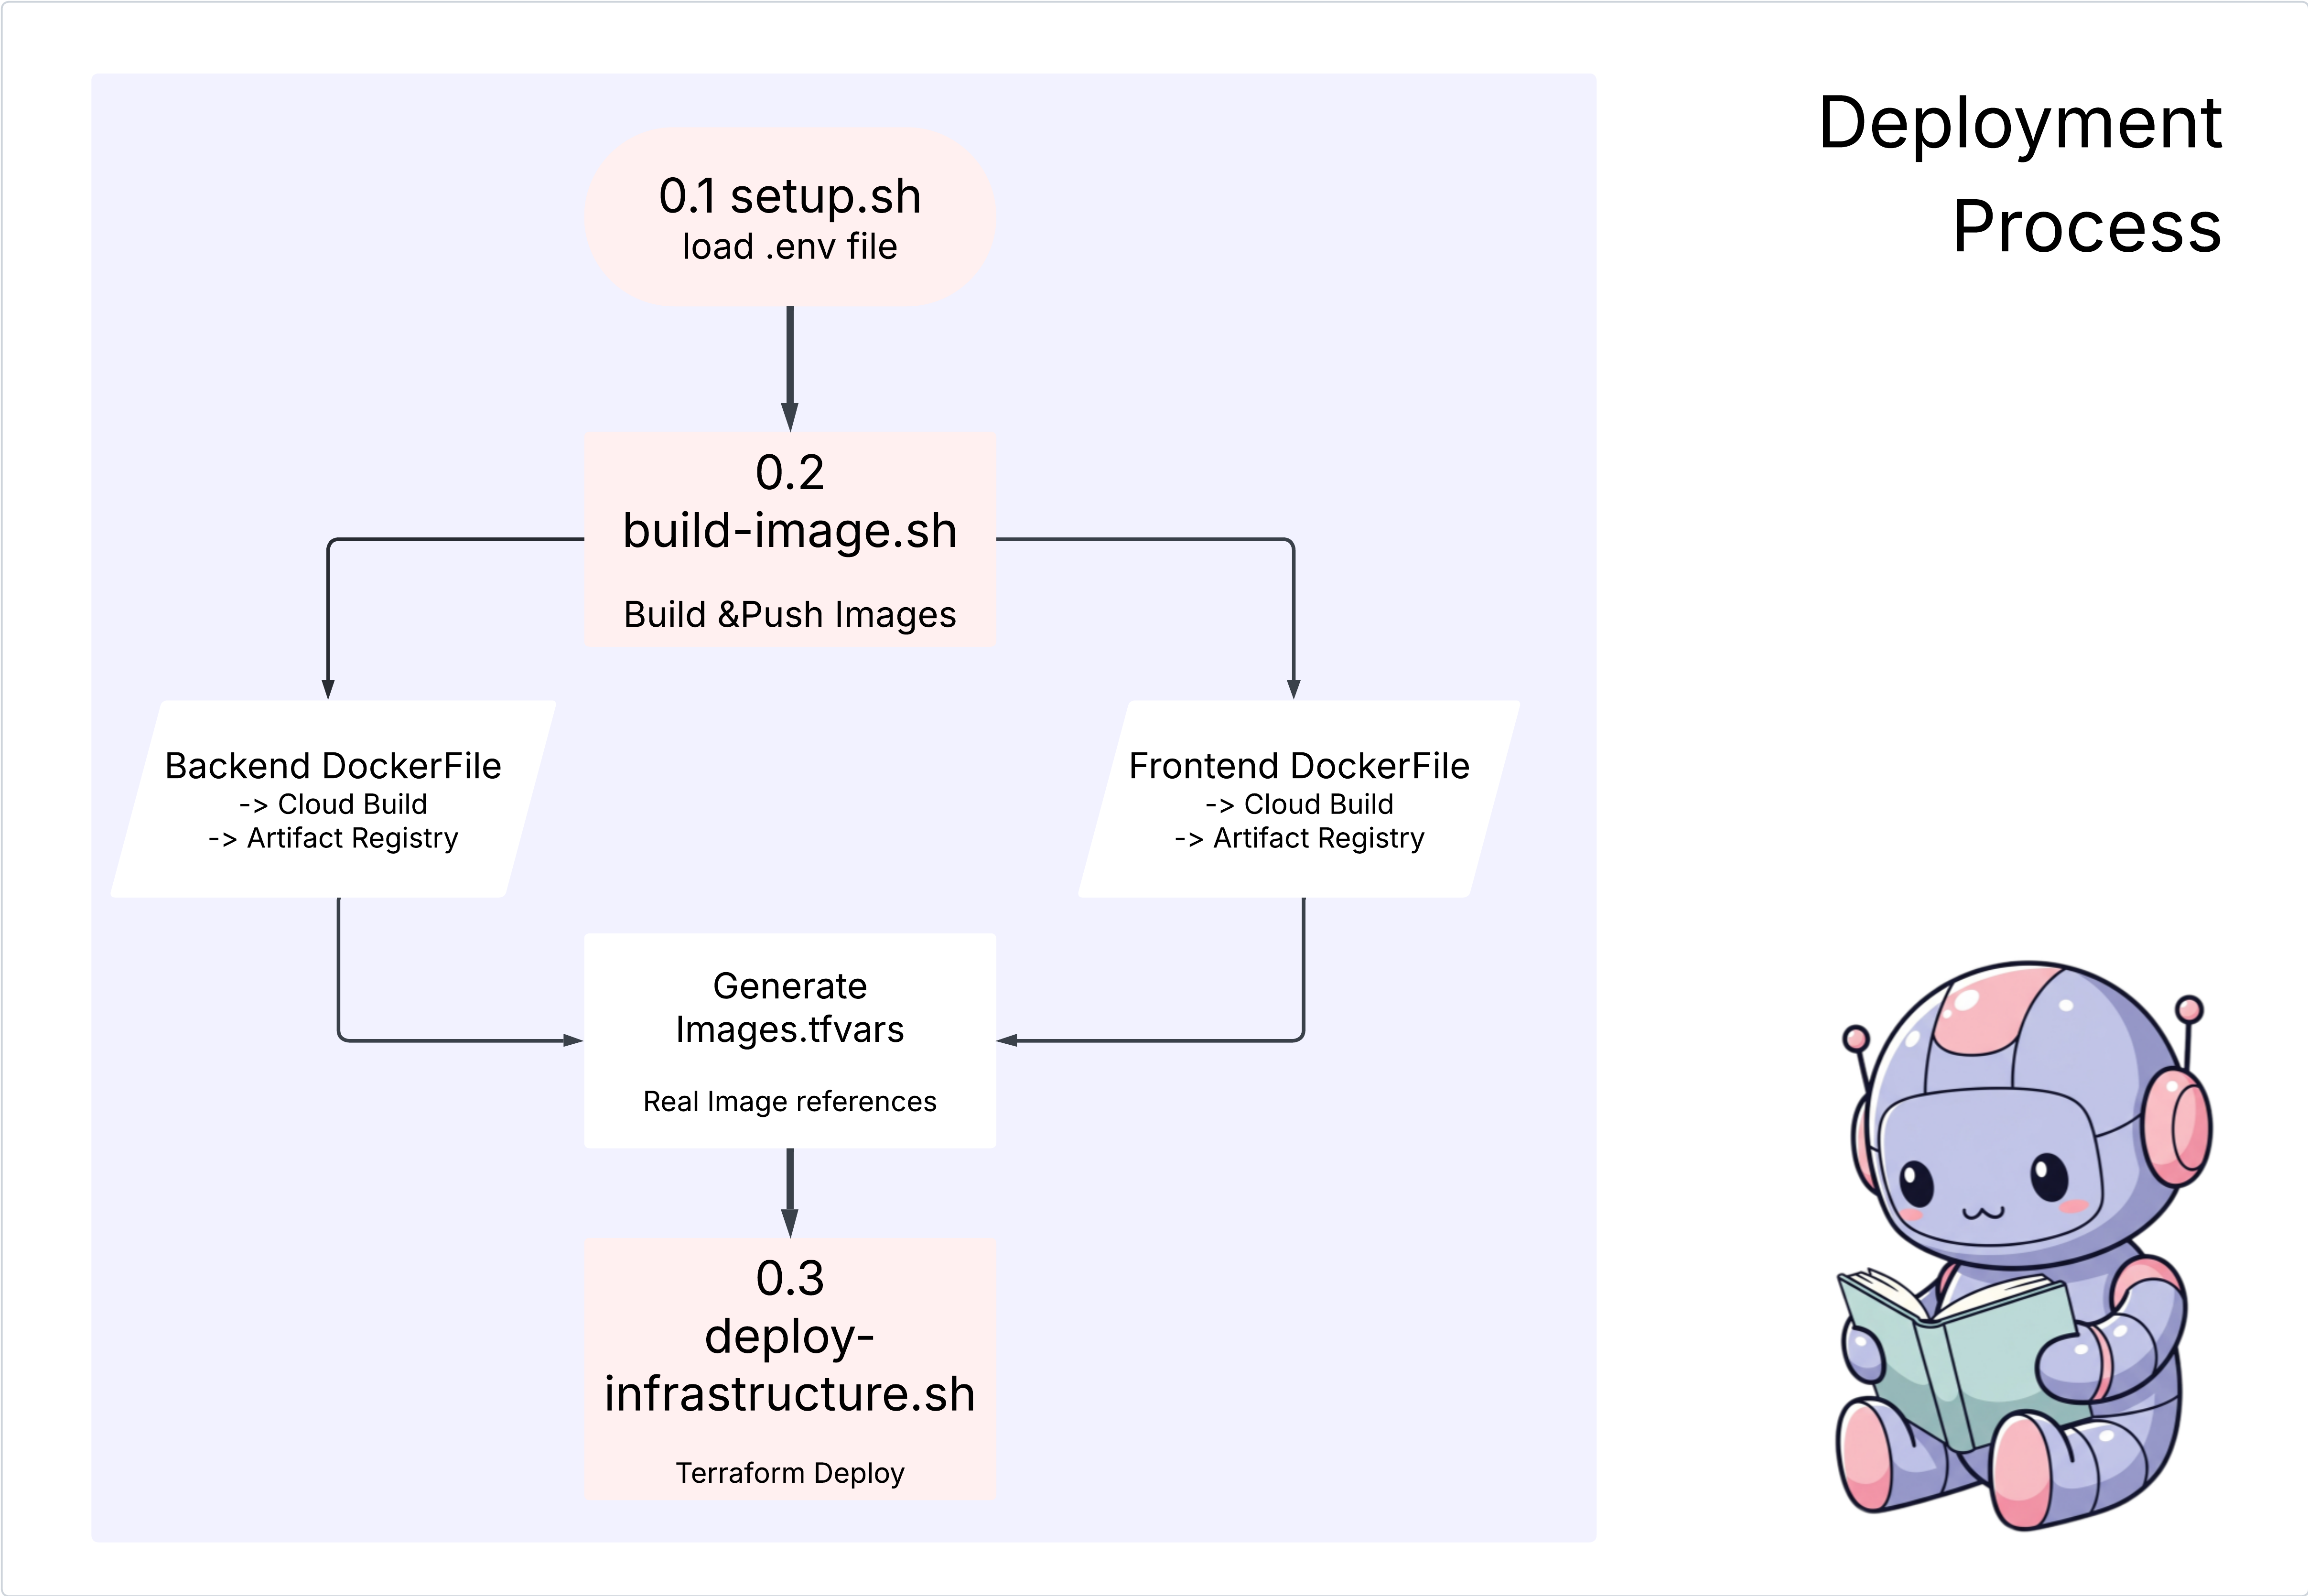
1. **01-setup.sh** - Environment setup and authentication
2. **02-build-images.sh** - Build and push Docker images to Google Container Registry
3. **03-deploy-infrastructure.sh** - Deploy with Terraform and configure services
4. **load-env.sh** - Load environment variables for deployment
**Requirements:**
- Use Google Cloud Run for both frontend and backend
- Configure Imagen API and storage buckets
- Set up proper IAM permissions
- Use environment variables from .env file
- Include error handling and status checks
Keep scripts simple, well-commented, and production-ready for manual execution.
해결 방법:
cd ~/storygen-learning/04b_Manual_Deployment_Done
실행:
source ../.venv/bin/activate
./01-setup.sh
./02-build-images.sh
./03-deploy-infrastructure.sh
배포 결과와 인프라 생성이 표시됩니다.
10. 자동화 (CI/CD): 디지털 조립 라인
애플리케이션을 수동으로 배포하면 움직이는 부분을 이해하는 데 도움이 되지만 속도가 느리고 수동 작업이 필요하며 인적 오류가 발생할 수 있습니다. 전문 소프트웨어 개발에서는 CI/CD라는 방식을 사용하여 이 전체 프로세스를 자동화합니다.
CI/CD는 지속적 통합 및 지속적 배포를 의미합니다. 변경사항을 적용할 때마다 코드를 자동으로 빌드, 테스트, 배포하는 방법입니다.
- 지속적 통합 (CI): '빌드 및 테스트' 단계입니다. 개발자가 코드 변경사항을 공유 저장소 (예: GitHub)에 푸시하면 자동화된 시스템이 시작됩니다. 애플리케이션을 빌드하고 생성한 에이전트 평가와 같은 모든 테스트를 실행하여 새 코드가 올바르게 통합되고 버그가 발생하지 않는지 확인합니다.
- 지속적 배포 (CD): '출시' 단계입니다. CI 단계가 성공적으로 통과되면 시스템에서 테스트를 거친 새 버전의 애플리케이션을 프로덕션에 자동으로 배포하여 사용자에게 제공합니다.
이 자동화된 파이프라인은 개발자 컴퓨터의 코드를 프로덕션으로 빠르고 안전하며 안정적으로 가져오는 '디지털 조립 라인'을 만듭니다. 이 섹션에서는 AI 어시스턴트에게 GitHub Actions와 Google Cloud Build를 사용하여 이 조립 라인을 빌드해 달라고 요청합니다.
작업
cd ~/storygen-learning/05a_CICD_Pipeline_Ready
Gemini CLI를 사용하여 GitHub로 CI/CD 파이프라인 빌드:
Gemini CLI 열기
Gemini
Gemini CLI에서 다음 프롬프트를 사용해 보세요.
Create a CI/CD pipeline for my StoryGen app using Google Cloud Build and GitHub integration.

Generate these automation files:
1. **cloudbuild.yaml** (for backend) - Automated build, test, and deploy pipeline
2. **GitHub Actions workflow** - Trigger builds on push/PR
3. **Deployment automation scripts** - Streamlined deployment process

**Requirements:**
- Auto-trigger on GitHub push to main branch
- Build and push Docker images
- Run automated tests if available
- Deploy to Google Cloud Run
- Environment-specific deployments (staging/prod)
- Notification on success/failure

Focus on fully automated deployment with minimal manual intervention. Include proper secret management and rollback capabilities.
—————————————— 여기부터 솔루션 시작 ——————————————–
해결 방법:
cd ~/storygen-learning/06_Final_Solution/
# Copy the GitHub workflow to parent folder
cp -r 06_Final_Solution/.GitHub ../../../.GitHub
06_Final_Solution 폴더로 돌아가 스크립트를 실행합니다.
cd ~/storygen-learning/06_Final_Solution/

./setup-cicd-complete.sh
CI/CD 파이프라인 설정 완료가 표시됩니다.
워크플로 트리거: 코드를 커밋하고 main에 푸시합니다. 권한을 허용하려면 GitHub 이메일과 이름을 설정해야 합니다.
git add .
git commit -m "feat: Add backend, IaC, and CI/CD workflow"
git push origin main
GitHub 저장소의 '작업' 탭으로 이동하여 자동 배포 실행을 확인합니다.
11. 운영: AI 컨트롤 타워
라이브 스트리밍이 시작되었습니다. 하지만 여정은 끝나지 않았습니다. 이것이 '2일차'인 운영입니다. Cloud Assist로 돌아가 실행 중인 애플리케이션을 관리해 보겠습니다.
작업
- Google Cloud 콘솔에서 Cloud Run 서비스로 이동합니다. 라이브 앱과 상호작용하여 트래픽과 로그를 생성합니다.
- Cloud Assist 창을 열고 다음과 같은 프롬프트를 사용하여 운영 부조종사로 사용합니다.
로그 분석:
Summarize the errors in my Cloud Run logs for the service 'genai-backend' from the last 15 minutes.
성능 조정:
My Cloud Run service 'genai-backend' has high startup latency. What are common causes for a Python app and how can I investigate with Cloud Trace?
비용 최적화:
Analyze the costs for my 'genai-backend' service and its GCS bucket. Are there any opportunities to save money?
주요 학습 순간: AI SDLC는 지속적인 루프입니다. 애플리케이션 빌드를 지원한 동일한 AI 코파일럿은 프로덕션에서 애플리케이션을 모니터링, 문제 해결, 최적화하는 데 없어서는 안 될 파트너입니다.