
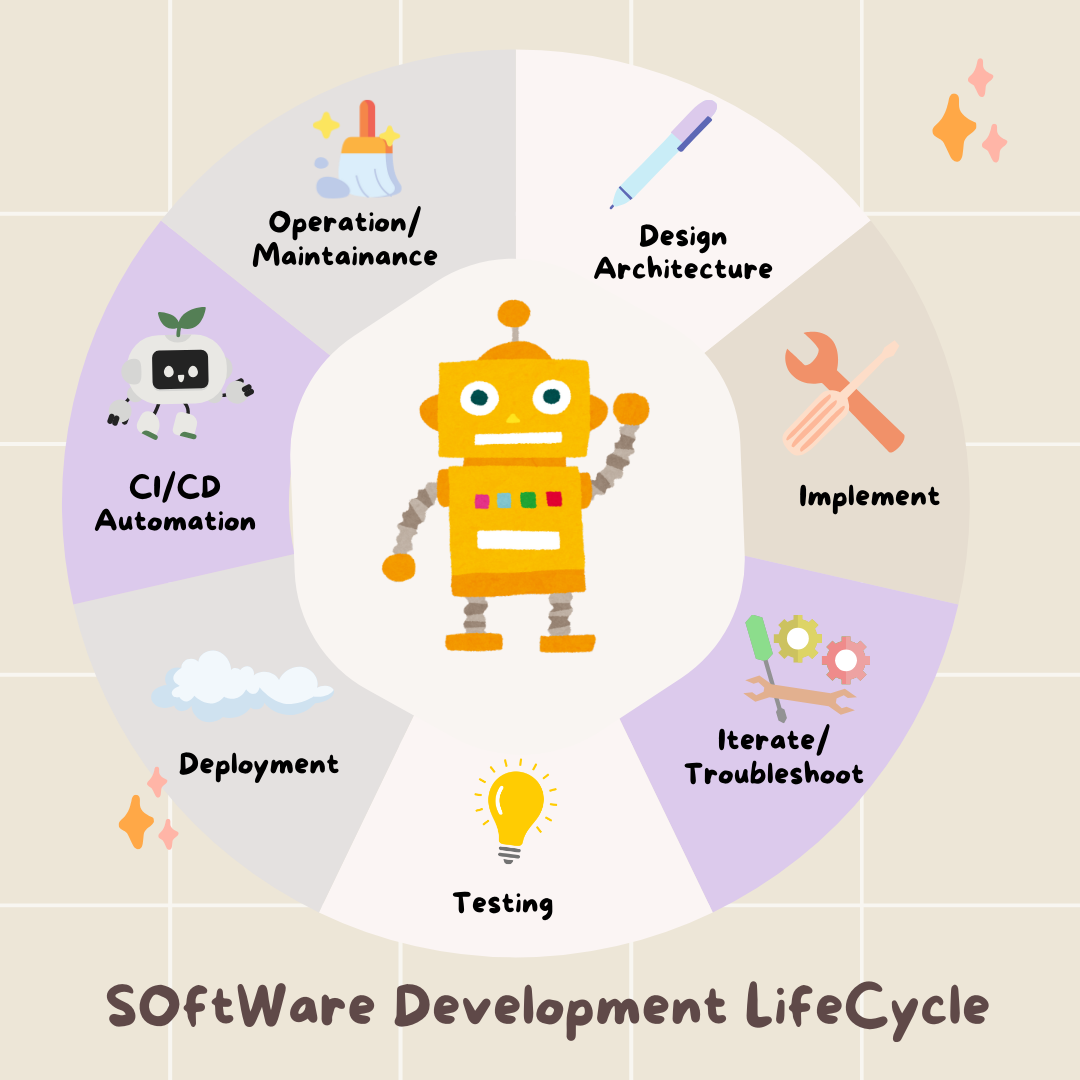
1. สิ่งที่คุณจะได้เรียนรู้
AI Agent Vibe Full Stack
ยินดีต้อนรับ คุณกำลังจะได้เรียนรู้ทักษะที่สำคัญอีกอย่างในการพัฒนาซอฟต์แวร์ นั่นคือวิธีแนะนําปัญญาประดิษฐ์ (AI) อย่างมีประสิทธิภาพเพื่อสร้าง ทดสอบ และติดตั้งใช้งานซอฟต์แวร์ระดับเวอร์ชันที่ใช้งานจริง Generative AI ไม่ใช่ "ระบบควบคุมอัตโนมัติ" แต่เป็นผู้ช่วยนักบินที่มีประสิทธิภาพซึ่งต้องมีผู้กำกับที่มีทักษะ
เวิร์กช็อปนี้จะนำเสนอวิธีการที่มีโครงสร้างและทำซ้ำได้สำหรับการทำงานร่วมกับ AI ในทุกขั้นตอนของวงจรการพัฒนาซอฟต์แวร์ (SDLC) ระดับมืออาชีพ คุณจะเปลี่ยนจากผู้เขียนโค้ดทีละบรรทัดไปเป็นผู้อำนวยการด้านเทคนิค ซึ่งเป็นสถาปนิกที่มีวิสัยทัศน์และผู้รับเหมาทั่วไปที่ใช้ AI เพื่อดำเนินการตามวิสัยทัศน์นั้นอย่างแม่นยำ 🚀
เมื่อจบบทแนะนำนี้ คุณจะมีสิ่งต่อไปนี้
- เปลี่ยนไอเดียระดับสูงให้เป็นสถาปัตยกรรมระบบคลาวด์โดยใช้ AI
- สร้างแบ็กเอนด์ Python ที่สมบูรณ์ด้วยพรอมต์ที่เฉพาะเจาะจง
- ใช้ AI เป็นโปรแกรมเมอร์คู่เพื่อแก้ไขข้อบกพร่องและแก้ไขโค้ด
- มอบหมายให้ AI สร้าง Unit Test รวมถึงการจำลอง
- สร้าง Infrastructure as Code (IaC) ที่พร้อมใช้งานจริงด้วย Terraform
- สร้างไปป์ไลน์ CI/CD แบบเต็มใน GitHub Actions ด้วยพรอมต์เดียว
- ตรวจสอบและจัดการแอปพลิเคชันที่ใช้งานจริงโดยใช้เครื่องมือการดำเนินงานที่ทำงานด้วยระบบ AI
คุณจะไม่ได้แค่แอปที่ใช้งานได้ แต่ยังได้พิมพ์เขียวสำหรับการพัฒนาที่เพิ่มประสิทธิภาพด้วย AI อีกด้วย มาเริ่มกันเลย
2. ข้อกำหนดเบื้องต้นและการตั้งค่า
ก่อนเริ่ม เรามาเตรียมสภาพแวดล้อมให้พร้อมกันก่อน ซึ่งเป็นขั้นตอนสำคัญเพื่อให้การเข้าร่วมเวิร์กช็อปเป็นไปอย่างราบรื่น
สร้างบัญชี GCP ใหม่และลิงก์การเรียกเก็บเงิน
เราต้องมี 2 สิ่งเพื่อขับเคลื่อนเอเจนต์ AI ได้แก่ โปรเจ็กต์ Google Cloud เพื่อเป็นรากฐาน และคีย์ Gemini API เพื่อเข้าถึงโมเดลอันทรงพลังของ Google
ขั้นตอนที่ 1: เปิดใช้บัญชีสำหรับการเรียกเก็บเงิน
หากต้องการเรียกใช้ Codelab นี้ คุณต้องมีบัญชีสำหรับการเรียกเก็บเงินที่มีเครดิตอยู่บ้าง ใช้เครดิตจากแบนเนอร์ที่ด้านบนของ Codelab นี้เพื่อเริ่มต้นใช้งาน หากเชื่อมต่อกับบัญชีสำหรับการเรียกเก็บเงินอยู่แล้ว ให้ข้ามขั้นตอนนี้
ขั้นตอนที่ 2: สร้างโปรเจ็กต์ GCP ใหม่
- ไปที่ คอนโซล Google Cloud แล้วสร้างโปรเจ็กต์ใหม่
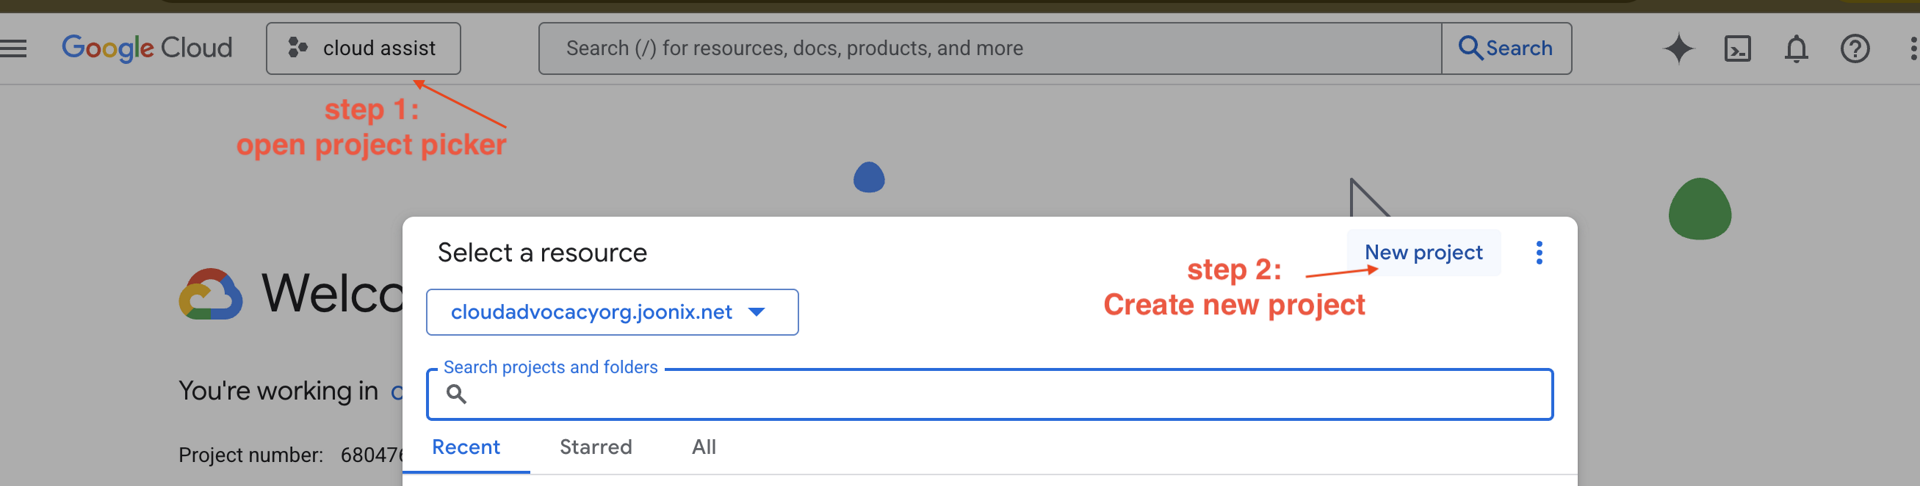
- เปิดแผงด้านซ้าย คลิก
Billingแล้วตรวจสอบว่าบัญชีสำหรับการเรียกเก็บเงินลิงก์กับบัญชี gcp นี้หรือไม่

หากเห็นหน้านี้ ให้ตรวจสอบ manage billing account เลือก Google Cloud Trial One แล้วลิงก์ไปยังบัญชี
ขั้นตอนที่ 3: สร้างคีย์ Gemini API
คุณต้องมีคีย์ก่อนจึงจะรักษาความปลอดภัยของคีย์ได้
- ไปที่ Google AI Studio ที่ https://aistudio.google.com/
- ลงชื่อเข้าใช้ด้วยบัญชี Gmail
- คลิกปุ่ม "รับคีย์ API" ซึ่งมักจะอยู่ในแผงการนำทางด้านซ้ายมือหรือที่มุมขวาบน
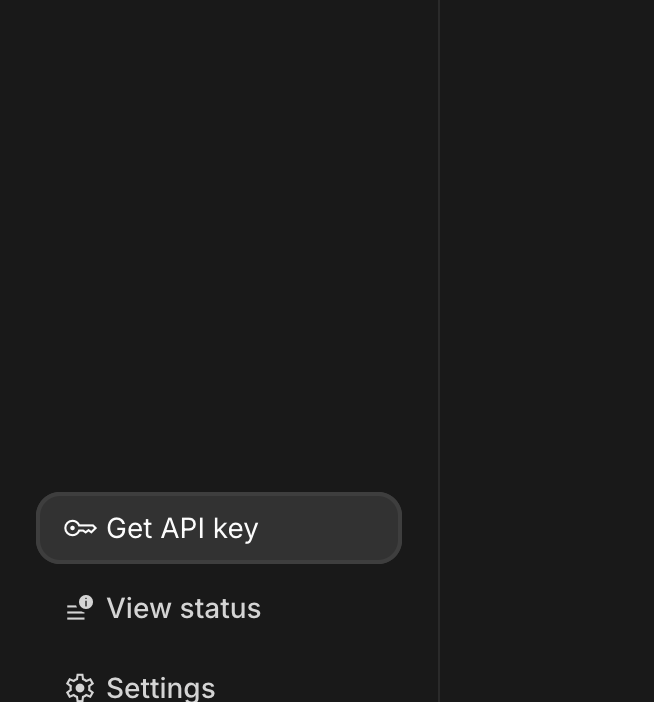
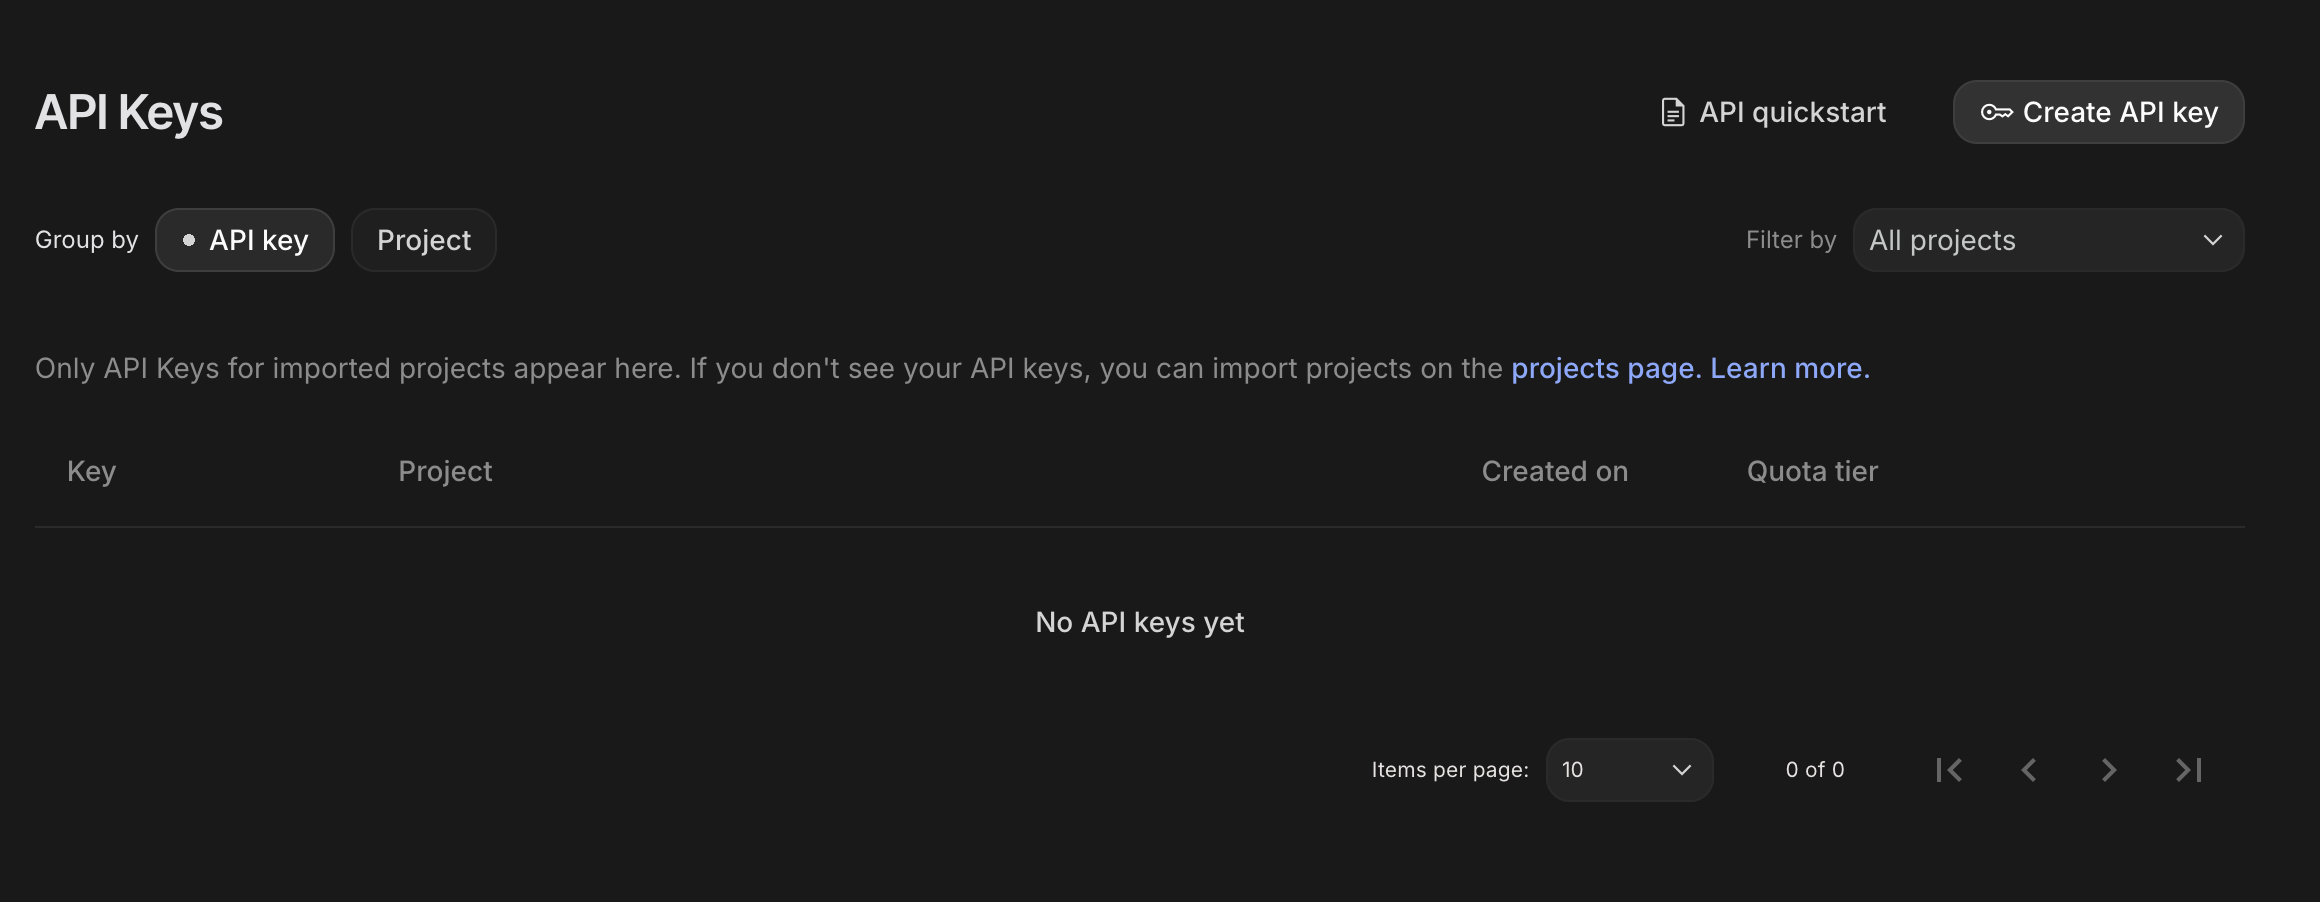
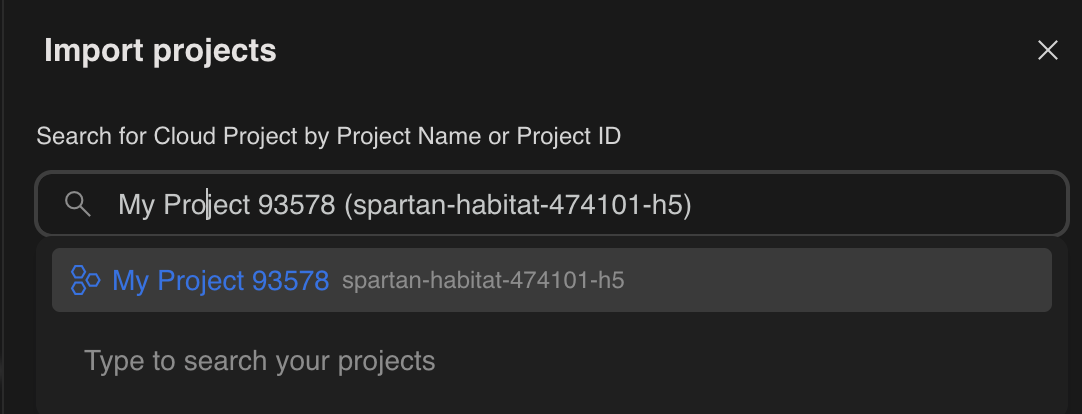
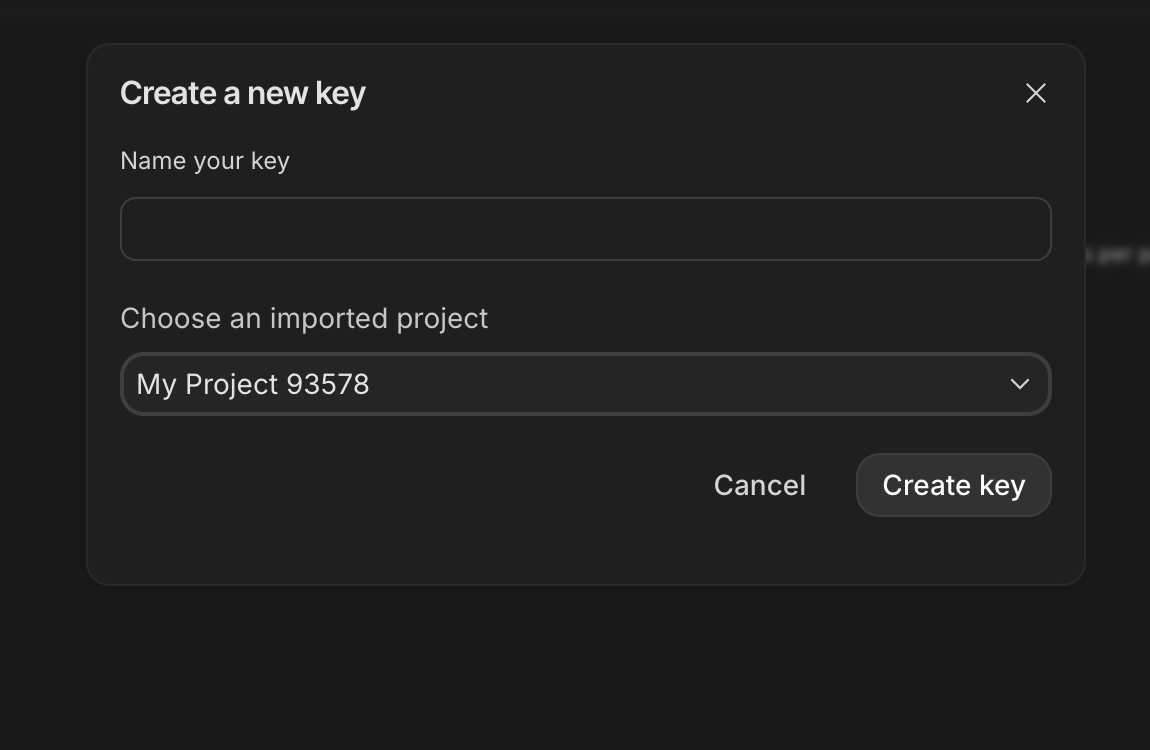
- ในกล่องโต้ตอบ "คีย์ API" ให้คลิก "สร้างคีย์ API ในโปรเจ็กต์ใหม่"
- เลือกโปรเจ็กต์ใหม่ที่คุณสร้างขึ้นซึ่งมีการตั้งค่าบัญชีสำหรับการเรียกเก็บเงิน
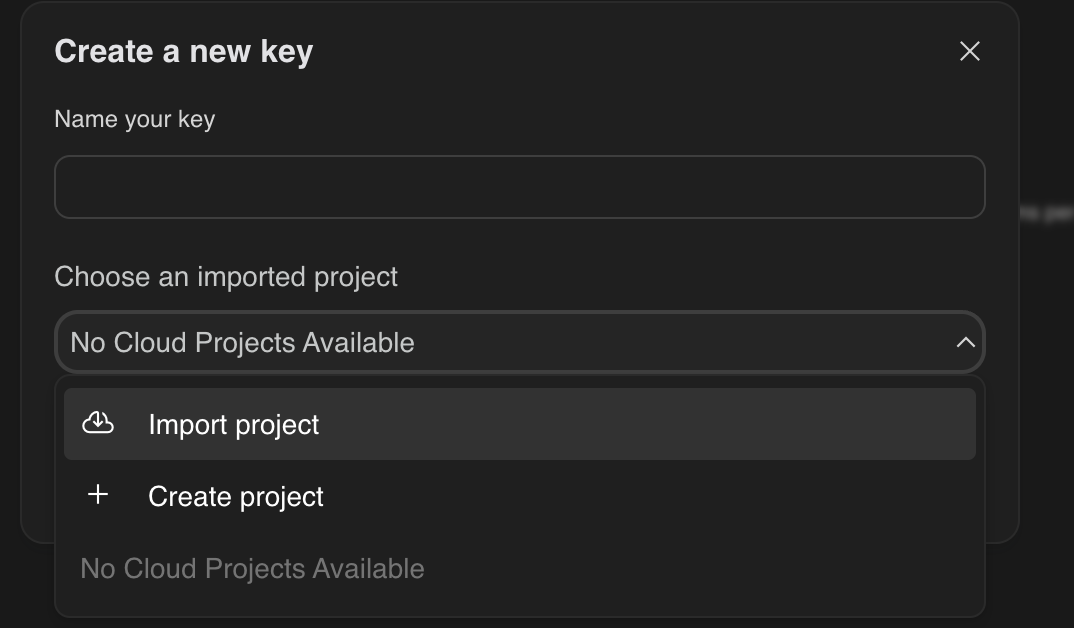
- ระบบจะสร้างคีย์ API ใหม่ให้คุณ
คัดลอกคีย์นี้ทันทีและจัดเก็บไว้ในที่ปลอดภัยชั่วคราว (เช่น เครื่องมือจัดการรหัสผ่านหรือโน้ตที่ปลอดภัย) ค่านี้เป็นค่าที่คุณจะใช้ในขั้นตอนถัดไป
การตรวจสอบสิทธิ์ของ GitHub
เปิด Cloud Shell โดยไปที่ คอนโซล Google Cloud แล้วคลิกปุ่ม "เปิดใช้งาน Cloud Shell" ที่ด้านขวาบน
ขั้นตอนที่ 1: เปิด Cloud Shell
👉คลิก "เปิดใช้งาน Cloud Shell" ที่ด้านบนของ คอนโซล Google Cloud (ไอคอนรูปเทอร์มินัลที่ด้านบนของแผง Cloud Shell) 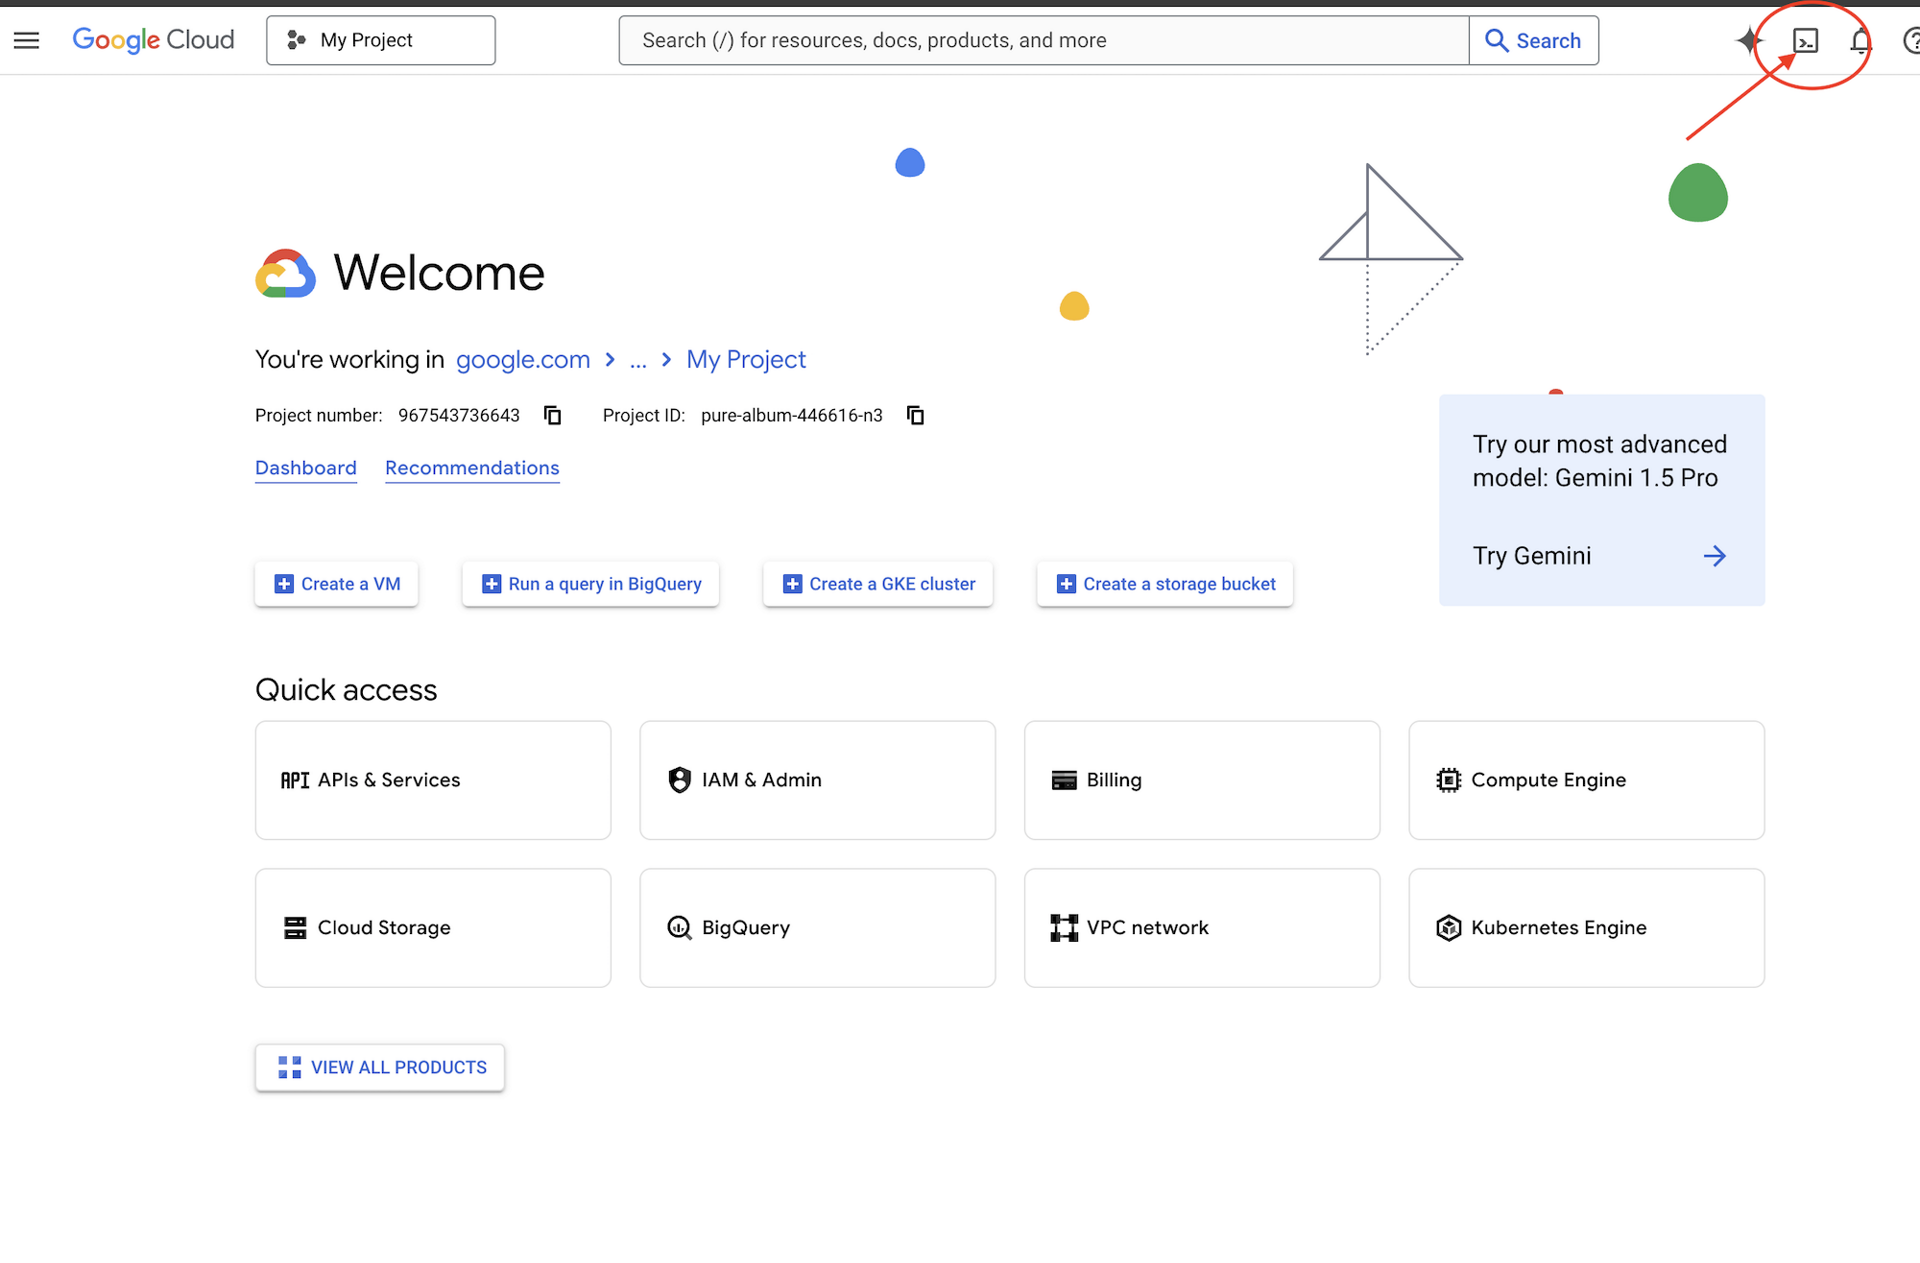
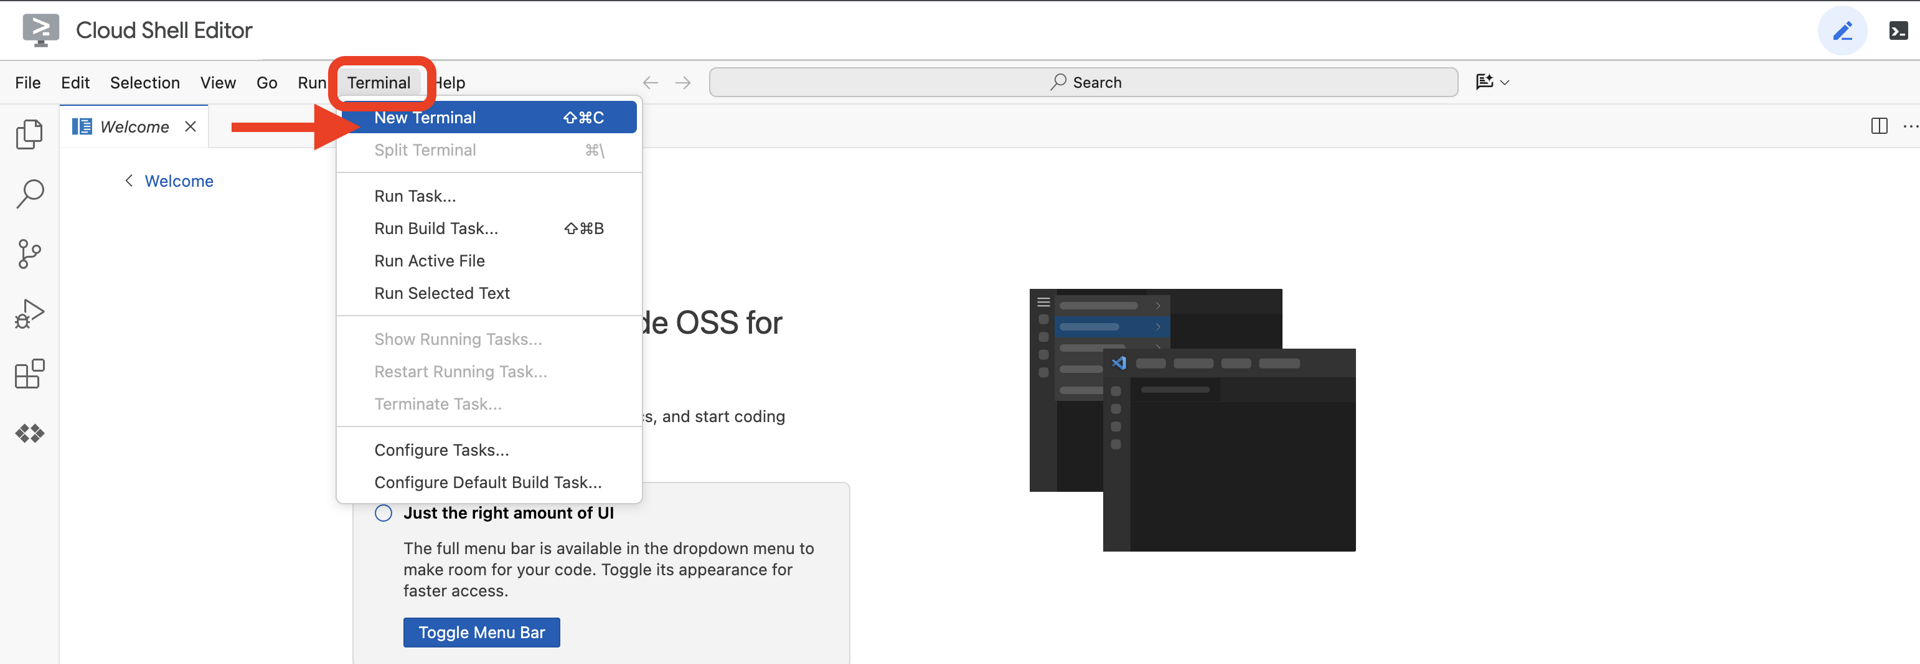
👉คลิกปุ่ม "เปิดตัวแก้ไข" (ลักษณะเป็นโฟลเดอร์ที่เปิดอยู่พร้อมดินสอ) ซึ่งจะเปิดตัวแก้ไขโค้ด Cloud Shell ในหน้าต่าง คุณจะเห็น File Explorer ทางด้านซ้าย 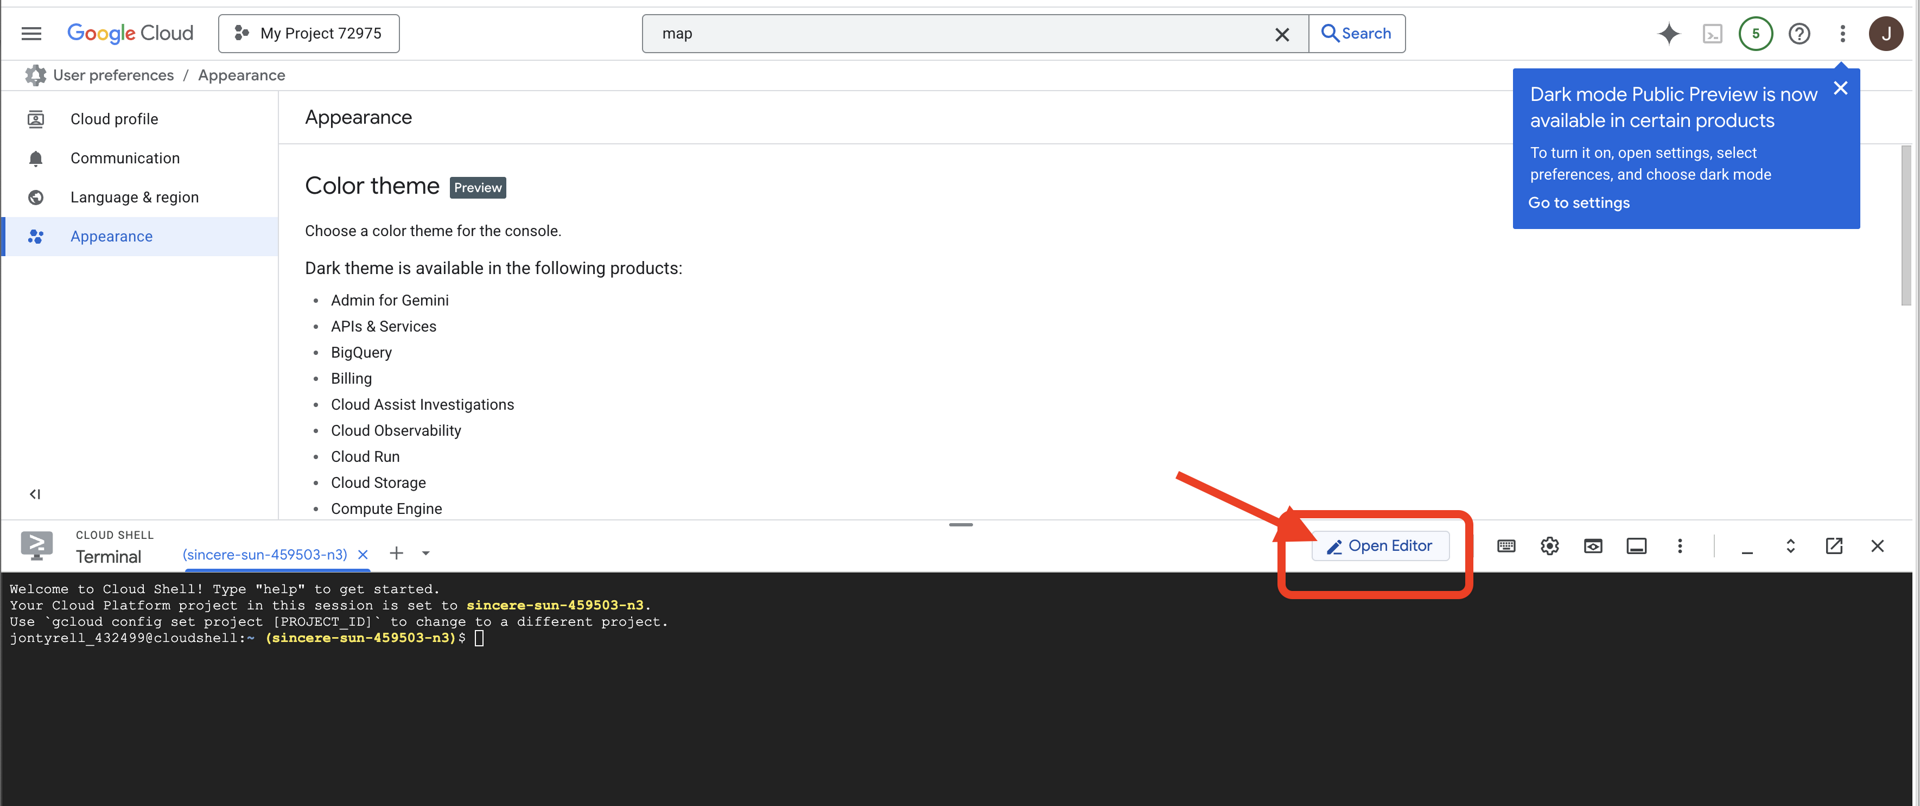
👉เมื่อเปิดเครื่องมือแก้ไขแล้ว ให้เปิดเทอร์มินัลใน Cloud IDE
👉💻 ในเทอร์มินัล ให้ตรวจสอบว่าคุณได้รับการตรวจสอบสิทธิ์แล้วและตั้งค่าโปรเจ็กต์เป็นรหัสโปรเจ็กต์โดยใช้คำสั่งต่อไปนี้
gcloud auth list
ขั้นตอนที่ 2: ตรวจสอบสิทธิ์ด้วย GitHub และ Fork
ตรวจสอบสิทธิ์ด้วย GitHub
👉💻 คัดลอกและวางคำสั่งลงในเทอร์มินัลระบบคลาวด์
gh auth login
- "คุณใช้ GitHub ที่ใด" ให้เลือก "GitHub.com"
- "คุณต้องการใช้โปรโตคอลใดสำหรับการดำเนินการ Git ในโฮสต์นี้" ให้เลือก "HTTPS"
- "ตรวจสอบสิทธิ์ Git ด้วยข้อมูลเข้าสู่ระบบของ GitHub ไหม" ให้เลือก "ใช่"
- "คุณต้องการตรวจสอบสิทธิ์ GitHub CLI อย่างไร" ให้เลือก "เข้าสู่ระบบด้วยเว็บเบราว์เซอร์"
สำคัญ!! อย่ากด "Enter"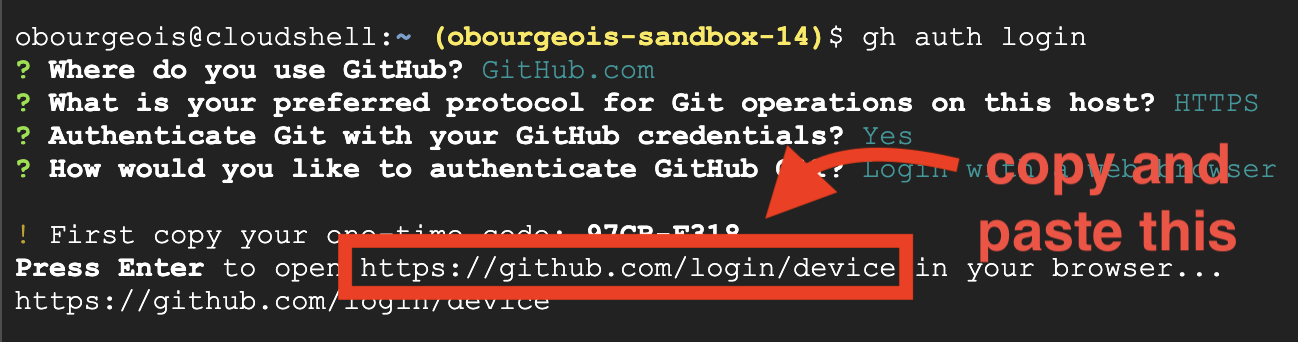
คัดลอกรหัสจากเทอร์มินัลไปยังหน้ายืนยันการเข้าสู่ระบบ
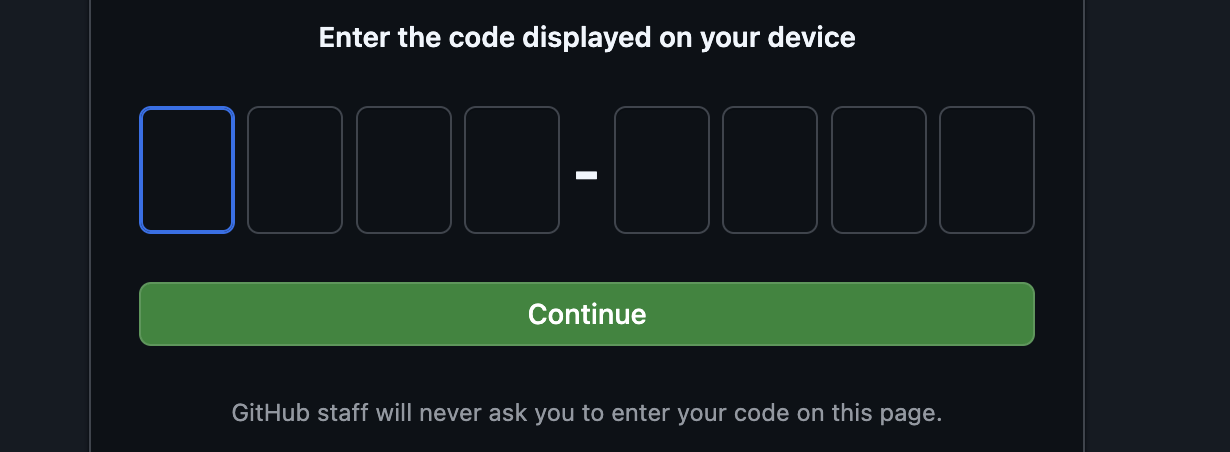
เมื่อป้อนรหัสเสร็จแล้ว ให้กลับไปที่เทอร์มินัล Cloud Shell แล้วกด "Enter" เพื่อดำเนินการต่อ

ขั้นตอนที่ 4: Fork และโคลนที่เก็บ
👉💻 คัดลอกและวางคำสั่งลงในเทอร์มินัลระบบคลาวด์
gh repo fork cuppibla/storygen-learning --clone=true
3. สถาปัตยกรรม: จากแนวคิดสู่พิมพ์เขียวด้วย Cloud Assist
ทุกโปรเจ็กต์ที่ยอดเยี่ยมเริ่มต้นด้วยวิสัยทัศน์ที่ชัดเจน เราจะใช้ผู้ช่วย AI อย่าง Cloud Assist เพื่อออกแบบสถาปัตยกรรมแอป
การดำเนินการ
- เปิด Google Cloud Console: [https://console.cloud.google.com](Google Cloud Console)
- คลิก "เปิดแชท Cloud Assist" ที่มุมขวาบน
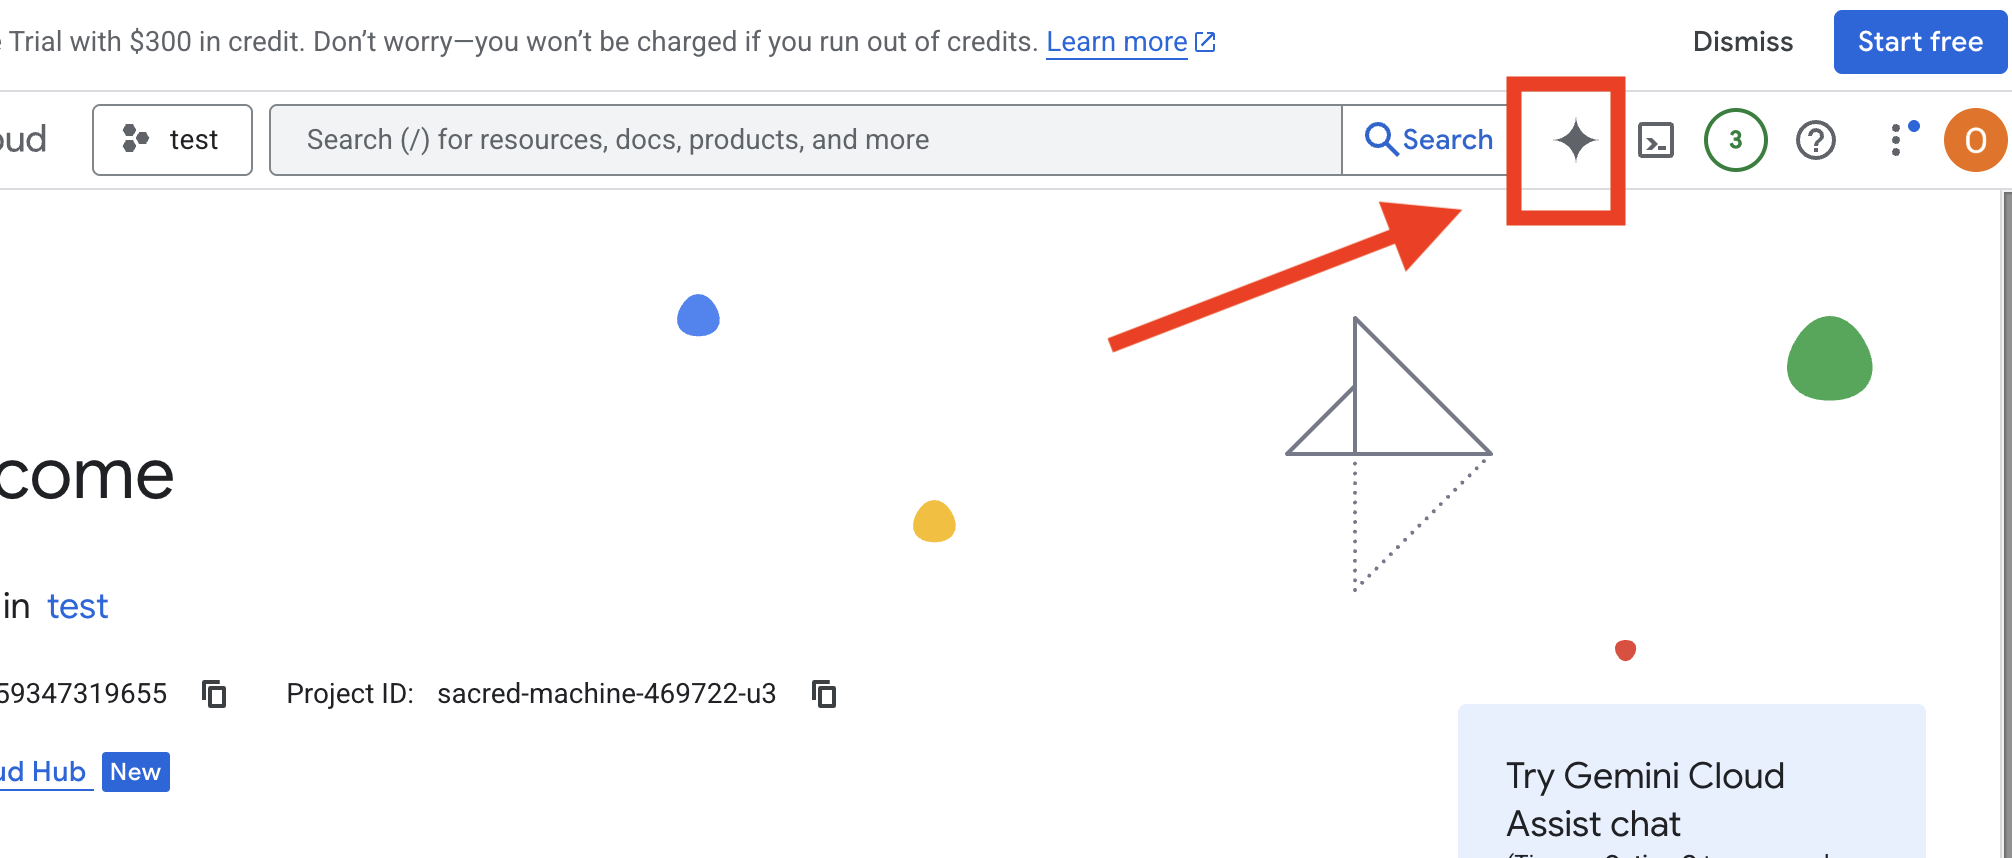
เปิดใช้ Cloud Assist
- คลิก
Get Gemini Assistแล้วคลิกEnable Cloud Assist at no cost - และเริ่มแชทได้เลย
 ระบุพรอมต์แบบละเอียดต่อไปนี้กับ Cloud Assist
ป้อนไอเดียของคุณ
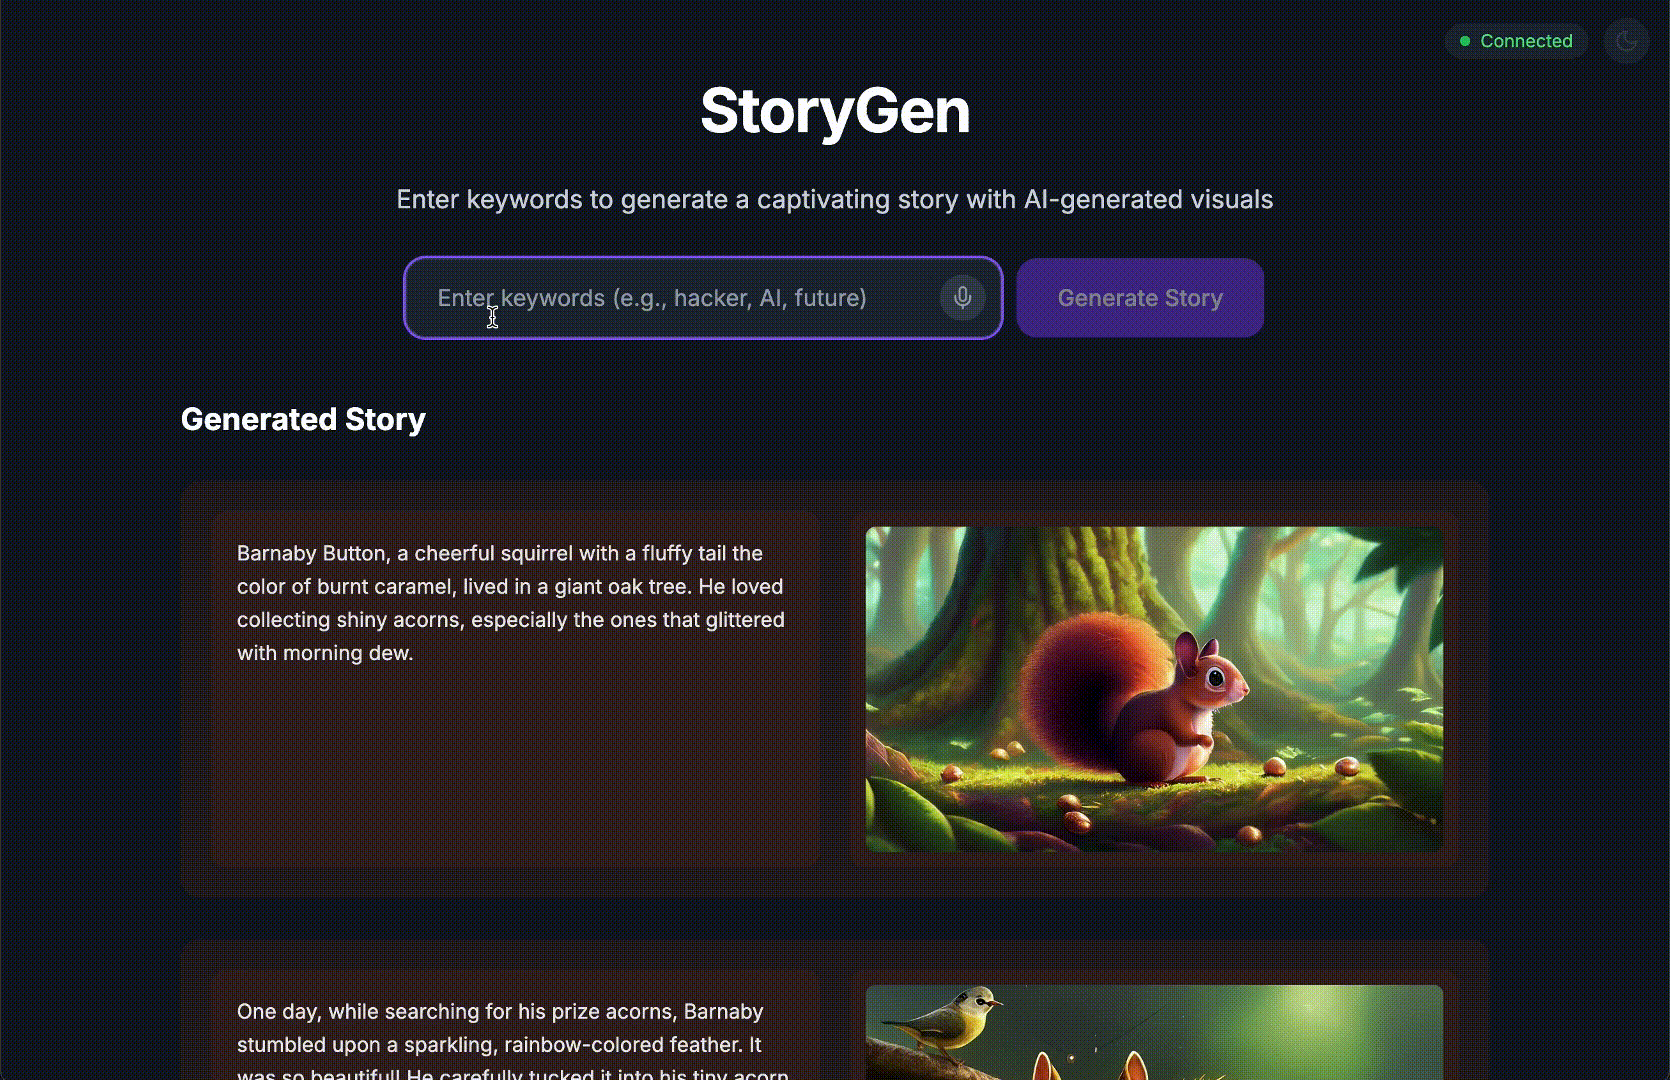
Generate a Python web application that uses AI to generate children's stories and illustrations. It has Python backend and React frontend host separately on Cloudrun. They communicate through Websocket. It needs to use a generative model for text and another for images. The generated images must be used by Imagen from Vertex AI and stored in a Google Cloud Storage bucket so that frontend can fetch from the bucket to render images. I do not want any load balancer or a database for the story text. We need a solution to store the API key.
รับพิมพ์เขียวของแอป
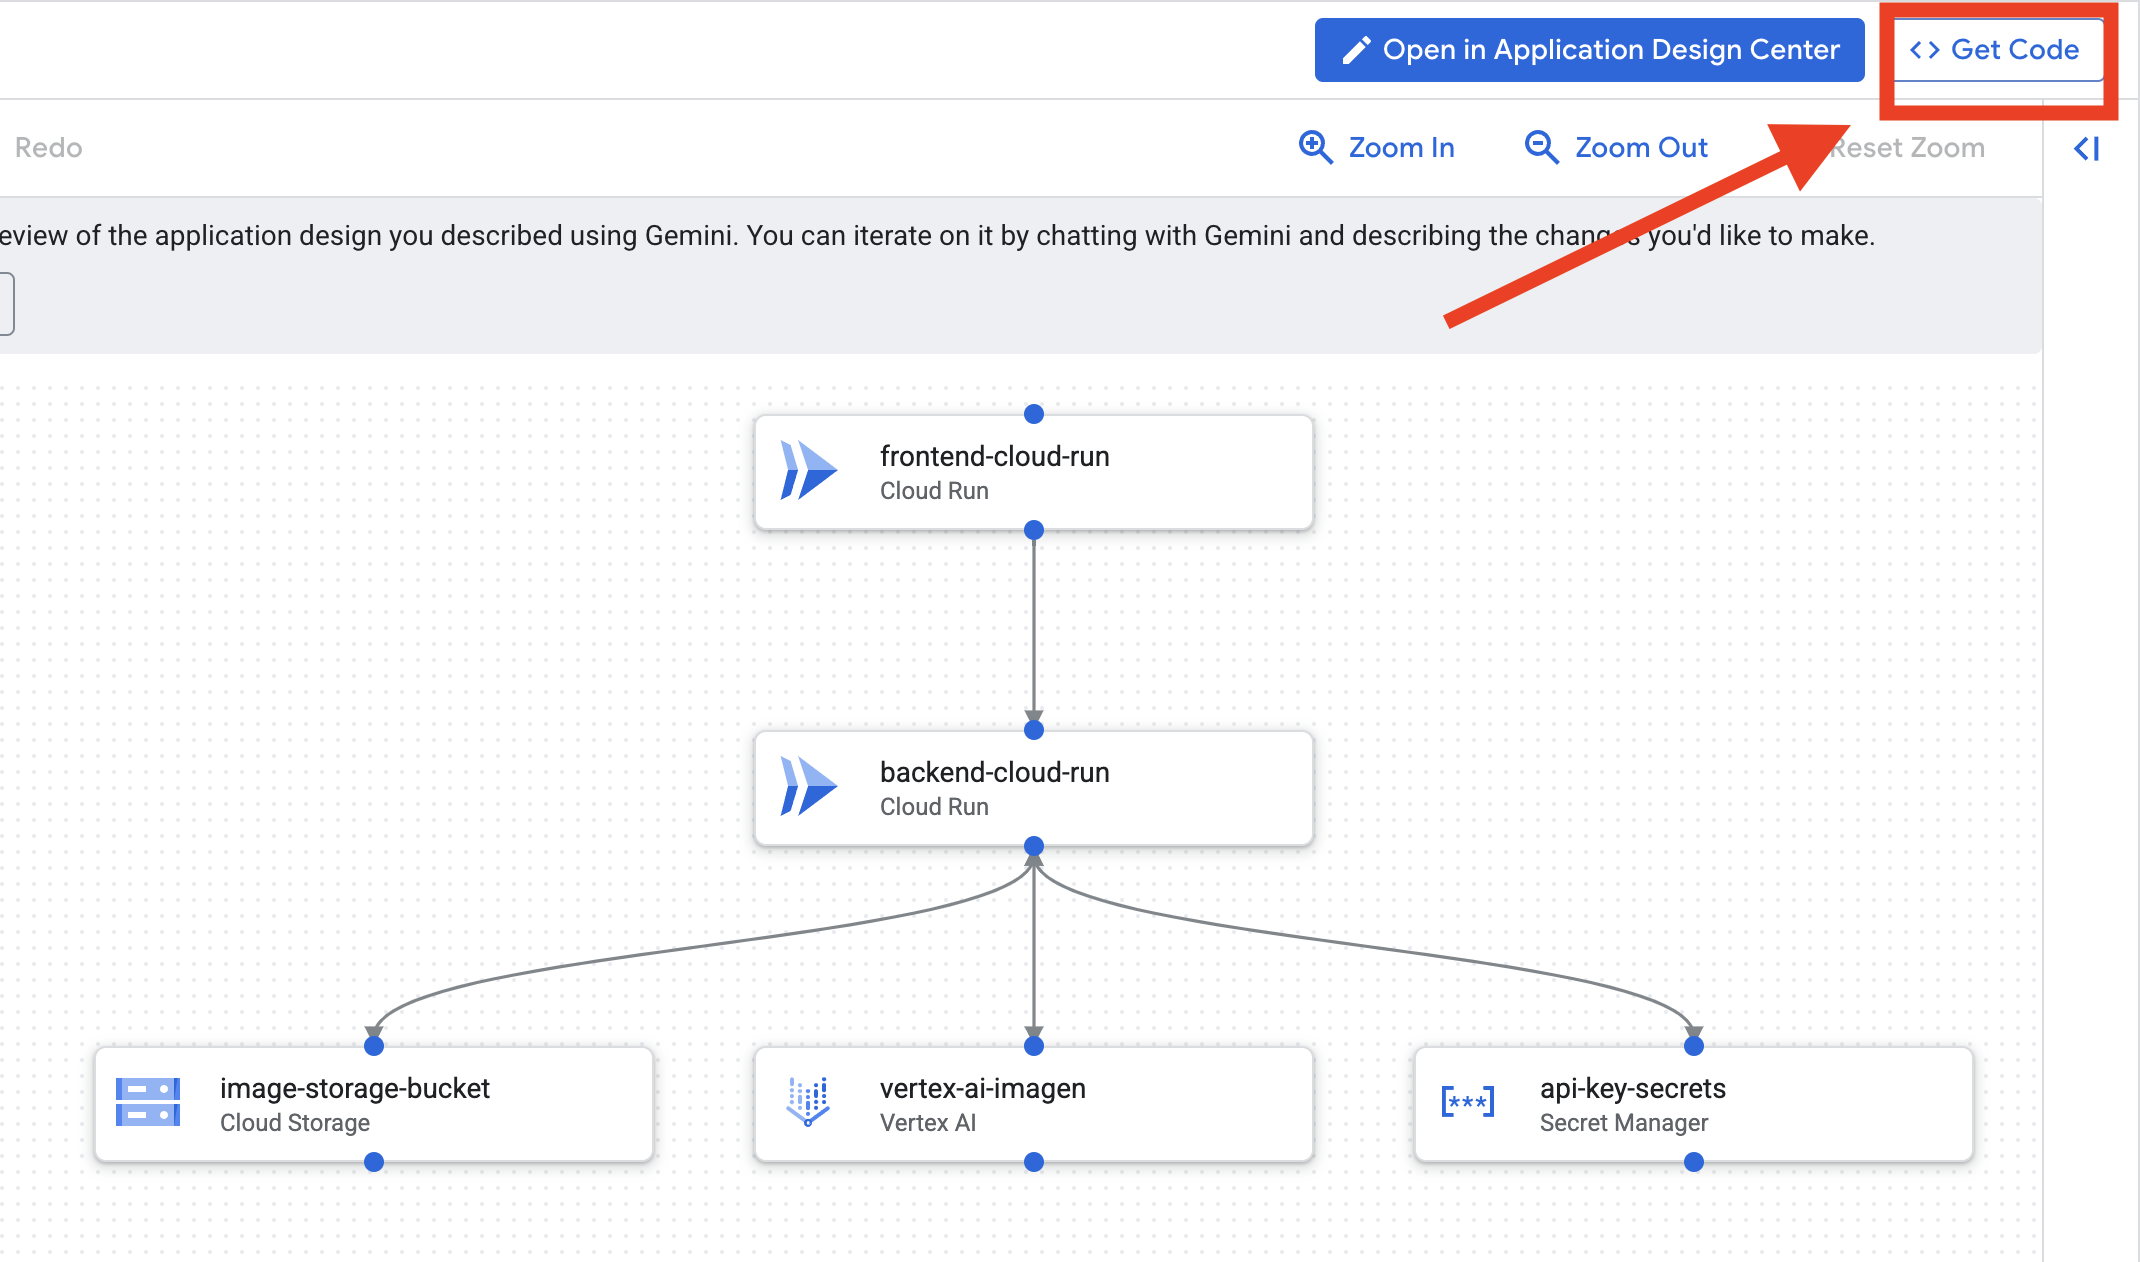
- คลิก "แก้ไขการออกแบบแอป" คุณจะเห็นไดอะแกรม คลิกแผงด้านขวาบน "<> รับโค้ด" เพื่อดาวน์โหลดโค้ด Terraform
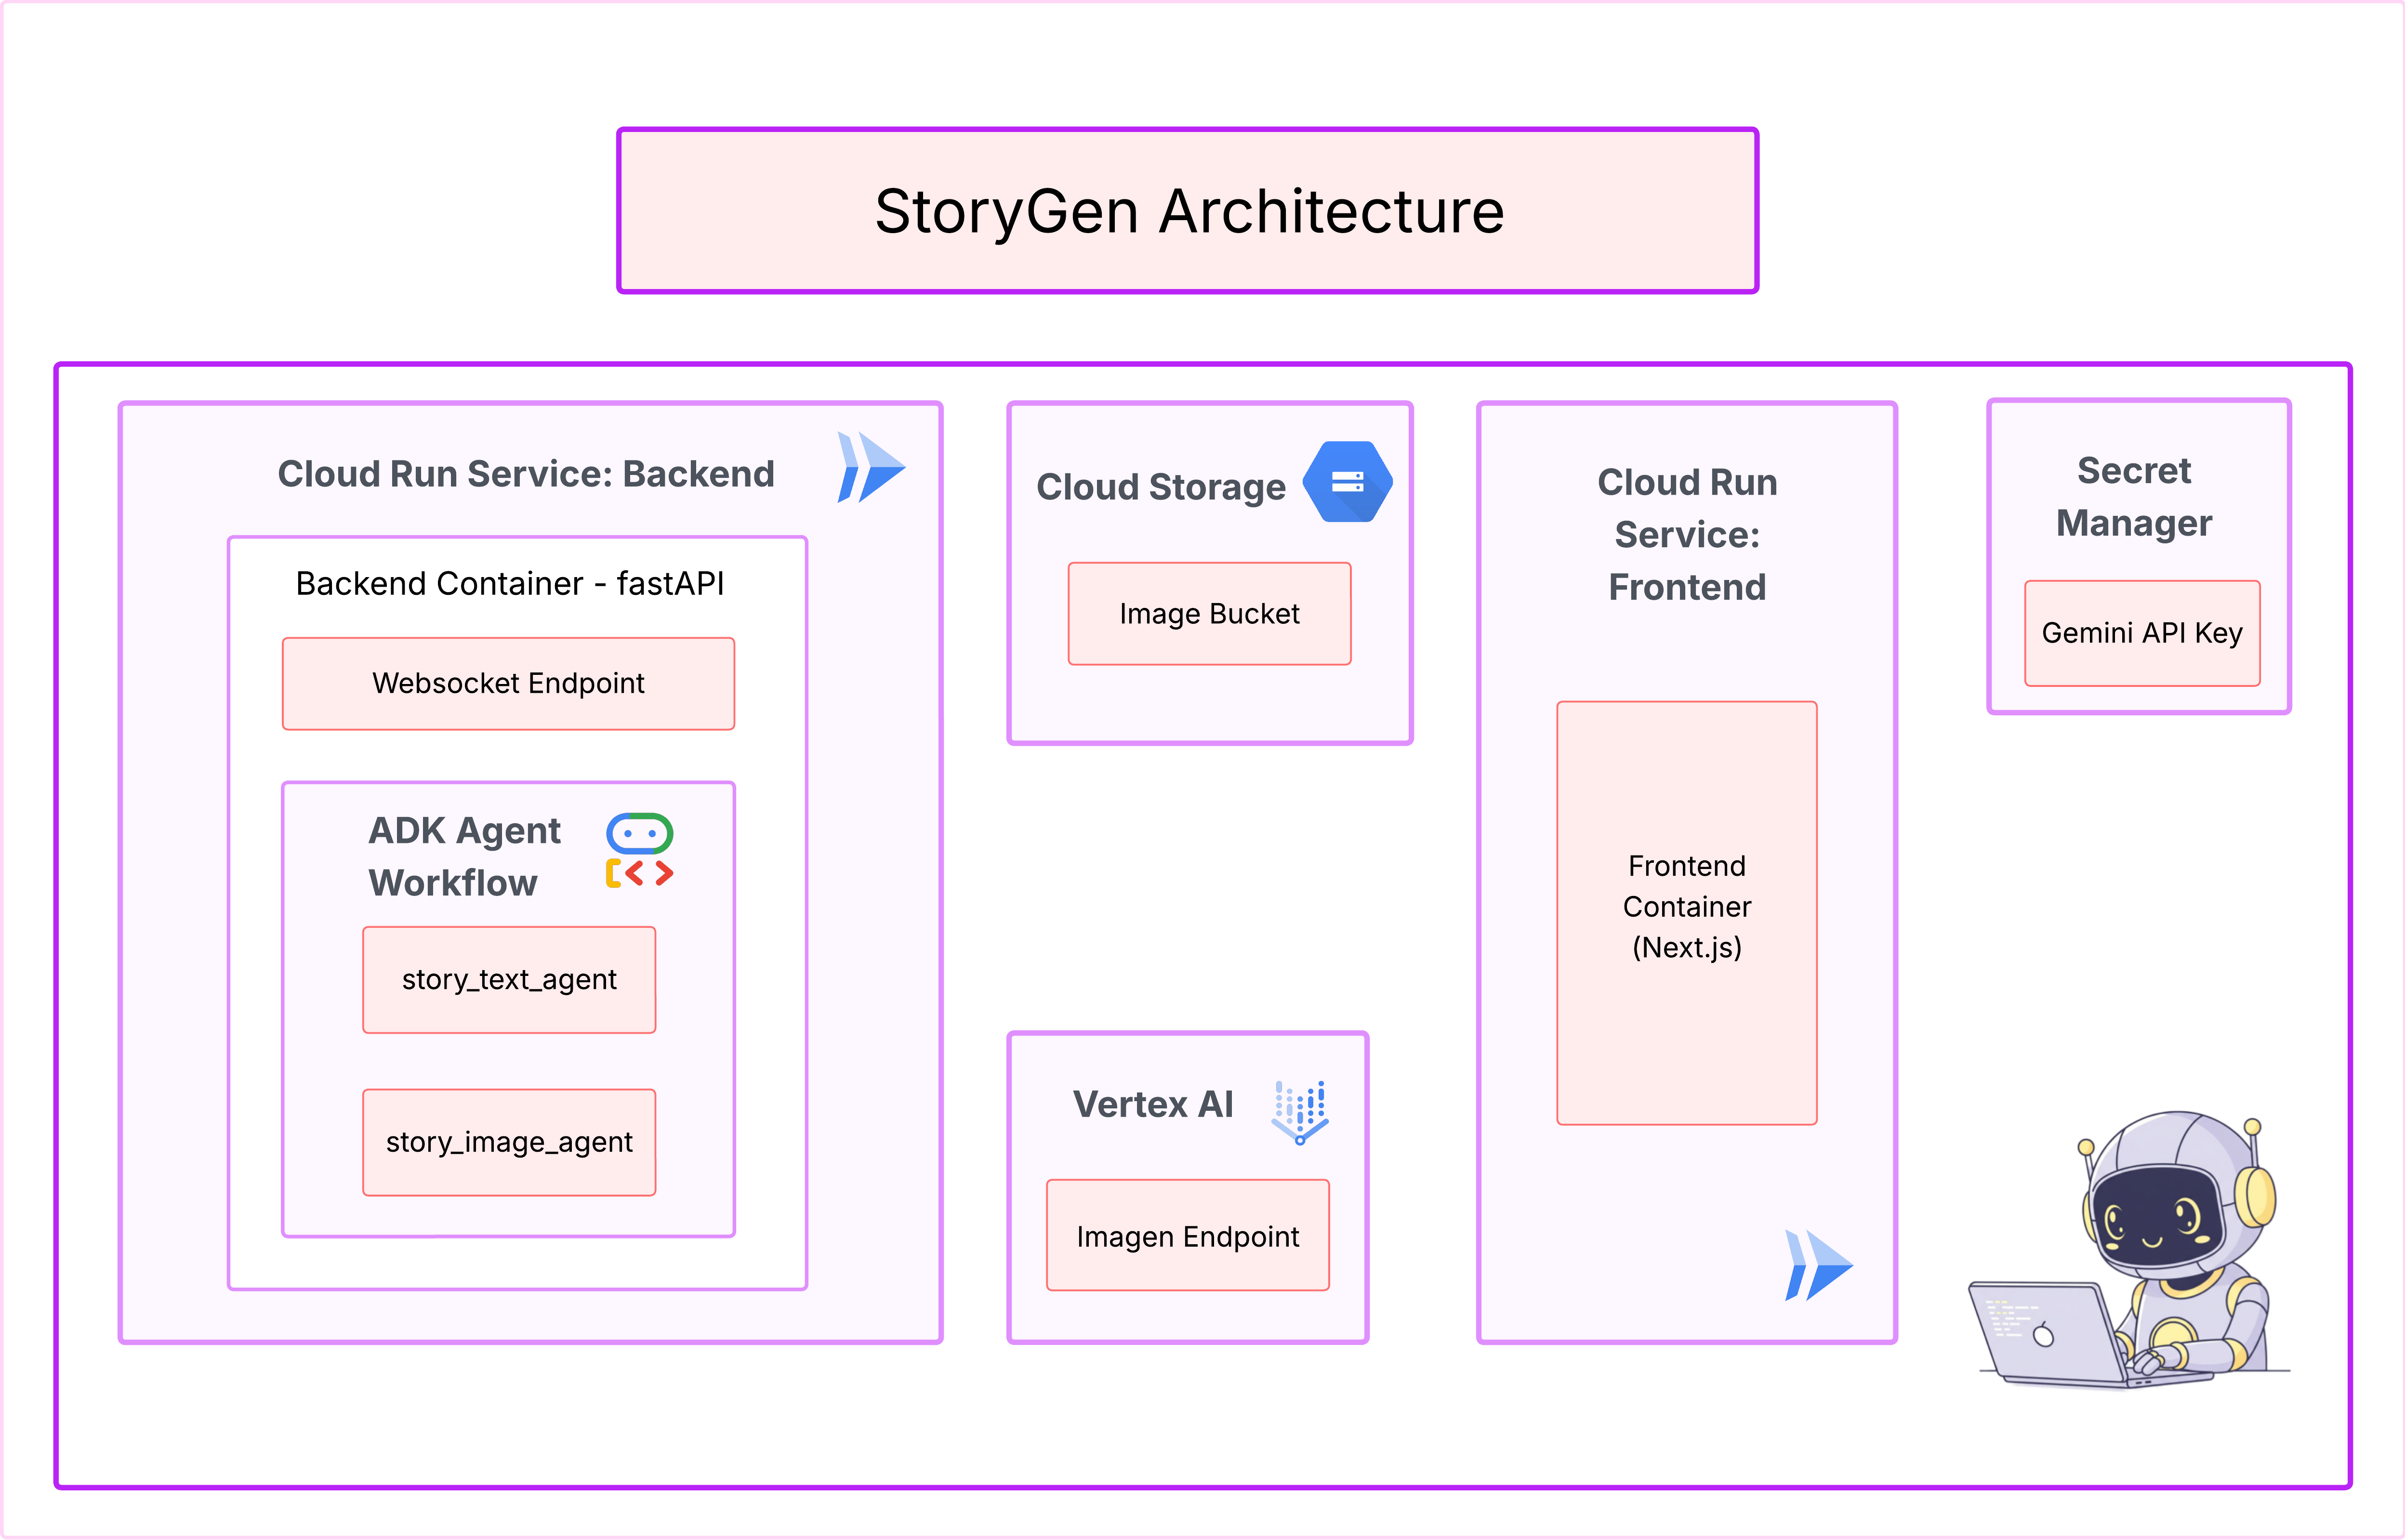
- Cloud Assist จะสร้างแผนภาพสถาปัตยกรรม นี่คือพิมพ์เขียวด้านภาพของเรา
คุณไม่ต้องดำเนินการใดๆ กับรหัสนี้ อ่านคำอธิบายเพิ่มเติมด้านล่าง
ทำความเข้าใจโค้ด Terraform ที่สร้างขึ้น คุณเพิ่งได้รับชุดไฟล์ Terraform ทั้งหมดจาก Cloud Assist คุณยังไม่จำเป็นต้องดำเนินการใดๆ กับโค้ดนี้ในตอนนี้ แต่เราจะมาอธิบายโดยย่อว่าโค้ดนี้คืออะไรและเหตุใดจึงมีประสิทธิภาพมาก
Terraform คืออะไร Terraform เป็นเครื่องมือ Infrastructure as Code (IaC) โดยให้คิดว่าโครงสร้างพื้นฐานเป็นพิมพ์เขียวสำหรับสภาพแวดล้อมระบบคลาวด์ที่เขียนด้วยโค้ด คุณกำหนดทรัพยากรทั้งหมดในไฟล์การกำหนดค่าเหล่านี้แทนการคลิกผ่านคอนโซล Google Cloud เพื่อสร้างบริการ พื้นที่เก็บข้อมูล และสิทธิ์ด้วยตนเอง จากนั้น Terraform จะอ่านพิมพ์เขียวและสร้างสภาพแวดล้อมที่ตรงกันให้คุณโดยอัตโนมัติ
จากแผนภาพไปจนถึงโค้ดที่เรียกใช้ได้ แผนภาพสถาปัตยกรรมที่ Cloud Assist จัดทำขึ้นคือแผนภาพของคุณ โค้ด Terraform คือแผนเดียวกันนั้นในเวอร์ชันที่เครื่องอ่านได้ ซึ่งเป็นลิงก์สำคัญที่เปลี่ยนแนวคิดการออกแบบให้กลายเป็นความจริงที่ทำซ้ำได้และเป็นอัตโนมัติ การกำหนดโครงสร้างพื้นฐานในโค้ดช่วยให้คุณทำสิ่งต่อไปนี้ได้
- สร้างโดยอัตโนมัติ: สร้างสภาพแวดล้อมเดียวกันซ้ำๆ ได้อย่างน่าเชื่อถือ
- ใช้การควบคุมเวอร์ชัน: ติดตามการเปลี่ยนแปลงโครงสร้างพื้นฐานใน Git เหมือนกับโค้ดของแอปพลิเคชัน
- ป้องกันข้อผิดพลาด: หลีกเลี่ยงข้อผิดพลาดที่เกิดจากผู้ปฏิบัติงานซึ่งอาจเกิดขึ้นเมื่อคลิกผ่านอินเทอร์เฟซเว็บ
สําหรับเวิร์กช็อปนี้ คุณไม่จําเป็นต้องเรียกใช้โค้ด Terraform นี้ด้วยตนเอง คิดว่านี่คือพิมพ์เขียวระดับมืออาชีพหรือ "เฉลย" สำหรับโครงสร้างพื้นฐานที่คุณจะสร้างและติดตั้งใช้งานในขั้นตอนถัดไป
4. การพัฒนา: ข้อมูลเบื้องต้นเกี่ยวกับ Gemini CLI
👉💻 ในเทอร์มินัล Cloud Shell ให้ไปที่ไดเรกทอรีส่วนตัว
cd ~/storygen-learning
👉💻 ลองใช้ Gemini เป็นครั้งแรก
clear
gemini --model=gemini-2.5-flash
หากระบบถามว่า Do you want to connect Cloud Shell editor to Gemini CLI? ให้เลือกไม่
👉✨ เครื่องมือ Gemini ทุกตัวมีคำอธิบาย อ่านเลย ในพรอมต์ Gemini ให้พิมพ์ดังนี้
ใน Gemini CLI
/help
👉✨ Gemini CLI มีความสามารถในตัวของตัวเอง วิธีตรวจสอบ
ใน Gemini CLI
/tools
คุณจะเห็นรายการที่มี ReadFile, WriteFile และ GoogleSearch เทคนิคเหล่านี้เป็นเทคนิคเริ่มต้นที่คุณเรียกใช้ได้โดยไม่ต้องดึงมาจากแหล่งภายนอก
👉✨ Gemini Blade สามารถเก็บ "การรับรู้เชิงกลยุทธ์" (บริบท) เพื่อเป็นแนวทางในการดำเนินการ
ใน Gemini CLI
/memory show
ขณะนี้ยังว่างเปล่า
👉✨ ก่อนอื่น ให้เพิ่มลักษณะตัวตนลงในหน่วยความจำของเอเจนต์ ซึ่งจะกำหนดขอบเขตความเชี่ยวชาญของโมเดล ดังนี้
ใน Gemini CLI
/memory add "I am master at python development"
เรียกใช้ /memory show อีกครั้งเพื่อยืนยันว่าใบมีดของคุณได้ซึมซับความรู้นี้แล้ว
👉✨ หากต้องการแสดงวิธีอ้างอิงไฟล์ด้วยสัญลักษณ์ @ ก่อนอื่นเรามาสร้างไฟล์ "สรุปภารกิจ" กัน
เปิดเทอร์มินัลใหม่ แล้วเรียกใช้คำสั่งต่อไปนี้เพื่อสร้างไฟล์ภารกิจ
!echo "## Mission Objective: Create Imagen ADK Agent for Story Book" > mission.md
👉✨ตอนนี้ ให้สั่ง Gemini CLI วิเคราะห์สรุปและรายงานสิ่งที่พบ
ใน Gemini CLI
Explain the contents of the file @mission.md
ตอนนี้อาวุธหลักของคุณรู้เป้าหมายแล้ว
👉💻 กด Ctrl+C 2 ครั้งเพื่อออกจาก Gemini CLI
กำลังเรียนรู้
วิธีที่ Gemini CLI ได้รับความสามารถอันทรงพลัง: gemini.md ก่อนดำเนินการต่อ คุณควรทำความเข้าใจวิธีปรับแต่ง Gemini CLI ให้เหมาะกับโปรเจ็กต์ที่เฉพาะเจาะจง แม้ว่าคุณจะใช้เป็นเครื่องมือแชทอเนกประสงค์ได้ แต่ประสิทธิภาพที่แท้จริงของ Gemini Chat มาจากไฟล์การกำหนดค่าพิเศษที่ชื่อ gemini.md
เมื่อเรียกใช้คำสั่ง gemini ระบบจะค้นหาไฟล์ gemini.md ในไดเรกทอรีปัจจุบันโดยอัตโนมัติ ไฟล์นี้ทำหน้าที่เป็นคู่มือการใช้งานเฉพาะโปรเจ็กต์สำหรับ AI ซึ่งสามารถกำหนดสิ่งสำคัญ 3 อย่างได้ดังนี้
- ลักษณะตัวตน: คุณสามารถบอก AI ว่าควรเป็นใคร เช่น "คุณเป็นนักพัฒนา Python ผู้เชี่ยวชาญที่เชี่ยวชาญด้าน Google Cloud" ซึ่งจะช่วยให้โฟกัสการตอบกลับและสไตล์ได้
- เครื่องมือ: คุณสามารถให้สิทธิ์เข้าถึงไฟล์ที่เฉพาะเจาะจง (@file.py) หรือแม้แต่การค้นหาของ Google (@google) ซึ่งจะช่วยให้ AI มีบริบทที่จำเป็นในการตอบคำถามเกี่ยวกับโค้ดของโปรเจ็กต์
- หน่วยความจำ: คุณสามารถระบุข้อเท็จจริงหรือกฎที่ AI ควรจดจำไว้เสมอสำหรับโปรเจ็กต์นี้ ซึ่งจะช่วยรักษาความสอดคล้องกัน
การใช้gemini.mdจะเปลี่ยนโมเดล Gemini ทั่วไปให้กลายเป็นผู้ช่วยผู้เชี่ยวชาญที่ได้รับข้อมูลสรุปเกี่ยวกับเป้าหมายของโปรเจ็กต์และมีสิทธิ์เข้าถึงข้อมูลที่ถูกต้องแล้ว
5. การพัฒนา: สร้าง ADK ด้วย Gemini CLI
การกำหนดค่าสภาพแวดล้อม
ไปที่ Cloud Shell แล้วคลิกปุ่ม "เปิดเทอร์มินัล"
- คัดลอกเทมเพลตสภาพแวดล้อม
cd ~/storygen-learning
cp ~/storygen-learning/env.template ~/storygen-learning/.env
ดูไฟล์ที่ซ่อนในเครื่องมือแก้ไขหากไม่พบ .env
- คลิกดูในแถบเมนูด้านบน
- เลือกสลับไฟล์ที่ซ่อน
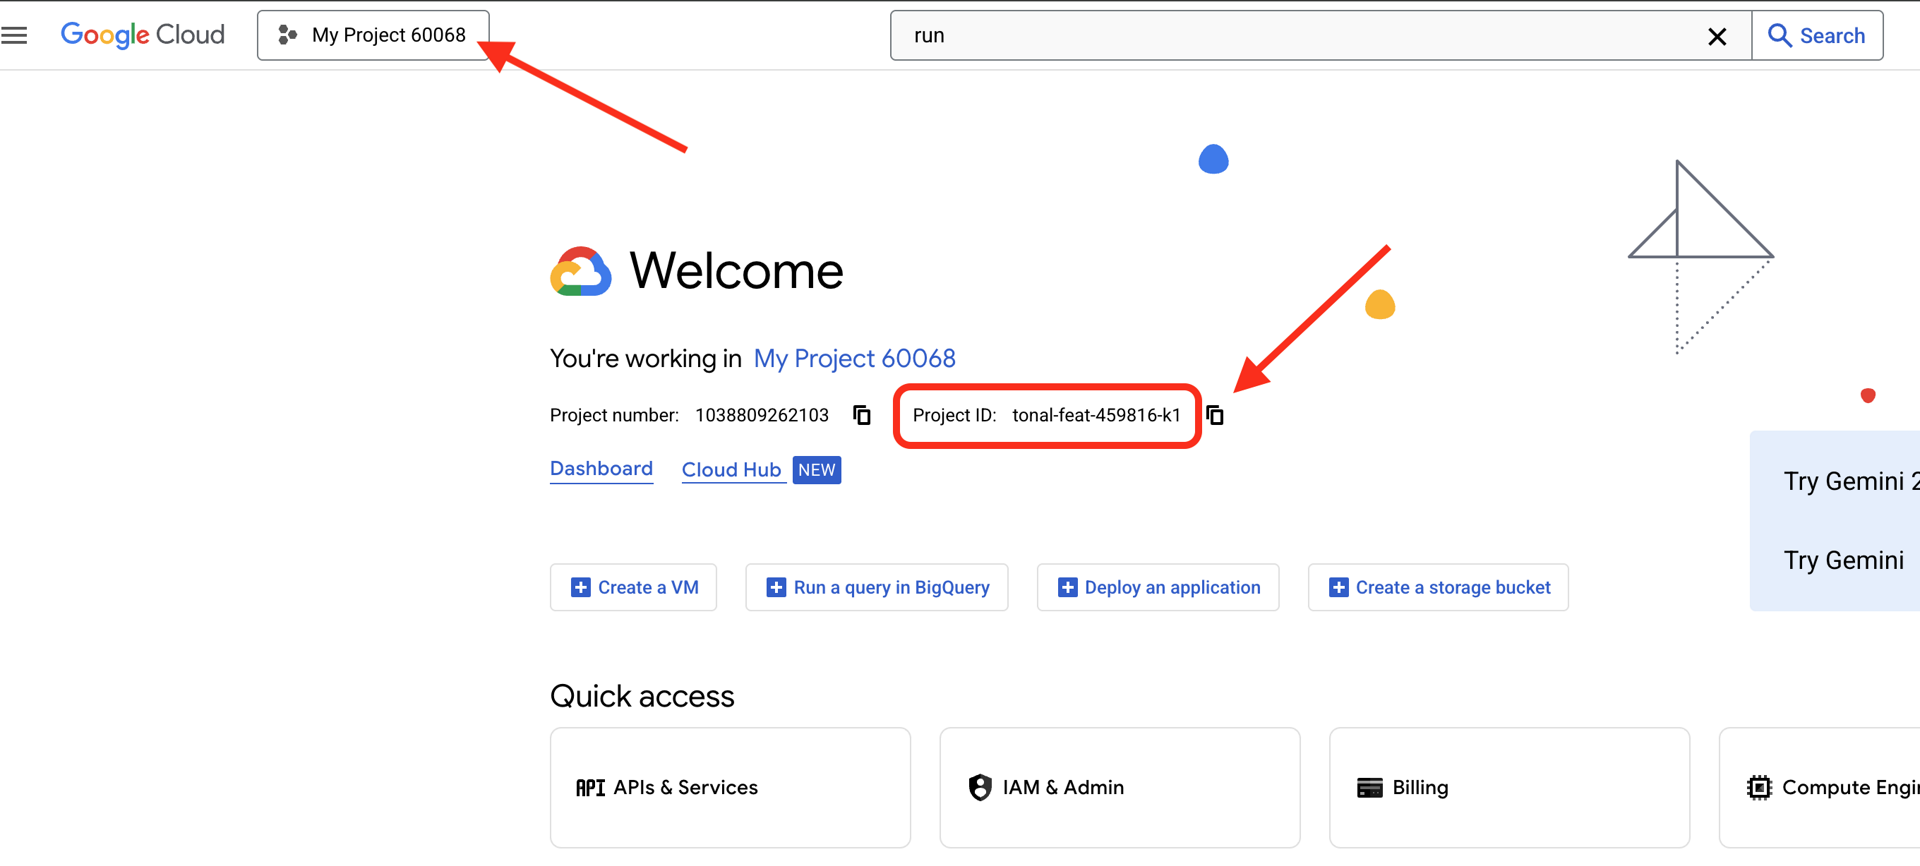
👉ค้นหารหัสโปรเจ็กต์ Google Cloud
- เปิดคอนโซล Google Cloud: link
- เลือกโปรเจ็กต์ที่ต้องการใช้สําหรับเวิร์กช็อปนี้จากเมนูแบบเลื่อนลงของโปรเจ็กต์ที่ด้านบนของหน้า
- รหัสโปรเจ็กต์จะแสดงในการ์ดข้อมูลโปรเจ็กต์ในแดชบอร์ด
👉ค้นหาชื่อผู้ใช้ GitHub
- ไปที่ GitHub แล้วค้นหาชื่อผู้ใช้ GitHub
แก้ไขไฟล์ .env 2. แทนที่ค่าต่อไปนี้ใน .env
GOOGLE_API_KEY=[REPLACE YOUR API KEY HERE]
GOOGLE_CLOUD_PROJECT_ID=[REPLACE YOUR PROJECT ID]
GITHUB_USERNAME=[REPLACE YOUR USERNAME]
GENMEDIA_BUCKET=[REPLACE YOUR PROJECT ID]-bucket
เช่น หากรหัสโปรเจ็กต์คือ testproject คุณควรใส่ GOOGLE_CLOUD_PROJECT_ID=testproject และ GENMEDIA_BUCKET=testproject-bucket
สคริปต์การตั้งค่า
ไปที่ 00_Starting_Here เปิดเทอร์มินัลใหม่ (ไม่ใช่ใน Gemini CLI)
cd ~/storygen-learning/00_Starting_Here
เรียกใช้การตั้งค่าทั้งหมด
./setup-complete.sh
คุณควรเห็นผลการตั้งค่าในเทอร์มินัล
สร้าง Agent ตัวแรก
ไปที่ 01a_First_Agent_Ready มาใช้ Gemini CLI เพื่อสร้าง Agent ของ ADK กัน**
cd ~/storygen-learning/01a_First_Agent_Ready
เปิด Gemini CLI
gemini
ในหน้าต่าง Gamini CLI ให้ลองใช้พรอมต์ต่อไปนี้
I need you to help me create a Google ADK (Agent Development Kit) agent for story generation. I'm working on a children's storybook app that generates creative stories with visual scenes.

Please create a complete `agent.py` file that implements an LlmAgent using Google's ADK framework. The agent should:

**Requirements:**
1. Use the `google.adk.agents.LlmAgent` class
2. Use the "gemini-2.5-flash" model (supports streaming)
3. Be named "story_agent"
4. Generate structured stories with exactly 4 scenes each
5. Output valid JSON with story text, main characters, and scene data
6. No tools needed (images are handled separately)

**Agent Specifications:**
- **Model:** gemini-2.5-flash
- **Name:** story_agent
- **Description:** "Generates creative short stories and accompanying visual keyframes based on user-provided keywords and themes."
**Story Structure Required:**
- Exactly 4 scenes: Setup → Inciting Incident → Climax → Resolution
- 100-200 words total
- Simple, charming language for all audiences
- Natural keyword integration
**JSON Output Format:**

{
  "story": "Complete story text...",
  "main_characters": [
    {
      "name": "Character Name",
      "description": "VERY detailed visual description with specific colors, features, size, etc."
    }
  ],
  "scenes": [
    {
      "index": 1,
      "title": "The Setup",
      "description": "Scene action and setting WITHOUT character descriptions",
      "text": "Story text for this scene"
    }
    // ... 3 more scenes
  ]
}


**Key Instructions for the Agent:**
- Extract 1-2 main characters maximum
- Character descriptions should be extremely detailed and visual
- Scene descriptions focus on ACTION and SETTING only
- Do NOT repeat character appearance in scene descriptions
- Always respond with valid JSON

Please include a complete example in the instructions showing the exact format using keywords like "tiny robot", "lost kitten", "rainy city".

The file should start with necessary imports, define an empty tools list, include a print statement for initialization, and then create the LlmAgent with all the detailed instructions.

Can you create this agent in backend/story_agent/agent.py
เมื่อเสร็จแล้ว ให้ปิดเทอร์มินัล Gemini CLI ด้วย Control+C
—————————————— ไม่บังคับ คุณสามารถข้ามไปยังส่วนวิธีแก้ปัญหาได้——————————————–
ตอนนี้ให้ยืนยันการเปลี่ยนแปลงใน ADK Web
cd ~/storygen-learning/01a_First_Agent_Ready/backend

source ../../.venv/bin/activate

adk web --port 8080
คุณจะต้องมี Command Prompt เพื่อดำเนินการต่อ
สร้างเว็บไซต์
cd ~/storygen-learning/01a_First_Agent_Ready

./start.sh
หากการเปลี่ยนแปลงไม่ได้ผล คุณจะเห็นข้อผิดพลาดใน ADK Web UI และเว็บไซต์
——————————————– วิธีแก้ปัญหาเริ่มต้นที่นี่ ——————————————–
Solution
สิ้นสุดกระบวนการก่อนหน้าด้วย Control+C หรือคุณจะเปิดเทอร์มินัลอื่นก็ได้
cd ~/storygen-learning/01b_First_Agent_Done
สร้างเว็บไซต์:
./start.sh
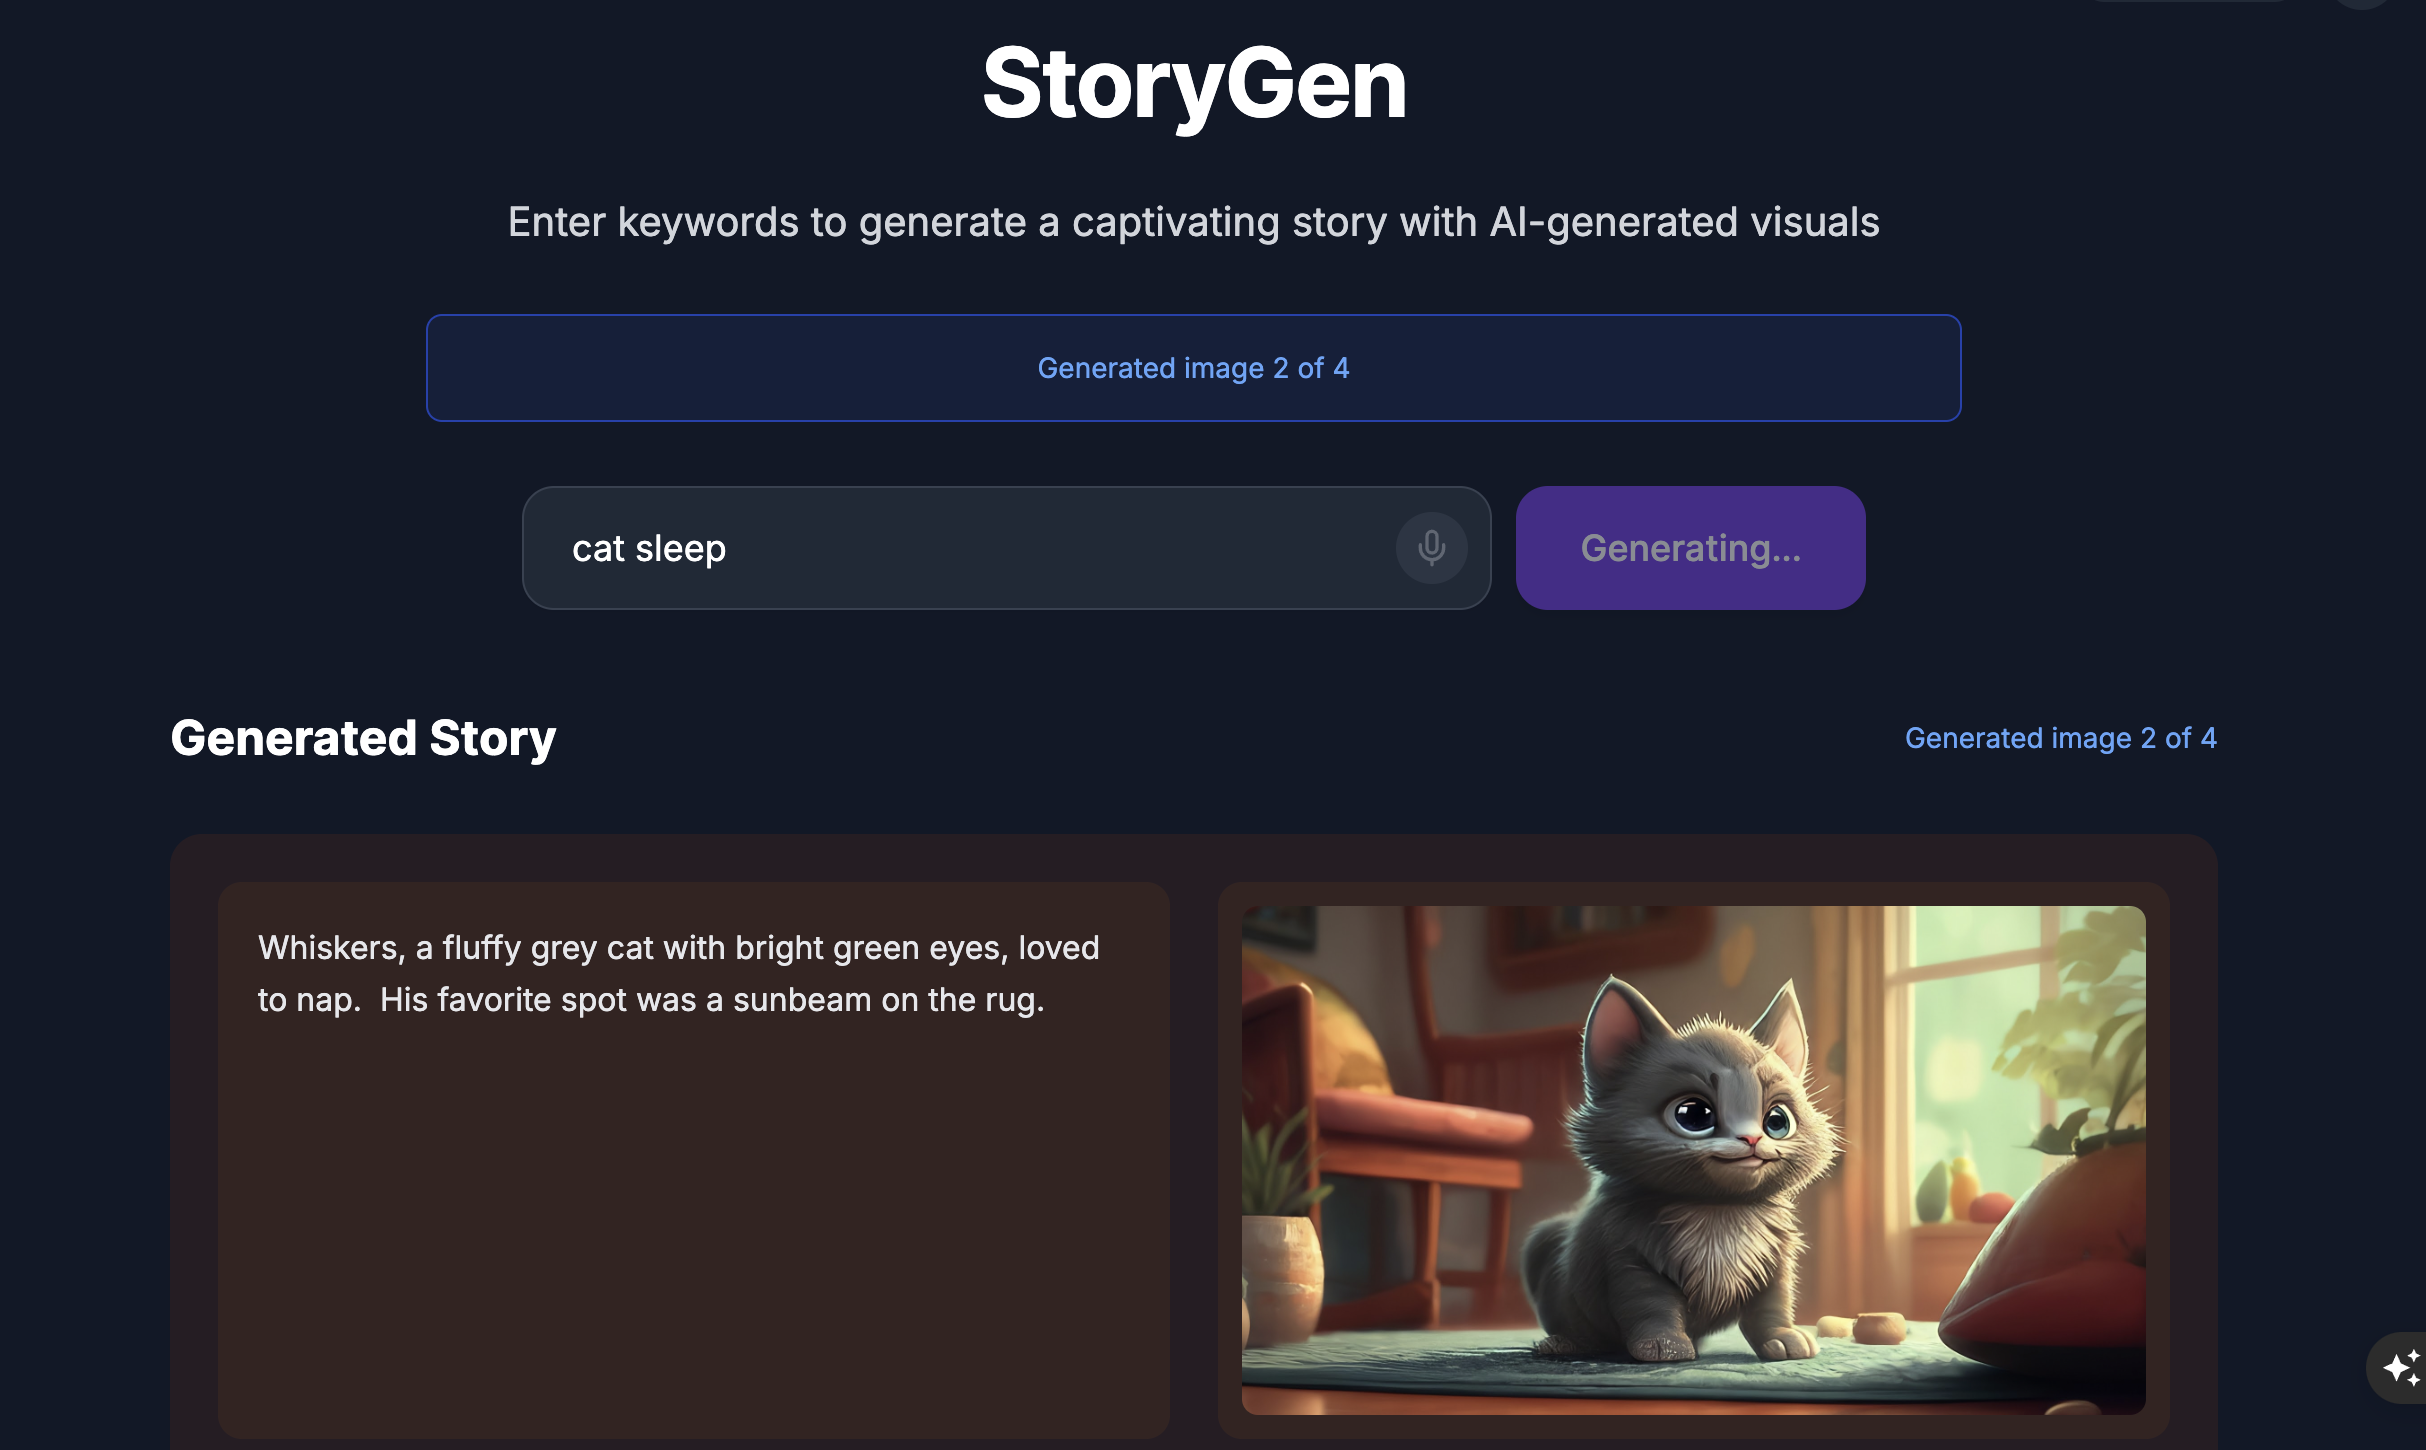
คุณจะเห็นเว็บไซต์ดังนี้
ลองใช้ UI ของ ADK: เปิดเทอร์มินัลอื่น
cd ~/storygen-learning/01b_First_Agent_Done/backend
source ../../.venv/bin/activate

adk web --port 8080
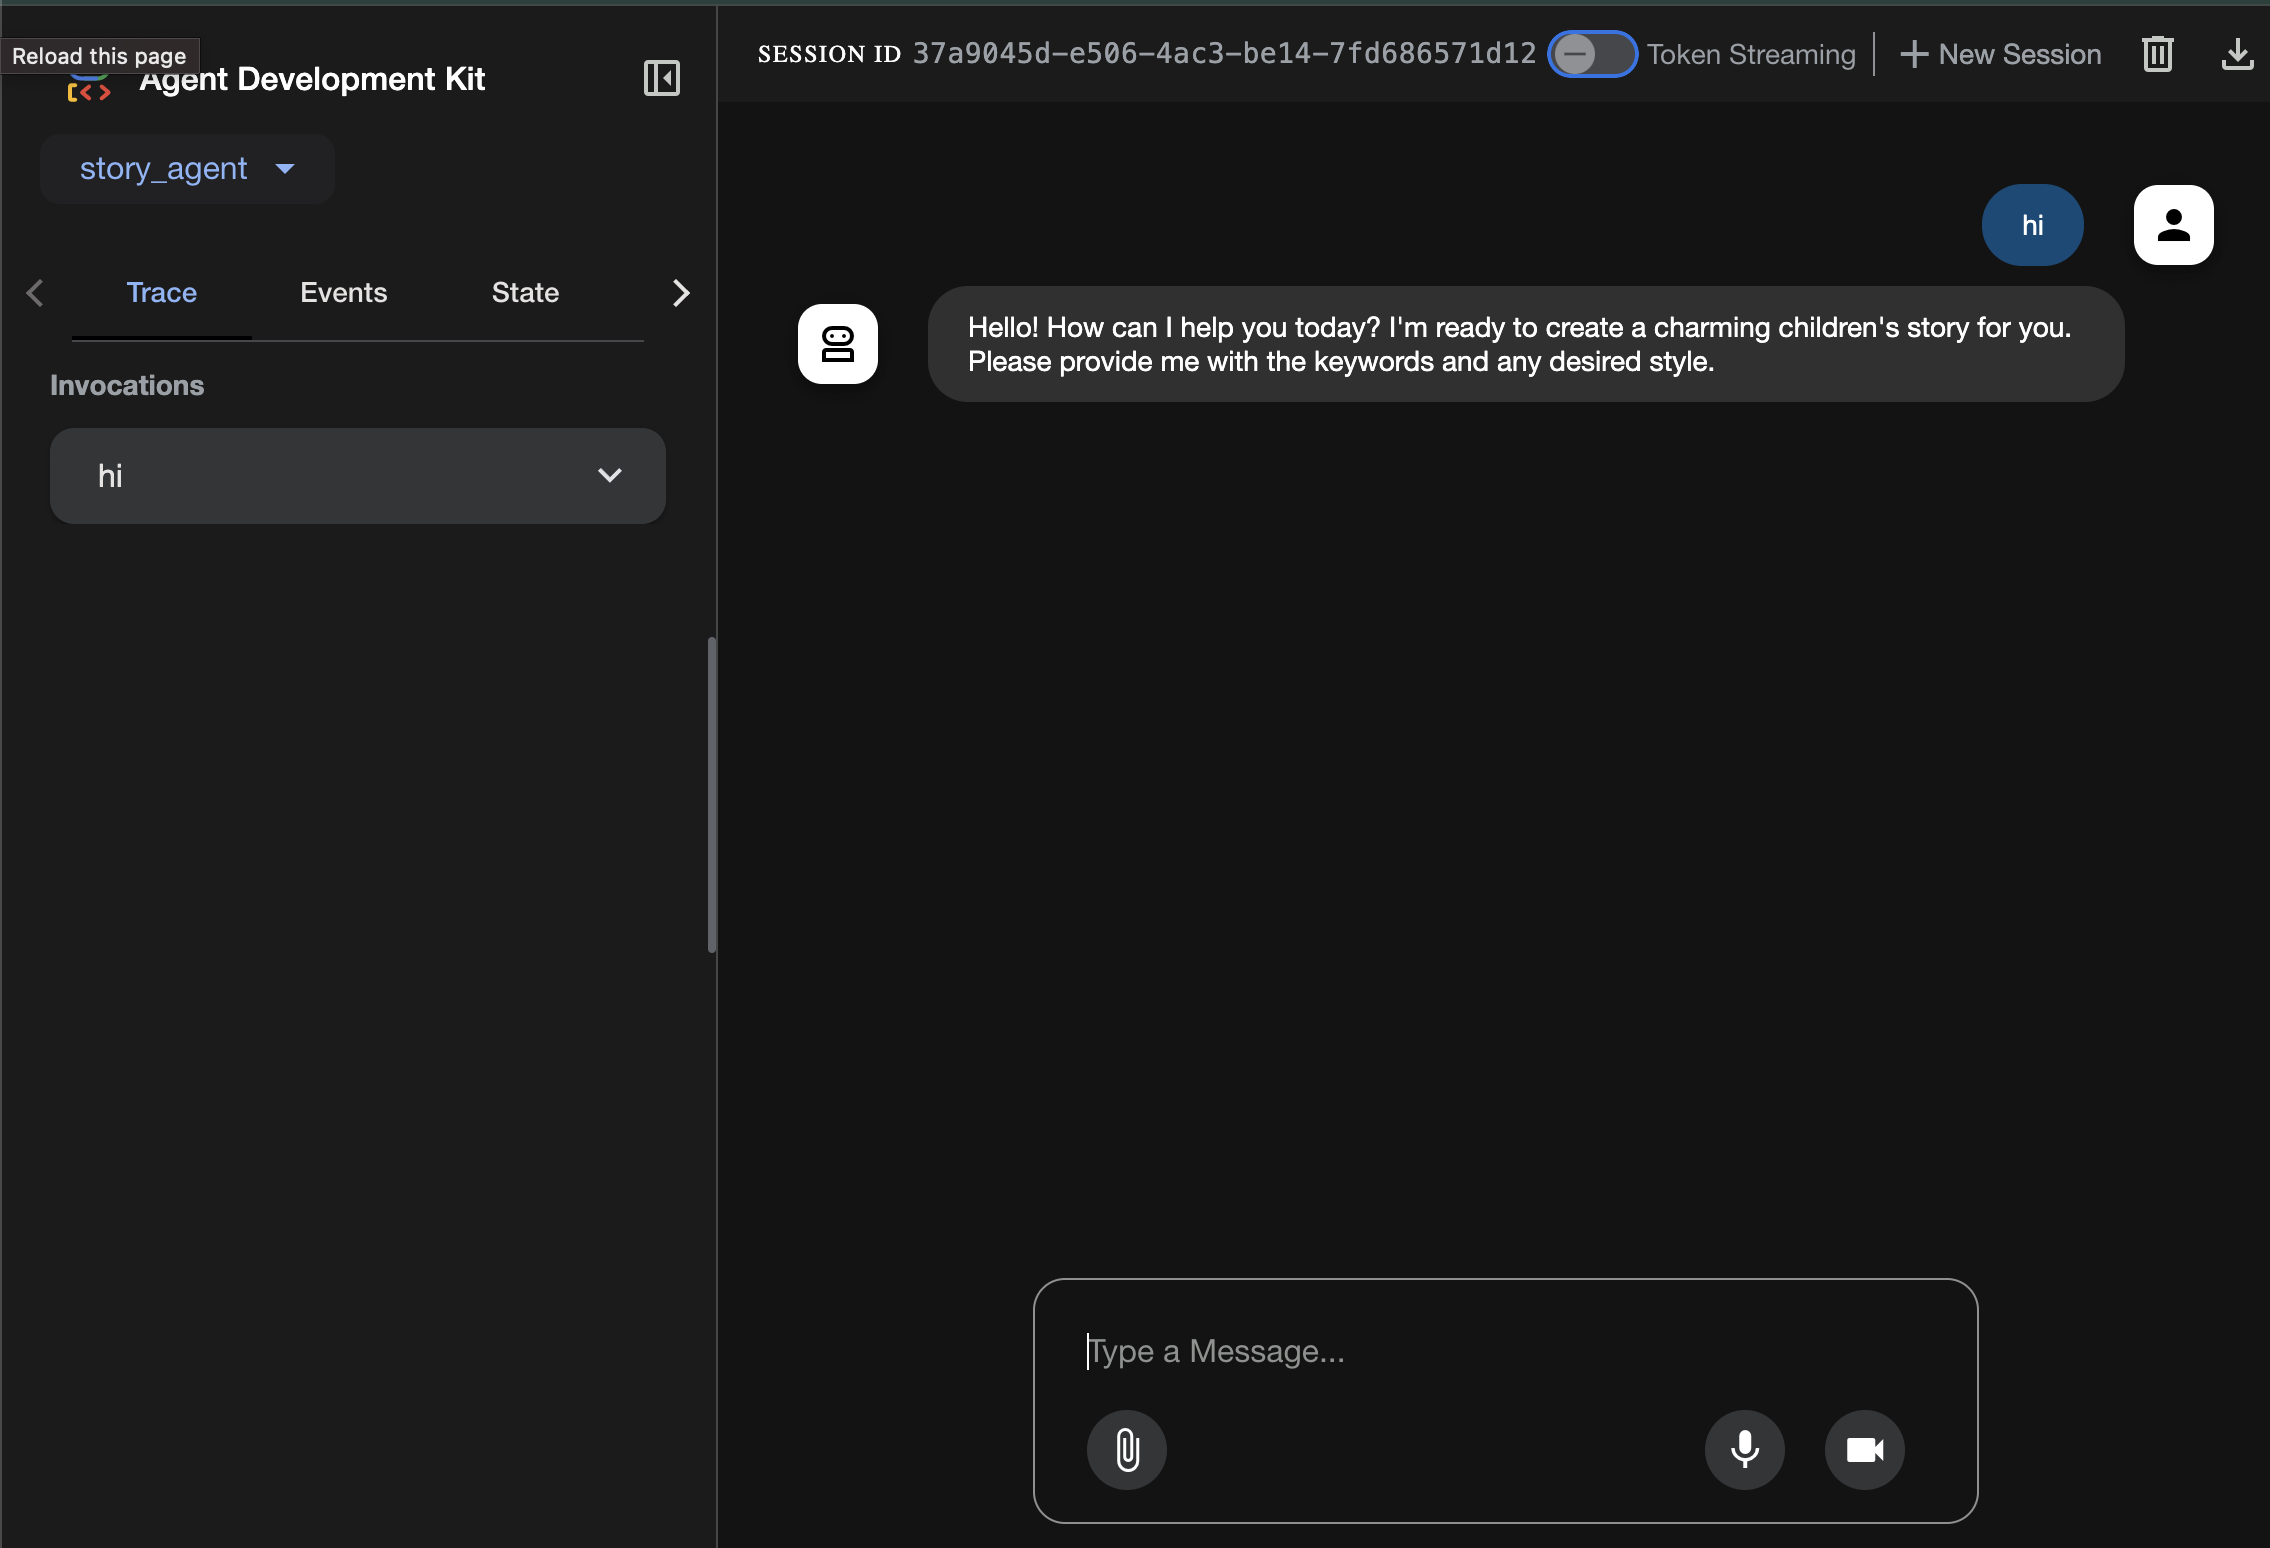
คุณจะเห็น UI ของ ADK ซึ่งคุณสามารถถามคำถามกับ Agent ได้
ก่อนที่จะไปยังส่วนถัดไป ให้กด Ctrl+C เพื่อสิ้นสุดกระบวนการ
6. การพัฒนา: สร้าง ADK ด้วย Gemini CLI - (วิธีวิศวกรรมบริบท)
การตั้งค่าเบื้องต้น
ตรวจสอบว่าเราได้ลบไฟล์ Agent ที่สร้างไว้ก่อนหน้านี้ใน 01a_First_Agent_Ready/backend/story_agent/agent.py แล้ว
ไปที่ 01a_First_Agent_Ready มาใช้ Gemini CLI เพื่อสร้าง Agent ของ ADK กัน**
cd ~/storygen-learning/01a_First_Agent_Ready/backend
เปิด Gemini CLI
gemini
ในหน้าต่าง Gamini CLI ให้ลองใช้พรอมต์ต่อไปนี้
Summarize the design doc @design.md for me, do not attempt to create file just yet.
👉💻 ออกจาก Gemini ชั่วคราวโดยกด Ctrl+C 2 ครั้ง
👉💻 ในเทอร์มินัล ให้เรียกใช้คำสั่งต่อไปนี้เพื่อเขียนไฟล์หลักเกณฑ์
cat << 'EOF' > GEMINI.md
  ### **Coding Guidelines**
  **1. Python Best Practices:**

  *   **Type Hinting:** All function and method signatures should include type hints for arguments and return values.
  *   **Docstrings:** Every module, class, and function should have a docstring explaining its purpose, arguments, and return value, following a consistent format like reStructuredText or
  Google Style.
  *   **Linter & Formatter:** Use a linter like `ruff` or `pylint` and a code formatter like `black` to enforce a consistent style and catch potential errors.
  *   **Imports:** Organize imports into three groups: standard library, third-party libraries, and local application imports. Sort them alphabetically within each group.
  *   **Naming Conventions:**
      *   `snake_case` for variables, functions, and methods.
      *   `PascalCase` for classes.
      *   `UPPER_SNAKE_CASE` for constants.
  *   **Dependency Management:** All Python dependencies must be listed in a `requirements.txt` file.

  **2. Web APIs (FastAPI):**

  *   **Data Validation:** Use `pydantic` models for request and response data validation.
  *   **Dependency Injection:** Utilize FastAPI's dependency injection system for managing resources like database connections.
  *   **Error Handling:** Implement centralized error handling using middleware or exception handlers.
  *   **Asynchronous Code:** Use `async` and `await` for I/O-bound operations to improve performance.
EOF
cat GEMINI.md
เมื่อมีกฎหมายระบุไว้แล้ว เรามาเรียกพาร์ทเนอร์ AI ของเราอีกครั้งและมาดูความมหัศจรรย์ของอาร์ติแฟกต์กัน
👉💻 เปิดใช้ Gemini CLI อีกครั้งจากไดเรกทอรี shadowblade
cd ~/storygen-learning/01a_First_Agent_Ready/backend
clear
gemini
👉✨ ตอนนี้ก็ขอความช่วยเหลือจาก Gemini ให้แสดงสิ่งที่กำลังคิดอยู่ได้เลย อ่านรูนแล้ว
/memory show
👉✨ นี่คือคำสั่งเดียวที่ทรงพลังซึ่งจะสร้าง Agent ของคุณ ออกเลย
You are an expert Python developer specializing in the Google Agent Development Kit (ADK). Your task is to write the complete, production-quality code for `agent.py` by following the technical specifications outlined in the provided design document verbatim.

Analyze the design document at `@design.md` and generate the corresponding Python code for `agent.py`.

I need you to generate a Python script based on the provided design document and reference examples. Follow these requirements:

Read the design document carefully - it contains the complete technical specification for the code you need to write
Follow the structure and patterns shown in the reference context files
Adhere to all Python best practices specified in the coding standards document
Implement every requirement mentioned in the design document exactly as specified
Use the exact variable names, function names, and string values mentioned in the specifications

The design document describes the complete architecture, dependencies, configuration, and logic flow. Your generated code must match these specifications precisely while following professional Python coding standards.
Generate clean, production-ready Python code that can be used immediately without modifications.
เมื่อเสร็จแล้ว ให้ปิดเทอร์มินัล Gemini CLI ด้วย Control+C
—————————————— ไม่บังคับ คุณสามารถข้ามไปยังส่วนวิธีแก้ปัญหาได้——————————————–
ตอนนี้ให้ยืนยันการเปลี่ยนแปลงใน ADK Web
cd ~/storygen-learning/01a_First_Agent_Ready/backend

source ../../.venv/bin/activate

adk web --port 8080
คุณจะต้องมี Command Prompt เพื่อดำเนินการต่อ
สร้างเว็บไซต์
cd ~/storygen-learning/01a_First_Agent_Ready

./start.sh
หากการเปลี่ยนแปลงไม่ได้ผล คุณจะเห็นข้อผิดพลาดใน ADK Web UI และเว็บไซต์
——————————————– วิธีแก้ปัญหาเริ่มต้นที่นี่ ——————————————–
Solution
สิ้นสุดกระบวนการก่อนหน้าด้วย Control+C หรือคุณจะเปิดเทอร์มินัลอื่นก็ได้
cd ~/storygen-learning/01b_First_Agent_Done
สร้างเว็บไซต์:
./start.sh
คุณจะเห็นเว็บไซต์ดังนี้
ลองใช้ UI ของ ADK: เปิดเทอร์มินัลอื่น
cd ~/storygen-learning/01b_First_Agent_Done/backend
source ../../.venv/bin/activate

adk web --port 8080
คุณจะเห็น UI ของ ADK ซึ่งคุณสามารถถามคำถามกับ Agent ได้
ก่อนที่จะไปยังส่วนถัดไป ให้กด Ctrl+C เพื่อสิ้นสุดกระบวนการ
7. การพัฒนา: สร้าง Agent ที่กำหนดเองด้วย Imagen
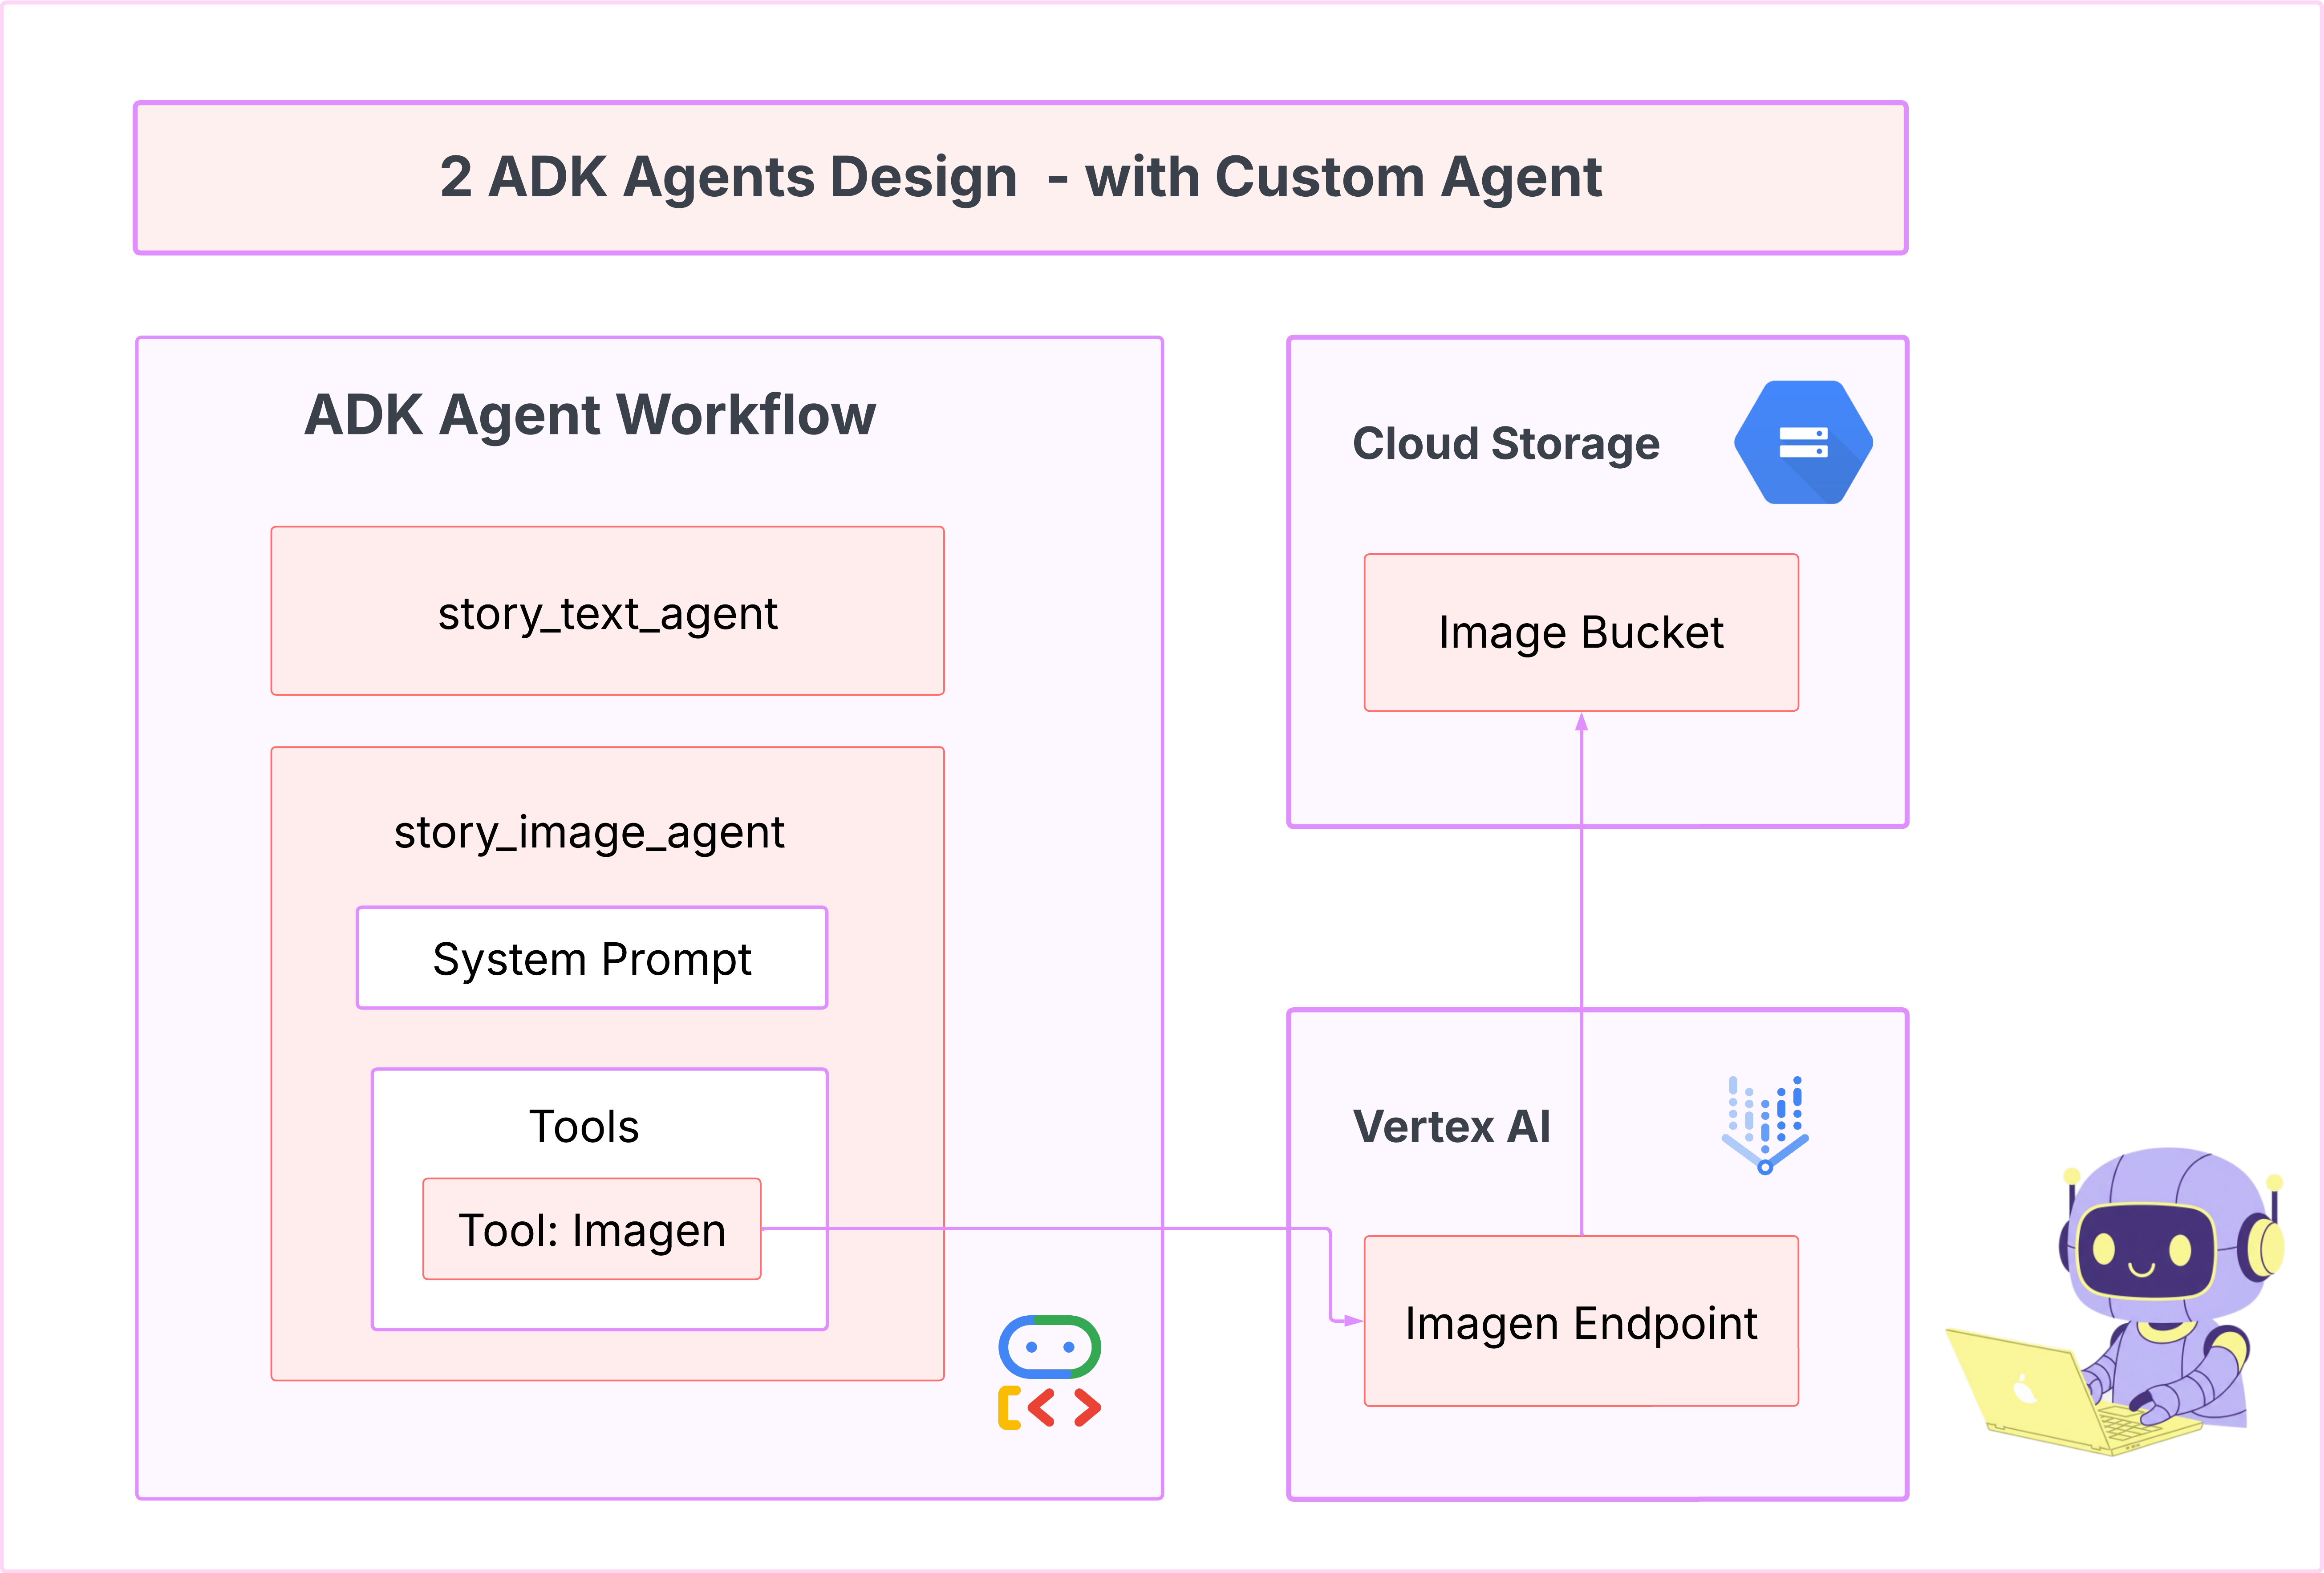
สร้างเครื่องมือ Imagen (เอเจนต์ที่ 2)
cd ~/storygen-learning/02a_Image_Agent_Ready
ใช้ Gemini CLI เพื่อสร้าง Agent การสร้างรูปภาพ
gemini generate "I need you to help me create a custom Google ADK (Agent Development Kit) agent for image generation. This is different from the story agent - this one handles image generation directly using the BaseAgent pattern for full control over tool execution.

Please create a complete `agent.py` file that implements a custom image generation agent. The agent should:

**Requirements:**
1. Use the `google.adk.agents.BaseAgent` class (NOT LlmAgent)
2. Be named "custom_image_agent"
3. Directly execute the ImagenTool without LLM intermediation
4. Handle JSON input with scene descriptions and character descriptions
5. Store results in session state for retrieval by main.py
6. Use async generators and yield Events

**Key Specifications:**
- **Class Name:** CustomImageAgent (inherits from BaseAgent)
- **Agent Name:** "custom_image_agent"
- **Tool:** Uses ImagenTool for direct image generation
- **Purpose:** Bypass LLM agent limitations and directly call ImagenTool

**Input Format:**
The agent should handle JSON input like:
{
  "scene_description": "Scene action and setting",
  "character_descriptions": {
    "CharacterName": "detailed visual description"
  }
}


**Core Method:** `async def _run_async_impl(self, ctx: InvocationContext) -> AsyncGenerator[Event, None]:`
   - Extract user message from `ctx.user_content.parts`
   - Parse JSON input or fallback to plain text
   - Extract scene_description and character_descriptions
   - Build image prompt with style prefix: "Children's book cartoon illustration with bright vibrant colors, simple shapes, friendly characters."
   - Include character descriptions for consistency
   - Call `await self.imagen_tool.run()` directly
   - Store results in `ctx.session.state["image_result"]`
   - Yield Event with results


 **Session State:**
   - Store JSON results in `ctx.session.state["image_result"]`
   - Include success/error status
   - Store actual image URLs or error messages

Expected Output Structure:
- Successful results stored as JSON with image URLs
- Error results stored as JSON with error messages
- Results accessible via session state in main.py

Can you create this agent in backend/story_image_agent/agent.py

"
—————————————— ไม่บังคับ คุณสามารถข้ามไปยังส่วนวิธีแก้ปัญหาได้——————————————–
ตอนนี้ให้ยืนยันการเปลี่ยนแปลงใน ADK Web
cd ~/storygen-learning/02a_Image_Agent_Ready/backend

source ../../.venv/bin/activate

adk web --port 8080
สร้างเว็บไซต์
cd ~/storygen-learning/02a_Second_Agent_Ready

./start.sh
หากการเปลี่ยนแปลงไม่ได้ผล คุณจะเห็นข้อผิดพลาดใน ADK Web UI และเว็บไซต์
—————————————— วิธีแก้ไขปัญหาเริ่มจากตรงนี้ ———————————————
Solution
สิ้นสุดกระบวนการก่อนหน้าด้วย Control+C หรือคุณจะเปิดเทอร์มินัลอื่นก็ได้
# Open new terminal
cd ~/storygen-learning/02b_Image_Agent_Done
สร้างเว็บไซต์:
./start.sh
คุณจะเห็นเว็บไซต์ดังนี้
ลองใช้ UI ของ ADK: เปิดเทอร์มินัลอื่น
# Open new terminal
cd ~/storygen-learning/02b_Image_Agent_Done/backend

source ../../.venv/bin/activate

adk web --port 8080
คุณจะเห็น UI ของ ADK ซึ่งคุณสามารถถามคำถามกับ Agent ได้
ก่อนที่จะไปยังส่วนถัดไป ให้กด Ctrl+C เพื่อสิ้นสุดกระบวนการ
กำลังเรียนรู้
เอเจนต์ตัวแรกของเราเก่งเรื่องการสร้างข้อความ แต่ตอนนี้เราต้องการสร้างรูปภาพ เราต้องควบคุมโดยตรงมากขึ้นสำหรับงานนี้ เราไม่ต้องการให้ LLM ตัดสินใจว่าจะสร้างรูปภาพหรือไม่ แต่ต้องการสั่งให้สร้างรูปภาพโดยตรง งานนี้เหมาะกับ BaseAgent อย่างยิ่ง
BaseAgent เป็นแบบคำสั่ง ซึ่งแตกต่างจาก LlmAgent ที่เป็นแบบประกาศ ซึ่งหมายความว่าคุณในฐานะนักพัฒนาซอฟต์แวร์จะต้องเขียนตรรกะ Python แบบทีละขั้นตอนที่แน่นอนภายในเมธอด _run_async_impl คุณควบคุมโฟลว์การดำเนินการได้อย่างเต็มที่
คุณจะเลือก BaseAgent เมื่อต้องการสิ่งต่อไปนี้
ตรรกะที่แน่นอน: เอเจนต์ต้องทำตามลำดับขั้นตอนที่เฉพาะเจาะจงและเปลี่ยนแปลงไม่ได้
การดำเนินการเครื่องมือโดยตรง: คุณต้องการเรียกใช้เครื่องมือโดยตรงโดยไม่ต้องมี LLM เข้าแทรกแซง
เวิร์กโฟลว์ที่ซับซ้อน: กระบวนการนี้เกี่ยวข้องกับการจัดการข้อมูลที่กำหนดเอง, การเรียก API และตรรกะที่ซับซ้อนเกินกว่าที่ LLM จะอนุมานจากพรอมต์เพียงอย่างเดียวได้อย่างน่าเชื่อถือ
สำหรับแอปของเรา เราจะใช้ BaseAgent เพื่อรับคำอธิบายฉากจากเอเจนต์ตัวแรกและเรียกใช้เครื่องมือ Imagen โดยตรงเพื่อให้มั่นใจว่าจะมีการสร้างรูปภาพสำหรับแต่ละฉาก
8. การทดสอบ: การประเมินตัวแทน
แอปของเราใช้งานได้ แต่เราต้องการระบบทดสอบที่ปลอดภัยโดยอัตโนมัติ นี่คืองานที่เหมาะอย่างยิ่งที่จะมอบหมายให้ AI Co-Pilot ของเรา
การดำเนินการ
cd ~/storygen-learning/03a_Agent_Evaluation_Ready/backend
ใช้ Gemini CLI เพื่อเขียนการทดสอบที่ครอบคลุม:
เปิด Gemini CLI
gemini
ในหน้าต่าง Gamini CLI ให้ลองใช้พรอมต์ต่อไปนี้
I need you to create comprehensive test files for my backend/story_agent in Google ADK. I need three specific JSON files that match the testing structure used in ADK evaluation.

**Context:**
- The story agent generates structured JSON stories with exactly 4 scenes
- It uses LlmAgent with no tools, just direct LLM responses
- Input: Keywords
- Output: JSON with story, main_characters, and scenes arrays

**Files to Create:**

### 1. `story_agent_eval.evalset.json` (Comprehensive Integration Tests)
Create a comprehensive evaluation set with:
- **eval_set_id**: "story_agent_comprehensive_evalset"
- **name**: "Story Agent Comprehensive Evaluation Set"
- **description**: "Comprehensive evaluation scenarios for story_agent covering various keyword combinations, edge cases, and story quality metrics"


Each eval_case should include:
- Full conversation arrays with invocation_id, user_content, final_response
- Complete expected JSON responses with detailed stories, characters, and 4 scenes
- session_input with app_name "story_agent"
- All fields: story (narrative text), main_characters (with detailed visual descriptions), scenes (with index, title, description, text)

### 2. `story_generation.test.json` (Unit Tests)
Create basic generation tests with:
- **eval_set_id**: "story_agent_basic_generation_tests"
- **name**: "Story Agent Basic Generation Tests"
- **description**: "Unit tests for story_agent focusing on JSON structure compliance, scene generation, and keyword integration"

### 3. `test_config.json` (Evaluation Configuration)
Create test configuration with:
- **criteria**: response_match_score: 0.7, tool_trajectory_avg_score: 1.0
- **custom_evaluators**:
  - json_structure_validator (validates required fields, scene count, character fields)
  - story_quality_metrics (word count 80-250, keyword integration threshold 0.8)
- **evaluation_notes**: Story agent specifics and trajectory expectations

**Important Requirements:**
1. All responses must be valid, parseable JSON
2. Stories must have exactly 4 scenes with indices 1-4
3. Each scene must have: index, title, description, text
4. Main characters must have detailed visual descriptions
5. No tool_uses expected (empty arrays) since story agent uses direct LLM
6. Word count should be 100-200 words total
7. Keywords must be naturally integrated into the narrative

Please generate all three files with realistic example stories and comprehensive test coverage matching the ADK evaluation format.
—————————————— ไม่บังคับ คุณสามารถข้ามไปยังส่วนวิธีแก้ปัญหาได้——————————————–
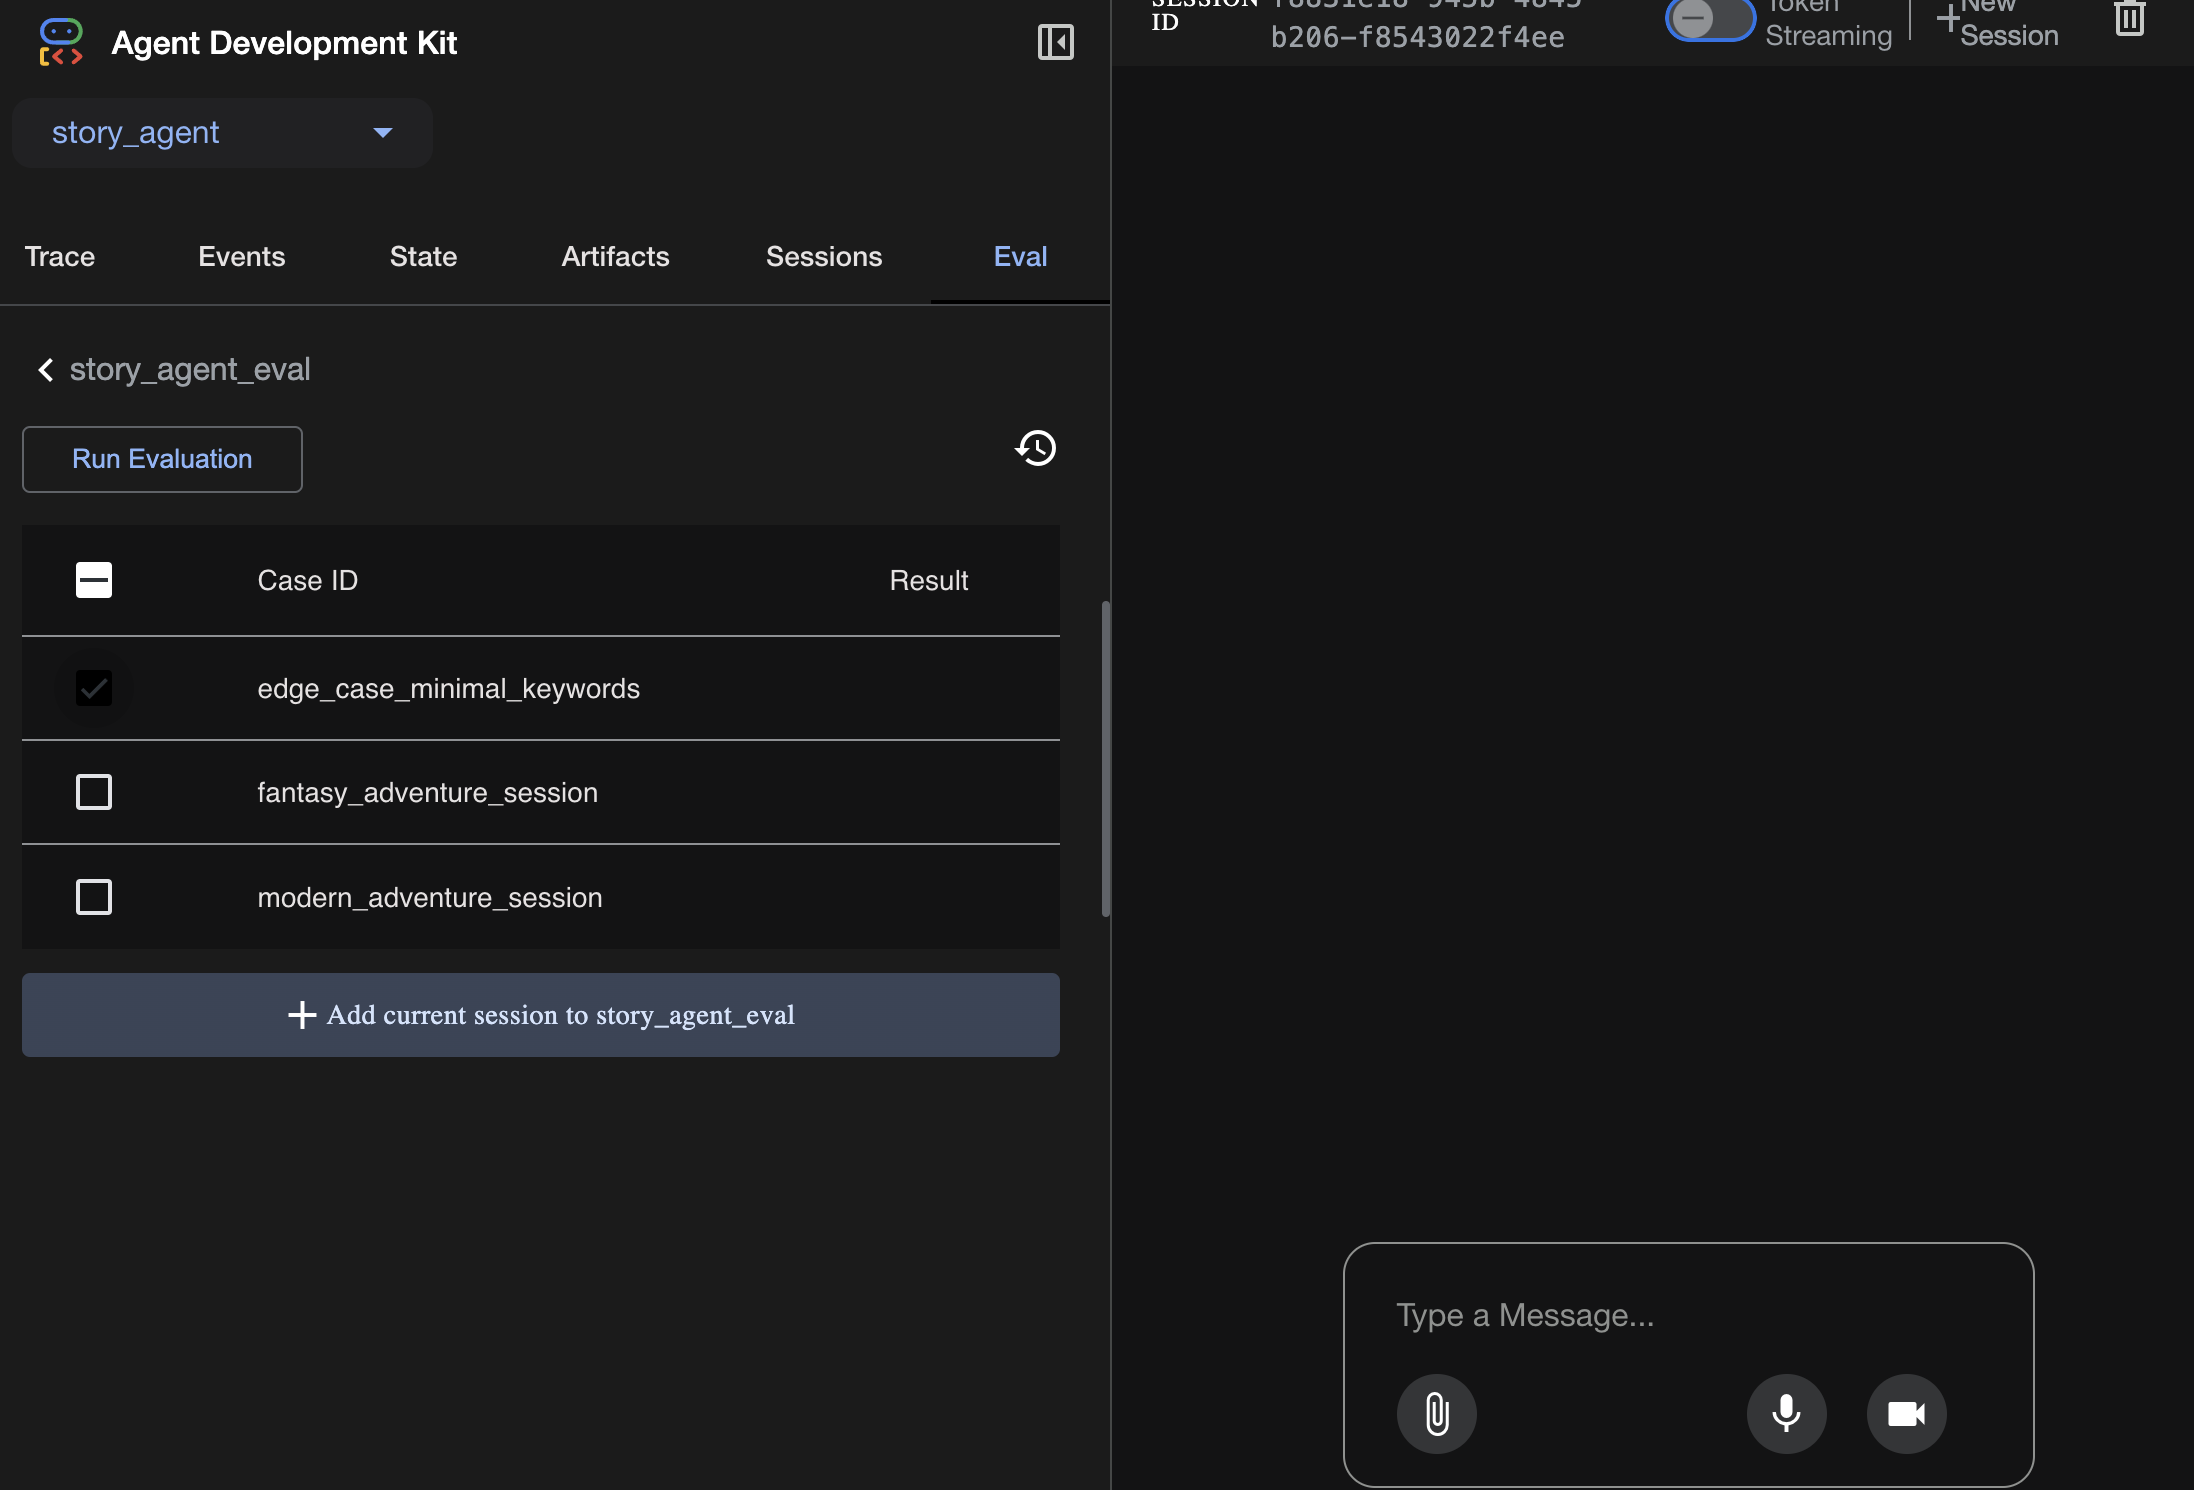
วิธีดูการประเมิน
./run_adk_web_persistent.sh
ไปที่แท็บ eval ใน UI ของ ADK
คุณควรเห็น UI เว็บของ ADK ที่มีความสามารถในการทดสอบแบบต่อเนื่อง
ช่วงเวลาสำคัญในการเรียนรู้: AI เป็นพาร์ทเนอร์ที่มีประสิทธิภาพในการทำให้การประกันคุณภาพเป็นไปโดยอัตโนมัติ โดยจะจัดการโค้ดมาตรฐานของการเขียนการทดสอบ ทำให้คุณมีเวลาในการมุ่งเน้นที่การสร้างฟีเจอร์
——————————————– วิธีแก้ปัญหาเริ่มต้นที่นี่ ——————————————–
Solution
- ไปที่โฟลเดอร์โซลูชัน
cd ~/storygen-learning/03b_Agent_Evaluation_Done/backend
- เปิด UI บนเว็บของ ADK
./run_adk_web_persistent.sh
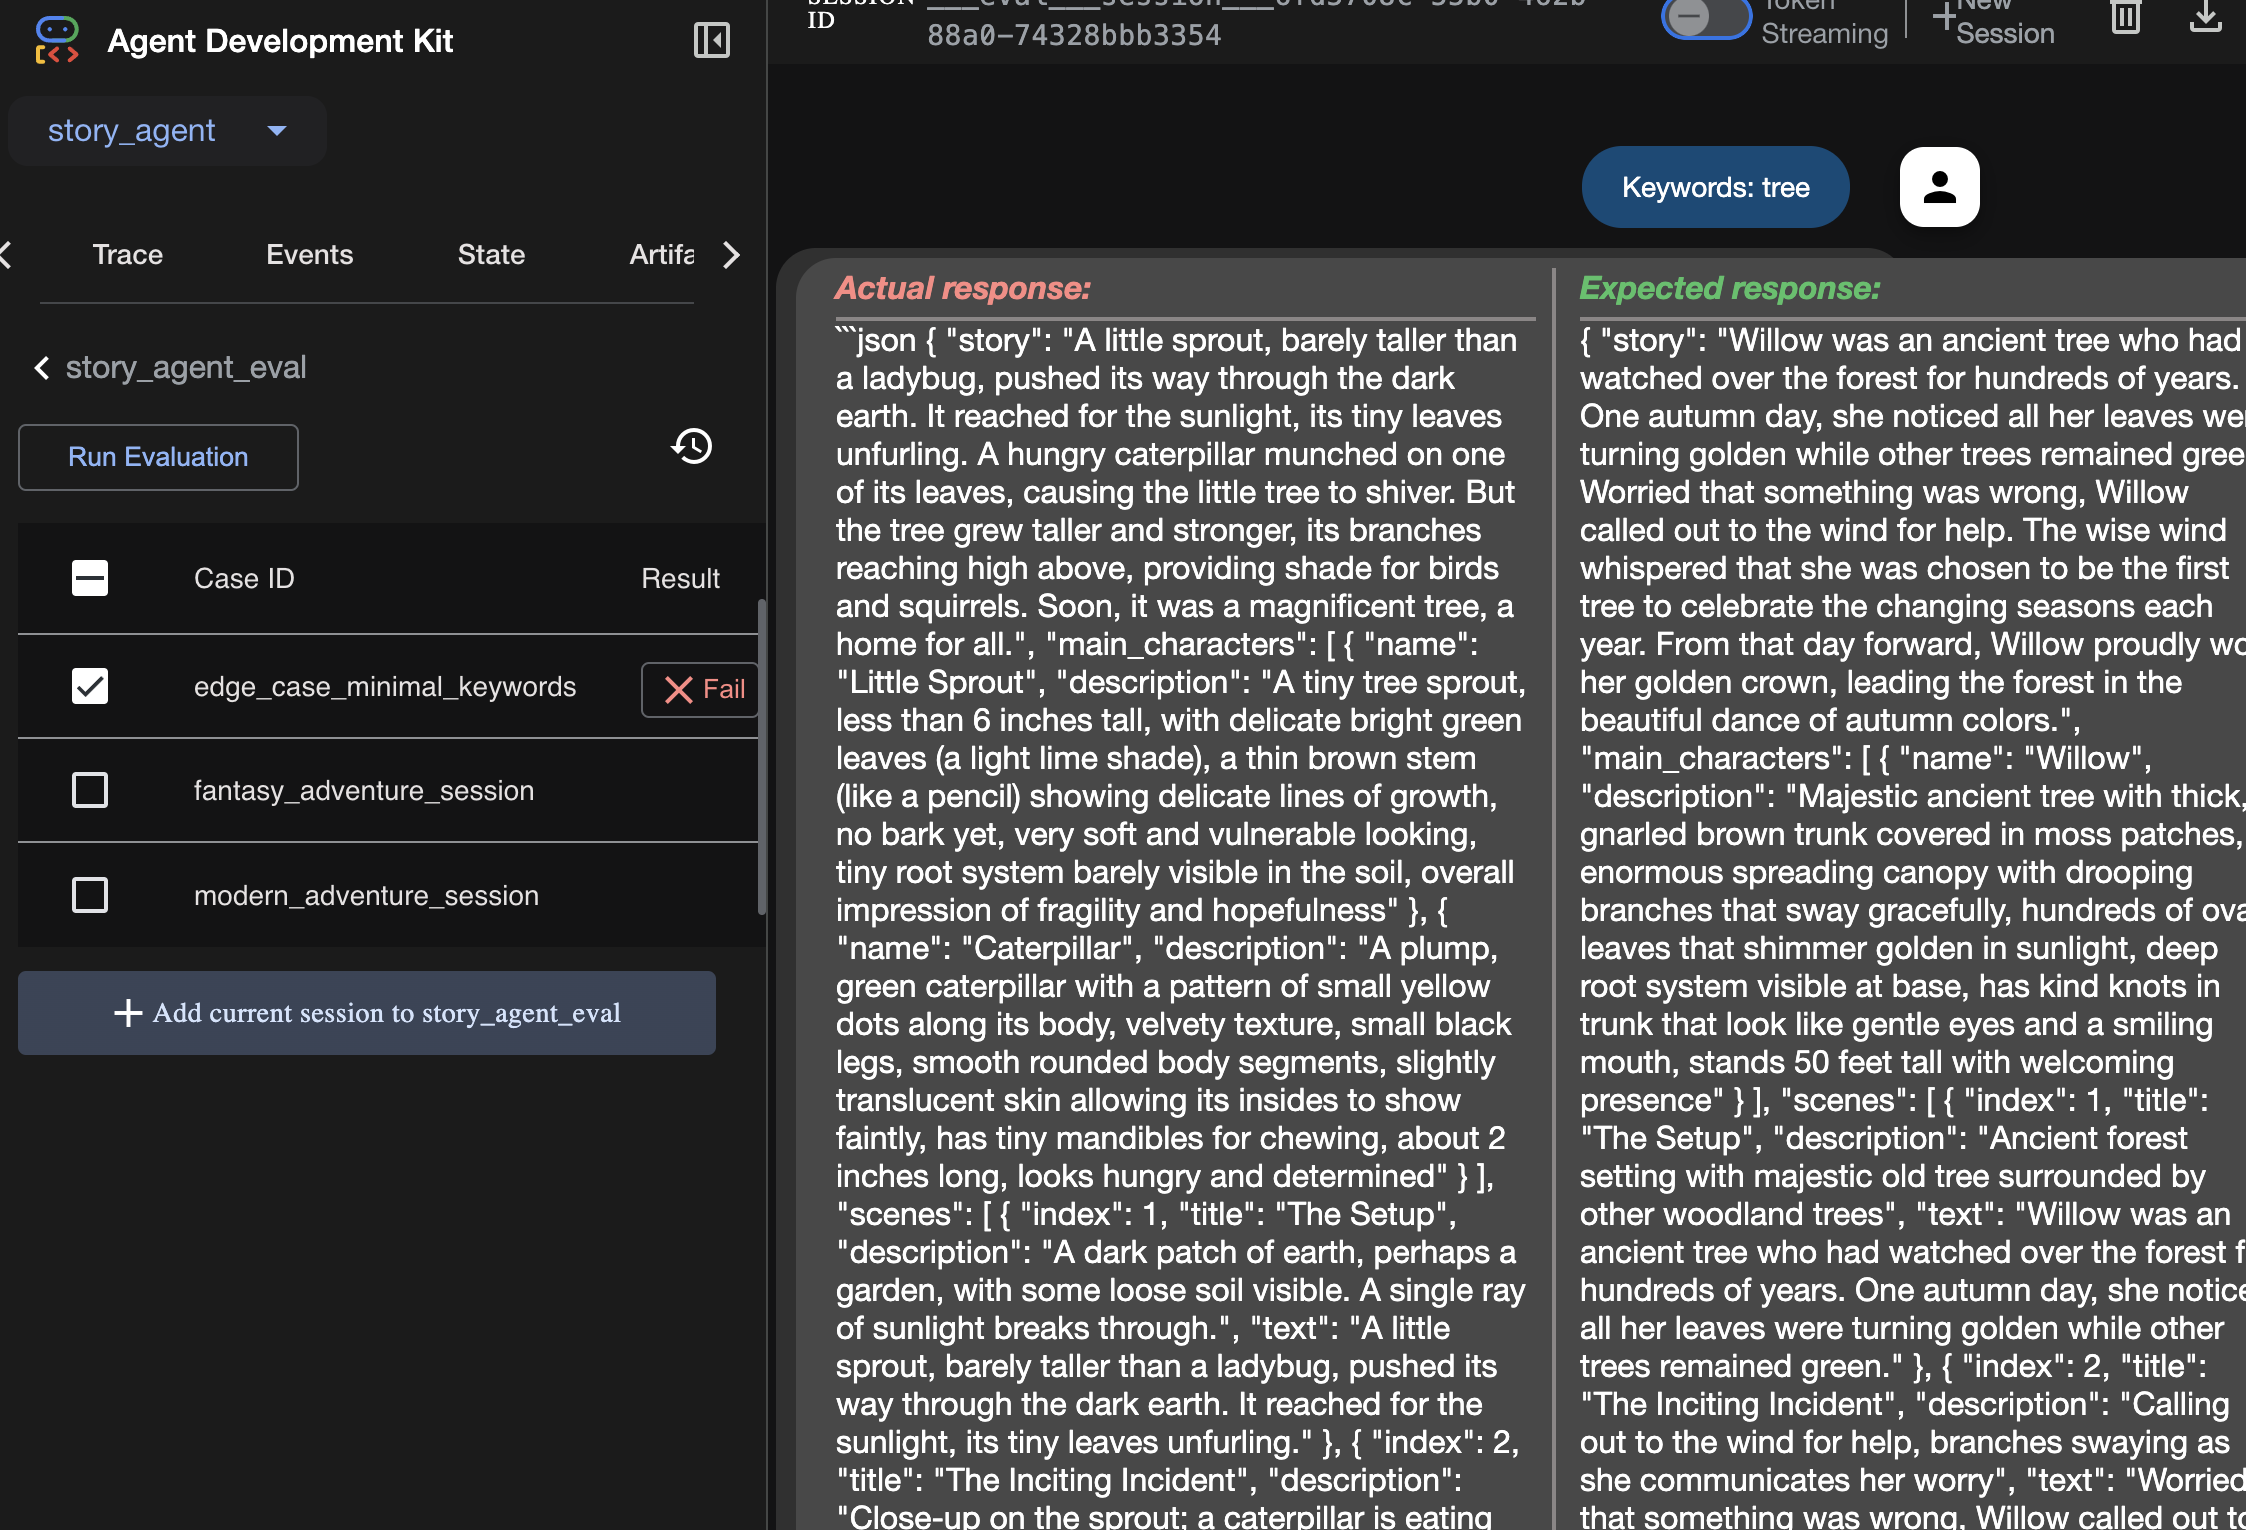
คุณดูกรณีทดสอบได้จากแท็บ Eval โดยทำดังนี้
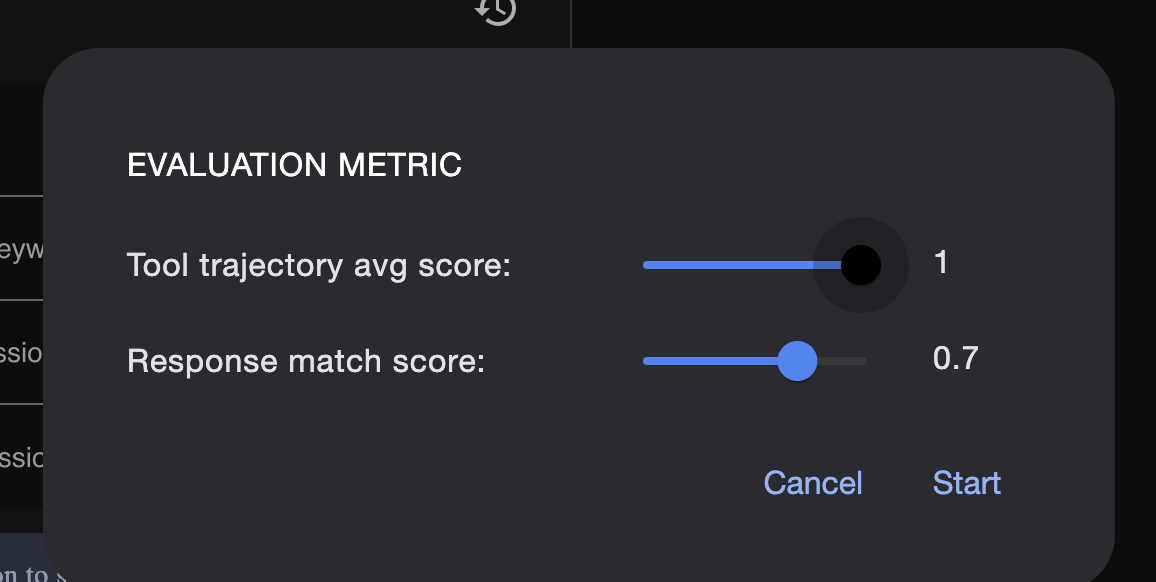
ปรับเมตริกได้ที่นี่
ดูผลการเรียกใช้การประเมินที่นี่
กำลังเรียนรู้
เอเจนต์สามารถ "ทำงาน" ได้โดยไม่มีข้อผิดพลาด แต่เราจะรู้ได้อย่างไรว่าเอเจนต์สร้างเอาต์พุตที่ถูกต้อง เรื่องราวดีไหม รูปแบบ JSON ถูกต้องหรือไม่ ซึ่งเป็นจุดที่กรอบการประเมินของ ADK เข้ามามีบทบาท
การประเมินเอเจนต์คือระบบการทดสอบอัตโนมัติที่ออกแบบมาเพื่อวัดคุณภาพและความถูกต้องของการตอบกลับของเอเจนต์ แทนที่จะตรวจสอบข้อผิดพลาดของโค้ดเพียงอย่างเดียว เครื่องมือนี้จะตรวจสอบว่าลักษณะการทำงานของเอเจนต์เป็นไปตามที่คุณคาดหวังหรือไม่ โดยเฟรมเวิร์กจะใช้ไฟล์หลัก 2-3 ไฟล์เป็นหลัก ดังนี้
evalset.json: ชุดทดสอบหลัก "กรณีการประเมิน" แต่ละรายการในไฟล์นี้มีการสนทนาตัวอย่าง (เช่น พรอมต์ของผู้ใช้) และคำตอบที่ "ดีที่สุด" ที่คุณคาดหวังให้เอเจนต์สร้างขึ้น
test_config.json: ไฟล์นี้กำหนดกฎสำหรับความสำเร็จ คุณกำหนดเกณฑ์ได้ที่นี่ เช่น
response_match_score: การตอบกลับของ Agent ต้องตรงกับการตอบกลับ "ที่ถูกต้อง" มากน้อยเพียงใด (คะแนน 1.0 หมายความว่าต้องเหมือนกันทุกประการ)
custom_evaluators: คุณสร้างกฎของคุณเองได้ เช่น "คำตอบต้องเป็น JSON ที่ถูกต้อง" หรือ "เรื่องราวต้องมีคำมากกว่า 100 คำ"
การเรียกใช้การประเมินช่วยให้คุณทดสอบเอเจนต์กับสถานการณ์ต่างๆ หลายสิบสถานการณ์ได้โดยอัตโนมัติ เพื่อให้มั่นใจว่าการเปลี่ยนแปลงพรอมต์หรือเครื่องมือจะไม่ทําให้ฟังก์ชันหลักของเอเจนต์หยุดทํางานโดยไม่ตั้งใจ ซึ่งเป็นเครื่องมือที่ทรงพลังในการสร้าง AI Agent ที่พร้อมใช้งานจริง
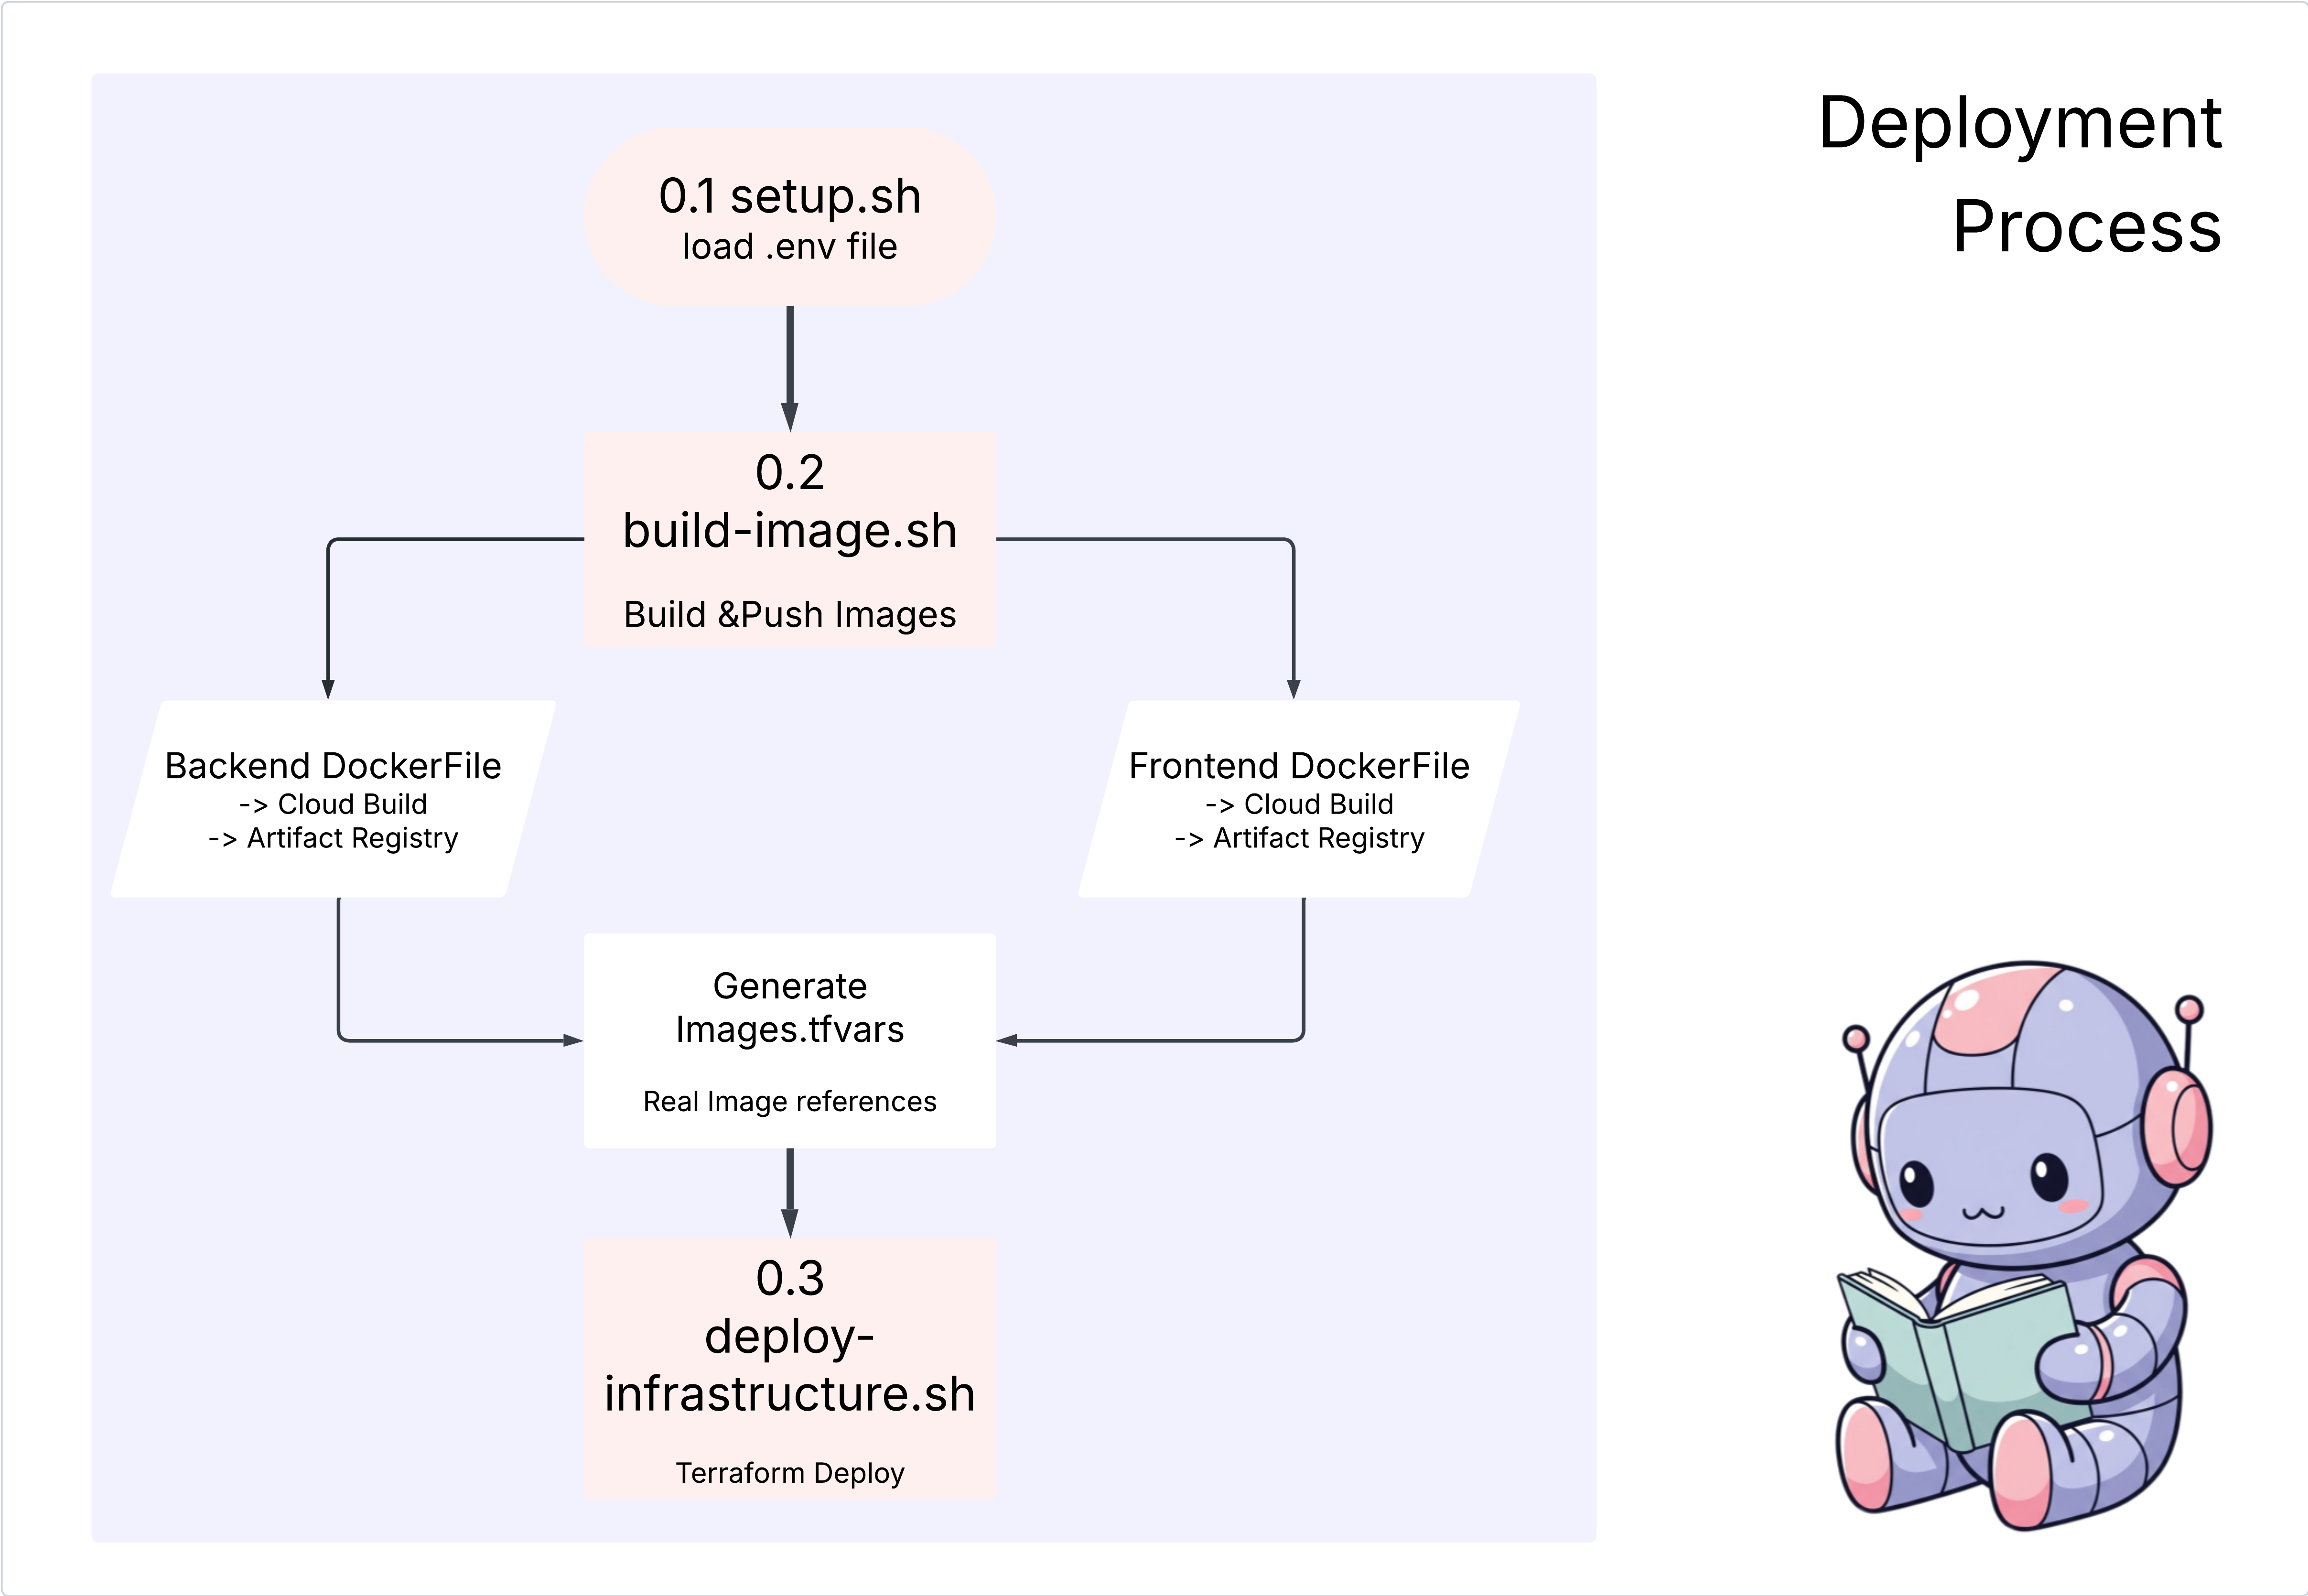
9. โครงสร้างพื้นฐานเป็นโค้ด (IaC): การสร้างบ้านในระบบคลาวด์
เราได้ทดสอบโค้ดแล้ว แต่ยังต้องการที่อยู่สำหรับใช้งานจริง เราจะใช้ "โครงสร้างพื้นฐานเป็นโค้ด" เพื่อกำหนดสภาพแวดล้อม
Docker คืออะไร
Docker เป็นแพลตฟอร์มสำหรับสร้างและเรียกใช้แอปพลิเคชันในคอนเทนเนอร์ โดยให้มองว่าคอนเทนเนอร์เป็นเหมือนตู้คอนเทนเนอร์สำหรับการจัดส่งซอฟต์แวร์ที่ได้มาตรฐาน โดยจะรวมทุกสิ่งที่แอปพลิเคชันของคุณต้องใช้ในการเรียกใช้ไว้ในแพ็กเกจเดียวที่แยกต่างหาก
- โค้ดของแอปพลิเคชัน
- รันไทม์ที่จำเป็น (เช่น Python เวอร์ชันที่เฉพาะเจาะจง)
- เครื่องมือและไลบรารีของระบบทั้งหมด
จากนั้นคุณจะเรียกใช้แอปพลิเคชันที่มีคอนเทนเนอร์นี้ในเครื่องที่ติดตั้ง Docker ได้ ซึ่งจะช่วยแก้ปัญหาคลาสสิกที่ว่า "มันทำงานในเครื่องของฉัน"
ในส่วนนี้ เราจะขอความช่วยเหลือจาก Gemini เพื่อสร้าง Dockerfile ซึ่งเป็นเพียงสูตรหรือพิมพ์เขียวสำหรับการสร้างอิมเมจคอนเทนเนอร์ของแอปพลิเคชัน
การดำเนินการ
cd ~/storygen-learning/04a_Manual_Deployment_Ready
ใช้ Gemini CLI เพื่อสร้าง Dockerfile สำหรับแบ็กเอนด์: เปิด Gemini CLI
Gemini
ลองใช้พรอมต์ต่อไปนี้ใน Gemini CLI
Create a manual deployment plan for my StoryGen app with Google Cloud Platform. I have a Next.js frontend, Python backend, and Terraform infrastructure.

Generate these deployment files:
1. **01-setup.sh** - Environment setup and authentication
2. **02-build-images.sh** - Build and push Docker images to Google Container Registry
3. **03-deploy-infrastructure.sh** - Deploy with Terraform and configure services
4. **load-env.sh** - Load environment variables for deployment

**Requirements:**
- Use Google Cloud Run for both frontend and backend
- Configure Imagen API and storage buckets
- Set up proper IAM permissions
- Use environment variables from .env file
- Include error handling and status checks

Keep scripts simple, well-commented, and production-ready for manual execution.
วิธีแก้ไข
cd ~/storygen-learning/04b_Manual_Deployment_Done
วิ่ง
source ../.venv/bin/activate
./01-setup.sh
./02-build-images.sh
./03-deploy-infrastructure.sh
คุณควรเห็นผลการติดตั้งใช้งานและการสร้างโครงสร้างพื้นฐาน
10. การทำงานอัตโนมัติ (CI/CD): สายการประกอบดิจิทัล
การติดตั้งใช้งานแอปพลิเคชันด้วยตนเองเป็นวิธีที่ดีในการทำความเข้าใจส่วนประกอบต่างๆ แต่ก็ช้า ต้องใช้ความพยายามด้วยตนเอง และอาจทำให้เกิดข้อผิดพลาดจากผู้ปฏิบัติงาน ในการพัฒนาซอฟต์แวร์ระดับมืออาชีพ กระบวนการทั้งหมดนี้จะทำงานโดยอัตโนมัติโดยใช้แนวทางปฏิบัติที่เรียกว่า CI/CD
CI/CD ย่อมาจากการรวมอย่างต่อเนื่องและการติดตั้งใช้งานอย่างต่อเนื่อง ซึ่งเป็นวิธีสร้าง ทดสอบ และติดตั้งใช้งานโค้ดโดยอัตโนมัติทุกครั้งที่คุณทำการเปลี่ยนแปลง
- การรวมอย่างต่อเนื่อง (CI): นี่คือระยะ "สร้างและทดสอบ" ทันทีที่นักพัฒนาซอฟต์แวร์พุชการเปลี่ยนแปลงโค้ดไปยังที่เก็บที่แชร์ (เช่น GitHub) ระบบอัตโนมัติจะเริ่มทำงาน โดยจะสร้างแอปพลิเคชันและเรียกใช้การทดสอบทั้งหมด (เช่น การประเมินเอเจนต์ที่เราสร้างขึ้น) เพื่อให้แน่ใจว่าโค้ดใหม่ผสานรวมได้อย่างถูกต้องและไม่มีข้อบกพร่อง
- การติดตั้งใช้งานอย่างต่อเนื่อง (CD): นี่คือระยะ "การเผยแพร่" หากเฟส CI ผ่านไปได้ด้วยดี ระบบจะทำให้แอปพลิเคชันเวอร์ชันใหม่ที่ผ่านการทดสอบใช้งานจริงโดยอัตโนมัติ ซึ่งจะทำให้ผู้ใช้ใช้งานได้
ไปป์ไลน์อัตโนมัตินี้สร้าง "สายการประกอบดิจิทัล" ที่นำโค้ดจากเครื่องของนักพัฒนาซอฟต์แวร์ไปสู่การผลิตได้อย่างรวดเร็ว ปลอดภัย และเชื่อถือได้ ในส่วนนี้ เราจะขอให้ผู้ช่วย AI สร้างสายการประกอบนี้ให้เราโดยใช้ GitHub Actions และ Google Cloud Build
การดำเนินการ
cd ~/storygen-learning/05a_CICD_Pipeline_Ready
ใช้ Gemini CLI เพื่อสร้างไปป์ไลน์ CI/CD ด้วย GitHub:
เปิด Gemini CLI
Gemini
ลองใช้พรอมต์ต่อไปนี้ใน Gemini CLI
Create a CI/CD pipeline for my StoryGen app using Google Cloud Build and GitHub integration.

Generate these automation files:
1. **cloudbuild.yaml** (for backend) - Automated build, test, and deploy pipeline
2. **GitHub Actions workflow** - Trigger builds on push/PR
3. **Deployment automation scripts** - Streamlined deployment process

**Requirements:**
- Auto-trigger on GitHub push to main branch
- Build and push Docker images
- Run automated tests if available
- Deploy to Google Cloud Run
- Environment-specific deployments (staging/prod)
- Notification on success/failure

Focus on fully automated deployment with minimal manual intervention. Include proper secret management and rollback capabilities.
——————————————– วิธีแก้ปัญหาเริ่มต้นที่นี่ ——————————————–
วิธีแก้ไข
cd ~/storygen-learning/06_Final_Solution/
# Copy the GitHub workflow to parent folder
cp -r 06_Final_Solution/.GitHub ../../../.GitHub
กลับไปที่โฟลเดอร์ 06_Final_Solution แล้วเรียกใช้สคริปต์
cd ~/storygen-learning/06_Final_Solution/

./setup-cicd-complete.sh
คุณควรเห็นการตั้งค่าไปป์ไลน์ CI/CD เสร็จสมบูรณ์
ทริกเกอร์เวิร์กโฟลว์: คอมมิตและพุชโค้ดไปยัง main โปรดทราบว่าคุณต้องตั้งค่าอีเมลและชื่อ GitHub เพื่ออนุญาตสิทธิ์
git add .
git commit -m "feat: Add backend, IaC, and CI/CD workflow"
git push origin main
ไปที่แท็บ "Actions" ในที่เก็บ GitHub เพื่อดูการทำงานของการติดตั้งใช้งานอัตโนมัติ
11. การปฏิบัติงาน: AI Control Tower
เราพร้อมให้บริการแล้ว แต่การเดินทางยังไม่สิ้นสุด นี่คือ "วันที่ 2" ซึ่งก็คือการปฏิบัติงาน กลับไปที่ Cloud Assist เพื่อจัดการแอปพลิเคชันที่กำลังทำงาน
การดำเนินการ
- ไปที่บริการ Cloud Run ในคอนโซล Google Cloud โต้ตอบกับแอปที่ใช้งานจริงเพื่อสร้างการเข้าชมและบันทึก
- เปิดแผง Cloud Assist แล้วใช้เป็นผู้ช่วยในการปฏิบัติงานด้วยพรอมต์ต่อไปนี้
การวิเคราะห์บันทึก:
Summarize the errors in my Cloud Run logs for the service 'genai-backend' from the last 15 minutes.
การปรับแต่งประสิทธิภาพ:
My Cloud Run service 'genai-backend' has high startup latency. What are common causes for a Python app and how can I investigate with Cloud Trace?
การเพิ่มประสิทธิภาพต้นทุน:
Analyze the costs for my 'genai-backend' service and its GCS bucket. Are there any opportunities to save money?
ช่วงเวลาสำคัญในการเรียนรู้: SDLC ของ AI เป็นวงจรต่อเนื่อง ผู้ช่วย AI คนเดียวกันที่ช่วยสร้างแอปพลิเคชันนี้เป็นพาร์ทเนอร์ที่ขาดไม่ได้สำหรับการตรวจสอบ การแก้ปัญหา และการเพิ่มประสิทธิภาพในเวอร์ชันที่ใช้งานจริง