
1. Kiến thức bạn sẽ học được
Ngăn xếp đầy đủ về tác nhân AI
Chào mừng bạn! Bạn sắp học được kỹ năng quan trọng tiếp theo trong phát triển phần mềm: cách hướng dẫn Trí tuệ nhân tạo một cách hiệu quả để tạo, kiểm thử và triển khai phần mềm cấp sản xuất. AI tạo sinh không phải là "chế độ lái tự động", mà là một trợ lý ảo mạnh mẽ cần có người chỉ đạo tài ba.
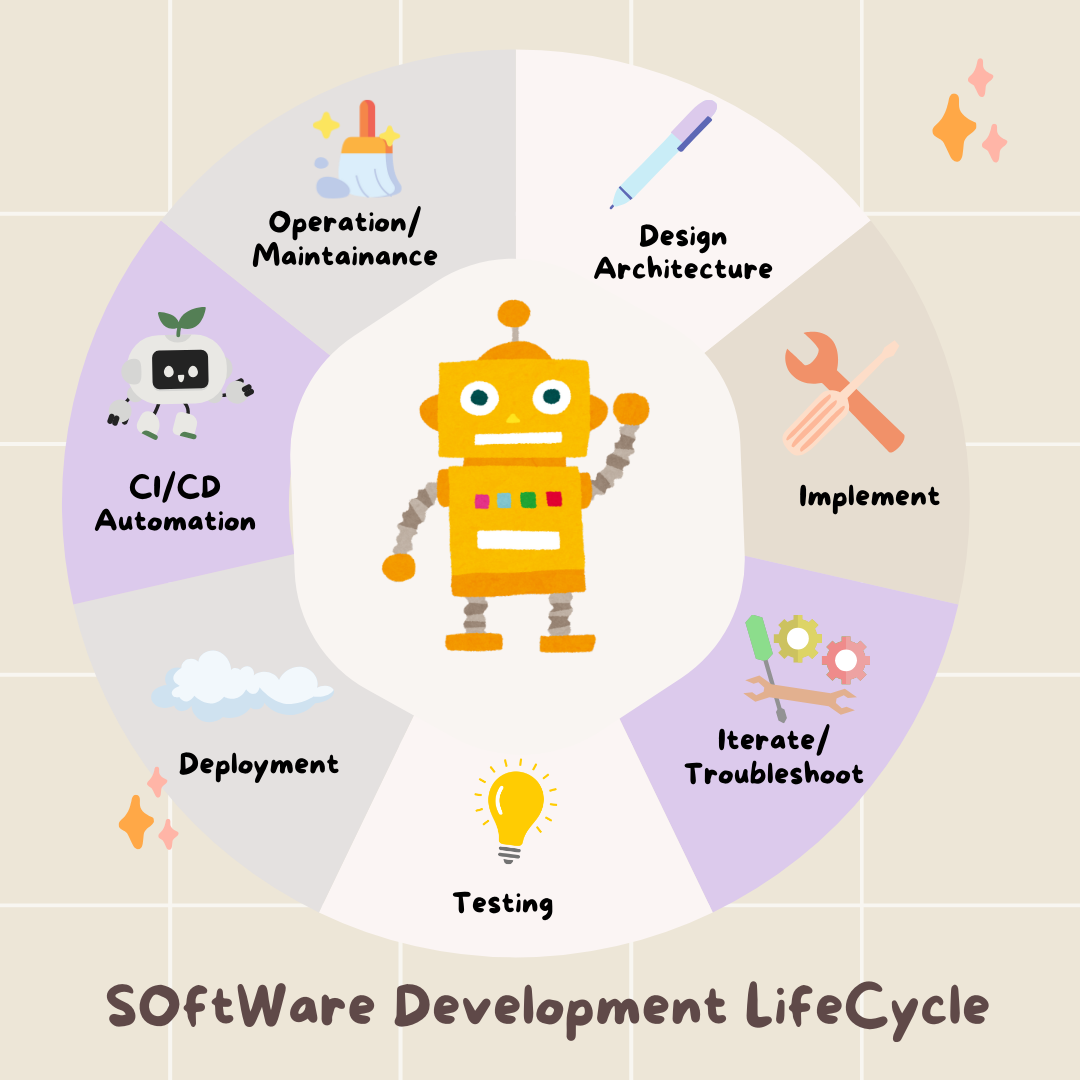
Hội thảo này cung cấp một phương pháp có cấu trúc và có thể lặp lại để hợp tác với AI ở mọi giai đoạn của Vòng đời phát triển phần mềm (SDLC) chuyên nghiệp. Bạn sẽ chuyển từ một người viết mã từng dòng sang một giám đốc kỹ thuật – một kiến trúc sư có tầm nhìn và một tổng thầu sử dụng AI (trí tuệ nhân tạo) để thực hiện tầm nhìn đó một cách chính xác. 🚀
Khi kết thúc hướng dẫn này, bạn sẽ:
- Dùng AI để chuyển một ý tưởng tổng quan thành kiến trúc đám mây.
- Tạo một phần phụ trợ Python hoàn chỉnh bằng các câu lệnh cụ thể, có mục tiêu.
- Sử dụng AI làm lập trình viên cặp để gỡ lỗi và sửa mã.
- Uỷ quyền cho AI tạo các kiểm thử đơn vị, bao gồm cả các đối tượng mô phỏng.
- Cơ sở hạ tầng dưới dạng mã (IaC) đã tạo sẵn sàng cho hoạt động sản xuất bằng Terraform.
- Tạo một quy trình CI/CD hoàn chỉnh trong GitHub Actions chỉ bằng một câu lệnh.
- Giám sát và quản lý ứng dụng đang hoạt động bằng các công cụ vận hành dựa trên AI.
Bạn sẽ không chỉ có một ứng dụng hoạt động mà còn có một bản kế hoạch cho quá trình phát triển được tăng cường bằng AI. Bắt đầu thôi!
2. Điều kiện tiên quyết và cách thiết lập
Trước khi bắt đầu, hãy chuẩn bị môi trường của bạn. Đây là một bước quan trọng để đảm bảo hội thảo diễn ra suôn sẻ.
Tạo tài khoản GCP mới và liên kết thông tin thanh toán
Để hỗ trợ các tác nhân AI của chúng tôi, chúng tôi cần 2 thứ: một Dự án Google Cloud để cung cấp nền tảng và một Khoá Gemini API để truy cập vào các mô hình mạnh mẽ của Google.
Bước 1: Bật Tài khoản thanh toán
Để chạy lớp học lập trình này, bạn cần có một tài khoản thanh toán có sẵn một số tín dụng. Hãy sử dụng tín dụng trong biểu ngữ ở đầu lớp học lập trình này để bắt đầu. Nếu đã kết nối với một tài khoản thanh toán, bạn có thể bỏ qua bước này.
Bước 2: Tạo một dự án GCP mới
- Truy cập vào Google Cloud Console rồi tạo một dự án mới.
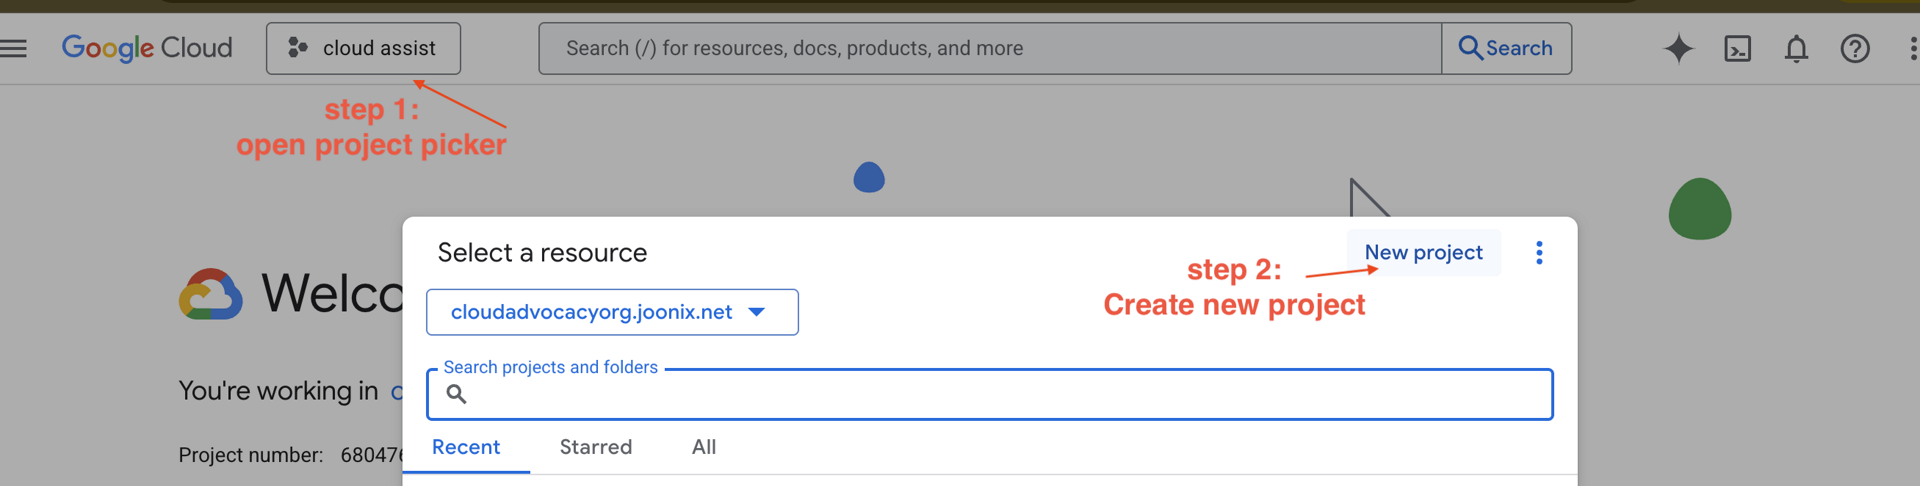
- Mở bảng điều khiển bên trái, nhấp vào
Billing, kiểm tra xem tài khoản thanh toán có được liên kết với tài khoản GCP này hay không.
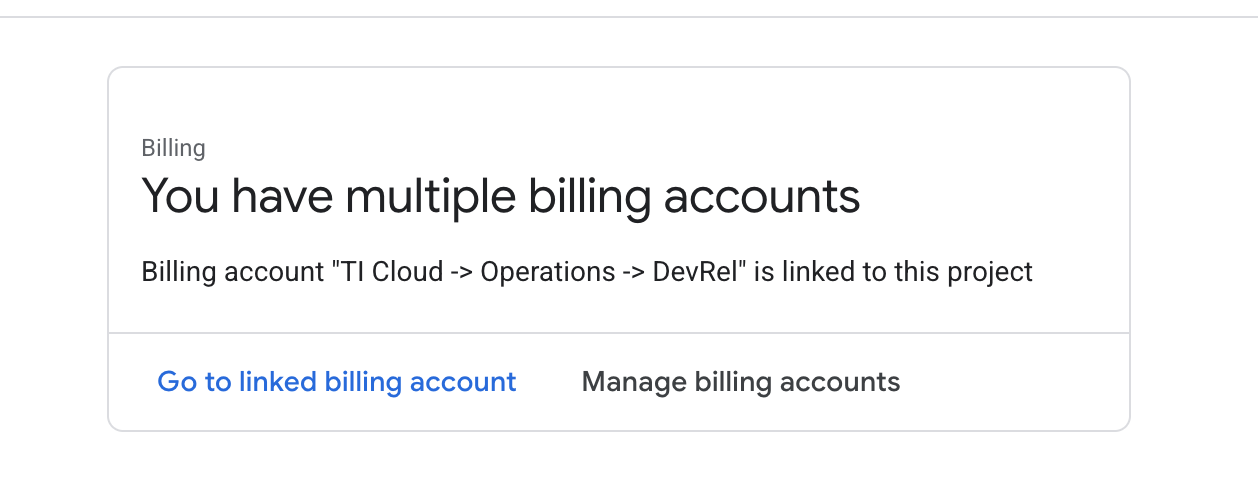
Nếu bạn thấy trang này, hãy đánh dấu vào manage billing account, chọn Google Cloud Trial One rồi liên kết đến trang đó.
Bước 3: Tạo khoá Gemini API
Trước khi có thể bảo mật khoá, bạn cần phải có khoá.
- Truy cập vào Google AI Studio : https://aistudio.google.com/
- Đăng nhập bằng tài khoản Gmail của bạn.
- Nhấp vào nút "Lấy khoá API", thường nằm ở ngăn điều hướng bên trái hoặc ở góc trên cùng bên phải.
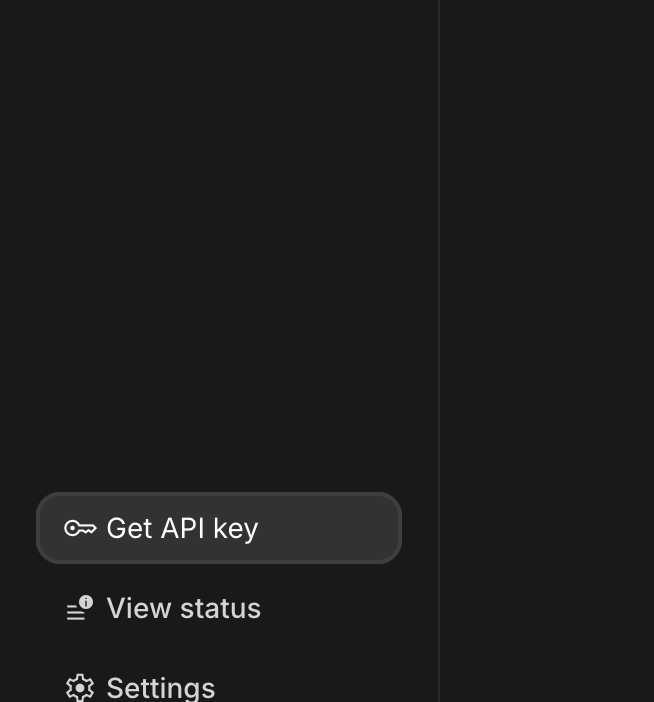
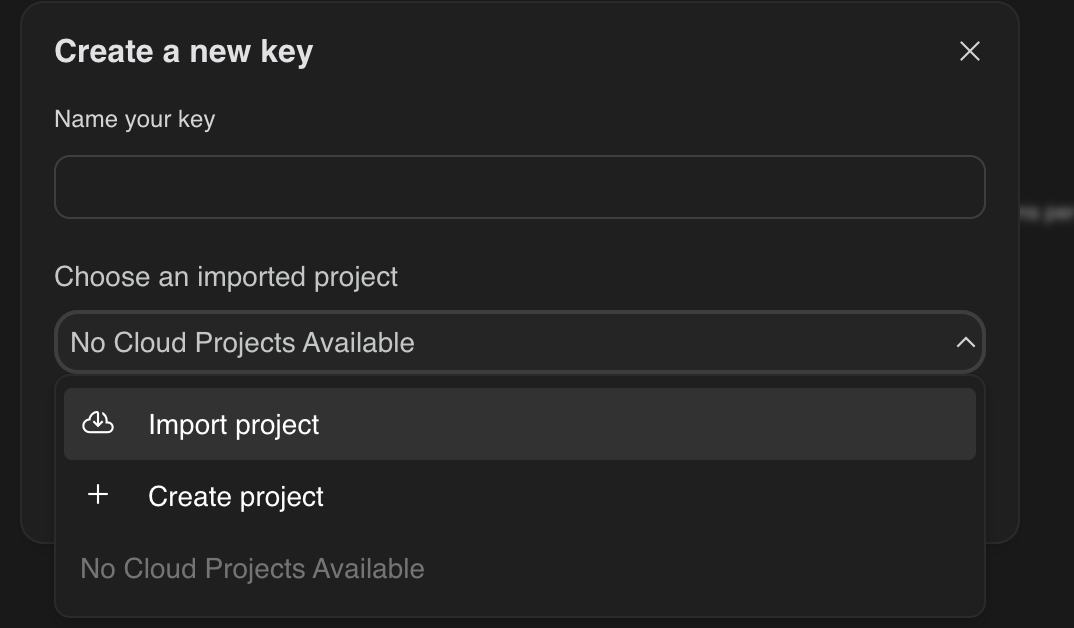
- Trong hộp thoại "Khoá API", hãy nhấp vào "Tạo khoá API trong dự án mới".
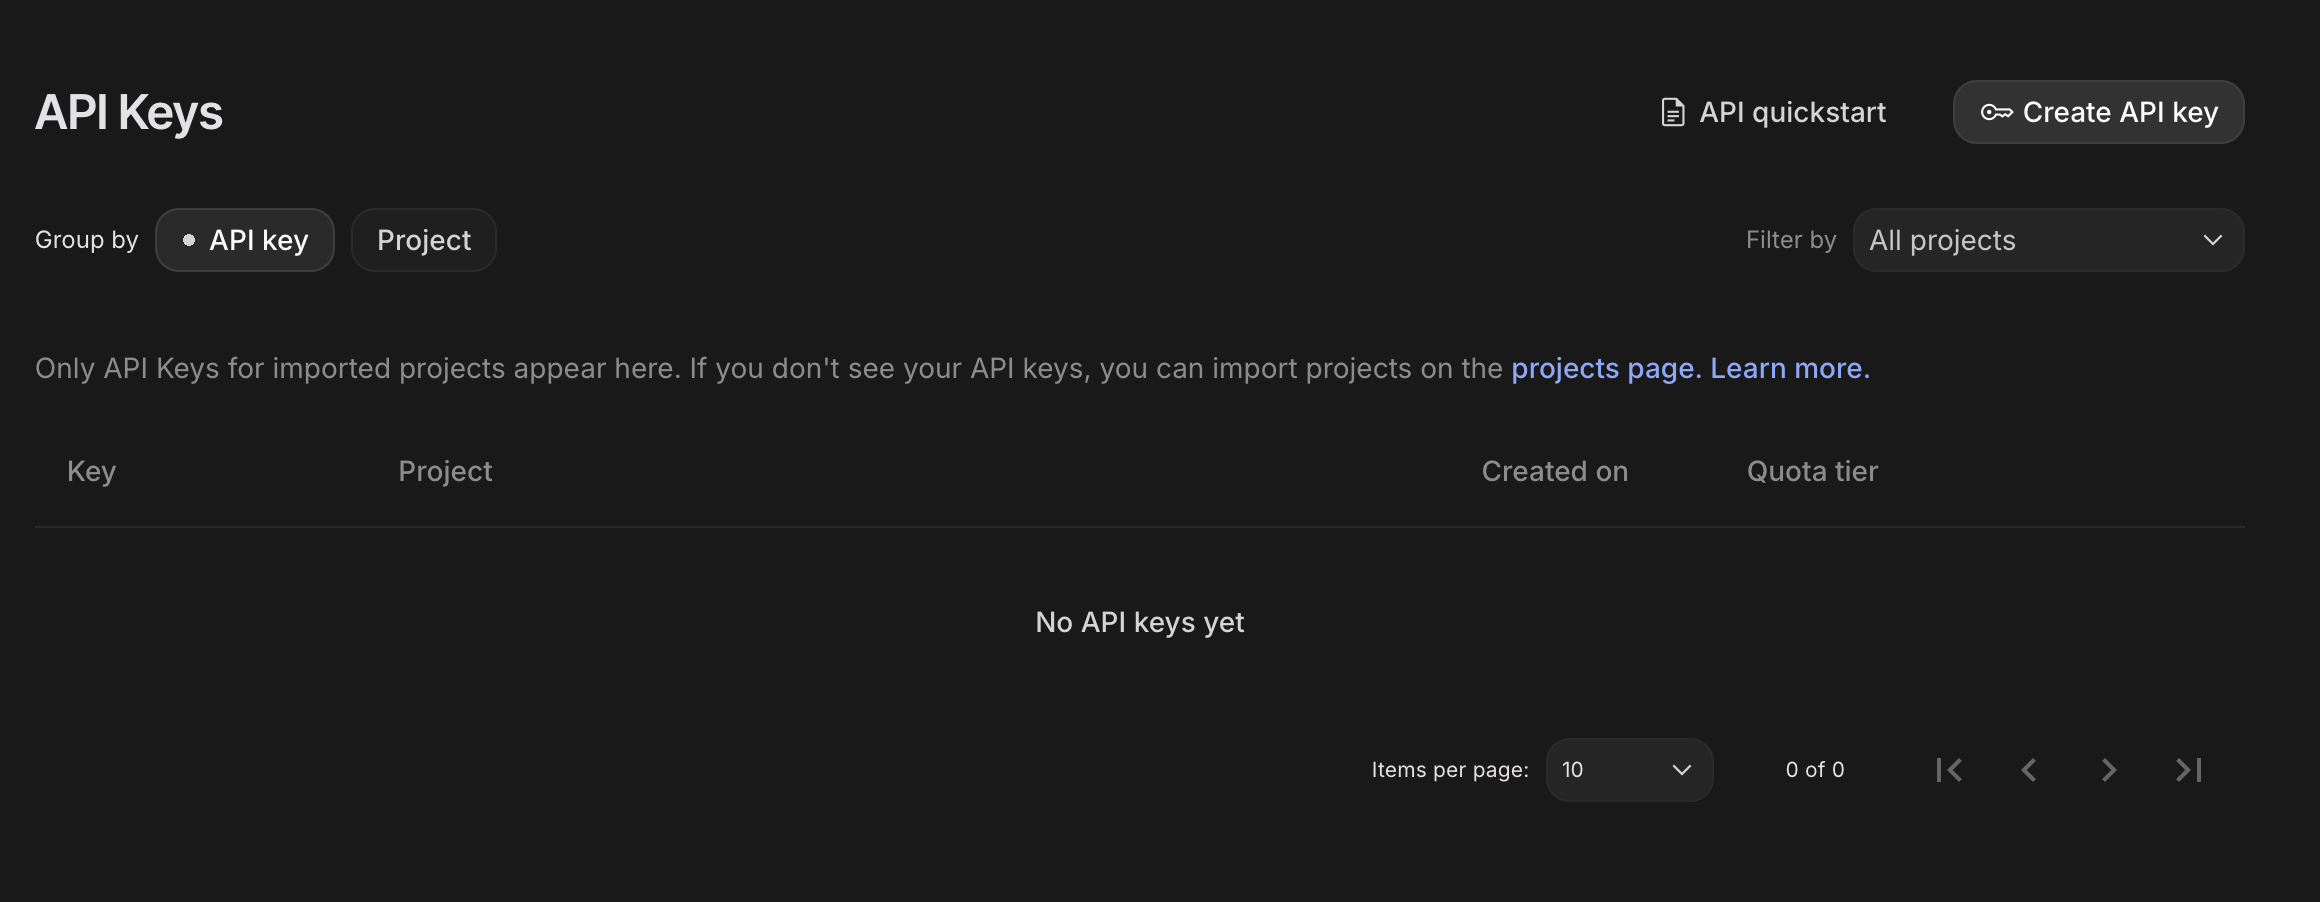
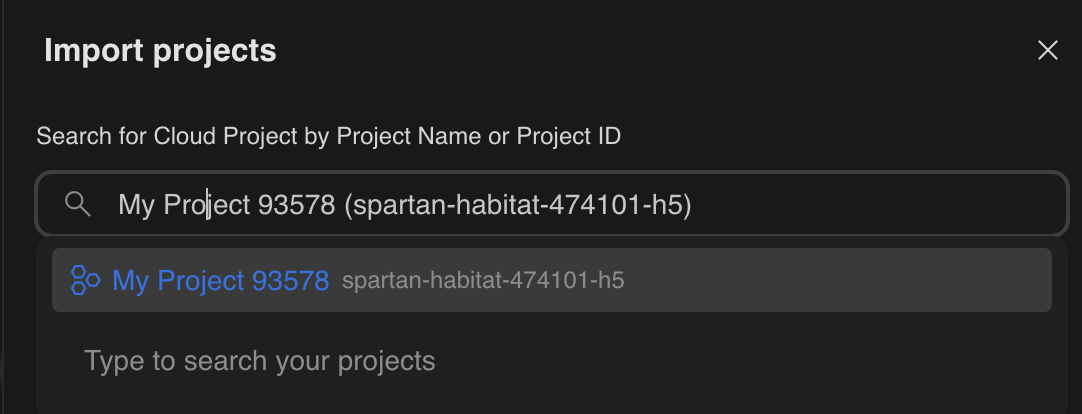
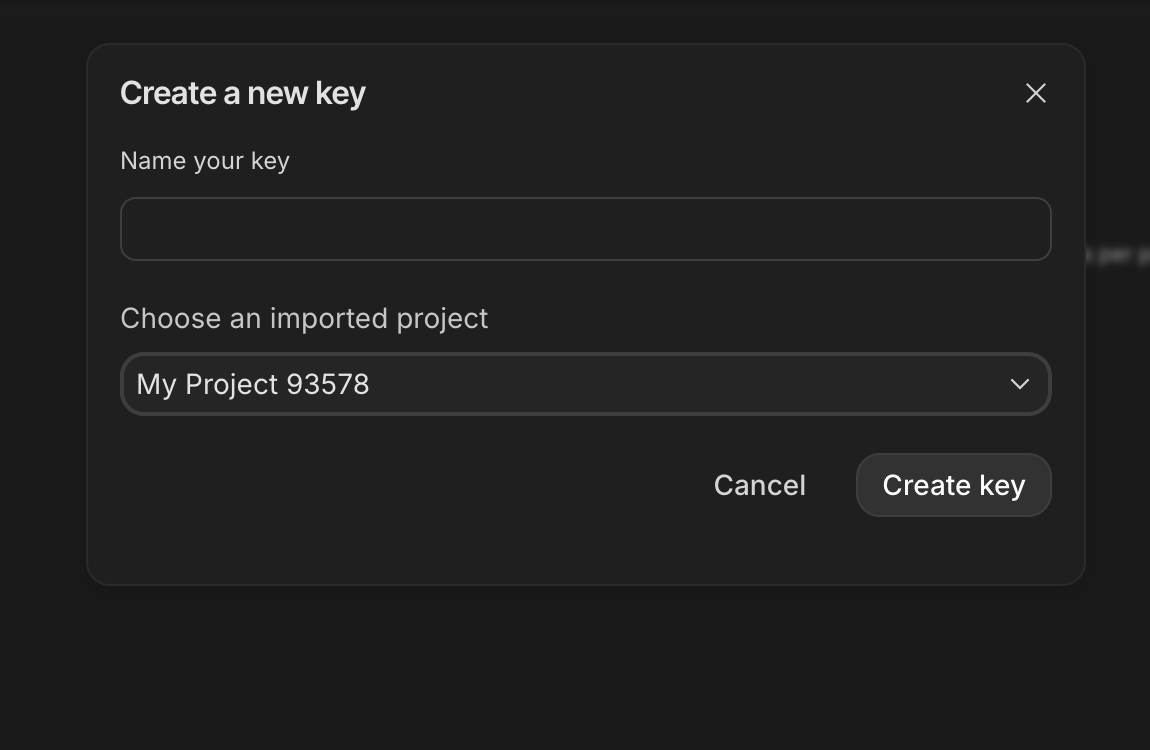
- Chọn dự án mới mà bạn đã tạo và đã thiết lập tài khoản thanh toán.
- Một khoá API mới sẽ được tạo cho bạn.
Sao chép ngay khoá này và tạm thời lưu trữ ở một nơi an toàn (chẳng hạn như trình quản lý mật khẩu hoặc ghi chú bảo mật). Đây là giá trị bạn sẽ sử dụng trong các bước tiếp theo.
Xác thực GitHub
Mở Cloud Shell bằng cách chuyển đến Google Cloud Console, rồi nhấp vào nút "Kích hoạt Cloud Shell" ở trên cùng bên phải.
Bước 1: Mở Cloud Shell
👉Nhấp vào "Kích hoạt Cloud Shell" ở đầu bảng điều khiển Cloud (Đây là biểu tượng có hình dạng thiết bị đầu cuối ở đầu ngăn Cloud Shell), 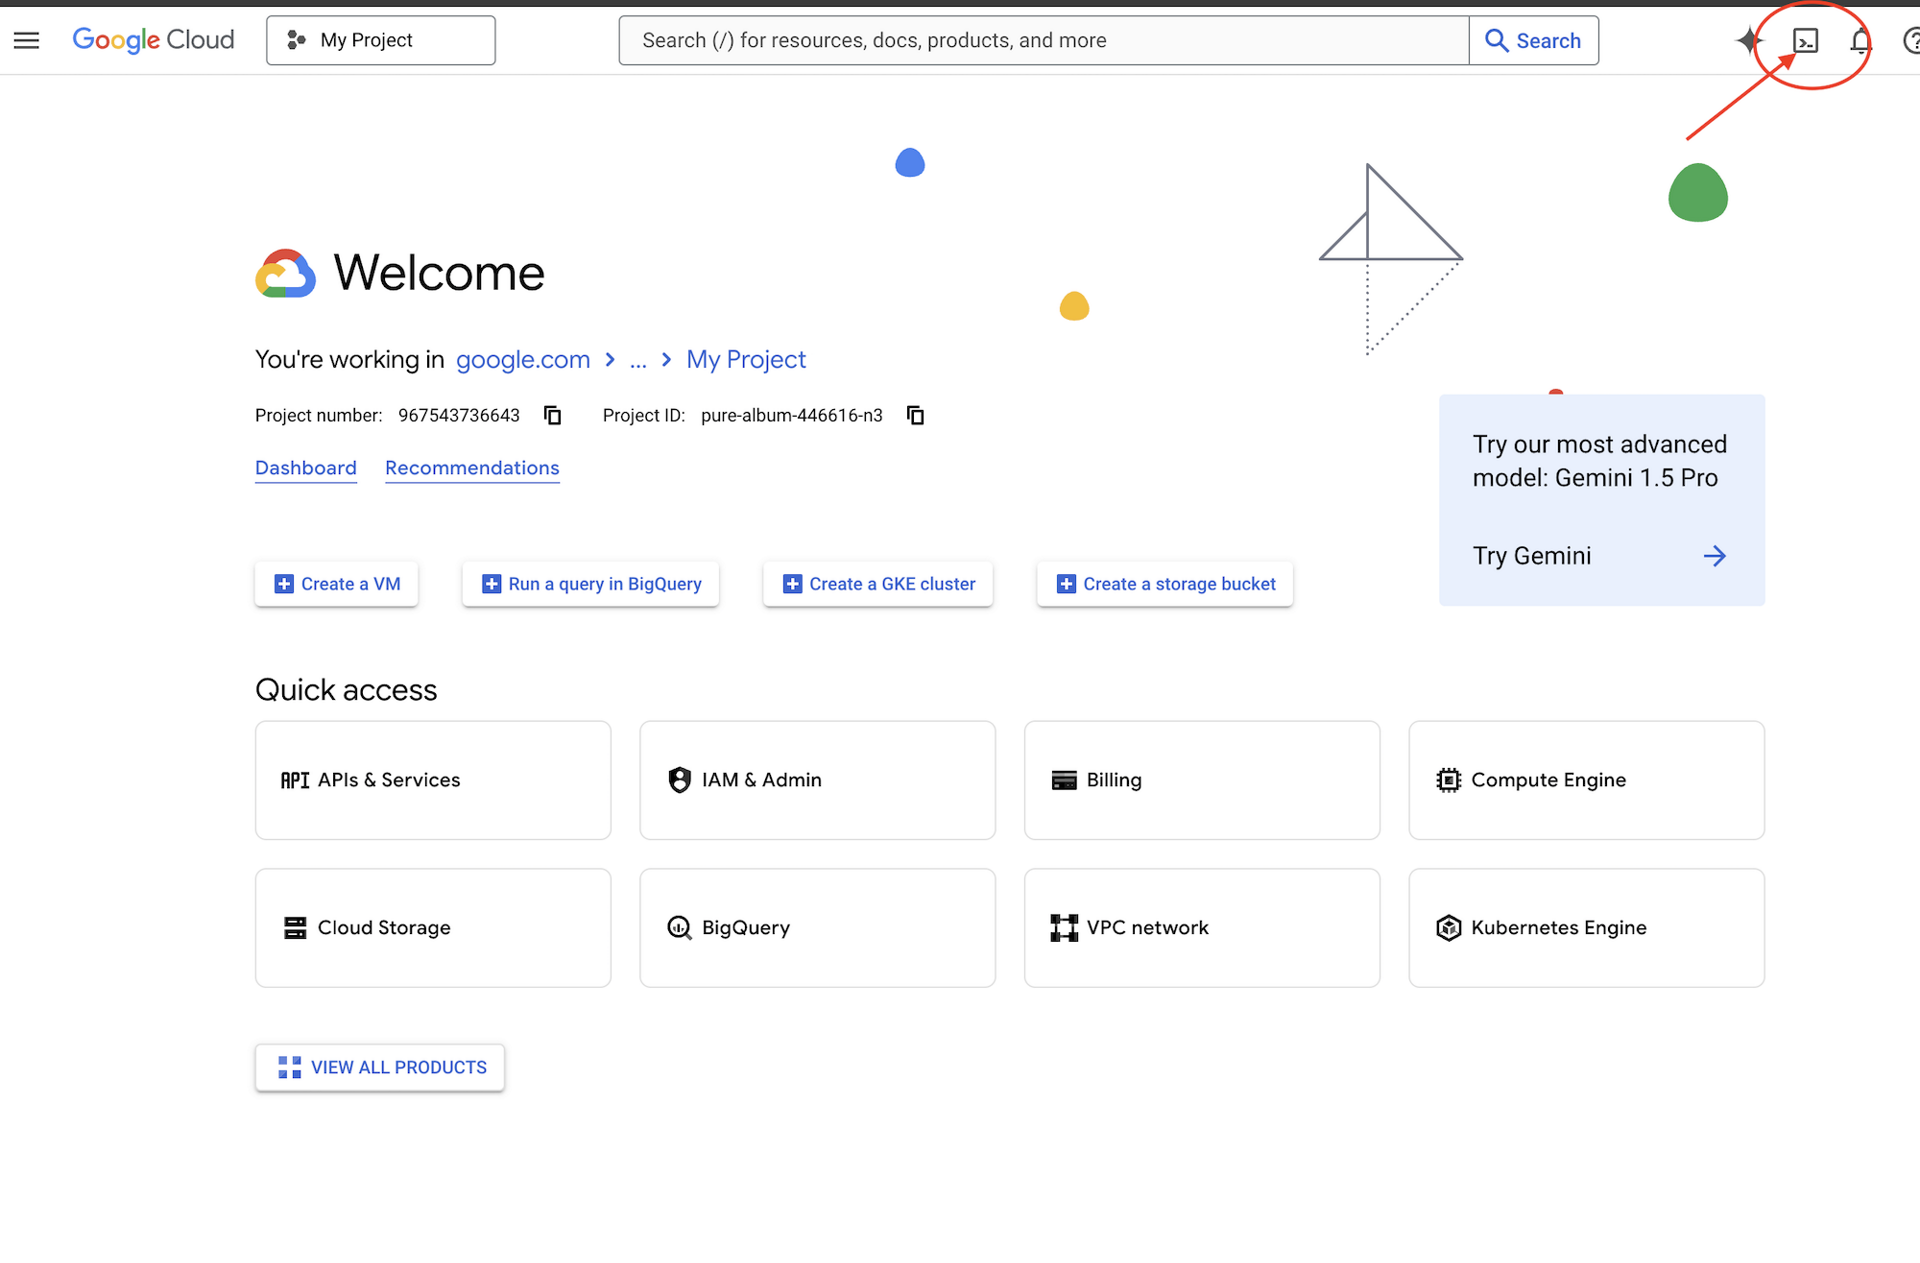
👉Nhấp vào nút "Mở trình chỉnh sửa" (nút này trông giống như một thư mục đang mở có bút chì). Thao tác này sẽ mở Trình chỉnh sửa mã Cloud Shell trong cửa sổ. Bạn sẽ thấy một trình khám phá tệp ở bên trái. 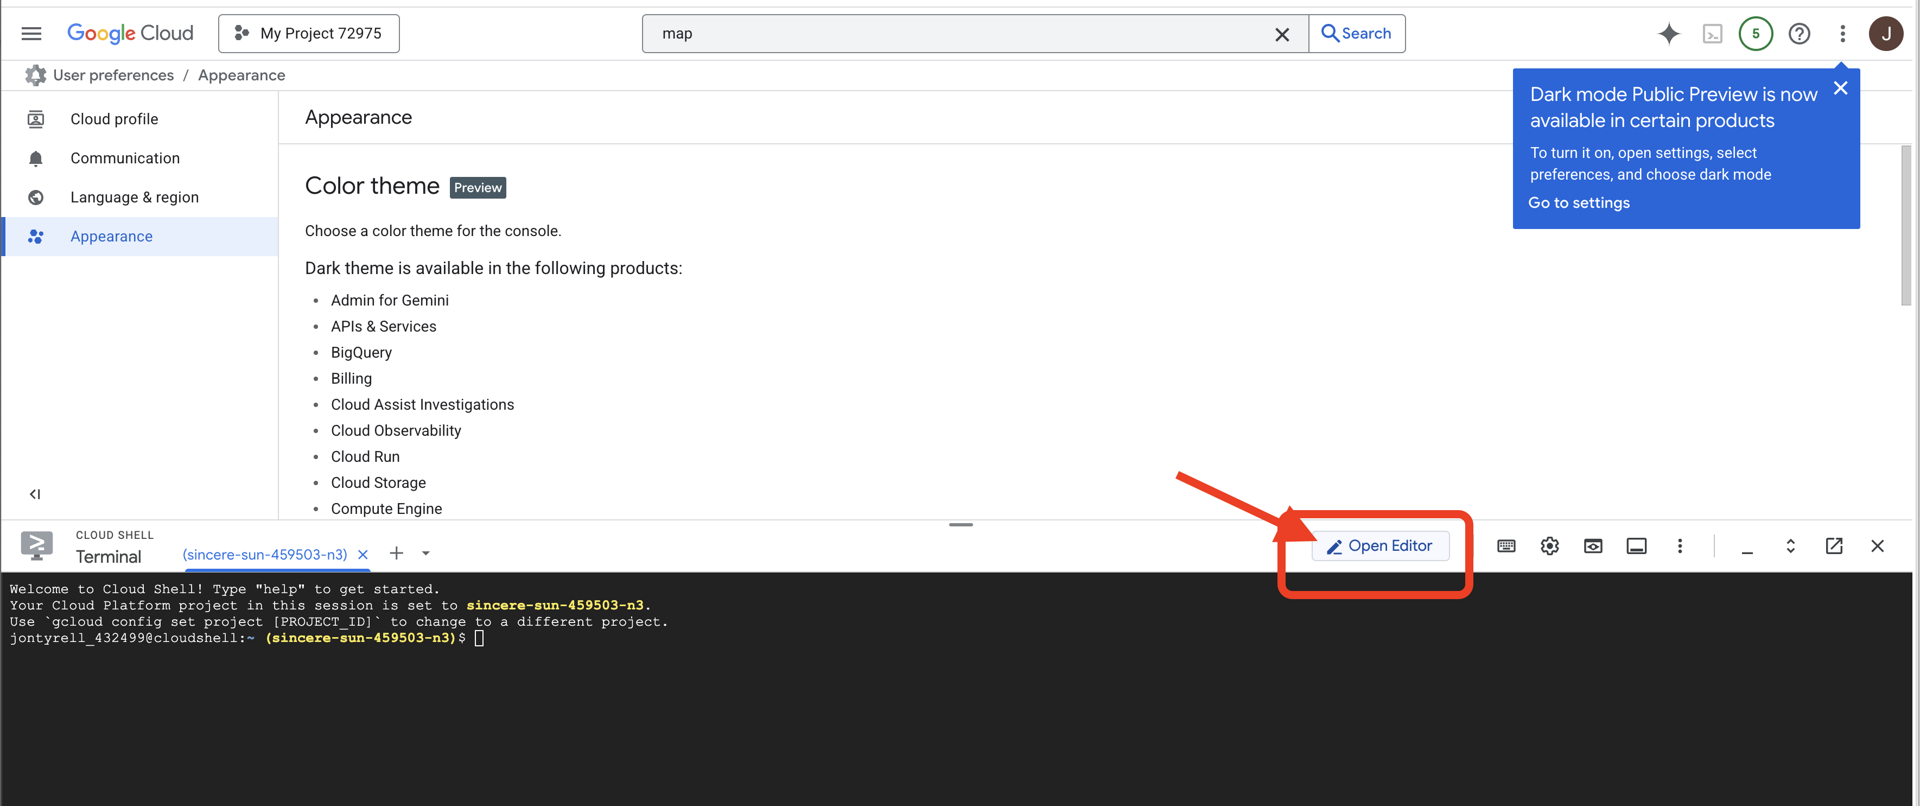
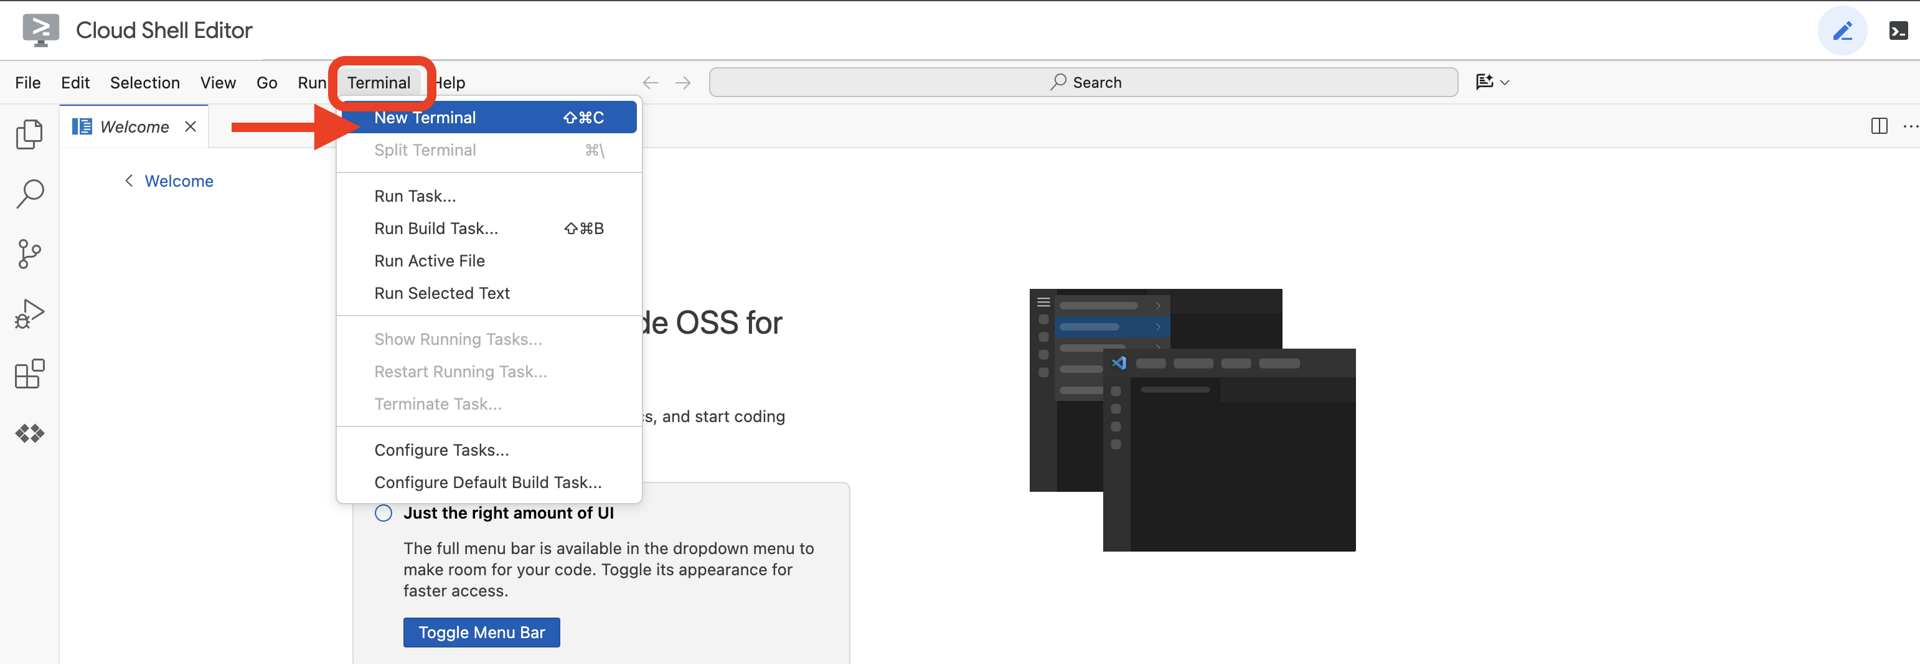
👉Sau khi mở trình chỉnh sửa, hãy mở thiết bị đầu cuối trong IDE trên đám mây,
👉💻 Trong thiết bị đầu cuối, hãy xác minh rằng bạn đã được xác thực và dự án được đặt thành mã dự án của bạn bằng lệnh sau:
gcloud auth list
Bước 2: Xác thực bằng GitHub và Fork
Xác thực bằng GitHub:
👉💻 Sao chép và dán lệnh vào thiết bị đầu cuối trên đám mây:
gh auth login
- "Bạn sử dụng GitHub ở đâu", chọn "GitHub.com"
- "What is you preferred protocol for Git operations on this host?" (Bạn muốn dùng giao thức nào cho các thao tác Git trên máy chủ này?), chọn "HTTPS"
- "Xác thực Git bằng thông tin đăng nhập GitHub?", chọn "Có"
- "How would you like to authenticate GitHub CLI?" (Bạn muốn xác thực GitHub CLI bằng cách nào?), chọn "Login with a web browser" (Đăng nhập bằng trình duyệt web)
quan trọng!! đừng nhấn "enter" ngay
sao chép mã từ thiết bị đầu cuối sang trang xác minh đăng nhập
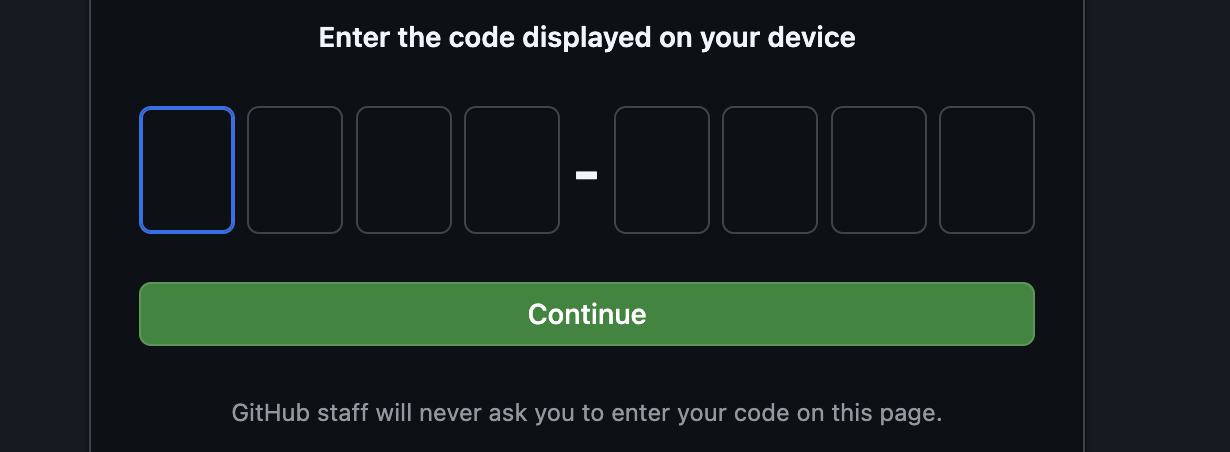
Sau khi nhập mã xong, hãy quay lại Cloud Shell Terminal, nhấn phím "enter" để tiếp tục.

Bước 4: Phân nhánh và sao chép kho lưu trữ:
👉💻 Sao chép và dán lệnh vào thiết bị đầu cuối trên đám mây:
gh repo fork cuppibla/storygen-learning --clone=true
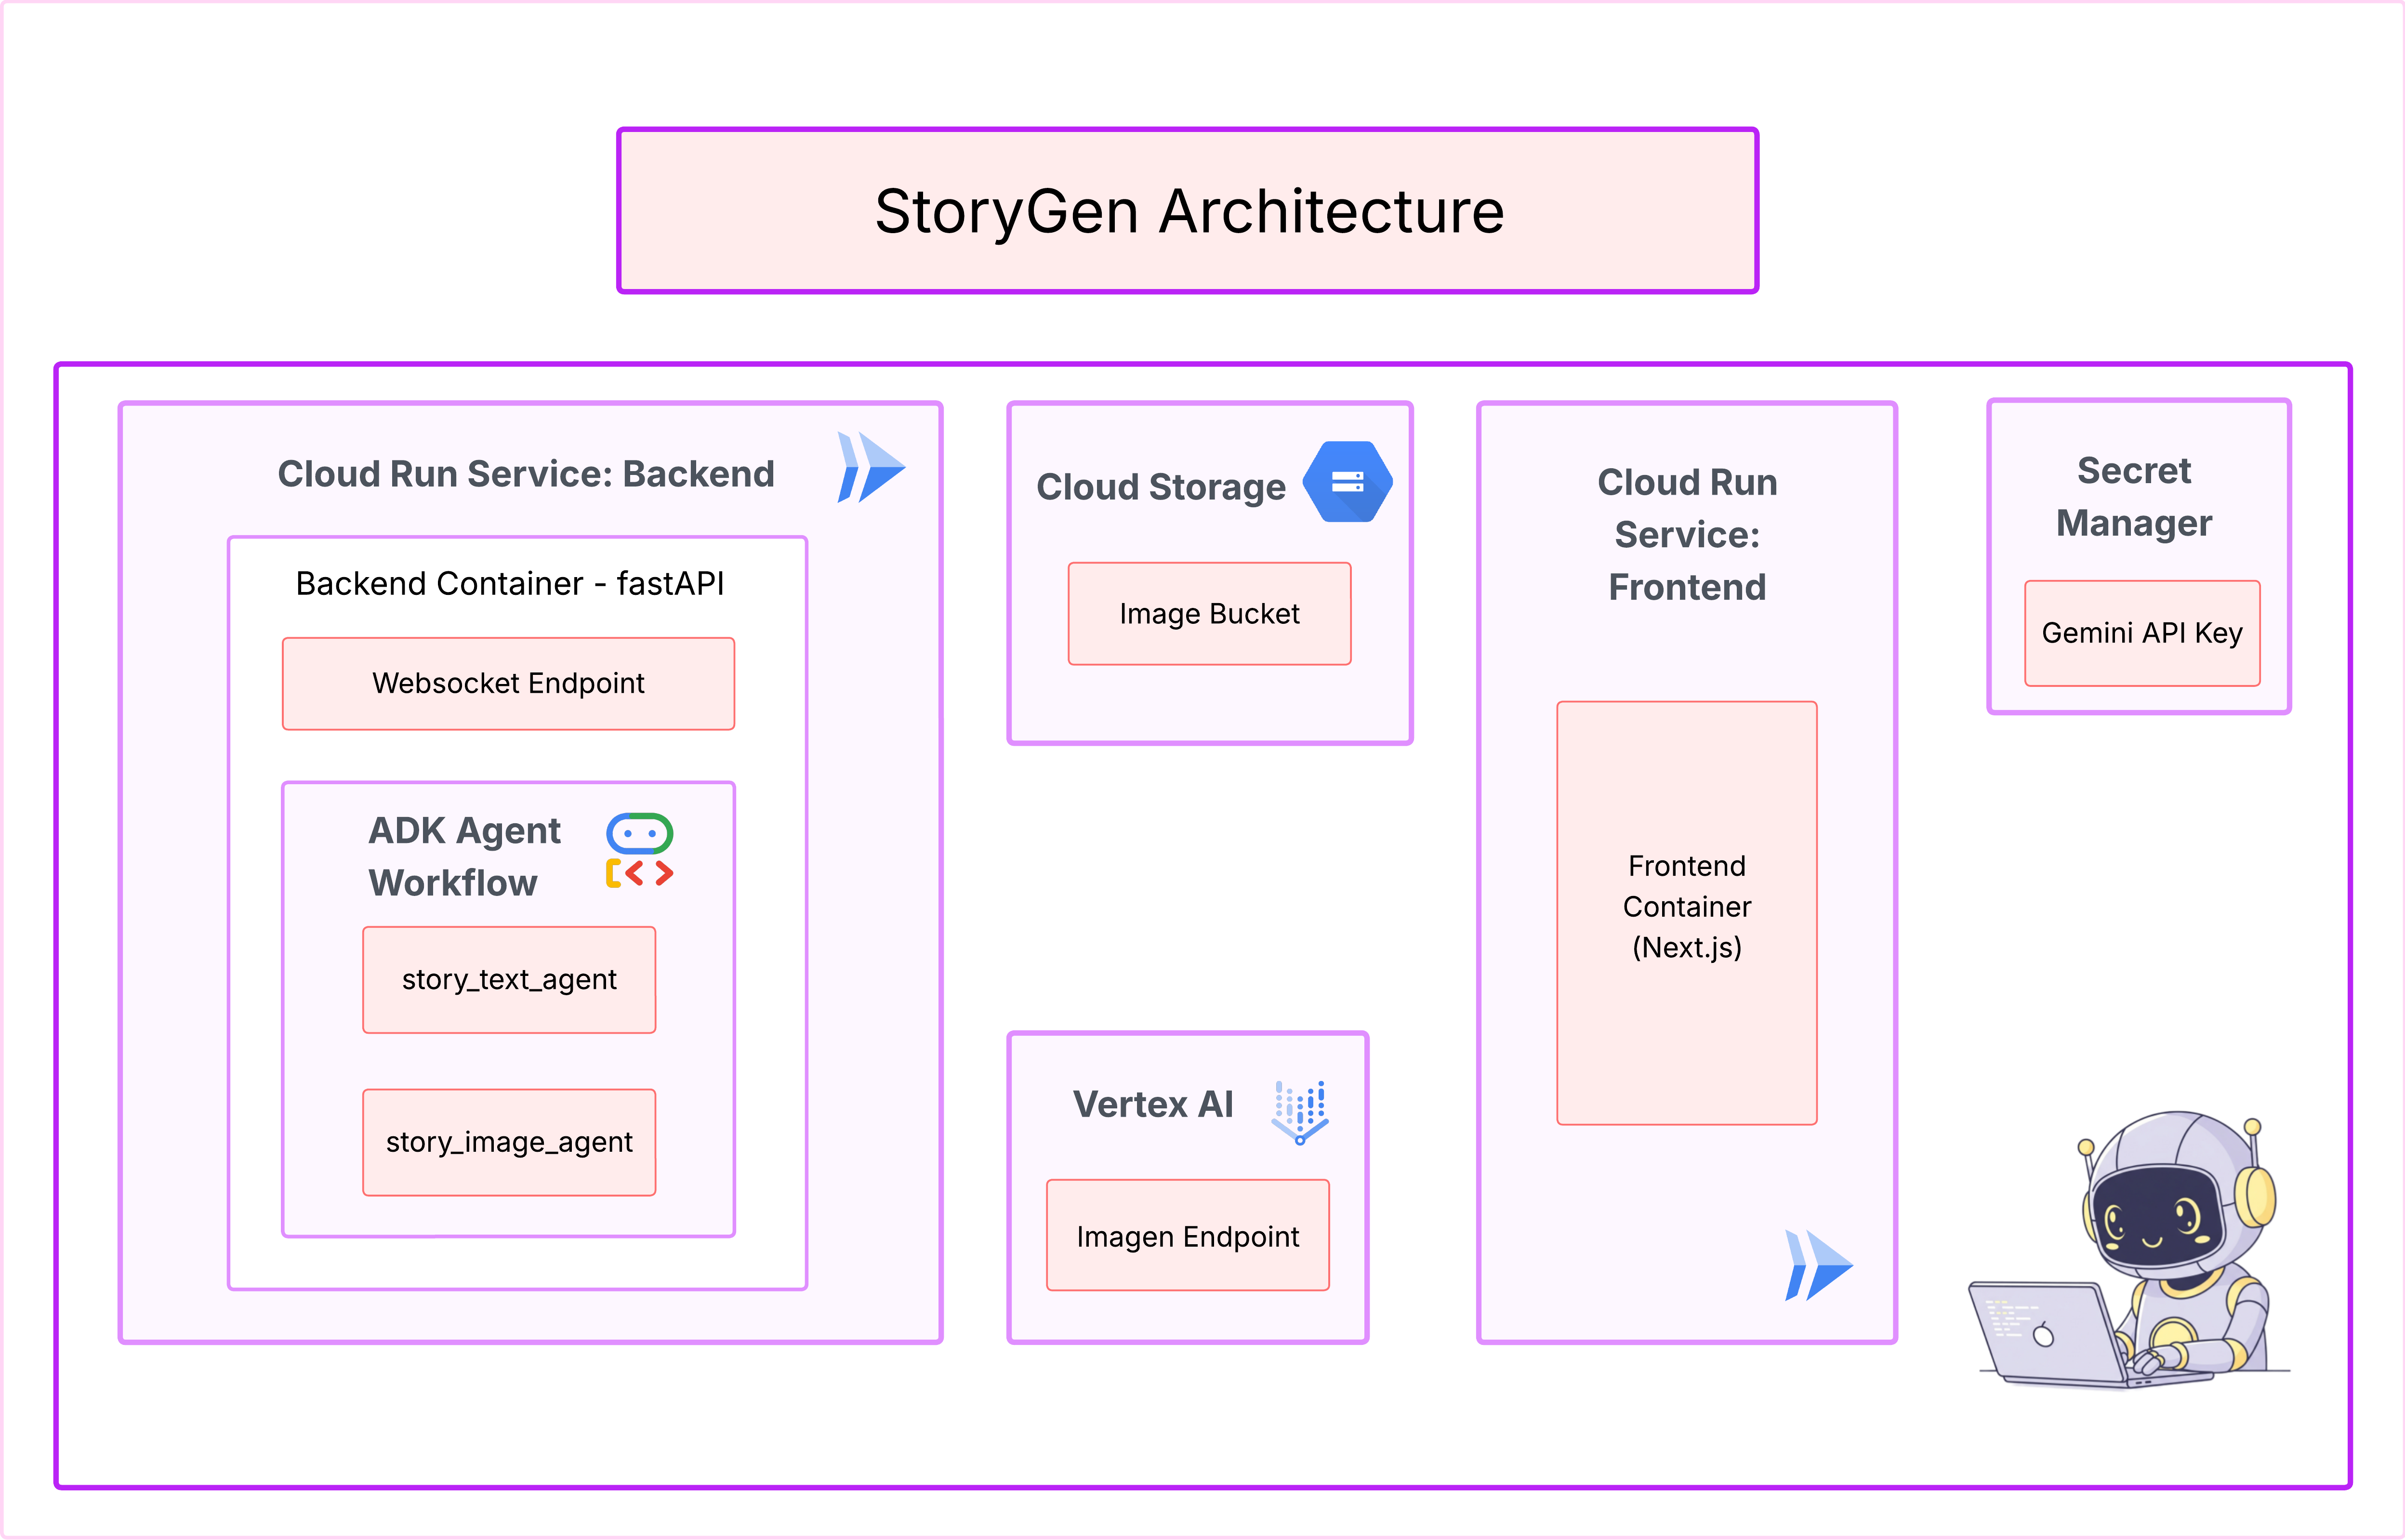
3. Kiến trúc: Từ ý tưởng đến bản thiết kế với Cloud Assist
Mọi dự án lớn đều bắt đầu bằng một tầm nhìn rõ ràng. Chúng ta sẽ sử dụng trợ lý AI Cloud Assist để thiết kế cấu trúc ứng dụng.
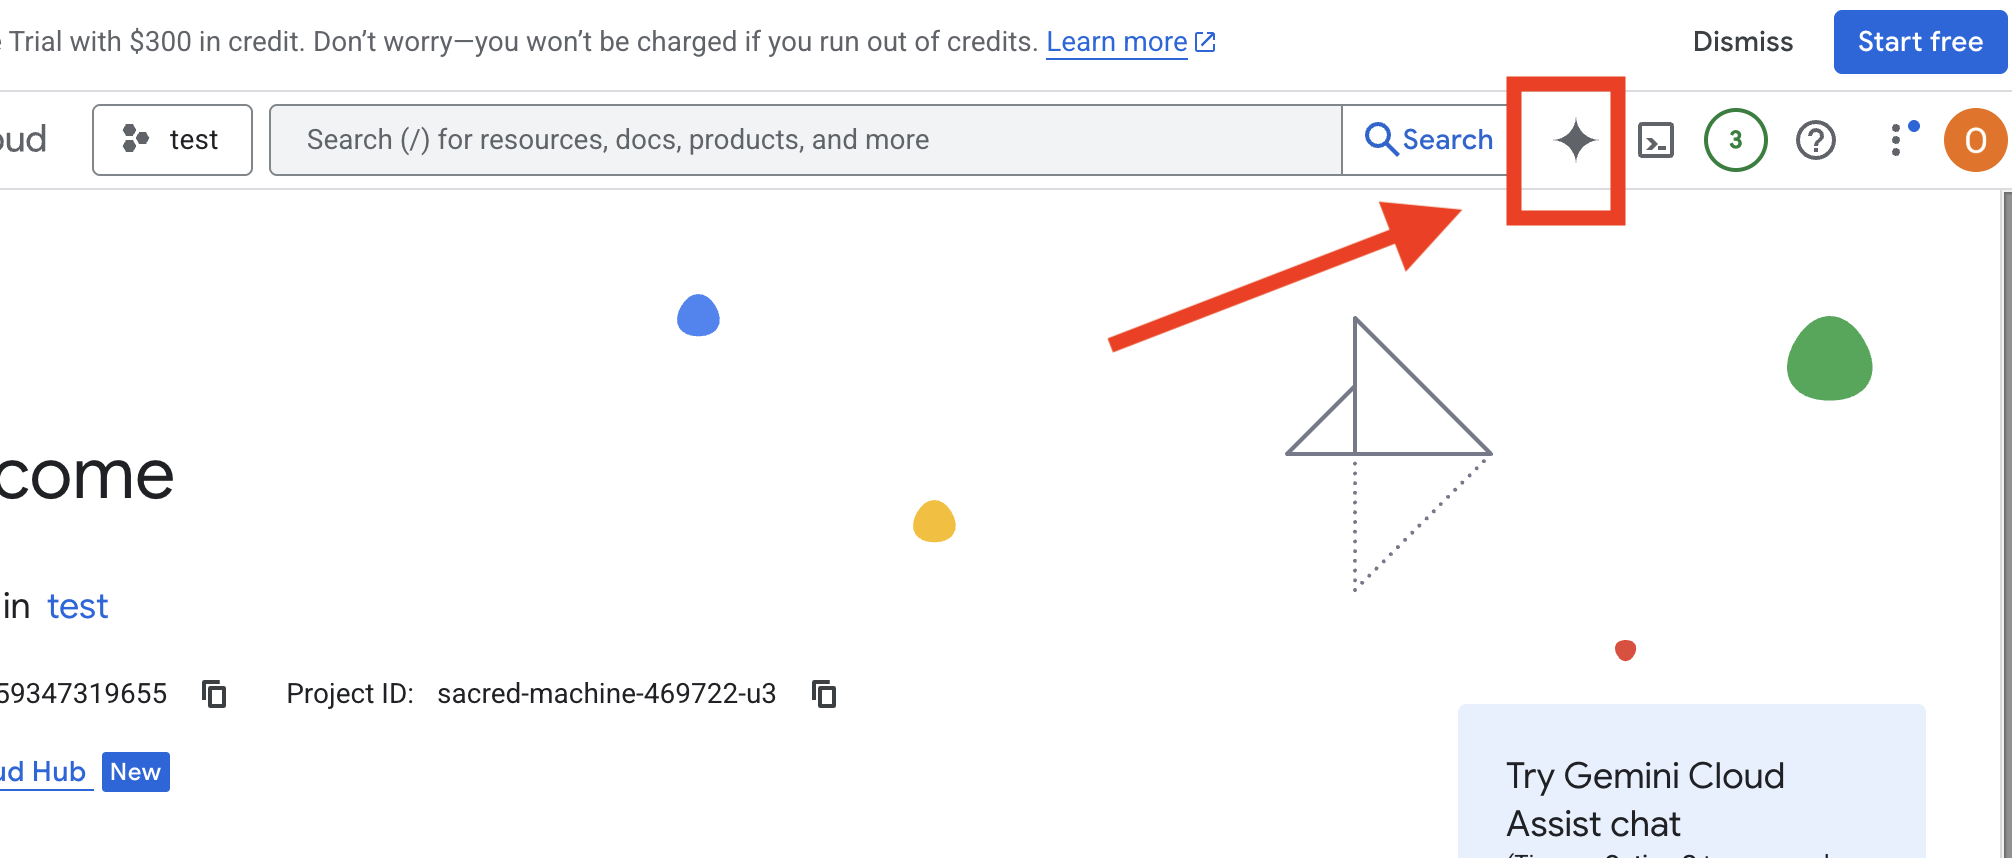
Thao tác
- Mở Google Cloud Console: [https://console.cloud.google.com](Google Cloud Console)
- Ở góc trên cùng bên phải, hãy nhấp vào "mở Cloud Assist Chat"
Bật Cloud Assist
- Nhấp vào
Get Gemini Assist, rồi nhấp vàoEnable Cloud Assist at no cost. - Và bắt đầu trò chuyện!
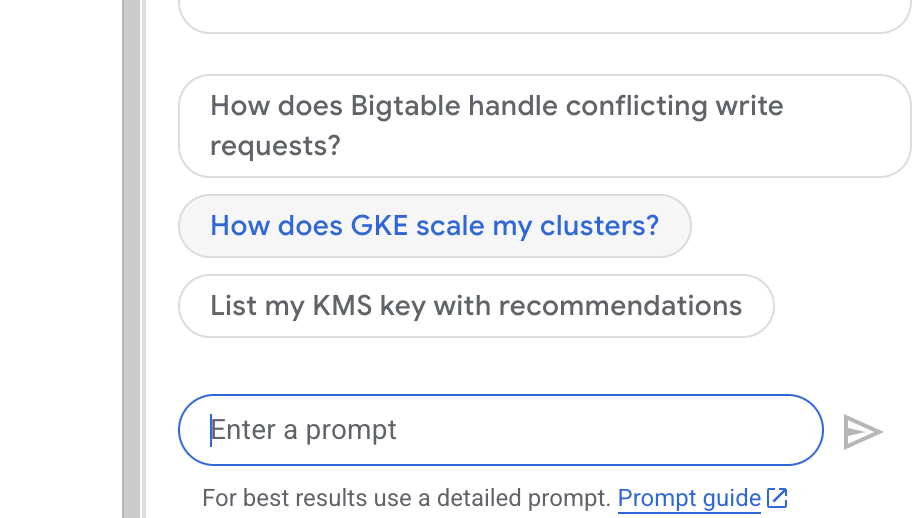 Cung cấp câu lệnh chi tiết sau cho Cloud Assist:
Nhập ý tưởng của bạn
Generate a Python web application that uses AI to generate children's stories and illustrations. It has Python backend and React frontend host separately on Cloudrun. They communicate through Websocket. It needs to use a generative model for text and another for images. The generated images must be used by Imagen from Vertex AI and stored in a Google Cloud Storage bucket so that frontend can fetch from the bucket to render images. I do not want any load balancer or a database for the story text. We need a solution to store the API key.
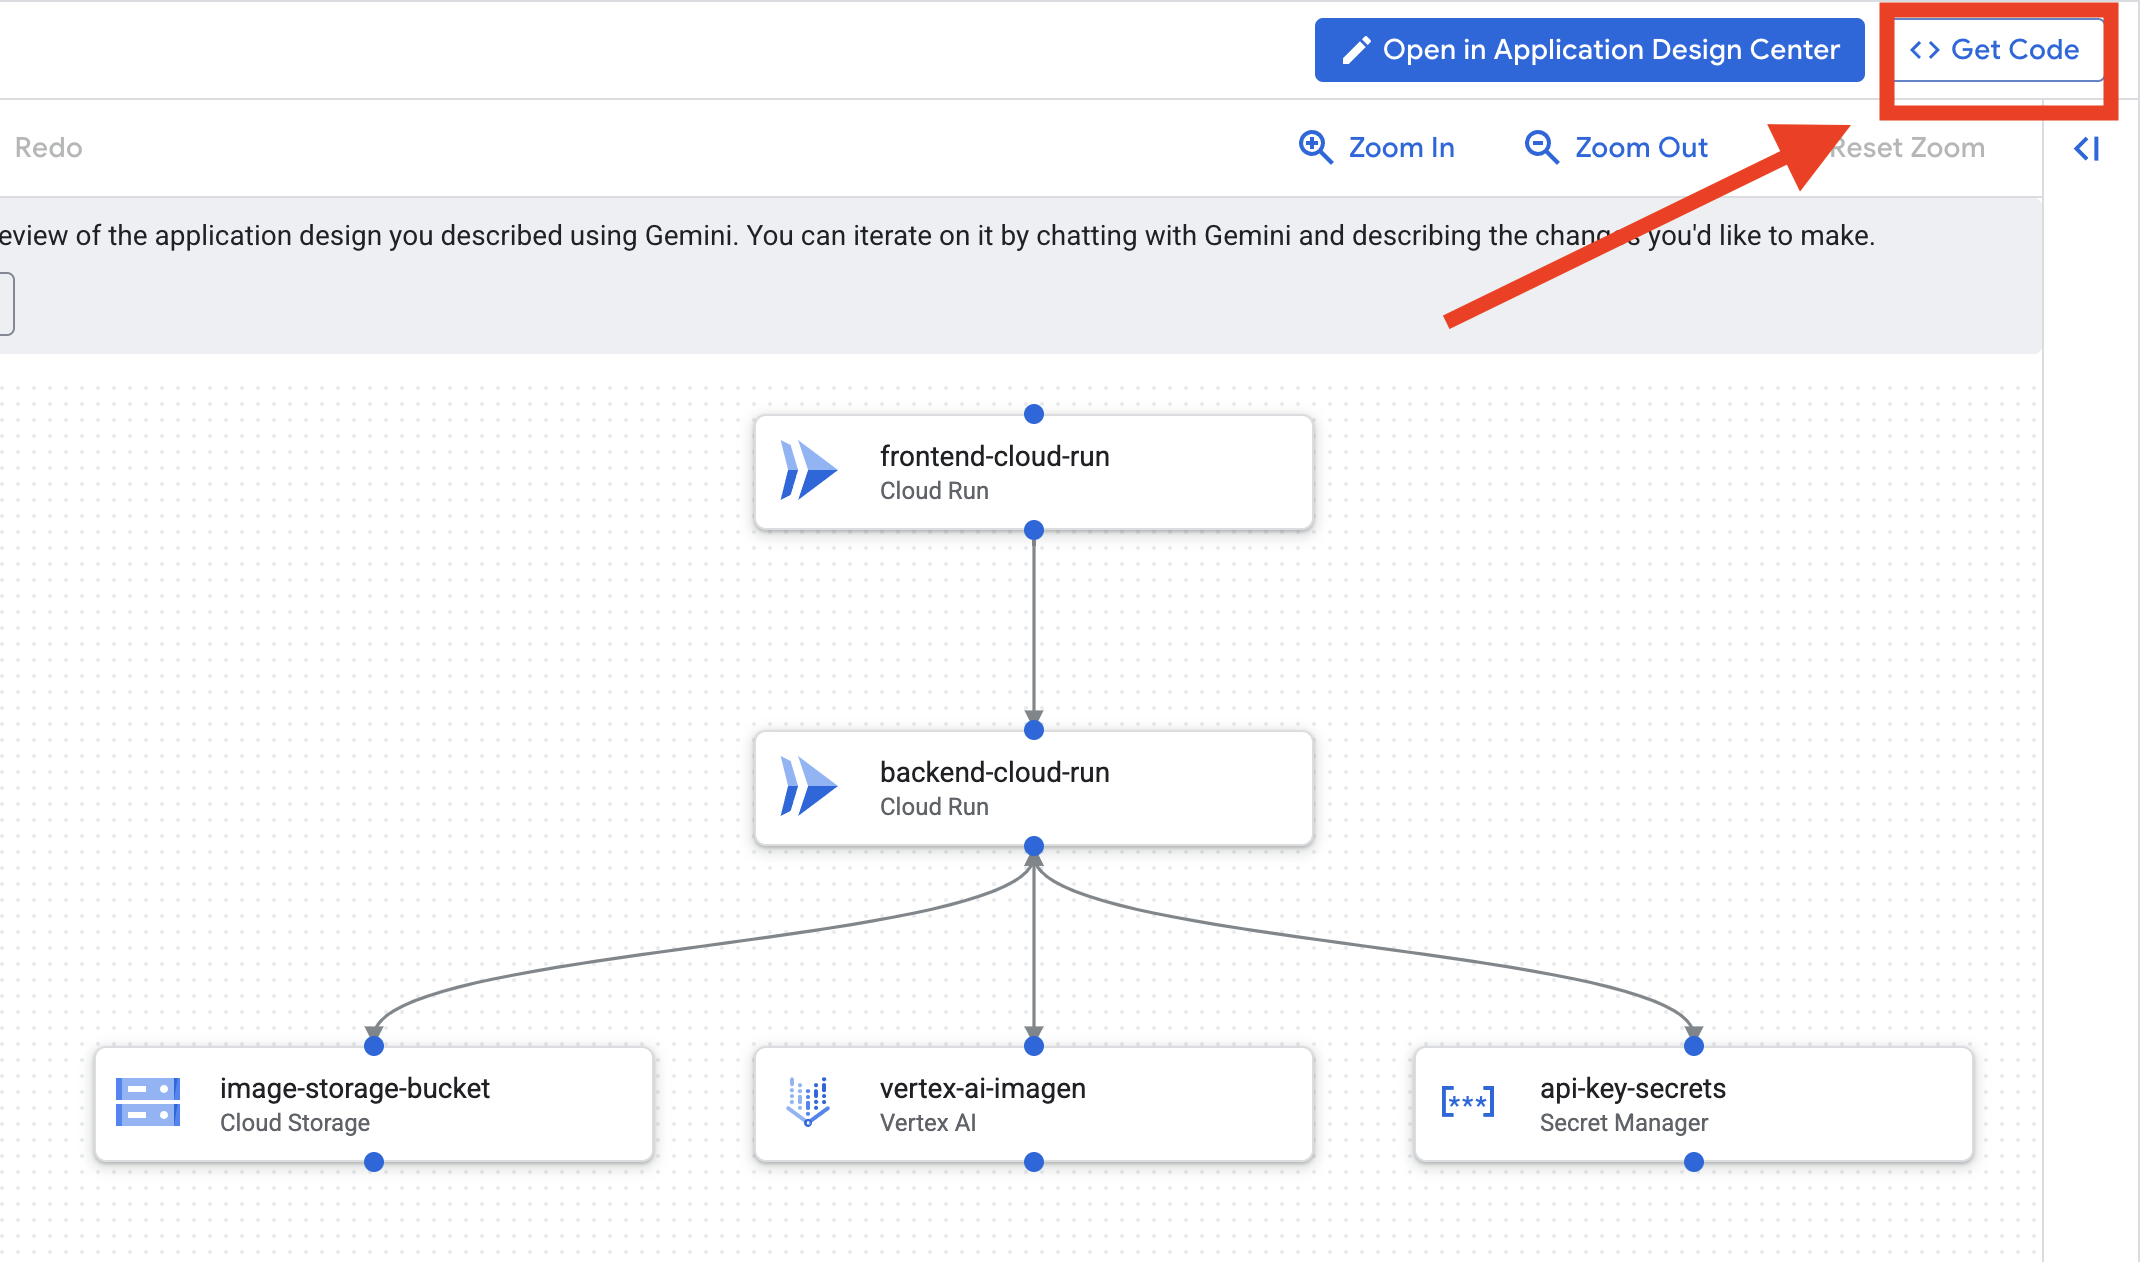
Lập bản kế hoạch cho ứng dụng
- Nhấp vào "Chỉnh sửa thiết kế ứng dụng", bạn sẽ thấy sơ đồ. Nhấp vào bảng điều khiển trên cùng bên phải "<> Get Code" (Lấy mã) để tải mã Terraform xuống.
- Cloud Assist sẽ tạo một sơ đồ kiến trúc. Đây là bản kế hoạch trực quan của chúng tôi.
Bạn không cần làm gì với mã này. Hãy đọc phần bên dưới để biết thêm thông tin giải thích
Tìm hiểu về mã Terraform được tạo. Bạn vừa nhận được một bộ tệp Terraform hoàn chỉnh từ Cloud Assist. Hiện tại, bạn không cần làm gì với mã này, nhưng hãy nhanh chóng tìm hiểu xem mã này là gì và tại sao nó lại mạnh mẽ đến vậy.
Terraform là gì? Terraform là một công cụ Cơ sở hạ tầng dưới dạng mã (IaC). Hãy coi đây là bản thiết kế cho môi trường đám mây của bạn, được viết bằng mã. Thay vì nhấp vào bảng điều khiển Google Cloud theo cách thủ công để tạo các dịch vụ, bộ nhớ và quyền, bạn có thể xác định tất cả các tài nguyên đó trong những tệp cấu hình này. Sau đó, Terraform sẽ đọc bản thiết kế của bạn và tự động tạo chính xác môi trường đó cho bạn.
Từ kế hoạch trực quan đến mã thực thi. Sơ đồ kiến trúc mà Cloud Assist cung cấp là kế hoạch trực quan của bạn. Mã Terraform là phiên bản mà máy có thể đọc được của chính kế hoạch đó. Đây là mối liên kết quan trọng giúp biến một ý tưởng thiết kế thành một thực tế có thể tái tạo và tự động hoá. Bằng cách xác định cơ sở hạ tầng trong mã, bạn có thể:
- Tự động hoá việc tạo: Xây dựng cùng một môi trường nhiều lần một cách đáng tin cậy.
- Sử dụng tính năng quản lý phiên bản: Theo dõi các thay đổi đối với cơ sở hạ tầng của bạn trong Git, giống như mã xử lý ứng dụng.
- Ngăn chặn lỗi: Tránh các lỗi do thao tác thủ công có thể xảy ra khi nhấp vào giao diện web.
Trong hội thảo này, bạn sẽ không cần tự chạy mã Terraform này. Hãy coi đây là bản thiết kế chuyên nghiệp – "khoá đáp án" – cho cơ sở hạ tầng mà bạn sẽ xây dựng và triển khai trong các bước sắp tới.
4. Phát triển: Giới thiệu về Gemini CLI
👉💻 Trong cửa sổ dòng lệnh Cloud Shell, hãy chuyển đến thư mục cá nhân của bạn.
cd ~/storygen-learning
👉💻 Dùng thử Gemini lần đầu tiên.
clear
gemini --model=gemini-2.5-flash
Nếu hệ thống hỏi bạn Do you want to connect Cloud Shell editor to Gemini CLI?, hãy chọn NO (KHÔNG).
👉✨ Mọi công cụ của Gemini đều có nội dung mô tả. Hãy đọc ngay. Trong câu lệnh cho Gemini, hãy nhập:
Trong Gemini CLI
/help
👉✨ Gemini CLI có một bộ khả năng tích hợp riêng. Cách kiểm tra các quy tắc này:
Trong Gemini CLI
/tools
Bạn sẽ thấy một danh sách gồm ReadFile, WriteFile và GoogleSearch. Đây là những kỹ thuật mặc định mà bạn có thể sử dụng mà không cần phải lấy từ một kho vũ khí bên ngoài.
👉✨ Gemini Blade có thể lưu giữ "nhận thức chiến thuật" (bối cảnh) để hướng dẫn các hành động của mình.
Trong Gemini CLI
/memory show
Hiện tại, danh sách này đang trống.
👉✨ Trước tiên, hãy thêm một tính cách vào bộ nhớ của trợ lý. Điều này sẽ xác định lĩnh vực chuyên môn của mô hình:
Trong Gemini CLI
/memory add "I am master at python development"
Chạy lại /memory show để xác nhận rằng lưỡi dao đã hấp thụ kiến thức này.
👉✨ Để minh hoạ cách tham chiếu tệp bằng biểu tượng @, trước tiên, hãy tạo một tệp "mission brief" (bản tóm tắt nhiệm vụ).
Mở một cửa sổ dòng lệnh mới rồi chạy lệnh sau để tạo tệp nhiệm vụ:
!echo "## Mission Objective: Create Imagen ADK Agent for Story Book" > mission.md
👉✨Giờ đây, hãy yêu cầu Gemini CLI phân tích bản tóm tắt và báo cáo kết quả:
Trong Gemini CLI
Explain the contents of the file @mission.md
Giờ đây, vũ khí chính của bạn đã biết được mục tiêu của nó.
👉💻 Nhấn Ctrl+C hai lần để thoát Gemini CLI
Đang học:
Cách Gemini CLI có được những khả năng vượt trội: gemini.md Trước khi tiếp tục, bạn cần hiểu cách điều chỉnh Gemini CLI cho một dự án cụ thể. Mặc dù bạn có thể sử dụng công cụ này như một công cụ trò chuyện đa năng, nhưng sức mạnh thực sự của công cụ này đến từ một tệp cấu hình đặc biệt: gemini.md.
Khi bạn chạy lệnh gemini, lệnh này sẽ tự động tìm kiếm tệp gemini.md trong thư mục hiện tại. Tệp này đóng vai trò là hướng dẫn sử dụng dành riêng cho dự án cho AI. Bạn có thể xác định 3 điều chính:
- Nhân cách: Bạn có thể cho AI biết nhân cách mà AI nên có. Ví dụ: "Bạn là một nhà phát triển Python chuyên về Google Cloud." Điều này giúp AI tập trung vào câu trả lời và phong cách.
- Công cụ: Bạn có thể cấp cho mô hình này quyền truy cập vào các tệp cụ thể (@file.py) hoặc thậm chí là các cụm từ tìm kiếm trên Google (@google). Nhờ đó, AI có được ngữ cảnh cần thiết để trả lời các câu hỏi về mã của dự án.
- Bộ nhớ: Bạn có thể cung cấp các sự kiện hoặc quy tắc mà AI phải luôn ghi nhớ cho dự án này, giúp duy trì tính nhất quán.
Bằng cách sử dụng tệp gemini.md, bạn sẽ biến mô hình Gemini chung thành một trợ lý chuyên biệt đã được hướng dẫn về các mục tiêu của dự án và có quyền truy cập vào thông tin phù hợp.
5. Phát triển: Xây dựng ADK bằng Gemini CLI
Cấu hình môi trường
Chuyển đến Cloud Shell, nhấp vào nút "Mở thiết bị đầu cuối".
- Sao chép mẫu môi trường:
cd ~/storygen-learning
cp ~/storygen-learning/env.template ~/storygen-learning/.env
Xem tệp ẩn trong trình chỉnh sửa nếu bạn không tìm thấy .env
- Nhấp vào Xem trong thanh trình đơn trên cùng.
- Chọn Toggle Hidden Files (Bật/tắt chế độ Hiện tệp ẩn).
👉Tìm mã dự án trên Google Cloud:
- Mở Google Cloud Console: đường liên kết
- Chọn dự án mà bạn muốn sử dụng cho hội thảo này trong trình đơn thả xuống dự án ở đầu trang.
- Mã dự án của bạn sẽ xuất hiện trong thẻ Thông tin dự án trên Trang tổng quan
👉Tìm tên người dùng GitHub:
- Truy cập vào GitHub và tìm tên người dùng GitHub của bạn

Chỉnh sửa tệp .env 2. Thay thế các giá trị sau trong .env:
GOOGLE_API_KEY=[REPLACE YOUR API KEY HERE]
GOOGLE_CLOUD_PROJECT_ID=[REPLACE YOUR PROJECT ID]
GITHUB_USERNAME=[REPLACE YOUR USERNAME]
GENMEDIA_BUCKET=[REPLACE YOUR PROJECT ID]-bucket
ví dụ: Nếu mã dự án của bạn là: testproject, bạn nên đặt GOOGLE_CLOUD_PROJECT_ID=testproject và GENMEDIA_BUCKET=testproject-bucket
Tập lệnh thiết lập
Go to 00_Starting_Here (Chuyển đến 00_Bắt_đầu_từ_đây) Mở một cửa sổ dòng lệnh mới (không phải trong Gemini CLI)
cd ~/storygen-learning/00_Starting_Here
Chạy quy trình thiết lập hoàn chỉnh:
./setup-complete.sh
Bạn sẽ thấy kết quả thiết lập trong thiết bị đầu cuối
Tạo tác nhân đầu tiên
Chuyển đến 01a_First_Agent_Ready Hãy dùng Gemini CLI để tạo tác nhân ADK:**
cd ~/storygen-learning/01a_First_Agent_Ready
Mở Gemini CLI
gemini
Trong cửa sổ Gemini CLI, hãy thử câu lệnh:
I need you to help me create a Google ADK (Agent Development Kit) agent for story generation. I'm working on a children's storybook app that generates creative stories with visual scenes.

Please create a complete `agent.py` file that implements an LlmAgent using Google's ADK framework. The agent should:

**Requirements:**
1. Use the `google.adk.agents.LlmAgent` class
2. Use the "gemini-2.5-flash" model (supports streaming)
3. Be named "story_agent"
4. Generate structured stories with exactly 4 scenes each
5. Output valid JSON with story text, main characters, and scene data
6. No tools needed (images are handled separately)

**Agent Specifications:**
- **Model:** gemini-2.5-flash
- **Name:** story_agent
- **Description:** "Generates creative short stories and accompanying visual keyframes based on user-provided keywords and themes."
**Story Structure Required:**
- Exactly 4 scenes: Setup → Inciting Incident → Climax → Resolution
- 100-200 words total
- Simple, charming language for all audiences
- Natural keyword integration
**JSON Output Format:**

{
  "story": "Complete story text...",
  "main_characters": [
    {
      "name": "Character Name",
      "description": "VERY detailed visual description with specific colors, features, size, etc."
    }
  ],
  "scenes": [
    {
      "index": 1,
      "title": "The Setup",
      "description": "Scene action and setting WITHOUT character descriptions",
      "text": "Story text for this scene"
    }
    // ... 3 more scenes
  ]
}


**Key Instructions for the Agent:**
- Extract 1-2 main characters maximum
- Character descriptions should be extremely detailed and visual
- Scene descriptions focus on ACTION and SETTING only
- Do NOT repeat character appearance in scene descriptions
- Always respond with valid JSON

Please include a complete example in the instructions showing the exact format using keywords like "tiny robot", "lost kitten", "rainy city".

The file should start with necessary imports, define an empty tools list, include a print statement for initialization, and then create the LlmAgent with all the detailed instructions.

Can you create this agent in backend/story_agent/agent.py
Sau khi hoàn tất, hãy tắt cửa sổ dòng lệnh Gemini CLI bằng cách nhấn Control+C
—————————————— Không bắt buộc, bạn có thể bỏ qua phần Giải pháp——————————————–
Xác minh thay đổi của bạn trong ADK Web ngay
cd ~/storygen-learning/01a_First_Agent_Ready/backend

source ../../.venv/bin/activate

adk web --port 8080
Để tiếp tục, bạn cần có một dấu nhắc lệnh.
Spin Up The Website
cd ~/storygen-learning/01a_First_Agent_Ready

./start.sh
Nếu thay đổi của bạn không có tác dụng, bạn sẽ thấy lỗi trong giao diện người dùng web và trang web ADK.
——————————————– Giải pháp bắt đầu từ đây ——————————————–
Giải pháp
Kết thúc quy trình trước đó bằng Control+C hoặc bạn có thể mở một thiết bị đầu cuối khác:
cd ~/storygen-learning/01b_First_Agent_Done
Tạo trang web:
./start.sh
Bạn sẽ thấy trang web:
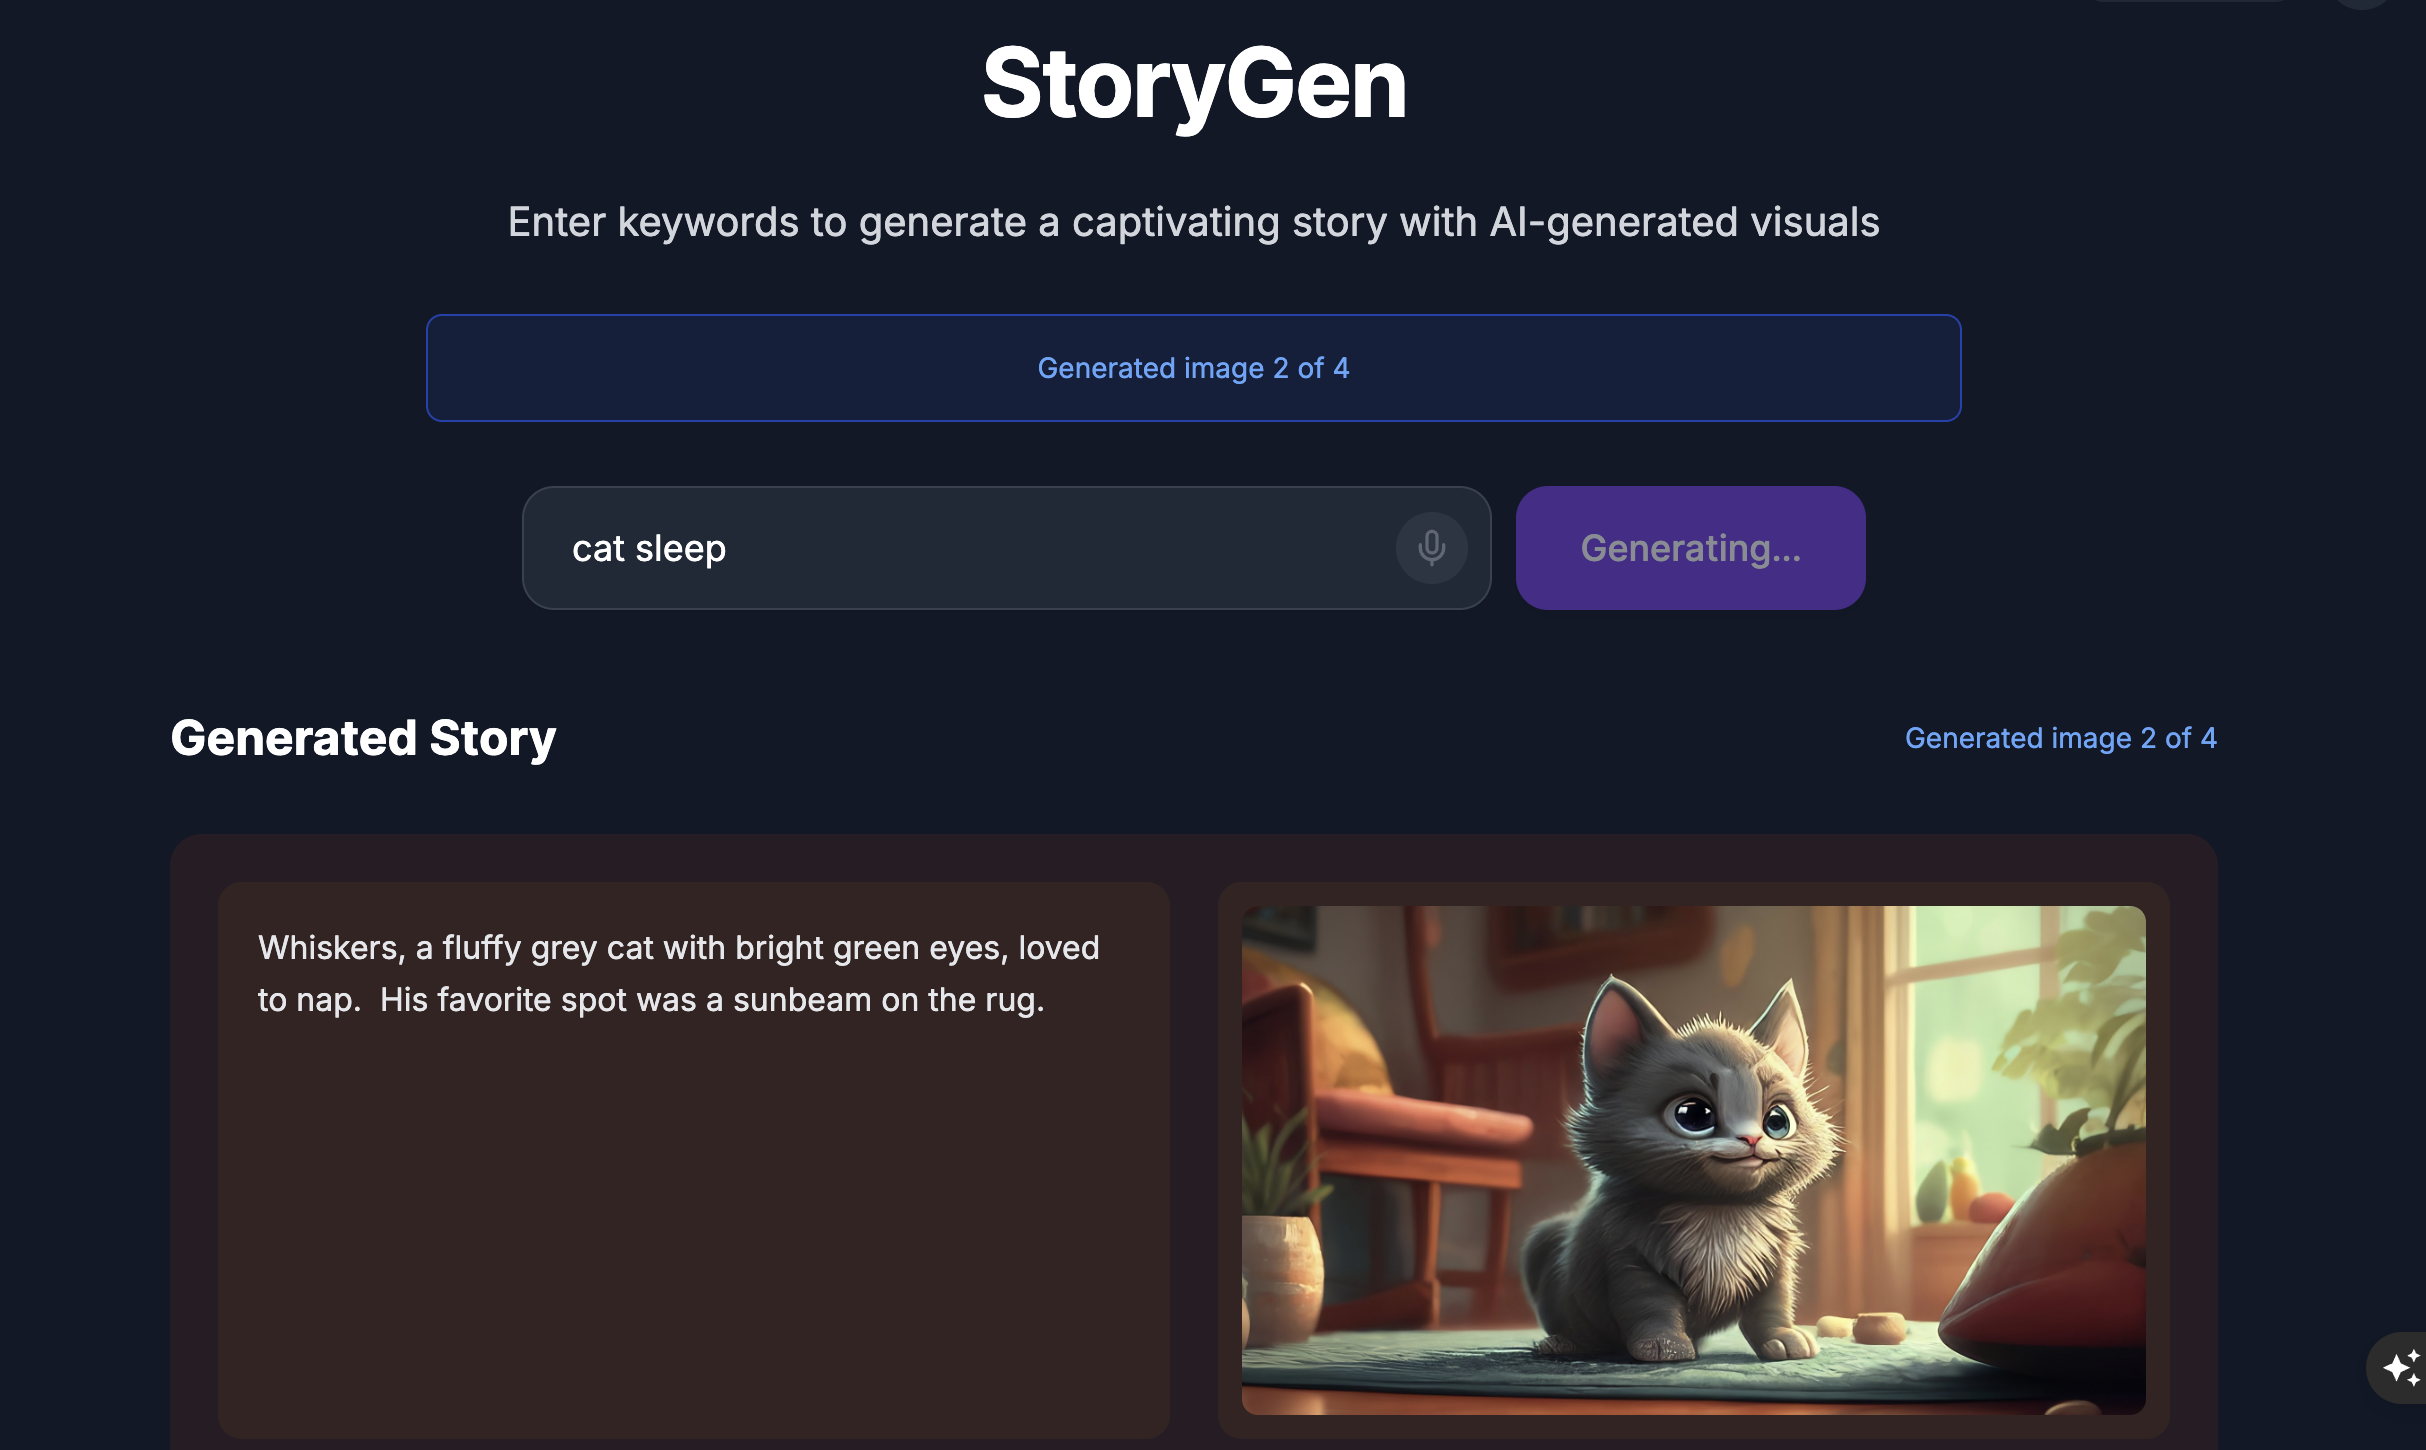
Thử giao diện người dùng ADK: Mở một cửa sổ dòng lệnh khác:
cd ~/storygen-learning/01b_First_Agent_Done/backend
source ../../.venv/bin/activate

adk web --port 8080
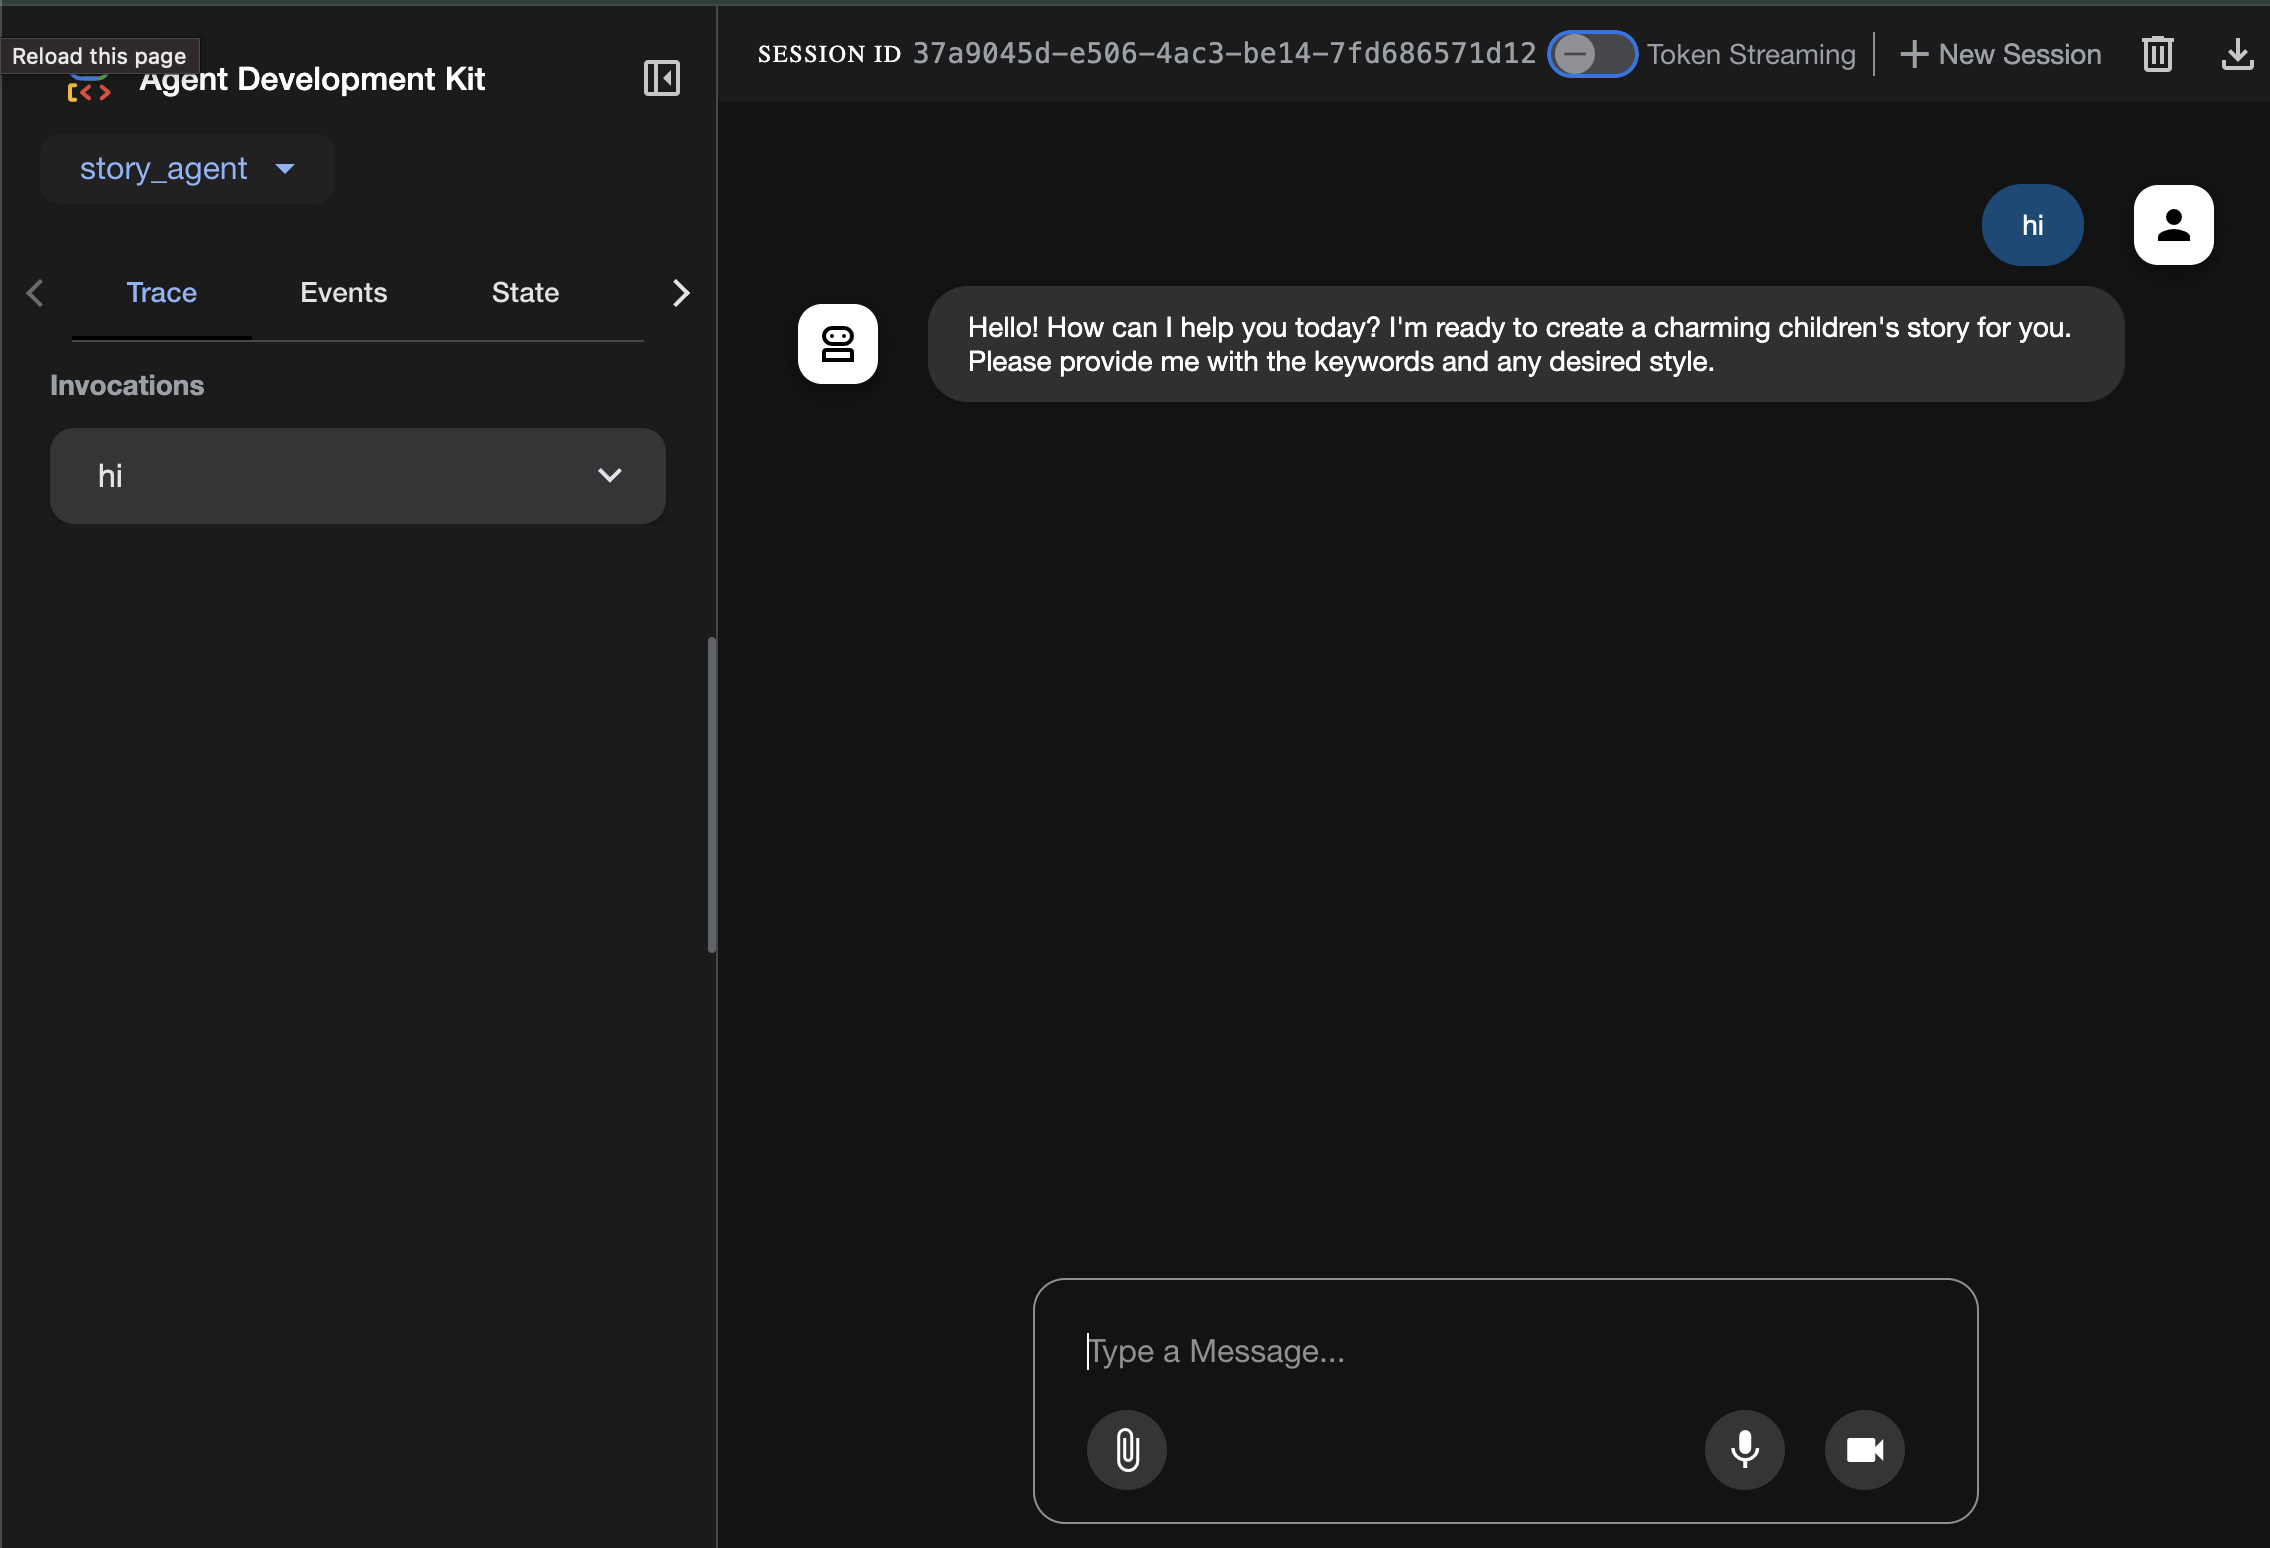
Bạn sẽ thấy giao diện người dùng ADK, nơi bạn có thể đặt câu hỏi cho tác nhân
Trước khi chuyển sang phần tiếp theo, hãy nhấn tổ hợp phím Ctrl+C để kết thúc quy trình.
6. Phát triển: Xây dựng ADK bằng Gemini CLI – (Cách thiết kế bối cảnh)
Thiết lập ban đầu
Đảm bảo rằng chúng ta xoá tệp tác nhân mà chúng ta đã tạo trước đó, trong 01a_First_Agent_Ready/backend/story_agent/agent.py:
Chuyển đến 01a_First_Agent_Ready Hãy dùng Gemini CLI để tạo tác nhân ADK:**
cd ~/storygen-learning/01a_First_Agent_Ready/backend
Mở Gemini CLI
gemini
Trong cửa sổ Gemini CLI, hãy thử câu lệnh:
Summarize the design doc @design.md for me, do not attempt to create file just yet.
👉💻 Thoát Gemini tạm thời bằng cách nhấn Ctrl+C hai lần.
👉💻 Trong thiết bị đầu cuối, hãy chạy lệnh sau để ghi tệp nguyên tắc.
cat << 'EOF' > GEMINI.md
  ### **Coding Guidelines**
  **1. Python Best Practices:**

  *   **Type Hinting:** All function and method signatures should include type hints for arguments and return values.
  *   **Docstrings:** Every module, class, and function should have a docstring explaining its purpose, arguments, and return value, following a consistent format like reStructuredText or
  Google Style.
  *   **Linter & Formatter:** Use a linter like `ruff` or `pylint` and a code formatter like `black` to enforce a consistent style and catch potential errors.
  *   **Imports:** Organize imports into three groups: standard library, third-party libraries, and local application imports. Sort them alphabetically within each group.
  *   **Naming Conventions:**
      *   `snake_case` for variables, functions, and methods.
      *   `PascalCase` for classes.
      *   `UPPER_SNAKE_CASE` for constants.
  *   **Dependency Management:** All Python dependencies must be listed in a `requirements.txt` file.

  **2. Web APIs (FastAPI):**

  *   **Data Validation:** Use `pydantic` models for request and response data validation.
  *   **Dependency Injection:** Utilize FastAPI's dependency injection system for managing resources like database connections.
  *   **Error Handling:** Implement centralized error handling using middleware or exception handlers.
  *   **Asynchronous Code:** Use `async` and `await` for I/O-bound operations to improve performance.
EOF
cat GEMINI.md
Với những quy tắc đã được ghi lại, hãy triệu hồi lại đối tác AI của chúng ta và chứng kiến điều kỳ diệu của hiện vật này.
👉💻 Chạy lại Gemini CLI từ thư mục shadowblade:
cd ~/storygen-learning/01a_First_Agent_Ready/backend
clear
gemini
👉✨ Giờ đây, hãy hỏi Gemini để công cụ này cho bạn biết công cụ này đang nghĩ gì. Các chữ cái đã được đọc.
/memory show
👉✨ Đây là lệnh duy nhất và mạnh mẽ sẽ tạo ra trợ lý ảo của bạn. Phát hành ngay:
You are an expert Python developer specializing in the Google Agent Development Kit (ADK). Your task is to write the complete, production-quality code for `agent.py` by following the technical specifications outlined in the provided design document verbatim.

Analyze the design document at `@design.md` and generate the corresponding Python code for `agent.py`.

I need you to generate a Python script based on the provided design document and reference examples. Follow these requirements:

Read the design document carefully - it contains the complete technical specification for the code you need to write
Follow the structure and patterns shown in the reference context files
Adhere to all Python best practices specified in the coding standards document
Implement every requirement mentioned in the design document exactly as specified
Use the exact variable names, function names, and string values mentioned in the specifications

The design document describes the complete architecture, dependencies, configuration, and logic flow. Your generated code must match these specifications precisely while following professional Python coding standards.
Generate clean, production-ready Python code that can be used immediately without modifications.
Sau khi hoàn tất, hãy tắt cửa sổ dòng lệnh Gemini CLI bằng cách nhấn Control+C
—————————————— Không bắt buộc, bạn có thể bỏ qua phần Giải pháp——————————————–
Xác minh thay đổi của bạn trong ADK Web ngay
cd ~/storygen-learning/01a_First_Agent_Ready/backend

source ../../.venv/bin/activate

adk web --port 8080
Để tiếp tục, bạn cần có một dấu nhắc lệnh.
Spin Up The Website
cd ~/storygen-learning/01a_First_Agent_Ready

./start.sh
Nếu thay đổi của bạn không có tác dụng, bạn sẽ thấy lỗi trong giao diện người dùng web và trang web ADK.
——————————————– Giải pháp bắt đầu từ đây ——————————————–
Giải pháp
Kết thúc quy trình trước đó bằng Control+C hoặc bạn có thể mở một thiết bị đầu cuối khác:
cd ~/storygen-learning/01b_First_Agent_Done
Tạo trang web:
./start.sh
Bạn sẽ thấy trang web:
Thử giao diện người dùng ADK: Mở một cửa sổ dòng lệnh khác:
cd ~/storygen-learning/01b_First_Agent_Done/backend
source ../../.venv/bin/activate

adk web --port 8080
Bạn sẽ thấy giao diện người dùng ADK, nơi bạn có thể đặt câu hỏi cho tác nhân
Trước khi chuyển sang phần tiếp theo, hãy nhấn tổ hợp phím Ctrl+C để kết thúc quy trình.
7. Phát triển: Xây dựng Tác nhân tùy chỉnh của bạn bằng Imagen
Tạo Công cụ Imagen (Tác nhân thứ hai)
cd ~/storygen-learning/02a_Image_Agent_Ready
Sử dụng Gemini CLI để tạo tác nhân tạo sinh hình ảnh:
gemini generate "I need you to help me create a custom Google ADK (Agent Development Kit) agent for image generation. This is different from the story agent - this one handles image generation directly using the BaseAgent pattern for full control over tool execution.

Please create a complete `agent.py` file that implements a custom image generation agent. The agent should:

**Requirements:**
1. Use the `google.adk.agents.BaseAgent` class (NOT LlmAgent)
2. Be named "custom_image_agent"
3. Directly execute the ImagenTool without LLM intermediation
4. Handle JSON input with scene descriptions and character descriptions
5. Store results in session state for retrieval by main.py
6. Use async generators and yield Events

**Key Specifications:**
- **Class Name:** CustomImageAgent (inherits from BaseAgent)
- **Agent Name:** "custom_image_agent"
- **Tool:** Uses ImagenTool for direct image generation
- **Purpose:** Bypass LLM agent limitations and directly call ImagenTool

**Input Format:**
The agent should handle JSON input like:
{
  "scene_description": "Scene action and setting",
  "character_descriptions": {
    "CharacterName": "detailed visual description"
  }
}


**Core Method:** `async def _run_async_impl(self, ctx: InvocationContext) -> AsyncGenerator[Event, None]:`
   - Extract user message from `ctx.user_content.parts`
   - Parse JSON input or fallback to plain text
   - Extract scene_description and character_descriptions
   - Build image prompt with style prefix: "Children's book cartoon illustration with bright vibrant colors, simple shapes, friendly characters."
   - Include character descriptions for consistency
   - Call `await self.imagen_tool.run()` directly
   - Store results in `ctx.session.state["image_result"]`
   - Yield Event with results


 **Session State:**
   - Store JSON results in `ctx.session.state["image_result"]`
   - Include success/error status
   - Store actual image URLs or error messages

Expected Output Structure:
- Successful results stored as JSON with image URLs
- Error results stored as JSON with error messages
- Results accessible via session state in main.py

Can you create this agent in backend/story_image_agent/agent.py

"
—————————————— Không bắt buộc, bạn có thể bỏ qua phần Giải pháp——————————————–
Xác minh thay đổi của bạn trong ADK Web ngay
cd ~/storygen-learning/02a_Image_Agent_Ready/backend

source ../../.venv/bin/activate

adk web --port 8080
Spin Up The Website
cd ~/storygen-learning/02a_Second_Agent_Ready

./start.sh
Nếu thay đổi của bạn không có tác dụng, bạn sẽ thấy lỗi trong giao diện người dùng web và trang web ADK.
—————————————— Giải pháp bắt đầu từ đây ——————————————–
Giải pháp
Kết thúc quy trình trước đó bằng Control+C hoặc bạn có thể mở một thiết bị đầu cuối khác:
# Open new terminal
cd ~/storygen-learning/02b_Image_Agent_Done
Tạo trang web:
./start.sh
Bạn sẽ thấy trang web:
Thử giao diện người dùng ADK: Mở một cửa sổ dòng lệnh khác:
# Open new terminal
cd ~/storygen-learning/02b_Image_Agent_Done/backend

source ../../.venv/bin/activate

adk web --port 8080
Bạn sẽ thấy giao diện người dùng ADK, nơi bạn có thể đặt câu hỏi cho tác nhân:
Trước khi chuyển sang phần tiếp theo, hãy nhấn tổ hợp phím Ctrl+C để kết thúc quy trình.
Học hỏi
Tác nhân đầu tiên của chúng tôi rất giỏi tạo văn bản, nhưng giờ đây chúng ta cần tạo hình ảnh. Đối với tác vụ này, chúng ta cần có quyền kiểm soát trực tiếp hơn. Chúng ta không muốn LLM quyết định có tạo hình ảnh hay không; chúng ta muốn ra lệnh trực tiếp cho LLM làm việc đó. Đây là công việc hoàn hảo cho một BaseAgent.
Không giống như LlmAgent khai báo, BaseAgent là bắt buộc. Điều này có nghĩa là bạn (nhà phát triển) sẽ viết chính xác logic từng bước của Python bên trong phương thức _run_async_impl. Bạn có toàn quyền kiểm soát quy trình thực thi.
Bạn sẽ chọn BaseAgent khi cần:
Logic xác định: Trợ lý ảo phải tuân theo một trình tự các bước cụ thể và không thay đổi.
Thực thi công cụ trực tiếp: Bạn muốn gọi một công cụ trực tiếp mà không cần sự can thiệp của LLM.
Quy trình công việc phức tạp: Quy trình này liên quan đến việc thao tác dữ liệu tuỳ chỉnh, lệnh gọi API và logic quá phức tạp để một LLM có thể suy luận một cách đáng tin cậy chỉ từ một câu lệnh.
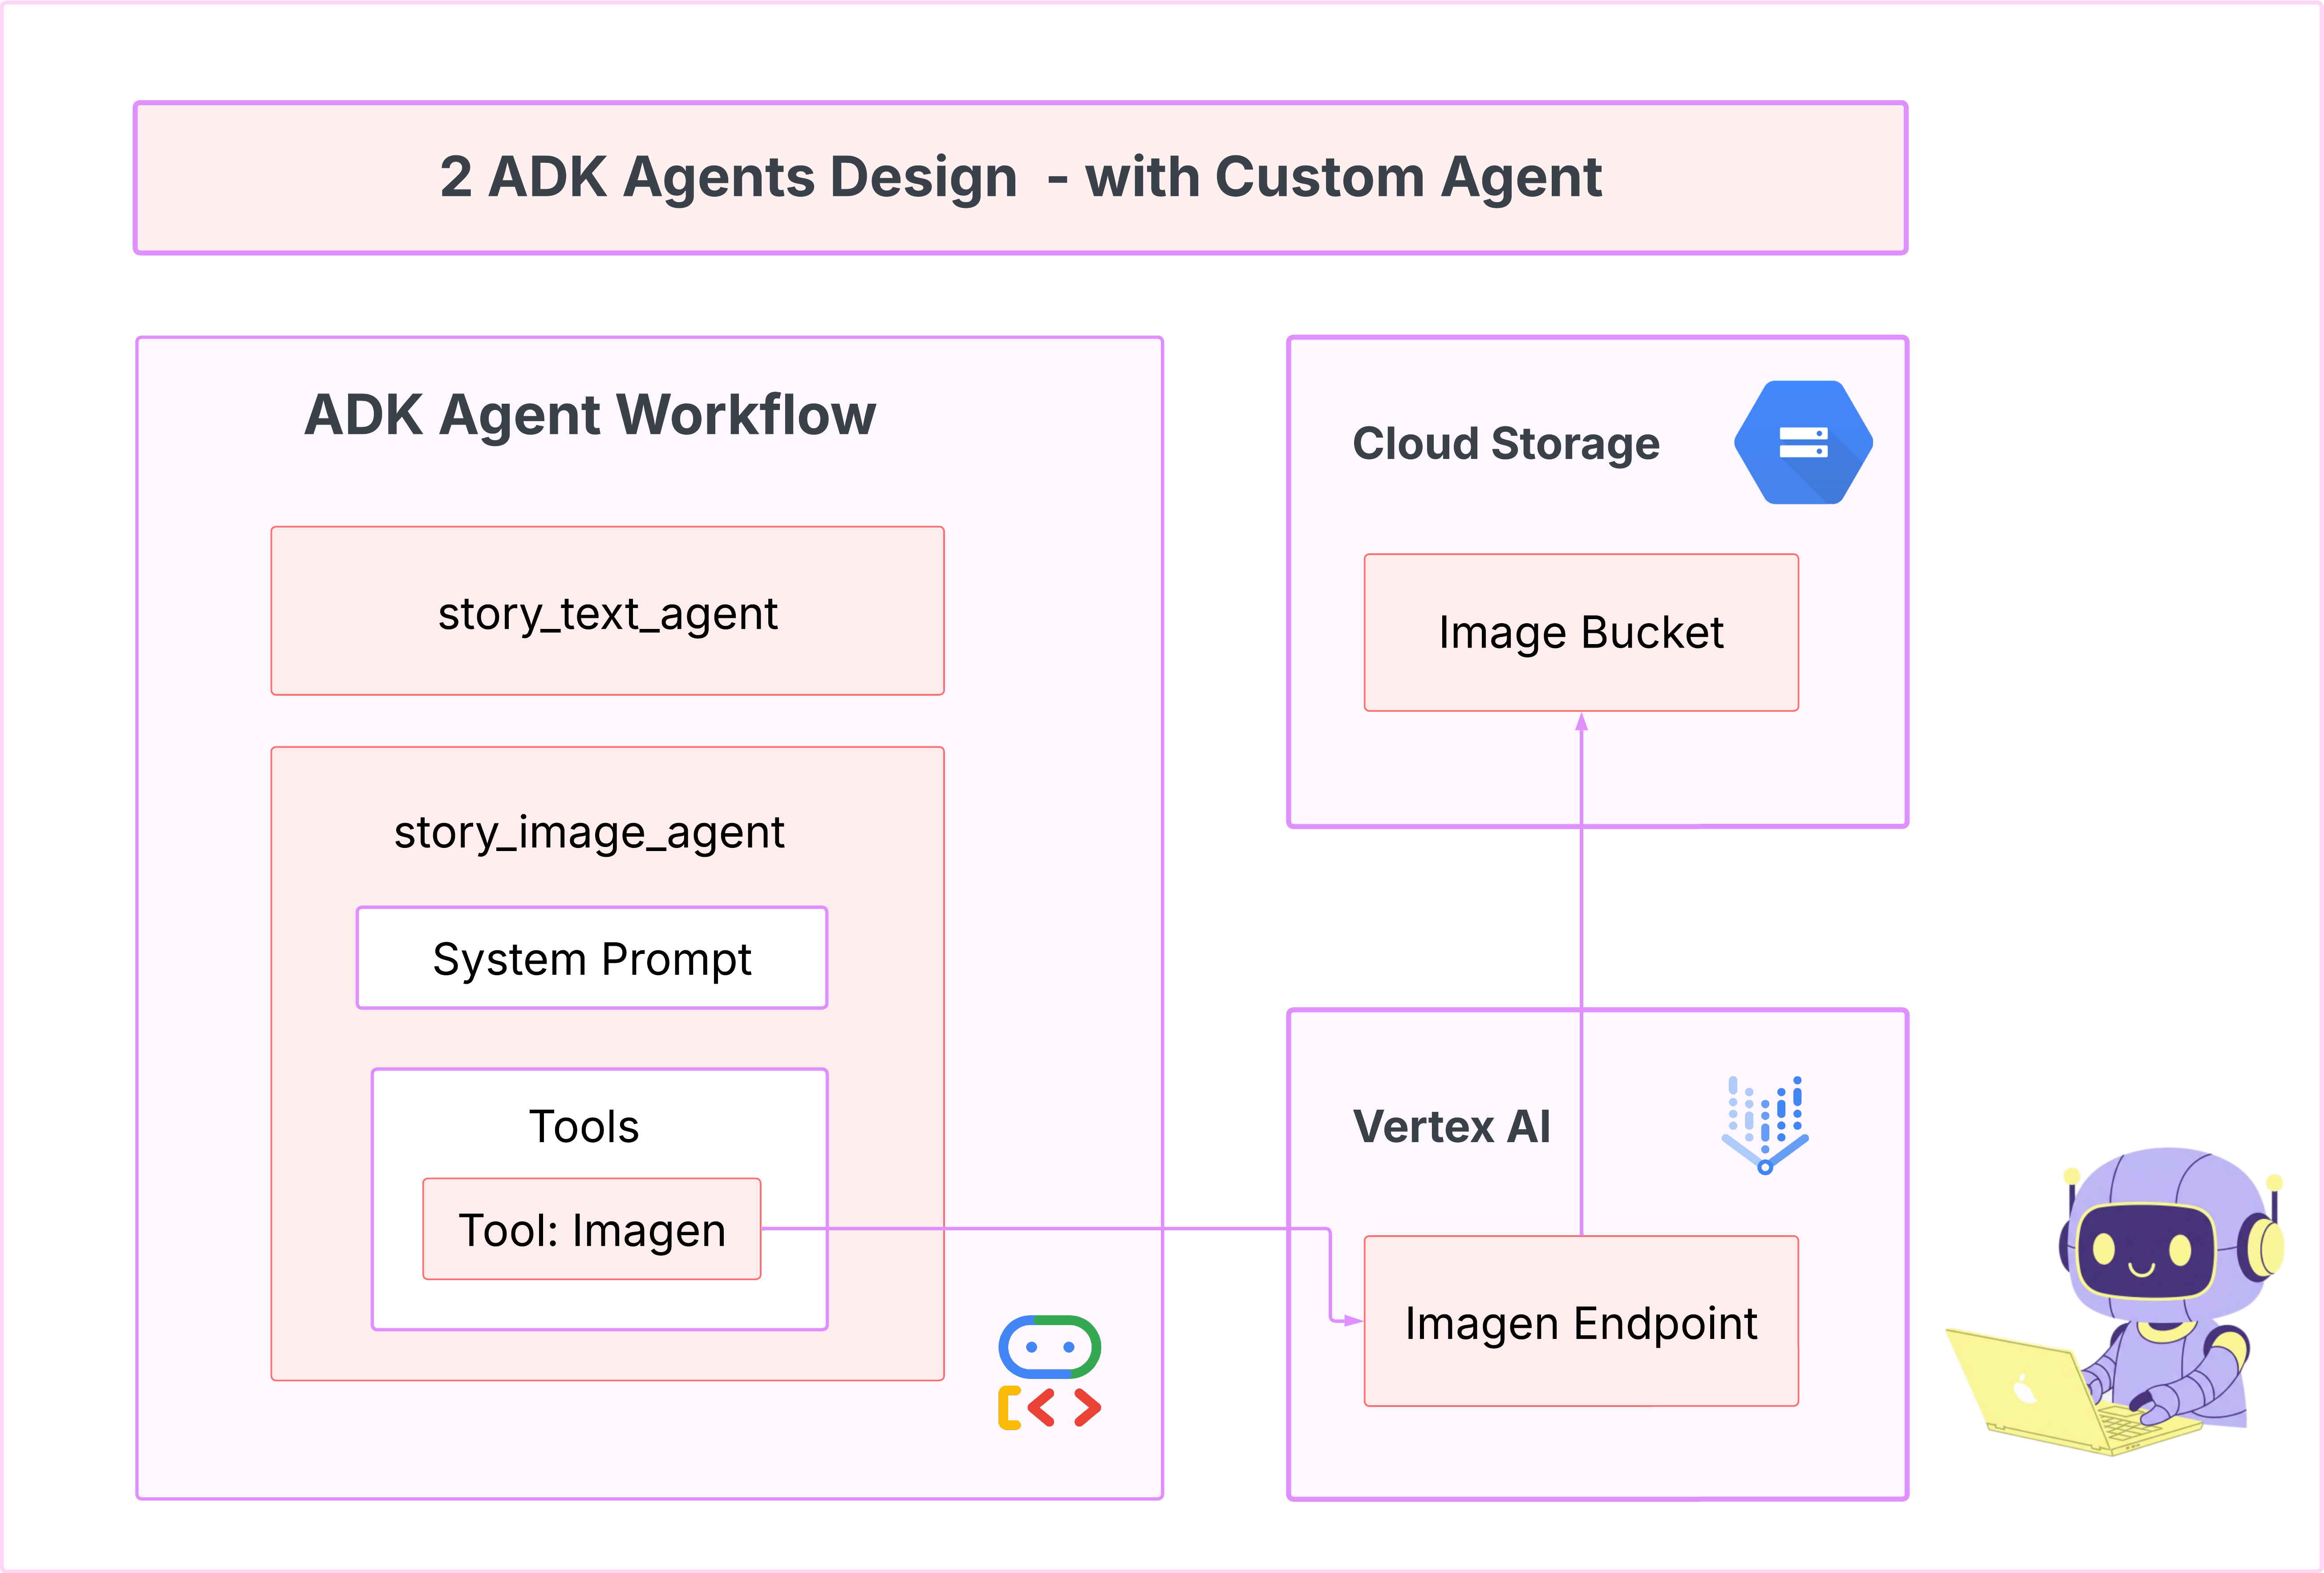
Đối với ứng dụng của chúng tôi, chúng tôi sẽ sử dụng BaseAgent để nhận nội dung mô tả cảnh từ tác nhân đầu tiên và gọi trực tiếp công cụ Imagen để đảm bảo rằng mỗi cảnh đều được tạo hình ảnh.
8. Thử nghiệm: Đánh giá nhân viên hỗ trợ
Ứng dụng của chúng ta hoạt động, nhưng chúng ta cần một mạng lưới kiểm thử tự động để đảm bảo an toàn. Đây là một nhiệm vụ hoàn hảo để uỷ quyền cho AI đồng hành.
Thao tác
cd ~/storygen-learning/03a_Agent_Evaluation_Ready/backend
Sử dụng Gemini CLI để viết các bài kiểm tra toàn diện:
Mở Gemini CLI
gemini
Trong cửa sổ Gemini CLI, hãy thử câu lệnh:
I need you to create comprehensive test files for my backend/story_agent in Google ADK. I need three specific JSON files that match the testing structure used in ADK evaluation.

**Context:**
- The story agent generates structured JSON stories with exactly 4 scenes
- It uses LlmAgent with no tools, just direct LLM responses
- Input: Keywords
- Output: JSON with story, main_characters, and scenes arrays

**Files to Create:**

### 1. `story_agent_eval.evalset.json` (Comprehensive Integration Tests)
Create a comprehensive evaluation set with:
- **eval_set_id**: "story_agent_comprehensive_evalset"
- **name**: "Story Agent Comprehensive Evaluation Set"
- **description**: "Comprehensive evaluation scenarios for story_agent covering various keyword combinations, edge cases, and story quality metrics"


Each eval_case should include:
- Full conversation arrays with invocation_id, user_content, final_response
- Complete expected JSON responses with detailed stories, characters, and 4 scenes
- session_input with app_name "story_agent"
- All fields: story (narrative text), main_characters (with detailed visual descriptions), scenes (with index, title, description, text)

### 2. `story_generation.test.json` (Unit Tests)
Create basic generation tests with:
- **eval_set_id**: "story_agent_basic_generation_tests"
- **name**: "Story Agent Basic Generation Tests"
- **description**: "Unit tests for story_agent focusing on JSON structure compliance, scene generation, and keyword integration"

### 3. `test_config.json` (Evaluation Configuration)
Create test configuration with:
- **criteria**: response_match_score: 0.7, tool_trajectory_avg_score: 1.0
- **custom_evaluators**:
  - json_structure_validator (validates required fields, scene count, character fields)
  - story_quality_metrics (word count 80-250, keyword integration threshold 0.8)
- **evaluation_notes**: Story agent specifics and trajectory expectations

**Important Requirements:**
1. All responses must be valid, parseable JSON
2. Stories must have exactly 4 scenes with indices 1-4
3. Each scene must have: index, title, description, text
4. Main characters must have detailed visual descriptions
5. No tool_uses expected (empty arrays) since story agent uses direct LLM
6. Word count should be 100-200 words total
7. Keywords must be naturally integrated into the narrative

Please generate all three files with realistic example stories and comprehensive test coverage matching the ADK evaluation format.
—————————————— Không bắt buộc, bạn có thể bỏ qua phần Giải pháp——————————————–
Cách xem kết quả đánh giá:
./run_adk_web_persistent.sh
Chuyển đến thẻ eval trên giao diện người dùng ADK.
Bạn sẽ thấy giao diện người dùng web ADK có các chức năng kiểm thử liên tục
Khoảnh khắc học tập quan trọng: AI là một đối tác mạnh mẽ trong việc tự động hoá quy trình đảm bảo chất lượng. Công cụ này có thể xử lý mã nguyên mẫu của việc viết kiểm thử, giúp bạn tập trung vào việc xây dựng các tính năng.
——————————————– Giải pháp bắt đầu từ đây ——————————————–
Giải pháp
- Chuyển đến thư mục giải pháp:
cd ~/storygen-learning/03b_Agent_Evaluation_Done/backend
- Mở giao diện người dùng web ADK
./run_adk_web_persistent.sh
Bạn có thể xem các trường hợp kiểm thử trong thẻ Eval:
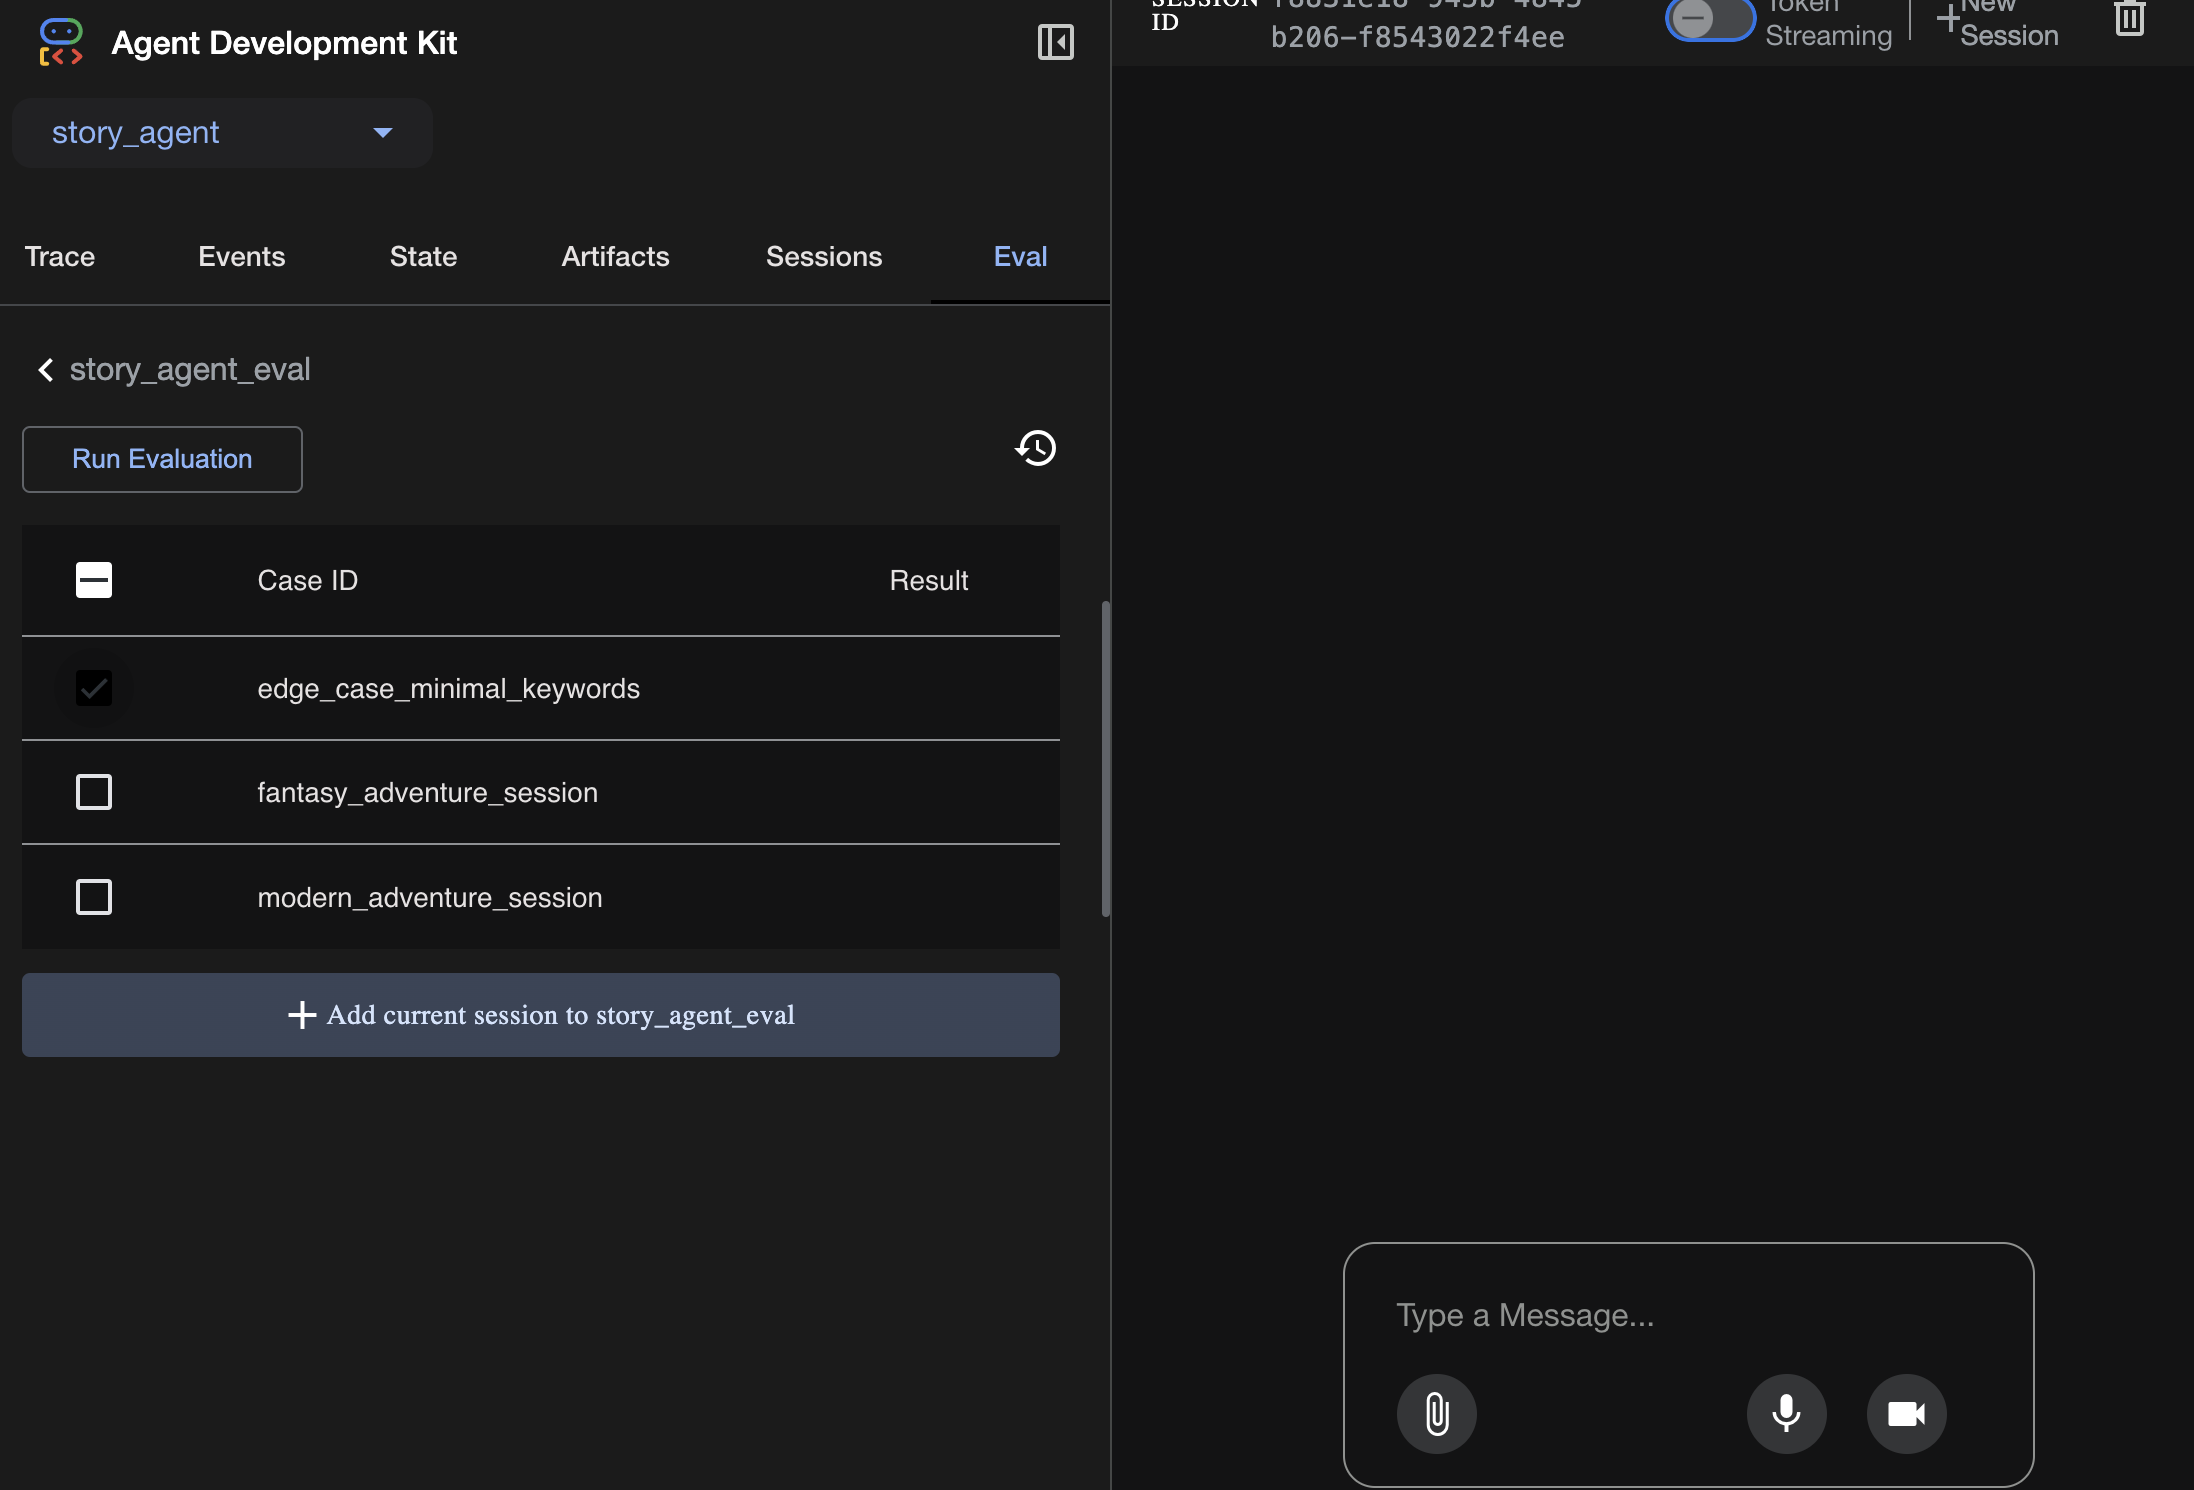
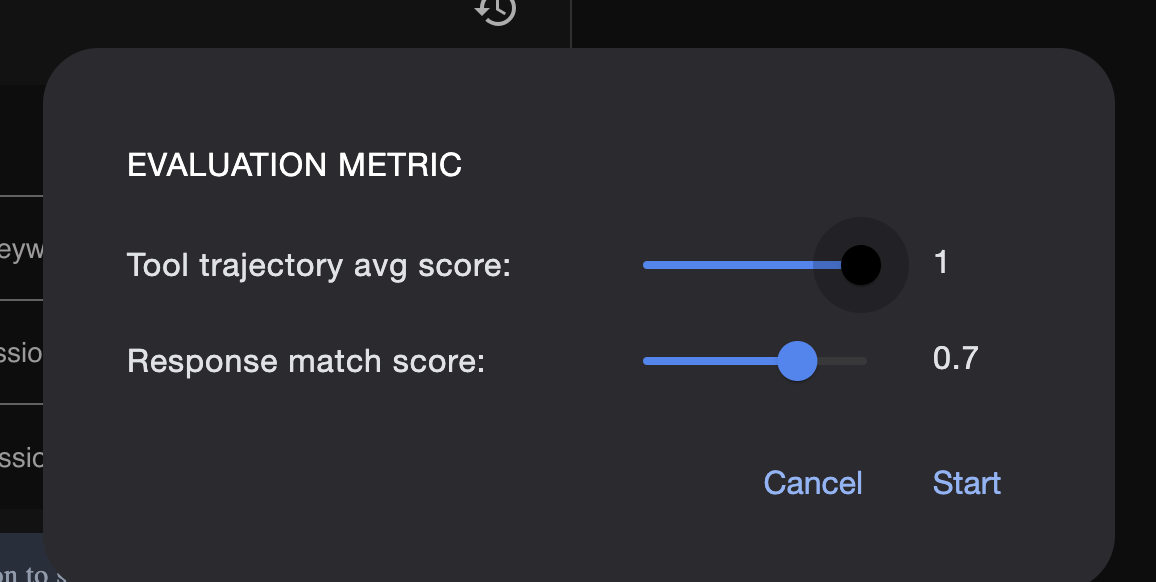
Điều chỉnh các chỉ số tại đây:
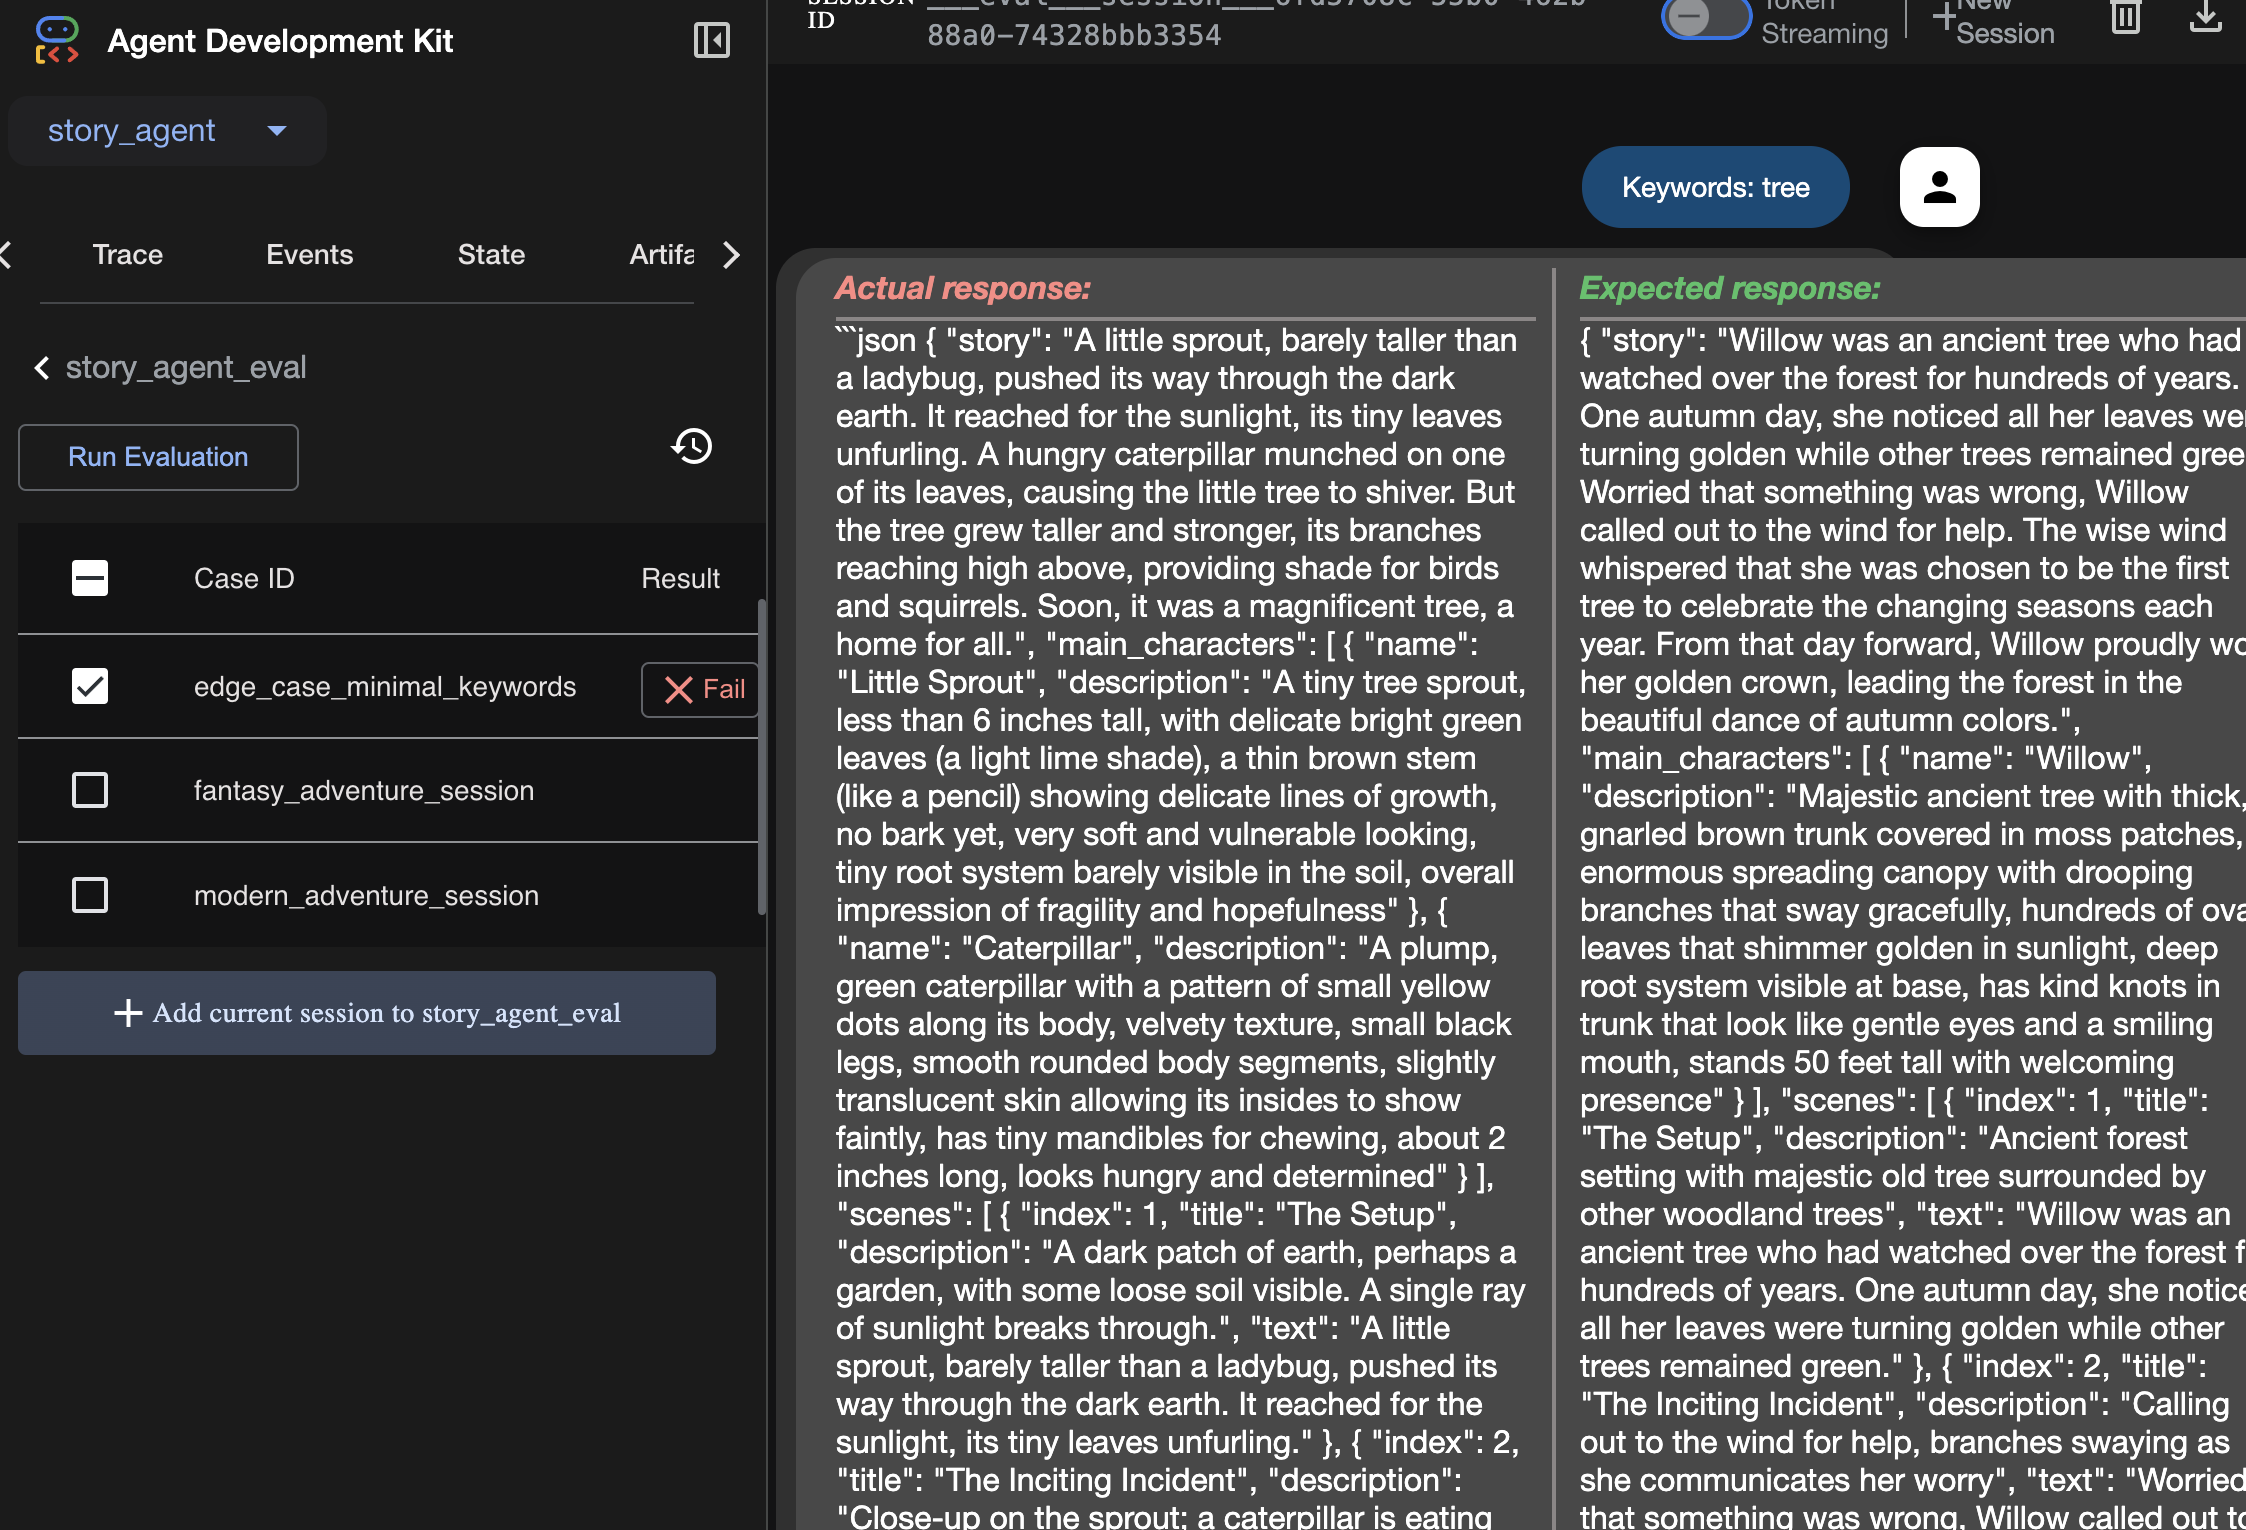
Xem kết quả chạy quy trình đánh giá tại đây:
Học hỏi
Một tác nhân có thể "hoạt động" mà không gặp lỗi, nhưng làm cách nào để biết liệu tác nhân đó có tạo ra đầu ra phù hợp hay không? Câu chuyện có hay không? Định dạng JSON có chính xác không? Đây là lúc khung đánh giá của ADK phát huy tác dụng.
Đánh giá tác nhân là một hệ thống kiểm thử tự động được thiết kế để đo lường chất lượng và độ chính xác của các câu trả lời của tác nhân. Thay vì chỉ kiểm tra lỗi mã, nó sẽ kiểm tra xem hành vi của tác nhân có đáp ứng được kỳ vọng của bạn hay không. Khung này chủ yếu sử dụng một số tệp chính:
evalset.json: Đây là bộ kiểm thử chính của bạn. Mỗi "trường hợp đánh giá" trong tệp này đều chứa một cuộc trò chuyện mẫu (ví dụ: lời nhắc của người dùng) và câu trả lời "vàng" lý tưởng mà bạn muốn tác nhân tạo ra.
test_config.json: Tệp này xác định các quy tắc để thành công. Bạn có thể đặt các tiêu chí tại đây, chẳng hạn như:
response_match_score: Phản hồi của trợ lý phải khớp với phản hồi "chuẩn" ở mức độ nào? (Điểm 1.0 có nghĩa là phải giống hệt nhau).
custom_evaluators: Bạn có thể tạo các quy tắc của riêng mình, chẳng hạn như "Câu trả lời phải là JSON hợp lệ" hoặc "Câu chuyện phải có hơn 100 từ".
Bằng cách chạy quy trình đánh giá, bạn có thể tự động kiểm thử tác nhân của mình dựa trên hàng chục tình huống, đảm bảo rằng những thay đổi đối với câu lệnh hoặc công cụ của bạn không vô tình làm hỏng chức năng cốt lõi của tác nhân. Đây là một mạng lưới an toàn mạnh mẽ để xây dựng các tác nhân AI sẵn sàng cho hoạt động sản xuất.
9. Cơ sở hạ tầng dưới dạng mã (IaC): Xây dựng một ngôi nhà trên đám mây
Mã của chúng ta đã được kiểm thử, nhưng cần có một vị trí sẵn sàng cho việc phát hành công khai. Chúng ta sẽ sử dụng "Cơ sở hạ tầng dưới dạng mã" để xác định môi trường.
Docker là gì?
Docker là một nền tảng để tạo và chạy các ứng dụng trong vùng chứa. Hãy xem vùng chứa như một vùng chứa vận chuyển tiêu chuẩn cho phần mềm. Nó tập hợp mọi thứ mà ứng dụng của bạn cần để chạy vào một gói riêng biệt:
- Chính mã xử lý ứng dụng
- Thời gian chạy bắt buộc (ví dụ: phiên bản cụ thể của Python)
- Tất cả các công cụ và thư viện hệ thống
Sau đó, bạn có thể chạy ứng dụng được chứa này trên mọi máy đã cài đặt Docker, giải quyết vấn đề "ứng dụng chạy trên máy của tôi" thường gặp.
Trong phần này, chúng ta sẽ hỏi Gemini tạo một tệp Docker. Đây chỉ đơn giản là công thức hoặc bản thiết kế để tạo hình ảnh vùng chứa của ứng dụng
Thao tác
cd ~/storygen-learning/04a_Manual_Deployment_Ready
Sử dụng Gemini CLI để tạo Dockerfile cho phần phụ trợ: Mở Gemini CLI
Gemini
Trong Gemini CLI, hãy thử câu lệnh:
Create a manual deployment plan for my StoryGen app with Google Cloud Platform. I have a Next.js frontend, Python backend, and Terraform infrastructure.
Generate these deployment files:
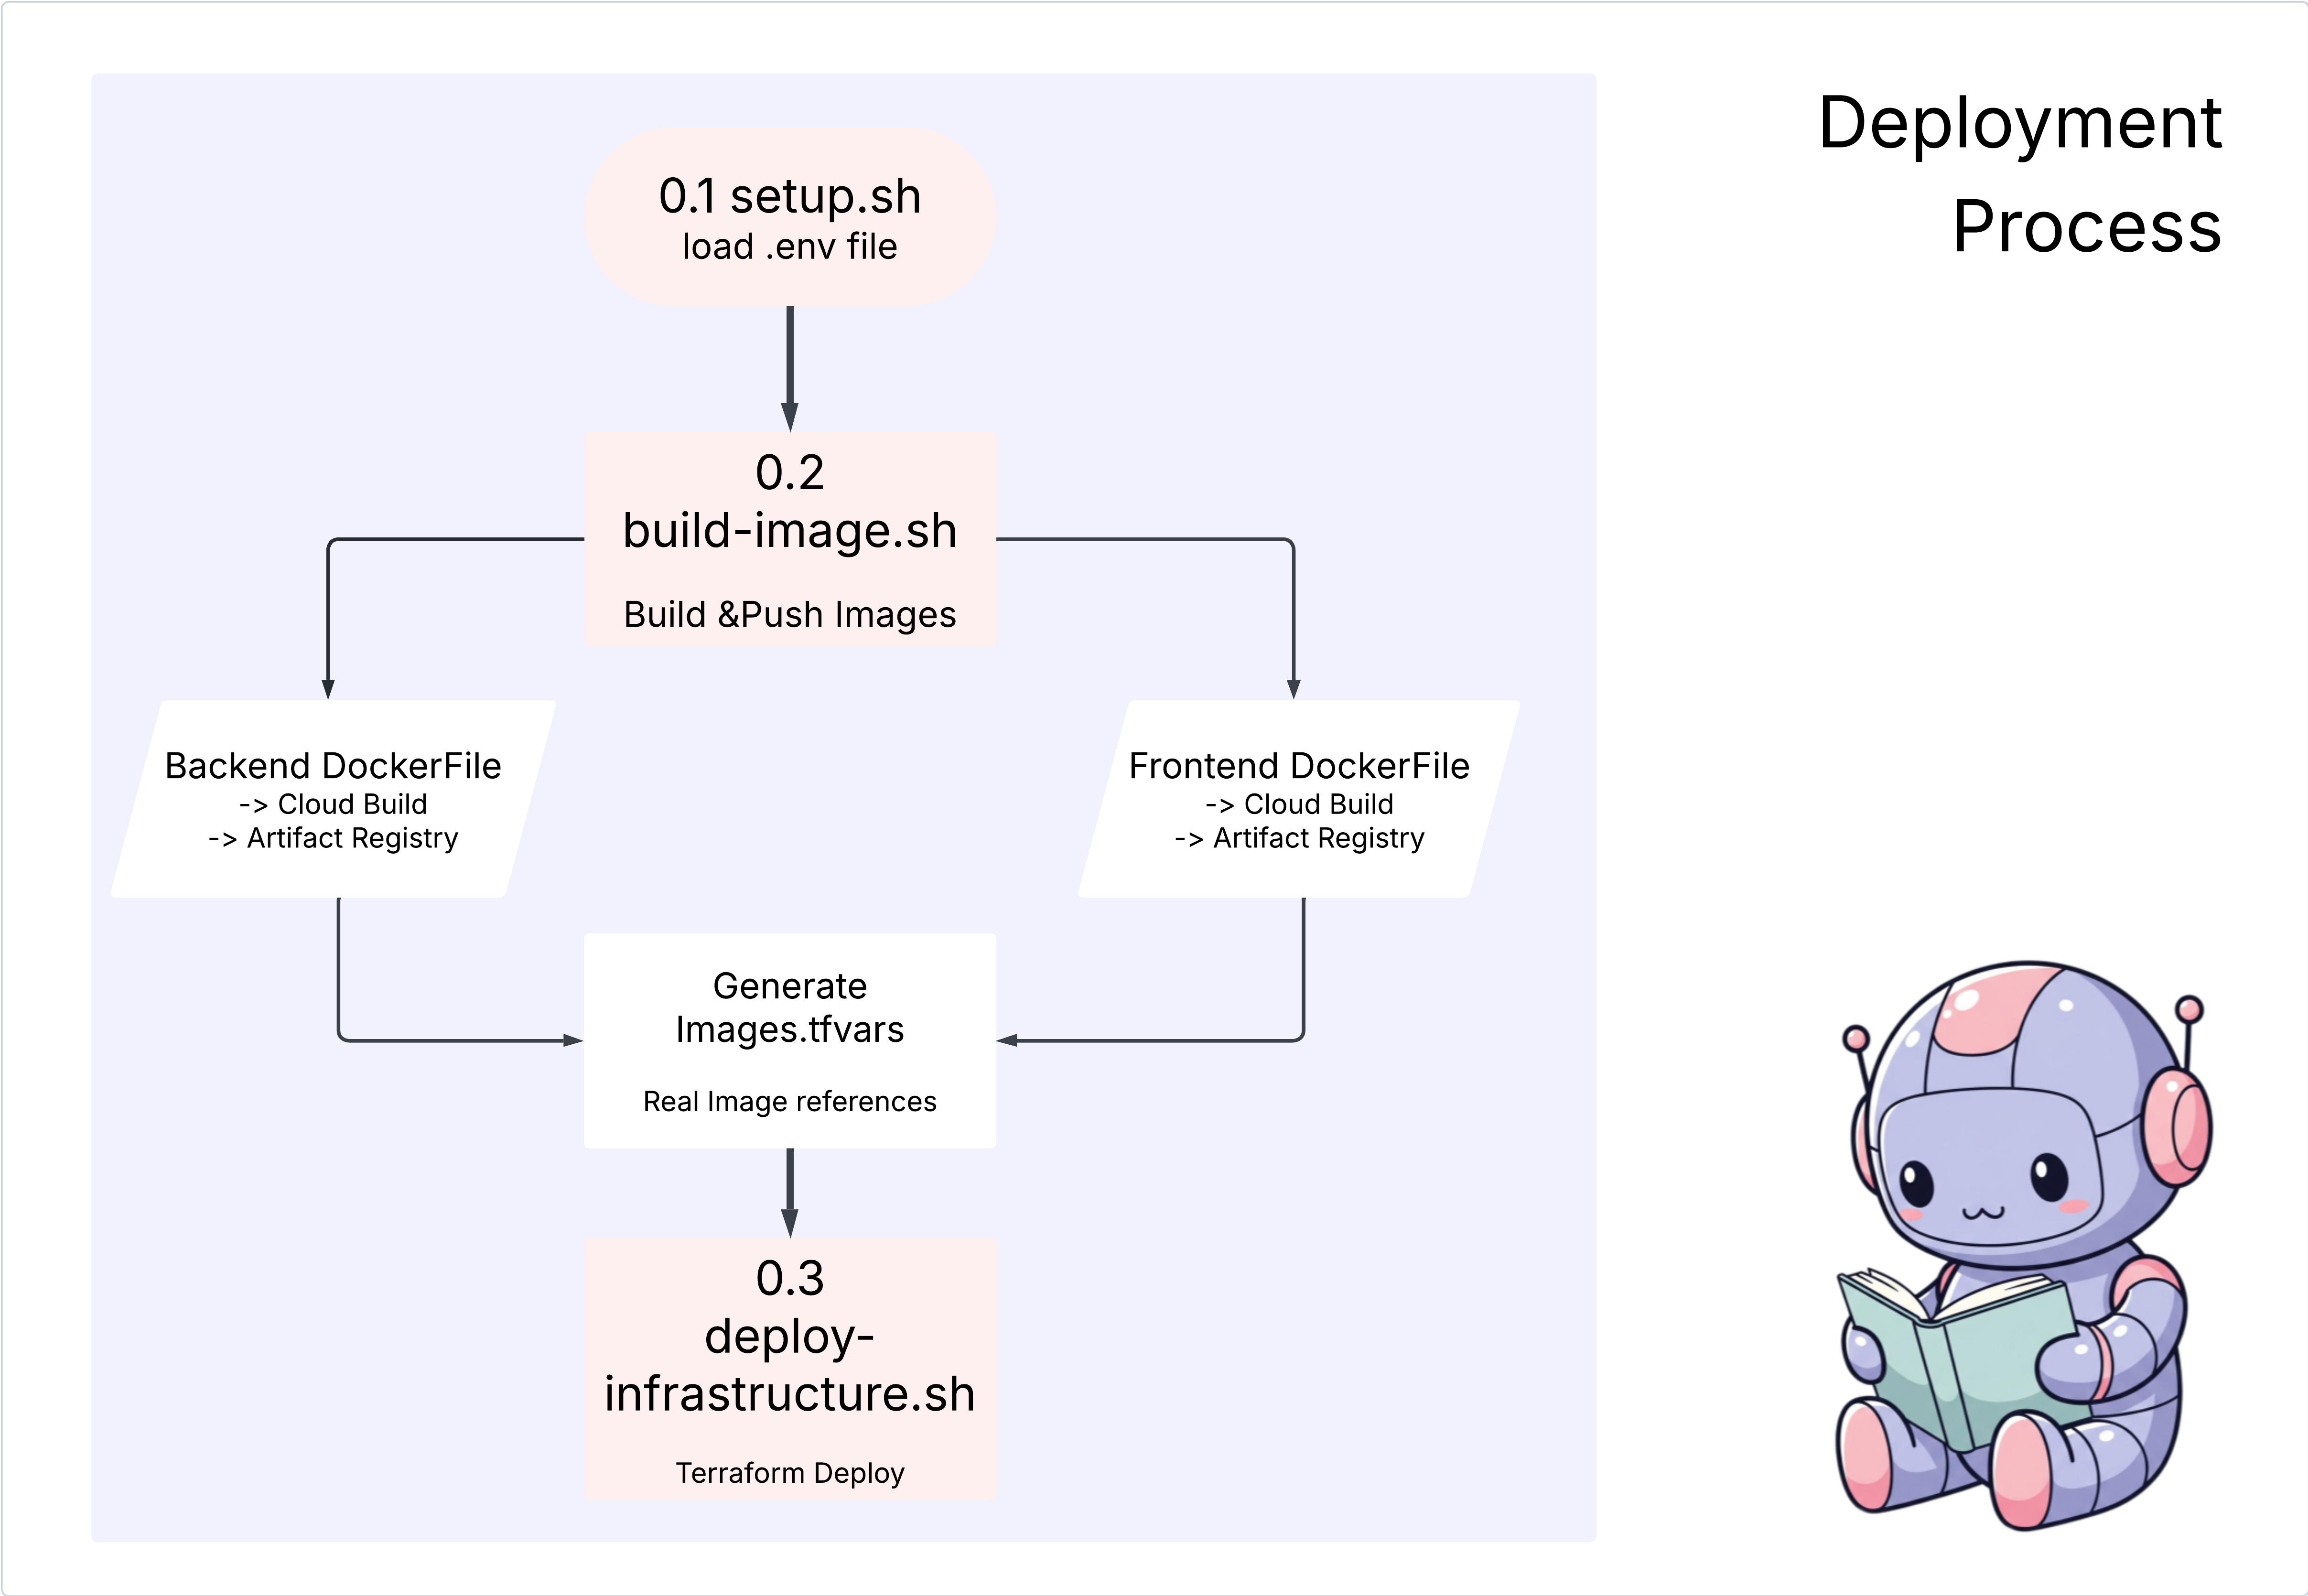
1. **01-setup.sh** - Environment setup and authentication
2. **02-build-images.sh** - Build and push Docker images to Google Container Registry
3. **03-deploy-infrastructure.sh** - Deploy with Terraform and configure services
4. **load-env.sh** - Load environment variables for deployment
**Requirements:**
- Use Google Cloud Run for both frontend and backend
- Configure Imagen API and storage buckets
- Set up proper IAM permissions
- Use environment variables from .env file
- Include error handling and status checks
Keep scripts simple, well-commented, and production-ready for manual execution.
Giải pháp:
cd ~/storygen-learning/04b_Manual_Deployment_Done
Chạy:
source ../.venv/bin/activate
./01-setup.sh
./02-build-images.sh
./03-deploy-infrastructure.sh
Bạn sẽ thấy kết quả triển khai và quá trình tạo cơ sở hạ tầng
10. Tự động hoá (CI/CD): Dây chuyền lắp ráp kỹ thuật số
Triển khai ứng dụng theo cách thủ công là một cách hay để hiểu rõ các thành phần, nhưng cách này chậm, đòi hỏi nhiều công sức và có thể dẫn đến lỗi do con người gây ra. Trong quá trình phát triển phần mềm chuyên nghiệp, toàn bộ quy trình này được tự động hoá bằng một phương pháp gọi là CI/CD.
CI/CD là viết tắt của Tích hợp liên tục và Triển khai liên tục. Đây là một phương thức để tự động tạo, kiểm thử và triển khai mã mỗi khi bạn thực hiện thay đổi.
- Tích hợp liên tục (CI): Đây là giai đoạn "tạo và kiểm thử". Ngay khi nhà phát triển đẩy một thay đổi về mã vào một kho lưu trữ dùng chung (chẳng hạn như GitHub), một hệ thống tự động sẽ bắt đầu hoạt động. Nó tạo ứng dụng và chạy tất cả các kiểm thử (chẳng hạn như các đánh giá về tác nhân mà chúng ta đã tạo) để đảm bảo mã mới tích hợp đúng cách và không gây ra bất kỳ lỗi nào.
- Triển khai liên tục (CD): Đây là giai đoạn "phát hành". Nếu giai đoạn CI diễn ra thành công, hệ thống sẽ tự động triển khai phiên bản mới đã được kiểm thử của ứng dụng cho bản phát hành công khai, giúp người dùng có thể sử dụng phiên bản này.
Quy trình tự động này tạo ra một "dây chuyền lắp ráp kỹ thuật số" giúp chuyển mã từ máy của nhà phát triển sang sản xuất một cách nhanh chóng, an toàn và đáng tin cậy. Trong phần này, chúng ta sẽ yêu cầu trợ lý AI xây dựng dây chuyền lắp ráp này cho chúng ta bằng cách sử dụng GitHub Actions và Google Cloud Build.
Thao tác
cd ~/storygen-learning/05a_CICD_Pipeline_Ready
Sử dụng Gemini CLI để tạo quy trình CI/CD bằng GitHub:
Mở Gemini CLI
Gemini
Trong Gemini CLI, hãy thử câu lệnh:
Create a CI/CD pipeline for my StoryGen app using Google Cloud Build and GitHub integration.

Generate these automation files:
1. **cloudbuild.yaml** (for backend) - Automated build, test, and deploy pipeline
2. **GitHub Actions workflow** - Trigger builds on push/PR
3. **Deployment automation scripts** - Streamlined deployment process

**Requirements:**
- Auto-trigger on GitHub push to main branch
- Build and push Docker images
- Run automated tests if available
- Deploy to Google Cloud Run
- Environment-specific deployments (staging/prod)
- Notification on success/failure

Focus on fully automated deployment with minimal manual intervention. Include proper secret management and rollback capabilities.
——————————————– Giải pháp bắt đầu từ đây ——————————————–
Giải pháp:
cd ~/storygen-learning/06_Final_Solution/
# Copy the GitHub workflow to parent folder
cp -r 06_Final_Solution/.GitHub ../../../.GitHub
Quay lại thư mục 06_Final_Solution rồi chạy tập lệnh:
cd ~/storygen-learning/06_Final_Solution/

./setup-cicd-complete.sh
Bạn sẽ thấy quy trình thiết lập CI/CD đã hoàn tất
Kích hoạt quy trình công việc: Xác nhận và đẩy mã của bạn lên nhánh chính. Xin lưu ý rằng bạn cần thiết lập email và tên trên GitHub để cấp quyền.
git add .
git commit -m "feat: Add backend, IaC, and CI/CD workflow"
git push origin main
Chuyển đến thẻ "Actions" (Hành động) trong kho lưu trữ GitHub để xem quá trình triển khai tự động.
11. Hoạt động: Trung tâm kiểm soát AI
Chúng tôi đang phát trực tiếp! Nhưng hành trình vẫn chưa kết thúc. Đây là "Ngày 2" – hoạt động. Hãy quay lại Cloud Assist để quản lý ứng dụng đang chạy.
Thao tác
- Chuyển đến dịch vụ Cloud Run trong Bảng điều khiển Google Cloud. Tương tác với ứng dụng đang hoạt động để tạo ra một số lưu lượng truy cập và nhật ký.
- Mở ngăn Cloud Assist và sử dụng ngăn này làm trợ lý vận hành với các câu lệnh như sau:
Phân tích nhật ký:
Summarize the errors in my Cloud Run logs for the service 'genai-backend' from the last 15 minutes.
Điều chỉnh hiệu suất:
My Cloud Run service 'genai-backend' has high startup latency. What are common causes for a Python app and how can I investigate with Cloud Trace?
Tối ưu hoá chi phí:
Analyze the costs for my 'genai-backend' service and its GCS bucket. Are there any opportunities to save money?
Thời điểm học tập quan trọng: SDLC AI là một vòng lặp liên tục. Cùng với việc giúp xây dựng ứng dụng, AI cũng là một đối tác không thể thiếu trong việc giám sát, khắc phục sự cố và tối ưu hoá ứng dụng trong quá trình phát hành công khai.