
1. 学习内容
AI Agent Vibe 全栈
欢迎!您即将学习软件开发中的下一项关键技能:如何有效地引导人工智能构建、测试和部署生产级软件。生成式 AI 不是“自动驾驶”功能,而是一个强大的副驾驶,需要经验丰富的驾驶员。
本研讨会提供了一种结构化、可重复的方法,可在专业软件开发生命周期 (SDLC) 的每个阶段与 AI 协作。您将从逐行编写代码的程序员转变为技术总监,成为有远见的架构师和使用 AI 精确执行远见的总承包商。🚀
完成本教程后,您将能够:
- 使用 AI 将高级别想法转化为云架构。
- 通过有针对性的具体提示生成了完整的 Python 后端。
- 将 AI 用作结对程序员来调试和修复代码。
- 将单元测试(包括模拟对象)的创建委托给 AI。
- 使用 Terraform 生成可用于生产用途的基础设施即代码 (IaC)。
- 通过单个提示在 GitHub Actions 中创建了完整的 CI/CD 流水线。
- 使用 AI 赋能的运维工具监控和管理您的实时应用。
您不仅会获得一个可正常运行的应用,还会获得一份 AI 增强型开发蓝图。我们开始吧!
2. 前提条件和设置
在开始之前,我们先准备好环境。这是确保顺畅的研讨会体验的关键步骤。
创建新的 GCP 账号并关联结算信息
为了让 AI 代理正常运行,我们需要两样东西:一个提供基础的 Google Cloud 项目和一个用于访问 Google 强大模型的 Gemini API 密钥。
第 1 步:启用结算账号
如需运行此 Codelab,您需要拥有一个有一定信用额度的结算账号。使用本 Codelab 顶部横幅中的积分开始学习。如果您已关联结算账号,则可以跳过此步骤。
第 2 步:创建新的 GCP 项目
- 前往 Google Cloud 控制台并创建一个新项目。
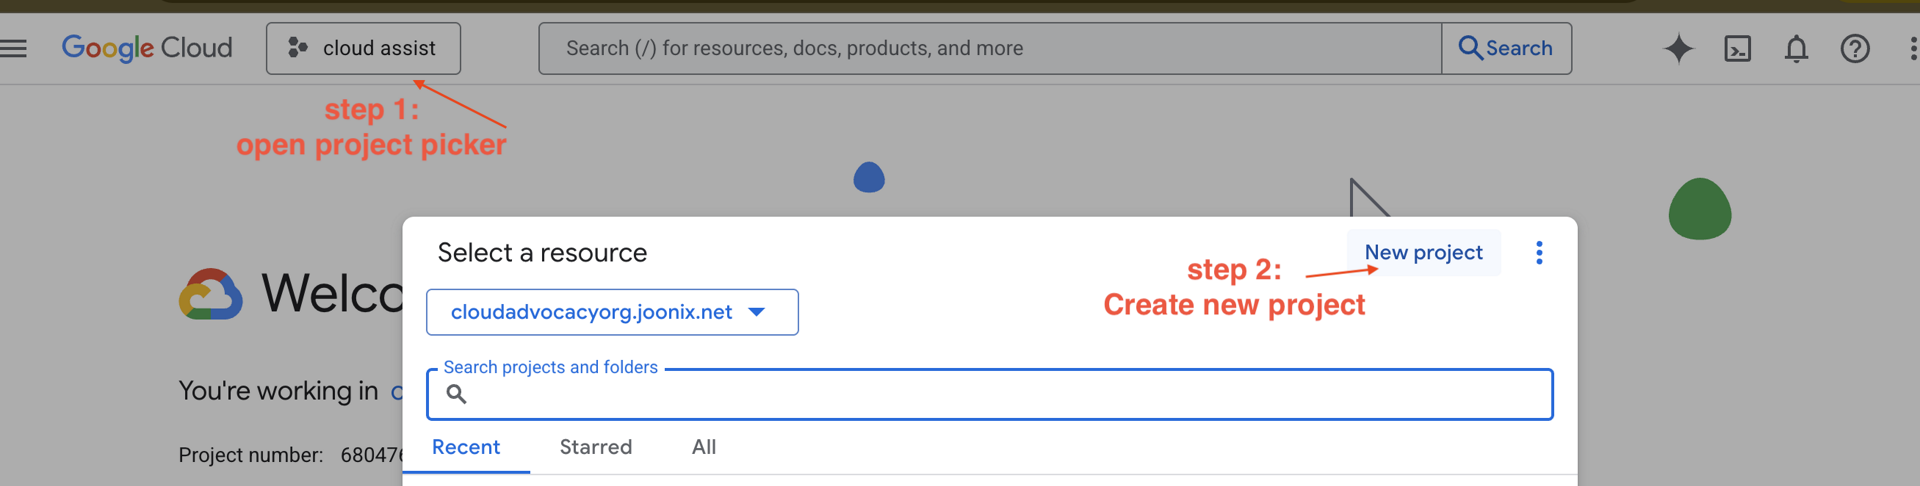
- 打开左侧面板,点击
Billing,检查结算账号是否与此 GCP 账号相关联。
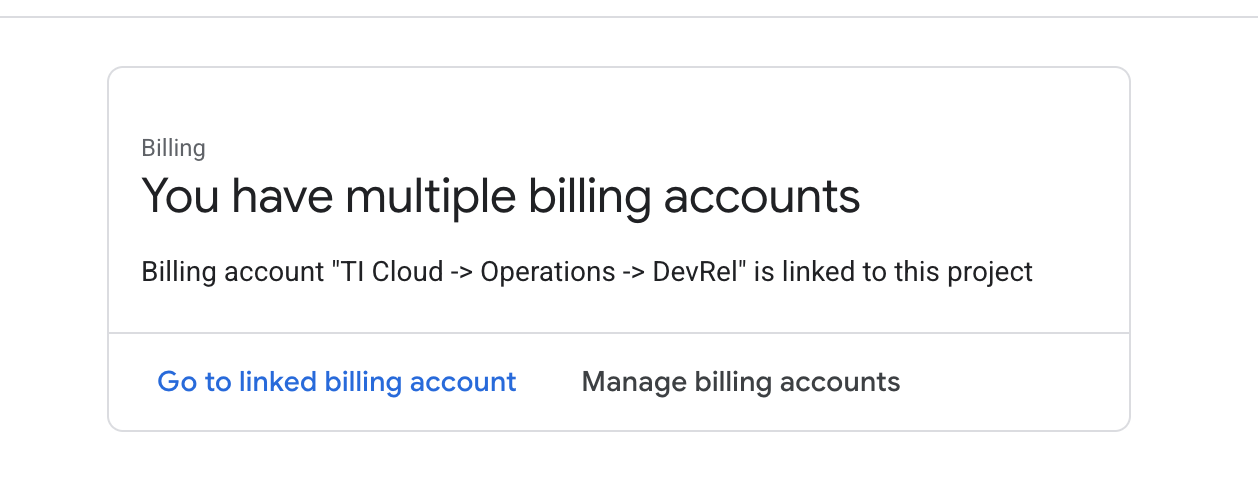
如果您看到此页面,请检查 manage billing account,选择 Google Cloud 试用版,然后关联到该试用版。
第 3 步:生成 Gemini API 密钥
您需要先拥有密钥,然后才能保护该密钥。
- 前往 Google AI Studio:https://aistudio.google.com/
- 使用您的 Gmail 账号登录。
- 点击“获取 API 密钥”按钮,该按钮通常位于左侧导航窗格中或右上角。
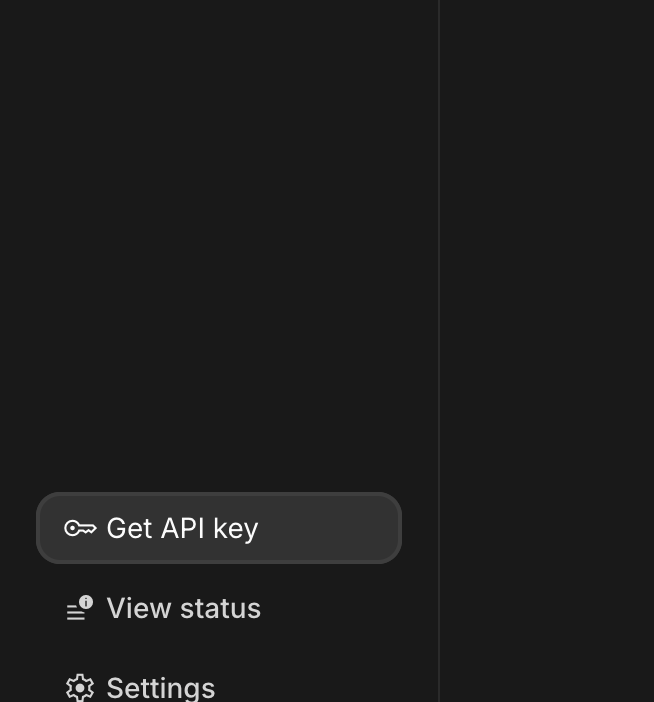
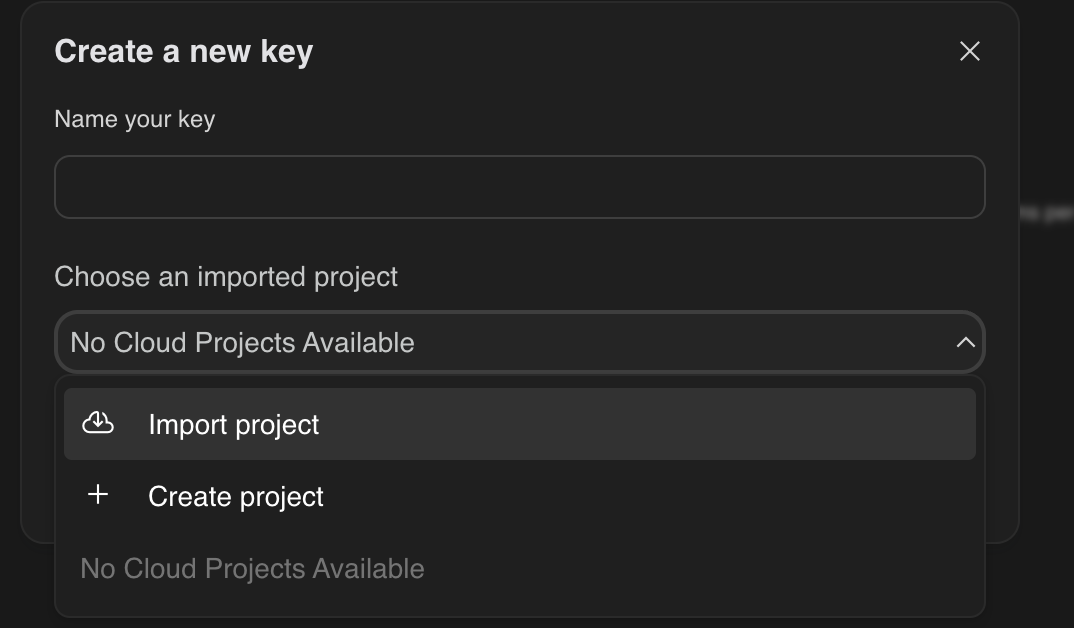
- 在 “API 密钥”对话框中,点击“在新项目中创建 API 密钥”。
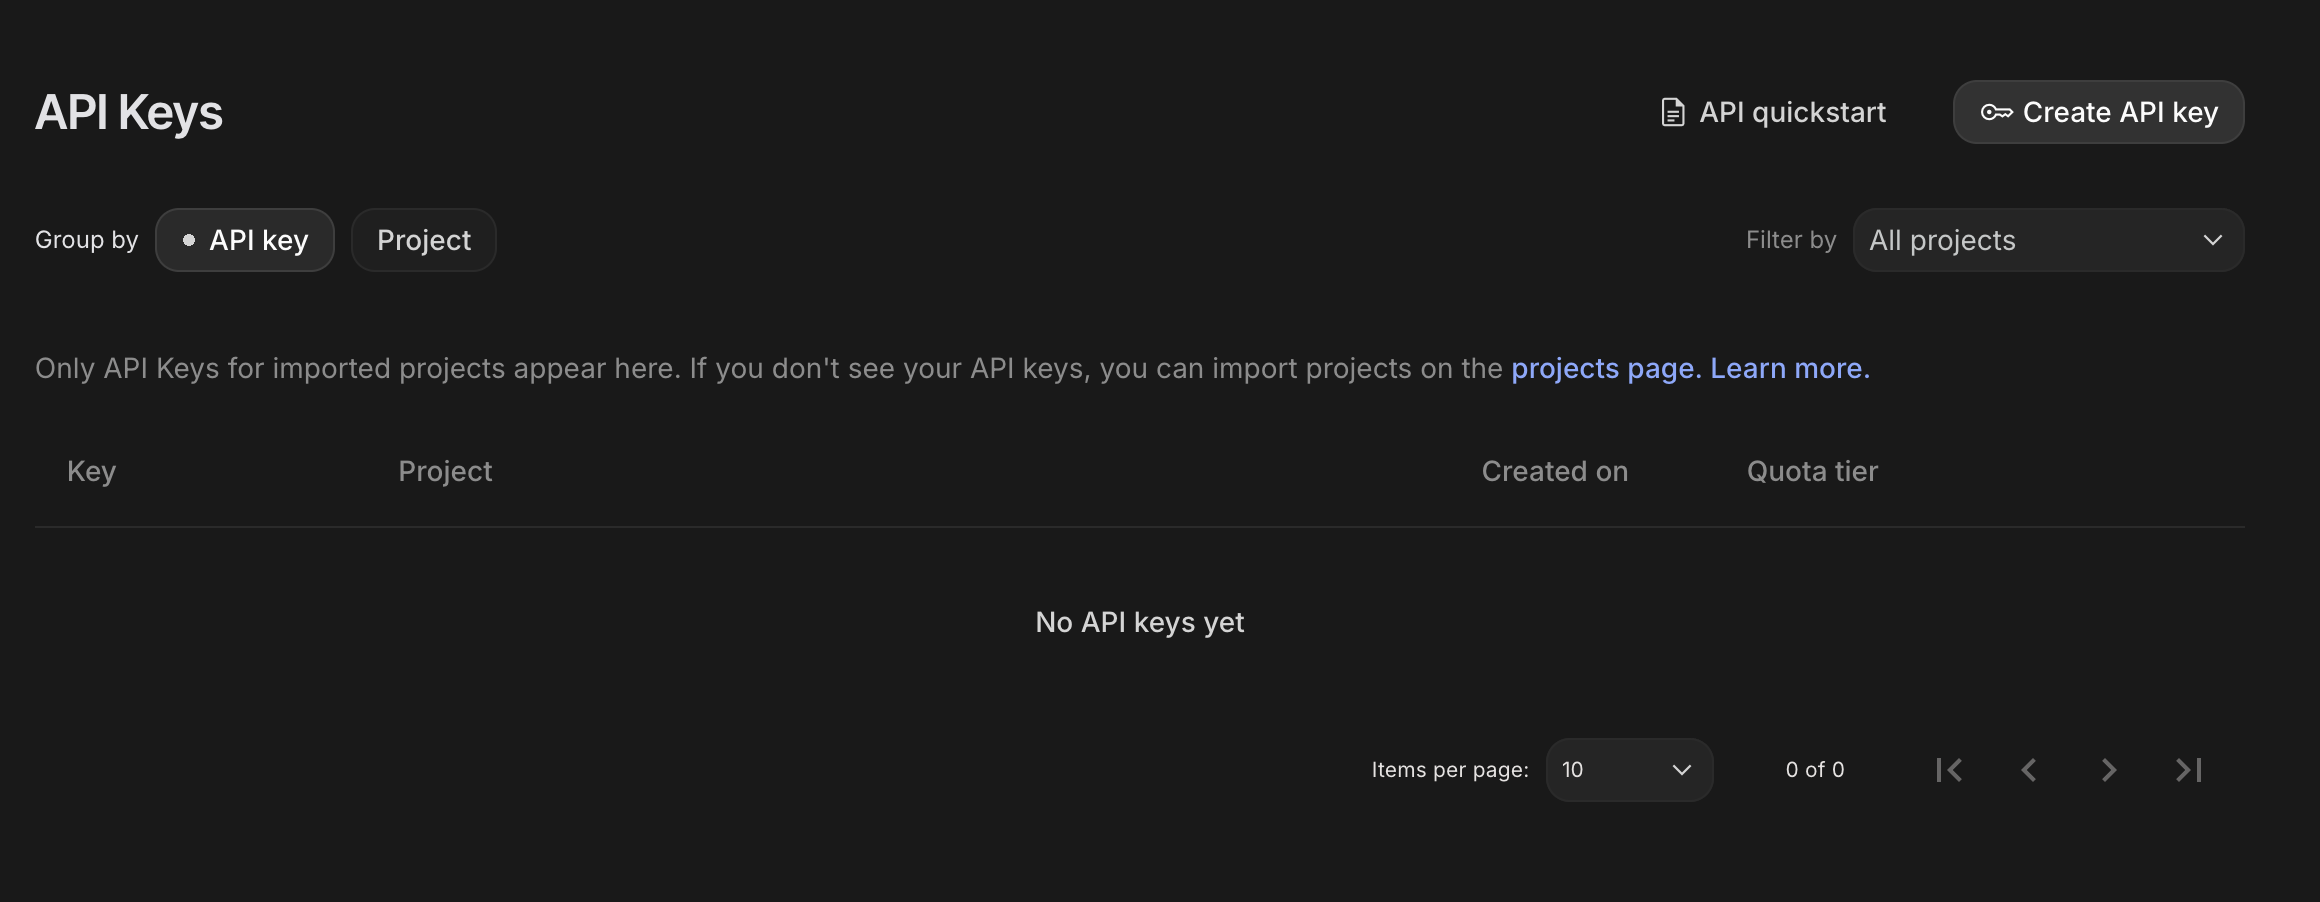
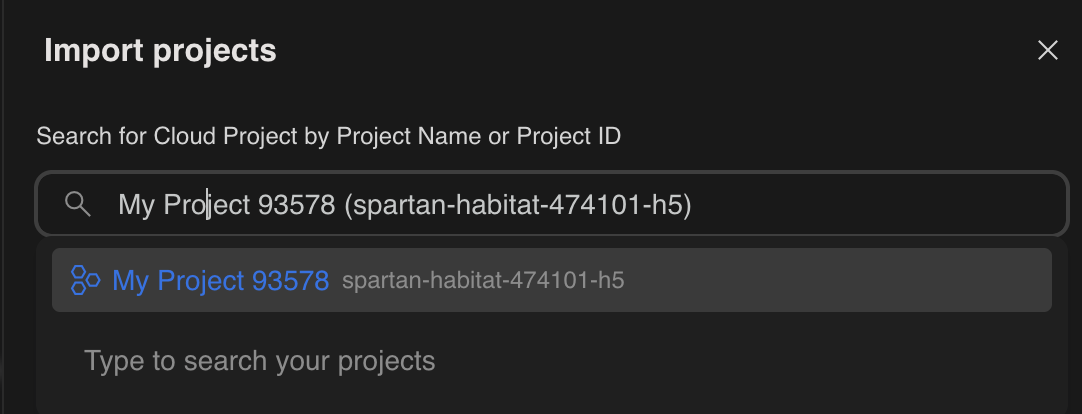
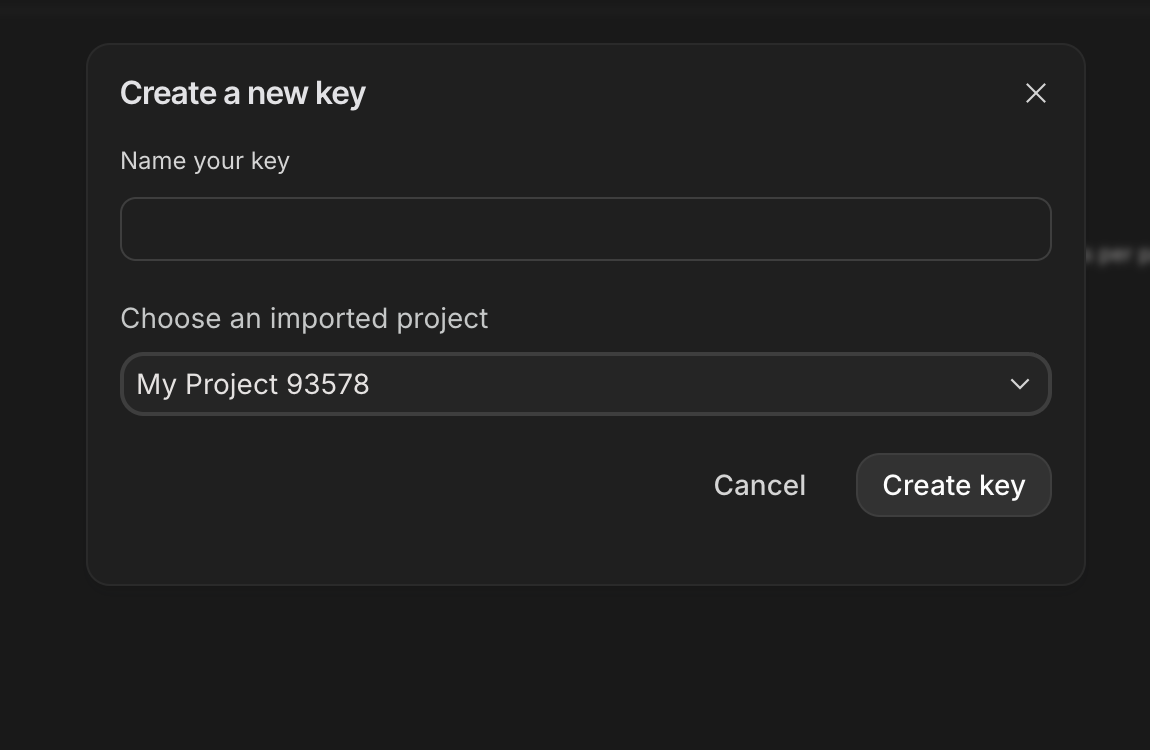
- 选择您创建的已设置结算账号的新项目。
- 系统会为您生成新的 API 密钥。
立即复制此密钥,并将其暂时存储在安全的地方(例如密码管理工具或安全记事本)。您将在后续步骤中使用此值。
GitHub 身份验证
打开 Cloud Shell,方法是前往 Google Cloud 控制台,然后点击右上角的“激活 Cloud Shell”按钮。
第 1 步:打开 Cloud Shell
👉点击 Google Cloud 控制台顶部的“激活 Cloud Shell”(它是 Cloud Shell 窗格顶部的终端形状图标),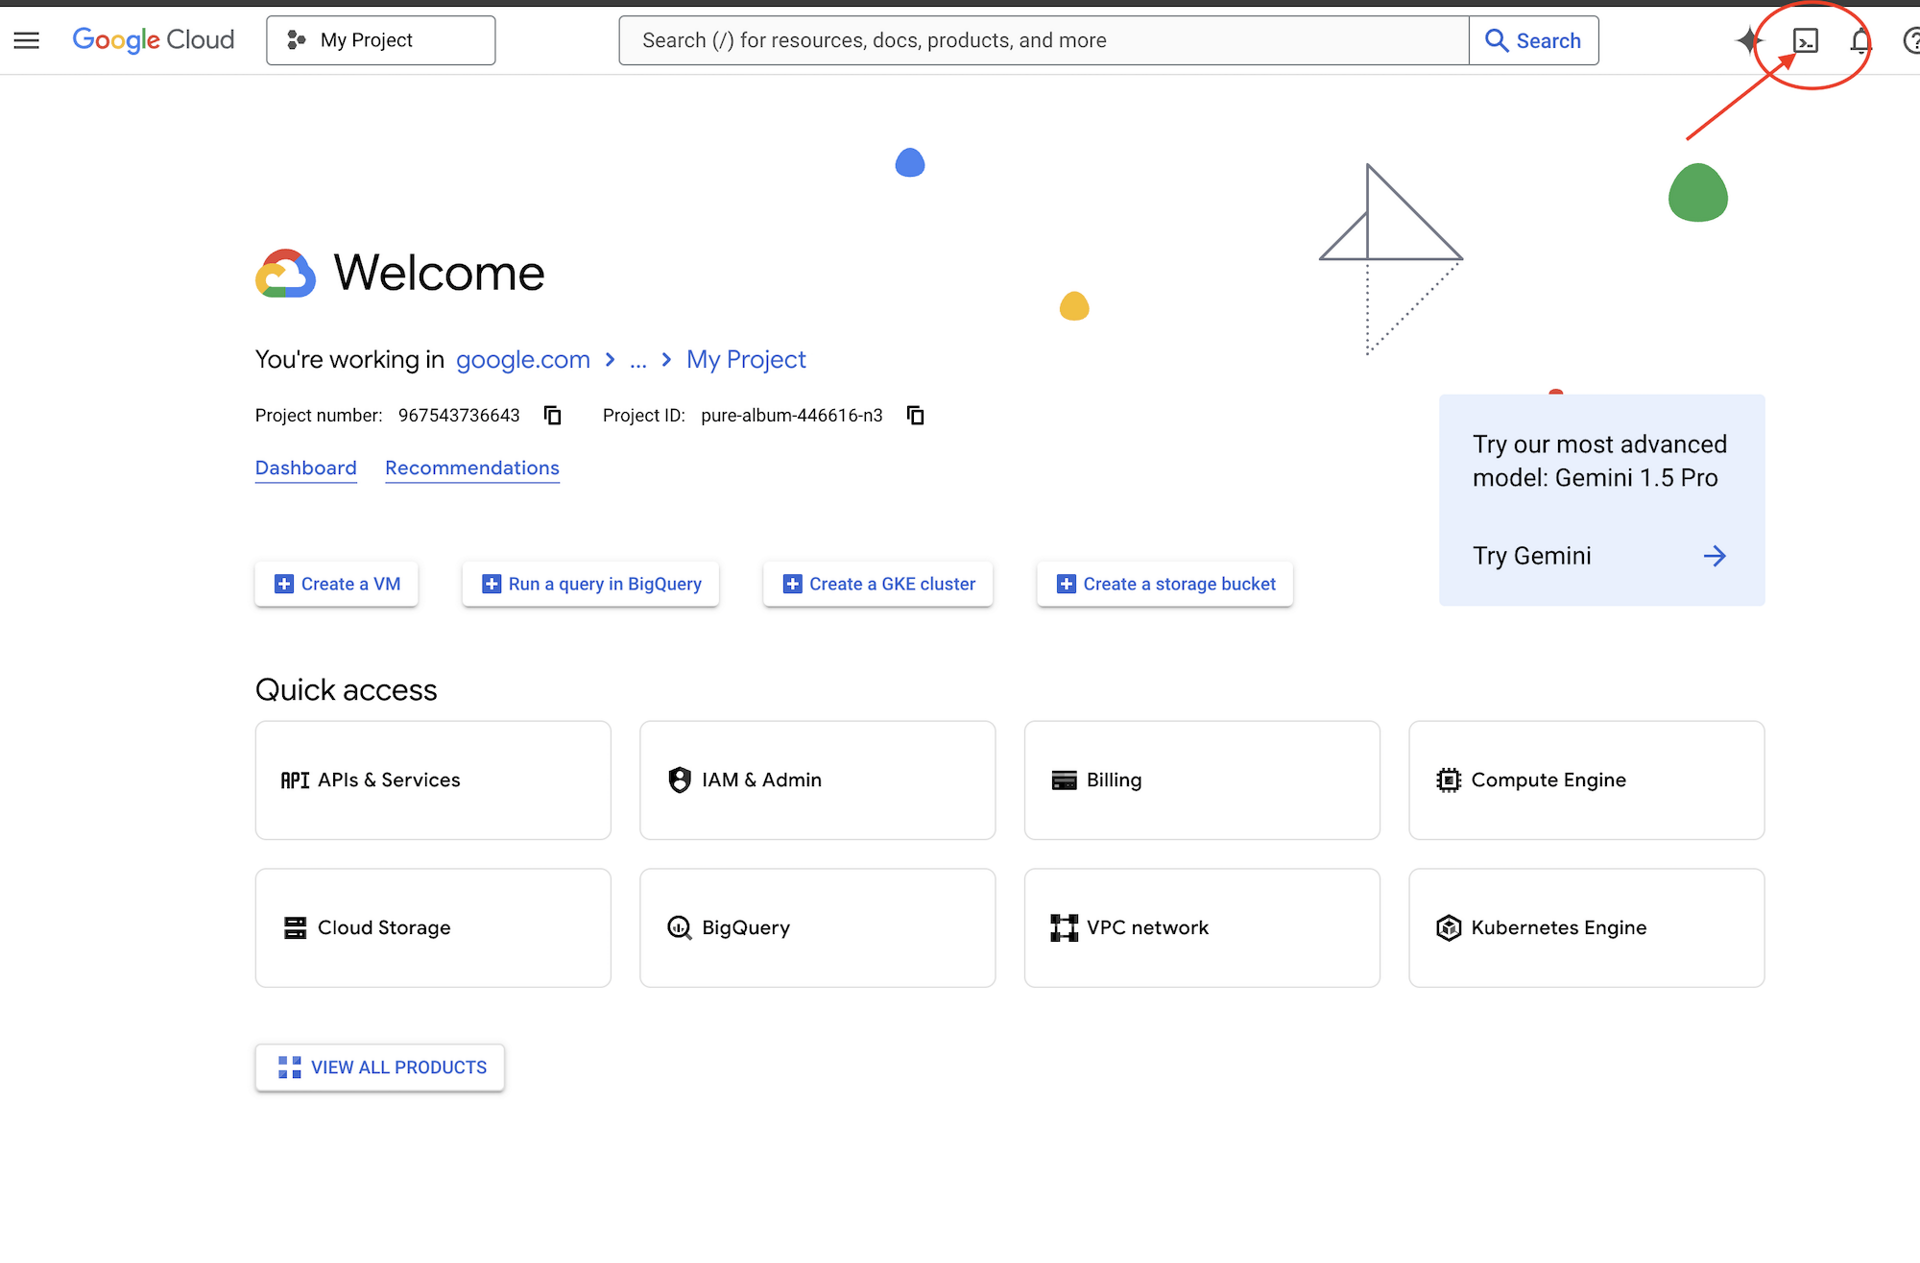
👉点击“打开编辑器”按钮(看起来像一个打开的文件夹,上面有一支铅笔)。此操作会在窗口中打开 Cloud Shell 代码编辑器。您会在左侧看到文件资源管理器。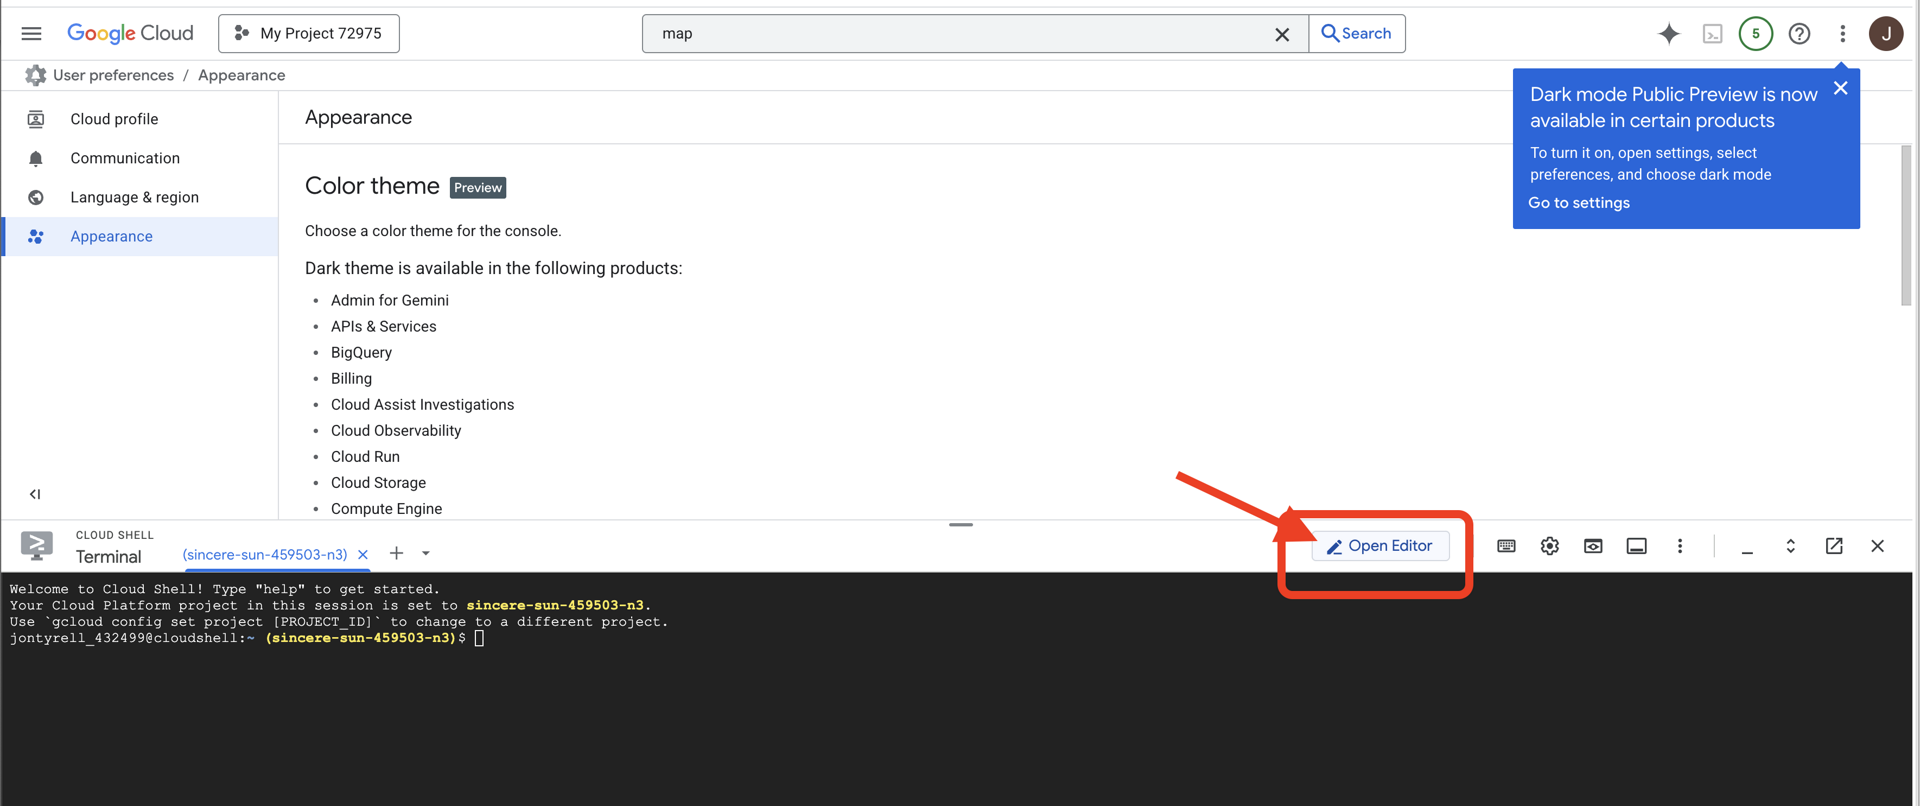
👉打开编辑器后,在云 IDE 中打开终端,
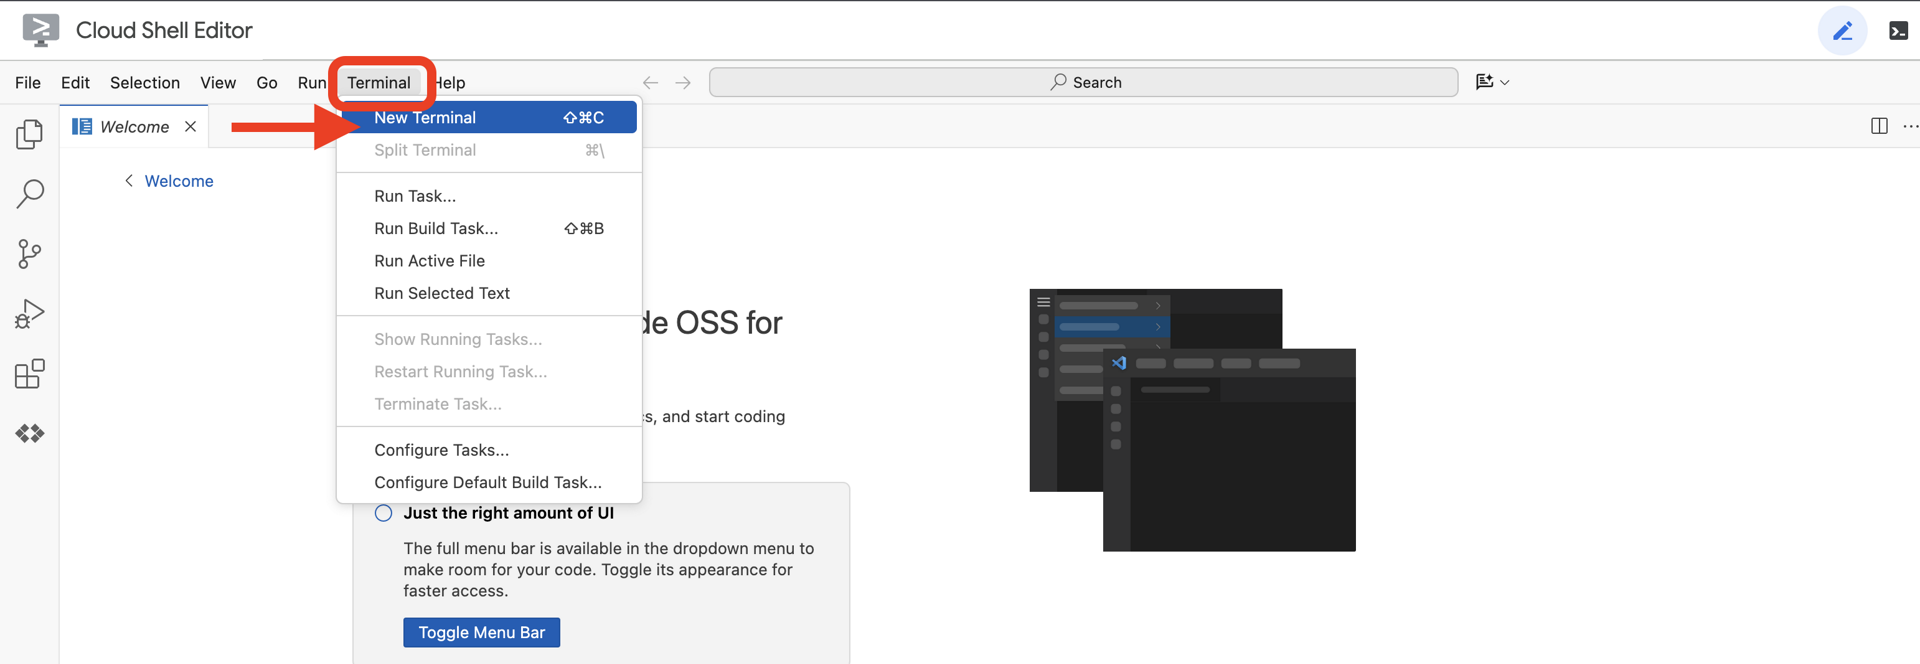
👉💻 在终端中,使用以下命令验证您是否已通过身份验证,以及项目是否已设置为您的项目 ID:
gcloud auth list
第 2 步:使用 GitHub 进行身份验证并克隆
使用 GitHub 进行身份验证:
👉💻 将命令复制并粘贴到云终端:
gh auth login
- 在“您在何处使用 GitHub”中,选择“GitHub.com”
- “What is you preferred protocol for Git operations on this host?”,选择“HTTPS”
- “是否使用 GitHub 凭据对 Git 进行身份验证?”,选择“是”
- “您想如何对 GitHub CLI 进行身份验证?”,选择“使用网络浏览器登录”
重要提示!请勿立即按“Enter”键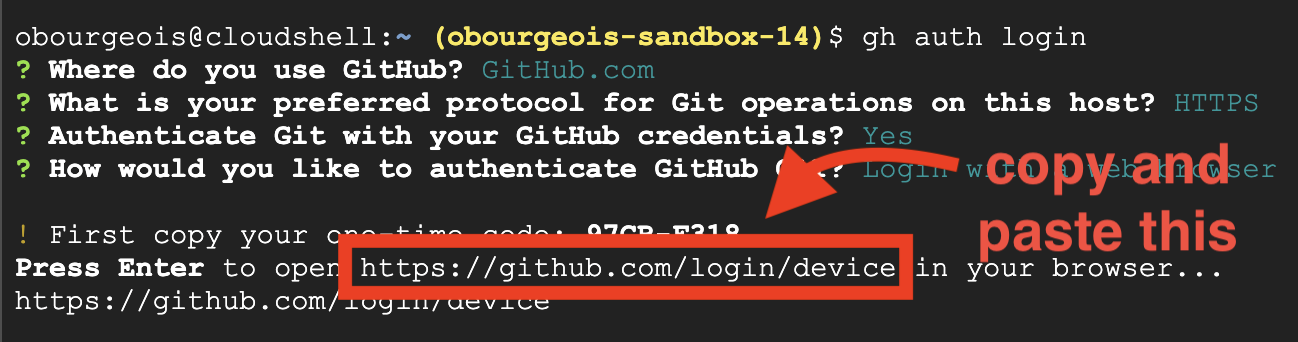
将代码从终端复制到登录验证页面
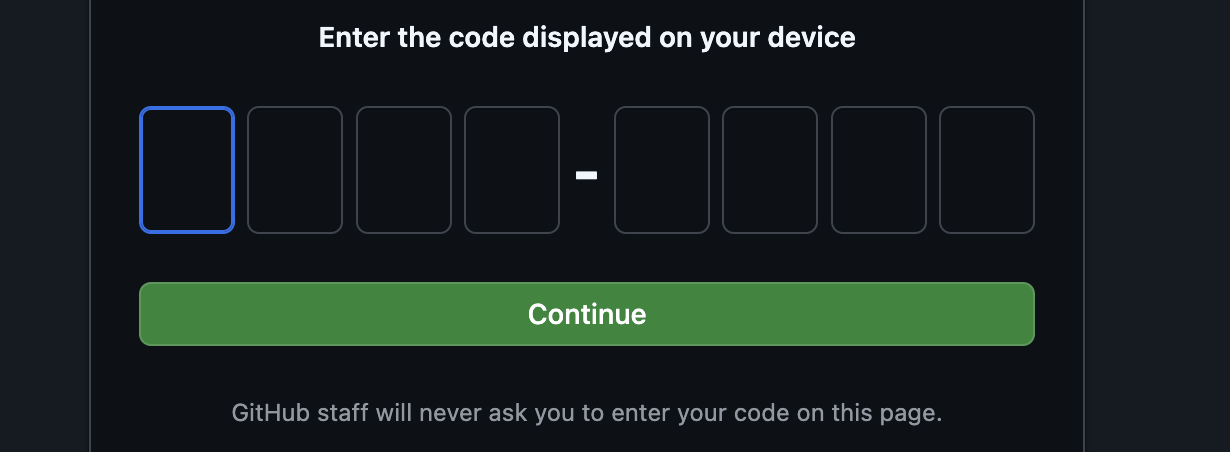
输入完代码后,返回 Cloud Shell 终端,然后按“Enter”键继续操作。

第 4 步:派生并克隆代码库:
👉💻 将命令复制并粘贴到云终端:
gh repo fork cuppibla/storygen-learning --clone=true
3. 架构:使用 Cloud Assist 从创意到蓝图
每个出色的项目都始于清晰的愿景。我们将使用 AI 助手 Cloud Assist 来设计应用架构。
操作
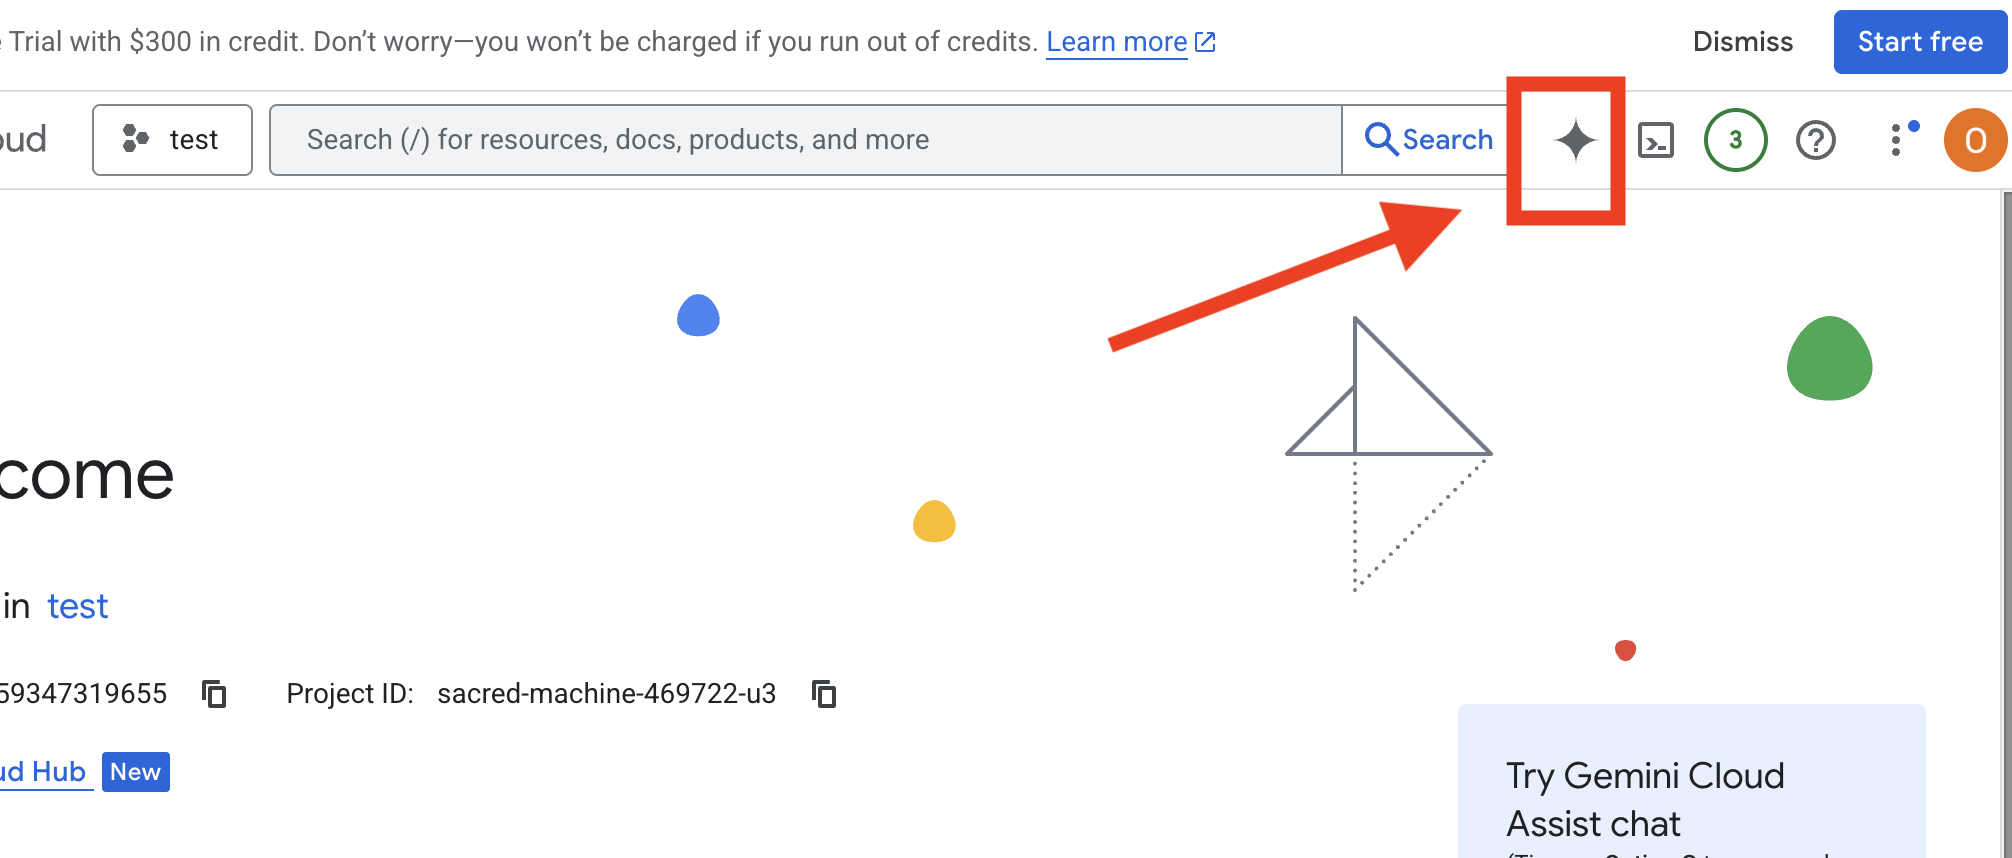
- 打开 Google Cloud 控制台:[https://console.cloud.google.com](Google Cloud 控制台)
- 点击右上角的“打开 Cloud Assist 对话”
启用 Cloud Assist
- 依次点击
Get Gemini Assist和Enable Cloud Assist at no cost。 - 然后开始聊天!
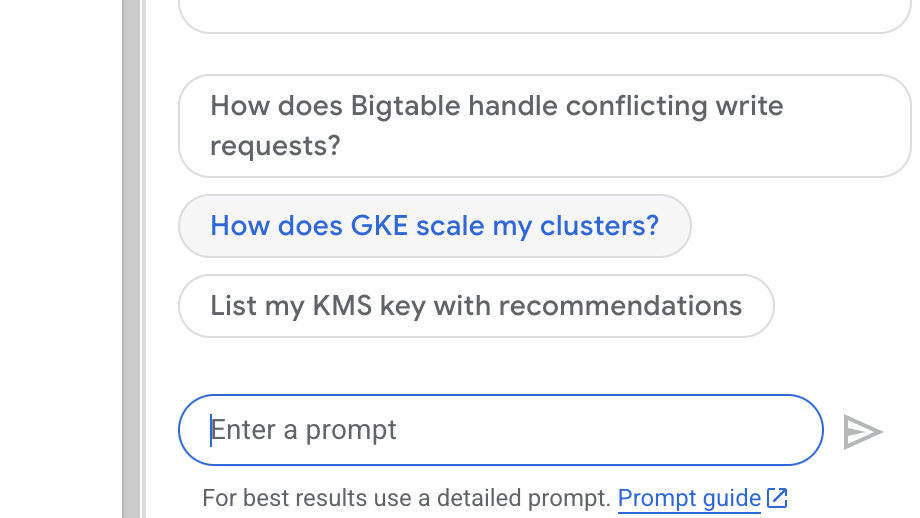 向 Cloud Assist 提供以下详细提示:
输入您的想法
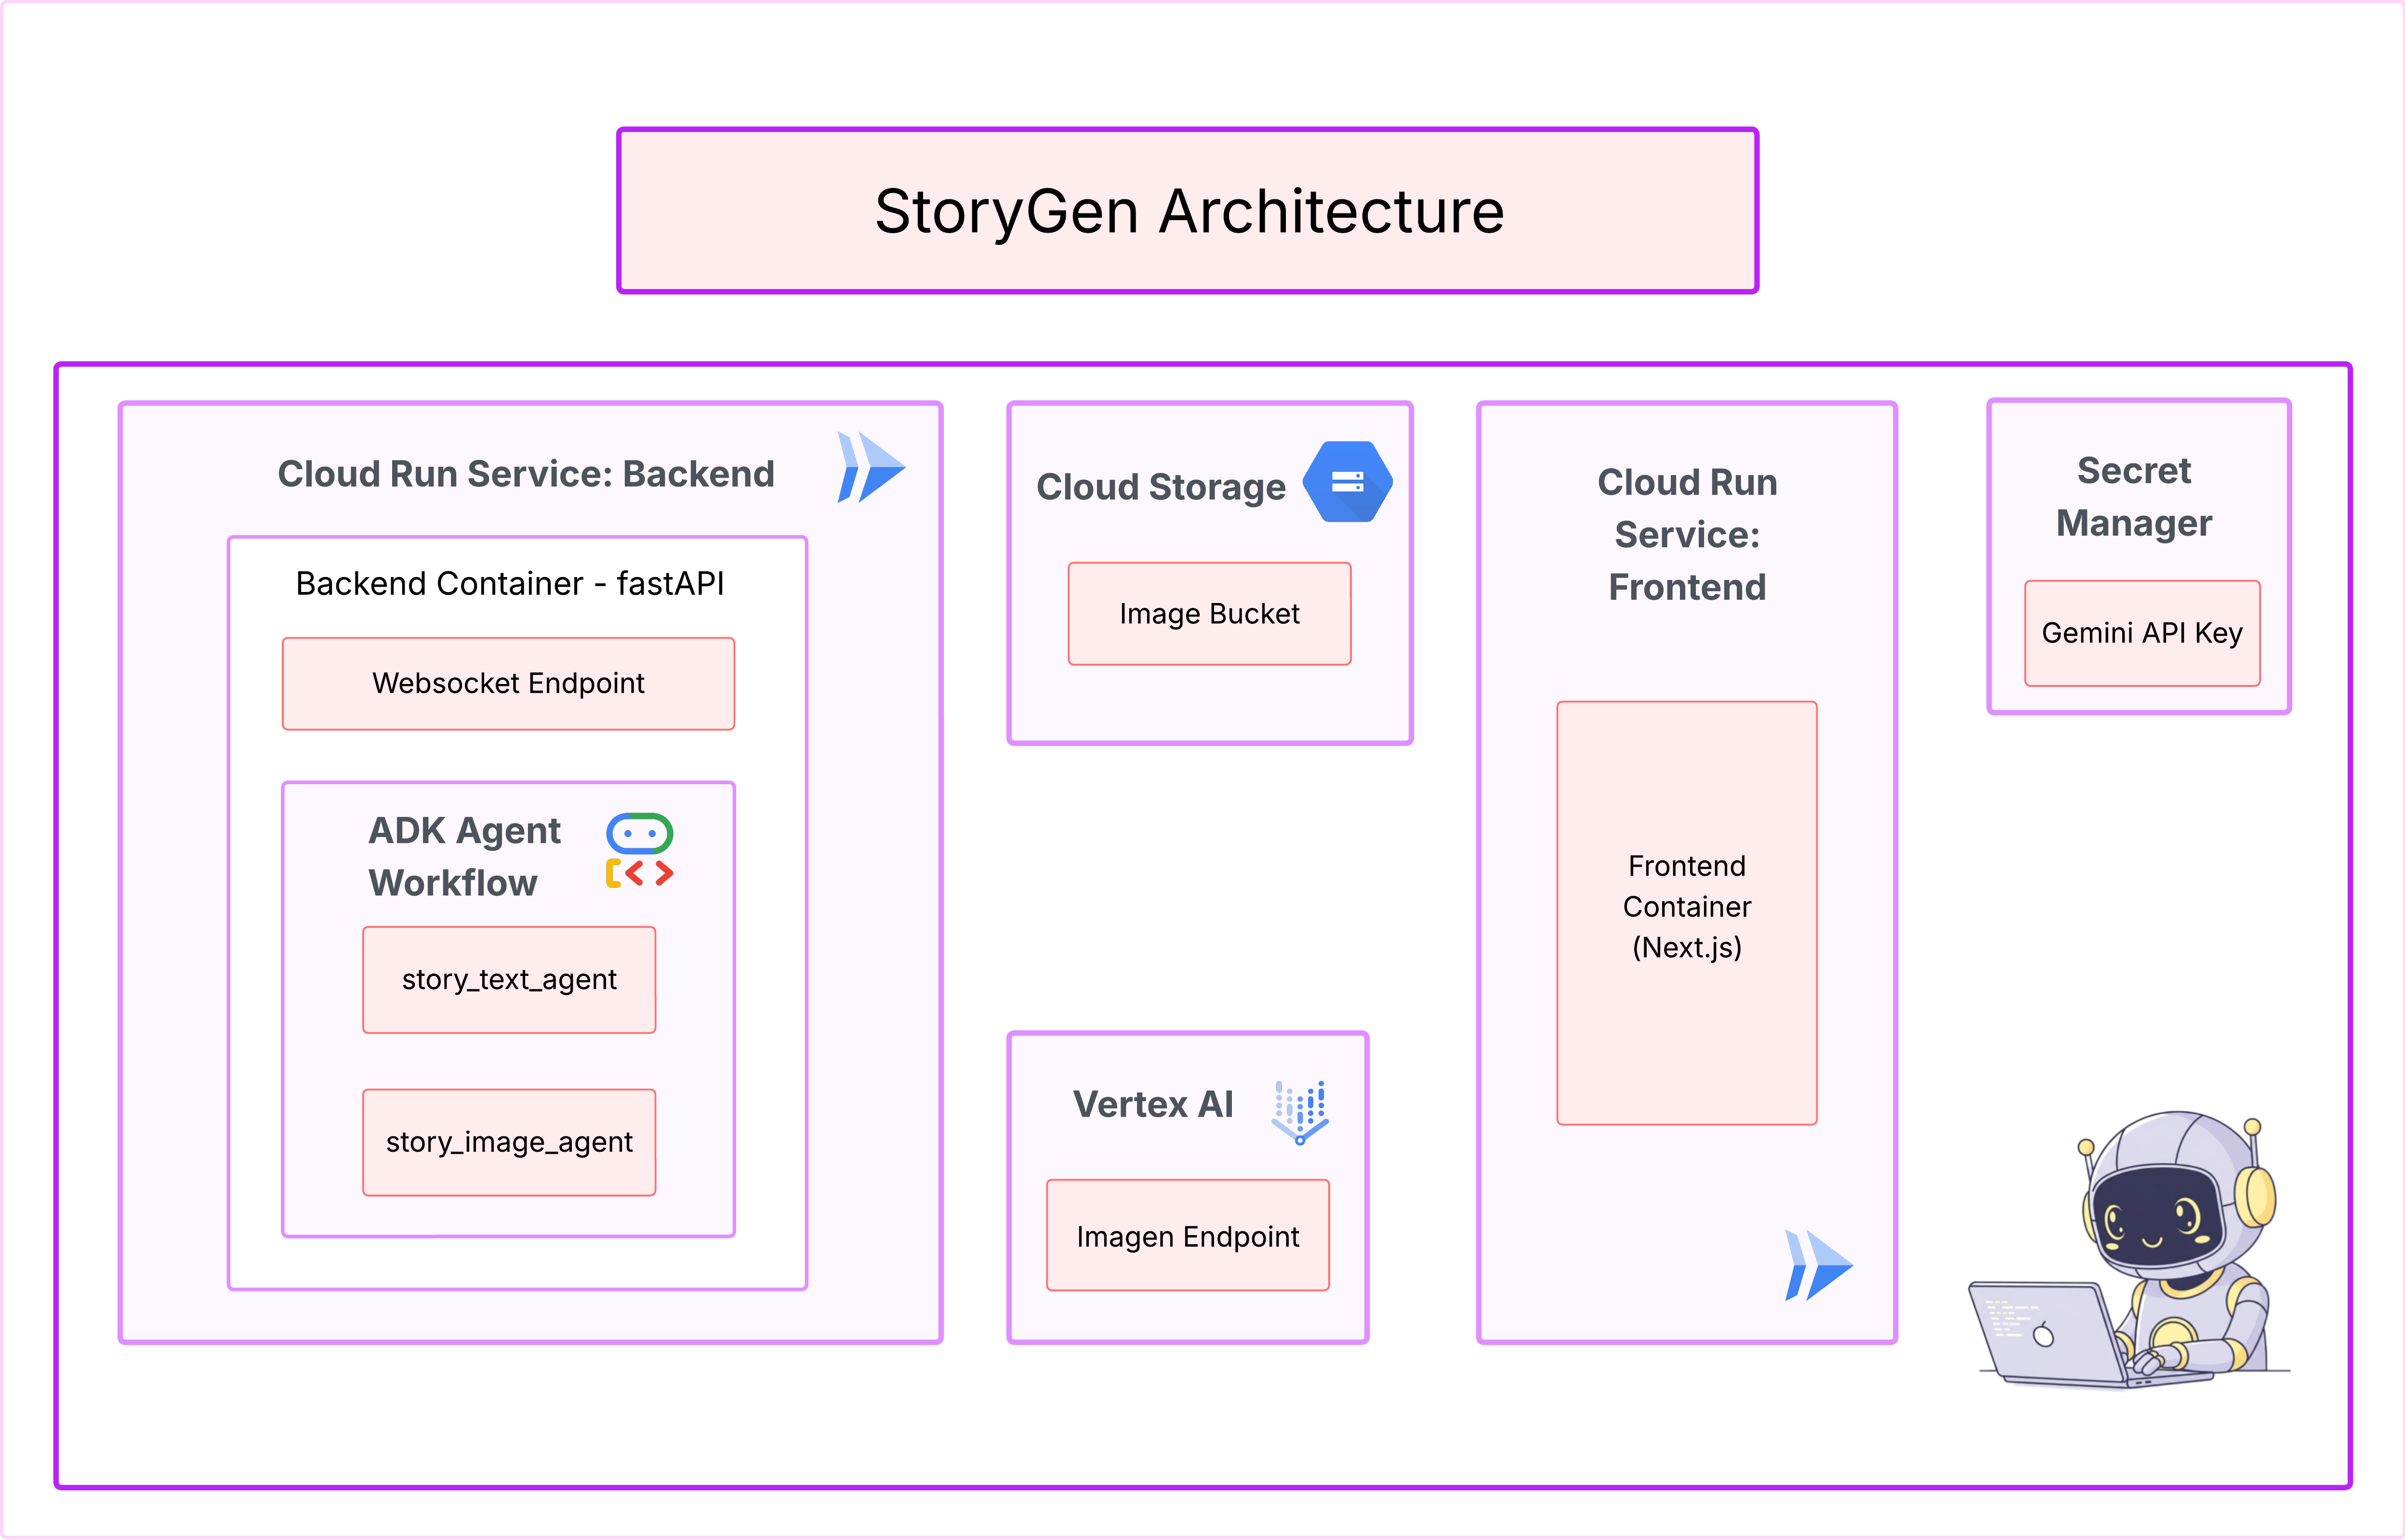
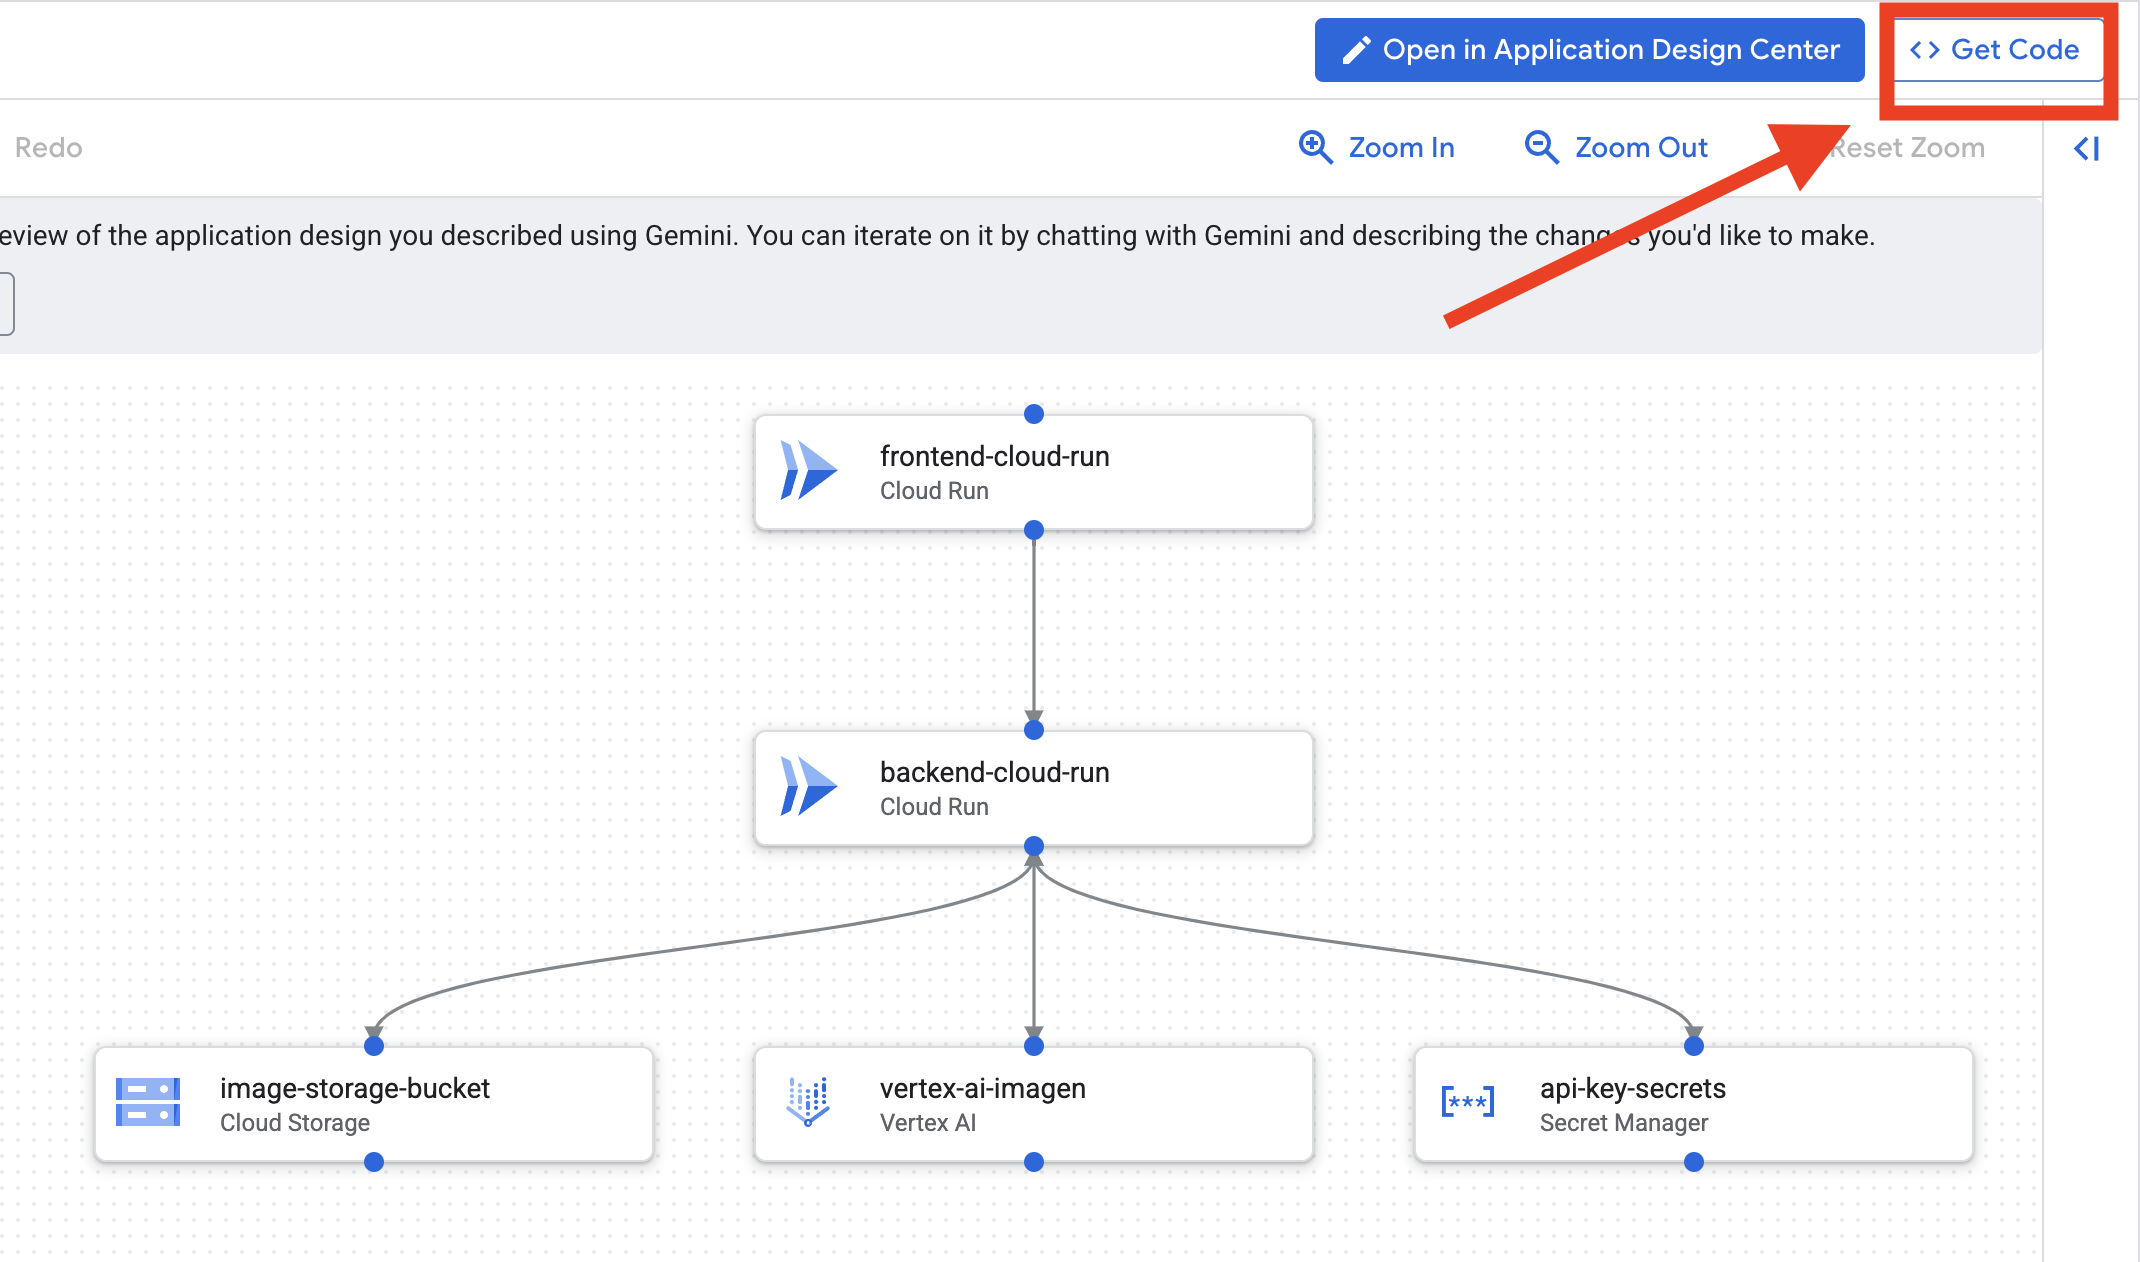
Generate a Python web application that uses AI to generate children's stories and illustrations. It has Python backend and React frontend host separately on Cloudrun. They communicate through Websocket. It needs to use a generative model for text and another for images. The generated images must be used by Imagen from Vertex AI and stored in a Google Cloud Storage bucket so that frontend can fetch from the bucket to render images. I do not want any load balancer or a database for the story text. We need a solution to store the API key.
获取应用蓝图
- 点击“修改应用设计”,您将看到该图表。点击右上角的面板“<> 获取代码”,下载 Terraform 代码。
- Cloud Assist 将生成架构图。这就是我们的视觉蓝图。
无需针对此代码采取任何行动。如需了解详情,请参阅下文
了解生成的 Terraform 代码。您刚刚从 Cloud Assist 收到了一整套 Terraform 文件。目前,您无需对这段代码执行任何操作,但我们来快速了解一下这段代码是什么以及它为何如此强大。
Terraform 是什么? Terraform 是一种基础设施即代码 (IaC) 工具。您可以将其视为以代码形式编写的云环境蓝图。您无需手动点击 Google Cloud 控制台来创建服务、存储空间和权限,只需在这些配置文件中定义所有这些资源即可。然后,Terraform 会读取您的蓝图,并自动为您构建完全相同的环境。
从可视化计划到可执行代码。Cloud Assist 提供的架构图是您的直观计划。Terraform 代码是该计划的机器可读版本。它是将设计概念转化为可重现的自动化现实的关键环节。通过在代码中定义基础架构,您可以:
- 自动创建:可靠地重复构建相同的环境。
- 使用版本控制:在 Git 中跟踪对基础架构的更改,就像跟踪应用代码一样。
- 防止出错:避免在点击网页界面时可能出现的人为错误。
在此研讨会中,您无需自行运行此 Terraform 代码。您可以将其视为专业蓝图,也就是您将在后续步骤中构建和部署的基础设施的“答案”。
4. 开发:Gemini CLI 简介
👉💻 在 Cloud Shell 终端中,前往您的个人目录。
cd ~/storygen-learning
👉💻 首次试用 Gemini。
clear
gemini --model=gemini-2.5-flash
如果系统询问您是否要使用 Do you want to connect Cloud Shell editor to Gemini CLI?,请选择否。
👉✨ 每个 Gemini 工具都有说明。立即阅读。在 Gemini 提示中,输入:
在 Gemini CLI 中
/help
👉✨ Gemini CLI 具有自己的一组内置功能。如需检查这些文件,请执行以下操作:
在 Gemini CLI 中
/tools
您会看到一个列表,其中包含 ReadFile、WriteFile 和 GoogleSearch。这些是您可以调用的默认技术,无需借助外部武器库。
👉✨ Gemini Blade 可以保持“战术意识”(背景信息),以便指导其行动。
在 Gemini CLI 中
/memory show
目前为空白状态。
👉✨ 首先,向代理的记忆中添加角色。这将定义其专业领域:
在 Gemini CLI 中
/memory add "I am master at python development"
再次运行 /memory show,确认您的刀片已吸收此知识。
👉✨ 为了演示如何使用 @ 符号引用文件,我们先创建一个“任务简报”文件。
打开新终端,然后运行以下命令以创建任务文件:
!echo "## Mission Objective: Create Imagen ADK Agent for Story Book" > mission.md
👉✨现在,命令 Gemini CLI 分析简报并报告其发现:
在 Gemini CLI 中
Explain the contents of the file @mission.md
主武器现在知道自己的目标了。
👉💻 按两次 Ctrl+C 即可退出 Gemini CLI
学习:
Gemini CLI 如何获得超能力:gemini.md 在继续之前,请务必了解如何针对特定项目定制 Gemini CLI。虽然您可以将其用作通用聊天工具,但它的真正强大之处在于一个特殊的配置文件:gemini.md。
当您运行 gemini 命令时,该命令会自动在当前目录中查找 gemini.md 文件。此文件充当 AI 的项目专属说明手册。它可以定义以下三项关键内容:
- 角色:您可以告知 AI 它应该扮演的角色。例如,“你是一位精通 Google Cloud 的 Python 开发者。”这会影响其回答和风格。
- 工具:您可以向其授予对特定文件 (@file.py) 甚至 Google 搜索 (@google) 的访问权限。这样可以为 AI 提供所需的上下文,以便回答有关项目代码的问题。
- 记忆:您可以提供 AI 在此项目中应始终记住的事实或规则,这有助于保持一致性。
通过使用 gemini.md 文件,您可以将通用 Gemini 模型转变为专业助理,该助理已了解您项目的目标,并且可以访问正确的信息。
5. 开发:使用 Gemini CLI 构建 ADK
环境配置
前往 Cloud Shell,然后点击“打开终端”按钮。
- 复制环境模板:
cd ~/storygen-learning
cp ~/storygen-learning/env.template ~/storygen-learning/.env
在编辑器中查看隐藏文件(如果您找不到 .env)
- 点击顶部菜单栏中的查看。
- 选择切换隐藏文件。
👉查找您的 Google Cloud 项目 ID:
- 打开 Google Cloud 控制台:链接
- 从页面顶部的项目下拉菜单中选择要用于本次研讨会的项目。
- 您的项目 ID 会显示在信息中心的项目信息卡片中
👉查找您的 GitHub 用户名:
- 前往 GitHub 并找到您的 GitHub 用户名

修改 .env 文件 2. 替换 .env 中的以下值:
GOOGLE_API_KEY=[REPLACE YOUR API KEY HERE]
GOOGLE_CLOUD_PROJECT_ID=[REPLACE YOUR PROJECT ID]
GITHUB_USERNAME=[REPLACE YOUR USERNAME]
GENMEDIA_BUCKET=[REPLACE YOUR PROJECT ID]-bucket
例如,如果您的项目 ID 为:testproject,您应放置 GOOGLE_CLOUD_PROJECT_ID=testproject 和 GENMEDIA_BUCKET=testproject-bucket
设置脚本
前往 00_Starting_Here 打开新终端(不在 Gemini CLI 中)
cd ~/storygen-learning/00_Starting_Here
运行完整设置:
./setup-complete.sh
您应该会在终端中看到设置结果
构建首个代理
前往 01a_First_Agent_Ready 我们将使用 Gemini CLI 创建 ADK 代理:**
cd ~/storygen-learning/01a_First_Agent_Ready
打开 Gemini CLI
gemini
在 Gemini CLI 窗口中,尝试以下提示:
I need you to help me create a Google ADK (Agent Development Kit) agent for story generation. I'm working on a children's storybook app that generates creative stories with visual scenes.

Please create a complete `agent.py` file that implements an LlmAgent using Google's ADK framework. The agent should:

**Requirements:**
1. Use the `google.adk.agents.LlmAgent` class
2. Use the "gemini-2.5-flash" model (supports streaming)
3. Be named "story_agent"
4. Generate structured stories with exactly 4 scenes each
5. Output valid JSON with story text, main characters, and scene data
6. No tools needed (images are handled separately)

**Agent Specifications:**
- **Model:** gemini-2.5-flash
- **Name:** story_agent
- **Description:** "Generates creative short stories and accompanying visual keyframes based on user-provided keywords and themes."
**Story Structure Required:**
- Exactly 4 scenes: Setup → Inciting Incident → Climax → Resolution
- 100-200 words total
- Simple, charming language for all audiences
- Natural keyword integration
**JSON Output Format:**

{
  "story": "Complete story text...",
  "main_characters": [
    {
      "name": "Character Name",
      "description": "VERY detailed visual description with specific colors, features, size, etc."
    }
  ],
  "scenes": [
    {
      "index": 1,
      "title": "The Setup",
      "description": "Scene action and setting WITHOUT character descriptions",
      "text": "Story text for this scene"
    }
    // ... 3 more scenes
  ]
}


**Key Instructions for the Agent:**
- Extract 1-2 main characters maximum
- Character descriptions should be extremely detailed and visual
- Scene descriptions focus on ACTION and SETTING only
- Do NOT repeat character appearance in scene descriptions
- Always respond with valid JSON

Please include a complete example in the instructions showing the exact format using keywords like "tiny robot", "lost kitten", "rainy city".

The file should start with necessary imports, define an empty tools list, include a print statement for initialization, and then create the LlmAgent with all the detailed instructions.

Can you create this agent in backend/story_agent/agent.py
完成后,使用 Control+C 关闭 Gemini CLI 终端
—————————————— 可选,您可以跳过此部分,直接前往解决方案部分 ——————————————
现在,在 ADK Web 中验证您的更改
cd ~/storygen-learning/01a_First_Agent_Ready/backend

source ../../.venv/bin/activate

adk web --port 8080
如要继续,您需要使用命令提示符。
启动网站
cd ~/storygen-learning/01a_First_Agent_Ready

./start.sh
如果您的更改不起作用,您应该会在 ADK Web 界面和网站中看到错误。
——————————————– 解决方案从此处开始 ———————————————–
解决方案
使用 Control+C 结束上一个进程,也可以打开另一个终端:
cd ~/storygen-learning/01b_First_Agent_Done
启动网站:
./start.sh
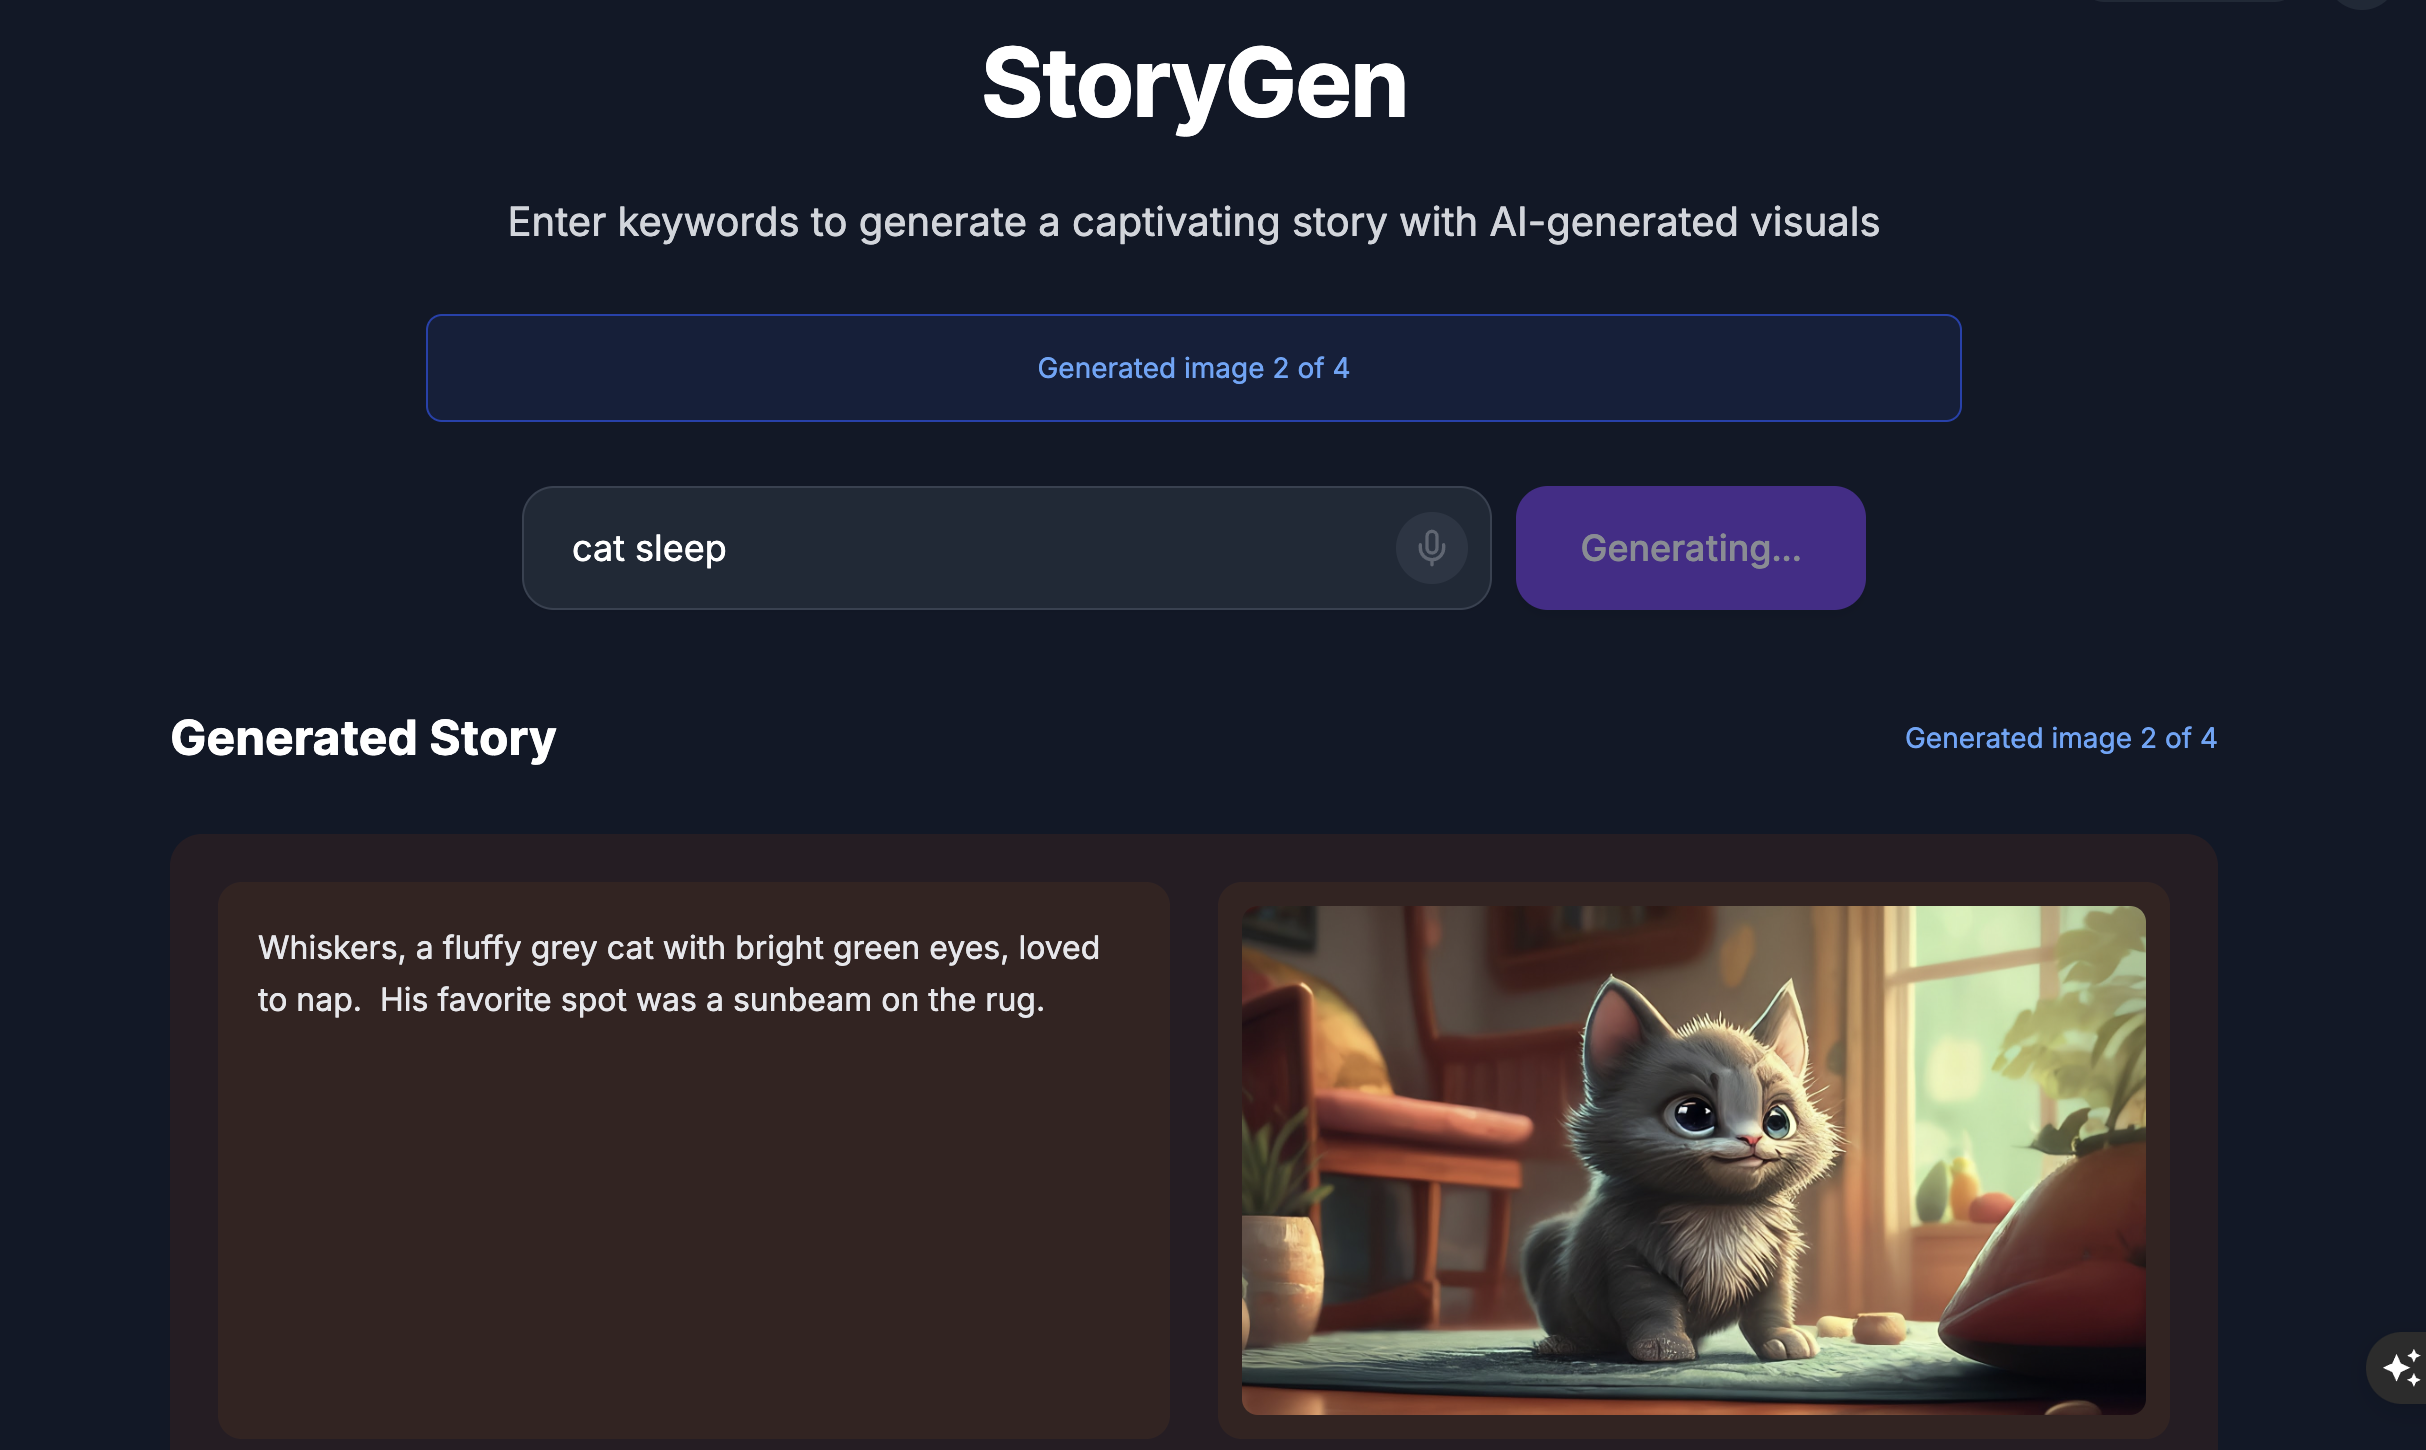
您将看到该网站:
试用 ADK 界面:打开另一个终端:
cd ~/storygen-learning/01b_First_Agent_Done/backend
source ../../.venv/bin/activate

adk web --port 8080
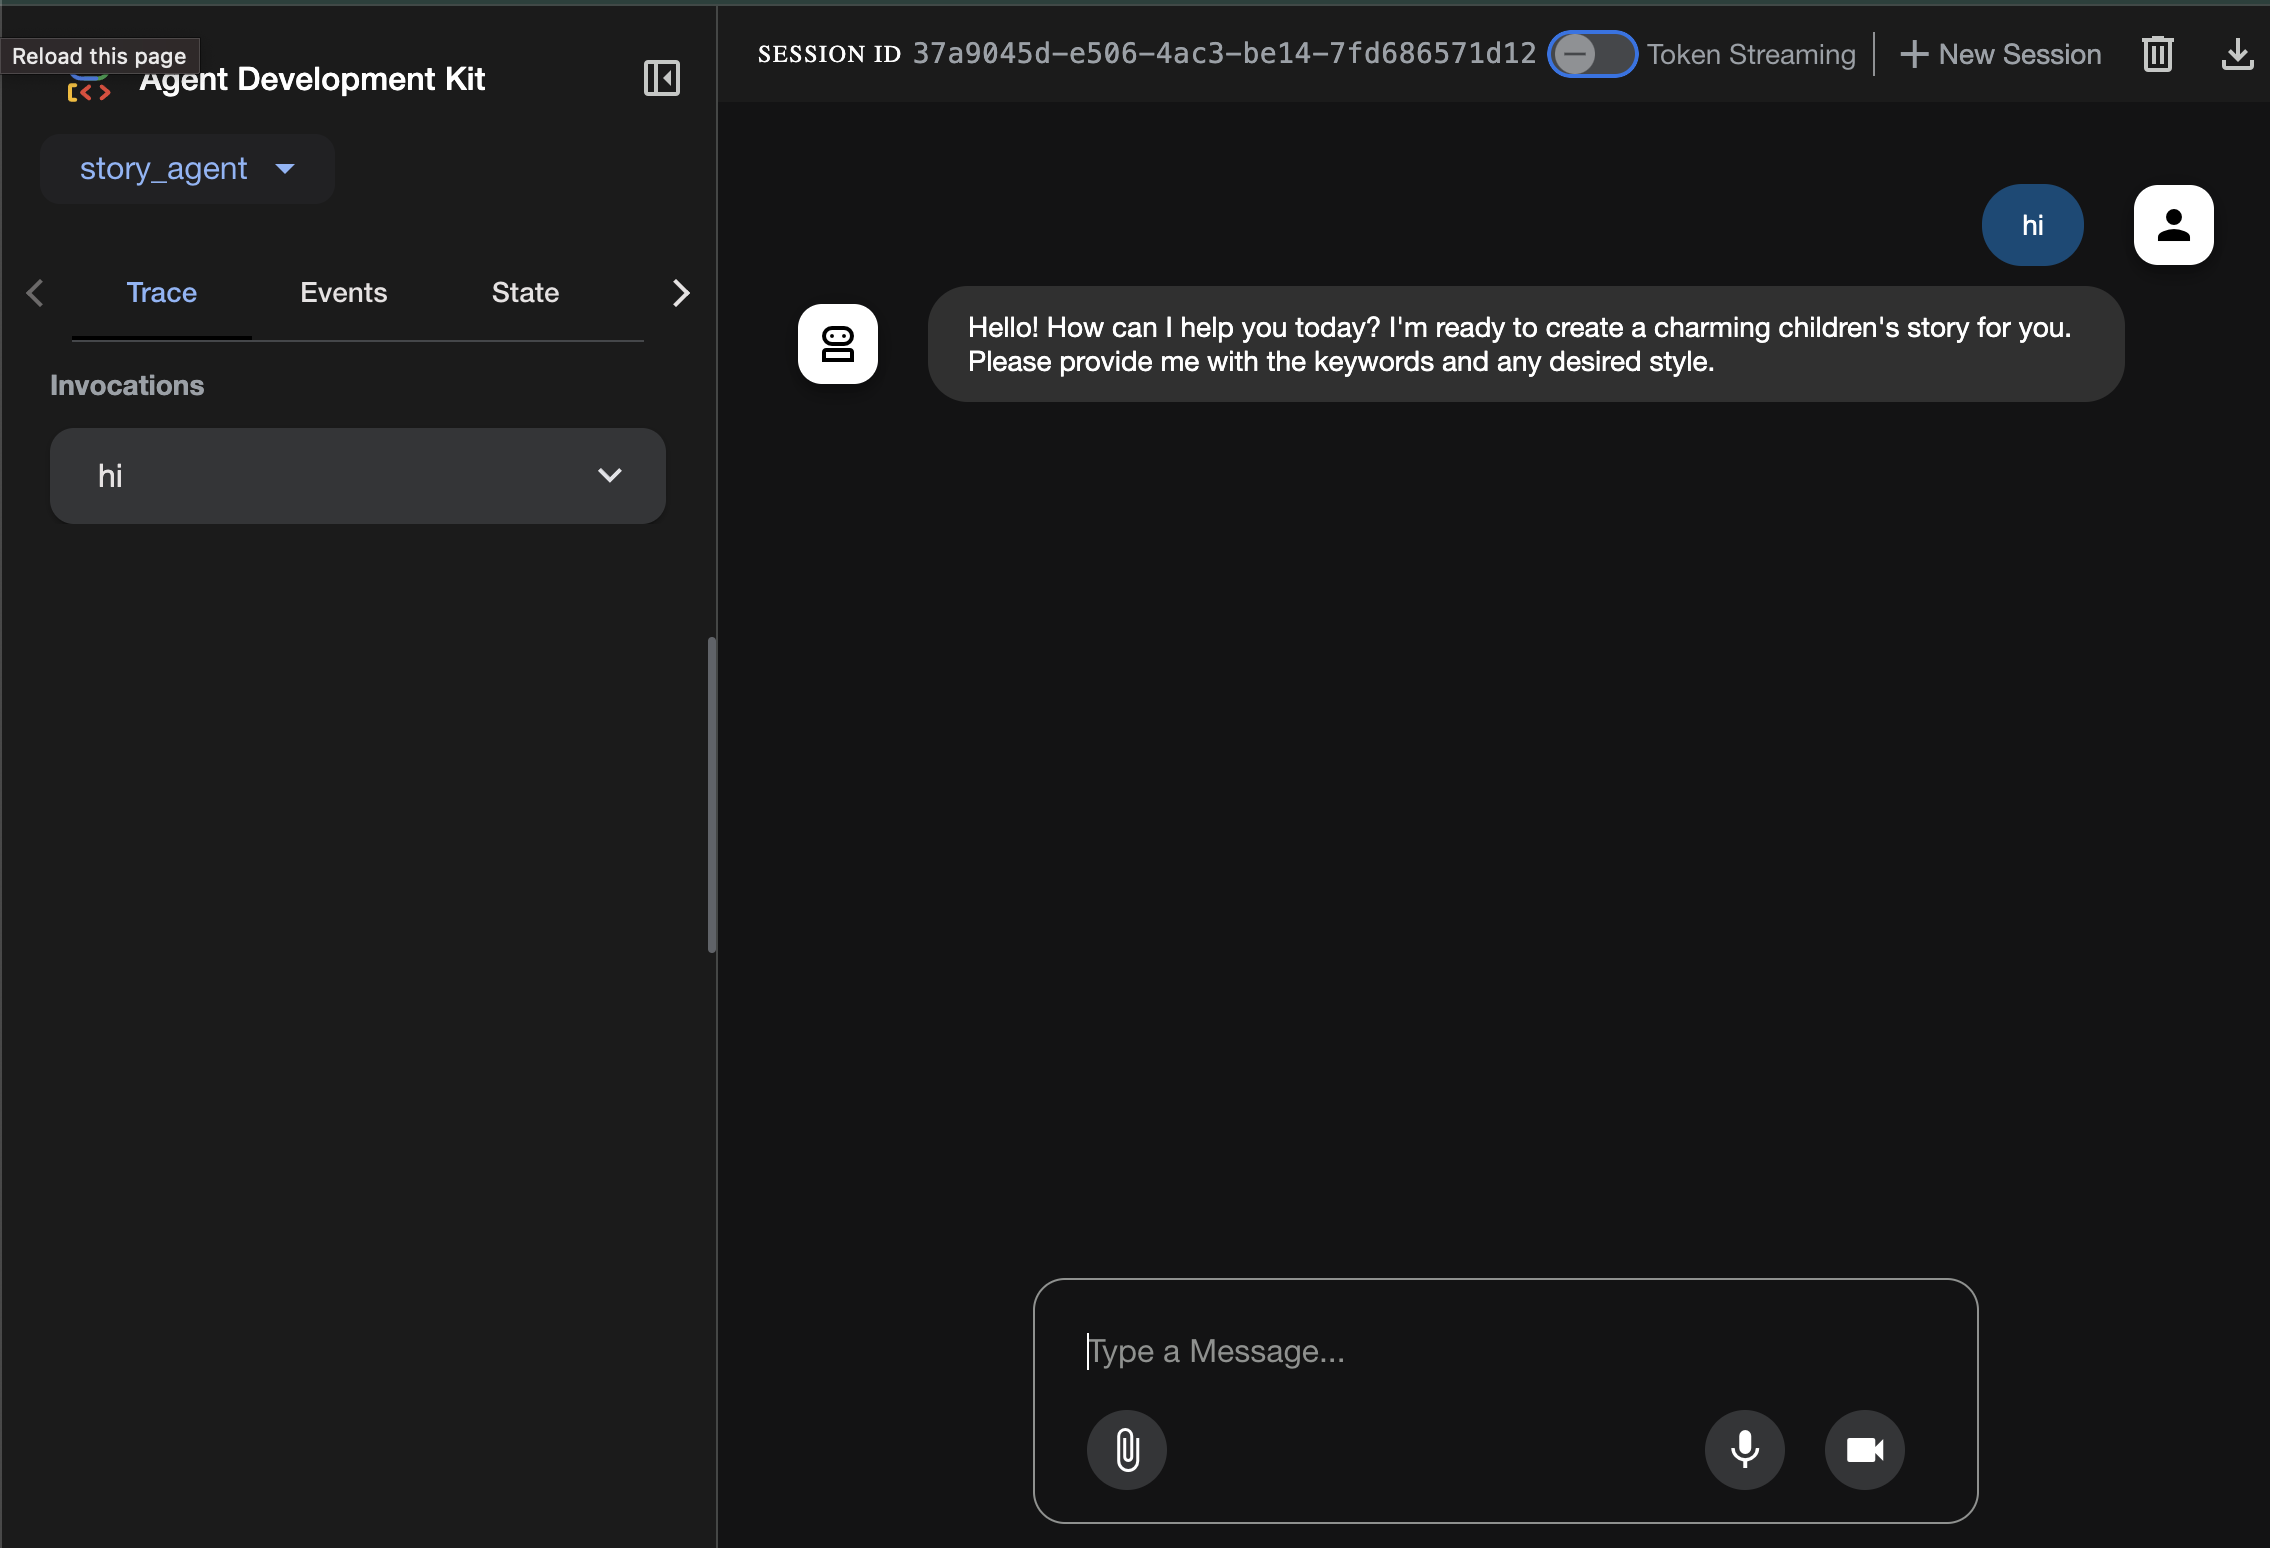
您将看到 ADK 界面,可以在其中向智能体提问
在继续下一部分之前,请按 Ctrl+C 结束该进程。
6. 开发:使用 Gemini CLI 构建 ADK -(上下文工程方法)
初始设置
确保我们删除之前在 01a_First_Agent_Ready/backend/story_agent/agent.py 中生成的代理文件:
前往 01a_First_Agent_Ready 我们将使用 Gemini CLI 创建 ADK 代理:**
cd ~/storygen-learning/01a_First_Agent_Ready/backend
打开 Gemini CLI
gemini
在 Gemini CLI 窗口中,尝试以下提示:
Summarize the design doc @design.md for me, do not attempt to create file just yet.
👉💻 按两次 Ctrl+C 暂时退出 Gemini。
👉💻 在终端中,运行以下命令以写入指南文件。
cat << 'EOF' > GEMINI.md
  ### **Coding Guidelines**
  **1. Python Best Practices:**

  *   **Type Hinting:** All function and method signatures should include type hints for arguments and return values.
  *   **Docstrings:** Every module, class, and function should have a docstring explaining its purpose, arguments, and return value, following a consistent format like reStructuredText or
  Google Style.
  *   **Linter & Formatter:** Use a linter like `ruff` or `pylint` and a code formatter like `black` to enforce a consistent style and catch potential errors.
  *   **Imports:** Organize imports into three groups: standard library, third-party libraries, and local application imports. Sort them alphabetically within each group.
  *   **Naming Conventions:**
      *   `snake_case` for variables, functions, and methods.
      *   `PascalCase` for classes.
      *   `UPPER_SNAKE_CASE` for constants.
  *   **Dependency Management:** All Python dependencies must be listed in a `requirements.txt` file.

  **2. Web APIs (FastAPI):**

  *   **Data Validation:** Use `pydantic` models for request and response data validation.
  *   **Dependency Injection:** Utilize FastAPI's dependency injection system for managing resources like database connections.
  *   **Error Handling:** Implement centralized error handling using middleware or exception handlers.
  *   **Asynchronous Code:** Use `async` and `await` for I/O-bound operations to improve performance.
EOF
cat GEMINI.md
在法律铭刻完毕后,我们重新召唤 AI 伙伴,见证神器带来的奇迹。
👉💻 从 shadowblade 目录重新启动 Gemini CLI:
cd ~/storygen-learning/01a_First_Agent_Ready/backend
clear
gemini
👉✨ 现在,问问 Gemini 它在想什么。符文已读。
/memory show
👉✨ 这是一条功能强大的命令,可用于构建您的代理。立即发布:
You are an expert Python developer specializing in the Google Agent Development Kit (ADK). Your task is to write the complete, production-quality code for `agent.py` by following the technical specifications outlined in the provided design document verbatim.

Analyze the design document at `@design.md` and generate the corresponding Python code for `agent.py`.

I need you to generate a Python script based on the provided design document and reference examples. Follow these requirements:

Read the design document carefully - it contains the complete technical specification for the code you need to write
Follow the structure and patterns shown in the reference context files
Adhere to all Python best practices specified in the coding standards document
Implement every requirement mentioned in the design document exactly as specified
Use the exact variable names, function names, and string values mentioned in the specifications

The design document describes the complete architecture, dependencies, configuration, and logic flow. Your generated code must match these specifications precisely while following professional Python coding standards.
Generate clean, production-ready Python code that can be used immediately without modifications.
完成后,使用 Control+C 关闭 Gemini CLI 终端
—————————————— 可选,您可以跳过此部分,直接前往解决方案部分 ——————————————
现在,在 ADK Web 中验证您的更改
cd ~/storygen-learning/01a_First_Agent_Ready/backend

source ../../.venv/bin/activate

adk web --port 8080
如要继续,您需要使用命令提示符。
启动网站
cd ~/storygen-learning/01a_First_Agent_Ready

./start.sh
如果您的更改不起作用,您应该会在 ADK Web 界面和网站中看到错误。
——————————————– 解决方案从此处开始 ———————————————–
解决方案
使用 Control+C 结束上一个进程,也可以打开另一个终端:
cd ~/storygen-learning/01b_First_Agent_Done
启动网站:
./start.sh
您将看到该网站:
试用 ADK 界面:打开另一个终端:
cd ~/storygen-learning/01b_First_Agent_Done/backend
source ../../.venv/bin/activate

adk web --port 8080
您将看到 ADK 界面,可以在其中向智能体提问
在继续下一部分之前,请按 Ctrl+C 结束该进程。
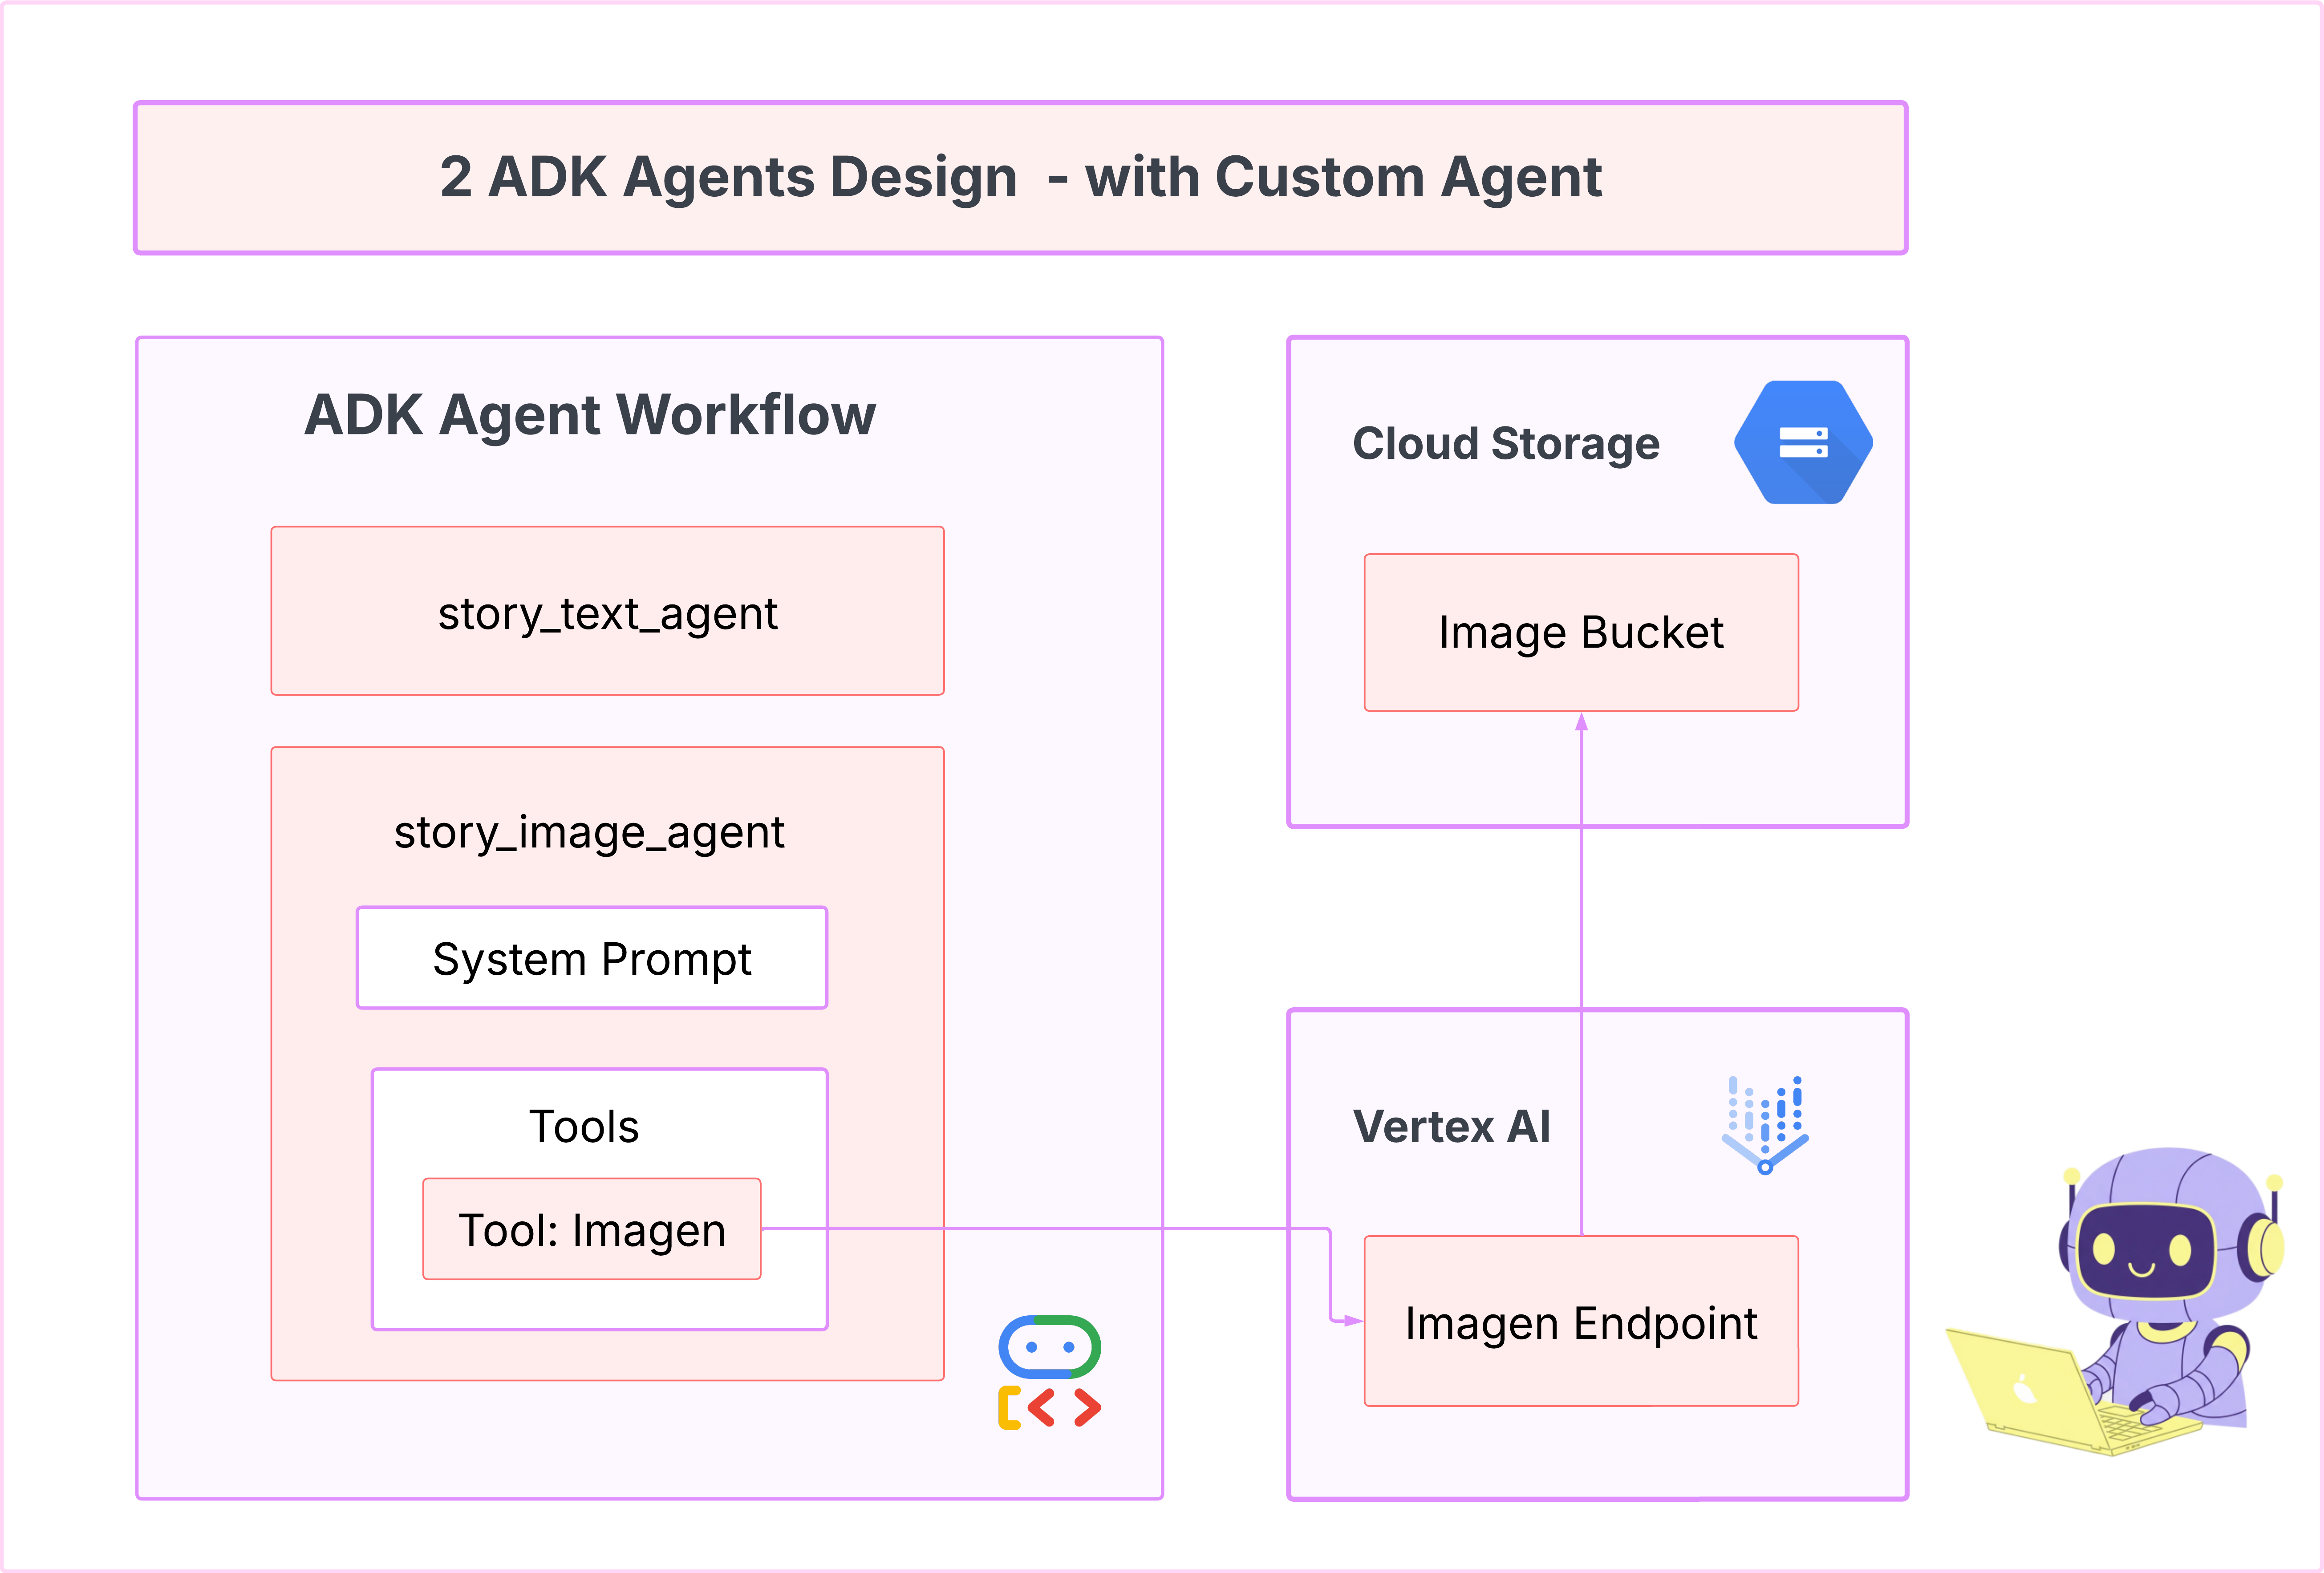
7. 开发:使用 Imagen 构建自定义智能体
生成 Imagen 工具(第二个代理)
cd ~/storygen-learning/02a_Image_Agent_Ready
使用 Gemini CLI 创建图片生成代理:
gemini generate "I need you to help me create a custom Google ADK (Agent Development Kit) agent for image generation. This is different from the story agent - this one handles image generation directly using the BaseAgent pattern for full control over tool execution.

Please create a complete `agent.py` file that implements a custom image generation agent. The agent should:

**Requirements:**
1. Use the `google.adk.agents.BaseAgent` class (NOT LlmAgent)
2. Be named "custom_image_agent"
3. Directly execute the ImagenTool without LLM intermediation
4. Handle JSON input with scene descriptions and character descriptions
5. Store results in session state for retrieval by main.py
6. Use async generators and yield Events

**Key Specifications:**
- **Class Name:** CustomImageAgent (inherits from BaseAgent)
- **Agent Name:** "custom_image_agent"
- **Tool:** Uses ImagenTool for direct image generation
- **Purpose:** Bypass LLM agent limitations and directly call ImagenTool

**Input Format:**
The agent should handle JSON input like:
{
  "scene_description": "Scene action and setting",
  "character_descriptions": {
    "CharacterName": "detailed visual description"
  }
}


**Core Method:** `async def _run_async_impl(self, ctx: InvocationContext) -> AsyncGenerator[Event, None]:`
   - Extract user message from `ctx.user_content.parts`
   - Parse JSON input or fallback to plain text
   - Extract scene_description and character_descriptions
   - Build image prompt with style prefix: "Children's book cartoon illustration with bright vibrant colors, simple shapes, friendly characters."
   - Include character descriptions for consistency
   - Call `await self.imagen_tool.run()` directly
   - Store results in `ctx.session.state["image_result"]`
   - Yield Event with results


 **Session State:**
   - Store JSON results in `ctx.session.state["image_result"]`
   - Include success/error status
   - Store actual image URLs or error messages

Expected Output Structure:
- Successful results stored as JSON with image URLs
- Error results stored as JSON with error messages
- Results accessible via session state in main.py

Can you create this agent in backend/story_image_agent/agent.py

"
—————————————— 可选,您可以跳过此部分,直接前往解决方案部分 ——————————————
现在,在 ADK Web 中验证您的更改
cd ~/storygen-learning/02a_Image_Agent_Ready/backend

source ../../.venv/bin/activate

adk web --port 8080
启动网站
cd ~/storygen-learning/02a_Second_Agent_Ready

./start.sh
如果您的更改不起作用,您应该会在 ADK Web 界面和网站中看到错误。
—————————————- 解决方案从此处开始 ——————————————–
解决方案
使用 Control+C 结束上一个进程,也可以打开另一个终端:
# Open new terminal
cd ~/storygen-learning/02b_Image_Agent_Done
启动网站:
./start.sh
您将看到该网站:
试用 ADK 界面:打开另一个终端:
# Open new terminal
cd ~/storygen-learning/02b_Image_Agent_Done/backend

source ../../.venv/bin/activate

adk web --port 8080
您将看到 ADK 界面,可以在其中向智能体提问:
在继续下一部分之前,请按 Ctrl+C 结束该进程。
正在学习
我们的第一个智能体擅长生成文本,但现在我们需要生成图片。对于此任务,我们需要更直接的控制。我们不希望 LLM 决定是否创建图片,而是希望直接命令它创建图片。对于 BaseAgent 来说,这是一项完美的工作。
与声明式 LlmAgent 不同,BaseAgent 是命令式的。这意味着,开发者需要在 _run_async_impl 方法中编写确切的 Python 逻辑步骤。您可以完全控制执行流程。
如果您需要以下功能,可以选择 BaseAgent:
确定性逻辑:智能体必须遵循特定的、不可更改的步骤序列。
直接执行工具:您希望直接调用工具,而无需 LLM 干预。
复杂的工作流:该流程涉及自定义数据处理、API 调用和逻辑,这些内容过于复杂,LLM 无法仅从提示中可靠地推断出来。
对于我们的应用,我们将使用 BaseAgent 从第一个代理接收场景描述,并直接调用 Imagen 工具来确保为每个场景生成图片。
8. 测试:代理评估
我们的应用可以正常运行,但我们需要一个自动化的测试安全网。这项任务非常适合委托给我们的 AI 助理。
操作
cd ~/storygen-learning/03a_Agent_Evaluation_Ready/backend
使用 Gemini CLI 编写全面的测试:
打开 Gemini CLI
gemini
在 Gemini CLI 窗口中,尝试以下提示:
I need you to create comprehensive test files for my backend/story_agent in Google ADK. I need three specific JSON files that match the testing structure used in ADK evaluation.

**Context:**
- The story agent generates structured JSON stories with exactly 4 scenes
- It uses LlmAgent with no tools, just direct LLM responses
- Input: Keywords
- Output: JSON with story, main_characters, and scenes arrays

**Files to Create:**

### 1. `story_agent_eval.evalset.json` (Comprehensive Integration Tests)
Create a comprehensive evaluation set with:
- **eval_set_id**: "story_agent_comprehensive_evalset"
- **name**: "Story Agent Comprehensive Evaluation Set"
- **description**: "Comprehensive evaluation scenarios for story_agent covering various keyword combinations, edge cases, and story quality metrics"


Each eval_case should include:
- Full conversation arrays with invocation_id, user_content, final_response
- Complete expected JSON responses with detailed stories, characters, and 4 scenes
- session_input with app_name "story_agent"
- All fields: story (narrative text), main_characters (with detailed visual descriptions), scenes (with index, title, description, text)

### 2. `story_generation.test.json` (Unit Tests)
Create basic generation tests with:
- **eval_set_id**: "story_agent_basic_generation_tests"
- **name**: "Story Agent Basic Generation Tests"
- **description**: "Unit tests for story_agent focusing on JSON structure compliance, scene generation, and keyword integration"

### 3. `test_config.json` (Evaluation Configuration)
Create test configuration with:
- **criteria**: response_match_score: 0.7, tool_trajectory_avg_score: 1.0
- **custom_evaluators**:
  - json_structure_validator (validates required fields, scene count, character fields)
  - story_quality_metrics (word count 80-250, keyword integration threshold 0.8)
- **evaluation_notes**: Story agent specifics and trajectory expectations

**Important Requirements:**
1. All responses must be valid, parseable JSON
2. Stories must have exactly 4 scenes with indices 1-4
3. Each scene must have: index, title, description, text
4. Main characters must have detailed visual descriptions
5. No tool_uses expected (empty arrays) since story agent uses direct LLM
6. Word count should be 100-200 words total
7. Keywords must be naturally integrated into the narrative

Please generate all three files with realistic example stories and comprehensive test coverage matching the ADK evaluation format.
—————————————— 可选,您可以跳过此部分,直接前往解决方案部分 ——————————————
查看评估:
./run_adk_web_persistent.sh
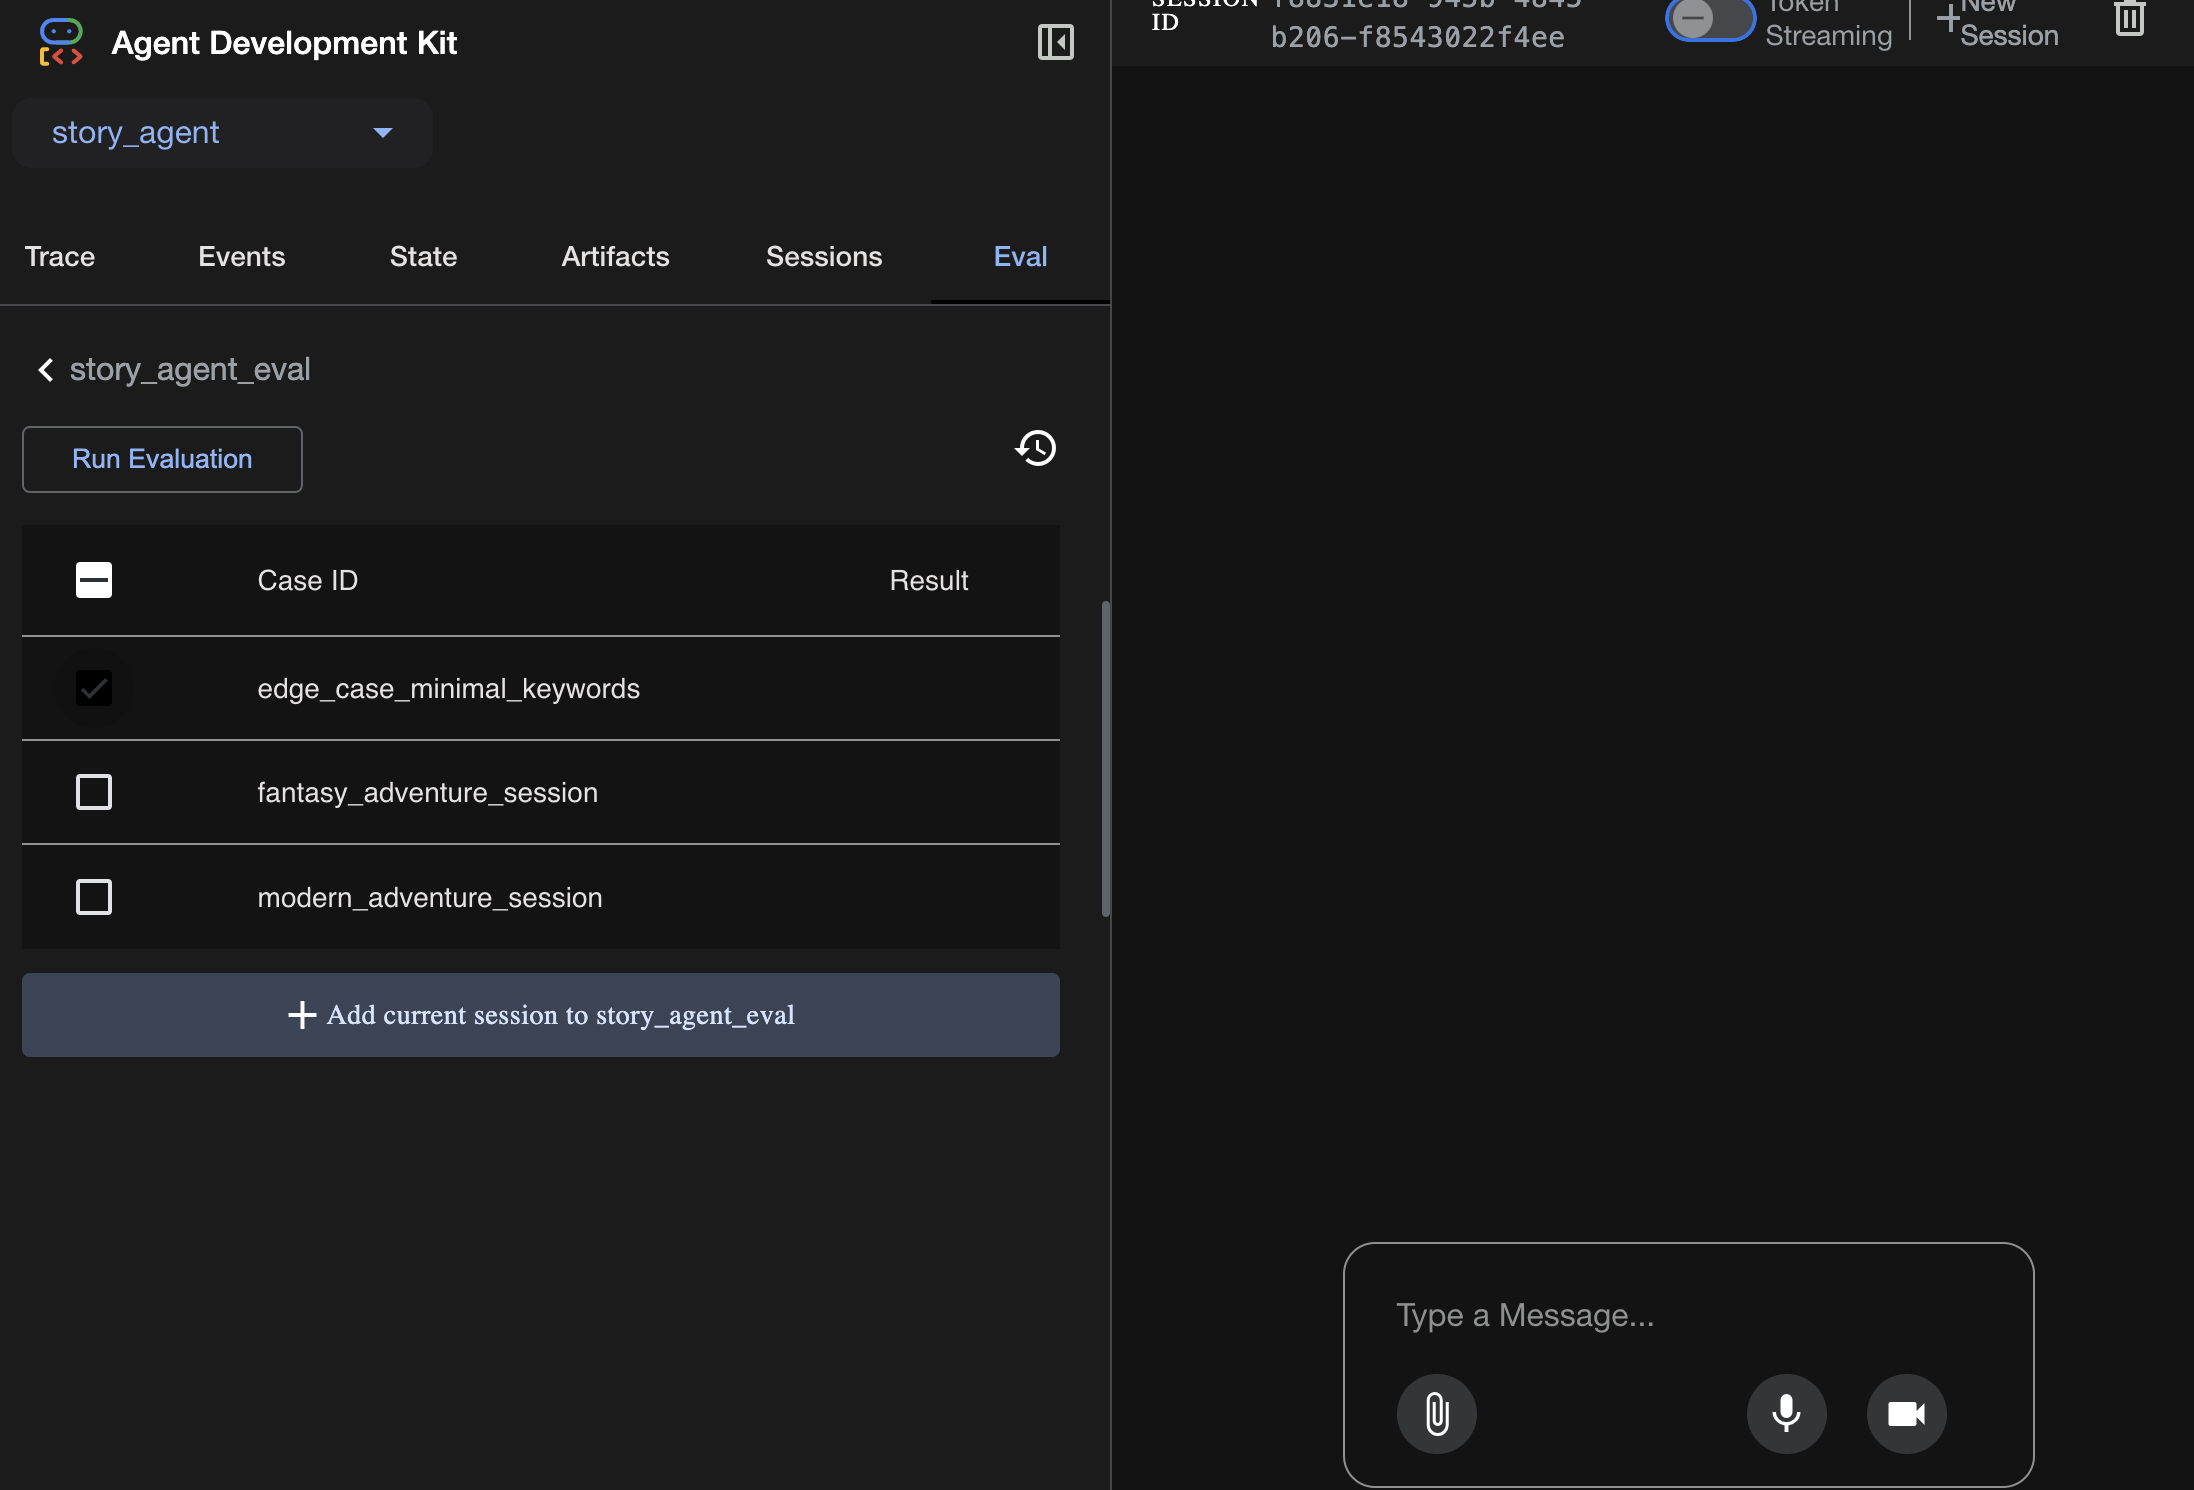
前往 ADK 界面上的 eval 标签页。
您应该会看到具有持续测试功能的 ADK 网页界面
关键学习时刻:AI 是自动化质量保证的强大合作伙伴。它可以处理测试编写的样板,让您专注于构建功能。
——————————————– 解决方案从此处开始 ———————————————–
解决方案
- 前往解决方案文件夹:
cd ~/storygen-learning/03b_Agent_Evaluation_Done/backend
- 打开 ADK Web 界面
./run_adk_web_persistent.sh
您可以在 Eval 标签页中查看测试用例:
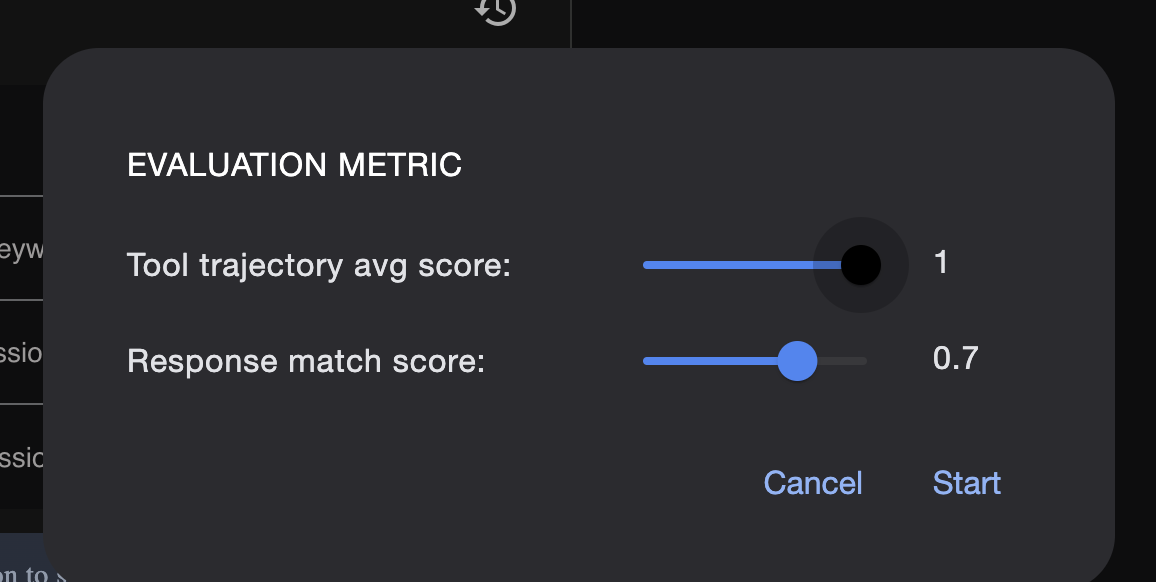
在此处调整指标:
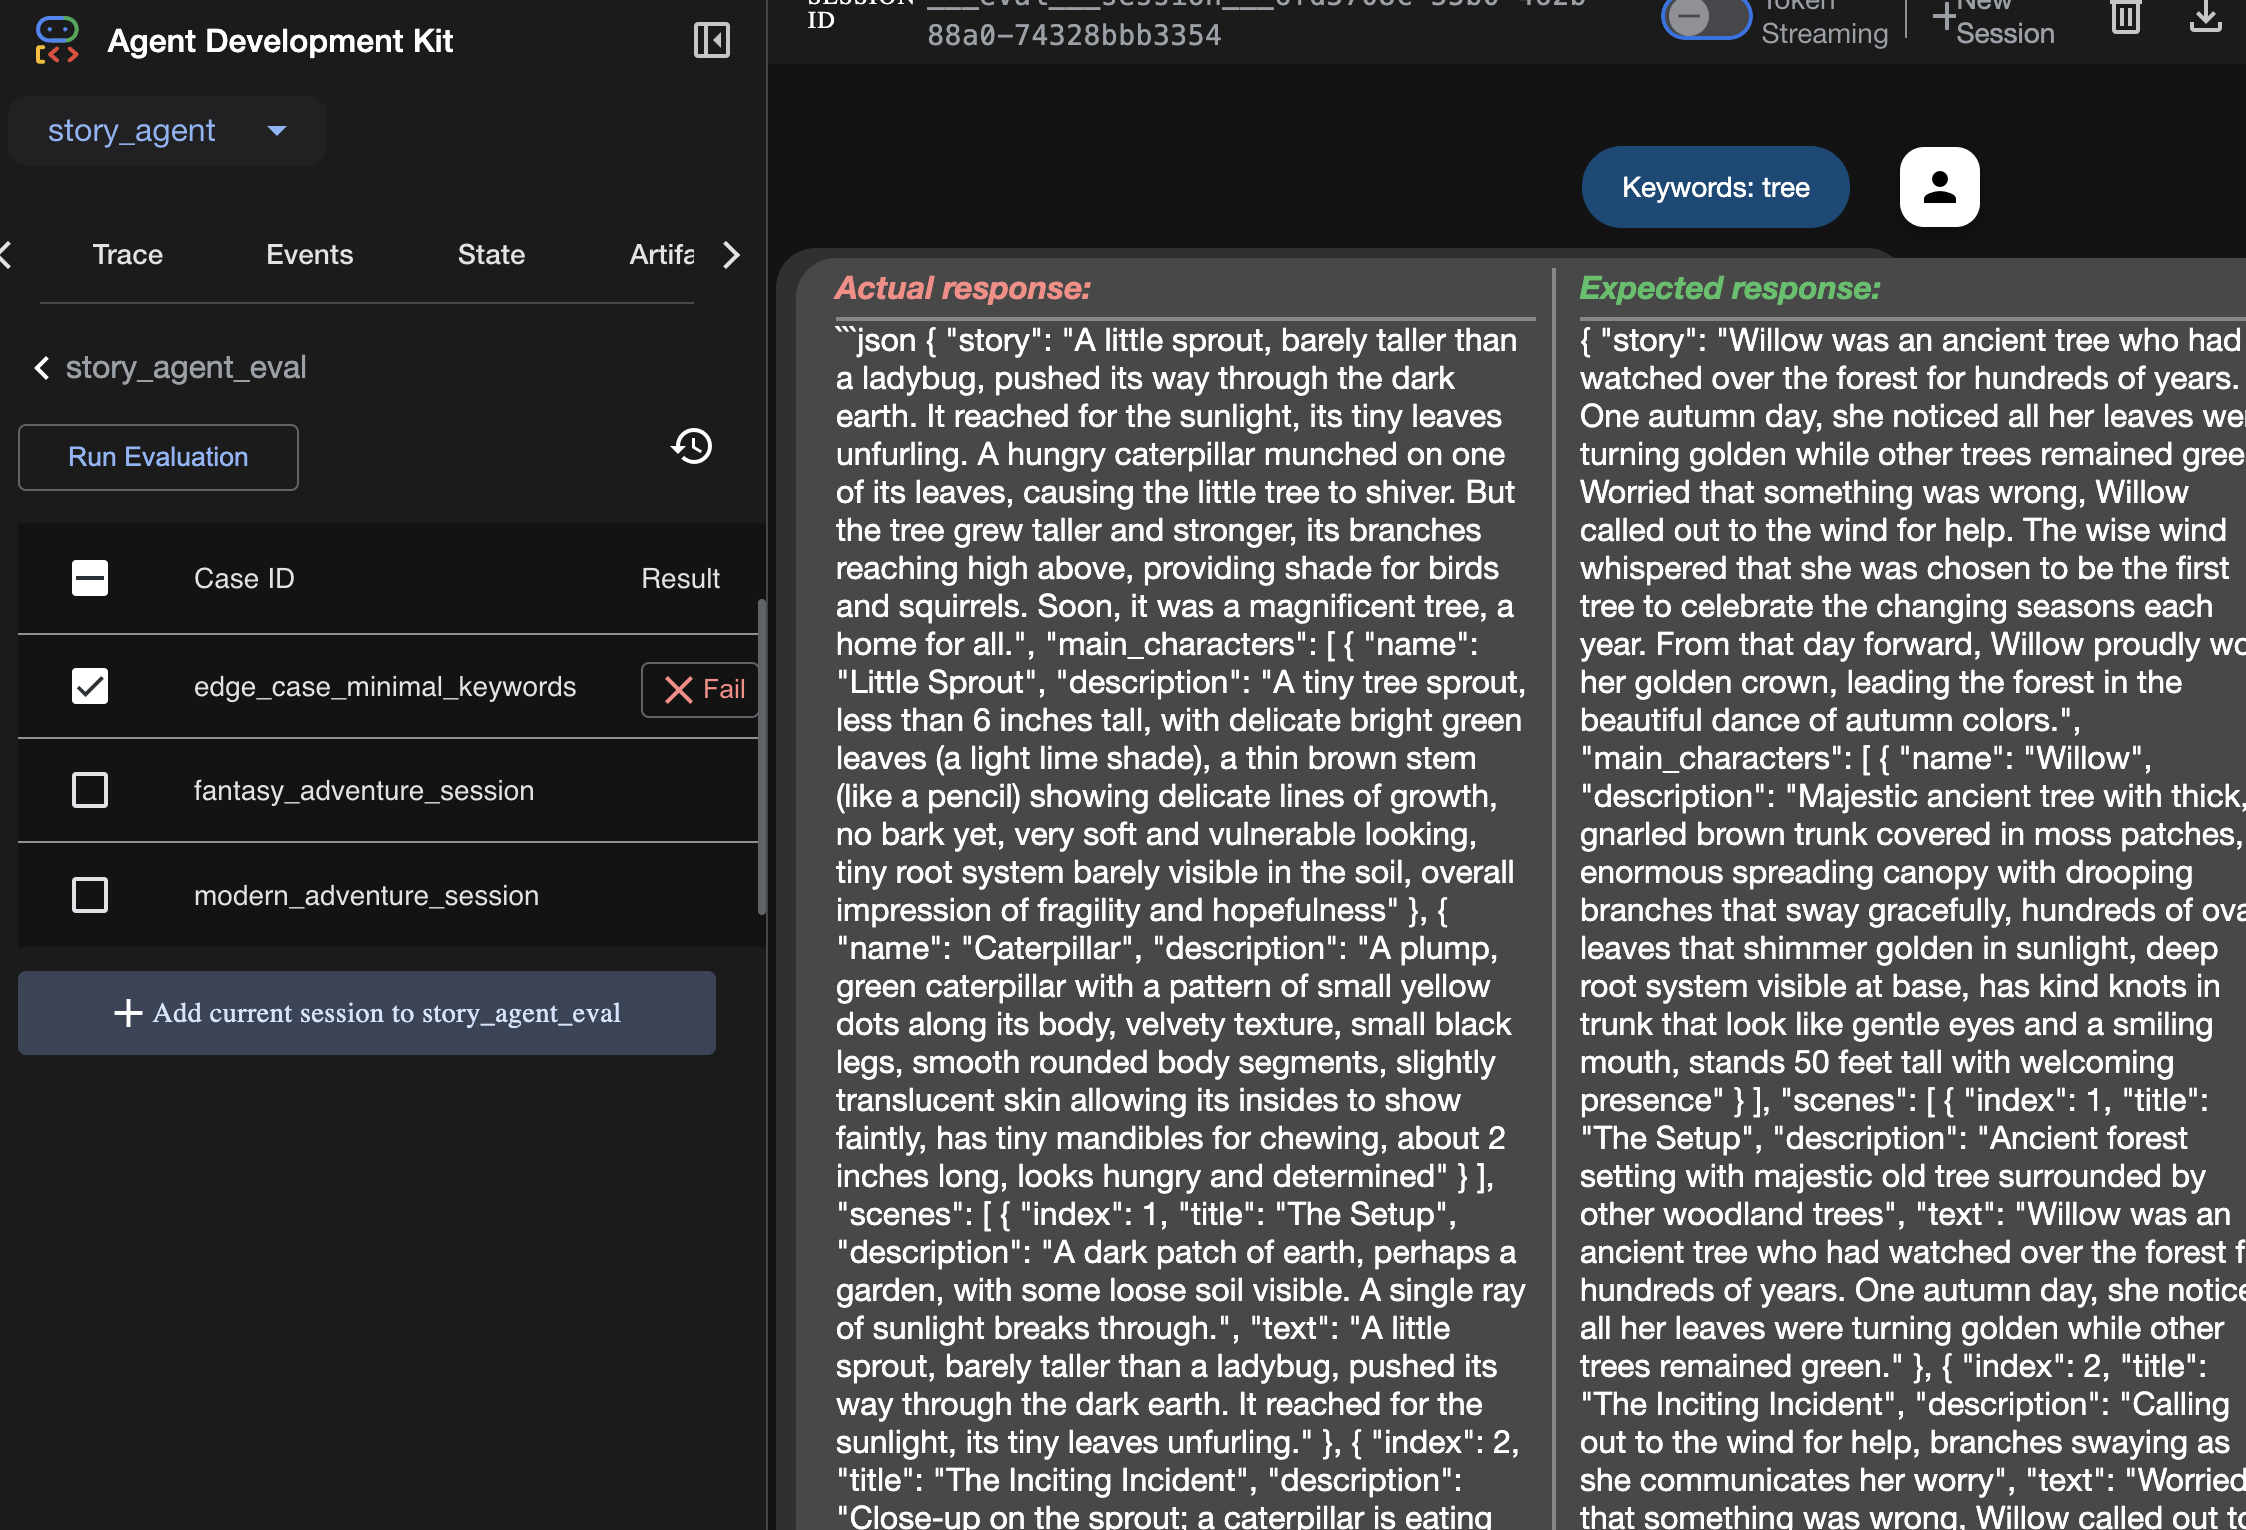
您可以在此处查看评估运行结果:
正在学习
代理可以“正常工作”,即在运行过程中不会出错,但我们如何知道它是否会生成正确的输出?这个故事好吗?JSON 格式是否正确?这时,ADK 的评估框架就派上用场了。
智能体评估是一种自动化测试系统,旨在衡量智能体回答的质量和正确性。它不仅会检查代码错误,还会检查智能体的行为是否符合您的预期。该框架主要使用以下几个关键文件:
evalset.json:这是您的主测试套件。此文件中的每个“评估情形”都包含一个对话示例(例如用户提示)以及您希望代理生成的理想“标准”回答。
test_config.json:此文件定义了成功规则。您可以在此处设置条件,例如:
response_match_score:智能体的回答必须与“标准”回答有多接近?(得分为 1.0 表示必须完全相同)。
custom_evaluators:您可以创建自己的规则,例如“回答必须是有效的 JSON”或“故事必须包含 100 字以上”。
通过运行评估,您可以针对数十种场景自动测试代理,确保对提示或工具的更改不会意外破坏其核心功能。它是构建可用于生产用途的 AI 智能体的强大安全网。
9. 基础设施即代码 (IaC):在云中构建家园
我们的代码已经过测试,但需要一个可用于生产用途的归宿。我们将使用“基础设施即代码”来定义环境。
什么是 Docker?
Docker 是一个用于在容器中创建和运行应用的平台。您可以将容器想象成软件的标准化运输容器。它将应用运行所需的一切内容打包到单个隔离的软件包中:
- 应用代码本身
- 所需的运行时(例如,特定版本的 Python)
- 所有系统工具和库
然后,此容器化应用可以在安装了 Docker 的任何机器上运行,从而解决经典的“在我的机器上能运行”的问题。
在本部分中,我们将问问 Gemini 生成一个 Dockerfile,它只是用于构建应用容器映像的配方或蓝图
操作
cd ~/storygen-learning/04a_Manual_Deployment_Ready
使用 Gemini CLI 为后端创建 Dockerfile:打开 Gemini CLI
Gemini
在 Gemini CLI 中,尝试以下提示:
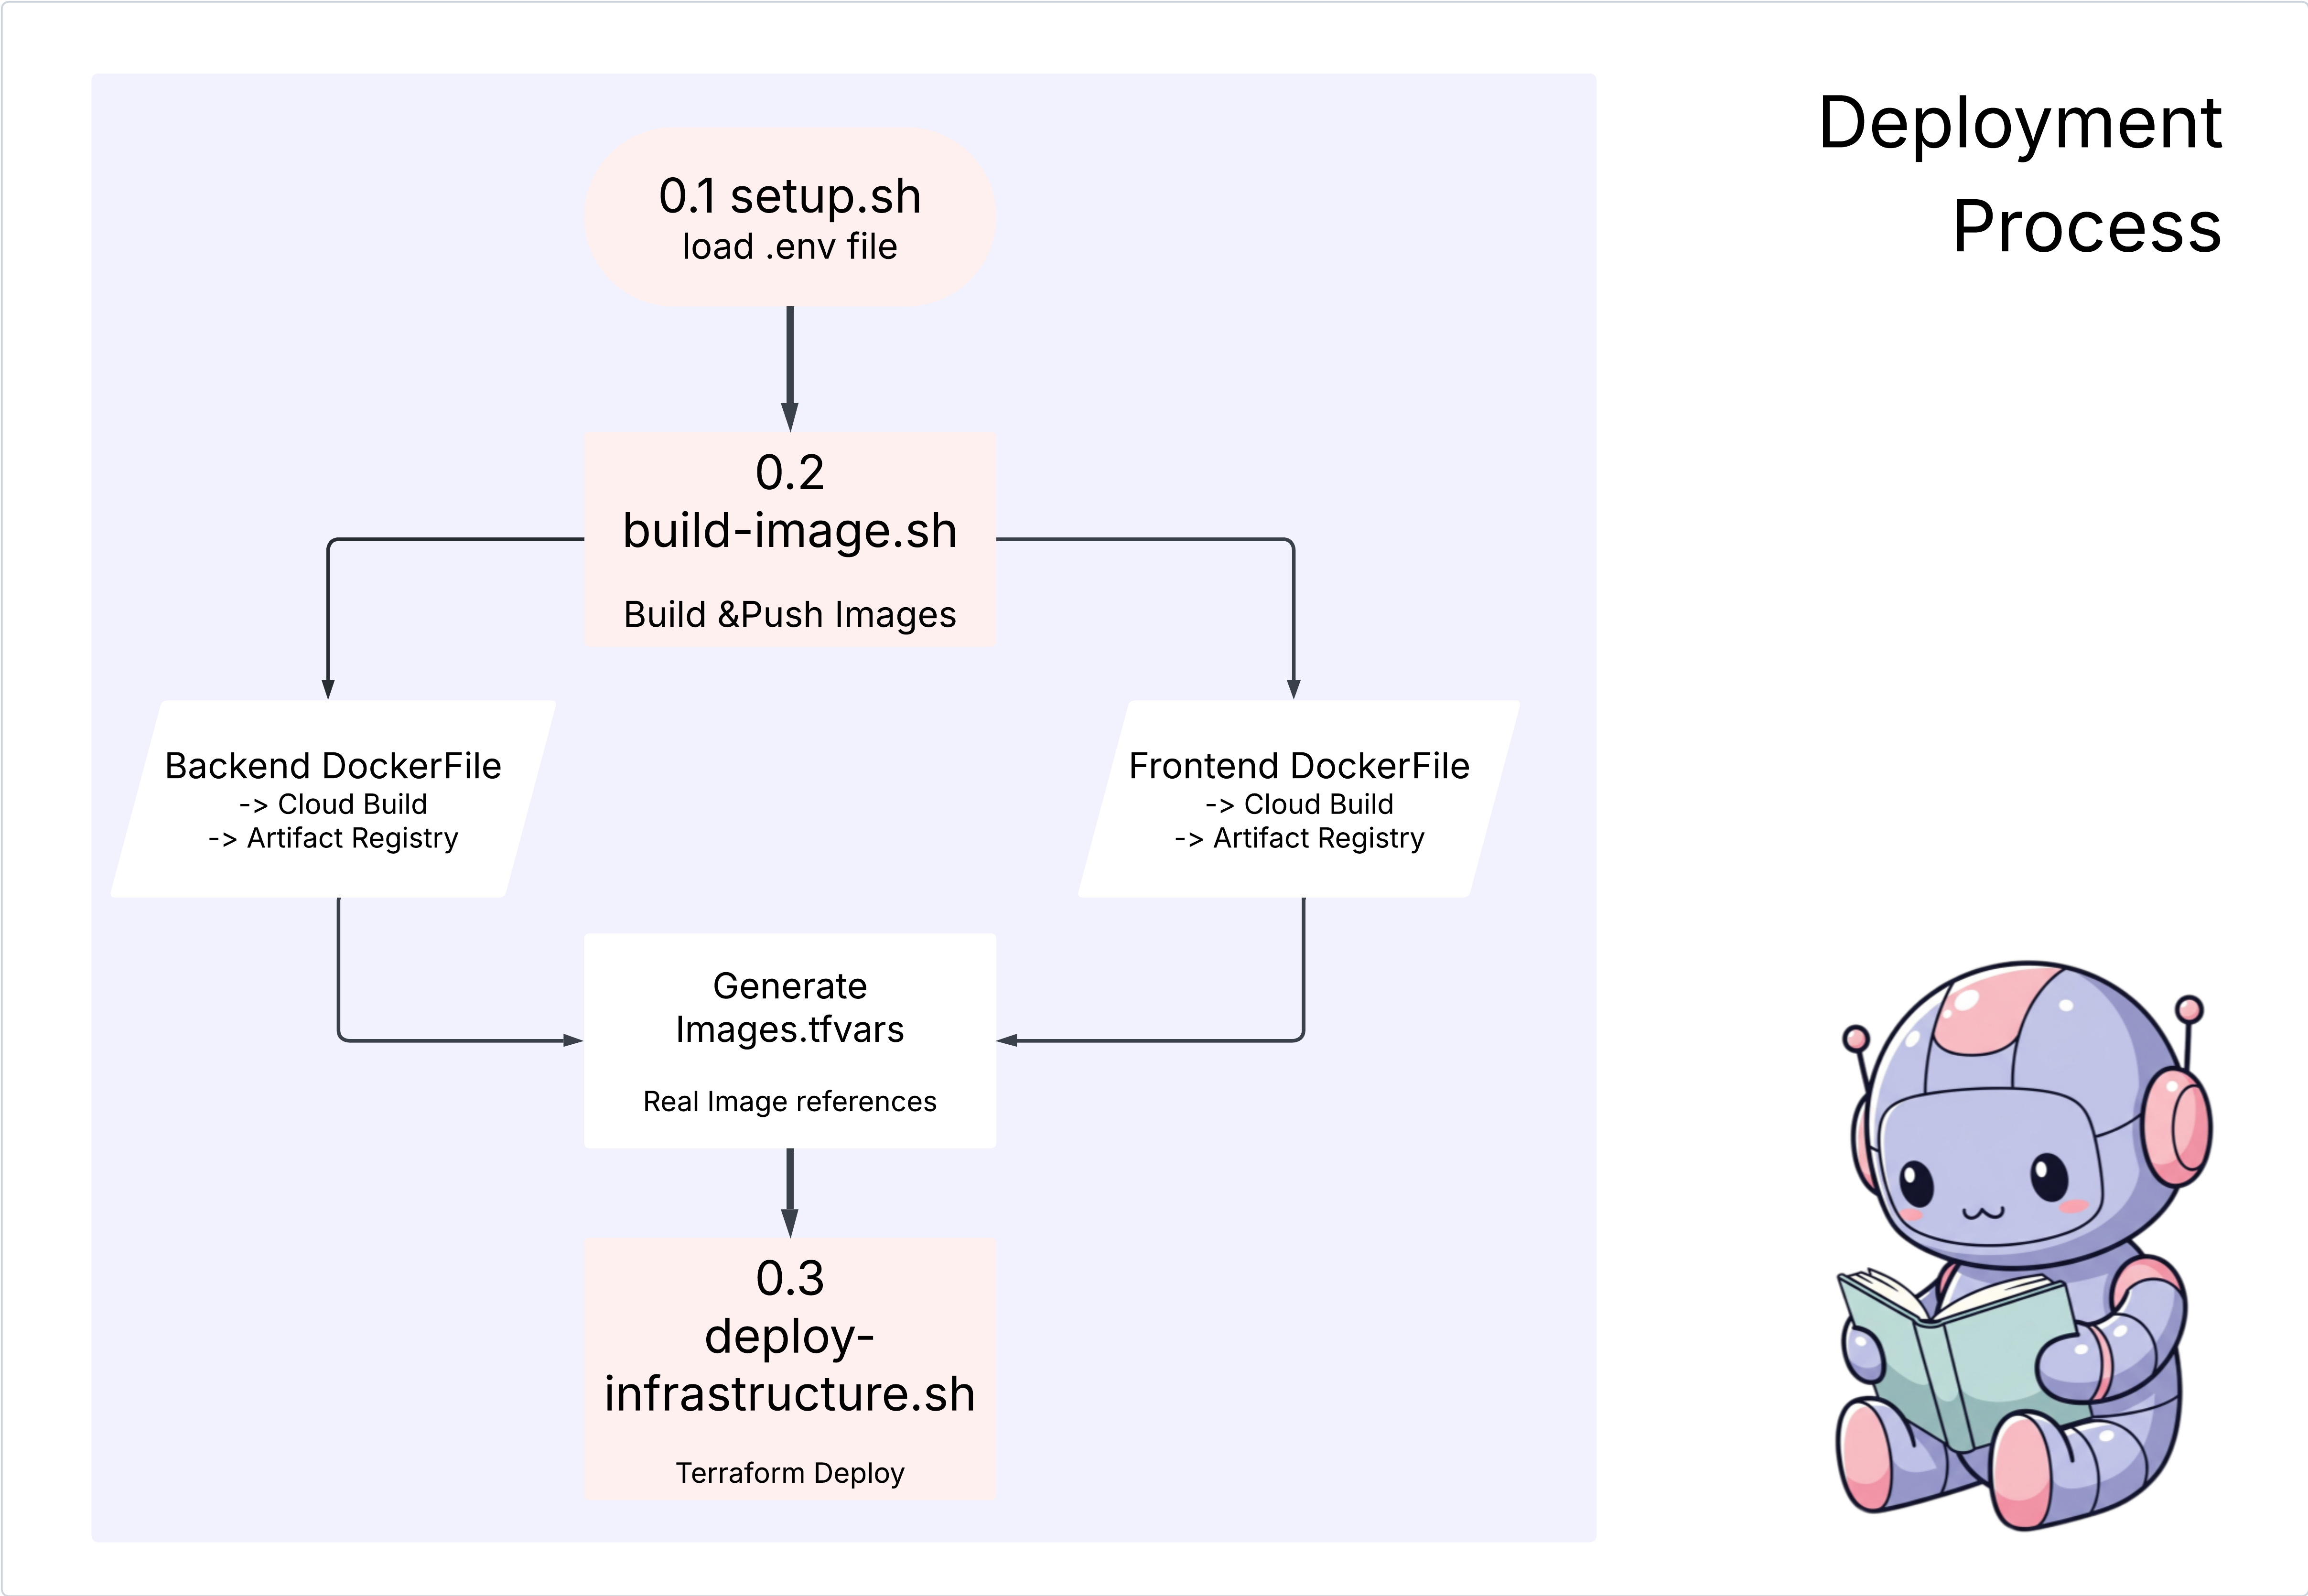
Create a manual deployment plan for my StoryGen app with Google Cloud Platform. I have a Next.js frontend, Python backend, and Terraform infrastructure.

Generate these deployment files:
1. **01-setup.sh** - Environment setup and authentication
2. **02-build-images.sh** - Build and push Docker images to Google Container Registry
3. **03-deploy-infrastructure.sh** - Deploy with Terraform and configure services
4. **load-env.sh** - Load environment variables for deployment

**Requirements:**
- Use Google Cloud Run for both frontend and backend
- Configure Imagen API and storage buckets
- Set up proper IAM permissions
- Use environment variables from .env file
- Include error handling and status checks

Keep scripts simple, well-commented, and production-ready for manual execution.
解决方案:
cd ~/storygen-learning/04b_Manual_Deployment_Done
运行以下命令:
source ../.venv/bin/activate
./01-setup.sh
./02-build-images.sh
./03-deploy-infrastructure.sh
您应该会看到部署结果和基础设施创建情况
10. 自动化 (CI/CD):数字化流水线
手动部署应用是了解各个组件的好方法,但速度较慢,需要手动操作,并且可能会导致人为错误。在专业软件开发中,整个流程都通过一种称为 CI/CD 的实践进行自动化处理。
CI/CD 表示持续集成和持续部署。这是一种在每次更改代码时自动构建、测试和部署代码的方法。
- 持续集成 (CI):这是“构建和测试”阶段。开发者将代码更改推送到共享代码库(例如 GitHub)后,自动化系统会立即启动。它会构建应用并运行所有测试(例如我们创建的代理评估),以确保新代码正确集成,并且不会引入任何 bug。
- 持续部署 (CD):这是“发布”阶段。如果 CI 阶段顺利通过,系统会自动将经过测试的新版应用部署到生产环境,供用户使用。
此自动化流水线可创建“数字装配线”,将开发者机器上的代码快速、安全、可靠地部署到生产环境。在本部分中,我们将要求 AI 助理使用 GitHub Actions 和 Google Cloud Build 为我们构建此装配线。
操作
cd ~/storygen-learning/05a_CICD_Pipeline_Ready
使用 Gemini CLI 通过 GitHub 构建 CI/CD 流水线:
打开 Gemini CLI
Gemini
在 Gemini CLI 中,尝试以下提示:
Create a CI/CD pipeline for my StoryGen app using Google Cloud Build and GitHub integration.

Generate these automation files:
1. **cloudbuild.yaml** (for backend) - Automated build, test, and deploy pipeline
2. **GitHub Actions workflow** - Trigger builds on push/PR
3. **Deployment automation scripts** - Streamlined deployment process

**Requirements:**
- Auto-trigger on GitHub push to main branch
- Build and push Docker images
- Run automated tests if available
- Deploy to Google Cloud Run
- Environment-specific deployments (staging/prod)
- Notification on success/failure

Focus on fully automated deployment with minimal manual intervention. Include proper secret management and rollback capabilities.
——————————————– 解决方案从此处开始 ———————————————–
解决方案:
cd ~/storygen-learning/06_Final_Solution/
# Copy the GitHub workflow to parent folder
cp -r 06_Final_Solution/.GitHub ../../../.GitHub
返回到 06_Final_Solution 文件夹并运行脚本:
cd ~/storygen-learning/06_Final_Solution/

./setup-cicd-complete.sh
您应该会看到 CI/CD 流水线设置完成
触发工作流:将代码提交并推送到 main。请注意,您需要设置 GitHub 电子邮件地址和名称才能允许该权限。
git add .
git commit -m "feat: Add backend, IaC, and CI/CD workflow"
git push origin main
前往 GitHub 代码库中的“操作”标签页,观看自动化部署运行情况。
11. 运营:AI 控制塔
我们正在直播!但旅程尚未结束。这是“第 2 天”——运营。让我们返回 Cloud Assist 来管理正在运行的应用。
操作
- 在 Google Cloud 控制台中前往您的 Cloud Run 服务。与您的已发布应用互动,以生成一些流量和日志。
- 打开 Cloud Assist 窗格,并将其用作操作副驾驶,使用如下提示:
日志分析:
Summarize the errors in my Cloud Run logs for the service 'genai-backend' from the last 15 minutes.
性能优化:
My Cloud Run service 'genai-backend' has high startup latency. What are common causes for a Python app and how can I investigate with Cloud Trace?
费用优化:
Analyze the costs for my 'genai-backend' service and its GCS bucket. Are there any opportunities to save money?
关键学习时刻:AI SDLC 是一个持续循环。帮助构建应用的 AI 联驾助手也是在生产环境中监控、排查问题和优化应用的不可或缺的合作伙伴。