
1. 學習目標
AI 代理程式 Vibe 全端
歡迎!您即將學習軟體開發的下一個重要技能:如何有效引導人工智慧建構、測試及部署生產級軟體。生成式 AI 並非「自動駕駛」功能,而是需要熟練的導演才能發揮威力的「副駕駛」。
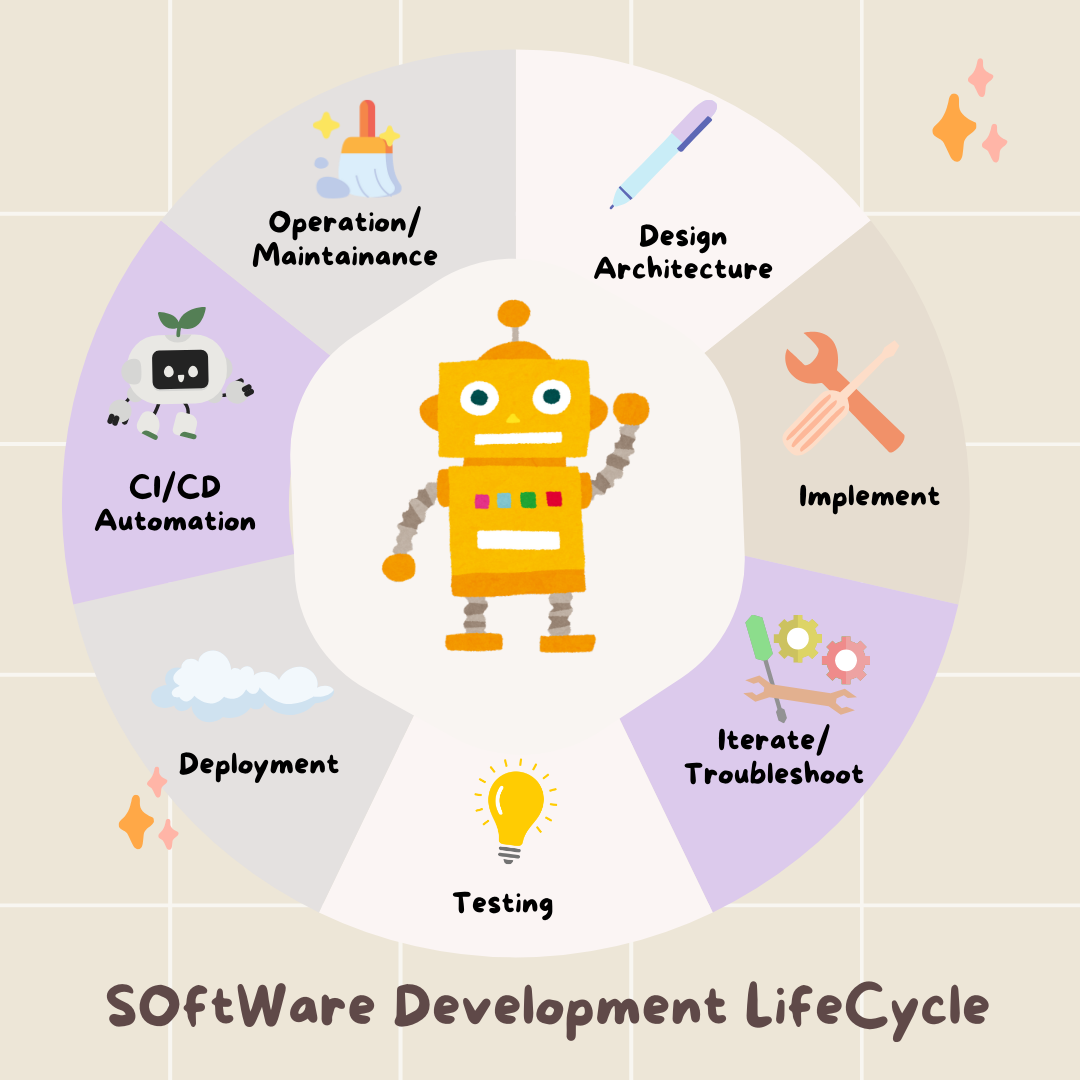
本研討會提供結構化的可重複方法,協助您在專業軟體開發生命週期 (SDLC) 的每個階段與 AI 合作。您將從逐行編寫程式碼的程式設計師,轉變為技術總監,也就是有遠見的架構師,以及運用 AI 精確執行遠見的總承包商。🚀
完成本教學課程後,您將:
- 使用 AI 將高階概念轉換為雲端架構。
- 使用明確的提示生成完整的 Python 後端。
- 使用 AI 擔任程式設計夥伴,偵錯及修正程式碼。
- 將單元測試 (包括模擬) 的建立作業委派給 AI。
- 使用 Terraform 生成可供正式環境使用的基礎架構即程式碼 (IaC)。
- 在 GitHub Actions 中,使用單一提示建立完整的 CI/CD 管道。
- 使用 AI 輔助作業工具監控及管理上線的應用程式。
您不僅能帶回可運作的應用程式,還能獲得 AI 輔助開發的藍圖。我們馬上開始!
2. 事前準備和設定
開始之前,請先準備好環境。這是確保研討會順利進行的重要步驟。
建立新的 GCP 帳戶並連結帳單
如要為 AI 代理程式提供支援,我們需要兩項資源:Google Cloud 專案 (做為基礎) 和 Gemini API 金鑰 (用來存取 Google 強大的模型)。
步驟 1:啟用帳單帳戶
如要執行本程式碼研究室,您需要有具備部分抵免額的帳單帳戶。請使用本程式碼研究室頂端橫幅中的抵免額開始操作。如果已連結帳單帳戶,可以略過這個步驟。
步驟 2:建立新的 GCP 專案
- 前往 Google Cloud 控制台,然後建立新專案。
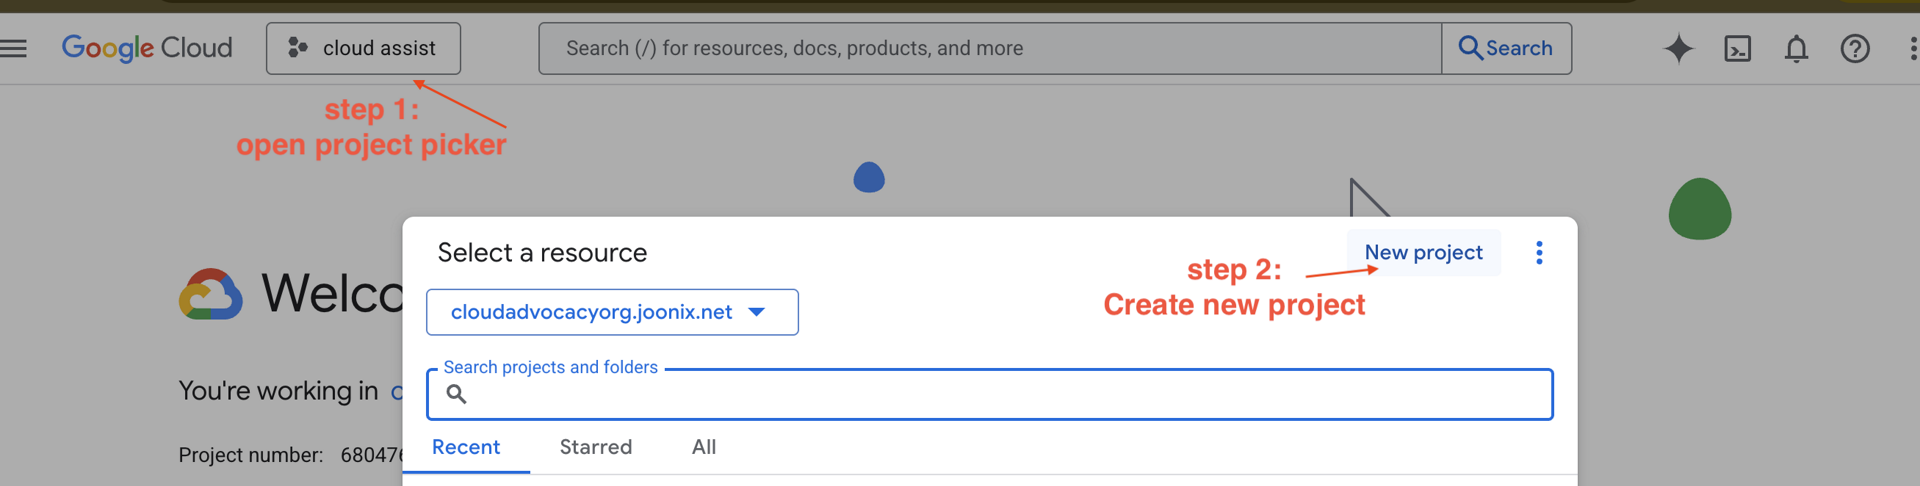
- 開啟左側面板,按一下
Billing,確認帳單帳戶是否已連結至這個 GCP 帳戶。
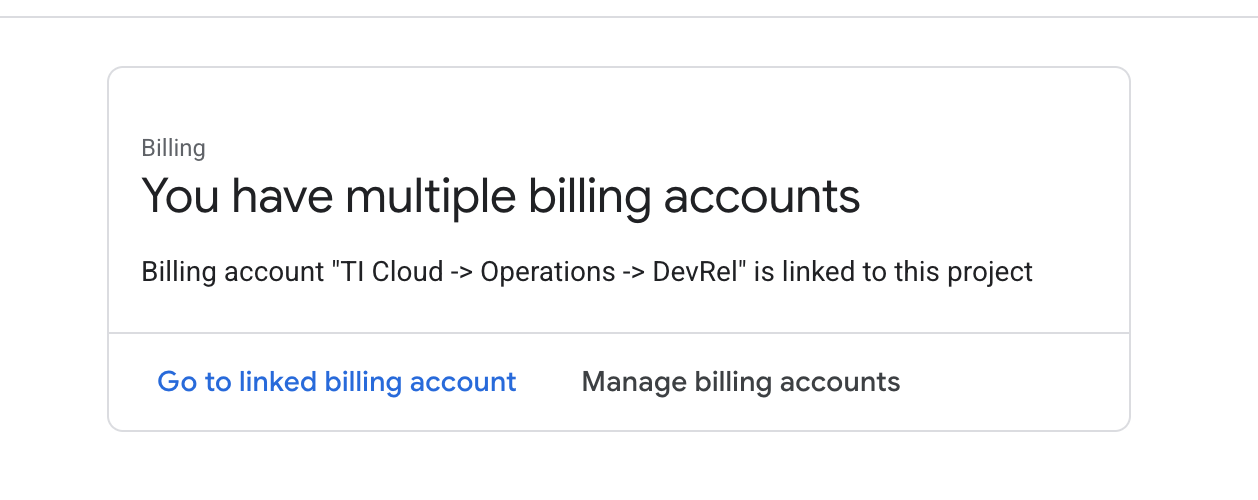
如果看到這個頁面,請檢查 manage billing account,選擇 Google Cloud Trial One 並連結至該頁面。
步驟 3:產生 Gemini API 金鑰
您必須先擁有金鑰,才能保護金鑰。
- 前往 Google AI Studio:https://aistudio.google.com/
- 使用 Gmail 帳戶登入。
- 按一下「取得 API 金鑰」按鈕,通常位於左側導覽窗格或右上角。
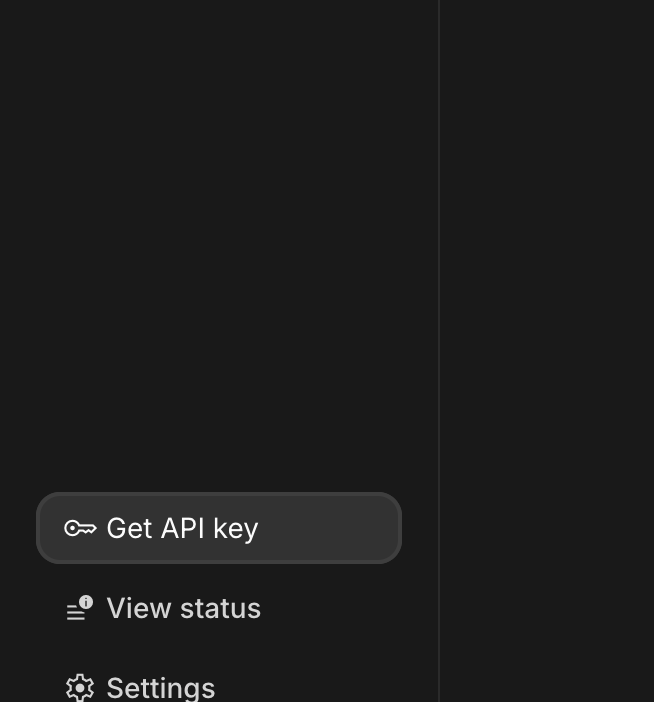
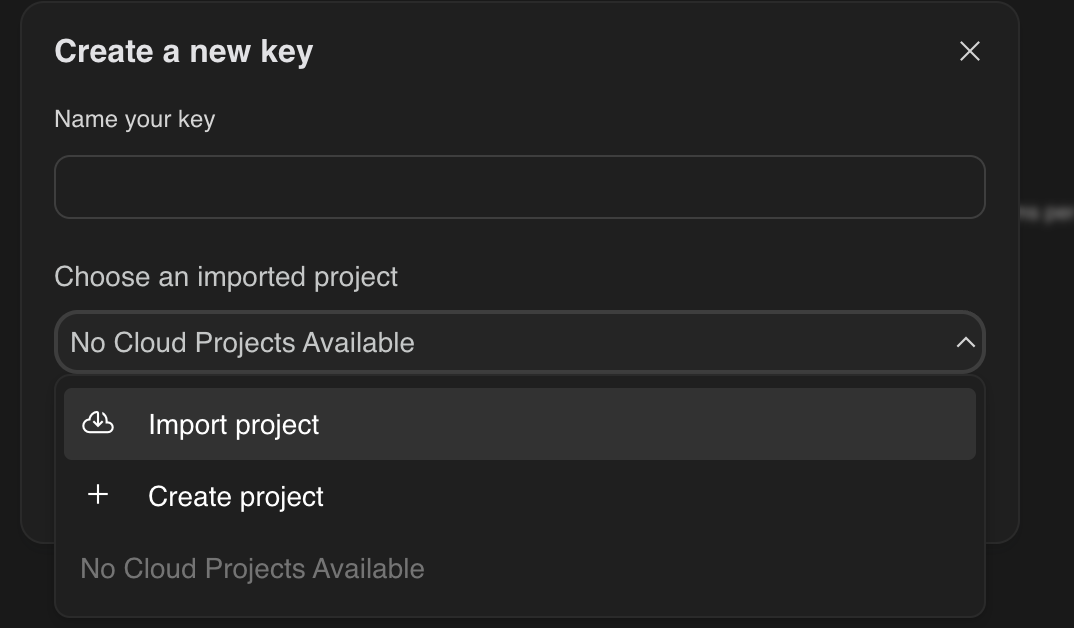
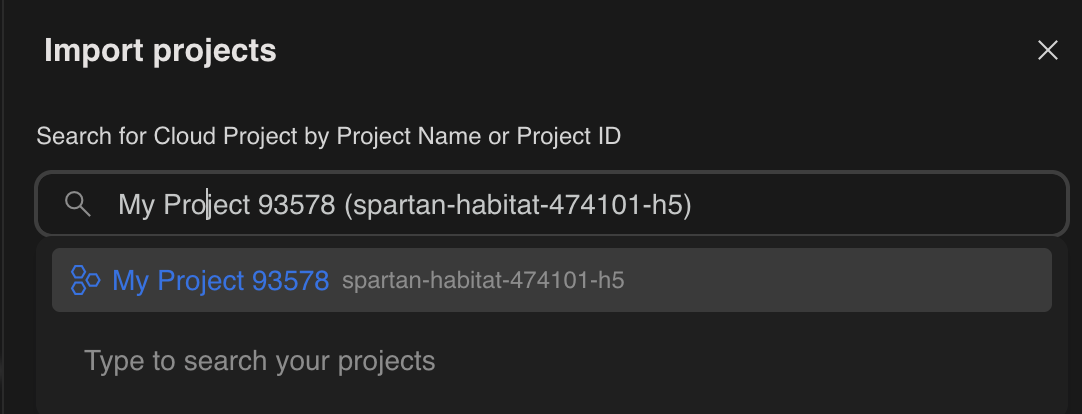
- 在「API 金鑰」對話方塊中,按一下「在新專案中建立 API 金鑰」
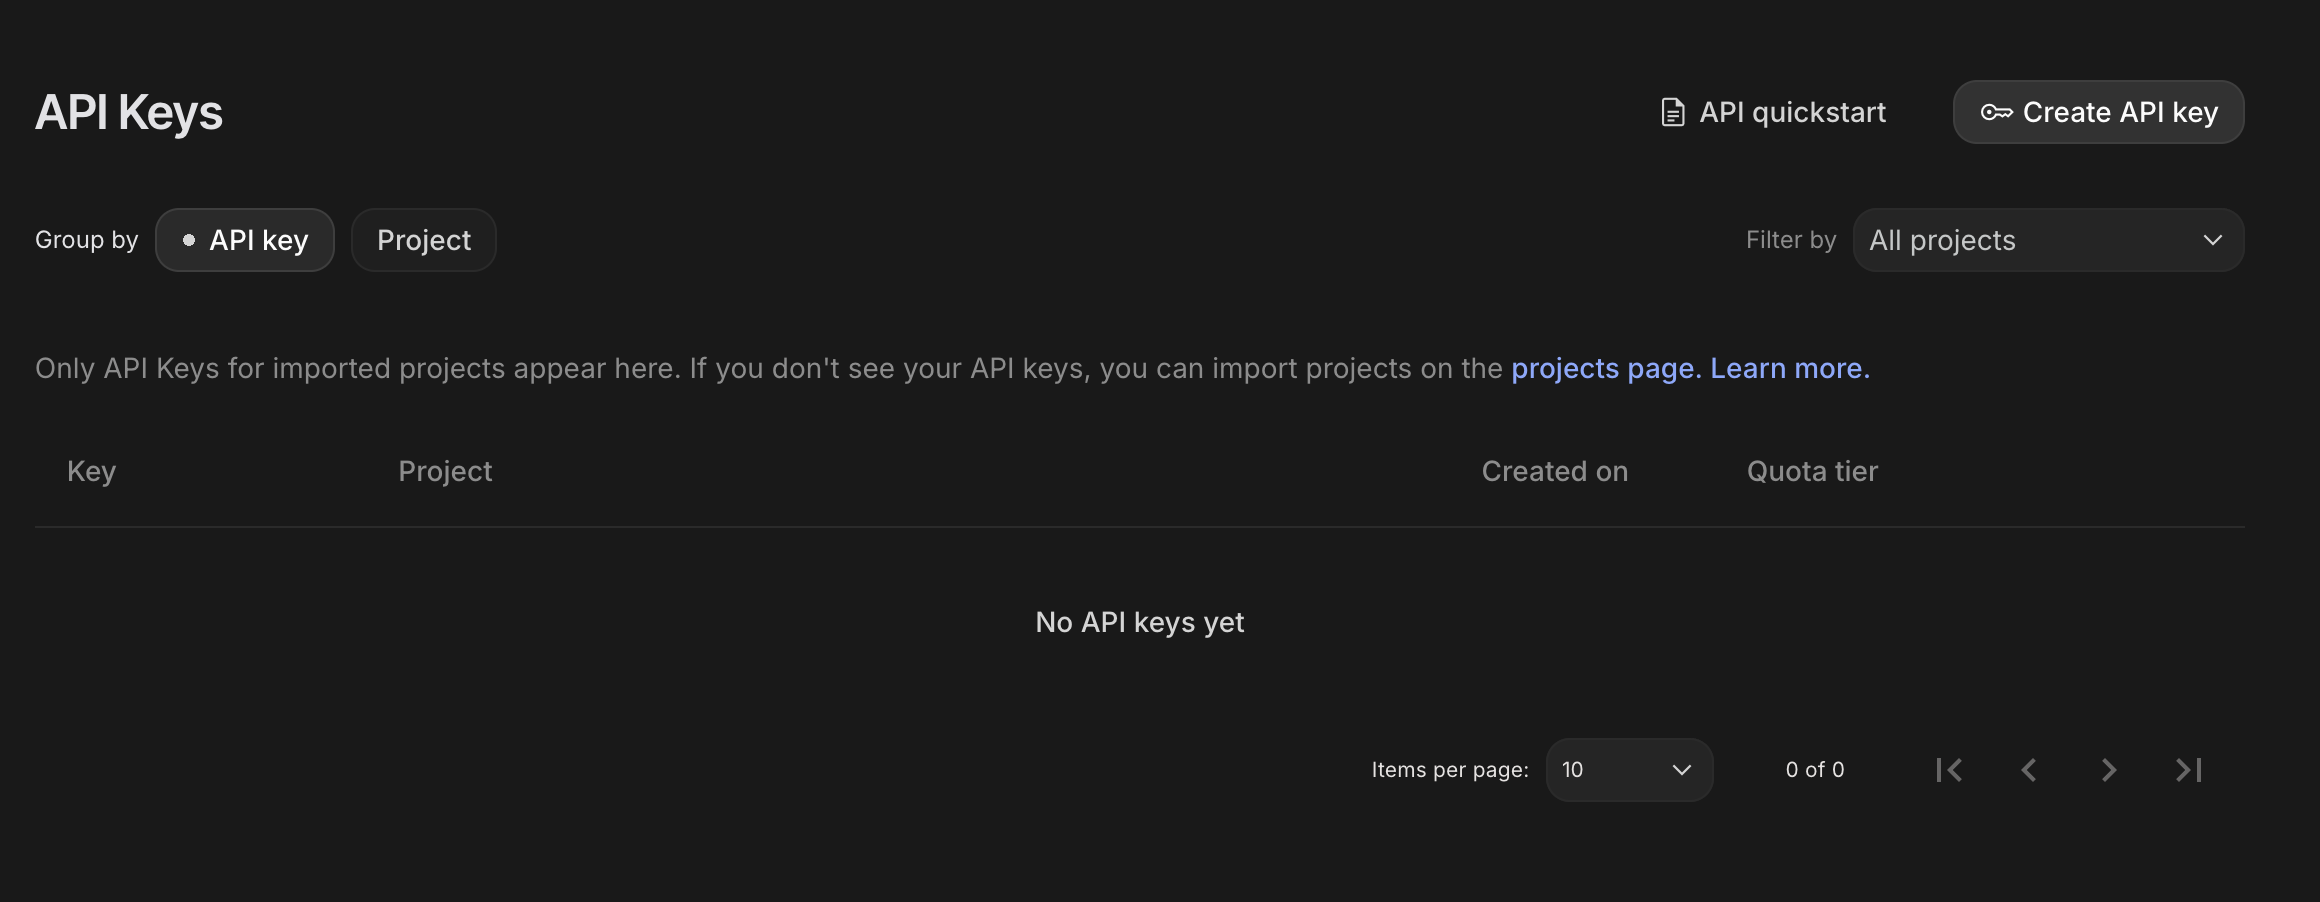 。
。 - 選擇您建立的新專案,並設定帳單帳戶。
- 系統會為您產生新的 API 金鑰。
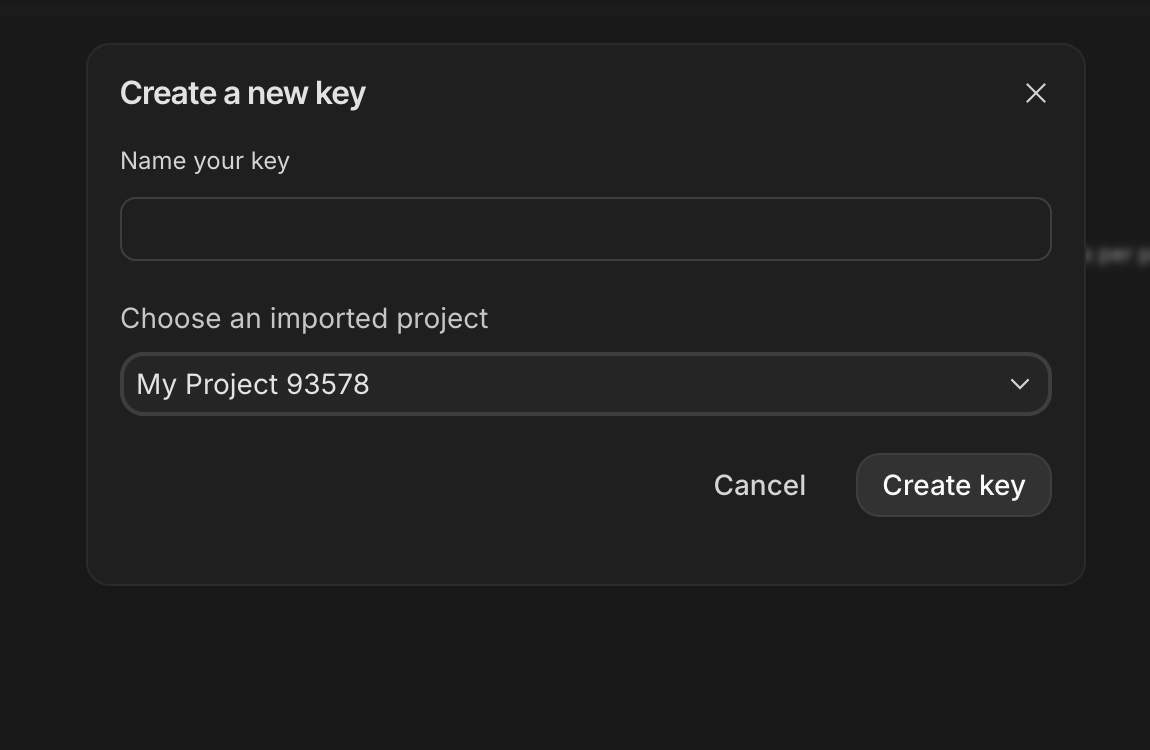
立即複製這組金鑰,並暫時存放在安全的地方 (例如密碼管理工具或安全記事)。您會在後續步驟中使用這個值。
GitHub 驗證
前往 Google Cloud 控制台,然後點選右上角的「啟用 Cloud Shell」按鈕,即可開啟 Cloud Shell。
步驟 1:開啟 Cloud Shell
👉點選 Google Cloud 控制台頂端的「啟用 Cloud Shell」(這是 Cloud Shell 窗格頂端的終端機形狀圖示),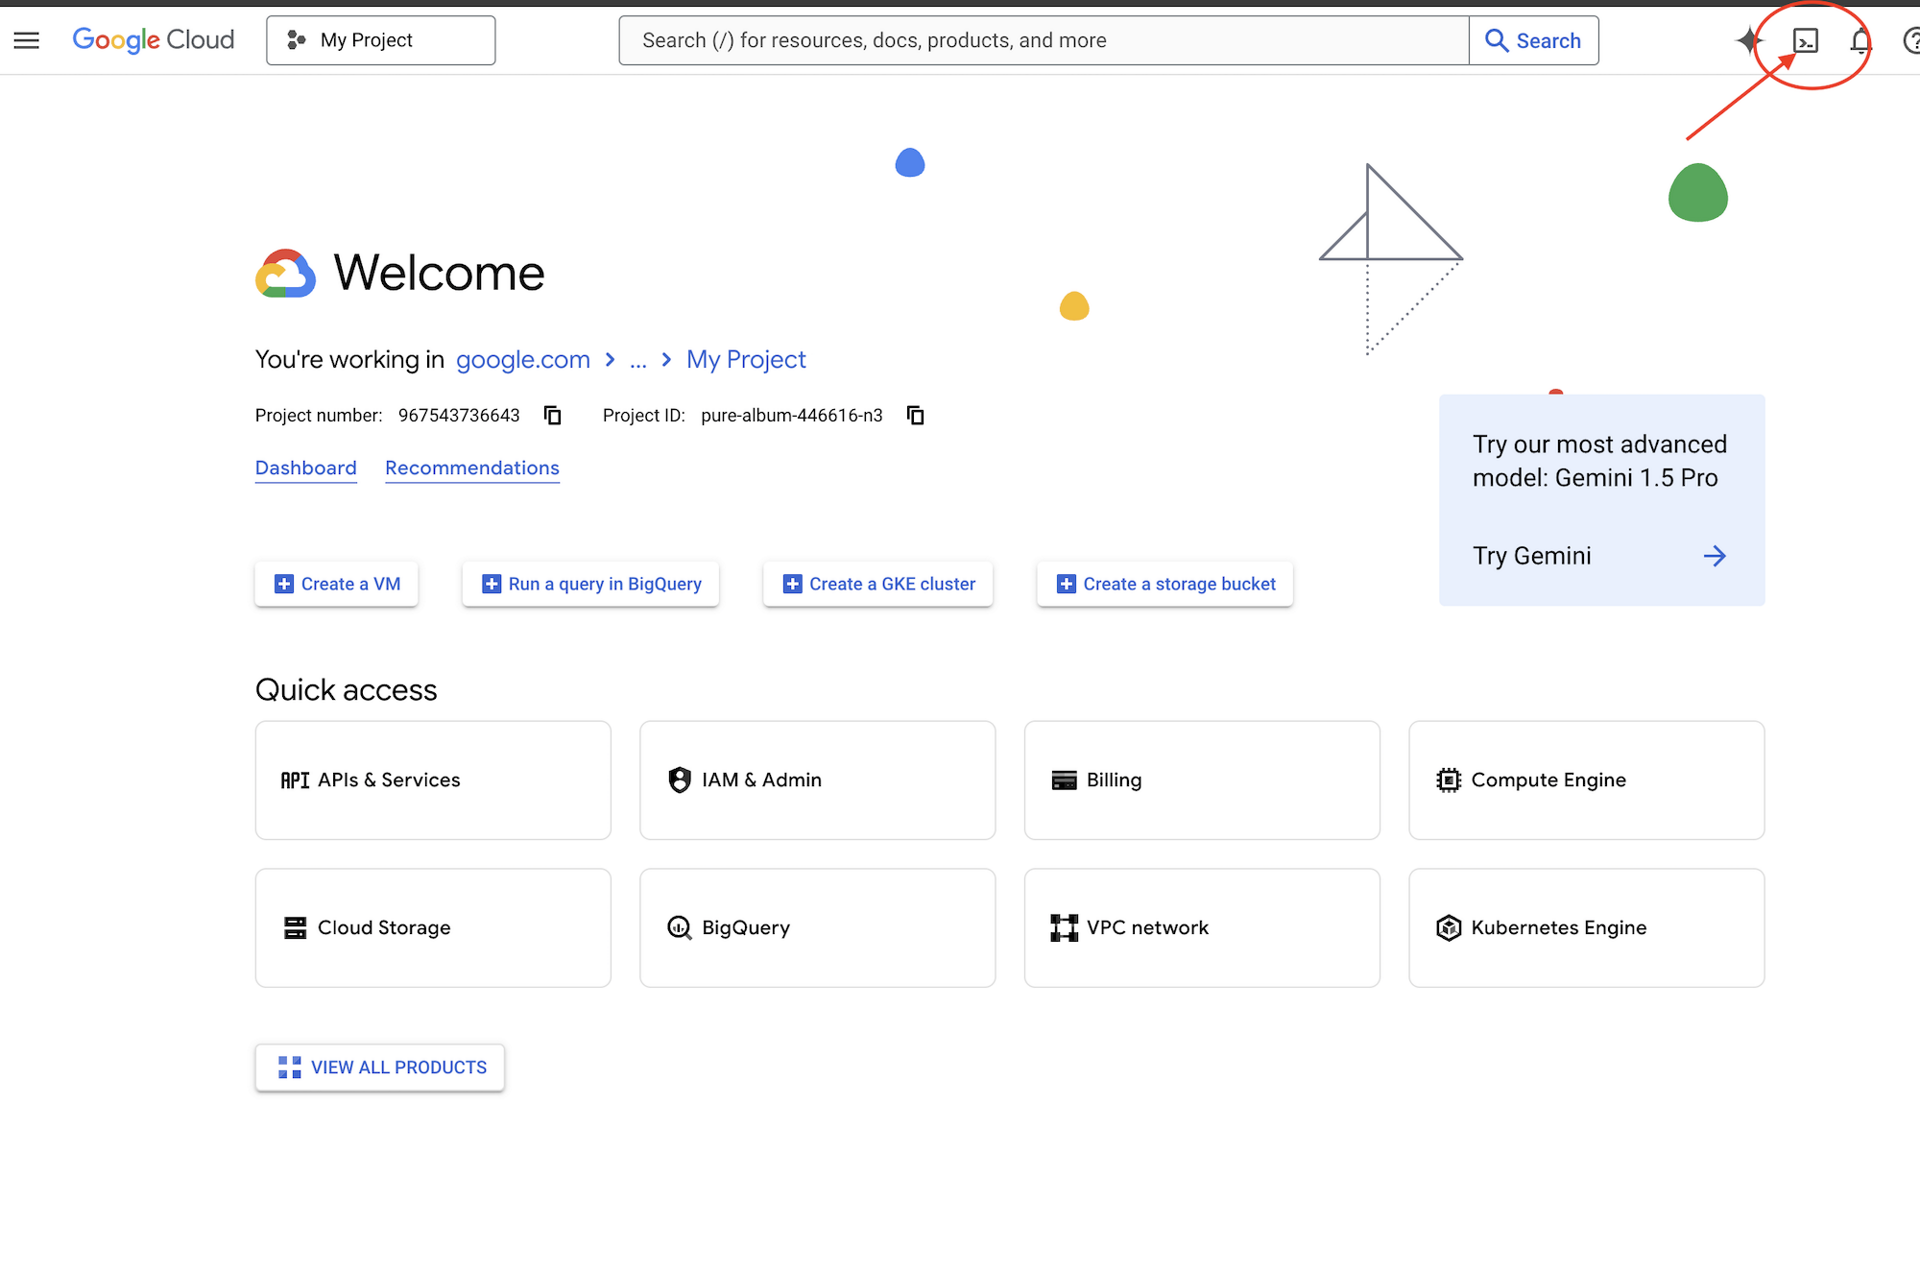
👉按一下「Open Editor」按鈕 (類似於有鉛筆的開啟資料夾)。視窗中會開啟 Cloud Shell 程式碼編輯器。左側會顯示檔案總管。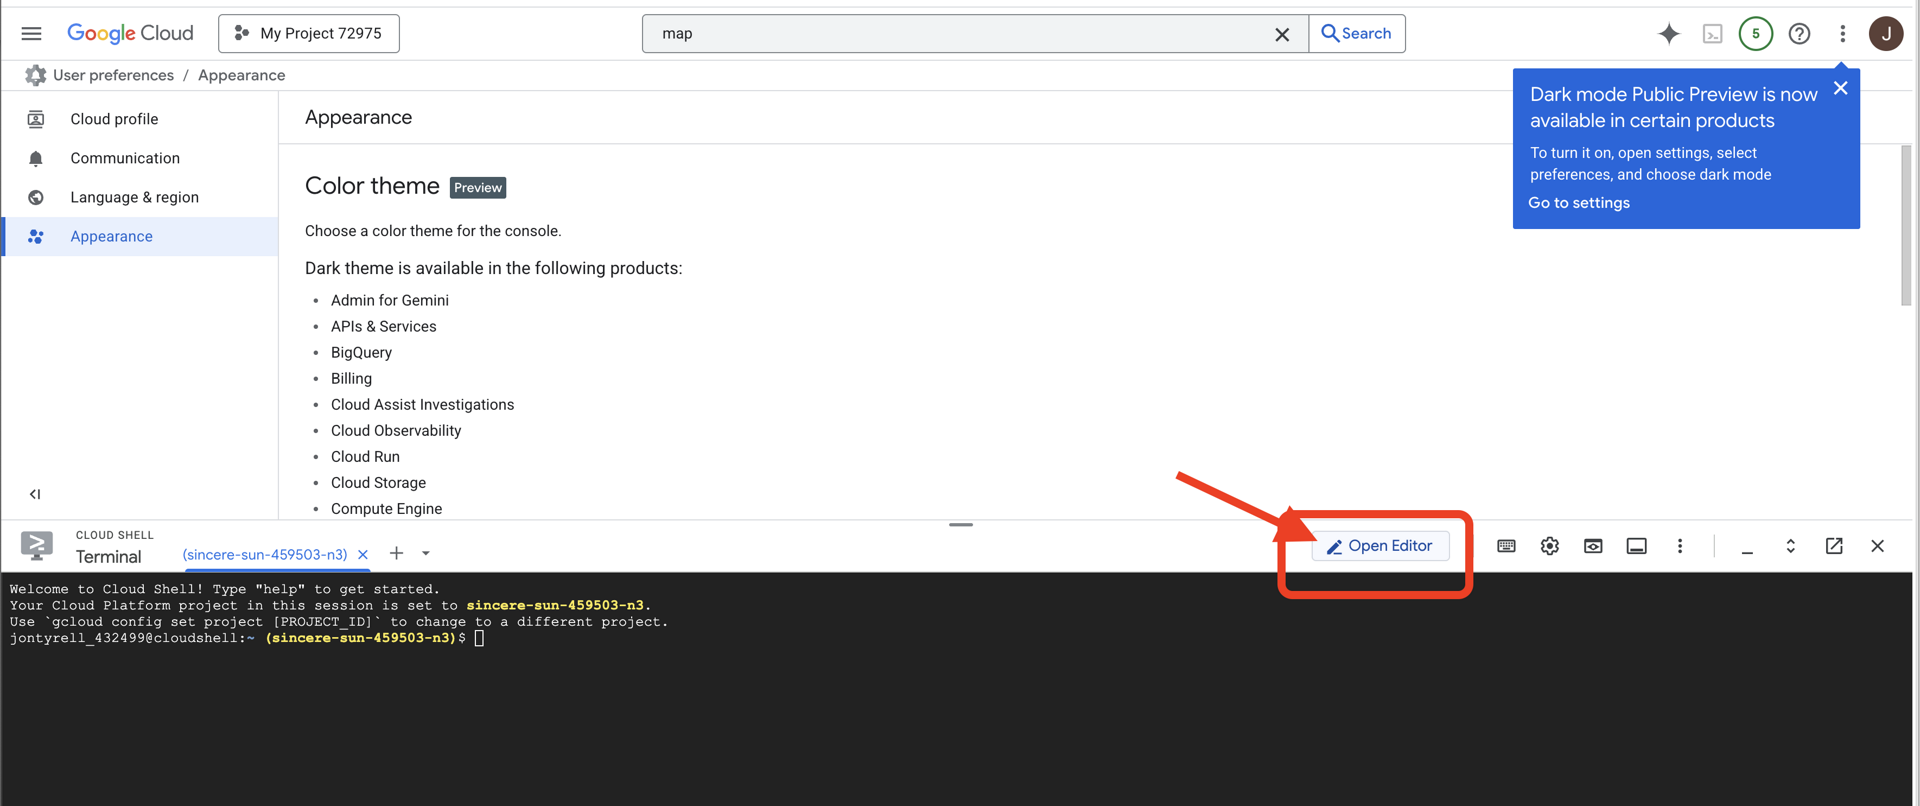
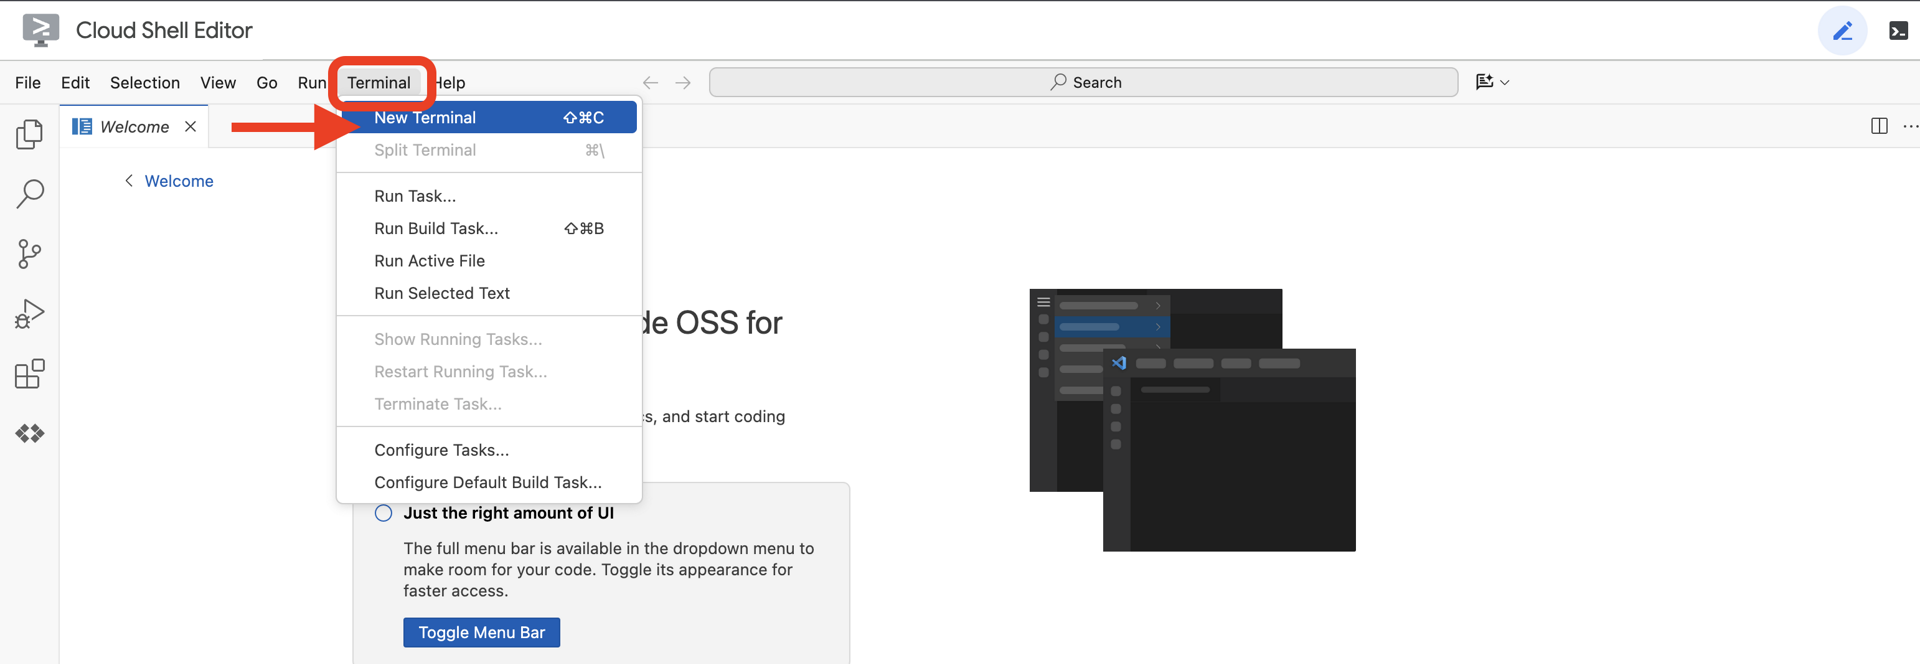
👉開啟編輯器後,在雲端 IDE 中開啟終端機,
👉💻 在終端機中,使用下列指令驗證您是否已通過驗證,以及專案是否已設為您的專案 ID:
gcloud auth list
步驟 2:透過 GitHub 驗證並 Fork
透過 GitHub 進行驗證:
👉💻 將指令複製並貼到雲端終端機:
gh auth login
- 在「Where do you use GitHub」(你在哪裡使用 GitHub) 中,選擇「GitHub.com」
- 「What is you preferred protocol for Git operations on this host?」(您偏好使用哪種通訊協定,在這個主機上執行 Git 作業?),選擇「HTTPS」
- 「Authenticate Git with your GitHub credentials?」(是否要使用 GitHub 憑證驗證 Git?),選擇「Yes」(是)
- 「您要如何驗證 GitHub CLI?」選擇「透過網路瀏覽器登入」
重要事項:請勿按下「Enter」鍵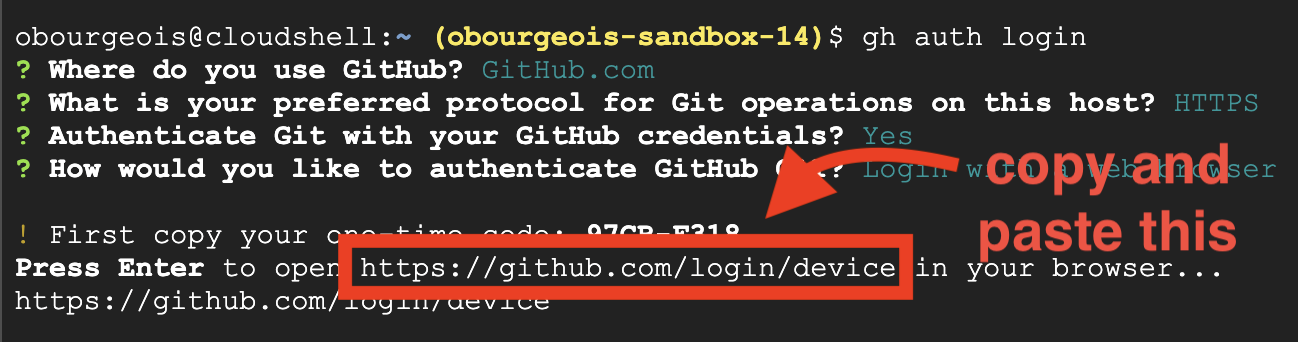
從終端機複製驗證碼,然後貼到登入驗證頁面

輸入完畢後,返回 Cloud Shell 終端機,按下 Enter 鍵繼續操作。

步驟 4:分叉及複製存放區:
👉💻 將指令複製並貼到雲端終端機:
gh repo fork cuppibla/storygen-learning --clone=true
3. 架構:從構想變成藍圖 (Cloud Assist)
每個偉大的專案都始於明確的願景。我們將使用 AI 副駕駛 Cloud Assist 設計應用程式架構。
動作
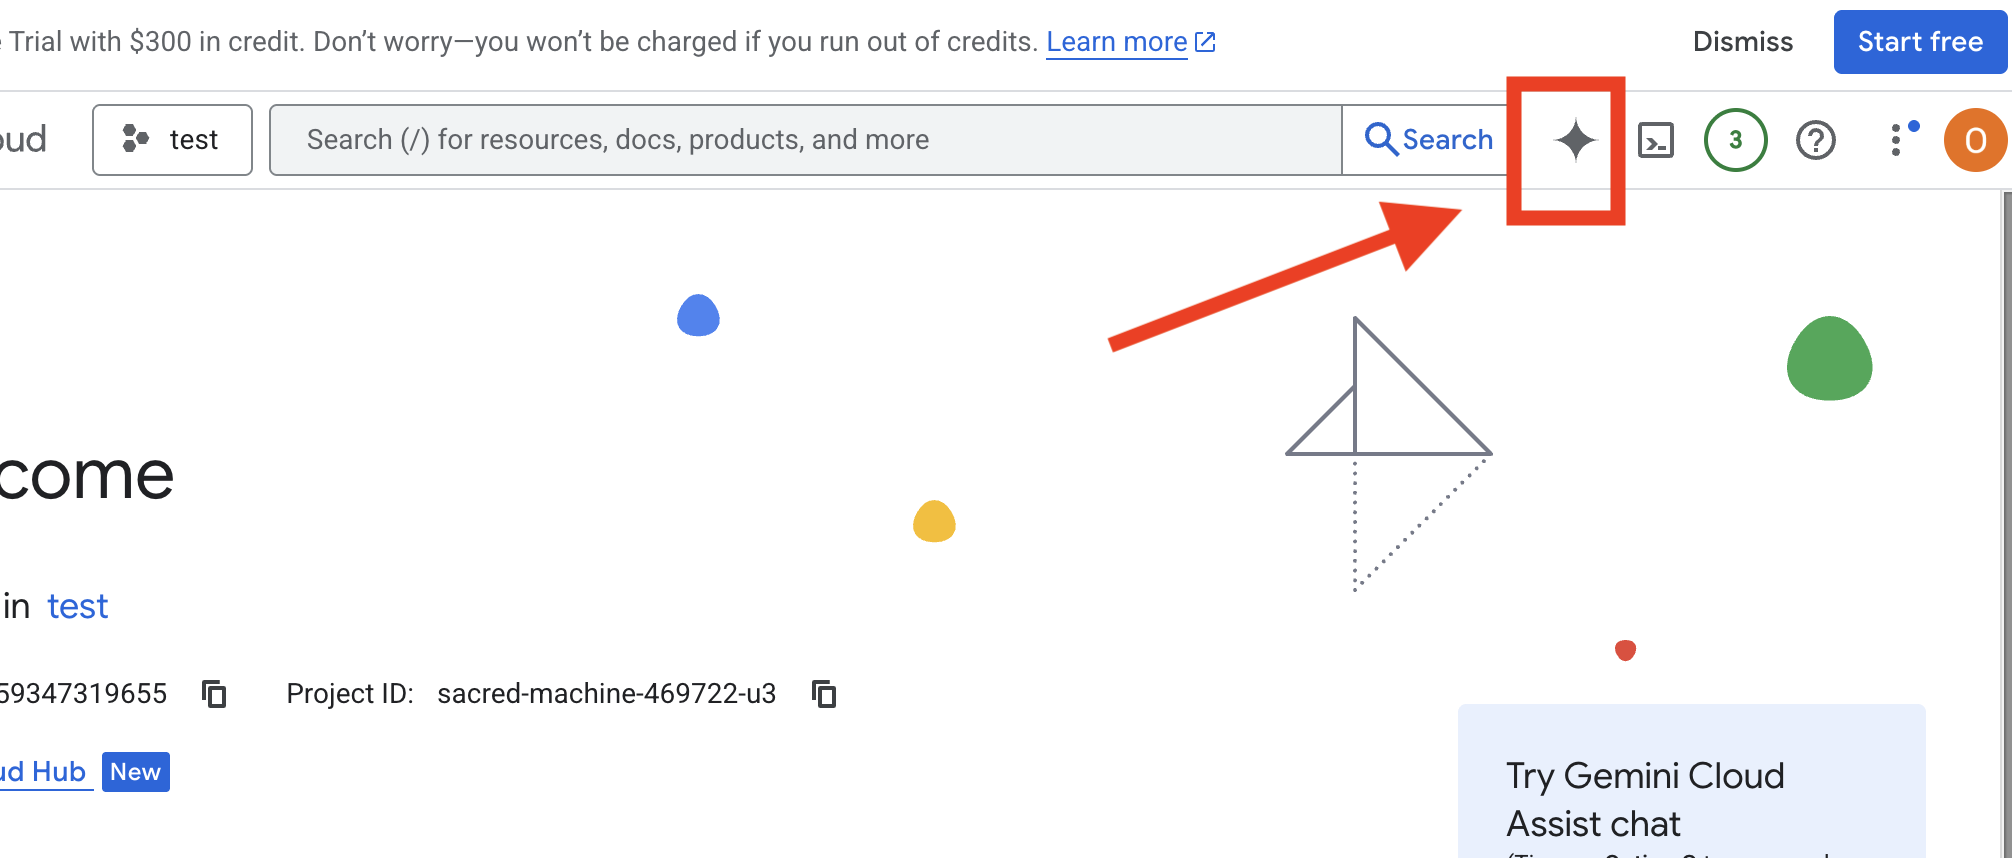
- 開啟 Google Cloud 控制台:[https://console.cloud.google.com](Google Cloud 控制台)
- 按一下右上角的「開啟 Cloud Assist Chat」
啟用 Cloud Assist
- 依序點選
Get Gemini Assist和Enable Cloud Assist at no cost。 - 開始聊天!
 向 Cloud Assist 提供下列詳細提示:
輸入想法
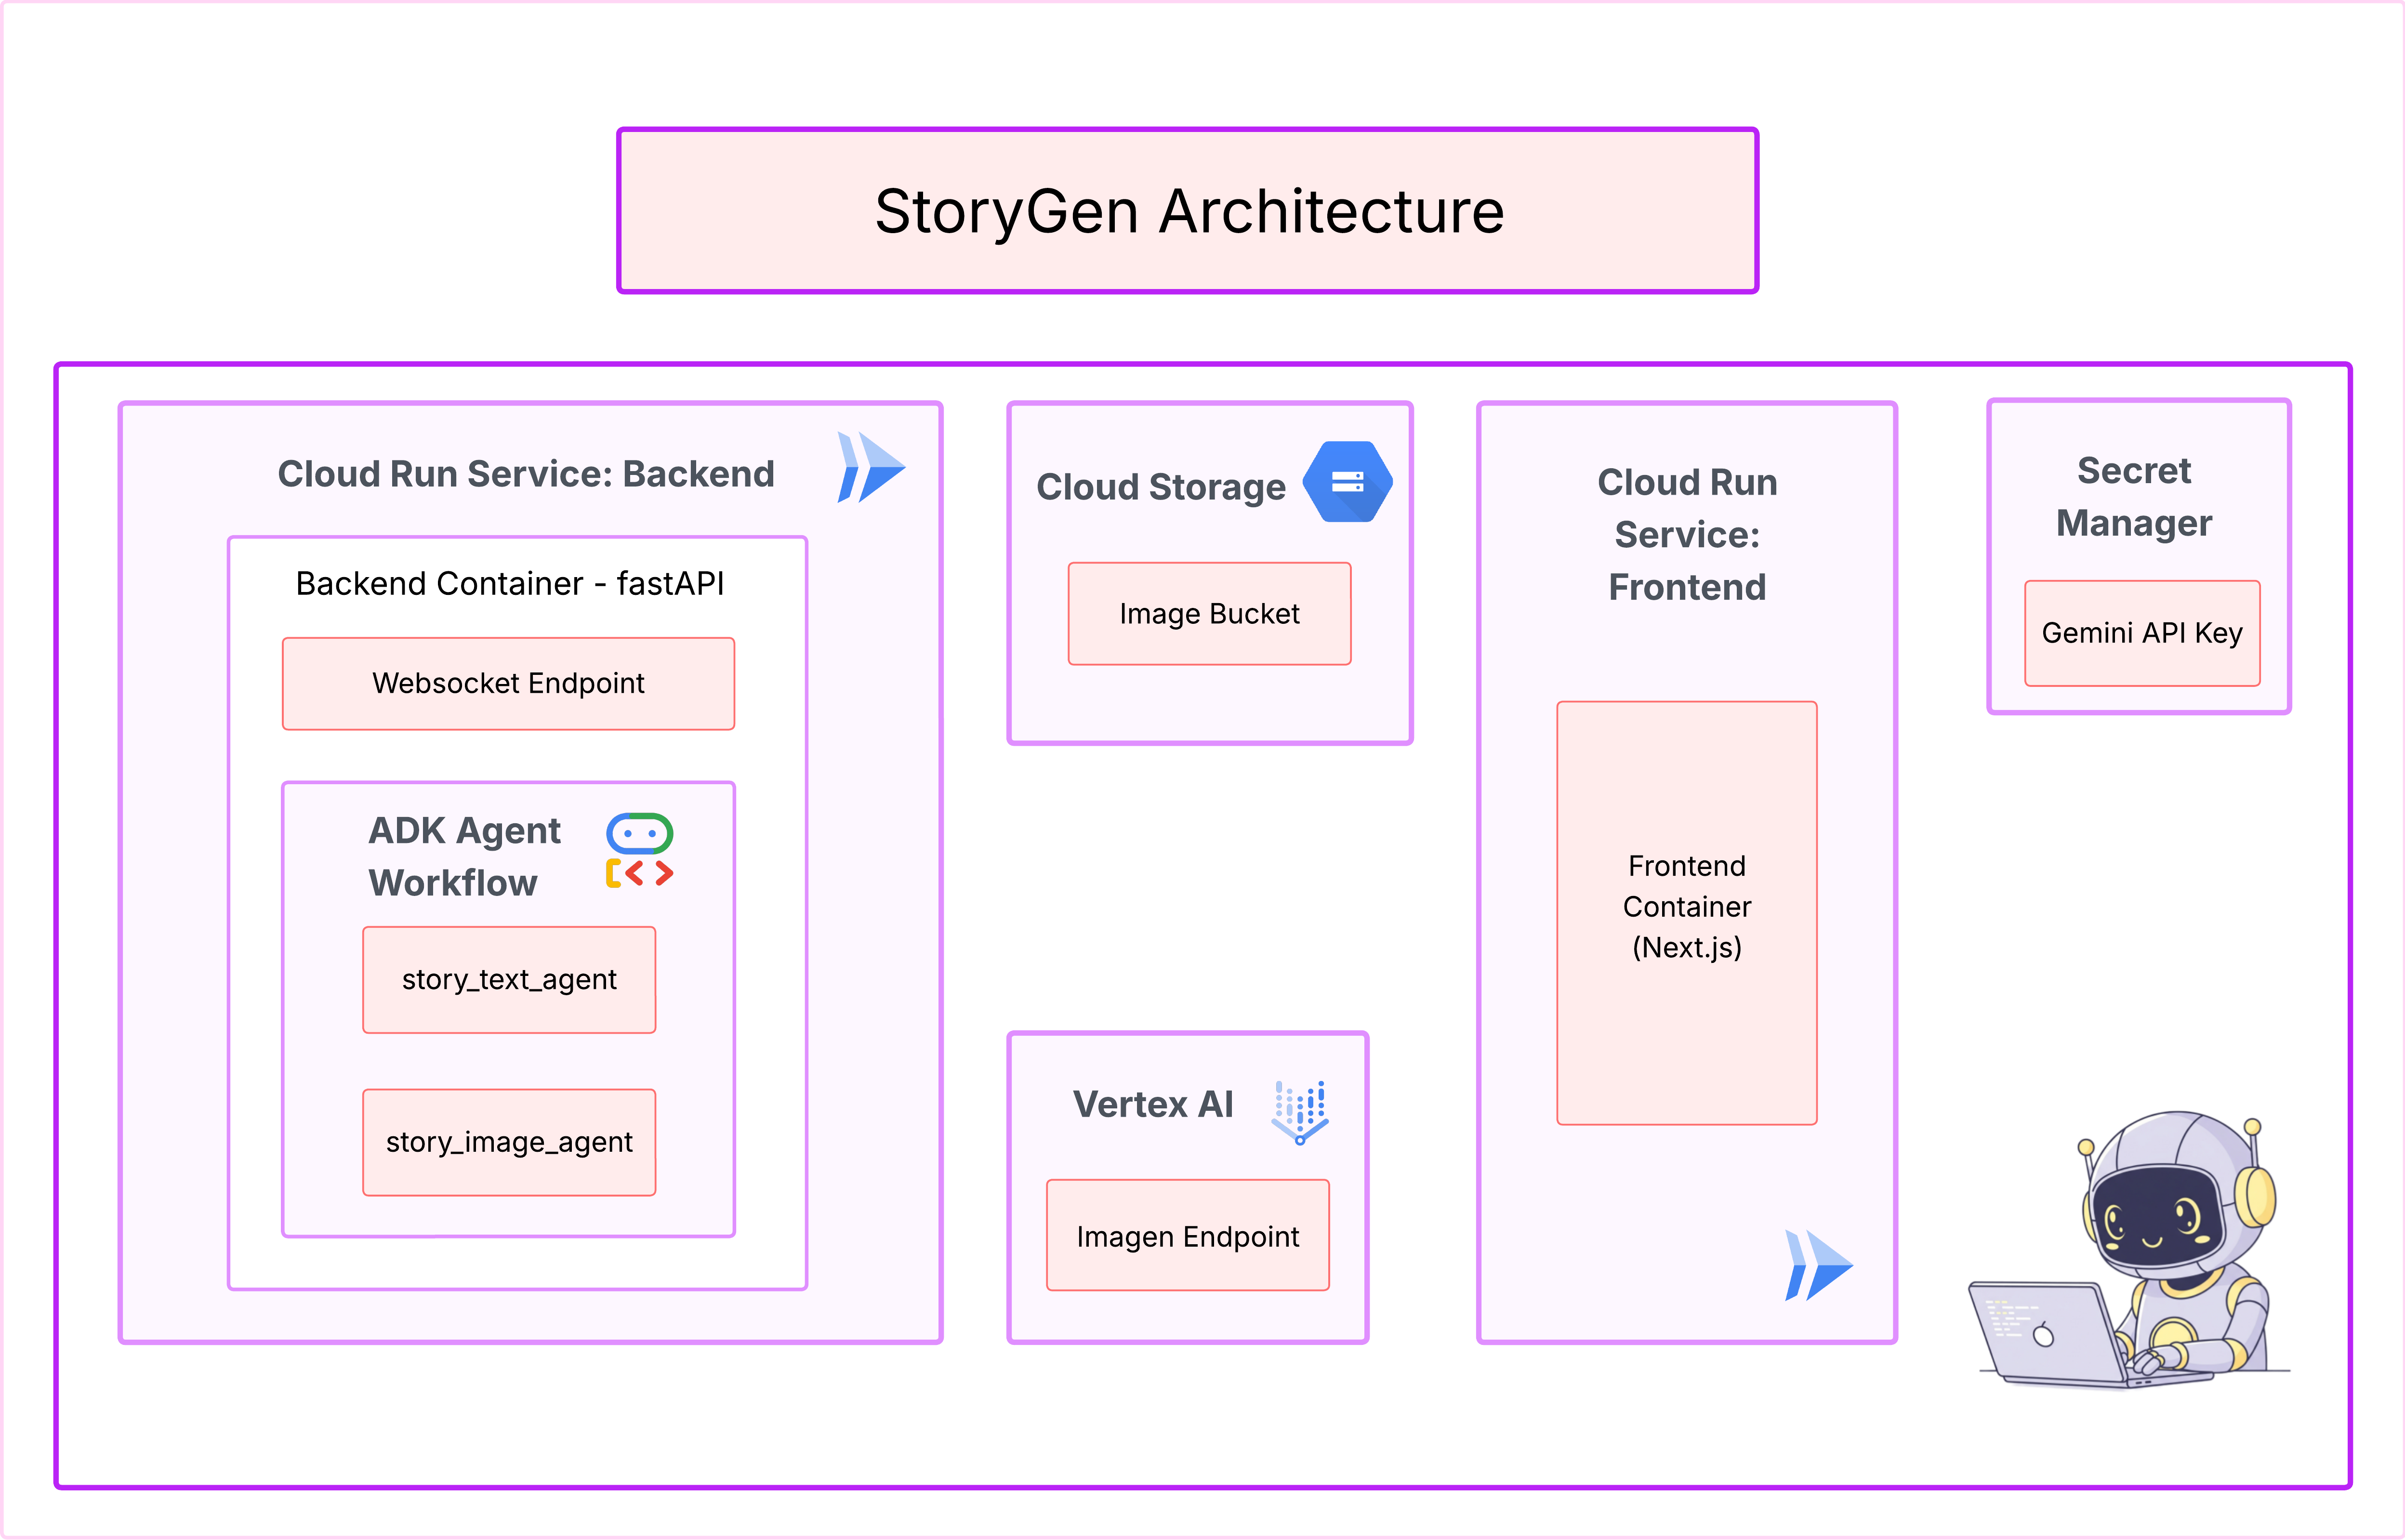
Generate a Python web application that uses AI to generate children's stories and illustrations. It has Python backend and React frontend host separately on Cloudrun. They communicate through Websocket. It needs to use a generative model for text and another for images. The generated images must be used by Imagen from Vertex AI and stored in a Google Cloud Storage bucket so that frontend can fetch from the bucket to render images. I do not want any load balancer or a database for the story text. We need a solution to store the API key.
取得應用程式藍圖
- 按一下「編輯應用程式設計」,您會看到圖表。按一下右上方面板的「<> 取得程式碼」,即可下載 Terraform 程式碼。
- Cloud Assist 會生成架構圖。這是我們的視覺藍圖。

您無須對此代碼採取任何行動。詳情請參閱下文
瞭解產生的 Terraform 程式碼。您剛收到 Cloud Assist 傳送的一組完整 Terraform 檔案。目前不需要對這段程式碼採取任何行動,但我們先快速瞭解這段程式碼的用途,以及為何如此強大。
What is Terraform? (什麼是 Terraform?) Terraform 是基礎架構即程式碼 (IaC) 工具,您可以將其視為以程式碼編寫的雲端環境藍圖。您不必手動點選 Google Cloud 控制台來建立服務、儲存空間和權限,而是要在這些設定檔中定義所有資源。然後 Terraform 會讀取藍圖,並自動為您建構完全相同的環境。
從視覺化計畫到可執行的程式碼。Cloud Assist 提供的架構圖就是您的視覺化計畫。Terraform 程式碼是該計畫的機器可讀版本。這是將設計概念轉化為可重現的自動化現實的關鍵環節。以程式碼定義基礎架構,可達到下列目的:
- 自動建立:反覆建構相同的環境。
- 使用版本管控:在 Git 中追蹤基礎架構的變更,就像追蹤應用程式程式碼一樣。
- 避免錯誤:避免透過網頁介面點選時可能發生的手動錯誤。
在本研討會中,您不需要自行執行這段 Terraform 程式碼。您可以將其視為專業藍圖,也就是您在後續步驟中建構及部署基礎架構的「答案」。
4. 開發:Gemini CLI 簡介
👉💻 在 Cloud Shell 終端機中,前往個人目錄。
cd ~/storygen-learning
👉💻 首次試用 Gemini。
clear
gemini --model=gemini-2.5-flash
如果系統詢問 Do you want to connect Cloud Shell editor to Gemini CLI?,請選擇「否」。
👉✨ 每個 Gemini 工具都有說明。立即閱讀。在 Gemini 提示詞中輸入:
在 Gemini CLI 中
/help
👉✨ Gemini CLI 具備一組內建功能。如要檢查這些項目,請按照下列步驟操作:
在 Gemini CLI 中
/tools
清單會顯示 ReadFile、WriteFile 和 GoogleSearch 等項目。這些是預設技術,您可直接呼叫,不必從外部工具庫中提取。
👉✨ Gemini Blade 可掌握「戰術意識」(脈絡),引導後續動作。
在 Gemini CLI 中
/memory show
目前為空白。
👉✨ 首先,將角色新增至服務專員的記憶體。這會定義其專業領域:
在 Gemini CLI 中
/memory add "I am master at python development"
再次執行 /memory show,確認刀鋒伺服器已吸收這項知識。
👉✨ 為示範如何使用 @ 符號參照檔案,我們先建立「任務簡報」檔案。
開啟新的終端機,然後執行下列指令來建立任務檔案:
!echo "## Mission Objective: Create Imagen ADK Agent for Story Book" > mission.md
👉✨現在,請使用 Gemini CLI 分析簡報並回報結果:
在 Gemini CLI 中
Explain the contents of the file @mission.md
主武器現在知道自己的目標。
👉💻 按兩次 Ctrl+C 即可退出 Gemini CLI
學習內容:
Gemini CLI 的超能力來源:gemini.md 在繼續之前,請務必瞭解如何為特定專案量身打造 Gemini CLI。雖然你可以將其做為一般用途的聊天工具,但真正的強大之處在於特殊的設定檔:gemini.md。
執行 gemini 指令時,系統會自動在目前目錄中尋找 gemini.md 檔案。這個檔案就像是 AI 的專案專屬說明手冊,這項服務可定義三項重要事項:
- 人物角色:您可以告訴 AI 該角色應有的特質。例如:「您是專精於 Google Cloud 的資深 Python 開發人員。」這會決定回覆的重點和風格。
- 工具:你可以授予存取特定檔案 (@file.py) 甚至 Google 搜尋 (@google) 的權限。讓 AI 瞭解專案程式碼的背景資訊,以便回答相關問題。
- 記憶體:您可以提供 AI 應時時記住的事實或規則,有助於維持一致性。
使用 gemini.md 檔案,將一般 Gemini 模型變成專門的助理,事先瞭解專案目標並存取正確資訊。
5. 開發:使用 Gemini CLI 建構 ADK
環境設定
前往 Cloud Shell,然後按一下「Open Terminal」(開啟終端機) 按鈕。
- 複製環境範本:
cd ~/storygen-learning
cp ~/storygen-learning/env.template ~/storygen-learning/.env
在編輯器中查看隱藏檔案 (如果找不到 .env)
- 按一下頂端選單列的「查看」。
- 選取「Toggle Hidden Files」。
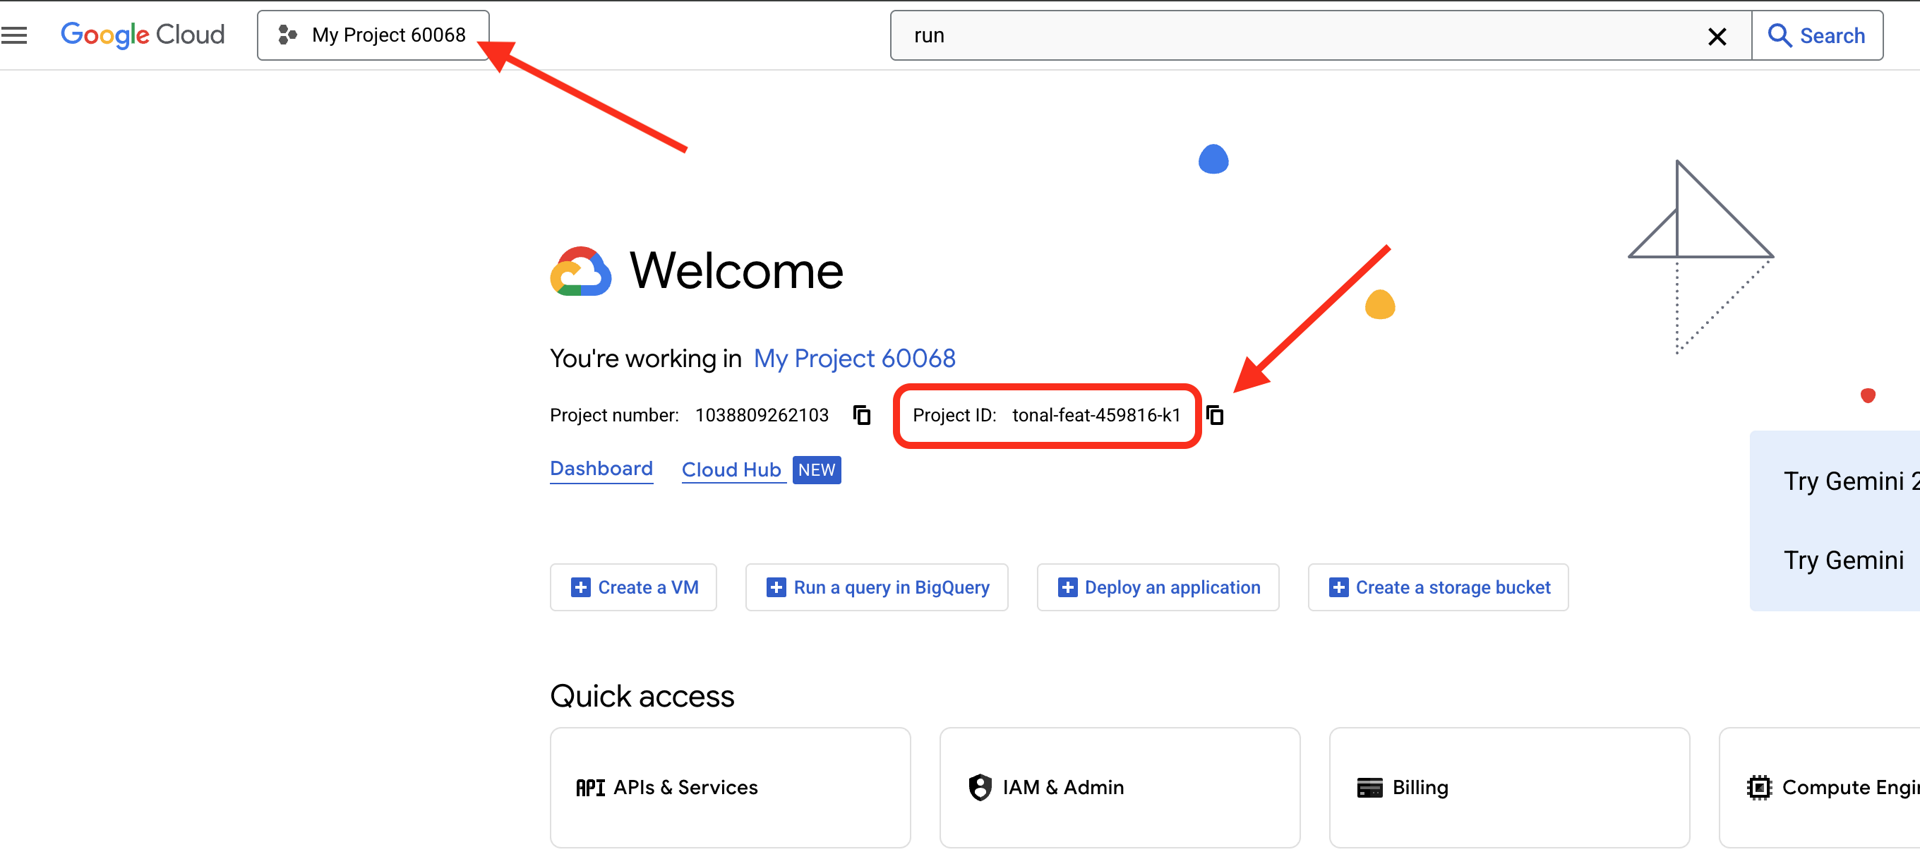
👉找出 Google Cloud 專案 ID:
- 開啟 Google Cloud 控制台:連結
- 從頁面頂端的專案下拉式選單中,選取要用於本研討會的專案。
- 專案 ID 會顯示在資訊主頁的「專案資訊」資訊卡中
👉找出 GitHub 使用者名稱:
- 前往 GitHub 並找出 GitHub 使用者名稱
編輯 .env 檔案 2. 在 .env 中替換下列值:
GOOGLE_API_KEY=[REPLACE YOUR API KEY HERE]
GOOGLE_CLOUD_PROJECT_ID=[REPLACE YOUR PROJECT ID]
GITHUB_USERNAME=[REPLACE YOUR USERNAME]
GENMEDIA_BUCKET=[REPLACE YOUR PROJECT ID]-bucket
例如,如果專案 ID 為 testproject,則應輸入 GOOGLE_CLOUD_PROJECT_ID=testproject 和 GENMEDIA_BUCKET=testproject-bucket
設定指令碼
前往 00_Starting_Here 開啟新的終端機 (不是 Gemini CLI)
cd ~/storygen-learning/00_Starting_Here
執行完整設定:
./setup-complete.sh
終端機應會顯示設定結果
建立第一個代理程式
前往 01a_First_Agent_Ready,使用 Gemini CLI 建立 ADK 代理:**
cd ~/storygen-learning/01a_First_Agent_Ready
開啟 Gemini CLI
gemini
在 Gemini CLI 視窗中,嘗試下列提示:
I need you to help me create a Google ADK (Agent Development Kit) agent for story generation. I'm working on a children's storybook app that generates creative stories with visual scenes.

Please create a complete `agent.py` file that implements an LlmAgent using Google's ADK framework. The agent should:

**Requirements:**
1. Use the `google.adk.agents.LlmAgent` class
2. Use the "gemini-2.5-flash" model (supports streaming)
3. Be named "story_agent"
4. Generate structured stories with exactly 4 scenes each
5. Output valid JSON with story text, main characters, and scene data
6. No tools needed (images are handled separately)

**Agent Specifications:**
- **Model:** gemini-2.5-flash
- **Name:** story_agent
- **Description:** "Generates creative short stories and accompanying visual keyframes based on user-provided keywords and themes."
**Story Structure Required:**
- Exactly 4 scenes: Setup → Inciting Incident → Climax → Resolution
- 100-200 words total
- Simple, charming language for all audiences
- Natural keyword integration
**JSON Output Format:**

{
  "story": "Complete story text...",
  "main_characters": [
    {
      "name": "Character Name",
      "description": "VERY detailed visual description with specific colors, features, size, etc."
    }
  ],
  "scenes": [
    {
      "index": 1,
      "title": "The Setup",
      "description": "Scene action and setting WITHOUT character descriptions",
      "text": "Story text for this scene"
    }
    // ... 3 more scenes
  ]
}


**Key Instructions for the Agent:**
- Extract 1-2 main characters maximum
- Character descriptions should be extremely detailed and visual
- Scene descriptions focus on ACTION and SETTING only
- Do NOT repeat character appearance in scene descriptions
- Always respond with valid JSON

Please include a complete example in the instructions showing the exact format using keywords like "tiny robot", "lost kitten", "rainy city".

The file should start with necessary imports, define an empty tools list, include a print statement for initialization, and then create the LlmAgent with all the detailed instructions.

Can you create this agent in backend/story_agent/agent.py
完成後,請使用 Control+C 關閉 Gemini CLI 終端機。
—————————————— 選用,您可以略過「解決方案」部分——————————————–
現在請在 ADK Web 中驗證變更
cd ~/storygen-learning/01a_First_Agent_Ready/backend

source ../../.venv/bin/activate

adk web --port 8080
如要繼續,請開啟命令提示字元。
啟動網站
cd ~/storygen-learning/01a_First_Agent_Ready

./start.sh
如果變更無效,您應該會在 ADK 網頁使用者介面和網站中看到錯誤。
—————————————— 解決方案從這裡開始 ——————————————
解決方案
使用 Control+C 結束先前的程序,或開啟另一個終端機:
cd ~/storygen-learning/01b_First_Agent_Done
啟動網站:
./start.sh
您會看到網站:
試用 ADK 使用者介面:開啟另一個終端機:
cd ~/storygen-learning/01b_First_Agent_Done/backend
source ../../.venv/bin/activate

adk web --port 8080
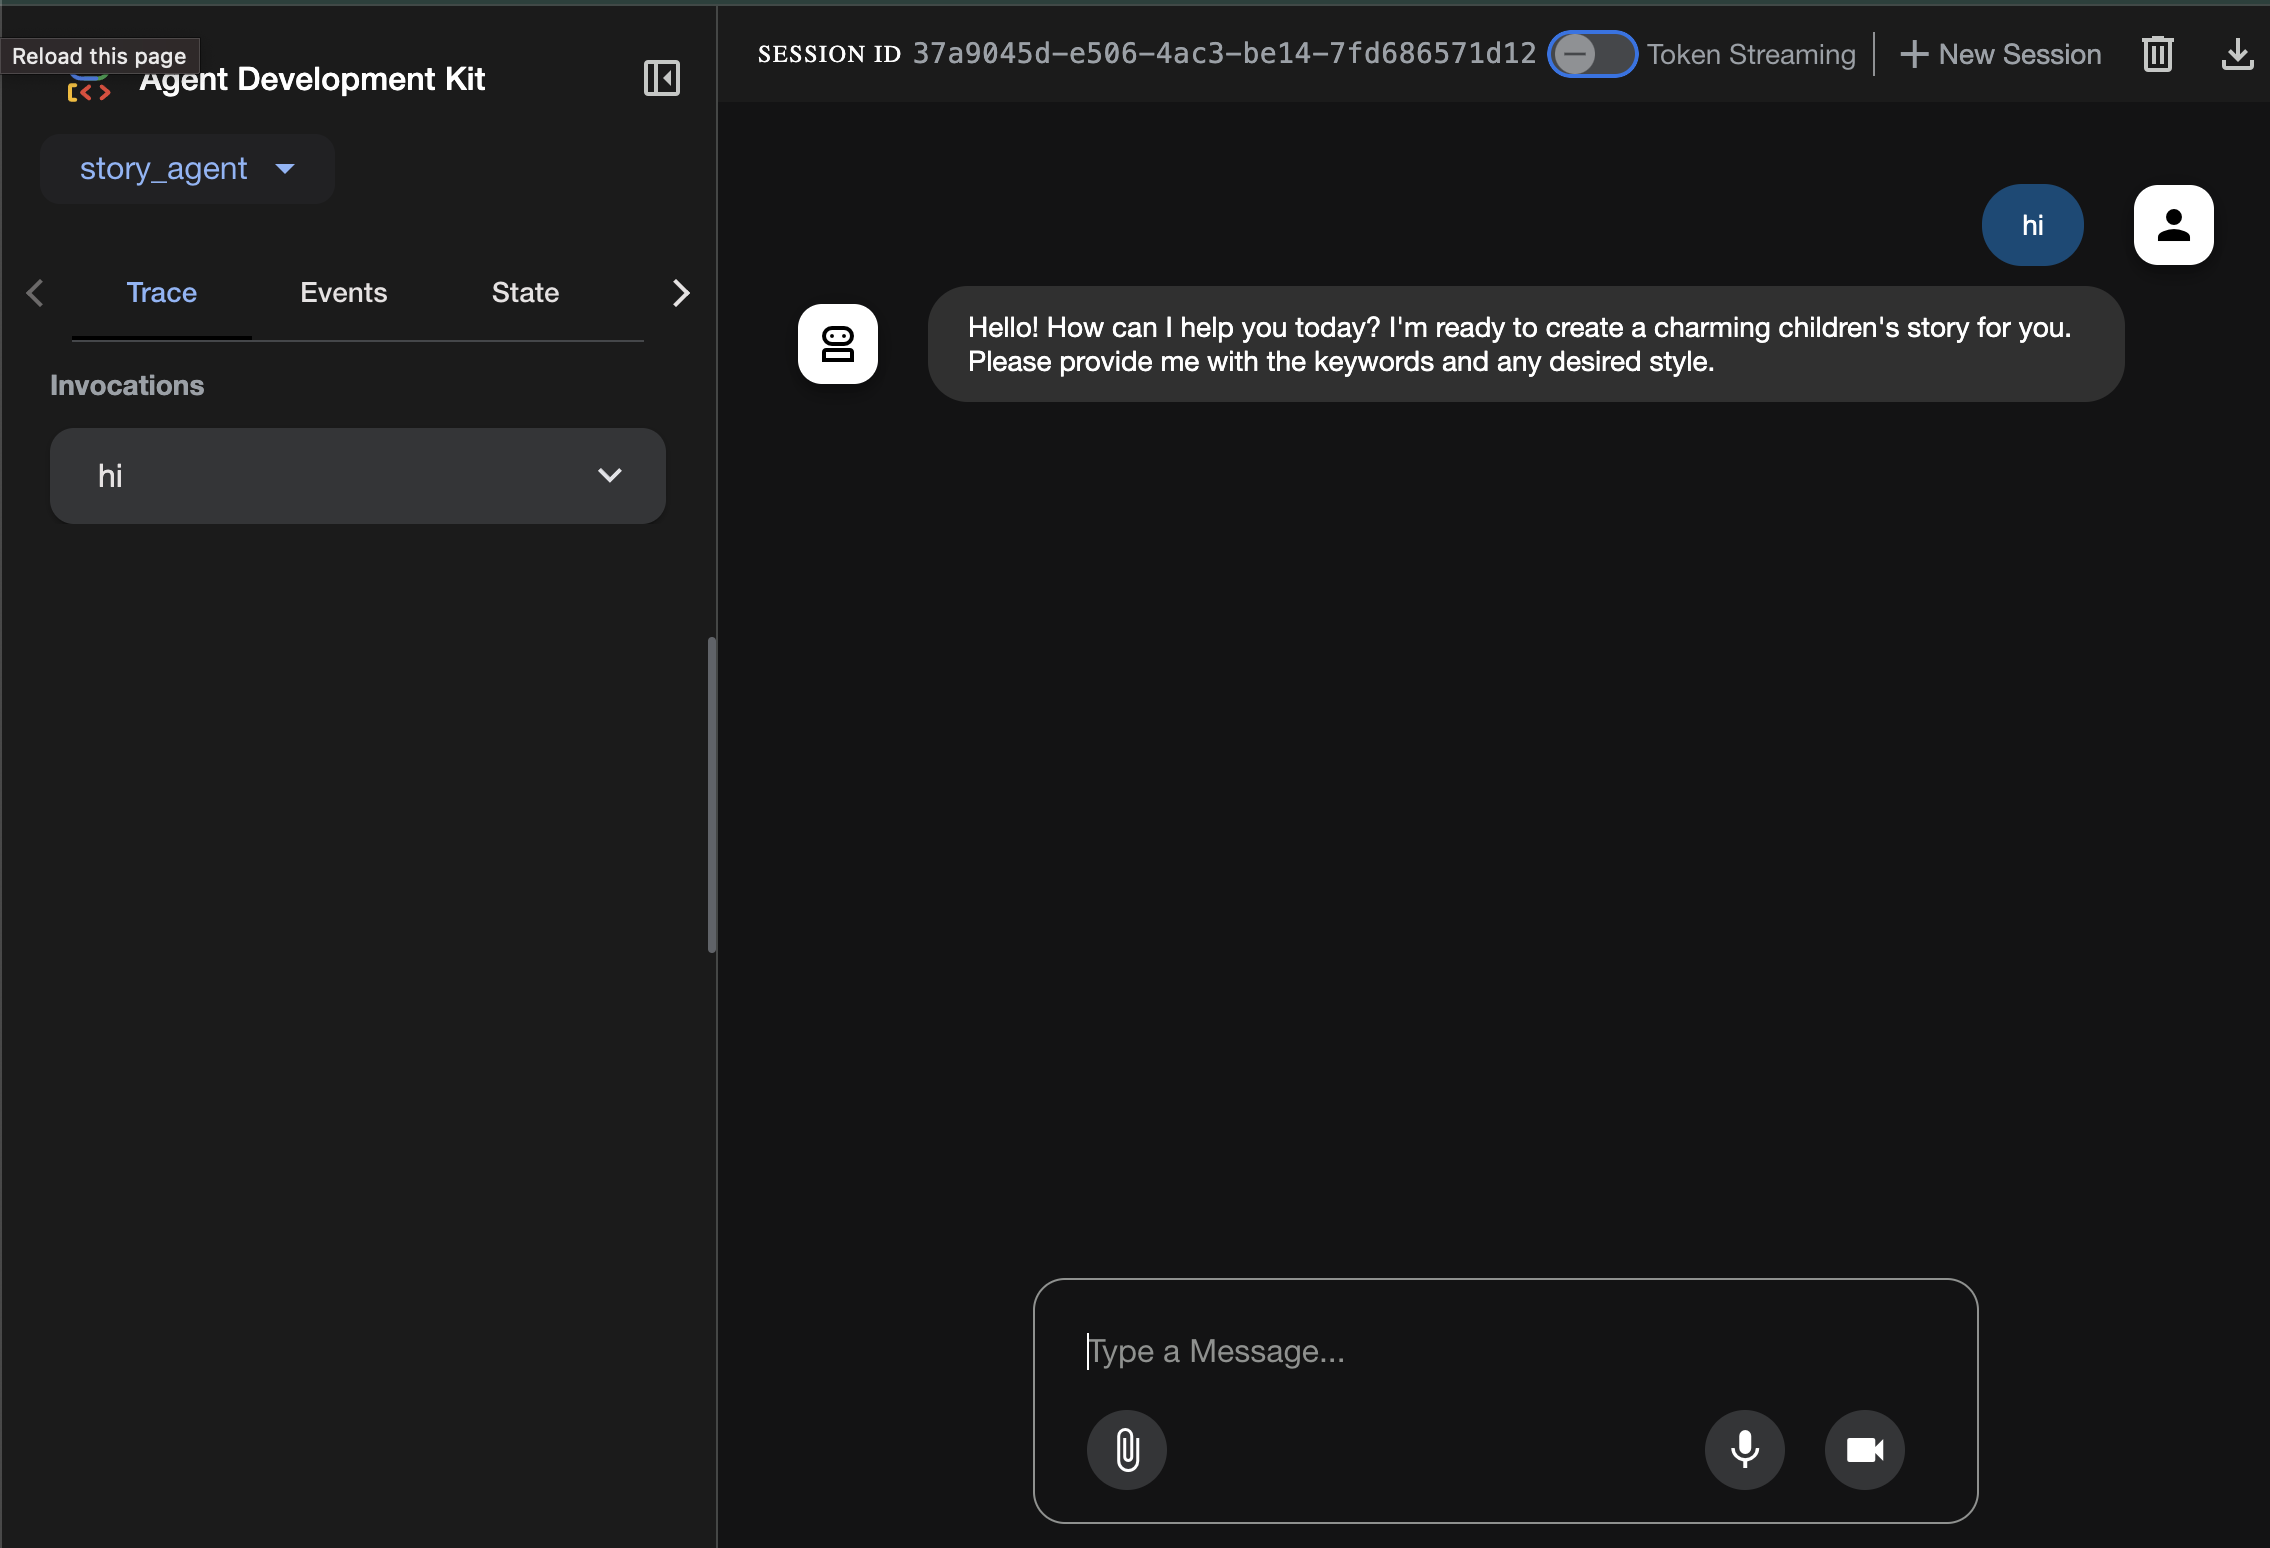
您會看到 ADK 使用者介面,可以在這裡向代理提出問題
在移至下一個部分之前,請按下 Ctrl+C 鍵結束程序。
6. 開發:使用 Gemini CLI 建構 ADK - (情境工程方式)
初始設定
請務必刪除先前在 01a_First_Agent_Ready/backend/story_agent/agent.py 中產生的代理程式檔案:
前往 01a_First_Agent_Ready,使用 Gemini CLI 建立 ADK 代理:**
cd ~/storygen-learning/01a_First_Agent_Ready/backend
開啟 Gemini CLI
gemini
在 Gemini CLI 視窗中,嘗試下列提示:
Summarize the design doc @design.md for me, do not attempt to create file just yet.
👉💻 按兩下 Ctrl+C 暫時退出 Gemini。
👉💻 在終端機中執行下列指令,寫入指引檔案。
cat << 'EOF' > GEMINI.md
  ### **Coding Guidelines**
  **1. Python Best Practices:**

  *   **Type Hinting:** All function and method signatures should include type hints for arguments and return values.
  *   **Docstrings:** Every module, class, and function should have a docstring explaining its purpose, arguments, and return value, following a consistent format like reStructuredText or
  Google Style.
  *   **Linter & Formatter:** Use a linter like `ruff` or `pylint` and a code formatter like `black` to enforce a consistent style and catch potential errors.
  *   **Imports:** Organize imports into three groups: standard library, third-party libraries, and local application imports. Sort them alphabetically within each group.
  *   **Naming Conventions:**
      *   `snake_case` for variables, functions, and methods.
      *   `PascalCase` for classes.
      *   `UPPER_SNAKE_CASE` for constants.
  *   **Dependency Management:** All Python dependencies must be listed in a `requirements.txt` file.

  **2. Web APIs (FastAPI):**

  *   **Data Validation:** Use `pydantic` models for request and response data validation.
  *   **Dependency Injection:** Utilize FastAPI's dependency injection system for managing resources like database connections.
  *   **Error Handling:** Implement centralized error handling using middleware or exception handlers.
  *   **Asynchronous Code:** Use `async` and `await` for I/O-bound operations to improve performance.
EOF
cat GEMINI.md
法律已刻在石板上,現在讓我們重新召喚 AI 合作夥伴,見證神器帶來的魔法。
👉💻 從 shadowblade 目錄重新啟動 Gemini CLI:
cd ~/storygen-learning/01a_First_Agent_Ready/backend
clear
gemini
👉✨ 現在,問問 Gemini 正在思考的內容。符文已讀取。
/memory show
👉✨ 這項強大的單一指令可建構代理程式。立即核發:
You are an expert Python developer specializing in the Google Agent Development Kit (ADK). Your task is to write the complete, production-quality code for `agent.py` by following the technical specifications outlined in the provided design document verbatim.

Analyze the design document at `@design.md` and generate the corresponding Python code for `agent.py`.

I need you to generate a Python script based on the provided design document and reference examples. Follow these requirements:

Read the design document carefully - it contains the complete technical specification for the code you need to write
Follow the structure and patterns shown in the reference context files
Adhere to all Python best practices specified in the coding standards document
Implement every requirement mentioned in the design document exactly as specified
Use the exact variable names, function names, and string values mentioned in the specifications

The design document describes the complete architecture, dependencies, configuration, and logic flow. Your generated code must match these specifications precisely while following professional Python coding standards.
Generate clean, production-ready Python code that can be used immediately without modifications.
完成後,請使用 Control+C 關閉 Gemini CLI 終端機。
—————————————— 選用,您可以略過「解決方案」部分——————————————–
現在請在 ADK Web 中驗證變更
cd ~/storygen-learning/01a_First_Agent_Ready/backend

source ../../.venv/bin/activate

adk web --port 8080
如要繼續,請開啟命令提示字元。
啟動網站
cd ~/storygen-learning/01a_First_Agent_Ready

./start.sh
如果變更無效,您應該會在 ADK 網頁使用者介面和網站中看到錯誤。
—————————————— 解決方案從這裡開始 ——————————————
解決方案
使用 Control+C 結束先前的程序,或開啟另一個終端機:
cd ~/storygen-learning/01b_First_Agent_Done
啟動網站:
./start.sh
您會看到網站:
試用 ADK 使用者介面:開啟另一個終端機:
cd ~/storygen-learning/01b_First_Agent_Done/backend
source ../../.venv/bin/activate

adk web --port 8080
您會看到 ADK 使用者介面,可以在這裡向代理提出問題
在移至下一個部分之前,請按下 Ctrl+C 鍵結束程序。
7. 開發:使用 Imagen 建構自訂代理
生成 Imagen 工具 (第二個代理程式)
cd ~/storygen-learning/02a_Image_Agent_Ready
使用 Gemini CLI 建立圖片生成代理:
gemini generate "I need you to help me create a custom Google ADK (Agent Development Kit) agent for image generation. This is different from the story agent - this one handles image generation directly using the BaseAgent pattern for full control over tool execution.

Please create a complete `agent.py` file that implements a custom image generation agent. The agent should:

**Requirements:**
1. Use the `google.adk.agents.BaseAgent` class (NOT LlmAgent)
2. Be named "custom_image_agent"
3. Directly execute the ImagenTool without LLM intermediation
4. Handle JSON input with scene descriptions and character descriptions
5. Store results in session state for retrieval by main.py
6. Use async generators and yield Events

**Key Specifications:**
- **Class Name:** CustomImageAgent (inherits from BaseAgent)
- **Agent Name:** "custom_image_agent"
- **Tool:** Uses ImagenTool for direct image generation
- **Purpose:** Bypass LLM agent limitations and directly call ImagenTool

**Input Format:**
The agent should handle JSON input like:
{
  "scene_description": "Scene action and setting",
  "character_descriptions": {
    "CharacterName": "detailed visual description"
  }
}


**Core Method:** `async def _run_async_impl(self, ctx: InvocationContext) -> AsyncGenerator[Event, None]:`
   - Extract user message from `ctx.user_content.parts`
   - Parse JSON input or fallback to plain text
   - Extract scene_description and character_descriptions
   - Build image prompt with style prefix: "Children's book cartoon illustration with bright vibrant colors, simple shapes, friendly characters."
   - Include character descriptions for consistency
   - Call `await self.imagen_tool.run()` directly
   - Store results in `ctx.session.state["image_result"]`
   - Yield Event with results


 **Session State:**
   - Store JSON results in `ctx.session.state["image_result"]`
   - Include success/error status
   - Store actual image URLs or error messages

Expected Output Structure:
- Successful results stored as JSON with image URLs
- Error results stored as JSON with error messages
- Results accessible via session state in main.py

Can you create this agent in backend/story_image_agent/agent.py

"
—————————————— 選用,您可以略過「解決方案」部分——————————————–
現在請在 ADK Web 中驗證變更
cd ~/storygen-learning/02a_Image_Agent_Ready/backend

source ../../.venv/bin/activate

adk web --port 8080
啟動網站
cd ~/storygen-learning/02a_Second_Agent_Ready

./start.sh
如果變更無效,您應該會在 ADK 網頁使用者介面和網站中看到錯誤。
—————————————— 解決方案從這裡開始 ——————————————–
解決方案
使用 Control+C 結束先前的程序,或開啟另一個終端機:
# Open new terminal
cd ~/storygen-learning/02b_Image_Agent_Done
啟動網站:
./start.sh
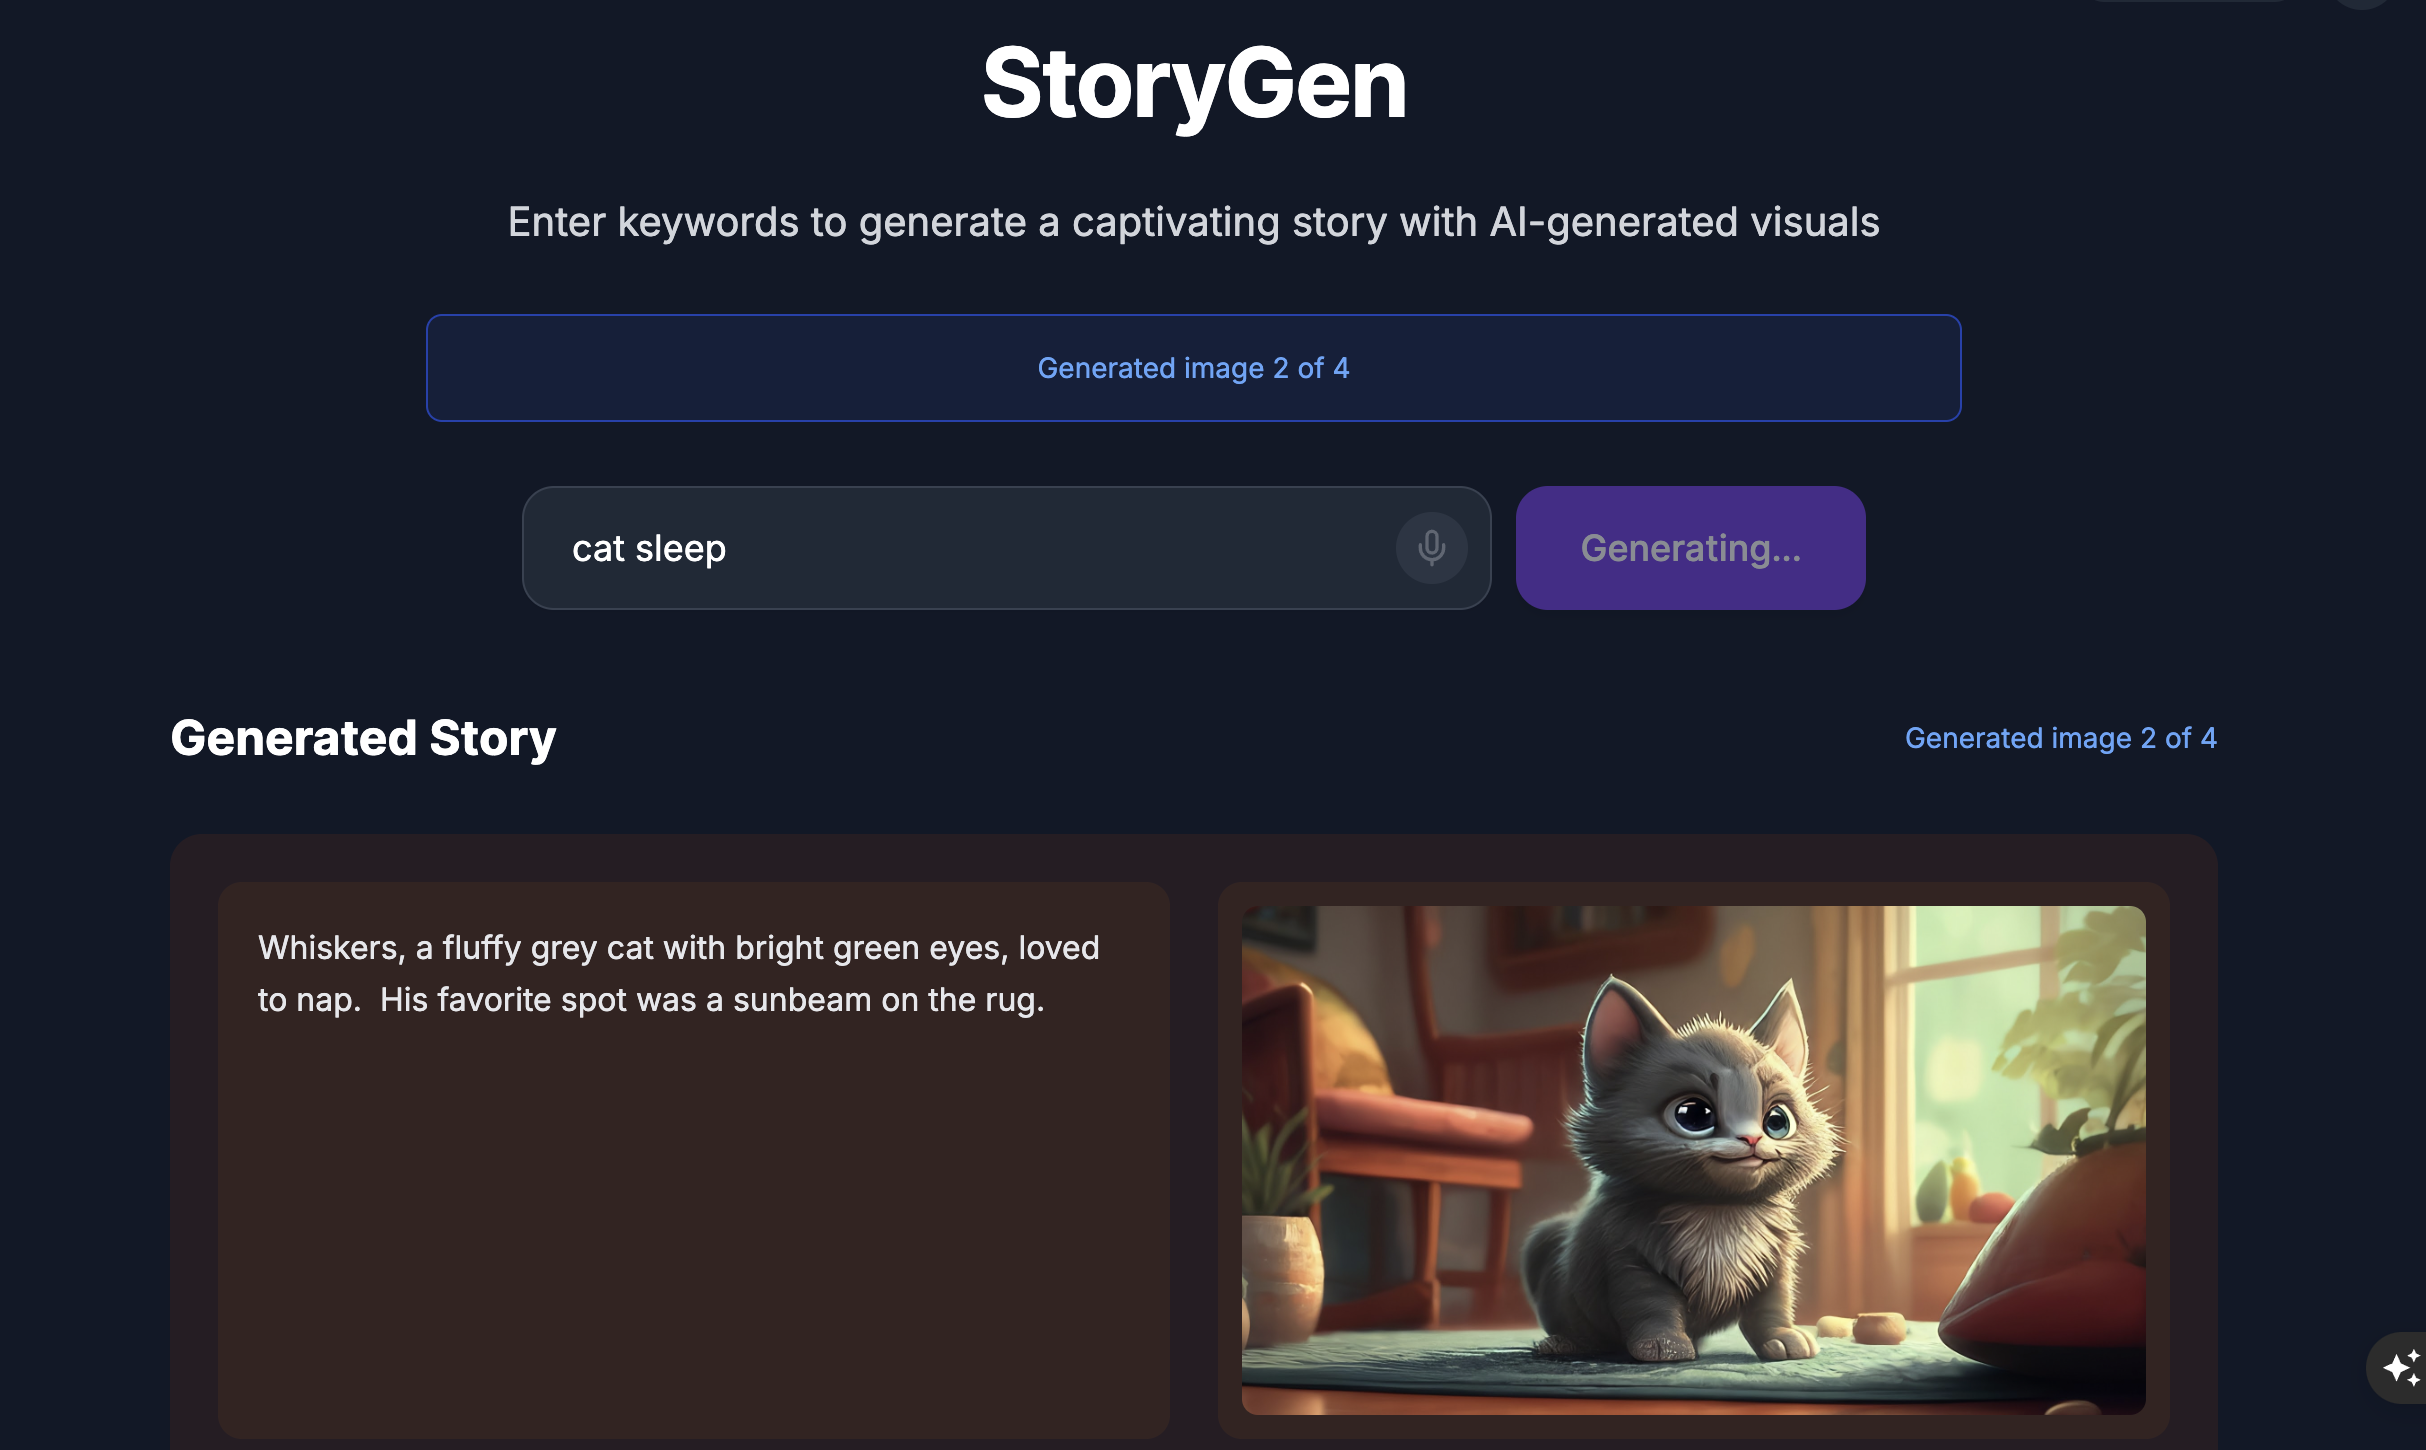
您會看到網站:
試用 ADK 使用者介面:開啟另一個終端機:
# Open new terminal
cd ~/storygen-learning/02b_Image_Agent_Done/backend

source ../../.venv/bin/activate

adk web --port 8080
您會看到 ADK 使用者介面,可以在這裡向代理提出問題:
在移至下一個部分之前,請按下 Ctrl+C 鍵結束程序。
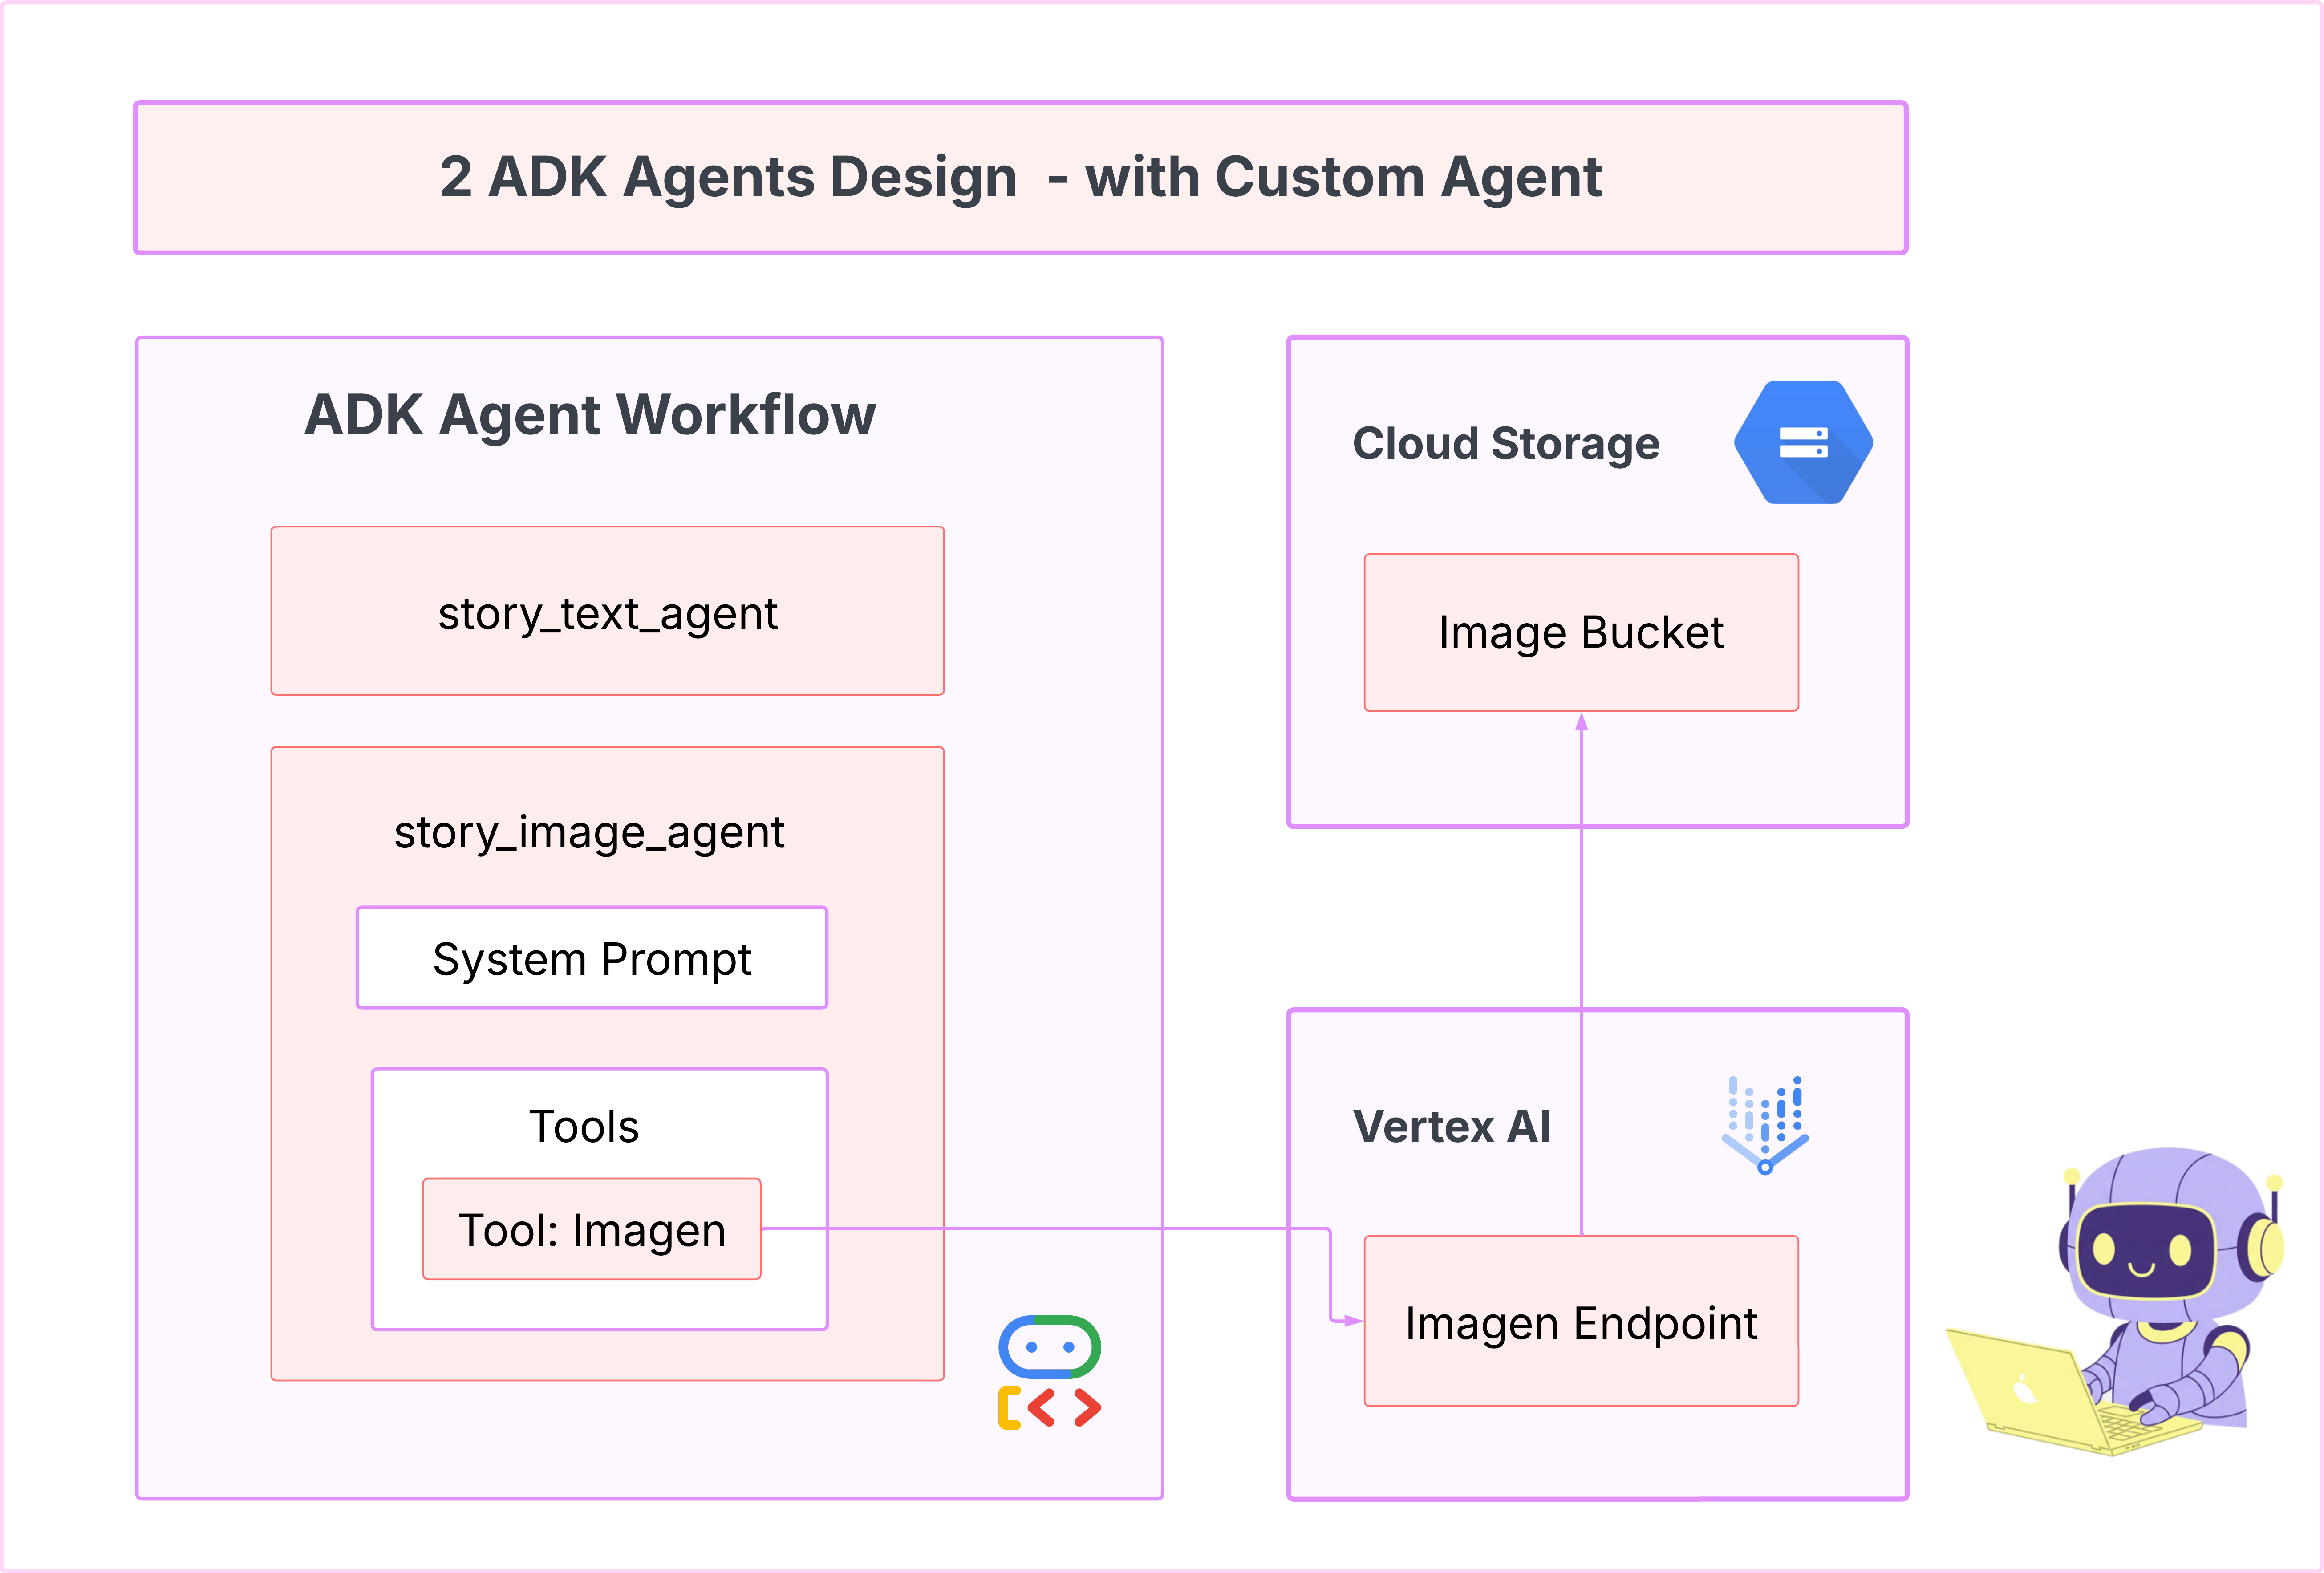
學習
第一個代理程式很擅長生成文字,但現在我們需要生成圖片。這項工作需要更直接的控制權。我們不希望 LLM 決定是否要建立圖片,而是要直接命令它這麼做。這項工作非常適合 BaseAgent。
與宣告式 LlmAgent 不同,BaseAgent 是命令式代理。也就是說,開發人員會在 _run_async_impl 方法中編寫確切的 Python 邏輯步驟。您可以完全掌控執行流程。
需要以下功能時,請選擇 BaseAgent:
確定性邏輯:服務專員必須按照特定且不可變更的步驟順序操作。
直接執行工具:您想直接呼叫工具,不需 LLM 介入。
複雜的工作流程:這類工作流程涉及自訂資料操控、API 呼叫和邏輯,複雜程度超出 LLM 的能力範圍,無法單從提示可靠地推斷。
在我們的應用程式中,我們會使用 BaseAgent 接收第一個代理程式的場景描述,並直接呼叫 Imagen 工具,確保每個場景都能生成圖片。
8. 測試:代理評估
我們的應用程式可以運作,但需要自動測試安全網。這項工作非常適合交給 AI 副駕駛。
動作
cd ~/storygen-learning/03a_Agent_Evaluation_Ready/backend
使用 Gemini CLI 編寫全面測試:
開啟 Gemini CLI
gemini
在 Gemini CLI 視窗中,嘗試下列提示:
I need you to create comprehensive test files for my backend/story_agent in Google ADK. I need three specific JSON files that match the testing structure used in ADK evaluation.

**Context:**
- The story agent generates structured JSON stories with exactly 4 scenes
- It uses LlmAgent with no tools, just direct LLM responses
- Input: Keywords
- Output: JSON with story, main_characters, and scenes arrays

**Files to Create:**

### 1. `story_agent_eval.evalset.json` (Comprehensive Integration Tests)
Create a comprehensive evaluation set with:
- **eval_set_id**: "story_agent_comprehensive_evalset"
- **name**: "Story Agent Comprehensive Evaluation Set"
- **description**: "Comprehensive evaluation scenarios for story_agent covering various keyword combinations, edge cases, and story quality metrics"


Each eval_case should include:
- Full conversation arrays with invocation_id, user_content, final_response
- Complete expected JSON responses with detailed stories, characters, and 4 scenes
- session_input with app_name "story_agent"
- All fields: story (narrative text), main_characters (with detailed visual descriptions), scenes (with index, title, description, text)

### 2. `story_generation.test.json` (Unit Tests)
Create basic generation tests with:
- **eval_set_id**: "story_agent_basic_generation_tests"
- **name**: "Story Agent Basic Generation Tests"
- **description**: "Unit tests for story_agent focusing on JSON structure compliance, scene generation, and keyword integration"

### 3. `test_config.json` (Evaluation Configuration)
Create test configuration with:
- **criteria**: response_match_score: 0.7, tool_trajectory_avg_score: 1.0
- **custom_evaluators**:
  - json_structure_validator (validates required fields, scene count, character fields)
  - story_quality_metrics (word count 80-250, keyword integration threshold 0.8)
- **evaluation_notes**: Story agent specifics and trajectory expectations

**Important Requirements:**
1. All responses must be valid, parseable JSON
2. Stories must have exactly 4 scenes with indices 1-4
3. Each scene must have: index, title, description, text
4. Main characters must have detailed visual descriptions
5. No tool_uses expected (empty arrays) since story agent uses direct LLM
6. Word count should be 100-200 words total
7. Keywords must be naturally integrated into the narrative

Please generate all three files with realistic example stories and comprehensive test coverage matching the ADK evaluation format.
—————————————— 選用,您可以略過「解決方案」部分——————————————–
如何查看評估結果:
./run_adk_web_persistent.sh
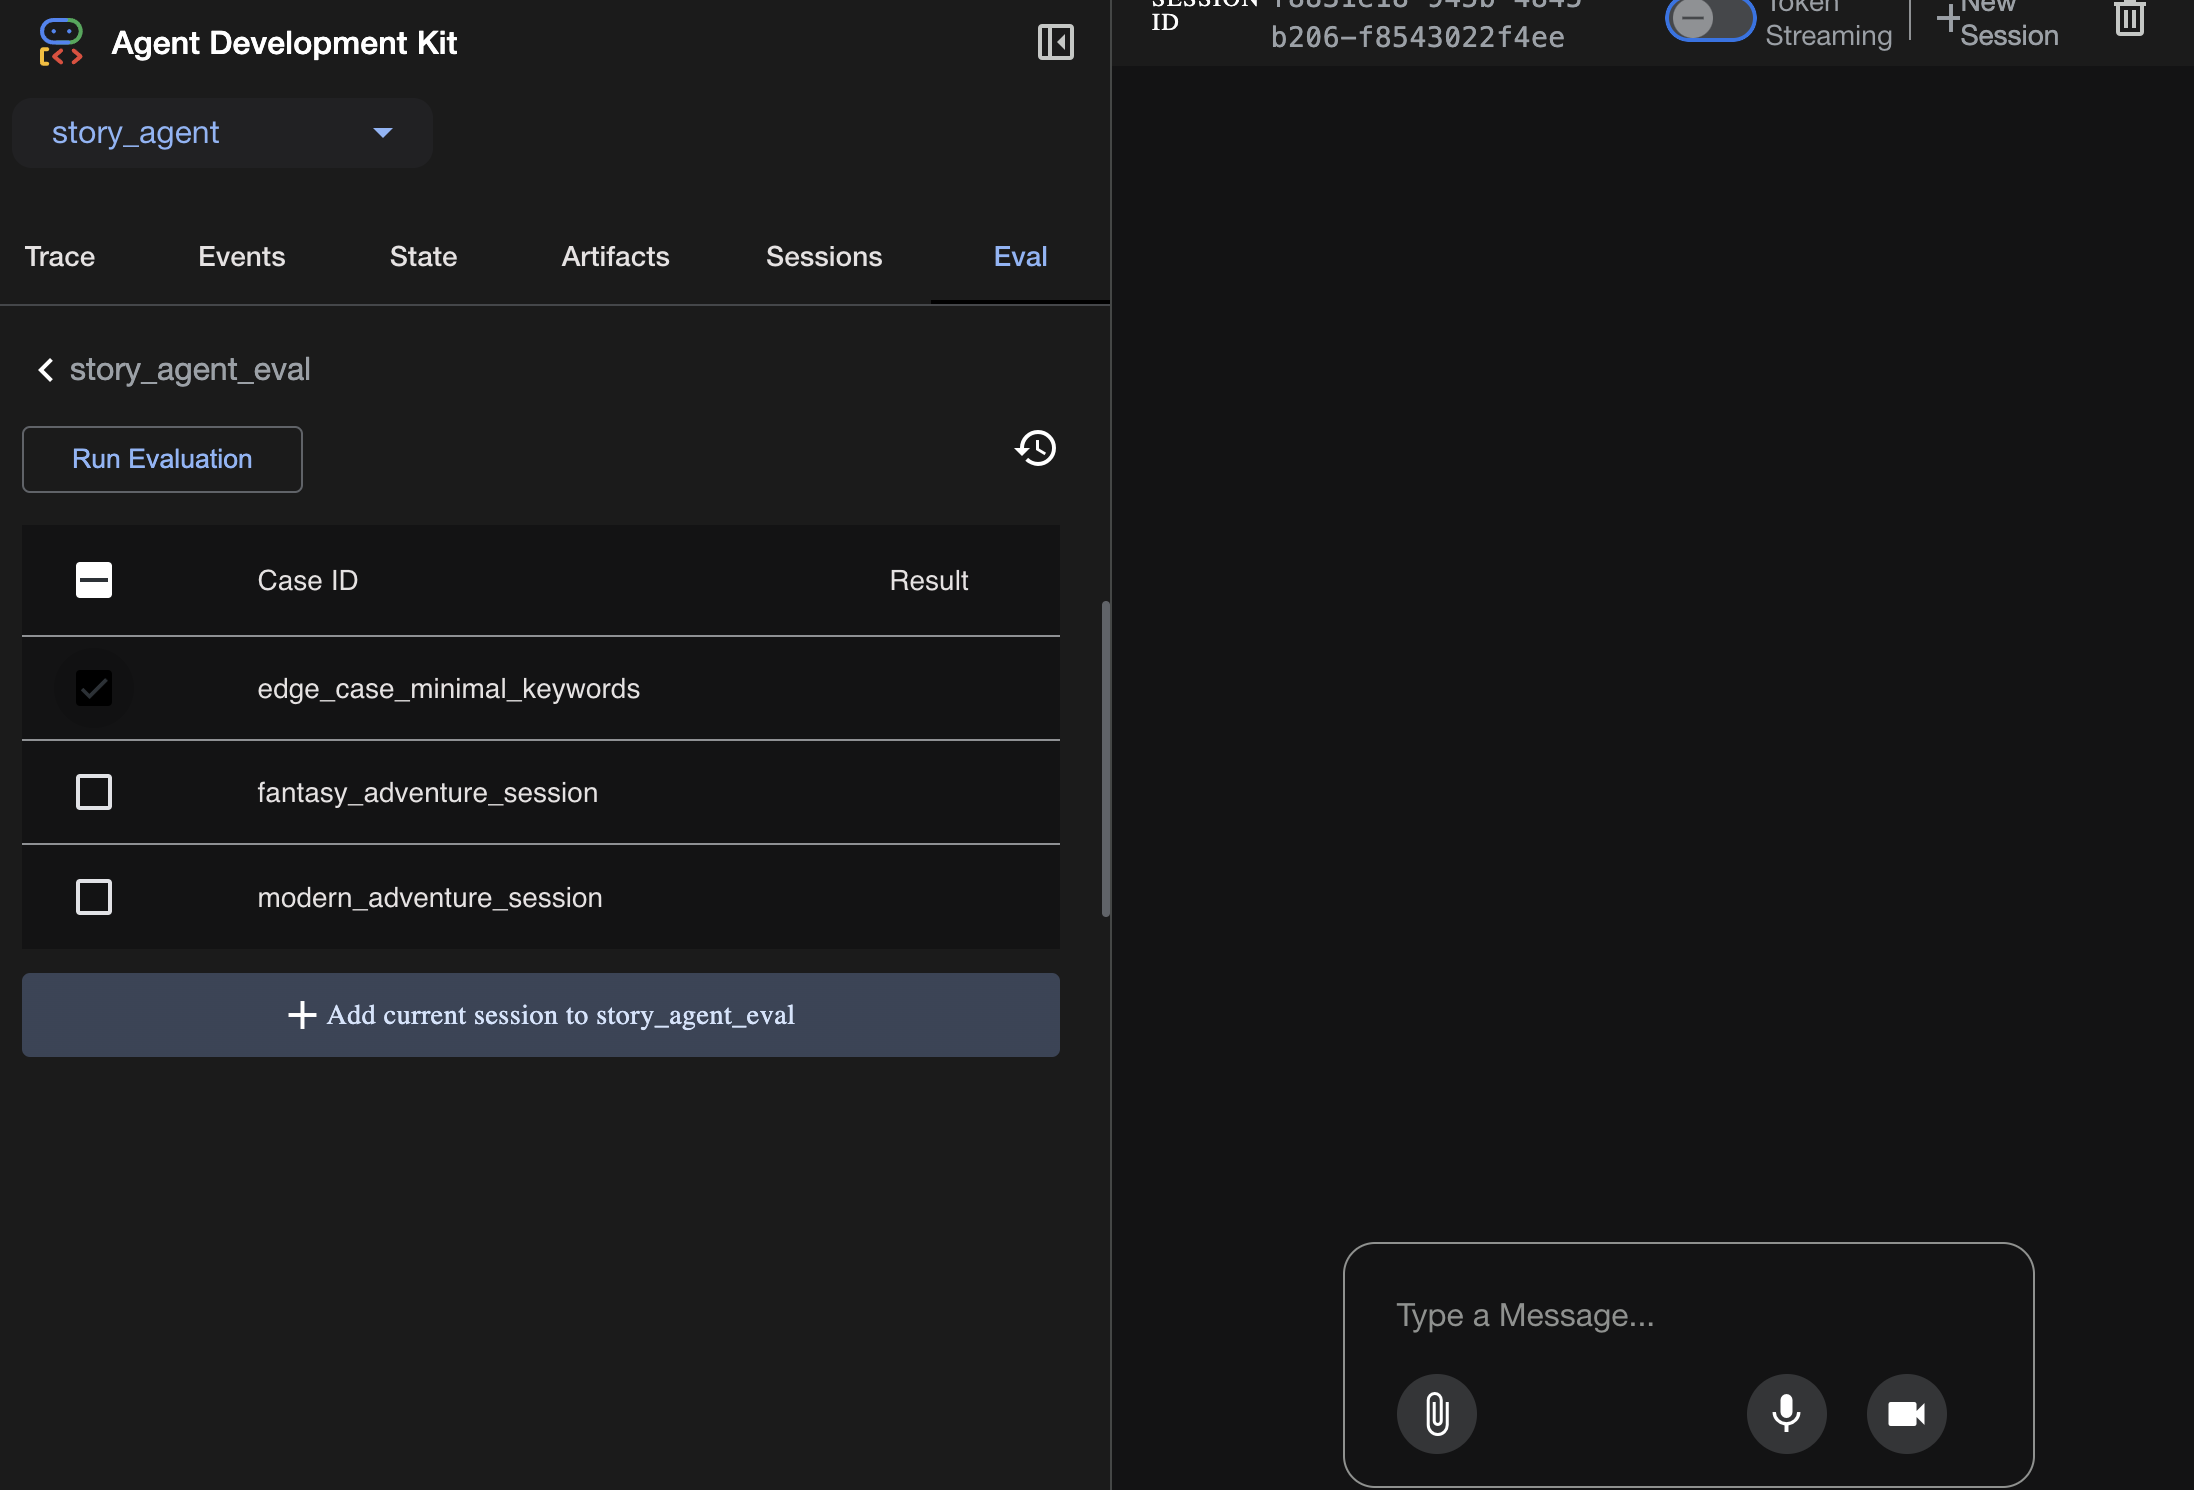
前往 ADK UI 的「eval」分頁。
您應該會看到 ADK 網頁 UI,並具備持續測試功能
重要學習時刻:AI 是強大的合作夥伴,可自動執行品質保證程序。這項工具可處理測試編寫的樣板,讓您專注於建構功能。
—————————————— 解決方案從這裡開始 ——————————————
解決方案
- 前往解決方案資料夾:
cd ~/storygen-learning/03b_Agent_Evaluation_Done/backend
- 開啟 ADK 網頁版 UI
./run_adk_web_persistent.sh
您可以從「Eval」分頁查看測試案例:
如要調整指標,請按照下列步驟操作:

在此查看評估作業執行結果:
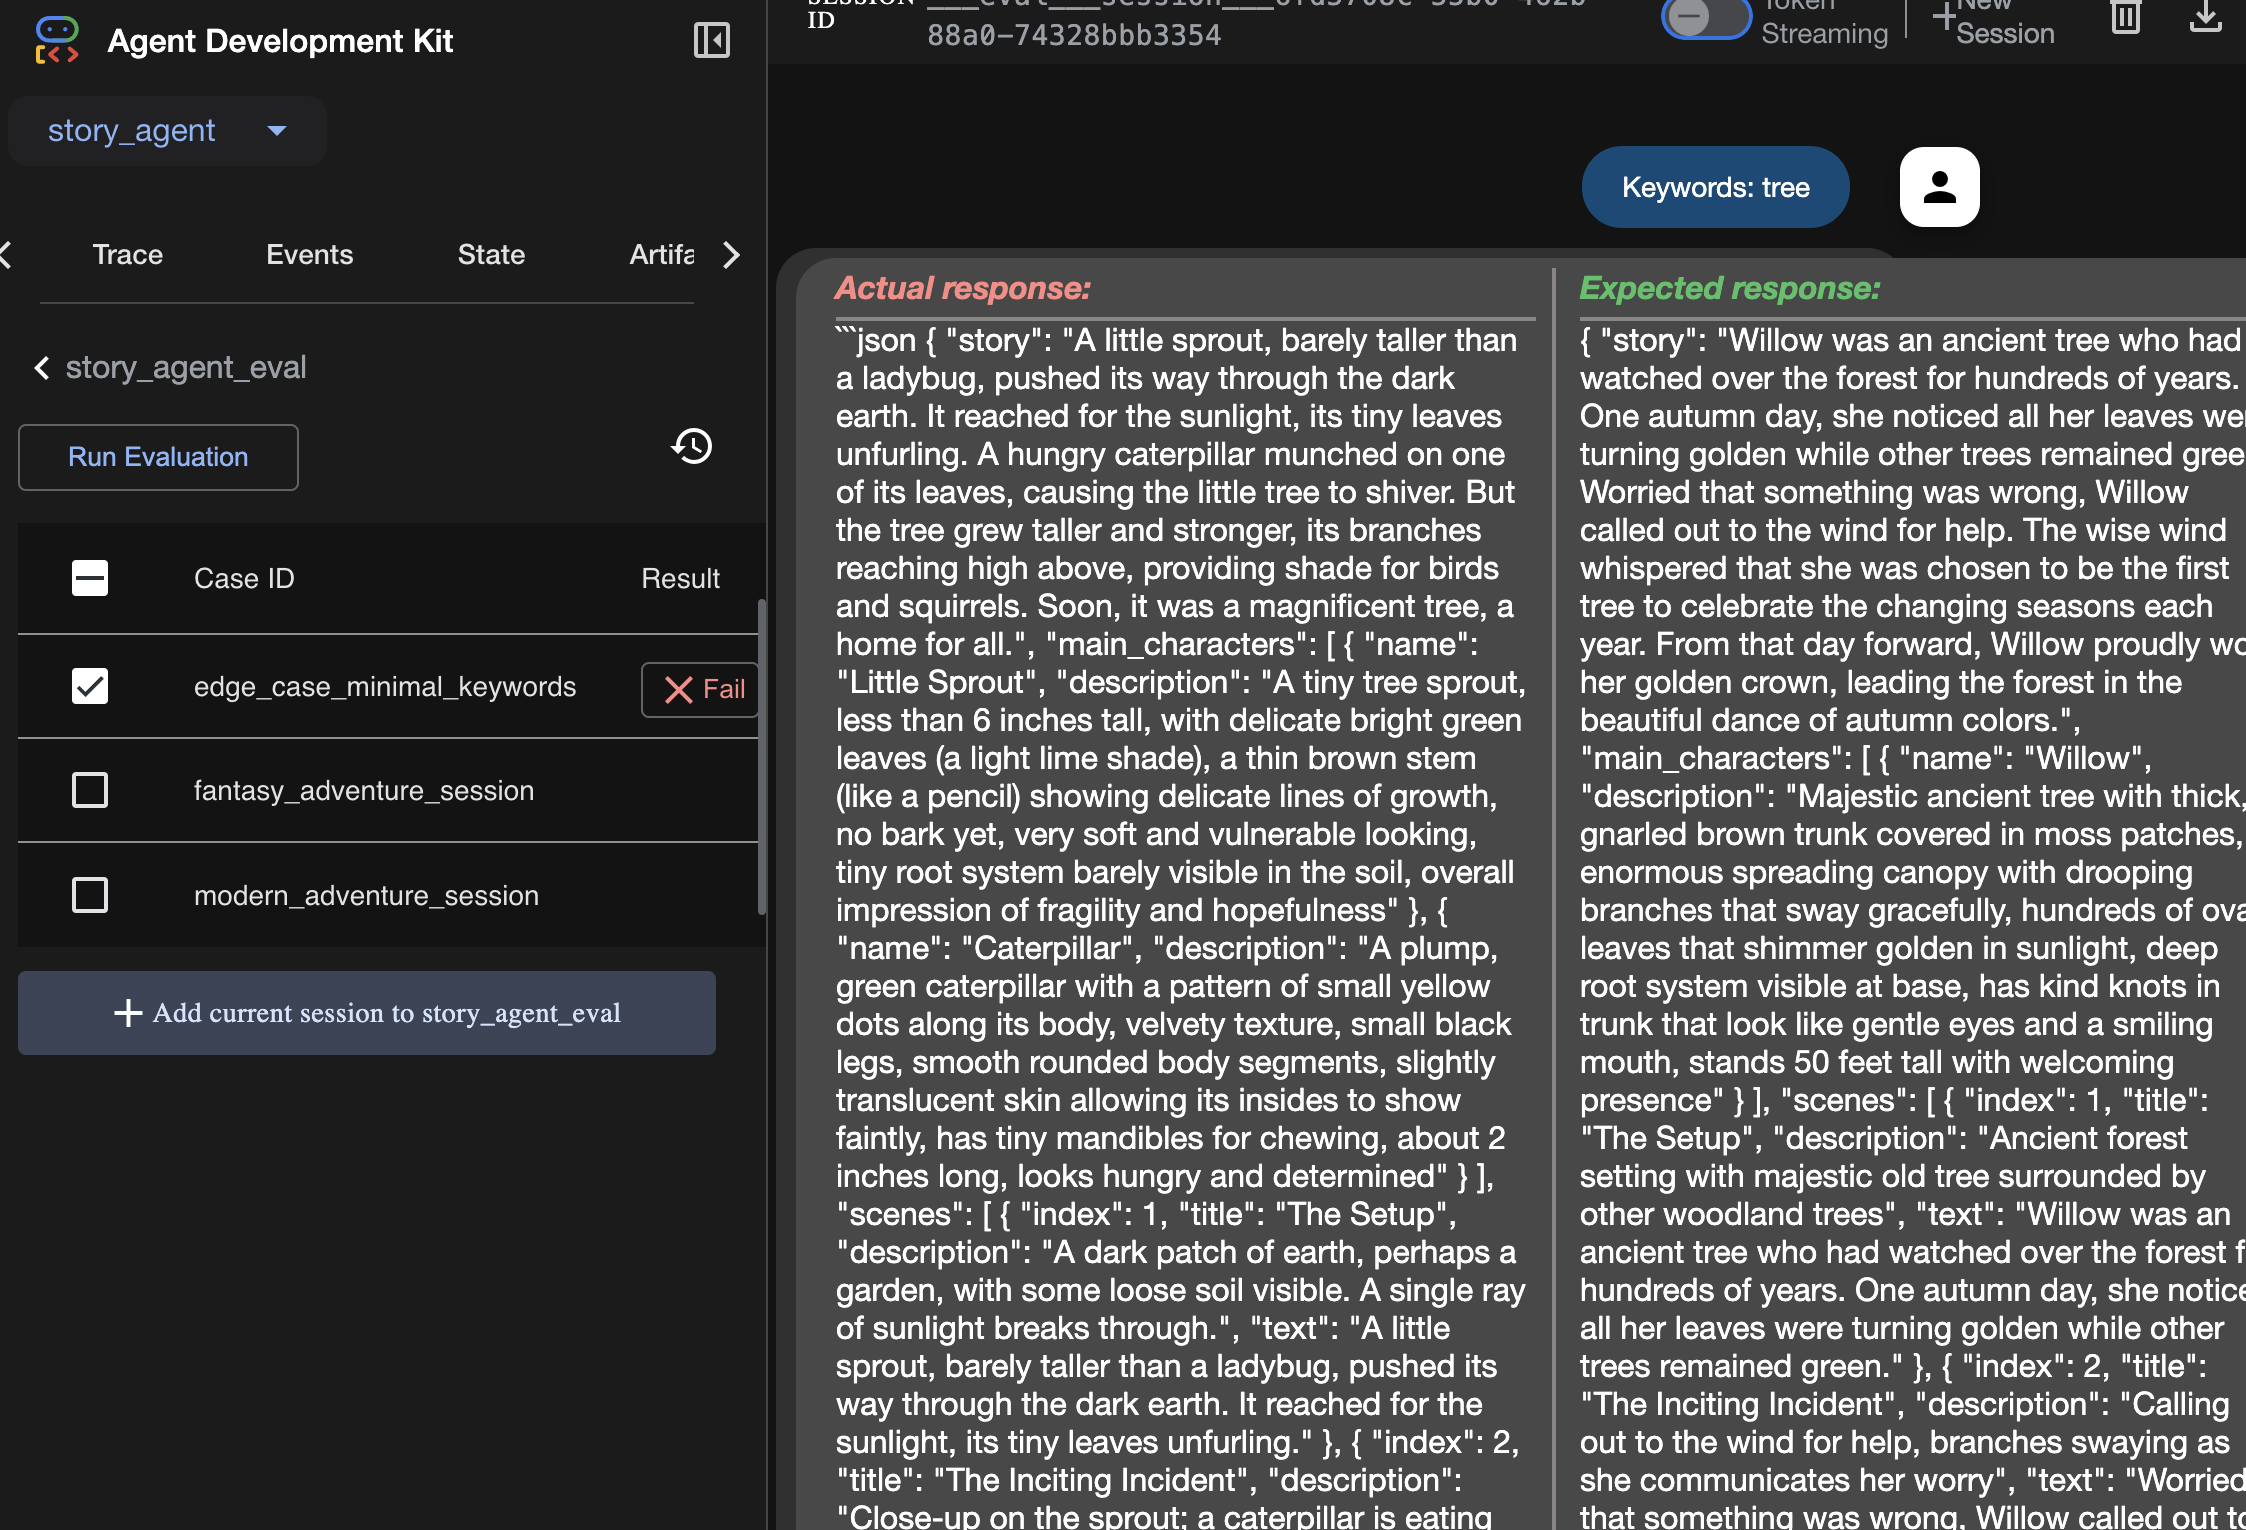
學習
代理程式可以「運作」,也就是執行時不會發生錯誤,但我們如何確定代理程式產生正確的輸出內容?故事是否精彩?JSON 格式是否正確?這時 ADK 的評估架構就能派上用場。
代理評估是一套自動測試系統,用於評估代理回覆的品質和正確性。這項功能不僅會檢查程式碼錯誤,還會檢查代理程式的行為是否符合您的期望。這個架構主要使用下列幾個重要檔案:
evalset.json:這是主要測試套件。這個檔案中的每個「評估案例」都包含範例對話 (例如使用者提示) 和您預期代理程式產生的理想「黃金」回應。
test_config.json:這個檔案定義成功規則。您可以在這裡設定條件,例如:
response_match_score:代理程式的回覆必須與「黃金」回覆有多接近?(分數為 1.0 表示必須完全相同)。
custom_evaluators:您可以建立自己的規則,例如「回覆內容必須是有效的 JSON」或「故事必須包含超過 100 個字」。
執行評估時,您可以自動針對數十種情境測試服務專員,確保提示或工具的變更不會意外破壞核心功能。這項功能可做為強大的安全網,協助您打造可用於正式環境的 AI 代理。
9. 基礎架構即程式碼 (IaC):在雲端建立家園
我們的程式碼已通過測試,但需要可直接用於正式環境的住家。我們會使用「基礎架構即程式碼」定義環境。
什麼是 Docker?
Docker 平台可建立及執行容器中的應用程式。容器就像是軟體的標準化貨櫃,將應用程式需要執行的所有內容,全都封裝至與外界隔離的單一套件內:
- 應用程式程式碼本身
- 必要的執行階段 (例如特定版本的 Python)
- 所有系統工具和程式庫
接著,您可以在安裝 Docker 的任何機器上執行這個容器化應用程式,解決經典的「在我的機器上可以運作」問題。
在本節中,我們會問問 Gemini 生成 Dockerfile,這只是建構應用程式容器映像檔的配方或藍圖
動作
cd ~/storygen-learning/04a_Manual_Deployment_Ready
使用 Gemini CLI 為後端建立 Dockerfile:開啟 Gemini CLI
Gemini
在 Gemini CLI 中,嘗試輸入下列提示:
Create a manual deployment plan for my StoryGen app with Google Cloud Platform. I have a Next.js frontend, Python backend, and Terraform infrastructure.
Generate these deployment files:
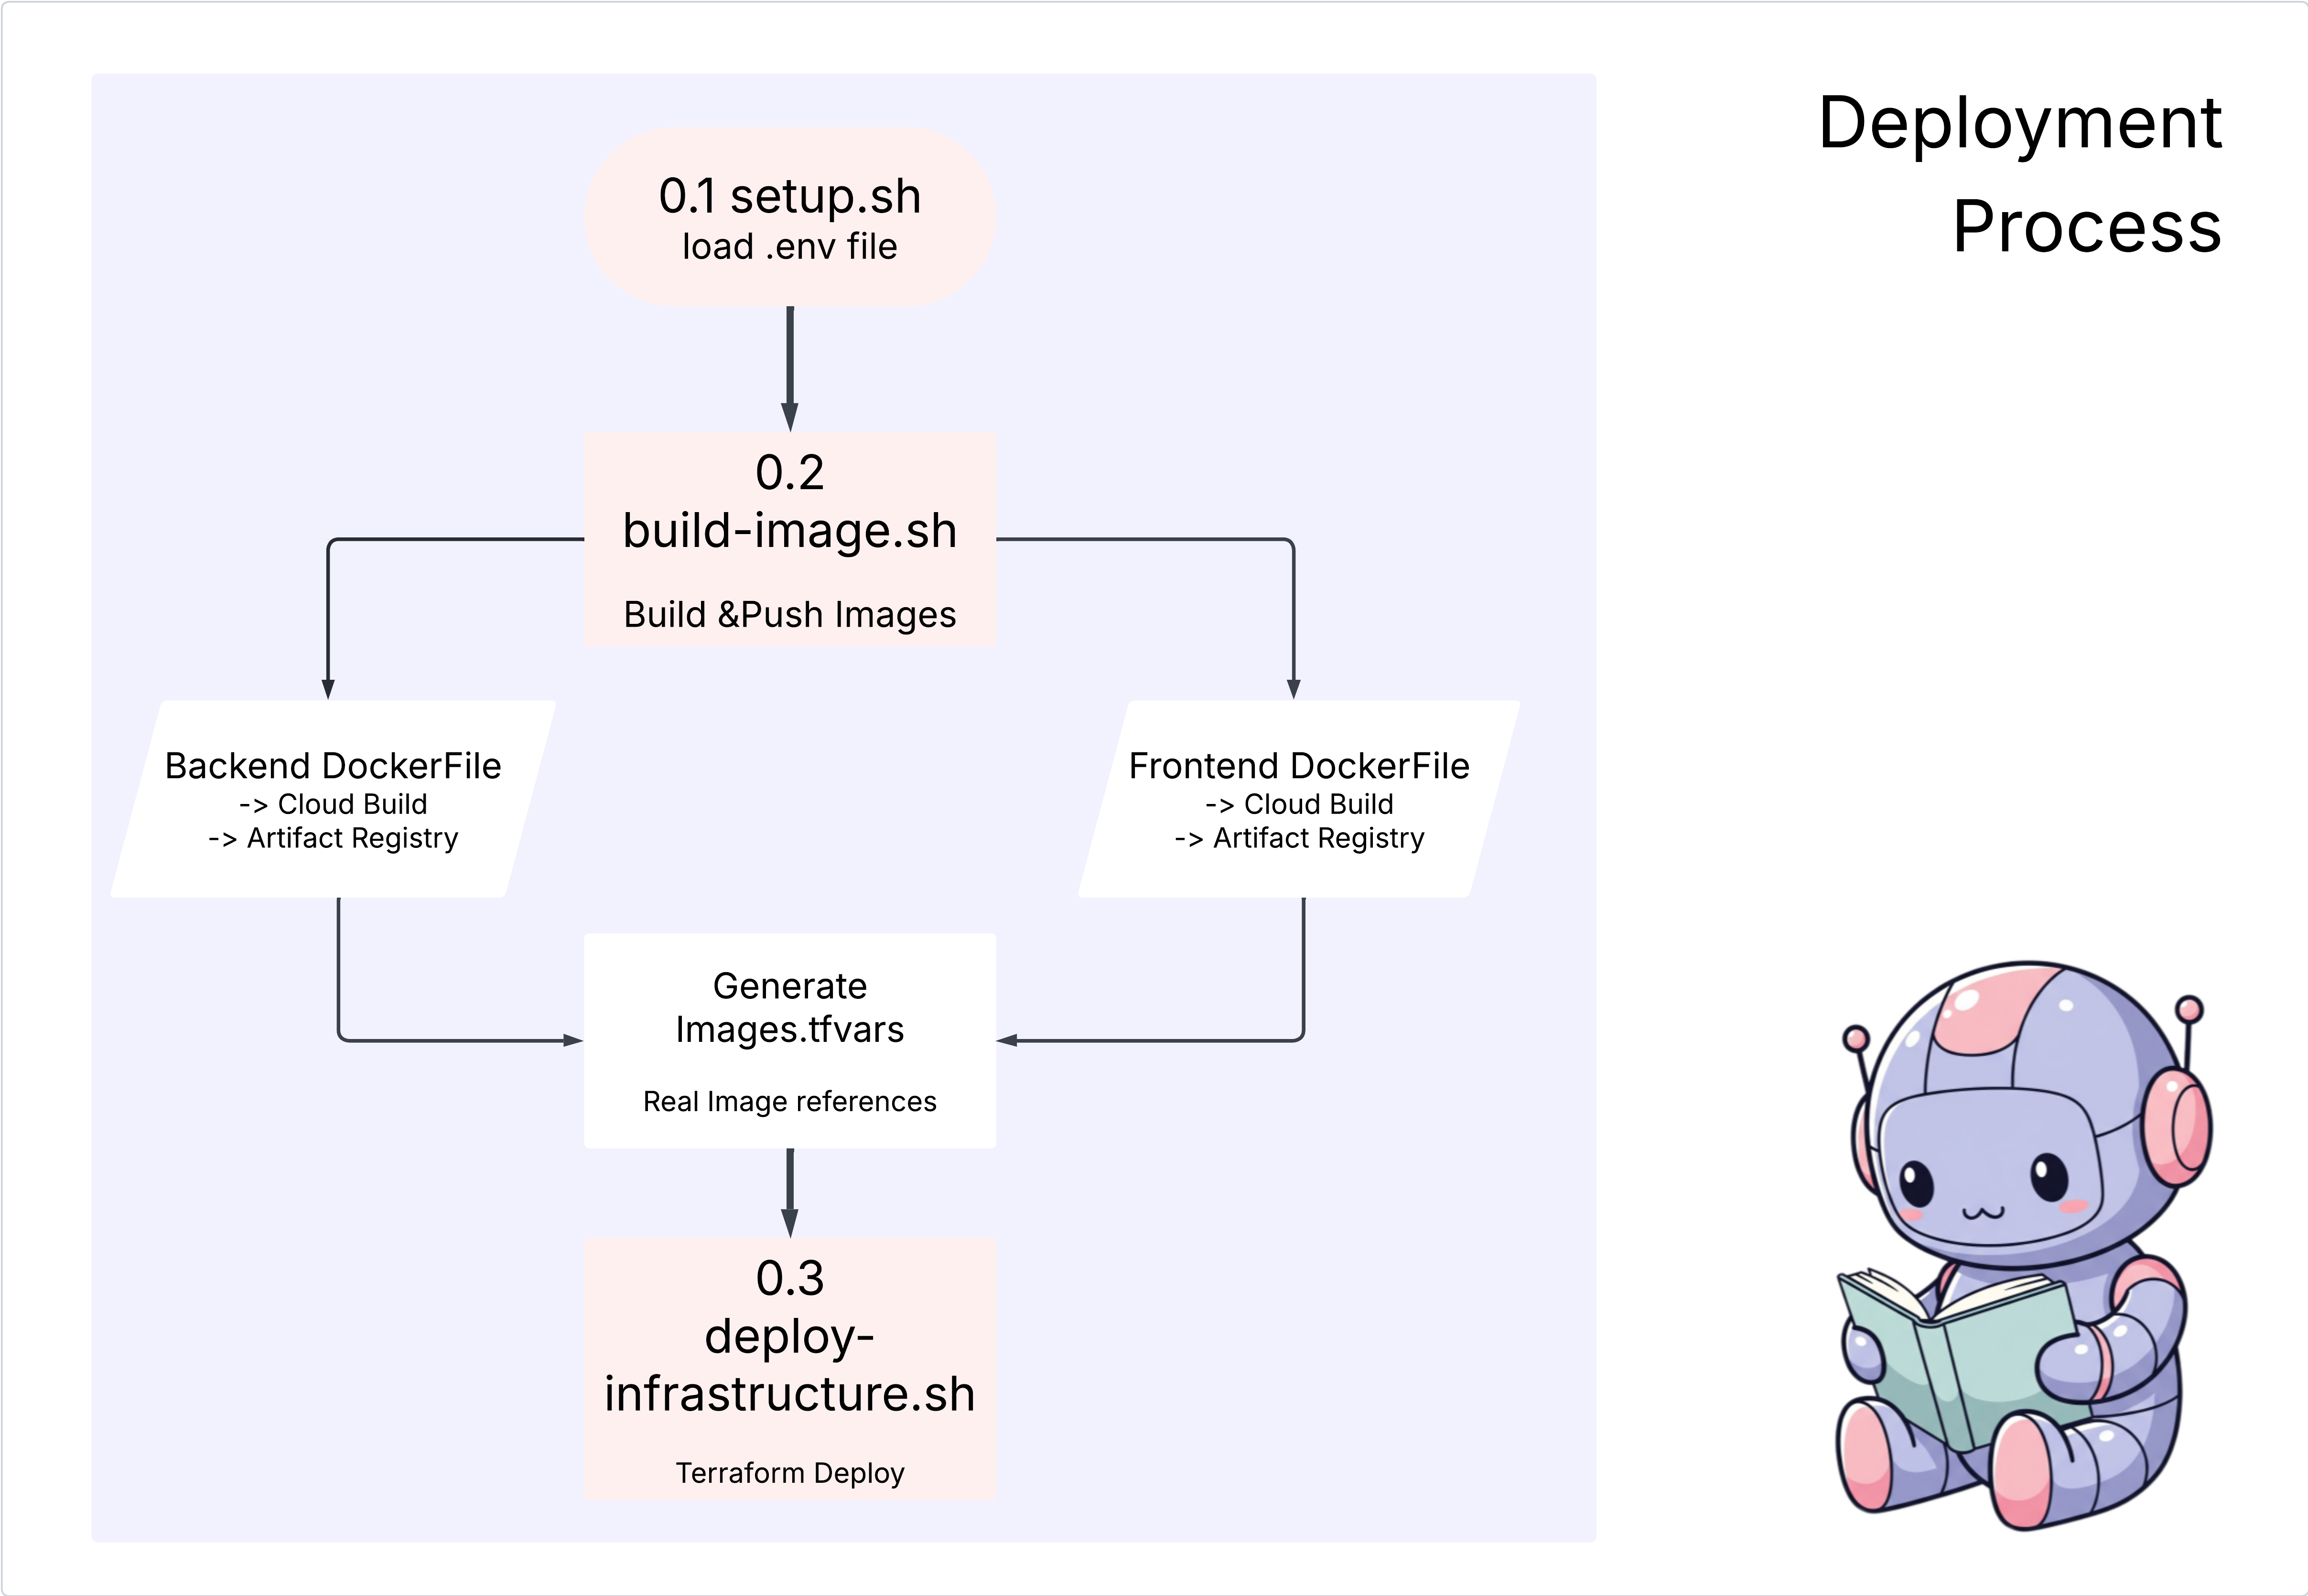
1. **01-setup.sh** - Environment setup and authentication
2. **02-build-images.sh** - Build and push Docker images to Google Container Registry
3. **03-deploy-infrastructure.sh** - Deploy with Terraform and configure services
4. **load-env.sh** - Load environment variables for deployment
**Requirements:**
- Use Google Cloud Run for both frontend and backend
- Configure Imagen API and storage buckets
- Set up proper IAM permissions
- Use environment variables from .env file
- Include error handling and status checks
Keep scripts simple, well-commented, and production-ready for manual execution.
解決方式:
cd ~/storygen-learning/04b_Manual_Deployment_Done
執行作業:
source ../.venv/bin/activate
./01-setup.sh
./02-build-images.sh
./03-deploy-infrastructure.sh
您應該會看到部署結果和基礎架構建立作業
10. 自動化 (CI/CD):數位生產線
手動部署應用程式是瞭解各個環節的好方法,但速度緩慢,需要手動作業,且可能導致人為錯誤。在專業軟體開發中,整個程序會使用 CI/CD 做法自動化。
CI/CD 是指持續整合和持續部署。這項方法會在您每次變更程式碼時,自動建構、測試及部署程式碼。
- 持續整合 (CI):這是「建構及測試」階段。開發人員將程式碼變更推送到共用存放區 (例如 GitHub) 後,自動化系統就會啟動。這項工具會建構應用程式並執行所有測試 (例如我們建立的代理程式評估),確保新程式碼正確整合,且不會造成任何錯誤。
- 持續部署 (CD):這是「發布」階段。如果 CI 階段順利通過,系統會自動將經過測試的新版應用程式部署到正式環境,供使用者使用。
這個自動化管道會建立「數位裝配線」,將開發人員電腦中的程式碼快速、安全且可靠地部署到正式環境。在本節中,我們將要求 AI 助理使用 GitHub Actions 和 Google Cloud Build,為我們建構這條裝配線。
動作
cd ~/storygen-learning/05a_CICD_Pipeline_Ready
使用 Gemini CLI 搭配 GitHub 建構 CI/CD 管道:
開啟 Gemini CLI
Gemini
在 Gemini CLI 中,嘗試輸入下列提示:
Create a CI/CD pipeline for my StoryGen app using Google Cloud Build and GitHub integration.

Generate these automation files:
1. **cloudbuild.yaml** (for backend) - Automated build, test, and deploy pipeline
2. **GitHub Actions workflow** - Trigger builds on push/PR
3. **Deployment automation scripts** - Streamlined deployment process

**Requirements:**
- Auto-trigger on GitHub push to main branch
- Build and push Docker images
- Run automated tests if available
- Deploy to Google Cloud Run
- Environment-specific deployments (staging/prod)
- Notification on success/failure

Focus on fully automated deployment with minimal manual intervention. Include proper secret management and rollback capabilities.
—————————————— 解決方案從這裡開始 ——————————————
解決方式:
cd ~/storygen-learning/06_Final_Solution/
# Copy the GitHub workflow to parent folder
cp -r 06_Final_Solution/.GitHub ../../../.GitHub
返回 06_Final_Solution 資料夾,然後執行指令碼:
cd ~/storygen-learning/06_Final_Solution/

./setup-cicd-complete.sh
您應該會看到 CI/CD 管道設定完成的訊息
觸發工作流程:將程式碼提交並推送至 main。請注意,您必須設定 GitHub 電子郵件和名稱,才能允許這項權限。
git add .
git commit -m "feat: Add backend, IaC, and CI/CD workflow"
git push origin main
前往 GitHub 存放區的「Actions」分頁,即可觀看自動部署作業的執行情況。
11. 作業:AI 控制中心
我們正在直播!但這段旅程尚未結束。這就是「第 2 天」的作業。讓我們返回 Cloud Assist 管理正在執行的應用程式。
動作
- 前往 Google Cloud 控制台中的 Cloud Run 服務。與上線的應用程式互動,產生一些流量和記錄檔。
- 開啟 Cloud Assist 窗格,並將其做為作業副駕駛,使用下列提示:
記錄檔分析:
Summarize the errors in my Cloud Run logs for the service 'genai-backend' from the last 15 minutes.
效能調整:
My Cloud Run service 'genai-backend' has high startup latency. What are common causes for a Python app and how can I investigate with Cloud Trace?
成本最佳化:
Analyze the costs for my 'genai-backend' service and its GCS bucket. Are there any opportunities to save money?
重要學習時刻:AI SDLC 是持續循環的過程。在正式環境中監控、排解問題及最佳化應用程式時,協助建構應用程式的 AI 副駕駛是不可或缺的合作夥伴。