

১. ভূমিকা
এই কোডল্যাবে, আপনি Google Cloud-এ gCurrenC ক্যালকুলেটর ওয়েব অ্যাপ্লিকেশন তৈরি ও ডিপ্লয় করবেন, তারপর অবাঞ্ছিত অ্যাক্সেস থেকে এটি সুরক্ষিত করবেন। Google Antigravity, Google Cloud Developer প্লাগ-ইন এবং Developer Knowledge (DK) MCP সার্ভার ব্যবহার করে, আপনি একটি নিরাপত্তা আর্কিটেকচার ডিজাইন ও বাস্তবায়ন করেন যা অ্যাপ্লিকেশনটি কে অ্যাক্সেস করতে পারবে তা নিয়ন্ত্রণ করে এবং এটিকে অননুমোদিত ব্যবহার থেকে রক্ষা করে।
এই ল্যাব জুড়ে, আপনি Google Antigravity-কে DK MCP সার্ভার-এর সাথে কানেক্ট করেন, যা Antigravity-কে অফিসিয়াল, রিয়েল-টাইম Google Cloud ডকুমেন্টেশনে গ্রাউন্ড করে। স্ট্যাটিক ট্রেনিং ডেটা বা পুরনো মডেল ওয়েটের উপর নির্ভর করার পরিবর্তে, Antigravity ডায়নামিকভাবে বর্তমান আর্কিটেকচারাল প্যাটার্ন, লেটেস্ট gcloud CLI সিনট্যাক্স ও নিরাপত্তা প্যারামিটার ফিরিয়ে আনে, যা হ্যালুসিনেশন কমায় এবং আপ-টু-ডেট জ্ঞানের ভিত্তিতে উত্তর দেয়।
আপনি কী তৈরি করবেন
- প্রাইভেট কম্পিউট ওয়ার্কলোড: দুটি Compute Engine ভার্চুয়াল মেশিন (VM) কাস্টম ভার্চুয়াল প্রাইভেট ক্লাউড (VPC) নেটওয়ার্কের মধ্যে gCurrenC ক্যালকুলেটর ওয়েব অ্যাপ রান করছে, যার কোনও পাবলিক IP অ্যাড্রেস নেই।
- সুরক্ষিত ইনগ্রেস পাইপলাইন: একটি গ্লোবাল এক্সটার্নাল অ্যাপ্লিকেশন লোড ব্যালেন্সার, যার সাথে একটি ডেডিকেটেড প্রক্সি-অনলি সাবনেট থাকে যা Google Front Ends (GFEs)-এর মাধ্যমে আপনার প্রাইভেট VM-এ ইন্টারনেট ট্রাফিক রুট করে, যাতে সেগুলি পাবলিক ইন্টারনেটে প্রকাশ না পায়।
- সুরক্ষিত ইগ্রেস পাইপলাইন: আউটবাউন্ড HTTPS কারেন্সি এক্সচেঞ্জ API ট্রাফিকের উপর অন-দ্য-ফ্লাই TLS ইন্সপেকশন এবং ইন্ট্রুশন প্রিভেনশন সার্ভিস (IPS) স্ক্যানিং করার জন্য প্রোজেক্ট-লেভেল Cloud Next Generation Firewall (Cloud NGFW) Enterprise এবং সার্টিফিকেট অথরিটি সার্ভিস (CAS)-এর সাথে পেয়ার করা একটি Cloud Router এবং Cloud NAT গেটওয়ে।
আপনি কী শিখবেন
- Antigravity CLI ব্যবহার করে
google-cloud-developerপ্লাগ-ইন ইনস্টল করুন এবং Antigravity-তে DK MCP সার্ভার কনফিগার করুন। - Identity-Aware Proxy (IAP) TCP ফরওয়ার্ডিং ব্যবহার করে Compute Engine-এ একটি আইসোলেটেড প্রাইভেট ওয়েব অ্যাপ্লিকেশন ডিপ্লয় ও পরীক্ষা করা।
- প্রজেক্ট-লেভেল ইনগ্রেস ও ইগ্রেস নিরাপত্তা আর্কিটেকচার ডিজাইন করার জন্য Antigravity-তে গ্রাউন্ডেড মাল্টি-টার্ন প্রম্পটিং ব্যবহার করো।
- গ্লোবাল এক্সটার্নাল অ্যাপ্লিকেশন লোড ব্যালেন্সিং, Cloud NAT, CAS এবং Cloud NGFW Enterprise-এর জন্য
bashডিপ্লয়মেন্ট স্ক্রিপ্ট তৈরি, সেল্ফ-অডিট ও রান করুন।
২. শুরু করার আগে
পূর্বশর্ত
এই কোডল্যাব শুরু করার আগে, আপনার কাছে নিম্নলিখিতগুলি আছে কিনা তা নিশ্চিত করুন:
- Google অ্যাকাউন্ট ও Google Chrome ব্রাউজার।
- বিলিং চালু করা সহ একটি নতুন Google Cloud প্রোজেক্ট। আপনার প্রোজেক্ট আইডি (
PROJECT_ID) নোট করে নিন, কারণ API চালু করতে, আপনার API কী তৈরি করতে এবং Google Cloud রিসোর্স ডিপ্লয় করতে এই কোডল্যাব জুড়ে আপনি এটি ব্যবহার করবেন। - API কী, Compute Engine রিসোর্স, VPC নেটওয়ার্ক, CAS পুল, IAP টানেল ও Cloud NGFW এন্ডপয়েন্ট তৈরি করার জন্য আপনার Google Cloud প্রোজেক্টে আইডেন্টিটি ও অ্যাক্সেস ম্যানেজমেন্ট (IAM) সংক্রান্ত অনুমতি।
gcloudCLI-এর মাধ্যমে যাচাই করুন, আপনার অ্যাক্টিভ Google Cloud প্রোজেক্ট সেট করুন এবং প্রয়োজনীয় API চালু করুন:- আপনার টার্মিনাল বা Cloud Shell-এ, আপনি আগে থেকেই যাচাইকৃত কিনা তা চেক করুন:
gcloud auth listgcloud auth login - আপনার প্রোজেক্ট ব্যবহার করার জন্য
gcloudCLI কনফিগার করা আছে কিনা তা যাচাই করুন:gcloud config list projectPROJECT_IDপরিবর্তন করুন:export PROJECT_ID=PROJECT_ID gcloud config set project PROJECT_ID - আপনার Google Cloud প্রোজেক্টে প্রয়োজনীয় API চালু করুন:
gcloud services enable \
   compute.googleapis.com \
   iap.googleapis.com \
   networksecurity.googleapis.com \
   privateca.googleapis.com \
   developerknowledge.googleapis.com \
   apikeys.googleapis.com
- আপনার টার্মিনাল বা Cloud Shell-এ, আপনি আগে থেকেই যাচাইকৃত কিনা তা চেক করুন:
- Google Antigravity ডাউনলোড পৃষ্ঠা থেকে আপনার লোকাল সিস্টেমে Antigravity 2.0 ইনস্টল করুন।
Antigravity CLI ব্যবহার করে Google Cloud Developer প্লাগ-ইন ইনস্টল করা
Antigravity CLI ব্যবহার করে Google Cloud Developer প্লাগ-ইন ইনস্টল করতে, নিম্নলিখিত ধাপগুলি অনুসরণ করুন:
- আপনার লোকাল ওয়ার্কস্টেশনে Antigravity CLI ইনস্টল করতে, নিম্নলিখিত ধাপগুলি অনুসরণ করুন:
- আপনার লোকাল টার্মিনাল খুলুন।
- ইনস্টলার স্ক্রিপ্ট রান করুন:
curl -fsSL https://antigravity.google/cli/install.sh | bash - আপনার টার্মিনাল সেশন বন্ধ করে আবার খুলুন যাতে Antigravity CLI বাইনারি
agyআপনার সিস্টেমেPATHউপলভ্য হয়।
- আপনার লোকাল টার্মিনালে,
google-cloud-developerপ্লাগ-ইন ইনস্টল করতে নিম্নলিখিত কমান্ড রান করুন:agy plugin install https://github.com/google/skills/plugins/cloud/google-cloud-developerCloning plugin from https://github.com/google/skills.git... [ok] google-cloud-developer ✔ skills : 5 processed - agents : skipped (not found) - commands : skipped (not found) ✔ mcpServers : 1 processed - hooks : skipped (not found)
৩. Antigravity ও DK MCP সার্ভার সেট-আপ করা
এই বিভাগে, আপনি সীমাবদ্ধ Google Cloud API কী ব্যবহার করে Antigravity-তে DK MCP সার্ভার কনফিগার করবেন।
- Antigravity খুলুন,
/goalটাইপ করুন এবং গোল মোড অ্যাক্টিভেট করতে Enter প্রেস করুন, তারপর সীমাবদ্ধ API কী তৈরি করতে এবং DK MCP সার্ভার কনফিগার করতে নিম্নলিখিত প্রম্পট পেস্ট করুন। শুরু করার আগে বিভাগ থেকে আপনার Google Cloud প্রোজেক্ট আইডি দিয়েPROJECT_IDপরিবর্তন করুন। আরও তথ্যের জন্য, google-cloud-developer প্লাগ-ইন দেখুন।Set up Antigravity to use the Developer Knowledge MCP server on my local machine. Run the necessary terminal commands to complete the following: 1. Create a restricted API key named 'DKP-MCP-Key' that can only target the Developer Knowledge API. Use the PROJECT_ID to create the API key. 2. Retrieve the actual key string of the newly created API key. 3. Create or safely update my ~/.gemini/config/mcp_config.json file (preserve any existing MCP servers) with the correct JSON structure to connect the developer-knowledge server using that API key in the headers. You MUST use the following JSON structure for the new server: "developer-knowledge": { "serverUrl": "https://developerknowledge.googleapis.com/mcp", "headers": { "x-goog-api-key": "<INSERT_RETRIEVED_API_KEY_HERE>" } } When you are done, confirm that the setup is complete. - DK MCP সার্ভার অ্যাক্টিভ আছে কিনা তা যাচাই করতে, Antigravity চ্যাট উইন্ডোতে নিম্নলিখিত প্রম্পট লিখুন:
Which MCP servers are available?developer-knowledgeএবং এর উপলভ্য টুল (search_documents,answer_queryএবংget_documents) তালিকাভুক্ত করে: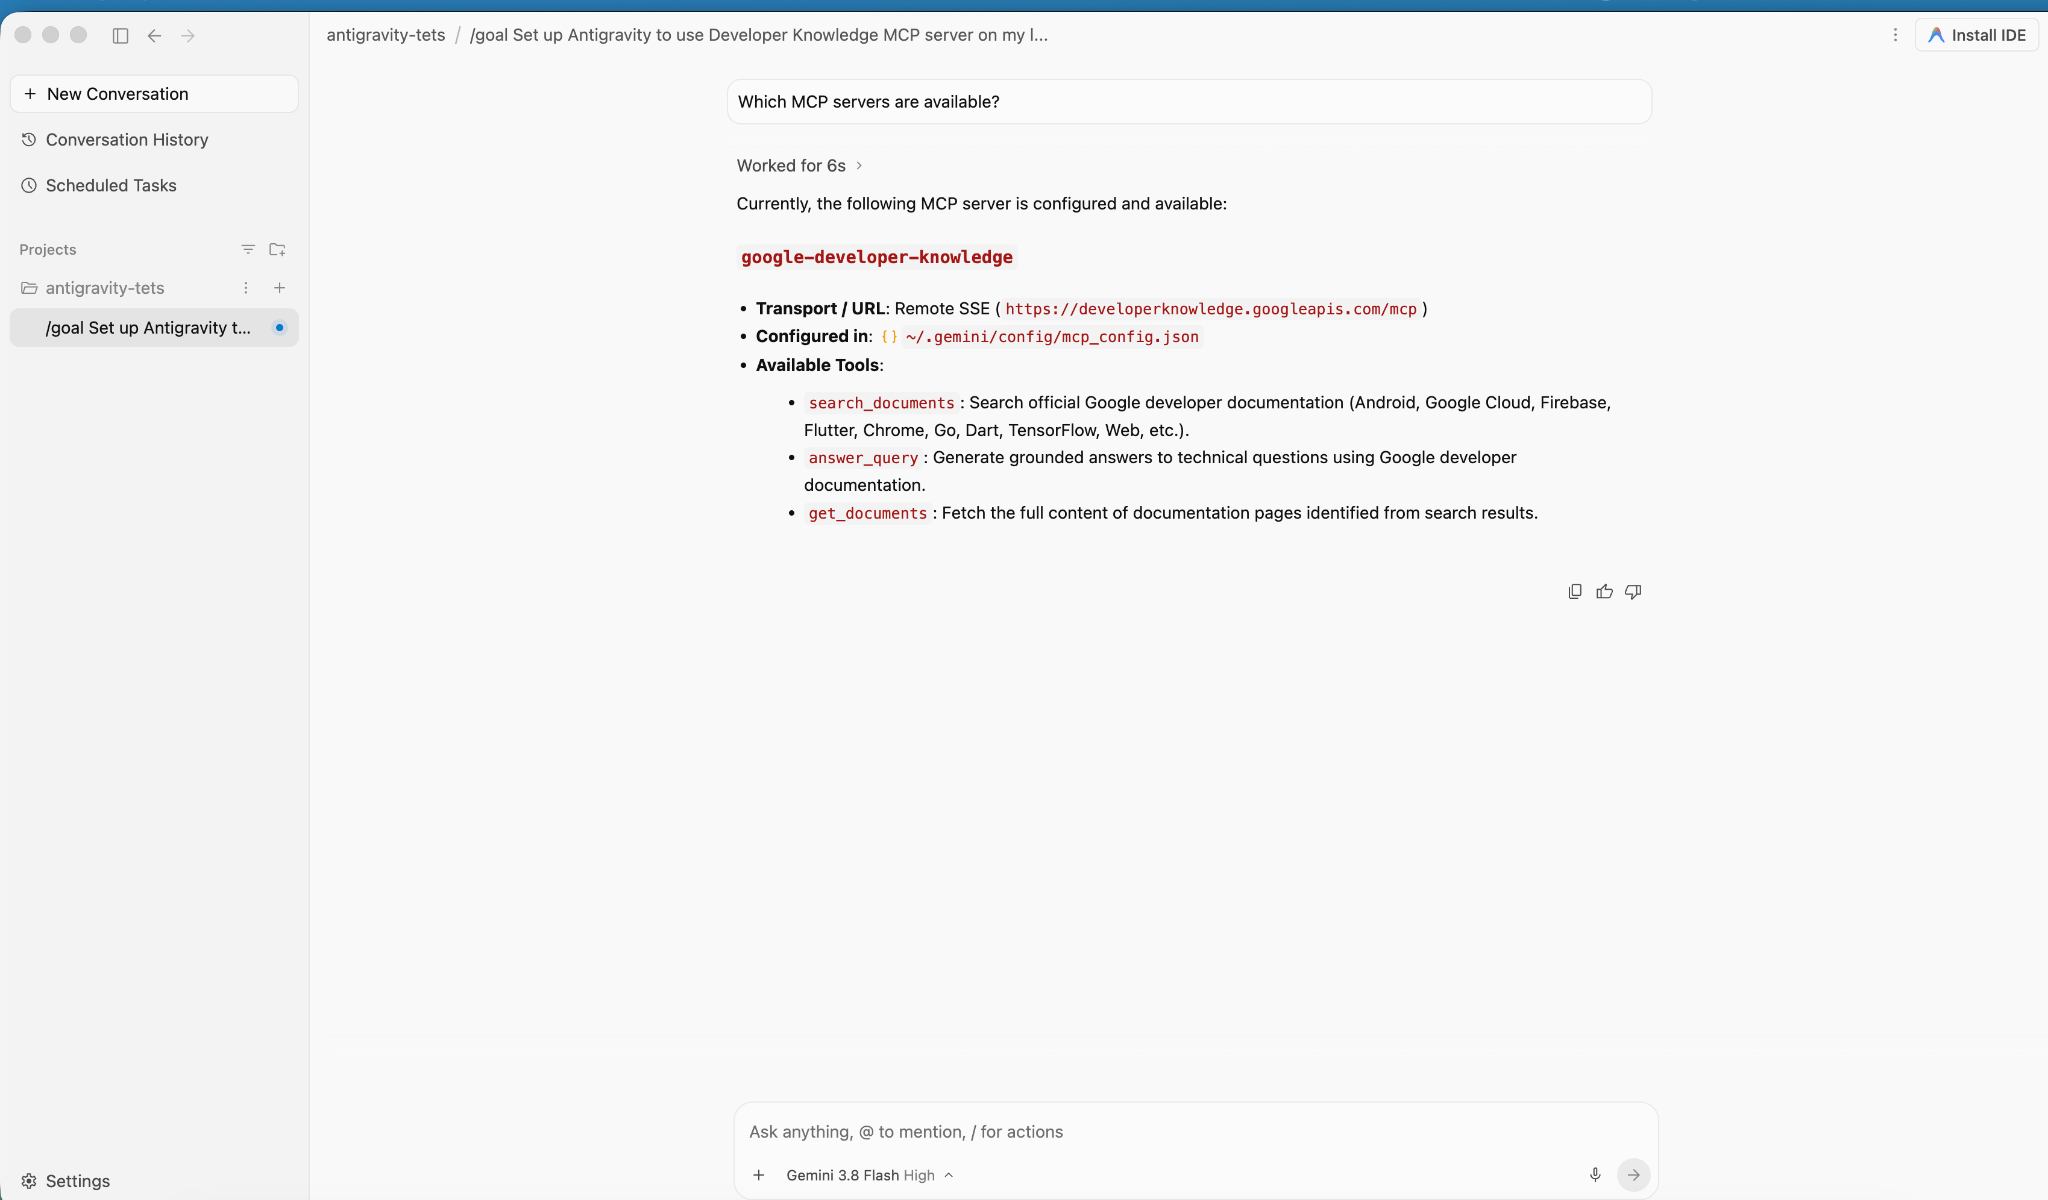
৪. অ্যাপ্লিকেশন তৈরি ও ডিপ্লয় করা
এই বিভাগে, আপনি কাস্টম VPC নেটওয়ার্কের মধ্যে দুটি প্রাইভেট Compute Engine VM-এ gCurrenC ক্যালকুলেটর অ্যাপ্লিকেশন ডিপ্লয় করবেন।
অ্যাপ্লিকেশনটি প্রদান করে:
- Python-এর বিল্ট-ইন
http.serverস্ট্যান্ডার্ড লাইব্রেরি ব্যবহার করেUSD,EUR,GBP,JPY,CAD,INRএবংAUD-এর জন্য লাইভ কারেন্সি কনভার্টার,8080পোর্টে/healthzহেলথ চেক এন্ডপয়েন্ট সহ। - রিয়েল-টাইম আউটবাউন্ড API কানেক্টিভিটি ও এনক্রিপ্ট করা থ্রেট-প্রিভেনশন প্রোব চালানোর জন্য নিরাপত্তা যাচাইকরণ কনসোল।
- একটি ইনগ্রেস ফায়ারওয়াল নিয়ম যা Google-এর IAP রেঞ্জকে সর্বজনীন IP অ্যাড্রেস প্রকাশ না করেই অ্যাডমিনিস্ট্রেটিভ টেস্টিংয়ের জন্য পোর্ট
22এবং8080-এ পৌঁছানোর অনুমতি দেয়।
অ্যাপ্লিকেশন ডিপ্লয় করুন
- Antigravity চ্যাট উইন্ডোতে,
/goalলিখুন এবং তারপরে নিম্নলিখিত প্রম্পট রান করুন:You are a Cloud developer. Deploy the "gCurrenC calculator" app onto two (2) Compute Engine VMs with no external IP addresses (`--no-address`) inside a dedicated custom VPC network and private subnet. CRITICAL INSTRUCTIONS ON OUTPUT: - The VMs are strictly private with no external IP addresses and the local IAP tunnel has NOT been started yet. Any web URL is completely unreachable and will fail with a connection error. - In your final response, simply confirm that the private VMs and Managed Instance Group are deployed, and state that the user should establish the IAP tunnel. Do not output, format, or suggest any web preview link or URL (such as http://localhost:8080 or internal IP addresses) in your final response. Run this script in the terminal: ```bash #!/usr/bin/env bash set -euxo pipefail # Disable any interactive confirmation prompts so execution never hangs export CLOUDSDK_CORE_DISABLE_PROMPTS=1 # --- User Configuration --- PROJECT_ID="[PROJECT_ID]" REGION="us-central1" ZONE="us-central1-a" NETWORK="gcurrenc-vpc" SUBNET="gcurrenc-app-subnet" SUBNET_RANGE="10.10.1.0/24" # -------------------------- echo "==> [1/5] Configuring project, default region/zone, and enabling APIs..." gcloud config set project "${PROJECT_ID}" gcloud config set compute/region "${REGION}" gcloud config set compute/zone "${ZONE}" gcloud services enable compute.googleapis.com echo "==> [2/5] Creating custom VPC network and private workload subnet..." gcloud compute networks create "${NETWORK}" \ --subnet-mode=custom \ --description="Dedicated VPC for currency exchange app demo" 2>/dev/null || true gcloud compute networks subnets create "${SUBNET}" \ --network="${NETWORK}" \ --region="${REGION}" \ --range="${SUBNET_RANGE}" \ --enable-private-ip-google-access \ --description="Private subnet hosting backend compute instances" 2>/dev/null || true echo "==> [3/5] Generating standalone Python standard-library startup script..." cat << 'STARTUP_EOF' > /tmp/private_app_startup.sh #!/bin/bash set -euxo pipefail mkdir -p /opt/gcurrenc-app # Pure Python standard-library application (zero pip/apt dependencies needed at boot) cat << 'APPEOF' > /opt/gcurrenc-app/app.py import os import sys import json import socket import urllib.request import urllib.parse import ssl from http.server import BaseHTTPRequestHandler, ThreadingHTTPServer SUPPORTED_CURRENCIES = ["USD", "EUR", "GBP", "JPY", "CAD", "INR", "AUD"] class CurrencyAppHandler(BaseHTTPRequestHandler): def address_string(self): return str(self.client_address[0]) def do_GET(self): parsed = urllib.parse.urlparse(self.path) path = parsed.path params = urllib.parse.parse_qs(parsed.query) if path == "/favicon.ico": self.send_response(204) self.end_headers() return if path == "/healthz": self.send_response(200) self.send_header("Content-Type", "text/plain") self.end_headers() self.wfile.write(b"OK") return if path == "/api/security-test": mode = params.get("mode", ["safe"])[0] target = "https://secure.eicar.org/eicar.com.txt" if mode == "threat" else "https://api.frankfurter.dev/v1/latest?from=USD&to=EUR" try: req = urllib.request.Request(target, headers={"User-Agent": "SecureCurrencyApp/1.0"}) ctx = ssl.create_default_context() with urllib.request.urlopen(req, timeout=5, context=ctx) as resp: data = {"verdict": "PERMITTED", "target": target, "http_status": resp.status} code = 200 except Exception as e: data = {"verdict": "BLOCKED_OR_FAILED", "target": target, "error": str(e)} code = 502 self.send_response(code) self.send_header("Content-Type", "application/json") self.end_headers() self.wfile.write(json.dumps(data, indent=2).encode("utf-8")) return self.render_page() def do_POST(self): parsed = urllib.parse.urlparse(self.path) if parsed.path == "/generate": content_length = int(self.headers.get("Content-Length", 0)) post_body = self.rfile.read(content_length).decode("utf-8") form = urllib.parse.parse_qs(post_body) base_curr = form.get("base_curr", ["USD"])[0] target_curr = form.get("target_curr", ["EUR"])[0] try: amount = float(form.get("amount", ["2500.00"])[0]) except ValueError: amount = 2500.00 rate_str = "Unavailable" total_str = "Rate lookup pending outbound internet activation" try: if base_curr == target_curr: rate = 1.0 else: url = f"https://api.frankfurter.dev/v1/latest?from={base_curr}&to={target_curr}" req = urllib.request.Request(url, headers={"User-Agent": "SecureCurrencyApp/1.0"}) with urllib.request.urlopen(req, timeout=4) as resp: res_json = json.loads(resp.read().decode("utf-8")) rate = res_json["rates"][target_curr] rate_str = str(rate) total_str = f"{round(amount * rate, 2):,.2f} {target_curr}" except Exception as e: total_str = f"Outbound connection unavailable {str(e)}" self.render_page(base_curr, target_curr, amount, rate_str, total_str) return self.send_response(404) self.end_headers() def render_page(self, base_curr="USD", target_curr="EUR", amount=2500.00, fx_rate="1.00", total_str=""): hostname = socket.gethostname() curr_options_base = "".join([f'<option value="{c}" {"selected" if c == base_curr else ""}>{c}</option>' for c in SUPPORTED_CURRENCIES]) curr_options_target = "".join([f'<option value="{c}" {"selected" if c == target_curr else ""}>{c}</option>' for c in SUPPORTED_CURRENCIES]) result_block = "" if total_str: if fx_rate == "Unavailable": rate_line = "<p style='margin: 6px 0;'>Exchange Rate: <span style='color: #d93025; font-weight: bold;'>⚠️ Offline-Outbound internet blocked</span></p>" else: rate_line = f"<p style='margin: 6px 0; font-size: 14px; color: #137333;'>🟢 Exchange Rate: <strong>1 {base_curr} = {fx_rate} {target_curr}</strong> (Secured via Cloud NAT & Cloud NGFW)</p>" result_block = f""" <div style="margin-top: 22px; background: #e6f4ea; border: 1px solid #c6e1c6; border-left: 5px solid #34a853; padding: 18px 20px; border-radius: 8px;"> <h4 style="margin: 0 0 6px 0; text-transform: uppercase; font-size: 12px; color: #137333; letter-spacing: 0.5px;">Conversion Result</h4> <div style="font-size: 24px; font-weight: 700; color: #202124; margin-bottom: 6px;"> {amount:,.2f} {base_curr} = <span style="color: #1a73e8;">{total_str}</span> </div> {rate_line} </div> """ html = ("""<!DOCTYPE html> <html lang="en"> <head> <meta charset="UTF-8"> <meta name="viewport" content="width=device-width, initial-scale=1.0"> <title>gCurrenC calculator</title> <style> body { font-family: -apple-system, BlinkMacSystemFont, "Segoe UI", Roboto, "Helvetica Neue", Arial, sans-serif; background: #f8f9fa; margin: 30px 15px; color: #202124; display: flex; justify-content: center; } .container { width: 100%; max-width: 860px; } .card { background: white; padding: 24px 28px; border-radius: 12px; box-shadow: 0 1px 3px rgba(60,64,67,0.12), 0 4px 8px rgba(60,64,67,0.06); border: 1px solid #dadce0; margin-bottom: 20px; } .header { display: flex; justify-content: space-between; align-items: center; border-bottom: 1px solid #e8eaed; padding-bottom: 14px; margin-bottom: 20px; } .header h2 { margin: 0 0 4px 0; font-size: 20px; font-weight: 600; } .header p { margin: 0; font-size: 13px; color: #5f6368; } .badge { background: #e8f0fe; color: #1a73e8; padding: 6px 12px; border-radius: 16px; font-weight: 600; font-size: 12px; border: 1px solid #d2e3fc; display: flex; align-items: center; gap: 6px; } .badge::before { content: ""; width: 8px; height: 8px; border-radius: 50%; background-color: #34a853; } .form-row { display: flex; gap: 14px; align-items: flex-end; flex-wrap: wrap; } .form-group { display: flex; flex-direction: column; gap: 6px; } .form-group label { font-size: 12px; font-weight: 600; color: #5f6368; text-transform: uppercase; letter-spacing: 0.5px; } input, select { padding: 10px 14px; border: 1px solid #dadce0; border-radius: 6px; font-size: 14px; color: #202124; background-color: #fff; box-sizing: border-box; transition: border-color 0.15s, box-shadow 0.15s; } input:focus, select:focus { outline: none; border-color: #1a73e8; box-shadow: 0 0 0 3px rgba(26, 115, 232, 0.15); } button { padding: 11px 20px; background: #1a73e8; color: white; border: none; border-radius: 6px; font-size: 14px; font-weight: 500; cursor: pointer; transition: background 0.15s, box-shadow 0.15s; } button:hover { background: #1557b0; box-shadow: 0 1px 2px rgba(60,64,67,0.3); } .danger-btn { background: #d93025; } .danger-btn:hover { background: #b31412; } pre { background: #202124; color: #8ab4f8; padding: 14px; border-radius: 6px; overflow-x: auto; font-family: "SF Mono", "Fira Code", Consolas, monospace; font-size: 13px; line-height: 1.5; margin: 0; } /* Collapsible Security Console */ details.security-drawer { background: white; border-radius: 12px; box-shadow: 0 1px 3px rgba(60,64,67,0.12); border: 1px solid #dadce0; overflow: hidden; margin-bottom: 24px; } details.security-drawer summary { padding: 16px 20px; font-size: 14px; font-weight: 600; cursor: pointer; list-style: none; display: flex; justify-content: space-between; align-items: center; user-select: none; background: #fafafa; transition: background 0.15s; } details.security-drawer summary::-webkit-details-marker { display: none; } details.security-drawer summary:hover { background: #f1f3f4; } details.security-drawer[open] summary { border-bottom: 1px solid #dadce0; background: #ffffff; } .expand-toggle { font-size: 13px; font-weight: 500; } details.security-drawer summary .expand-toggle::before { content: "▶ Click to Expand"; color: #1a73e8; } details.security-drawer[open] summary .expand-toggle::before { content: "▼ Click to Collapse"; color: #5f6368; } .drawer-body { padding: 20px; background: #ffffff; } .drawer-body p { margin-top: 0; font-size: 13px; color: #5f6368; } .probe-buttons { display: flex; gap: 10px; margin-bottom: 14px; } </style> </head> <body> <div class="container"> <div class="card"> <div class="header"> <div> <h2>💱 gCurrenC calculator</h2> </div> <div class="badge">Serving host: {hostname}</div> </div> <form method="POST" action="/generate"> <div class="form-row"> <div class="form-group" style="flex: 1.5; min-width: 140px;"> <label>Amount</label> <input type="number" step="0.01" name="amount" value="{amount}" required> </div> <div class="form-group" style="flex: 1; min-width: 100px;"> <label>From</label> <select name="base_curr">{curr_options_base}</select> </div> <div class="form-group" style="flex: 1; min-width: 100px;"> <label>To (Target)</label> <select name="target_curr">{curr_options_target}</select> </div> <div class="form-group"> <button type="submit">Convert currency ➔</button> </div> </div> </form> {result_block} </div> <!-- Collapsible Security Verification Console --> <details class="security-drawer"> <summary> <span>🛡️ Security verification console</span> <span class="expand-toggle"></span> </summary> <div class="drawer-body"> <p>Test outbound HTTPS traffic and threat prevention capabilities in real time:</p> <div class="probe-buttons"> <button type="button" onclick="runProbe('safe')">Test Outbound API Connection</button> <button type="button" class="danger-btn" onclick="runProbe('threat')">Simulate Encrypted Threat (EICAR)</button> </div> <pre id="output">Waiting for command...</pre> </div> </details> </div> <script> function runProbe(mode) { const el = document.getElementById('output'); el.innerText = 'Executing outbound request...'; fetch('/api/security-test?mode=' + mode) .then(res => res.json()) .then(data => el.innerText = JSON.stringify(data, null, 2)) .catch(err => el.innerText = 'Connection dropped / reset by Firewall: ' + err); } </script> </body> </html>""" .replace("{hostname}", str(hostname)) .replace("{amount}", str(amount)) .replace("{curr_options_base}", curr_options_base) .replace("{curr_options_target}", curr_options_target) .replace("{result_block}", result_block) ) self.send_response(200) self.send_header("Content-Type", "text/html; charset=utf-8") self.end_headers() self.wfile.write(html.encode("utf-8")) def run(): server_address = ('0.0.0.0', 8080) httpd = ThreadingHTTPServer(server_address, CurrencyAppHandler) httpd.serve_forever() if __name__ == '__main__': run() APPEOF # Register and start systemd unit cat << 'SERVICEEOF' > /etc/systemd/system/gcurrenc-app.service [Unit] Description=Currency exchange calculator web application After=network.target [Service] Type=simple User=root WorkingDirectory=/opt/gcurrenc-app ExecStart=/usr/bin/python3 /opt/gcurrenc-app/app.py Restart=always [Install] WantedBy=multi-user.target SERVICEEOF systemctl daemon-reload systemctl enable gcurrenc-app systemctl start gcurrenc-app STARTUP_EOF echo "==> [4/5] Creating Firewall, Regional Instance Template, and 2-VM MIG..." gcloud compute firewall-rules create allow-iap-admin \ --network="${NETWORK}" \ --allow=tcp:22,tcp:8080 \ --source-ranges=35.235.240.0/20 \ --target-tags=gcurrenc-app-vm \ --description="Allow IAP SSH and port 8080 access to private VMs" \ --quiet 2>/dev/null || true # Explicitly pass both --region and --instance-template-region to avoid prompt gcloud compute instance-templates create gcurrenc-app-template \ --instance-template-region="${REGION}" \ --region="${REGION}" \ --network="${NETWORK}" \ --subnet="${SUBNET}" \ --machine-type=e2-medium \ --no-address \ --tags=gcurrenc-app-vm \ --metadata-from-file=startup-script=/tmp/private_app_startup.sh \ --quiet gcloud compute instance-groups managed create gcurrenc-app-mig \ --base-instance-name=gcurrenc-vm \ --template="projects/${PROJECT_ID}/regions/${REGION}/instanceTemplates/gcurrenc-app-template" \ --size=2 \ --zone="${ZONE}" \ --quiet gcloud compute instance-groups managed set-named-ports gcurrenc-app-mig \ --named-ports=http-port:8080 \ --zone="${ZONE}" \ --quiet echo "==> [5/5] Verifying private VM deployment and internal status..." sleep 30 gcloud compute instances list \ --filter="name ~ '^gcurrenc-vm-'" \ --zones="${ZONE}" \ --format="table(name,zone.basename():label=ZONE,networkInterfaces[0].networkIP:label=INTERNAL_IP,status)" FIRST_VM=$(gcloud compute instances list \ --filter="name ~ '^gcurrenc-vm-'" \ --zones="${ZONE}" \ --format="value(name)" \ --limit=1) echo "Testing healthz on ${FIRST_VM} via IAP tunnel..." gcloud compute ssh "${FIRST_VM}" \ --zone="${ZONE}" \ --tunnel-through-iap \ --quiet \ --command="curl -fsS http://localhost:8080/healthz" echo "" echo "==========================================================================" echo "PREREQUISITE COMPLETE: 2 private VMs deployed with no external IPs." echo "VPC: ${NETWORK} | Subnet: ${SUBNET} (${SUBNET_RANGE})" echo "Instance Group: gcurrenc-app-mig (Zone: ${ZONE}, Port: 8080)" echo "" echo "The VMs are private and the IAP tunnel is not active. Set up the background IAP tunnel first to access the deployed app." echo "" echo "==========================================================================" ```
VM ইনস্ট্যান্স তৈরি করা যাচাই করুন
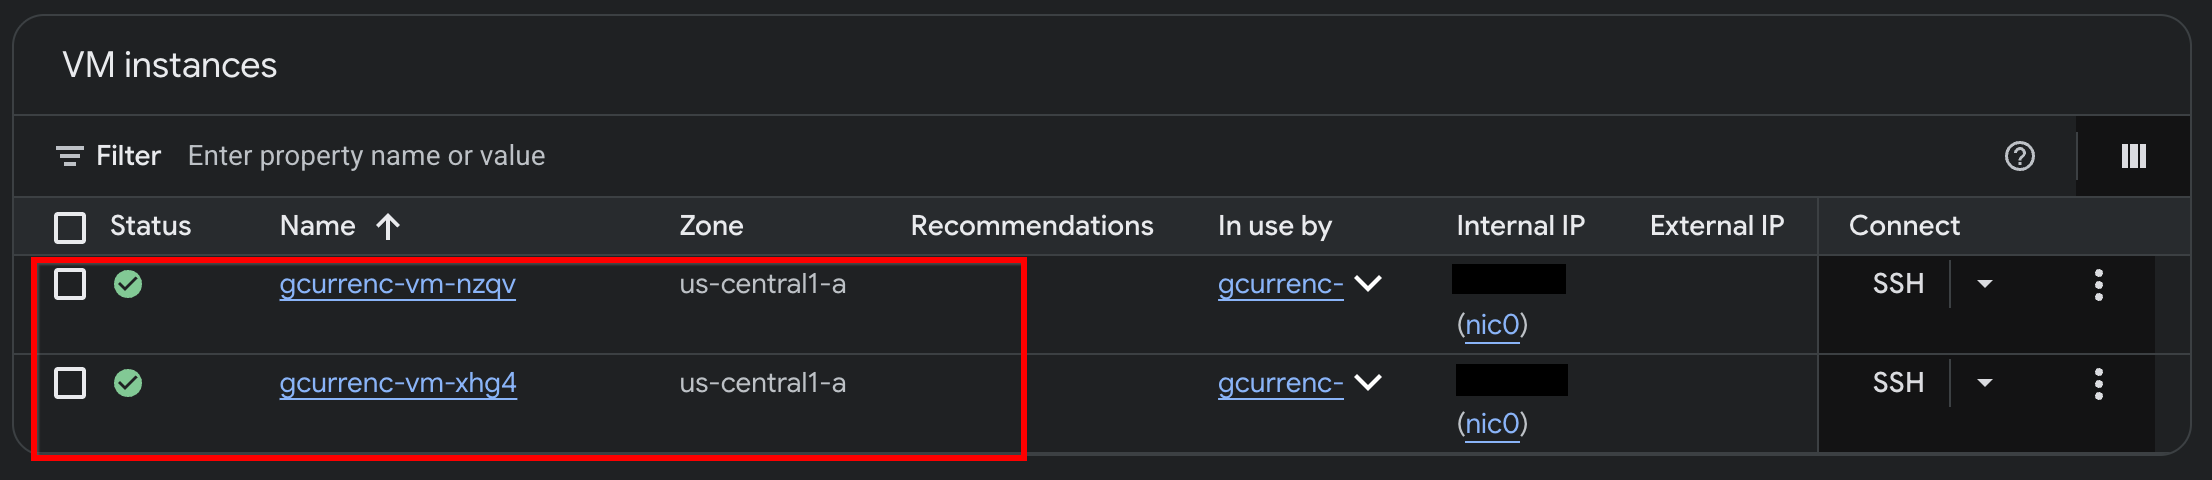
Antigravity দুটি প্রাইভেট Compute Engine VM-এ অ্যাপ্লিকেশন ডিপ্লয় করা শেষ করার পরে, Google Cloud কনসোলে ইনস্ট্যান্সগুলি যাচাই করুন:
- Google Cloud কনসোল-এ, VM ইনস্ট্যান্স-এ যান।
- দুটি VM ইনস্ট্যান্স ইন্টার্নাল IP অ্যাড্রেস এবং কোনও এক্সটার্নাল IP অ্যাড্রেস ছাড়াই চলছে কিনা তা যাচাই করুন:
৫. অ্যাপ্লিকেশন টেস্ট করুন
প্রাইভেট VM-এর কোনও এক্সটার্নাল IP অ্যাড্রেস (--no-address) এবং Cloud NAT গেটওয়ে না থাকার কারণে, ইন্টারনেটের সাথে কোনও কানেকশন নেই এবং এক্সটার্নাল কারেন্সি এক্সচেঞ্জ API-এর সাথে কানেক্ট করতে পারে না। নিরাপদ আউটবাউন্ড অ্যাক্সেস কনফিগার করার আগে, কোনও ইন্টারনেট অ্যাক্সেস নেই তা যাচাই করতে লোকাল IAP টানেলের মাধ্যমে অ্যাপ্লিকেশনটি পরীক্ষা করুন।
/goalমোডে, Antigravity চ্যাট উইন্ডোতে নিম্নলিখিত প্রম্পট রান করুন:Automate the IAP tunnel configuration and health verification for the web app, then output the live test URL. Run a terminal script that performs the following steps non-interactively: 1. Firewall Check: - Identify the active network ('gcurrenc-vpc' if it exists, otherwise 'default'). - Idempotently ensure an ingress firewall rule exists permitting 'tcp:22,tcp:8080' from the Google IAP range '35.235.240.0/20' targeting 'gcurrenc-app-vm'. 2. VM Health Verification: - Find the first running instance matching '^gcurrenc-vm-' in zone 'us-central1-a'. - Via 'gcloud compute ssh --tunnel-through-iap', verify that the 'gcurrenc-app' systemd service is active. If not active, restart it. 3. Background IAP Tunnel: - Free up local port 8080 if an old tunnel or process is lingering (e.g., using 'lsof -ti:8080 | xargs kill -9' or 'fuser -k 8080/tcp'). - Launch 'gcloud compute start-iap-tunnel <VM_NAME> 8080 --local-host-port=localhost:8080 --zone=us-central1-a' in the background using nohup, redirecting output to '/tmp/iap_tunnel.log'. - Wait up to 10 seconds for the tunnel to establish, checking with 'curl -fsS http://localhost:8080/healthz'. 4. Output Web Preview URL: - Detect whether the environment is Google Cloud Shell (check if $CLOUD_SHELL is true) or a local workstation. - If Cloud Shell, print instructions and the direct web preview link. - If local machine, provide the clickable 'http://localhost:8080' URL.- টানেল শুরু হওয়ার পরে, আপনার ওয়েব ব্রাউজারে
http://localhost:8080/খুলুন: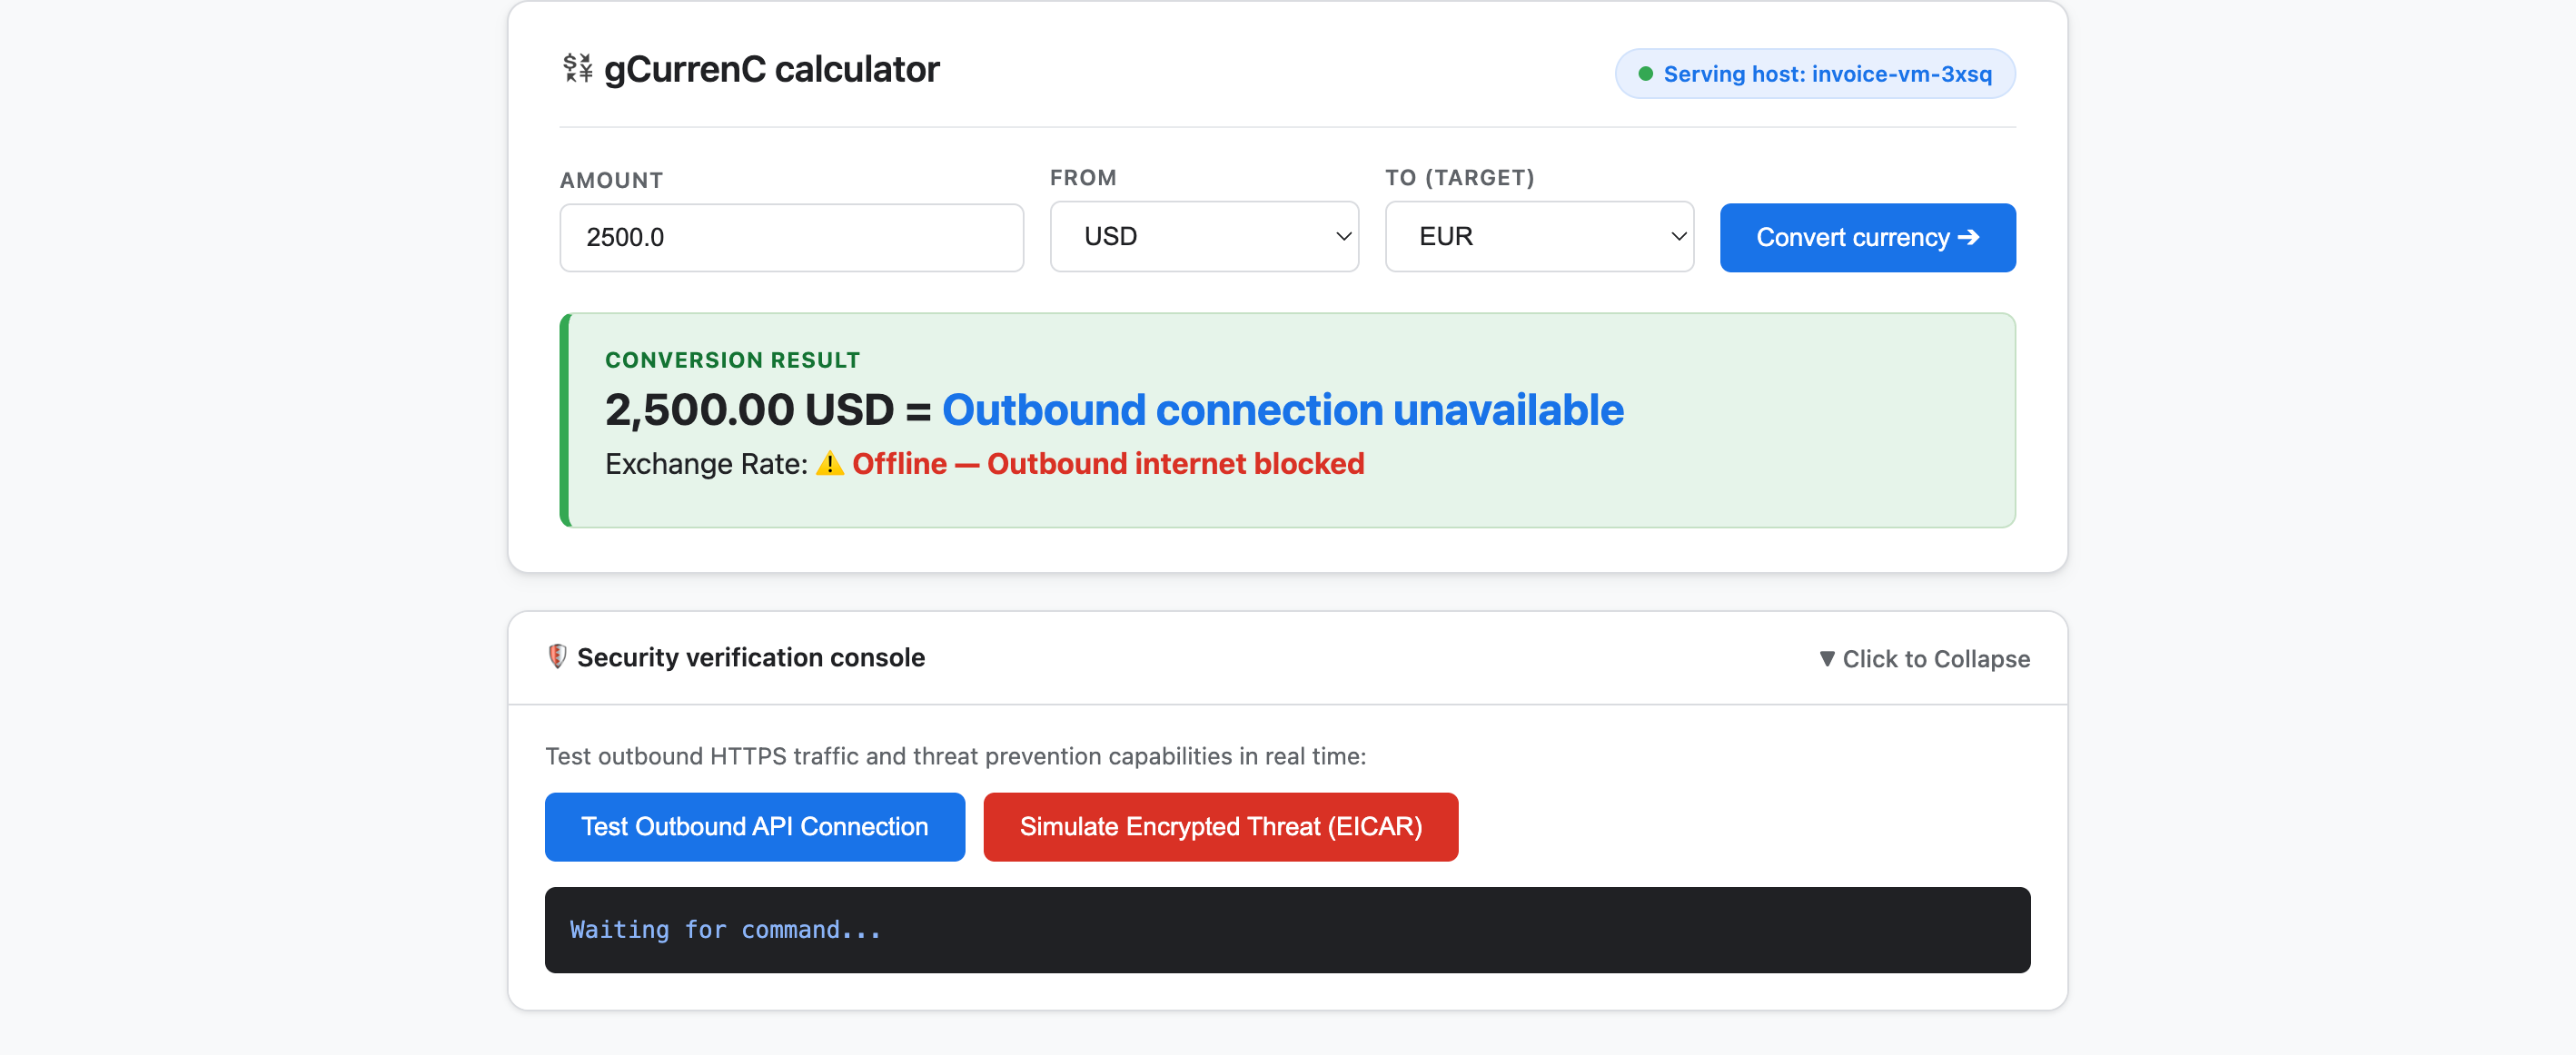
- অ্যাপ্লিকেশনটি পরীক্ষা করুন:
- কারেন্সি কনভার্ট করুন বিকল্পে ক্লিক করুন। কনভার্সনের ফলাফলে
Offline - Outbound internet blockedওOutbound connection unavailableদেখা যায়। এই ফলাফল প্রত্যাশিত কারণ লেটেস্ট এক্সচেঞ্জ রেট ফেচ করার জন্য প্রাইভেট VM ইন্টারনেটের সাথে কানেক্ট করতে পারে না। - নিরাপত্তা যাচাইকরণ কনসোল বড় করে আউটবাউন্ড API কানেকশন পরীক্ষা করুন বিকল্পে ক্লিক করুন। আউটপুটে
https://api.frankfurter.dev/v1/latest-এর জন্যverdict: BLOCKED_OR_FAILED(https://api.frankfurter.dev/v1/latestথেকে এক্সচেঞ্জ রেট ফেচ করতে পারে না। - এনক্রিপ্ট করা থ্রেট (EICAR) সিমুলেট করুন বিকল্পে ক্লিক করুন। এছাড়াও, আউটপুটে
https://secure.eicar.org/eicar.com.txt-এর জন্যverdict: BLOCKED_OR_FAILEDদেখায়। এই ফলাফলও প্রত্যাশিত কারণ ব্যক্তিগত VM-এর কোনও ইন্টারনেট কানেক্টিভিটি নেই।
- কারেন্সি কনভার্ট করুন বিকল্পে ক্লিক করুন। কনভার্সনের ফলাফলে
স্থানীয় IAP টানেল বন্ধ করুন
নিরাপত্তা আর্কিটেকচার ডিজাইন ও ডিপ্লয় করার আগে, পোর্ট 8080 খালি করতে স্থানীয় IAP টানেল বন্ধ করুন:
/goalমোডে, নিম্নলিখিত প্রম্পট রান করুন:Free up local port 8080 and terminate any running Google Cloud IAP tunnels (e.g., kill processes matching 'start-iap-tunnel' or listening on port 8080).8080ফ্রি আছে।
৬. অ্যাপ্লিকেশনটি সুরক্ষিত করুন
আগের বিভাগে, আপনি কোনও পাবলিক IP অ্যাড্রেস ছাড়াই প্রাইভেট Compute Engine VM তৈরি করেছেন এবং দুটি মূল নেটওয়ার্কিং ও নিরাপত্তা সংক্রান্ত চ্যালেঞ্জ যাচাই করেছেন:
- ইনবাউন্ড অ্যাক্সেস (ইনগ্রেস): ইন্টারনেট ব্যবহারকারীরা সরাসরি প্রাইভেট VM ইনস্ট্যান্স অ্যাক্সেস করতে পারেন না এবং ওয়েব অ্যাপ্লিকেশন দেখানোর জন্য গ্লোবাল এক্সটার্নাল অ্যাপ্লিকেশন লোড ব্যালেন্সার এবং ডেডিকেটেড প্রক্সি-অনলি সাবনেটের মাধ্যমে ট্রাফিক প্রক্সি করতে হয়, যাতে পাবলিক ইন্টারনেটে VM প্রকাশ না হয়।
- আউটবাউন্ড অ্যাক্সেস (এগ্রেস): লাইভ HTTPS কারেন্সি এক্সচেঞ্জ API কোয়েরি করার জন্য প্রাইভেট VM-এর ইন্টারনেটে কোনও রুট নেই এবং আউটবাউন্ড অ্যাক্সেস চালু করার জন্য SSL/TLS ট্রাস্ট না ভেঙে ম্যালওয়্যার এবং ডেটা এক্সফিল্ট্রেশনের জন্য এনক্রিপ্ট করা ট্রাফিক পরীক্ষা করতে হবে।
এই বিভাগে, আপনি Antigravity-কে একটি স্ট্রিমলাইনড ওয়ার্কফ্লোর মাধ্যমে গাইড করবেন যা অফিসিয়াল Google Cloud ডকুমেন্টেশন (@retrieving-developer-knowledge)-এর উপর ভিত্তি করে তৈরি। এর উদ্দেশ্য হল আপনার অ্যাপ্লিকেশনের জন্য প্রোজেক্ট-লেভেল ইনগ্রেস এবং ইগ্রেস নিরাপত্তা আর্কিটেকচার ডিজাইন, সেল্ফ-অডিট এবং ডিপ্লয় করা।
ইউনিফায়েড নিরাপত্তা আর্কিটেকচার ডিজাইন করা
/goalমোডে, ইনবাউন্ড ও আউটবাউন্ড ট্রাফিক ফ্লো কভার করে এমন এন্ড-টু-এন্ড আর্কিটেকচার ডায়াগ্রাম ও ব্যাখ্যা তৈরি করতে নিম্নলিখিত প্রম্পট রান করুন:You are a Google Cloud Network and Security Architect. We need to design an end-to-end security architecture for our "gCurrenC calculator" app running on private Compute Engine VMs with no external IP addresses inside 'gcurrenc-vpc'. We are operating in a standalone Google Cloud project without an Organization resource, so all security resources must be scoped at the project level. Use the @retrieving-developer-knowledge skill to consult official Google Cloud documentation and suggest an architecture diagram and explanation covering both flows: 1. Ingress Flow: - How internet users securely reach the private VMs via a global external Application Load Balancer. - Why Envoy-based external Application Load Balancers require a dedicated proxy-only subnet, and how Google Front Ends (GFEs) proxy traffic to private backends without exposing VMs to the public internet. 2. Egress Flow: - How private VMs reach the internet via Cloud NAT to query live currency exchange APIs, such as frankfurter.dev. - How Cloud NGFW Enterprise provides Layer 7 deep packet inspection and intrusion prevention (IPS) for outbound encrypted HTTPS traffic. - How TLS inspection backed by Certificate Authority Service (CAS) decrypts outbound HTTPS sessions on the fly, and what Root CA trust configuration the private VMs require. Provide a clear diagram and explain how these components connect together.
আর্কিটেকচারাল রিসোর্স আউটলাইন তৈরি করুন
- ডিপ্লয়মেন্ট স্ক্রিপ্ট জেনারেট করার আগে, ডিজাইনকে বিভাগ অনুযায়ী প্রোজেক্ট-লেভেল রিসোর্স আউটলাইনে সাজাতে, নিম্নলিখিত প্রম্পট লিখুন:
Act as a Lead Network Security Architect. Using the @retrieving-developer-knowledge skill, provide an architectural outline of all the Google Cloud resources required to secure the "gCurrenC calculator" app.

Our starting state:
- The custom VPC ('gcurrenc-vpc'), workload subnet ('gcurrenc-app-subnet'), and 2-instance MIG ('gcurrenc-app-mig', port 8080) are already deployed.
- All newly added security components must be project-level resources (no organization resources).

Structure your resource outline into three distinct categories, indicating which resources are new additions:
1. Core VPC Infrastructure: proxy-only subnet ('gcurrenc-proxy-subnet', 10.10.2.0/24), Cloud Router, and Cloud NAT gateway.
2. Inbound security (ingress): global external ALB components (forwarding rule on port 443, target HTTPS proxy, SSL certificate, URL map, backend service attached to 'gcurrenc-app-mig' on port 8080, and HTTP health check on '/healthz') and ingress firewall rules.
3. Outbound security (egress): CAS DevOps CA pool and root CA, project-level Cloud NGFW Enterprise components (Threat Prevention profile, Security Profile Group, Firewall Endpoint in zone us-central1-a, and Endpoint Association attaching the TLS policy), and global network firewall policy egress rules.

For each resource, briefly state its role in the security boundary and how it connects to adjacent components.
ডিপ্লয়মেন্ট স্ক্রিপ্ট জেনারেট ও সেল্ফ-অডিট করুন
/goalমোডে, একটি সম্পূর্ণ, নন-ইন্টার্যাক্টিভbashডিপ্লয়মেন্ট স্ক্রিপ্ট তৈরি করতে এবং একই সাথে কমপ্লায়েন্সের প্রয়োজনীয়তা অনুযায়ী অটোমেটিক সেল্ফ-অডিট করতে, নিম্নলিখিত প্রম্পট রান করুন:Act as a Principal Infrastructure Engineer. Using the @retrieving-developer-knowledge skill, generate a complete, non-interactive Bash script to deploy this entire security architecture for our "gCurrenC calculator" app, and self-audit the script before outputting it. Requirements: - Discover the project ID, region, and zone dynamically from the existing 'gcurrenc-app-subnet' and 'gcurrenc-app-mig'. - Keep all resources scoped strictly to the project level (no Organization resource). - Deploy the proxy-only subnet, global external Application Load Balancer, Cloud Router, and Cloud NAT. Don't use Cloud Armor. - Deploy project-level Cloud NGFW Enterprise with CAS TLS inspection ('--tls-inspect' on the firewall policy egress rule and 'gcloud beta' for the project-level firewall endpoint association) and an explicit DENY override for malware and antivirus threats. - Distribute the root CA to the private VMs over IAP SSH with connection timeouts so the guest OS trust store is updated. - Print the final Load Balancer URL ('https://${LB_IP}') at the end. Wrap the script in 'set -euxo pipefail' and output only the single executable bash script block.bashস্ক্রিপ্ট তৈরি করে, প্রতিটি কমান্ডকে সম্মতি সংক্রান্ত সীমাবদ্ধতার সাথে মিলিয়ে সেল্ফ-অডিট করে এবংset -euxo pipefail-এ মোড়ানো একটি এক্সিকিউটেবল স্ক্রিপ্ট ব্লক আউটপুট হিসেবে দেখায়।
নিরাপত্তা ডিপ্লয়মেন্ট স্ক্রিপ্ট রান করুন
/goalমোডে, ডিপ্লয়মেন্ট রান করতে এবং লাইভ অ্যাপ্লিকেশন URL (https://<LB_IP>) আউটপুট করতে, আগের প্রম্পট থেকে তৈরি করাbashস্ক্রিপ্টটি Antigravity চ্যাট উইন্ডোতে নিম্নলিখিত ফর্ম্যাটে পেস্ট করুন:Run this script. <PASTED-SCRIPT>
৭. সুরক্ষিত অ্যাপ্লিকেশন যাচাই করুন
ডিপ্লয়মেন্ট স্ক্রিপ্ট শেষ হলে, Antigravity গ্লোবাল এক্সটার্নাল অ্যাপ্লিকেশন লোড ব্যালেন্সারের (https://<LB_IP>) এক্সটার্নাল HTTPS URL আউটপুট করে।
- আপনার ওয়েব ব্রাউজারে
https://<LB_IP>খুলুন এবং gCurrenC ক্যালকুলেটর ইন্টারফেস লোড করতে ব্রাউজারের সেল্ফ-সাইন করা সার্টিফিকেট সংক্রান্ত সতর্কতা বাইপাস করুন: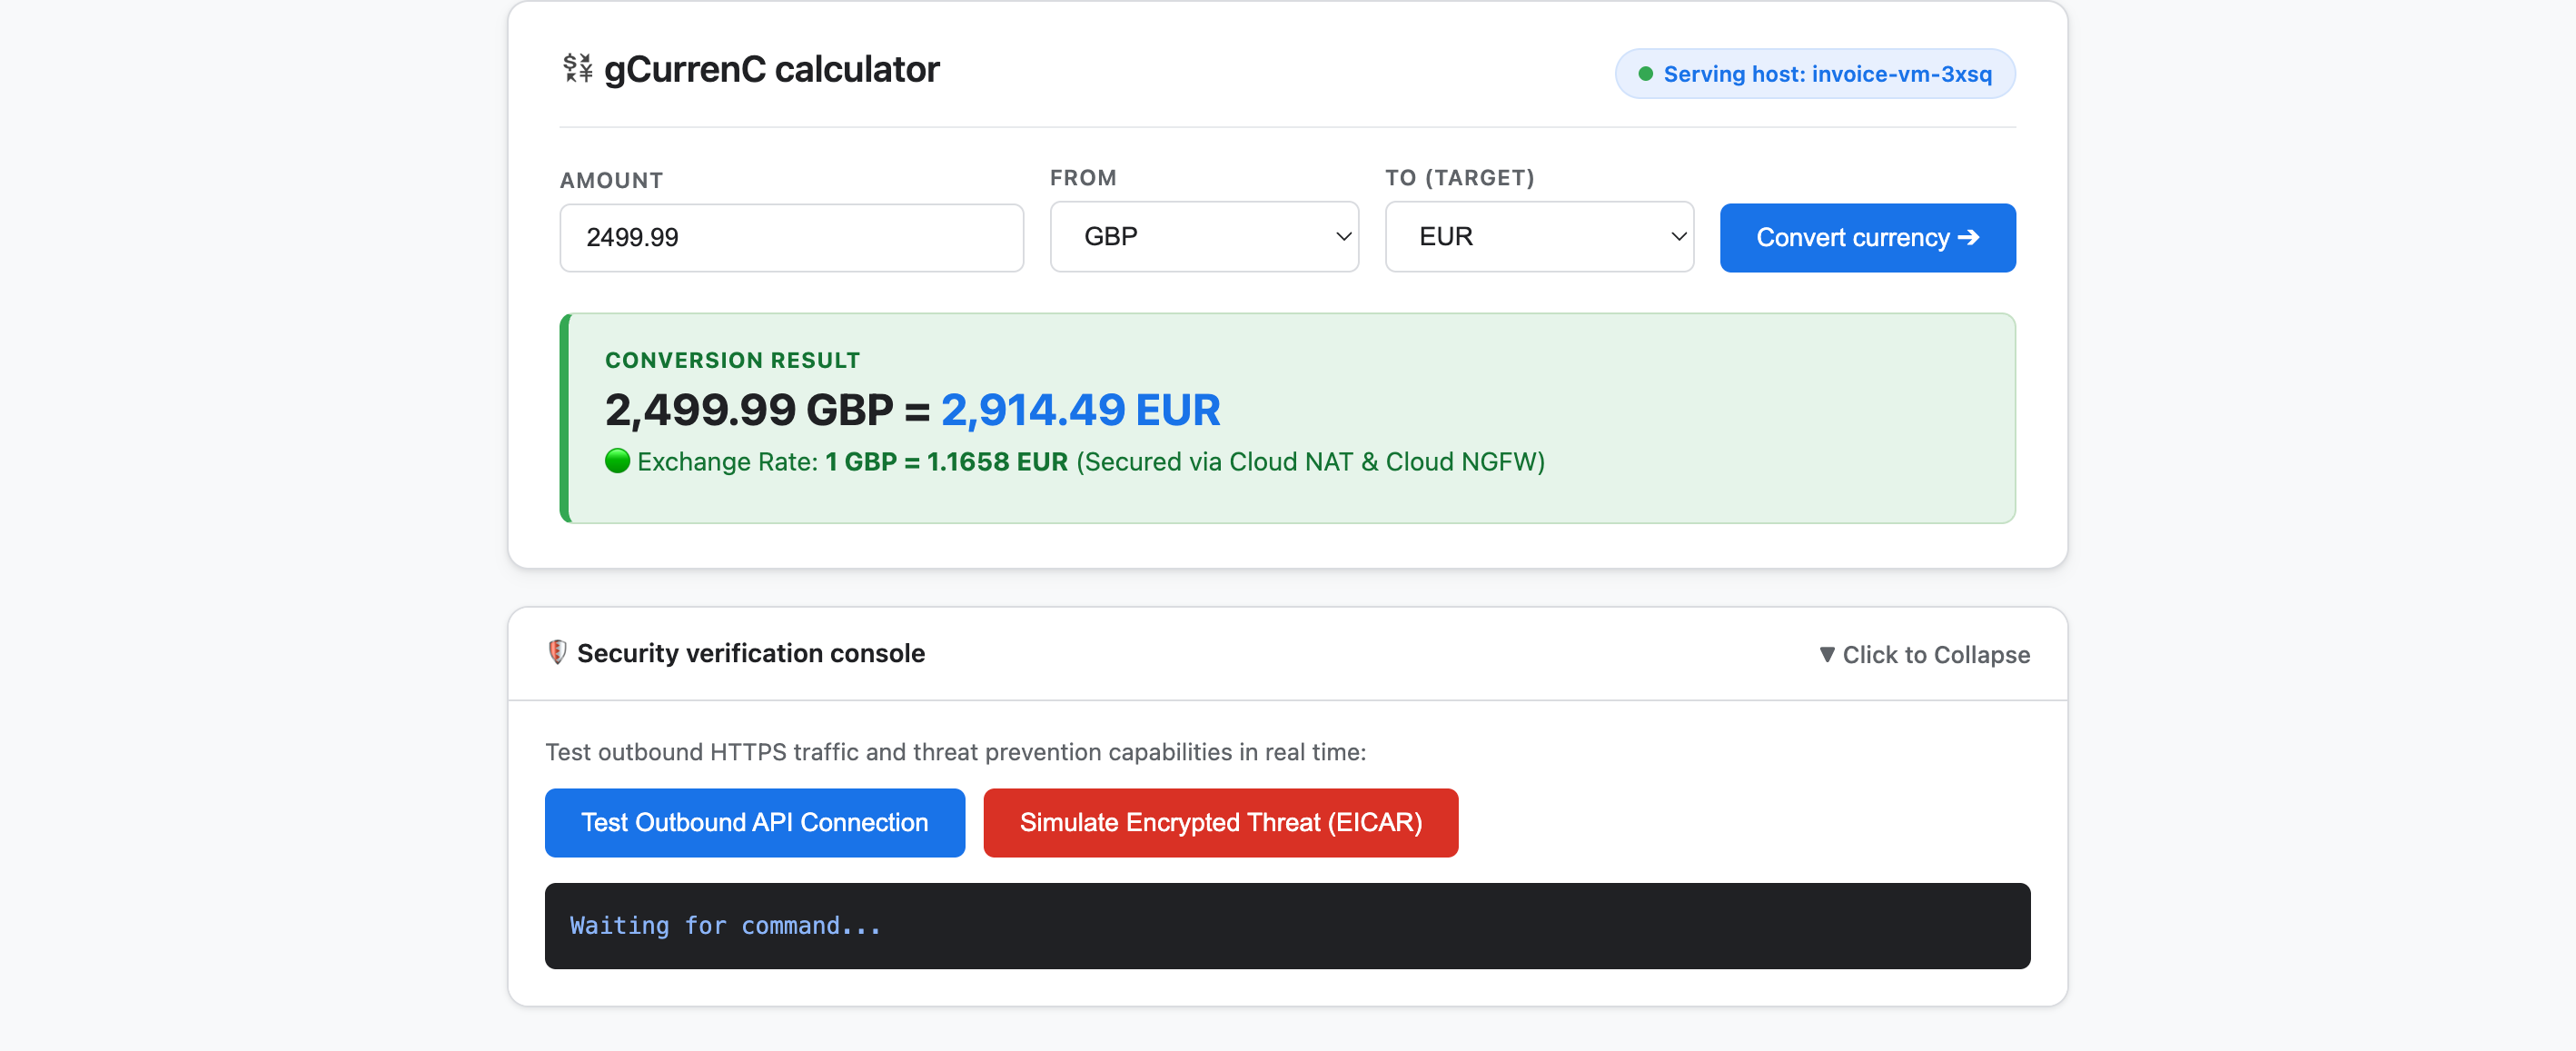
- আউটবাউন্ড কানেক্টিভিটি এবং থ্রেট প্রতিরোধ, দুটিই যাচাই করতে অ্যাপ্লিকেশনটি পরীক্ষা করুন:
- কারেন্সি কনভার্ট করুন বিকল্পে ক্লিক করুন। অ্যাপ্লিকেশনটি অবিলম্বে লাইভ কনভার্ট করা এক্সচেঞ্জ রেট দেখায়। এটি নিশ্চিত করে যে ইনগ্রেস লোড ব্যালেন্সিং Google Front Ends (GFEs) এবং শুধুমাত্র প্রক্সি সাবনেটের মাধ্যমে মসৃণভাবে রুট করে, যখন Cloud NAT
api.frankfurter.devথেকে লাইভ এক্সচেঞ্জ রেট নিয়ে আসে। - নিরাপত্তা যাচাইকরণ কনসোল বড় করে আউটবাউন্ড API কানেকশন পরীক্ষা করুন বিকল্পে ক্লিক করুন। অ্যাপ্লিকেশনটি
verdict: PERMITTED(HTTP 200) দেখায়। এটি নিশ্চিত করে যে Cloud NAT রাউটিং কাজ করে এবং VM অপারেটিং সিস্টেম ডিক্রিপ্ট করা HTTPS সেশনের জন্য প্রাইভেট CAS রুট CA-কে বিশ্বাস করে। - এনক্রিপ্ট করা থ্রেট (EICAR) সিমুলেট করুন বিকল্পে ক্লিক করুন। অ্যাপ্লিকেশনটি
verdict: PERMITTEDদেখায়। এটি নিশ্চিত করে যে Cloud NGFW Enterprise, CAS দ্বারা ব্যাক-আপ করা TLS ইন্সপেকশন ব্যবহার করে আউটবাউন্ড HTTPS অনুরোধ ডিক্রিপ্ট করে এবং এর ইন্ট্রুশন প্রিভেনশন সার্ভিস (IPS)-এর মাধ্যমে EICAR টেস্ট সিগনেচার ইন্সপেক্ট করে।
- কারেন্সি কনভার্ট করুন বিকল্পে ক্লিক করুন। অ্যাপ্লিকেশনটি অবিলম্বে লাইভ কনভার্ট করা এক্সচেঞ্জ রেট দেখায়। এটি নিশ্চিত করে যে ইনগ্রেস লোড ব্যালেন্সিং Google Front Ends (GFEs) এবং শুধুমাত্র প্রক্সি সাবনেটের মাধ্যমে মসৃণভাবে রুট করে, যখন Cloud NAT
৮. অপ্রয়োজনীয়গুলি মুছুন
এই কোডল্যাবে তৈরি করা রিসোর্সের জন্য আপনার Google Cloud অ্যাকাউন্টে চলমান চার্জ এড়াতে, আপনি শুধুমাত্র কোডল্যাব রিসোর্স মুছে ফেলতে পারেন বা আপনার Google Cloud প্রোজেক্ট মুছে ফেলতে পারেন।
- আপনি যদি নিজের Google Cloud প্রোজেক্ট রাখতে চান এবং শুধুমাত্র এই কোডল্যাব চলাকালীন তৈরি করা রিসোর্সগুলি সরাতে চান, তাহলে Antigravity চ্যাট উইন্ডোতে
/goalমোডে নিম্নলিখিত প্রম্পটটি চালান:Remove all resources created in this session, including the gcurrenc app and its resources. Don't delete the project. - আপনি যদি এই কোডল্যাবের জন্য একটি ডেডিকেটেড Google Cloud প্রোজেক্ট তৈরি করে থাকেন এবং পুরো প্রোজেক্টটি মুছে ফেলতে চান, তাহলে Antigravity চ্যাট উইন্ডোতে
/goalমোডে নিম্নলিখিত প্রম্পটটি রান করুন:Clean up the demo environment by deleting the Google Cloud project. Run the following command in the terminal: gcloud projects delete "$(gcloud config get-value project 2>/dev/null)" --quiet
৯. অভিনন্দন
অভিনন্দন! আপনি Google Antigravity-তে Google Cloud Developer প্লাগ-ইন (DK MCP সার্ভার) ব্যবহার করে Google Cloud-এ gCurrenC ক্যালকুলেটর ওয়েব অ্যাপ্লিকেশন ডিপ্লয় ও সুরক্ষিত করেছেন।
এর পরে কী করতে হবে
এই কোডল্যাবে ব্যবহৃত পরিষেবাগুলি সম্পর্কে আরও জানতে অফিসিয়াল Google Cloud ডকুমেন্টেশন এক্সপ্লোর করুন: