

1. Einführung
In diesem Codelab erstellen und stellen Sie die Webanwendung gCurrenC Calculator in Google Cloud bereit und schützen sie vor unerwünschtem Zugriff. Mit Google Antigravity, dem Google Cloud Developer-Plug-in und dem Developer Knowledge (DK) MCP-Server entwerfen und implementieren Sie eine Sicherheitsarchitektur, die den Zugriff auf die Anwendung steuert und sie vor unbefugter Nutzung schützt.
In diesem Lab verbinden Sie Google Antigravity mit dem DK-MCP-Server, um Antigravity mit der offiziellen Google Cloud-Dokumentation in Echtzeit zu fundieren. Anstatt sich auf statische Trainingsdaten oder veraltete Modellgewichtungen zu verlassen, ruft Antigravity dynamisch aktuelle Architekturmuster, die neueste gcloud-CLI-Syntax und Sicherheitsparameter ab. Dadurch werden Halluzinationen reduziert und Antworten auf der Grundlage aktueller Informationen generiert.
Aufgaben
- Private Computing-Arbeitslast: Zwei Compute Engine-VMs, auf denen die Webanwendung gCurrenC-Rechner in einem benutzerdefinierten VPC-Netzwerk (Virtual Private Cloud) ohne öffentliche IP-Adressen ausgeführt wird.
- Sichere Pipeline für eingehenden Traffic: Ein globaler externer Application Load Balancer mit einem dedizierten Nur-Proxy-Subnetz, das Internettraffic über Google Front Ends (GFEs) an Ihre privaten VMs weiterleitet, ohne sie im öffentlichen Internet verfügbar zu machen.
- Sichere Pipeline für ausgehenden Traffic: Ein Cloud Router und ein Cloud NAT-Gateway, kombiniert mit Cloud Next Generation Firewall (Cloud NGFW) Enterprise auf Projektebene und Certificate Authority Service (CAS), um eine sofortige TLS-Prüfung und einen Intrusion Prevention Service (IPS)-Scan für ausgehenden HTTPS-Währungsumrechnungs-API-Traffic durchzuführen.
Lerninhalte
- Installieren Sie das
google-cloud-developer-Plug-in über die Antigravity CLI und konfigurieren Sie den DK-MCP-Server in Antigravity. - Eine isolierte private Webanwendung in Compute Engine mithilfe der TCP-Weiterleitung von Identity-Aware Proxy (IAP) bereitstellen und testen.
- Verwenden Sie fundierte Multi-Turn-Prompts in Antigravity, um eine Sicherheitsarchitektur für eingehenden und ausgehenden Traffic auf Projektebene zu entwerfen.
- Generieren, prüfen und führen Sie ein
bash-Bereitstellungsskript für globales externes Application Load Balancing, Cloud NAT, CAS und Cloud NGFW Enterprise aus.
2. Hinweis
Vorbereitung
Bevor Sie mit diesem Codelab beginnen, benötigen Sie Folgendes:
- Ein Google-Konto und den Google Chrome-Browser.
- Ein neues Google Cloud-Projekt mit aktivierter Abrechnung. Notieren Sie sich Ihre Projekt-ID (
PROJECT_ID). Sie benötigen sie im Verlauf dieses Codelabs, um APIs zu aktivieren, Ihren API-Schlüssel zu erstellen und Google Cloud-Ressourcen bereitzustellen. - IAM-Berechtigungen (Identity and Access Management) in Ihrem Google Cloud-Projekt zum Erstellen von API-Schlüsseln, Compute Engine-Ressourcen, VPC-Netzwerken, CAS-Pools, IAP-Tunneln und Cloud NGFW-Endpunkten.
- Authentifizieren Sie sich mit der
gcloud-CLI, legen Sie Ihr aktives Google Cloud-Projekt fest und aktivieren Sie die erforderlichen APIs:- Prüfen Sie in Ihrem Terminal oder in der Cloud Shell, ob Sie bereits authentifiziert sind:
gcloud auth listgcloud auth login - Prüfen Sie, ob die
gcloud-Befehlszeile für die Verwendung Ihres Projekts konfiguriert ist:gcloud config list projectPROJECT_IDdurch Ihre Google Cloud-Projekt-ID:export PROJECT_ID=PROJECT_ID gcloud config set project PROJECT_ID - Aktivieren Sie die erforderlichen APIs in Ihrem Google Cloud-Projekt:
gcloud services enable \
   compute.googleapis.com \
   iap.googleapis.com \
   networksecurity.googleapis.com \
   privateca.googleapis.com \
   developerknowledge.googleapis.com \
   apikeys.googleapis.com
- Prüfen Sie in Ihrem Terminal oder in der Cloud Shell, ob Sie bereits authentifiziert sind:
- Installieren Sie Antigravity 2.0 von der Google Antigravity-Downloadseite auf Ihrem lokalen System.
Google Cloud Developer-Plug-in mit der Antigravity CLI installieren
So installieren Sie das Google Cloud Developer-Plug-in mit der Antigravity CLI:
- So installieren Sie die Antigravity CLI auf Ihrer lokalen Workstation:
- Öffnen Sie Ihr lokales Terminal.
- Führen Sie das Installations-Script aus:
curl -fsSL https://antigravity.google/cli/install.sh | bash - Schließen Sie die Terminal-Sitzung und öffnen Sie sie wieder, damit die Antigravity-CLI-Binärdatei
agyin Ihrem System-PATHverfügbar ist.
- Führen Sie im lokalen Terminal den folgenden Befehl aus, um das
google-cloud-developer-Plug-in zu installieren:agy plugin install https://github.com/google/skills/plugins/cloud/google-cloud-developerCloning plugin from https://github.com/google/skills.git... [ok] google-cloud-developer ✔ skills : 5 processed - agents : skipped (not found) - commands : skipped (not found) ✔ mcpServers : 1 processed - hooks : skipped (not found)
3. Antigravity und den DK-MCP-Server einrichten
In diesem Abschnitt konfigurieren Sie den DK-MCP-Server in Antigravity mit einem eingeschränkten Google Cloud API-Schlüssel.
- Öffnen Sie Antigravity, geben Sie
/goalein und drücken Sie die Eingabetaste, um den Zielmodus zu aktivieren. Fügen Sie dann den folgenden Prompt ein, um einen eingeschränkten API-Schlüssel zu erstellen und den DK-MCP-Server zu konfigurieren. Ersetzen SiePROJECT_IDdurch die Google Cloud-Projekt-ID aus dem Abschnitt Vorbereitung. Weitere Informationen finden Sie unter google-cloud-developer-Plug-in.Set up Antigravity to use the Developer Knowledge MCP server on my local machine. Run the necessary terminal commands to complete the following: 1. Create a restricted API key named 'DKP-MCP-Key' that can only target the Developer Knowledge API. Use the PROJECT_ID to create the API key. 2. Retrieve the actual key string of the newly created API key. 3. Create or safely update my ~/.gemini/config/mcp_config.json file (preserve any existing MCP servers) with the correct JSON structure to connect the developer-knowledge server using that API key in the headers. You MUST use the following JSON structure for the new server: "developer-knowledge": { "serverUrl": "https://developerknowledge.googleapis.com/mcp", "headers": { "x-goog-api-key": "<INSERT_RETRIEVED_API_KEY_HERE>" } } When you are done, confirm that the setup is complete. - Geben Sie den folgenden Prompt in das Antigravity-Chatfenster ein, um zu prüfen, ob der DK-MCP-Server aktiv ist:
Which MCP servers are available?developer-knowledgeund die verfügbaren Tools (search_documents,answer_queryundget_documents) auf: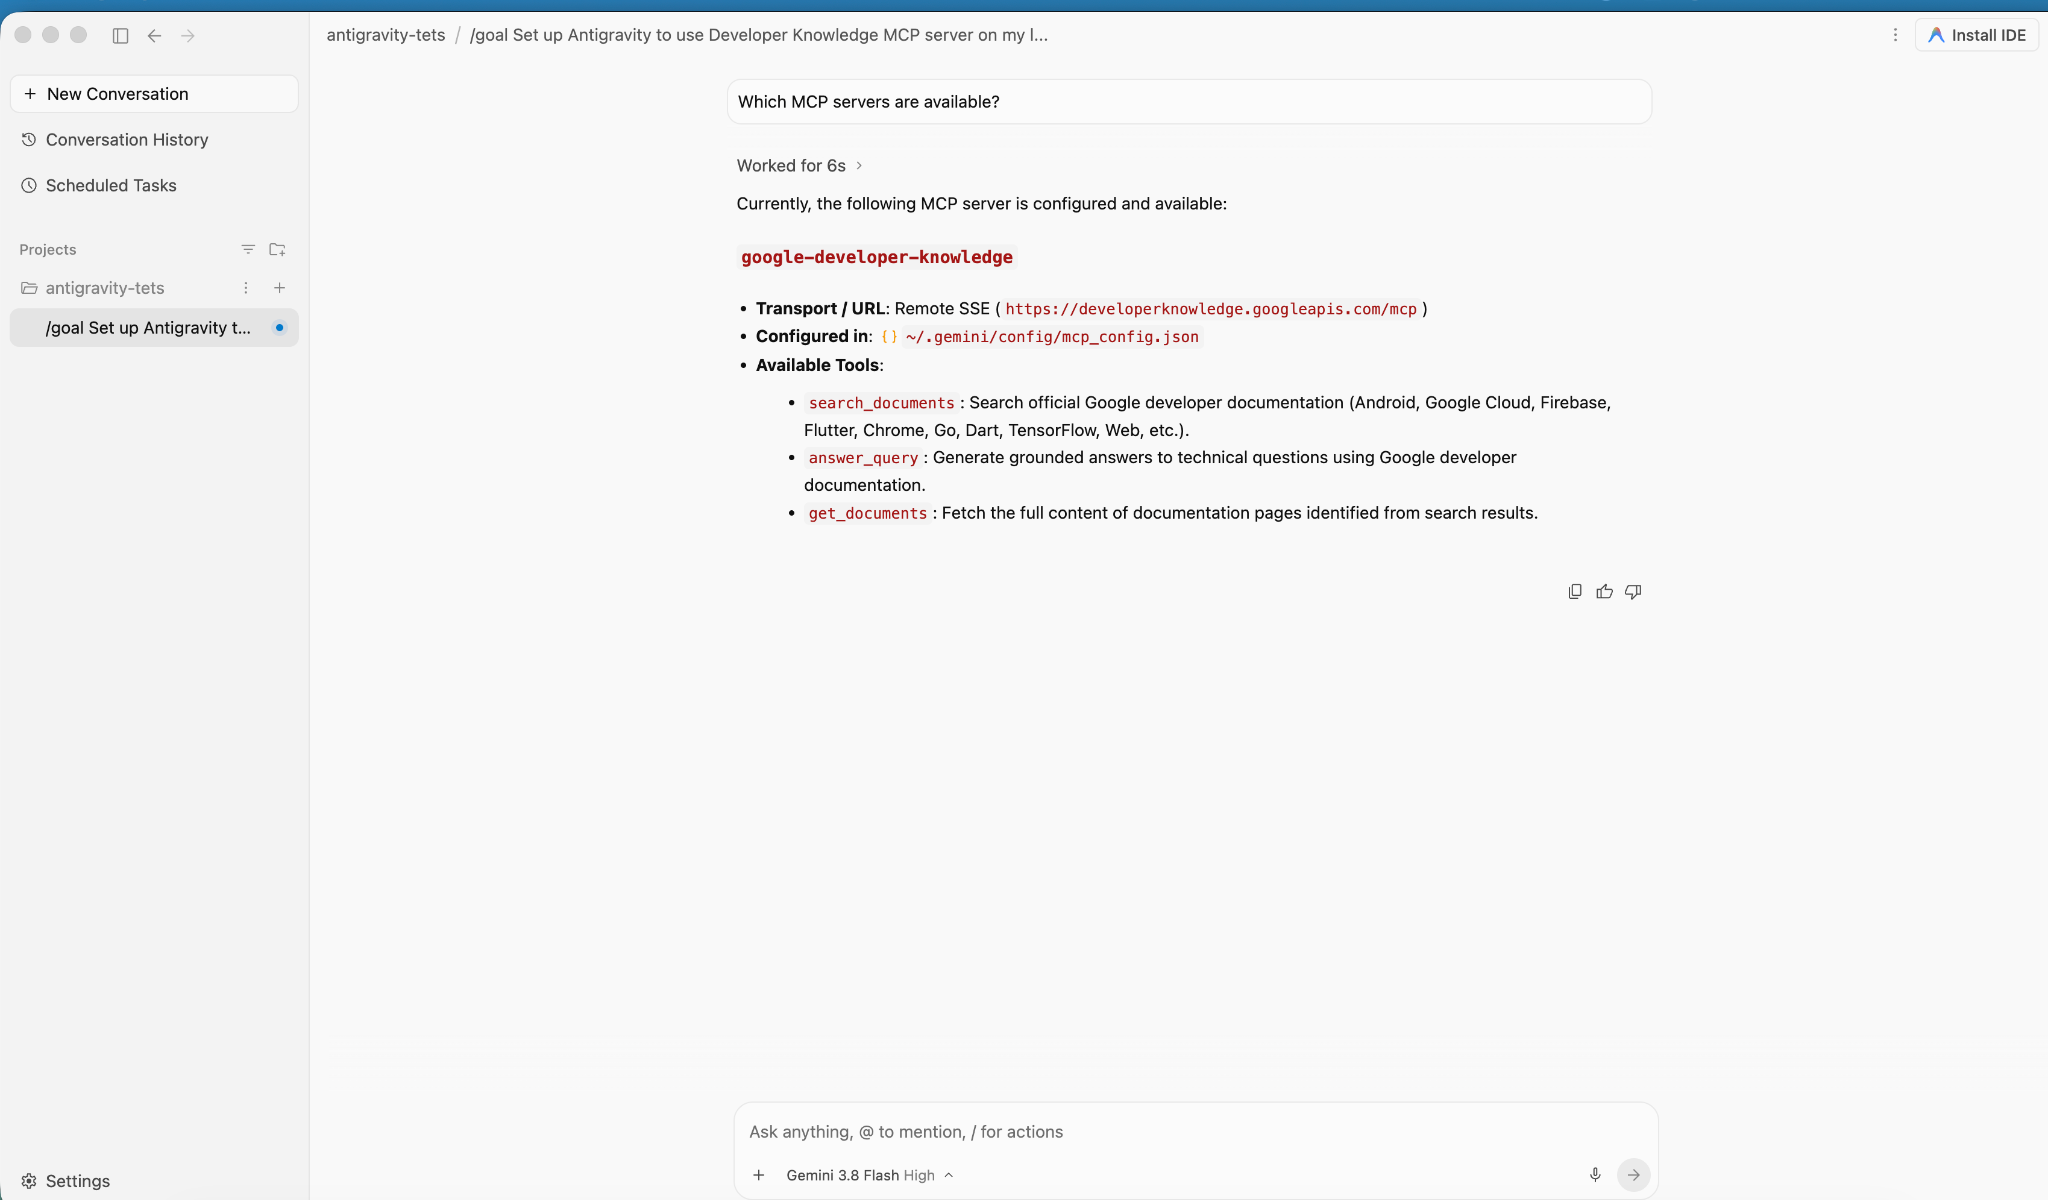
4. Anwendung erstellen und bereitstellen
In diesem Abschnitt stellen Sie die Anwendung gCurrenC calculator auf zwei privaten Compute Engine-VMs in einem benutzerdefinierten VPC-Netzwerk bereit.
Die Anwendung bietet Folgendes:
- Ein Live-Währungsumrechner, der
USD,EUR,GBP,JPY,CAD,INRundAUDunterstützt und die integrierte Standardbibliothekhttp.servervon Python auf Port8080mit einem/healthz-Systemdiagnose-Endpunkt verwendet. - Eine Konsole zur Sicherheitsüberprüfung, um die ausgehende API-Konnektivität in Echtzeit zu prüfen und verschlüsselte Bedrohungsabwehrprüfungen auszuführen.
- Eine Firewallregel für eingehenden Traffic, die dem IAP-Bereich von Google den Zugriff auf die Ports
22und8080für administrative Tests ermöglicht, ohne öffentliche IP-Adressen offenzulegen.
Anwendung bereitstellen
- Geben Sie im Antigravity-Chatfenster
/goalein und führen Sie dann den folgenden Prompt aus:You are a Cloud developer. Deploy the "gCurrenC calculator" app onto two (2) Compute Engine VMs with no external IP addresses (`--no-address`) inside a dedicated custom VPC network and private subnet. CRITICAL INSTRUCTIONS ON OUTPUT: - The VMs are strictly private with no external IP addresses and the local IAP tunnel has NOT been started yet. Any web URL is completely unreachable and will fail with a connection error. - In your final response, simply confirm that the private VMs and Managed Instance Group are deployed, and state that the user should establish the IAP tunnel. Do not output, format, or suggest any web preview link or URL (such as http://localhost:8080 or internal IP addresses) in your final response. Run this script in the terminal: ```bash #!/usr/bin/env bash set -euxo pipefail # Disable any interactive confirmation prompts so execution never hangs export CLOUDSDK_CORE_DISABLE_PROMPTS=1 # --- User Configuration --- PROJECT_ID="[PROJECT_ID]" REGION="us-central1" ZONE="us-central1-a" NETWORK="gcurrenc-vpc" SUBNET="gcurrenc-app-subnet" SUBNET_RANGE="10.10.1.0/24" # -------------------------- echo "==> [1/5] Configuring project, default region/zone, and enabling APIs..." gcloud config set project "${PROJECT_ID}" gcloud config set compute/region "${REGION}" gcloud config set compute/zone "${ZONE}" gcloud services enable compute.googleapis.com echo "==> [2/5] Creating custom VPC network and private workload subnet..." gcloud compute networks create "${NETWORK}" \ --subnet-mode=custom \ --description="Dedicated VPC for currency exchange app demo" 2>/dev/null || true gcloud compute networks subnets create "${SUBNET}" \ --network="${NETWORK}" \ --region="${REGION}" \ --range="${SUBNET_RANGE}" \ --enable-private-ip-google-access \ --description="Private subnet hosting backend compute instances" 2>/dev/null || true echo "==> [3/5] Generating standalone Python standard-library startup script..." cat << 'STARTUP_EOF' > /tmp/private_app_startup.sh #!/bin/bash set -euxo pipefail mkdir -p /opt/gcurrenc-app # Pure Python standard-library application (zero pip/apt dependencies needed at boot) cat << 'APPEOF' > /opt/gcurrenc-app/app.py import os import sys import json import socket import urllib.request import urllib.parse import ssl from http.server import BaseHTTPRequestHandler, ThreadingHTTPServer SUPPORTED_CURRENCIES = ["USD", "EUR", "GBP", "JPY", "CAD", "INR", "AUD"] class CurrencyAppHandler(BaseHTTPRequestHandler): def address_string(self): return str(self.client_address[0]) def do_GET(self): parsed = urllib.parse.urlparse(self.path) path = parsed.path params = urllib.parse.parse_qs(parsed.query) if path == "/favicon.ico": self.send_response(204) self.end_headers() return if path == "/healthz": self.send_response(200) self.send_header("Content-Type", "text/plain") self.end_headers() self.wfile.write(b"OK") return if path == "/api/security-test": mode = params.get("mode", ["safe"])[0] target = "https://secure.eicar.org/eicar.com.txt" if mode == "threat" else "https://api.frankfurter.dev/v1/latest?from=USD&to=EUR" try: req = urllib.request.Request(target, headers={"User-Agent": "SecureCurrencyApp/1.0"}) ctx = ssl.create_default_context() with urllib.request.urlopen(req, timeout=5, context=ctx) as resp: data = {"verdict": "PERMITTED", "target": target, "http_status": resp.status} code = 200 except Exception as e: data = {"verdict": "BLOCKED_OR_FAILED", "target": target, "error": str(e)} code = 502 self.send_response(code) self.send_header("Content-Type", "application/json") self.end_headers() self.wfile.write(json.dumps(data, indent=2).encode("utf-8")) return self.render_page() def do_POST(self): parsed = urllib.parse.urlparse(self.path) if parsed.path == "/generate": content_length = int(self.headers.get("Content-Length", 0)) post_body = self.rfile.read(content_length).decode("utf-8") form = urllib.parse.parse_qs(post_body) base_curr = form.get("base_curr", ["USD"])[0] target_curr = form.get("target_curr", ["EUR"])[0] try: amount = float(form.get("amount", ["2500.00"])[0]) except ValueError: amount = 2500.00 rate_str = "Unavailable" total_str = "Rate lookup pending outbound internet activation" try: if base_curr == target_curr: rate = 1.0 else: url = f"https://api.frankfurter.dev/v1/latest?from={base_curr}&to={target_curr}" req = urllib.request.Request(url, headers={"User-Agent": "SecureCurrencyApp/1.0"}) with urllib.request.urlopen(req, timeout=4) as resp: res_json = json.loads(resp.read().decode("utf-8")) rate = res_json["rates"][target_curr] rate_str = str(rate) total_str = f"{round(amount * rate, 2):,.2f} {target_curr}" except Exception as e: total_str = f"Outbound connection unavailable {str(e)}" self.render_page(base_curr, target_curr, amount, rate_str, total_str) return self.send_response(404) self.end_headers() def render_page(self, base_curr="USD", target_curr="EUR", amount=2500.00, fx_rate="1.00", total_str=""): hostname = socket.gethostname() curr_options_base = "".join([f'<option value="{c}" {"selected" if c == base_curr else ""}>{c}</option>' for c in SUPPORTED_CURRENCIES]) curr_options_target = "".join([f'<option value="{c}" {"selected" if c == target_curr else ""}>{c}</option>' for c in SUPPORTED_CURRENCIES]) result_block = "" if total_str: if fx_rate == "Unavailable": rate_line = "<p style='margin: 6px 0;'>Exchange Rate: <span style='color: #d93025; font-weight: bold;'>⚠️ Offline-Outbound internet blocked</span></p>" else: rate_line = f"<p style='margin: 6px 0; font-size: 14px; color: #137333;'>🟢 Exchange Rate: <strong>1 {base_curr} = {fx_rate} {target_curr}</strong> (Secured via Cloud NAT & Cloud NGFW)</p>" result_block = f""" <div style="margin-top: 22px; background: #e6f4ea; border: 1px solid #c6e1c6; border-left: 5px solid #34a853; padding: 18px 20px; border-radius: 8px;"> <h4 style="margin: 0 0 6px 0; text-transform: uppercase; font-size: 12px; color: #137333; letter-spacing: 0.5px;">Conversion Result</h4> <div style="font-size: 24px; font-weight: 700; color: #202124; margin-bottom: 6px;"> {amount:,.2f} {base_curr} = <span style="color: #1a73e8;">{total_str}</span> </div> {rate_line} </div> """ html = ("""<!DOCTYPE html> <html lang="en"> <head> <meta charset="UTF-8"> <meta name="viewport" content="width=device-width, initial-scale=1.0"> <title>gCurrenC calculator</title> <style> body { font-family: -apple-system, BlinkMacSystemFont, "Segoe UI", Roboto, "Helvetica Neue", Arial, sans-serif; background: #f8f9fa; margin: 30px 15px; color: #202124; display: flex; justify-content: center; } .container { width: 100%; max-width: 860px; } .card { background: white; padding: 24px 28px; border-radius: 12px; box-shadow: 0 1px 3px rgba(60,64,67,0.12), 0 4px 8px rgba(60,64,67,0.06); border: 1px solid #dadce0; margin-bottom: 20px; } .header { display: flex; justify-content: space-between; align-items: center; border-bottom: 1px solid #e8eaed; padding-bottom: 14px; margin-bottom: 20px; } .header h2 { margin: 0 0 4px 0; font-size: 20px; font-weight: 600; } .header p { margin: 0; font-size: 13px; color: #5f6368; } .badge { background: #e8f0fe; color: #1a73e8; padding: 6px 12px; border-radius: 16px; font-weight: 600; font-size: 12px; border: 1px solid #d2e3fc; display: flex; align-items: center; gap: 6px; } .badge::before { content: ""; width: 8px; height: 8px; border-radius: 50%; background-color: #34a853; } .form-row { display: flex; gap: 14px; align-items: flex-end; flex-wrap: wrap; } .form-group { display: flex; flex-direction: column; gap: 6px; } .form-group label { font-size: 12px; font-weight: 600; color: #5f6368; text-transform: uppercase; letter-spacing: 0.5px; } input, select { padding: 10px 14px; border: 1px solid #dadce0; border-radius: 6px; font-size: 14px; color: #202124; background-color: #fff; box-sizing: border-box; transition: border-color 0.15s, box-shadow 0.15s; } input:focus, select:focus { outline: none; border-color: #1a73e8; box-shadow: 0 0 0 3px rgba(26, 115, 232, 0.15); } button { padding: 11px 20px; background: #1a73e8; color: white; border: none; border-radius: 6px; font-size: 14px; font-weight: 500; cursor: pointer; transition: background 0.15s, box-shadow 0.15s; } button:hover { background: #1557b0; box-shadow: 0 1px 2px rgba(60,64,67,0.3); } .danger-btn { background: #d93025; } .danger-btn:hover { background: #b31412; } pre { background: #202124; color: #8ab4f8; padding: 14px; border-radius: 6px; overflow-x: auto; font-family: "SF Mono", "Fira Code", Consolas, monospace; font-size: 13px; line-height: 1.5; margin: 0; } /* Collapsible Security Console */ details.security-drawer { background: white; border-radius: 12px; box-shadow: 0 1px 3px rgba(60,64,67,0.12); border: 1px solid #dadce0; overflow: hidden; margin-bottom: 24px; } details.security-drawer summary { padding: 16px 20px; font-size: 14px; font-weight: 600; cursor: pointer; list-style: none; display: flex; justify-content: space-between; align-items: center; user-select: none; background: #fafafa; transition: background 0.15s; } details.security-drawer summary::-webkit-details-marker { display: none; } details.security-drawer summary:hover { background: #f1f3f4; } details.security-drawer[open] summary { border-bottom: 1px solid #dadce0; background: #ffffff; } .expand-toggle { font-size: 13px; font-weight: 500; } details.security-drawer summary .expand-toggle::before { content: "▶ Click to Expand"; color: #1a73e8; } details.security-drawer[open] summary .expand-toggle::before { content: "▼ Click to Collapse"; color: #5f6368; } .drawer-body { padding: 20px; background: #ffffff; } .drawer-body p { margin-top: 0; font-size: 13px; color: #5f6368; } .probe-buttons { display: flex; gap: 10px; margin-bottom: 14px; } </style> </head> <body> <div class="container"> <div class="card"> <div class="header"> <div> <h2>💱 gCurrenC calculator</h2> </div> <div class="badge">Serving host: {hostname}</div> </div> <form method="POST" action="/generate"> <div class="form-row"> <div class="form-group" style="flex: 1.5; min-width: 140px;"> <label>Amount</label> <input type="number" step="0.01" name="amount" value="{amount}" required> </div> <div class="form-group" style="flex: 1; min-width: 100px;"> <label>From</label> <select name="base_curr">{curr_options_base}</select> </div> <div class="form-group" style="flex: 1; min-width: 100px;"> <label>To (Target)</label> <select name="target_curr">{curr_options_target}</select> </div> <div class="form-group"> <button type="submit">Convert currency ➔</button> </div> </div> </form> {result_block} </div> <!-- Collapsible Security Verification Console --> <details class="security-drawer"> <summary> <span>🛡️ Security verification console</span> <span class="expand-toggle"></span> </summary> <div class="drawer-body"> <p>Test outbound HTTPS traffic and threat prevention capabilities in real time:</p> <div class="probe-buttons"> <button type="button" onclick="runProbe('safe')">Test Outbound API Connection</button> <button type="button" class="danger-btn" onclick="runProbe('threat')">Simulate Encrypted Threat (EICAR)</button> </div> <pre id="output">Waiting for command...</pre> </div> </details> </div> <script> function runProbe(mode) { const el = document.getElementById('output'); el.innerText = 'Executing outbound request...'; fetch('/api/security-test?mode=' + mode) .then(res => res.json()) .then(data => el.innerText = JSON.stringify(data, null, 2)) .catch(err => el.innerText = 'Connection dropped / reset by Firewall: ' + err); } </script> </body> </html>""" .replace("{hostname}", str(hostname)) .replace("{amount}", str(amount)) .replace("{curr_options_base}", curr_options_base) .replace("{curr_options_target}", curr_options_target) .replace("{result_block}", result_block) ) self.send_response(200) self.send_header("Content-Type", "text/html; charset=utf-8") self.end_headers() self.wfile.write(html.encode("utf-8")) def run(): server_address = ('0.0.0.0', 8080) httpd = ThreadingHTTPServer(server_address, CurrencyAppHandler) httpd.serve_forever() if __name__ == '__main__': run() APPEOF # Register and start systemd unit cat << 'SERVICEEOF' > /etc/systemd/system/gcurrenc-app.service [Unit] Description=Currency exchange calculator web application After=network.target [Service] Type=simple User=root WorkingDirectory=/opt/gcurrenc-app ExecStart=/usr/bin/python3 /opt/gcurrenc-app/app.py Restart=always [Install] WantedBy=multi-user.target SERVICEEOF systemctl daemon-reload systemctl enable gcurrenc-app systemctl start gcurrenc-app STARTUP_EOF echo "==> [4/5] Creating Firewall, Regional Instance Template, and 2-VM MIG..." gcloud compute firewall-rules create allow-iap-admin \ --network="${NETWORK}" \ --allow=tcp:22,tcp:8080 \ --source-ranges=35.235.240.0/20 \ --target-tags=gcurrenc-app-vm \ --description="Allow IAP SSH and port 8080 access to private VMs" \ --quiet 2>/dev/null || true # Explicitly pass both --region and --instance-template-region to avoid prompt gcloud compute instance-templates create gcurrenc-app-template \ --instance-template-region="${REGION}" \ --region="${REGION}" \ --network="${NETWORK}" \ --subnet="${SUBNET}" \ --machine-type=e2-medium \ --no-address \ --tags=gcurrenc-app-vm \ --metadata-from-file=startup-script=/tmp/private_app_startup.sh \ --quiet gcloud compute instance-groups managed create gcurrenc-app-mig \ --base-instance-name=gcurrenc-vm \ --template="projects/${PROJECT_ID}/regions/${REGION}/instanceTemplates/gcurrenc-app-template" \ --size=2 \ --zone="${ZONE}" \ --quiet gcloud compute instance-groups managed set-named-ports gcurrenc-app-mig \ --named-ports=http-port:8080 \ --zone="${ZONE}" \ --quiet echo "==> [5/5] Verifying private VM deployment and internal status..." sleep 30 gcloud compute instances list \ --filter="name ~ '^gcurrenc-vm-'" \ --zones="${ZONE}" \ --format="table(name,zone.basename():label=ZONE,networkInterfaces[0].networkIP:label=INTERNAL_IP,status)" FIRST_VM=$(gcloud compute instances list \ --filter="name ~ '^gcurrenc-vm-'" \ --zones="${ZONE}" \ --format="value(name)" \ --limit=1) echo "Testing healthz on ${FIRST_VM} via IAP tunnel..." gcloud compute ssh "${FIRST_VM}" \ --zone="${ZONE}" \ --tunnel-through-iap \ --quiet \ --command="curl -fsS http://localhost:8080/healthz" echo "" echo "==========================================================================" echo "PREREQUISITE COMPLETE: 2 private VMs deployed with no external IPs." echo "VPC: ${NETWORK} | Subnet: ${SUBNET} (${SUBNET_RANGE})" echo "Instance Group: gcurrenc-app-mig (Zone: ${ZONE}, Port: 8080)" echo "" echo "The VMs are private and the IAP tunnel is not active. Set up the background IAP tunnel first to access the deployed app." echo "" echo "==========================================================================" ```
Erstellung der VM-Instanz prüfen
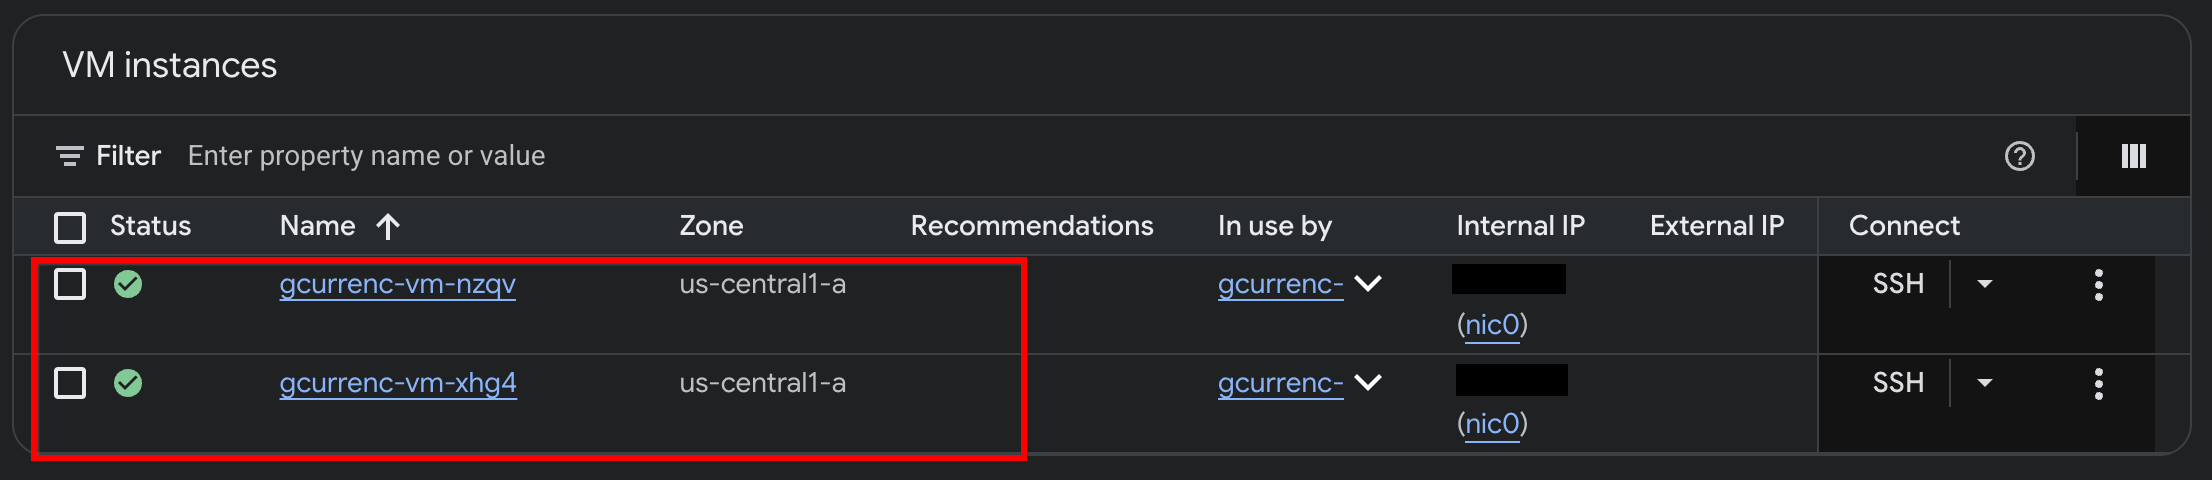
Nachdem Antigravity die Anwendung auf den beiden privaten Compute Engine-VMs bereitgestellt hat, prüfen Sie die Instanzen in der Google Cloud Console:
- Rufen Sie in der Google Cloud Console die Seite VM-Instanzen auf.
- Prüfen Sie, ob die beiden VM-Instanzen mit internen IP-Adressen und ohne externe IP-Adressen ausgeführt werden:
5. Anwendung testen
Da die privaten VMs keine externen IP-Adressen (--no-address) und kein Cloud NAT-Gateway haben, haben sie keine Route zum Internet und können keine externen APIs für den Währungsumtausch erreichen. Bevor Sie den sicheren ausgehenden Zugriff konfigurieren, testen Sie die Anwendung über einen lokalen IAP-Tunnel, um zu prüfen, ob kein Internetzugriff besteht.
- Führen Sie im
/goal-Modus den folgenden Prompt im Antigravity-Chatfenster aus:Automate the IAP tunnel configuration and health verification for the web app, then output the live test URL. Run a terminal script that performs the following steps non-interactively: 1. Firewall Check: - Identify the active network ('gcurrenc-vpc' if it exists, otherwise 'default'). - Idempotently ensure an ingress firewall rule exists permitting 'tcp:22,tcp:8080' from the Google IAP range '35.235.240.0/20' targeting 'gcurrenc-app-vm'. 2. VM Health Verification: - Find the first running instance matching '^gcurrenc-vm-' in zone 'us-central1-a'. - Via 'gcloud compute ssh --tunnel-through-iap', verify that the 'gcurrenc-app' systemd service is active. If not active, restart it. 3. Background IAP Tunnel: - Free up local port 8080 if an old tunnel or process is lingering (e.g., using 'lsof -ti:8080 | xargs kill -9' or 'fuser -k 8080/tcp'). - Launch 'gcloud compute start-iap-tunnel <VM_NAME> 8080 --local-host-port=localhost:8080 --zone=us-central1-a' in the background using nohup, redirecting output to '/tmp/iap_tunnel.log'. - Wait up to 10 seconds for the tunnel to establish, checking with 'curl -fsS http://localhost:8080/healthz'. 4. Output Web Preview URL: - Detect whether the environment is Google Cloud Shell (check if $CLOUD_SHELL is true) or a local workstation. - If Cloud Shell, print instructions and the direct web preview link. - If local machine, provide the clickable 'http://localhost:8080' URL. - Öffnen Sie nach dem Start des Tunnels
http://localhost:8080/in Ihrem Webbrowser: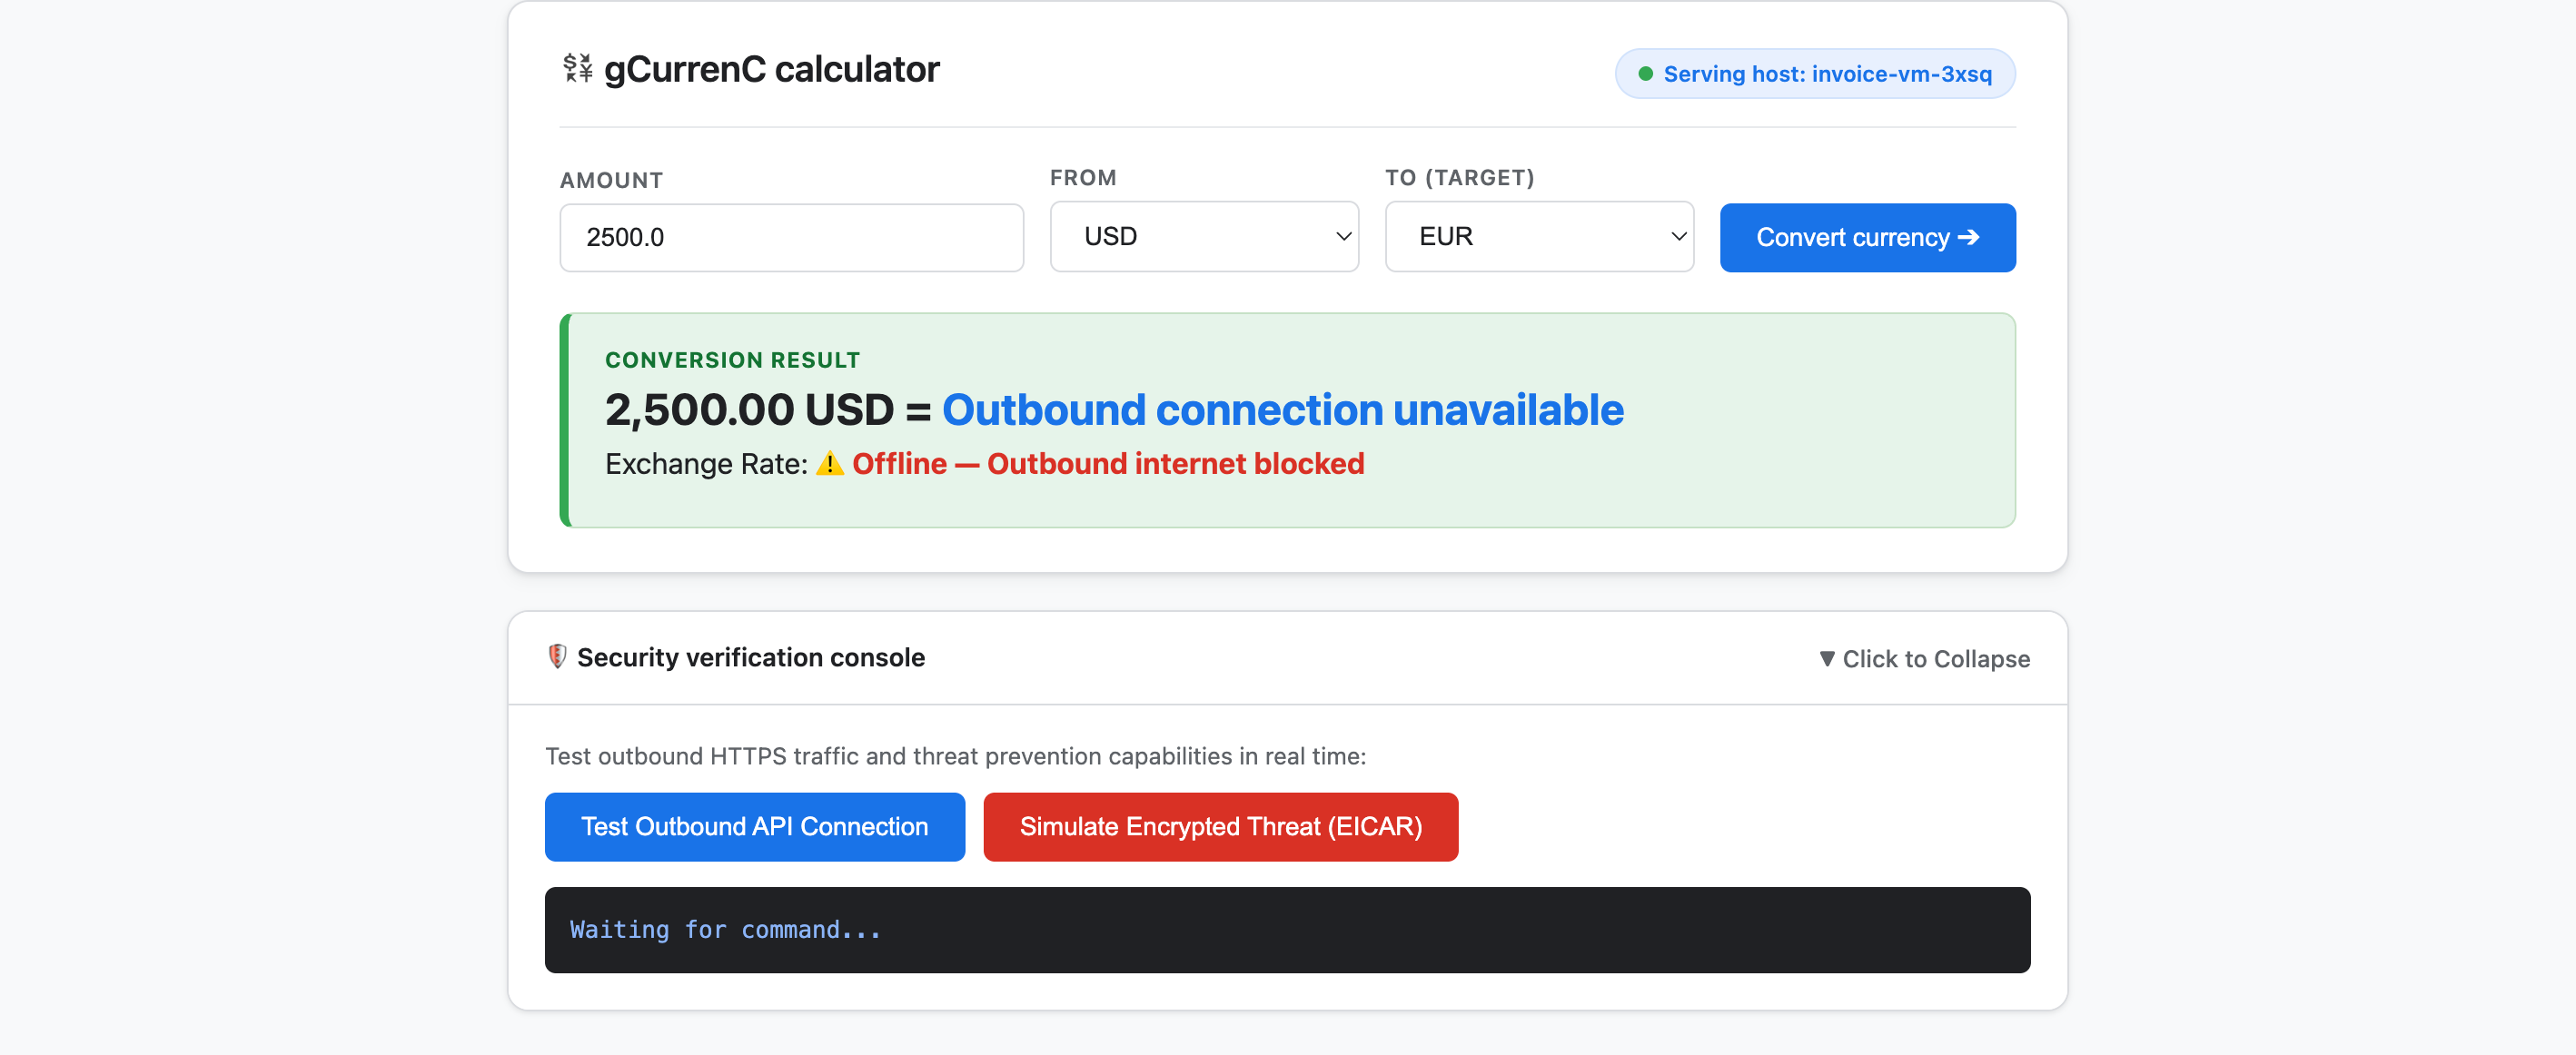
- Testen Sie die Anwendung:
- Klicken Sie auf Währung umrechnen. Das Konvertierungsergebnis zeigt
Offline - Outbound internet blockedundOutbound connection unavailablean. Dieses Ergebnis ist zu erwarten, da die privaten VMs keine Verbindung zum Internet herstellen können, um die aktuellen Wechselkurse abzurufen. - Maximieren Sie die Konsole für die Sicherheitsüberprüfung und klicken Sie auf Ausgehende API-Verbindung testen. In der Ausgabe wird
verdict: BLOCKED_OR_FAILED(https://api.frankfurter.dev/v1/latestangezeigt. Dieses Ergebnis ist zu erwarten, da die privaten VMs keine Verbindung zum Internet herstellen und keine Wechselkurse vonhttps://api.frankfurter.dev/v1/latestabrufen können. - Klicken Sie auf Verschlüsselte Bedrohung simulieren (EICAR). In der Ausgabe wird auch
verdict: BLOCKED_OR_FAILEDfürhttps://secure.eicar.org/eicar.com.txtangezeigt. Dieses Ergebnis ist ebenfalls zu erwarten, da die privaten VMs keine Internetverbindung haben.
- Klicken Sie auf Währung umrechnen. Das Konvertierungsergebnis zeigt
Lokalen IAP-Tunnel beenden
Bevor Sie die Sicherheitsarchitektur entwerfen und bereitstellen, beenden Sie den lokalen IAP-Tunnel, um Port 8080 freizugeben:
- Führen Sie im
/goal-Modus den folgenden Prompt aus:Free up local port 8080 and terminate any running Google Cloud IAP tunnels (e.g., kill processes matching 'start-iap-tunnel' or listening on port 8080).8080verfügbar ist.
6. Anwendung schützen
In den vorherigen Abschnitten haben Sie private Compute Engine-VMs ohne öffentliche IP-Adressen erstellt und zwei zentrale Netzwerk- und Sicherheitsherausforderungen überprüft:
- Eingehender Zugriff (Ingress): Internetnutzer können die privaten VM-Instanzen nicht direkt erreichen. Um die Webanwendung verfügbar zu machen, muss der Traffic über einen globalen externen Application Load Balancer und ein dediziertes Nur-Proxy-Subnetz geleitet werden, ohne dass die VMs dem öffentlichen Internet ausgesetzt werden.
- Ausgehender Zugriff (Egress): Die privaten VMs haben keine Route zum Internet, um Live-HTTPS-Währungsumrechnungs-APIs abzufragen. Um den ausgehenden Zugriff zu ermöglichen, muss der verschlüsselte Traffic auf Malware und Datenabfluss untersucht werden, ohne die SSL/TLS-Vertrauensstellung zu beeinträchtigen.
In diesem Abschnitt führen Sie Antigravity durch einen optimierten Workflow, der auf der offiziellen Google Cloud-Dokumentation (@retrieving-developer-knowledge) basiert, um eine Sicherheitsarchitektur für eingehenden und ausgehenden Traffic auf Projektebene für Ihre Anwendung zu entwerfen, selbst zu prüfen und bereitzustellen.
Einheitliche Sicherheitsarchitektur entwerfen
- Führen Sie im
/goal-Modus den folgenden Prompt aus, um ein End-to-End-Architekturdiagramm und eine Erklärung zu generieren, die sowohl eingehende als auch ausgehende Traffic-Flüsse abdecken:You are a Google Cloud Network and Security Architect. We need to design an end-to-end security architecture for our "gCurrenC calculator" app running on private Compute Engine VMs with no external IP addresses inside 'gcurrenc-vpc'. We are operating in a standalone Google Cloud project without an Organization resource, so all security resources must be scoped at the project level. Use the @retrieving-developer-knowledge skill to consult official Google Cloud documentation and suggest an architecture diagram and explanation covering both flows: 1. Ingress Flow: - How internet users securely reach the private VMs via a global external Application Load Balancer. - Why Envoy-based external Application Load Balancers require a dedicated proxy-only subnet, and how Google Front Ends (GFEs) proxy traffic to private backends without exposing VMs to the public internet. 2. Egress Flow: - How private VMs reach the internet via Cloud NAT to query live currency exchange APIs, such as frankfurter.dev. - How Cloud NGFW Enterprise provides Layer 7 deep packet inspection and intrusion prevention (IPS) for outbound encrypted HTTPS traffic. - How TLS inspection backed by Certificate Authority Service (CAS) decrypts outbound HTTPS sessions on the fly, and what Root CA trust configuration the private VMs require. Provide a clear diagram and explain how these components connect together.
Übersicht über die Architekturressourcen erstellen
- Geben Sie den folgenden Prompt ein, um das Design in eine kategorisierte Ressourcenübersicht auf Projektebene zu strukturieren, bevor Sie das Bereitstellungsskript generieren:
Act as a Lead Network Security Architect. Using the @retrieving-developer-knowledge skill, provide an architectural outline of all the Google Cloud resources required to secure the "gCurrenC calculator" app.

Our starting state:
- The custom VPC ('gcurrenc-vpc'), workload subnet ('gcurrenc-app-subnet'), and 2-instance MIG ('gcurrenc-app-mig', port 8080) are already deployed.
- All newly added security components must be project-level resources (no organization resources).

Structure your resource outline into three distinct categories, indicating which resources are new additions:
1. Core VPC Infrastructure: proxy-only subnet ('gcurrenc-proxy-subnet', 10.10.2.0/24), Cloud Router, and Cloud NAT gateway.
2. Inbound security (ingress): global external ALB components (forwarding rule on port 443, target HTTPS proxy, SSL certificate, URL map, backend service attached to 'gcurrenc-app-mig' on port 8080, and HTTP health check on '/healthz') and ingress firewall rules.
3. Outbound security (egress): CAS DevOps CA pool and root CA, project-level Cloud NGFW Enterprise components (Threat Prevention profile, Security Profile Group, Firewall Endpoint in zone us-central1-a, and Endpoint Association attaching the TLS policy), and global network firewall policy egress rules.

For each resource, briefly state its role in the security boundary and how it connects to adjacent components.
Bereitstellungsskript generieren und selbst prüfen
- Führen Sie im
/goal-Modus den folgenden Prompt aus, um ein vollständiges, nicht interaktivesbash-Bereitstellungsskript zu generieren und es im selben Schritt automatisch auf die Compliance-Anforderungen zu prüfen:Act as a Principal Infrastructure Engineer. Using the @retrieving-developer-knowledge skill, generate a complete, non-interactive Bash script to deploy this entire security architecture for our "gCurrenC calculator" app, and self-audit the script before outputting it. Requirements: - Discover the project ID, region, and zone dynamically from the existing 'gcurrenc-app-subnet' and 'gcurrenc-app-mig'. - Keep all resources scoped strictly to the project level (no Organization resource). - Deploy the proxy-only subnet, global external Application Load Balancer, Cloud Router, and Cloud NAT. Don't use Cloud Armor. - Deploy project-level Cloud NGFW Enterprise with CAS TLS inspection ('--tls-inspect' on the firewall policy egress rule and 'gcloud beta' for the project-level firewall endpoint association) and an explicit DENY override for malware and antivirus threats. - Distribute the root CA to the private VMs over IAP SSH with connection timeouts so the guest OS trust store is updated. - Print the final Load Balancer URL ('https://${LB_IP}') at the end. Wrap the script in 'set -euxo pipefail' and output only the single executable bash script block.bash-Script, prüft jeden Befehl selbst auf die Compliance-Einschränkungen und gibt den einzelnen ausführbaren Scriptblock inset -euxo pipefailaus.
Sicherheitsbereitstellungsscript ausführen
- Fügen Sie im
/goal-Modus das generiertebash-Skript aus dem vorherigen Prompt im folgenden Format in das Antigravity-Chatfenster ein, um die Bereitstellung auszuführen und die Live-Anwendungs-URL (https://<LB_IP>) auszugeben:Run this script. <PASTED-SCRIPT>
7. Geschützte Anwendung prüfen
Wenn das Bereitstellungsskript abgeschlossen ist, gibt Antigravity die externe HTTPS-URL des globalen externen Application Load Balancers (https://<LB_IP>) aus.
- Öffnen Sie
https://<LB_IP>in Ihrem Webbrowser und umgehen Sie die Warnung des Browsers zu selbst signierten Zertifikaten, um die Oberfläche des gCurrenC-Rechners zu laden: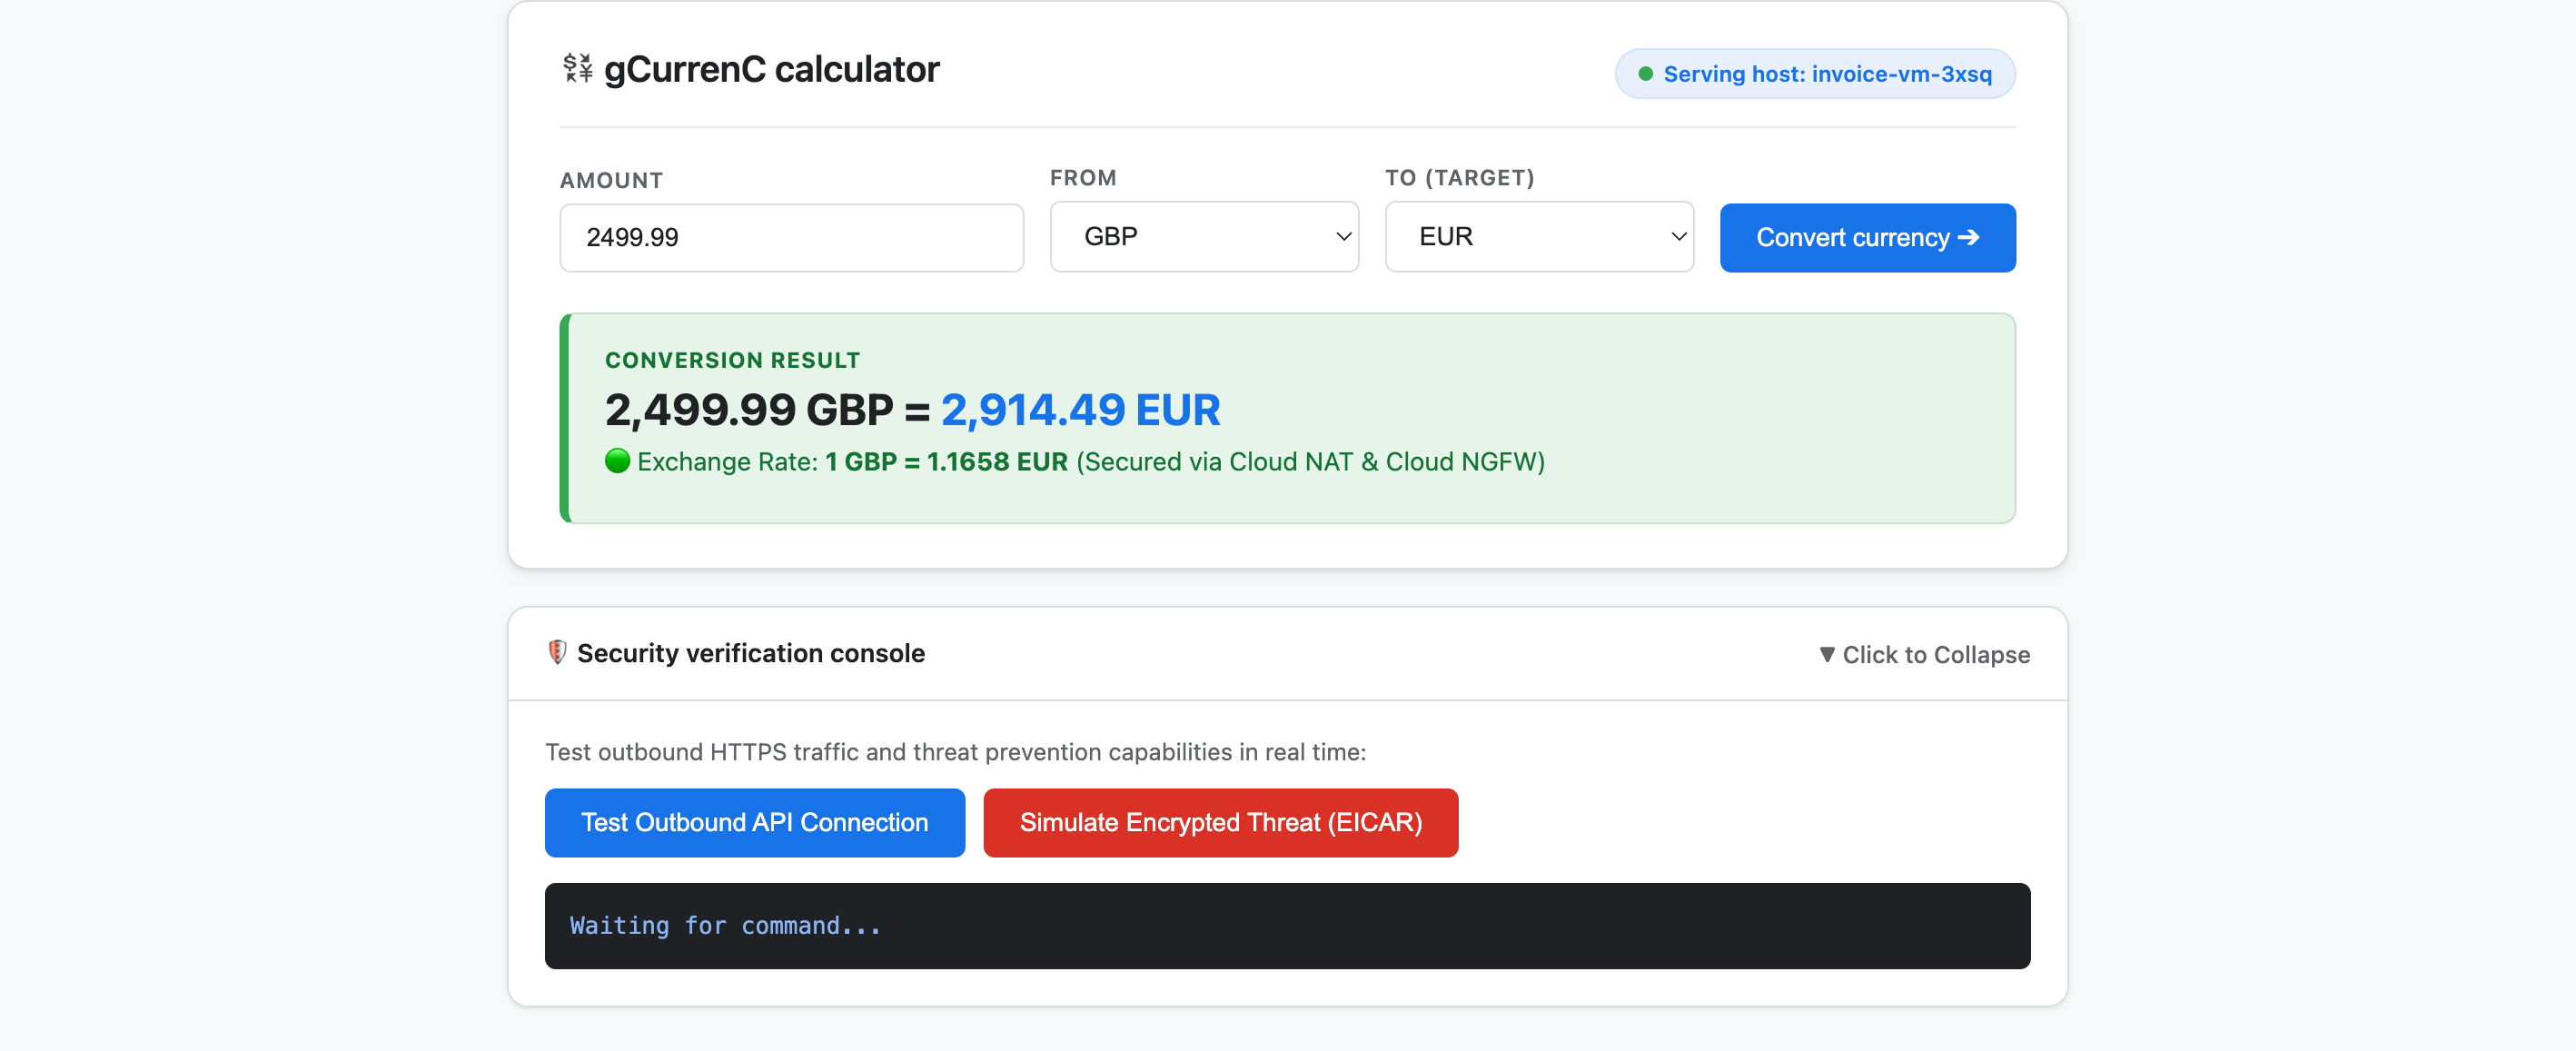
- Testen Sie die Anwendung, um sowohl die ausgehende Verbindung als auch die Bedrohungsabwehr zu prüfen:
- Klicken Sie auf Währung umrechnen. Die Anwendung zeigt sofort den umgerechneten Wechselkurs an. Dies bestätigt, dass das Ingress-Load-Balancing reibungslos über Google Front Ends (GFEs) und das Nur-Proxy-Subnetz erfolgt, während Cloud NAT Live-Wechselkurse von
api.frankfurter.devabruft. - Maximieren Sie die Konsole für die Sicherheitsüberprüfung und klicken Sie auf Ausgehende API-Verbindung testen. Die Anwendung zeigt
verdict: PERMITTED(HTTP 200) an. Dies bestätigt, dass das Cloud NAT-Routing funktioniert und das VM-Betriebssystem der privaten CAS-Stamm-CA für entschlüsselte HTTPS-Sitzungen vertraut. - Klicken Sie auf Verschlüsselte Bedrohung simulieren (EICAR). In der Anwendung wird
verdict: PERMITTEDangezeigt. Dies bestätigt, dass die Cloud NGFW Enterprise die ausgehende HTTPS-Anfrage mithilfe der TLS-Prüfung entschlüsselt, die von CAS unterstützt wird, und die EICAR-Testsignatur mit ihrem Intrusion Prevention Service (IPS) prüft.
- Klicken Sie auf Währung umrechnen. Die Anwendung zeigt sofort den umgerechneten Wechselkurs an. Dies bestätigt, dass das Ingress-Load-Balancing reibungslos über Google Front Ends (GFEs) und das Nur-Proxy-Subnetz erfolgt, während Cloud NAT Live-Wechselkurse von
8. Bereinigen
Damit Ihrem Google Cloud-Konto die in diesem Code-Lab verwendeten Ressourcen nicht laufend in Rechnung gestellt werden, können Sie entweder nur die Code-Lab-Ressourcen oder Ihr Google Cloud-Projekt löschen.
- Wenn Sie Ihr Google Cloud-Projekt beibehalten und nur die in diesem Codelab erstellten Ressourcen entfernen möchten, führen Sie im Antigravity-Chatfenster im
/goal-Modus den folgenden Prompt aus:Remove all resources created in this session, including the gcurrenc app and its resources. Don't delete the project. - Wenn Sie für dieses Codelab ein eigenes Google Cloud-Projekt erstellt haben und das gesamte Projekt löschen möchten, führen Sie im Antigravity-Chatfenster im
/goal-Modus den folgenden Prompt aus:Clean up the demo environment by deleting the Google Cloud project. Run the following command in the terminal: gcloud projects delete "$(gcloud config get-value project 2>/dev/null)" --quiet
9. Glückwunsch
Glückwunsch! Sie haben die Webanwendung gCurrenC-Rechner in Google Cloud mit dem Google Cloud Developer-Plug-in (DK-MCP-Server) in Google Antigravity bereitgestellt und gesichert.
Nächste Schritte
In der offiziellen Google Cloud-Dokumentation finden Sie weitere Informationen zu den in diesem Codelab verwendeten Diensten:
- Google Cloud Developer-Plug-in in Antigravity installieren und verwenden
- Verbindung zum MCP-Server für Entwicklerwissen herstellen
- Bibliothek für Agentenfähigkeiten
- Developer Knowledge-Plug-in
- Application Load Balancer – Übersicht
- Certificate Authority Service-Dokumentation
- Cloud Next Generation Firewall – Übersicht