

1. परिचय
इस कोडलैब में, Google Cloud पर gCurrenC कैलकुलेटर वेब ऐप्लिकेशन को बनाया और डिप्लॉय किया जाता है. इसके बाद, उसे अनचाहे ऐक्सेस से सुरक्षित किया जाता है. Google Antigravity, Google Cloud Developer प्लग इन, और डेवलपर नॉलेज (डीके) एमसीपी सर्वर का इस्तेमाल करके, आपको एक ऐसा सुरक्षा आर्किटेक्चर डिज़ाइन और लागू करना होगा जो यह कंट्रोल करे कि ऐप्लिकेशन को कौन ऐक्सेस कर सकता है. साथ ही, उसे बिना अनुमति के इस्तेमाल होने से बचाए.
इस लैब में, Google Antigravity को DK एमसीपी सर्वर से कनेक्ट किया जाता है. इससे Antigravity को Google Cloud के आधिकारिक और रीयल-टाइम दस्तावेज़ों से ग्राउंड किया जाता है. Antigravity, स्टैटिक ट्रेनिंग डेटा या पुराने मॉडल वेट पर निर्भर रहने के बजाय, मौजूदा आर्किटेक्चरल पैटर्न, नए gcloud सीएलआई सिंटैक्स, और सुरक्षा पैरामीटर को डाइनैमिक तरीके से हासिल करता है. इससे, गलत जानकारी देने की संभावना कम हो जाती है और अप-टू-डेट जानकारी के आधार पर जवाब दिए जाते हैं.
आपको क्या बनाना होगा
- निजी कंप्यूट वर्कलोड: Compute Engine की दो वर्चुअल मशीनें (वीएम), कस्टम वर्चुअल प्राइवेट क्लाउड (वीपीसी) नेटवर्क में gCurrenC कैलकुलेटर वेब ऐप्लिकेशन चला रही हैं. इस नेटवर्क में कोई सार्वजनिक आईपी पता नहीं है.
- सुरक्षित इन्ग्रेस पाइपलाइन: एक ग्लोबल एक्सटर्नल ऐप्लिकेशन लोड बैलेंसर, जिसमें एक खास प्रॉक्सी-ओनली सबनेट होता है. यह सबनेट, इंटरनेट ट्रैफ़िक को Google फ़्रंट एंड (GFE) के ज़रिए आपके निजी वीएम पर भेजता है. इसके लिए, वीएम को सार्वजनिक इंटरनेट पर एक्सपोज़ नहीं किया जाता.
- सुरक्षित इग्रेस पाइपलाइन: Cloud Router और Cloud NAT गेटवे को प्रोजेक्ट-लेवल के Cloud Next Generation Firewall (Cloud NGFW) Enterprise और Certificate Authority Service (CAS) के साथ जोड़ा गया है. इससे, आउटबाउंड एचटीटीपीएस करंसी एक्सचेंज एपीआई ट्रैफ़िक पर, टीएलएस की जांच और घुसपैठ की रोकथाम की सेवा (आईपीएस) की स्कैनिंग की जा सकती है.
आपको क्या सीखने को मिलेगा
- Antigravity CLI का इस्तेमाल करके,
google-cloud-developerप्लग इन इंस्टॉल करें. इसके बाद, Antigravity में DK एमसीपी सर्वर को कॉन्फ़िगर करें. - Identity-Aware Proxy (IAP) टीसीपी फ़ॉरवर्डिंग का इस्तेमाल करके, Compute Engine पर एक अलग निजी वेब ऐप्लिकेशन को डिप्लॉय और टेस्ट करना.
- प्रोजेक्ट-लेवल पर इन्ग्रेस और इग्रेस डेटा ट्रैफ़िक के लिए सुरक्षा आर्किटेक्चर डिज़ाइन करने के लिए, Antigravity में ग्राउंडेड मल्टी-टर्न प्रॉम्प्टिंग का इस्तेमाल करें.
- ग्लोबल एक्सटर्नल ऐप्लिकेशन लोड बैलेंसिंग, Cloud NAT, CAS, और Cloud NGFW Enterprise के लिए,
bashडिप्लॉयमेंट स्क्रिप्ट जनरेट करें, खुद ऑडिट करें, और चलाएं.
2. शुरू करने से पहले
ज़रूरी शर्तें
इस कोडलैब को शुरू करने से पहले, पक्का करें कि आपके पास ये चीज़ें हों:
- एक Google खाता और Google Chrome ब्राउज़र.
- बिलिंग की सुविधा वाला नया Google Cloud प्रोजेक्ट. अपना प्रोजेक्ट आईडी (
PROJECT_ID) नोट करें. इसका इस्तेमाल इस कोडलैब में एपीआई चालू करने, एपीआई पासकोड बनाने, और Google Cloud के संसाधनों को डिप्लॉय करने के लिए किया जाता है. - आपके Google Cloud प्रोजेक्ट में पहचान और ऐक्सेस मैनेजमेंट (आईएएम) की अनुमतियां होनी चाहिए, ताकि एपीआई पासकोड, Compute Engine के संसाधन, वीपीसी नेटवर्क, सीएएस पूल, आईएपी टनल, और Cloud NGFW एंडपॉइंट बनाए जा सकें.
gcloudसीएलआई की मदद से पुष्टि करें, अपना चालू Google क्लाउड प्रोजेक्ट सेट करें, और ज़रूरी एपीआई चालू करें:- अपने टर्मिनल या Cloud Shell में, देखें कि आपकी पुष्टि पहले ही हो चुकी है या नहीं:
gcloud auth listgcloud auth login - पुष्टि करें कि
gcloudसीएलआई को आपके प्रोजेक्ट का इस्तेमाल करने के लिए कॉन्फ़िगर किया गया है:gcloud config list projectPROJECT_IDको अपने Google Cloud प्रोजेक्ट आईडी से बदलें:export PROJECT_ID=PROJECT_ID gcloud config set project PROJECT_ID - अपने Google Cloud प्रोजेक्ट में ज़रूरी एपीआई चालू करें:
gcloud services enable \
   compute.googleapis.com \
   iap.googleapis.com \
   networksecurity.googleapis.com \
   privateca.googleapis.com \
   developerknowledge.googleapis.com \
   apikeys.googleapis.com
- अपने टर्मिनल या Cloud Shell में, देखें कि आपकी पुष्टि पहले ही हो चुकी है या नहीं:
- Google Antigravity के डाउनलोड पेज पर जाकर, अपने लोकल सिस्टम पर Antigravity 2.0 इंस्टॉल करें.
Antigravity CLI का इस्तेमाल करके, Google Cloud Developer प्लग इन इंस्टॉल करना
Antigravity CLI का इस्तेमाल करके, Google Cloud Developer प्लगइन इंस्टॉल करने के लिए, यह तरीका अपनाएं:
- अपने लोकल वर्कस्टेशन पर Antigravity CLI इंस्टॉल करने के लिए, यह तरीका अपनाएं:
- अपना लोकल टर्मिनल खोलें.
- इंस्टॉलर स्क्रिप्ट चलाएं:
curl -fsSL https://antigravity.google/cli/install.sh | bash - अपने टर्मिनल सेशन को बंद करके फिर से खोलें, ताकि Antigravity CLI बाइनरी
agyआपके सिस्टमPATHमें उपलब्ध हो.
- अपने लोकल टर्मिनल में,
google-cloud-developerप्लग इन इंस्टॉल करने के लिए यह कमांड चलाएं:agy plugin install https://github.com/google/skills/plugins/cloud/google-cloud-developerCloning plugin from https://github.com/google/skills.git... [ok] google-cloud-developer ✔ skills : 5 processed - agents : skipped (not found) - commands : skipped (not found) ✔ mcpServers : 1 processed - hooks : skipped (not found)
3. Antigravity और DK MCP सर्वर को सेट अप करना
इस सेक्शन में, पाबंदी वाले Google Cloud एपीआई पासकोड का इस्तेमाल करके, Antigravity में DK MCP सर्वर को कॉन्फ़िगर करने का तरीका बताया गया है.
- Antigravity खोलें,
/goalटाइप करें, और लक्ष्य मोड चालू करने के लिए Enter दबाएं. इसके बाद, प्रतिबंधित एपीआई पासकोड बनाने और DK MCP सर्वर को कॉन्फ़िगर करने के लिए, यह प्रॉम्प्ट चिपकाएं.PROJECT_IDकी जगह, शुरू करने से पहले सेक्शन में मौजूद अपना Google Cloud प्रोजेक्ट आईडी डालें. ज़्यादा जानकारी के लिए, google-cloud-developer प्लगिन देखें.Set up Antigravity to use the Developer Knowledge MCP server on my local machine. Run the necessary terminal commands to complete the following: 1. Create a restricted API key named 'DKP-MCP-Key' that can only target the Developer Knowledge API. Use the PROJECT_ID to create the API key. 2. Retrieve the actual key string of the newly created API key. 3. Create or safely update my ~/.gemini/config/mcp_config.json file (preserve any existing MCP servers) with the correct JSON structure to connect the developer-knowledge server using that API key in the headers. You MUST use the following JSON structure for the new server: "developer-knowledge": { "serverUrl": "https://developerknowledge.googleapis.com/mcp", "headers": { "x-goog-api-key": "<INSERT_RETRIEVED_API_KEY_HERE>" } } When you are done, confirm that the setup is complete. - DK एमसीपी सर्वर चालू है या नहीं, इसकी पुष्टि करने के लिए Antigravity चैट विंडो में यह प्रॉम्प्ट डालें:
Which MCP servers are available?developer-knowledgeऔर इसके उपलब्ध टूल (search_documents,answer_query, औरget_documents) को दिखाता है: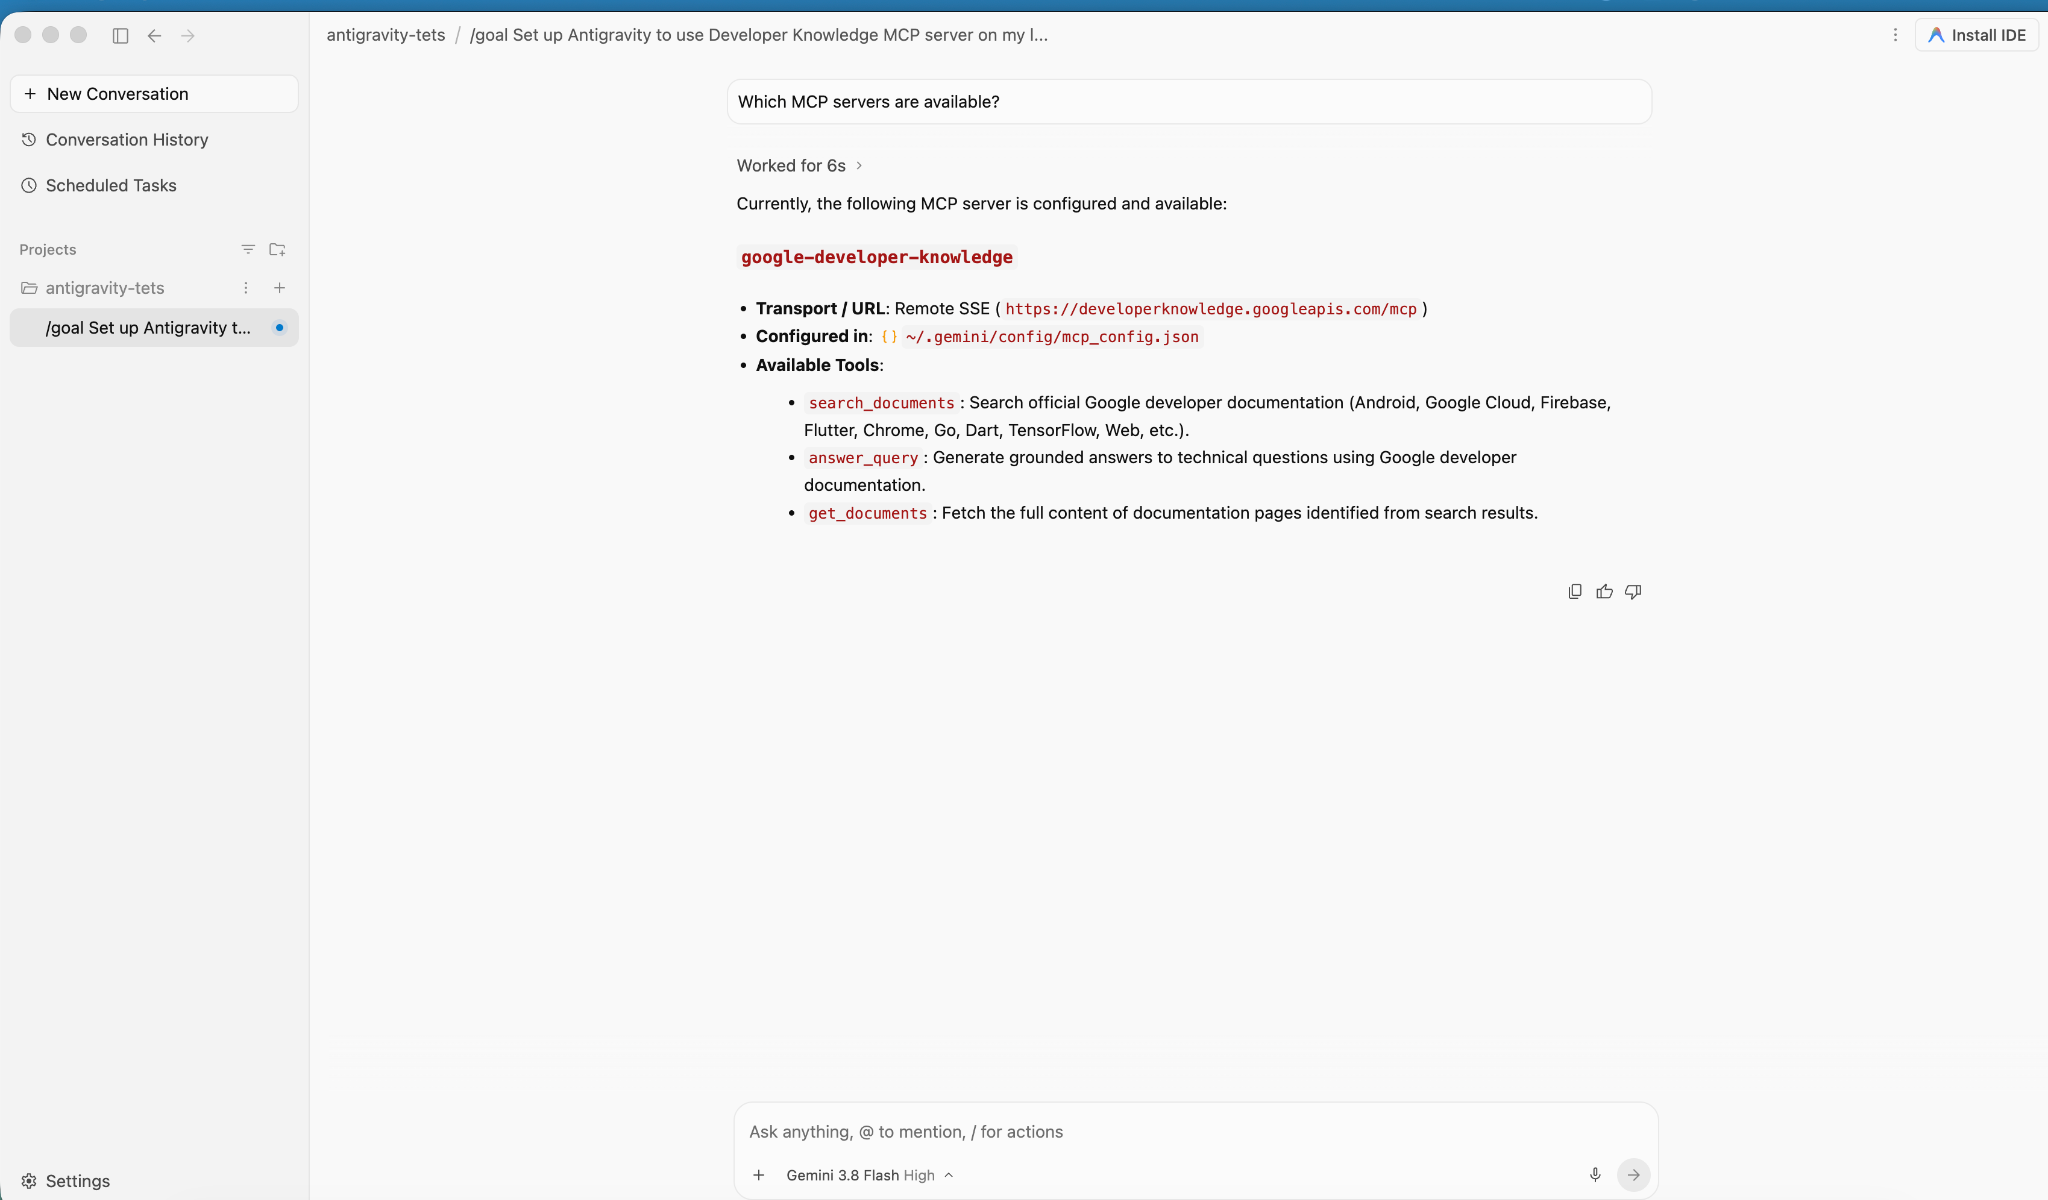
4. ऐप्लिकेशन बनाना और उसे डिप्लॉय करना
इस सेक्शन में, कस्टम वीपीसी नेटवर्क में मौजूद दो निजी Compute Engine वीएम पर, gCurrenC कैलकुलेटर ऐप्लिकेशन को डिप्लॉय किया जाता है.
ऐप्लिकेशन में ये सुविधाएं मिलती हैं:
- Python की पहले से मौजूद
http.serverस्टैंडर्ड लाइब्रेरी का इस्तेमाल करके,USD,EUR,GBP,JPY,CAD,INR, औरAUDको सपोर्ट करने वाला लाइव करेंसी कन्वर्टर. यह पोर्ट8080पर काम करता है और इसमें/healthzहेल्थ चेक एंडपॉइंट है. - सुरक्षा की पुष्टि करने वाला कंसोल, ताकि रीयल-टाइम में आउटबाउंड एपीआई कनेक्टिविटी और एन्क्रिप्ट किए गए खतरे की रोकथाम की जांच की जा सके.
- इन्ग्रेस फ़ायरवॉल का एक नियम, जो Google की आईएपी रेंज को पोर्ट
22और8080तक पहुंचने की अनुमति देता है. इससे सार्वजनिक आईपी पतों को ज़ाहिर किए बिना, एडमिन के तौर पर टेस्टिंग की जा सकती है.
ऐप्लिकेशन को डिप्लॉय करना
- Antigravity की चैट विंडो में,
/goalडालें. इसके बाद, यह प्रॉम्प्ट चलाएं:You are a Cloud developer. Deploy the "gCurrenC calculator" app onto two (2) Compute Engine VMs with no external IP addresses (`--no-address`) inside a dedicated custom VPC network and private subnet. CRITICAL INSTRUCTIONS ON OUTPUT: - The VMs are strictly private with no external IP addresses and the local IAP tunnel has NOT been started yet. Any web URL is completely unreachable and will fail with a connection error. - In your final response, simply confirm that the private VMs and Managed Instance Group are deployed, and state that the user should establish the IAP tunnel. Do not output, format, or suggest any web preview link or URL (such as http://localhost:8080 or internal IP addresses) in your final response. Run this script in the terminal: ```bash #!/usr/bin/env bash set -euxo pipefail # Disable any interactive confirmation prompts so execution never hangs export CLOUDSDK_CORE_DISABLE_PROMPTS=1 # --- User Configuration --- PROJECT_ID="[PROJECT_ID]" REGION="us-central1" ZONE="us-central1-a" NETWORK="gcurrenc-vpc" SUBNET="gcurrenc-app-subnet" SUBNET_RANGE="10.10.1.0/24" # -------------------------- echo "==> [1/5] Configuring project, default region/zone, and enabling APIs..." gcloud config set project "${PROJECT_ID}" gcloud config set compute/region "${REGION}" gcloud config set compute/zone "${ZONE}" gcloud services enable compute.googleapis.com echo "==> [2/5] Creating custom VPC network and private workload subnet..." gcloud compute networks create "${NETWORK}" \ --subnet-mode=custom \ --description="Dedicated VPC for currency exchange app demo" 2>/dev/null || true gcloud compute networks subnets create "${SUBNET}" \ --network="${NETWORK}" \ --region="${REGION}" \ --range="${SUBNET_RANGE}" \ --enable-private-ip-google-access \ --description="Private subnet hosting backend compute instances" 2>/dev/null || true echo "==> [3/5] Generating standalone Python standard-library startup script..." cat << 'STARTUP_EOF' > /tmp/private_app_startup.sh #!/bin/bash set -euxo pipefail mkdir -p /opt/gcurrenc-app # Pure Python standard-library application (zero pip/apt dependencies needed at boot) cat << 'APPEOF' > /opt/gcurrenc-app/app.py import os import sys import json import socket import urllib.request import urllib.parse import ssl from http.server import BaseHTTPRequestHandler, ThreadingHTTPServer SUPPORTED_CURRENCIES = ["USD", "EUR", "GBP", "JPY", "CAD", "INR", "AUD"] class CurrencyAppHandler(BaseHTTPRequestHandler): def address_string(self): return str(self.client_address[0]) def do_GET(self): parsed = urllib.parse.urlparse(self.path) path = parsed.path params = urllib.parse.parse_qs(parsed.query) if path == "/favicon.ico": self.send_response(204) self.end_headers() return if path == "/healthz": self.send_response(200) self.send_header("Content-Type", "text/plain") self.end_headers() self.wfile.write(b"OK") return if path == "/api/security-test": mode = params.get("mode", ["safe"])[0] target = "https://secure.eicar.org/eicar.com.txt" if mode == "threat" else "https://api.frankfurter.dev/v1/latest?from=USD&to=EUR" try: req = urllib.request.Request(target, headers={"User-Agent": "SecureCurrencyApp/1.0"}) ctx = ssl.create_default_context() with urllib.request.urlopen(req, timeout=5, context=ctx) as resp: data = {"verdict": "PERMITTED", "target": target, "http_status": resp.status} code = 200 except Exception as e: data = {"verdict": "BLOCKED_OR_FAILED", "target": target, "error": str(e)} code = 502 self.send_response(code) self.send_header("Content-Type", "application/json") self.end_headers() self.wfile.write(json.dumps(data, indent=2).encode("utf-8")) return self.render_page() def do_POST(self): parsed = urllib.parse.urlparse(self.path) if parsed.path == "/generate": content_length = int(self.headers.get("Content-Length", 0)) post_body = self.rfile.read(content_length).decode("utf-8") form = urllib.parse.parse_qs(post_body) base_curr = form.get("base_curr", ["USD"])[0] target_curr = form.get("target_curr", ["EUR"])[0] try: amount = float(form.get("amount", ["2500.00"])[0]) except ValueError: amount = 2500.00 rate_str = "Unavailable" total_str = "Rate lookup pending outbound internet activation" try: if base_curr == target_curr: rate = 1.0 else: url = f"https://api.frankfurter.dev/v1/latest?from={base_curr}&to={target_curr}" req = urllib.request.Request(url, headers={"User-Agent": "SecureCurrencyApp/1.0"}) with urllib.request.urlopen(req, timeout=4) as resp: res_json = json.loads(resp.read().decode("utf-8")) rate = res_json["rates"][target_curr] rate_str = str(rate) total_str = f"{round(amount * rate, 2):,.2f} {target_curr}" except Exception as e: total_str = f"Outbound connection unavailable {str(e)}" self.render_page(base_curr, target_curr, amount, rate_str, total_str) return self.send_response(404) self.end_headers() def render_page(self, base_curr="USD", target_curr="EUR", amount=2500.00, fx_rate="1.00", total_str=""): hostname = socket.gethostname() curr_options_base = "".join([f'<option value="{c}" {"selected" if c == base_curr else ""}>{c}</option>' for c in SUPPORTED_CURRENCIES]) curr_options_target = "".join([f'<option value="{c}" {"selected" if c == target_curr else ""}>{c}</option>' for c in SUPPORTED_CURRENCIES]) result_block = "" if total_str: if fx_rate == "Unavailable": rate_line = "<p style='margin: 6px 0;'>Exchange Rate: <span style='color: #d93025; font-weight: bold;'>⚠️ Offline-Outbound internet blocked</span></p>" else: rate_line = f"<p style='margin: 6px 0; font-size: 14px; color: #137333;'>🟢 Exchange Rate: <strong>1 {base_curr} = {fx_rate} {target_curr}</strong> (Secured via Cloud NAT & Cloud NGFW)</p>" result_block = f""" <div style="margin-top: 22px; background: #e6f4ea; border: 1px solid #c6e1c6; border-left: 5px solid #34a853; padding: 18px 20px; border-radius: 8px;"> <h4 style="margin: 0 0 6px 0; text-transform: uppercase; font-size: 12px; color: #137333; letter-spacing: 0.5px;">Conversion Result</h4> <div style="font-size: 24px; font-weight: 700; color: #202124; margin-bottom: 6px;"> {amount:,.2f} {base_curr} = <span style="color: #1a73e8;">{total_str}</span> </div> {rate_line} </div> """ html = ("""<!DOCTYPE html> <html lang="en"> <head> <meta charset="UTF-8"> <meta name="viewport" content="width=device-width, initial-scale=1.0"> <title>gCurrenC calculator</title> <style> body { font-family: -apple-system, BlinkMacSystemFont, "Segoe UI", Roboto, "Helvetica Neue", Arial, sans-serif; background: #f8f9fa; margin: 30px 15px; color: #202124; display: flex; justify-content: center; } .container { width: 100%; max-width: 860px; } .card { background: white; padding: 24px 28px; border-radius: 12px; box-shadow: 0 1px 3px rgba(60,64,67,0.12), 0 4px 8px rgba(60,64,67,0.06); border: 1px solid #dadce0; margin-bottom: 20px; } .header { display: flex; justify-content: space-between; align-items: center; border-bottom: 1px solid #e8eaed; padding-bottom: 14px; margin-bottom: 20px; } .header h2 { margin: 0 0 4px 0; font-size: 20px; font-weight: 600; } .header p { margin: 0; font-size: 13px; color: #5f6368; } .badge { background: #e8f0fe; color: #1a73e8; padding: 6px 12px; border-radius: 16px; font-weight: 600; font-size: 12px; border: 1px solid #d2e3fc; display: flex; align-items: center; gap: 6px; } .badge::before { content: ""; width: 8px; height: 8px; border-radius: 50%; background-color: #34a853; } .form-row { display: flex; gap: 14px; align-items: flex-end; flex-wrap: wrap; } .form-group { display: flex; flex-direction: column; gap: 6px; } .form-group label { font-size: 12px; font-weight: 600; color: #5f6368; text-transform: uppercase; letter-spacing: 0.5px; } input, select { padding: 10px 14px; border: 1px solid #dadce0; border-radius: 6px; font-size: 14px; color: #202124; background-color: #fff; box-sizing: border-box; transition: border-color 0.15s, box-shadow 0.15s; } input:focus, select:focus { outline: none; border-color: #1a73e8; box-shadow: 0 0 0 3px rgba(26, 115, 232, 0.15); } button { padding: 11px 20px; background: #1a73e8; color: white; border: none; border-radius: 6px; font-size: 14px; font-weight: 500; cursor: pointer; transition: background 0.15s, box-shadow 0.15s; } button:hover { background: #1557b0; box-shadow: 0 1px 2px rgba(60,64,67,0.3); } .danger-btn { background: #d93025; } .danger-btn:hover { background: #b31412; } pre { background: #202124; color: #8ab4f8; padding: 14px; border-radius: 6px; overflow-x: auto; font-family: "SF Mono", "Fira Code", Consolas, monospace; font-size: 13px; line-height: 1.5; margin: 0; } /* Collapsible Security Console */ details.security-drawer { background: white; border-radius: 12px; box-shadow: 0 1px 3px rgba(60,64,67,0.12); border: 1px solid #dadce0; overflow: hidden; margin-bottom: 24px; } details.security-drawer summary { padding: 16px 20px; font-size: 14px; font-weight: 600; cursor: pointer; list-style: none; display: flex; justify-content: space-between; align-items: center; user-select: none; background: #fafafa; transition: background 0.15s; } details.security-drawer summary::-webkit-details-marker { display: none; } details.security-drawer summary:hover { background: #f1f3f4; } details.security-drawer[open] summary { border-bottom: 1px solid #dadce0; background: #ffffff; } .expand-toggle { font-size: 13px; font-weight: 500; } details.security-drawer summary .expand-toggle::before { content: "▶ Click to Expand"; color: #1a73e8; } details.security-drawer[open] summary .expand-toggle::before { content: "▼ Click to Collapse"; color: #5f6368; } .drawer-body { padding: 20px; background: #ffffff; } .drawer-body p { margin-top: 0; font-size: 13px; color: #5f6368; } .probe-buttons { display: flex; gap: 10px; margin-bottom: 14px; } </style> </head> <body> <div class="container"> <div class="card"> <div class="header"> <div> <h2>💱 gCurrenC calculator</h2> </div> <div class="badge">Serving host: {hostname}</div> </div> <form method="POST" action="/generate"> <div class="form-row"> <div class="form-group" style="flex: 1.5; min-width: 140px;"> <label>Amount</label> <input type="number" step="0.01" name="amount" value="{amount}" required> </div> <div class="form-group" style="flex: 1; min-width: 100px;"> <label>From</label> <select name="base_curr">{curr_options_base}</select> </div> <div class="form-group" style="flex: 1; min-width: 100px;"> <label>To (Target)</label> <select name="target_curr">{curr_options_target}</select> </div> <div class="form-group"> <button type="submit">Convert currency ➔</button> </div> </div> </form> {result_block} </div> <!-- Collapsible Security Verification Console --> <details class="security-drawer"> <summary> <span>🛡️ Security verification console</span> <span class="expand-toggle"></span> </summary> <div class="drawer-body"> <p>Test outbound HTTPS traffic and threat prevention capabilities in real time:</p> <div class="probe-buttons"> <button type="button" onclick="runProbe('safe')">Test Outbound API Connection</button> <button type="button" class="danger-btn" onclick="runProbe('threat')">Simulate Encrypted Threat (EICAR)</button> </div> <pre id="output">Waiting for command...</pre> </div> </details> </div> <script> function runProbe(mode) { const el = document.getElementById('output'); el.innerText = 'Executing outbound request...'; fetch('/api/security-test?mode=' + mode) .then(res => res.json()) .then(data => el.innerText = JSON.stringify(data, null, 2)) .catch(err => el.innerText = 'Connection dropped / reset by Firewall: ' + err); } </script> </body> </html>""" .replace("{hostname}", str(hostname)) .replace("{amount}", str(amount)) .replace("{curr_options_base}", curr_options_base) .replace("{curr_options_target}", curr_options_target) .replace("{result_block}", result_block) ) self.send_response(200) self.send_header("Content-Type", "text/html; charset=utf-8") self.end_headers() self.wfile.write(html.encode("utf-8")) def run(): server_address = ('0.0.0.0', 8080) httpd = ThreadingHTTPServer(server_address, CurrencyAppHandler) httpd.serve_forever() if __name__ == '__main__': run() APPEOF # Register and start systemd unit cat << 'SERVICEEOF' > /etc/systemd/system/gcurrenc-app.service [Unit] Description=Currency exchange calculator web application After=network.target [Service] Type=simple User=root WorkingDirectory=/opt/gcurrenc-app ExecStart=/usr/bin/python3 /opt/gcurrenc-app/app.py Restart=always [Install] WantedBy=multi-user.target SERVICEEOF systemctl daemon-reload systemctl enable gcurrenc-app systemctl start gcurrenc-app STARTUP_EOF echo "==> [4/5] Creating Firewall, Regional Instance Template, and 2-VM MIG..." gcloud compute firewall-rules create allow-iap-admin \ --network="${NETWORK}" \ --allow=tcp:22,tcp:8080 \ --source-ranges=35.235.240.0/20 \ --target-tags=gcurrenc-app-vm \ --description="Allow IAP SSH and port 8080 access to private VMs" \ --quiet 2>/dev/null || true # Explicitly pass both --region and --instance-template-region to avoid prompt gcloud compute instance-templates create gcurrenc-app-template \ --instance-template-region="${REGION}" \ --region="${REGION}" \ --network="${NETWORK}" \ --subnet="${SUBNET}" \ --machine-type=e2-medium \ --no-address \ --tags=gcurrenc-app-vm \ --metadata-from-file=startup-script=/tmp/private_app_startup.sh \ --quiet gcloud compute instance-groups managed create gcurrenc-app-mig \ --base-instance-name=gcurrenc-vm \ --template="projects/${PROJECT_ID}/regions/${REGION}/instanceTemplates/gcurrenc-app-template" \ --size=2 \ --zone="${ZONE}" \ --quiet gcloud compute instance-groups managed set-named-ports gcurrenc-app-mig \ --named-ports=http-port:8080 \ --zone="${ZONE}" \ --quiet echo "==> [5/5] Verifying private VM deployment and internal status..." sleep 30 gcloud compute instances list \ --filter="name ~ '^gcurrenc-vm-'" \ --zones="${ZONE}" \ --format="table(name,zone.basename():label=ZONE,networkInterfaces[0].networkIP:label=INTERNAL_IP,status)" FIRST_VM=$(gcloud compute instances list \ --filter="name ~ '^gcurrenc-vm-'" \ --zones="${ZONE}" \ --format="value(name)" \ --limit=1) echo "Testing healthz on ${FIRST_VM} via IAP tunnel..." gcloud compute ssh "${FIRST_VM}" \ --zone="${ZONE}" \ --tunnel-through-iap \ --quiet \ --command="curl -fsS http://localhost:8080/healthz" echo "" echo "==========================================================================" echo "PREREQUISITE COMPLETE: 2 private VMs deployed with no external IPs." echo "VPC: ${NETWORK} | Subnet: ${SUBNET} (${SUBNET_RANGE})" echo "Instance Group: gcurrenc-app-mig (Zone: ${ZONE}, Port: 8080)" echo "" echo "The VMs are private and the IAP tunnel is not active. Set up the background IAP tunnel first to access the deployed app." echo "" echo "==========================================================================" ```
वीएम इंस्टेंस बनाने की पुष्टि करना
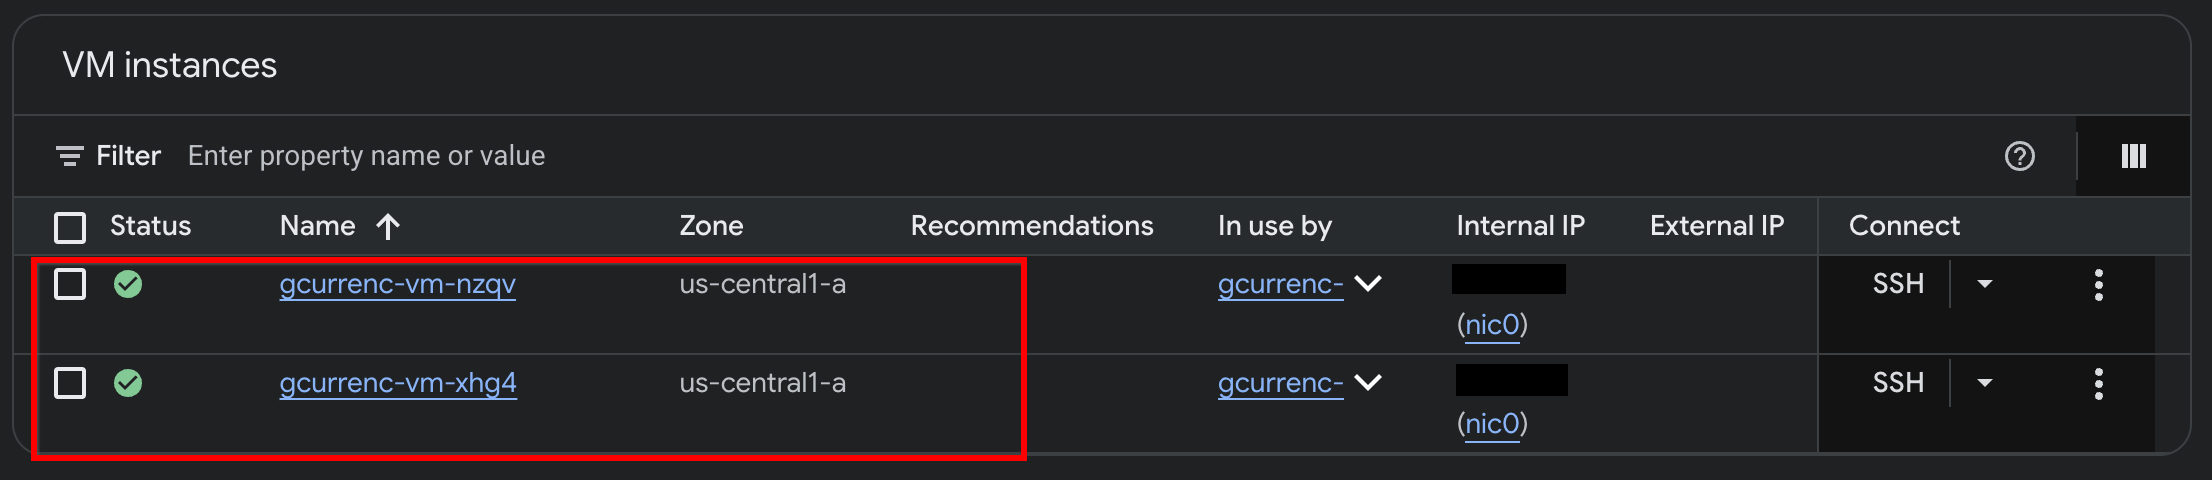
Antigravity की ओर से, दो निजी Compute Engine वीएम पर ऐप्लिकेशन को डिप्लॉय करने के बाद, Google Cloud Console में इंस्टेंस की पुष्टि करें:
- Google Cloud console में, वीएम इंस्टेंस पर जाएं.
- पुष्टि करें कि दोनों वीएम इंस्टेंस, इंटरनल आईपी पतों के साथ चल रहे हों और कोई बाहरी आईपी पता न हो:
5. ऐप्लिकेशन को टेस्ट करना
निजी वीएम के पास कोई बाहरी आईपी पता (--no-address) और Cloud NAT गेटवे नहीं होता. इसलिए, उनके पास इंटरनेट से कनेक्ट करने का कोई रास्ता नहीं होता और वे बाहरी मुद्रा विनिमय एपीआई को ऐक्सेस नहीं कर सकते. सुरक्षित आउटबाउंड ऐक्सेस कॉन्फ़िगर करने से पहले, ऐप्लिकेशन को लोकल आईएपी टनल पर टेस्ट करें. इससे यह पुष्टि की जा सकेगी कि इंटरनेट ऐक्सेस नहीं है.
/goalमोड में, Antigravity की चैट विंडो में यह प्रॉम्प्ट चलाएं:Automate the IAP tunnel configuration and health verification for the web app, then output the live test URL. Run a terminal script that performs the following steps non-interactively: 1. Firewall Check: - Identify the active network ('gcurrenc-vpc' if it exists, otherwise 'default'). - Idempotently ensure an ingress firewall rule exists permitting 'tcp:22,tcp:8080' from the Google IAP range '35.235.240.0/20' targeting 'gcurrenc-app-vm'. 2. VM Health Verification: - Find the first running instance matching '^gcurrenc-vm-' in zone 'us-central1-a'. - Via 'gcloud compute ssh --tunnel-through-iap', verify that the 'gcurrenc-app' systemd service is active. If not active, restart it. 3. Background IAP Tunnel: - Free up local port 8080 if an old tunnel or process is lingering (e.g., using 'lsof -ti:8080 | xargs kill -9' or 'fuser -k 8080/tcp'). - Launch 'gcloud compute start-iap-tunnel <VM_NAME> 8080 --local-host-port=localhost:8080 --zone=us-central1-a' in the background using nohup, redirecting output to '/tmp/iap_tunnel.log'. - Wait up to 10 seconds for the tunnel to establish, checking with 'curl -fsS http://localhost:8080/healthz'. 4. Output Web Preview URL: - Detect whether the environment is Google Cloud Shell (check if $CLOUD_SHELL is true) or a local workstation. - If Cloud Shell, print instructions and the direct web preview link. - If local machine, provide the clickable 'http://localhost:8080' URL.- टनल शुरू होने के बाद, अपने वेब ब्राउज़र में
http://localhost:8080/खोलें: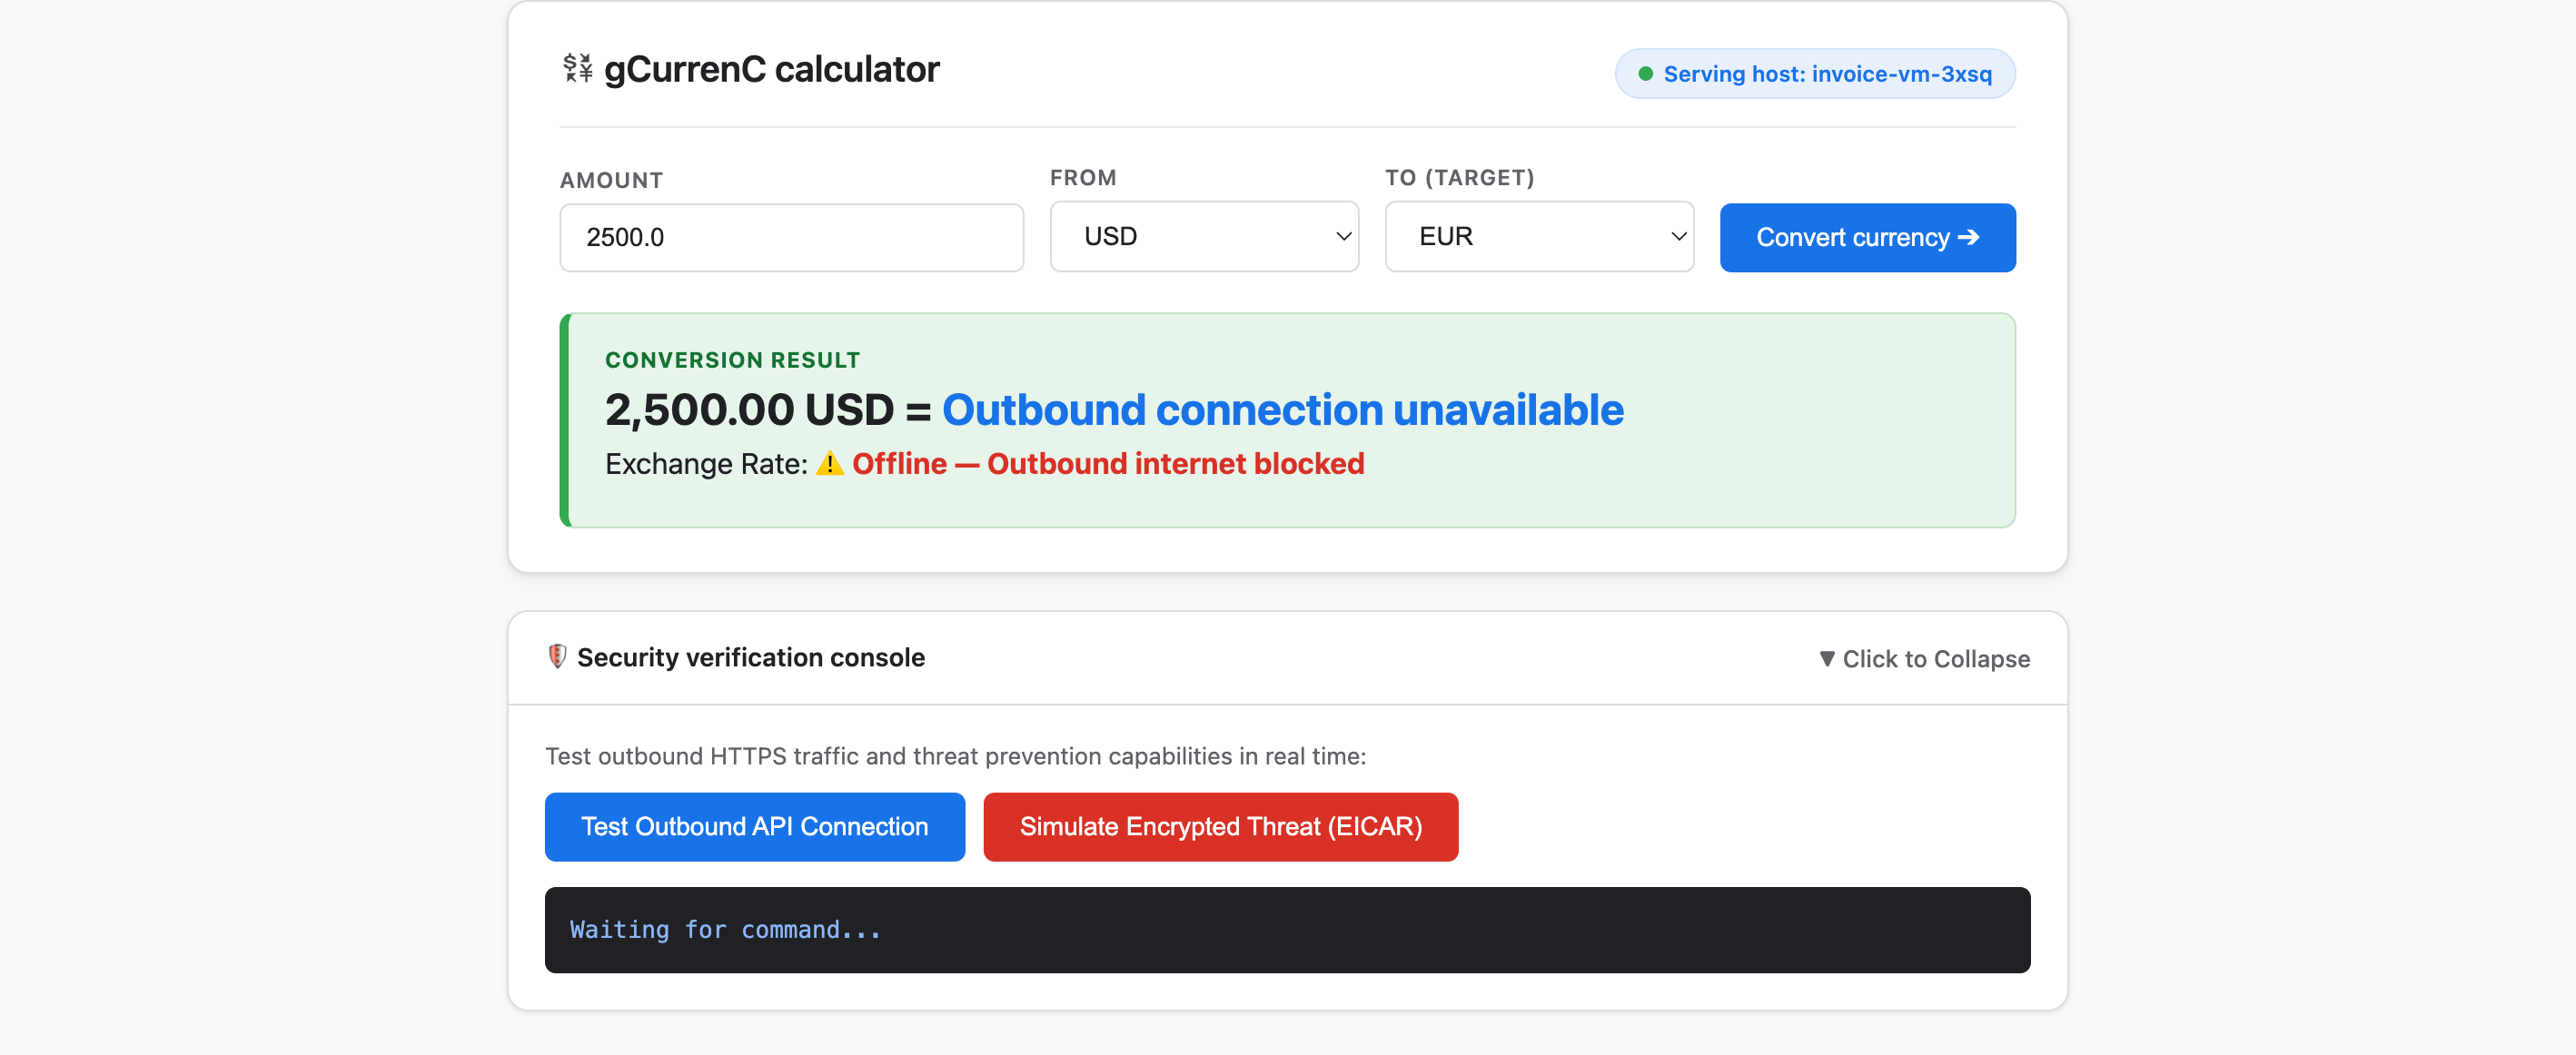
- ऐप्लिकेशन को टेस्ट करें:
- मुद्रा बदलें पर क्लिक करें. कन्वर्ज़न के नतीजे में
Offline - Outbound internet blockedऔरOutbound connection unavailableदिखता है. यह नतीजा इसलिए मिला है, क्योंकि निजी वीएम, इंटरनेट से कनेक्ट नहीं हो सकते. इस वजह से, वे एक्सचेंज रेट की नई जानकारी फ़ेच नहीं कर सकते. - सुरक्षा की पुष्टि करने वाला कंसोल को बड़ा करें और आउटबाउंड एपीआई कनेक्शन की जांच करें पर क्लिक करें. आउटपुट में,
https://api.frankfurter.dev/v1/latestके लिएverdict: BLOCKED_OR_FAILED(https://api.frankfurter.dev/v1/latestसे एक्सचेंज रेट फ़ेच नहीं कर सकते. - एन्क्रिप्ट किए गए खतरे (ईआईसीएआर) को सिम्युलेट करें पर क्लिक करें. आउटपुट में,
https://secure.eicar.org/eicar.com.txtके लिएverdict: BLOCKED_OR_FAILEDभी दिखता है. यह नतीजा भी उम्मीद के मुताबिक है, क्योंकि निजी वीएम में इंटरनेट कनेक्टिविटी नहीं होती.
- मुद्रा बदलें पर क्लिक करें. कन्वर्ज़न के नतीजे में
लोकल आईएपी टनल को बंद करना
सुरक्षा आर्किटेक्चर को डिज़ाइन और डिप्लॉय करने से पहले, पोर्ट 8080 को खाली करने के लिए, लोकल आईएपी टनल को बंद करें:
/goalमोड में, यह प्रॉम्प्ट चलाएं:Free up local port 8080 and terminate any running Google Cloud IAP tunnels (e.g., kill processes matching 'start-iap-tunnel' or listening on port 8080).8080खाली है.
6. ऐप्लिकेशन को सुरक्षित करना
पिछले सेक्शन में, आपने बिना किसी सार्वजनिक आईपी पते के निजी Compute Engine वीएम बनाए. साथ ही, नेटवर्किंग और सुरक्षा से जुड़ी दो मुख्य समस्याओं की पुष्टि की:
- इनबाउंड ऐक्सेस (इन्ग्रेस): इंटरनेट उपयोगकर्ता, निजी वीएम इंस्टेंस को सीधे ऐक्सेस नहीं कर सकते. साथ ही, वेब ऐप्लिकेशन को सार्वजनिक करने के लिए, ग्लोबल एक्सटर्नल ऐप्लिकेशन लोड बैलेंसर और सिर्फ़ प्रॉक्सी वाले सबनेट के ज़रिए ट्रैफ़िक को प्रॉक्सी करना ज़रूरी है. इसके लिए, वीएम को सार्वजनिक इंटरनेट पर एक्सपोज़ करने की ज़रूरत नहीं है.
- आउटबाउंड ऐक्सेस (इग्रेस): निजी वीएम के पास, लाइव एचटीटीपीएस मुद्रा विनिमय एपीआई से क्वेरी करने के लिए इंटरनेट का कोई रास्ता नहीं है. साथ ही, आउटबाउंड ऐक्सेस चालू करने के लिए, एसएसएल/टीएलएस ट्रस्ट को तोड़े बिना, मैलवेयर और डेटा एक्सफ़िल्ट्रेशन के लिए एन्क्रिप्ट किए गए ट्रैफ़िक की जांच करनी होगी.
इस सेक्शन में, Antigravity को Google Cloud के आधिकारिक दस्तावेज़ (@retrieving-developer-knowledge) पर आधारित एक आसान वर्कफ़्लो के ज़रिए गाइड किया जाता है. इससे आपको अपने ऐप्लिकेशन के लिए, प्रोजेक्ट-लेवल पर इन्ग्रेस और इग्रेस डेटा ट्रैफ़िक के लिए सुरक्षा आर्किटेक्चर को डिज़ाइन करने, खुद ऑडिट करने, और डिप्लॉय करने में मदद मिलती है.
एक जैसा सिक्योरिटी आर्किटेक्चर डिज़ाइन करना
/goalमोड में, एंड-टू-एंड आर्किटेक्चर डायग्राम जनरेट करने के लिए, यह प्रॉम्प्ट चलाएं. साथ ही, इनबाउंड और आउटबाउंड, दोनों तरह के ट्रैफ़िक फ़्लो के बारे में जानकारी दें:You are a Google Cloud Network and Security Architect. We need to design an end-to-end security architecture for our "gCurrenC calculator" app running on private Compute Engine VMs with no external IP addresses inside 'gcurrenc-vpc'. We are operating in a standalone Google Cloud project without an Organization resource, so all security resources must be scoped at the project level. Use the @retrieving-developer-knowledge skill to consult official Google Cloud documentation and suggest an architecture diagram and explanation covering both flows: 1. Ingress Flow: - How internet users securely reach the private VMs via a global external Application Load Balancer. - Why Envoy-based external Application Load Balancers require a dedicated proxy-only subnet, and how Google Front Ends (GFEs) proxy traffic to private backends without exposing VMs to the public internet. 2. Egress Flow: - How private VMs reach the internet via Cloud NAT to query live currency exchange APIs, such as frankfurter.dev. - How Cloud NGFW Enterprise provides Layer 7 deep packet inspection and intrusion prevention (IPS) for outbound encrypted HTTPS traffic. - How TLS inspection backed by Certificate Authority Service (CAS) decrypts outbound HTTPS sessions on the fly, and what Root CA trust configuration the private VMs require. Provide a clear diagram and explain how these components connect together.
आर्किटेक्चरल रिसॉर्स की आउटलाइन जनरेट करना
- डिप्लॉयमेंट स्क्रिप्ट जनरेट करने से पहले, डिज़ाइन को प्रोजेक्ट-लेवल के रिसॉर्स आउटलाइन में कैटगरी के हिसाब से बांटने के लिए, यह प्रॉम्प्ट डालें:
Act as a Lead Network Security Architect. Using the @retrieving-developer-knowledge skill, provide an architectural outline of all the Google Cloud resources required to secure the "gCurrenC calculator" app.

Our starting state:
- The custom VPC ('gcurrenc-vpc'), workload subnet ('gcurrenc-app-subnet'), and 2-instance MIG ('gcurrenc-app-mig', port 8080) are already deployed.
- All newly added security components must be project-level resources (no organization resources).

Structure your resource outline into three distinct categories, indicating which resources are new additions:
1. Core VPC Infrastructure: proxy-only subnet ('gcurrenc-proxy-subnet', 10.10.2.0/24), Cloud Router, and Cloud NAT gateway.
2. Inbound security (ingress): global external ALB components (forwarding rule on port 443, target HTTPS proxy, SSL certificate, URL map, backend service attached to 'gcurrenc-app-mig' on port 8080, and HTTP health check on '/healthz') and ingress firewall rules.
3. Outbound security (egress): CAS DevOps CA pool and root CA, project-level Cloud NGFW Enterprise components (Threat Prevention profile, Security Profile Group, Firewall Endpoint in zone us-central1-a, and Endpoint Association attaching the TLS policy), and global network firewall policy egress rules.

For each resource, briefly state its role in the security boundary and how it connects to adjacent components.
डिप्लॉयमेंट स्क्रिप्ट जनरेट करना और उसका ऑडिट करना
/goalमोड में, पूरा और नॉन-इंटरैक्टिवbashडिप्लॉयमेंट स्क्रिप्ट जनरेट करने के लिए, यह प्रॉम्प्ट चलाएं. साथ ही, उसी टर्न में, नियमों के पालन से जुड़ी ज़रूरी शर्तों के हिसाब से, अपने-आप ऑडिट होने की सुविधा चालू करें:Act as a Principal Infrastructure Engineer. Using the @retrieving-developer-knowledge skill, generate a complete, non-interactive Bash script to deploy this entire security architecture for our "gCurrenC calculator" app, and self-audit the script before outputting it. Requirements: - Discover the project ID, region, and zone dynamically from the existing 'gcurrenc-app-subnet' and 'gcurrenc-app-mig'. - Keep all resources scoped strictly to the project level (no Organization resource). - Deploy the proxy-only subnet, global external Application Load Balancer, Cloud Router, and Cloud NAT. Don't use Cloud Armor. - Deploy project-level Cloud NGFW Enterprise with CAS TLS inspection ('--tls-inspect' on the firewall policy egress rule and 'gcloud beta' for the project-level firewall endpoint association) and an explicit DENY override for malware and antivirus threats. - Distribute the root CA to the private VMs over IAP SSH with connection timeouts so the guest OS trust store is updated. - Print the final Load Balancer URL ('https://${LB_IP}') at the end. Wrap the script in 'set -euxo pipefail' and output only the single executable bash script block.bashस्क्रिप्ट जनरेट करता है. साथ ही, हर कमांड की खुद जांच करके यह पक्का करता है कि वह नियमों के मुताबिक हो. इसके बाद, वहset -euxo pipefailमें रैप की गई एक ऐसी स्क्रिप्ट जनरेट करता है जिसे सीधे तौर पर चलाया जा सकता है.
सुरक्षा से जुड़ी डिप्लॉयमेंट स्क्रिप्ट चलाना
/goalमोड में, पिछले प्रॉम्प्ट से जनरेट की गईbashस्क्रिप्ट को Antigravity की चैट विंडो में इस फ़ॉर्मैट में चिपकाएं. इससे डिप्लॉयमेंट शुरू हो जाएगा और लाइव ऐप्लिकेशन का यूआरएल (https://<LB_IP>) आउटपुट के तौर पर दिखेगा:Run this script. <PASTED-SCRIPT>
7. सुरक्षित किए गए ऐप्लिकेशन की पुष्टि करना
डिप्लॉयमेंट स्क्रिप्ट पूरी होने के बाद, Antigravity, ग्लोबल एक्सटर्नल ऐप्लिकेशन लोड बैलेंसर (https://<LB_IP>) का एक्सटर्नल एचटीटीपीएस यूआरएल आउटपुट करता है.
- अपने वेब ब्राउज़र में
https://<LB_IP>खोलें. इसके बाद, gCurrenC कैलकुलेटर इंटरफ़ेस लोड करने के लिए, ब्राउज़र की खुद हस्ताक्षर किए हुए सर्टिफ़िकेट की चेतावनी को बायपास करें: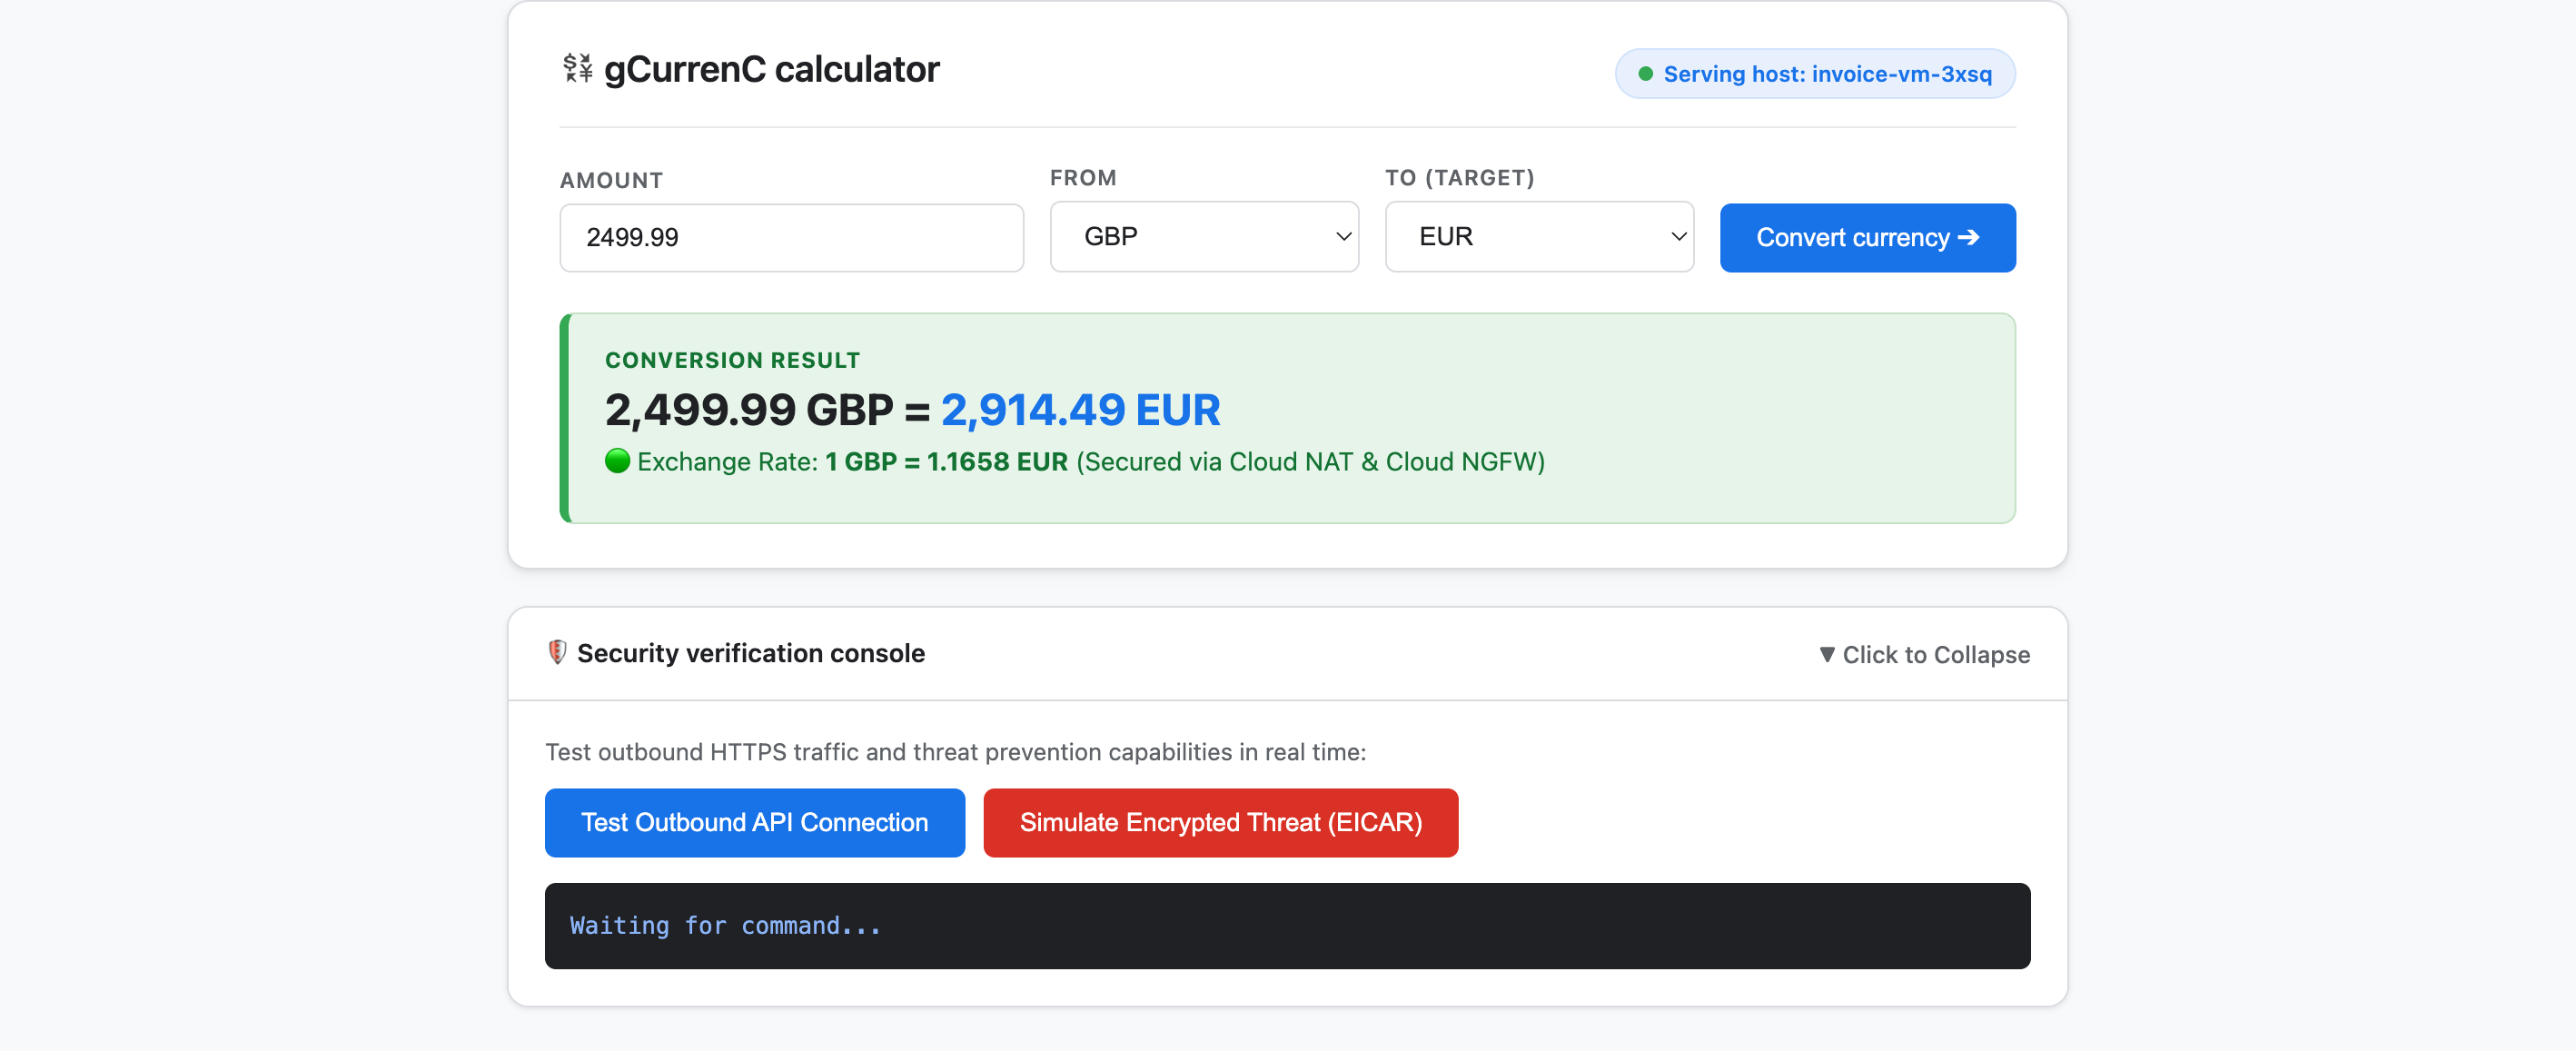
- आउटबाउंड कनेक्टिविटी और खतरे से बचाव, दोनों की पुष्टि करने के लिए ऐप्लिकेशन की जांच करें:
- मुद्रा बदलें पर क्लिक करें. ऐप्लिकेशन, बदली गई लाइव एक्सचेंज रेट को तुरंत दिखाता है. इससे यह पुष्टि होती है कि इन्ग्रेस लोड बैलेंसिंग, Google फ़्रंट एंड (GFE) और प्रॉक्सी-ओनली सबनेट के ज़रिए आसानी से रूट होती है. साथ ही, Cloud NAT,
api.frankfurter.devसे लाइव एक्सचेंज रेट फ़ेच करता है. - सुरक्षा की पुष्टि करने वाला कंसोल को बड़ा करें और आउटबाउंड एपीआई कनेक्शन की जांच करें पर क्लिक करें. ऐप्लिकेशन में
verdict: PERMITTED(HTTP 200) दिखता है. इससे पुष्टि होती है कि क्लाउड एनएटी की राउटिंग काम करती है. साथ ही, वीएम का ऑपरेटिंग सिस्टम, डिक्रिप्ट किए गए एचटीटीपीएस सेशन के लिए निजी सीएएस रूट सीए पर भरोसा करता है. - एन्क्रिप्ट किए गए खतरे (ईआईसीएआर) को सिम्युलेट करें पर क्लिक करें. ऐप्लिकेशन में
verdict: PERMITTEDदिखता है. इससे यह पुष्टि होती है कि Cloud NGFW Enterprise, सीएएस की मदद से टीएलएस की सुरक्षा जांच का इस्तेमाल करके, आउटबाउंड एचटीटीपीएस अनुरोध को डिक्रिप्ट करता है. साथ ही, घुसपैठ की रोकथाम की सेवा (आईपीएस) की मदद से, EICAR टेस्ट सिग्नेचर की जांच करता है.
- मुद्रा बदलें पर क्लिक करें. ऐप्लिकेशन, बदली गई लाइव एक्सचेंज रेट को तुरंत दिखाता है. इससे यह पुष्टि होती है कि इन्ग्रेस लोड बैलेंसिंग, Google फ़्रंट एंड (GFE) और प्रॉक्सी-ओनली सबनेट के ज़रिए आसानी से रूट होती है. साथ ही, Cloud NAT,
8. व्यवस्थित करें
इस कोडलैब में बनाए गए संसाधनों के लिए, अपने Google Cloud खाते पर लगने वाले शुल्कों से बचने के लिए, सिर्फ़ कोडलैब के संसाधनों को मिटाया जा सकता है या अपने Google Cloud प्रोजेक्ट को मिटाया जा सकता है.
- अगर आपको अपना Google Cloud प्रोजेक्ट बनाए रखना है और सिर्फ़ इस कोडलैब के दौरान बनाए गए संसाधनों को हटाना है, तो Antigravity चैट विंडो में
/goalमोड में यह प्रॉम्प्ट चलाएं:Remove all resources created in this session, including the gcurrenc app and its resources. Don't delete the project. - अगर आपने इस कोडलैब के लिए कोई Google Cloud प्रोजेक्ट बनाया है और आपको पूरा प्रोजेक्ट मिटाना है, तो Antigravity चैट विंडो में
/goalमोड में यह प्रॉम्प्ट चलाएं:Clean up the demo environment by deleting the Google Cloud project. Run the following command in the terminal: gcloud projects delete "$(gcloud config get-value project 2>/dev/null)" --quiet
9. बधाई हो
बधाई हो! आपने Google Antigravity में Google Cloud Developer प्लग इन (DK MCP सर्वर) का इस्तेमाल करके, Google Cloud पर gCurrenC कैलकुलेटर वेब ऐप्लिकेशन को डिप्लॉय और सुरक्षित किया है.
आगे क्या करना है
इस कोडलैब में इस्तेमाल की गई सेवाओं के बारे में ज़्यादा जानने के लिए, Google Cloud का आधिकारिक दस्तावेज़ देखें:
- Antigravity में Google Cloud Developer प्लग इन इंस्टॉल करना और उसका इस्तेमाल करना
- डेवलपर नॉलेज एमसीपी सर्वर से कनेक्ट करना
- एजेंट की स्किल लाइब्रेरी
- डेवलपर नॉलेज प्लगिन
- ऐप्लिकेशन लोड बैलेंसर के बारे में खास जानकारी
- Certificate Authority Service के दस्तावेज़
- Cloud Next Generation Firewall के बारे में खास जानकारी